UV 32 B - Lawn mower Wolf Garten - Free user manual and instructions
Find the device manual for free UV 32 B Wolf Garten in PDF.
User questions about UV 32 B Wolf Garten
0 question about this device. Answer the ones you know or ask your own.
Ask a new question about this device
Download the instructions for your Lawn mower in PDF format for free! Find your manual UV 32 B - Wolf Garten and take your electronic device back in hand. On this page are published all the documents necessary for the use of your device. UV 32 B by Wolf Garten.
USER MANUAL UV 32 B Wolf Garten
3 Cable anti-kink protection
4 Tailgate
5 Deflector plate
6 Throttle control lever
7 Safety Bar
8 Air Filter
9 Petrol Filling Connection Piece
10 Spark plug
11 V-belt Cover
12 Oil Filling Connection Piece
13 Oil open plug
14 Control for Working Depth
GB Important tips for the aeriating
The secret of strong, green and cared for lawns.
Why aeriating?
Aerating is part of the most important care measures for a lawn and is a precondition for a healthy and hard-wearing green carpet.
In every lawn there is build-up of moss as soon as one year after it was laid due to dead grasses and plant particles. This felt is soon so dense that it hinders the absorption of nutrients, water and oxygen into the roots or prevents it completely. The result is that the lawn turns brown, has weak roots, bad growth and is not resistant to disease and dryness, strong growth of weeds and build-up of moss.
Through aerating this extremely damaging grass felt and also moss and flat-growing weeds are removed and the crusted over grassroots are loosened up. The lawn can breathe again and absorb nutrients, water and oxygen. A healthy and hard-wearing lawn is the result of your efforts.
When and how often should be aeriated?
In principal, aerating may be carried out during the whole of the vegetation period, that means, depending on climatic conditions, from end of April until September. During this time the lawn grows and is therefore able to regenerate itself after aerating and to reintegrate the cleaned patches. In any case, an aerator should be used at least once a year. When the lawn is used and cut frequently this clean-up should be carried out a second time, preferably during late summer. This prevents the establishing of bacteria in the lawn felt during the wintertime.
What should I observe during aeriating?
The grass should be dry, therefore aeriate about 2 days after the last rainfall. First, cut the lawn to its usual height (30-40 mm). Your lawnmower with grassbox from WOLF cuts the grass effortlessly and cleanly and saves the raking up of the grass.
When you use an aerator without grassbox the raked felt must be brushed off the grass. This can be done effortlessly with the plastic fan broom Ui42 from WOLF or the lawn rake UH.
To remove all felt residues once and for all from the lawn and to cut off the flat lawn shoots which are pulled up by the aerator cut the lawn once again with your lawnmower with grassbox. We strongly recommend feeding your lawn with super lawnfeed from WOLF immediately after aerating. Through this the lawn receives the nutrients which have been missing for a long time and gains renewed strength. After approx. 3 weeks it is once again dense, green and hard-wearing like never before. During the 2-3 weeks after aerating your lawn is quite sensitive to dryness. Therefore, it should be watered regularly in dry weather during this time; in the summertime, when the weather is quite warm, this should be done every 2-3 days.
When you have aeriated your lawn and there are large bald patches we recommend the Novaplant-System by WOLF to renew your lawn. This helps you to have a brilliant green, durable, hard-wearing lawn without.
We hope you take great pleasure in your beautiful lawn.
Your WOLF lawn experts
GB Safety Instructions
It is important that you read, fully understand and observe the following safety precautions and warnings. Careless or improper use of the machine may cause serious or fatal injury. The user is responsible for any accidents involving other people or other people's property. Meaning of the symbols
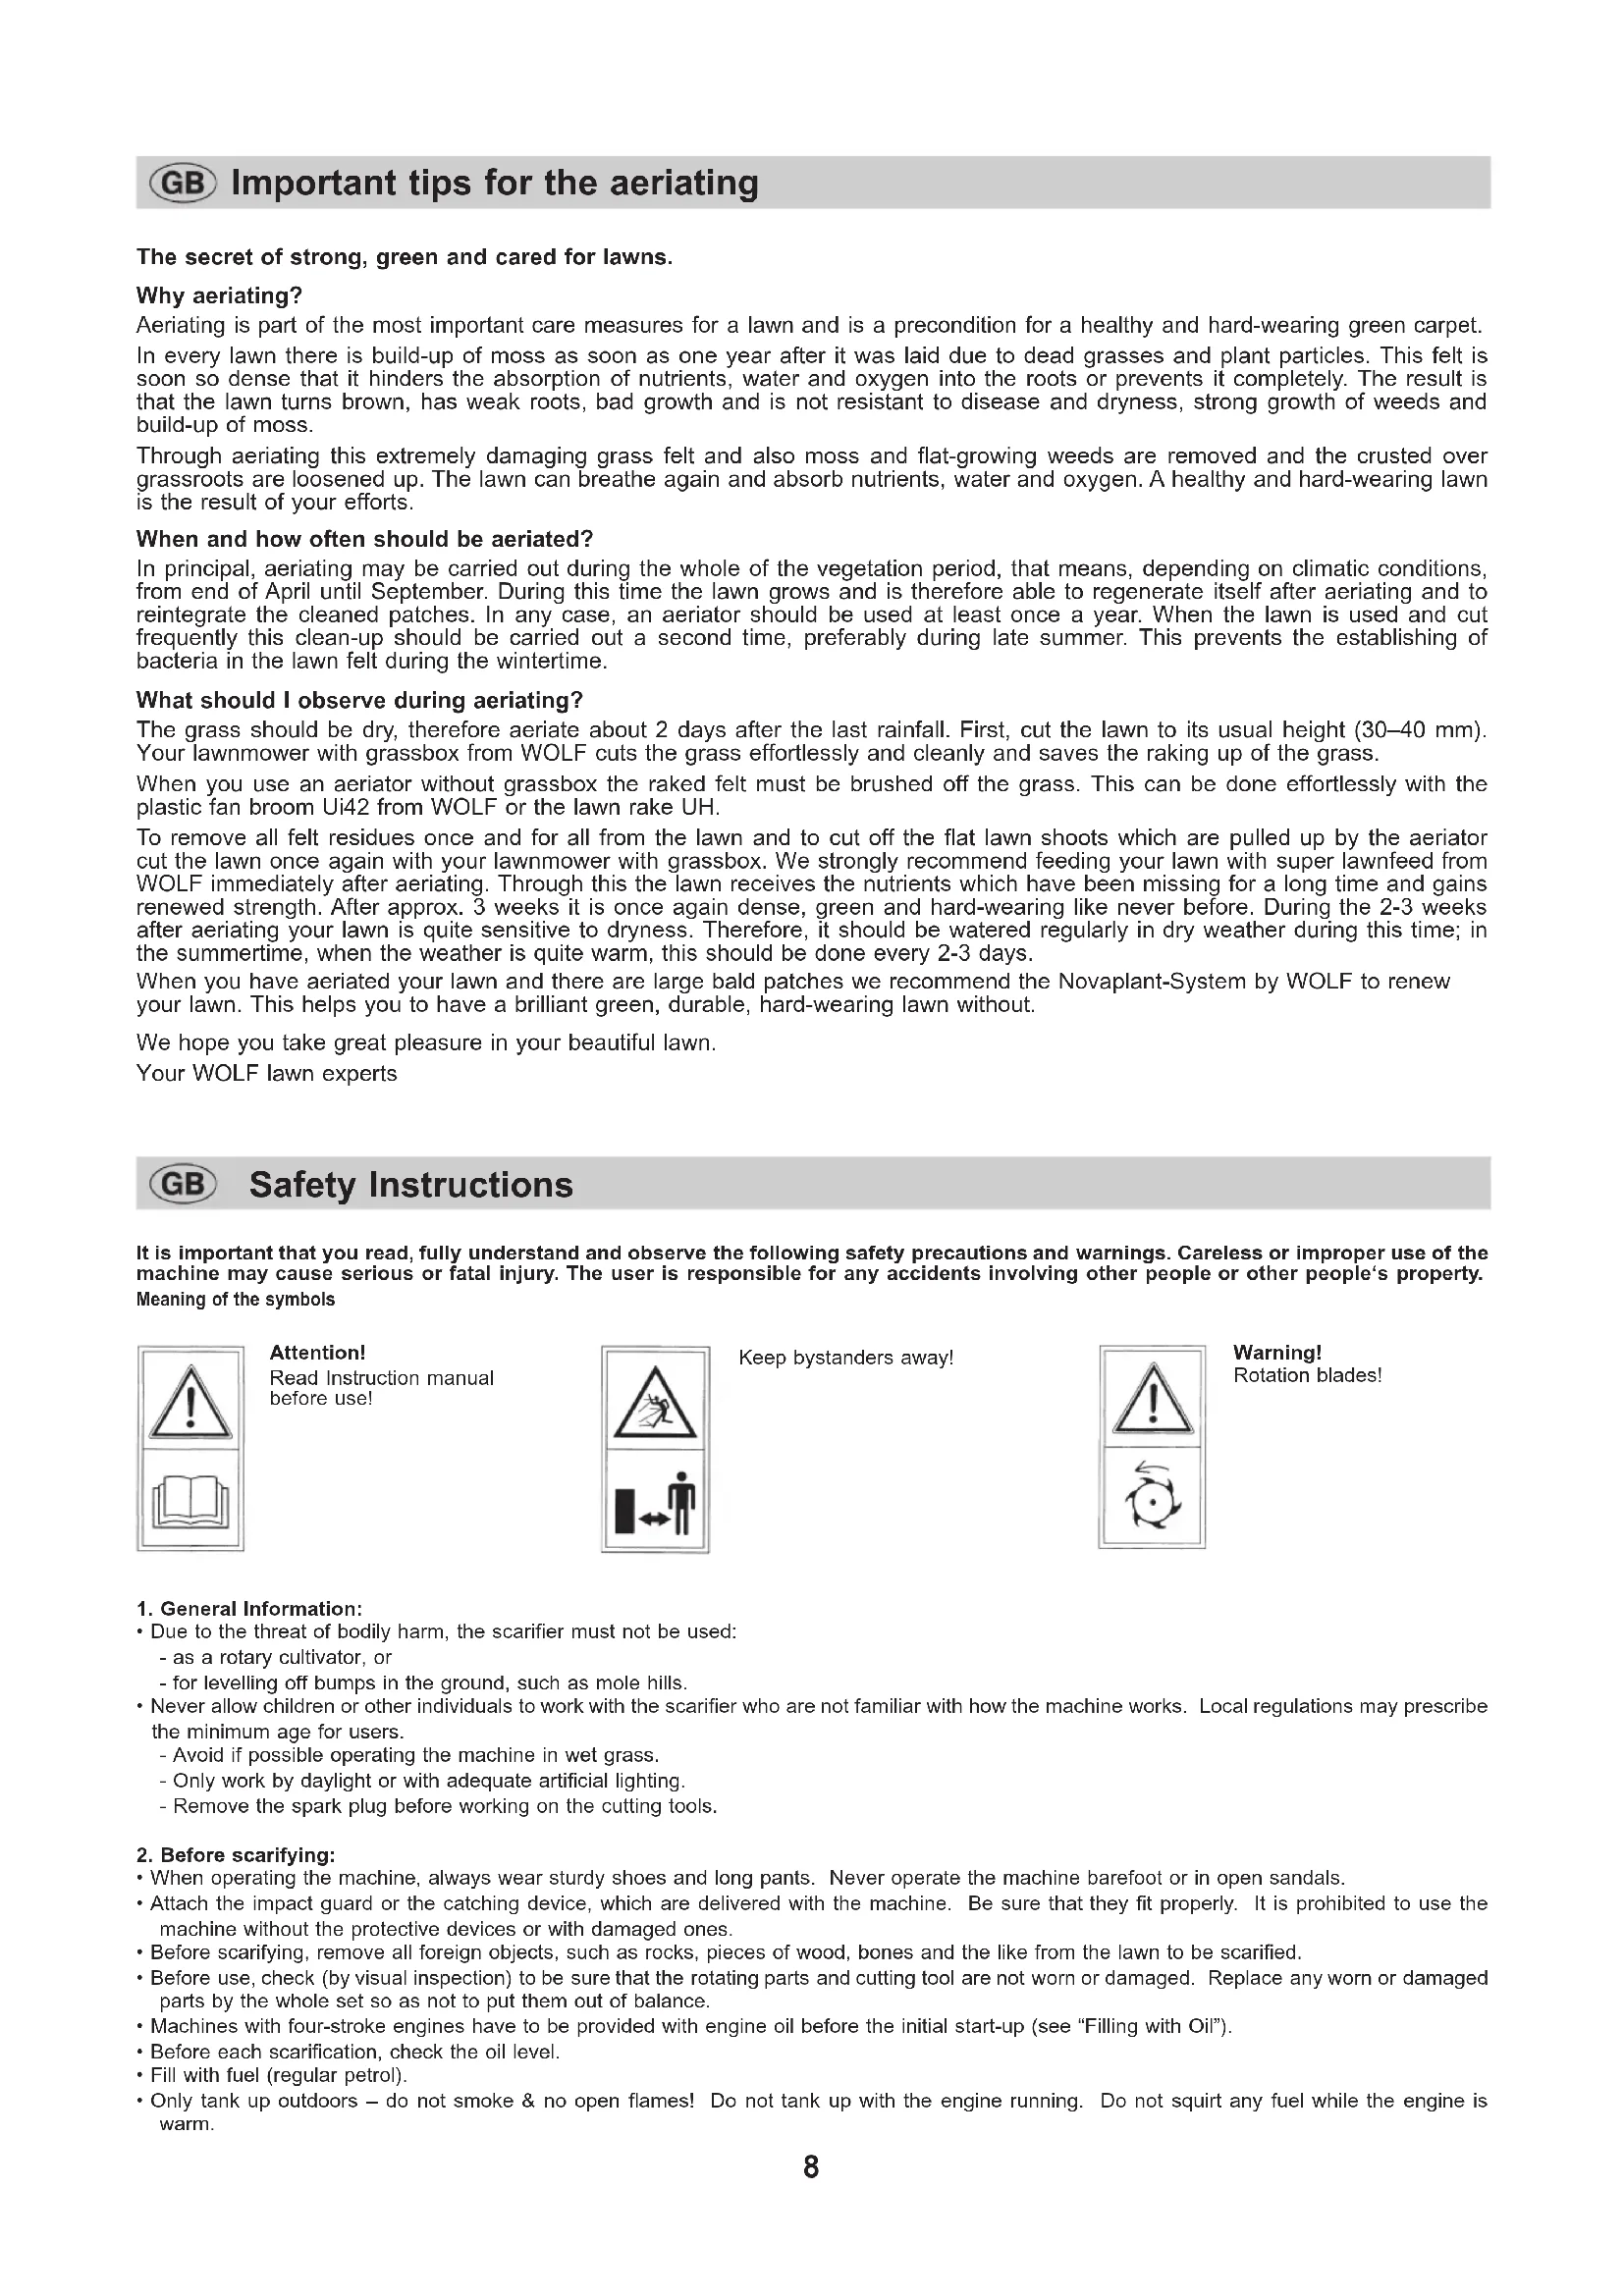
Attention!
Read Instruction manual before use!
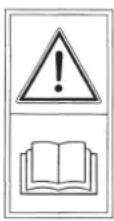
Keep bystanders away!
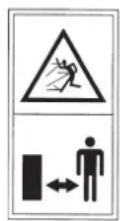
Warning!
Rotation blades!
1. General Information:
- Due to the threat of bodily harm, the scarifier must not be used:
-as a rotary cultivator, or - for levelling off bumps in the ground, such as mole hills.
- Never allow children or other individuals to work with the scarifier who are not familiar with how the machine works. Local regulations may prescribe the minimum age for users.
- Avoid if possible operating the machine in wet grass.
- Only work by daylight or with adequate artificial lighting.
- Remove the spark plug before working on the cutting tools.
2. Before scarifying:
- When operating the machine, always wear sturdy shoes and long pants. Never operate the machine barefoot or in open sandals.
- Attach the impact guard or the catching device, which are delivered with the machine. Be sure that they fit properly. It is prohibited to use the machine without the protective devices or with damaged ones.
Before scarifying, remove all foreign objects, such as rocks, pieces of wood, bones and the like from the lawn to be scarified. - Before use, check (by visual inspection) to be sure that the rotating parts and cutting tool are not worn or damaged. Replace any worn or damaged parts by the whole set so as not to put them out of balance.
- Machines with four-stroke engines have to be provided with engine oil before the initial start-up (see "Filling with Oil").
Before each scarification, check the oil level. - Fill with fuel (regular petrol).
-
Only tank up outdoors - do not smoke & no open flames! Do not tank up with the engine running. Do not squirt any fuel while the engine is warm.
-
If the fuel runs over, it has to be removed, and the engine must not be started before doing so.
- Only store the fuel in containers approved for such.
- Remove any remaining grass there might be on the engine from the last time it was used this is a fire hazard.
- Check to be sure that the connections fit snugly on the petrol lines, air filter, etc.
- Never operate the machine when any individuals, especially children or pets are nearby.
The user is responsible for any accidents or instances of endangerment which are incurred by others or their property. - For safety reasons, the tank cap has to be replaced if it gets damaged.
3. When Starting Up
- Only switch on the engine when your feet are at a safe distance to the cutting tools.
- Do not tilt the scarifier when you actuate the switch unless this is absolutely necessary. If it is, tilt the scarifier as little as possible always such that the scarifier remains between you and the blade.
- Do not allow the machine to run in confined surroundings, such as closed rooms. Danger of poisoning!
- Only operate the machine by daylight or with sufficient artificial lighting.
4. When Scarifying - For Your SAFETY:
- Important: Danger! The cutting tool continues to coast after being switched off!
- Keep the safety clearance provided by the guide braces.
-
Never use the machine:
-
when the protective devices or shields are damaged
- with the protective devices such as the deflecting device and/or the catching devices missing.
- Switch on the engine according to instructions and only when your feet are at a safe distance to the rotating parts.
- On slopes, pay special attention to a safe degree of stability.
- Always walk, and never run.
- Always work crosswise to the slope and never up and down it.
- Special caution is required when you change direction on a slope.
- Do not operate the machine on excessively steep slopes.
- Special caution is required when you drive the machine in reverse or carry out pulling toward you.
- Turn off the device when it has to be tilted for transport. Do not operate the cutting tools when crossing areas other than lawns and the device is being taken to or from the area to be worked on
- Before removing the grass-catcher, turn off the engine and wait until the working tools coast to a stop.
- Replace any worn or damaged blades as sets. Follow the instructions for installation. For safety reasons, only use spare part made by the manufacturer.
- Only when the engine is switched off may any maintenance or cleaning work be carried out on the scarifier or the protective device be removed.
- Do not park the scarifier in moist rooms or near open flames.
If you should ever drive over an obstacle, to be on the safe side, have the scarifier examined by a specialist (see List of Service Shops). - Never open the protective shutter when the engine is still running.
- Never drive over gravel with the engine running - danger of flying rocks!
- Important: Handling the grass-catcher improperly may present a danger.
- Only adjust the working depth with the engine switched off and the spark plug connector pulled off.
-
Turn off the device, pull off the spark plug connector and wall until the device comes to a stop,
-
always when you leave the machine;
-
before you clear any blocking;
-
before you examine, clean or work on the device;
-
when you have hit a foreign object. Check the device for any damage and carry out any repairs that might be necessary;
-
if the device begins to vibrate unusually (examine immediately)
-
Never put your hands or feet near the rotating parts. Do not stand in front of the grass ejection opening.
- Never ever put your hands or feet near or under the rotating parts.
- With rotating devices, nothing and nobody must be placed in front of the ejection opening when it is open.
- Never lift the device or carry it away when the engine is running.
- With devices with an ejection opening, the protective equipment (such as grass-catchers or deflector plate) has to be used.
- Do not touch the engine or exhaust silencer while or shortly after operation. Hot parts can produce burns or provoke jumpy movements, which might result in injuries.
5. After Work:
- Do not park the device in a closed room immediately after work, but rather allow it to cool down outdoors.
- Before leaving the device, pull the spark plug connector and, if present, take out the ignition key.
-
Lifting the device for transport:
-
never do so with the engine running, nor when the engine is hot and only with the spark plug socket pulled out.
-
When folding it up, take off the starter rope and be sure the cables do not get bent
- Always only change the oil with the tank empty and closed, and with the engine warm.
6. Maintenance:
- Check the catching device frequently for wear or deformation.
- For safety reasons, replace any worn or damaged parts. When replacing, follow the instructions for installation.
- Maintenance and cleaning work on the device or removing the protective equipment may only be carried out with the engine stopped and the spark plug connector pulled off and - if present - the ignition key taken out.
- If the device has to be tilted for maintenance work, first the fuel has to be removed from the tank entirely.
- If the fuel tank has to be emptied, this should be done outdoors. Be sure that no fuel gets spilt.
- Clean the device after every use with a hand brush not with water, and in particular, do not spray with high pressure. Be sure the cooling fins on the cylinder are clean and that the intakes are clean.
- Do not park the device in moist rooms or near open flames or anywhere where a spark could ignite petrol gases.
- Check all the visible fastening bolts and nuts regularly to be sure they are snug and tighten them.
- Only use spare parts made by WOLF; otherwise you do not have a guarantee that your scarifier meets safety regulations.
Filling in the engine oil (Fig. B1)
Before starting up, you have to fill in 0.3 l of the brand-name oil HD SAE15-W40 up to "max" marking on the dip stick (not above the marking). Plug in the dip stick in accordance, check the oil level.
Before scarifying, always be sure to check the oil level.
Filling in fuel (Fig. B2/B4)
No smoking, and no open flames! Do not tank up with the engine running. Do not squirt fuel while the engine is warm. Use lead-free regular petrol (not Super Plus). Avoid spilling petrol. Do not inhale the vapours.
Adjustment of working depth
Proceed only with motor switched off and tines at complete standstill. The unit is supplied with tines set at highest working position. Adjust working depth to suit lawn condition.
Working lever should always be placed in „start" position (Fig. B3, a)
-
Turn hand wheel (Fig. B4) by 8-10 turns to the left (1 x turn = 1 mm working depth)
-
Scarifying test
-
start motor
-
move working lever s lowly forward (Fig. B3, b)
-
Push unit slowly forward into the direction of working
-
when hitting foreign object (stone, etc.) or motor stalls
-
Switch off motor immediately
-
turn hand wheel by 2-3 turns to the right
-
test scarifying action again
The working depth can be adjusted infinitively according to the condition of the ground and/or the wear of times.
Recommended working heights:
| Lawn condition Working position | |
| well kept lawns with stone-free, soft ground Set tool exactly to ground height | • to ground height |
| stony, untidy lawns Set tool to ground height | • Increase working height if stones are thrown up |
| unkempt, extremely mossy lawns • Start with a high working height | • Do not overload appliance (increase working height if motor blocks) • Cut vertically and crossways several times • Re-sow with WOLF >>Loretta<< lawn seeds |
Starting (Fig. B5/B6/B3)
- Place mower on level ground, not onto high grass.
- Accelerator lever (Fig. B5, 1) in START position.
- Lift and hold safety bar (Fig. B5, 2).
Pull starter (Fig. B6) cord rapidly and return starter grip slowly. After engine started to run, move throttle lever to "Betrieb" (Fig. B5, 3). - To stop engine: Release safety bar (Fig. B5, 4).
- Starting of warm engine: Throttle lever to "Betrieb" (Fig. B5, 3) (= running). If engine will not start after second attempt, place throttle to "Start" (1) position and try again.
- Working: Place lever slowly into forward position (Fig. B3, b). Work at slow walking pace.
GB
Maintenance
Before all maintenance and cleaning work, pull off the spark plug connector.
After each use, clean the scarifier with a hand brush (Fig. B7)
Do not by any means spray down with water. Store the scarifier in a dry room.
Always change the engine oil with the engine warm, and the tank empty.
Do so the first time after the first 20 hours of operation. Then every 100 hours of operation, or no later than the end of the mowing season. When used under difficult or dusty conditions, do so more frequently. Open the oil filling connection piece, slowly tilt the scarifier to the side and let the oil drain out. Dispose of the used oil according to local regulations. Note: Oil must not get into the ground.
Clean the spark plug
Dirty spark plugs reduce the engine performance. Clean the spark plug and check to be sure the spark plug gap is correct (0.6 - 0.7 mm).
Clean the air filter
See the Operating Instructions from the manufacturer of the engine (enclosed).
Storage during Winter
Empty the tank
- Empty the carburettor:
- To do so, start and engine and let it run until it stops by itself.
Clean the scarifier thoroughly.
- Change the oil.
- Preserve the engine as follows:
- Twist out the spark plug, and put one tablespoon of engine oil in the opening for the spark plug.
- Slowly pull the starter rope all the way out (to distribute oil in the cylinder). Screw the spark plug back, but do not put the spark plug connector back on.
- Store the scarifier in a cool and dry place.
| Remedy (X) by: | |||
| Problem Possible cause | WOLF service shop | Oneself | |
| No scarification result | • The working depth is set too low (B4) | --- X | |
| Erratic running • A blade is defective | X --- | ||
| The engine does not start or has not power | • Too little fuel in the tank | --- | X |
| • The spark plug socket is not on the spark plug | --- | X | |
| • The spark plug is not functioning | --- | X | |
| • The air filter is dirty or oily | --- | X | |
| If you are in doubt, always call on a WOLF service shop. Important: Before every inspection or work on the blades, turn off the scarifier and take off the spark plug connectors. | |||

Guarantee terms
Please carefully retain the guarantee card completed by the seller, or the proof of purchase.
The company WOLF-Garten provides a guarantee for 24 months from the date of purchase. This guarantee is in accordance with the relevant state of technology and the utilisation purpose / area of application. The consumer's statutory rights are not affected by the following guarantee guidelines.
Pre-conditions for the 24-month guarantee entitlement:
- Deployment of the device solely for private use.
The guarantee is reduced to 12 months in the commercial sector or leasing business. - Proper handling and observance of all information given in the operating manual, which forms part of our guarantee terms.
- Observance of the prescribed maintenance intervals.
- No unauthorised alteration of the design.
- Installation of original WOLF replacement parts / accessories.
- Presentation of the completed guarantee card and/or proof of purchase.
This guarantee does not extend to normal wear-and-tear on blades, blade mounting components or friction disks, V-belts/toothed belts, running wheels/tyres, air filters, spark plugs and spark plug connectors. Any guarantee claim shall be immediately void in the event of unauthorised repairs. Faults and defects which can be traced to material or manufacturing faults will be rectified exclusively by our contracted workshops (the seller has the right to remedy a defect) in your vicinity, or by the manufacturer if the latter is closer. Any claims going beyond the provision of a guarantee are ruled out. There is no entitlement to a replacement. Any transport damage should be reported not to us but to the shipper in question since, otherwise, any compensation claims vis-à-vis the shipper would be voided.

The guarantee will be implemented at our authorized customer service shops or:
Wolf Garden Ltd.
Crown Business Park
TREDEGAR Gwent NP22 4EF

WOLF-Italia S.r.l. Via G.Galilei 5 20060 Ornago (Mi)

In case of complaints, please present this card to the workshop when placing your order. Only correctly completed warranty cards will be accepted.
To be completed by the dealer:
Dealer stamp and signature:
Ort, Place, Lieu, Datum, date, date
Luogo, Plaats, data datum datum.