
WX461 - Saw WORX - Free user manual and instructions
Find the device manual for free WX461 WORX in PDF.
| Brand | Worx |
| Model | WX461 |
| Product type | Jigsaw |
| Rated voltage | 230-240 V ~ 50 Hz |
| Power | 550 W |
| No-load speed | 800-2800 min⁻¹ |
| Stroke | 24 mm |
| Max. cutting capacity wood | 80 mm |
| Max. cutting capacity aluminum | 12 mm |
| Max. cutting capacity steel | 6 mm |
| Sole plate inclination | 0° – 45° |
| Double insulation | Yes (Class II) |
| Weight | 2.4 kg |
| Sound pressure level (LpA) | 91 dB(A) |
| Sound power level (LwA) | 102 dB(A) |
| Vibrations (wood) | 7.07 m/s² (uncertainty K=1.5 m/s²) |
| Vibrations (metal) | 6.39 m/s² (uncertainty K=1.5 m/s²) |
| Variable speed adjustment | Yes (thumbwheel) |
| Pendulum action | Yes, 3 positions |
| Parallel guide | Included |
| Dust extraction adapter | Yes |
| Blade type | U-shank (universal) |
| Supplied with blades | Wood (HCS), metal (BIM), aluminum (HSS) |
| Maintenance | Clean with dry cloth; no user-serviceable parts |
| Safety features | Safety bar, double insulation |
Frequently Asked Questions - WX461 WORX
User questions about WX461 WORX
0 question about this device. Answer the ones you know or ask your own.
Ask a new question about this device
Download the instructions for your Saw in PDF format for free! Find your manual WX461 - WORX and take your electronic device back in hand. On this page are published all the documents necessary for the use of your device. WX461 by WORX.
USER MANUAL WX461 WORX
Not all the accessories illustrated or described are included in standard delivery.
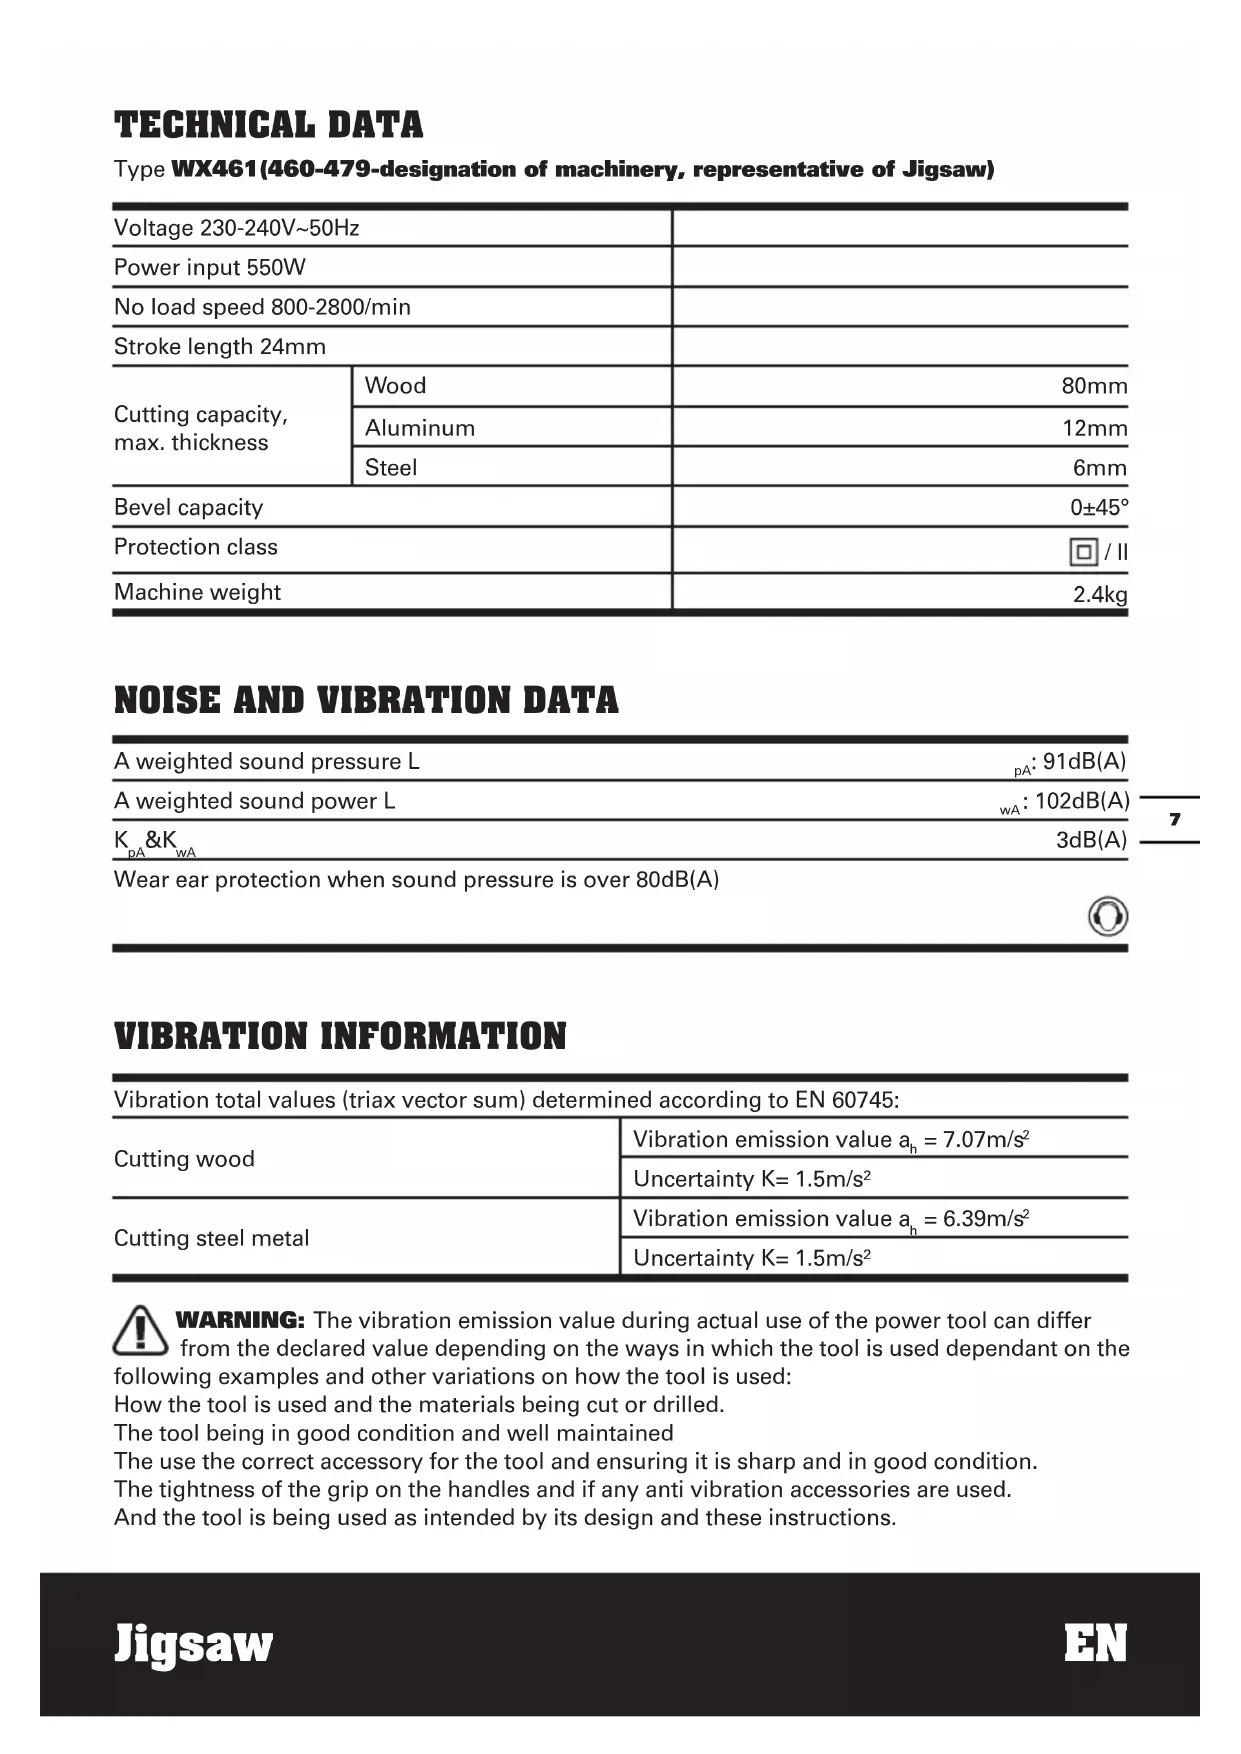
TECHNICAL DATA
Type WX461(460-479-designation of machinery, representative of Jigsaw)
| Voltage 230-240V~50Hz | ||
| Power input 550W | ||
| No load speed 800-2800/min | ||
| Stroke length 24mm | ||
| Cutting capacity, max. thickness | Wood | 80mm |
| Aluminum | 12mm | |
| Steel | 6mm | |
| Bevel capacity | 0±45° | |
| Protection class | ☐/II | |
| Machine weight | 2.4kg | |
NOISE AND VIBRATION DATA
| A weighted sound pressure L | pA: 91dB(A) |
| A weighted sound power L | wA: 102dB(A) |
| K & KWA | 3dB(A) |
Wear ear protection when sound pressure is over 80dB(A)

VIBRATION INFORMATION
| Vibration total values (triax vector sum) determined according to EN 60745: | |
| Cutting wood | Vibration emission value ah = 7.07m/s2 |
| Uncertainty K= 1.5m/s2 | |
| Cutting steel metal | Vibration emission value ah = 6.39m/s2 |
| Uncertainty K= 1.5m/s2 | |

WARNING: The vibration emission value during actual use of the power tool can differ
from the declared value depending on the ways in which the tool is used dependant on the
following examples and other variations on how the tool is used:
How the tool is used and the materials being cut or drilled.
The tool being in good condition and well maintained
The use the correct accessory for the tool and ensuring it is sharp and in good condition.
The tightness of the grip on the handles and if any anti vibration accessories are used.
And the tool is being used as intended by its design and these instructions.
This tool may cause hand-arm vibration syndrome if its use is not adequately managed

WARNING: To be accurate, an estimation of exposure level in the actual conditions of use should also take account of all parts of the operating cycle such as the times when oil is switched off and when it is running idle but not actually doing the job. This may significantly reduce the exposure level over the total working period.
Helping to minimise your vibration exposure risk.
ALWAYS use sharp chisels, drills and blades.
Maintain this tool in accordance with these instructions and keep well lubricated (where appropriate).
If the tool is to be used regularly then invest in anti vibration accessories.
Avoid using tools in temperatures of 10^ or less.
Plan your work schedule to spread any high vibration tool use across a number of days.
ACCESSIONS
Hex key 1
Dust tube 1
Parallel guide 1
Wood cutting blade: 100mm x 10TPI, HCS 1
Metal cutting blade: 92mm x 21TPI, BIM 1
Aluminum cutting blade: 100mm x 8TPI, HSS 1
We recommend that you purchase your accessories from the same store that sold you the tool. Use good quality accessories marked with a well-known brand name. Choose the type according to the work you intend to undertake. Refer to the accessory packaging for further details. Store personnel can assist you and offer advice.
ADDITIONAL SAFETY POINTS FOR YOUR JIGSAW
- Always wear a dust mask.
- Hold power tool by insulated gripping surfaces when performing an operation where the cutting tool may contact hidden wiring or its own cord. Contact with a" live" wire will make exposed metal parts of the tool" live" and shock the operator.
- Use clamps or another practical way to secure and support the workpiece to a stable platform. Holding the work by hand or against your body leaves it unstable and may lead to loss of control.
- Always wear safety glasses or eye shields when using the jigsaw. Everyday eyeglasses have only impact-resistant lenses; they are NOT safety glasses. Following this rule will reduce the risk of serious personal injury.
- Always wear hearing protection during extended periods of operation. Following this rule will reduce the risk of serious personal injury.
- Keep your hands away from cutting area. Do not reach under the material being cut because the nearness of the blade to your hand is hidden from your sight.
- Do not use dull or damaged blades. Bent blades can break easily, or cause kickback.
- Remove the plug from the socket before carrying out any adjustment, servicing or maintenance.
- Fully unwind cable drum extensions to avoid potential overheating.
- When an extension cable is required you must ensure it has the correct ampere rating for your power tool and is in a safe electrical condition.
- Ensure your mains supply voltage is the same as indicated on the rating plate.
- Your tool is double insulated for additional protection against a possible electrical insulation failure within the tool.
- Always check walls, floors and ceilings to avoid hidden power cables and pipes.
- After long working period, external metal parts and accessories could be hot.
- Only withdraw the blade from the cut when
the blade has been stopped moving.
- The pivoting blade foot must be held firmly against the material being cut to reduce saw vibration, blade jumping and blade breakage.
- Before cutting, check the cutting line is free of nails, screws, etc.
- If possible, ensure the work-piece is firmly clamped to prevent movement.
- Never stop the cutting blade by applying side pressure to the blade.
- Your Jigsaw is a hand held tools, do not clamp your Jigsaw.
WARNING: Some dust particles created by power sawing, contain chemicals known to cause cancer, birth defects or other reproductive harm. Some examples of these chemicals are:
- Lead from lead-based paints.
- Crystalline silica from bricks and cement and other masonry products.
- Arsenic and chromium from chemically treated lumber.
Your risk from these exposures varies, depending upon how often you do this type of work. To reduce your exposure to these chemicals:
Work in a well-ventilated area.
- Work with approved safety equipment, such as those dust masks that are specially designed to filter microscopic particles.
SYMBOLS OPERATING INSTRUCTIONS

To reduce the risk of injury, user must read instruction manual

NOTE: Before using the tool, read the instruction book carefully.

Warning

Double insulation

Wear eye protection

Wear ear protection

Wear dust mask

Waste electrical products should not be disposed of with household waste. Please recycle where facilities exist. Check with your Local Authority or retailer for recycling advice.
INTENDED USE:
The machine is intended for sawing wood, plastic, metal and building materials while resting firmly on the workpiece. It is suitable for straight and curved cuts with metre angles to 45^ . The saw blade recommendations are to be observed.
1. ON/OFF SWITCH (See Fig. A)
The tool is switched on by the switch button located at the side of the motor housing. The switch locks in the on position, a convenience for continuous operation.
TO TURN ON THE TOOL on slide the switch button forward.
TO TURN OFF slide the switch button backward.
2. VARIABLE SPEED CONTROL (See Fig.B)
Adjust the Variable speed control to increase or decrease the speed according to the material, material thickness and blade specification to be used (also possible during no load operation). See Chart 1 for general guidance on speed selection. Avoid prolonged use at very low speed as this may damage your jigsaw's motor.
| Chart 1 | |
| Material Speed | setting |
| Wood 5-6 | |
| Metal 3-4 | |
| Aluminum 3-5 | |
| PVC 3-4 | |
| Ceramic 3-5 | |
3. HAND GRIP AREAS
Always ensure you maintain a firm grip whilst operating your jigsaw. Your hand must hold on the handle when you are working.
4.BLADE FITTING (See Fig.C,D)
You can only use the blade type shown in Fig C. To open the blade holder rotate the ring anti-clockwise (jigsaw upside down) and hold in position (See Fig. D). Then fully insert the blade into the blade holder slot with blade teeth facing forward and release the ring, which will self, rotate and clamp over the top of the blade. Push the blade into the blade holder again to ensure it is locked in position. Ensure the edge of the blade is located in the groove of the blade guide. To remove a blade, hold the blade and rotate the blade holder ring anti-clockwise then lift out the blade (blade could be spring ejected).

WARNING: Blade teeth are very
sharp. For best cutting results ensure
you use a blade suited to the material and cut quality you need.
5. PARALLEL GUIDE FIXTURE
Slide the parallel guide arm through both fixtures to achieve the required cutting distance and tighten both screws to lock into position.
6. ROLLER GUIDE (See Fig. E)
Ensure the blade is located and runs smoothly in the groove otherwise the pendulum function will not work correctly and the blade will not be supported during cutting.
7. PENDULUM ACTION CONTROL (See Fig. F)
The pendulum action varies the forward cutting angle of the blade for increased cutting efficiency. This can also be adjusted during no load running. Refer to the chart 2 for more details. Do not use excessive blade force when cutting with the pendulum action. The blade cuts on the upward stroke only.
| Chart 2 | |
| 0 Thin materials. Fine cuts. Hard materials, (e.g. steel & chipboard) | |
| I Thick materials (e.g. wood) & plastic | |
| II Fast cuts (e.g. softwood). Cutting in the direction of the wood grain. |
8. BASE PLATE
Adjusting the angle of the base plate (10) enables bevel cutting. The base plate must always be held firmly against the materials being cut to reduce saw vibration, blade jumping or blade breakage.
9. BASE PLATE ANGLE ADJUSTMENT (See Fig. G)
Use a hex key. Loosen the bolts securing the base plate. For preset angles, adjust the pressboard arrow pointing at the desired angle (0,15,30,45) on the angle plate (See Fig. G). For other metre angles, rotate to your desired angle (use a protractor scale). Following one of the above procedures, hold the base plate in position and firmly tighten the bolts to clamp the base plate at that angle. Finally, check the angle and ensure the base plate is firmly clamped. The angle markings on the base plate are accurate for most general purposes but it is recommended for accurate work to set the angle with a protractor and make a test cut on other material.
10. VACUUM ADAPTOR (See Fig. H)
The adapter (4) rotates anti-clockwise inside the dust tube and locks in position by a groove inside the dust tube. The adapter must then be connected to a suitable external dust extraction machine.
11. PROTECTION FINGER
The finger is located in front of the blade holder. Whilst working, it will help prevent accidental contact with moving blade.
12. DUST BLOWER AIR HOLE
This is a small aperture located underneath the housing just behind the blade guide. Ensure this is kept clean to allow the airflow to continually blow dust away from the cutting area.
WORKING HINTS FOR YOUR JIG SAW
If your power tool becomes too hot, especially when used at low speed, set the speed to
maximum and run no Load for 2-3 minutes to cool the motor. Avoid prolonged usage at very low speeds.
GENERAL
Always use a blade suited to the material and material thickness to be cut. Always ensure the work-piece is firmly held or clamped to prevent movement. For easier control, use low speed to start cutting, then increase to correct speed.
Any movement of the material may affect the quality of the cut. The blade cuts on the upward stroke and may chip the uppermost.
Ensure your uppermost surface is a nonvisible surface when your work is finished.
CUTTING LAMINATES
Use a fine tooth blade when cutting most laminates and thin wood materials. To reduce edge chipping, clamp pieces of waste wood at both ends on both sides and cut through the wood during cutting.
CIRCLE CUTTING
Do not use the pendulum action when cutting tight circles or angles.
PLUNGE SAWING (See Fig. I,J)
Plunge cutting may be used only on soft materials such as wood, aerated concrete, gypsum plaster boards, etc.!.
Use only short saw blades.
Place the front edge of the base plate on the workpiece and switch on. Press the machine firmly against the workpiece and plunge the saw blade slowly into the workpiece.
As soon as the complete surface of the base plate rests on the work piece, continue to saw along the cutting line.
METAL CUTTING
Use a finer tooth blade for ferrous metals and a coarse tooth blade for non-ferrous metals.
When cutting thin sheet metals, always clamp wood on both sides of the sheet to reduce vibration or tearing of the sheet metal. Both wood and sheet metal must be cut. Do not force the cutting blade when cutting thin metal or sheet steel, as they are harder materials
and will take longer to cut. Excessive blade force may reduce the life of the blade or damage the motor. To reduce heat during metal cutting, add a little lubricant along the cutting line.
MAINTENANCE
Remove the plug from the socket before carrying out any adjustment, servicing or maintenance.
Your power tool requires no additional lubrication or maintenance. There are no user serviceable parts in your power tool. Never use water or chemical cleaners to clean your power tool. Wipe clean with a dry cloth. Always store your power tool in a dry place. Keep the motor ventilation slots clean. Keep all working controls free of dust. If you see some sparks flashing in the ventilation slots, this is normal and will not damage your power tool.
If the supply cord is damaged, it must be replaced by the manufacturer, its service agent or similarly qualified persons in order to avoid a hazard.
ENVIRONMENTAL PROTECTION

Waste electrical products should not be disposed of with household waste. Please recycle where facilities exist.
Check with your local authorities or retailer for recycling advice.
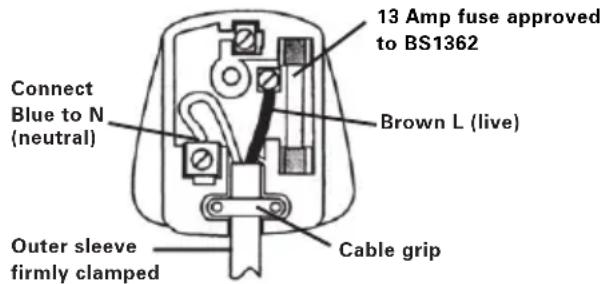
PLUG REPLACEMENT (UK & IRELAND ONLY)
If you need to replace the fitted plug then follow the instructions below.
IMPORTANT
The wires in the mains lead are colored in accordance with the following code:
Blue - Neutral
Brown - Live
As the colors of the wires in the mains lead of this appliance may not correspond with the colored markings identifying the terminals in your plug, proceed as follows. The wire which is colored blue must be connected to the terminal which is marked with N. The wire which is colored brown must be connected to the terminal which is marked with L.
WARNING: Never connect live or neutral wires to the earth terminal of the plug. Only fit an approved 13A BS1363/A plug and the correct rated fuse.
NOTE: If a moulded plug is fitted and has to be removed take great care in disposing of the plug and severed cable, it must be destroyed to prevent engaging into a socket.
DECLARATION OF CONFORMITY
We,
POSITEC Germany GmbH
Declare that the product,
Description WORX Jigsaw
Type WX461(460-479-designation of machinery, representative of Jigsaw)
Function Sawing various materials
Complies with the following Directives, Machinery directive 2006/42/EC
Electromagnetic compatibility directive
2004/108/EC
RoHS directive 2011/65/EU
Standards conform to
EN 60745-1
EN 60745-2-11
EN 55014-1
EN 55014-2
EN 61000-3-2
EN 61000-3-3
The person authorized to compile the technical file,
Name Russell Nicholson
Address Positec Power Tools (Europe)
Ltd, PO Box 152, Leeds, LS10 9DS, UK

2012/10/24
LeoYue
POSITEC Quality Manager
Ltd, PO Box 152, Leeds, LS10 9DS, UK


2012/10/24
LeoYue
INFORMATIONS RELATIVES AU BRUIT
INFORMATIONS RELATIVE AUX VIBRATIONS
SYMBOLS FONCTIONNEMENT

Directive RoHS 2011/65/EU
Et conforme aux normes
EN 60745-1
EN 60745-2-11
EN 55014-1
EN 55014-2
EN 61000-3-2
EN 61000-3-3
Ltd, PO Box 152, Leeds, LS10 9DS, UK


2012/10/24
Leo Yue
Responsible qualite POSITEC
| 1. INTERRUPTORE D'ACCENSIONE/SPEGNIMENTO |
| 2. IMPUGNATURE |
| 3. CONTROLLO VELOCITÀ VARIABILE L (Si Veda La Figura. B) |
| 4. ADATTATORE PER POLVERE |
| 5. SUPPORTO LAMA AD INCASTRO |
| 6. PROTEZIONE PER LE DITA |
| 7. GUIDA DELLA LAMA |
| 8. TUBO ASPIRAPOLVERE |
| 9. SUPPORTO |
| 10. PIASTA |
| 11. LAMA |
| 12. SCANALATURE GUIDA PARALLELA |
| 13. CONTROLLO AZIONE DI PENDOLO |
5. SCANALATURE GUIDA PARALLELA
Ltd, PO Box 152, Leeds, LS10 9DS, UK


2012/10/24
LeoYue
Ltd, PO Box 152, Leeds, LS10 9DS, UK


2012/10/24
LeoYue
Gestor de Qualidade POSITEC
| 1. AAN/UITSCHAKELAAR |
| 2. HANDVATGEBIEDEN |
| 3. SNELHEIDSREGELAAR (Zie. B) |
| 4. STOFADAPTER |
| 5. BLADHOUDER |
| 6. BESCHERMKAPJE |
| 7. BLADGELEIDER |
| 8. STOFBUISJE |
| 9. HOUDER |
| 10. VOETPLAAT |
| 11. ZAAGBLAD |
| 12. PARALLEGELEIDING KLEMMEN |
| 13. PENDEL INSTELLINGEN |
Sommige aufgebeidelde of beschreiben toebehoren worden nicht meegeleverd.
TECHNISCHE GEGEVENS
2. SNELHEIDSREGELAAR (Zie B)
PO Box 152, Leeds, LS10 9DS, UK


2012/10/24
Leo Yue
Ltd, PO Box 152, Leeds, LS10 9DS, UK


2012/10/24
Leo Yue
Blad for metallskjaering: 92mm x 21TPI, BIM 1
Aluminiumskjareblad:100mmx8TPI,HSS 1
Aluminiumskärblad: 100mm x 8TPI, HSS 1
Ltd, PO Box 152, Leeds, LS10 9DS, UK


2012/10/24
LeoYue
POSITEC Kvalitetsdirektor
| 1. AÇMA/KAPAMA DÜGMESI |
| 2. ELLE TUTMA BÖLGELERI |
| 3. DEĞΙŞKEN HIZ KONTROLÜ (Bkz B) |
| 4. TOZ ADAPTÖRÜ |
| 5. TOZ MUHAFAZASI |
| 6. KORUYUCU PARMAK |
| 7. BIÇAK KILAVUZU |
| 8. TOZ BORUSU |
| 9. MESNET |
| 10. TABAN PLAKASI |
| 11. BIÇAK |
| 12. PARALEL KILAVUZ SABIT PARçALARI |
| 13. SARKAÇ HAREKETI KONTROLÜ |
Ahşap kesmekığ: 100mm x 10TPI, HCS 1
Metal kesme bicaigi: 92mm x 21TPI, BIM 1
Aluminyum kesme bicaigi: 100mm x 8TPI, HSS 1
Ilgi Positec Power Tools (Europe) Ltd,
PO Box 152, Leeds, LS10 9DS, UK


2012/10/24
Leo Yue
He BCE npHnHaJIeJXHOCTN, nJIIOCTpnpOBaHHbI e IIN ONNCaHHbI B KJIIOUeHbI B cTaHdApTHyIO NOCTaBky.
TEXHNUECKNE XAPAKTEPNUCTNUK
Moe nen Wx461(460-479- 063HaueHne HnctpyMeHTa, Io63NK 3JeKtpnueckn)
Cnocob nCnoB3OBAHnI INCTpyMeHTa N CBOYCTBa 6pa6aTbIbAemoro MaTePnIaJIa.
CocToaHHe INcTpymeHTa UypoBeHb Texo6cIyKINBaHnA
Tnncnojbl3yeMbIX npHaadJeKHOCTe N IX TexHnueCKoe COCTOHNHe.
Cnla ydepkaHn pykortok n HaNnue npOTNB0Bn6paunOHbIX cpeCTB.
IcnoJIb3yEmble pa6Oue HNCTpyMeHTbl, COOTBeTCTBne npIMeHnH INCTpyMeHTOB nHa3HaueHnIO.
CeptnuΦnKaT COOTBeTCTBnA FOCT P
ME77
3KcPJIyATAUЯ

BHIMAHNE:Перед ИсторьанецMHCTpymeHTa, BHIMaTeNbHO npOHTaTe
pyKOBOIDCTBO NO 3KcNJIyatauIN.
ПРIMЕΗΝΕ ΠΟ HA3HAUYEHNIO
3JIeKTPoINHCTpymeHT npEHa3NaueH dIa BbINOJIHeHnHa npOuHoi OOnope npOdoNbHbIX paCNIIOB N Bblpe3OB B DpeBecnHe, CINTeTNUeCKOM MaTePnaIe, MetaJIe, KepAMUeCKNX PIIITax n pe3InHe. OH npiroDeH dIra BblNOJHeHnI npAmbIX KpINBOJInHeHbIX pe3OB C yIOM HAKIoHa Do 45^ . YcHTbIbaiTe peKOMeHdaunn dIa npIMeHeHnIIOK.
1. BbIKJIIOUATEJIb NHTAHN (Cm.Pnc.A)
INCTpymeHT BKNIOUaETc npn NOMOuBbIKIOUaTeJI pNTAHNHa 6OKOBOn CTOpOHeKOpNyCa DBNrAteJI. DaHbI BbIKIOUaTeJIbΦNKcnpyETc BO BKIOUeHHOM NIOJOKeHN dIpyydo6CTBa pa60Tbl.
ДЛЯВКЛIOUECHИИHCTPYMEHTAпереметиTe BBIKJIIOUaTeIb BnpeIe.ДЛЯВКЛIOUECHИИHCTPYMEHTA
Nepemecnte BbIKnOuataTeNbHa3a.
2. PEGYJATOP CKOPOCTN (Cm.Pnc.B)
He nCnoJb3yIte MaTTHIKOBoe DvIXeHne npu BblnInBaHH KpyTbIX CkpyrIeHn IJIy rIIOB.
BPE3AHNE (CM.Pnc.IJ)
you've got the power
Copyright © 2012, Positec. All Rights Reserved.
2PSJ10APK11001A3