
Action - Earplug HAMA - Free user manual and instructions
Find the device manual for free Action HAMA in PDF.

| Product type | Weather station with outdoor sensor |
| Brand | Hama |
| Model | Action |
| Power supply | 5 LR03/AAA/Micro batteries (1.5 V) |
| Indoor temperature measurement range | 0 °C to +50 °C (32 °F to +122 °F) |
| Outdoor temperature measurement range | 0 °C to +50 °C (32 °F to +122 °F) |
| Humidity measurement range | 20 % to 95 % |
| Max. number of outdoor sensors | 3 |
| Radio range | Approx. 50 m in open space |
| Frequency | 433.92 MHz |
| Max. transmission power | 0.327 mW |
| Display | LCD screen with weather icons |
| Functions | Indoor/outdoor temperature, humidity, 12-hour weather forecast, min/max, °C/°F switching |
| Mounting | Base station on stand or wall, wall sensor |
| Maintenance and cleaning | Slightly damp non-fibrous cloth, avoid harsh detergents and liquids |
| Safety | Keep out of reach of children, do not modify, protect from moisture and shock |
| Batteries | Observe polarity, do not mix types, remove if unused for a long time |
| Package contents | Base station, outdoor sensor, 5 LR03 batteries, instruction manual |
| Dimensions | Not specified |
| Weight | Not specified |
Frequently Asked Questions - Action HAMA
User questions about Action HAMA
0 question about this device. Answer the ones you know or ask your own.
Ask a new question about this device
Download the instructions for your Earplug in PDF format for free! Find your manual Action - HAMA and take your electronic device back in hand. On this page are published all the documents necessary for the use of your device. Action by HAMA.
USER MANUAL Action HAMA
natural_image
Line drawing of a rectangular electronic device with three vertical slots and a dotted base (no text or symbols)OperatingInstructions
Bedienungsanleitung
Moded'emploi
Instruccionesdeuso
Gebruiksaanwijzing
Istruzioniperl'uso
Instrukcjaobsługi
Használatiútmutató
Manualdeutilizare
Návodk p oužití
Návodnapoužitie
Manualdeinstruções
Bruksanvisning
natural_image
Simple line drawing of a smartphone screen with three horizontal lines above and four bottom dots below (no text or symbols)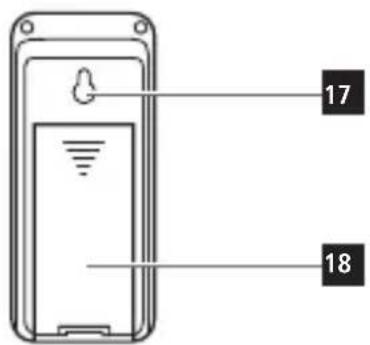
B
ControlsandDisplays
A B asestation
- Display
- Outdoor temperature
- Outdoorhumidity
4.Time
5.Day
6.Month - Roomhumidity
8.Indoortemperature
9.Weatherforecastsymbol - 'CH| ▲' button = switches channel | increases the current setvalue
- 'C/F | SET' button = switches between °C and °F | sets timeanddate
- 'MEM | ▼' button = displays the stored maximum/minimumindoorandoutdoortemperature v alues|decreasesthecurrentsetvalue
- Measuring station wireless symbol
- Batterycompartment
- Recessforwallmounting
16.Base
B M easuringstation
- Recessforwallmounting
18.Batterycompartment
1. ExplanationofWarningSymbolsandNotes
Warning

This symbol is used to indicate safety instructions to draw your attention to specific hazards and risks.
Note

This symbol is used to indicate additional information or important notes.
2.PackageContents
- 'Action' weather station (base station for indoors / measuring stationforoutdoors)
• 5 AAAMicrobatteries
• Theseoperatinginstructions
3. SafetyNotes
• T heproductisintendedforprivate,non-commercialuseonly.
• U setheproductforitsintendedpurposeonly.
- Protect the product from dirt, moisture and overheating, and only use itina dry environment.
- Do not usetheproductintheimmediatevicinityofheaters orotherheatsourcesorindirectsunlight.
- Keep this product, as all electrical products, out of there each of children!
- D o n otoperatetheproductoutsidethepowerlimitsgivenin thespecifications.
- Do not use the product in areas where the use of electronic devices is not permitted.
- D o n otusetheproductinmoistenvironmentsandavoid splashes.
- Do not place the product near interference fields, metal frames, computers, TVs, etc. Electronic devices and window frames can negatively affect the product's functionality.
- D o n otdroptheproductanddonotexposeittoanymajor shocks.
- Do not modify the product in any way. Doing so voids the warranty.
- Keep the packaging material out of the reach of children due totheriskofsuffocation.
- D isposeofpackagingmaterialimmediatelyaccordingto locallyapplicableregulations.
Warning-Batteries

- W heninsertingbatteries, notethecorrectpolarity(+and - markings) and insert the batteries accordingly. Failure to dosocouldresultinthebatteriesleakingorexploding.
- O nlyusebatteries(orrechargeablebatteries)thatmatch thespecifiedtype.
- Before you insert the batteries, clean the battery contacts and the polar contacts.
- Don otallowchildrentochangebatterieswithout supervision.
- Do not mix old and new batteries or batteries of a different type make.
- Remove the batteries from products that are not being usedforanextendedperiod(unlessthesare b eingkept readyforanemergency).
• Don otshort-circuitbatteries. - Donotchargebatteries.
- Do not throw batteries in a fire.
- Keepbatteriesoutofthereachofchildren.
- N everopen,damageorswallowbatteriesorallow themtoentertheenvironment.Theycancontaintoxic,environmentallyharmfulheavymetals.
- I immediately remove and dispose of dead batteries from the product.
- A voidstoring, chargingorusingbatteriesinextreme temperatures.
4. Getting Started

Note
Before use, ensure you insert the batteries in the measuring stationfirstandtheninthebasestation.
4.1 Insertbatteries
Measuringstation
- O penthebatterycompartment(19)andremovethecontact breaker.
- T henclosethebatterycompartmentcover.
Basestation
- R emovethescreenprotectorfromthedisplay.
- O penthebatterycompartment(14)andinsertthreeAAA Micro b atterieswiththecorrectpolarity.
• T henclosethebatterycompartmentcover.
4.2Replacingthebatteries
Note- R eplacingthebatteries

- N otethatthestationshavetoberesynchronisedeach timeafteryouchangethebatteriesinthemeasuringor basestation.
- To do this, remove the batteries from the other station and thenreinsertthem,orchangethemasrequired.
Measuringstation
- O penthebatterycompartment(18), remove and properly dispose of the depleted batteries, and insert twonew AAA Micro batteries with the correct polarity. Then close the battery compartment cover.
Basestation
- O penthebatterycompartment(14),removeandproperly disposeofthedepletedbatteries,andinsertthreenewAAA Micro batteries with the correct polarity. Then close the batterycompartmentcover.
5. Installation
Note-Installation

- We recommend initially placing the base and measuring stationsintheintendedlocationswithoutinstallingthem andmakingallthesettingsdescribedin6.Operation — t o d o.
- Only install the stations on the appropriate settings have been made and a table wireless connection is established.
Note
- T hewirelesstransmissionrangebetweenthemeasuring andbasestationsisupto50m i n o penspaces.
- Before installation, ensure that wireless transmission will not be disrupted by interference or obstacles like buildings, trees, vehicles, high-voltagelines, etc.
- Before the final installation, ensure that there is sufficient reception between the intended installation locations.
- When installing the measuring station, ensure that it is protected from direct sunlight and rain.
- The international standard height for measuring air temperature is 1.25 m (4 ft) above ground.

Warning

- B uyspecialorsuitableinstallationmaterialfroma specialiseddealerforwall-mounting.
- Ensure that no faulty or damaged parts are installed.
- N everapplyforceduringinstallation.Thiscoulddamage theproduct.
- Before installation, ensure that the chosen wall is suitable fortheweighttobemounted, and makesure t hatthere are no electrical wires, water, gas or other lines at the installationsiteonthewall.
- Do not mount the product above locations where persons might linger.
5.1.Basestation
- U sethebasetopositionthebasestation(16)ona level surface.
- Alternatively, you can install the base station on a wall using theopening(15)ontheback.
5.2. Measuringstation
- Youcanalsopositionthemeasuringstationonalevel outdoorsurface.
• We recommend installing the measuring station securely on anoutdoorwall.
• Install an anchor, screw, nail, etc. in the wall of your choice. - H angupthebase/measuringstationusingtheopening(17) intendedforthispurpose.
6.Operation

Note
Hold down the 'CH | ▲' button (10) or the 'MEM | ▼' button (12)toselectthevaluesfaster.
6.1. Connectiontothemeasuringstation
- A fteryouinsertthebatteries, thebasestationautomatically searchesfora c onnectiontothemeasuringstationand performsinitialsetup.

Note
- I nitialsetuptakesapprox.2 m inutes.
- D uringconnection, thewirelesssymbolonthemeasuring stationwillflash(13).
- Do not press any buttons during setup. Otherwise, values may not be transmitted correctly and there is a risk of value errors and in accuracies.
- T hesetupprocessiscompletedwhentheindoor(7/8)and outdoor(2/3)measurementdataisdisplayed.
- T hemeasuredvalueisautomaticallyupdatedbythebase deviceaboutevery45seconds.
- If the temperature is outside of the measuring range, --.-(lowerthanminimumtemperature)or--.-(higherthan maximumtemperature)willappearonthetemperature display.
- If the base station still does not receive a signal from the measuringstation, pressandholdthe'CHI' b u ▲t o n (10)forapprox.3 s econdstostartthemanualsearchfor thesignal.
| Display | Searchfora s ignalfromthe measuringstation |
 Displayflashing Displayflashing | Active |
 Displayedcontinuously Displayedcontinuously | Successful–signalisbeingreceived |
 Displayedcontinuously Displayedcontinuously | Inactive–nosignalreception |
Note— Faultytransferofmeasuredvalues

- In isolated cases, interference - e.g. from a WLAN network, a computer or a television set - can cause the transferofmeasuredvaluesbetweenthemeasuring stationandthebasestationtofail.
- I n t hiscase, you must resynchronis the stations by briefly removing the batteries from both stations and reinserting them.
- If the measured values are not transferred again once thebatteriesare inserted, replacethebatterieswith newones.
- If necessary, select a new location for the base station in ordertoavoidpossibleinterferenceinthefuture.
6.2 Selecting the channel/other measuring stations

Note
- You can install two more measuring stations in addition to the included measuring station. Ensure that the base and measuring stations are set to the same channel.
• V isitwww.hama.comforsuitablemeasuringstations.
- Press the 'CH | ▲' button (10) to set the channel to that setontherespectivemeasuringstation.Channel1,2or3 isdisplayed
6.3 Basicandmanualsettings
Manuallysettingthedate/time
- Press and hold the 'C/F | SET' button (11) for approximately 3 secondstomakethefollowingsettingsoneaftertheother.
- Year
- Month
Day
• 1 2/24-hourformat - Hour
-
Minute
-
To s electtheindividualvalues,pressthe'CH| ▲' button(10) or the 'MEM | ▼' button (12) and confirm each selection by pressingthe'C/F| S ET'button(11).
- Press the 'C/F | SET' button (11) to adopt the set value displayedandtoskip.
- If you do not make an entry for 8 seconds, you automatically exitSettingsmode.
6.5 Temperature measurement, maximum/minimum
- Press the 'MEM | ▼ button (12) to display the maximum or minimum values for temperature a ndhumidity recording.
- If you press the 'MEM | ▼' button (12) once, the maximum temperature and humidity values are displayed. When youpressthebuttononcemore, theminimumvaluesare displayed.
6.6 Resettingdata
- Press and hold the 'MEM | ▼ button (12) for approximately 3 s econdstoresetthestoredmaximumandminimumvalues forindoortemperature (2),roomhumidity(3),outdoor temperature (2)andoutdoorhumidity(3).
6.7Weatherforecast
- T heweatherstationshowsthetrendoftheweatherforthe next8 h oursusingthefollowingweathersymbols:
| SymbolWeather | |
 | Sunny |
 | Slightlycloudy |
 | Cloudy |
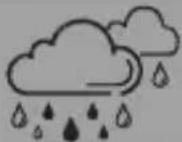 | Rainy |
7. Care and Maintenance
Onlycleanthisproductwitha s lightlydamp,lint-freeclothand donotuseaggressivecleaningagents.Makesure t hatwater doesnotgetintotheproduct.
8.WarrantyDisclaimer
Hama GmbH & Co KG assumes no liability and provides no warranty for damager resulting from improper installation/mounting, improper use of the product from failure to observ the operating instructions and or safety notes.
9.TechnicalData
| WeatherStation | |
| Max.transmitting power | 1.5V5 A AAMicro batteries |
| Measuringrange for t emperature | 0°C - 50°C / 32°F - 122°F |
| Measuringrange forhumidity | 20% - 9 5% |
| Max.numberof measuringstations | 3 |
| Range | Approx.50m |
10. DeclarationofConformity

Hereby, Hama GmbH & Co KG declares that the radio equipmenttype[00186412]isincompliancewith Directive2014/53/EU. ThefulltextoftheEU
declarationofconformityisavailableatthefollowinginternet address:www.hama.com->00186412->Downloads.
| Frequencyband(s)433,92MHz | |
| Maximumradio-frequency powertransmitted | 0,327mW |
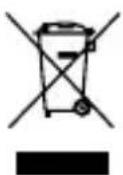
11. Recycling Information
Noteonenvironmentalprotection:
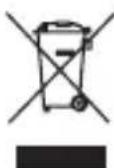
AftertheimplementationoftheEuropeanDirective 2012/19/EUand2006/66/EUinthenationallegal system, the following applies: Electricandelectronicdevicesaswellasbatteries mustnotbedisposedofwithhouseholdwaste. Consumersare o bligedbylawtoreturnelectrical
andelectronicdevicesaswellasbatteriesattheendoftheir servicelivestothepubliccollectingpointssetupforthis purpose or point of sale. Details to this are defined by the nationallawoftherespectivecountry. T hissymbolonthe product, theinstructionmanualorthepackageindicatesthat a p roductissubjecttotheseregulations.Byrecycling,reusing thematerialsorotherformsofutilisingolddevices/Batteries, youare m akinganimportantcontributiontoprotectingour environment.
11. Pokynyk likvidaci
86652Monheim/Germany
Service& Support
www.hama.com
+499091502-0
D GB
CE
All listed brands are trademarks of the corresponding companies. Errors and omissions excepted, and subject to technical changes. Our general terms of delivery and payment are applied.