
HU1065 - Humidifier ALPATEC - Free user manual and instructions
Find the device manual for free HU1065 ALPATEC in PDF.
| Product Type | Humidifier |
| Model | HU1065 |
| Brand | Alpatec |
| Water tank capacity | Approximately 1.8 liters |
| Steam output | 2 levels: high and low flow |
| LED lighting | 3 intensities (high, medium, low) |
| Timer | Programmable for 1, 2 or 4 hours (steam and light) |
| Remote control | Yes, with on/off, steam flow, light intensity, timer functions |
| Filter | Ceramic filter (ceramic balls) |
| Essential oil compartment | Yes, capacity of 3 to 5 drops |
| Automatic shut-off | Yes, when water level is low |
| Adjustable steam outlet | Yes |
| Cleaning and maintenance | Clean the transducer with a dry cloth; regular descaling with anti-limescale product |
| Power supply | 220-240 V ~ 50 Hz (check the rating plate) |
| Power consumption | Not specified |
| Dimensions | Not specified |
| Weight | Not specified |
| Warranty | In accordance with applicable law; contact authorized after-sales service |
Frequently Asked Questions - HU1065 ALPATEC
User questions about HU1065 ALPATEC
0 question about this device. Answer the ones you know or ask your own.
Ask a new question about this device
Download the instructions for your Humidifier in PDF format for free! Find your manual HU1065 - ALPATEC and take your electronic device back in hand. On this page are published all the documents necessary for the use of your device. HU1065 by ALPATEC.
USER MANUAL HU1065 ALPATEC
Many thanks for choosing to purchase a Solac brand product.
Thanks to its technology, design and operation and the fact that it exceeds the strictest quality standards, a fully satisfactory use and long product life can be assured.
- Read these instructions carefully before switching on the appliance and keep them for future reference. Failure to follow and observe these instructions could lead to an accident.
SAFETY ADVICE AND WARNINGS
This appliance can be used by children aged from 8 years and above and persons with reduced physical, sensory or mental capabilities or lack of experience and knowledge if they have been given supervision or instruction concerning use of the appliance in a safe way and understand the hazards involved.
This appliance is not a toy. Children should be supervised to ensure that they do not play with the appliance.
. Cleaning and user maintenance shall not be made by children unless they are supervised.
- Disconnect the appliance from the mains when not in use and before undertaking any cleaning task.
- Unplug the appliance from the mains before refilling the water tank.
Only use the appliance with the specific electric connector provided.
If the connection to the mains has been damaged, it must be replaced, take the appliance to an authorised technical support service. Do not attempt to disassemble or repair the appliance by yourself in order to avoid a hazard.
This appliance is for household use only, not professional, industrial use - Ensure that the voltage indicated on the rating label matches the mains voltage before plugging in the appliance.
- Connect the appliance to a socket that can supply a minimum of 10 amperes.
- The appliance's plug must fit into the mains socket properly. Do not alter the plug. Do not use plug adaptors.
- Do not force the power cord. Never use the power cord to lift up, carry or unplug the appliance.
- Do not wrap the power cord around the appliance.
- Check the state of the power cord. Damaged or tangled cables increase the risk of electric shock.
- Do not touch the plug with wet hands.
- Do not use the appliance if the cable or plug is damaged.
- If any of the appliance casings breaks, immediately disconnect the appliance from the mains to prevent the possibility of an electric shock.
- Do not use the appliance if it has fallen on the floor, if there are visible signs of damage or if it has a leak.
EN
- Do not place the appliance where it can reach the sunlight.
- The appliance must be used and placed on a flat, stable surface.
- Do not use the appliance in association with a programmer, timer or other device that automatically switches it on.
- Do not use or store the appliance outdoors.
USE AND CARE:
- Fully unroll the appliance's power cable before each use.
- Do not use the appliance if the accessories attached to it are defective. Replace them immediately.
- Do not switch the appliance on without water
- Do not use the appliance if the on/off switch does not work.
- Do not move the appliance while in use.
- Do not turn the appliance over while it is in use or connected to the mains.
- Unplug the appliance from the mains when not in use and before undertaking any cleaning task.
- Store this appliance out of reach of children and/or persons with physical, sensory or reduced mental or lack of experience and knowledge.
- Do not expose the appliance to extreme temperatures.
- Keep the appliance in a dry, dust-free place, out of direct sunlight.
Always fill the tank with clean water. We recommend you use filtered or distilled water. Do not use mineral water. NEVER POUR WATER IN THE STEAM CHAMBER - CAUTION: Water condensation may appear on the surfaces and objects around this appliance.
- Place on a flat, firm shelf about 0.5m or 1m from the floor. Never use on the floor. Never tip. Secure the appliance to prevent it tipping over.
- Make sure the surface on which the appliance is installed/placed is moisture resistant.
- Do not palce the steam outlet closet o furniture, a wall, a TV or any othe appliance that could be damaged by the moisture. Excessive use or misuse of the appliance could over-saturate the air humidity and cause water to condense around the humidifier.
- Do not use the applause when relative air hu
humidity exceeds 55% . Using a hygrometer, regulatory check that the room's relative humidity is between 40% - 60% .
- The recommended comfortable room temperature is from 18 - 22^ . Use the applaicne within this range temperature. Below this temperature, the air in the room cannot absorb more moisture and condensation is more likely.
- Do not leave the appliance unattended when switched on
- Do not use essential oils, these affects the correct function of the appliance.
SERVICE:
- Any misuse or failure to follow the instructions for use renders the guarantee and the manufacturer's liability null and void.
DESCRIPTION
1 Mist regulator button
2 Ligth level regulator button
3 Mist working timer
4 External body
5 Water tank
6 Tank cover
7 Adjustable mist outlet
8 Base
9 Transducer
10 Aroma compartment
11 LED light
12 Ceramic balls filter
13 Power cord
14 Remote control:
a. On/Off button
b. Mist regulator button
c. Ligth level regulator button
d. Mist timer
e. Led light timer
INSTRUCTIONS FOR USE
BEFORE USE:
- Make sure that all products' packaging has been removed.
USE:
- Remove the upper part of the body of the humidifier (4).
- Remove the water tank (5) from the base (8) (Fig. 1).
- Turn it over and remove the cover from the bottom part (6) by turning it counter-clockwise. (Fig.2.).
EN
- Add cold water (18 - 22^) without filling it completely. Maximum capacity: 1.8 l. approx.
- Put the cover back and turn it clockwise. Be sure that it is closed firmly.
- Turn the tank back over and place it on the base while making sure that it is seated correctly.
- When placing the water tank (5) back on the base, some of the water it contains enters the base (8); this is part of the normal operation of the appliance and does not entail any risk.
- If you wish to use an aroma essence pour a few drops (3 -5) into the aroma compartment (10).
- Plug the humidifier into the mains.
- Press mist regulator button (1) and a green indicator light will come on.
- Choose the flow of steam desired by pressing the button (1). Theres are two intensity levels.
1st press: High Intensity
2nd press: Low Intensity
3rd press: Off - We recommend you start with a low flow to avoid condensation and increase this if necessary.
- If there is insufficient water in the tank, the green pilot light of the mist level will flash three times with a beep and the humidifier will turn off. Before turning the device back on, it will be necessary to refill the tank with water.
- When you want to stop the appliance from emitting steam, press the mist regulator button (1) several times (High, Low, Off) till it goes off.
- Unplug the humidifier from the mains socket and empty the water tank and interior tank.
LIGHT FUNCTION
- The device can work as a humidifier, as a lamp or as a humidifier and lamp at the same time.
- The lamp function can be selected through the device or through the remote control.
- Select the desired light intensity, from highest to lowest intensity, by pressing the button (2) of the appliance or the button (c) of the remote control.
REMOTE CONTROL:
a) On / Off button. Pressing once turns on and selects the highest mist and lighting levels. When pressing again, the device switches off.
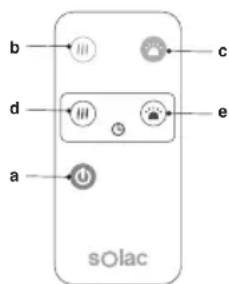
b) Mist regulator button (2 levels): Choose the flow of steam desired by pressing the button.
1st press: High Intensity
2nd press: Low Intensity 3rd press: Off
c) Light intensity regulator button. 3 levels: High, Medium, Low.
d) Mist timer to turn off the nebulizer automatically after a specific time interval (1, 2 or 4 hours).
e) Led light timer to switch off the light automatically after a specific time interval (1, 2 or 4 hours).
TIMER FUNCTION
- The operating time of the mist and light of the device can be controlled.
- Mistimer: This works with the mist function turned on and by pressing the button (3) on the appliance or the button (d) on the remote control.
1st press: 1 working hour
2nd press: 2 working hours
3rd press: 4 working hours
4th press: Time is cancelled
- Led light timer: This works with the lighting on and by pressing the button (e) on the remote control.
1st press: 1 working hour
2nd press: 2 working hours
3rd press: 4 working hours
4th press: Time is cancelled
- The selection made will be reflected in the humidifier by a green indicator light that changes position according to the chosen option.
CLEANING
- Disconnect the appliance from the mains and allow it to cool before undertaking any cleaning task.
- Clean the electrical equipment and the mains connection with a damp cloth and dry. DO NOT IMMERSE IN WATER OR ANY OTHER LIQUID.
- Clean the equipment with a damp cloth with a few drops of washing-up liquid and then dry.
- Do not use solvents, or products with an acid or base pH such as bleach, or abrasive products, for cleaning the appliance.
- Never submerge the appliance in water or any other liquid or place it under running water.
- Never submerge the connector in water or any other liquid or place it under running water.
EN
- If the appliance is not in good condition of cleanliness, its surface may degrade and inexorably affect the duration of the appliance's useful life and could become unsafe to use.
- Ceramic balls filter: Remove it from the appliance and clean it by placing it under the tap (Fig.3)
-
There may be some scale deposits in the transducer, particularly in areas with hard water.
-
Overcome this drawback by cleaning the transducer
- Rub down with a dry cloth and remove remains of moisture
- Do not place the transducer directly under the tap
- Do not rub the transducer with hard or metal objects.
-
Do not clean with chemical products
-
Then dry all parts before its assembly and storage.
HOW TO DEAL WITH LIME SCALE INCRUSTATIONS:
- For the appliance to work correctly it should be kept free of limescale or magnesium incrustations caused by the use of hard water.
- To prevent this kind of problem, we recommend the use of water with low lime or magnesium mineralisation.
However, if it is not possible to use the kind of water recommended above, you should periodically remove the limescale from the appliance:
Every week if the water is "very hard". Every 4 weeks if the water is "hard".
- A specific anti-lime scale product should be used on this kind of product.
- Fill the tank with water plus the anti-lime product, leave about 30 minutes, drain and clean with water.
- Homemade solutions are not recommended in the decaling of this appliance, such as the use of vinegar.
RECOMMENDATIONS
- Never leave water in the base or in the tank.
- Note: Water accumulated over long periods may create bacteria and mildew (fungus).
- Dry all the parts inside the appliance carefully, paying particular attention to the transducer.
- Store the appliance in a cool, dry place.
ANOMALIES AND REPAIR
- Take the appliance to an authorised technical support service if product is damaged or other problems arise. Do not attempt to disassemble or repair the appliance yourself as this may be dangerous.
FOR EU PRODUCT VERSIONS AND/OR IN CASE THAT IT IS REQUESTED IN YOUR COUNTRY:
ECOLOGY AND RECYCLABILITY OF THE PRODUCT
- The materials of which the packaging of this appliance consists are included in a collection, classification and recycling system. Should you wish to dispose of them, use the appropriate public recycling bins for each type of material.
- The product does not contain concentrations of substances that could be considered harmful to the environment.
This symbol means that in case you wish to dispose of the product once its working life has ended; take it to an authorised waste agent for the selective collection of Waste from Electric and Electronic Equipment (WEEE).
This appliance complies with Directive 2014/35/EU on Low Voltage, Directive 2014/30/EU on Electromagnetic Compatibility, Directive 2011/65/EU on the restrictions of the use of certain hazardous substances in electrical and electronic equipment and Directive 2009/125/EC on the ecodesign requirements for energy-related products.
FR
Cher Client,
DLA URZADZEN WYPRODUKOWANYCH W UNII EUROPEJSKIEJ I W PRZYPADKU WY-MAGAN PRAWNYCH OBOWIAZUACYCH W DANYM KRAJU:
EKOLOGIA I ZARZADZANIE ODPADAMI
PL
OBCLYKBAHE HA YPEDA:
- HenpaBnHTo n3NoJ3BaHe Ha ypeHa nn HeCna3BaHeTo Ha yka3aHnraTa 3a pa6Ota c Hero eOnacHo, anynpa rapaHnraTa n ocbo6oxJaBaAnpOu3BOUnteJIr OTROBOPHOCT.
ONICAHNE
1 BytoH 3a peynpahe ne6nTa Ha npapaTa
2 ByToH 3a peIpypIpaHe cIIJATA Ha CBeTNIHaTa
3Прогампане Врето Ha pa60Ta Ha De6nTa Ha napaTa
BG
4BbHWeH Kopnyc
5 Pe3epBoap 3a B0da
6 Kanak Ha pe3epBoapa
7 N3XoJ Ha napaTa C Bb3MOxHOCT 3a HACOyBaHe.
8 OCHOBa
9 Ppeo6pa3ybaTeI
10 XpaHnIInIe 3a eceHnI
11 OcBeTJIeHHe LED
12 Kepamnueh fntbpr
13 Ka6eI 3a CbP3BaHe KbM MpeKaTa
14ДиCTaHcNoHNOynpaBJIeHne:
a.П配电bCBAu 3a BKNIOUOVAHe/N3KJIIOUOVAHe
b. ByToH 3a peryIinpaHe Ha npOnIoToka
c. ByToH 3a peryInpae cnlaT aHa BETJINHATA
d. Поррампане Врето на pa60ta на OBлжнітěя
e. Iporpemipane BpeMeTo Ha yHKnna CBETJINHa"
HAUYH HA YNOTPEBA
3ABEJIEXKINIPEENYUOTPEBA:
HEN3INPABHOCTN IN PEMOHT
B CnyaHa Heun3npabHocT, MoJr OTHecTe ypeDa B OTOPn3napc cepBn3 3a TexHnuecko 6cbnykBaHe. MoJr He ce ONNTBaIte Da pa3- rno6baTe ypeDa nn nK da ro nonpaBraTe - TOBa e OnacHO.
3A PA3HOBNUHOCHTNE EU HA TOBA N3- DEJINE N/NIIN B CJIYUAR, PPNIOXIM 3A BAWATA CTPAHA:
ОПАЗВАЕ HA OKOLHATA CРЕДА И PE-UNKЛИРАЕ HA N3ДELЛNETO.
MaTePnAInTe,OT KOInTo n3pa6oTeHa onaKOB KaTa Ha To3n eJNEKTPOyPeD Ca BKNIOueHb CnCTema 3a T8XHOTo Cb6nPaHe,KnacnOuCnPaHe n peunKnnpaHe.AkO JeJaTe Da ce ocBO6oDnTe OT T8x, N3NoN3BaInTe O6IeCTBeHnTe KOHTeHepn, npriOdoHn 3a BCEKn OTDeJeHn BVd MaTePnAn.
Bn3dJIeHrTOOTcBCTBaKOHcHTpaunHaBeUeCTBa,KoIToMOraTda6bDaTOnpeJeEnKaTO BpeHN3aOKOJHaTa CpeJa.

To3n CmBOJ O3HaUaBa, Ye aKO JeNaeTe Da ce OCBo6OJaTe OTypeDa CneI n3TuHaHe Ha EKcnloatauOnHnTMy KINBOT
Tp6Ba Da ro npedeAte Te no NOxOJaH aHuH Ha qnpMa 3a npepa6OTka Ha OTpaDbu, OTOpN3npaHa 3a pa3dEnHO C6bnpaHe Ha OTHOCO OTnAbuOT eNEKtpueecko n eNEKtpoHNO o6OpyDbaHe (OEEO).
Hactoiany ypei n3bHnBa DnpeKtNa 2014/35/UE 3a Hnckn HnpeXeHn, DnpeKtNa 2014/30/UE 3a eNeKtpomarHnTHO cBoTBcTCTBne n C DnpeKtNa 2011/65/EU 3a OrpaHnueHnra TApn ynoTpe6a Ha hKoN onpeJeHn OnaChn Be- uectBa B eneKtpuYeCKn n eNeKtpoHN anapatn n C DnpeKtNa 2009/125/CE 3a n3ncKBaHnraTa 3a ekOJorHn DN3aH, pnpIOxHM KbM n3deJIy, CBbp3aHn c eHeprn.
ROMÁNA RO
Stimate client,
J 1
J
J
J
J
J
J
J
J
J
J
J
J
J
J
J
J
J
J
J
J
J
J
J
J
J
J
J
J
J
J
J
J
J
J
J
J
J
J
J
J
J
J
J
J
J
J
J
J
J
J
3
.(Fig.1) (8) acll j0 0 clll jz J
.(Fig.2).
J1A.1:0Joll gaoall aasll.8gaoall 1
aLal aL
5 5
(8) 11
3 1
(10)
jgl (1) jll gai j j bai. jgill lglil gall g g
.(1)
1
·
a 1
.
A,B = A1,A2
1
jglall jygia 11
jz jz jz jz jz jz jz jz jz jz jz jz jz jz jz jz jz jz jz jz jz jz jz jz jz jz jz jz jz jz jz jz jz jz jz jz jz jz jz jz jz jz jz jz jz jz jz jz jz jz jz
J 1
aill ygbjglia Lioic jgaii
jglai jlgai jg jg jg
. 1
1
1
S ACD = S COD + S BDO - S CDO
j
a5^2 + a6^2 + a_7^2 = 10
S凹 = S OBC - S_ BOC = 12
l2 = l1 + l_2
y = kx + b
Joo
a_0 = 2,b_0 = - 4
Jaaui 1
jlaaiy
y
·
aaii iac ay pial g allaoiwl
l2//l1l_2
aai i aaii i n nn jn jnnn nnnn nnnn nnnn nnnn nnnn nnnn nnnn nnnn nnnn nnnn nnnn nnnn nnnn nnnn nnnn nnnn nnnn nnnn nnnn nnnn nnnn nnnn nnnn nnnn nnnn nnnn nnnn nnnn nnnn nnnn nnnn nnnn nnnn nannn nnnn nnnn nnnn nnnn nnnn nnnn nnnn nnnn nnnn nnnn nnnn nnnn nnnn nnnn nnnn nnnn nnnn nnnn nnnn nnnn nnnn nnnn nnnn nnnn
.
a1 = 23,a2 = - 43,b1 = 56,b2 = - 78
·
·
jglg
aaiil aaii j 12345678901234567890
·gjglgj
y 1 y j 1 1
#
1
gialldiaioj2
3
S APQ = S AQP + S_ PQR
a1 + a2 = 3
jbsbc 6
- gill 7
8
a111 9
yjbeell 10
LED 11
12
13
: 14
cbblj j .a
j.
gaiial aiaia j.C
a1g 111 b0 a4b g c0g a2a d
a
jglalb
siue jie jie jie
124 10000000000000000000000000000000000
pa 1y aillolpa2 .j21 5c gao go
i j 1
a
j j j j j j j j j j j j j j j j j j j j j j j j j j j j j j j j j j j j j j j j j j j j j j j j j j
y
- | x - 2| = 52 .
AR
a
.
·
Solac.
1 1
Jg jag g aaii i 1jog.202aiaiaiaiaia Jg 45gglai y jblal gl
1
Jia 1
j. jaiall g jg jia jia jia jia jia jia jia jia jia jia jia jia jia jia jia jia jia jia jia jia jia jia jia jia jia jia jia jia jia jia jia jia jia jia jia jia jia jia jia jia jia jia jia jia jia jia
g iagll Jiauuiu uui g bai
Ji jiljll jll jll lldl 1
j1b1 = j2b2
yI IaIbociaolgall agl 1uall yI
.
1 1
1
1
1
1
1
1
1
1
1
1
10
·j 1
This product enjoys the recognition and protection of the legal guarantee in accordance with current legislation. To enforce your rights or interests you must go to any of our official technical assistance services.
You can find the closest one by accessing the following web link: http://solac.com
You can also request related information by contacting us by phone.
You can download this instruction manual and its updates at http://solac.com
DE) GARANTIE UND TECHNISCHER SERVICE
sl = f x
aaii iiaii oelalil cldi jso jso
1
:Jell gall
http://solac.com(ia
Jb Jc alall lI cIgaleall Ila sAsLs
yie li Jua
12 12
gall
http://solac.com
Unit 25 & 26, San Croy Office Park, Die Agora
Road, Croydon, Kempton Park, 1619
Johannesburg
(+27)0113925652
1
1
一
一
solac
what we do, we do well
Espanol / ES
English / EN
Français / FR
Deutsch/DE
Portugues / PT
Italiano / IT
Nederlands / NL
Cesky/CS
Polski / PL
Slovenský / SK
Magyar/HU
6bIrapck / BG
Româna / RO


- SAFETY ADVICE AND WARNINGS
- EN
- USE AND CARE:
- SERVICE:
- DESCRIPTION
- INSTRUCTIONS FOR USE
- BEFORE USE:
- USE:
- LIGHT FUNCTION
- REMOTE CONTROL:
- TIMER FUNCTION
- CLEANING
- HOW TO DEAL WITH LIME SCALE INCRUSTATIONS:
- RECOMMENDATIONS
- ANOMALIES AND REPAIR
- FOR EU PRODUCT VERSIONS AND/OR IN CASE THAT IT IS REQUESTED IN YOUR COUNTRY:
- ECOLOGY AND RECYCLABILITY OF THE PRODUCT
- FR
- PL
- OBCLYKBAHE HA YPEDA:
- ONICAHNE
- BG
- HAUYH HA YNOTPEBA
- 3ABEJIEXKINIPEENYUOTPEBA:
- HEN3INPABHOCTN IN PEMOHT
- 3A PA3HOBNUHOCHTNE EU HA TOBA N3- DEJINE N/NIIN B CJIYUAR, PPNIOXIM 3A BAWATA CTPAHA:
- ОПАЗВАЕ HA OKOLHATA CРЕДА И PE-UNKЛИРАЕ HA N3ДELЛNETO.
- ROMÁNA RO
- a_0 = 2,b_0 = - 4
- #
- AR
- a
- DE) GARANTIE UND TECHNISCHER SERVICE
- solac
Brand : ALPATEC
Model : HU1065
Category : Humidifier