BP W150 IMT - Blood pressure monitor MICROLIFE - Free user manual and instructions
Find the device manual for free BP W150 IMT MICROLIFE in PDF.

User questions about BP W150 IMT MICROLIFE
0 question about this device. Answer the ones you know or ask your own.
Ask a new question about this device
Download the instructions for your Blood pressure monitor in PDF format for free! Find your manual BP W150 IMT - MICROLIFE and take your electronic device back in hand. On this page are published all the documents necessary for the use of your device. BP W150 IMT by MICROLIFE.
USER MANUAL BP W150 IMT MICROLIFE
Europe/Middle-East/Africa
Microlife AG
Espenstrasse 139
9443 Wienau/Switzerland
14.12771277030
代码:1777270635
www.michelle.com
Asia
Metallife Corporation
SF,431,RuiGang Road,NeiHu
Taipei, 114 Taiwan, H.C.
- 10562879-1263
Fax:8622757-1263 Email: sales@jvq.com
www.nicillle.com
North / Central / South America
Micalife USA, Inc.
1617 Gulf to Say Blvd., 2nd Floor, She A
Clearwater, H. 33755/USA
1.177447553
1727年3597Eos
www.msfchina.com www.msfchina.com

Microlife BP W150 IMT
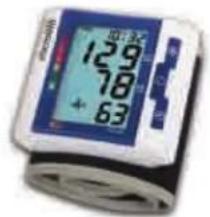
microlife
Microlife BP W150 IMT
microlife
Guarantee Card BP W150 IMT
Name of Purchaser / Nm / I m chetatur / Nmber de compado / Nma de compado / Nname du Klaes / FIO. nongaurena / Imie j nazwisky nabwyc / Vassarino neve / Viva khyrnesa / Numale parnatiorul / Jnme kupcujcho / Meno zakaznka / Ime in primek kappa / Alcinin Ad / Ovqoxternovxu oopoay / gdo
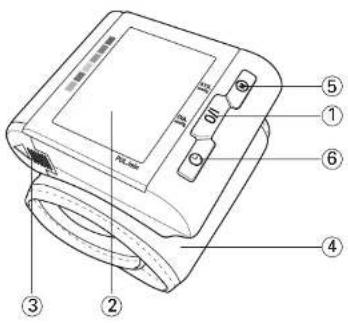
① ON/OFF Button
② Display
③ Battery Compartment
④ Cuff
⑤ M-Button (Memory)
⑥ Time Button
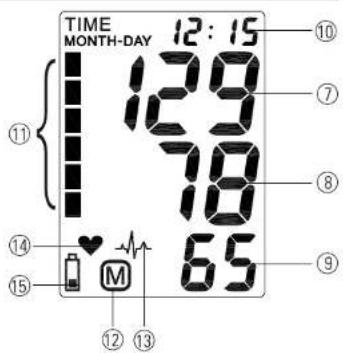
Display
Systolic Value
8 Diastolic Value
⑨ Pulse
10 Date/Time
① Traffic Light Display
12 Stored Value
Heart Arrhythmia Indicator
14 Pulse Rate
15 Battery Display

Read the instructions carefully before using this device.
Dear Customer,
Your new Microlife blood pressure monitor is a reliable medical instrument for taking measurements on the wrist. It is simple to use, accurate and comes highly recommended for blood pressure monitoring in your home. This instrument was developed in collaboration with physicians and clinical tests prove its measurement accuracy to be very high.*
Please read through these instructions carefully so that you understand all functions and safety information. We want you to be happy with your Microlife product. If you have any questions, problems or want to order spare parts, please contact Microlife-Customer Service. Your dealer or pharmacy will be able to give you the address of the Microlife dealer in your country. Alternatively, visit the Internet at www.microlife.com where you will find a wealth of invaluable information on our products.
Stay healthy - Microlife AG!
- This instrument is clinically tested according to the British Hypertension Society (BHS) protocol.
Table of Contents
- Important Facts about Blood Pressure and Self-Measurement
How do I evaluate my blood pressure?
- Using the Instrument for the First Time
Activating the fitted batteries
Setting the date and time
-
Taking a Blood Pressure Measurement using this Instrument
-
Appearance of the Heart Arrhythmia Indicator for early Detection
-
Data Memory
Viewing the stored values
Memory full
Clearing all values
-
Traffic Light Indication in the Display
-
Battery Indicator and Battery change
Low battery
- Flat battery - replacement
Using rechargeable batteries
-
Error Messages
-
Safety, Care, Accuracy Test and Disposal
Safety and protection
Instrument care
-
Cleaning the cuff
Accuracy test
Disposal -
Guarantee
-
Technical Specifications Guarantee Card

Type BF applied part
1. Important Facts about Blood Pressure and Self- Measurement
- Blood pressure is the pressure of the blood flowing in the arteries generated by the pumping of the heart. Two values, the systolic (upper) value and the diastolic (lower) value, are always measured.
-
The instrument also indicates the pulse rate (the number of times the heart beats in a minute).
-
Permanently high blood pressure values can damage your health and must be treated by your doctor!
- Always discuss your values with your doctor and tell him/her if you have noticed anything unusual or feel unsure. Never rely on single blood pressure readings.
- A number of factors can affect the accuracy of measurements taken on the wrist. In some cases, the result may differ from the measurement taken on the upper arm. We therefore advise you to compare these values with those produced by the upper arm measurement and discuss them with your doctor.
- Enter your readings in the enclosed blood pressure diary. This will give your doctor a quick overview.
- There are many causes of excessively high blood pressure values. Your doctor will explain them in more detail and offer treatment where appropriate. Besides medication, relaxation techniques, weight loss and exercise can also lower your blood pressure.
- Under no circumstances should you alter the dosages of any drugs prescribed by your doctor!
- Depending on physical exertion and condition, blood pressure is subject to wide fluctuations as the day progresses. You should therefore take your measurements in the same quiet conditions and when you feel relaxed. Take at least two measurements per day, one in the morning and one in the evening.
It is quite normal for two measurements taken in quick succession to produce significantly different results.
- Deviations between measurements taken by your doctor or in the pharmacy and those taken at home are quite normal, as these situations are completely different.
- Several measurements provide a much clearer picture than just one single measurement.
- Leave a small break of at least 15 seconds between two measurements.
- If you are pregnant, you should monitor your blood pressure very closely as it can change drastically during this time!
- If you suffer from an irregular heartbeat (arrhythmia, see «Section 4.»), measurements taken with this instrument should only be evaluated after consultation with your doctor.
- The pulse display is not suitable for checking the frequency of heart pacemakers.
How do I evaluate my blood pressure?
Table for classifying blood pressure values in adults in accordance with the World Health Organisation (WHO) in 2003. Data in mmHg
| Range Systolic Diastolic Recommendation | ||||
| blood pressure too low | 100 | 60 | Consult your doctor | |
| 1. | blood pressure optimum | 100 - 120 | 60 - 80 Self-check | check |
| 2. | blood pressure normal | 120 - 130 | 80 - 85 Self-check | check |
| 3. | blood pressure slightly high | 130 - 140 | 85 - 90 Consult | your doctor |
| 4. | blood pressure too high | 140 - 160 | 90 - 100 Seek | medical advice |
| 5. | blood pressure far too high | 160 - 180 | 100 - 110 Seek | medical advice |
| 6. | blood pressure dangerously high | 180 ↑ | 110 ↑ Urgently seek medical advice! | |
The higher value is the one that determines the evaluation. Example: a readout value between 150/85 or 120/98 mmHg indicates «blood pressure too high».
2. Using the Instrument for the First Time
Activating the fitted batteries
Pull out the protective strip projecting from the battery compartment ③.
Setting the date and time
- After the new batteries are fitted, the year number flashes in the display. You can set the year by pressing the M-button 5. To confirm and then set the month, press the time button 6.
- You can now set the month using the M-button. Press the time button to confirm and then set the day.
- Please follow the instructions above to set the day, hour and minutes.
- Once you have set the minutes and pressed the time button, the date and time are set and the time is displayed.
- If you want to change the date and time, press and hold the time button down for approx. 3 seconds until the year number starts to flash. Now you can enter the new values as described above.
3. Taking a Blood Pressure Measurement using this Instrument
Checklist for taking a reliable measurement
-
Avoid activity, eating or smoking immediately before the measurement.
-
Sit down for at least 5 minutes before the measurement and relax.
- Always take the measurement on the left arm while in a sitting position.
- Remove any items of clothing and your watch, for example, so that your wrist is free.
- Always ensure that the cuff is positioned correctly, as shown in the pictures illustrated on the short instruction card.
- Fit the cuff comfortably but not too tight. The cuff will cover a wrist diameter of 13.5 to 21.5cm (5.25 - 8.5 inches).
- Support your arm in a relaxed position and ensure that the instrument is at the same height as your heart.
- Press the ON/OFF button ① to start the measurement.
- The cuff will now pump up automatically. Relax, do not move and do not tense your arm muscles until the measurement result is displayed. Breathe normally and do not talk.
- When the correct pressure is reached, the pumping stops and the pressure falls gradually. If the required pressure was not reached, the instrument will automatically pump some more air into the cuff.
-
During the measurement, the heart symbol ⑭ flashes in the display and a beep sounds every time a heartbeat is detected.
-
The result, comprising the systolic 7 and the diastolic 8 blood pressure and the pulse 9 is displayed and longer beep is heard. Note also the explanations on further displays in this booklet.
- Remove and switch off the monitor and enter the result in the enclosed blood pressure pass. (The monitor does switch off automatically after approx. 1 min.)
You can stop the measurement at any time by pressing the ON/OFF button (e.g. if you feel uneasy or an unpleasant pressure sensation).
4. Appearance of the Heart Arrhythmia Indicator for early Detection
This symbol 13 indicates that certain pulse irregularities were detected during the measurement. In this case, the result may deviate from your normal blood pressure - repeat the measurement. In most cases, this is no cause for concern. However, if the symbol appears on a regular basis (e.g. several times a week with measurements taken daily) we advise you to tell your doctor. Please show your doctor the following explanation:
Information for the doctor on frequent appearance of the Arrhythmia indicator
This instrument is an oscillometric blood pressure monitor that also analyses pulse frequency during measurement. The instrument is clinically tested.
The arrhythmia symbol is displayed after the measurement, if pulse irregularities occur during measurement. If the symbol appears more frequently (e.g. several times per week on measurements performed daily) we recommend the patient to seek medical advice.
The instrument does not replace a cardiac examination, but serves to detect pulse irregularities at an early stage.
5. Data Memory
At the end of a measurement, this instrument automatically stores each result, including date and time.
Viewing the stored values
Press the M-button ⑤ briefly, when the instrument is switched off. The display first shows «M» ⑫ and then a value, e.g. «M 17». This means that there are 17 values in the memory. The instrument then switches to the last stored result.
Pressing the M-button again displays the previous value. Pressing the M-button repeatedly enables you to move from one stored value to another.
Memory full

When the memory has stored 30 results, the memory is full. From this point onwards, a new measured value is stored by overwriting the oldest value.
Clearing all values
If you are sure that you want to permanently remove all stored values, hold down the M-button (the instrument must have been switched off beforehand) until «CL» appears and then release the button. To permanently clear the memory, press the M-button while «CL» is flashing. Individual values cannot be cleared.
6. Traffic Light Indication in the Display
The bars on the left-hand edge of the traffic light display 1 show you the range within which the indicated blood pressure value lies. Depending on the height of the bar, the readout value is either within the normal (green), borderline (yellow) or danger (red) range. The classification corresponds to the 6 ranges in the Table as defined by the WHO, as described in «Section 1».
7. Battery Indicator and Battery change
Low battery
When the batteries are approximately 34 empty the battery symbol will flash as soon as the instrument is switched on (partly filled battery displayed). Although the instrument will continue to measure reliably, you should obtain replacement batteries.
Flat battery - replacement
When the batteries are flat, the battery symbol 15 will flash as soon as the instrument is switched on (flat battery displayed). You cannot take any further measurements and must replace the batteries.
- Open the battery compartment ③ by pulling off the cap.
- Replace the batteries - ensure correct polarity as shown by the symbols in the compartment.
- To set date and time, follow the procedure described in «Section 2».
The memory retains all values although date and time (and possibly also set alarm times) must be reset - the year number therefore flashes automatically after the batteries are replaced.
Use 2 new, long-life 1.5V, size AAA batteries.
Do not use batteries beyond their date of expiry.
Remove batteries if the instrument is not going to be used for a prolonged period.
Using rechargeable batteries
You can also operate this instrument using rechargeable batteries.
Only use «NiMH» type reusable batteries.
Batteries must be removed and recharged when the flat battery symbol appears. They should not remain inside the instrument as they may become damaged (total discharge as a result of low use of the instrument, even when switched off).
Always remove the rechargeable batteries if you do not intend to use the instrument for a week or more.
Batteries cannot be charged in the blood pressure monitor. Recharge batteries in an external charger and observe the information regarding charging, care and durability.
8. Error Messages
If an error occurs during the measurement, the measurement is interrupted and an error message, e.g. «ERR 3», is displayed.
| Error Description Potential cause and remedy | ||
| “ERR 1” | Signal too weak | The pulse signals on the cuff are too weak. Re-position the cuff and repeat the measurement.* |
| Error Description Potential cause and remedy |
| ERR 2 Error signal Duaing the measurement, error signals were detected by the cuff, caused for instance by movement or muscle tension. Repeat the measurement, keeping your arm still. |
| ERR 3 No pressure in the cuff An adequate pressure cannot be generated in the cuff. A leak may have occurred. Check that the cuff is correctly connected and is not too loose. Replace the batteries if necessary. Repeat the measurement. |
| ERR 5 Abnormal result The measuring signals are inaccurate and no result can therefore be displayed. Read through the checklist for performing reliable measurements and then repeat the measurement.* |
| HI Pulse or cuff pressure too high The pressure in the cuff is too high (over 300 mmHg) OR the pulse is too high (over 200 beats per minute). Relax for 5 minutes and repeat the measurement.* |
| LO Pulse too low The pulse is too low (less than 40 beats per minute). Repeat the measurement.* |
- Please consult your doctor, if this or any other problem occurs repeatedly.
If you think the results are unusual, please read through the information in «Section 1.» carefully.
9. Safety, Care, Accuracy Test and Disposal

Safety and protection
- This instrument may be used only for the purpose described in this booklet. The manufacturer cannot be held liable for damage caused by incorrect application.
- This instrument comprises sensitive components and must be treated with caution. Observe the storage and operating conditions described in the «Technical Specifications» section!
- Protect it from:
water and moisture
extreme temperatures
impact and dropping
contamination and dust
direct sunlight
heat and cold
The cuffs are sensitive and must be handled with care.
- Only pump up the cuff once fitted.
- Do not use the instrument close to strong electromagnetic fields such as mobile telephones or radio installations.
- Do not use the instrument if you think it is damaged or notice anything unusual.
- Never open the instrument.
- If the instrument is not going to be used for a prolonged period the batteries should be removed.
- Read the additional safety instructions in the individual sections of this booklet.

Ensure that children do not use the instrument unsupervised; some parts are small enough to be swallowed.
Instrument care
Clean the instrument only with a soft, dry cloth.
Cleaning the cuff
Carefully remove any marks on the cuff with a damp cloth and mild detergent.
Accuracy test
We recommend this instrument is tested for accuracy every 2 years or after mechanical impact (e.g. being dropped). Please contact Microlife-Service to arrange the test (see foreword).
Disposal

Batteries and electronic instruments must be disposed of in accordance with the locally applicable regulations, not with domestic waste.
10. Guarantee
This instrument is covered by a 5 year guarantee from the date of purchase. The guarantee is valid only on presentation of the guarantee card completed by the dealer (see back) confirming date of purchase or the receipt.
- Batteries, cuff and wearing parts are not included.
- Opening or altering the instrument invalidates the guarantee.
- The guarantee does not cover damage caused by improper handling, discharged batteries, accidents or non-compliance with the operating instructions.
Please contact Microlife-Service (see foreword).
11. Technical Specifications
Operating temperature: 10 - 40 °C / 50 - 104 °F
15 - 95 % relative maximum humidity
Storage temperature: -20 - +55 °C / -4 - +131 °F
15 - 95 % relative maximum humidity
Weight: 130g (including batteries)
Dimensions: 80 × 70 × 70 ~mm
Measuring procedure: oscillometric, corresponding to Korotkoff method: Phase I systolic, Phase V diastolic
Measurement range: 20 - 280 mmHg - blood pressure 40 - 200 beats per minute - pulse
Cuff pressure display
range: 0 - 299 mmHg
Resolution: 1mmHg
Static accuracy: pressure within ± 3mmHg
Pulse accuracy: ± 5% of the readout value
Voltage source: 2 × 1.5 V Batteries; size AAA
Reference to EN 1060-1/-3/-4; IEC 60601-1; standards: IEC 60601-1-2 (EMC)
This device complies with the requirements of the Medical Device Directive 93/42/EEC.
Technical alterations reserved.
Microlife BP W150 IMT
FR
Resolution: 1mmHg
Ybaxaemblnokynatatelb,
Baw HObBI ToHOMeTp Microlife ABJREcTa HaDeXHBIM MedIuHNckIM np6opom DnRA BblIOJIHeHnI N3MepeHnHa 3aJIAcTbe. OH IpocB INCNoIb3OBAHm, TOeH n HAcToTeBHO peKoMeHDoBaH dIy N3MepeHnApTePnaJIbHO rDaBHeHnB D DomauHnx ycNobHX. Pnp6Op 6bl pa3pa6OtaH B COTpyDnHueCTBe C BpaAAM, a KInHNeCKne TcEbl NOITBepDNII BBICOKYU TOHOCb Ero N3MepeHn.*
IoxaJyNCTa, BHIMATEbHO npOHTHe HAcTOrUe yka3AHnI dJI
nonyueHnry ueTKoro npedctabNeHnro 06o Bcex fynKmX IN TexHKe
630NaChocTn. Ham 6bl xoteNoCb, YTO6bl Bbl 6bln yIOBneTBOpEHbl
kayecTBOM n3DeHnra Microlife. PnB O3HNKHOBeHnB BonpOCB,
npoblem nnI dIg 3aka3a 3anachbIX qacte, noxayncta,
obpaauTeCb B cepBncbHnI cHTp Microlife.BaW dInep HnI anTeKa
moryt npedocTabb Bam aDpeC dInepa Microlife B BaWe cTpaHe.
B kaueCTbe aIbTepHaTbbl, nocTeNTe BV INTEPheTe cTpaHnCy
www.microlife.ru, rge Bbl cMOkeTe hAIITn pRd nOJe3bIX cBeDeHnI
no HaewMy n3DeHnIO.
Bynte 3doopBbI - Microlife AG!
* 3mom npubop 6bIn KluHueeCK npomecmupoBaH coaNacho npomokony BpumahckOzo obuecmea zunepmohu (BHS).
OrIaBJIeHne
- Baxhna nHΦopMaun 06 apTepaNbHOM daBneHHn caMoCToRteMbHOe N3MepeHne
Kak onpeidenb apertepnabhoe daBneHne?
2.Испоьзоване пибopaВпервьл pa3
- AkTnBaun6batapei
-
YctahOBka DaTbI N BpeMeHH
-
BbInOpJIHeHne n3MepeHn apTePnaIbHorO daBHeHn npi nOMoU np6opa
4.ПявлесниндакетаразгтмпсердцаHa paHн сади - NamrB dNxpaHeHHaHbIX
PioocMOTp COxpaHeHHbIX BeJIuINH
3anonHeHne naMRTN
- YdaJIeHHe BCex 3NaUeHnI
6.Инд Икада CBETOOPaHaДиСплlee
IcnoJIb3ObaHHe aKkymyIaTopoB
C np6bopom moKHO pa6oTaTb, nIcIIOJIb3yraAkkymJITOpHbe 6aTapeKn.
IPOKanyuCTa,INcONb3yUeTOnbKO Ond TnAkkymyIaTOPhIx 6atapeek «NiMH».
Батарейки Нeo6хоДМО ВьИнТи Nepe3apДТь, ecnnoBnIeTcR CnMBOJ 3IeMeHToB ПNTAHN (pa3prKeHHa6batapeka).Он He DoJIKNbI OCTaBaTbCByHTPN np6oPA, nockOblky MOrTy BvIITN I3 CTPOr (JaXe B BvIKIOUeHHom np6ope batapeeykn npoDOnJkaOT pa3pKaTbcra).
Bcerda BbHIMaTe aKKMyTAp0b,ecn He cobpaetecb noIb3ObaTcB np6opom B TeueHne HeeJIN JIN BoJee!
AkkymyIaTOpI HE MOrY 3apJxATbC B TOHOMeTpe! NOBTOPOHO 3apJIte AKKMyIaTOpI BO BHeUHem 3apJHOM yCTPOIcTBe I O3HaKOMbTeCb C INΦOpMaUeN No 3apJKe, yXoNy I cPOK cyJx6bl!
8. Coo6eHn8 o6wn6kax
EcJIN BO Bpemr n3MpeHnI npOxCoDnT OOn6Ka,To pOpoeDpya n3MepeHnI ppebIAeTcN bYdaeTcN COo6JeHne oB OOn6Ke, HAnpImep (ERR 3).
Octopoxho ydaIte Bce cneblc MaHKeTbI npn NMOUIN BlaXHOI TkaHIMARKOrO MOUJero CpeCTBa.
PpOBePaToUHocTn
Mby peKoMeHdyem npOBepaTb TOnHocTb np6opka KaJbIe 2 roJa
JI60 nOcIe MexAHueckoro BO3JeICTBn (HaNPIMep, naEHH).
IIy npOBeEHnRA TeCTa o6paNTecb B cepBnchbl ueHTp Microlife.
BoIee noPp6HyIO HnΦopMauIO O nobepKe Bbl MoXeTe IOnyUHTB
MeCTHom OTDeJIeHN PoCTeTa.
yTnIu3aun

BaTapeH 3IeKToHHbIe np6Opbl CJeDyEt yTNJIN3NPOBaTB B COOTBETCTBn C pInHrTbIMn HOpMaMn N He Bbl6paCbIBaTB BMeCTe C bItOBbIMN OTXoAMn.
10. rapaHTnA
Ha np6op pacnpocpantpaHreTcraPANTB B TeueHne 5 net C daTbI npno6peTeHH. FapANTN DeiCTBnTEbHa TOIbKO npn HAnuHn rapaHTnHO TALoHa, 3aONHeHHO dInepom (CM. C o6paTHo CTOpHO), NOtBepKdAHOe Odaty npdoaKn, Nn KaccBOrO YeKa.
- TapaHTnHe paCnPoCTpaHReTcHa 6aTapeN, MaHXeTy n3HaUNBaEmbIe YactN.
Bckpbitne nJn n3MeHHe np6opa npBOaT K ytpaTe rapaHTM. - TapaHTnHe paCnpocTpaHReTcHa NoBpeKDeHn, BbI3BaHHbIe HnpaBnIbHbIM o6paSeHnEm, pa3pIINBUnmncs 6aTapeAIM, HeChAcTHbIMCJyAaAMN IIN HeBbINOJIHeHnEM INCTpyKcNIO 3KcNlYatauMn.
IopkaJyncTa, 6paTntEcB CepBnchbI cHTp Microlife (cM. daiJe).
11.Texnueckne xapaKepncnkn
Дианазон pa6oynx Temnepatyp: Temnepatypa xpaHeHn:
OT 10do 40^ ;MaKcImaJIbHaOTHOCHTeJIbHaBnAaXHoCTb15-95%OT-20do +55^ ;MaKcImaJIbHaOTHOCHTeJIbHaBnAaXHoCTb15-95%
Macca: 130 rp. (BkIIOUa8 BaTapeu)
Pa3Mepbl: 80x70x70MM
IpoeDypa OCLIJIOMETPNUeCKa, B COOTBETCTBm C mToDOM KopOTKOb: a3aICNTOJNueCKa, a3aV dnaactoJnuecka
Диана30нзмерен: 20-280 MM pt. ct.-apTeprnaIbHoe dabneHne 40-200 ydapOB B MmHyTu - nyIbc
HnkaaDaBHeHHa
B MaHxete: 0-299 MM pt.ct. MmMaIbHbI Wa IHHaKauu: 1 MM pt.ct.
CtaTnueckar ToHocb: daBneHe B npedeJax ± 3 MM pT. CT.
Toohoctb n3mepenna nyIbca:
IcToHnK nHTaHn: 2x1,5B6aTapeiKn;pa3MeP AAA COoTBeTCTBHe EN1060-1/-3/-4;IEC60601-1; cTaNaptam: IEC60601-1-2(EMC)
JaHHbI npH6Op COOTBETCTByET Tpe6oBaHNrM DnpeKTHBbE3C o MeuHnckOM 6opdyoBaHn93/42/EEC.
Ppabo HbHeCHeTexHnuecknx N3MeHeHm COxpaHReTcra.
Microlife BP W150 IMT
PL
BaTePnIte ca n3ToUeHN - NOmHa
Korato 6atepinte ca n3toeHN, CmB0tBT 6atepna 15 3anoBa da Mira BeDHara cIeBkIOUbaHe Ha anapata (Ha DnCnner ce NOKa3Ba npa3Ha 6atepna). He MoKeTe Da n3BbPWBATE NOBEue N3MepBAHn, Tpr6Ba d a noDMehnte 6atepinte.
- OTbopete OTeJeHHeTo 3a 6aTepeN ③ ue3 n3DbpNaHe Ha KaNauchKaTa.
2.ПоДмeheteбatepnte-yBepetcece,ye cna3eHa NOJIaRhoCTTa,KaKTo e NOKa3aHO Ha CmMBOJInTe B OTdJeHHeNTo.
- 3aДанachtponTeДATAИЧAC,СЛЕДВайТЕпpoцEDypaTа,ОисаHA B《Pa3dEN2.》.
Pametta 3ana3Ba BCnKu DaHHN, BbnpKeN Ye daTata u YacbT (a BepoTHO n 3adaeHIne TBeMeHa 3a aIapMaTa) Tp6BaDa 6bDat HactpoEH NTOHO - 3aTOB aOINHaT a3anoYBa da Mnra aBTOMaTHUHO, CJIe KATO ca CMeHeHb 6aTepuNTe.
MoJnI3noJI3BaIte 2 HOB, dIJIroTpaIIH, 1.5V AAA 6aTePN.
He n3no3BaIte 6aTeepn C n3TEkbl cpoK Ha roJHOCT.
OTCTpaHete 6aTepeHnTE, ako anapaTbT HMa da ce n3noN3Ba 3a NO-dbIbT nepNOd OT Bpeme.
N3noJ3BaHe Ha akymyLatopHn 6aTePm
Moxete da n3no13BaTe anapata n cbc acymyntopn6bATEPM.
MOnIa, n3no3BaTe cAmo TnT«NiMH» peuKInpyem6aTePun!
Batepnte Tpa6ba Da ce OCTpaHbAt n 3apejdaT, aKO ce IIOBn CmBOJbT 6atepy (npa3Ha 6atepy)! He 6BaDa OCTaBAT BbTpE B anapata, TbK KATO MOKe Da CE NOBpeJrT (NbIHO pa3pekdahe B pe3yIITa H aOrpaHueHa yNtpe6bHa anapata, DOpu N Korato e N3KJIouHe).
BnHaHOr OTCpaHraBaIte akymyIaTOpHIne 6aTePmN, aKo He CmTaTe Da n3NoJ3BaTe anapaTa 3a cEdMNca nn NOBeue!
Batepnnte HE morat da ce 3apejdat Bbtpre B anapata 3a KpbBHO hanahe! 3apekdaite Te3n 6atepn BBbHnHO 3apdno yctpoiCTBO n pereJedeTne HFOpmaqraTa OTHOCHO 3apekdahe, rpuKa n DblroTpaihoCT!
8. Cb06eHn3a rpeuKa
Ako no Bpeme Ha n3MepBaHETO Bb3HnKHe rpeuKa, n3MepBaHTo Ce npekcba u Cbo6ueHne 3a rpeuKa, Hapr. E R R 3 ^ 日 , ce norra Ba Ha dincnner.
06xbat Ha HanaheTo Ha
MaHSeTa, N3BExJaHa Ha
Dncnne:0-299mmHg
Pa3dJIeJIteJIHa
cnoc6Hoct:1mmHg
CTaTnUHa TOUHOCT:
HaIrahe B pamKITE Ha ± 3 mmHg
ToHocHa nylca:
±5% OT OTHETA CTOHCT
N3touHnKaHaHapexeHne:
2x1.5V6aTePm;roIeMnHa AAA
IpenpaTka KbM
EN 1060-1/-3/-4; IEC 60601-1;
CTaHdapTn:
IEC 60601-1-2 (EMC)
ToBa n3dene OTROBapHa n3NCKBaHnraHa NpKeTbBaTa 3a MeiHnHcckn n3denn 93/42/EEC.TexHueeckn n3MeHeHHa 3ana3ehn.
Microlife BP W150 IMT
RO
Turoc BF eapoooevo tna