
MUM55761 - Food Processor BOSCH - Free user manual and instructions
Find the device manual for free MUM55761 BOSCH in PDF.
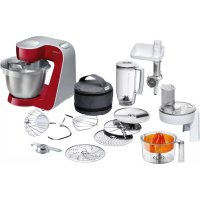



| Brand | Bosch |
| Model | MUM55761 |
| Product type | Multi-function food processor |
| Dimensions (approx.) | 30 x 25 x 30 cm |
| Weight (approx.) | 6 kg |
| Power supply | 220-240 V, 50/60 Hz |
| Power (estimated) | 800-1000 W |
| Main functions | Mixing, kneading, whisking, grating, slicing, blending (with optional accessory) |
| Speeds | 7 speeds + pulse (M) for MUM55/MUM56 |
| Mixing bowl capacity | Up to 750 g of flour + ingredients |
| Blender capacity | 1.25 L (max 0.5 L for hot/frothy liquids) |
| Included accessories | Mixing whisk, balloon whisk, dough hook with deflector, reversible grating/slicing discs, disc holder, stainless steel bowl, lid, pusher, storage bag |
| Bowl material | Stainless steel |
| Cleaning | Bowl and accessories dishwasher safe (except base). Clean the base with a damp cloth |
| Safety | Safety lock (bowl and lids), restart protection after power cut, overload protection, automatic shut-off of the drives |
| Maintenance | No maintenance required; repairs reserved for after-sales service |
| Spare parts | Available from after-sales service |
| Warranty | According to distributor's terms |
| Storage | Accessory bag stored in the bowl; power cord with automatic rewind |
Frequently Asked Questions - MUM55761 BOSCH
User questions about MUM55761 BOSCH
0 question about this device. Answer the ones you know or ask your own.
Ask a new question about this device
Download the instructions for your Food Processor in PDF format for free! Find your manual MUM55761 - BOSCH and take your electronic device back in hand. On this page are published all the documents necessary for the use of your device. MUM55761 by BOSCH.
USER MANUAL MUM55761 BOSCH
Register your new Bosch now: www.bosch-home.com/welcome
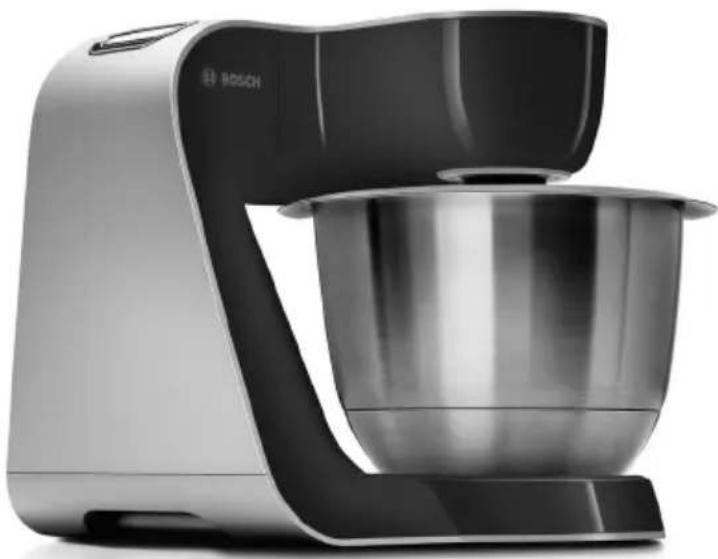
MUM55761

BOSCH
en Operating instructions
Congratulations on the purchase of your new BOSCH appliance. In doing so, you have opted for a modern, high-quality domestic appliance. You can find further information about our products on our web page.
Contents
| For your safety | 3 |
| Overview | 5 |
| Operation | 7 |
| Cleaning and servicing | 10 |
| Storage | 10 |
| Troubleshooting | 10 |
| Application examples | 11 |
| Optional accessories | 13 |
| Disposal | 15 |
| Warranty conditions | 15 |
For your safety
Before use, read these instructions carefully in order to become familiar with important safety and operating instructions for this appliance.
If the instructions for correct use of the appliance are not observed, the manufacturer's liability for any resulting damage will be excluded. This appliance is designed for processing normal household quantities in the home or similar quantities in non-industrial applications. Nonindustrial applications include e.g. use in employee kitchens in shops, offices, agricultural and other commercial businesses, as well as use by guests in boarding houses, small hotels and similar dwellings. Use the appliance for processing normal quantities of food for domestic use. Do not exceed permitted maximum quantities (see "Application examples").
This appliance is suitable for mixing, kneading and beating food. It must not be used for processing other objects or substances. Other applications are possible if the accessories approved by the manufacturer are used.
Use the appliance with original accessories only. When using the accessories, follow the enclosed operating instructions.
Please keep the operating instructions in a safe place. If passing on the appliance to a third party, always include the operating instructions.

General safety instructions
Electric shock risk
The appliance must not be used by children. The appliance and its power cord must be kept away from children.
Appliances can be used by persons with reduced physical, sensory or mental capabilities or lack of experience and knowledge if they have been given supervision or instruction concerning use of the appliance in a safe way and if they understand the hazards involved.
Children shall not play with the appliance. Do not leave the running appliance unattended.
Connect and operate the appliance only in accordance with the specifications on the rating plate. Only use indoors. Do not use the appliance if the power cord and/or appliance are damaged.
Before replacing accessories or additional parts, which move during operation, switch off the appliance and disconnect from the power supply. Always disconnect the appliance from the supply if it is left unattended and before assembling, disassembling or cleaning.
Do not place the power cord over sharp edges or hot surfaces.
To prevent injury, a damaged power cord must be replaced by the manufacturer or his customer service or a similarly qualified person.
Only our customer service may repair the appliance.
Safety instructions for this appliance
Risk of injury
Risk of electric shock!
Do not insert mains plug until all preparations for working with the appliance are complete.
Never immerse the base unit in liquid or hold under running water.
Do not use a steam cleaner.
Do not adjust the swivel arm while the appliance is switched on.
Wait until the drive has come to a standstill.
Do not change tool/accessory until the drive is at a standstill - when the appliance is switched off, the drive continues running briefly.
Use only the rotary switch to switch the appliance on or off.
When the appliance is not in use, pull out the mains plug.
Before eliminating a fault, pull out the mains plug.
Risk of injury from the rotating tools!
Keep hands clear of rotating parts. While the appliance is operating, never place fingers in the mixing bowl. Attach the cover (12) before operating the appliance!
Do not change tools until the drive has come to a standstill – when the appliance is switched off, the drive continues running briefly and stops in the tool change position. Do not move the swivel arm until the tool has come to a standstill. For reasons of safety the appliance cannot be operated unless unused drives are covered with drive guards (5, 8).
Before attaching/removing the continuous-feed shredder, wait until the drive has come to a standstill and pull out the mains plug. Do not reach into the feed tube.
Risk of injury from sharp blades!
Do not grip the sharp blades or edges of the cutting discs. Take hold of cutting discs by the edge only. Do not touch blender blades with bare hands.
Risk of injury from sharp blades/rotating drive!
Never place fingers in the attached blender! Do not remove/attach the blender until the drive is at a standstill! Operate the assembled blender only and with the lid attached.
Risk of scalding!
If processing hot liquids, steam escapes through the funnel in the lid.
Add a max. 0.5 litres of hot or frothing liquid.
Important!
Use the appliance with original accessories only. When using the accessories, follow the enclosed operating instructions.
Use only one tool or accessory at any one time.
Explanation of the symbols on the appliance or accessory

Follow the instructions in the operating instructions.

Caution! Rotating blades.

Caution! Rotating tools.
Do not place fingers in the feed tube.
Safety systems
Start lock-out
See "Operating positions" table.
The appliance can be switched on in pos. 1 and 3 only:
- when the bowl (11) has been inserted and turned until it locks into place and
the blender drive cover has been attached (8).
Restart lock-out
If the power is interrupted, the appliance remains switched on but the motor does not start running again when the power is restored. To switch the appliance on again, turn the rotary switch to 0/off, then switch on.
Overload protection
If the motor switches itself off while the appliance is being used, the overload protection feature has been activated.
A possible cause may be that too much food was processed at one time.
If a safety system is activated, see "Troubleshooting".
The operating instructions describe several models, see also overview of models (Fig. ①).
The appliance requires no maintenance.
Overview
Please fold out the illustrated pages. Fig. A
Base unit
1 Release button
2 Swivel arm
"Easy Armlift" function to support the upward movement of the arm (see "Work positions").
3 Rotary switch
When the appliance has been switched off (position 0/off), the appliance runs automatically to the optimum position for changing the tools.
MUM52..
0/off = Stop
M = Instantaneous switching at maximum speed, hold switch for required blending duration.
Settings 1-4, Operating speed:
1 = low speed - slow,
4 = high speed - fast.
MUM54/.MUM55/.MUM56..
0/off = Stop
M = Instantaneous switching at maximum speed, hold switch for required blending duration.
Settings 1-7, Operating speed:
1 = low speed - slow,
7 = high speed - fast.
4 On/Off display (MUM54/.55/.56.)
Is lit while the appliance is operating (rotary switch on M or 1-7).
Flashes if the appliance has been operated incorrectly, the electronic fuse has tripped or the appliance is defective - see section "Troubleshooting".
5 Drive cover
To remove the drive cover, press on the rear area and remove cover.
6 Drive for
- Continuous-feed shredder and
- Citrus press (optional accessory *).
When not in use, attach the drive cover.
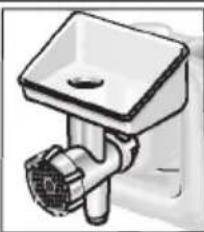
7 Drive for tools (stirrer, whisk, kneading hook) and mincer (optional accessory *)
8 Blender drive cover
9 Drive for blender (optional accessory *)
When not in use, attach the blender drive cover.
10 Cord store
MUM52../MUM54:
Stow the cord in the cord store
MUM55..\MUM56..
Automatic cord winder
Bowl with accessories
11 Stainless steel stirring bowl
12 Lid
Tools
13 Stirrer
14 Whisk
15 Kneading hook with dough deflector
16 Accessories bag
For storage of the tools and cutting discs.
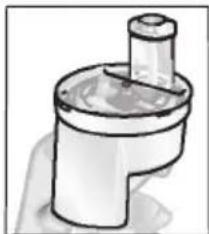
Continuous-feed shredder
17 Pusher
18 Cover with filling shaft
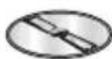
19 Cutting discs
19a Reversible slicing disc - thick/thin
19b Reversible shredding disc - coarse/fine
19c Grating disc - medium-fine
20 Disc holder
21 Housing with outlet opening
Blender *
22 Blender jug
23 Lid
24 Funnel
- If an accessory is not included in the product package, it can be purchased via the trade or customer service.
Operating positions Fig. 3
Attention!
Before operating the appliance, attach the tool/accessory to the correct drive and in the correct position and place in the operating position according to this table.
The swivel arm must be engaged in every operating position.

Note:
The swivel arm features an "Easy Armlift" function which supports the upwards movement of the swivel arm.
Selecting the operating position:
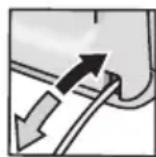
- Press the Release button and move the swivel arm. Support movement with your hand.
- Move the swivel arm until it engages in the required position.
| Position | Drive MU | M52.. | MUM54.. MUM55.. MUM56.. | |
| 1 | 7 | 1-4 | 1-7 | |
| 1-4 | 1-7 | |||
| 1-2 | 1-3 | |||
| 2 | 7 | * | - | - |
| 3 | 6 | 2-4 | 3-7 | |
| 2-3 | 3-5 | |||
| 4 | 9 | 3-4 | 5-7 | |
| 7 | 3-4 | 5-7 |
- Insert/remove whisk, stirrer or kneading hook. Add large quantities of ingredients.
Operation

Risk of injury!
Do not insert mains plug until all preparations for working with the appliance are complete.

Attention!
Do not operate the appliance without an accessory/tool in the operating position. Do not operate the appliance empty. Do not expose appliance or accessories to heat sources. Parts are not microwave-safe.
- Before operating the appliance and accessories for the first time, clean thoroughly; see "Cleaning and servicing".

Important information
In these instructions for use the recommended reference values for the operating speed refer to appliances with a 7-setting rotary switch. For appliances with a 4-setting rotary switch you can find the values in brackets after the values for a 7-setting rotary switch.
These operating instructions contain a sticker with reference values for the operating speed of the appliance when using the tools or accessories.
We recommend attaching this sticker to the appliance (Fig. ①).
Preparation
- Place the base unit on a smooth, clean surface. Pull out the power cord (Fig. D).
MUM52../MUM54..
Cord store:
Pull out cable to the required length.
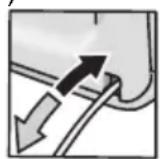
MUM55../MUM56...
Automatic cord winder:
Pull out the cord in one go to the required length (max. 100 cm) and slowly release; the cord is locked.
Reducing the cord length:
Pull gently on the cord and allow it to roll up to the required length. Then gently pull the cord again and slowly release; the cable is locked.
Warning!
Do not twist the cord when inserting it. If the appliance features an automatic cord winder, do not insert the cord manually. If the cord jams, pull out the cord all the way and then allow it to wind up.
- Insert the mains plug.
Bowl and tools

Risk of injury from rotating tools
While the appliance is operating, never place fingers in the mixing bowl. Attach the cover (12) before operating the appliance! Do not change tools until the drive has come to a standstill - when the appliance is switched off, the drive continues running briefly and stops in the tool change position. Do not move the swivel arm until the tool has come to a standstill. For reasons of safety the appliance may only be operated when unused drives have been covered with drive guards (5, 8).

Attention!
Use bowl with this appliance only.
Stirrer (13)
for stirring dough, e.g. cake mixture

Whisk (14)
for whisking egg whites, cream and light dough, e.g. sponge mixture Kneading hook (15)

for kneading heavy dough and mixing in ingredients that ought not be cut (e.g. raisins and chocolate chips)

Working with the bowl and the tools Fig. E
- Press the Release button and move the swivel arm to position 2.
- Insert the bowl:
- Tilt the bowl forwards and then set it down.
- Turn anti-clockwise until it locks into place.
Depending on the processing task, insert the stirrer, whisk, or kneading hook until it locks into position.
Note:
If using the kneading hook, rotate the dough deflector until the kneading hook can lock into position (Fig. 4b).
- Put the ingredients to be processed into the bowl.
- Press the Release button and move the swivel arm to position 1.

- Attach the cover.
- Set the rotary switch to the desired setting.
Our recommendation:
- Stirrer: first stir in at setting 1 (1), then select setting 7 (4) - Whisk: setting 7 (4), mix in at setting 1 (1)
- Kneading hook: first stir in at setting 1 (1), knead at setting 3 (2)
Adding more ingredients
- Switch off the appliance with the rotary switch.
- Add more ingredients through the feed tube in the cover, or
- Remove lid.
- Press the Release button and move the swivel arm to position 2.
- Add ingredients.

After using the appliance
- Switch off the appliance with the rotary switch.
- Remove mains plug.
- Remove lid.
- Press the Release button and move the swivel arm to position 2. Take the tool out of the drive.
- Remove the bowl.
- Clean all parts, see "Cleaning and servicing".

Continuous-feed shredder

Risk of injury
Do not grip the sharp blades or edges of the cutting discs. Take hold of cutting discs by the edge only.
Before attaching/removing the continuous-feed shredder, wait until the drive has come to a standstill and pull out the mains plug.
Do not reach into the feed tube.
Warning!
The continuous-feed shredder must be completely assembled before use. Never assemble the continuous-feed shredder on the base unit.
Operate the continuous-feed shredder in the indicated operating position only.
Predetermined breaking point Fig. 1
The built-in predetermined breaking point protects the drive of the appliance. If an overload occurs, the drive shaft of the continuous-feed shredder breaks. However, the drive shaft can easily be replaced.
A new disc holder with drive shaft is available from customer service.
Reversible slicing disc - thick/thin for slicing fruit and vegetables.

Process at setting 5 (3).
Designation on the reversible slicing disc:
"1" for the thick slicing side
"3" for the thin slicing side
Warning!
The reversible slicing disc is not suitable for slicing hard cheese, bread, rolls or chocolate.
Slice boiled, waxy potatoes only when they are cold.
Reversible shredding disc - coarse/fine

for shredding vegetables, fruit and cheese, except for hard cheese (e.g. Parmesan).
Processing at setting 3 (2) or 4 (3).
Designation on the reversible shredding disc:
"2" for the coarse shredding side
"4" for the fine shredding side
Warning!
The reversible shredding disc is not suitable for shredding nuts. Shred soft cheese with the coarse side only at setting 7 (4).

Grating disc - medium-fine
for grating raw potatoes, hard cheese (e.g. Parmesan), cooled chocolate and nuts. Process at setting 7 (4).
Warning!
The grating disc is not suitable for grating soft cheese and cheese slices.
Working with the continuous-feed shredder Fig. 6
- Press the Release button and move the swivel arm to position 2.

- Insert the bowl:
- Tilt the bowl forwards and then set it down.
- Turn anti-clockwise until it locks into place.
- Press the Release button and move the swivel arm to position 3.

- Remove drive cover from the drive of the continuous-feed shredder (Fig. 6-5a).
- Hold disc holder at the lower end, ensuring that the two tips are face up.
- Carefully place the required slicing or shredding disc onto the tips of the disc holder (Fig. 6-6a). In the case of reversible discs, ensure that the required side is face up.
- Grip disc holder at the upper end and insert into the housing (Fig. 6-6b).
- Attach the cover (note mark) and turn all the way in a clockwise direction.
- Place continuous-feed shredder on the drive and rotate all the way in a clockwise direction, as illustrated in Fig. 6-8.
- Turn rotary switch to recommended setting.
- Put food to be processed in the feed tube and push down with the pusher.
Warning!
Prevent the cut ingredients from building up in the outlet opening.
Tip: To ensure even cutting results, process thin ingredients in bunches.
Note: If the food to be processed sticks in the continuous-feed shredder, switch food processor off, pull out mains plug, wait until the drive comes to a standstill, remove cover from the continuous-feed shredder and empty feed tube.
After using the appliance
- Switch off the appliance with the rotary switch.
- Rotate the continuous-feed shredder in an anti-clockwise direction and remove.
- Rotate the lid in an anti-clockwise direction and remove.
- Remove disc holder with disc. To do this, press finger from below against the drive shaft (Fig. H).
- Clean parts.
Blender

Risk of injury from sharp blades/ rotating drive!
Never place fingers in the attached blender! Do not remove/attach the blender until the drive is at a standstill! Operate the assembled blender only and with the lid attached.

Risk of scalding!
If processing hot liquids, steam escapes through the funnel in the lid. Add a max. 0,5 litres of hot or frothing liquid.
Warning!
Blender may be damaged. Do not process deep-frozen ingredients (except ice cubes). Do not operate blender when empty.
Working with the blender (Fig.)
- Press the release button and move the swivel arm to position 4.
- Remove the blender drive cover.
- Attach blender jug (mark on the handle on mark on the base unit) and turn all the way in an anti-clockwise direction.
- Add ingredients. Maximum amount of liquid = 1.25 litres; maximum amount of frothing or hot liquids = 0.5 litres; Optimal processing capacity - solids = 50 - 100 g
- Attach the cover and turn anti-clockwise all the way into the blender handle. The cover must be locked in position.
- Set the rotary switch to the desired setting.
Adding more ingredients (Fig. 1-8)
- Switch off the appliance with the rotary switch.
- Remove the lid and add ingredients
or
- remove the funnel and gradually add solid ingredients through the refill opening or
- pour liquid ingredients through the funnel.
After using the appliance
- Switch off the appliance with the rotary switch.
- Rotate the blender in a clockwise direction and remove.
Tip: It is recommended to clean the blender immediately after use.
Cleaning and servicing

Attention!
Do not use abrasive cleaning agents.
Surfaces may be damaged.
Cleaning the base unit

Risk of electric shock!
Never immerse the base unit in water or place under running water. Do not use a steam cleaner.
- Remove mains plug.
- Wipe the base unit and drive cover with a damp cloth. If required, use a little detergent.
- Then dry the base unit.
Cleaning the bowl and tools
The bowl and tools are dishwasher-proof.
Do not wedge plastic parts in the dishwasher, as they could be permanently deformed during the washing process!
Cleaning the continuous-feed shredder
All parts of the continuous-feed shredder are dishwasher-proof.
Tip: To remove the red film after processing e.g. carrots, pour a little cooking oil on a cloth and rub the film off the continuous-feed shredder (not the cutting discs). Then rinse the continuous-feed shredder.
Cleaning the blender

Risk of injury from sharp blades!
Do not touch blender blades with bare hands.
The blender jug, lid and funnel are dishwasher-proof.
Tip: After processing liquids, it is often sufficient to clean the blender without removing it from the appliance. Pour a little water and washing-up liquid into the attached blender. Switch on the blender for several seconds (setting M). Pour out the water and rinse out the blender with clear water.

Important information
If required, clean accessories bag.
Follow care instructions in the bag.
Storage

Risk of injury!
When the appliance is not in use, pull out the mains plug.
Fig. K
- Store tools and cutting discs in the accessories bag.
- Keep the accessories bag in the bowl. To store in the original packaging, see Fig.
Troubleshooting

Risk of injury!
Before eliminating a fault, pull out the mains plug.

Important information for MUM54.~/ MUM55./MUM56..
The Operating indicator flashes if the appliance has been operated incorrectly or the electronic fuse has tripped or the appliance is defective.
The swivel arm must be engaged in every operating position.
Initially try to eliminate the problem which has occurred with the help of the following information.
Fault
Appliance does not start.
Remedial action
- Check the power supply.
- Check the mains plug.
- Check swivel arm. Correct position? Engaged?
- Screw on blender or bowl as far as possible.
- Attach the blender cover and screw on as far as possible.
- Attach drive cover to unused drives.
- The safety lock is active. Switch appliance to 0/off and then back to the required setting.
Fault
Appliance switches off during use.
The overload protection feature has been activated. Too much food was processed at one time.
Remedial action
- Switch off the appliance.
- Reduce processing quantity. Do not exceed permitted maximum quantities (see "Application examples").
Fault
While the drive was running, the release button was inadvertently pressed.
The swivel arm moves up. The drive switches off, but does not stop in the tool change position.
Remedial action
- Set the rotary switch to 0/off.
- Move swivel arm to position 1.
- Switch on appliance (setting 1).
- Switch off appliance again.
Tool stops in tool change position.

Fault
Blender does not start working or stops during use, the drive is "humming". Blade is blocked.
Remedial action
- Switch off the appliance and pull out the mains plug.
- Detach the blender and remove the obstruction.
- Re-attach the blender.
- Switch on the appliance.

Important information
If the fault cannot be eliminated, please contact customer service.
Application examples
Whipped cream
100g-600g

Whip cream with the whisk for 1 1/2 to 4 minutes at setting 7 (4) depending on the quantity and properties of the cream.
Egg white
1 to 8 egg whites - Beat egg white with the whisk for 4 to 6 minutes at setting 7 (4).
Sponge mixture
Basic recipe
2 eggs
2-3 tbs. hot water
100 g sugar
1 packet of vanilla sugar
70 g flour
70 g cornflour
Baking powder if required
- Beat the ingredients (except flour and cornflour) with the whisk for approx. 4-6 minutes at setting 7 (4) until frothy.
- Rotate switch to setting 1 (1) and spoon in the sifted flour and cornflour within approx. 1/2 to 1 minute.
Maximum quantity: 2 x basic recipe
Cake mixture
Basic recipe
3-4 eggs
200-250 g sugar
1 pinch of salt, 1 packet of vanilla sugar or peel from 1/2 lemon, 200-250 g butter or margarine (room temperature), 500 g flour, 1 packet of baking powder, 125 ml of milk - Mix all ingredients with the stirrer for approx. 1/2 minute at setting 1 (4), then for approx. 3-4 minutes at setting 7 (4).
Maximum quantity: 1.5 x basic recipe
Short pastry
Basic recipe
125 g butter (room temperature)
100-125 g sugar
1 egg
1 pinch of salt
A little lemon peel or vanilla sugar
250 g flour


Baking powder if required
- Using the stirrer, process all ingredients for approx. 1/2 minute at setting 1 (1), then for approx. 2-3 minutes at setting 6 (3).
From 500 g flour:
- Knead the ingredients with the kneading hook for approx. 1/2 minute at setting 1 (1), then for approx. 3-4 minutes at setting 3 (2).
Maximum quantity: 2 x basic recipe
Yeast dough
Basic recipe
500 g flour
1 egg
80 g fat (room temperature)
80 g sugar
200-250 ml lukewarm milk
25 g fresh yeast or 1 packet of dried yeast
Peel of 1/2 lemon
1 pinch of salt
- Process all ingredients for approx. 1/2 minute at setting 1, then for approx. 3-6 minutes at setting 3 (2) using the kneading hook.
Maximum quantity: 1.5 x basic recipe
Pasta dough
Basic recipe
300 g flour
3 eggs
1-2 tbs. (10-20 g) cold water as required
- Process all ingredients for approx. 3-5 minutes at setting 3 (2) until a dough forms.
Maximum quantity: 1.5 x basic recipe
Bread dough
Basic recipe
750 g flour
2 packets of dry yeast
2 tsp. salt
450-500 ml warm water
Process all ingredients for approx. 1/2 minute at setting 1, then for approx. 4-5 minutes at setting 3 (2) using the kneading hook.


Mayonnaise
2 eggs
2 tsp. mustard
1/4 oil
2 tbs. lemon juice or vinegar
1 pinch of salt
1 pinch of sugar
Ingredients must be at the same temperature.
- Process the ingredients (except the oil) in the blender for several seconds at setting 3 (2) or 4 (3).
- Switch the blender to setting 7 (4) and slowly pour the oil through the funnel and mix until the mayonnaise emulsifies.
Eat the mayonnaise immediately, do not store.
Honey bread spread

30 g butter (from refrigerator, 7°C)
190 g honey (from refrigerator, 7°C)
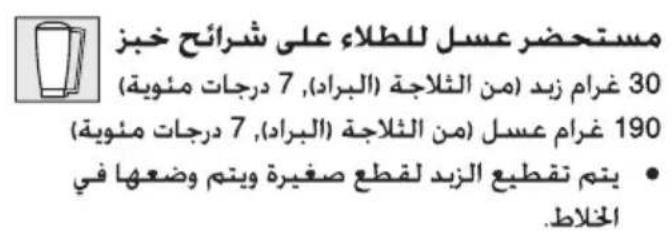
Cut butter into small pieces and put into the blender. Add honey and blend for 15 seconds at setting 7 (4).
Optional accessories
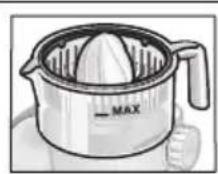
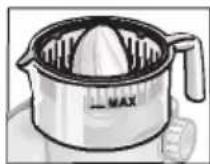
| MUZ5ZP1 Citrus press | For squeezing oranges, lemons and grapefruits. |
| MUZ5CC1 Dicer | For cutting fruit and vegetables into equally sized cubes |
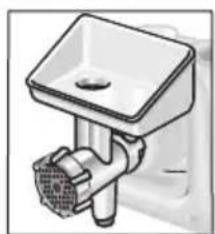
| MUZ5FW1 Mincer | For cutting fresh meat for steak tartare or meat loaf. |
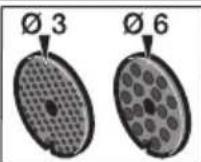
| MUZ45LS1 Perforated disc set fine (3 mm), coarse (6 mm) | For the mincer MUZ5FW1. Fine disc for pasties and spreads, coarse disc for sausages and bacon. |
| MUZ45SV1 Viennese whirl attachment | For the mincer MUZ5FW1. With metal template for 4 different pastry moulds. |
| MUZ45RV1 Grater attachment | For the mincer MUZ5FW1. For grating nuts, almonds, chocolate and dried bread rolls. |
| MUZ45FV1 Juicer attachment | For the mincer MUZ5FW1. For pressing soft fruit, except raspberries, tomatoes and rose hips, to a pulp. At the same time e.g. currants are automatically stemmed and pitted. |
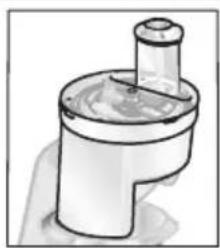
| MUZ45PS1 Chipper disc | For the continuous-feed shredder MUZ5DS1. For slicing raw potatoes for chips. |
| MUZ45AG1 Asian vegetable disc | For the continuous-feed shredder MUZ5DS1. Slices fruit and vegetables into fine strips for Asian vegetable dishes. |
en
| MUZ45RS1 Grating disc coarse | For the continuous-feed shredder MUZ5DS1. For grating raw potatoes, e.g. for potato pancakes or dumplings. |
| MUZ45KP1 Potato fritter disc | For the continuous-feed shredder MUZ5DS1. For grating raw potatoes for rostis and potato fritters, for cutting fruit and vegetables into thick slices. |
| MUZ5ER2 Stainless steel stirring bowl | Up to 750 g of flour plus ingredients can be processed in the bowl. |
| MUZ5KR1 Plastic mixing bowl | Up to 750 g of flour plus ingredients can be processed in the bowl. |
| MUZ5MX1 Plastic blender attachment | For blending drinks, for pureeing fruit and vegetables, for preparing mayonnaise, for cutting fruit, nuts, for crushing ice cubes. |
| MUZ5MM1 Multi-mixer | For chopping herbs, vegetables, apples and meat, for shredding carrots, radishes and cheese, for grating nuts and cooled chocolate. |
If an accessory is not included in the product package, it can be purchased via the trade or from customer service.
Disposal
This appliance is identified according to the European guideline 2012/19/EU on waste electrical and electronic equipment - WEEE.
The guideline specifies the framework for an EU-wide valid return and re-use of old appliances.
Please ask your dealer or inquire at your local authority about current means of disposal.
Warranty conditions
The guarantee conditions for this appliance are as defined by our representative in the country in which it is sold.
Details regarding these conditions can be obtained from the dealer from whom the appliance was purchased.
The bill of sale or receipt must be produced when making any claim under the terms of this guarantee.
Caution! Rotating blades.
Caution! Rotating accessories.
Overload safety
Beveling against overloading fig. F
"2" for the coarse rasp side
"4" for the fine rasp side
NOTE!
- Place the container:
Working instructions Figures
!warning
Operate the machine only when the tool/accessory has been fitted in the drive and in the same position and when it is in the working position.
The inserted tool must be securely clamped in the working position.

Instruction
(Set selector M to 1-7).
citrus and grapefruit.
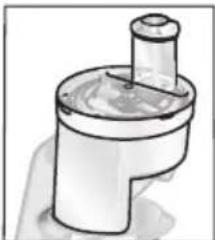
MUZ5CC1
Attachment for
dicing
(3 mm), coarse (6 mm)
Intended for food products. Do not use for processing other items or objects. Under conditions of use, the manufacturer permits the use of other applications.
Use only in the case when the device and its power cord have no visible damage.
Before replacing the device or additional parts that wear out during operation, the device must be switched off and disconnected from the power supply. Do not leave the device unattended, and before assembling, disassembling, or cleaning it, always disconnect it from the power supply.
Do not pull the power cord over sharp edges or hot surfaces. If the power cord is damaged, it must be replaced by the manufacturer, its service center, or a similarly qualified person to avoid risks. Repair the device only at a service center.

Safety instructions for your device
Unsafe operation
Danger of electric shock!
Plug the power cord into the socket only after all preparations for working with the device are completed.
Never immerse the main unit of the device in liquid and do not hold it under running water.
Do not use a steam cleaner.
Do not turn the switch while the device is switched on.
After the drive has completely stopped.
Attachments/nozzles may only be inserted or removed after the drive has stopped - the attachment may continue to move for a short time after switching off.
Do not touch rotating parts. Never reach into the machine while it is running. Only work with the handle (12) installed!
Attachments may only be inserted or removed after the drive has stopped - the attachment may continue to move for a short time after switching off and must be in the correct position for changing attachments. Only move after the attachment has completely stopped.
For safety reasons, the device may only be operated with the drive, which is not in use, covered with the protective caps for the drive (5, 8).
The multifunctional attachment may only be inserted/removed after the drive has stopped and after the plug has been pulled from the socket.
Do not reach into the hopper.
Danger of injury from sharp blades!
Do not touch the sharp edges of the discs for cutting.
Never reach into the installed blender! The blender may only be removed/installed after the drive has stopped!
Do not reach into the feed opening.
Safety systems
Lock against switching on
*Parts not included in the delivery scope can be ordered from sales and service.
Work position illustration E

Warning!
Only use the device when the attachments are installed according to the correct procedure and in the correct position in accordance with this table and are in working position. The cable must be fully unwound and locked in place in each working position.

Instructions
Pull the cable out with one hand to the desired length
(max. 100 cm) and release it completely; the cable will remain in place.
Speed adjustment: Pull the cable slightly, then wind it to the desired length.
Then slightly pull the cable again and release it completely; the cable will remain in place.
Warning!
Do not kink the cable while winding it.
Do not pull the cable out of the device with automatic winding. If the cable locks, pull it out completely, then wind it again.
Insert the mains plug into the socket.
Device and accessories

Safety instructions for working with attachments
During operation, never insert your hand into the device. Work only with the cover (12) installed!
Attach the attachment only after the drive has stopped - the attachment may continue to move for some time after switching off and will stop in the position for changing attachments. Move only after the attachment has completely stopped.
The device may only be used under the conditions of safety, according to which, if not used, it must be closed with protective caps (5, 8).
! Warning!
The device may only be used for work with this device.
Blender attachment (13)
For mixing dough, e.g., yeast dough.

Whisk attachment (14)
For whipping cream, egg whites, and light doughs, e.g., sponge cake dough.

Dough hook (15)
For kneading dough and mixing ingredients that do not need to be whipped (e.g., for shortcrust pastry).

Working with the device and attachments
Press the release button and turn the rotary switch to position 2. - Setting up the device:
- Set the device upright and place it level.
- Turn the rotary switch to the lock position.
Depending on the processing purpose, insert the blender attachment, whisk attachment, or dough hook into the device until it locks.
Note:
Turn the lid counterclockwise to remove it so that the lid can be removed from the base (Figure E-4).
Load the products for processing into the bowl. Press the unlock button and move the switch to position 1. Install the lid. Install the rotary switch to the desired speed.
Recommendations:
- Chopping: first pulse at speed 1 (1), then switch to speed 7 (4) - Blending: speed 7 (4), then pulse at speed 1 (1) - For filling: first pulse at speed 1 (1), then pulse at speed 3 (2)
Adding ingredients
Turn off the appliance using the rotary switch. - Add ingredients through the opening in the lid, or remove the lid. Press the unlock button and move the switch to position 2. Add ingredients.
Work bowl
Turn off the appliance using the rotary switch. Unplug the power cord from the outlet. Remove the lid. Press the unlock button and move the switch to position 2. Remove the blade from the drive. Remove the bowl. - Wash all parts. "Clean and dry".

Multi-function attachment

Safety instructions
Do not touch the sharp blades or edges of the discs when handling them. Discs for shredding can only be held by the edge. The multi-function attachment can only be inserted/removed after the motor has stopped and the plug has been pulled from the outlet. Do not insert hands into the feed tube.
Warning!
Use the multi-function attachment only in the fully assembled state. Never store the multi-function attachment on the main unit.
Use the multi-function attachment only in the specified working position.
Accessory for loading the bowl
Any transverse load on the bowl during loading of the multifunctional nozzle is applied to the drive shaft of the multifunctional nozzle, on which a notch (place of a given bend) is made. In the loading position, the drive shaft bends in this place. The shaft for discs with a drive shaft can be purchased at a service center.
Double-sided disc for cutting - thick/thin slices

Cutting fruits and vegetables. Processing at level \ll 5\gg (3>
Purpose of the double-sided disc for cutting:
<1> - side for cutting thick slices <3> - side for cutting thin slices
Warning
The double-sided disc for cutting is not intended for cutting hard cheese, bread, butter, and chocolate. Boiled, hard potatoes should be cut only cold.
Double-sided shredder - coarse/fine

For shredding vegetables, fruits, and cheese, except hard cheese (e.g., "Parmesan"). Processing at level "3" ("2") or "4" ("3").
Purpose of the double-sided shredder: "2" - side for coarse shredding "4" - side for fine shredding
Warning
The double-sided shredder is not intended for shredding nuts. Soft nuts can be shredded on the side for coarse shredding at level "7" ("4").
Disc grater - medium

For grating potatoes, hard cheese (e.g., "Parmesan"), chilled chocolate, and nuts. Processing at level "7" ("4").
The disc is not suitable for cutting soft and notched materials.
Working with the multifunctional nozzle


Press the unlock button and turn the rotary switch to position 2. - Installation of the disc: - Install the disc with the inclined edge and place it evenly, - Turn it against the clockwise direction until it locks. Press the unlock button and turn the rotary switch to position 3. Remove the protective cover from the multifunctional nozzle (Fig. 5a). Hold the discs by their lower edges, with the protrusion pointing upward. - For cutting or chopping, place the desired disc carefully on the shaft teeth for discs (Fig. 6a). When using double-sided discs, make sure the desired side points upward. Take the discs by their lower edges and insert them into the housing (Fig. 6b). Install the cover (pay attention to the mark) and turn it clockwise until it stops.
- Install the multifunctional nozzle on the device as shown in Fig. 8, and turn it clockwise until it stops. Set the recommended speed level. Load the products to be processed into the receiving hopper and press with the pusher.
Avoid accumulation of processed products in the outlet opening.
Tip: For even results, process the products in small batches.
Note: If the processed products clog the multifunctional nozzle, turn off the device, unplug it from the outlet, wait for the device to stop, remove the cover from the multifunctional nozzle, and empty the receiving hopper.
After work
Turn off the device using the rotary switch. - Turn the multifunctional nozzle counterclockwise and remove it. - Turn the cover counterclockwise and remove it. Remove the discs together with the disc holder. To do this, press the release button from below (Fig. H). - Clean the parts.
Blender

Danger of injury from sharp blades/rotating knives!
Never insert your hand into the installed blender! The blender can only be removed/installed after the device has stopped! The blender can only be used in the assembled state and with the cover installed.

Danger of burns!
When processing hot products, the blender jug with the lid acts as a steam outlet. Fill with a maximum of 0.5 liters of hot liquid or puree.
Attention!
The blender may be damaged. Do not process frozen products (except ice cubes). Do not operate the blender empty.
Working with the blender - low speed
Press the unlock button and set the rotary switch to the position for removing the drive cover of the blender. Install the blender jug (the mark on the handle opposite the mark on the main unit) and turn it counterclockwise until it stops. Load the ingredients. Maximum quantity, liquid = 1.25 liters; maximum quantity of puree or hot liquid = 0.5 liters; optimal quantity for processing solid products = 50-100 grams. Install the lid and turn it counterclockwise until it stops in the handle of the blender. The lid must be fixed in the groove. Set the rotary switch to the desired speed.
Adding ingredients while working
J-8
Turn off the appliance using the rotary switch. Remove the lid and fill with ingredients, or pour out the liquid and add solid ingredients gradually through the filler opening, or add ingredients through the opening. After work, turn off the appliance using the rotary switch. - Turn the lid counterclockwise and remove it.
Tip: The blender works best if you let it run a little after use.
Cleaning and care

Attention!
Do not use abrasive cleaning agents. Scratches may occur on the surfaces.
Cleaning the main unit

Danger of electric shock!
Never immerse the main unit in water and do not hold it under running water. Do not use a steam cleaner.
Disconnect the device from the power outlet. Check the main unit and the protection of the drive circuit of the water pump. If necessary, you can use a small amount of cleaning agent. After checking, rinse with clean water.
Cleaning the attachments
The attachments and the attachment holder can be washed in the dishwasher.
Do not wash plastic elements in the dishwasher, as this can lead to their permanent deformation under the influence of high temperatures!
Cleaning the multifunctional attachment: All parts of the multifunctional attachment can be washed in the dishwasher.
Tip: After processing products of the first filling, e.g., carrots, pour a little cooking oil into a container and run the multifunctional attachment (except for discs for grating). After that, rinse the multifunctional attachment.
Cleaning the blender

Danger of injury from sharp blades!
Do not touch the blender blades with bare hands.
The blender jug, lid, and pusher can be washed in the dishwasher. Tip: For cleaning the blender after processing fish or other strongly smelling products, it is not necessary to disassemble it. Pour a little water with a cleaning agent into the installed blender. Turn on the blender for a few seconds (pulse mode). Pour out the soapy water and rinse the blender with clean water.

Descaling
Descale the device as needed. We recommend using a descaling agent for coffee machines.
Storage

Safety during operation!
When not in use, disconnect the device from the power outlet.
- Keep the device away from moisture and do not use it for purposes other than intended. Store the device in a dry place. This storage condition is important for the device's operation.
Troubleshooting

Danger of injury!
Pull the mains plug out of the socket before troubleshooting.

Important instructions for MUM54../MUM55./MUM56..
In case of malfunction of the device, when the electronic lock is triggered or defects of the device, the indicator table appears.
The rotary switch must be locked in the groove in every working position.
First try to solve the problem with the help of the following instructions.
Malfunction
The device does not switch on.
Remedy
- Check the power cord.
- Check the mains plug.
- Check the rotary switch. Is it in the correct position? Is it locked in the groove?
- Turn the knob clockwise to the stop. Set the knob and tighten it to the stop.
Close the unused connections with the protective caps. The protection is activated again. Switch the lever to «0 / off», and then back to the desired level.
The device switches off during operation. The protection against overload is activated. Too many products are being processed at the same time.
Troubleshooting
Switch off the device. Reduce the number of products being processed. Do not exceed the maximum permitted quantity of products (see «Intended Use»).
During operation of the device, the release button was accidentally pressed.
The rotary switch is turned to the top. The device switches on, but it does not stay in the position for changing attachments.
Troubleshooting
Set the rotary switch to «0 / off» - the rotary switch is in position 1. Switch off the device (level «1»). - Switch the device on again. The attachment stays in the position for changing attachments.

Intended Use
Vertical whisk
100g-600g

Beat the eggs with a mixer for 1.5-4 minutes at speed "7" (4) (depending on the quantity and fat content of the yolks).
No mistakes
From 1 to 6 eggs

- Beat the yolks with a mixer for 4-6 minutes at speed "7" (4).
Whisk the dough
Main ingredients

2 pcs.
2-3 tbsp. hot water
100 g sugar
1 packet of vanilla sugar, 70 g flour, 70 g starch
You can knead the dough
- Ingredients (except flour and starch) approx. 4-6 minutes beat with a mixer at speed "7" (4).
- Rotary whisk. Set speed "1" (1), add gradually the sifted flour and starch over approx. 0.5-1 minute.
Maximum quantity: 2X main ingredients
Knead the dough
Main recipe
3-4 servings
200-250 g flour
1 pinch of salt
1 pinch of baking soda or 1/2 lemon juice
200-250 g butter or margarine (at room temperature)
500 g flour
1 packet of baking powder
125 ml milk
Mix all ingredients with a mixer for about 1/2 minute on setting 1 (1), then for 3-4 minutes on setting 7 (4).
Maximum quantity: 1.5 x main recipe

Yeast dough
Main recipe
125 g butter
(at room temperature)
Mix the cream cheese or cottage cheese (250 g) thoroughly.
You can use a blender.
Process all ingredients with a blender for about 1/2 minute on speed 1 (1), then for 2-3 minutes on speed 6 (3).
Ingredients should be at the same temperature.

- Process the ingredients (except oil) for a few seconds in a blender on speed 3 (2) or 4 (3).
- Tilt the blender to speed 7 (4) and pour the oil slowly through the opening - continue until the mixture is almost smooth.
Use the mayonnaise immediately, do not store it.
Butter mass method

30 g butter
(from refrigerator at 7°C)
190 g honey (from refrigerator at 7°C)
Cut the butter into small pieces and place in the blender. Add honey and blend for 15 seconds on speed 7 (4).
PpeCdIa UHTpycoBHX
IyBnAubHbAHnCOKy 3 aneJbcNHiB, NMOHIB i rpeinphiTyib.
HacaKa dHa Hapi3aHHky6nKaMn
IЯ Hapi3aHHa pkyKtIB Ta OBOyIB Ky6nKaMpiBHomipHOI BENuHH
M'acopy6ka
TapaHTnHbIe ycNoBn 226
He Tporatb octpble HOJN IN BbICTybl DnCKOB-N3MeJIbHTeJe.
CnCTeMbI 6e3oNaChOCTN
Блорва Вкюець.
Cm. Ta6nuy «Pa6oyne noJoxKeHnra»
Pn6op BkIIOUaETcB nOJ.1n3Tolbko
BTOM Cnyuae:
He BKNIOUaTb NyCTOIN PnHOBp.
Pn6Op n npHaJneKHOCTn He NOBepraTb BO3JeHCTBnIO NCTOCHNKOB TeNna. JEtAJIH He IpeHa3NaYeHbI DnA NCNoB3OBAHn B M N K P O B O J H O B O N Neu n.
OTCEKДЯхpaHEnHa Ka6eHa: BbITaHyTb Ka6eNb Ha KeJaemyO dInHy.
MUM55../MUM56..
ABTomatnueckoe CMaTbIBaHHe Ka6eJ: BbITHyTb Ka6eJb 3a OINH pa3 Ha JeknaEMyO DInHy (MaKc. 100 cm) n MeDJIeHNO OTNcyTNT Ka6eJb 3aΦNKcnpyETcR.

YMeHbWeHne pa6oey dHHbI Ka6eJ: CnerKa NotaHyTb 3a Ka6eJb N DaTb emy cmOtaTbcr DO JeenaEMoN DnHbI. 3aTeM CHOBa CnErKa NotaHyTb 3a Ka6eJb N MeDJIeHHO OTNyCTHTb; Ka6eJb 3aФHKcpyETca.
BHIMAHHe!
He nepekpyuBaTb Ka6enb npn erO 3aPpaBKe.
B npnbopax c aBTOMaTHueckHM CMaTbIBaHnEM Ka6eHa Ka6eHb HEnb3aIpaBnTb BpyHyO. Ecnn Ka6eHb 3aKnHnNo, CJeDyET BbITAHyTb ero NOnHOCTbIO n 3aTeM DaTb emy CMOTaTbCra.
BCTaBntbIteNceIbHyIO BnKy Bpo3eKy.
CmeCNTelbHa YaSha n HacaIKN

ONaCHOCb TpaBMnpoBaHn O BpaUoUneCHaCaJKN
Bo Bpem3KcNpyatauHnHKoRda He Onyckatb pyKn B CmecnteNbHyU qaUy. Paobotab TOnbKO C yCTaHOBNeHHOi KpbIshKOi (12)!
HacaKy MoXHO 3aMeHbT TOnbKO NocNe OCTaHOBKn PnVBOD -PnVBOD DnHexETc eUe HeKOTOpOE BpEMr NocNe BbIKIO- Yehn I OCTaHaBnBaETC B NIOJKeHN dJIa CmHebl HacadOK. N3MeHbT NIOJKeHne NOBOPoTHOrO KPOHtTeHNa MOXHO TOnbKO NocNe OCTaHOBKn HacaKn.
For safety reasons, the appliance can only be used when the unused drives are covered with protective covers (5,8).

Attention!
Use the mixing bowl only for working with this appliance.
which must not be changed
-Install the bowl tilted forward and then lower it,
- turn it counterclockwise until it locks.
Depending on the type of products to be processed, insert into the drive for locking the whisk for mixing, the whisk for whipping, or the kneading attachment.


Note:
When installing the kneading attachment, turn the switch so that the kneading attachment can lock into place (figure E-4b).
Load the ingredients intended for processing into the mixing bowl. Press the unlocking button and turn the switch to position 1. - Install the cover. - Set the rotary switch to the desired speed.
Recommendations:

-Whisk for mixing:
first mix at speed «1» («1»), then switch to speed «7» («4»)
-Whisk for whipping:
2-side for coarse whipping, 4-side for fine whipping
Attention!
Double-sided disc grater is not suitable for grating nuts. The marks can only be used on the side for large grating on the setting «7» («4»)
Disc grater - medium

For grating hard cheese (e.g., Parmesan), cold chocolate, nuts.
Processing on setting «7» (4)
Attention!
Disc grater is not suitable for grating soft and sliced cheese.
Working with the universal cutter
Press the release button and turn the swivel arms to position 2. - Installing the mixing bowl: - Tilt it forward, insert, and then lower it, - Turn it counterclockwise until it locks. Press the release button and turn the swivel arms to position 3. - Remove the protective cover from the universal cutter drive (figure G-5a). - Hold the disc holder by its lower end, with both protrusions pointing upward. - Carefully place the desired disc (grater or slicer) onto the protrusions of the disc holder (figure 6a). When using double-sided discs, make sure the desired side faces up. Take the disc holder by the upper end and insert it into the housing (figure G-6b). - Install the cover (note the marking) and turn it clockwise until it stops. - Install the universal cutter on the drive as shown in figure G-8, and turn it clockwise until it stops.


- Set the rotary switch to the recommended setting. Load the products for processing into the feed tube and push them down with the pusher.
Attention!
Avoid accumulation of cut products in the outlet opening.
Recommendation: For even results, process thin products for cutting in batches.
Note: In case of jamming of the products being processed in the universal cutter, switch it off with the on/off button, unplug the appliance, wait for the drive to stop, remove the cover from the universal cutter, and empty the feed tube.
After work
Turn off the device using the rotary switch. - Turn the universal cutting blade counterclockwise to remove it. - Turn the lid counterclockwise to remove it. - Remove the pusher for discs together with the disc. To do this, press on the drive shaft from below with your finger (Figure H). - Pull out the blade.
Blender

Danger of injury from sharp blades/rotating drive!
Never put your hands in the installed blender! The blender can only be removed/installed after the drive has stopped! The blender can only be used when assembled and with the lid in place.

Danger of scalding!
When processing hot products in the blender, steam escapes through the opening in the lid. Fill a maximum of 0.5 liters of hot or foaming liquid.
Attention!
The blender can be damaged. Do not process frozen ingredients (except ice cubes). Do not switch on the blender when empty.
Working with the blender Figure

Press the release button and turn the rotary switch to position 4. - Remove the locked lid from the blender drive. - Place the blender jar (marking on the handle opposite the marking on the base unit) and turn it counterclockwise until it stops. Load ingredients. Maximum amount of liquid = 1.25 liters; maximum amount of foaming or hot liquids = 0.5 liters; optimal amount for processing solid ingredients = 100 grams; - Place the lid and turn it counterclockwise until it stops in the blender handle. The lid must click into place. - Set the rotary switch to the desired level.
Loading ingredients Figure 8-8
Turn off the device using the rotary switch. - Remove the lid and load ingredients or remove the filler cap and gradually add solid ingredients through the filling opening.
NN
Pour liquid ingredients through the filler cap.
After work
Cleaning the main unit

Danger of electric shock!
The main unit must never be immersed in water or held under running water.
Do not use steam cleaners.
Remove the plug from the socket. - Wipe the main unit and the protective covers of the controls with a damp cloth. If necessary, use a little dishwashing liquid. Finally, wipe the appliance dry.
Cleaning the mixing jug and attachments
The mixing jug and attachments can be washed in a dishwasher.
Do not clamp plastic parts in the dishwasher, as they may become deformed during the washing process.
Cleaning the universal blade
All parts of the universal blade can be washed in a dishwasher.
Recommendation: To remove strong discoloration after processing, e.g., carrots, put a little vegetable oil on a cloth and wipe the universal blade (not the chopping blade).
Then rinse the universal blade.
Cleaning the blender

Danger of injury from sharp blades!
Do not touch the blender blades with bare hands.
The blender, lid and chopper can be washed in the dishwasher.
Recommendation: After processing liquids, it is usually sufficient to rinse the blender without removing it from the appliance. To do this, pour a little water with dishwashing liquid into the installed blender. Switch on the blender for a few seconds (level "M"). Then rinse the blender with clean water.

Important note
Clean the accessories bag as needed. Follow the care instructions on the bag.
Storage

Risk of injury!
When the appliance is not in use, remove the plug from the socket.
Figure K
- Place the attachments and chopper in the accessories bag. Store the accessories bag in a dry place. For original packaging, see figure.
Help with troubleshooting

Risk of injury!
Before troubleshooting, remove the plug from the socket.

Important note MUM54./MUM55./MUM56.
An error in operating the appliance, a blown fuse, or a malfunction of the appliance is indicated by the flashing indicator light.
The rotary switch must be set to the off position in every working position.
Possible to eliminate the problem with the help of the following instructions.
Fault
The appliance does not switch on.
Elimination
- Check the power supply.
- Check the mains plug.
- Check the rotary switch. Is it in the correct position and locked?
- Turn the blender jug clockwise until it stops.
- Install the blender lid and turn it clockwise until it stops. Cover the unused drives with the protective caps.
- The overload protection has been activated. Switch the appliance to the «0/off» position and then select the desired speed.
Fault
The appliance switches off during use. The overload protection has been activated. Too many products were processed at the same time.
Elimination
Switch off the appliance. Reduce the quantity of products to be processed. Do not exceed the maximum permissible quantity of products (see «Examples of use»)!
Fault
The power cord plug was accidentally pressed the unlock button.
Turn the rotary switch upwards. The drive disengages, but does not stop in the position for changing attachments.
Troubleshooting
- Turn the rotary switch to the «0/off» position.
- Turn the rotary switch to position 1. Switch on the appliance (stage «1»).
- Switch off the appliance again. The attachment stops in the position for changing attachments.

Malfunction
The blender does not start working or stops during use, the drive «runs» but is blocked.
Troubleshooting
Disconnect the appliance from the mains and remove the plug from the socket. Remove the blender and remove the obstruction. - Reinstall the blender. Switch on the appliance.

Important note
If the malfunction cannot be eliminated in this way, please contact the service department.
Usage examples
Whipped cream
100g-600g

- Preheat the oven to 1½
- 4 minutes on level «7» («4») -
- depending on the quantity and properties
- of the eggs, using the whisk
- for beating.
Egg whites
from 1 to 8 egg whites

- Preheat the egg whites for 4 to 6 minutes on level «7» («4») using the whisk for beating.
Sponge cake
Basic recipe

2 eggs
2-3 tbsp. hot water
100 g sugar
1 packet of vanilla sugar 70 g flour 70 g starch
if necessary, a little chemical leavening agent
Add the ingredients (except flour and starch) and mix for about 4-6 minutes on level "7" ("4") using the whisk until a foam forms. Then turn the rotary switch to level "1" ("1") and for about 1/2 to 1 minute, slowly fold in the sifted flour and starch with a spatula.
Maximum quantity: 2 times the quantity of ingredients from the basic recipe.
Rich dough
Basic recipe
3-4 eggs
200-250 g sugar
1 pinch of salt
1 packet of vanilla sugar or zest
1/2 lemon
200-250 g butter or margarine (at room temperature)
500 g flour
1 packet of baking powder
125 ml milk
Mix all ingredients for about 1/2 minute on level "1" ("1"), then for about 3-4 minutes on level "7" ("4") using the whisk to mix.
Maximum quantity: 1.5 times the basic recipe.
Main recipe
125 g of vegetable oil
(at room temperature)
100-125 g sugar
1 egg
1 pinch of salt
a little lemon zest or vanilla sugar
250 g flour
if necessary, a little chemical leavening agent
Mix all ingredients for about 1/2 minute at level 1 (1), then for about 2-3 minutes at level 6 (3) using the whisk for mixing.
When using more than 500 g of flour:
Mix all ingredients for about 1/2 minute at level 1 (1), then for about 3-4 minutes at level 3 (2) using the kneading hook.
Maximum quantity: 2 times the main recipe


Yeast dough
80 g flour (at room temperature)
80 g sugar
200-250 ml warm milk
25 g fresh yeast or 1 packet of dry yeast with 1/2 lemon
1 egg
Process all ingredients for about 1/2 minute on speed "1" ("1"), then for about 3-6 minutes on speed "3" ("2") using the kneading attachment.
Maximum quantity: 1.5 times the basic recipe
Dough for macaroni
Basic recipe
300 g flour
3
If necessary, 1-2 tbsp. (10-20 g) cold water
All ingredients should be processed for about 30 minutes on setting 3 (2) until the test is obtained.
Maximum quantity: 1.5 x basic recipe
Bread dough
Basic recipe
750 g flour
2 packets of dry yeast
- 1 tsp salt
450-500 ml warm water
Process all ingredients for about 1/2 minute on setting 1 (1 ), then for about 4-5 minutes on setting 3 (2 ) using the dough hook.
Mayonnaise
2 eggs
- 1 tsp mustard
1/4 L vegetable oil
2 tbsp lemon juice or vinegar
1 pinch of salt
1 tablespoon of sugar
Ingredients must have the same temperature.
Juicers for citrus fruits
For extracting juice from oranges, lemons, and grapefruits.
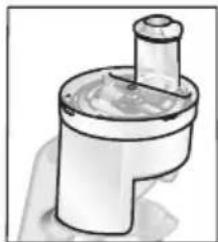
MUZ5CC1
Nozzle for cutting into cubes
For cutting fruits and vegetables into uniform cubes
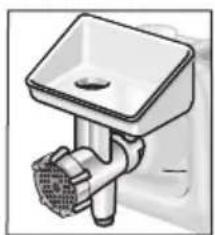
MUZ5FW1
Blender
| MUZ5FW1 MUZ5FW1 MUZ5FW1 MUZ5FW1 MUZ5FW1 MUZ5FW1 MUZ5FW1 MUZ5FW1 MUZ5FW1 MUZ5FW1 MUZ5FW1 MUZ5FW1 MUZ5FW1 MUZ5FW1 MUZ5FW1 MUZ5FW1 MUZ5FW1 MUZ5FW1 MUZ5FW1 MUZ5FW1 MUZ5FW1MUZ5FW1 MUZ5FW1 MUZ5FW1 MUZ5FW1 MUZ5FW1 MUZ5FW1 MUZ5FW1 MUZ5FW1 MUZ5FW1 MUZ5FW1 MUZ5FW1 MUZ5FW1 MUZ5FW1 MUZ5FW1 MUZ5FW1 MUZ5FW1 MUZ5FW1 MUZ5FW1 MUZ5FW1 MUZ5FWI MUZ5FW1 MUZ5FW1 MUZ5FW1 MUZ5FW1 MUZ5FW1 MUZ5FW1 MUZ5FW1 MUZ5FW1 MUZ5FW1 MUZ5FW1 MUZ5FW1 MUZ5FW1 MUZ5FW1 MUZ5FW1 MUZ5FW1 MUZ5FW1 MUZ5FW1 MUZ5FW1 MUZ5FW1 MUZ5FWIMUZ5FW1 MUZ5FW1 MUZ5FW1 MUZ5FW1 MUZ5FW1 MUZ5FW1 MUZ5FW1 MUZ5FW1 MUZ5FW1 MUZ5FW1 MUZ5FW1 MUZ5FW1 MUZ5FW1 MUZ5FW1 MUZ5FW1 MUZ5FW1 MUZ5FW1 MUZ5FW1 MUZ5FW1 MUZ5FW2 MUZ5FW2 MUZ5FW2 MUZ5FW2 MUZ5FW2 MUZ5FW2 MUZ5FW2 MUZ5FW2 MUZ5FW2 MUZ5FW2 MUZ5FW2 MUZ5FW2 MUZ5FW2 MUZ5FW2 MUZ5FW2 MUZ5FW2 MUZ5FW2 MUZ5FW2 MUZ5FW2 MUZ5FW2 MUZ5FW3 MUZ5FW3 MUZ5FW3 MUZ5FW3 MUZ5FW3 MUZ5FW3 MUZ5FW3 MUZ5FW3 MUZ5FW3 MUZ5FW3 MUZ5FW3 MUZ5FW3 MUZ5FW3 MUZ5FW3 MUZ5FW3 MUZ5FW3 MUZ5FW3 MUZ5FW3 MUZ5FW3 MUZ5FW3 MUZ5FW4 MUZ5FW4 MUZ5FW4 MUZ5FW4 MUZ5FW4 MUZ5FW4 MUZ5FW4 MUZ5FW4 MUZ5FW4 MUZ5FW4 MUZ5FW4 MUZ5FW4 MUZ5FW4 MUZ5FW4 MUZ5FW4 MUZ5FW4 MUZ5FW4 MUZ5FW4 MUZ5FW4 MUZ5FW4 MUZ5FW5 MUZ5FW5 MUZ5FW5 MUZ5FW5 MUZ5FW5 MUZ5FW5 MUZ5FW5 MUZ5FW5 MUZ5FW5 MUZ5FW5 MUZ5FW5 MUZ5FW5 MUZ5FW5 MUZ5FW5 MUZ5FW5 MUZ5FW5 MUZ5FW5 MUZ5FW5 MUZ5FW5 MUZ5FW5 MUZ5FW6 MUZ5FW6 MUZ5FW6 MUZ5FW6 MUZ5FW6 MUZ5FW6 MUZ5FW6 MUZ5FW6 MUZ5FW6 MUZ5FW6 MUZ5FW6 MUZ5FW6 MUZ5FW6 MUZ5FW6 MUZ5FW6 MUZ5FW6 MUZ5FW6 MUZ5FW6 MUZ5FW6 MUZ5FW6 MUZ5FW7 MUZ5FW7 MUZ5FW7 MUZ5FW7 MUZ5FW7 MUZ5FW7 MUZ5FW7 MUZ5FW7 MUZ5FW7 MUZ5FW7 MUZ5FW7 MUZ5FW7 MUZ5FW7 MUZ5FW7 MUZ5FW7 MUZ5FW7 MUZ5FW7 MUZ5FW7 MUZ5FW7 MUZ5FW7 MUZ5FW8 MUZ5FW8 MUZ5FW8 MUZ5FW8 MUZ5FW8 MUZ5FW8 MUZ5FW8 MUZ5FW8 MUZ5FW8 MUZ5FW8 MUZ5FW8 MUZ5FW8 MUZ5FW8 MUZ5FW8 MUZ5FW8 MUZ5FW8 MUZ5FW8 MUZ5FW8 MUZ5FW8 MUZ5FW8 MUZ5FW9 MUZ5FW9 MUZ5FW9 MUZ5FW9 MUZ5FW9 MUZ5FW9 MUZ5FW9 MUZ5FW9 MUZ5FW9 MUZ5FW9 MUZ5FW9 MUZ5FW9 MUZ5FW9 MUZ5FW9 MUZ5FW9 MUZ5FW9 MUZ5FW9 MUZ5FW9 MUZ5FW9 MUZ5FW9 MUZ5FW10 MUZ5FW10 MUZ5FW10 MUZ5FW10 MUZ5FW10 MUZ5FW10 MUZ5FW10 MUZ5FW10 MUZ5FW10 MUZ5FW10 MUZ5FW10 MUZ5FW10 MUZ5FW10 MUZ5FW10 MUZ5FW10 MUZ5FW10 MUZ5FW10 MUZ5 FW10 MUZ5FW10 MUZ5FW10 MUZ5FW10 MUZ5FW10 MUZ5FW10 MUZ5FW10 MUZ5FW10 MUZ5FW10 MUZ5FW10 MUZ5FW10 MUZ5FW10 MUZ5FW10 MUZ5FW10 MUZ5FW10 MUZ5FW10 MUZ5FW10 MU Z5FW10 MUZ5FW10 MUZ5FW10 MUZ5FW10 MUZ5FW10 MUZ5FW10 MUZ5FW10 MUZ5FW10 MUZ5FW10 MUZ5FW10 MUZ5FW10 MUZ5FW10 MUZ5FW10 MUZ5FW10 MUZ5FW10 MUZ5FW10 MUZ5FW11 MUZ5FW11 MUZ5FW11 MUZ5FW11 MUZ5FW11 MUZ5FW11 MUZ5FW11 MUZ5FW11 MUZ5FW11 MUZ5FW11 MUZ5FW11 MUZ5FW11 MUZ5FW11 MUZ5FW11 MUZ5FW11 MUZ5FW11 MUZ5FW11 MUZ5 FW11 MUZ5FW11 MUZ5FW11 MUZ5FW11 MUZ5FW11 MUZ5FW11 MUZ5FW11 MUZ5FW11 MUZ5FW11 MUZ5FW11 MUZ5FW11 MUZ5FW11 MUZ5FW11 MUZ5FW11 MUZ5FW11 MUZ5FW11 MUZ5FW11 MU Z5 FW11 MUZ5FW11 MUZ5FW11 MUZ5FW11 MUZ5FW11 MUZ5FW11 MUZ5FW11 MUZ5FW11 MUZ5FW11 MUZ5FW11 MUZ5FW11 MUZ5FW11 MUZ5FW11 MUZ5FW11 MUZ5FW11 MUZ5FW11 MUZ5FW12 MUZ5FW12 MUZ5FW12 MUZ5FW12 MUZ5FW12 MUZ5FW12 MUZ5FW12 MUZ5FW12 MUZ5FW12 MUZ5FW12 MUZ5FW12 MUZ5FW12 MUZ5FW12 MUZ5FW12 MUZ5FW12 MUZ5FW12 MUZ5FW12 MUZ5 FW12 MUZ5FW12 MUZ5FW12 MUZ5FW12 MUZ5FW12 MUZ5FW12 MUZ5FW12 MUZ5FW12 MUZ5FW12 MUZ5FW12 MUZ5FW12 MUZ5FW12 MUZ5FW12 MUZ5FW12 MUZ5FW12 MUZ5FW12 MUZ5FW12 MU Z5 FW12 MUZ5FW12 MUZ5FW12 MUZ5FW12 MUZ5FW12 MUZ5FW12 MUZ5FW12 MUZ5FW12 MUZ5FW12 MUZ5FW12 MUZ5FW12 MUZ5FW12 MUZ5FW12 MUZ5FW12 MUZ5FW12 MUZ5FW12 MUZ5FW13 MUZ5FW13 MUZ5FW13 MUZ5FW13 MUZ5FW13 MUZ5FW13 MUZ5FW13 MUZ5FW13 MUZ5FW13 MUZ5FW13 MUZ5FW13 MUZ5FW13 MUZ5FW13 MUZ5FW13 MUZ5FW13 MUZ5FW13 MUZ5FW13 MUZ5 FW13 MUZ5FW13 MUZ5FW13 MUZ5FW13 MUZ5FW13 MUZ5FW13 MUZ5FW13 MUZ5FW13 MUZ5FW13 MUZ5FW13 MUZ5FW13 MUZ5FW13 MUZ5FW13 MUZ5FW13 MUZ5FW13 MUZ5FW13 MUZ5FW13 MU Z5 FW13 MUZ5FW13 MUZ5FW13 MUZ5FW13 MUZ5FW13 MUZ5FW13 MUZ5FW13 MUZ5FW13 MUZ5FW13 MUZ5FW13 MUZ5FW13 MUZ5FW13 MUZ5FW13 MUZ5FW13 MUZ5FW13 MUZ5FW13 MUZ5FW14 MUZ5FW14 MUZ5FW14 MUZ5FW14 MUZ5FW14 MUZ5FW14 MUZ5FW14 MUZ5FW14 MUZ5FW14 MUZ5FW14 MUZ5FW14 MUZ5FW14 MUZ5FW14 MUZ5FW14 MUZ5FW14 MUZ5FW14 MUZ5FW14 MUZ5 FW14 MUZ5 FW14 MUZ5 FW14 MUZ5 FW14 MUZ5 FW14 MUZ5 FW14 MUZ5 FW14 MUZ5 FW14 MUZ5 FW14 MUZ5 FW14 MUZ5 FW14 MUZ5 FW14 MUZ5 FW14 MUZ5 FW14 MUZ5 FW14 MUZ5 FW14 MUZ5 FW14 MU Z5 FW14 MUZ5 FW14 MUZ5 FW14 MUZ5 FW14 MUZ5 FW14 MUZ5 FW14 MUZ5 FW14 MUZ5 FW14 MUZ5 FW14 MUZ5 FW14 MUZ5 FW14 MUZ5 FW14 MUZ5 FW14 MUZ5 FW14 MUZ5 FW14 MUZ5 FW14 MUZ5 FW1 4 MU Z5 FW14 MU Z5 FW14 MU Z5 FW14 MU Z5 FW14 MU Z5 FW14 MU Z5 FW14 MU Z5 FW14 MU Z5 FW14 MU Z5 FW14 MU Z5 FW14 MU Z5 FW14 MU Z5 FW14 MU Z5 FW14 MU Z5 FW14 MU Z5 FW14 MU Z5 FW14 MU Z5 FW14 MU ZS FW14 MU ZS FW14 MU ZS FW14 MU ZS FW14 MU ZS FW14 MU ZS FW14 MU ZS FW14 MU ZS FW14 MU ZS FW14 MU ZS FW14 MU ZS FW14 MU ZS FW14 MU ZS FW14 MU ZS FW14 MU ZS FW14 MU ZS FW14 MU ZS FW14 NU ZS FW14 NU ZS FW14 NU ZS FW14 NU ZS FW14 NU ZS FW14 NU ZS FW14 NU ZS FW14 NU ZS FW14 NU ZS FW14 NU ZS FW14 NU ZS FW14 NU ZS FW14 NU ZS FW14 NU ZS FW14 NU ZS FW14 NU ZS FW14 NU ZS FW20 FW20 FW20 FW20 FW20 FW20 FW20 FW20 FW20 FW20 FW20 FW20 FW20 FW20 FW20 FW20 FW20 FW20 FW20 FW20 FW20 FW20 FW20 FW20 FW20 FW20 FW20 FW20 FW20 FW20 FW20 FW20 FW20 FW20 FMU ZS FW20 FMU ZS FW20 FMU ZS FW20 FMU ZS FW20 FMU ZS FW20 FMU ZS FW20 FMU ZS FW20 FMU ZS FW20 FMU ZS FW20 FMU ZS FW20 FMU ZS FW20 FMU ZS FW20 FMU ZS FW20 FMU ZS FW20 FMU ZS FW 20 FMU ZS FW 20 FMU ZS FW 20 FMU ZS FW 20 FMU ZS FW 20 FMU ZS FW 20 FMU ZS FW 20 FMU ZS FW 20 FMU ZS FW 20 FMU ZS FW 20 FMU ZS FW 20 FMU ZS FW 20 FMU ZS FW 20 FM U ZS FW 20 FM U ZS FW 20 FM U ZS FW 20 FM U ZS FW 20 FM U ZS FW 20 FM U ZS FW 20 FM U ZS FW 20 FM U ZS FW 20 FM U ZS FW 20 FM U ZS FW 20 FM U ZS FW 20 FM U ZS FW 20 FM U ZS FW20 FMU ZS FW20 FMU ZS FW20 FMU ZS FW20 FMU ZS FW20 FMU ZS FW20 FMU ZS FW20 FMU ZS FW20 FMU ZS FW20 FMU ZS FW20 FMU ZS FW20 FMU ZS FW20 FMU ZS FW20 FMU ZS FW20 FMU Zs FW20 FMU Zs FW20 FMU Zs FW20 FMU Zs FW20 FMU Zs FW20 FMU Zs FW20 FMU Zs FW20 FMU Zs FW20 FMU Zs FW20 FMU Zs FW20 FMU Zs FW20 FMU Zs FW20 FMU Zs FW20 FMU Zs FW20 FMU Zs FW 20 FMU Zs FW 20 FMU Zs FW 20 FMU Zs FW 20 FMU Zs FW 20 FMU Zs FW 20 FMU Zs FW 20 FMU Zs FW 20 FMU Zs FW 20 FMU Zs FW 20 FMU Zs FW 20 FMU Zs FW 20 FMU Zs FW 20 FM U ZS FW 20 FM U ZS FW 20 FM U ZS FW 20 FM U ZS FW 20 FM U ZS FW 20 FM U ZS FW 20 FM U ZS FW 20 FM U ZS FW 20 FM U ZS FW 20 FM U ZS FW 20 FM U ZS FW 20 FM U ZS FW 2 0 M U ZS FW 2 0 M U ZS FW 2 0 M U ZS FW 2 0 M U ZS FW 2 0 M U ZS FW 2 0 M U ZS FW 2 0 M U ZS FW 2 0 M U ZS FW 2 0 M U ZS FW 2 0 M U ZS FW 2 0 M U ZS FW 2 0 M M U ZS FW 2 0 M M U ZS FW 2 0 M M U ZS FW 2 0 M M U ZS FW 2 0 M M U ZS FW 2 0 M M U ZS FW 2 0 M M U ZS FW 2 0 M M U ZS FW 2 0 M M U ZS FW 2 0 M M U ZS FW 2 0M M U ZS FW 2 0 M M U ZS FW 2 0 M M U ZS FW 2 0 M M U ZS FW 2 0 M M U ZS FW 2 0 M M U ZS FW 2 0 M M U ZS FW 2 0 M M U ZS FW 2 0 M M U ZS FW 2 0 M M U ZS FW 2 0 MO M M U ZS FW 2 0 MO M M U ZS FW 2 0 MO M M U ZS FW 2 0 MO M M U ZS FW 2 0 MO M M U ZS FW 2 0 MO M M U ZS FW 2 0 MO M M U ZS FW 2 0 MO M M U ZS FW 2 0 MO M M U ZS FW 2 0 MOM M M U ZS FW 2 0 MO M M U ZS FW 2 0 MO M M U ZS FW 2 0 MO M M U ZS FW 2 0 MO M M U ZS FW 2 0 MO M M U ZS FW 2 0 MO M M U ZS FW 2 0 MO M M U ZS FW 2 0 MO M M U ZS FW 2 0 MO N M M U ZS FW 2 0 MO N M M U ZS FW 2 0 MO N M M U ZS FW 2 0 MO N M M U ZS FW 2 0 MO N M M U ZS FW 2 0 MO N M M U ZS FW 2 0 MO N M M U ZS FW 2 0 MO N M M U ZS FW 2 0 MO N M M U/ZS FW 2 0 MO N M M U/ZS FW 2 0 MO N M M U/ZS FW 2 0 MO N M M U/ZS FW 2 0 MO N M M U/ZS FW 2 0 MO N M M U/ZS FW 2 0 MO N M M U/ZS FW 2 0 MO N M M U/ZS FW 2 0 MO N M M U/ZS FW 3 0 F M F M F M F M F M F M F M F M F M F M F M F M F M F M F M F M F M F M F M F M F M F M F M F M F M F M F M F M F M F M F M F M F M F M F M F M F M F M F M F M F M F M F M F M F M F M F M F M F M F M F F M F M F M F M F M F M F M F M F M F M F M F M F M F M F M F M F M F M F M F M F M F M F M F M F M F M F M F M F M F M F M F M F M F M F M F M F M F M F M F M F M F M F M F M F M F M F M F M F M F A M F M F M F M F M F M F M F M F M F M F M F M F M F M F M F M F M F M F M F M F M F M F M F M F M F M F M F M F M F M F M F M F M F M F M F M F M F M F M F M F M F M F M F M F M F M F M F M F M F MF M F M F M F M F M F M F M F M F M F M F M F M F M F M F M F M F M F M F M F M F M F M F M F M F M F M F M F M F M F M F M F M F M F M F M F M F M F M F M F M F M F M F M F M F M F M F M F M F M F M E M F M F M F M F M F M F M F M F M F M F M F M F M F M F M F M F M F M F M F M F M F M F M F M F M F M F M F M F M F M F M F M F M F M F M F M F M F M F M F M F M F M F M F M F M F M F M F M F M F M f M F M F M F M F M F M F M F M F M F M F M F M F M F M F M F M F M F M F M F M F M F M F M F M F M F M F M F M F M F M F M F M F M F M F M F M F M F M F M F M F M F M F M F M F M F M F M F M F M F M I M F M I M F M I M F M I M F M I M F M I M F M I M F M I M F M I M F M I M F M I M F M I M F M I M F M I M F M I M F M I M F M I M F M I M F M I M F M I M F M I M F M I M F M I M F M I M F M I M F M F M I M F M I M F M I M F M I M F M I M F M I M F M I M F M I M F M I M F M I M F M I M F M I M F M I M F M I M F M I M F M I M F M I M F M I M F M I M F M I M F M I M F M I M F M I M F M I M |

2
1
C1110J L
Jswll Joo
aLiooLiigS11 aI50j> 4gss
1531g(cuiIacLao)cUigS1slaq!
(3)4aJg(2)3aJgLc gla J 1 (4)7 aJgLc bXJ L
1
j
gjoo 81 g: blaio>81 pcc
aolaiuosi lao
()g
MUZ5ZP1
CJJgooLAC
Lc
MUZ5CC1
= h - a + δ 可以
L.S11
MUZ5FW1
a+0.
MUZ45LS1
a a 0
(jio 3) acl
(joLo6)
∴ \ 1.3,5\
a.aaa 1234567890
LwLo gCLO 3J!2
100
LiLiJus≤1
70
(L)
(4)7 6 4
ai gai yall plsiwi
(1)1aJJIgcljglJIiJI
aioLo iaij 1y bui Liilg Jjell jnll
20 1
a. 2011/12
aLwIyIyIyIyIyIyIyIyIyIyIy
LaaJauo Jaua g sIg I g JbIaI aI
C
Jyjgai jao gao hki slhac sji
Caaal aagllglc alz1 20
e 1
L

Therefore, the area of triangle ACD equals the area of triangle COD plus the area of triangle BDO minus the area of triangle ADB.

Therefore, a1 = 3/2, a2 = 4/2, b1 = 5/8, b2 = 7/8.
Therefore, L = 5 : 1, therefore L = 5 > 11.

Therefore, the area of triangle ACD equals the area of triangle COD plus the area of triangle DCE minus the area of triangle CEA.

/MUM55./MUM54.
MUM56..
jI 1Jg jIg jIg jIg jIg jIg jIg jIg jIg jIg jIg jIg jIg jIg jIg jIg jIg jIg jIg jIg jIg jIg jIg jIg jIg jIg jIg jIg jIg jIg jIg jIg jIg jIg jI
aagoofofoo 0g
JgEg
a>g11 a1< a11 a1j; aJgLx g1gogai oSio
aJllg
1
J 1
1
LcSIL 1
afo 10
Caaal aagll glc sglgSIL:
g2g2g 10.2g111 E111 g2g a>1o
1 1
1 1
Therefore, the area of triangle OBC equals the area of triangle COD plus the area of triangle BOC.
J 1
(g)
by 1
15
Therefore, cos A = BP/PC = sqrt(3/5)

Therefore, the area of triangle ACD = area of triangle COD + area of triangle BDO - area of triangle CDO
Therefore, angle 1 = angle 2
A
Therefore, the area of triangle OBC = area of triangle ABC + area of triangle BOC - area of triangle BCA
Therefore, a = b + (b - 1)/2

Therefore, the area of triangle OBC = 1/2 * CD * BC = CD.
∴ AG = 2GD = 2√5,AD = 2AE = 4√5
∴ a 4 = a 1 + 2 = 3
10 × 12
Therefore, angle 1 equals angle 2.
1
(H)
a1 > 8 > a2 > 8 > a3 > 8 > a4 < 1/2
b.x.31
x2 < x1, i.e., y2 < y1 (2)
Since a1 = 2, a2 = -4, therefore b2^2 = 4a
201 1
05 1
{1,2,3} = y{1,2,3}

Jds 10, Jds 20
Therefore, the area of triangle OAB is equal to the area of triangle AOB plus the area of triangle OBC.
-1
2
(3)5
143
Therefore, 2xy is less than or equal to 2xy, which is less than or equal to 2xy.
Therefore, the area of triangle OBC equals the area of triangle COD plus the area of triangle BOC minus the area of triangle BOC.
20 times 21 times 1, 22 times 22 times 1, 23 times 23 times 1
Therefore, the area of triangle AOB equals the area of triangle COD plus the area of triangle BDO minus the area of triangle BOC.
1
.
(13)gjzJ1
gjgl Jll JwJc, jn
JLLJgLALJI LooIe! aill

(14)
aui j 1 (j0j) j2 j3 pss
Jll Jwgc,
∴ c < 5 < 2∴ y > 5
(15)
cloglll 1111g jai jai jai jai po s
JJIJIJIJIJIJIJIJIJIJIJIJIJIJIJIJIJIJIJIJIJIJIJIJIJIJIJIJIJIJIJIJIJIJIJIJIJIJIJIJIJIJIJIJIJIJIJIJIJIJIJIJIJIJIJIJIJIJIJIJIJIJIJIJIJIJIJIJIJIJIJIJIJIJIJIJIJIJIJIJIJIJIJIJIJIJIJIJIJIJIJIJIJIJIJIJIJIJIJIJIJ
∴ ( a + b) ≤ - a + b
国
JcJI cIgclgJL JcJI

jLx1pL>0j+0 1
__SUPPIMER__
Therefore y = 1

Therefore |L1| = |S|
Therefore, the area of triangle ACD equals the area of triangle COD plus the area of triangle DCE minus the area of triangle CDE.

| MUM54.. MUM55.. MUM56.. | MUM52.. | \( \begin{matrix} & & \\ & & \\ & & \\ & & \\ & & \\ & & \\ & & \\ & & \\ & & \\ & & \\ & & \\ & & \\ & & \\ & & \\ & & \\ & & \\ & & \\ & & \end{matrix} \) |  | |
| 1-7 | 1-4 |  |  | 1 |
| 1-7 | 1-4 | |||
| 1-3 | 1-2 | |||
| - | - | - | 7 | 2 |
| 3-7 | 2-4 |  |  | 3 |
| 3-5 | 2-3 |  | ||
| 5-7 | 3-4 |  |  | 4 |
| 5-7 | 3-4 |  |  |
The logarithm of g equals three halves times the logarithm of 2.
JU:MUM55./MUM56.
Therefore, in right triangle ABD:
19a
19b
19c
Jol20
21
Therefore, b^2 >= 4
bls 22
cIb23
24
15
1yjsciaic,ajgill liiaio jao oog
1
1000
| 3 |
| Jgclzgl# |
| Jgclzgl# |
| Jgclzgl# |
| Jgclzgl# |
| Jgclzgl# |
| Jgclzgl# |
| Jgclzgl# |
| Jgclzgl# |
| Jgclzgl# |
| Jgclzgl# |
| Jgclzgl# |
| Jgclzgl#Jgcl# |
| Jgclzgl#Jgcl# |
| Jgclzgl#Jgcl# |
| Jgclzgl#Jgcl# |
| Jgclzgl#Jgcl# |
| Jgclzgl#Jgcl# |
| Jgclzgl#Jgcl# |
| Jgclzgl#Jgcl# |
| Jgclz# |
| Jgcl# |
| Jgcl# |
| Jgcl# |
| Jgcl# |
| Jgcl# |
| Jgcl# |
| Jgcl# |
| Jgcl# |
| Jgcl# |
| Jgcl# |
| Jgcl# |
| Jgcl# |
| Jgcl# |
| Jgcl# |
| Jgcl#Jgcl# |
| Jgcl#Jgcl# |
| Jgcl#Jgcl# |
| Jgcl#Jgcl# |
| Jgcl#Jgcl# |
| Jgcl#Jgcl# |
| Jgcl#Jgcl# |
| Jgcl#Jgcl# |
| Jgcl#Jgcl# |
| Jgcl# |
| Jgcl# |
| Jgcl# |
| Jgcl# |
| Jgcl# |
| Jgcl# |
| Jgcl# |
| Jgcl# |
| Jgcl# |
| Jgcl# |
| Jgcl# |
| Jgcl# |
| Jgcl# |
| J#gcl# |
| J#gcl# |
| J#gcl# |
| J#gcl# |
| J#gcl# |
| J#gcl# |
| J#gcl# |
| J#gcl# |
| J#gcl# |
| J#gcl# |
| J#gcl# |
| J#gcl# |
| J#gcl# |
| J#gcl# |
| J#gcl# J#gcl# |
| J#gcl# |
| J#gcl# |
| J#gcl# |
| J#gcl# |
| J#gcl# |
| J#gcl# |
| J#gcl# |
| J#gcl# |
| J#gcl# |
| J#gcl# |
| J#gcl# |
| J#gcl# |
| J#gcl# |
| J@gcl# |
| J@gcl# |
| J@gcl# |
| J@gcl# |
| J@gcl# |
| J@gcl# |
| J@gcl# |
| J@gcl# |
| J@gcl# |
| J@gcl# |
| J@gcl# |
| J@gcl# |
| J@gcl# |
| J@gcl# |
| J@gcl# J@gcl# |
| J@gcl# |
| J@gcl# |
| J@gcl# |
| J@gcl# |
| J@gcl# |
| J@gcl# |
| J@gcl# |
| J@gcl# |
| J@gcl# |
| J@gcl# |
| J@gcl# |
| J@gcl# |
| J@gcl# |
| J#gcl# |
| J#gcl# |
| J#gcl# |
| J#gcl# |
| J#gcl# |
| J#gcl# |
| J#gcl# |
| J#gcl# |
| J#gcl# |
| J#gcl# |
| J#gcl# |
| J#gcl# |
| J#gcl# |
| J#gcl # |
| J#gcl# |
| J#gcl# |
| J#gcl# |
| J#gcl# |
| J#gcl# |
| J#gcl# |
| J#gcl# |
| J#gcl# |
| J#gcl# |
| J#gcl# |
| J#gcl# |
| J#gcl# |
| J#gcl# |
| J#gcl# |
!LwJgWJX
(12)
14000 150
J 1
L 1
pJgSg 10
y 8
(8,5) 1
aii jiao Jldjpc
10d1J 5L
1
10
1 1
8! b31 J 1234567890101123456789010112345678901011234567890101123456789010112345678901011234567890101123456789010112345678
L 150
1g 1
blll aiee pae e bie ggeaagaae ae aiee aiee
aaggSgLgAiaLwJlglssj05c
!plo 4
a a a a a a a a a a a a a a a a a a a a a a a a
J5y
g
A
pLwI LaoJg Icog aill 1sLwRyLpJzIyIoc
a 1


a! a#d jLd! pdc b b d gds
∴ ≤ 1

| ar-1 | ### |
| ar-4 | ### |
| ar-6 | ### |
| ar-9 | ### |
| ar-10 | ### |
| ar-10 | ### |
| ar-11 | ### |
| ar-13 | ### |
| ar-15 | ### |
| ar-15 | ### |
AE United Arab Emirates,
BSH Home Appliances FZE
Round About 13,
Plot Nr MO-0532A
Jebel Ali Free Zone - Dubai
Tel.: 04 881 4401
mailto:service.uae@bshg.com
www.bosch-home.com/ae
AL Republic of Albania, Albania
AERTECH SH.P.K.
Rruga Qemal Stafa
Pallati ri perball Prokuroris se
General
Entry C, 10th Floor
Tirana
Tel.: 066 206 47 94
mailto:g.volina@aertech.al
HEATHERTON, Victoria 3202
Tel.: 1300 368 339
mailto:bshau-as@bshg.com
www.bosch-home.com.au
BA Bosnia and Herzegovina, Bosnia-Herzegovina
"HIGH" d.o.o
Gradačka 29b
71000 Sarajevo
Info-Line: 061 100 905
Fax: 033 213 513
mailto:delicnanda@hotmail.com
BE Belgium BSH Home Appliances S.A.
European Trade Center Building,
5th floor
1784 Sofia
Tel.: 02 892 90 47
Fax: 02 878 79 72
mailto:informacia.servis-bg@
bshg.com
www.bosch.home.bg
BH Bahrain,
Khalaifat Company
Manama
Tel.: 017400553
mailto:service@khalaifat.com
BY Belarus, Enapycb
OOO"BCX BbITOBaTeHHka"
TeJ.: 495 737 2961
mailto:mok-kdhl@bshg.com
CH Schweiz, Suisse, Svizzera, Switzerland
BSH Hausgeräte AG
+17 snt/min (alv 23%)
FR France
BSH Electroménager S.A.S.
To arrange an engineer visit, to order spare parts and accessories or for product advice please visit www.bosch-home.co.uk or call
*Calls from a BT landline will be charged at up to 3 pence per minute. A call set-up fee of up to 6 pence may apply.
GR Greece. EAAAC
BSH Ikiakes Siskeves A.B.E.
Central Branch Service
17 km E.O. Athinon-Lamias &
Potamou 20
14564 Kifisia
Unit 1 & 2. 3rd Floor
North Block, Skyway House
3 Sham Mong Road
Tai Kok Tsui, Kowloon
Hong Kong
Tel.: 2565 6151
Fax: 2565 6681
mailto:bosch.hk.service@bshg.com
www.bosch-home.cn
HR Hrvatska, Croatia
BSH kučni urežaji d.o.o.
Kneza Branimira 22
10000 Zagreb
Tel.: 016403609
Fax: 01 640 36 03
mailto:informacije.servis-hr@
bshg.com
www.bosch-home.com/hr
www.bosch-home.com/hu
IE Republic
BSH Home Appliances Ltd.
Unit F4, Ballymount Drive
Ballymount Industrial Estate
Walkinstown
Dublin 12
Service Requests,
Spares and Accessories
Tel.: 01450 2655
Fax: 01450 2520
www.bosch-home.co.uk
IL Israel,
C/S/B Home Appliance Ltd.
Uiel Building
- Hamelacha St.
Industrial Park North
71293 Lod
Tel.: 089777222
Fax:089777245
mailto:csb-serv@zahav.net.il
www.bosch-home.co.il
IN India, Bharat
BSH Customer Service Front Office
Shop No.4, Everest Grande,
Opp. Shanti Nagar Bus Stop,
Mahakali Caves Road, Andheri East
Mumbai 400093
IS Iceland
Smith & Norland hf.
Noatuni 4
105 Reykjavik
Tel.: 0520 3000
Fax: 0520 3011
www.sminor.is
IT Italia, Italy
www.bosch-home.com/it
KZ Kazakhstan, Kazakhstan
IP Turebekov Yerzhan
Nurmanovich
Jangeldina str. 15
Shimkent 160018
Tel.: 0252 31 00 06
mailto:evrika_kz@mail.ru
LB Lebanon,
Teheni, Hana & Co.
Boulevard Dora 4043 Beyrouth
P.O.Box 90449
Jdeideh 1202 2040
Tel.: 01 255 211
mailto:Info@Teheni-Hana.com
LT Lietuva, Lithuania
Senuku prekybos centras UAB
Jonavos g. 62
44192 Kaunas
Tel.: 0372 12146
Fax: 0372 12165
www.senukai.lt
LU Luxembourg
BSH electromagens S.A.
13-15 ZI Breedeweues
1259 Senningerberg
Tel.: 26349 300
Fax: 26349 315
mailto:lux-service.electromenager@
bshg.com
www.bosch-home.com/lu
LV Latvija, Latvia
General Serviss Limited
Bullu street 70c
1067 Riga
Tel.: 07424137
mailto:bt@olimpeks.lv
Elkor Serviss
Brivibas gatte 201
1039 Riga
Tel.: 067 0705 20; -36
Fax: 067 0705 24
mailto:demoservice@elkor.lv
www.servisacentrs.lv
MD Moldova
S.R.L. "Rialto-Studio"
yI. lIyceBa 98
2012 KIIMHeB
TeJ./ΦaKc: 022 23 81 80
mailto:bosch-md@mail.ru
ME Crna Gora, Montenegro
Elektronika komerc
UI.Slobode 17
84000 Bijelo Polje
Tel./Fax: 050 432 575
Mobil: 069324812
mailto:ekobosch.servis@
t-com.me
MK Macedonia, Macedonia
GORENEC
Jane Sandanski 69 lok.3
1000 Skopje
Tel.: 022 454 600
Mobil: 070697463
mailto:gorenec@yahoo.com
MT Malta
Oxford House Ltd.
Notabile Road
Mriehel BKR 14
Tel.: 021 442 334
Fax: 021 488 656
www.oxfordhouse.com.mt
MV Raajeyge Jumhooriyyaa, Maledives
Lintel Investments
Ma. Maadheli, Majeedhee Magu Malé
Tel.: 0331 0742
mailto:mohamed.zuhuree@
lintel.com.mv
NL Nederland, Netherlands
Unit F 2, 4 Orbit Drive
Mairangi Bay
Auckland 0632
Tel.: 094770492
Fax: 094772647
mailto:bshnz-cs@bshg.com
www.bosch-home.co.nz
PL Polska, Poland
OOO "BSH Bytovaya Tekhnika"
Service from the manufacturer
Malaya Kaluzhskaya 19/1
119071 Moscow
Tel.: 495 737 2961
mailto:mok-kdhl@bshg.com
www.bosch-home.com
SA Kingdom Saudi Arabia,
BSH Home Appliances
Saudi Arabia L.L.C.
Bin Hamran Commercial Centr.
6th Floor 603B
Jeddah 21481
Tel.: 800 124 1247
mailto:service.ksa@bshg.com
www.bosch-home.com/sa
SE Sverige, Sweden
BSH Hushallsapparater AB
Landsvagen 32
169 29 Solna
Tel.: 0771 11 22 77 local rate
mailto:Bosch-Service-SE@
bshg.com
www.bosch-home.se
SG Singapore, 新加坡
BSH Home Appliances Pte. Ltd.
TECHPLACE I and
Mo Kio Avenue 10
Block 4012 #01-01
569628 Singapore
Tel.: 6751 5000
Fax: 6751 5005
mailto:bshsgp.service@bshg.com
www.bosch-home.com.sg
SI Slovenija, Slovenia
BSH Hisni aparati d.o.o.
Litostrojska 48
1000 Ljubljana
Tel.: 01 583 07 01
Fax: 01 583 08 89
www.bosch-home.com/tr
4th floor, No. 112 Sec 1
Chung Hsiao E Road
Taipei ROC 100
Tel.: 02 2321 6222
mailto:Bosch@achelis.com.tw
UA Ukraine, Ukraine
TOB "BCX NóbyoBa Texhika"
Tel.: 044 490 2095
mailto:bsh-service.ua@bshg.com
gama-electronics.com
XS Srbija, Serbia
BSH Kučni aparati d.o.o.
Milutina Milankovica 11a
11070 Novi Beograd
Tel.: 011 205 23 97
Fax: 011 205 23 89
mailto:informacije.servis-sr@bshq.com
www.bosch-home.rs
For South Africa
BSH Home Appliances (Pty) Ltd.
15th Road Randjespark
Private Bag X36, Randjespark
1685 Midrand-Johannesburg
Tel.: 086 002 6724
Fax: 086 617 1780
Fax: 086 617 1780
mailto:applianceserviceza@
bshg.com
www.bosch-home.com/zao
Bosch Home Appliance Group
P.O.Box 830101
D-81701 Munich
Germany
www.bosch-home.com
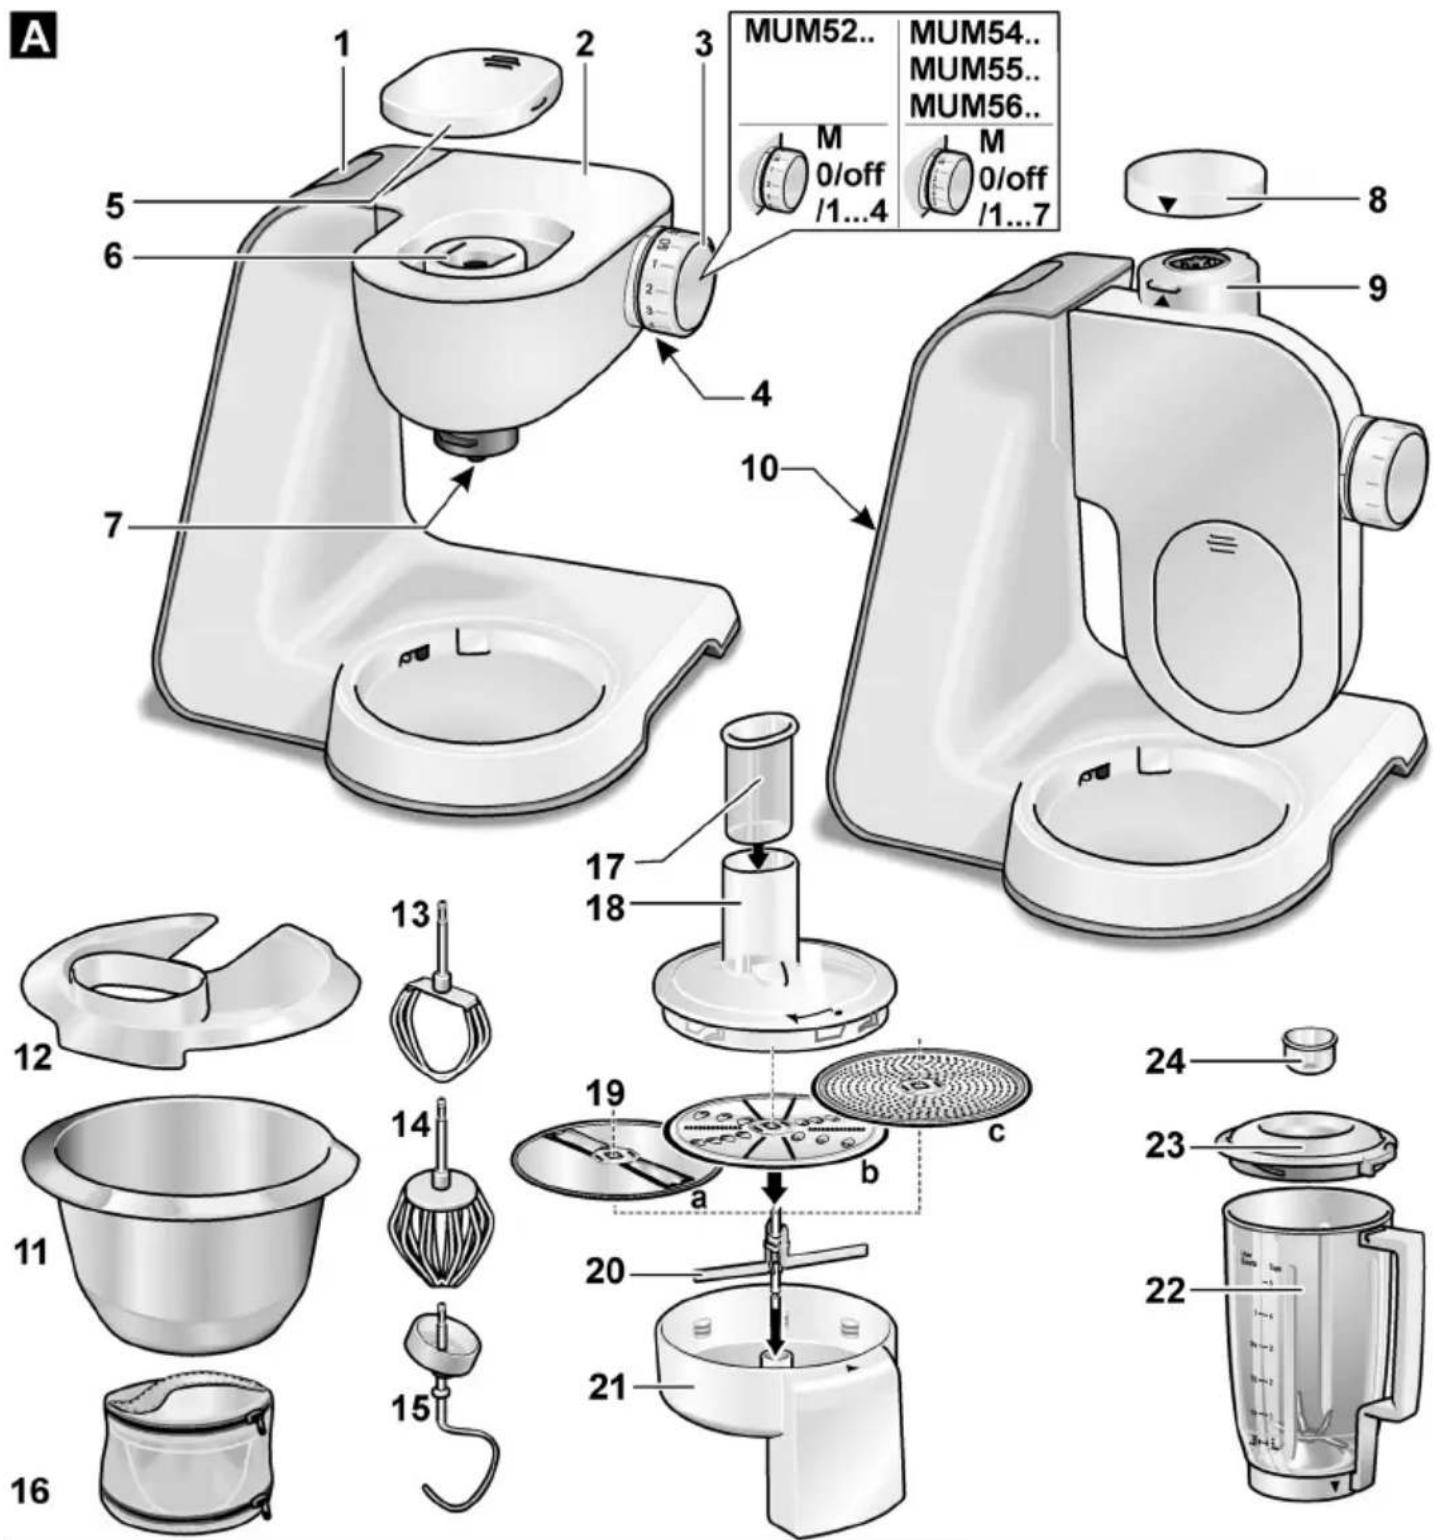
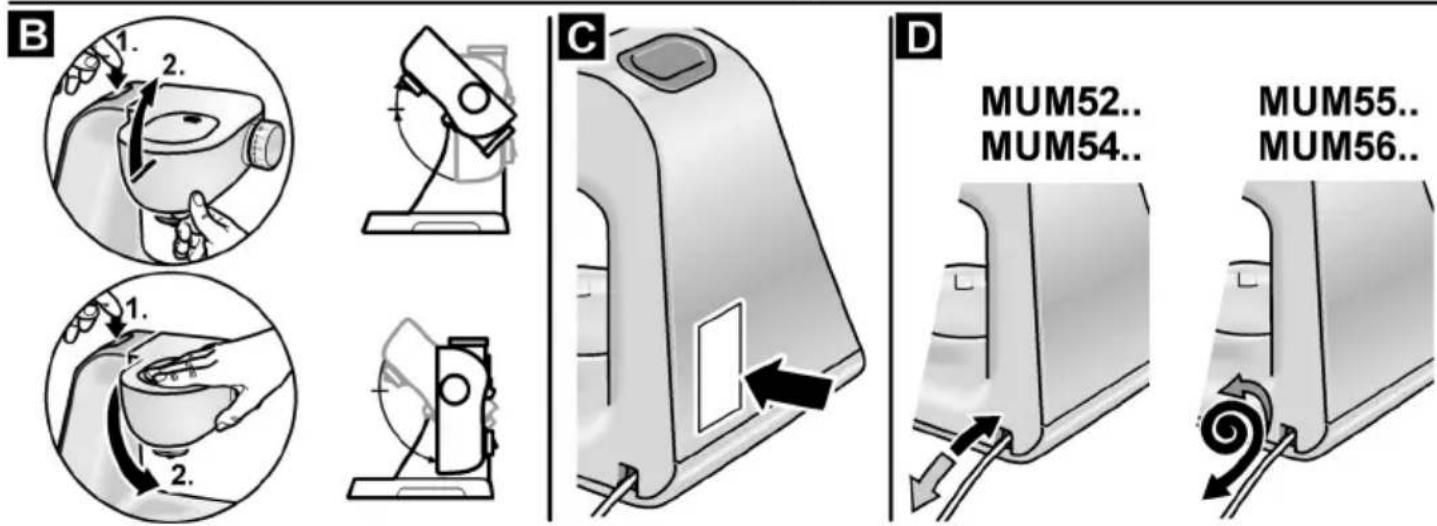
E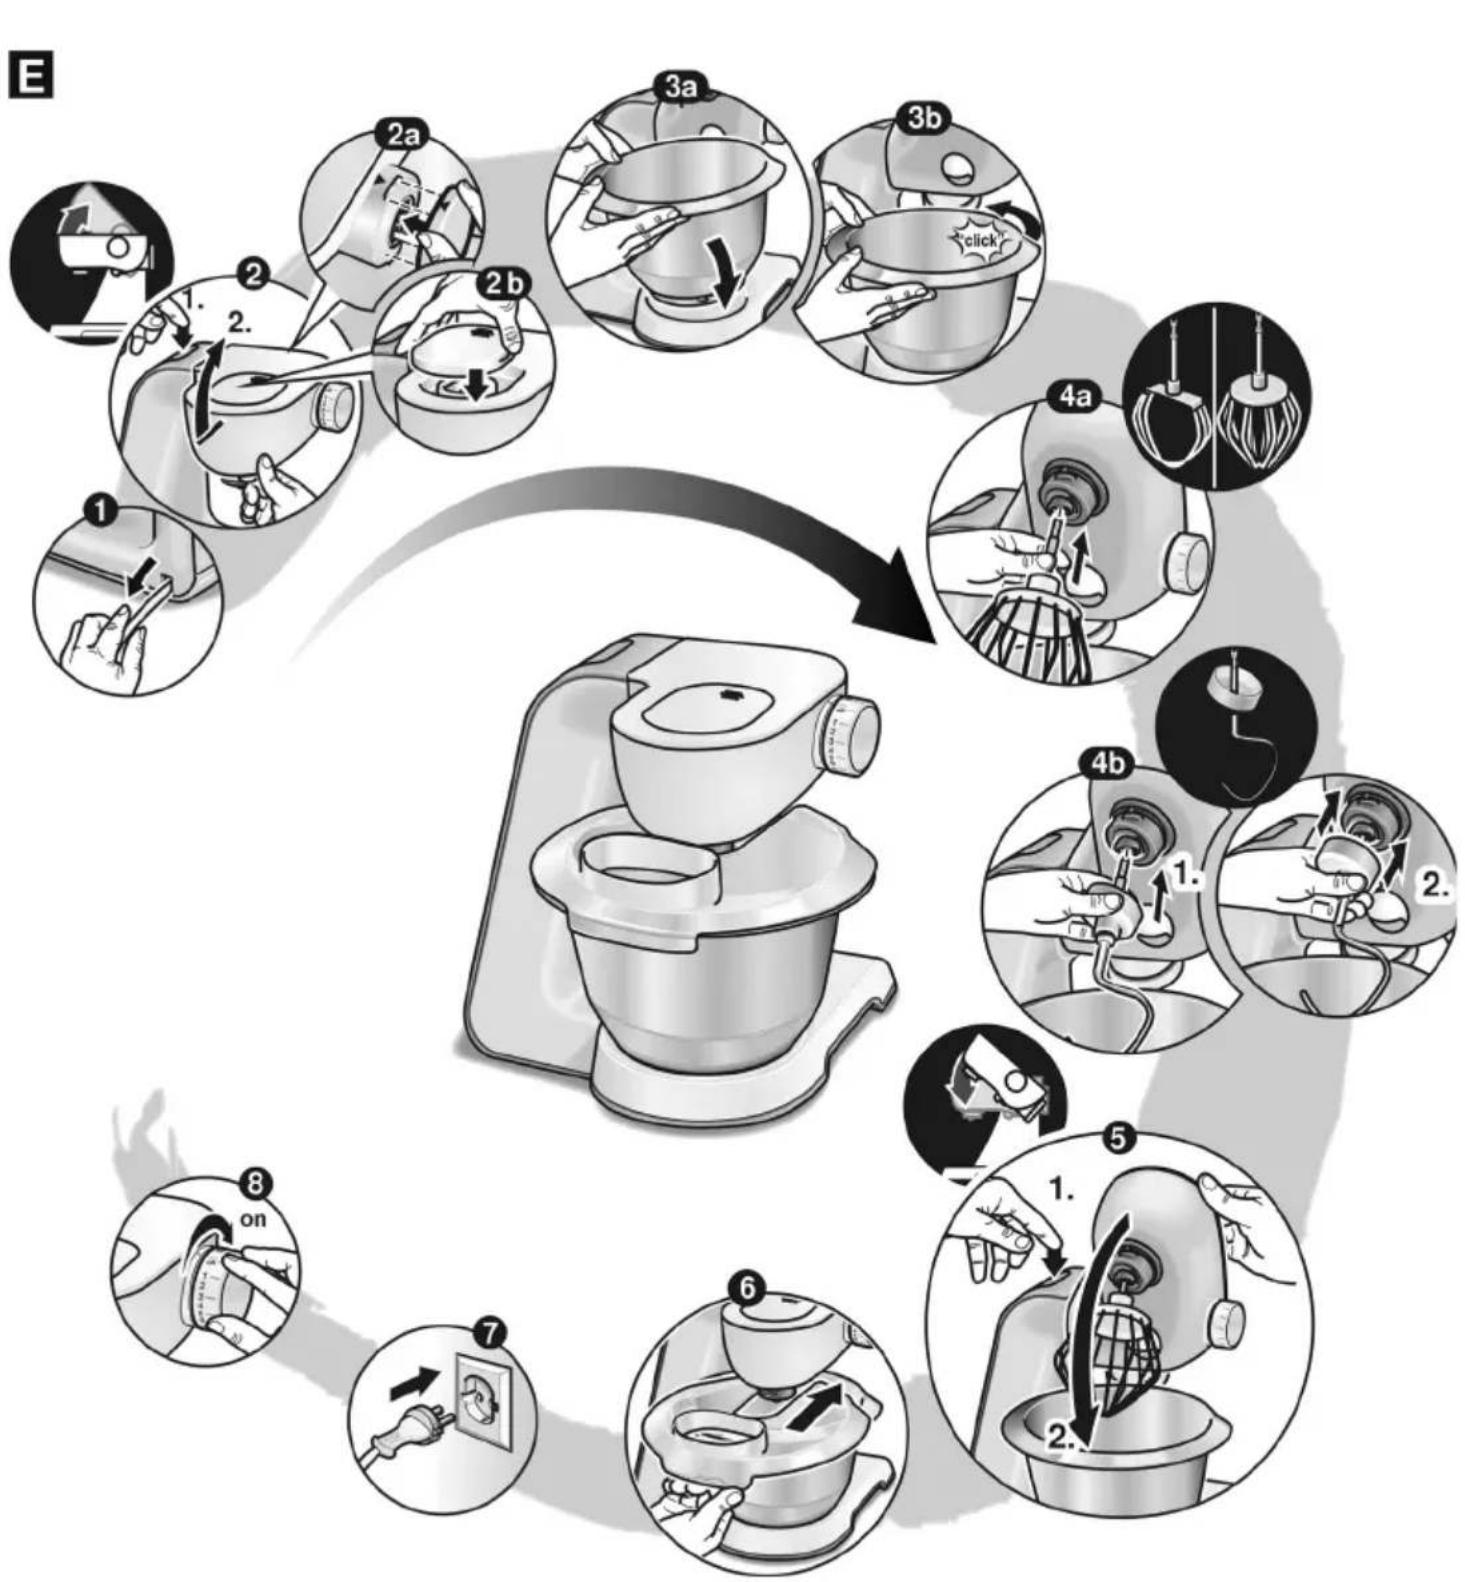
F G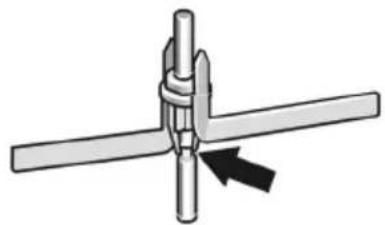

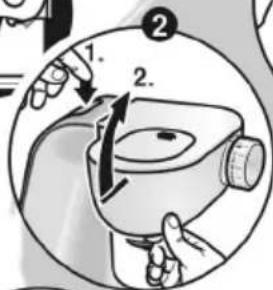
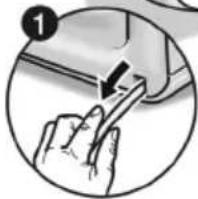
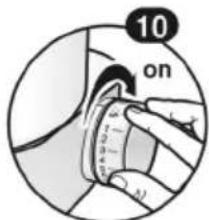
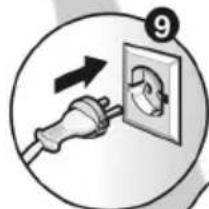
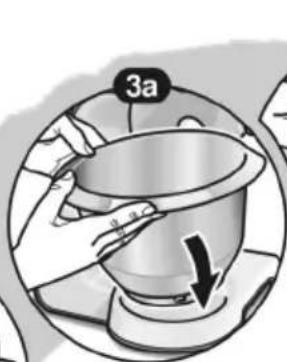


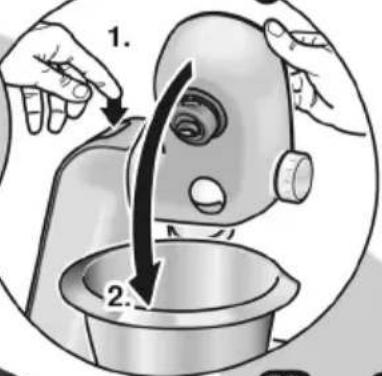
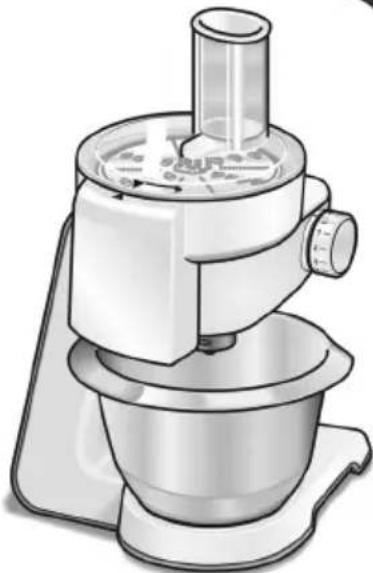
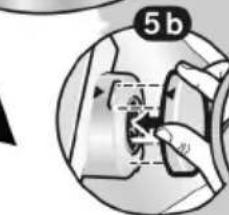
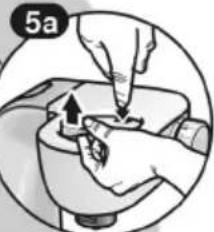
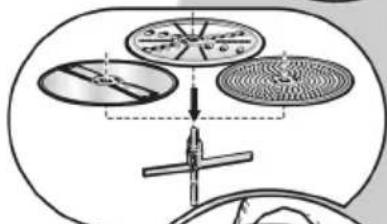
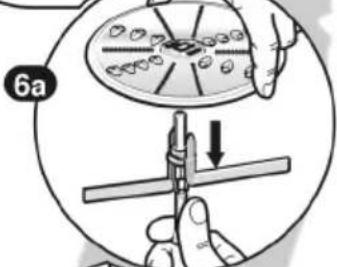
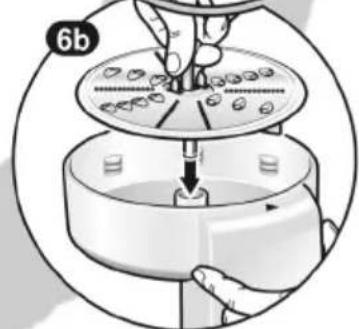
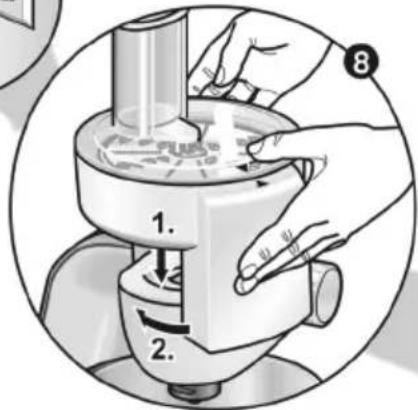
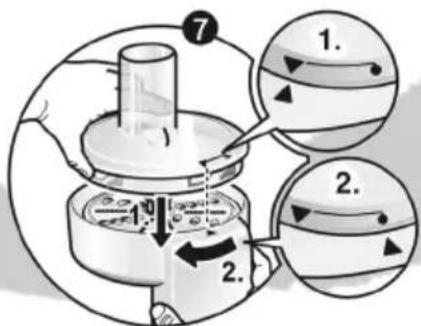
H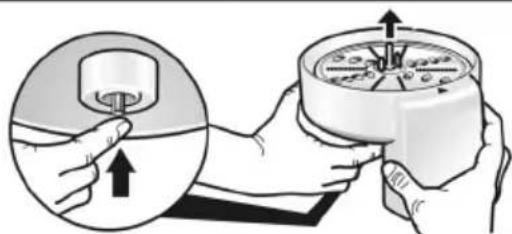
J K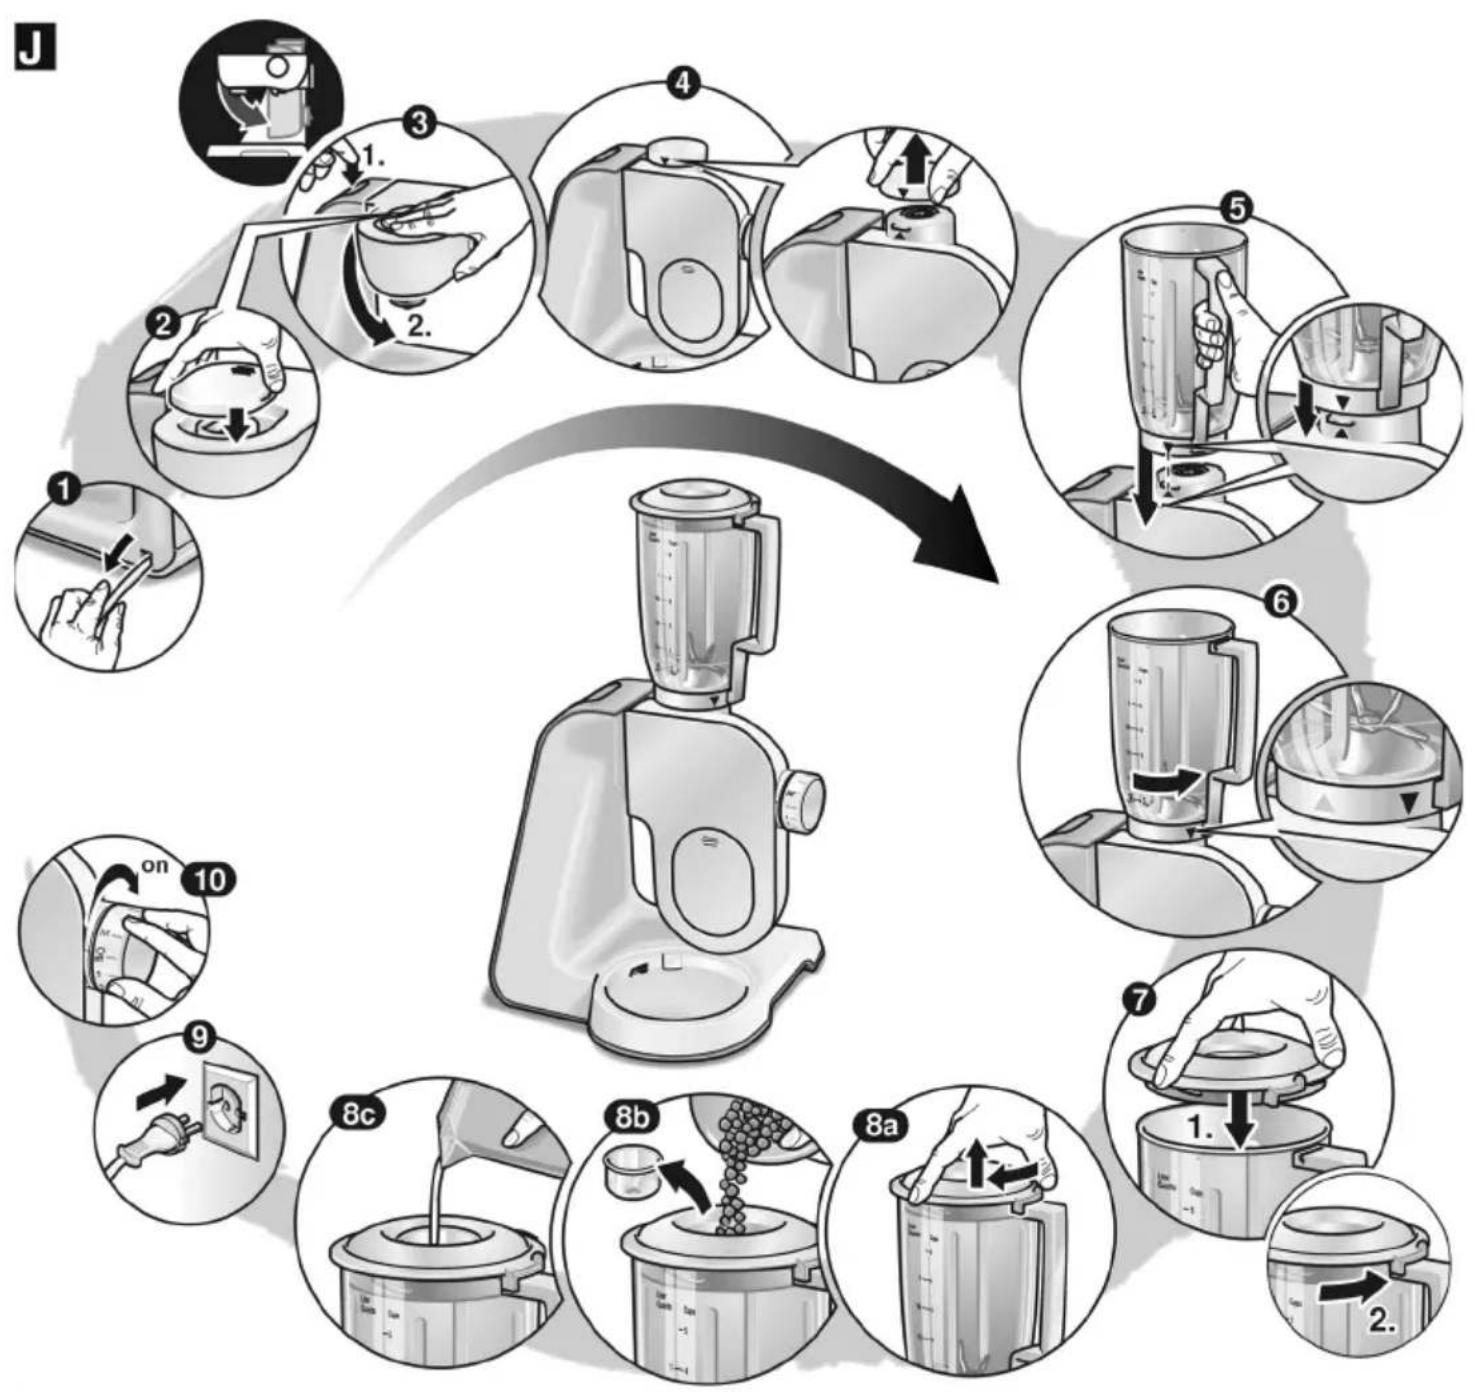
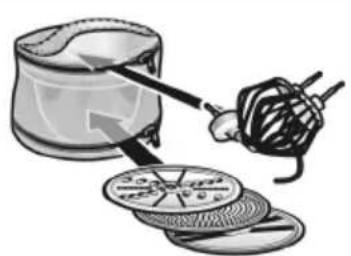
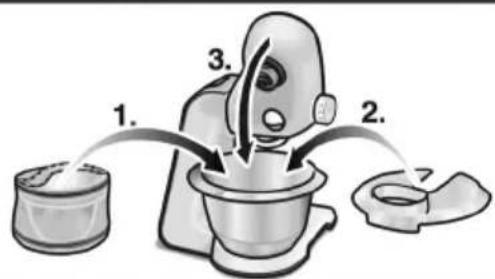
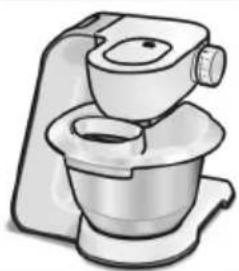
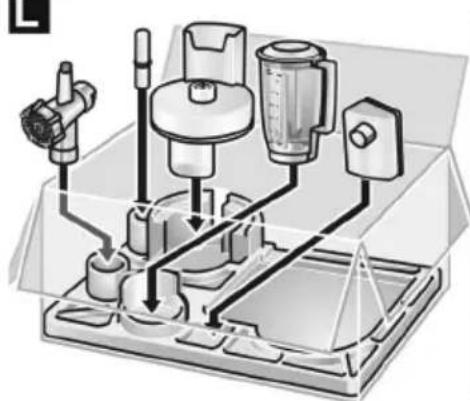
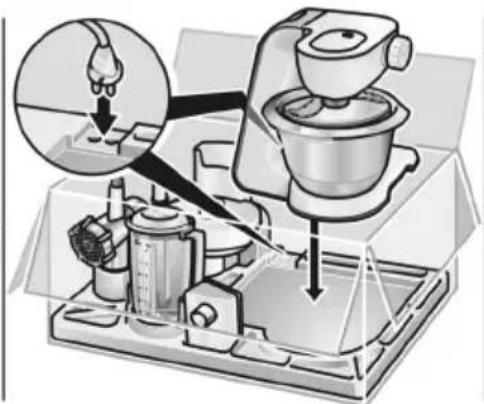
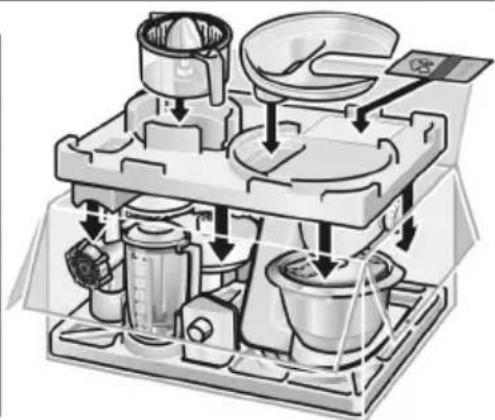
| M | M/1...4 | M/1...7 | STAINLESS STEEL | |||||
| MUM 55761 | ||||||||
| MUM 55761 | √ | √ | √ | √ | ||||||


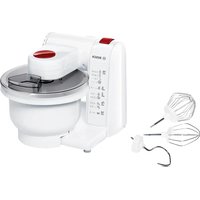
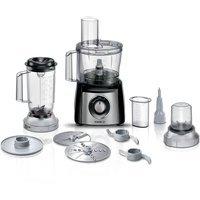

- CONTENTS
- FOR YOUR SAFETY
- GENERAL SAFETY INSTRUCTIONS
- ELECTRIC SHOCK RISK
- SAFETY INSTRUCTIONS FOR THIS APPLIANCE
- RISK OF INJURY
- EXPLANATION OF THE SYMBOLS ON THE APPLIANCE OR ACCESSORY
- SAFETY SYSTEMS
- OVERVIEW
- BASE UNIT
- OPERATING POSITIONS FIG
- ATTENTION
- NOTE
- SELECTING THE OPERATING POSITION
- OPERATION
- IMPORTANT INFORMATION
- PREPARATION
- WARNING
- BOWL AND TOOLS
- RISK OF INJURY FROM ROTATING TOOLS
- OUR RECOMMENDATION
- ADDING MORE INGREDIENTS
- AFTER USING THE APPLIANCE
- CONTINUOUS-FEED SHREDDER
- PREDETERMINED BREAKING POINT FIG
- REVERSIBLE SHREDDING DISC - COARSE/FINE
- WORKING WITH THE CONTINUOUS-FEED SHREDDER FIG
- BLENDER
- WORKING WITH THE BLENDER (FIG.)
- ADDING MORE INGREDIENTS (FIG. 1-8)
- CLEANING AND SERVICING
- RISK OF ELECTRIC SHOCK
- CLEANING THE BOWL AND TOOLS
- CLEANING THE CONTINUOUS-FEED SHREDDER
- RISK OF INJURY FROM SHARP BLADES
- STORAGE
- FIG. K
- TROUBLESHOOTING
- IMPORTANT INFORMATION FOR MUM54.~/ MUM55./MUM
- THE SWIVEL ARM MUST BE ENGAGED IN EVERY OPERATING POSITION
- FAULT
- APPLIANCE DOES NOT START
- REMEDIAL ACTION
- APPLICATION EXAMPLES
- WHIPPED CREAM
- EGG WHITE
- SPONGE MIXTURE
- CAKE MIXTURE
- SHORT PASTRY
- YEAST DOUGH
- PASTA DOUGH
- BREAD DOUGH
- MAYONNAISE
- HONEY BREAD SPREAD
- DISPOSAL
- WARRANTY CONDITIONS
- OVERLOAD SAFETY
- PLACE THE CONTAINER
- WORKING INSTRUCTIONS FIGURES
- INSTRUCTION
- MUZ5CC
- SAFETY INSTRUCTIONS FOR YOUR DEVICE
- LOCK AGAINST SWITCHING ON
- WORK POSITION ILLUSTRATION E
- INSTRUCTIONS
- DEVICE AND ACCESSORIES
- SAFETY INSTRUCTIONS FOR WORKING WITH ATTACHMENTS
- WORKING WITH THE DEVICE AND ATTACHMENTS
- RECOMMENDATIONS
- ADDING INGREDIENTS
- WORK BOWL
- MULTI-FUNCTION ATTACHMENT
- SAFETY INSTRUCTIONS
- ACCESSORY FOR LOADING THE BOWL
- DOUBLE-SIDED DISC FOR CUTTING - THICK/THIN SLICES
- DOUBLE-SIDED SHREDDER - COARSE/FINE
- DISC GRATER - MEDIUM
- WORKING WITH THE MULTIFUNCTIONAL NOZZLE
- AFTER WORK
- DANGER OF INJURY FROM SHARP BLADES/ROTATING KNIVES
- DANGER OF BURNS
- WORKING WITH THE BLENDER - LOW SPEED
- ADDING INGREDIENTS WHILE WORKING
- CLEANING AND CARE
- CLEANING THE MAIN UNIT
- DANGER OF ELECTRIC SHOCK
- CLEANING THE ATTACHMENTS
- CLEANING THE BLENDER
- DANGER OF INJURY FROM SHARP BLADES
- DESCALING
- SAFETY DURING OPERATION
- DANGER OF INJURY
- IMPORTANT INSTRUCTIONS FOR MUM54../MUM55./MUM
- MALFUNCTION
- REMEDY
- INTENDED USE
- VERTICAL WHISK
- NO MISTAKES
- WHISK THE DOUGH
- KNEAD THE DOUGH
- BUTTER MASS METHOD
- CNCTEMBI 6E3ONACHOCTN
- MUM55../MUM
- BHIMAHHE
- CMECNTELBHA YASHA N HACAIKN
- ONACHOCB TPABMNPOBAHN O BPAUOUNECHACAJKN
- WORKING WITH THE UNIVERSAL CUTTER
- WORKING WITH THE BLENDER FIGURE
- LOADING INGREDIENTS FIGURE
- NN
- IMPORTANT NOTE
- FIGURE K
- HELP WITH TROUBLESHOOTING
- IMPORTANT NOTE MUM54./MUM55./MUM
- ELIMINATION
- USAGE EXAMPLES
- EGG WHITES
- SPONGE CAKE
- RICH DOUGH
- DOUGH FOR MACARONI
- MUZ5FW
- AOLAIUOSI LAO
- ∴
- 国
- AE UNITED ARAB EMIRATES
- AL REPUBLIC OF ALBANIA, ALBANIA
- BA BOSNIA AND HERZEGOVINA, BOSNIA-HERZEGOVINA
- BE BELGIUM BSH HOME APPLIANCES S.A
- BH BAHRAIN
- BY BELARUS, ENAPYCB
- CH SCHWEIZ, SUISSE, SVIZZERA, SWITZERLAND
- FR FRANCE
- GR GREECE. EAAAC
- HR HRVATSKA, CROATIA
- IE REPUBLIC
- IL ISRAEL
- IN INDIA, BHARAT
- IS ICELAND
- IT ITALIA, ITALY
- KZ KAZAKHSTAN, KAZAKHSTAN
- LT LIETUVA, LITHUANIA
- LU LUXEMBOURG
- LV LATVIJA, LATVIA
- MD MOLDOVA
- ME CRNA GORA, MONTENEGRO
- MK MACEDONIA, MACEDONIA
- MT MALTA
- MV RAAJEYGE JUMHOORIYYAA, MALEDIVES
- NL NEDERLAND, NETHERLANDS
- PL POLSKA, POLAND
- SA KINGDOM SAUDI ARABIA
- SE SVERIGE, SWEDEN
- SG SINGAPORE, 新加坡
- SI SLOVENIJA, SLOVENIA
- UA UKRAINE, UKRAINE
- XS SRBIJA, SERBIA
- BSH HOME APPLIANCES (PTY) LTD
- BOSCH HOME APPLIANCE GROUP
Brand : BOSCH
Model : MUM55761
Category : Food Processor