ACE 102 IXL - Coffee machine WHIRLPOOL - Free user manual and instructions
Find the device manual for free ACE 102 IXL WHIRLPOOL in PDF.

| Product type | Espresso coffee machine with built-in grinder |
| Brand | Whirlpool |
| Model | ACE 102 IXL |
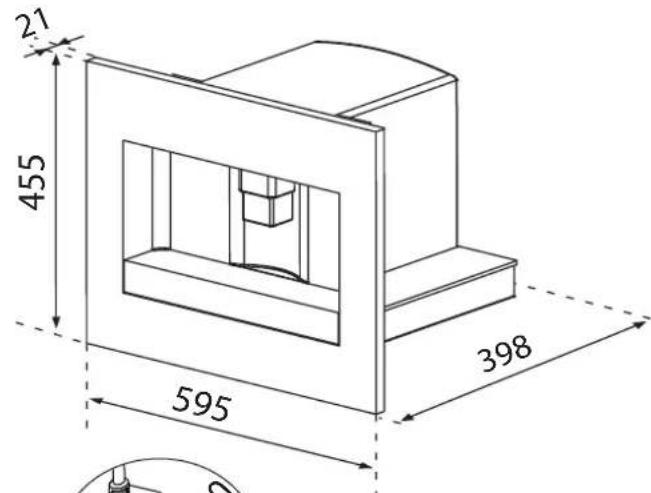
| Dimensions (W × H × D) | 595 × 455 × 398 mm |
| Weight | 26 kg |
| Power supply | 220-240 V ~ 50/60 Hz, 10 A max |
| Water tank capacity | 1.8 L |
| Bean hopper capacity | Approximately 250 g |
| Types of coffee prepared | Espresso, strong coffee, normal, long, mug, cappuccino, latte, hot water |
| Usage | Whole beans or ground coffee |
| Grind adjustment | 7 positions (from fine to coarse) |
| Milk system | Integrated milk tank with adjustable frother |
| Programmable functions | Coffee quantity, milk quantity, coffee temperature, switch-on duration, clock, automatic start |
| Maintenance | Automatic circuit cleaning, descaling program, cleaning of removable brewing unit, cleaning of milk tank |
| Safety | Automatic shut-off, burn protection, main switch |
| Display | Digital screen with multilingual menus |
| Included accessories | Dosing spoon, milk tank, water hardness test strip |
Frequently Asked Questions - ACE 102 IXL WHIRLPOOL
User questions about ACE 102 IXL WHIRLPOOL
0 question about this device. Answer the ones you know or ask your own.
Ask a new question about this device
Download the instructions for your Coffee machine in PDF format for free! Find your manual ACE 102 IXL - WHIRLPOOL and take your electronic device back in hand. On this page are published all the documents necessary for the use of your device. ACE 102 IXL by WHIRLPOOL.
USER MANUAL ACE 102 IXL WHIRLPOOL
IMPORTANT SAFETY INSTRUCTIONS 25
Your safety and that of others is paramount. 25
Critical safety warnings 25
Prescribed use. 26
Instructions for use 26
PRELIMINARY STEPS 26
Transport check. 26
Installing the appliance 26
Connecting the appliance 26
SCRAPPING 26
DECLARATION OF CONFORMITY 26
BUILT-IN INSTALLATION 27
PRODUCT DESCRIPTION 29
Appliance 29
Control panel 29
Milk and accessories container. 29
USING THE APPLIANCE FOR THE FIRST TIME 30
SWITCHING ON AND PREHEATING 30
MAKING COFFEE (USING COFFEE BEANS) 31
CHANGING THE AMOUNT OF COFFEE IN THE CUP 32
ADJUSTING THE COFFEE GRINDER 32
MAKING ESPRESSO WITH PRE-GROUND COFFEE (INSTEAD OF BEANS) 32
RUNNING OFF HOT WATER 32
MAKING CAPPUCCINO. 33
CHANGING THE AMOUNT OF MILK AND COFFEE FOR CAPPUCCINO 33
CHANGING AND SETTING MENU PARAMETERS 34
Setting the language 34
Rinsing 34
Changing the duration of operation 34
Setting the clock 34
Setting automatic start time 34
Changing the coffee temperature 35
Setting water hardness 35
Dscaling 35
Resetting factory default values (reset) 35
Statistics 36
Setting the tone 36
Programming coffee 36
Programming cappuccino 36
CLEANING AND MAINTENANCE 36
Cleaning the machine 36
Cleaning the coffee grounds container 36
Cleaning the drip tray 36
Cleaning the water tank. 36
Cleaning the spouts 37
Cleaning the pre-ground coffee feed funnel 37
Cleaning the inside of the machine 37
Cleaning the brewing unit 37
Cleaning the milk container 38
SWITCHING OFF THE APPLIANCE 38
DISPLAYED MESSAGES 39
TROUBLESHOOTING 40
TECHNICAL DATA 41
IMPORTANT SAFETY INSTRUCTIONS
The appliance is not intended for use by persons (including children) with reduced physical, sensory or mental capabilities, or lack of experience and knowledge, unless they have been given supervision or instruction concerning use of the appliance by a person responsible for their safety.
Children should be supervised to ensure that they do not play with the appliance.
Cleaning and user maintenance shall not be made by children without supervision.
Never immerse the appliance in water.
This is an household appliance only. It is not intended to be used in: staff kitchen areas in shops, offices and other working environments; farm houses; by clients in hotels, motels and other residential type environments; bed and breakfast type environments.
If the plug or power cable is damaged, it must be replaced by customer services only to avoid all risk.
For European markets only:
This appliance can be used by children aged from 8 years and above if they have been given supervision or instruction concerning use of the appliance in a safe way and if they understand the hazard involved. Cleaning and user maintenance shall not be made by children unless they are older than 8 and supervised. Keep the appliance and its cord out of the reach of children aged less than 8 years.
Appliances can be used by persons with reduced physical, sensory or mental capabilities or lack of experience and knowledge if they have been given supervision or instruction concerning use of the appliance in a safe way and understand the hazards involved.
Children shall not play with the appliance.
When not in use and before cleaning, always unplug the appliance.
Surfaces marked with this symbol become hot during use (the symbol is present in certain models only).
Your safety and that of others is paramount
Failure to fully comply with the indications given in this user handbook can lead to electric shocks, serious injury, burns, fire, or damage to the appliance.
Important warnings are accompanied by the following symbols.

This is the danger symbol, pertaining to safety, which alerts users to potential risks to themselves and others. All safety warnings are preceded by the danger symbol and the following terms:

DANGER

WARNING
Indicates a hazardous situation which, if not avoided, will result in serious injury.
Indicates a hazardous situation which, if not avoided, may result in serious injury.
Critical safety warnings

WARNING
This appliance is designed exclusively for domestic use.
-
This is an electrical appliance; you must therefore observe the following safety warnings:
-
do not touch the appliance with wet hands;
-
do not touch the plug with wet hands;
-
make sure that the power socket used is always accessible, so that the appliance can be unplugged whenever necessary;
-
in the event of an appliance malfunction, do not attempt to carry out any repairs yourself. Switch the appliance off using the main switch (A23), unplug it from the mains and contact After-sales Service.
-
Keep packaging materials (plastic bags, polystyrene) out of reach of children.
- Risk of Burns! This machine produces hot water and hot steam may form during operation. Take care to avoid contact with splashes of hot water or hot steam. Use the knobs or handles.
- Do not hold onto or lean on the coffee machine while it is outside the housing unit.
Do not place items containing liquids or flammable or corrosive materials on the machine. Use the accessories compartment to store all accessories needed for making coffee (for example, the scoop). Do not place unstable objects on the machine, or large items which might prevent it being moved.
- Do not use the machine while it is removed from the housing unit: always wait for the machine to be switched off before removing it. The only exception to this rule is adjustment of the coffee grinder, which must be carried out with the machine extracted from the housing (see chapter ADJUSTING THE COFFEE GRINDER).
N.B.: only use original spare parts and accessories, or those expressly recommended by the manufacturer.

Prescribed use
This machine is designed and constructed for the preparation of coffee and for heating drinks.
Any other use is to be considered improper.
This machine is not suitable for commercial use. The manufacturer declines all liability for damage or injury resulting from improper use of the machine.
This appliance may be installed above a built-in oven if the latter is equipped with a rear cooling fan (maximum power 3kW).
Instructions for use
Read this user handbook carefully before using the machine.
-
Keep this handbook in a safe place.
-
Failure to observe the instructions can lead to personal injury or damage to the appliance. The manufacturer declines all liability for injury or damage resulting from failure to observe these user instructions.
N.B.: the machine is equipped with a cooling fan. The fan switches on every time the machine dispenses coffee, steam or hot water. It switches off again automatically after a few minutes.
PRELIMINARY STEPS
Transport check
After unpacking the appliance, check that it is undamaged and that all the accessories are present and correct. Do not use the appliance is there is any visible damage. Contact the After-sales Service.
Installing the appliance

WARNING
- Installation must be carried out by a qualified technician in accordance with local regulations (see chapter BUILT-IN INSTALLATION).
- Keep the packaging material (plastic bags, polystyrene parts, etc.) out of the reach of children.
- Under no circumstances should the appliance be installed in rooms where the temperature may drop to 0^ .
- Adjust the water hardness setting as soon as possible, following the instructions in chapter BUILT-IN INSTALLATION.
Connecting the appliance

WARNING
Make sure that the voltage indicated on the rating plate on the underside of the machine corresponds to the domestic power supply voltage.
Connect the machine to a professionally installed power socket having a current rating of at least 10A and an efficient earth connection. If the appliance plug and socket are incompatible, have an electrician replace the socket with one of a suitable type. Observance of safety directives requires that a multi pole switch with a minimum contact gap of 3mm be used for the installation. Do not use multiple plug adapters or extension cords.
In case of damage to the plug or cable have them replaced only by the After-Sales Service in order to avoid any risk.

WARNING
The mains power supply must have electrical disconnect devices in compliance with national installation standards.
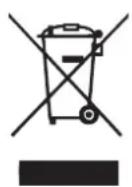
SCRAPPING
Electrical appliances must not be disposed of as general household waste. Appliances marked with this symbol fall under European Directive 2002/96/CE. Electrical and electronic appliances must not be disposed of as household waste, but delivered to an authorized collection centre for scrapping. Correct scrapping of the appliance after its working life prevents damage to the environment and potential health hazards. For further information on the scrapping of the appliance, contact your local authority, the waste disposal service or the shop where you purchased the product.
DECLARATION OF CONFORMITY (C)
This appliance conforms to the following EC directives:
- Low Voltage Directive 2006/95/EC and subsequent amendments.
- Directive EMC 2004/108/EC and subsequent amendments.
The materials and articles intended to come into contact with foodstuffs conform to the requirements of European regulation (EC) N°1935/2004.
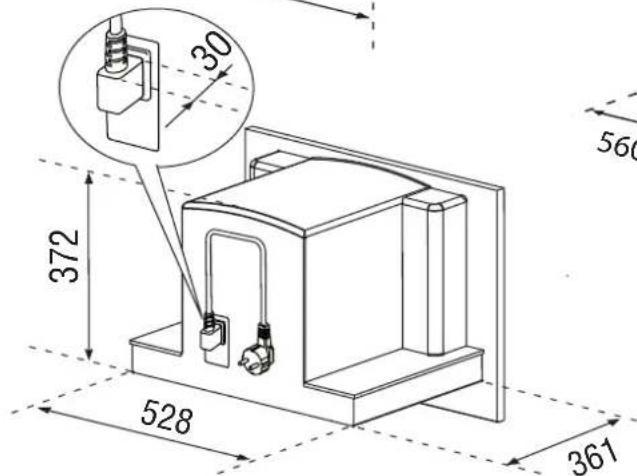
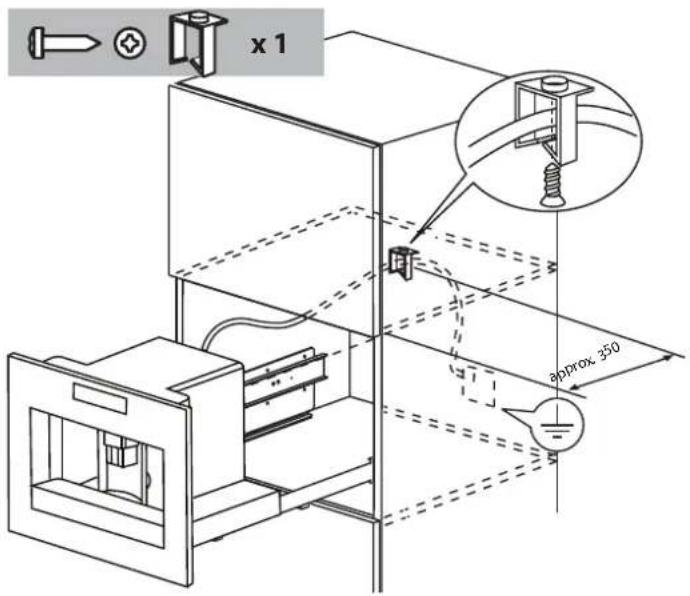
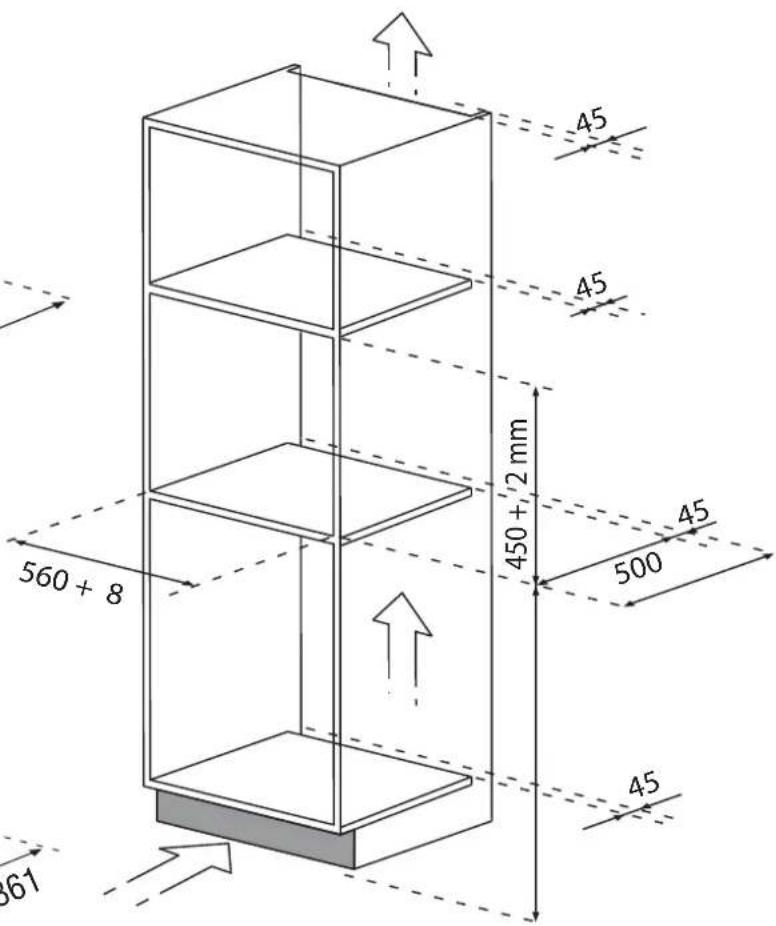
BUILT-IN INSTALLATION
Check the minimum measurements required for correct installation of the appliance.
The coffee machine must be installed in a column unit, which must in turn be securely fixed to the wall by means of commercial brackets.
Attention:
Disconnect the appliance from the mains before carrying out any installation work or servicing.
Kitchen units in contact with the appliance must be heat resistant (min. 65^)
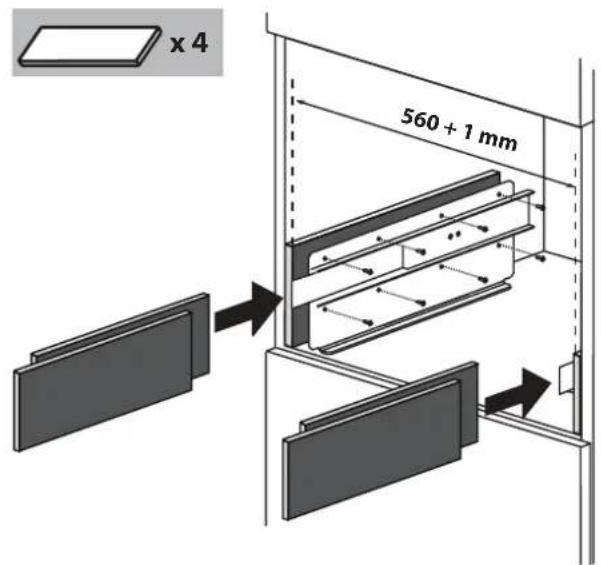
To ensure adequate ventilation, provide an opening on the bottom of the housing (see dimensions in Figure).
Dimensions in mm

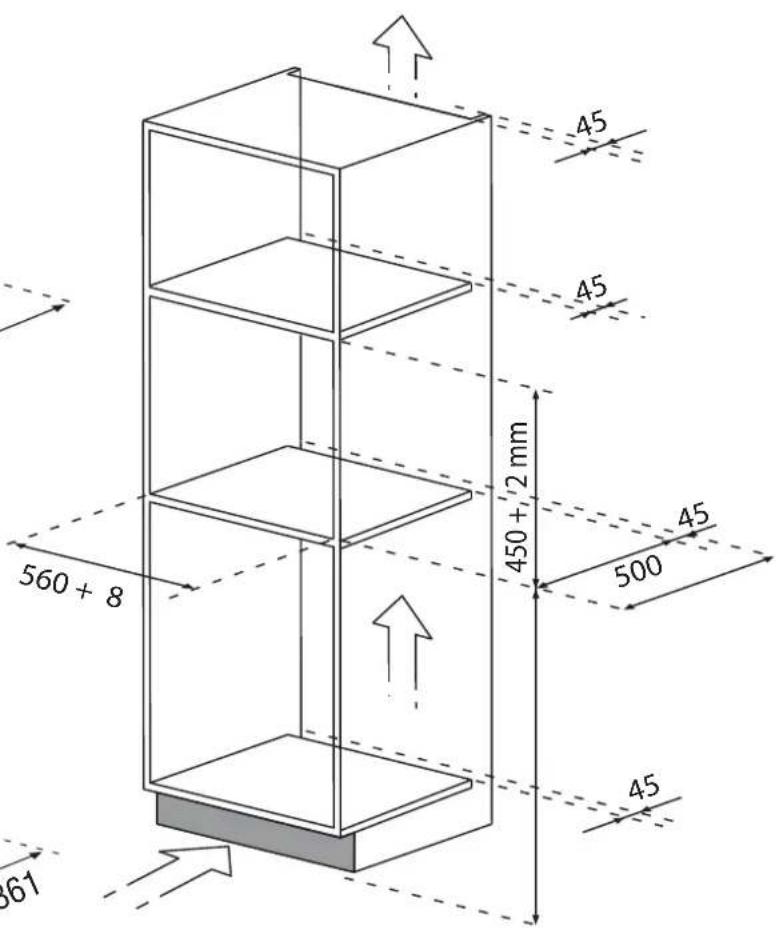
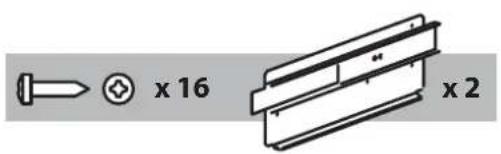
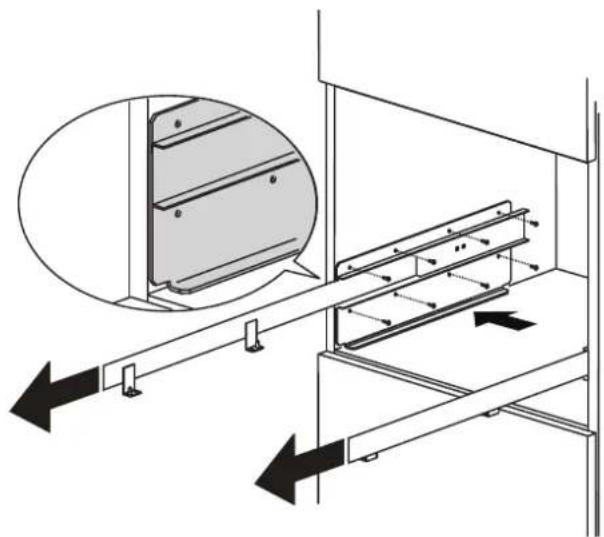
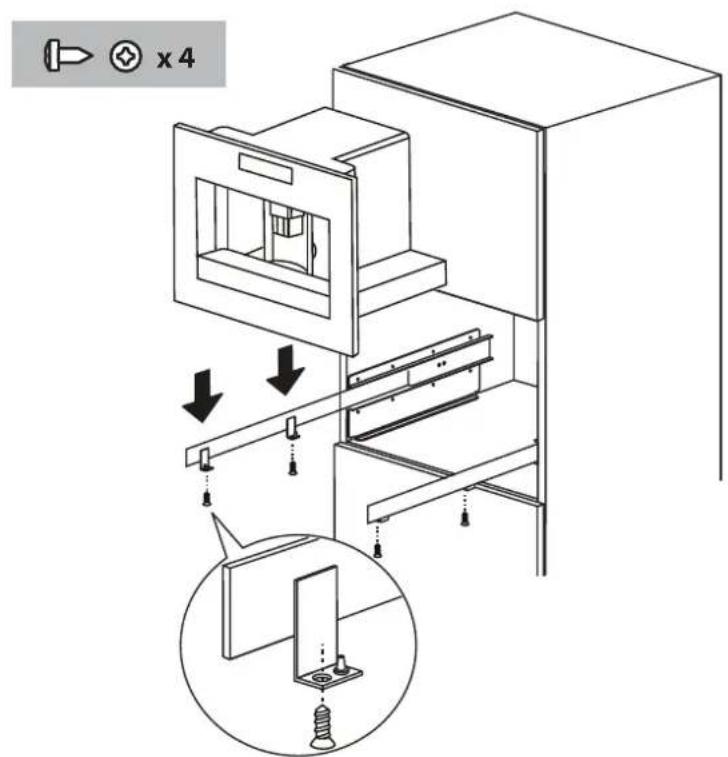
Position the runners on the sides of the housing, as shown in the Figure. Secure the runners with the screws supplied, then pull them out to full extension. If the coffee machine is installed above a "warmer drawer", use the top of the latter as a reference for positioning the runners. In this case, there will be no support surface.

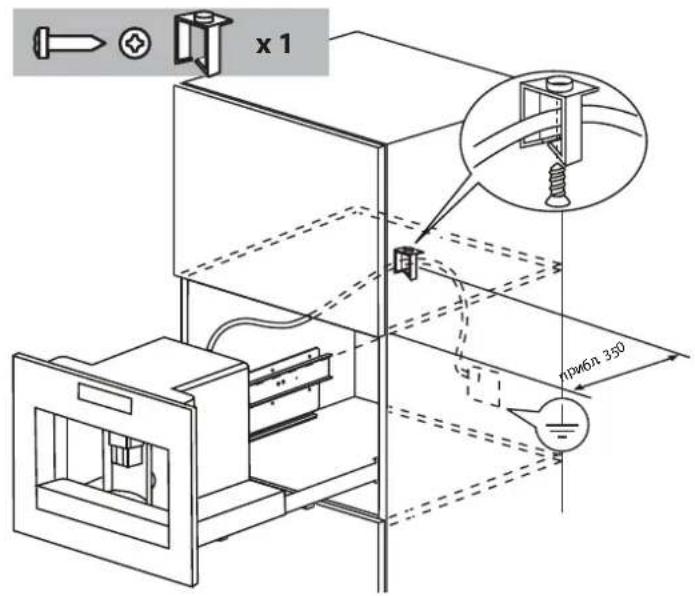
Secure the power supply cable with the clip provided. The power supply cable must be long enough to allow the machine to be removed from the housing in order to fill the coffee bean container. Regulations require that the appliance is earthed. Electrical connection must be carried out by a qualified electrician in accordance with the manufacturer's instructions.
Position the machine on the runners, making sure that the pins engage properly in their seats before securing with the screws provided.

If machine alignment requires adjustment, position the spacers provided either below or at the side of the support.

PRODUCT DESCRIPTION
Appliance
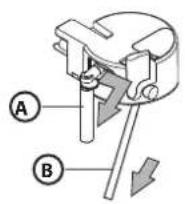
See image A on page 2.
A1 Cup tray
A2 Service door
A3 Coffee feed
A4 Coffee grounds container
A5 Brewing unit
A6 Cup tray lights
A7 On/stand-by button
A8 Control panel
A9 Terminal board
A10 Hot water and steam nozzle
A11 Storage tray
A12 Water tank
A13 Coffee spout (height-adjustable)
A14 Drip tray
A15 Lid of coffee bean container
A16 Coffee bean container
A17 Grinding coarseness adjustment knob
A18 Ground coffee funnel cap
A19 Scoop
A20 Scoop compartment
A21 Ground coffee feed funnel
A22 Power supply cable
A23 Main ON/OFF switch
Control panel
See image B on page 2.
N.B.: the touch-control buttons are activated at the lightest touch of a finger.
B1 Display: guides the user through use of the machine.
B2 MENU Button to activate or deactivate the menu setting mode.
B3 Button for selecting the coffee taste.
B4 Button for selecting the type of coffee desired (espresso, small cup, medium cup, large cup, mug)
B5-B6 Buttons for browsing through the various menu entries.
B7 Button OK to confirm the selection
B8 Button to prepare one cup of coffee
B9 Button to prepare two cups of coffee
B10 Button to prepare a cappuccino.
B11 Button to dispense hot water.
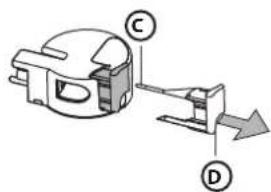
Milk and accessories container
See image C on page 2.
C1 Milk frother pointer
C2 Milk container handle
C3 CLEAN button
C4 Milk intake tube
C5 Frothed milk spout
C6 Milk frother
C7 Hot water spout
USING THE APPLIANCE FOR THE FIRST TIME
Coffee has been used to factory test the machine and it is therefore completely normal for there to be traces of coffee in the mill.
- Customize water hardness as soon as possible, following the instructions in paragraph Setting water hardness.
-
Connect the appliance to the mains power supply. Set the desired language.
-
Scroll using the buttons (B5 and B6) until you find the desired language (Figure 2). When the display shows: PRESS OK TO INSTALL ENGLISH, press the OK button (B7) (Figure 3). If you select the wrong language, follow the instructions in paragraph Setting the language. If, on the other hand, your language is not available, select one of those displayed. English is the reference language for the instructions. Next, follow the instructions indicated on the display.
- After 5 seconds, the display shows FILL TANK!: remove the water tank (Figure 4), rinse and fill to the MAX line with fresh water then replace in the machine.
- Place a cup underneath the hot water spout (Figure 5). (If the water spout is not inserted, the appliance displays the message INSERT WATER SPOUT! insert it as shown in Figure 6. The display shows HOT WATER. PRESS 'OK'. Press OK (B7) (Figure 3) and after a few seconds, water runs out of the spout.
- The display shows TURNING OFF. PLEASE WAIT... and switches off.
- Slide the machine out, using the handles provided (Figure 7); open the lid, fill the coffee bean container, then close the lid and push the machine back into the housing.
The coffee machine is now ready for normal use.

WARNING
Never place pre-ground coffee, freeze-dried coffee, caramelized coffee or foreign objects in the container, as they could damage the machine
N.B.:
- When using the appliance for the first time, you need to make 4/5 cups of coffee and 4/5 cappuccinos before the appliance gives good results.
Each time the machine is turned on using the main ON/OFF switch (A23) it runs the SELF-DIAGNOSIS function and then switches off: to switch back on again, press the (A7) on/stand-by button (Figure 1).
SWITCHING ON AND PREHEATING
Each time the machine is switched on, it performs an automatic preheat and rinse cycle which cannot be interrupted. The machine is ready for use only after completion of this cycle

WARNING
Risk of burns! During rinsing, some hot water is run off from the coffee spouts.
To switch the appliance on, press the (A7) on/stand-by button (Figure 1): the display shows HEATING UP. PLEASE WAIT.... After heating, the display shows another message: RINSING. The machine is at working temperature when the display shows MEDIUM CUP STANDARD TASTE.
MAKING COFFEE (USING COFFEE BEANS)
- The machine is factory-set to make coffee with a standard taste. You can choose coffee with the following tastes: extra-mild, mild, standard, strong or extra-strong, with the option of using pre-ground coffee. To choose the desired taste, press the button (B3) (Figure 8) repeatedly until the required taste is displayed.
- Place 1 cup under the coffee spouts if you wish to make 1 coffee (Figure 9) or 2 cups for 2 coffees (Figure 9). For a creamier coffee, lower the coffee spout as near as possible to the cups (Figure 10).
- Press button (B4) (Figure 11) to select the type of coffee desired: espresso, small cup, medium cup, large cup, mug.
Press button (B8) (Figure 12) to make 1 coffee, or button (B9) (Figure 13) to make 2 coffees.
The machine grinds the coffee beans and then runs off the coffee.
After running off the pre-set quantity of coffee, the machine automatically stops run-off and then empties the coffee grounds into the grounds container.
- After a few seconds, the machine is once again ready for use.
- To switch off the machine, press the on/stand-by button (A7) (Figure 1). (Before switching off, the machine runs an automatic rinse cycle: beware of the danger of burns).
N.B.:
If coffee run-off is too slow or incomplete, refer to chapter ADJUSTING THE COFFEE GRINDER.
If coffee run-off is too quick and the coffee is not creamy enough, refer to chapter ADJUSTING THE COFFEE GRINDER.
-
Tips for hotter coffee:
-
proceed as described in chapter CHANGING AND SETTING MENU PARAMETRS, function Rinsing;
- do not use very thick cups as they absorb too much heat unless pre-heated in advance;
-
use pre-heated cups, rinsing them with hot water.
-
You can interrupt run-off any time by pressing the previously selected button again.
As soon as run-off is finished, to increase the amount of coffee in the cup, simply press and hold the previously selected button within 3 seconds of completion of run-off).
- When the display shows FILL TANK! the water tank must be filled, otherwise the machine will not prepare any coffee. (The tank may still contain some water; this is normal).
Every 14 single coffees (or 7 doubles) made, the display shows the message EMPTY GROUNDS CONTAINER!. To clean, open the service door on the front by pulling the spout (Figure 16), then remove the drip tray (Figure 17) and clean it.
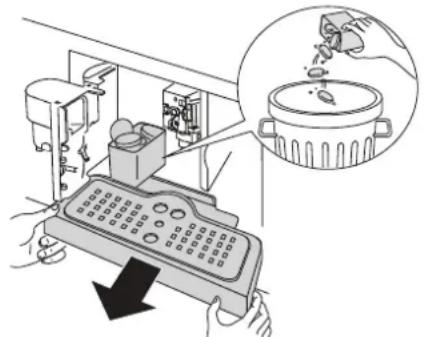
When cleaning the machine, always fully remove the drip tray.
- When removing the drip tray, the grounds container MUST be emptied. If this is not done, the machine may clog up.
- The water tank must never be pulled out during coffee run-off. If the tank is removed at this point, the machine cannot make the coffee and will display the message: GROUND TOO FINE. ADJUST MILL! PRESS 'OK' followed by FILL TANK!. Check the water level in the tank and replace in the machine. To restart the machine, insert the water spout if not already inserted (Figure 6), press OK (B7) and the display shows HOT WATER. PRESS 'OK'. Press OK (B7) within a few seconds, let water run off from the spout for around 30 seconds. After run-off, the machine display automatically reverts to the programmed standard settings.
The machine may require you to repeat the operation several times; this is in order to eliminate any air in the hydraulic circuit.
If the above described operation is not carried out correctly or if the machine is switched off, the display may revert to showing the programmed standard settings, even if in actual fact the problem persists.
CHANGING THE AMOUNT OF COFFEE IN THE CUP
The appliance is factory-set to automatically deliver the following amounts of coffee:
- Espresso,
- Small cup,
M e d i u m c u p L a r g e c u p
M u g
To modify these quantities and set the amount of coffee desired, for example changing the amount of espresso, proceed as follows:
Press the button (B4) repeatedly until the display shows ESPRESSO.
- Keep the button (B8) pressed until the display shows the message PROGRAM QUANTITY. Meantime the machines runs off coffee.
Press the button (B8) again to stop run-off and reprogram the machine with the new quantity of coffee.
The machine is now reprogrammed with the new setting and is ready for use.
You can also modify the amount of coffee in a small cup, medium cup, large cup and mug.
N.B.: press button (B9) for a measure of coffee which is double that previously set using button (B8).
If you wish to return to the original machine settings, see paragraph Resetting factory default values (reset).
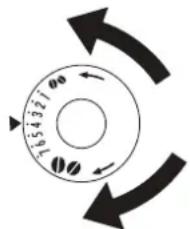
ADJUSTING THE COFFEE GRINDER
The coffee grinder is factory-set and does not require adjustment; nonetheless, if run-off is too fast or too slow (coffee drips out), carry out an adjustment using the grinding coarseness adjustment knob (Figure 14).

WARNING
The adjustment knob must only be turned while the grinder is in operation.
For slower run-off and creamier coffee, turn the knob 1 click in an anti-clockwise direction (=finer ground coffee).
For faster run-off (not in drips), turn the knob 1 click in a clockwise direction (=coarser ground coffee).
MAKING ESPRESSO WITH PRE-GROUND COFFEE (INSTEAD OF BEANS)
- Press button (B3)(Figure 8) and select the pre-ground coffee function.
- Slide the machine out towards you; be sure to use the purpose-designed handles (Figure 7).
- Lift the small central lid, pour one scoop of pre-ground coffee into the funnel (Figure 18); push the machine back inside the housing and proceed as described in chapter MAKING COFFEE (USING COFFEE BEANS).
N.B.: only one coffee at a time can be made, press button (B8) (Figure 12).
If, after operating the machine with pre-ground coffee, you want to revert to making coffee with beans again, deactivate the pre-ground coffee function by pressing button (B3) (Figure 8) again.
N.B.:
- Never add pre-ground coffee when the machine is switched off, as it could spread throughout the inside.
- Never add more than 1 scoop, otherwise the machine will not prepare the coffee.
- Use only the scoop provided.
- Only use pre-ground coffee for espresso coffee machines.
If you add more than one scoop of ground coffee and the funnel becomes blocked, carefully use a knife to clear the coffee through the funnel (Figure 20), then remove and clean the brewing unit and the machine as described in paragraph Cleaning the brewing unit.
RUNNING OFF HOT WATER
- Always check that the machine is ready for use.
- Check that the water spout is attached to the nozzle (Figure 6).
- Place a container under the spout.
- Press OK (B7).
The display shows HOT WATER and hot water runs out of the spout, filling the container below (Do not run off hot water for more than 2 minutes at a time). To stop the flow, press the button (B11). Run-off stops automatically when the preset quantity of water has been dispensed.
MAKING CAPPUCCINO
- Select the taste of coffee you wish to use for making the cappuccino, pressing the button (B3).
- Remove the milk container lid.
- Fill the container with approximately 100ml of milk for each cappuccino you want to make (Figure 22), without exceeding the MAX line (equivalent to 750ml approx.) on the container. Ideally, use skimmed or semi-skimmed milk at refrigerator temperature (about 5^ ).
Make sure the milk intake tube is properly inserted in the rubber washer (Figure 23), then replace the milk container lid.
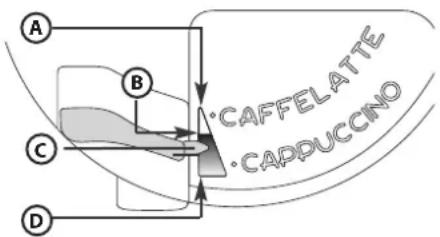
Position the milk frother pointer (C1) between the words CAPPUCCINO and CAFFELATTE printed on the milk container lid. The quantity of froth produced can be adjusted: move the pointer towards the word CAFFELATTE for a lighter froth. Moving the pointer, on the other hand, towards CAPPUCCINO gives a thicker froth.
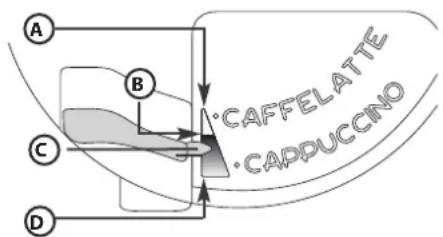
A.NO froth
B.Lighter froth
C. Pointer
D. Thicker froth
- Remove the hot water spout (Figure 6) and attach the milk container to the nozzle (Figure 24).
- Move the milk spout as shown in Figure 25 and place a sufficiently large cup under the coffee spout and the milk spout.
Press the button (B10). The message CAPPUCCINO is displayed and a few seconds later, frothed milk runs out of the milk spout and fills the cup below. (Run-off of milk stops automatically and coffee run-off begins). - The cappuccino is now ready: add sugar to taste and, if you like, dust the froth with powdered cocoa.
N.B.:
- While making cappuccino, you can stop frothed milk or coffee run-off by pressing the button (B10)
If the milk container empties completely during frothed milk run-off, release the container and add more milk. Then reattach the container and press the button (B10) to prepare more cappuccino.
To keep the milk frother hygienically clean at all times, always clean the internal tubes of the milk container lid after making cappuccino. The message PRESS CLEAN BUTTON is displayed:
- place a container under the milk spout (Figure 25);
- press and hold the CLEAN button (C3) on the milk container lid for at least 8 seconds, (Figure 25) to activate cleaning. The message CLEANING... is displayed with a progress bar below. Do not release the CLEAN button until the bar is complete and cleaning has ended. The cleaning cycle stops when the CLEAN button is released. After cleaning, remove the milk container and place it in the refrigerator. It is best not to leave milk out of the refrigerator for longer than 15 minutes.
If you want to modify the amount of coffee or frothed milk automatically run off into cups by the machine, proceed as described in chapter CHANGING THE AMOUNT OF MILK AND COFFEE FOR CAPPUCCINO.
CHANGING THE AMOUNT OF MILK AND COFFEE FOR CAPPUCCINO
The appliance is factory-set to automatically deliver a standard cappuccino. To modify these quantities, proceed as follows:
-
Fill the milk container up to the maximum level indicated on the container itself.
-
Keep the button (B10) pressed until the display shows the message PROGRAM QUANTITY MILK FOR CAPPUCCINO. Meantime the machine runs off milk.
Press the button (B10) again to stop run-off and reprogram the machine with the new quantity of milk.
After a few seconds, coffee begins running out and the display shows the message PROGRAM QUANTITY COFFEE FOR CAPPUCC..
Press the button (B10) again to stop run-off and reprogram the machine with the new quantity of coffee.
The machine is now reprogrammed with the new setting and is ready for use.
CHANGING AND SETTING MENU PARAMETERS
When the machine is ready for use, you can access the menu in order to change the following parameters or functions:
R I N S I N G
- SETTING THE CLOCK
• L A N G U A G E
• A U T O S T A R T
• D E S C A L I N G
COFFEE TEMPERATURE
- AUTO OFF
• W A T E R H A R D N E E S S
• R E S E T T O D E F A U L T
• S T A T I S T T I C S
- SETTING THE TONE
E X I T
Setting the language
To change the display language, proceed as follows:
- Press the MENU button (B2) to access the menu and then buttons (B5) and (B6) to select LANGUAGE.
- Press OK (B7).
- Press buttons (B5) and (B6) until the required language is displayed.
- Press OK (B7) to confirm.
- Press the MENU button (B2) to exit the menu.
Rinsing
This function is used to obtain hotter coffee. Proceed as follows:
If, when you turn the machine on, you select a small cup of coffee (less than 60ml), use the hot water from the rinse cycle to pre-heat the cup.
- If, on the other hand, more than 2/3 minutes have elapsed since the last coffee was made, pre-heat the brewing unit before making any more coffee. To do so, press the MENU button (B2) to access the menu; the display shows the message RINSING. Press OK (B7). The display shows 'OK' TO CONFIRM. Press the OK button (B7) again. Let the water run into the drip tray below or use it to fill (and then empty) the cup to be used for coffee, thus warming it.
Changing the duration of operation
The appliance is factory-set to switch off automatically after 30 minutes of inactivity. To change this time (max 120 min.), proceed as follows:
Press the MENU button (B2) to access the menu and then buttons (B5) and (B6) until the display shows the message AUTO-OFF.
- Press OK (B7) to confirm.
Press buttons (B5) and (B6) to set the period of time after which the appliance must switch off (30 minutes, 1 hour, 2 hours).
- Press OK (B7) to confirm.
- Press the MENU button (B2) to exit the menu.
Setting the clock
- Press the MENU button (B2) to access the menu and then buttons (B5) and (B6) until the display shows the message ADJUST TIME.
- Press OK (B7).
To set the hours, use buttons (B5) and (B6) then press OK (B7) to confirm.
To set the minutes, use buttons (B5) and (B6) and then press OK (B7) to confirm.
- Press the MENU button (B2) to exit the menu.
Setting automatic start time
This function allows you to set the machine to switch on automatically at a time of your choosing.
- Make sure the appliance clock has been set.
- Press the MENU button (B2) to access the menu and then buttons (B5) and (B6) until the display shows the message AUTO-START.
- Press OK (B7).
The machine displays the message AUTO-START ENABLE? - Press OK (B7) to confirm.
The display shows AUTO-START 07:30..
To set the auto start time, use the buttons (B5) and (B6) then press OK (B7) to confirm.
To set the minutes, use buttons (B5) and (B6) and then press OK (B7) to confirm.
Press OK (B7), the display shows AUTO-START ENABLED.
Changing the coffee temperature
To change the temperature of coffee run off, proceed as follows:
- Press the MENU button (B2) to access the menu and then buttons (B5) and (B6) until the display shows the message COFFEE TEMPERATURE;
- Press OK (B7).
- Press buttons (B5) and (B6) to select the required coffee temperature: low, medium, high.
- Press OK (B7) to confirm the temperature chosen.
- Press the MENU button (B2) to exit the menu.
Setting water hardness
If desired, the interval between descending cycles can be increased so that descending is performed less frequently and in accordance with the actual calcium content of the water used. Proceed as follows:
- Remove the "Total hardness test" water hardness strip from its packaging (attached to page 2), immerse it fully in the water for a few seconds. Next, remove it and wait around 30 seconds (until it changes colour and red squares appear on the strip).
- Press the MENU button (B2) to access the menu and then buttons (B5) and (B6) until the display shows the message WATER HARDNESS.
- Press OK (B7).
- Press buttons (B5) and (B6) to select the number of dots corresponding to the number of red squares which have formed on the test strip (for example, if the test strip shows 3 red squares, you need to select the message );
Press OK (B7) to confirm. The machine is now set to carry out descending when it is actually necessary. - Press the MENU button (B2) to exit the menu.
Dscaling

WARNING
Descalier contains acids. Observe the manufacturer's safety warnings given on the descaler pack.
N.B.: Only use descalers recommended by the manufacturer. Failure to do so invalidates the machine warranty. Failure to descale the machine regularly will also invalidate the warranty.
When the display shows the message DESCALE!, it is time to descale the machine. Proceed as follows:
Make sure that the machine is ready for use.
- Attach the water spout (C7) to the nozzle (A10).
- Press the MENU button (B2) to access the menu and then buttons (B5) and (B6) until the display shows the message DESCALING.
Press OK (B7), the display shows the message DESCALING. 'OK' TO CONFIRM.
Press OK (B7). The display shows the message ADD DESCALER. PRESS 'OK'.
Empty the water tank, pour in the contents of the bottle of descaler, taking care to observe the manufacturer's instructions on the label, then add water. Place a container with a capacity of approx. 2 litres underneath the hot water spout. - Press the OK button (B7); the descending solution runs out of the hot water spout and starts to fill the container below. The message DESCALING UNDERWAY... is displayed.
- The descending programme automatically follows a series of run-offs and pauses.
After approximately 30 minutes, the display shows the message RINSING. FILL TANK!.
Empty the water tank, rinse it thoroughly to eliminate all traces of descaler and then fill it again with clean water.
Fit the tank full of clean water back in the machine. The display shows the message RINSING COMPLETE. PRESS 'OK'. - Press OK again (B7). Hot water runs out of the spout, filling the container, and the message RINSING is displayed.
Wait for the message RINSING COMPLETE. PRESS 'OK!. - Press OK (B7). The display shows the message DESCALING COMPLETE. followed by FILL TANK!. Fill the tank again with clean water.
The descending programme is now complete and the machine is ready to prepare coffee again.
N.B.: if you interrupt the descending cycle before it has been completed, you will have to start again from the beginning.
N.B.: FAILURE TO DESCALE THE MACHINE REGULARLY WILL INVALIDATE THE MACHINE WARRANTY.
Resetting factory default values (reset)
To restore the machine's original default values (even after they have been changed), proceed as follows:
- Press the MENU button (B2) to access the menu and then buttons (B5) and (B6) until the display shows the message DEFAULT VALUES.
Press OK (B7), the display shows the message 'OK' TO CONFIRM.. - Press OK (B7) to restore factory settings. The display shows the message RESTORE for a few seconds.
- Press the MENU button (B2) to exit the menu.
Statistics
This function enables you to view the machine statistics. To view them, proceed as follows:
- Press the MENU button (B2) to access the menu and then buttons (B5) and (B6) until the machine shows the message STATISTICS.
- Press OK (B7).
-
Press buttons (B5) and (B6) to verify:
-
how many coffees and cappuccinos have been made;
- how many times the machine has been descaled;
-
the total number of litres of water run off.
-
Press the MENU button (B2) once to exit the function, or press MENU (B2) twice to exit the menu.
Setting the tone
This function enables you to activate or deactivate an acoustic signal emitted by the machine each time a button is pressed and each time the accessories are inserted/removed.
N.B.: the machine is factory set with the acoustic signal activated.
- Press the MENU button (B2) to access the menu and then buttons (B5) and (B6) until the display shows the message BEEP.
Press OK (B7). The display shows the message BEEP DISABLE?. - Press OK (B7) to deactivate the acoustic signal.
- Press the MENU button (B2) to exit the menu.
Programming coffee
For instructions on programming coffee, refer to chapter CHANGING THE AMOUNT OF COFFEE IN THE CUP.
Programming cappuccino
For instructions on programming cappuccino, see chapter CHANGING THE AMOUNT OF MILK AND COFFEE FOR CAPPUCCINO.
CLEANING AND MAINTENANCE
Cleaning the machine
Do not use solvents or abrasive detergents to clean the machine. A soft damp cloth will suffice. The following machine parts must be cleaned regularly:
- Coffee grounds container (A4).
D r i p t r a y (A 1 4 )
Water tank (A12).
- Coffee spouts (A13).
- Feed funnel for adding pre-ground coffee (A21).
- The inside of the machine, accessed from the service door (A2).
The brewing unit (A5).
Cleaning the coffee grounds container
When the display shows the message EMPTY GROUNDS CONTAINER!, empty and clean the grounds container. To clean, proceed as follows:
- Open the service door on the front of the machine (Figure 16), next remove the drip tray (Figure 17), and clean it.
- Clean the coffee grounds container thoroughly.
N.B.: When removing the drip tray, the grounds container MUST be emptied.
Cleaning the drip tray

WARNING
If the drip tray is not emptied, the water can overflow. This can damage the machine.
The drip tray has a water level indicator in the form of a red float (Figure 27).
Empty and clean the drip tray before the red float protrudes from the cup tray.
To remove the drip tray:
- Open the service door (Figure 16).
- Remove the drip tray and the coffee grounds container (Figure 17).
- Clean the drip tray and the grounds container (A4).
- Fit the drip tray and the coffee grounds container back in place (A4).
- Close the service door.
Cleaning the water tank
- Clean the water tank (A12) regularly (about once a month) with a damp cloth and a little mild detergent.
- Take care to remove all traces of detergent.
Cleaning the spouts
- Clean the spouts regularly, using a sponge (Figure 28).
- Check regularly that the holes in the coffee spout are not blocked. If necessary, remove coffee deposits with a toothpick (Figure 26).
Cleaning the pre-ground coffee feed funnel
- Check regularly (about once a month) that the feed funnel for pre-ground coffee is not blocked (Figure 20).

WARNING
Before any cleaning operation, switch the machine off using the main switch (A23) and unplug it from the mains.
Never immerse the coffee machine in water.
Cleaning the inside of the machine
- Check regularly (about once a week) that the inside of the machine is not dirty. If necessary, remove coffee deposits with a sponge.
- Remove any residues with a vacuum cleaner (Figure 29).
Cleaning the brewing unit
The brewing unit must be cleaned at least once a month.

WARNING
The brewing unit (A5) cannot be removed while the appliance is switched on. Do not attempt to use force to remove the brewing unit.
- Make sure that the machine is properly switched off (see SWITCHING OFF THE APPLIANCE).
- Open the service door (Figure 16).
- Remove the drip tray and the coffee grounds container (Figure 17).
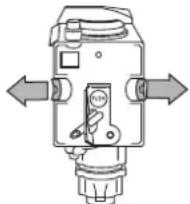
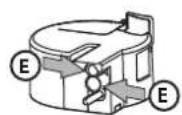
- Press the two red release buttons inwards and at the same time extract the brewing unit (Figure 30).
N.B.: Clean the brewing unit without any detergent since the inside of the piston is treated with lubricant which detergent would remove.
- Soak the brewing unit in water for about 5 minutes, then rinse.
- After cleaning, re-insert the brewing unit (A5) so that the support and the pin at the bottom are fully engaged; then push the PUSH symbol until it clicks into place.
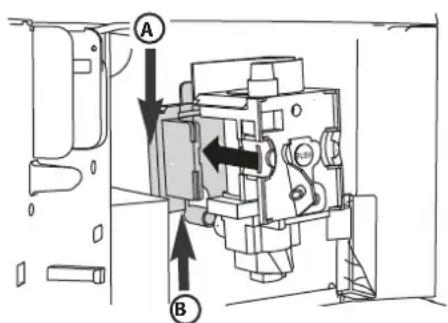
A. Support B.Pin
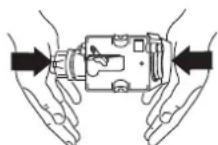
N.B.: If you encounter difficulty inserting the brewing unit, before inserting it adapt it to the right size by pressing it forcefully from both the bottom and top simultaneously as shown in the figure.
- Once inserted, make sure the two red buttons have clicked out.
- Replace the drip tray and coffee grounds container.
- Close the service door.
Cleaning the milk container

WARNING
Always clean the tubes inside the milk container (C) after preparing milk.
If there is still milk in the container, do not leave it out of the refrigerator for longer than is strictly necessary. Clean the container each time you prepare milk as described at point 3 in chapter MAKING CAPPUCCINO. All the components can be washed in the dishwasher, as long as they are placed in the top rack.
1. Turn the milk container lid clockwise and remove it.
2. Remove the milk spout and intake tube.
A. Milk spout
B. Intake tube
C. Groove
D. Pointer
E.Hole
- Remove the pointer by pulling it outwards.
- Wash all the components thoroughly with hot water and mild detergent. Make sure there is no milk residue left inside the holes or the groove on the fine end of the pointer.
- Check that the intake tube and spout are not clogged with milk residue.
- Replace the pointer, milk spout and intake tube.
- Replace the milk container lid.
SWITCHING OFF THE APPLIANCE
Each time the appliance is switched off, it performs an automatic rinse which cannot be interrupted.

WARNING
During rinsing, some hot water is run off from the coffee spouts. Avoid contact with splashes of water. To switch the appliance off, press the on/stand-by button (A7). The appliance performs a rinse cycle and then switches off.
N.B.: in the event of prolonged disuse, press the ON/OFF button (A23), on the side of the machine, in position 0.
| DISPLAYEDMESSAGEPOSSIBLECAUSE REMEDY | |
| FILL TANK!·The water tank is empty or incorrectly positioned. | ·Fill the tank with water and/or insert it correctly, pushing it as far as it will go. |
| GROUND TOO FINERADJUST MILL!·The ground is too fine so the coffee runs off too slowly. | ·Turn the grinding adjustment knob one click towards number 7. |
| INSERT WATER SPOUT AND PRESS 'OK'. | |
| GROUND TOO FINERADJUST MILL!·The tank was removed during run-off.·There is air in the hydraulic circuit. | ·Replace the tank and press OK (B7). The display shows HOT WATER. The machine runs off hot water and is then ready for use again. |
| (alternating with) PRESS 'OK' (and then) FILL TANK! | |
| EMPTY GROUNDSCONAINER!·The coffee grounds container (A4) is full or more than three days have passed since the last run-off (this operation ensures the machine remains hygienically clean). | ·Empty and clean the grounds container, then replace it. IMPORTANT: when removing the drip tray, the grounds container MUST be emptied, even if it is not completely full. If this is not done, when you make the next coffees, the grounds container may fill up more than expected and clog the machine. |
| INSERT GROUNDSCONAINER!·After cleaning, the grounds container has not been replaced. | ·Open the service door and insert the grounds container. |
| ADD GROUND COFFEE!·The "pre-ground coffee" function has been selected without placing any pre-ground coffee in the funnel.·The funnel (A21) is blocked. | ·S | i d e t h funnel, add pre-ground coffee. ·Carefully use a knife to clear the funnel as described in paragraph Cleaning the pre-ground coffee feed funnel. |
| DESCALE! (alternating with) MEDIUM CUP STANDARD TASTE | ·The descaling programme must be carried out as soon as possible, following instructions described in paragraph DESCALING. |
| LESS COFFEE! | ·Select a milder taste or reduce the quantity of ground coffee, then run off the coffee again. |
| FILL BEANS CONTAINER! | ·Fill the beans container. |
| INSERT INFUSER ASSEMBLY! | ·Insert the brewing unit as described in paragraph Cleaning the brewing unit. |
| CLOSE DOOR! | ·Close the service door. |
| GENERAL ALARM! | ·Clean the inside of the appliance thoroughly, as described in chapter CLEANING AND MAINTENANCE. If the message is still displayed after cleaning, contact a service centre. |
TROUBLESHOOTING
Below is a list of some possible malfunctions.
If the problem cannot be resolved as described, contact After-sales Service.
| PROBLEM POSSIBLE CAUSE REMEDY | ||
| The coffee is not hot. • The cups have not been pre-heated. • The brewing unit has cooled down because 2/3 minutes have elapsed since the last coffee was made. • The set temperature is not high enough. | • Heat the cups by rinsing them with hot water. • Before making coffee, heat the brewing unit by selecting the RINSE function from the menu. • Change the set temperature (see paragraph Changing the coffee temperature). | |
| The coffee is not creamy enough. | • The coffee is ground too coarsely. • Turn the grinding adjustment knob one click anti-clockwise towards the number 1 while the coffee mill is in operation (Figure 14). • The blend of coffee is unsuitable. • Use a blend of coffee specifically for espresso coffee machines. | |
| The coffee runs out too slowly or in drips. | • The coffee is ground too finely. • Turn the grinding adjustment knob one click clockwise towards the number 7 while the coffee mill is in operation (Figure 14). Continue one click at a time until coffee run-off is satisfactory. Results are only visible after running off 2 coffees. | |
| The coffee runs out too quickly. | • The coffee is ground too coarsely. • Turn the grinding adjustment knob one click anti-clockwise towards the number 1 while the coffee mill is in operation (Figure 14). Avoid turning the grinding coarseness regulator too far otherwise when you select 2 cups, the coffee may run out in drips. Results are only visible after running off 2 coffees. | |
| The coffee does not run out of one or either of the spouts. | • The spouts are blocked. • Clean the spouts with a toothpick (Figure 26). | |
| The coffee does not come out of the spouts, but around the service door (A2). | • The holes in the spouts are clogged with dry coffee powder. • The coffee feed (A3) inside the service door is blocked. | • Clean the spouts with a toothpick, a sponge or a hard bristled kitchen brush (Figures 26-28). • Clean the coffee feed (A3) thoroughly, especially around the hinges. |
| Water comes out of the spouts instead of coffee. | • Ground coffee is blocking the funnel (A21) | • Clean the funnel (A21) with a wooden or plastic fork and clean the inside of the machine. |
| The milk does not come out of the milk spout (C5). | • The intake tube is not inserted or is inserted incorrectly. | • Insert the intake tube (C4) in the rubber washer in the milk container lid (Figure 23). |
| The milk is not well frothed. • The milk container lid is dirty. • Clean the milk container lid as described in paragraph Cleaning the milk container. | ||
| • The milk pointer is incorrectly positioned. | • Adjust the pointer as described in chapter MAKING CAPPUCCINO. | |
PROBLEM POSSIBLE CAUSE REMEDY
The milk contains large bubbles or spurts out of the milk spout
The milk is not cold enough or is not semi-skimmed.
-
Ideally, use skimmed milk at refrigerator temperature, or semi-skimmed milk at refrigerator temperature (about 5^ ). If results are still not satisfactory, try changing brand of milk.
-
The milk frother pointer is incorrectly adjusted.
-
Move the pointer slightly towards the word CAFFELATTE (see chapter MAKING CAPPUCCINO).
-
The milk container lid is dirty. - Clean the milk container lid as described in paragraph Cleaning the milk container.
TECHNICAL DATA
Voltage: 220 - 240V 50 / 60Hz max.10A
Absorbed power: 1350W
Pressure: 15 bar
Water tank capacity: 1.8 litres
Size (L x H x W): 595 x 455 x 398 mm
Weight: 26kg
TABLE DES MATIÈRES
INSTRUCTIONS IMPORTANTES SUR LA SECURITE 43
- Directive Basse Tension 2006/95/CE et modifications successives.
- Directive CEM 2004/108/CE et modifications successives.
Puisance absorbee:1350W
Pression : 15 bars
INSTALLATIE ALS INBOUW 63
BESCHRIJVING VAN HET APPARAAT 65
Apparaat 65
Bedieningspaneel 65
Houder melk en accessoires 65
EERSTE INWERKINGSTELLING VAN HET APPARAAT 66
INSTALLATIE ALS INBOUW
BESCHRIJVING VAN HET APPARAAT
Apparaat
AFGIFTE VAN HEET WATER
Programming cappuccino
A J U S T E H O R A
I D I O M A
I N I CIO A U T O
- DESCALCIFICACION
• T E M P E R A T U R A C A FÉ
A P A G A D O A U T O
• D U R E Z A D E L A G U A
- CONFIGUR. PREDETER
E S T A D I S T I C A S
A J U S T E T O N O
S A L I R
Selección delidioma
PROBLEMA CAUSA POSIBLE SOLUCION
PROBLEMA POSSIBLE CAUSA RIMEDIO
| • | P | Y | Θ | M | I | Σ | H | T | O | N | O | Y |
| • | E | Ξ | O | Δ | O | Σ |
Puroion tnc yawooac
Eav tpoononoioeTe T ywOo aOnv, aokouhote tvnapakatw diaikiaia:
KONFORMITETSDEKLARATION (C)
Apparaten uppyller foljande EG-direktiv:
| • | S | K | Ö | L | J | N | I | N | G | |||||||
| • | S | T | Ä | L | L | K | L | O | C | K | A | N | ||||
| • | S | P | R | Ä | K | |||||||||||
| • | S | J | Ä | L | V | P | Ä | S | L | A | G | N | I | N | G | |
| • | A | V | K | A | L | K | A | |||||||||
| • | K | A | F | F | E | T | E | M | P | E | R | A | T | U | R | |
| • | S | J | Ä | L | V | A | V | S | T | Ä | N | G | N | I | N | G |
| • | V | A | T | T | E | N | H | Ä | R | D | H | E | T | |||
| • | Ä | T | E | R | S | T | Ä | L | L | |||||||
| • | S | T | A | T | I | S | T | I | K |
- INSTALLING AV TON
L A M N A
• S K Y L L I N G
- STILL KLOKESLETT
·S P R Å K
A U T O S T A R T
A V K A L K I N G
• K A F F E T E M P E R A T U R
A U T O - A V
VANNHARDHET
TILBAKESTILL
• S T A T I S T I K K
- INNSTILLING AV LYD
G A U T
RENGJØRING OG VEDLIKEHOLD
SLUKNING AF APPARATET 183
VISTEMEDDELELSERPA DISPLAYET 184
LØSNING AF PROBLEMER 185
TEKNISKE SPECIFICATIONER 186
VIGTIGE ANVISNINGER VEDRØRENDE SIKKERHEDEN
Installation of apparatus

ADVARSEL
• R E N S E R
• I N D S T I L U R
• S P R O G
• A U T O M A T I S K S T A R T
- AFKALKNING I GANG
• K A F F E T E M P E R A T U R
• A U T O - S L U K N I N G
VANDETS HARDHED
STANDARDVARDIER
• S T A T I S T I K
• L Y D S I G N A L
• F O R L A D M E N U
SLUKNING AF APPARATET
A S E T A K E L L O
K I E L I
AUTOM. KAYNNISTYS
K AL K I N P O I S T O
K A H V I N L A M P O T I L A
AUTOM.SAMMUTUS
VEDEN KOVUUS
• T E H D A S A R V O T
T I L A S T O
SUMMERI
- POISTU VALIKOSTA
Kielen asettaminen
LAITTEEN KYTKEMINEN POIS TOIMINNASTA
CZYNNOSC1 WSTEPNE 207
P R O P L A C H O V A N I
N A S T A V I T C A S
J A Z Y K
A U T O M A T I C K Y S T A R T
O D V A P N E N I
T E P L O T A K A V Y
A U T O M A T I C K E V Y P N U T I
TVRPOST VODY
R ES E T
S T A T I S T I K A
NASTAVENI ZVUKOVÉHO SIGNÁLU
K O N E C
Nastavení jazyka
P R E P L A C H O V A N I E
- NASTAVENIE CASU
J A Z Y K A U T O M A T I C K Y S T A R T
ODVAPNOVANIE
T E P L O T A K A V Y
AUTOM.VYPNUTIE
- TVRDOsV VODY
- PÓVODNÉ NASTAVENIE
A T I S T K A
- NASTAVENIE SIGNÁLU
KONIEC
Nastavenie jazyka
• Ó R A B E Á L L I T Á S A • N Y E L V
AUTOMATIKUSINDITAS
VIZKÖMENTESITÉS
KAVEHOMERSEKLET
A U T O M A T I K U S K I K A P C S O L A V Z K E M E N Y S E G G Y Y A R I E E R T E K E K
- STATISZTIKA
HANGBEÁLLITÁS
KILEPES
A nyelv beallitasa
INSTALAREA PRIN INCORPORARE 280
DESCRIEREAPARATULUI 282
Aparatul 282
Panoul de control 282
Carafa pentru lapse si accesoriile 282
PRIMA PUNERE IN FUNCIUNE A APARATULUI 283
PORNIREA SI PREINCALZIREA 283
PREPARAREA CAFELEI (FOLOSIND CAFEA BOABE) 284
MODIFICAREA CANTITÄTÄI DE CAFEA DIN CEASCA 285
REGLAREA RÁSNITEI DE CAFEA 285
PREPARAREA CAFELEI ESPRESSO CU CAFEA RÁSNOTÁ (IN LOC DE BOABE) 285
PREPARAREA APEI FIERBINTI 285
PREPARAREA UNUI CAPPUCCINO 286
MODIFICAREA CANTITÄTÄI DE LAPTE Sİ DE CAFEA PENTRU CAPPUCCINO 286
MODIFICAREA 1 SETAREA PARAMETRILOR DIN MENIU. 287
Setarea limbii 287
Clàtre 287
Modificarea duratei de fonctionare 287
Reglarea ceasului 287
Setarea orei de pornire automată 287
Modificarea temperaturii cafelei 288
Programarea duritatai apei 288
Decalcifierea 288
Restabilirea setarilor din fabrica (reset) 289
Statistici 289
Semnal sonor. 289
Programare cafea 289
Programare cappuccino 289
CURATAREA INTRETINEREA 290
INSTALAREA PRIN INCORPORARE
A7 Buton pornire/stand-by
A8 Panou de control
A9 Panou de borne
C L A T I R E
- REGLAREA CEASULUI
LIMBB
· P O R N I R E A U T O M A T
- DECALCIFIERE
• T E M P E R A T U R Å C A F E A
O P R I R E
DURITATE APA
VALORIDINFABRICA
• S T A T I S T I C I
• S E M N A L S O N O R
- IESIRE
Setarea limbii
Dacà doriti sǎ modificazioni limba de pe afiṣaj, procedati astfel:
KoIi Bn He KOpncTyEcTecr npuIaIOM, a TaKoX nepH hIX NOUHaTN MUTN Ioro, 3aBXdN BiDKlOuaTe npuIaI Bd Ixepela CTrpymy.
Iobepxhi, nO3Hauehi LIM CUMBOJOM, HarpiBaOTbC B IpoLeci pO6Ot (cMBOJ HA8Bn TIlbkN DjaKnx MoJeTAX).
Bawa 6e3neka Ta 6e3neka iHnux IIOdei Ma e nepshoprdHe 3HaueHHa
HeDToPmHaHHNoBHOIO MIOIO BnKlaeHnx y cIbOMy Noci6Hky KopncTyBaay BKa3IBOK MoKe npN3BecTn do ypaKeHHa eNEKtpuHMM CTpymOM, cepno3Hx TpaBM, onIKIB, a TaKoX Bn6Byx a6o noNkoJKeHHa pncTpoio.
Baxnbi nonepeJxehn cynpoBODKyoTbcra HacTyHmN CmBOLAAM.

Lc cmbn He6e3neK, knn nopejkae KopncTyBaiv npo nToHui Hi pn3nKn dIe ce6e Ta OTOuyOHX.
Ycim nonepeJKeHHaM 6oDo 6e3neKn nepeDyecmBOI He6e3neKn i Taki TepMiHn:

HE6E3NEKA
Bka3ye Ha He6e3neuHy cnTuayio, kKa, kKuo II He yHnKHyTN, npn3Bepe do cepno3HOI TpaBMn.

NONEPEDXEHHRA
Bka3ye Ha He6e3neuHy cnTyauio, RaKa, RaKIo II He yHnKHyTN, MoKe npn3BecTu do cepno3HOI TpaBMN.
KpntuHi nonepeJxehn3 6e3neKn

NONEPEDXEHHA:
Даннnpилад npизнayechивknluquHо дя no6yTOBOrO 3aCTOCyBaHHa.
- Lc e enektpnHn npnaT; TOMy Heo6xHNO DoTpumyBaTncra HacTyHnx npabn 6e3neKn:
-He TopKaITeCs Ido npuIaNy MOKpIMn pykAmn;
-HeTopKaITeCnIOBUNKIMOKPmMpykAm;
- no6aite npo te, 06 po3eKb 6yla 3abxndocTyHa, 06 npuJa moKha 6yno BdknOHTn 3a Heo6xidHocTi;
y pa3i HecnpabHocti npnlaHy He HamaraTecB uKohyBatu 6yb-akn peMOHT camoCTIHHO. BumkHtB npnla3a DOnOMoroIroIIOBHorO BUMKaua (A23), BiKIOUcITb Ioro BiD MepeXi i 3BepHITbcra Do ueHTpy nicnaipodaJxHorO 06CnyROByBaHH.
TpmaTe nakyBaIbHI MaTepiAn (nlaCTNKOBi NaKeTu, nonicTnpO) B HeIOCTynHOMy dIaIteN.
He6e3neka oniky! Lcien npnlaBnpo6nre rapauy Body i niz cac po60Tu Moze yTBopioBaTncra rapaay napa. I6aTe npo te, 06yHKATN KOHTAKTy 36pn3kamn rapaoyi BODn a6o rapaoyi napn. BnKOpNCbOByte KhoNKn a6o pykn.
He trpmaunTeca Ta He cnnpaunTeca Ha KaOBapky, KOJI NBOHa 3HaxoDntbc No3a npmiiueHHam Micem, Kydi II B6yObaHO. He po3miuYte npedmetn, 0o MictaTb pIDHN a6o NERKOaMnCTi YN KOpO3iHi MaTePiAn, Ha npuaadi. BuKOpNCTOByTe BiCik dIra akcecyapib, 0o6 36epiratu BcI akceCyapn, Heo6xHd IJRA npriroTyBaHnKaBn (HanPknlad, mHy lokky). He CTABTe Ha npinad HectiKi npedmetn a6o BeNki npedmetn, Aki MoKyTB 3aBaADTu Ioro nepemiuEHHIO.
He BnKOpNCToBnyTe npnad, KOJI BIn BnHnTm 3 KopnCy: 3abXdN YekaIe, NOKn npnlaD BmKHeTBcA, nepu HIX BnMaTn Ioro 3 KopnCy. EINHM BnHrTkOM i3 cboR O npabnA e peryIIOBAHH KABOMOLKn, AKe BnKOHyETbCp nI 3HATOMy Kopnci (DbNbcb po3dn PEYJIOBAHH KABOMOLKn).
N.B.: BnKOpncToBvIe TijbKn OpriHaJIbHi 3aIuaCTHnTa aKceCyapn a6o TaKi, IIO npRAO peKOMHyOTbc BnPo6HnKOM.

PpN3HaueHn
Cen npnnaD po3po6leHn i cKoHCTpyuOBaHn dny npiroTuBaHHKaBn i dny po3irpiBaHH HanoiB.
Byb-Ke iHwe BnKOpNCaHHN NOBnHb BBaXaTcNc HnPaBnblnM.
Cen npnlaH ne nixoHbIy KomepuHoro BnKOpncTahH. Bpu6HKe He Hece BiNobiaNbHoCTi 3a 36ntKn a60 nowkoJxehn, kci cTANcB pezylbTaTI HnpabuHoro BnKOpncTahH npnaLy.
Ue npuaaMOKe 6yTN BCTAHOBHeHn HAd B6yDObaHO uXOBKOIO, AKNO OCTaHaHa 3aHIM BeHTnIaTOPOM OxIoJxKeHHa (MaKcMmaJIbHa NoTyXHiCTb - 3 kBt).
Ihctpykui KOpncTyBaay
IpountaTe 10 iHctpykciio KOpncTyBaayo NoaTky KopncTyBaHH npnaDOM.
36epiraTe uei noci6nky naHInHomy micu.
HeDToPmAHHaHCTpyKcIM MoKe npu3BecTu Do TpaBM a6o N0wKOJxehn HpncTPOU. BInpo6Hk He Hece BiNobiJaBHoCTI 3a TpaBMn a6o 3bntKn, CnpuHHeHi HeDToPmAHHm Iie iHCTpyKcII KopNCtBuBaA.
N.B.: Ppnilad oCnaueHn BeHTIaTOpOM OxOnoJxHeH. BeHTIaTOp BMnKaETbcra 0op3y, KOJI npilad BnJaE Kaby, npay a60 rapauy Body. Upe3 KInbKa XBnIH BIn 3HOBy BMnKaETbcra ABTomTuHo.
ПИДROTOВЧИ ETAP
Ipebipka nicla TpaHcnpTyBaHHa
P03nayBaHH npuIady nepekoHaTeC, 00 Bin He nooKdoKeHm i 00 BcA kceCyap HaaBHi bInobiaotb onucobi. y pa3i BuABLeHH BAIMMux nooKdoKeHb He KopncTyteCpunadom. 3B'axkTbca 3eHTpom nicnnpodaxhoro 6cbnyrobyaHH.
BctaHOBJIeHn npuIaIy

NONEPEDXEHHRA
YctahOBky NOBHNb HBNKOHyBaTN KBaIiΦIKOBaHn φaxibeu b y BiIOBIDHOCTI do MicueBux npabun (mB. po3in B6yIOBYBAHH).
36epiraTe nakybalbHi matepiann (nonietnneHOBI naKeTu, nonictnpoIobi yactHm ToO) B HeodctynHomy dJe tme Mi ci.
Hi B ykomy pa3i npuJaH He MoXHa BCTaHOBnIOBaTu B npMiuIeHHx, De TempepaTypa moKe 3HnKByBaTnc Da 0^
BippernyIIOte pibeHb KOpCTKcTi BOu JAKHaWbUdWe, 3riH0 3 iHCTpyKciIMn, HabeDeHMm BpozdiN B6y[OBYBAHH].
PiKJIoueHH npuJaIy

NONEPEDXEHHRA
IpekeohAtecra, 0o Hanpyra, 3a3naeHa Ha Ta6nuei TexHInx daHux, po3taowabhi Ha dHni npnady, BiNobidae Hanpyz iKMBneHHy y Bawomy domi.
IipKluHb npuaDIO npofoeciHo BCTaHOBneHO po3eTK, 0o noaE cTpym cnloIO He MeHwe 10 A ta Ma eefKeTNBHe 3a3emnHn. RaIO BuNka npuaDy i po3eTKa HecymicHi, BnKnUte eNeKtpnKa, 0o6 3amHHTn po3eTKy Ha BiINOBiHy. 3riHNOiHy. 3npaBnAmTexhIK 6e3neKN, dIra yctaHOBKn MaE 3aCTOCOByBaTnC4 6araTOnOJIIOChn BmNKay 3MiHimaJIbHM 3a3Opom MIX KOHTaMn 3 MM. He BnKOpNCTOByBaTu TpiHHNK Ta nOobXyBaYai.
y pa3i nooKoJKeHHBnKn a6o Ka6eIIO, 0o6 yHnKHyTn 6yNb-koRo pN3uKy,ix MaE 3amHHTMaJCTep 3 ceHTpy nicJnpodaxHoro o6cnyroByBaHH.

NONEPEDXEHHA:
MepexeBn 6IIOK XNBLeHNa NOBHeH MaTn npCTpoI dN BIDKnOueHH BId MepeXi XNBHeHH, 0o BiNObIAaOTb npuHrTm CTaHdapTaM.
YTNJI3AUJIA
EneKtpexHika He NOBHHa yTnI3yBaTncra JK 3BnuaHi NObTyOBI BixOHy. Ha npuHa n 3 cM CmBOJOM
po3noBcIOxcyTbcA dI NapeKTHBn EC 2002/96/CE.EneKtpnHi Ta eneKtpoHni npuaHn He NOBHHi yTnI3yBaTncra
pa3OM 3 no6TyOBm CMITrM; ix cNd 3daBAtn B ABTOPn3OBaHn CEHTp 36Opy npuaDiB nry Tynl3aui. IpaBnBHa
yTnI3aui npnaLy niCnla 3abepweHHa TepmiHy Noro ekcnnyataa 3anobira 3anodiaHHIO shKOOn doBknllio i
ycBaE noteHciHny He6e3Neky dJa 3doPob'J. DnA OTPMaHH DaDAtkBooi IHopmaQII npo Tynl3aui npnaLy
3b'jXtbc 3 MicceBn M opraHOM, cnYx6oIo yTnI3aui BiXoID a6O Mara3HOM, de npuaad 6by npud6AHn.
DEKJIAPAUJIBIINOBIDHOCTI(E
Cen npnlaB ViINOBiJaT aKIM dIpeKTiBaM EC:
IpuekTnBa 10oHn3bKoi Hanpyu 2006/95/EC 3 HacTyHMMDIOOBHeHHM.
- DnpeKtNb npo eJekTpomarHITHy cymichcTb 2004/108/EC 3 hAcTyNHmM dOnOBHeHHaM.
MATEPIANI Ta BINO6n, npu3Hauehi IJRA KOHTaKTy 3 xapOOBmN npOyKTAMN, BiINoBIaHOb BmORam EbponecBkoR PerlaMeHTy (EC) Homep 1935/2004.
ББУДОВУBAHHЯ
IpebeipTe mHimaJIbHi po3MIpN, Heo6xIDH Ia npaBnIbHOrO BCTaHOBNeHHa npuHa.
KabOBapKa Mae BCTaHOBNIbATnC y KxOHHy Cekuio, kA B CBOIO Yepry Ma€ 6ytN HaIDIHO 3aKpInIeHOIO do CTIH N 3a DonOMoIO KOmepuHnx KpiINbHnx IHCTpyMeHTIB.
ybara:
- Ipeed BnKoHaHHm MoHTaxKnHx po6it a6o texHiHm 06cnyroBaHHm npnaad Mae 6ytu BiKluoyenb BiMepexi.
Kyxohhi uafni, kki KOHTaKryIob i3 npunaDOM, mIoTb 6yTu TEnIOCTiIKUMN (MIH. +65^ - 363e3neehn HaneKHOI BENTINaCi II NO6aTe IPO HAIBHcTB 3aOpy NiK OOPnyCOM (DnB. po3mipn Ha ManIOHky).
Po3Mipu BMM

Po3aWyIe HApnMHi 360Kb KOpNcy, Ra Noka3aHO Ha MaIIOHky. PpIKpIniMb HApnMHi 3a DOnOMoIO 6OITb, 10 BxOJaTb y KomPJIeKT NOCTABKN, NOTIM BNTARHIb IX DO KINz. Jkso KaOBapka BCTaHOBNeHa NaD «WyXJrDOIO dna Po3irpiBaHHra, BkOPnCTOBuYte NOrO BepXHIO qACTHy Ra OpiENTnp Ida Po3MiueHna HApnMHNx. YCbOMy pa3i OnopHOI nobepxhi He 6yde.
3akpiinb ka6eb jkBHeHHa 3a donomoroio 3aTnCKa, oBxOHTb y KOMPNEKT NOCTABKN. Ka6eb kNBHeHHaNOBHeHbTyDocntb DOBtM, 0o6 npuaad moXHa 6yNoBIMATN 3 KopnyCy dIa 3anOBHeHHKoTHeHepa dJaKaBOBux 3epeH. 3rIINO 3 npabunam TxHik 6e3neKn npuaad MaE 6ytN 3a3emNeH. PdKnIOueHHdo eJeKTPoMEpexi NOBHe H BuKOHByTaN KBaIIfIKOBaHm faxibeCb BiIOBIdHO do IHcTpkyci Bnpo6nka.
IocTaBTe npnlaHa HnpanMHi, nepeKoHaBwnCb, 0cO cTpnXHi npaBnIbHO 3axOJaTb Ha CBOIX MlCyr, nepH HIX 3akpinnIOBAtuix TBnHTamN, 00 BxOJaTb y KOMnKeT NOCTaBKn.
Y pa3i Heo6xioHocTi BupibHn npnnaBcTaBte po3nipkn, 10 BXo4r8y KOMnneKT noCTabKn, a6o HxKHe, a6o o6a6iH onOpn.
Ppna
INB.MaA.AHa ctopiHj2.
A1 PIIIOH Dnayawkn
A2 DBepuTa dna o6cnyroByBaHHa
A3 Pnncptpi dny noaqui kabni
A4 KoHTeHep dIy KaBOvX BiXoIDiB (ryi)
A5 BLOK 3aBapIOBaHHa
A6 IndikaTopn niDOna dnyaushk
A7 Khonka《yBMK./peXmOiyKaBaHHa
A8 Panaenb KepyBaHHa
A9 KneMHa KOJOKa
A10 Conno nla rapaoyo BOn Ta nap
A11 Pidon Dn 36epiraHH
A12 Pe3epByap nla BOIN
A13 Byzoi noaikabn (perynioetbca 3a Bncotoio)
A14 PIIIOH IJI Kpanenb
A15 Kpnka konTeHepa nla KaBOBx 3epeh
A16 KoHTeHepIa KaBOBx3epeH
A17 Pyka perynioBaHHn omeLy
A18 Kpwn BOpKn DnMa MeJeHo KaBn
A19 MipHa loXka
A20 BiDJIeHnH nI MIPHOI JOKKn
A21 BopoHka JIy MeJeHOi KABN
A22 Ka6eJb XnBHeHHa
A23 TOnOBHmBmKaU ON/OFF
Pahenb KepyBaHHa
INB.MaB.BHa ctopiHui 2.
N.B.: KhoNkCeHcOpHOrO ynpabInHHaKtBHyIbCbHaJInerWMIM DOTNKOM NaJbZa.
B1 Dicnnei: niKa3ye KOpncTyBaCy, kKopncTyBaTnc npnlaDom.
B2 MEHIO KhoNka dIa BkIoueHH a6o BnKIOueHH pexMMy hAcToPoiKn MeHIO.
B3 KhoNka Dnla Bn6Opy Cmaky KaBn.
B4 Khonka Dnla Bn60py 6aKaHOro Tnny KaBn (ecnPecO, MaJIeHbKa YaShKa, cpeDnHa YaShKa, BeNkA YaShKa, KyXoJb)
B5-B6 KhoNKn A\nDnpeperny pi3Hnx nyHKtmb MeHIO.
B7 KhoNka OK nIy niTBePdxJxHn Bn60py
B8 Khonka dny npnroTyBaHHy OndHcIaAsKn KabN
B9 Khonka nnpiroTyBaHHaDoxaawokKaBN
B10 Khonka nla npiroTyBaHHa KanyuHNO.
B11 Khonka dny do3yBaHHrapaoyo BOn.
KoHTeHepIraMonokaiaKcecyapiB
INB.MaN.CHa cTopHui 2.
C1 POKaKcNk MoJOKo36nBaUa
C2Pyka KOHTeHepa DnMa MoIoka
C3 Khonka CLEAN (OuNCTKA)
C4 Tpy6ka 3abopy monoka
C5 Tpy6ka npaui 3bntoro mooka
C6 Monoko3bBau
C7 Conno nra rapaoyo BOn
NEPWE BUKOPUCTAHN PUNJADY
Ha 3aBoDi KaBOBapKy Bnnpo6OByBaJIu 3 BnKOpncTahHnM KabN, TOMy a6cOJIOTHO HopMaJIbHo, JaIIO Ha KaBOMOni e CJIIN KABN.
BiiperynnoTe pibeHb xopctkocTi BOIN RAKHaiWBnIe, 3riINO 3 iNCTpyKciyMn, HabeJeHMn B po3diBcmaHOBneHHaXopcmKocmi bOdu.
1.ПлкючтbpnpctpiДоМерекиЖИБLEHЯ.BCTAHOBITbNotp6HyMOBy.
2. Порку用车а ддомогго кногг АВ (B5 ta B6), ддддддддддддддддддддддддддддддддддддддддддддддддддддддддддддддддддддддддддддддддддддддддддддддддддддд徳ь MOБ (MaHOBK 2).КOnДиспел NOKA3yE: HATCHITb OK, IOB BCTAHOBUTN AHJIICbKY, HATNCHTb KONKQ OK (B7) (MaHOBK 3).Якpo BV OspaNO MOBy HENpaBnIbHO, dOTpMnyTecb IHctpykui INHKTu BY CmaHOBNeHHA MOu. RaIO, 3 iHwOro 6OKy, BaWa MOBa HeIOCTynHa, Bn6epiTB ONDy 3 Tnx, Aki BiIO6paKaIoTBcA. AHRIICbKa MOBa E MOBy NocnlaHn DnI INcTpkyci.Дani DOtPmMyTECB IHctpykui, pOKa3AHx Ha DCnIeI.
3. Yepe3 5 cekyHa nucnnei BiO6pa3ntbcra FILL TANK! (3ANOBHTN PE3EPBYAP): iicTaHbTe pe3epByap Ina BoMn (MaHOHK 4), npomnTe i HanoBHtB do liHII MAX BOIOU, notim BCTaHOBiTb NORo B KaOBApKy.
4. NocTabe TyaKny nI dO3aToP rapayoi BOi (MaIIOHOK 5). (KIO DO3aToP He BCTABHeo, npuIaB BiIO6paKae NOIOMJIeHnI INSERT WATER SPOUT! (BCTABITN IO3ATOP IINB OIDN): BCTABTe Ioro, kIOKA3aHO Ha MaIIOHKy 6. DInCIIe NOKa3yE HOT WATER (RAPA BOJa). HATNCHTb OK'HaTNCHTb OK (B7) (MaIOHOK 3) i uepe3 KJIbKa cekyHd BOda no6IXNTb 3 Hocika.
5.Диспел поауE TURING OFF (BUMUKAHHA).3AYEKAITE...i BUMUKaETbca.
6. BucyHbTe npicpti Ha3oBHi, BukopnctObyuOn nepe6aueH iIra zuoro pyuKn (MaHOHok 7); BiKpnnte KpUkky, 3anOBHtB KOHTeHep IJI KABOvX 3epeH, 3akpnTe KpUkKy i 3acyhTe npicptpi Ha3aI, y Kopnyc.
KabOBapka TeNep rotoba do HopmaJIbHOi po6oTn.

NONEPEDXEHHRA
Hikon He 3aknaaTe nonepeHbO meHe Ky Kaby, cy6limoBaHy Kaby, Kapameniobany Kaby a60 cTOpOHnI pEmETn B KOHTeHep, oKInbKn BOHN MOKyTb NowKOuNTn npnilad.
N.B.:
IpnctynBwn Do BnKOpncTaanHn npnlaNy, Heo6xioHOn npnroTyBaTu 4-5 yawok Kabn i 4-5 yawok kanyuHNO, nepw hix npnilad daCTb do6pi pe3ynbTaTu.
- Пи КхнOMу BкluчeHHI npnauy 3a donomorOIO roNobHOro BmMkaCy ON/OFF (A23) 3anycKaETbcg cyHKzIg SELF-DIAGNOSIS (CAMOJIAIHGCTNUKA),notIM BOHa BmMkaETbcg: 3HObY yBIMKHyTn,HaTNCHTb KhoNkY «yBIMKHeHH/peKIM OUYBaHHA(A7)(MaIHOHOK1).
YBIMKHEHЯ i NONEPEdHI HArPIB
Lopa3y, KOnI npnlaBmKKaetbCra, ABOMaTHUHO BnKOHyETbCra uNKl nonepeHbOro HarpIBaHH I npomNBKn, kN He MoKHnepepNBAtu. KaOBapka 6yde roTOBa do BnKOpNCtAHn TInbKn niCna 3abepWeHH NcBOro cnKny

NONEPEDXEHHNA
He6e3neKa oniky! NiD yac npommbaHna Deja Ka KInbKicTB rapaoyi BOnn BNTiKae 3 KabOBnx HocNKIB.
UO6 3HOBy yBIMKHyTN, HATNCiHb KONky «YBIMKHeHHr/pexm OuykBaHHra(A7) (MaHOHK 1): dncnne noka3ye HEATING UP (HARPIBAHHRA).3AueKAITE.... Picna 3aBepeHHra HarpibaHHra dncnne noka3ye iHne nobidomHeHH: RINSING
(ПОМИBAHЯ).Прилад мае робочу temпату, колдиспей поka3у MEDIUM CUP STANDARD TASTE (САнДAPТНС CMAK CEPEДньОЛ YAUKKI).
BNTIKAHHЯГAPЯQUOIBODI
3aBXn npeBiprIe roTOBHiCTb KaOBapKn do po6oTn.
- PepekoHaTeCra, 10 HocnK IaB BoDn npKpInneHn Do conla (MaIHOK 6).
NoctabTe EMHicThPiHocNK.
HaTnCHiTb OK (B7).
Incnne noka3ye HOT WATER (TAPRAA BODA) i rapa a BOD 6ixntb 3 Hocnka, 3anOBHIOOu npctabneHn KOHTeHep (He BnnyckaIte rapayy BDOY npotraom 6iNbH hIX 2 XBnIH 3oDIN pa3).Uo6 3ynHHnTn NotIK BOnNk (B11).BNTiKaHH BOnn ABToMaTHNo 3yInHcTBcR, KOnn BnNyueHO NonepeHbO BCTaHOBNeHy KInbKICTb BOnn.
IPNIGOTYBAHHKANYUHNO
Bn6epitb cMaK Kabn, kAn Bn XOuyTe BnKOpncTOByBaTn dIy BnROToBneHn KaynuHn, HATNCHyBn Ha KOnky (B3).
3Himits KpniKoHTeHepa DnMa MoNoka.
3aJIInTe B KOHTeHep npn6n3Ho 100 Mm MONoka IJRA KOXHOI YauK KanyuHNO, Aky Bu XOuyTe npuroTyBaTn (MaHIOHOK 22), He nepeBnUyOuN liHiO MAX (biINOBiAde npu6n. 750 mN) Ha KOHTeHepi. B iJeani, BIKOpNCTOByte 3HexKIpHe a6o HAnIB3HexKnpeHe MOKO 3 Tempepatypo 6bn3bKO 5^ (TempepatypaB xOJOINbHnky).
-ipekoHaTeC,io Tpy6ka BcMOKtyBaHHa MOnoka BCTabHeHa B rMoBy 8a8y (MaIOHOK 23), notim 3akpnte KpuKy KOHTeHepa dna MOlOka.
BCTaHObitnOKaKUKNMOJIOKO36NBaHa (C1) mIX cNoBaMn CAPPUCCINO (KANYUNHO) i CAFFELATTE (KABA-JIATTE), HApyKOBAHmHa KpNsi KOHTeHepa dny MONoka. KInbKiTb nHiMoKe 6yTu cKOpuROBaHa: nepemiaohu nokaxuk y 6ik cNoBa CAFFELATTE (KABA-JIATTE), OTPmaEmo 6ilbIerky niHy. 3iHoro 60ky, nepemiuoyu nokaxuk y 6ik cNoBa CAPPUCCINO (KAPUYINHO), OTPmaEmo rcyiuy niHy.
A. B E3 n i n
B. binbwnerka nHa
C.Покаяхунк
D. Binbw rycta niHa
3HimItb Hocnk Iy noaui rapaoyo BOni (MaHOHok 6) i npKpinitb KOHTeHep dIy MOnoka do conna (MaIOHOk 24).
- IpecsyHbTe Tpy6ky noaui MoNoka, knoka3aHo Ha MaIIOHky 25, i nomictiB doCtB BeNIky uAky niD IO3aTOp dJa KaBn i Tpy6ky noaui MoNoka.
HaTnCHiB KHOHky (B10). Ha nCnIe i 3'ABuTBcN IOBIOMJeHH CAPPUCCINO (KApyHIO) i uepe3 kInbKa cekyHd 36nte B nIHy MONOKO NOUHe BUTiKaTu 3 HOCiKa i 3aONBHOBaTu NiCTabNeHy aWkY. (Bntik MOnoKa npunHReTbcr abTomATnuHO i nouHae BUTiKaTu Kaba).
KanyuHNO rOToBn:doaTe ykOp 3a cMaKom i,3a 6aKaHaNm, nocunTe niHy npDoio 3 kaKao.
N.B.:
Пд ус пиротуваньkanунho можна зуниити поаду 36ntoB nHy MONoka a60 kabn, haTnchybUn Khonky (B10).
- RaKIO nID Yac BUNINBAHH 36NTO R B NHy MOLOKA KOHTeHep NOBHCtIO CnycToWntbCRA, BUNINbHITb KOHTeHep i DoaIte DO HbORO MOLOKA. Notim BCTAHOBiTB KOHTeHep 3HOBy i HAInCHiB KHONKy (B10), 0io6 npriroTyBaTn ige kanyuHo.
- 36epertn MOnoKo dny npiroTyBaHHa KanyuHOr ririEHIHO uCTmU, nCJ npiroTyBaHHa KanyuHo 3aBxdn npomBaTe BHytpiHi Tpy6Kn KpiuKo KOHeIHepa dny MoNoka. Ha dinCnnei BiO6paKaETbcra NobiDOMJeHHa PRESS CLEAN BUTTON (HATNCHTb KHONKY ONUCTKN):
nomicttb KOHTHeHep nID HOCNK DnM OLOKa (MaIOHOK 25);
HaTNCiB i yTpmyte KhoNky CLEAN (OHTCKA) (C3) Ha Kpuiu KoTeHepa dIy MoNoka npoTAROM oHaMeHwe 8 cekyn (MaIOHOK 25), uo6 akTbByBatn ouNCTKy. Ha dinnei BiO6paKaeTBcR NOBIOMJIeHH CLEANING...(OYNCTKA), a nI Hm - cmyKka cTahy onepaii He BiNyckaTe KhoNky CLEAN (OYNCTKA), doKn cmyKka cTahy onepaii He 3abPbTBcra NobHicTo i ouNCTKa He 3abePbTBcR. LkN ONUCTKN npINHReTBcR, kUo BiNyCTTN KhoNky CLEAN (OYNCTKA).PiCn ONUCTKN 3HIMtB KOHeHep dIy MoNoka i NOMICTIB noRo B XONODNBHK. Kpaue He 3aIIWATM MOKO No3a XOnODNBHKOM DOBWe, HIX Ha 15 XBNIH.
RkUo BV XOye 3MInHTN KInbKicTB Kabn a60 3bUToro B nHy MONoka, IIO abTOMaTHNO NOaETBCRA YaShKn KaBOBapKOIO, BnKOHaiTe dii, onncahi B po3dini 3MIHA KJIbKOCTI MOJOKA I KABN JIA KANYUHO.
3MIHA KIIbKOCTI MOJOKA I KABNДЯ KAnyHNO
PnnaHaJaaTobHn Ha 3aBodi Iy ABTomauHoi Ioayi CtaHapTHoro KanyuHo. 06 3miHTn ci BeJIuHn, BUKOaTe HactynH i ii:
3anobHbTKoHTeHepdmoMOLOKaDoMaKcImaJIbHorO pIBH,BAka3aHOroHa caMOMy KOHTeHepi.
- YtpmnyTe KhoNky (B10) HATnCHyToH, NOKn Ha nCnIeI He BIDOpa3nTbc nObIDomHeHHA PROGRAM QUANTITY MILK FOR CAPPUCCINO (3APPOrPAMyBATN KJIbKICTb MOJOKA IJIKA KANYUHO). Y ceu cakabOBapka noJaE MONOKO.
HATNCHTb KhoNky (B10) 3e pa3 dIyunHKn noaui KaBN i nepenporpaMyTe KaBObApKy Ha iHsu KykbKicTB MOka.
Yepe3 KjIbKa cekyHn noUHe BntiKaTu KaBa, a Ha nucnneB iDobpa3ntbCra nobiOmneHHA PROGRAM QUANTITY COFFEE FOR CAPPUCC. (3APPOrPAMyBATN KJIbKICTb KABN JIA KANYHNO).
HaTncHtB KhONky (B10) ige pa3 dIy npunHeHHn oDaui KaB i nepenporpaMyte II Ha HOBy KInbKicTB KaBN.
Tenep KabOBapka nepenporpaMoBaHa Ha HOBe HanaaHTyBaHHI rTOBAso BnKOpncTaHHA.
3MIHA I HAJAIWTYBAHHI NAPAMETPIB MEHIO
KoJI NaBOBAPka rOToBa DO BnKOpNCTaHHa, BN MoXeTe OTrMaTn DoCTyn Do MeHIO, 3MiHTu HAcTyNHi napametpn a60 fHKui:
RINSING (IPOMUBKA)
- SETTING THE CLOCK (BCTAHOBJIENHRA FOJINHHKA)
LANGUAGE (MOBA)
AUTO START (ABTOCTAPT)
DESCALING(BUDAJIEHHAKINIY)
COFFEE TEMPERATURE (TEMINEPATYKA BUN)
AUTO OFF (ABTOMATUHE BUMUKAHH)
WATER HARDNESS (KOPCTKICTb BOJN)
- RESET TO DEFAULT (BIДНОВТИЗHAЧЕHHЯ 3A 3AMOBΥBAHHЯM)
STATISTICS (CTATNCTIKA)
- SETTING THE TONE (BCTAHOBEHRA TOHY)
EXI T (B INXI)
BctaHOBJIeHHMOBu
UO6 3mHnMoBy iTepeCy, BvKoHaTe Taki dii:
HaTnCHiTB KHOKNy MENU (MEHIO) (B2), 106 nepeuTN B MeHIO, a noTIM HaTnCHiTB KHOKNs A V (B5) Ta (B6), 106 nepeuTN Ha L ANGUAGE (MOBA).
HaTncHItb OK (B7).
HaTnCKaIte KhoNKn A(V) Ta (B6), DoKn He BiO6pa3Ntbcn Notpi6Ha MoBa.
HaTnciTb OK (B7), 06 niTBePdntn.
HaTnchItb Ha KhoNky MENU (MEHIO) (B2), 06 BnTu3 MeHIO.
ПомИВань
Za yHKzIy BnKOpncTObYcBa Ia OtpMaHHa 6InbW rapAoyi KabN. DiTe B TaKni cnOci6:
Ko, KOn Bn BkIouHte npucpti, Bb6paTu Maenbky KaBn (MeHwe 60 M), 3a donomoroio rapayoi BoN 3 uKnny npommbHHBAKOHai Te nonepdHe HarpiBaHHaakn.
-Якшинубьwe 2-3хилнicяoctaHHboro npiroTybaHnKaBn, nonepeHbHO harpiTe 3abapOBAhN 6nOK, nepshixK roTyBaTn Kaby dani.Дяцboro HatnciHbHa KhoNKy MENU (MEHIO) (B2), zu6 nepeHTn MeHIO; dinpnei noka3e nobidomneHHra RINSING (POMUBAHH).HaTncihtb OK (B7).Ducnnei noka3ye 'OK'TO CONFIRM ('OK'Дпг ППТВЕРДЖEHHA. HatnciHb KhONky OK (B7) 3HOby. 3nIte Body y niCTabNeHn NiDoH a60 ckopncTaitecHn Hm DnH anOBHeHHa (a notIM BInnoPoXHeHH) yaShk, ra Ka 6yde BkOpncToByBaTncdЯ kabu, y TaKni cNoci6 harpiaOuyi II.
3MiHa Tpmbalocti onepaui
PnnaHanaTobAHn Ha 3aOdi, o6 aTOMaTHNO BmNKaTncr nCra 30 xBUNH 6e3iJIbHOCTi. Oo6 3miHTu ceJ Yac (MaKc. 120 XB). BUKOHATEk iii:
HaTnCHiB KhoNkY MENU (MEHIO) (B2), 106 nepeytn B MeHIO, a Notim HATnCHiB KhoNkI (B5) Ta (B6), nOKn Ha Dncnnei He 3'BAuTBcA AUTO-OFF (ABTOMATUHE BUMUKAHHA).
HaTnciTB OK (B7), 0o6 niTBePdntn.
HaTnCHiTb KONKU (B5) Ta (B6), 06 BCTaHOBTu Yac, no 3aBepHHeIyko rnpuaMae BmNkATncr (30 xBUNH, 1 roHNHa, 2 roDHH).
HaTnciTB OK (B7), 06 niTbepdntn.
HaTncihtb Ha KhoNkY MENU (MEHIO) (B2), 06 BnTn3 MeHIO.
BCTaHOBJIeHHr rOINHHnKa
HaTnCHiB KHOJky MENU (MEHIO) (B2), 06 nepeuB MeHIO, a NOTIM HaTnCHiB KHOJKN A V (B5) Ta (B6), nOKn HAcnPJIe He 3'ABtbcra ADJUST TIME (BCTAHOBJIeHHRA YACY).
HaTnCHiThoK (B7).
- Ⅲo6 yctaHOBHTI rOHN,CKOpNCaTaeC KHOKAMn A V (B5) Ta (B6), a notim HATNCHITb OK (B7), iO6 niTBePdNTn.
- Ⅲo6 yctaHOBHTXbUHHN, cKOpntaTecs KONkamn A(V) ta (B6), a notim HATNCHTb OK (B7), iO6 niTdBePdNTn.
HaTnCHiB Ha KhoNky MENU (MEHIO) (B2), 06 BnTu3 MeHIO.
YCTaHOBJIeHHaCay aBTOMaTHUHOrO 3aNyCKy
ZyHkciIdo3BONeHaNaHTyBaTn npiJaHa aBTOMaTuHc BkJIoueHHa Yac 3a BaIm B6Opom.
-
PepekoHaTeca, 10 roDHHK y npuaH aHaJToBaHn.
HaTnCHiB KHOHky MENU (MEHIO) (B2), 06 nepeuT B MeHIO, a NOTIM HaTnCHiB KHOHKn A V (B5) Ta (B6), NOKn HnDnCnJIe He 3'ABnTBcA AUTO-START (ABTOMATUHIN 3ANYCK).
HaTnCHiTb OK (B7).
Ha dncnnei biO6paKaεTbcra nobiOdmJeHHRAUTO-START ENABLE? (AKTNByBATN ABTOMATUHNI 3ANCK?).
HaTnciB OK (B7), 06 niTbepaTn.
-Диспел поау AUTO-START 07:30 (ABTOMATИЧИЗ 3АПСК O 07:30). -
Uo6 yctaHOBtN uac 3anycky, ckopncTaItecK HONkAmu A V (B5) Ta (B6), a notim HaTNCiHb OK (B7), o6 niTdBePdNTn.
- ь6 yctaHOBtN XbJIHH, ckopncTaTecr KhoNkAmn AV (B5) Ta (B6), a Notim HATNCiThb OK (B7), 0o6 niTBePdHTn.
HaTncHbOK (B7),nncnnne noka3e AUTO-START ENABLED (ABTOMATUHN 3ANYCK AKTNBOAHN).
3miHa TemnepaTpyn KaBn
UO6 3miHnTu TemnepaTy pNoaui Kabu, BnKoHaTe Taki dii:
- Hatncihb KhoNky MENU (MEHIO) (B2), 06 nepeuB MeHIO, a NOTIM HATNCiHb KhoNKn A√ (B5) Ta (B6), Dokn Ha cnnei He 3'ABtbc8 COFFEE TEMPERATURE (TEMNEPATyPA KABN).
HaTnCHiTb OK (B7).
HaTnckaIte KhoNkU (B5) Ta (B6), IOKu He BiIO6pa3ntbca Ntpi6Ha TeMnepeAtya: Hn3bKa, cepeHr, Bucoka.
HaTncHtB OK (B7), 106 niTBePdntu o6paHy TempeaTypy.
HaTnchItb Ha KhoNkY MENU (MEHIO) (B2), 06 BnTu 3 MeHIO.
BctaHOBJIeHHJXOpCTKoCTi BOJN
3a 6axaHHam, iTePbAm mix zuklamn OuyueneHH Bid HauNpy MoKe 6yTu 36iNbueHnn, uO6 BuJaIeHHra HauNpy BkOHyBaIOc piJe i y BiINOBiIDHOCTi 3 aKtNUHM BMICTOM KaIbciU y BkOpNCTOBvAHHi BOJI. BuKoHaTe Taki iii:
BnMItb 3 ynaKOBKn CmJxky Iy BnMipIOBaHH JoxpCTKoCTI BoN «TecHa 3araJIbHy JoxpCTKicTB» (npNKpinHeO CTopIHKn 2), 3aHypTe II y BOy Ha JeKIbKa cekyHd. Iani BnMItb II i 3aYeKaIte 30 cekyHd (nOKn BOHa He 3MiHITb KOnip i Ha Cmyxci He 3'ABTbcA YepBOHc KBaIpaTu).
HaTnCHiB KHOKNy MENU (MEHIO) (B2), 0o6 nepeuTN B MeHIO, a NOTIM HaTnCHiB KHOKNs AV (B5) Ta (B6), DOKN Hdncnne He 3'ABnTBcR WATER HARDNESS (XOPCTKICTb BOIN).
- HatncItb OK (B7).
HaTnchItb KhoNkn A(V (B5) Ta (B6), 0o6 o6paTn KInbKicTB ToOk, 0o BiDnOBiAe KInbKocTi eepBOHnx KBaDpaTIB, 0o 3'ABuINcna Ha TectOBI cmxu (Ha npNKlaD, kUo TectOBA cmxkka noka3yE 3 eepBOHi KBaDpaTn, Bam Tpe6a 6paTn NobidomneHHA ● ● O);
HaTncHtB OK (B7), 06 nIeTBepdntu. Tene npnaad HanaaTOBaHn dla BnKoHaHHaBuaJeHHa Hakny, kUO ue diiCHO Heo6xIDHO.
HaTnCHiB Ha KHONky MENU (MEHIO) (B 2), 106 BnTn 3 MeHIO.
BvdaenHaKnny

NONEPEDXEHHNA
3aci6 dIy BuaJIeHnHaKunNy MICTNb KNCOTn. DToPmMyTecb npabN 6e3neKn BuroTOBIOBaU, HabeEHx Ha ynaKOBci 3ac06om.
N.B.: BnKOpNCToBvIe TINbKn 3acO6n, peKOMeHNOBaHI BnPo6HnKOM. HeNoTpmuHaHH ciEi BmOrn TaIHe 3a Co6oIO BtpaTy rapaHTII Ha npuaad. HeNoTpmuHaHH BkazIBOK uOdo peryIapHoro BnuJaIeHH HaKIny TaKoX BeDe DO BtpaTn rapaHTII. Konn Ha DcncJIe I BiO6paKaAeTbc NaBIOMJeHHA DESCALE ! (BnDAJNTN HAKNI!), ue O3Naue, lo Heo6xio npoBeCTu BnuJaIeHHaKIny. BnKoHaIte Taki di:
IpeBipTe roTOBHiCTb KaOBaPkn Do po6oTu.
- Pnikpinb Hocnk (C7) do conna (A10).
HaTnCHiB KONky MENU (MEHIO) (B2), 06 nepeu Tn B MeHIO, a NOTIM HaTnCHiB KONKn A (B5) Ta (B6), DOKn HnDnCnneI He 3'ABnTBc DESCALING (BUNAJIeHHH HAKNpy).
HaTncHtB OK (B7), nCnnei noka3ye nobidomleHHRA DESCALING (BnDAJIeHHRA HAKIpy). 'OK' TO CONFIRM ('OK'ДЯПТВEPDIXEHHA.
HaTnCHITb OK (B7).IinCnnei noka3yE noBIDOMnEHnA ADD DESCALER (IOATN 3ACIB DJIAB BUNAJIENHn HAKINY). PRESS 'OK' (HATNUCTHlb 'OK').
3nnIte BODy 3 pe3epByapy, 3aIIIe Bmict nIaIKn 3acO6y IJIaBdAeHHeHaKIny, dOtpMHyOuChb IHCTpyKcii Bnpo6HnKa Ha eTKeTci, a Notim DoaIte BODy. PocTaBe EMHictb 6'EMOM 6J. 2 NIptiB niD do3atop rapraoyo BDOH.
HaTncHtB KhoNky OK (B7); po3uH nIy BnDaleHn HaKIny Bu6irae 3do3aTopa rapryo BoNDi I noUYHae 3aNoBHIOBaTN iDCTabHeHn KOHTeHep. BiO6paKaetbCra NobIDomHeHHA DESCALING UNDERWAY... (BUNAJIeHHRA HAKINY).
- PpOpaMa BnIaJIeHHa HAKIny aBToMaTtUH O BnKoHc pRd npOMBaHb i NaY3.
- Пиблзно черз 30х влимдиспей поже поюмени RINSING (ПРОМВАHH). FILL TANK! (HANOBHITb PE3EPBYAP!).
3HOBY HCTOIO BOIOIO.
BctaHObitpe3epByap 3uHcTIO BOIOHO Ha Micue. Iucnnei noka3yec nobIDOMHeHH RINSING COMPLETE (POMUBAH3ABEPUEHE). PRESS 'OK' (HATNCTHb 'OK').
HaTnCHITb OK (B7) 3HOBy. Tapraa Boda 6ixntb 3 Hocika, 3anOBHIOUOu KOHTeHep, i 3'ABNtbcn NOBIDOMHeHH RINSING (POMUBAHH).
3auekaite Ha noBIDOMJeHHRAINSING COMPLETE (IPOMUBAHH 3ABEPUEHE).PRESS 'OK' (HATNCTHlb 'OK').
HaTnCHiB OK (B7).Dncnnei noka3yec nobidomneHHA DESCALING COMPLETE (BIDAJEHH HAKINY 3ABEPUHE). Notim FILL TANK! (3ANOBHTb PE3EPBYAP). 3anOBHtpe3epbyap 3HOBy uNcTOIO BOIOIO.
- Iporpama BndaIeHna HakuNy 3aBepWeHa, i KaOBapKa roToBa roTyBaTu KaBy 3HOy. N.B.: JaKIO Bu nepePBete Lnk BndaIeHHa HakuNy do nooro 3aBepWeHHa, Bam DoBeJeTbcra NoOaTu BCE CNoaTkY. N.B.: HEOTPUMAHHBAk3IBOK 0oO PeYJAPPHo BO BndaIeHHa HAKNpy BEDe IO BTPATu TAPAHITII.
CknndaHnHa3aBODcbKnxHaNaWtYBaHb(cknDaHHa)
Uo6 cKnHytn opnirHaJIbHI HanaIHTyBaHHa IpnCTpoHO 3a 3AMOBuYBaHHaM (HabITb nICr TORO, kBOHn 6yIn 3MiHeHi), BIKOHaTe Taki iii:
HaTnCHiB KhoNky MENU (MEHIO) (B2), 0o6 nepeuTN B MeHIO, a notim HaTnCHiB KhoNkn A V (B5) ta (B6),doKn Ha DnCnnei He 3'ABuTBcA DEFAULT VALUES (3HAUEHHH 3A 3AMOByBAHHaM).
HaTncItb OK (B7), nucnnei noka3ye nobidomlenHHA OK TO CONFIRM (OK' IJIa IIITBEpIXEHHA).
HaTnCHITb OK (B7), 06 BiHOBuTI 3aOoCbKi HanaTuBaHH. NcPneN noka3yBaTMe NOiOMHeHHRESTORE (BIHOBUHTN) npotrrom KjIbKOx cekyHd.
HaTnCHiB Ha KhoNkY MENU (MEHIO) (B2), 06 BnTu3 MeHIO.
CtTuCTuKa
Za yHKcIa Do3BONae neperraDatn cTaTnCTNky npunaNy. 1o6 nepeRnaHytn cTaTncNkY, BnKoHaTe taki dii:
HaTnCHiB KhoNkY MEnu (MEHIO) (B2), 06 nepeuTu B MeHIO, a Notim HaTnCHiB KhoNkn A V (B5) Ta (B6), DOKn HauDnCnneI He 3'ABnTBcR STATISTICS (CTATNUCTUKA).
HaTnCHiThbOK(B7).
HaTnCHiB KHOHKn A(V (B5) Ta (B6), 0o6 nepeBipuTu:
CKIbKu yaWok KaBn Ta KanyuHNo 6yNo npuroToBHeHO;
ckinbKn pa3iB BnKOHyBaIacOuNCTKa BiHakiny;
3aRaIbHy KInBkICTb NITPIB NOaHOI BOH.
HaTnCHiTB Ha KhONkY MEnu (MEHIO) (B2), 0o6 BnItn 3 ciEi fynKci, a6o HATnCHiTb KhONkY MEnu (MEHIO) (B2) DbiCi, 0o6 BnITn 3 MeHIO.
BCTaHOBJIeHHa ToHy
Lg yHKcijdo3B0JIe BkIIOHTn a6o BVKIOHTn 3ByKOBn CnHaj, kN npJna nd nOa e opa3y npHaTnCKaHHi KONKn i KOJI BCTAHOBIOIObcr/3HimaHObcr akcecyapn.
N.B.: KaBOBapKa HalaaTOBaHa Ha 3aBODi Ha NOaHy 3ByKOBuX CnHaNiB.
HaTnCHiB KbONky MENU (MEHIO) (B2), 06 nepeuTN B MeHIO, a Notim HaTnCHiB KbONKn A (B5) Ta (B6), DOKN Hdncnne He 3'ABuTBcAm BEEP (CINHAJI).
HaTnCHiTB OK (B7). DnCnnei noka3y e nobidomJeHH BEEP DISABLE? (DEAKTNBYBATN CnHAn?).
HaTncHbOK (B7), 06 deakTuByaTn 3byKOBm CnHaJ.
HaTnCHiB hA KHONKy MENU (MEHIO) (B2), 06 BmTu3 MeHIO.
Поррамванда Кавп
Ia 03HaonmEnn 3 iHctpyKziamu 0do nporpaMyBaHH Kabn, 3BepHtbcra do po3iny 3MIHA KJIbKOCTI KABU B YALILJ.
IporpamyBaHHaKanyuHNO
Дя Oзнайомлени 3 iHctpукizIMn zuo do nporpaMyBaHHa KanyuHNo duB. po3dIn 3MiHA KIlbKOCTI MONOKA I KABU dJIY KANYUHIO.
YIeHHI DOrJIaI
MnTTa npunaDy
He BnKOpncToBvIe po3uHHNk a6o abpa3aNBHI MIOUc 3aco6n dJe OOnuHenn npuaNy. DocTaTHbO NOro npoteptm M'raKO BoIoro cepBeTkoIO. Heo6xIDHO perynapno OOnuATn Taki qactnHn npuaNy:
KoHTeHep dIg KaBOoi ryui (A4).
-Плдон(A14).
Pe3epByap nla BODn (A12).
Bny 30 n nn o da qu k a Bn (A13).
JIiKaIpaIdoaBaHHMeJeHOI KaBn(A21).
BHytpiwnHa cactnHa npnilaNy,doctynHa uepe3 DBepuTaN IJN TeXhiHoro 06CnyroByBaHHA (A2).
3abapobaHn6nok(A5).
OuHHeHHa KOHTeHepa IJa KaBOBux BiXoDIB
KoJIINcIe NOKa3ye NOBIOMJeHnE EMPTY GROUNDS CONTAINER! (3BJIbHHTN KOHTeHEP IJIYUJI), BUNOpOxHITb i NOMInTe KOHTeHep IJIyUJI. IJIy ONUCTKN BIKOHaJIte Taki II:
BikpnTe DBePraTa Ia TExHIOO 6cnyroBaHHa HnepeHnI qactnHi npuaNy (MaHOK 16), notim BuaJIb t niioh (MaHOK 17) i nomiTe no.
PetelbHO nOMnTe KOHTeHep Ia KaBOBx BiXoJiB.
N.B.:KoIa3bpaTbcra nIDOn, KOHTeHep dna ruyi O5OB'RA3KOBO Ma 6yTu 3BInhEnn.
OuHneHHnIdoHy

NONEPEDXEHHA:
Якwo nio don He cnopoxHHoBaTu, Boga MoKe nepenHtnc ype3 kpa. Ze moKe cnpuHHtu nowkoJxehn npnaady.
Piioh Ma e iHnkaTop pibra BOny y Bnrgndi YepBoHOrO nonnaBka (MaiohoK 27).
Cnoopokhtb i nomnTe nioH Do TOr, kUeRboHn nonnaBOK nIDHimetbcra BUnue nIDHOy dyaWok.
Uo6 3nT niDIOH:
- BiKpnIe IBepeTaIaTeXHicHOrO 6cNHyroBvBaHn (MaIIOHOK 16).
- BnIMtB niIDoH dIy 36Opy BOu i KOHTeINHeP dIy KaBOBx BiXOiB (MaIIOHOK 17).
3.ПOMnTe nIDOnH i KOHTeHep dIa BiXoDIB(A4). - BctaHOBtI npIOH i KOHTeHep Ira KaOBx BiXoIb Ha Micue (A4).
- 3akpiTe DBeepaTa dIy TexHIOHO DOrnaIy.
OuHneHHpe3epByapaIbOHN
- Pe3epByap dny BOni (A12) tpe6a peryIpaHNO (pnp6n3HO pa3 Ha MicaB) npOTnpaTb BOLOHO TKAHHIO 3 HeBeNkoKo KInbKiCTTO MNoOro 3acO6y.
- Poi6aIte, 06 BuaNTn Bci peTkn MIOUOro 3aco6y.
OuHsENHa HocnKIB
- HocnKHeo6xIDHO uCTHTu peyIpaH0 3a DoIOMOrO r6Kn (MaIOHOK 28).
- PeryIaRHO nepeBipraTe, 06 HocIK Bdo3aTopi Kabn He 3a6nbABc. 3a Heo6xHocTi BuaJIb KabOBn HanIT 3a DonomoroO 3y6OuNCTKn (MaioHOK 26).
OuHHeHHa LiHKn Dja MeJeHoK KaBn
PerynapHo (pnp6n3Hpa3 Ha micay) nepeBipayte, 06 niKa dIy MeNeHOi KabN He 3a6nBaIacr (MaiohoK 20).

NONEPEDXEHHA:
Ipepe 6ydb-koIO onepaicio OUHnB BmKHiTb MaunHy 3a DonomoroIO roOBHOro BmNkay (A23) i BiD'edhaTe BiMpexi.
3a60pOHaεTbc3aHypioBaTu KaBOBapKy y Body.
OuHHeHH BHyTpIiHbOoi YaCTUH Maunnn
- PerynapHO (npn6n3HO pa3 Ha TnKdHe) nepebipTe, 06 npnaB BCEpaHHe 6yB 3a6pydHneH. 3a Heo6xioHocTi BndiT b KaOBn HaiT 3a DOnOMOIO ry6Kn.
- Bvdaitb yci 3a nnu kn 3a donomoroio nnoococa (MaiohoK 29).
OuHHeHHaBaIbHaJIbHoRo 6noka
3aBapOBaIbHn 6JNO Heo6xIDHO uCTHTn npHaMHi OINH pa3 Ha Micayb.

NONEPEDXEHHA:
3abapobalbHn 6nK (A5) He moXHa 3HImaTn, KOI npucptpi yBIMKHeHn. He HamaraTeca 3actocOByBatn cnny, uO6 BnDAnNTu 3abapobalbHn 6nK.
- IpekeonaiTecb, lo KaOBaBapka BmKHeHa (nB. BmKHeHHI PnIaIy).
- BiikpnTe DBepeTa dIa TexHicHoro 06cnyroBvBaHHa (MaIIOHOK 16).
- BnMItb nIDOnD nIa 36Opy BOu i KOHTeHep dIa KaBOBx BiXoDb (MaIOHOK 17).
- Hatachihb Ha dBi YepBoHi KNHKn BcepeuHi i OJHOaCHO notarHtB 3abapIOBaIbn 6Jok (MaHOK 30).
N.B.: Ounchitb 3abapobalbHn 6loK 6e3 MIOUOro 3acoby, ockinbkn nopueh ycepeuHi obo6neHn MaCTNJOM, AKe MNouH 3aci6 MoKe BuaJNTn.
- 3amoyitb 3abapobanbHn6Iok y BOi npotraGM 5xbuINH,notim npononoitb.
6.ПсЯ OUHENH BCTaTe 3aBapObIbHn 6Jok (A5) Ha mICe, 06 onopa Ta 7nnIbKa BHN3y NOBHcTIO cnIBnI; notIM HATNCHTb Ha CmBOL PUSH (HAdABNTN)do KnaaHn, 0o CBiDHT npTo Te, 0o 6Jok CTab Ha mICe.
A. Onopa
B. 小丽小班
N.B.: RaKIO y BAC BVHINKHyTb TpydHOni npu BCTabJIaHHI 3aBapIOBaJIbHOrO 6nOky, nepu HIX BCTaBJIaTI, aJAnTyIe NOro Do npabINbHOrO po3mIPy, i3 3ycuIIaM HaTNCyBUn Ha HxHIO i BepXHIO qACTInH OndOcACHO, kNOKa3aHO Ha MaJIIOHKY.
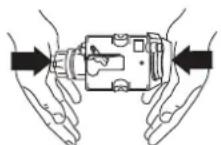
- BctabBnBn 6Iok, nepekoHaTeC, 0o 6nbI yepBOH I KhoN BuipIBHaNNcA.
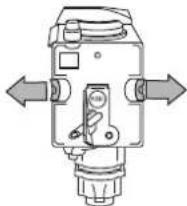
-
BCTaBTe Ha Micce nIDoH dIy BOu i KOHTeHep Ia KaBOBx BiXOiB.
-
3akpiTe DBepeyTa DnTexHnOo 6cIyroByBaHHa
OuHHeHHa KOHTeHepa dHa MoIoka

NONEPEDXEHHRA
Пия npurotybaHHaMOJOKa 3abKdnpommbaTe Tpy6Kn BCEpeuHi KOHTeHepa dJa MOJOKa (C).
KoB KOHeHepi 3aIIuHaCTbCa 1e NeBHa KJIbKicTB MONoka, He TpMaIte NOrO 6e XOnOduNbHnKa DOBwe, HIX CE KOHue Heo6xIDHO.
MnTe KOHTeHep 0op3y, KOnr rOToYcTe MoNOKo, Akr OOncaHO BnyKkTi 3 pOzdiy PnIrOTyBAHHKAJIyUHO.
Yci KOMNOHEHTN MOKHA MNTU B NOCYDOMNIHIM MaunHi, 3a yMOBN PO3MIeHHI IX HA BEPXHI NOLNI.
-
NObepHtB 3a roDHHNKOBIO U CtrpIKO KoPIKU KOHTeHepa IJN MONoka i 3HIMtB ii.
-
3HimiTb Tpy6Ky noDaqi MoNOKa i BCMOKTyBaNbHy Tpy6Ky.
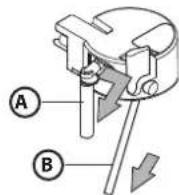
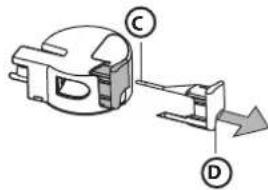
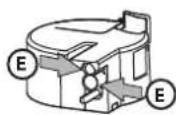
A.HocNKJIMMONOKa
B. BcmoKryBaIbHa Tpy6a
C. Πa3
D.ПокатчимK
E. O T B i p
- 3Himits nokaxuk,notarhywn noro ha3OBHI.
- Bumnte petenbHO BcI KOMnoHENTn rapayo BOOIO I nariHMMNIOUHM 3aco6om. NepekoHaTecra, IO BCEpeHHOTBopIB a60 na3y Ha TOHKI qactuHI NOKAKKUNA HEma 3aJIuWKB MOLOka.
- IpekeohaiTec, 10 BCMOKtyBaIbHa Tpy6Ka Ta Tpy6Ka NOnaHi MOJOKa He 3a6nti 3aIIuKamn MOJOKa.
- BctaHObitbHaMicue NOKaXuNK, HOCIK DnA MOJOKa I BCMOKTyBaJIbHy Tpy6Ky.
- BctahOBiBt ha Micue KpUkky KOHTeHepa dna MoNoka.
BIMKHEHHI PUNA
Lopa3y, KOIN pnilad BmNkaTbC8, BiH ABtOMaTHNO BIKOHye npOMBaHHaKe He MoXHa nepePBAtn.

NONEPEDXEHHRA:
Iiud npommbaHna deka kibkictb rapayoi BOu BNtika 3 HocnKIB nra Kabn. Ynkaite KOHTAKTy 36puz3kamboDn. 0o6 BmKHytn npna, HATNCHTb Ha KHONky «yBIMK./peXMM ouikyBaHHa (A7).Ppnaad BnKOHOc uNKn npommbaHHa a notim BUMNKAeTbca.
N.B.: y pa3i kku npuaad dobrn qac He BkOpucToByeTbca, HATNCHTb Ha KHONky ON/OFF (A23) Ha 6iHni ctopoHi npuany, noCTaBnBwn ii B nOJKeHHa 0.
ПОВIDOMЛЕнHAДИСПЛЕI
| ПОВИДOMЛЕNHЯ, сIo BIVIOBAPKAIOTbCЯ | MOЖЛВI ПИЧИН | СПОСΙБ UCYHEHЯ |
| FILL TANKI (3АПОВHITb PE3EPBYAPI) | ·Рezервардя ВODи поожни aбо не网络传播ь ВСТАновлени. | ·Заловпь розервар вodю i/aбo правимь ВСТаве яого, натусяш do уpopу. |
| GROUND TOO FINE ADJUST MILLI (3AZAДTO ДПБНIM ПOMEЛ, BIDPERYJIIOHTE KABOMOLKYI) INSERT WATER SPOUT AND PRESS 'OK'. (BCTABTE HOCIK Ддя ВODи I HATUCHITb 'OK'). | ·Помел дуждрибни, тому кава витikae 3azadto nobiibho. | ·Поверніт рчук рereулованни поему на один клік у hapрашицla 7. |
| GROUND TOO FINE ADJUST MILLI (3AZAДTO ДПБНIM ПOMEЛ, BIDPERYJIIOHTE KABOMOLKYI) (чсруевся 3) PRESS 'OK' (HATUCHITb 'OK') (a notim) FILL TANKI (3АПОВHITb PE3EPBYAPI) | ·Рezервар 6ув вдалени пid чac поду ВODи. | ·Вставе розервар на мicse i ratисHTы OK (В7).Дисплел поkaусу HOT WATER (ТAPARA BODA). Kabоварка вгустить rapочу вody inotim знову 6уde ro'tobа do роботи. |
| EMPTY GORDS CONTAINER! (BПООХHITb KOHTEHEP Ддя ГУSSII) | ·Контынер дя кавови bixdovib (A4) заловени дбо миуно 6дьше трbox ддь вд мореньу octanhhboro prirotrutваня кави (чд оретаignotriha, сdб prinlad zalilshabc ririchnich nochstим). | ·Виpopожніь inomіte kohteyнер дя ryш,а.notIMВCTABTEйого на мicse. BAKJIINOВ: коли забиретсья пддон,коваянер дя ryш OБОВ'3KOBOМа6утп 3ынени. Катоцьоге на Буогуbetсья kава в подаль�у,котельнер помен�у,т кolyотуватметсья kава в подаль�у,котельнер помен�у bixьше,ніж очkyвалоса, i prinlad 3a6'etcb. |
| INSERT GORDS CONTAINER! (BCTABTE KOHTEHEP Ддя ГУSSII) | ·П i c l a oуruşи He 6ув bctavlenni ha mizce. | ·И Вдддддддддддддддддддддддддддддддддддддддддддддддддддддддддддддддддддддддддддддддддддддддддддддддддддд徳хувалпьпяпьпяпьпяпьпяпьпяпьпяпьпяпьпяпьпяпьпяпьпяпьпяпьпяпьпяпьпяпьпяпьпяпьпяпьпяпьпяпьпяпьпяпьпяпьпяпьпяпьп�. |
| ADD GROUND COFFEE! (ДОДАITE MELEHOЛ KABUNI) | ·Бун a obpana Функци «Meleha kaba»,aine Meleha kaba y likeyne He 6уna засида. | ·Висьтpe prinlad i поадутme мeledноi kави,скороставиь niiюк. |
| ·Лійka (A21) 3a6nokobana. | ·Оberжно пооч'tь niiу ку за домогоюююха,я описань в рункti Oчшени niiу за домогоюююха,я описань в рункti Oчшени niiу за домогоюююха. | |
| DESCALE! (ВИДАЛITb HAKHIJI) (чесугъсяз) MEDIUM CUP STANDARD TASTE (CEPEDNЯ YAUKA, CTAHДAPTHN CMAK) | ·Вkaayе на Heobexidnichtь вдалени Нakиу. | ·Heobxidno кнайшвдide ВИКОнати рpropamу вдалени Нakиу, Дотrimуочьи Inctrypкui, описань y рункti BИДАЛEHNЯ HAKHIJI. |
| LESS COFFEE! (MEHUSIE KABUNI) | ·Булwo ВИКористо ЗанадTo 6barato kави. | ·ОберітmeMuшMiCiHuКаву abo 3menшte kinькістmeлои кави,notim prirotrotуte каву 3нову. |
| FILL BEANS CONTAINER! (3АПОВHITb KOHTEHEP Ддя 3EPEHII) | ·ЗakihuINSCa Kavobi 3eRNa. | ·Заловпь контейнер дя зерп. |
| INSERT INFUSER ASSEMBLY! (BCTABTE 3ABAPIOBALNBII BLOKI) | ·Псля ouchstkn 3abarpovalNBII 6lOK He 6ув bctavlenni Ha mizce. | ·Вставе 3abarpovalNBII 6lOK,я описань в рункti Oчшelenny 3abarpovalNBOso 6lOKa. |
| CLOSE DOOR! (3AчИHITb DBEPIRATAI) | ·Дерц�а дя тхнчнор 06cnyrobvbaHN He 3auchinehi. | ·Зачніть деврцага дя тхнчнор 06cnyrobvbaHN. |
| GENERAL ALARM! (3AralbHA TPMBORAII) | ·Всереди прлад дуж 6prdni. | ·Очиріть рerteьно ррлад усeredи,я описань в роздini QuIlSEHNI I DOfTIAJ.Яksо poliDOMLhenny npodobkuye Biiodobaxatncs niçla очишени, 3berhHITCS B cepBICN ceHTrp. |
NOSYK I YCYHEHHA HECNPABHOCTEIN
HnKHe HabeDeHO CnucOK Deeknx MOxJIbNx HeCnpaBHOCTe.
KpO np6nema He MoKe 6yTu BnpiueHa TaK, AOK OINcaHO, 3B'JxItbC 3 cHTpOM nICnnpoJaXHOrO o6cIyroByBaHHa.
Printed in Italy 09/2014
501934401014/B