
EY3552 - Saw PANASONIC - Free user manual and instructions
Find the device manual for free EY3552 PANASONIC in PDF.
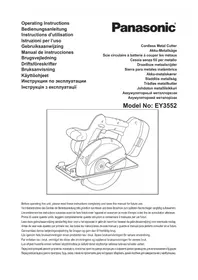



| Brand | Panasonic |
| Model | EY3552 |
| Product type | Cordless metal circular saw |
| Main use | Cutting non-hardened ferrous metals and non-ferrous metals |
| Power source | Cordless Ni-MH 18 V battery (model EY9251) |
| Charger | Model EY0110, charging time 65 min for EY9251 |
| No-load speed | 2900 rpm |
| Blade diameter | 165 mm (6-1/2") |
| Maximum cutting depth | 3 to 56 mm (depending on 165 mm blade) |
| Dimensions (L × W × H) | 345 × 198 × 264 mm |
| Weight (with battery) | 4 kg |
| Blade brake | Yes |
| Lower blade guard | Movable, retractable via lever |
| Saw guide | Optional accessory (EY3500B7727) |
| Recommended blade for raw steel | EY9PM17A (thickness 0.3-6.0 mm) |
| Recommended blade for thin steel | EY9PM17B (thickness 0.3-2.0 mm) |
| Cleaning | Dry cloth, do not immerse |
| Maintenance | Check and replace blade if damaged, have repairs done by an authorized center |
| Essential safety | Wear glasses, mask, ear protectors; avoid knit gloves; do not use near flammable materials |
| Included accessories | Hex wrench, battery (depending on version), charger |
Frequently Asked Questions - EY3552 PANASONIC
User questions about EY3552 PANASONIC
0 question about this device. Answer the ones you know or ask your own.
Ask a new question about this device
Download the instructions for your Saw in PDF format for free! Find your manual EY3552 - PANASONIC and take your electronic device back in hand. On this page are published all the documents necessary for the use of your device. EY3552 by PANASONIC.
USER MANUAL EY3552 PANASONIC
Cordless Metal Cutter
Cordless Metal Saw
Before operating this unit, please read these instructions completely and save this manual for future use.
Guide line of blade front
Thank you for purchasing the Panasonic Metal Cutter. The powerful cutting action of this cutter, combined with the convenience of its rechargeable battery pack, provides you with great metal cutting performance.
This Metal Cutter is only to be used for cutting unhardened ferrous metal.

DANGER
This product is a cutting tool, designed to cut through metal. It has a rotating blade which is capable of cutting you deeply, causing serious injury or death. As a result, please read this manual and the cautionary markings on the tool carefully, and obey all of the Safety Instructions to avoid such injury.

WARNING
To avoid injury, never insert your finger or any other object into any opening of the metal cutter.
How to Use This Manual
- Please read this manual completely before starting to cut with your metal cutter. If you let someone else use the metal cutter, make sure they either read this manual or are fully instructed in the proper use and all safety precautions concerning the metal cutter.
- Please keep this manual for future reference. It contains important safety information that you must follow to use the metal cutter safely. This manual and product use the following signal words:
NOTE
Notes provide additional information that you should know about the metal cutter.
CAUTION
Caution indicates a potentially hazardous situation, which could result in minor or moderate injury if not avoided. Cautions also alert you to unsafe practices to be avoided.
WARNING
Warning indicates a potentially hazardous situation, which could result in serious injury or death if not avoided.
DANGER
Danger indicates an imminent hazard which will result in serious injury or death if not avoided.
Read the "Safety Instructions" booklet and the following before using.
II. ADDITIONAL SAFETY RULES
Safety instructions for all saws

DANGER
- Keep hands away from cutting area and the blade. Keep your second hand on auxiliary handle, or motor housing. If both hands are holding the saw, they cannot be cut by the blade.
- Do not reach underneath the workpiece. The guard cannot protect you from the blade below the workpiece.
- Adjust the cutting depth to the thickness of the workpiece. Less than a full tooth of the blade teeth should be visible below the workpiece.
- Never hold piece being cut in your hands or across your leg. Secure the workpiece to a stable platform. It is important to support the work properly to minimize body exposure, blade binding, or loss of control.
- Hold power tool by insulated gripping surfaces when performing an operation where the cutting tool may contact hidden wiring or its own cord. Contact with a "live" wire will also make exposed metal parts of the power tool "live" and shock the operator.
- When ripping, always use a rip fence or straight edge guide. This improves the accuracy of the cut and reduces the chance of blade binding. Always use blades with the correct size and shape (diamond versus round) of arbor holes. Blades that do not match the mounting hardware of the saw will run eccentrically, causing loss of control.
- Never use damaged or incorrect blade washers or bolts. The blade washers and bolt were specially designed for your saw, for optimum performance and safety of operation.
Further safety instructions for all saws
Causes and operator prevention of kickback:
- Kickback is a sudden reaction to a pinched, bound, or misaligned saw blade, causing an uncontrolled saw to lift up and out of the workpiece toward the operator;
- When the blade is pinched or bound tightly by the kerf closing down, the blade stalls and the motor reaction drives the unit rapidly back toward the operator;
- If the blade becomes twisted or misaligned in the cut, the teeth at the back edge of the blade can dig into the top surface of the wood, causing the blade to climb out of the kerf and jump back toward the operator.
Kickback is the result of saw misuse and/or incorrect operating procedures or conditions and can be avoided by taking proper precautions as given below.
1) Maintain a firm grip with both hands on the saw and position your arms to resist kickback forces. Position your body to either side of the blade, but not in line with the blade.
Kickback could cause the saw to jump backwards, but kickback forces can be controlled by the operator, if proper precautions are taken.
2) When the blade is binding, or when interrupting a cut for any reason, release the trigger and hold the saw motionless in the material until the blade comes to a complete stop. Never attempt to remove the saw from the work or pull the saw backward while the blade is in motion, or kickback may occur.
Investigate and take corrective actions to eliminate the cause of blade binding.
3) When restarting a saw in the workpiece, center the saw blade in the kerf and check that saw teeth are not engaged into the material.
If the saw blade is binding, it may walk up or kickback from the workpiece as the saw is restarted.
4) Support large panels to minimize the risk of blade pinching and kickback.
Large panels tend to sag under their own weight. Supports must be placed under the panel on both sides, near the line of cut and near the edge of the panel.
5) Do not use dull or damaged blades.
Unsharpened or improperly set blades produce narrow kerf causing excessive friction, blade binding and kickback.
6) Blade depth and bevel adjusting locking levers must be tight and secure before making cut. If blade adjustment shifts while cutting, it may cause binding and kickback. 7) Use extra caution when making a "plunge cut" into existing walls or other blind areas. The protruding blade may cut objects that can cause kickback.
Safety instructions for this saw
1) Check lower guard for proper closing before each use. Do not operate the saw if lower guard does not move freely and close instantly. Never clamp or tie the lower guard into the open position. If saw is accidentally dropped, lower guard may be bent. Raise the lower guard with the Lower Guard Lift Lever and make sure it moves freely and does not touch the blade or any other part, in all angles and depths of cut. 2) Check the operation of the lower guard spring. If the guard and the spring are not operating properly, they must be serviced before use. Lower guard may operate sluggishly due to damaged parts, gummy deposits, or a buildup of debris. 3) Lower guard should be retracted manually only for special cuts such as "plunge cuts" and "compound cuts." Raise lower guard by Lower Guard Lift Lever and as soon as blade enters the material, the lower guard must be released. For all other sawing, the lower guard should operate automatically. 4) Always observe that the lower guard is covering the blade before placing saw down on bench or floor. An unprotected, coasting blade will cause the saw to walk backwards, cutting whatever is in its path. Be aware of the time it takes for the blade to stop after switch is released. 5) Do not use any abrasive wheels. 6) Wear a dust mask, if the work causes dust. 7) Use saw blades recommended by Manufacture. 8) Wear ear protectors when using the tool for extended periods. 9) The risk of kickback increases as the battery pack discharges. 10) Be sure to inspect material. Avoid cutting other different material.
11) Be careful not to drop the Metal Cutter. 12) Never swing the Metal Cutter. 13) Never cover the ventilation slots, and keep them free from dust or other material. 14) Do not clamp the Metal Cutter in a vise. Never cut with the Metal Cutter held upside down in a vise. This is extremely dangerous and can lead to serious accidents. 15) Never wear knitted gloves. 16) Be sure no one is below when using the Metal Cutter in high locations. 17) Do not touch the blade immediately after operation. It may be hot and could burn your skin. 18) Do not touch material after it has been cut. Cut material may be very hot. 19) Do not use cutting oil. This use of cutting oil may cause a fire. 20) Do not cut workpieces covered or stained with gas, oil, solvents, thinners, etc. Exposure to these materials may damage the transparent guard. 21) Do not remove the transparent and lower guards. If the transparent and lower guards are damaged or missing, return the tool to an authorized service center for replacement. 22) Do not start the blade when it is in contact with the workpiece. Wait for the blade to reach full speed before beginning the cut.
Symbol
| Symbol | Meaning |
| V | Volts |
| Direct current | |
| n0 | No load speed |
| ... / min | Revolutions or reciprocations per minute |
| A | Amperes |
III. SETTING UP
Charging Battery Pack EY9251
Charge the battery pack when the cutting speed becomes too slow for effective cutting.
If you have two battery packs, you can use one to continue working while charging the other one.
NOTE:
When you charge the battery pack for the first time, or after prolonged storage, charge it for about 24 hours to bring the battery up to full capacity.
Battery charger (EY0110)
- Plug the charger into the AC outlet.
NOTE:
Sparks may be produced when the plug is inserted into the AC power supply, but this is not a problem in terms of safety.
- Insert the battery pack firmly into the charger.
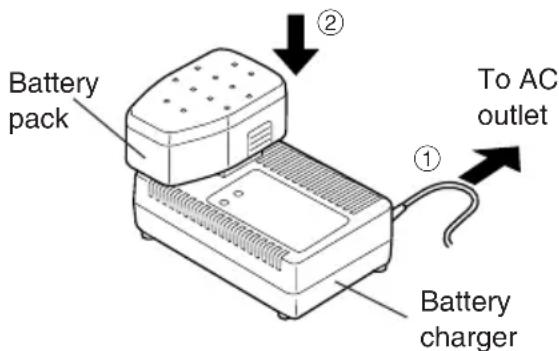
- During charging, the charging lamp will be lit. When charging is completed, an internal electronic switch will automatically be triggered to prevent overcharging.
- Charging will not start if the battery pack is warm (for example, immediately after heavy-duty operation).
The orange standby lamp will be lit until the battery cools down. Charging will then begin automatically.
- When charging is completed, the charging lamp will start flashing quickly in green color.
- When in any of the conditions that battery pack is too cool, or the battery pack has not been used for a long time, the charging lamp is lit. In this case, charging takes longer to fully charge the battery pack, than the standard charging time.
- If a fully charged battery pack is inserted into the charger again, the charging lamp lights up. After several minutes, the charging lamp may flash quickly to indicate the charging is completed.
- If the charging lamp does not light immediately after the charger is plugged in, or if after the standard charging time the lamp does not go off, consult an authorized dealer.
NOTE:
- When charging a cool battery pack (below 5°C (41°F)) in a warm place, leave the battery pack at the place and wait for more than one hour to warm up the battery to the level of the ambient temperature. Otherwise battery pack may not be fully charged. Cool down the charger when charging more than two battery packs consecutively.
- Do not insert your fingers into contact hole, when holding charger or any other occasions.
CAUTION:
To prevent damage or risk of fire:
- Do not use power source from an engine generator.
- Do not cover vent holes on the charger and the battery pack.
- Unplug the charger when not in use.
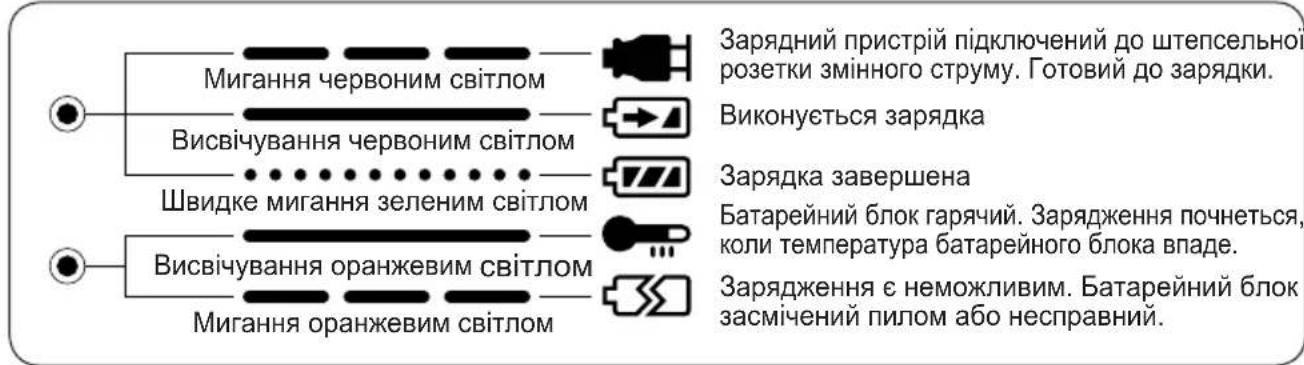
Lamp Indications
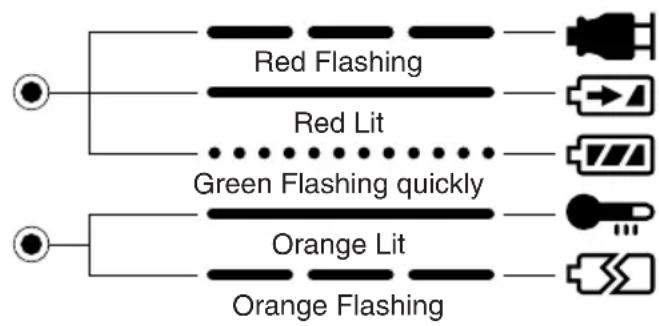
Charger is plugged into the AC outlet. Ready to charge.
Now charging
Charging is completed.
Battery pack is warm. Charging will begin when temperature of battery pack drops.
Charging is not possible. Clogged with dust or malfunction of the battery pack.
Inserting Battery Pack
CAUTION:
Before inserting battery pack, check that the power switch in the Metal Cutter actuates properly and returns to the "OFF" position when released.
1.To insert the battery pack: (See Fig.2)
Slide the battery pack in place at the rear of the metal cutter. The battery should snap into place. If the battery is loose, it has not been properly connected.
2. To remove the battery pack:
Press the two tabs on the sides of the battery pack. Slide the battery pack out of the metal cutter body.
IV. OPERATION
Before Using Metal Cutter
This tool is intended for cutting unhardened ferrous metal and nonferrous metal. Refer to the "Accessories" section for a list of blades to be used for the proper applications of this tool. The following precautions must be followed to reduce the risk of injury:
- Do not cut stacked materials. Cut one piece at a time.
- Do not cut hardened steel.
- Cut materials with the wider edge of the shoe over the clamped side of the material.
- Do not touch the saw blade, workpiece, or cutting chips with bare hands immediately after cutting; they may be hot and could burn skin.
Each time you use the metal cutter, you must make sure it is in good operating condition.
Use the following checklist:
- Is the blade installed in the correct direction?
The arrow on the blade must point in the same direction as the arrow on the upper blade cover.
- Is the blade installed properly?
Make sure the hex bolt is tightened securely. (See Fig.12)
3. Does the blade look alright?
Replace the blade immediately if there are any cracks in it or if any teeth are broken.
4. Does the lower guard close properly?
WARNING
To avoid injury, do not use the metal cutter if the lower guard does not close quickly over the blade.
6. Is the battery pack charged and inserted firmly to the metal cutter? 7. Is the depth adjustment lever for cutting securely tightened? 8. Is the workpiece securely clamped on a saw horse or bench?
Using Metal Cutter
CAUTION:
To reduce the risk of injury read the Safety Instructions at the front of this manual before using the metal cutter.
WARNING
To reduce the risk of injury, wear safety goggles or glasses with side shields.
Follow these steps:
Hold the metal cutter with both hands. (See Fig.4) Do not attempt to remove cut material when blade is moving.
1. Line up the sight line on shoe with your cutting line. (See Fig.3)
Alignment with cutting line
- Use the notch as guide to establish cutting position. Align the notch with cutting line.
As the cutting position may differ depending on the blade, do a trial cut beforehand.
- Press the switch lock lever down, then squeeze the power switch to start the motor, and then release the switch lock lever.
CAUTION:
- Check that the switch lock lever works. If power switch can be activated without depressing the switch lock lever, discontinue use immediately. Take the tool to an authorized service center. Always hold the handle with one hand and the front grip with the other. (See Fig.4) Maintain a firm grip and depress the switch fully.
- The blade should not touch the cutting material before you start the motor. Wait until the blade reaches full speed before starting a cut.
- This tool has no provision to lock the power switch in the "ON" position, and you must not attempt to secure it in the "ON" position.
3.Start cutting when the blade reaches full speed.
4.During cutting, keep your cutting line straight. Move the metal cutter forward at a steady speed, while looking at the tip of the blade through the transparent guard.
5.Is the transparent guard securely installed?

WARNING
- To prevent dangerous kickback, keep the shoe of the metal cutter flat on the surface of the material being cut.
- Never force the cutter. Use light and continuous pressure.
5.If the motor starts to feel too warm, stop cutting. Let the metal cutter cool down before continuing work. 6. It is always a safe practice to remove the battery pack after use and before storing the metal cutter.
Cutting depth adjustment
- Remove battery pack.
- Loosen the depth adjustment lever by pushing it and adjust the cutting depth.
Tighten the depth adjustment lever securely by lifting it up towards the motor housing at the desired cutting depth. (See Fig.5)
Rip fence (EY3500B7727)
(Available as an accessory, not included) Rip fence is convenient for rip cuts and repeated cuts of uniform width.
- Remove battery pack. -Insert rip fence and adjust cutting width. (See Fig.6)
- Fasten screw securely to fix rip fence.
For Proper Use (Further Detail)

WARNING
To prevent the risk of serious personal injury:
It is important to use an appropriate device to hold the material being cut properly, and to hold the cutter firmly with both hands to prevent loss of control which could cause personal injury. Figure 7 shows proper cutting position. Note that hands are kept away from cutting area. - Make sure bystanders are away from work area and from underneath of workpiece. - When cutting, do not try to hold the material with your hand.
Cutting large sheets;
Support large sheets. Be sure to set the depth of the cut so that you only cut through the workpiece, not through the supports. (See Fig.8)
Large sheets sag or bend if they are not correctly supported. If you attempt to cut without leveling and properly supporting the workpiece, the blade will tend to bind, causing kickback. (See Fig.9)
- Don't support the material away from the cut.
Cutting thin or corrugated materials;
Cut thin and corrugated materials at least 1 inch from the edge of the workpiece to avoid injury or damage to the tool caused by thin strips of metal being pulled into the upper guard.
- Use sharp blades only. Clean and sharp blades minimize stalling and kickback.

WARNING
To prevent the risk of serious personal injury:
- When making an incomplete cut or cutting is interrupted, or blade is binding or cutter is stalling; release the power switch immediately and hold the cutter motionless in the material until the blade comes to a complete stop.
- To avoid kickback, never attempt to remove the cutter from the work or pull the cutter backward while the blade is in motion. Make sure the blade has come to a complete stop, then remove cutter from cut.
- To resume cutting, start metal cutter, allow the blade to reach full speed, reenter the cut slowly and resume cutting.
- Place the wider part of the shoe on the part of the work piece which is solidly supported (See Fig.10), never on the section that will fall off when the cut is made. (See Fig.11)
Hold the cutter firmly to prevent loss of control. Working carelessly can cause severe personal injury.
2. Make sure the blade stops.
Even though your metal cutter has a brake, before setting the metal cutter down, make sure the blade has come to a complete stop and the lower guard has closed.
3. Do not use if anything seems unusual. Remove battery pack immediately.
If the metal cutter body becomes very hot, or does not work properly, remove the battery pack and do not use. Have it checked by an authorized service center.
WARNING
To prevent the risk of serious personal injury or fire, do not try to repair the metal cutter by yourself. Never disassemble or modify the metal cutter body. There are no user-repairable parts inside.
4. NEVER ALLOW THE CUTTER TO COME IN CONTACT WITH YOUR BODY.
After completing a cut, do not allow the cutter to brush against your leg or side.
Since the lower guard is retractable, it could catch on your clothing and expose the blade.
Keep clothing away from metal cutter. Be aware of the exposed blade sections that exist in both the upper and lower guard areas.
WARNING
Because cutting metal creates sparks;
Always use safety goggles. - Do not use metal cutter near any flammable substance or in an area where flammable substances are used. Fire and burn injury could result.
5. Never engage the spindle lock while blade is running, or engage in an effort to stop the tool. Never turn the switch on when the spindle lock is engaged. Serious damage to your metal cutter will result.
V. MAINTENANCE
WARNING
To avoid severe personal injury, always remove the battery pack from the metal cutter before starting any maintenance procedure.
CAUTION:
To assure product SAFETY and RELIABILITY, servicing should be performed by an authorized service center. Always insist on genuine Panasonic replacement parts.
Removing Blade
CAUTION:
The blade will be hot right after cutting. Be sure to let the blade cool down before removing it.
Follow these steps:
1. Remove the battery pack from the metal cutter. 2. Hold the spindle lock button down. This prevents the blade from rotating. 3. Use the provided hex wrench to loosen the hex bolt.
NOTE:
Keep the hex wrench in the storage slot on the metal cutter's body when not using it.
4. Remove the hex bolt and outer washer. 5. Use the lower guard lift lever to retract (open) the lower guard. 6. Carefully remove the blade. 7. Clean the metal cutter if necessary.
CAUTION:
Be careful to avoid cutting your hands on the blade.
- When disposing of a blade, secure it inside heavy or corrugated paper. This will help prevent anyone from being cut by the discarded blade.
Installing Blade
Follow these steps:
- 1. Remove the battery pack from the metal cutter. 2. Remove any cutting debris from blade area. 3. Use the lower guard lift lever to retract (open) the lower guard. 4. Install the blade as illustrated. (See Fig.12)
Make sure that both the direction arrow on the blade and the direction arrow on the upper blade cover point in the same direction.
5. Set the outer washer in place. 6. Insert the hex bolt. 7. Hold the spindle lock button down. This prevents the blade from rotating. 8. Tighten the hex bolt securely with the provided hex wrench. Store the hex wrench.
NOTE:
Keep the hex wrench in the storage slot on the metal cutter's body when not using it.
WARNING
Failure to follow these instructions can result in serious personal injury.
For Appropriate Use of Battery Pack
Ni-MH Battery Pack (EY9251)
- Charge the Ni-MH battery fully before storage to ensure a longer service life. The ambient temperature range is between 0°C (32°F) and 40°C (104°F).
If the battery pack is used when the battery temperature is below 0°C (32°F), the tool may fail to function properly. In that case, charge the battery until charging is completed for appropriate functioning of the battery. When the battery pack is not in use, keep it away from other metal objects like paper clips, coins, keys, nails, screws, or other small metal objects that can make a connection from one terminal to another.
Shorting the battery terminals together may cause sparks, burns, or a fire.
- When operating with a Ni-MH battery pack, make sure the place is well ventilated.
Battery Pack Life
The rechargeable batteries have a limited life. If operation time becomes extremely short after recharging, replace the battery pack with a new one.
NOTE:
- Use under extremely hot or cold conditions will reduce operating capacity per charge. Even if you don't use the Metal Cutter, charge
the battery pack at least once every six months.
Battery Recycling
ATTENTION:
- For environmental protection and recycling of materials, be sure that it is disposed of at an officially assigned location, if there is one in your country.
Cleaning Metal Cutter
Keep your metal cutter clean for good cutting performance, and to help keep it safe to use.
Follow these steps:
- Remove the battery pack from the metal cutter.
- Wipe the metal cutter with a dry, soft cloth. Do not use a wet cloth or cleaning liquids.
They could damage the metal cutter's finish.
3. Be sure to rub off any oil or grease which could make the metal cutter slippery or hard to handle. 4. Remove the blade and brush off any dust.
CAUTION:
To avoid injury or damage to the unit, never immerse any part of the tool in a liquid.
Transparent Guard
WARNING
If the guard is cracked or broken, take the metal cutter to an authorized service center for replacement. Do not attempt to operate the cutter. It could result in serious personal injury. Never use your metal cutter with a damaged transparent guard or without the transparent guard installed. Flying chips could result in serious injury.
VI. ACCESSORIES
WARNING
The use of any accessories not specified in this manual may result in fire, electric shock, or personal injury. Use recommended accessories only. - Use of a blade on material that is thicker or thinner than that recommended for that blade will result in a rough cut, and could increase the risk of "kickback" or other injury.
Blade for cutting metal material
-ey9PM17A
For cutting unhardened ferrous material
Thickness of material
0.3 mm - 6.0 mm (1/64" - 15/64")
Blade for cutting thin metal material (Optional accessory)
- EY9PM17B
For cutting unhardened thin ferrous material
Thickness of material
0.3 mm - 2.0 mm (1/64" - 5/64")
Rip Fence (Optional accessory)
·EY3500B7727
For convenience of rip cuts and repeated cut of uniform width
Battery Pack
·EY9251
Battery Charger
·EY0110
VII. SPECIFICATIONS
Metal Cutter (EY3552)
| Motor voltage 18 V DC | |
| Blade Speed 2900 /min (rpm) | |
| Blade Size Outside diameter Arbor size | 165 mm (6-1/2") 20 mm (25/32") |
| Maximum cutting depth | 3 - 56 mm (1/8" - 2-13/64") (φ165mm blade) |
| Dimensions (L × W × H) | 345 × 198 × 264 mm (13-37/64" × 7-51/64" × 10-25/64") |
| Weight (with battery pack) 4 kg (8.82lbs) | |
Battery Pack (EY9251)
| Storage Battery Ni-MH Battery |
| Voltage 18 V DC (1.2 V × 15 cells) |
Battery Charger (EY0110)
| Model EY0110 | |
| Electrical rating See the rating | plate on the bottom of the charger. |
| Weight | 0.78 kg (1.72 lbs) |
| Charging time | 65 minutes (EY9251) |
NOTE:
- Do not charge "Y" type Ni-Cd battery packs.
- For applicable battery packs to this charger, see the label on the charger or the latest general catalog.
ONLY FOR U.K.
VIII ELECTRICAL PLUG INFORMATION
FOR YOUR SAFETY PLEASE READ THE FOLLOWING TEXT CAREFULLY
This appliance is supplied with a moulded three pin mains plug for your safety and convenience.
A 3 amp fuse is fitted in this plug.
Should the fuse need to be replaced please ensure that the replacement fuse has a rating of 3 amp and that it is approved by ASTA or BSI to BS1362.
Check for the ASTA mark or the BSI mark on the body of the fuse.
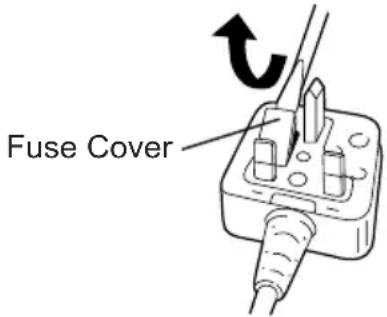
If the plug contains a removable fuse cover you must ensure that it is refitted when the fuse is replaced.
If you lose the fuse cover the plug must not be used until a replacement cover is obtained.
A replacement fuse cover can be purchased from your local Panasonic Dealer.
IF THE FITTED MOULDED PLUG IS UNSUITABLE FOR THE SOCKET
OUTLET IN YOUR HOME THEN THE FUSE SHOULD BE REMOVED AND THE
PLUG CUT OFF AND DISPOSED OF SAFELY.
THERE IS A DANGER OF SEVERE ELECTRICAL SHOCK IF THE CUT OFF PLUG IS INSERTED INTO ANY 13 AMP SOCKET.
If a new plug is to be fitted please observe the wiring code as shown below.
If in any doubt please consult a qualified electrician.
IMPORTANT:
The wires in this mains lead are coloured in accordance with the following code:
Blue: Neutral
Brown: Live
As the colours of the wire in the mains lead of this appliance may not correspond with the coloured markings identifying the terminals in your plug, proceed as follows.
The wire which is coloured BLUE must be connected to the terminal in the plug which is marked with the letter N or coloured BLACK.
The wire which is coloured BROWN must be connected to the terminal in the plug which is marked with the letter L or coloured RED.
Under no circumstances should either of these wires be connected to the earth terminal of the three pin plug, marked with the letter E or the Earth Symbol.
How to replace the fuse: Open the fuse compartment with a screwdriver and replace the fuse and fuse cover if it is removable.
This apparatus was produced to BS800.
-MEMO-
I. INTRODUCTION
1. Is the blade installed in the correct direction?
The arrow on the blade should point in the same direction as the arrow on the upper blade guard.
This is the result of improper use or maintenance of the blade, or failure to follow the technical instructions. It can be avoided by taking appropriate precautions as listed below.
1) Keep the blade guard in a position that allows counteracting kickback forces. Stand so that your body is to one side of the blade, not in line with it. Kickback can cause the blade to jump in a backward direction, but the operator can maintain control if proper precautions are taken. 2) When the blade is pinched, or when the cutting process is interrupted for any reason, release the trigger and hold the saw.
Keep the blade stationary in the material until the blade has completely stopped. Never attempt to remove the blade from the workpiece or pull the blade backward while the blade is moving, otherwise kickback may occur. Investigate the cause of the pinching and take the necessary corrective actions to eliminate the cause of the pinching.
3) When restarting the saw, with the blade inside the workpiece, center the blade in the kerf and check that the teeth are not engaged in the material.
If the blade binds, kickback can act on the workpiece in any direction when the saw is restarted.
4) Support large panels securely to minimize the risk of blade pinching and kickback.
Large panels tend to sag under their own weight. Supports must be placed under the panel on both sides, near the line of cut and near the edge of the panel.
5) Do not use dull or damaged blades.
Unsharpened or improperly set blades cause a narrow kerf, which leads to excessive friction, blade pinching, and kickback.
6) The blade depth and bevel adjusting locking levers must be tight and securely fastened before making the cut.
If the blade adjustment shifts during cutting, it may cause binding and kickback.
7) Use extra caution when making a "plunge cut" into an existing wall or other blind area. The protruding blade may cut objects that could cause kickback.
Safety instructions for this saw
1) Before starting operation, check the correct closing of the lower guard. Do not operate the saw if the lower guard does not move freely and close instantly. Never clamp the lower guard in the open position.
The lower protective device is raised using clamps or yokes. If the blade is accidentally dropped, the lower protective device may bend. Raise the lower protective device using the retractable handle and make sure that it moves freely and does not touch the fabric or any other part when cutting at any angle or depth. 2) Check the functioning of the spring of the lower protective device. If the protective device and the spring do not function properly, they must be repaired before use. The lower protective device may function too slowly due to damage to parts, accumulation of sticky deposits, or ingress of debris. 3) The lower protective device must be retracted manually only for special types of saws, such as "plunge" and "combination". Raise the lower protective device with the retractable handle, and as soon as the blade enters the material, the lower protective device must be released. For all other types of saws, the lower protective device must function automatically. 4) Do not forget to check that the lower protective device covers the blade before placing the saw on the workbench or floor. An unprotected blade, coasting by inertia, will become the cause of the saw moving in the reverse direction and cutting everything in its path. Remember that it takes some time for the blade to stop after switching off. 5) Do not use abrasive discs. 6) Wear a dust mask if cutting parts generates dust. 7) Use blades recommended by the manufacturer. 8) Wear safety glasses when using the tool for an extended period of time. 9) The risk of kickback increases when the battery pack is discharged. 10) Carefully inspect the material. Avoid cutting other materials.
11) Be careful not to drop the metal cutter. 12) Never perform any work with the metal cutter. 13) Never block the ventilation openings and keep them free from dust and other materials. 14) Do not clamp the metal cutter in a vise. Do not cut with the metal cutter turned upside down in the vise. This is extremely dangerous and can lead to serious accidents. 15) Never wear loose clothing or gloves. 16) When using the metal cutter at height, make sure that no one is below. 17) Do not touch the tool immediately after use. It may be hot and burn your skin. 18) Do not touch the material after it has been cut. The cut material may be very hot. 19) Do not use emulsion oil. Such use of emulsion oil may cause a fire. 20) Do not cut materials with a coating or paint of benzene, oil, solvents, thinners, etc. The effect of these materials may damage the transparent protective device. 21) Do not remove the transparent and lower protective devices. If the transparent or lower protective device is damaged or missing, return the tool to an authorized service center for replacement. 22) Do not turn on the tool if the blade is touching the workpiece. Wait until the blade reaches full speed before starting to cut. 23) In accordance with the Federal Law of Russia "On Protection of Consumer Rights", the service life of this product is 7 years, 1200 charges (only for the battery pack) from the date of manufacture, provided that the product is used with the tool in accordance with this instruction manual and applicable technical standards.
Maxwita Electric Works, Ltd.
Symbols
Charging device (EY0110)
- Plug the charging device into an AC outlet.
NOTE:
When plugging the plug into the power source, sparks may appear, but this is not a safety problem.
2. Firmly insert the battery pack into the charging device.
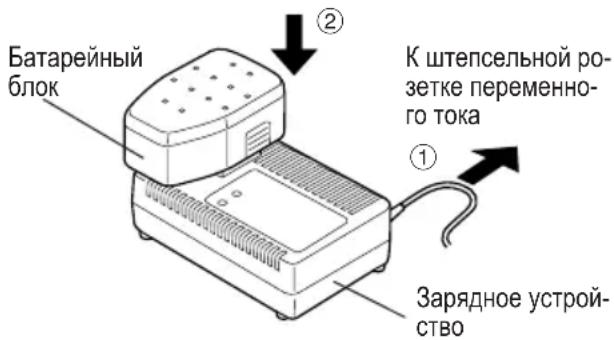
3. During charging, the charging lamp will light. After charging is complete, the internal electronic switch will automatically operate, preventing overcharging.
- Charging will not start if the battery
pack is too hot (for example, immediately after operation under heavy load).
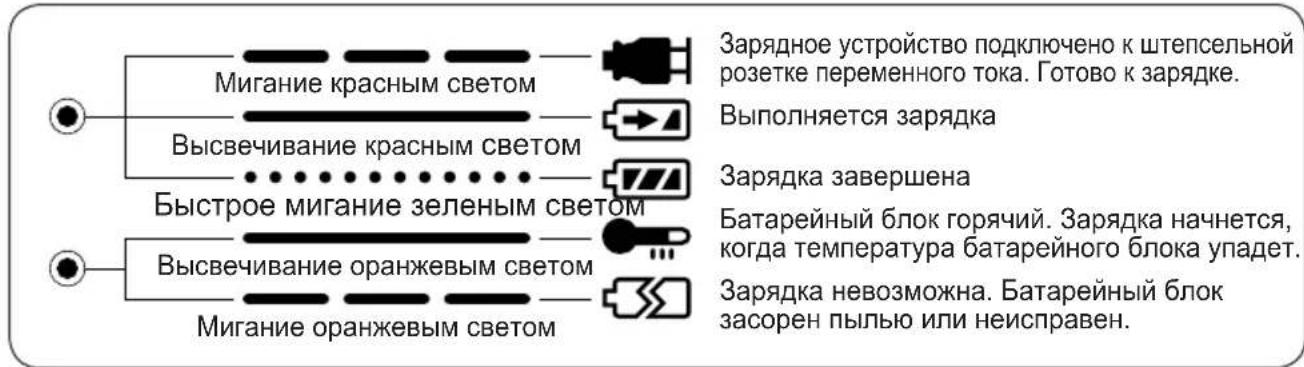
The orange standby lamp will stay on until the battery cools down. Then charging will start automatically.
- After charging is complete, the charging lamp will quickly blink green.
5. If the battery pack is too cold or has not been used for a long time, the charging lamp will light. In this case, charging will take longer until the battery pack is fully charged, compared to standard charging time.
- When the battery pack is fully charged, the battery pack can be inserted into the charging device again, and the charging indicator will light up. After a few minutes, the charging indicator may start flashing rapidly, indicating that the charging is complete.
If the charging indicator does not light up immediately after the charging device is turned on, or if the indicator does not go out after the standard charging time, contact the authorized service center. NOTE:
- When charging a cold battery pack (with temperature below 5°C), place the battery pack in a warm place and leave it for more than one hour until the battery warms up to the ambient temperature level. Otherwise, the battery pack may not charge fully. - Cool the charging device when charging more than two battery packs in succession. Do not insert your fingers into the contact holes when you hold the charging device, and also in other cases.
WARNING:
To reduce the risk of fire:
Do not use a generator as a power source. - Do not block the ventilation openings on the charging device and battery pack. - Disconnect the charging device from the mains if it is not in use.
Light indicators
Connecting the battery pack
WARNING:
Before connecting the battery pack, make sure that the power switch of the metal cutter is properly in the "OFF" position and is disconnected.
1. To connect the battery pack: (see Fig. 2) Insert the battery pack into the compartment from the rear side of the metal cutter. The battery should click into place. If the battery is not inserted correctly, it must be properly connected. 2. To remove the battery pack: Press the two buttons on both sides of the battery pack. Pull the battery pack out of the metal cutter housing.
IV. FUNCTIONING
Before using the metal cutter
This tool is intended for cutting hardened black and non-ferrous metals. For applications that can be used for proper use of this tool, refer to the "Intended Use" section. To reduce the risk of injury, the following precautions must be observed:
- Do not cut multiple layers of material. Cut one piece at a time. - Do not cut hardened steel. - Cut materials whose wider side of the base exceeds the clamped side of the material. Do not touch with bare hands the chips, the material being cut, or the cut parts immediately after cutting; they may be hot.
Before using the metal cutting saw, make sure it is in good working condition. Use
the following checklist of checks:
1. Is the blade installed in the correct rotation direction? The arrow on the blade should point in the same direction as the arrow on the top cover of the blade. 2. Is the blade installed correctly? Make sure the hex bolt is securely tightened. (See Fig. 12) 3. Does the blade fully satisfy? Immediately replace the blade if it has any cracks or if any tooth is broken. 4. Does the lower protective guard close properly?
CAUTION
To avoid injury, do not use the metal cutting saw if the lower protective guard does not close quickly over the blade.
5. Is the transparent protective guard securely installed? 6. Is the battery pack charged and does it fit the metal cutting saw? 7. Is the depth adjustment lever securely tightened? 8. Is the workpiece securely clamped to prevent it from moving or vibrating?
Using the metal cutting saw WARNING:
To reduce the risk of injury, before starting to operate this metal cutting saw, read the safety instructions on the front cover of this manual.
CAUTION
To reduce the risk of injury, wear safety glasses or glasses with side shields.
Perform the following actions:
Hold the metal cutting saw with both hands. (See Fig. 4) Do not try to remove the cut
material while the blade is rotating.
- Align the guide line on the base with the cutting line. (See Fig. 3)
Aligning with the line
- Make a trial cut to use as a guide for setting the cutting position. Compare the cut with the cutting line. Since the cutting position may vary depending on the material, first make a trial cut.
2. Press down the switch lock lever, then press the switch trigger to start the motor, then release the switch lock lever.
WARNING:
- Make sure the switch lock lever works. If the switch trigger is activated without pressing the switch lock lever, stop work immediately. Return the tool to an authorized service center. Always hold the tool with one hand on the handle and the other hand on the auxiliary handle. (See Fig. 4) Keep the auxiliary handle securely and fully press the switch. - The blade must not touch the material being cut before you start the motor. Wait until the blade reaches full speed before starting to cut.
- This tool is not equipped with a switch lock to lock the trigger in the "ON" position, and you should not attempt to fix it in the "ON" position. 3. Start cutting when the blade reaches full speed. 4. During cutting, maintain a straight cutting direction. Move the metal cutting blade forward at a constant speed, and simultaneously watch the end of the blade through the transparent protective guard.
CAUTION
- To avoid dangerous kickback, keep the base of the metal cutting blade flat on the surface of the material being cut. Never apply force to the blade. Use light and intermittent pressure.
5. If the motor starts to overheat, stop cutting. Let the metal cutting blade cool down before continuing work. 6. It is always safer to remove the battery cartridge after use before changing the metal cutting blade.
Adjusting the cutting depth
- Remove the battery cartridge.
- Loosen the depth adjustment lever by pressing it, and adjust the cutting depth. Securely tighten the depth adjustment lever by lifting it up toward the motor housing, setting the desired cutting depth. (See Fig. 5)
Guide plate (EY3500B7727)
(Accessory, not included)
The guide plate is useful for cutting grooves of the same width.
- Remove the battery cartridge. Insert the guide plate and adjust the cutting depth. (See Fig. 6) Securely tighten to fix the guide plate.
Battery pack service life
Battery packs have a limited service life. If after charging the operating time becomes excessively short, replace the battery pack with a new one.
NOTE:
- Using the metal cutter in hot or cold conditions shortens the operating time per charge. Even if you use the metal cutter, charge the battery pack at least once every six months.
Battery disposal
WARNING:
To protect the environment and material recycling, make sure the battery is disposed of at an officially designated location, if such exists in your country.
Metal cutter maintenance
Keep your metal cutter clean to maintain good cutting performance and safe operation.
Perform the following steps:
1. Remove the battery pack from the metal cutter. 2. Wipe the metal cutter with a dry, soft cloth. Do not use a wet cloth or cleaning liquids.
Remove any debris from the metal cutter.
3. Make sure to remove any oil or grease that could make the metal cutter slippery or difficult to hold. 4. Remove the blade and wipe off any dust.
WARNING:
To avoid injury or damage to the tool, never immerse any part of the tool or instrument in liquid.
Protective transparent guard
CAUTION
If the protective guard is cracked or broken, return the metal cutter to an authorized service center for replacement. Do not attempt to operate the metal cutter. This may result in serious injury. Never use the metal cutter with a damaged transparent protective guard or with the transparent protective guard removed. Metal cutting debris may cause serious injuries.
CAUTION
Use of any accessories not listed in this manual may result in fire, electric shock, or injury. Use only recommended accessories.
Use of a blade that is thicker or thinner than the recommended one for this saw may result in poor cutting and may increase the risk of kickback or other injury.
Metal cutting saw blade
- EY9PM17A
Cutting unhardened ferrous metals
Material thickness
0.3 mm - 6.0 mm (1/64" - 15/64")
Thin metal cutting saw blade (optional accessory)
EY9PM17B
Cutting unhardened thin ferrous metals
Tool material
0.3 mm - 2.0 mm (1/64" - 5/64")
Guide rail (optional accessory)
-EY3500B7727
For plunge cutting, repeat the cutting at the same width
Battery pack
.EY9251
Charging device
·EY0110
VII. TECHNICAL SPECIFICATIONS
Metal cutting (EY3552)
Charging device (EY0110)
The blade may become jammed or the tool may kick back, but the operator must not lose control of the tool. If the tool is used improperly, it may cause injury.
2) When opening the cut, or when interrupting the cutting process for any reason, release the switch and hold the tool motionless in the material until the blade comes to a complete stop. Never attempt to remove the blade from the workpiece or pull the blade backward while the blade is moving, otherwise the tool may kick back.
Remove the blade when opening the cut and hold the tool motionless until the blade has stopped.
3) On repeated start of the machine, if the blade is fully in the middle of the cut, it will be released; pull the blade out of the cut and check that it is not stuck in the material.
If the blade is open, the machine may feed onto the part being processed in any direction on repeated start of the machine.
4) Firmly hold the workpiece with both hands to minimize the risk of the blade and the machine binding.
The workpiece tends to be pulled in by its own weight. The support handle should be positioned close to the workpiece, along the cutting line and slightly better.
5) Do not use dull or damaged blades.
Unsharpened or incorrectly installed blades cause a narrow cut, which leads to excessive friction, blade opening and machine binding.
6) The blade guard and the blade opening must be exactly installed and firmly fixed before starting the cut. If the guard device is installed, the blade opening may shift during the cut, which can cause the blade to open and bind. 7) Follow additional safety measures when performing "cutting" into an existing wall or other non-visible areas.
The blade that extends forward may start cutting objects that cause the machine to bind.
Safety instructions for this machine
1) Before starting operation, each time check the correct functioning of the lower guard. Do not operate the machine if the lower guard does not move freely and close automatically. Never lock the lower guard in the open position with a latch or clamp.
If the machine is accidentally dropped, the lower guard may bend. Check the lower guard with the handle that is provided, and make sure it moves freely and does not touch the blade or any other part during cutting at any angle and from any side.
2) Check the functioning of the spring of the lower guard. If the guard and the spring do not function reliably, they must be repaired before operation.
The lower guard may function insufficiently quickly due to damage to parts, accumulation of sticky residues, or debris.
3) The lower guard must be
Before using the tool, read all instructions, such as "Safety" and "Combined". Lower the cutting head using the handle until it is fully lowered into the material. Lower the cutting head must be released. Before using the tool, the cutting head must be fully lowered. 4) Do not forget to check that the cutting head is completely closed before placing it on the workbench or on the floor. An unclosed head that moves by inertia will cause everything on the workbench to be thrown off during movement in the reverse direction. Remember that for the blade to stop after switching off, some time is needed. 5) Do not use worn or abrasive discs. 6) Wear a mask against dust if the cutting parts are accompanied by dust generation. 7) Use blades recommended by the manufacturer. 8) Wear safety goggles during prolonged use of the tool. 9) The risk of injury increases when the battery pack is discharged. 10) Carefully handle the material. Avoid cutting other materials. 11) Be careful, do not fall. 12) Never make sudden movements with the metal cutter. 13) Never block the ventilation openings and keep them free from dust and other materials. 14) Do not clamp the metal cutter in a vise. Do not perform cutting with the metal cutter turned upside down, installed in a vise. This is unsafe and can lead to serious accidents. 15) Never wear loose clothing. 16) When using the metal cutter at height, make sure there is no one below. 17) Do not touch the blade immediately after operation. It may be hot and burn your skin. 18) Do not touch the material after it has been cut. The cut material may be very hot. 19) Do not use abrasive oil. Such use of abrasive oil may cause a fire. 20) Do not cut workpieces that are painted or coated with gasoline, oil, solvents, thinners, etc. The impact of these materials may damage the protective cover of the tool.
21) Do not remove the protective covers and their fasteners. If the protective covers or their fasteners are damaged or missing, return the tool to an authorized service center for repair. 22) Do not switch on the tool if the blade touches the workpiece. Wait until the blade reaches full speed before starting to cut. 23) According to the Law of Ukraine "On Protection of Consumer Rights", the service life for this product is 7 years, 1200 charges (only for battery pack) from the date of manufacture, provided it is used strictly in accordance with the operating instructions and applicable technical standards.
Makita Electric Works, Ltd.
Osaka, Japan
Symbols
Before connecting the tool to the power source with alternating current, make sure
Grounding is not required, but this is not a safety issue.
- Fully insert the battery pack into the charger.
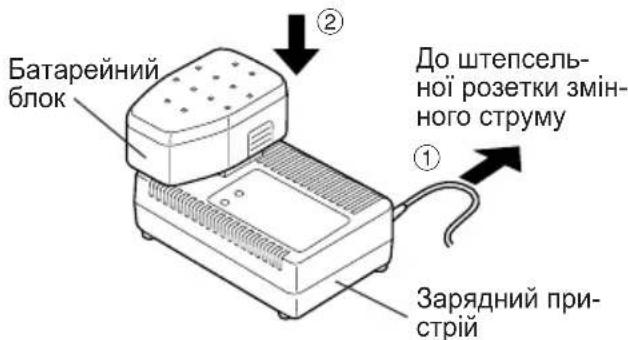
3. During charging, the charging lamp will light up. After charging is complete, the internal electronic switch will automatically turn off, preventing overcharging.
Do not charge the battery pack when it is hot (immediately after heavy use).
The orange charging indicator lamp will remain lit until the battery pack has cooled down. Then charging will begin automatically.
4. After charging is complete, the charging lamp will light up green. 5. If the battery pack is very cold or has not been used for a long time, the charging lamp will light up. In this case, charging will take longer until the battery pack is fully charged, compared to the standard charging time.
If a fully charged battery pack is inserted into the charger again, the charging lamp will light up. After a few minutes, the charging lamp may blink, indicating that charging is complete.
6. If the charging lamp does not light up immediately after inserting the charger, or if the lamp does not go out after the standard charging time, contact an authorized service center.
NOTE:
When charging a cold battery pack (below 5°C) in a warm place, leave the battery pack in that place and wait for about one hour until the battery pack warms up to the ambient temperature. In this case, the battery pack can be fully charged. - Cool the charger when charging two battery packs consecutively. - Do not insert your fingers into the contact openings while holding the charger, and also in other cases.
WARNING:
To prevent the risk of fire:
Do not use a diesel generator as a power source. Do not block the ventilation openings on the charger and battery pack. Disconnect the charger from the mains if it is not in use.
Battery indicator
Attaching the battery pack
WARNING:
Before attaching the battery pack, make sure that the metal detector is switched off and the switch is in the "OFF" position when releasing it.
1. To attach the battery pack: (see Fig. 2) Insert the battery pack into the slot on the back of the metal detector. The battery should click into place. If the battery is inserted incorrectly, it must be reattached securely. 2. To remove the battery pack: Press the two buttons on both sides of the battery pack. Pull the battery pack out of the metal detector housing.
IV. OPERATION
Before using the metal shear
The metal shear is intended for cutting unhardened non-ferrous metal. For the list of materials that can be cut and for intended use of the tool, refer to the "Purpose" section. To reduce the risk of injury, follow the required safety measures: - Do not cut multi-layer materials. Cut one piece at a time. - Do not cut hardened steel. - Cut materials with the wide side of the blade facing the material. - Do not touch the blade, material being processed, or cut pieces with your hands immediately after cutting; they may be hot. Each time you use the metal shear, you must ensure it is in good working condition. Use the required control checklist: 1. Is the blade installed in the correct position?
The arrow on the blade should point in the direction of the blade on the upper blade holder.
2. Is the blade installed securely? Make sure the screws are tightened. (See Fig. 12) 3. Is the blade sufficiently sharp? Replace the blade if it has any cracks or any teeth are damaged. 4. Is the lower lock of the device closed securely?
CAUTION
Do not use the metal shear if the lower lock of the device closes only on the blade.
5. Is the protective guard of the device installed correctly? 6. Are the battery pack and charger connected to the metal shear? 7. Is the cutting depth adjustment knob properly turned? 8. Is the workpiece being processed securely clamped on the table or workbench?
Using the metal shear
WARNING:
To reduce the risk of injury, before operating this metal shear, read the safety instructions in the front part of this manual.
CAUTION
To reduce the risk of injury, wear safety goggles or goggles with side shields.
Perform the following steps: Hold the metal shear with both hands. (See Fig. 4) Do not attempt to cut material while the blade is rotating. 1. Align the cutting line with the cutting line. (See Fig. 3)
Cutting with the cutting line
Open the protective cover to install the blade. Align the blade with the slot. Since the blade position may vary depending on the material, first make a test cut. 2. Press the blade lock lever, then press the trigger switch to start the motor, and then release the blade lock lever.
WARNING:
- It is recommended that the blade lock lever works properly. If the blade lock lever is activated without pressing the blade lock lever, it may be damaged. Take the tool to an authorized service center. Hold the handle with one hand, and press the switch with the other. (See Fig. 4) Keep the blade away from the material and fully press the switch. - The blade must not protrude from the material being cut before you start the motor. Wait until the blade reaches full speed before starting the cut.
If the tool is not equipped with a blade lock lever and the trigger switch is in the "ON" position, you should not attempt to lock it in the "ON" position. 3. Start cutting when the blade reaches full speed. 4. During cutting, keep the cutting direction straight. Move the blade forward at a constant speed, and simultaneously press the blade against the material through the opening in the base.
SURFACE
- To avoid unsafe operation, hold the base of the blade flat against the surface of the material being cut. Never apply force to the blade. Use light, continuous pressure.
5. If the motor begins to overheat, stop cutting. Let the blade cool down before continuing work. 6. It will be safer if you remove the battery pack after use and before storing the tool.
Adjusting the cutting depth
- Remove the battery pack. - Loosen the depth adjustment knob by pressing it, and adjust the cutting depth.
Tighten the depth adjustment knob firmly so that the base is pressed against the body of the tool, and the desired cutting depth is set. (See Fig. 5)
Guide plate (EY3500B7727)
(Optional accessory, not included)
The guide plate is useful for cutting grooves and cutting strips of equal width, as it can be repeated.
- Remove the battery pack. Install the guide plate and adjust the cutting depth. (See Fig. 6) Tighten the screw to secure the guide plate.
Installing the blade
Note:
1. Remove the battery block from the metal detector. 2. Remove any debris from the coil. 3. Use the appropriate wrench to tighten (open) the lower locking screw. 4. Install the coil as shown in the illustration. (See Fig. 12)
Make sure that the direction of the arrow on the coil and the direction of the arrow on the upper cover of the coil point in the same direction.
5. Install the outer cover in place. 6. Insert the hex bolt. 7. Hold the locking button of the handle in the pressed position. This will open the coil cover. 8. Tighten the hex bolt with the hex wrench until it is secure. Store the hex wrench.
NOTE:
Store the hex wrench in the storage compartment on the metal detector body when not in use.
CAUTION
Failure to follow these instructions may result in serious injury.
For reliable operation of the battery block
Nickel-metal hydride battery block (EY9251)
- Before storing, fully charge the nickel-metal hydride battery to ensure maximum service life. -The operating temperature range is from 0°C (32°F) to 40°C (104°F). If the battery block will be used at temperatures below 0°C (32°F), the instrument may not function properly. Before use, for reliable operation, fully charge the battery until charging is complete. If the battery block is not used, store it away from metal objects such as paper clips, coins, keys, nails, screws, or other small metal objects that can cause contact between terminals. Storing battery blocks together may cause sparks, fire, or damage. -During operation with the nickel-metal hydride battery block, ensure the area is well ventilated.
Service life of the battery block
Batteries have a limited service life. If the operating time after charging becomes noticeably short, replace the battery block with a new one.
NOTE:
Using under extremely hot or cold conditions will shorten the operating time per charge. - If you do not use the metal detector for a long time, charge the battery block at least once every six months.
WARNING:
3. To use the metal detector correctly and to utilize materials, make sure it is used for its intended purpose, which may also be in your country.
Cleaning the metal detector
Keep your metal detector in a clean place to preserve good performance and safe use.
Perform the following steps:
1. Remove the battery block from the metal detector. 2. Wipe the metal detector with a dry, soft cloth. Do not use a wet cloth or liquids. They may damage the metal detector's coating. 3. Make sure you have removed any dirt or debris that could make the metal detector slippery or heavy to hold. 4. Remove the coil and wipe it.
WARNING:
To avoid damage or injury, never immerse any part of the instrument in liquid.
Protective glasses
CAUTION
If the protective glasses are cracked or broken, return the metal detector to an authorized service center for replacement. Do not attempt to use the metal detector. This may result in serious injury. Never use the metal detector with damaged protective glasses or with the protective glasses removed. Fragments that may fall can cause serious injury.
VI. Accessories
CAUTION
Using accessories not listed in this manual may result in interference, electric shock, or injury. Use only recommended accessories. Using incorrect or worn materials for the coil may result in uneven performance and may increase the risk of "kickback" or other injury.
Control panel (remote control)
·EY3500B7727 Blade for circular saw and saw of the same width, for repeated
Battery pack
.EY9251
Charging device
·EY0110
VII. TECHNICAL CHARACTERISTICS
Metal cutting (EY3552)
Matsushita Electric Works, Ltd.
Osaka, Japan
- GUIDE LINE OF BLADE FRONT
- DANGER
- WARNING
- HOW TO USE THIS MANUAL
- NOTE
- CAUTION
- ADDITIONAL SAFETY RULES
- SAFETY INSTRUCTIONS FOR ALL SAWS
- FURTHER SAFETY INSTRUCTIONS FOR ALL SAWS
- CAUSES AND OPERATOR PREVENTION OF KICKBACK
- SAFETY INSTRUCTIONS FOR THIS SAW
- SETTING UP
- CHARGING BATTERY PACK EY
- BATTERY CHARGER (EY0110)
- LAMP INDICATIONS
- INSERTING BATTERY PACK
- OPERATION
- BEFORE USING METAL CUTTER
- USING METAL CUTTER
- ALIGNMENT WITH CUTTING LINE
- CUTTING DEPTH ADJUSTMENT
- RIP FENCE (EY3500B7727)
- FOR PROPER USE (FURTHER DETAIL)
- CUTTING LARGE SHEETS
- CUTTING THIN OR CORRUGATED MATERIALS
- MAINTENANCE
- REMOVING BLADE
- FOLLOW THESE STEPS
- INSTALLING BLADE
- FOR APPROPRIATE USE OF BATTERY PACK
- BATTERY PACK LIFE
- BATTERY RECYCLING
- ATTENTION
- CLEANING METAL CUTTER
- TRANSPARENT GUARD
- ACCESSORIES
- SPECIFICATIONS
- ONLY FOR U.K
- VIII ELECTRICAL PLUG INFORMATION
- FOR YOUR SAFETY PLEASE READ THE FOLLOWING TEXT CAREFULLY
- IMPORTANT
- INTRODUCTION
- SYMBOLS
- CHARGING DEVICE (EY0110)
- LIGHT INDICATORS
- CONNECTING THE BATTERY PACK
- FUNCTIONING
- BEFORE USING THE METAL CUTTER
- USING THE METAL CUTTING SAW WARNING
- ALIGNING WITH THE LINE
- ADJUSTING THE CUTTING DEPTH
- GUIDE PLATE (EY3500B7727)
- BATTERY PACK SERVICE LIFE
- BATTERY DISPOSAL
- METAL CUTTER MAINTENANCE
- PERFORM THE FOLLOWING STEPS
- PROTECTIVE TRANSPARENT GUARD
- TECHNICAL SPECIFICATIONS
- SAFETY INSTRUCTIONS FOR THIS MACHINE
- BATTERY INDICATOR
- ATTACHING THE BATTERY PACK
- BEFORE USING THE METAL SHEAR
- USING THE METAL SHEAR
- CUTTING WITH THE CUTTING LINE
- SURFACE
- INSTALLING THE BLADE
- FOR RELIABLE OPERATION OF THE BATTERY BLOCK
- SERVICE LIFE OF THE BATTERY BLOCK
- CLEANING THE METAL DETECTOR
- PROTECTIVE GLASSES
- TECHNICAL CHARACTERISTICS
Brand : PANASONIC
Model : EY3552
Category : Saw