Aroma Duo CK7345 - Coffee machine UFESA - Free user manual and instructions
Find the device manual for free Aroma Duo CK7345 UFESA in PDF.

User questions about Aroma Duo CK7345 UFESA
0 question about this device. Answer the ones you know or ask your own.
Ask a new question about this device
Download the instructions for your Coffee machine in PDF format for free! Find your manual Aroma Duo CK7345 - UFESA and take your electronic device back in hand. On this page are published all the documents necessary for the use of your device. Aroma Duo CK7345 by UFESA.
USER MANUAL Aroma Duo CK7345 UFESA
natural_image
Black and white photo of a coffee maker with visible branding 'ufesa' and 'droma duo', featuring glass coffee beans and a coffee maker (no text or symbols on the device itself)CK7345
INSTRUCCIONES DE USO
OPERATING INSTRUCTIONS
MODE D'EMPLOI
INSTRUÇÕES DE USO
GEBRAUCHSANLEITUNG
HASZNÁLATI UTASÍTÁS
NÁVOD K POUŽITÍ
INSTRUCTIUNI DE FOLOSIRE
إرشادات التشفيل
B
O
natural_image
Close-up of a hand pressing a button on an espresso machine, showing the handle and control panel (no text or symbols on the device itself)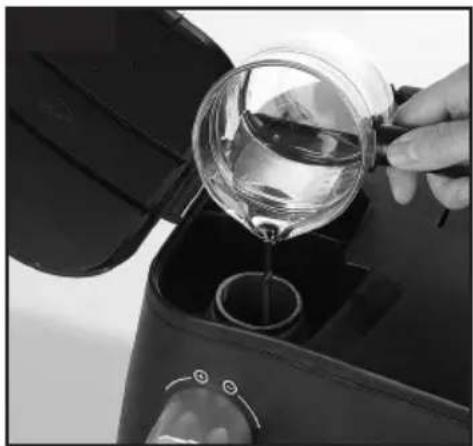
natural_image
Close-up of a hand pouring liquid from a glass container into a black appliance (no visible text or symbols)
natural_image
Close-up of hands using a manual tool to remove granular material from a container (no text or symbols visible)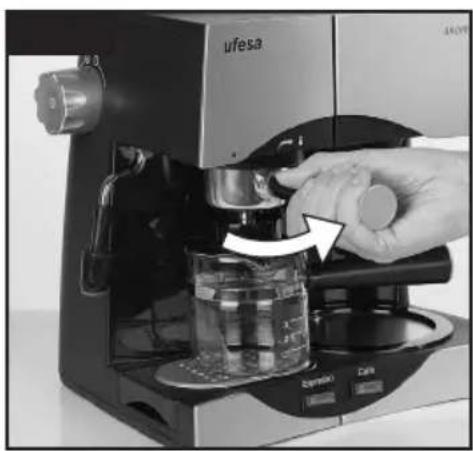
natural_image
Close-up of a Ufesa coffee maker using a hand mixer, with a glass pitcher and control panel visible (no text or symbols on the machine itself)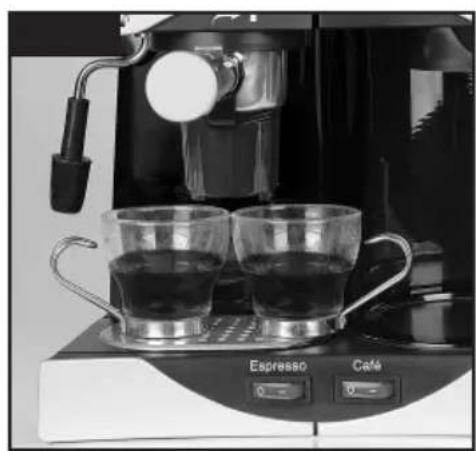
natural_image
Black and white photo of a espresso machine with two glass cups on a counter, no visible text or symbols on the equipment.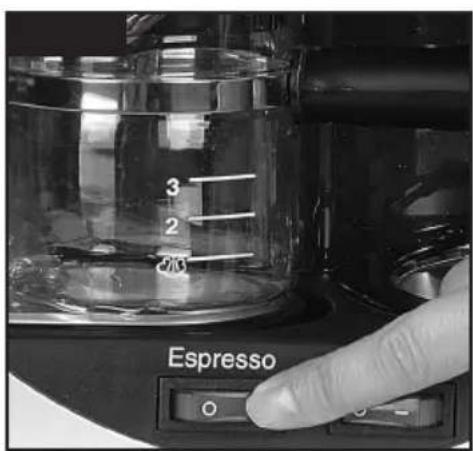
text_image
3 2 70 Espresso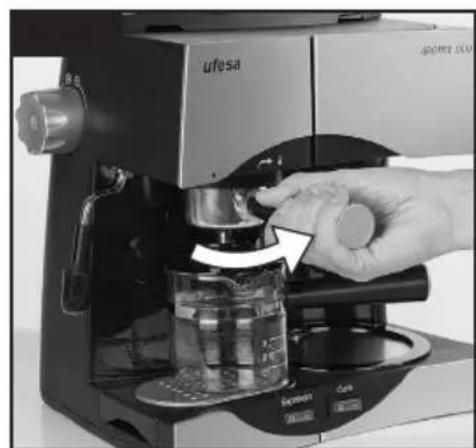
natural_image
Close-up of a hand using a UFSA coffee machine to press or adjust its volume, with no visible text or symbols on the device itself.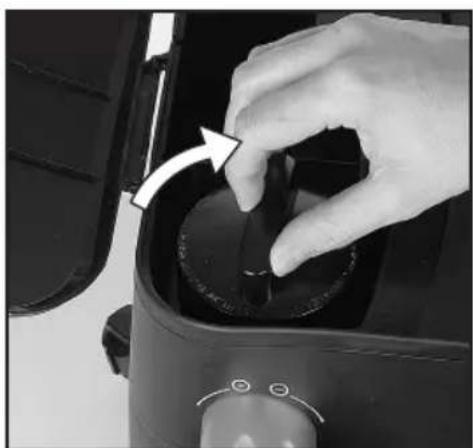
natural_image
Close-up of a hand pressing down on a kitchen appliance with a white arrow indicating the step (no text or symbols visible)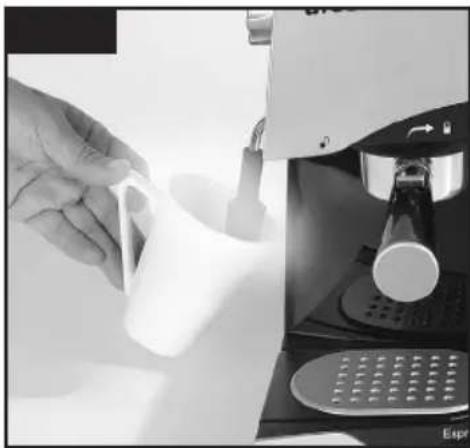
natural_image
Close-up of a hand using a coffee machine to press or spread a white cup (no visible text or symbols)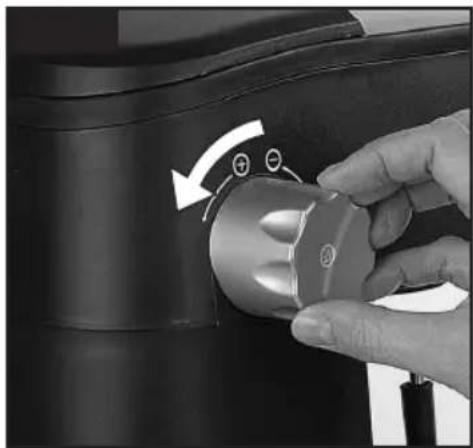
natural_image
Close-up of a hand holding a metallic mechanical component with a curved arrow indicating rotation (no text or symbols visible)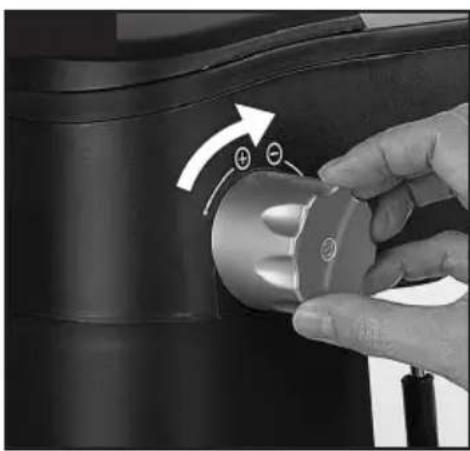
natural_image
Close-up of a hand pressing a button on a black mechanical component, with no visible text or symbols.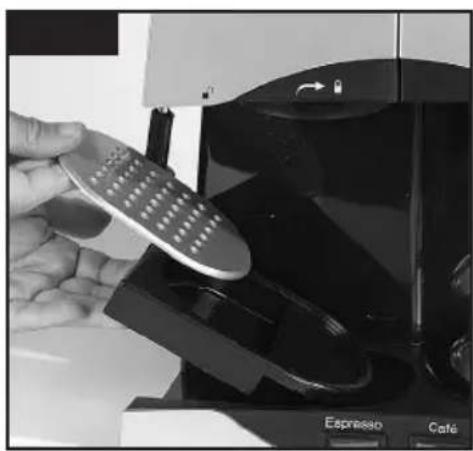
natural_image
Close-up of a hand using a gridded rice cooker to clean or store food (no visible text or symbols)
natural_image
Close-up of a hand using a tool to press or adjust a device on a computer monitor (no visible text or symbols)
natural_image
Hand cleaning a white paper on a microwave oven (no text or symbols visible)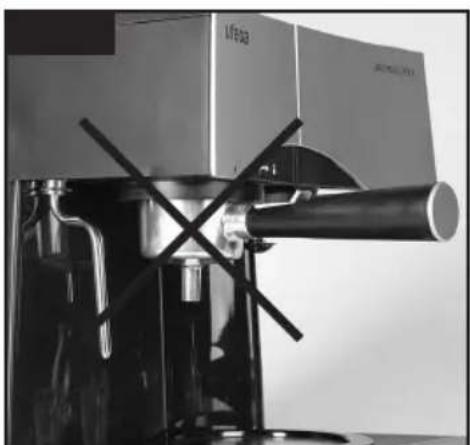
natural_image
Industrial machine with a cylindrical component and metal fittings, no visible text or symbols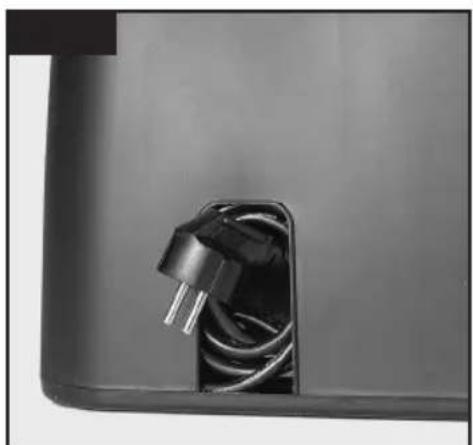
natural_image
Close-up of a black plastic electrical plug inserted into a cable socket (no text or symbols visible)This coffee maker can traditional filter coffee and cappuccino. Follow given below to ensure that operates correctly.
supervision or instruction of the appliance by a person for the said make
• as Kweelpl cahsi ledrperne sasway from t Cthrid driems tsrhucutlidorlose supervise tt htate tsherylidon got play with t
- Do not touch the hot surf handles or buttons.
DESCRIPTION OF THE DRIP FED COFFEE MAKER
-
Illuminated ON/OFF switch
-
Heating plate
-
Coffee jug with pot an indicator
-
Water tank
-
Swing filter holder
- Never immerse the cable into water or any other liquid
• tch Always unplug the coffee is not in use and before clnd water level down before removing any pieces and befo the appliance.
- Do not operate the coffee water.
DESCRIPTION OF THE ESPRESSO WATER COFFEE MAKER • The
-
Water tank
-
Illuminated ON/OFF switching them.
-
Steam regulator
-
Steam nozzle
-
Filter holder
-
Filter
-
Espresso jug with lid indicator
-
Two-cup adapter
-
Drip tray
-
Cable compartment
-
Coffee scoop
• The switches should be position when plugging the
- Do not unplug it by tuggi or leave the plug hanging fi
- Keep the appliance and tl from hot surfaces.
and water level
- Do not switch the applicable or plug are damaged or working correctly
- If the cable becomes must only be replaced by specialist, technical service manufacturer.
IMPORTANT NOTES
- Read these instructions WARANINGU ITO reduce the ri Safeguard them for future erIFecerrance.hock, do not remov
- Before plugging the coffee maker into the mains supply, check Thehat atthe nov ulstearg serviceable corresponds with that situation. onc the repairs and characteristics plate. must be carried out excl. The use of an earthed Autho reedi Technical Service recommended. - This appliance has been
- Always place the application only for domestic use level surface. Avoid moving before a splnigance for the first while it is operating. of the accessories and
• The glass jugs are desiwingtendoutto abney usofdiee.
with this coffee maker. They must not be
used on cooker hobs or PREPARING R-TER COFFEE ovens. Never place the hot (Flugs on -co4) d or
damp surfaces. Do not into the jugs while they use the jugs if they handles have come loose.
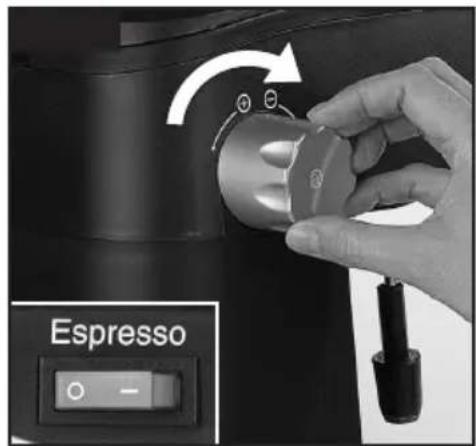
Figure 1. cold water the tank water still using the not water le are cracked pot or if measuring less than two cups is not re
- Do not leave the appliance operating unattended, especially with children's swing filter holder about.
- This appliance is not wat iert. ended for use by persons (including children) with reduced physical, sensor Not eor mental capabilities, or lack of experience and knowledge, unless they have been given 1x4 paper filters.
- For correct operation, Importants: e coffee
with too fine a grind.
• The tank can only be
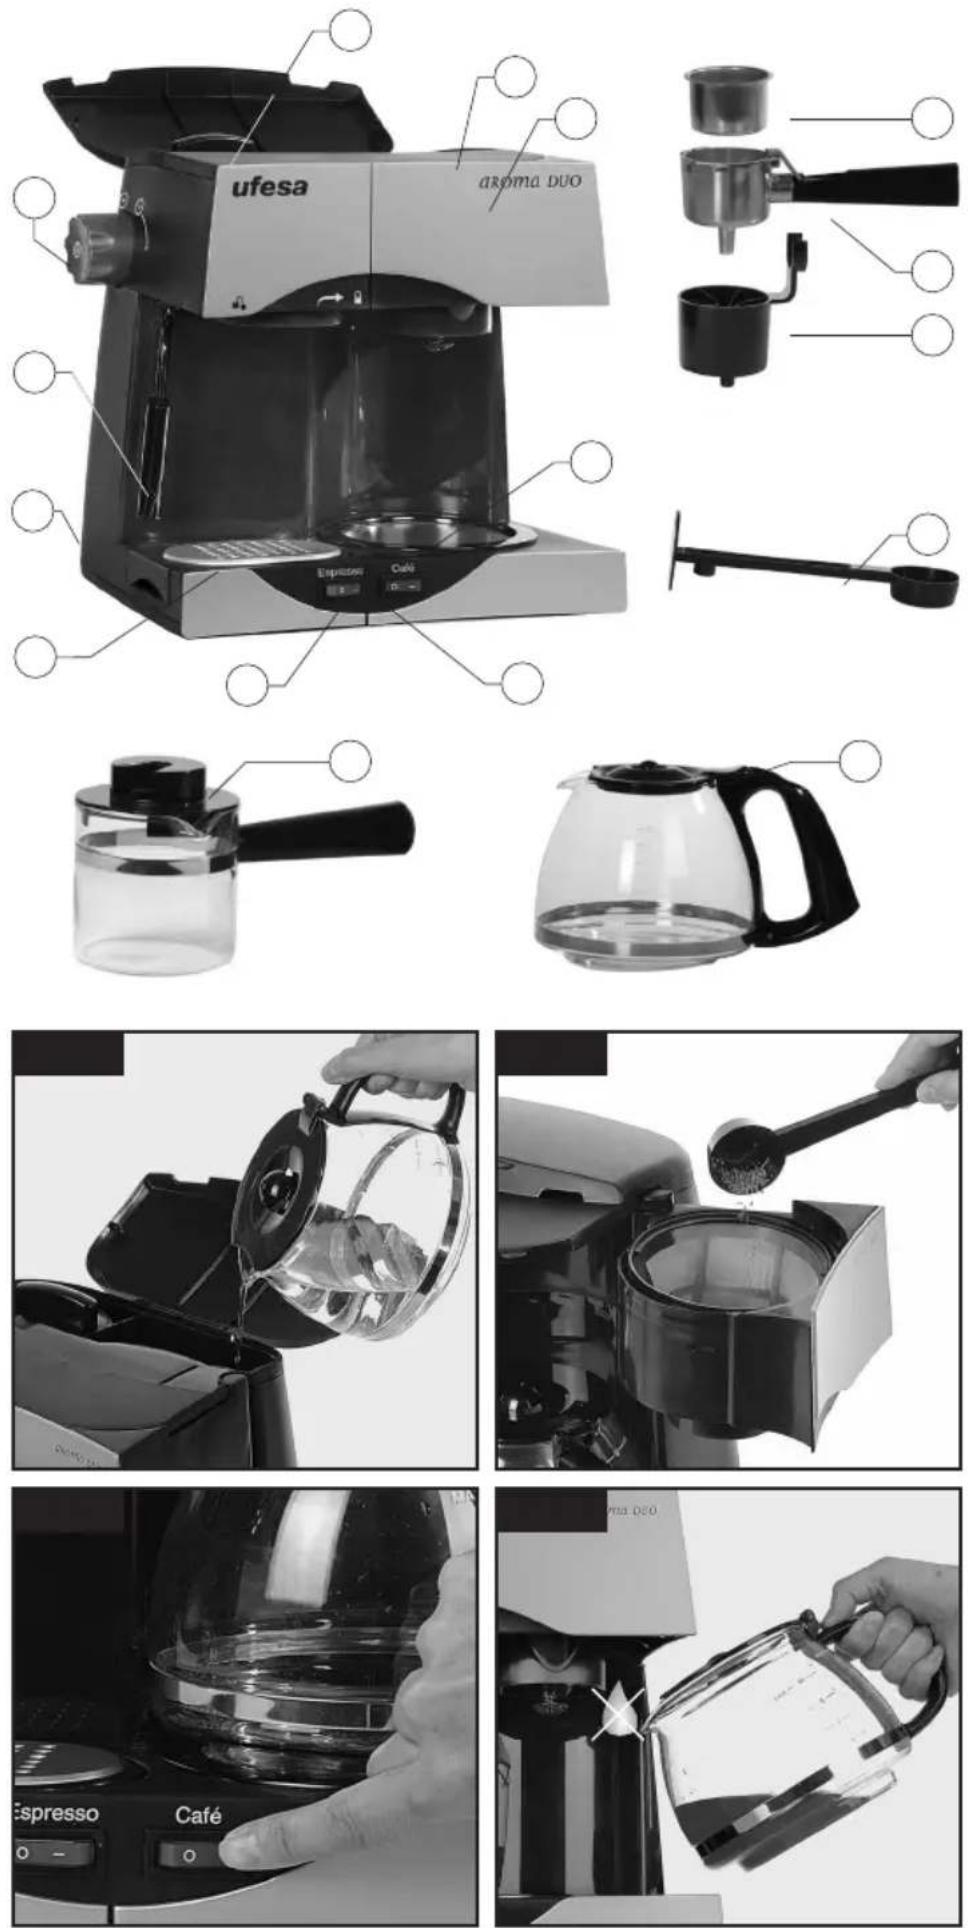
Figure 3. Place the coffeehejnugal(13)t,hewiwalter has been its lid fitted, on to tthre e hisa tniong or epslsautree i(n2s)i,de plug the appliance int d hatth e hemaei riss naonq pressure in press the Café ON/OFF _swi tch(1) the The Switch ON/OFF swit pilot lamp indicates that a nde unplug the maker appliance. is working.
Figure 4. A cup of coffee can be served before the brew cycle has finished. Whenever the jug is removed from the steam regulator heating plate, the coffee flow will be detained temporarily. - When no more steam comes place the jug back on the steam regulator by turn within 20 seconds.
• After usage the filter has left to cool down for a few taking it out.
PREPARING ESPRESSO (Fig. - 10)
5 left to cool down for a few taking it out.
Figure 5. Plug the appliance into the mains and make sure that the PREPARING CAPRUCCI NO
switch (7) is off. Close the steam regulator
(8) by turning it towards Ftihgur-e si1g n12. Follow the
Figure 6. Unscrew the lid of making the espresso. Use tank (6) and pour in the desired amount to measure of water. Use the espresso jug waited for measuring. One cup of water as equations and the first few cups of espresso. Screwarthe forced back through the lift and tighten it securely. can start frothing the milk.
Figure 7. Place the fill Figure(11)3. in place the tip filter holder (10). Use the ozfillet erh'asl foney wayt wonto a or three-cup level mark spent to the easurem the regulator amount of powder needed. Cleven dsft hengn. The excess w coffee powder that may flow quft througnd he espress the edge of the filter holder. Once the froth is ready, more Important: For best result and use na sdoghtly to heat up sely ground coffee, Italian espresso type. Figure 94. To stop the steam regulator close the steam regulator Do not pack the coffee powder regulator to
Figure 8. Use tghuei de markBouro the frothed-up milk on fit the filter holder and Itfuryout waonthe oui gshan sprir until it locks. Place pitchwereds prcaisnsna mojnug or(12g)rate underneath so that the copedecirogr atlei nits with a stick with the outlet for the esporesot. attempt to open
Figure 9. If you want ttahk, whirlless there is still flow directly into two Whenps yotu her havfeit fitnished r adaptor on the filter holding the pressure down by f Make sure that the water ttahk is closed in the p properly before using the espresso
CLEANING & MAINTENANCE
(Fig. 15 - the t
Do not attempt to open the lid on the tank while there is still press Furgurien15de (Unprl umgorthe app info see section «Importantth»). mains supply before Figure 10. Press the Espresso ON/OFF switch (7). The pilot lamp will light up and after a short heat-up time the espresso with wipe down the body of the co begin to flow out. When the flow stops, turn the switch back to the OFF position.
Figure 16. It is necessary the steam pipe regularly
it does not get clogged. Swid chel are te presso ma inside of the steam pilpe,ve fiitlt to tchool wodtwrr. tank (6) with enough water for one cup. To flush out any remain of espresso coffee and operate the estre stea maker through nozzle without milk until it stops using clear tap Switch off the steam and rub the nozzle down between down with a damp cloth immediately after wards.
Take care when doing this case if may still be very hot.
Figure 17. After use, check if both water tanks (4 and 6) are completely emptying. This basic not store the appliance with the materials which should be filter holder (10) still fitted to the local waste disposal
Figure 18. The mains cablecondary raw materials. stored away on the cable or compartments a used appliance (15) located at the re you should off first make it inoperable and be certain to

inoperable and be certain to in accordance with current Your Retailer, Town Hall
d a n b e s i d e s c a y l o u d d e t a i l e d i n t h i s e w a t e r
use.This appliance is lab accordance with Eur.
DESCALING
The coffee maker should be given detailed in regularly, depending on the water hardness and frequency of use. This appliance is lab
A) Descaling the filter cornedimakerive 2002/96/EC
-
Place the empty coffee used electrical heating plate (2). appliances (waste electrical
-
Dilute three cups of vinegar in nine cups of water and fill the This tank product must not be mixture.
-
Switch the coffee maker on for one authorized place for recycle minute. Switch it off and electronic appliances. half an hour.
-
Switch the coffee maker for the return and recycle all the water/vinegar solutions flows out. Pour this away and clean out, the jug.
-
To flush out any traces of vinegar, run the filter coffee maker through two more cycles using clear tap water.
B) Descaling the espresso maker
-
Before beginning the descaling operation, remove the filter holder (10) and the filter (11).
-
Remove the remains of any coffee that might be around the coffee outlet with a damp cloth.
-
With the help of the marks on the espresso jug (12) dissolve one part vinegar with three parts water and pour the mixture into the water tank (6) Place one container below the coffee outlet and another one below the steam nozzle. Switch the ON/OFF switch on.
-
Turn the steam regulator (8) on and let steam come out for about thirty seconds.
-
Close the steam regulator and allow the rest of the mixture to flow out through the coffee outlet head.
The Ground Truth image displays a single, solid horizontal line, which is a stylistic or background element (like a ruled paper line or separator), not a placeholder for text. According to Rule 2, such stylistic/background lines must be ignored by the OCR result. The OCR content provided is "", which consists of no characters. This correctly represents the line in the GT by ignoring it entirely. Since the OCR output includes no underscores for this line, this complies with the “Stylistic/Background Lines (Ignore)” rule. Therefore, the OCR result is consistent with the Ground Truth.
[Non-Text]
[Non-Text]
[Non-Text]
[Non-Text]
[Non-Text]
[Non-Text]
[Non-Text]
[Non-Text]
[Non-Text]
[Non-Text]
[Non-Text]
[Non-Text]
[Non-Text]
[Non-Text]
[Non-Text]
[Non-Text]
[Non-Text]
[Non-Text]
[Non-Text]
[Non-Text]
[Non-Text]
[Non-Text]
[Non-Text]
[Non-Text]
[Non-Text]
[Non-Text]
[Non-Text]
[Non-Text]
[Non-Text]
[Non-Text]
[Non-Text]
[Non-Text]
[Non-Text]
[Non-Text]
[Non-Text]
[Non-Text]
[Non-Text]
[Non-Text]