USER MANUAL Sensazione UFESA
natural_image
Black multifunctional coffee machine labeled 'ufesa Sensazione' (no additional text or symbols visible)
ESPAÑOL
natural_image
Technical illustration of a mechanical component with circular head and internal features (no text or symbols)
natural_image
Technical line drawings of mechanical components with no visible text or symbols
natural_image
Illustration of a coffee maker with a cup and a stand, showing liquid level indicator (no text or symbols)
natural_image
Two identical photos showing a coffee bean being added to a spoon, with an arrow indicating the process (no text or symbols present)
1-15 minutos 2-30 minutos
natural_image
Illustration of coffee beans and a hand pointing at the bottom, showing different positions (no text or symbols)
natural_image
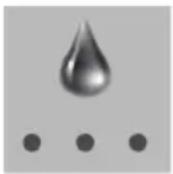
Illustration of a hand pointing at three droplets on a surface, with dots below (no text or symbols)
other
| Cantidad mínima | Función (ml) | Lungs (ml) |
|---|---|---|
| Espresso | 30 | 100 |
| Espresso | 40 | 120 |
| Espresso | 70* | 200* |
| Espresso | 360* | 360* |
The image contains a diagram illustrating the relationship between caffeine levels and the corresponding beverage types. The table includes four rows with icons representing different beverages: coffee cup, lungon, hot water, and an orange drop. The arrows indicate the direction of the flow or interaction between the bars.
natural_image
Glass mug filled with dark liquid, labeled 'Lungo' above and below (no other text or symbols)
natural_image
Mechanical component diagram showing a circular dial with red arrows indicating motion or force direction (no text or symbols)
natural_image
3D rendering of a mechanical assembly inside a vehicle or enclosure, showing internal components and no visible text or symbols.
natural_image
3D mechanical assembly diagrams showing internal components and cross-sectional views (no text or labels)
natural_image
3D rendering of a bathroom sink with a shower unit and mirror (no text or symbols visible)
natural_image
Close-up of a mechanical component with circular head and internal features (no visible text or symbols)
natural_image
Technical line drawings of three mechanical components with dimension annotations (Mn, Max), no readable text or symbols present.
- Recomendamos que substitua o filtro a cada 2 meses.
natural_image
Illustration of a coffee maker with a cup and a stand, showing liquid level indicator (no text or symbols)
natural_image
Two identical photos showing a coffee bean being added to a spoon, with an arrow indicating the process (no text or symbols present)
1-15 minutos 2-30 minutos
natural_image
Illustration of coffee beans being added to a spoon, showing different levels of density (no text or symbols)
natural_image
Illustration of a hand pointing at three droplets on a surface, with dots below (no text or symbols)
natural_image
Illustration of a glass mug filled with dark liquid, labeled 'Lungo' above and below (no other text or symbols)
natural_image
Mechanical component diagram showing a wheel and surrounding parts with red arrows indicating motion direction (no text or symbols)
natural_image
3D mechanical assembly showing internal components and housing (no visible text or symbols)
natural_image
Technical 3D renderings of a mechanical component, showing internal components and cross-sectional views (no text or symbols)
natural_image
3D rendering of a bathroom sink with a shower tube and mirror (no text or symbols)
e) Toque no ícone (i) durante 3 segundos. O indicador irá acender.
f) O indicador do ícone ficará intermitente.
WE WOULD LIKE TO THANK YOUR FOR CHOOSING UFESA. WE WISH THE PRODUCT PERFORMS TO YOUR SATISFACTION AND PLEASURE.
PLEASE NOTE
PLEASE READ THE INSTRUCTIONS FOR USE CAREFULLY PRIOR TO USING THE PRODUCT. STORE THESE IN A SAFE PLACE FOR FUTURE REFERENCE.
DESCRIPTION
- Control panel
- Coffee outlet nozzles
- Steam/hot water outlet nozzle
- Removable drip tray with grill
- Drip tray float
- Removable water tank
- Water tank cover
- Water tank handle
- Brewing unit compartment door
- Brewing unit
- Coffee grounds collector
- Coffee beans container lid
- Ground coffee container
- Supply cord
- Grind setting selector
- Water filter
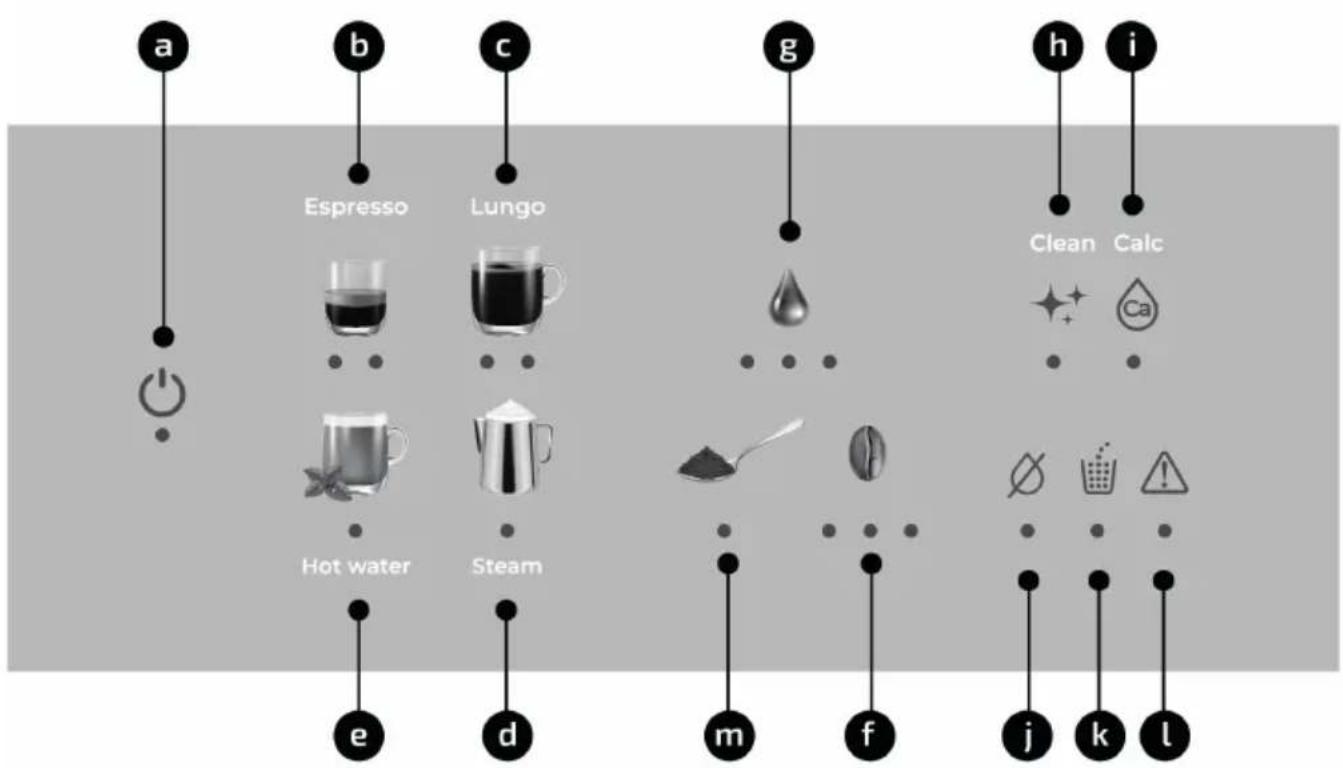
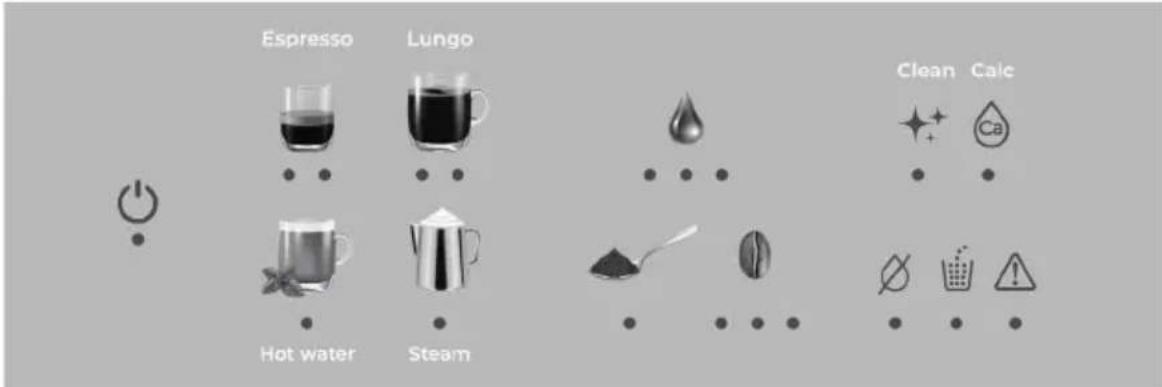
CONTROL PANEL DESCRIPTION
a) On/Off (Power)
b) Espresso (1 / 2 cups indicator)
c) Lungo Coffee (1/2 cups indicator)
d) Steam
e) Hot Water
f) Coffee strength (3 settings indicators)
g) Water volume per cup (3 settings indicators)
h) Cleaning with tablets
i) Descaling
j) Water tank empty indicator
k) Coffee ground collector full indicator
l) Warning indicator
m) Ground coffee
GENERAL SAFETY INSTRUCTIONS
Carefully read through the operating instructions for the appliance and safeguard them for future reference.
This appliance can be used by children aged from 8 years and above and by persons with reduced physical, sensory or mental capabilities or lack of experience and knowledge if they have been given supervision or instruction concerning use of the appliance in a safe way and if they understand the hazards involved.
Cleaning and user maintenance shall not be made by children unless they are older than 8 years and supervised.
Keep children under 8 years of age away from the appliance and connecting cable and do not allow them to use the appliance.
Children shall not play with the appliance.
If the supply cord is damaged, it must be replaced by the manufacturer, its service agent or similarly qualified persons in order to avoid a hazard.
This appliance is designed for household use. It is not intended to be used in applications such as:
- staff kitchen areas in shops, offices and other working environments;
- farm houses;
- by clients in hotels, motels and other residential
type environments;
- bed and breakfast type environments.
Never immerse the coffee maker, plug or supply cord in water or any other liquid.
Do not expose the electrical connections to water. Warning: potential injury from misuse! This appliance must be used only for the purposes for which it was designed, i.e. as a coffee maker. Any other use will be considered improper and consequently dangerous.
Proceed according to maintenance and cleaning sections of this manual for cleaning the surfaces in contact with water and coffee.
During brewing, this coffee maker reaches high temperatures and produces steam and hot water that could cause scalds or burns if not used properly. Keep your hands away during operation.
After use, some parts of the coffee maker are hot due to residual heat, and small jets of steam or hot water might come out. Let the appliance cool down before any further operation.
This appliance is designed only for household use up to 2000m above sea level.
The coffee maker shall not be placed in a cabinet while in use.
IMPORTANT NOTICES
This coffee maker is designed for home use and should never be used for commercial or industrial use under any circumstances. Any incorrect use or improper handling of the product shall render the guarantee null and void.
- This coffee maker is to be connected and used in accordance with the information stated on its characteristics plate.
- This coffee maker must be connected to an earthed socket. If it is absolutely necessary to use an extension cable, make sure that it is suitable for 16A and has a socket with an earth connection.
- The supply cord must not be tangled or wrapped around the product during use.
- The electrical plug must not be removed from the socket by pulling the cable.
- Do not leave the supply cord hanging over the working surface, to prevent the coffee maker from falling.
- Do not allow the supply cord to come into contact with sharp edges or with hot surfaces.
- Do not use the coffee maker, or connect and disconnect to supply mains with the hands and / or wet feet.
• The coffee maker must never be placed directly under the tap to fill the water tank.
- Unplug the coffee maker immediately from the mains in the event of any breakdown or damage, and contact and official technical support service. In order to prevent any risk of danger, do not open the appliance. Only qualified technical personnel from the brand's official technical support service may carry out repairs on the product.
- Turn the power off and disconnect the plug:
- in the event of any breakdown or damage;
- before taking out the brewing unit;
- before cleaning the coffee maker;
- if the coffee maker is not going to be used for a long period of time;
- Do not insert your fingers or any other object into the coffee grinder!
• The coffee maker must be used and placed on a stable surface.
• Make sure that the coffee maker is kept dry, ventilated and away from any source of heat.
- Do not use outdoors. Do not leave the coffee maker exposed to weather conditions (rain, sun, frost, etc.).
- Temperature for usage and storage shall be above 0^ . Operating the coffee maker below such temperature may cause serious damage due to water freezing.
- Never use warm or hot water to fill the water tank, as this could cause damage. Use always room temperature water.
- Do not operate the coffee maker with the water tank empty. Make sure there is enough water before each use.
- Do not remove the drip tray during operation.
- Do not touch hot surfaces. Only handles and knobs should be touched.
- Never aim the steam or hot water at persons.
- Do not use caramelized coffee beans.
- Do not use accessories from any other manufacturer.
B&B TRENDS SL. is not responsible for any damage that may be caused to people, animals or objects as a result of failure to comply with these warnings.
INDEX
1.1. Filling the water tank 52
1.2. Water tank refilling warning 52
1.3. Filling coffee beans container 52
1.4 Filling ground coffee compartment 52
1.5 Adjusting grinder setting 52
1.6 Water filter 53
-
BEFORE THE FIRST USE 54
-
SETTING UP THE COFFEE MAKER 55
3.1. Selecting the temperature 55
3.2. Selecting water hardness 55
3.3. Adjusting user choices 56
3.4. Setting auto shut off time 57
3.5. Deactivating / activating beeps 57
3.6. Restoring factory settings 57
- DRINKS PREPARATION 58
4.1. Preparing Espresso coffee 58
4.2. Preparing coffee (Lungo) 59
4.3. Preparing hot water for drinks 59
4.4. Preparing drinks using steam 60
- MAINTENANCE AND CLEANING 60
5.1. Cleaning the drip tray and grounds collector 60
5.2. Cleaning the brewing unit 61
5.3. Cleaning ground coffee inlet 62
5.4. Descaling the coffee maker 62
5.5. Cleaning the water tank 63
5.6. Cleaning the milk frother 63
5.7. Cleaning the housings 64
- ACCESSORIES 64
6.1. Cleaning tablets 64
6.2. Descaling solution 64
6.3. Water filter 64
6.4. Test strips 64
-
WARNING ICONS 64
-
TROUBLE SHOOTING 65
1. COFFEE MAKER PREPARATION
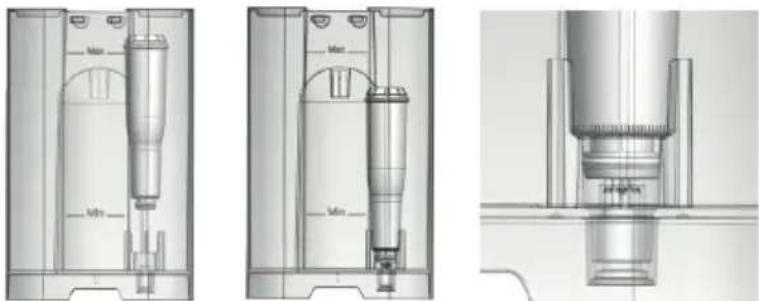
1.1. Filling the water tank
Remove the water tank (6) and open the lid (7). Fill the tank with fresh tap water.
Never fill beyond the level for maximum filling (MAX)! Do not use carbonated or hot water. Insert the water tank into the coffee maker. Make sure it is fitted correctly.
1.2. Water tank refilling warning
When water in the tank is below a minimum level, indicator of the icon (j) will light up and 3 beeps will be emitted, indicating that water tank should be refilled. To refill it, proceed as indicated in section "Filling the water tank".

1.3. Filling coffee beans container
Open up container lid (12) and fill it with coffee beans. Close the lid (12).
Do not use coffee beans glazed, caramelised or treated with additives containing sugar.
NOTE: use of the mentioned types of coffee will be considered as an incorrect use and shall render the guarantee null and void.
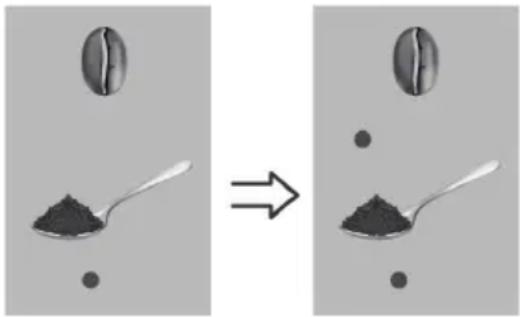
1.4. Filling ground coffee compartment
- Open ground coffee compartment lid (13) and pour the desired quantity of ground coffee inside. Close the lid.
Important: take into account that only one coffee at a time can be prepared.
Do not use instant coffee!
Do not fill beyond the upper edge of the compartment!
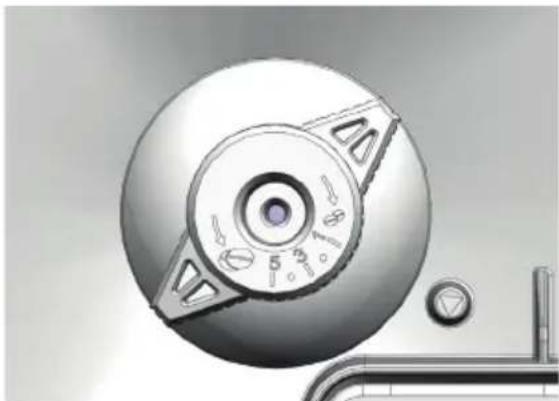
1.5. Adjusting grinder setting
Due to the different roasting degrees, blends, brands, etc., grind setting can be adjusted to suit your preference.
- Use the rotary selector (15) to adjust the grind setting.
Selector can be adjusted from fine to coarse: There are 5 adjustment positions of the grinder, where 1 is the position of the finest grind and 5 the thickest.
natural_image
Close-up of a mechanical component with a circular dial and mounting holes (no visible text or symbols)
- Set the selector to the corresponding position by lining it up with the index.
NOTES:
- Adjust the grind setting only while the grinder is working, otherwise it might be damaged.
- The new setting will not be noticed until after the second cup of coffee.
- Do not insert fingers or foreign objects into the grinding unit!
- Place the selector in the finest position if you want to get the most out of your coffee.
1.6. Water filter
The water filter (16) is supplied as an accessory (model dependent). It may be purchased from our after-sales service or specialist shops (see section "Accessories").
The filter is recommended for:
Protection against scaling, reduction of heavy metals (copper, lead), reduction of harmful organic substances (pesticides, herbicides), reduction of odors and flavors (chlorine) and optimization of the taste of coffee and cream.
To assemble the filter, proceed as follows:
- Rinse the new filter in a water container.
- Firmly insert the filter into the water tank connection in an upright position.
Very important: make sure that the rubber gasket is correctly inserted in the coupling on the bottom of the water tank.
natural_image
Technical line drawings of three mechanical components with dimension labels (Mn, Max), no readable text or symbols present.
- It is recommended to replace the filter every 2 months.
Replacement should be carried out preferably just after having carried out a descaling process. Turn the date indicator at the top of the filter by selecting the current month to remember which month the filter change was made.
-
Then, dispense a cup of hot water to rinse water circuit.
-
Program the coffee maker to indicate that the filter is mounted.
By default, the water filter is deactivated at the factory, to activate it follow these steps:
-
If the coffee maker is switched on, touch the power icon (a) to switch it off. All the indicators will go off.
-
Tap the cleaning icon (h) for 3-5 seconds and the icon will light up making 1 short beep. Press the icon again:
a) A long audible signal and the indicator flashing 2 seconds means that the filter is installed.
b) If only a 2-second flash occurs without an audible signal, the filter is not installed.
- Touch the cleaning icon (h) to switch from on to off mode and vice versa.
2. BEFORE THE FIRST USE
- Remove the water tank (6). Take it from the handle (8) and pull it out.
- Wash the water tank under the tap.
- Fill the water tank. Never fill beyond the level for maximum filling (MAX)!
- Insert the water tank into the coffee maker. Make sure it is fitted correctly.
- Plug the coffee maker to the mains.
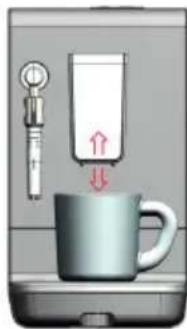
- Place a container underneath the coffee and steam outlet nozzles. Height of coffee outlet nozzles can be adjusted moving them upwards and downwards.
natural_image
Illustration of a coffee maker with a cup and a stand, showing a red arrow indicating motion (no text or symbols)
- Touch the Power (a) button to switch the coffee maker on.
- Indicators of the icons will light up and go off alternatively. After a time, water will start flowing out through the nozzles.
NOTE: During first use, the machine could detect that there is air in the system by illuminating the warning indicator (l) and the hot water button (e). Press the hot water button to start the system air extraction process.
- Once the rinsing process has finished, all the indicators will light up permanently.
- Remove the container placed underneath the nozzles and empty it. Never drink water collected after rinsing process!
- After rinsing, the coffee maker is ready to be used.
Notes:
- Automatic rinsing process will be carried out each time the coffee maker is plugged in to the mains, or when the coffee maker has cooled down after having prepared a drink. Duration may vary depending on the temperature of the system. Starting from cold, duration is about 45 seconds.
- The coffee maker is tested at the factory using coffee and water. Although the unit has been carefully cleaned, it is possible that some water and coffee residues remain. It is recommended to carry out this rinsing process several times before first use.
3. SETTING UP THE COFFEE MAKER
3.1 Selecting the temperature
Coffee temperature can be adjusted to suit your preference. While the coffee maker is plugged in, proceed as indicated below:
- If the coffee maker is switched on, touch the power icon (a) to switch it off. All the indicators will go off.
- Touch the water quantity adjustment icon (g) for 3-5 seconds.
A beep will be heard and the indicator will light up showing preselected temperature level.
3. Touch the icon (g) repeatedly for changing water temperature. Indicators will light up successively with each touch. Once selected, this value will be saved automatically.
Minimum: 90 °C / Medium 98°C / Maximum 105°C
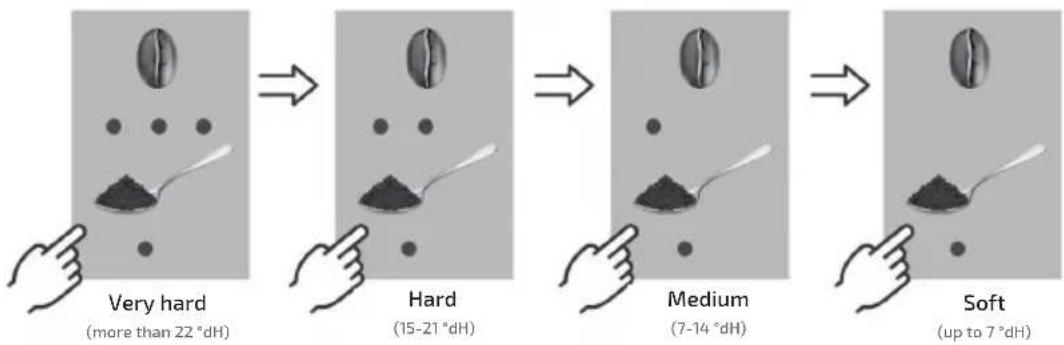
3.2 Selecting water hardness
Water hardness can be selected to be adapted to the characteristics of the water in your area. You can inquire about the water hardness with your local water supplier, or use test strips to determine it.
Test strips are supplied depending on the model or may be purchased from after sales service or specialist shops (see section "Accessories").
If test strips are used:
- Immerse the test strip in tap water for 2-5 seconds.
- Wait for 1 minute. The number of stripes that turn red indicate the water hardness.
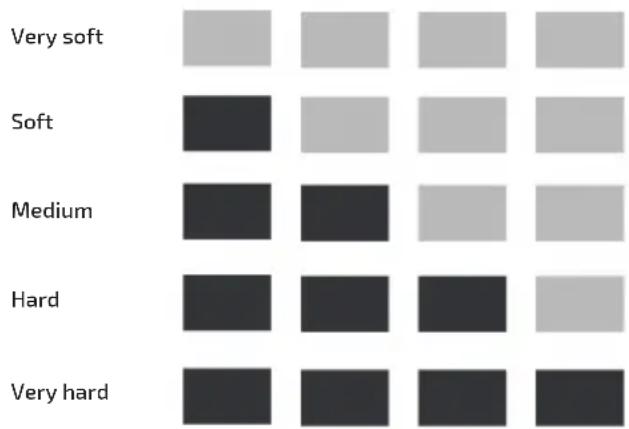
heatmap
| Rating | Very soft | Soft | Medium | Hard | Very hard |
| :--- | :--- | :--- | :--- | :--- | :--- |
| Very soft | 1 | 1 | 1 | 1 | 1 |
| Soft | 1 | 1 | 1 | 1 | 1 |
| Medium | 1 | 1 | 1 | 1 | 1 |
| Hard | 1 | 1 | 1 | 1 | 1 |
| Very hard | 1 | 1 | 1 | 1 | 1 |
-
If the coffee maker is switched on, touch the power icon (a) to switch it off. All the indicators will go off.
-
Touch the coffee strength adjustment icon (f) for 3-5 seconds.

A beep will be heard and indicators will light up showing preselected water hardness. "Very hard" hardness is selected by default from factory.
- Touch the icon (f) repeatedly for changing water hardness. Indicators will light up successively with each touch. Once selected, this value will be saved automatically.
flowchart
graph LR
    A["Very hard\n(more than 22 °dH)"] --> B["Hard\n(15-21 °dH)"]
    B --> C["Medium\n(7-14 °dH)"]
    C --> D["Soft\n(up to 7 °dH)"]
3.3 Customization of water quantity adjustment
The amount of water dispensed for each type of drink (espresso, lungo and hot water) can be selected and memorized. There are 3 levels, the first two are fixed and the third is customizable.
To memorize a quantity in the third position, proceed as follows:
- Touch the Power icon (a) to switch the coffee maker on. Wait until all the indicators light up permanently.
- Touch the icon corresponding to the drink you want to prepare for 5 seconds.
- A long beep will be heard. The indicator light for the maximum quantity of water per cup (g) will light up.
- Adjust the desired coffee intensity by repeatedly pressing the icon (f) (see section 4.1.5 selecting the coffee strength) and confirm by pressing on the icon of the selected drink (b, c, d or e). The coffee maker will start dispensing the selected drink, until you touch the icon of the selected drink (b, c, d or e) again.
At that time the drink will no longer be dispensed and the quantity dispensed will be memorized in the maximum position of water quantity.
NOTE: The customizable quantity for each type of drink is:
- Espresso / Steam: From 1 to 230ml
- Lungo / Hot Water: From 1 to 430ml
NOTE: The factory values in the maximum water position are: Espresso: 70 ml
Lungo: 200 ml
Hot Water: 360 ml Steam: 46 ml
It is recommended to fill the water tank previously up to the maximum level to be able to adjust the maximum volume.
- After some seconds, all the indicators will light up again.
3.4 Setting auto shut off time
For your safety and to save energy, the coffee maker switches off automatically when it has not been used for a period of time.
Switch off period is 15 or 30 minutes. (A period of 15 minutes will be selected by default from factory).
To select it, while the coffee maker is plugged in, proceed as indicated below:
- If the coffee maker is switched on, touch the power icon (a) to switch it off. All the indicators will go off.
- Touch the descaling icon (i) for 3-5 seconds. An audible signal will be emitted and the indicator (i) will light up along with the ground coffee icon (m).
- Touch the coffee intensity icon (f) to change the switch off period. Indicators will light up repeatedly with each touch.
Wait 3 seconds to confirm the selection. All the indicators will go off again.
natural_image
Two identical photos showing a coffee bean being added to a spoon, with no text or symbols present.
1-15 minutes 2-30 minutes
3.5 Deactivating / activating beeps
The beeps emitted when the icons of the display are touched can be deactivated or activated once again. While the coffee maker is plugged in, proceed as indicated below:
- If the coffee maker is switched on, touch the power icon (a) to switch it off. All the indicators will go off.
- Touch the hot water icon (e) for 3-5 seconds. The indicator will light up. Touch the hot water icon (e) again:
- If a continuous beep is produced for 2 seconds and the icon flashes, it means that the beeps have been activated.
- If the icon flashes without a beep, it means that the beeps have been disabled.
- All indicator lights will turn off confirming the selection.
3.6 Restoring factory settings
Modifications made to water volume dispensed, water temperature, water hardness and coffee strength can be restored to factory default settings at any moment.
While the coffee maker is plugged in, proceed as indicated below:
- If the coffee maker is switched on, touch the power icon (a) to switch it off. All the indicators will go off.
-
Touch the Espresso icon (b) for 3-5 seconds.
-
The Espresso icon (b) will light up.
If you press again (do not press again if you do not want to confirm) the restoration to factory settings is confirmed by emitting a 2-second beep in addition to the flashing of the icon.
4. DRINKS PREPARATION
4.1 Preparing Espresso coffee
- Place one or two cups underneath the coffee outlet nozzles. Height of coffee outlet nozzles can be adjusted moving them upwards and downwards.
- Touch the Power icon (a) to switch the coffee maker on. Wait until automatic rinsing process is finished.
- To prepare only one cup, touch the icon (b) once. Indicator will light up.
- To prepare two cups, touch the icon (b) again by holding it for 2-5 seconds (do not hold it for more than 5 seconds or it will enter "Customization of water quantity adjustment (3.3)" mode). The two indicator lights will light up. If you keep it pressed again between 2 to 5 seconds, the selection will toggle between 1 and 2 cups.
NOTE: to prepare two cups you need two loads of coffee. Do not remove the cups until the second extraction is complete.
NOTE: take into account that it is not possible to prepare two cups if ground coffee is used.
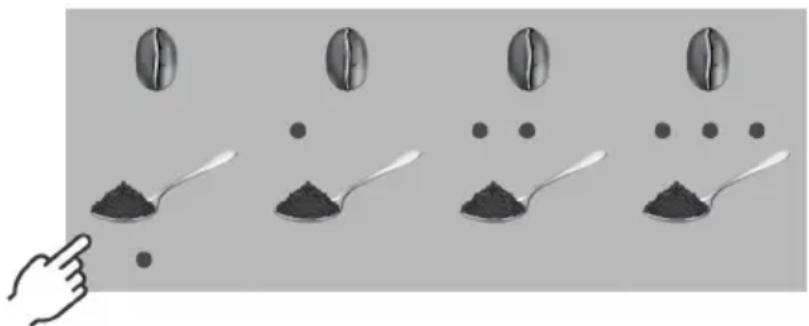
- Selecting coffee strength.
Grinded coffee quantity dispensed per cup can be selected.
Proceed as indicated below: (once the desired drink and 1 or 2 cups have been selected): Touch the coffee strength icon (f) repeatedly. Level Indicators will light up successively with each touch showing the values: soft, medium and strong.
natural_image
Illustration of coffee beans being added to a spoon, showing four different stages of processing (no text or symbols)
If you want to use ground coffee poured into the ground coffee compartment (13), touch the ground coffee icon (m). The spoon indicator (m) will light up. Then pour ground coffee into the compartment as indicated in section 1.4 Filling ground coffee compartment.
Note: With ground coffee you can not modify the strength of the coffee.
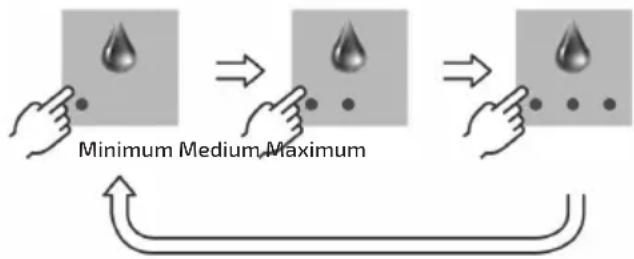
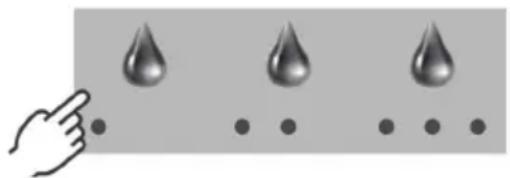
- Selecting water volume per cup.
Water volume dispensed per cup can be selected. Proceed as indicated below:
natural_image
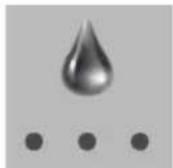
Illustration of a hand pointing at three droplets on a surface, with dots below (no text or symbols)
- Touch the water quantity icon (g) repeatedly. Level indicators will light up successively with each touch.
The quantity of water dispensed in each drink is as follows:
flowchart
graph TD
    A["Minimum quantity"] --> B["Function Function Function"]
    B --> C["Lungo"]
    B --> D["Hot water"]
    C --> E["30 mL/min"]
    D --> F["65 mL/min"]
    G["Minimum quantity"] --> H["Function Function"]
    H --> I["Lungo"]
    H --> J["Hot water"]
    I --> K["40 mL/min"]
    J --> L["120 mL/min"]
    K --> M["150 mL/min"]
    L --> N["150 mL/min"]
    O["Minimum quantity"] --> P["Function Function"]
    P --> Q["Lungo"]
    P --> R["Hot water"]
    Q --> S["70 mL/min"]
    R --> T["200 mL/min"]
    S --> U["360 mL/min"]
- If you want to prepare a drink according to your personal water volume choice, select the maximum level setting (3 LEDs on).
*NOTE: The water volume can be modified by the user (see section 3.3 "Customization of water quantity adjustment").
- Once the strength and volume of water is confirmed, touch the espresso coffee icon (b) to confirm the selection. Coffee preparation will start.
- During preparation, indicator of the icon (b) will flash.
- Touch the espresso coffee icon (b) to stop preparation at any time. The icons will turn off until the coffee maker is ready again.
- Once preparation process has finished, all the indicators of the icons will light up permanently. Wait until coffee stops flowing from the nozzles before removing the cups. Note: the coffee maker will store the last settings of coffee strength and water volume. Note: During the first selections, the drink may not be dispensed through the nozzles. This is because the coffee maker is making an initial adjustment so that you get the best quality in your coffee.
4.2 Preparing coffee (Lungo)
Follow the same steps as for the preparation of an espresso coffee but instead of pressing the espresso icon (b) press the lungo coffee icon (c):

natural_image
Glass mug filled with dark liquid, labeled 'Lungo' above it, with two small dots below (no other text or symbols)
4.3 Preparing hot water for drinks
- Place a cup underneath the steam/hot water outlet nozzle (3).
- Touch the Power icon (a) to switch the coffee maker on. Wait until automatic rinsing process is finished.
- Touch the hot water icon (e). Indicator will light up.
- Touch the icon (g) to select the water volume per cup.
- Tap the hot water icon (e) again to confirm the selection. Water preparation will start.
- During preparation, indicator of the icon (e) will flash.
- Touch the icon (e) to stop preparation at any time.
- Once preparation process has finished, all the indicators of the icons will light up permanently.
- Wait until water stops flowing from the nozzle before removing the cup.
Note: the coffee maker will store the last settings of water volume.
4.4 Preparing drinks using steam
Steam can be used to froth milk for preparing a capuccino, caffe latte, or for heating up liquids.
- Place a container underneath the steam outlet nozzle (3).
- Touch the Power icon (a) to switch the coffee maker on. Wait until automatic rinsing process is finished.
- Touch the icon (d). Indicator will light up.
- Touch the icon (d) again. Heating process for steam preparation will start.
- During preparation, indicator of the icon will flash.
- Touch the icon (d) to stop preparation at any time.
- Once preparation process has finished, all the indicators of the icons will light up permanently.
- Wait until steam stops flowing from the nozzle before removing the container.
Note: if you want to change the amount of steam to be dispensed, please refer to section
3.3 Customization of water quantity adjustment.
5. MAINTENANCE AND CLEANING
5.1 Cleaning the drip tray and grounds collector
When the drip tray (4) is full, the red float (5) will become visible through the grill, showing that the tray should be emptied and cleaned.
When the coffee grounds collector is almost full (6 coffees without cleaning), indicator light of the icon (k) will light up showing that grounds collector should be emptied and cleaned. It will be allowed to make 2 more coffees until it becomes mandatory to clean the grounds collector which is indicated with the flashing of the warning.
For cleaning, proceed as indicated below:
- Remove the tray by pulling it towards you. Along with the tray, grounds collector (11) will be taken out as well.
- Remove grounds collector. Empty the drip tray and the collector and wash them under the tap.
- Place ground collector on the drip tray again. Make sure it is fitted correctly. Once more than 10s have passed, the indicator of the icon (k) will flash and the warning will light up, showing that the container is clean and you can place it again. The coffee counter will be restarted.
- Place ground collector on the drip tray again. Make sure it is fitted correctly.
- Insert the drip tray into the coffee maker. Make sure it is fitted correctly. The indicator of the icon (k) and warning will turn off.
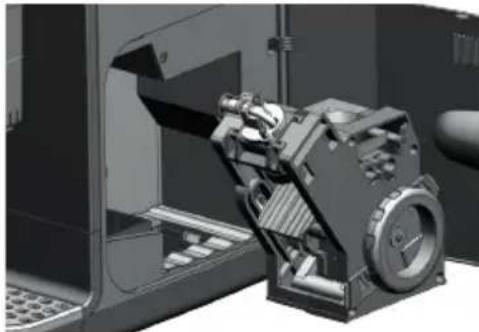
5.2 Cleaning the brewing unit
To keep the right function of your coffee maker for a long time, it is very important that brewing unit is cleaned frequently.
Important: do not wash the brewing unit in the dishwasher
Proceed as indicated below:
- Touch the Power icon (a) to switch the coffee maker off.
- Unplug the coffee maker from the mains to prevent from electric and mechanical hazards and let it cool down!
- Open the door of the compartment (9) where the brewing unit is located.
- Turn the wheel of the brewing unit counter clockwise to unlock it.

natural_image
Mechanical component diagram showing a circular dial with red arrows indicating motion or force direction (no text or symbols)
- Take the brewing unit out.
natural_image
3D mechanical assembly view showing a motor and gear assembly inside a vehicle (no visible text or symbols)
-
Hold the brewing unit over a sink and wash it using water from the tap.
-
Pay special care to wash the filters.
natural_image
3D mechanical assembly diagrams showing internal components and cross-sectional views (no text or labels)
- Then, let the brewing unit air-dry. Do not use cloths for drying the brewing unit, as fibres could block internal pipes!
- Insert the brewing unit into the coffee maker, until you a click is heard indicating that it is correctly fitted. Make sure it is fixed well at the 2 anchor points (very important!).
- Close the door of the compartment.
- Then, plug the coffee maker to the mains again.
Important: To keep the right function of your coffee maker for a long time, it is very important to clean internal parts frequently. Tablets are supplied depending on the model or may
be purchased from after sales service or specialist shops (see section "Accessories"). It is recommended to perform the cleaning if the coffee maker has not been used for a long time. Proceed as indicated below:
- Make sure that the coffee maker is switched on and water tank is full.
- Place a container (capacity about 1 litre) underneath the coffee outlet nozzles. Height of coffee outlet nozzles can be adjusted moving them upwards and downwards.
- Open up the ground coffee container lid (13) and pour a cleaning tablet. Then, close the lid.
- Touch the icon (h) for 3 seconds. The indicator will light up.
- Touch the icon (h) again: Cleaning process will start.
- During the cleaning process (about 18 minutes), the indicator of the icon (h) will flash.
NOTE: Once about 60ml of the solution has been dispensed, the coffee maker will remain stopped for 15min so that the tablet takes effect. The icon (h) will remain flashing. NOTE: Once the tablet has been added, the cleaning process must be carried out completely so that no residues of the degreasing agent are left behind.
- Once cleaning process has finished, all the indicators of the icons will light up permanently. The coffee maker is ready to be used again.
5.3 Cleaning ground coffee inlet
After a long period of use, internal walls of ground coffee inlet could get blocked due to coffee powder residues stuck on them. It is very important that inlet is cleaned frequently. Proceed as indicated below:
- Remove the brewing unit as indicated in section 5.3 "Cleaning the brewing unit".
- Open ground coffee compartment lid (13). Use a brush to remove the coffee powder residues stuck on inlet wall. Residues will be collected in the drip tray.
- Insert the brewing unit.
5.4 Descaling the coffee maker
Important: To keep the right function of your coffee maker for a long time, it is very important to perform the descaling process after a period of time.
Indicator of the icon (i) will light up showing that descaling process should be carried out. The process duration is about 40 minutes.
Important: if water filter is assembled, remove it before starting descaling process.
If the water filter has reached the end of its recommended use period (2 months), it is advisable to replace it after completing this descaling process. Please refer to sections "Water filter" and "Activating water filter".
Proceed as indicated below:
1. First stage: removing the scale
a) Make sure that the coffee maker is switched on.
b) Remove the water tank (6), empty it and pour the recommended dose of descaling solution (250 ml).
Descaling solution is supplied depending on the model or may be purchased from after sales service or specialist shops (see section "Accessories").
c) Fill the tank with water up to the "MAX" level mark.
d) Place a container (capacity about 1 litre) underneath the steam and coffee outlet nozzles. Height of coffee outlet nozzles can be adjusted moving them upwards and downwards.

natural_image
Interior view of a bathroom with sink, toilet, and shower (no text or symbols visible)
e) Touch the icon (i) for 3 seconds. Indicator will light up.
f) Indicator of the icon will flash.
g) Touch the icon (i) icon again to accept the selection. The descaling process will begin and the icon (i) will remain flashing.
Along the process, water will flow out at intervals through the steam and coffee outlet nozzles.
h) After a certain time (about 18 minutes), the indicator of the icon (j) will light up.
Take the water tank out, empty and fill it with fresh water up to the maximum level. Insert the water tank into the coffee maker. Make sure it is fitted correctly.
2. Second stage: rinsing the water circuit
a) Touch the icon (i). Descaling process will continue.
b) Once cleaning process has finished, all the indicators of the icons will light up permanently. The coffee maker is ready to be used again.
NOTE: If the descaling process is interrupted, touch the (i) icon again. Descaling process will continue automatically from the same point previous to the interruption.
NOTE: time counter for next descaling will be reset only after the process is completed without interruptions.
5.5 Cleaning the water tank
Regularly rinse the water tank for properly maintenance.
- Remove the water tank (6). Take it from the handle (8) and pull it out.
- Wash the water tank under the tap.
- Insert the water tank into the coffee maker. Make sure it is fitted correctly.
5.6 Cleaning the milk frother
Milk frother must be cleaned after each use.
- Insert the milk frother into a cup or container with hot water.
- Touch the Power icon (a) to switch the coffee maker on. Wait until automatic rinsing process is finished.
- Touch the icon (d) once. Indicator will light up.
- Touch the icon (d) again: Steam preparation will start.
- Keep the frother into the hot water for some seconds. Then, dry the frother with a damp cloth.
5.7 Cleaning the housings
Regularly clean your coffee maker for properly maintenance.
- Touch the Power icon (a) to switch the coffee maker off.
- Unplug the coffee maker from the mains to prevent from electric and mechanical hazards and let it cool down!
- Wipe the external housings, coffee beans and ground coffee containers with a damp cotton cloth only.
Never use a scouring pad, or chemicals to clean surfaces.
6.ACCESSORIES
Recommended accessories can be obtained from our after sales service or specialist shops.
6.1. Cleaning tablets
6.2. Descaling solution
6.3. Water filter
6.4. Test strips
7. WARNING ICONS
| Icon Meaning Solution | | |
 | The water tank is empty. | Fill the water tank.Proceed as indicate in section “Filling the water tank”. |
| Water tank is not correctly inserted. | Remove and insert the water tank into the coffee maker again. |
 | Coffee grounds collector is full. | Empty grounds collector. Proceed as indicated in section “Emptying coffee grounds collector”. |
| Drip tray is not correctly inserted. | Remove and insert the drip tray into the coffee maker again.Proceed as indicated in section “Emptying the drip tray”. |
 | Coffee grounds collector is full and has not been emptied.The coffee maker is blocked. The warning icon flashes. | Empty grounds collector. Proceed as indicated in section “Emptying coffee grounds collector”. |
 | Descaling process has to be carried out. | Proceed as indicated in section “Descaling the coffee maker”. |
 | Brewing unit compartment door not correctly closed. | Close the door. Proceed as indicated in section “Cleaning the brewing unit”, steps 1 to 3. |
| Brewing unit not installed. | Install the brewing unit. Proceed as indicated in section “Cleaning the brewing unit”, steps 1 to 4. |
| Brewing unit blocked. | Unplug the coffee maker for about 30 seconds, plug it in again and switch the coffee maker on. |
 | Air in system. | Place a container underneath the steam and coffee outlet nozzle. Touch the icon (e). Air removing process will start automatically. Important: make sure there is enough water in the tank. |
8.TROUBLESHOOTING
| Problem Possible cause Solution | | |
| No drink dispensed. | No water in the tank. | Refill the water tank (see “Filling the water tank” section). |
| Water tank not correctly fitted. | Remove and insert the water tank again (see “Filling the water tank” section). |
| The drink is poured slowly. | Outlet nozzles blocked. | Clean the nozzles with a needle. |
| Brewing unit is dirty. | Remove the brewing unit and wash it (see “Cleaning the brewing unit” section). |
| Water circuit blocked by limescale. | Carry out a descaling cycle (see “Descaling the coffee maker” section). |
| Water filter not correctly rinsed or clogged. | Prepare the filter correctly. Replace the filter every 2 months (see section “Activating water filter”). |
| Water leakage | Drip tray full and overflows. | Remove the drip tray and empty it (see “Emptying the drip tray” section). |
| The coffee maker is not placed on a horizontal surface. | Place the coffee maker on a horizontal flat and stable surface. |
| Drip tray fills up quickly. | Automatic rinsing process of the system. | This is normal. As soon as the red float is visible, remove the drip tray and empty it (see "Emptying the drip tray" section). |
| Indicator of the icon (k) flashes although grounds collector has been emptied. | Internal counter has not been reset. | Remove the drip tray again. Wait some seconds until the indicator (k) flashes and the indicator (l) lights up. Then, insert the drip tray. |
| Empty the coffee grounds collector while the machine is switched on. |
| The indicators of icons (l) and (e) light up. | Water tank has emptied while the drink was being prepared. Air has come into the water circuit. | Fill the water tank. Touch the icon (e). Air removing process will start automatically. |
| Brewing unit cannot be removed. | Brewing unit blocked. | Unplug the coffee maker for about 30s and turn it back on. Then, try to remove it once again. |
| Brewing unit cannot be inserted. | Brewing unit not placed in the right position. | Pay special attention to insert the brewing unit in the guides on its bottom. Then push it inwards. (see section 5.3 "Cleaning the brewing unit" step 9). Another possible solution would be: Unplug the coffee maker for about 30s and turn it back on. The system should be positioned to allow installation of the brewing unit. |
| Loud noise coming from the grinder. | Some kind of foreign object inside the grinder. | Contact your after sales service. |
| The coffee maker makes a pumping sound. | Water is being pumped into the system. | This is normal. |
| The drink is not hot enough. | Selected temperature is low. | Select a higher temperature (see section "Selecting the temperature"). |
| Cup is cold or drink prepared with cold milk. | Preheat the cup or use warm milk. |
| The coffee maker does not dispense the drink (espresso or lungo) even though it has been selected. | Actuation of internal protection system. | Wait for the brewing unit to be ready again and try the selection again. Note: This process may have to be performed several times until the amount of ground coffee in the brewing unit is no longer excessive. The machine will be calibrated automatically. |
If the above tips do not solve the problem, get in touch with our customer service.
PRODUCT DISPOSAL
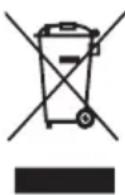
Do not dispose of the product at the end of its shelf-life. Contact the organic collection centre closest to your home in accordance with the waste electrical and electronic equipment (WEEE) Directive 2012/19/EU to contribute to the protection of the environment. Request detailed information regarding their current methods of disposing of packaging and scrappage of used devices from your distributor. We hope that you will be satisfied with this product.
FRANÇAISE
NOUS VOUS REMERCIONS D'AVOIR CHOISI UFESA. NOUS ESPÉRONS QUE CE PRODUIT RÉPOND À VOS BESOINS ET À VOS GOÛTS.
VEUILLEZ NOTER
VEUILLEZ LIRE ATTENTIVEMENT LE MODE D'EMPLOI AVANT D'UTILISER LE PRODUIT. CONSERVEZ-LE DANS UN ENDROIT SÛR POUR POUVOIR LE CONSULTER ULTÉRIEUREMENT.
DESCRIPTION
natural_image
Technical illustration of a mechanical component with circular dial and flanges (no text or symbols)
natural_image
Technical line drawings of mechanical components with no visible text or symbols
natural_image
Illustration of a coffee maker with a cup and a stand, showing a red arrow indicating direction (no text or symbols)
natural_image
Illustration of coffee beans and a hand pointing at the bottom, showing different positions (no text or symbols)
natural_image
Illustration of a hand pointing at three droplets on a surface, with dots below (no text or symbols)
other
| Product Type | Volume (L) | Percentage (%) |
| :--- | :--- | :--- |
| Function Fonection | 30 | 100 |
| Cooking | 40 | 120 |
| Heating | 65 | 150 |
| Cooking Minimale | 70 | 200 |
| Heating Minimale | 360 | 200 |
natural_image
Glass mug filled with dark liquid, labeled 'Lungo' above and below (no other text or symbols)
natural_image
Mechanical component diagram showing a circular dial with red arrows indicating direction (no text or symbols)
natural_image
3D mechanical assembly diagram showing a motor and gear assembly inside a vehicle (no text or symbols visible)
natural_image
Technical illustration of a mechanical assembly showing internal components and cross-sectional views (no text or symbols)
natural_image
Interior view of a bathroom sink with a shower tube and mirror (no text or symbols visible)
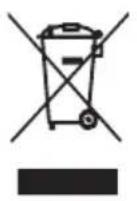
MISE AU REBUT DU PRODUIT
natural_image
Technical illustration of a mechanical component with no visible text or symbols
natural_image
Technical line drawings of three mechanical components with dimension annotations (Max, Min) and cross-sectional views (no readable text or symbols)
natural_image
Illustration of a coffee maker with a cup and a digital thermometer, no text or symbols present
natural_image
Two identical photos showing a coffee bean being added to a spoon, with an arrow indicating transformation (no text or symbols)
natural_image
Illustration of coffee beans being added to a spoon, showing four different stages of adding (no text or symbols)
natural_image
Illustration of a hand pointing at three droplets on a surface with dots below (no text or symbols)
natural_image
Glass mug filled with dark liquid, labeled 'Lungo' above and below (no other text or symbols)
natural_image
Mechanical component diagram showing a wheel and mounting bracket with red arrows indicating motion direction (no text or symbols)
natural_image
Mechanical assembly diagram showing a motor and gear assembly inside a vehicle (no text or symbols visible)
natural_image
3D mechanical assembly diagrams showing internal components and cross-sectional views (no text or labels)
natural_image
3D rendering of a bathroom sink with a shower tube and mirror (no text or symbols)
natural_image
Technical illustration of a mechanical component with no visible text or symbols
natural_image
Technical line drawings of three mechanical components with no visible text or symbols
natural_image
Illustration of a coffee maker with a mug and digital thermometer, no text or symbols present
natural_image
Two identical photos showing a coffee bean being added to a spoon, with an arrow indicating transformation (no text or symbols)
1-15 minuten 2-30 minuten
3.5 Pieptöne deaktivieren / aktivieren
natural_image
Illustration of coffee beans and a hand pointing at the bottom, showing different stages of coffee preparation (no text or symbols)
natural_image
Illustration of a hand pointing at three droplets on a surface with dots below (no text or symbols)
natural_image
Glass mug filled with dark liquid, labeled 'Lungo' above and below (no other text or symbols)
natural_image
Mechanical component diagram showing a circular dial with red directional arrows indicating motion or force (no text or symbols)
natural_image
3D mechanical assembly diagram showing internal components and housing (no visible text or symbols)
natural_image
Technical 3D renderings of a mechanical component, showing internal components and cross-sectional views (no text or symbols)
natural_image
3D rendered illustration of a bathroom sink with a pressure gauge and toilet (no text or symbols)
natural_image
Technical illustration of a mechanical component with circular dial and flanges (no text or symbols)
natural_image
Technical line drawings of a mechanical component with cross-sectional views (no text or symbols)
natural_image
Illustration of a coffee maker with a cup and a stand, showing a downward arrow indicating compression or reduction (no text or symbols present)
natural_image
Two identical diagrams showing a coffee bean being added to a spoon, with an arrow indicating transformation (no text or symbols)
1-15 минути 2-30 минути
natural_image
Illustration of coffee beans and a spoon with black powder, arranged in rows (no text or symbols)
natural_image
Illustration of a hand pointing at three droplets on a surface with dots below (no text or symbols)
natural_image
Glass mug filled with dark liquid, labeled 'Lungo' above and below (no other text or symbols)
natural_image
Mechanical component diagram showing a wheel and surrounding parts with red arrows indicating motion direction (no text or symbols)
natural_image
3D mechanical assembly diagram showing a motor and gear mechanism inside a vehicle (no text or symbols visible)
natural_image
3D mechanical assembly diagrams showing internal components and cross-sectional views (no text or labels)
natural_image
3D rendering of a bathroom sink with a pressure gauge and toilet (no text or symbols)
natural_image
Illustration of a bathroom sink with a water dispenser and mirror (no text or symbols)
natural_image
Mechanical component diagram showing a wheel and surrounding parts with red arrows indicating motion direction (no text or symbols)
- أخرج وحدة الإعداد.
natural_image
3D mechanical assembly view showing a motor and gear assembly inside a vehicle (no visible text or symbols)
natural_image
Technical illustration of a mechanical component with cross-sectional views (no visible text or symbols)
natural_image
Illustration of a hand pointing at three droplets on a surface, with dots below (no text or symbols)
natural_image
Glass mug filled with dark liquid, labeled 'Lungo' above and below (no other text or symbols)
natural_image
Two identical panels showing a coffee bean being added to a spoon, with an arrow indicating transformation (no text or symbols)
٢٠٣ دقيقة ١٥١ دقيقة
- manufacturers experts
1,5 ت有害 قهوة إسريسو
natural_image
Illustration of coffee beans and a hand pointing at the bottom, showing different stages of coffee preparation (no text or symbols)
flowchart
graph LR
    A["Grinding to serve"] --> B["Grinding to prepare"]
    B --> C["Modeling to make a spoon"]
    C --> D["Heating to prepare"]
flowchart
graph TD
    A["Water droplet"] --> B["Control: Initial contact"]
    B --> C["Press water droplet with control"]
    C --> D["Control: After contact"]
natural_image
Technical line drawing of a mechanical assembly with no visible text or symbols
natural_image
Illustration of a coffee maker with a cup and a water dispenser, showing a red arrow indicating motion (no text or symbols)
natural_image
Close-up of a mechanical component with a circular dial and internal features (no visible text or symbols)
natural_image
Close-up of a mechanical component with a circular head and internal features, no visible text or symbols.
natural_image
Technical line drawings of three mechanical components with dimension annotations (Max, Min) — no readable text or symbols present.
natural_image
Illustration of a coffee maker with a cup and a measuring tool, no text or symbols present
natural_image
Two identical diagrams showing a coffee bean being added to a spoon, with an arrow indicating transformation (no text or symbols)
natural_image
Illustration of coffee beans being added to a spoon, with a hand pointing at the spoon (no text or symbols)
natural_image
Illustration of a hand pointing at three droplets on a surface, with dots below (no text or symbols)
natural_image
Glass mug filled with dark liquid, labeled 'Lungo' above and below (no other text or symbols)
natural_image
Mechanical component diagram showing a circular dial with red arrows indicating motion or force direction (no text or symbols)
natural_image
3D rendering of a mechanical assembly inside a vehicle or machine (no visible text or symbols)
natural_image
3D mechanical assembly diagrams showing internal components and housing views (no text or labels)
natural_image
Interior view of a bathroom sink with toilet, shower tube, and bathtub (no text or symbols visible)
B&B TRENDS, SL. guarantees compliance of this product, for the use for which it is, during the period established by the legislation in force in the country of sale. In the case of breakdown during the term of this warranty, users are entitled to repair or else the replacement of the product at no charge if the former is unavailable, unless one of these options proves impossible to fulfil or is disproportionate. In this case, you can then opt for a reduction in price or cancellation of the sale, which must be dealt with directly with the sales vendor. This also covers replacement of spare parts provided that the product has been used according to the recommendations specified in this manual for both cases, and has not been tampered with by any third party that is not authorised by B & B TRENDS, SL. The warranty will not cover any parts subject to wear and tear. This warranty does not affect your rights as a consumer in accordance with the provisions in Directive 1999/44/EC for member states of the European Union.
USE OF WARRANTY
Customers must contact a B&B TRENDS, SL., authorised Technical Service for repair of the product. Since any tampering of the same by anyone not authorised by B&B TRENDS, SL., or the careless or improper use of the same shall render this warranty null and void.
You must keep the purchase invoice, receipt or delivery docket in order to exercise your warranty rights.
For technical service and after-sales care outside the Spanish territory, please submit your query to the point of sale where you purchased the item.
BON DE GARANTIE