Duetto Creme CE7165 - Coffee machine UFESA - Free user manual and instructions
Find the device manual for free Duetto Creme CE7165 UFESA in PDF.
User questions about Duetto Creme CE7165 UFESA
0 question about this device. Answer the ones you know or ask your own.
Ask a new question about this device
Download the instructions for your Coffee machine in PDF format for free! Find your manual Duetto Creme CE7165 - UFESA and take your electronic device back in hand. On this page are published all the documents necessary for the use of your device. Duetto Creme CE7165 by UFESA.
USER MANUAL Duetto Creme CE7165 UFESA
natural_image
Exterior view of a coffee machine labeled 'ufesa' with control panel and base plate (no readable text beyond branding)CE7165
INSTRUCCIONES DE USO
OPERATING INSTRUCTIONS
MODE D'EMPLOI
INSTRUÇÕES DE USO
GEBRAUCHSANLEITUNG
HASZNÁATI UTASÍTSÁ
natural_image
Pure geometric pattern of gray rectangles with no text, numbers, or symbols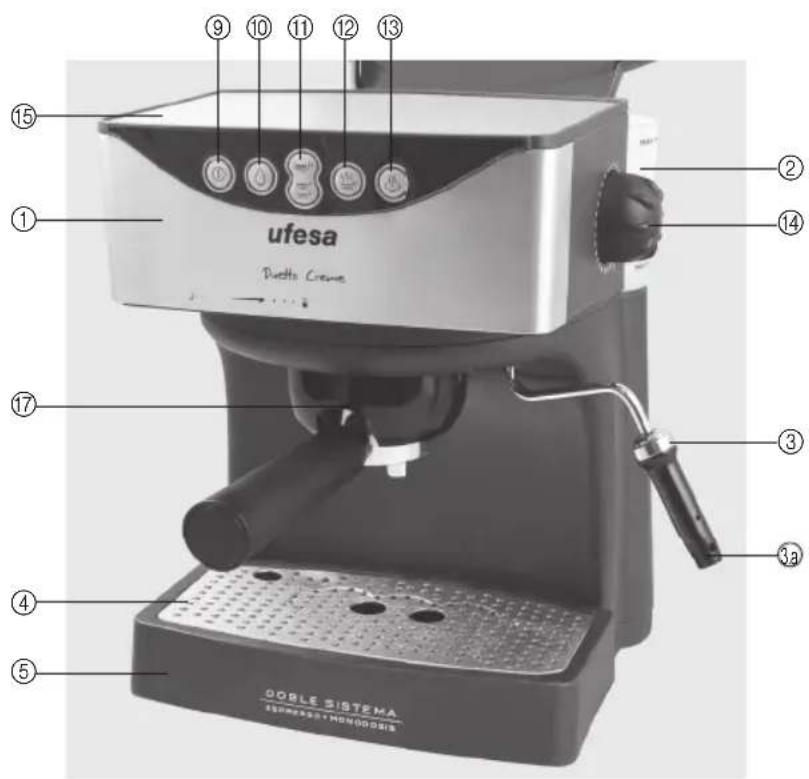
text_image
ufesa Dudta Creme OOBLE SISTEMA SANDERI MONOOBIS
text_image
Exploded view diagram of a bathroom sink with numbered parts for identification


natural_image
Close-up of a kitchen appliance with a side shelf and a brush (no visible text or symbols)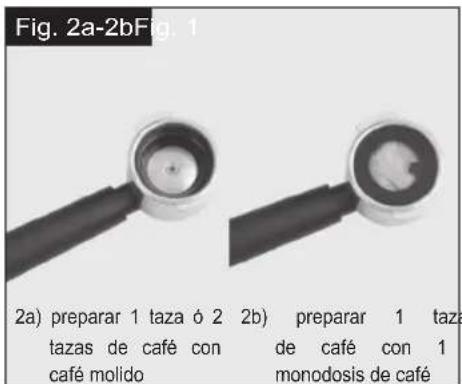
natural_image
Close-up of a hand holding a black object with a dotted circular mark, partially visible in a dark container (no text or symbols)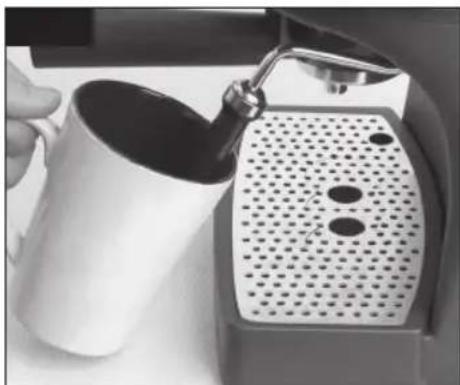
natural_image
Close-up of a hand pouring dark liquid into a white mug using a espresso machine (no visible text or symbols)
text_image
Fig. 6 ③ ③a
text_image
Fig. 7 ufesaESPAÑOL
CÓMO CONECTAR A LA RED:
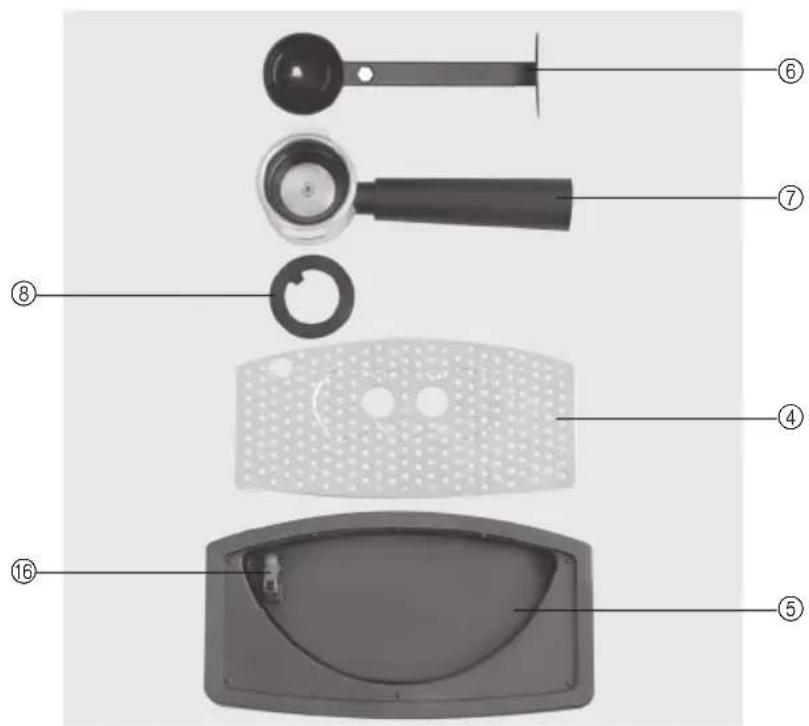
- Main body
- Water tank with lid
3/3a. Water/Steam nozzle - Detachable drip tray cover
- Drip tray
- Coffee spoon
- Filter holder and "all-in-one" filter
- Rubber ring for coffee pods
- ON/OFF button
- Manual espresso button
- Preset espresso button (1 cup / 2 cups)
- Espresso temperature button
- Steam button
- Steam regulator
- Cup warmer
- Overflowing indicator
- Filter reception
CONNECTING TO THE MAINS:
Before plugging the appliance into the mains, make sure that the voltage corresponds to that stated on the characteristics plate. Plug the appliance into an earthed socket.
SAFETY INSTRUCTIONS:
- Read these instructions carefully. Safeguard them for future reference.
- Do not touch any hot surfaces. Handle the coffee maker by the handles or by means of switches.
- Do not switch the coffee maker on without any water.
- Keep an eye on the coffee maker while it is working, especially when there are children about.
- Never use the coffee maker without the drip tray and cup stand.
- Never immerse the appliance in water or any other liquid.
- Unplug the coffee maker from the mains before proceeding to clean it or if it is not operating correctly.
- Leave the hot parts to cool down before proceeding to clean them.
- Never leave the cable hanging freely. Keep the coffee maker and the cable away from any heat sources.
- This appliance has been designed exclusively for domestic use.
- Do not use the coffee maker if either the cable or plug are damaged, or if it is not operating correctly or has become damaged.
-
Do not leave the appliance in temperatures below zero, as the water contained inside may damage it.
-
Cable repairs and replacements must be carried out exclusively by an Authorized Technical Service Centre.
• This appliance is not intended for use by persons (including children) with reduced physical, sensory or mental capabilities, or lack of experience and knowledge, unless they have been given supervision or instruction concerning use of the appliance by a person responsible for their safety.
• Children should be supervised to ensure that they do not play with the appliance.
BEFORE ITS FIRST USE:
Before using the coffee maker for the first time, wash all of its accessories in soapy water and dry them.
Use the appliance as if it were about to make an espresso coffee but without any coffee, so as to flush through all of the internal parts of the coffee maker.
PREPARING ESPRESSO BY USING PRESET FUNCTION WITH COFFEE POWDER
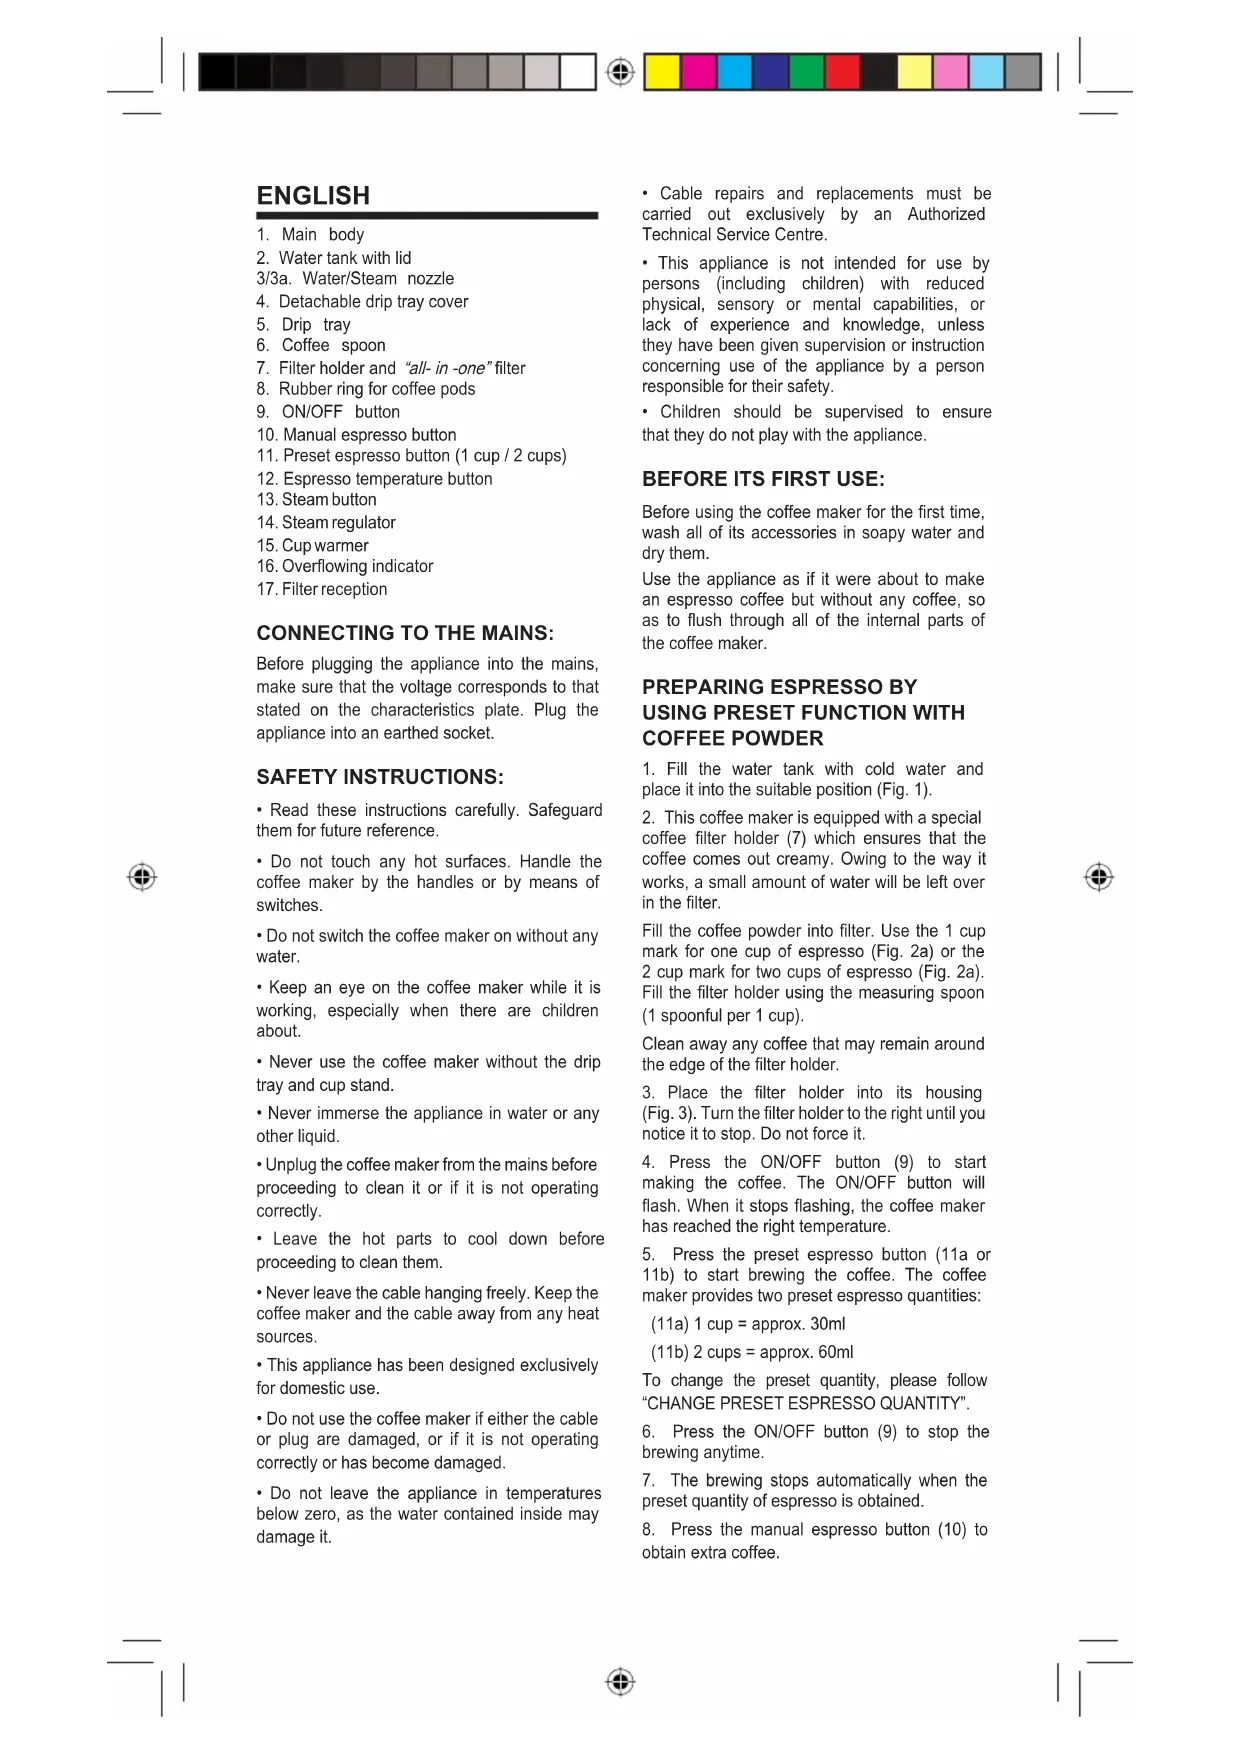
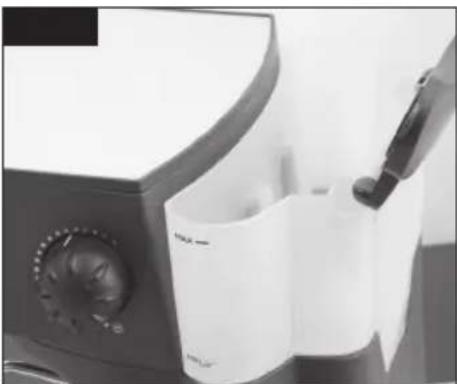
- Fill the water tank with cold water and place it into the suitable position (Fig. 1).
- This coffee maker is equipped with a special coffee filter holder (7) which ensures that the coffee comes out creamy. Owing to the way it works, a small amount of water will be left over in the filter.
Fill the coffee powder into filter. Use the 1 cup mark for one cup of espresso (Fig. 2a) or the 2 cup mark for two cups of espresso (Fig. 2a). Fill the filter holder using the measuring spoon (1 spoonful per 1 cup).
Clean away any coffee that may remain around the edge of the filter holder.
- Place the filter holder into its housing (Fig. 3). Turn the filter holder to the right until you notice it to stop. Do not force it.
- Press the ON/OFF button (9) to start making the coffee. The ON/OFF button will flash. When it stops flashing, the coffee maker has reached the right temperature.
- Press the preset espresso button (11a or 11b) to start brewing the coffee. The coffee maker provides two preset espresso quantities:
(11a) 1 cup = approx. 30ml
(11b) 2 cups = approx. 60ml
To change the preset quantity, please follow "CHANGE PRESET ESPRESSO QUANTITY".
- Press the ON/OFF button (9) to stop the brewing anytime.
- The brewing stops automatically when the preset quantity of espresso is obtained.
- Press the manual espresso button (10) to obtain extra coffee.
PREPARING ESPRESSO BY USING MANUAL FUNCTION WITH COFFEE POWDER
Espresso can be also obtained by using manual espresso function. This allows you to obtain the quantity of coffee that meets your need.
Follow the instruction 1-4 in "PREPARING ESPRESSO BY USING PRESET FUNCTION WITH COFFEE POWDER".
Press the manual espresso button (10) to start brewing the coffee. To stop the flow of coffee, press the button (10) again.
ATTENTION: Do not try to release the filter holder while button (10) or button (11) is on.
Given that the coffee maker is fitted with a self-priming system there is no special procedure to carry out when the tank runs out of water or after a prolonged period where the coffee maker has not been used.
SET THE TEMPERATURE OF ESPRESSO
The coffee maker provides 2 espresso temperature alternatives: normal or very hot espresso.
To set the very hot espresso, press the espresso temperature button (12), the ON/OFF button (9) will flash. When the ON/OFF button (9) stops flashing, operate the preset or manual espresso button as usual.
To set normal espresso, keep the espresso temperature button (12) at OFF mode (The espresso temperature button lamp is off).
CHANGE PRESET ESPRESSO QUANTITY
With this coffee maker you can adjust the cup sizes to your taste.
The factory-preset quantities are:
1 cup = approx. 30ml
2 cups = approx. 60ml
You can freely adjust the cup size:
1 cup = at least 30ml.
Recommendation 35ml - 65ml
2 cups = at least 60ml.
Recommendation 95ml - 125ml
There is no maximum quantity but the coffee will lose strength and taste the more water you add.
The programming can be completed while an espresso is being made.
Follow the instruction 1-4 in "PREPARING ESPRESSO BY USING PRESET FUNCTION WITH COFFEE POWDER", then press and hold the preset espresso button (1 cup espresso or 2 cups espresso depending on which one is to be programmed) until you obtain the desired espresso quantity. The programming is completed.
NOTE:
The brewing time for programming should not be less than 9 seconds; otherwise the minimum quantity will not be reached and the programming may not be completed.
Reset to the factory-programmed quantity
Press and hold 1 cup preset espresso button, and then press and hold the ON/OFF button (keep both buttons pressed and held).
After 10 seconds, set the ON/OFF button free and then set the 1 cup preset espresso button free.
The 1 cup preset espresso mode has been reset to the factory programmed quantity.
If the 2 cup preset espresso mode needs to be reset, do the same but press the 2 cups button.
PREPARING ESPRESSO WITH COFFEE PODS
Apart from ground coffee this coffee maker can also use single portions of coffee. There are two types of coffee pod available in the market:
A - 60mm flexible (loose) coffee pods, suitable for drip-fed coffee makers and percolators
B - 44mm packed coffee pods, especially for espresso machines
Your coffee maker will not operate correctly with 60mm flexible coffee pods as they do not fit properly in the filter holder.
Always use packed coffee pods of approximately 44mm diameter with this coffee maker, see Fig. 2c.
These single coffee pods can be found at your usual retailers.
Fit the all-in-one filter into the filter holder. Put 1 coffee pod into the filter. Place the rubber ring on top the coffee pod.
NOTE: When using the rubber ring to make espresso with espresso pods, make sure that the side with the dot is facing downwards (toward the pod).
Then follow steps 3-4 of the instructions for making espresso with coffee powder. (Fig. 2c)
PREPARING CAPPUCCINO
The steam can be used for warming the cups, heating liquids or preparing hot frothed milk for cappuccino coffee.
Remove the filter holder before using the steam, as this will stop the inside of the filter from becoming overpressurized.
- Fill cold milk into a jug.
Make sure that the ON/OFF button (9) has been switched on and is flashing (Fig. 7).
Press the steam button (13). When the ON/OFF button stops flashing, the right temperature for steam will have been reached.
-
Place a container below the steam nozzle (3) and turn the steam regulator (14) in an anti-clockwise direction (Fig. 4). After any water left in the nozzle has been cleared out, close it. Insert the nozzle into the jug of milk and turn the steam regulator back on so that steam comes out (Fig. 5).
-
Move the jug up and down slightly. Avoid letting the liquid go beyond the end of the nozzle as this will stop air from being drawn in. Place the steam pipe just above the surface of the milk in order to make it frothy. Add the frothed-up milk to the coffee.
IMPORTANT: After making froth clean off any milk left stuck to the nozzle. Giving it a further short burst of steam will help to clean it.
- Clean the steam nozzle regularly with the appliance unplugged and cold (Fig. 6).
Remove the sleeve (3a) from the steam pipe (3) and clean out the nozzle with soft damp cloth.
The sleeve can be washed under running tap water.
SWITCHING FROM CAPPUCCINO TO ESPRESSO
If you decide to make coffee again after having used the steam function, the water in the machine will be too hot for brewing coffee. To bring the temperature down press the steam button (13) to switch off the steam production, allowing the coffee maker to cool down.
Now, press the manual espresso button (10) and, at the same time, turn the steam regulator (14) on, allowing water to come through the steam nozzle until the ON/OFF button lights up again.
Turn the steam regulator off.
FILLING THE WATER BOILER
If the water boiler is empty, no steam will come out from the Steam Nozzle. Follow these instructions to fill the water boiler:
- Disconnect the appliance from mains supply.
- Fill the water tank with cold water.
- Connect the appliance to a suitable mains supply outlet, the appliance will be switched on with a deep sound and the ON/OFF button lamp flashes.
- Place an empty container under the filter reception (17).
- Press manual espresso button to allow half water in the water thank to run through.
- The boiler is filled.
AUTO SHUT-OFF FUNCTION
The appliance will switch off automatically if it has not been operated for 1 hour. Press ON/OFF Button (9) to restart the appliance.
HOW TO MAKE HOT WATER FOR TEA OR HOT DRINKS
- Press the ON/OFF button (9) and the steam button (13). The ON/OFF button will flash. When it stops flashing, the coffee maker has reached the right temperature.
- Place a cup below the steam nozzle (3) and press the manual espresso button (10). Then turn the steam regulator (14) on so that hot water comes through the steam nozzle.
CLEANING & MAINTENANCE
Make sure that the coffee maker is unplugged and cold before attempting to clean it.
The detachable parts can be washed in soapy water. Do not immerse the coffee maker in water or any other liquid.
With a damp cloth periodically clean out the area where the filter holder sits, so as to remove any coffee that may have become stuck to it.
Be careful when removing the filter holder as there may be hot water left inside it.
In order to prolong the life of the machine, do not refit the filter holder if the coffee maker is going to be stored away for prolonged periods. Do not clean any of the parts in the dishwasher.
DESCALING
The coffee maker should be descaled regularly. To do this, fill the tank with a mix of three parts water to one part vinegar.
Operate the appliance for two cycles, including the steam pipe.
Following this, and to flush out any traces of vinegar, operate the coffee maker for a further two cycles but with water only.
In order to obtain optimal results, it is also possible to add descaling liquid instead of vinegar into the water tank of the machine. To clean the coffee maker with this descaling liquid you must read carefully the instructions given by the manufacturer of the descaling product.
POSSIBLE FAULTS AND THEIR SOLUTION
The espresso coffee is not hot enough:
- Warm the cups up beforehand.
- Descale the coffee maker.
The flow rate is reduced considerably:
- Try putting less coffee in the filter.
- Use a coarser ground coffee, or pack the coffee down less.
- Descale the coffee maker.
The coffee spills out over the filter holder:
- Make sure that the filter holder is fitted correctly.
- Clean the seal or replace it if necessary.
No coffee comes out or very slowly:
- Make sure that the water tank is filled and fitted correctly.
- Make sure that the filter holder is fitted correctly.
- See "flow rate".
No steam comes out:
- Make sure that the water tank is filled and fitted correctly.
- Make sure that the steam nozzle is not blocked.
The pump makes too much noise:
- Make sure that the water tank is filled and fitted correctly.
REPAIRS
Should the appliance become defective, take it to an Authorized Technical Service Centre.
WARNING AND ADVICE ABOUT DISPOSAL:

Our goods come in optimized packaging.
This basically consists in using
non-contaminating materials which should be handed over to the local waste disposal service as secondary raw materials.
Before throwing a used appliance away, you should first make it noticeably inoperable and be certain to dispose of it in accordance with current national laws. Your Retailer, Town Hall or Local Council can give you detailed information about this.
This appliance is labeled in accordance with European Directive 2002/96/EC
- concerning used electrical and electronic appliances (waste electrical
and electronic equipment – WEEE).
This product must not be disposed together with the domestic waste. This product has to be disposed at an authorized place for recycling of electrical and electronic appliances.
The guideline determines the framework for the return and recycling of used appliances as applicable throughout the EU.
Please ask your dealer about current means of disposal.
FRANÇAIS
(11b) 2 tasses = approx 60 ml
1 tasse = approx 30 ml
2 tasses = approx 60 ml
(11b) 2 Tassen = ca. 60ml