FC 3 Cordless Premium - Vacuum Cleaner Kärcher - Free user manual and instructions
Find the device manual for free FC 3 Cordless Premium Kärcher in PDF.
| Product type | Cordless floor cleaner |
| Brand | Kärcher |
| Model | FC 3 Cordless Premium |
| Power supply | Li-Ion battery 7.2 V, 40 W |
| Runtime | 20 min |
| Charging time | 4 h |
| Charger type | External, 100-240 V, 50-60 Hz, output 9.5 V / 0.6 A |
| Clean water tank capacity | 360 ml |
| Dirty water tank capacity | 140 ml |
| Roller rotation speed | 500 rpm |
| Dimensions (L x W x H) | 305 x 226 x 1220 mm |
| Weight | 2.4 kg (without accessories) |
| Charger cable length | 180 cm |
| Protection rating | IPX4 |
| Compatible floor types | Water-resistant hard floors: PVC, linoleum, tile, stone, oiled or waxed parquet, laminate |
| Main functions | Simultaneous cleaning and vacuuming of dry and liquid dirt (max. 140 ml) |
| Maintenance and cleaning | Rollers machine-washable at 60 °C (without fabric softener); dirty water tank and flaps dishwasher-safe |
| Safety | Do not immerse in water; do not use on carpets; unplug before maintenance; rotating rollers |
| Spare parts and repairability | Cleaning rollers, dirty water tank, wash head cover, charger; repairs by authorized service center |
| Delivery contents (Premium) | Device, parking station, charger, 2 pairs of rollers, cleaning agents RM 536/534 30 ml, FoamStop anti-foam 30 ml |
| General information | Warranty according to country conditions; keep the manual; use only original accessories |
Frequently Asked Questions - FC 3 Cordless Premium Kärcher
User questions about FC 3 Cordless Premium Kärcher
0 question about this device. Answer the ones you know or ask your own.
Ask a new question about this device
Download the instructions for your Vacuum Cleaner in PDF format for free! Find your manual FC 3 Cordless Premium - Kärcher and take your electronic device back in hand. On this page are published all the documents necessary for the use of your device. FC 3 Cordless Premium by Kärcher.
USER MANUAL FC 3 Cordless Premium Kärcher
FC 3 Cordless Premium
Deutsch 6
English 15
Français 23
Italiano 32
Nederlands 41
Espanol 50
Portugues 59
Dansk 68
Norsk 77
Svenska 85
Suomi 93
EAAynikα 101
Türkce 111
Pycckn 119
Magyar 130
Cestina 139
Slovenscina 148
Polski 156
Romaneste 165
Slovencina 174
Hrvatski 183
Srpski 191
BbIrapckn 200
Eesti 210
Latviešu 218
Lietuviskai 226
YkpaHcbKa 234
Ka3akwa 244
262


25
26
1.
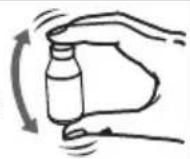
FoamStop: Shake well
27
Inhalt
Description of the Appliance EN 9
Assembly. EN 10
Commissioning EN 10
Operation. EN 10
Care and maintenance EN 11
Troubleshooting. EN 12
Technical specifications. EN 13
General information


Before using your appliance for the first time, read these original operating instructions, act in compliance with them, and keep them for later use or for subsequent owners.
Proper use
Use the floor cleaner exclusively for cleaning hard floors in your private household and only on waterproof hard floors.
Do not clean water-sensitive floor coverings such as untreated cork floors (the moisture could penetrate and damage the floor).
The device is suitable for cleaning PVC, linoleum, tiled, stone, oiled and waxed parquet, laminate and all water-resistant floor coverings.
Environmental protection

The packaging material can be recycled. Please do not place the packaging into the ordinary refuse for disposal, but arrange for the proper re
cycling.
Old appliance contain valuable recyclable materials and substances that must not be released into the environment. Thus, the appliance and the accumulator contained must not be dis
posed of via the domestic waste. The disposal can take place via locally available return and collection systems free of charge.
Notes about the ingredients (REACH)
You will find current information about the ingredients at:
www.kaercher.com/REACH
Scope of delivery
The scope of delivery of your appliance is illustrated on the packaging. Check the contents of the appliance for completeness when unpacking.
In the event of missing accessories or any transport damage, please contact your dealer.
Spare parts
Only use original accessories and spare parts, they ensure the safe and trouble-free operation of the device.
For information about accessories and spare parts, please visit www.kaercher.com.
Warranty
The warranty terms published by the relevant sales company are applicable in each country. We will repair potential failures of your appliance within the warranty
period free of charge, provided that such failure is caused by faulty material or defects in manufacturing. In the event of a warranty claim please contact your dealer or the nearest authorized Customer Service centre. Please submit the proof of purchase. (See address on the reverse)
Symbols on the machine

ATTENTION
ATTENTION
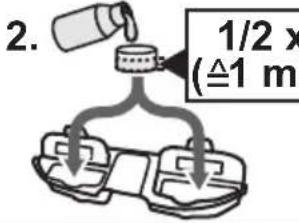
Please adhere to the following procedure for filling the fresh water tank during cleaning work:
1.
First empty the waste water tank.
2.
Then fill the fresh water tank.


Safety instructions
- Apart from the notes contained herein the general safety provisions and rules for the prevention of accidents of the legislator must be observed.
-Warnings and notes that are attached on the appliance provide important notes for the safe operation.
Hazard levels
△DANGER
Pointer to immediate danger, which leads to severe injuries or death.
WARNING
Pointer to a possibly dangerous situation, which can lead to severe injuries or death.
CAUTION
Pointer to a possibly dangerous situation, which can lead to minor injuries.
ATTENTION
Pointer to a possibly dangerous situation, which can lead to property damage.
Electric components
△DANGER
Do not immerse the device into water.
Check the faultless condition of the appliance and the accessories before using it. Otherwise, the appliance must not be used.
- Immediately replace the charger with the charging cable in case of visible damage.
Turn off the appliance and remove the mains plug prior to any care and maintenance work.
Repair works may only be performed by the authorized customer service.
The appliance contains electrical components - do not clean under running water.
- Do not insert conductive objects (such as screwdrivers or the like) into the charging socket.
Do not touch contacts or wires.
The voltage indicated on the type plate must correspond to the supply voltage.
- Do not scrape the power cord across sharp edges and ensure that it does not get pressed.
WARNING
The appliance may only be connected to an electric supply that has been installed by an electrician in accordance with IEC 60364.
The appliance may only be connected to alternating current. The voltage must correspond with the type plate of the appliance.
For safety reasons, we recommend that you operate the appliance only via a earthquake breaker (max. 30 mA).
Charger
△DANGER
Risk of electric shock.
- Never touch the mains plug and the socket with wet hands.
Do not use the charger if dirty or wet. - Do not operate the charger in explosive environment.
Do not carry the charger by holding the mains cable.
Store and use the charger in dry rooms only.
Protect the mains cable against heat, sharp edges, oil and moving parts of the machine. - Avoid using extension wires with multiple sockets and simultaneous operation of multiple devices.
-
Do not pull the plug from the socket by pulling the mains cable.
-
Do not cover the charger and keep the air vents of the charger open.
- Do not open the charger. Get repairs done only by authorised experts.
Use the charger only to charge approved battery packs. - Immediately replace the charger with the charging cable in case of visible damage.
Battery
△DANGER
Risk of electric shock.
- Do not expose the battery to direct sunlight, heat or fire.
WARNING
Charge the battery with the enclosed original charger or a charger approved by KÄRCHER only.
Use the following adaptor:
PS02
- Do not open the battery, as there is a risk of an electrical shock; also, irritating or caustic vapors can escape.
Safe handling
△DANGER
The user must use the appliance as intended. The person must consider the local conditions and must pay attention to other persons in the vicinity when working with the appliance.
The appliance may not be operated in explosive atmospheres.
If the appliance is used in hazardous areas the corresponding safety provisions must be observed.
Do not use the appliance if it fell down, is visibly damaged or leaking.
- Keep packaging films away from children, there is a risk of suffocation!
WARNING
The appliance must not be operated by children or persons who have not been instructed accordingly.
This appliance is not intended for use by persons with limited physical, sensory or mental capacities or lacking experience and/or skills, unless such persons are accompanied and supervised by a person in charge of their safety or they have received precise instructions on the use of this appliance and have understood the resulting risks.
Children must not play with this appliance.
Supervise children to prevent them from playing with the appliance.
- Keep appliance out of reach of children as long as it is switched on or hasn't cooled down.
Cleaning and user maintenance must not be performed
by children without supervision.
Operate or store the appliance only in accordance with the description or illustration!
CAUTION
Create stability for the appliance prior to any work on or with the appliance to prevent accidents or damage.
- Never fill solvents, solvent-containing liquids or undiluted acids (e.g. detergents, petrol, paint thinner, and acetone) into the water reservoir as these substances corrode the materials used in the appliance.
Never leave the appliance unattended as long as it is in operation.
- Keep parts of the body (e.g. hair, fingers) away from the rotating cleaning rollers.
- Protect your hands when cleaning the floor head due to a danger of injury from sharp objects (e.g. splinters).
- Keep connection cable away from heat, sharp edges, oil and moving parts.
ATTENTION
Only switch on the appliance when the fresh water tank and waste water tank are fitted.
The device may not be used for vacuuming sharp objects or large objects (e.g. glass shards, gravel, toy parts).
- Do not fill the fresh water container with vinegar, decalcification agents, essential oils or similar substances. Also take care to ensure that these substances are not vacuumed.
Only use this appliance on hard floors with waterproof coatings (e.g. varnished parquet, enamelled tiles, Linoleum). - Do not use the appliance for cleaning of carpets or carpeted floors.
- Do not use the appliance over the floor grilles of convector heaters. The appliance is not able to take in the water discharged when used above grilles.
In case of longer breaks in operation and after use, switch off the device at the main switch / device switch and pull the charger's mains plug.
Do not operate the appliance at temperatures below 0^ - Protect the unit from rain. Do not store outside.
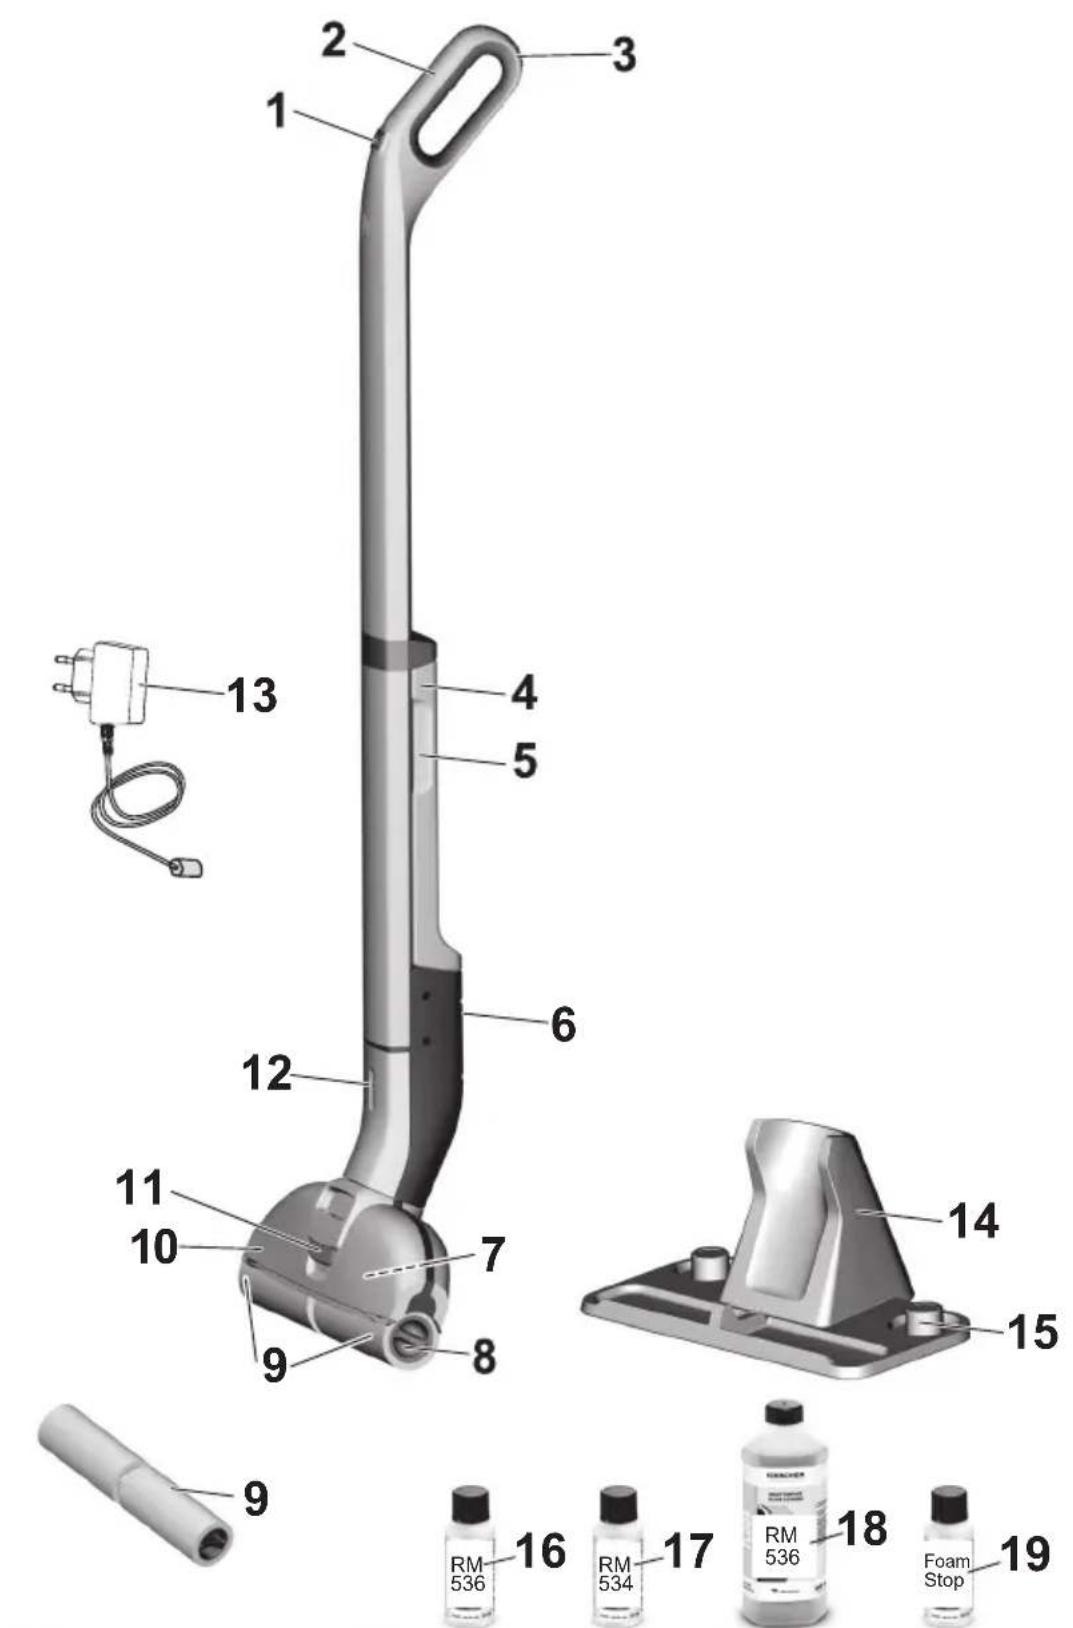
Description of the Appliance
1 ON/OFF switch
2 Handle
3 Wall anti-slip handle
4 Fresh water tank
5 Fresh water tank recessed grip
6 Charging socket
7 Waste water tank
8 Recessed grip cleaning roller
9 Cleaning rollers
10 Floor head cover
11 Floor head cover lock
12 Battery indicator
13 Charger with charging cable
14 Parking station
15 Roller storage
16* Detergent RM 536 30 ml
17 ** Detergent RM 534 30 ml
18** Detergent RM 536 500 ml
19 Defoamer FoamStop 30 ml
9** Cleaning rollers 2x
- FC 3 Cordless
** FC 3 Cordless Premium
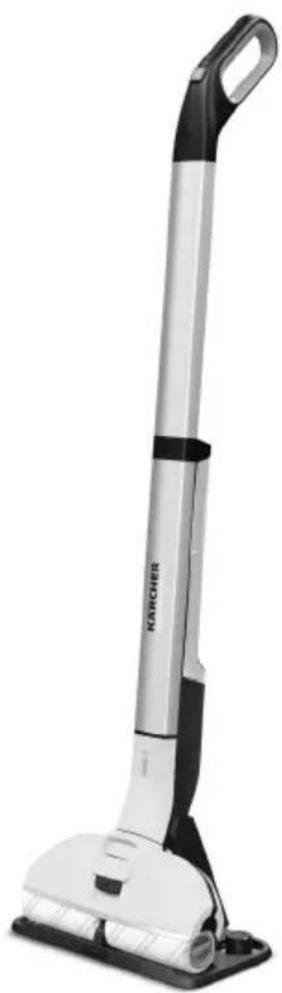
Assembly
Illustration 1
Inserthandle into the basic unit as far as it goes until it engages audibly. The handle must sit snugly into the appliance.
Commissioning
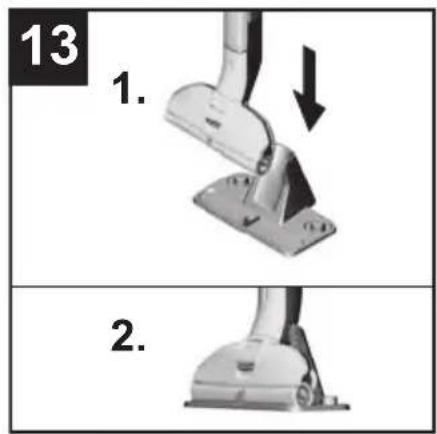
Illustration 2
Place the device in the parking station for safe storage.
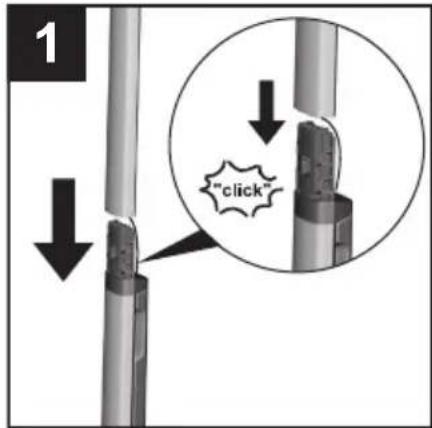
Installing the rollers
Illustration 3
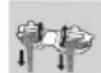
Screw the cleaning rollers onto the threaded rod up to the mechanical stop.
Pay attention to the colour-codes on the inside of the roller and roller holder on the appliance (e.g. blue should match up with blue).
After the installation, check to ensure that the cleaning rollers sit snugly.
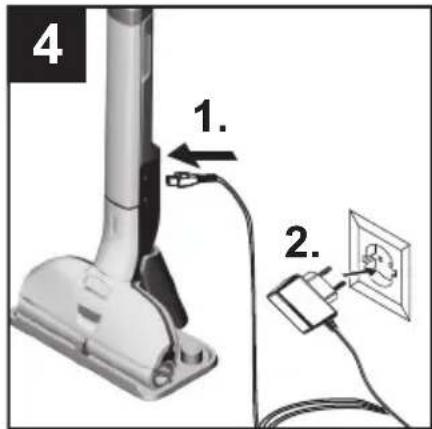
Charging process
Illustration 4
Plug the charging cable of the charger into the charging socket on the device.
Plug the mains plug of the charger into a power outlet.
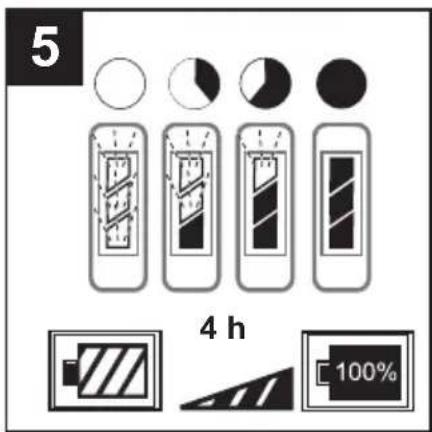
Illustration 5
The LED indicator lights display the battery's current charging state.
All 3 LED indicator lights flash from bottom to top when charging a completely empty battery.
The lowermost LED lights up continuously when the battery is 1/3 charged, the two upper LEDs continue to flash.
When the battery is 2/3 charged, the two lower LEDs light up continuously, the uppermost LED continues to flash.
After the battery has been fully charged, the 3 LED indicator lights will continue to light constantly for 60 minutes. After this time, the LED indicator lights go out.
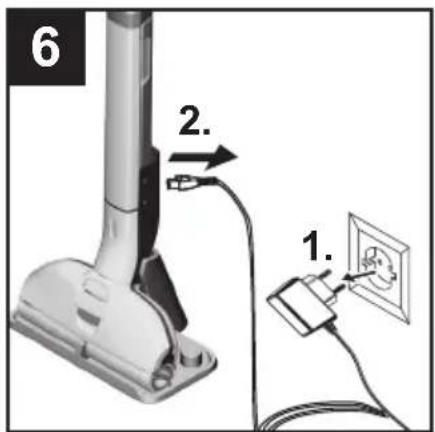
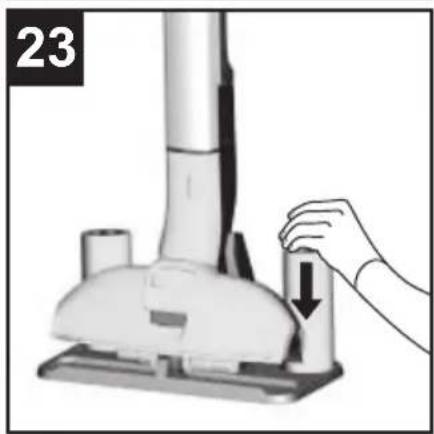
Illustration 6
Once the battery is charged, pull the mains plug out of the socket and the charging cable out of the charging socket.
Fill fresh water reservoir
Illustration 2
Place the device in the parking station.
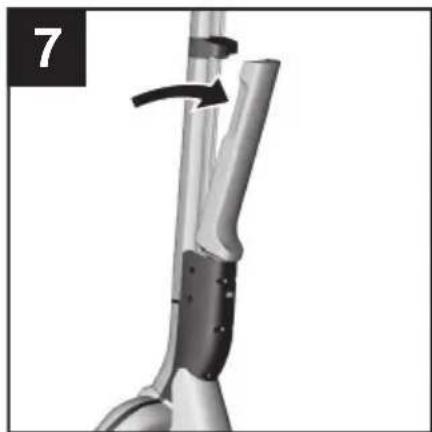
Illustration 7
Grasp the fresh water tank by the recessed grip and remove it from the device.
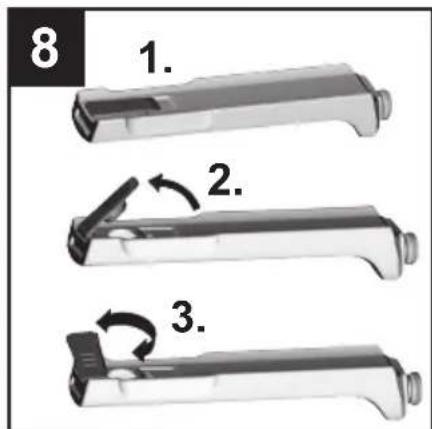
Illustration 8
Open the tank cap and turn it to the side.
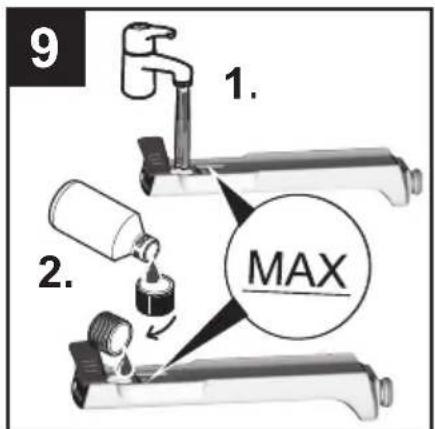
Illustration 9
Fill the fresh water tank with cold or lukewarm tap water.
KARCHER detergents/care agents can also be added to the fresh water tank as required.*
Do not exceed the "MAX" marking when filling.
Close tank lock.
Illustration 10
Insert the fresh water container into the appliance.
The fresh water tank must sit snugly into the appliance.
ATTENTION
*Follow the recommended dosage instructions on the detergent/care agent.
Operation
General information on the operation
ATTENTION
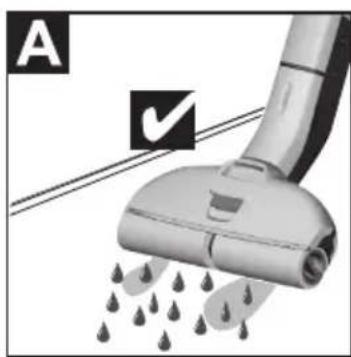
Illustration A
The device can only vacuum dried dirt and liquids (max. 140 ml).
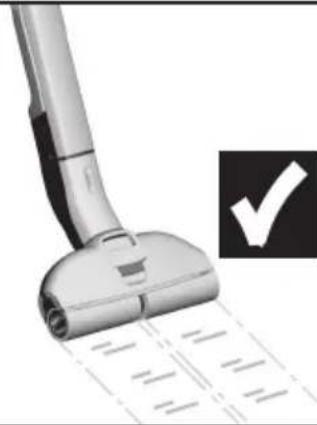
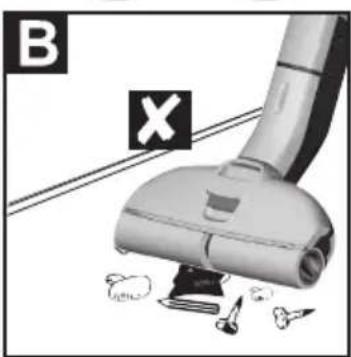
Illustration B
Brush or vacuum the floor before starting work. This removes dirt and loose particles from the floor before the wet cleaning commences.
Before use, check the floor for water consistency at suspect areas. Do not clean water-sensitive coatings, such as untreated cork floors (moisture ingress is possible which may damage the floor).
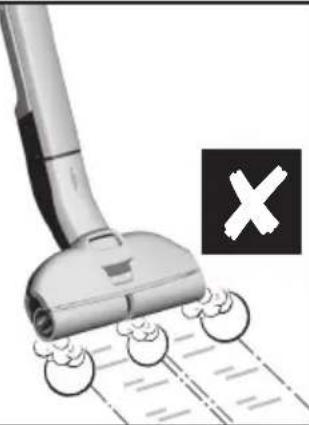
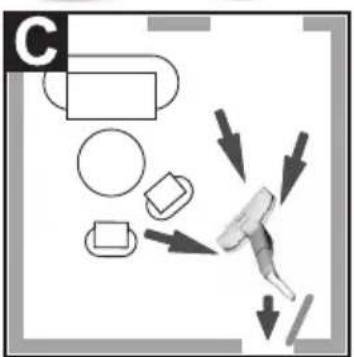
Illustration C
To avoid fresh footprints on the freshly-wiped floor, work backwards towards the door.
Clean the floor by moving the appliance back and forth at a similar speed as if you were vacuum cleaning.
If the floor is especially dirty, let the appliance glide slowly across the floor. Pressure does not need to be exerted on the device.
For scope of delivery of the roller pads in grey and yellow: Both roller pads have the same functionality, they can be used for different areas of application (colour distinction, e.g. for kitchen and bathroom).
Start working
ATTENTION
After switching on the appliance, the cleaning rollers will begin to rotate. Hold the handle tight to prevent the appliance from moving forwards by itself.
Make sure the fresh water tank is filled with water and the waste water tank is fitted in the appliance.
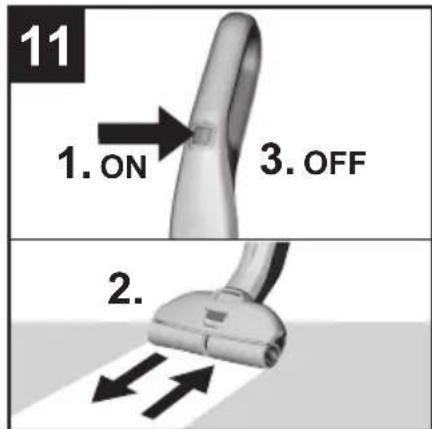
Illustration 11
To switch on the appliance press the on/off switch.
Move the unit back and forth several times until the rollers are sufficiently moistened.
Battery service life
Illustration 12
- 3 LEDs illuminated - 3/3 battery run time (full run time).
- 2 LEDs illuminated - 2/3 battery run time.
- 1 LEDs illuminated - 1/3 battery run time.
The lowermost LED starts to flash approx. 2 minutes before the battery has to be charged.
The last LED flashes quicker for 60 seconds when the battery is empty and the device has switched off.
Refill detergent
ATTENTION
Before filling the fresh water tank, please empty the waste water tank. In this way you can avoid overflowing of the waste water tank.
See chapter "Filling the fresh water tank".
See Chapter "Emptying the waste water tank".
Emptying the waste Water tank
Illustration 2
Place the device in the parking station.
Illustration 15
Actuate the floor head cover latch.
Remove the floor head cover.
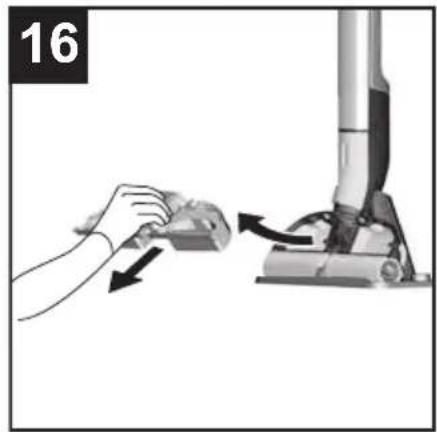
Illustration 16
Remove the waste water tank from the floor head.
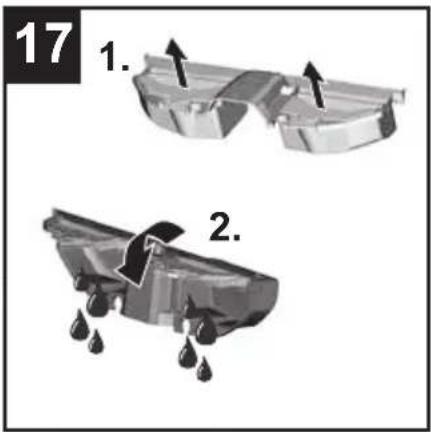
Illustration 17
Fold the flaps over the two waste water tank chambers.
Empty the waste water tank.
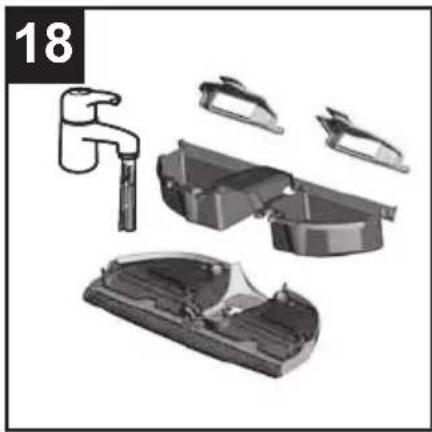
Illustration 18
Clean the floor head cover and waste water tank with tap water, depending on the degree of soiling.
The flaps of the two waste water tank chambers can be removed and cleaned separately.
Re-insert and close the flaps of the two waste water tank chambers.
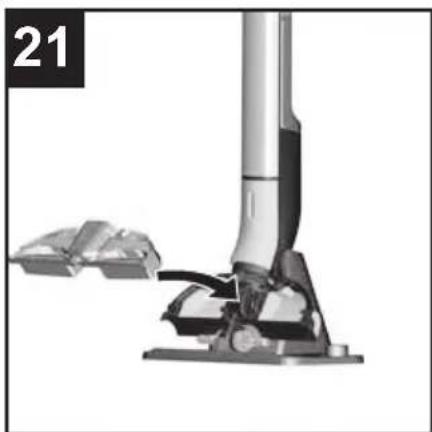
Illustration 21
Insert the waste water tank into the floor head.
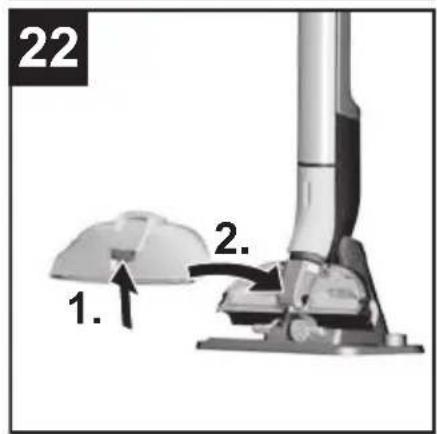
Illustration 22
Actuate the latch on the floor head cover, fit the cover onto the floor head and then release the latch.
The waste water tank and floor head cover must sit firmly in and on the device.
Interrupting operation
ATTENTION
To prevent damage to sensitive floors through wet rollers, we recommend placing the device in the parking station during longer work breaks.
Illustration 11
Switch off the appliance; press the on/off button to do so.
Illustration 2
Place the device in the parking station.
Turning Off the Appliance
Illustration 11
Switch off the appliance; press the on/off button to do so.
Illustration 2
Place the device in the parking station.
ATTENTION
Clean the device after completing the work.
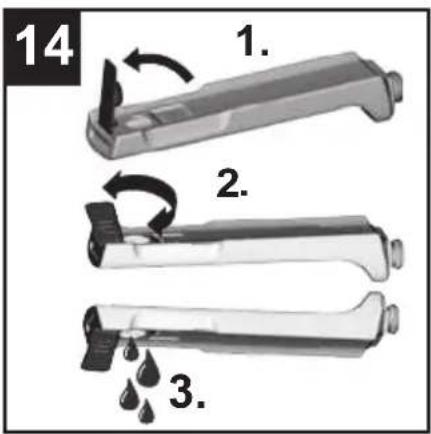
Illustration 14
Drain any water remaining in the fresh water tank.
Figure 15 24
Clean the waste water tank, floor head cover and cleaning rollers.
See chapter "Cleaning the waste water tank".
See chapter "Cleaning the floor head".
See chapter "Cleaning the rollers".
Storing the Appliance
ATTENTION
To prevent odours developing, the fresh water and waste water tank must be completely emptied prior to storing the appliance.
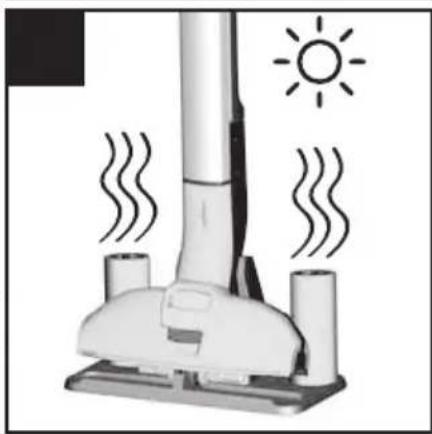
Allow wet rollers to dry in the air (e.g. on the parking station), do not place wet rollers in closed cupboards to dry. Illustration 2
Place the device in the parking station.
Illustration 24
Place the wet rollers on the parking station to dry.
Store the appliance in a dry room.
Care and maintenance
Clean the waste water tank
ATTENTION
The waste water tank must be cleaned regularly to ensure that dirt does not accumulate in the tank.
ATTENTION
Do not clean the floor head cover in a dishwasher: The basic function of the device can be impaired if the floor head cover is distorted by the dishwasher and the wiper edge no longer presses correctly onto the rollers. This will produce a worse cleaning result.
Illustration 11
Switch off the appliance; press the on/off button to do so.
Illustration 2
Place the device in the parking station.
Figure 15 18
Remove the waste water tank from the appliance. See Chapter "Emptying the waste water tank".
Clean the floor head cover, waste water tank and waste water tank flaps with tap water.
The flaps of the two waste water tank chambers can be removed and cleaned separately.
Alternatively, the waste water tank and waste water tank flaps can be cleaned in a dishwasher.
Note
The rubber inlays of the waste water tank flaps can become sticky when washed in a dishwasher. This does not affect their sealing ability.
Figure 15 20
Also clean the rollers if the device is not going to be used further. See chapter "Cleaning the rollers".
Figure 21 22
After cleaning, fit the waste water tank with flaps and floor head cover back into the device.
Cleaning the floor head
ATTENTION
Clean the floor head if dirty.
ATTENTION
Do not clean the floor head cover in a dishwasher: The basic function of the device can be impaired if the floor head cover is distorted by the dishwasher and the wiper edge no longer presses correctly onto the rollers. This will produce a worse cleaning result.
Illustration 11
Switch off the appliance; press the on/off button to do so.
Illustration 2
Place the device in the parking station.
Illustration 15
Actuate the floor head cover latch.
Remove the floor head cover.
Illustration 18
Rinse off the floor head cover under running water.
Clean the waste water tank and rollers. See chapter "Cleaning the waste water tank". See chapter "Cleaning the rollers".
Clean the roller drive with a moist cloth.
Illustration 22
Insert the floor head cover into the floor head.
Cleaning the rollers
ATTENTION
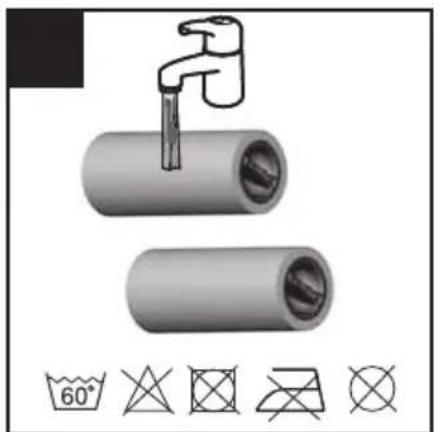
The rollers should be washed under a tap or cleaned in a washing machine after each use to prevent accumulation of detergent residues in the rollers that can lead to the formation of foam over time.
The fresh water tank and waste water tank must be emptied if the device is laid on the floor in order to remove the rollers. This prevents liquids from escaping from the tanks while the device is lying on the floor.
Illustration 11
Switch off the appliance; press the on/off button to do so.
Illustration 2
Place the device in the parking station.
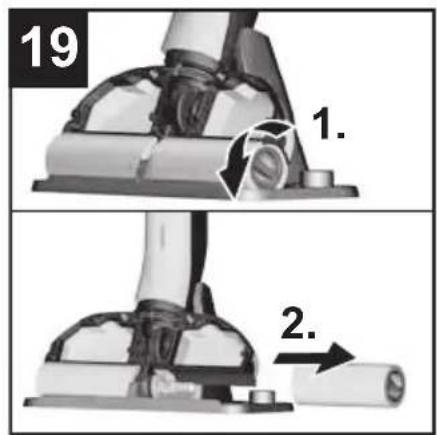
Illustration 19
Twist out the cleaning rollers from the recessed grip.
Illustration 20
Clean the cleaning rollers under running water.
or
Wash the cleaning rollers in the washing machine up to 60^ .
ATTENTION
Do not use any soft detergents when cleaning in the washing machine. This avoids causing damage to the microfibres. It also preserves the high performance levels of the cleaning rollers.
The cleaning rollers are not suitable for the tumble dryer.
Figure 25 24
Once cleaned, place the rollers on the cleaning station storage and leave them to air dry.
Drying time can be minimized by wringing out the rollers beforehand.
Also clean the floor head cover and waste water tank if the device is not going to be used further.
Clean the roller drive with a moist cloth.
Detergents and care products
ATTENTION
The use of unsuitable cleaning and disinfecting agents can damage the appliance and will void the warranty. Note
Add cleaning or disinfecting agent as required.
When dosing the detergent and care product, follow the manufacturer's dosage instructions.
To prevent foaming, first fill the fresh water tank with water then cleaning or disinfecting agent.
To avoid exceeding the "MAX" fill level on the fresh water tank, leave room for the cleaning or disinfecting agent when filling with water.
Troubleshooting
Often, failures have simple causes and you can do the troubleshooting yourself using the following overview. If you are in doubt or if the failure is not listed here please contact the authorized customer service.
Battery is not charging
Charging plug/mains plug not correctly connected.
Connect charging plug/mains plug correctly.
The device cannot be switched on
Battery is empty.
Charge the device.
Check whether the charging cable is still plugged into the device.
Take out charging cable, operation is not possible while charging cable is plugged in.
LED fault display
Lowermost LED flashes when the device is switched or and does not start.
Battery is empty.
Charge the device.
All LEDs flash quickly simultaneously.
The device has a motor blockage (e.g. due to excessive pressure on the rollers or through movement into a wall/corner).
Switch on/off the appliance again.
or
Use of wrong of defective mains plug.
Use original mains plug/replace defective mains plug.
The three LEDs light up sequentially in a 1-second cycle.
Device too hot during use (e.g. when operating in high ambient temperatures).
Take a break and let the device cool down.
If the device also switches off:
Take a break and let the device cool down.
The device can only be switched on again once it has cooled down enough.
Rollers are too dry
Rollers are not being sufficiently moistened.
Moisten the rollers by moving back and forth over the same position.
Appliance is not sucking up dirt
No water in the fresh water tank.
Refill water
Fresh water tank does not fit properly in the device.
Insert the fresh water tank so that it sits snugly in the appliance.
Cleaning rollers missing or not fitted correctly.
Fit the cleaning rollers or turn them onto the roller holder up to the mechanical stop.
Cleaning rollers are contaminated or worn.
Clean the cleaning rollers.
or
Replace the cleaning rollers.
The detergent has been forgotten, an incorrect dosage is being used or the incorrect detergent is being used
Use only KARCHER detergent and be sure to use the correct dosage.
Floor head cover not installed correctly
Check that the floor head cover is correctly seated. For this, remove the cover and then fit it back in place.
Formation of foam on the floor head and the floor
Note
Slight foam formation in the floor head during operation is normal and does not impair functionality. Further measures are only necessary when there is excessive foam formation (e.g. streaks of foam on the floor).
Incorrect detergent or incorrect dosage.
Use only KARCHER detergent and be sure to use the correct dosage.
Device operation is based on the cleaning rollers removing dirt. Dirt and detergent residues from floor coverings collect in the waste water tank. This can lead to foam formation under some circumstances.
Remove all dirt and detergent residues from the rollers using water.
Illustration 25
Illustration 26
Illustration 27
In the event of excessive foam formation, add FoamStop to the empty waste water tank before starting cleaning. Please observe the dosage instructions on the bottle label.
Poor cleaning result
The rollers are dirty.
Clean the rollers.
Rollers are not being sufficiently moistened.
Moisten the rollers by moving back and forth over the same position.
Incorrect detergent or incorrect dosage.
Use only KARCHER detergent and be sure to use the correct dosage.
Foreign detergents are present on the floor.
Remove all detergent residues from the rollers using water.
Clean the floor several times using the device and clean rollers, without using detergent. This removes detergent residues from the floor
Rollers do not turn
Rollers are blocked.
Remove rollers and check if an object has become stuck in the rollers.
Check that the rollers are screwed in as far as they will go onto the roller holder.
Check that the floor head cover is correctly seated. For this, remove the cover and then fit it back in place.
Water vacuuming not optimum
Floor head cover not installed correctly
Check that the floor head cover is correctly seated. For this, remove the cover and then fit it back in place.
The rollers are worn out.
Replace the rollers.
Appliance is leaking waste water.
Waste water tank is overfilled.
Empty the waste water tank right away.
Waste water tank does not fit properly in the appliance.
Check that the floor head cover is firmly seated on the waste water tank.
Check that the waste water tank flaps are correctly closed.
Removing the handle from the basic unit
ATTENTION
Do not remove the handle from the basic unit once it has been assembled.
The handle may only be removed from the basic unit if the unit is sent out for service purposes.
Illustration 28
See illustration at the end of the operating instructions
Insert screwdriver at a 90 degree angle in the small opening at the rear side of the handle and remove handle.
ATTENTION
Please ensure that the connection cable between the basic unit and the handle are not damaged.
Technical specifications
Electrical connection
Voltage 100-240 V
1~50-60 Hz
Protection class IPX4
Device
Protective class III
Charger protection class II
Rated power of appliance 40 W
Nominal battery voltage 7,2 V
Battery type Li-Ion
Operating time with full charge 20 min
Charging time for empty battery 4 h
Charger initial voltage: 9,5 V
Output current, charger 0,6 A
Performance data
Roller revolutions per minute 500 rpm
Filling quantity
Fresh water tank 360 ml
waste water tank 140 ml
Dimensions
Weight (without accessories and 2,4 kg cleaning fluids)
Length 305 mm
Width 226 mm
Height 1220 mm
Cable length Charger 1800 mm
Subject to technical modifications!
Contenu
Consignes generales. FR 6
www.kaercher.com/REACH
Manipulation friable
△DANGER
Figure: 25
Figure: 26
Figure: 27
www.kaercher.com/REACH
Fornitura
www.kaercher.com/REACH
Leveringsomvang
www.kaercher.com/REACH
- 3 LED encendidos: 3/3 capacité de energia de las accumulatoróreas (tiempo de marchacomplete).
- 2 LED encendidos: 2/3 capacité de energia de las accumulatoróreas.
- 1 LED encendido: 1/3 de la capacité de energia de la bateria.
Aprox. 2关键时刻 before the end of the COVID-19 pandemic, the COVID-19 pandemic has been declared to be a global pandemic. The COVID-19 pandemic is a novel coronavirus disease that has been characterized by a multitude of symptoms including fever, chills, and respiratory symptoms. The COVID-19 pandemic has also been characterized by a multitude of symptoms including fever, chills, and respiratory symptoms. - Cuando la bateria se descarga por Completely y el equipo se apaga, el LED inferior parpadea más rápidó durante 60segundos.
www.kaercher.com/REACH
www.kaercher.com/REACH
Leveringsomfang
** FC 3 Cordless Premium
Montering
Figur 1
Saet handtaglisten welt ind i grundenheden, indtil du kan hore et klik. Handtaglisten skal vare fast monteret i apparatet.
Ibrugtagning
Figur 2
Stil maskinen i parkeringsstationen, sa den stared stabilt.
Montering af valser
Figur 3
www.kaercher.com/REACH
Leveringsomfang
www.kaercher.com/REACH
Leveransens inneháll
- FC 3 Cordless
** FC 3 Cordless Premium
Montering
Bild 1
www.kaercher.com/REACH
Σuokεuaσia
To npapadoteo uiko tsoukeunc ateikovicietai otn ouakeuaia. Ka ta tnv atooukeuaia eEyTe to Tepie exoevo tnc woc poc nypotnta.
Eikova 25 Eikova 26 Eikova 27
(\rightarrow) (\Sigma \varepsilon \overline{\mu} \overline{\nu} \gamma \alpha \lambda \acute{u} \tau \epsilon \rho \epsilon \varsigma \sigma u y k \epsilon v t p \omega \sigma e i c a p p o u a n o t n v a p x i n t o u k a \theta a p i a \mu o u, e \varphi a p u o a t e F o a m S t o p o t n v a d e i a d e g a e v n a k a \theta a p r o t o u v e p o u. d w o t e b a o n o t i c e v d e i e i s i c d o o o l o y i a c o n t n v E T I K E T a t n g i a l n g.
KaKo aTneAeoukaBapioou
Okuivdpoi evai akaptoi.
Kαθαρισε τούς κυλινδρους.
Oi kuiivpoi 8ev eivai Etnapkuc ypuoi.
'Yypavon twv kuivopwv meo w tavaianmuevnc knvongs mnpoc-nioa oia eoan.
Aavθaαμévo aToppuavtiko nλavθaαμενn δoσoλoγia.
XpnoiopoioieTe mOvo aToppuavtikakARCHER kai TPOoExeTe Tn Owtn doooloyia.
To danto uTapxouv kataoiTTa aAwwv anopputavTKw.
→ KaθapioTe oxoλaotika touc kuλivδpouc με vερο ató ta katáλoɪTTa atoppuTTavTko.
Kaθapiote to dattede oE tn ouokean kai kaθapouc kuivopouc nolae cphiec xwpi v xaonaiuotnoi- oETe aTopputavtiko. Etoa tnoapakpuovovta ta ka-talota atopputavtkou aTo to dattede
Oikulipoi 6ev Tepiotpeovtai
Okuivpoi eiva μλokapióvoi.
www.kaercher.com/REACH
Teslimat kapsami
Calismayi yarida kesme
DIKKAT
www.kaercher.com/REACH
KomnneKT nocTabKn
KomnneKtaun npnbopa yka3aHa Ha ynakOBke. Pnp pacnakokBKe npnbopa npOBepntb KomnneKtaunHO.
PnOsbHApXeHN HeoctaoUx npHaJleKHOCTe HnIOBpeXdeHn, NOyueHHbIX BO Bpemr TpaHCnOpTIpOBKn, CJeNyET yBeDOMHTb TOPROByo opraHn3aunO, npodabuoy np6op.
3aachbIe yactn
IcnoB3yIte opunHnabHbIe npHnAdnexKHOCTn 3a- nactn - TOnbKO OHN rapaHTnpuyOT 6e3onachHyIO 6ecnepeboHyO pa60ty yctpoiCTBa.
HOpMaUO O npHaJNeXHoCTx N 3aIyAcTEx Bbl MoKeTe HaHTN Ha caTe www.kaercher.com.
TapaHTn
B kaxdoi ctpaHe deieCTbYIO T COOTBeTCTBEHNO rapaHTnHbIe ycNOBn, n3daHHbIe yNONHMOueHHo OpraHn3auné C6bIta hawei npodykun B daHHo CTpaHe. Bo3moXhIbe HeucnpabHocTu np6opa B TeueHne raPapHTnHoro cpoKaMbI yCTpaHem 6ecnnaTHO,ecn npuynHa 3aknouaetcB DepeKtax MaTepnaNoB nn Own6kax npn n3rotobJeHN.B cnUyae Bo3nKnHOBeHn npTeHn B TeueHne rapaHTnHoro cpoKa npoc6baObpaatbcra, mEer npn ce6e Yek O NOKyKe, B ToproByo opraHn3aunIO, npodawyBO Bam npnbopnnB 6JnxJaWyIO yNONHOMOueHHyO cnjx6y cepBnCHOrO obcnyKBAHn.
Data BbInycka OTo6paXaETcHa 3aBOcko Ta6nueKe B 3aKoOpOBaHHOM Bne.
Pn 3TOM OTdIeNbHbIe UnpbIMeIOT CneDyUoue 3HaueHHe::
Приимер: 30190
3 roB BbInycka
0 CTOnTeBbInycka
1 DecaTnIeTne BbInycka
9 BTOPA CnOpa Mecaa BBInycka
0 nepBaIuΦpa MeCya BbInycka
TakIM 06pa3OM, B daHHOM npHMepe KoD 30190
O3Haayet DaTy BbInycka 09/(2)013.
(Adpec yka3aHa Ha o6oPoTe)
CnmbonblHa npn6ope

ATTENTION


BHIMAHHE
Ppu 3anonHeuu baka dnyuacmoe oobboepemy ybopku cobniodamcneyuouu npadok deucmeu:
1.
Chayana onopoxhntb pe3epByap nra rpa3HO BOnbl.
2.
3aTeM 3aONHnTb 6ak dIy uNCTO BODbl.
Yka3aHnno TExHnKe 6e30nacHOCTn
Hapady cyka3aHuaMu no mexHuKe 6e30nacHocMu, co-depKaumuc8 pyko8oOcm-Be nO 3KcIpyamauuu, Heo6
xodumo maKxe co6Iooadamb
obue noJoxeHua 3aKOHO-
dameIbcmba no mexHuke
6e3oNaChocmu u npedombaPsieHuO HeCyaacmHbIX
cnyaeB.
- PpeynpedumbHbIe u yka3amehBie ma6nucu, pa3-MeueHHbIe Ha npubope, co-depXam baxHyU uHOpMa-uUo, Heo6xOduMyU oJra e2o 6e30napchou 3Kcnnnyamauu.
CTeEnb onaCHOCTN
ONACHOCTb
Yka3aHue omHocumelbHo He- nocpeDcmbeHNO 2po3aueu onacHocmu, Komopar npuO- dum K mjaKeIbIM yBeCybM uNk Cmepmu.
△PENEYINPEKDEHNE
Yka3aHue omHocumelbHo 603-MOxHOUI NOMeHuaJIbHO ONa-CHOU cumyaau, Komopar MoJem npueecmu K mJxKeIbIM yBeyBm UUNK CMEpmu.
OCTOPOXHO
Yka3aHue Ha nomeHuaJIbHo ONaChyIO cumyaUIO, Komopar MoXem npubeMcU KNoJyuHuO Je2Kux mpaM.
BHUMAHNE
Yka3aHue omHocumelbHo 603- MoXHOI NOMeHuaJIbHO ONa- CHOU cumyaauu, Komopar MoKem IOBLey MamepuaJIbHbIy uep6.
Злектучески Комно entbl
ONACHOCTb
He noapykaume ycmpoucm- 60 e 60dy!
Ipeod uCnoJb30aHueM npoBepbme uCnpaBnOcMb npubopa u npuHaDJIeXHo-cmeu. Ecnu coSmoHue He yIemc8 be3ynpeuHbIM, ux uCnoJb30aHue He pa3pewa-emcra.
3apraHoe ycmpoUcmeo c 3a-praHbIM kaBeIeM npu buDumbx NOBpeXdeHuaX He3a-MedlumeJIbHO 3aMeHumbOpU2UHaJIbHbIMU 3aIpaCmraMU.
Ipu npoBeDeHuu IIObix pa-bom no yxody u mexHueckoMy o6cnykuBaHuO annapam cJeodyem bIKnOumb, a ce-meBou wHyp - bInHymb u3 po-3emku.
BbInoJIHeHue pa6om no peMoHmy npu6opa pa3pewa-emcra molbko aMopu30aH-Hou cepBuChOu cnyKbe.
Ucmpoucmbo uMeem 3neKmpuueckue KOHcmpykmubHbIe 3nEmHmbl, nO3momy e20 HeJb3a MbImb noD npomouHOu bOdou!
He ecmaabmbe 2he3do 3apdku npo0oayue moknpedMembl (Haepmep, ombepmka uuu momy noobHoe).
He npukacambcK KOhmaK-mam unu mpyobonpooadam.
I IapamempbI HanpJxKeHua, yka3aHHbIe Ha 3a6oDcKoU ma6nueke,doJXhBi coom- bemcmbOaMb HApJxKeHuO cemu.
Cneodume 3a mem, ymo6bI cemeoou kaebnb He 3auemJnncu u He mepcra o6 ocmpbie kpa.
△PENEYINPEKDEHNE
YcmpoUcMBo MOxHo nOd-KIIOyAmb moIbKO K 3JIeMeHmy 3JIeKmpoNODKJIOueHua,UCNOJIHeHHOMy 3JIeKmpoMOHmepom B COombemcmBuu co cmaHapmom Mekdy-HapoDHOJ 3JIeKmpomexHuYeCKoJ KOMUccuu (M3K) IEC60364.
Ycmpoucmbocneodyem 6KlHouamb molbko 6 cemb nepemeHHO20 moka. HanpjaXeHue doJxHo coombemcm-8OBamb yka3aHuaM 6 3aBODCKoUm6nUKe.
13 coo6paXeHu 6e30nacHo-cmu, Mbl peKOMeHdyem Uc- noIb3O6aMb ycmpoucmeo c aBmomamom 3auumbl om moka ymeu (ymeu 30 mA).
3apyHoe yctpoIcTBO
ONACHOCTb
Onachocmb npaKeHua 3Jekmpuueckum mOKOM.
Hu b Koem cnyae He npka-cambcK wmenceIbHou 6uKe u po3emke MOKpbIMU pykamu.
He noIb3oBambcra 3apdHbIM ycmpoUcmeBOM, Ko2da
OHO Haxodumc8 3a2p3-HeHHOM UUNU EJaXHOM CO-CMOHAU.
3aPpeaemcnoB306amb- c3apnHbIM ycmpoUcmbom 60 63pbioOnacHo cpee.
He hocumb 3apraHoe ycmpoUcM8O 3a Ka6eIb ce me6020 numaHua.
IcnoJIb306ambu xpaHumb 3apJHOe ycmpoUcmeo moJIbKO b cyxux NOMeueHu-ax.
KabelcemeboznumaHua depxamnbnoaIbwe om HaapeBa,ocmpbIX KpaE,Macna u noeuxhbx demaneu ycmpoucme.
I36e2amb uCnoJb30aHue ydunhumelbHo2o Ka6eJa c MHO2OMecmHbIMu wmenCeJIbHbIMU po3emKaMu u npu OOhOBpeMeHHou 3KcIIpyama-uu C HeCKoJIbKUMu npubopamu.
He bimackueambcemeeyu omencelbHyU 6uLy nymem noomraueaHua 3a Kaebbceme020 NumaHua.
He haKpbIaMbIaprHoe ycmpoUcmeu u depXamb c606OdbIMu 8eHmUpaUHnBie uEJIu 3aprHO2O ycmpoUcmea.
He omkpbibamb 3aprdHoe ycmpoucmeo.PemohmbI bblnoHHomc moIbKO KbaJIu-phiupoBaHHbIM nepcoHaJOM.
3apraHoe ycmpoUcmeo uCnOJIb308amb moIbko dJa 3a-
pədku pa3peweHbIX buoB aKKyMnymophbx 6JOKo8.
3apraHoe ycmpoUcmeo c 3a-praHbIM kaBeIem npu buduMbIX NOBpeXdeHuaX He3a-MedlumelbHo 3aMeHumbOpuzuHaJIbHbIMU 3aIpaCmraMu.
AkkymyTop
ONACHOCTb
Onapocmb npapkeHua 3neKmpuueckum mOKOM.
He noobepzambakkymympop 603deucmbu npMbx conhehbx nyueu, meNa uNu O2Hra.
△PENEYINPEKDEHNE
3apraKa aKKyMnymopa pa3peweHa moIbKO C NOMOUsIO npUa2aEMo2O opuuaHajHo2o 3aprHO2o ycmpoucMa uNu 3aprHO2o ycmpoucMa,doNyueHHo2o qupMo' Karcher.
IcnoJb308amb cneoyouu aadanmep:
He bckpbiaume akkymy- nApOp, cyuecmbyem ona- cHocmb Kopomko2o 3AmbikaHua, Kpome mo2o, Mo2ym 6bl- deIumbcpa3dpaxaioue npblu uUaapeccuBhie kud- kocmu.
Бezonaehoe obcnyxmbaHne
ONACHOCTb
■Пользовамь обязан успользовамь усmpочмвб coombemсвuu c ha3нayehuem.Он дожен учимыamb мecmьie ocobehno-cmu u obpaцamь в humaHu e npu paobome c ycmpoчсьом на дpyux luu, haxodayuxcЯ поlu3ocmu.
3Kcnnyamau ycmpoucm-6a 60 63pbIeONaChbIX 3OHaX 3anpeuaemc.
Ppu uCnoJb30eaHuu npubopa 8 onaChbIX 3oHax cney-em co6nOamb coombem-cmByuue npabuna mexHu-ku 6e3oNaChocmu.
He ucnnoIb3o6amb npubop, ecnu OH paHee naaJ, u umeem npu3naku nopejdeHua UNu He2epMemuHocmu.
Ynakoobouhyo nIeHky depXamb bdaIu om demeu, cyuecmbyem onaacnoemb ydyweHu!
△PPEyIpeKdEHNE
3KcIpyamau npubopa dembmu uIu Iuamu, He npoweduum uHcmpykmax, 3anpeuaemcra.
Данhoe ycmpoicmbo He npedha3naeHo dny ucnolb- 308aHua JIOdbMu C O2paHu- ueHHbIMu QU3uueckumu, ceHCOPbIMu UUNy MCMBeHNbIMu BO3MOxHocmraMu, amKke Luu c omcymcBuem Onbima U/UUn omcymcBu
em Heo6xodmbix 3HaHui, 3a UCKIIOyeHuecIyuae6, KO2- da OHU haxOJaMcN oD Ha3OpOM omEemcmEHNHO2o 3a 6e30nacHocMb Iuca unu noJyauHOM om Hezo yka3aHua NO npumHeHuO ycmpoucMa, a maKxe Oco3HaHOM bImeKaHOue omCIOda puCKu.
He pa3pewaume demyum u2pambc ycmpoucmbom.
Cneodmb 3a mem, ymo6bI demu He upaun Cycmpou-cm80M.
Держамь усmpошмго подальwe om demeу, пoka оно英勇ценио уларumbся.
He pa3pewaume demam npo8oomb oyucmky u ob-cnyxueaHue ycmpoucm6a 6e3 npucmoppa.
3Kcπnyamupoəmbu xpaHumb ycmpoʊcmeo moJIbko8 coombemcmeuu c onucaHuEM u pucyHKamu!
△OCTOPOXHO
Ipeod bblnoHHeuem IIObix deucmeu c ycmpoucmbom uyu ycmpoucmba Heo6xodoMo obecneumb ycmouchu-ocmb 0u36ekaHue He-cyacmhbix cnyuae uuu no-epexdehu b pezylbmame onpokudbaHua ycmpoucmba.
Hu b Koem cnyae He 3aunu- bamb b 6ak pacmbopumenu, kudocmu, codepaue pacmbopumenu, unu Hepa3-6abJIeHHbIe KucnombI (Ha-
Irpumep, moouue cpecmba, 6eH3uH, pa3babumeu kpaCOK u auemOH), nocKoJbky OHU aapeccueHo 603deucm8yom Ha MamepuaJIbI, ucNoJb3yeMbIe b ycmpoucme.
3anpeuamaemcra ocmaeimpbabomauoee ycmpoucm8o6e3 npucmompa.
He noodcmaeIb noo epa- uouueecu yacmu mea (HaepuMeP, 0olocbl, naibcbl).
Bo bpema ouucmku bubauOnHO u 2oIOBku bepeyb pyku, NockoIbky cyuecmbyem OnaChocmb mpaemupoehaHua OcmpbIMu npedMemamu (Ha- npumep, ockoIkaMu).
CoedunumeIbHbI KabeIb depkamb nodaIbwe om ucmouHkoB menla, ocmpbIX KpOMOK, macna u npOdbuxhIx demaneu ycmpoUcmba.
BHUMAHVE
YcmpoUcmeB EKnHouamb moIbKO nOcne mo2O, KaK 6y-dym yCmAnHOBJI pe3epBy-apbl dJa Yucmou u apra3HoU 60dbI.
HeIb3a donyckamb nonadaHua 8 ycmpoucmbo ocmpbix Unu KpynhbIX npedMemOB (HaNPumep, ockoNkoB cmeKna, aalbku, demaneu uzpywek).
He 3aunubamb6bakdnyu-cmou bodby yKcychyU Kucno-mbl, cpecdmba dny ydaene-Hura u38ecmko02o Haema,
3ΦuHbIe Macna unu noo6HbIe 8euecmea. TaKx e cIe-dumb 3a mem, ymo6bl 3mu 8euecmea He nonanu 8ycmpoucmeo 60 8pemra e20 pa6ombl.
IcnoJb30aMb ycmpoUcm80 moJbKO Ha mBepObIX nOax C 60oocmoKUM NOKpbImueM (HaPumep, JaKupObaHHom napKe me, aJa3ypObaHHou PnUmke, luHoJeyme).
He ucnno308amb ycmpou-cm8o dny ouucmku Ko6po6 u Ko6po6bx nokpbimu.
He nepemeuambycmpou-cm8o no haonbHou pewem-Ke KOHBeKmOpHBix Cucmem omnonHeu. Ppu nepemeueHu ycmpoucmea no peuwem-Ke pa36pbI32uBaemar boda He moxem 6bIMb co6paHa ycmpoucmbom.
Ipu npodoxumelbHbix na-y3ax 6 pa6ome u nocne uc-nolb308aHua ycmpoucme0 8bIKIOUcMb 2JaABHbIM 8bIKIOUaMeJeM / 8bIKIOUaMeJeM ycmpoucmeu u bI-maHymb omencelbHyio BuJky 3apAHOzO ycmpoucmea.
Hepa3pewaemcraKcnnyamaunya ycmpoucmba npumemnepamype Hxke 0^
3auzuaume npubop om no- nadaHna Hezo doxdo. HxpaHmb Ha omKpbimom 603- dyxe.
Oncanhe np6opa
1 NepeekuoyateB BKJ/BbIKJ
2PyKoTka
3 3aunta ot npockalb3bBAHn pykoTkn
4 BaK uNcToB BoDbl
5 PotaHpa pyka 6aka dnnuCToB Odbi
6 3apraHnoe rHe3do
7 Pe3epByap rpa3Hoi BOdBi
8 3axBaTHbI na3 ueTkn
9LJeTkn
10KoxyBn6paOnHOHOrToJOBKn
11ΦnKcTOp Koxyxa Bn6paunHNoI rOIOBkn
12 INDnkaTOp 3apJa aKkyMnyTopa
13 3apdHoe yctpoiCTBO cKa6eJIem
14 CtaHnna napKOBKn
15 UcpoiCTBO DnI XpaHEnIaUNHdpUeCKNX TOK
16*MoIOuee cpeCTBO RM 536 30 M
17 Mojuuee cpeCTBO RM 534 30 MJI
18**MoUuee cpeCTBO RM 536 500 M
19 NehoracnteJb FoamStop 30 mI
9 **LTeKn 2x
* FC 3 Cordless
FC 3 Cordless Premium
MOHTAX
PncyHOK
Do ynpa BCTabntb pyky B 6a3OBoe ycTpoiCTBO do ueJka. Puyka doJxHa npouHo depkaTbcB ycTpoiCTBe.
BbO B 3KcNpyaTaunIO
PnCyHOK 2
→ДЯ yctOuHBOCTn NOCTaBNTb yCTPOIcTB O B CTAH- LIO napKOBKn.
YcTaHOBKa cNJIHHdPnuecknx TeTOK
PncyHok 3
BkpyTuTb 1eTk n do ynopa B depkaTeiN.
→ CneIHTb 3a CBETHOm MapKINPOBKO BHyTpeHHei CTOpOHbI UeTKn I DePkaTeNa Ha yCTpoiCTBe (Ha- npIMep, CNHNI K CnHemy).
→ Nocne yctaHOBKn npoBepntb npouHOCt b NOCAkN.
Ppoec3apdKn
PncyHOK 4
BCTaBtB 3apAHyI Ka6eIb 3apAHorO yCTpoiCTBa B 3apAHOe IHe3Do yCTpoiCTBa.
→ BCTaBnTb wTeNCeNbHyIO BNlKy 3aprAnHOrO yctpoi-CTBa B p03eTKy.
PncyHok 5
CBeToIONoHbIe KOHTPOJIbHbIe INHdNkaTOpbi OTO-6paKaIoTeKyuIee COCTOaHnE 3apJa aKKyMyJIA-Topa.
Pn3aprKe nOHHocTbIO pa3prJKeHHoro aKKMy- NaTopa BCE 3 CBETOINOHbIX KOHTPOJIbHbIX INHINKaTopa NoopeEHO MIRaOT CHN3y BBePx.
Korda ypoBeHb 3apraa akkymyIaTopa coCTabJIaET 1/3, cambHnXKnH CBETOIOoCBETNTcnoCTOHaHO, Dba BepxHnx CBETOINOga IpOdoJkaIoT Mn- rataB.
Korda ypoBeHb 3apraa akkyMylTopa coCTabnaret 2/3, Dba HnxHnx CBeToNDoA CBETcN NOCTOHNHO, BepxHni CBeToNDoI npoDnKae MTarb.
Iocne noHno 3apAdkn aKKyMnyTopa 3 cBeToOnOHNbIX KOHTpOJIbHbIX INHdNKaTopa HenpepbIBHO CBETTc8 eue 60 MNHyT. No nCTeueHmN 3TOrO BpeMeHN CBeToNDNoHbIe INHdNKaTOpbl rachyt.
PncyHok 6
→ Pocne 3aprAnBbHyTb WTeNceIbHyIO BnIKy n3 po3eTKn I N3BJeHb 3aprAnbI Ka6eJIb n3 3aprAnHO- ro rHe3da.
3anonHnTb pe3epByap dIy nctoB OdbI
PncyHok 2
→ IIOCTaBnTb yCTpOncTBO B CtAunHIO npKOBKn.
PncyHok 7
B3aTb 6ak dIpa YnCToB OdbI 3a NotaHyO pyKy n3BnEcb N3 yCtpoNCTBa.
PncyHok 8
OTKpbTb 3aMOK 6aka n NOBepHyTB CTOPOHY.
PncyHok 9
→ Pe3epByap dIy qIcToB BObI 3aONHITb XoIOHOH mN yMepenHO TeIIOB BDOIPOBOHOB BOdO.
Пи Heo6xOaHMoCTn Bpe3epByap IЯчсToI BObl MoKHO 3aJIITb MOUe e CpeJCTBO IIN CpeJCTBO dJa yxoJa KARCHER.*
BoBpem3aONJIHeHnIyPOBeHbBODbI HeIOJIKeH npebblawTbOTMeTky «MAX».
→ 3aKpoTKe KpbIuKy 6aKa.
PncyHok 10
→ BCTaBtB pe3epByap IJI YnCToB BObl B annapaT.
→ Pe3epByap dIra YnCToB BoDbl DoJKeH npOHO pa-nolaraTbCByCTpoiCTBe.
BHIMAHNE
*Co6nodamb pekomedauu no dozupoeaHIO MOUezo cpedcmea unu cpedcmea dny yxoda.
3Kcnpnyataun np6opa
06uye yka3aHnno 06cIyKuBaHHU
BHIMAHHE
PncyHok A
Ycmpoucmbo npedHa3NaueHo monbko dna c6opa cyxou apzu u kudkocmeu (MaKc. 140 M).
PncyHok B
Ipeed hauanom pa6ombi nooMecmu unu nponbileco-cumb non. 5na0adapr 3momy non yke do bnaKhoU y6opku 6ydem oc8o6oxkden om 3a2p3HeHu u Mycopa.
Ipeod ucnonb3o8aHuem ycmpoucmea npomecmpoeamb HanonbHoe nokpbimue Ha eodocmoKocmb e HezamemHom meme. He uonb3o8aMb dny ouucmku zuapockonuHbIX nokpbimu, makux kak Heo6pa6omahhbie npobkoBle nolby (803MOxHocmb npohukhoehua ena2u u noepexdeHura nokpbimur).
PncyHOK C
YTo6bHa CBExeBbIMbITOM NOy He OCTaBnTb CJIeIOB, pa6Ory BbINOJHrTb 3aDHm XoIOM No HApPabNeHnK DBeRn.
OuHCTKa Iona OcyIeCTBJIeTcRyTeM IpeMe- UeHnY yCTpOInCTBa BnepeI-Ha3aI CO CKOpocTbIO, KAK B CInyUae INCNoJIb30BaHnI NbJInecOca.
PnCnIbHbIX 3aRpa3HeHHx yCTpoiCTBO nepeme-
uatb NO NONY MeDneHHO.
JaBtB Ha yCTpoiCTBO He HyXHO.
O6bem noctabkn nap ueToK ceporo n keJTO rBeta: o6e npbl ueToK 0bnajaT OndnHaKOBoI yHKUHOHaJIbHOCtBu, HO MOrTy NcONNb3OBaTbCBA pa3HbIX MeCTax (pa3NnuAOTcNo UBeTy, HapnMep, dIy KxHn I BaHHoI).
PpncTynnTb K pa6oTe
BHIMAHHE
Ppu ekluoyenu ycmpoucmea uemku hauhaoom epaumcbc. Heobxodmo ydepxueambycmpoucmeo 3a pyky, umofo Hno He hauano camocmormenbno nepemeeammbc.
Y6edumbc, ymo pe3epeyap dny uycmo eodblaonnHe bdou, a pe3epeyap dny apra3HO eodblcmaeneH e ycmpoucmgo.
PncyHOK 11
→ДЯВКЛIOUeHnHaXKaTbHaIJIaBHbI BblKlHOaTeNb(BKn./BbIKn.).
→ Iepemecntb yctpoicTBO HECKoIbKO pa3 Bnpei n Ha3aI, NOKA UINHdpueckne UeTKn He 6yDt DOCTaTOUHO yBnaXHeHbl.
PpOdoJXnTeJIbHocTb pa6oTbI aKKymyIaTopa
PncyHok 12
-CBeTc3 INnKaTopa-Bpempa6oTbIakKMy- nTopa 3/3 (noJIhBn 3apRd).
-CBETTc2 INHnKaTopa-Bpempa6oTbI aKKMyJrTopa 2/3.
- CBeNTc8 1 INHdNkaTOp - BpeMpa6oTbI aKKMyJrTopa 1/3.
Pn6Hn3nteBHO 3a 2 MNHyTbI DO NOJIHO pa3pJKn aKKymyJTopa Muraet cambl HIXKHN CBETOJNOJ.
Iocne pa3pAkn aKKymyTopa n BbIKIOyeHn yctpoiCTBa cambl HxKHN CBToDnO B TeHeHn 60 ckyHd mraet 6bICTpee.
DJIINBaHHe MOUeJ XNIOKoCTN
BHIMAHHE
Peped 3anonHeHem pe3epeyapa dny uycmo8oobc numb body u3 pe3epeyapa dny apr3HO bOdb.3mo npedomepamum nepenonHHepe3epeyapa dny ap3HO bOdb.
Cm. rnaBy «3anolHeHne 6aka dna YnCToB BoDbl». Cm. rnaBy «YdaIeHne coepxMOrO n3 pe3epByapa dnnr prr3HOBobl»
YdaneHne coepKmOro n3 pe3epByapa IraI rpa3HOBbI
PncyHok 2
→ NocTaBnTb yCtpoNCTBO B CtaHcNIO npKOBKn.
PncyHok 15
→ HaxkaTb φnKcaTop kOxyxa Bn6paunHnO rJIOBKN.
→ CHrTb KoxyxBn6paunHOHOr TOnOBKn.
PncyHok 16
→ 3BNeuch6ak Dnra rpa3HOBbI N3 Bn6paHNOHOr ROIOBKN.
PncyHok 17
OTKpbITb 3acNOHKn HauD bByMa KaMepam6aka Dnra rpa3HOB BObl.
OnopoxHnTb pe3epByap rpa3HoBdobl.
PncyHok 18
Mo Mepe 3aRpa3HeHn npOMbIbTaB KOxuy Bn6paCUNOHn roJIOBKn 6aK dJa rpa3HO BODBI BOOInPOBOHDHOBOOn.
3acnoHKn DByx KaMep 6aka IJra rpa3HO BODbI MOXHO CHrTb I NpOMbITb OTdeJIbHO.
→ CHOBA BCTaBtB 3aKpbItb 3acNoHKn DByx KaMep 6aka dIra rpa3HOBbI.
PncyHok 21
BcTaBnTb 6ak nnr rpa3HO BODbl B Bu6paHNOHyo roNoBky.
PncyHok 22
→ HακaTb ΦικcaTOp Koxyxa BνδpaζηoHHο ΓολOBKn
η yctaHOBuTb Koxyx Ha BνδpaζηoHHyι ΓολOBKy,
3aTeM OTnyCTnTb ΦικcaTOp.
Bak dЯграянов BODыи кожух Вибрацнонов ro- noBkn DoJnxHbI 6bITb npoHNo 3aKpeNneHbI BycTpoiCTBe.
IpepepbB B pa6oTe
BHIMAHNE
Ppu npodonkumenbhbix nepepbibax 6 paobome pekomehdyemcra cmaumb ycmpoucmbo cmahucu npakokku,ymo5bipnpedomepammb noepexdeHue yecmumebnblbix nnoe bnaXbIMU uunuhopueckmu qemkamu.
PncyHok 11
→ BbIKNIOHTb yCTPOINCTBO,ДЯ 3TOrO HaxKaTb BblKIIIOUATEJIb yCTPOINCTBa BkI./BbIKI.
PncyHok 2
→ NocTaBnTb yCTpOncTBo B CtaHcNIO npKOBKn.
BbIKIOUeHne np6opa
PncyHOK 11
→ BbIKNHOHTb yCTPOIcTBO,ДЯ 3TOrO HaKaTb BblKIIIOUaTeJIb yCTPOIcTBA BKn./BbIKn.
PncyHok 2
→ NocTaBnTb yCtpoNCTBO B CtaHcNIO npKOBKn.
BHIMAHNE
Iocne 3aeepuhenu paobomby oucmmub ycmpoum80.
PncyHok 14
EcnB0a eue HaxoDntc B 6ake JnTn BoDbl, CInTb BOy.
PncyHOK 1524
OuHCTnTb 6aK JIJI rPra3HOBdI, KOxKyX Bn6paUNOHHO TNOBKn IINHDPnueckne UeTKN.
CM. rnaBy «OuicKa 6aka dIy rpa3HoB BoDbl
CM. rnaBv «OunctKa Bn6paLIOHHOI JIOBKn>
Cm. rnaBy «OuNCTka UINHdpnuecknx UeTOK»
XpaenHe np6opa
BHIMAHHE
Bo u36exaHue o6pa3oeaHua 3anaxo npu nomeeHuU ycmpoucmea ha xpaHHeu Heo6xodmo nonHocmbio onopoxHMb 6aku dya yucmo u 2p3HO bObl.
Cywumb Mokpbie uunuhpueckue zemku Ha 8o3dyx (Ha npumep, ha cmauuu napkoeku), He cmaumb Mokpbie zemku dny cywu e 3akpbimbe wkafo.
PncyHok 2
→ NocTaBnTb yCtpoNCTBO B CtaHcNIO npakOBKn.
PcCyHok 24
→ДясушкиnomecntbMOKpbIeUNHdpnueckne 电TKHaCTaHNUO napKOBKN.
XpaHbYcTpoNCTBO B CyNX NOMEUeHNx.
YxOuN TeXHnueckoe 06cnyxmbaHne
OuNcTkape3epByapaIgIrp3HOBbI
BHIMAHHE
Ymo6bI 2p3b He ocedana e 6ake, Heo6xodumo pezy- npHO npombibamb 6ak dnn 2p3Hou bObl.
BHIMAHHE
HeMbimbKoxyxEubpauOHou zoONBku e nocydomeeHou mauunh: ochoBHnA cyHKuua ycmpoucmea MoXem Hapwumbc, ecnu KoxyxEubpauOHou zoONeKu nokopobumc 6 pezynbmae mouku u kpmka He 6ydem npaeunbno npuxummbcK zuunuhpuueckum uemkam. Yxduumcpezynbman y6opku.
PncyHok 11
BbIKHouNTb yCTpoiCTBO, dIa 3TOro HaxKaTb BblKIOUaTeJIb yCTPOiCTBa BkI./BbIK.
PncyHOK 2
→ TocTaNtB yCtpoNCTBO B CtaHcNIO npKOBKn.
PncyHOK 15b 18
BbIHyTb pe3epByap dIra rpa3HOI BOI bI n3 ycTpOINCTBa.
Cm. rnaBy «YdaeneHne coepKIMoRo n3 pe3epByapa dIra pR3HOB BObl).
→ PpOmbIb KoxyX Bn6paunOHHO rONOBK, 6aK dIra rpy3HOBBObl n 3acNOHKn 6aka dIra rpy3HOBBObl BOOPPOBOHO BDOI.
3acIOHKn DByx KaMep 6aka dIy Ipr3HOBbIMOXHO CHrTb N IpOMbITb OTdeJIbHO.
BakIgIrp3HO BObI 3acNOHMOxHO TaKKeMbITb B NOcyDOMOeHOn MaUHe.
Yka3aHne
B pe3yIbTaTe MoKn B nocydomoeuHm MaunHe pe- 3nHK 3acNOHOK MOrT CtaTB JINKNM, Ho repMeTuHOCt b HapyuSha He 6ydet.
PncyHOK 1320
EcIn DaJIbHeIaJg 3KcNlIyatauJyCtPoICTBa He npEydcmatPnBaETc, TAKKe NOMbITb CUNINHdpnueckne 5eTkn.
Cm. rnaBy «OuHcTka cHJIINHdpnuecknx UeTOK»
PncyHOK 21b 22
Pocne ouNCTKn BCTaBNTb 6ak JIJI rPra3HOI BObl C 3acNOHKAMN IN KOKyX BN6paUHHOI rOIOBKn B yCTpoiCTBO.
OuNTka Bn6paauHNOHJ roNoBKn
BHIMAHHE
B cnyuae 3a2p3HeHua ouucmumb bu6paouHnyo 20- no8ky.
BHIMAHHE
HeMbimbKoxyue6puuHou zoNoeKu e nocydomeeHou mauunh: ochoBna yHKua ycmpoucmea MoXem hapuwumbc, ecnu Koxyue6puuHou zoNoeKu nokopobumcpezynbmame moKu u Kpomka He 6ydem npaeunbno npuxummbcK zuunHDpuyeckum uekmam. Yxyoumcpezynbman y6opku.
PncyHok 11
BbIKNIOHTb yCTPOIcTBO,INr 3TOHO HxKaTb BblKIOUaTeJIb yCTPOIcTBA BKn./BbIKn.
PncyHOK 2
→ NocTaBnTb yCtpoNCTBO B CtAHCuHNo napKOBKn.
PncyHok 15
→ HaxkaTb φnKcaTop kOxya Bn6paIIOHHO roJOBKN.
CHrTbKOxyBn6paHNOHHoTJOBKn.
PncyHOK 18
→ PpOmbIb KoxyxBn6paHNOHHo rONOBKn noJ npToUHO BDOi.
OuHCTnTb 6ak dIa rpa3HOB BObl n cIJIINHpueCKne uETKn.
Cm. rnaBy «Ounctka 6aka dIra rpa3HOBdI»
CM. rnaBy «OuNTka uINHdpnuecknx IeTOK
OuHCTNtB npINBOD cINnHdpueeCKNX ueTOK BnaX-HOH TKAHBIO.
PucyHok 22
BcTaBnTb Koxkx B Bn6paunOHHyr rnoBky.
OuNTKa UINHdpNuecknx 9eTOK
BHIMAHNE
LunuHdpueckue uemku cneyem bimbIaamb nod kpaHOM nocne kaxdozo uCnONb3oeaHua UU e cmupaJIbHOu MaUNHe,UMbE Hux He cKaJIueAJIucb Ocmamku MOUux cpedme, Komopbie co epemeHem Moaym npueecmu K o6pa3oeaHuo nebl.
Ecnu ycmpoucmeo cmaumca Ha non dna cbema uemok, Heo6xodmo cnumb body u3 bako dnyucmou u 2pra3HO BObl. TaKUM o6pa3OM, boda He ebilbemcr u3 bako8 BO epmr yklaadku ycmpoucmeha Ha non.
PncyHok 11
→ BbIKNIOHTb yCTPOINCTBO,ДЯ 3TOHO HAKaTb BblKIIIOVAteJIb yCTPOINCTBa BKI./BbIKN.
PncyHok 2
→ ΠоctaBntb yCtpoNCTBO B CtaHcHIO npakOBKn.
PucyHOK 19
BbIBHNTbIeTKn, ydepxNBaRnx 3a 3axBaTHbIn na3.
PncyHok 20
→ NombyTb 费Tkn NOd npOTouHOB BOdoN.
NIN
→ MbytB ΜeTKn B CTnpaJIbHoH MaunHe npn Temnepa-type do 60^
BHIMAHNE
Bo 6pem MoKu 8 cmupaHou MaUHe He uCnOJb3oBamb cpecmBa dna nonocKaHua. B pe3yIbMame npedomepaHaem noepexdeHue MUKpoeONOKOH u zemku coxpaniom ebICOKyIO 3ΦΦekmuBHOcMb oucMku. Zemku He npuzoDhbl dna cyuKu e cyuunbHou MaUHe.
PncyHOK 24
Pocne OuNCTKn NOMecNTb cUINHdpueckme UeTKN Ha CTaHcHIO napKObKn IN BbICyWHTb INx HA BO3DyXe.
→ PpeBapnteIbHO OTKaB cIINHdpueckne IeTKN, MOxH0 COKpaTb Bpem cyuKN.
→ Ecni daJIbHeIaIeKcNJIyTaIaIy ycTpoIcTba He npEydCMOTpeHa, TaKke OuNCTNb KOKyX Bn6paIOnHOHHOJrONOBKn 6ak JnI rpr3HOBBobl.
OuHCTnTb npBOD uINHdpuecknx ueTOK BnaXHOI TKAHbIO.
Mooucne cpeicTba n cpeicTba IyxoDa
BHIMAHNE
Icnonb3o8aHue HnOdoxOaux Moouux cpeocme unu cpedcme dny yxoda moKem noepedumb ycmpoucmeo u npueecmu K anHHnuPob8aHu 2apaHmuu.
Yka3aHne
Pn Heo6xOaMIOCTn INa OUcTKn IOnOB NcNoJIb3OBaTb MoUeNe CpeCTBa IIn CpeCTBa INa yXoJa.
Co6JIIODaTb INΦOpaMuIPOn3BOaNTeJIa OTHOcITeNbHO Do3NpuOBaHm MOUeIero CpeIcTBa n cpeIcTBa dny yXoJa.
Bo n36exkHne neHoO6pa3oBaHnB pe3epByap DnIy NCTOn BOdbI CHaJaHaJIb Tb NCTyIO BDOy, a NOTOM MOUe e CpeDCTBO IIN CpeDCTBO dJIy yxo-da.
→ Yto6bI He npebBicntb OTMeTky «MAX» B pe3epByape nla YnCToB OdbI, BO Bpemr erO HanoJIHeHnOCTABJIb MeCTo dI Ma MOUeero CpeDCTBa IINcpeDCTBa nn yXoJa.
POMOuB Bcnyuae HenoJaDoK
HeicnpabHocTn qacto ImeHOT npocTbe npuHbI M Omyr yctpaHraTbc CaMOCTOReTbHO C NOMOJIbO CneDyIOUeO pykoBOcTa. B cnyae comHeHHaN IIN BO3HKHOBeHHN HeONICAHHbIX 3Decb HeicnpabHocTe CneDyET o6paatbcB ynoJHOMoehHHy cnyk6y cepBnCHOro 06cnyKunBaHHa.
AkkymyTop He 3apxkaetc
3apnHbI WTeKep / cTeBaI WTeCenbHaB BNka NOKnOeHa HnPaBnHo.
→ IpaBnIbHO NOKNIQUHTb 3apAHyI WTeKepe / ceTeByIO WTeNCJIbHyIO BnIKy.
YcTpoIcTBo He BKJIIOHuaeTcA
AkkymyIaTOp pa3pIKeH.
3apAaTb yCTpoiCTBO.
PpOBepntb, BCTaBnEH nI 3apAHyI Ka6eJIb BycTPOINCTBO.
OTCOEINHtB 3apAINbI Ka6eNb, TAK KAK npn noKJIIOueHHOM 3apAINHom Ka6eJe pa6oTa yCTpoiCtBa HEBO3MOXHa.
CBeToaHbI HnKKaTOp HeNCpBaBHOCTe
Cambn HxHn CBeToNOm Mtrae TpN BkIOueHm yCTpoiCTBa, a yCTpoiCTBO He 3anyckaetcra.
AkkMyJrTop pa3pJKeH.
→ 3aPAnTb yCtpoNCTBO.
BceCBeToDIOObI6bICTPO MmraOT OHOBpeMeHNO.
■ DniratEnb yctpoiCTBa 3a6IOKnpoBaH (Ha npimep, n3-3a Ype3MepHO DaBHeHna HcIINHdpueckne uetkn nn n3-3a Hae3da Ha cTeHy / yroJ).
BbIKIOHTb n CHOBA BKIOHTb yCTPOIcTBO.
IcnoJb3ObaHne HnpaBnIbHoro IJIu HeucnPabHO-ro 6Joka NtAHn.
IcnoIb3ObaTbOpnHaHbHbI6IOkaNTaHna/ 3aMeHHTb HncnpaBbI6IOK NTaHna.
TpncBcTeOnoJa 3aRopaHOTcNooUepeEno C nHTepBaJOM B1 cekyHdy.
YcTPOIcTBO CnNtKOM TOpRyee BO BPeMg NcNoJIb-3OBaHnra (HaNPmep, npu pa6ote npu BBICOKNX TemnepaTypax OkpykaIouei cpebl).
→ CdeNaTb nepepbIb I daTb ycToiCBy octbITb.
Ecn yctpoCtBO eue N BBIKJIOUaEcTcA:
→ CdeNaTb nepepbIb I daTb yctpoiCTBy octbl.
YcTpoIcTBo HE BKNIOuHaeTCa, NOKa He OCTbIHET.
CINHdpnueckne 8eTKCNiHKOM cyxne.
LnnHdpueeckne 9etkn HeoctatoouHO yBnaXHeHbI.
YbnaJxHeHne zinHnpuecknx TeTOK nyTeM MHOrOkpaTHoro nepemueHn BnpeE n Ha3aHa oHOM MeCTe.
YcTpoIcTBo He co6npaet rpa3b
B6ake nIy uNCToB BObI OTCyTcTByeTOBa.
→ ΠΟΝΤΑν BΟΥ
Pe3epByap IJIa YIcTOn BOIbI yCTaHOBJIeH B yCTpoiCTBe HnpaBnJIbHO.
YCTaHOBNTb pe3epByap IJIyIHCToB OdbI TAkIM 06pa3OM, yTO6bl OH npOuHOr depXaNCr By yCTpoiCTBE.
LETKOTCYTCTBYOTNJYNCTAHOBJIeHbHEnpaBnIbHO.
YcTaHOBnTb ⅢeTKn HnN BkpyTnTb INx DO ynpa B depKaTeJI.
UeTkn 3aqrpa3HeHbI NnNn3HOWeHbI.
OuHCTnTbIeTKN.
N
3aMeHHTbIeTKN.
MoUoee cpeIcTBo He IobabJeHo, HenpaBnIbHO Do3HpoBaHO INN NcNOJb3OBaIOcB HenpaBnIbHOe MoOuooee cpeIcTBo
IcnoIb3OBAbToIbKO MoIOUIne CpeIcTBA KARCHER u cIeINr 3a npaBnIbHoi Do3npoBkoI.
KoJyX Bn6paHOnHO rOIOBKn yCTaHOBneH HeIpaBnIbHo
→ PpoBepntb npaBnIbHocTb KpeIeHnKoKxyx Bn-6paunOHnroIOBKn. Jnra 3TOrO ChrTb KoKyx n BCTaBnTb eRO CHOBA.
06pa3oBaHne neHbI B rOJOBKe HHa noJy
Yka3aHne
He3NaHTeJIbHoe neHOo6pa3OBAHne B BN6paCIOHHoI rOIOBKe BO BPem pa60tbi ABJnETCa HOpMaJIbHbIM I He OKa3bIbAeT HeratNBHO BRnHnHa pa60Ty yCTpoiCTBa. DOnONHInTeJIbHbIe Mepbl Heo6xOIMbl TOIbKO npu Ype3MepHom neHOo6pa3OBAHn (HaNPmEp, nIoocbl NeHb Ha NOly).
HenpaBnIbHOe MOIOoee cpeCTBO nIN HEnpaBnIbHaJdo3npOBka.
IcnoIb3OBAbToIbKO MoIOuIe CpeIcTBA KARCHER n cIeIITb 3a npaBnIbHOJ Do3npOB-KoI.
PpHcHn DeHCTBn yCTPOINCTBa OCHOBaH Ha ydaIeHNrpa3n CO UTeK. PpN 3TOM rpa3b N OCTaTKn MOUxhCpeDCTCB HANOJIbHbIX NOKpbITNI CO6npaOTcB B 6akeДЯг rpa3HOB BoDbI. PpN ONpeJeHHbIX YcIOBnX MoJKe T pOncxOoNTb 6pa3OBaHne NeHbI.
TtataTeIbHO ONUCTNTb UINHpUeCKne UeTKN OT rpa3n NOCtaTKOB MOIOeRO CpeDCTBa.
PncyHOK 25
PncyHOK 26
PncyHOK 27
→Пи сиьномпehoo6pa30baHnnepeДнayalOM npoceca y6opkn haInTb FoamStop B nycToB 6ak ДЯгязнов BObl. Co6NIOaTb INHΦOpMaunO Odo3npoBKe Ha 3TuKeTke 6yTBJIKN.
HeydOBtBOpTeIbHbI pe3yIbTaY6opKn
LINHdpueckne 3aqr3Hebl.
OuHCTnTbIINIHdpNueeCKneIeTKN.
LHnHnpueeckne 8etKn HeoocTaOuHO yBnaXHeHbI.
YBnaJxHeHne zINnHnpuecknx IeTOK nyTeM MHOrOkpaTHoro nepemueHn BnpeI n Ha3aI Ha oHOM MecTe.
HenpaBnIbHOe MOIOUee cpeCTBO nIN HEnpaBnIbHaJdo3npOBka.
IcnoIb3OBAbToIbKO MoIOUIne CpeIcTBA KARCHER u cIeINr 3a npabInbHoi Do3npoB-KoI.
Ha noJy npncyTCTBYOT OCTaTKI NOCTOPOHNX MOIOxN cpeIcTB.
TtataTeNbHO ONUCTnTB UINHdpNueCKne UeTKN OT OCTaTKOB MOUoIero CpeIDCTBa.
HeckoIbko pa3 NOMbITb NOc N NOMOu yCTpoiCTBaNCHbIX UINHdPnueeCKNX UETOK 6e3 NcNOJIb-3OBaHnMoUcero CpeCTBa.3To NOMoxet ydaJNTb OCTaTKn MOUcero CpeCTBa C NOla.
LINHdpnueckne etsKHeBpaaIOTc
LHnHdpueckne 6nOKpyOTcA.
→ CHaTb CUNHnHpueckne UeTKn n npOBepntb, He 3actprn Hn B Hnx KaKo-1n6o ppeMeT.
→ PpOBepntb, yTo6bluHnHdpueckne uetkn 6bln BBnHHeBb B depKaTeN uetOK do ynpa.
→ PpoBepntb npaBnIbHocTb KpeIeHnKoKyxa Bn-6paunOHHOJIOBKn.ДЯ 3TOrO CHrTb KoKyx IN BCTaBnTb erO CHOBa.
BodonorlooseHne He onTmAbHoe
KoJyX Bn6paUONHOI rOIOBKn yCTaHOBneH HenpaBUNbHO
→ PpOBepntb npaBnJIbHOCt b KpeIeHnKoKxyBa B-6paunOHHO rOIOBKn. Jnra 3TOrO CHrTb KoKyx n BCTaBnTb erO CHOBA.
LHINHdpueckne uetkn n3HOweHbI.
3aMeHnTbIJIINHdPnHeCKneIeTKN.
N3 yctpoiCTBa BbITEKaeT rpa3HaB BOda
Pe3epByap IJraIrp3HOB BOdbI nepenoJIHeH.
→ Cpa3y je onopoxHHTb pe3epByap nra rpa3HOI BOdbl.
Pe3epByap IJIg rpa3HOB BObI yCTaHOBnE H yCTPOiCTBe HnPaBnBHO.
→ IpoBepntb, nIOTHO Jn npIneraet KoxyxB6paLIOHHO rJOBKn K 6aKy dny rpr3HO BODbl.
→ PpOBepntb, YTO6bl 3acJIOHN 6aKa dJn rpa3HOI BObl 6blnn npabNJbHo 3akpbITbl.
Cbe m pyuKc 6a3oBoro yctpOuCTBa
BHIMAHHE
Iocne c6opku He cHumamb pyky c 6a3o020 ycmpoucmea.
Chumamb pykyc 6a3o020 ycmpoucmea paapeeHo monbko 8 mom cnyae, ecnu ycmpoucmeo omnpaenemcna cepuechoe obcykubane.
PncyHok 28
CM. pncyHOK B KOHue pyKOBOdCTBa IIO 3KcNlyaTaUIN
BCTaBnTb OTBepTKy NOJ yrIOM 90 rpaIycOB HHe6oJIbWoE OTBepCTne Ha 3aIHei CTopoHE pyKu IN CHaTb pyKy.
BHIMAHHE
Cneodum 3a mem, ymo6bi He noepedum coeduHumenbHbui Ka6enb Mexdy 6a3oebim ycmpoucmeom u pyko.
TexHHueckne daHHbIe
3neKtpnueckoe noDcoeHHeHne
HappxeHne 100-240 V
1~50-60 Hz
CTeneHb 3aunTbIPX4
Pn6op
Knacc 3aunTbI III
3apndnoe yctpoonCTBO 1800 MM
H320mOobumenb ocmaaern 3a co6ou npaeo BHeceHu mexHuueckux u3MeHeHu!
Tartalom
www.kaercher.com/REACH
Szallitasi tétel
www.kaercher.com/REACH
Obsah dodávky
- FC 3 Cordless
** FC 3 Cordless Premium
Montáž
Illustrate 1
Listu rukojeti nasadte na zakladni pristroj az na doraz, dokud slysitelné nezaklapne. Lista rukojeti musi byt pevnes usazena v pristroji.
Uvádení do provozu
Illustrate 2
Pro zajisteni stability postave pristroj do parkovaci stancice.
Montáz valcú
Illustrate 3
www.kaercher.com/REACH
Dobavni obseg
Obseg dobave Vase naprave je prikazan na embalazi. Pri jemanju stroja iz embalaze preverite popolnost vsebine.
Pri manjkajocem priboru ali transportnih skodah obvestite VaSega prodajalca.
Nadomestni deli
Uporabljaje samo originalen pribor in originalne nadomestne dele, ki zagotavljo varno in nemoteno delovanje naprave.
Informacije o priboru in nadomestnih delih najdete na www.kaercher.com.
Garancija
www.kaercher.com/REACH
Zakres dostawy
www.kaercher.com/REACH
Articolele livrate
Pokyny k zlozeniu (REACH)
www.kaercher.com/REACH
Rozsaḥ dodávky
Rozsah dodávky vásho zariadenia je zobrażny na obale. Pri vybałovani skontrolujte uplnost obsahu balenia.
Ak niedtoré diely chybaju, alebo ak zistite skody vznik-nute pri preprave, informujte prosim o tom predajcu.
Nahradne diely
** FC 3 Cordless Premium
Montáž
Obrázok 1
www.kaercher.com/REACH
Opseg isporuke
www.kaercher.com/REACH
Obim isporuke
Sadržaj isporuke Vaseg uredaja je prikazan na ambalaži. Pre vadenja uredaja iz ambalaže proverite da li je sadržaj potpun.
Ako pribor nedostaje ili je došlo do ostećenja prilikom transporte, molimo da o tome obavestite svog prodavca.
Rezervni delovi
19 Suzbijač pene FoamStop 30 ml
9** Valjci za cisćenje 2x
- FC 3 Cordless
** FC 3 Cordless Premium
Montaža
Slika 1
Letvicu rucke postaviti do graničnika u osnovni uredj, sve dok Čujno ne nalegne. Letvica rucke mora da Čvrsto leži u uredaju.
Upotreba
Slika 2
Zbog stabilosti uredaj odložiti u stanicu za parkiranje.
Montaža valjaka
Slika 3
Valjke za cisćenje postaviti sve do graničnika na držač za valjke.
Voditi računa o oznakama boja na unutrasnjoj strani valjka i držaču valjka na uredaju (npr. plava na plavu).
Nakon ugradnje proveriti da li su valjci za ciscenje cvrsto nalegli.
Postupak punjenja
Slika 4
Kabl za punjenje punjača utaknuti u uticnicu za punjenje na uredaju.
Utaknite strujni utikač punjača u uticnicu.
Slika 5
■ Kontrolne LED lampice prikazuju aktuelno stanje napunjenosti baterije.
Kod punjenja potpuno ispražnjene baterije, trepere sve 3 LED kontrolne lampice jegna za drugom odozdo prema gore.
Kod punjenja baterije od 1/3, trajno svetli donja LED lampica, a gornje dve LED lampice i dalje trepere.
Kod punjenja baterije od 2/3, trajno svetle donje dve LED lampice, a gornja LED lampica i dalje treperi.
Nakon sto je baterija u potpunosti napunjena, svetle 3 kontrolne LED lampice konstantno još 60 minuta. Nakon ovog vremena se kontrolne LED lampice gase.
Slika 6
Nakon punjenja izvaditi strujni utikač iz uticnice, a kabl za punjenje iz uticnice za punjenje.
Dopunjavanje rezvoara sveže vode
Slika 2
Uredaj ostaviti na stanici za parkiranje.
Slika 7
Uhvatiti rezervaor za svezu vodu na udubljenju za drzanje i izvaditi iz uredaja.
Slika 8
Otvoriti zatvarač rezervoara i okrenuti u stranu.
Slika 9
Rezervoor sveze vode napuniti hladnom ili mlakom obicnom vodom.
Urezvoar za svezu vodu, po potrebi, mogu da se napune sredstva za ciscenje odn. negu kompanije KARCHER.*
Oznaka "MAX" ne sme da se prekorači prilikom punjenja.
Zatvorite zatvaračrezervoara.
Slika 10
Rezervoor sveze vode stavite u uredaj.
Rezervoor sveze vode mora da cvrsto lezi u ureduju.
PAZNJA
*Obratiti paznju na preporuku za doziranje sredstva za ciscenje odn. negu.
Rad
Opste napomene o rukovanju
PAZNJA
Slika A
Ure'daj moze da prihvati samo osu'senu prljav'stinu i tecnosti (maks. 140 ml).
Slika B
Pre početka rada pod omesti ili usisati. Na taj nacin se sa moda uklanjaju nečistoco odn. Čestice još pre početka vlažnog Čišćenja.
Pre primene ureda ispitati na neprimetnom mestu da li je pod otporan na vodu. Ne cistiti podloge koje su osetljive na vodu kao npr. netretirane podove od plute (technost moze da prodre i osteti pod).
Slika C
Yka3aHn3a6e3onacnoct. BG6
OnncanHe Ha ypea BG 10
MoHTax BG 11
Iyckane B ekcnnoataunr . BG 11
Ecknoataua. BG 11
PnKn n PndpBxka BG 12
www.kaercher.com/REACH
06em Ha DocTaBkata
06embT ha doctabka ha ypea e n3o6pa3eh Ha onakobkata. Ppi pa3onakobahe npobepete daJn cbdbpXaHHeTo e nbJHo.
Pn nnncBaun npHaJnxHocT nnn np TpaHcnpTn Hne MoJyBeDomTe Baunr TbproBeu.
Pe3epBn qactn
I3non3BaIte cAmO opuHnHaHn akcecoapn OpuHnHaHn pe3epBn Yactn, NO To3n HauH NocrypRaTe 6e3onachata n 6e3npo6mHa ekcnloataun Ha ype- da.
Moxete da hamepinte uHOpMaζη 3a akcecoapu nepe3epBn yactn Ha www.kaercher.com.
TapaHcIa
BbB BcKa CtpaHa BaxaT rapaHnOHHNe ycNoBn, ny6nkyBaHn OT OToPn3npaHata OT Hac nucTp6yTopckaΦnpMa. EBeHTyaHn NOBpei Ha BaWn ypei OTeCTpaHm B pAmKITE Ha rapaHnOHHN cPoK 6e3nIaTHo, aKO CE Kacae 3a DeΦeKT B MATEpnaJIte NIn Pn npOn3BOJCTBO. B rapaHnOHeh cnUyai Ce o6bPheTe KbM DnCTpn6yTopa INN Hau-6n3KnO TOpn3npaH cepBn3, KaTO npEdCTabNTe KacOBaTa 6eJekka.
(AdpecnTe 电 Hamepnte Ha 3aHaTa cTpaHnua)
CnmboJnHa ypeJa
ATTENTION

BHIMAHVE


Braakhof Fruehner Tach
Ipu nblneHa pe3epboapa 3a yucma ooda no 6peMe Ha paobumme no noucmbeHe,MOra, cna38aume cneHuaHaun Ha deucmbue:
1.
PbRBO n3npa3HeTe pe3epBoapa 3a MpbcHa BOda.
2.
Cnei TOBa HAnbJIHHepepeepBoapa 3a YnCTa BODa.
yka3aHnna 3a6e30nacHOCT
- OcbeH yka3aHura m b moBa pkoBODcm6o mpr6ea da ce cna3bAm u obuOBAuDhume 3akOHodameHnU npednucHa 3a 6e30nacHocm u npedna3BaHe om HeuaCmHu cnyu.
- Празуредимнente у укаламениме мбелку на ураза дам вожи нальсвuar за бezona са рабома.
CTepeHn Ha onaCHOCT
ONACHOCT
Yka3aHue 3a HenocpeDcmeHo 2po3ra 0nacHocm, KoamO 8odu do mekku melechu Hapa-HaHaHua uUdo cMbpm.
△PPEdYIpEJKDEHNE
Yka3aHue 3a 6b3MOxHa onaHa cumyaun, kOmo moKe da doeede do mexku meJeCHu HapaHraHua unu do cMbpm.
△ПЕДПА3ЛИВОСТ
Yka3aHue 3a 6b3MOxHa OpaCha cumyauzra, KoJMo MoKe da doBeDe do neku HapaHyaHua.
BHUMAHNE
Yka3aHue 3a 6b3MOxHa ONaCHA cumyauzra, KoAmo MoKe da doBeDe do MamepuanHu uemu.
EneKtpnueckn KOMNoHENTN
ONACHOCT
He nomanmayme ypeda ebe boda!
Ipeu u3noJ36aHe yepa u npunadJeKHoCmume da ce npoBepam 3a cboBem-cmbaUO Ha u3ucKbHua ma cbcmohue. Ako ypebIm He e oMluHcBcMoHue, u3- noJ36aHemo My e 3a6paHeHO.
CmeHeme 3apdHomoycmpoumc6o u 3apejdauuaKa6eI npu budmu ypejda-Hnra He3a6aHo c opuzuHaJIHu YacMu.
■Прededвсякakbu paobmu no nodopbЖkama ypedbm da ce
u3KJIIOU8a u UeIcENb m da ce u3BaJka om KOHmakma.
PemohmHume deuHocmu no ypeda da ce u3bpuwam eduHcmeHo om omopu3upaH cepu3.
Ypeobm cbobpka eJeKmpu-uecku KOHcmpykmuBu Hne-Mehmu - mo' He mpaBa da ce noucmba noD meuaa ooda.
He nocmae me npoeodu npedmemu (Hnp. ombepmku unu noo6hu) 6 bykca ma 3a 3apejdahe.
He dokocbaume KOhmaKmu unu kaBenu.
LumupaHomo bpxy muo-ama mabeka HapexeHuempra6a da cbomemcmaHa HapexeHuemo 3a 3a-xpaHeaHe.
3axpaHbauuKa6eI da ce ce dbpna 6nuzocm do ocmpu pb6oe u da ce npumucka.
△PENEYNPEXKDEHNE
C8bp3baHemoHa ypeda e n0360JeHO cAmO KbM eIeKmpuuecku u360o, u3nblHeH om eIeKmpouHcmaJamop cb2aJacHo IEC 60364.
CbP3Baume ypeda camo KbM npomehnue mok. HanpeXeHuemo mpa6ba da cboemcma Ha nocouehomo Ebpxy qupmehama ma6eka Ha ypeda.
■ По пчну Ha cu2ypHoc-mma npuunno npenopb4-ame 3adeucmbaHemo Ha
ypeda npes3 3aumno npucnocobeneue 3a naooe haNPexeHuemo (MaKc. 30mA).
3apyIHO yCTpOiCTBO
ONACHOCT
Onachocm om mokoe ydap.
Hukozha He dokocbaume uencena u KOhmaca c 6naKHu pbue.
3apraHomo ycmpoucm8o da He ce u3noJ3Ba 6 3aMbpceHo UJIu MOKpo CbcmOHaue.
3apno ycmpoucmeo da He ce u3no36a 6b8 63pu600- nacha cpea.
3apraHomo ycmpoUcM8O da He ce Hocu 3a MpeXkoBua Ka-6eI.
3apraHomo ycmpoUcmeo mpa6ba da ce u3noJ3Ba u cbyxpanya camo b cyxu noMeueHua.
Mpeko8ua Ka6eI da ce na3u om monnHa, ocmpu pb6o- 6e, macna u dbuxeu ce yacmu Ha ypeDu.
Ja ce u36a6am yobjxumenu c pa3knOhumenu u eHO-6peMeHna ekCnNoamauuaHa noBee ypeDu.
I Iencelume da He ce u3aX-kam nopecmbom u3bpnahe Ha MPekosu Ka6en om KOhmaKma.
3aprHomo ycmpoUcmo da He ce nokpuu u behmuna- zuOHume omepu Ha 3a-prHomo ycmpoUcmo da ce dbpxam cbo6oohu.
Ja He Ce omBapr 3apdHomo ycmpoUcmBo. NoppaKume
da ce u38bpuwam camo om cneuau3upaH nepcoHaJ.
3apraHomo ycmpoUcm8o da ce u3noJ36a camo 3a 3apeKdaHe Ha no36OJehama akyMymamopHa 6amepu.
CmeHeme 3apdHomoycmpoucmeo u 3apejdaunka6en npu budmu ypejda-Hnra He3ababHo c opu2uHaJIHu yacmu.
AkymylaTopha 6aTepen
ONACHOCT
Opanchocm om mokoe ydap.
He u3naaume bamepuma Ha cunHu CbHue6u Ib4u, Xe2a UU O2bH.
△PENyPExKDEHNE
3apejdaume akymulupaama bamepuca mo c npuno-JeHOMO opuzuHaJIHO 3apdHo ycmpoUcMBO uIc pa3peweho om KARCHER 3a-paHO ycmpoUcMBO.
I3noJ36aUme cJeDnua aadan- mep:
He omeapnme 6amepu- ma,cbuecmeyba onachocm om KbcO cbeDuHeHue,do- nIbHumeHNO mOzam da u3- mekam dpa3Neu npu unu pa3jkaa mu mehocmu.
Cnrgpno 6opabeHe
ONACHOCT
Iompebumenmmpa da u3noJ3Ba ypea no npedHa3-HaueHue. Tou mpaea da 63eme nod bHumaHue Mecm-
Hume ycnoeua npu pa6oma cypeda da bHmaba 3a xopa-ma,HaMupau ce 6bnu-30cm.
3a6paHa e ekCnIooamauia 8 30Hu, 6 KOUmo UMa ONaC-Hocm om ekCnIIO3uu.
Ipu u3no3BaHe Ha ypeDa e Opanchu 30Hu cna3BaUmme Cb- ombeHume npednucnua 3a 6e3oPacHocm.
He u3noJ3BaUme ypeDa, aKo npedu moBa e naDHaI, aKO e buDumo ypeDeH uIu He xepMemuyeH.
I Dpbjxme onakobvHomo oOJnuo daJeue om obcea Ha deua, cBueecmByea onac-Hocm om 3adywaBaHe!
△PENEYNPEXKDEHNE
Ypeobm He mpra6ba da ce u3- non3ba om deua, mnaDEXku Unu Heomopu3upaHn luca.
To3u ypeo He e npedHa3Ha-uen 3a moBa, da 6bde u3-n0n38aH om luua c o2paHu-ueHu fU3uyeCKu, ceH3OpHu uyMcmBehu cnoocmU u lunca Ha onum u/uIu Lunca Ha n03HaHua, ocEeH aKO me ca noD had3opa Ha om2oBa-paio 3a mXhama be3onac-Hocm luue unu ca nOyuunu om He2o UHcmpkyuu, kaKa du u3noJ36am ypeo.
- Deuama He bua da upaam cypeda.
Ieua mpr6ba da 6bda m nohad3op, 3a da ce zapaHmupa, ye Hma da upaam cypeda.
I pybXme ypeda daJeue om deua,doKamo e bKnHoueH uu doKamo ose He ce e oxnaudun.
I OoucmbaHem o u nooDPbKkama om cmpaHa Ha nompe6umen He bua da ce u3-6bpwam om deua be3 HAD30p.
Pabomeme unu cbxpanhau me ypeda cmo bcbomemcBue c onucahuemo pecn. u3o6paKeHuemo!
△ПЕДПАЗЛИВОСТ
Ipedu bcuku deuHocmu c uuu no ypeda ycmaHOe me ycmoUyuOcmma, 3a da npedomapume 3noNolkyu uu ypejdoHn npadu na-dane Ha ypeda.
Hukozha He Hauueaume b8e 6oDnua pe3epboap pa3m6Opumeu,cbobpxau pa3-m6Opumenu meuHocmu uHn Hepa3peDeHu Kucelunu (Ha np. Noucmbau npenapaMu,ben3uHObU ob3ueemuMeu u aemOn),mbu kamo me ue pa3aam u3noJ36a-Hume b ypeDa MamepuaJU.
Hukozha He ocmaaume ype-da 6e3 ha3op, dokamo pa-bomu.
Дрьжme уacmu om mялomo (kamo kocu, npcbmu) daney om bvpmaume ce noucm- bauu bannu.
IopoBpeMeHaNoUcmbaHemo Ha2naBama 3a noD na3eme Pbueme cu, mbuKamo uma onacncm om Hapahyahe
om ocmpu npedmemu (Ha np. cmpykku).
Дрьжme cБьрЗваця кавел далаче om monnua, ocmpu рьбоerte, macno u deuxeuzuce yacmu Ha ypedu.
BHUMAHNE
Bknoubaume ypeda camoako ca nocmabeHu pe3ep8o-apbIm 3a yucma u pe3ep8o-apbIm 3a Mpbcha boda.
Cypeda He mpa6ba da ce no-emam ocmpu uuu No-20JeMu npedMemu (Haep. cyyneHu Heua, KaMbyema, yacmu om u2paqu).
He haIuBaUme b pe3epBo-apa 3a yucma boda ouemHa KuceJIuHa, npenapam 3a no-yucmbaHe Ha KompeH KaMbK, emepuHu Macna Upu NodobHu beuecmba. Cbuo maka BHumabaUme me3u vece-cmba da He sbdam noemu.
I3noJ3BaUme ypeDa cAmO 6bpy m6bpdu nodoBe c 8o- doycmouuBo nokpumue (Ha np. JaKupaH napKem, eMauiupaHu nnOuyku, luHoJIeym).
He u3noJ3BaUme ypeDa 3a noUcM8aHe Ha KuJUMu U nokpumC KuJUMu NODoe.
He npekapbaume ypeda bpyx npodobaama pewemka na KOHBeKmOpHu omOnIumEnHu ypedu. N3muauama Boda He MoKe da ce noeMe om ypeda, ako ce omEeJda npes pewemkama.
Ipu no-npodbJxumenu npekbcHnHa pa6omama u cneoynompeba u3Knou- baume ypeda om 2naHnru npekbc8a/npekbc8aua Ha ypeDa u 3eaJdaume ue nceHa 3apdHomo ycmpou-cm80.
He pa6omeme c ypeda npu memnepamypu no0 0^
■ Πa3eme ypeda om dBxko. He 20 cxbpaHraume Ha omKpu-mo.
OnncaHneHaypeda
1пекьсачВКЛ/N3KЛ
2PbkoXBaTaKa
3 Ctehen npedna3nteI cpeuy npinnb3Bahe pkoXBaTKa
4 Pe3epBoaap Yncta Boda
5 YdIbI6OueHne 3a XBaUaHe - pe3epBoap 3a YnCTa BOda
6 He3do 3a 3apeKdaHe
7 Pe3epBoap MpbCha BOda
8 yIbIbOueHne 3a XBaAaHe NOUcTbau BaJAK
9Почистваши валяши
10 Kanak Ha rnaBata 3a noD
11 BLOKINPOBka Ha KaNaka Ha rnaBaTa 3a noD
12 INHnkaunHa 6aTeepnte
13 3apAINO yCtpoiCTBO cBc 3apekdau ka6eI
14 CtaHnna 3a napKnpaHe
15 MЯсто за сьханенье валяи
16*PouncTbau npenapar RM 536 30 ml
17**IouncTbaa npenapat RM 534 30 ml
18** POnucTbauI npenapar RM 536 500 ml
19 AntineneHntel FoamStop 30 ml
9Почистваши ваяяи 2x
* FC 3 Cordless
FC 3 Cordless Premium
MoHTax
Φuγpa 1
NocTabete nlaHkata Ha pbkoxbatkata do ynop B ochoBnra ypei,doKaTo ce yye upaKaBaHe. PnaHkata Ha pbkoxbatkata Tpr6Ba da cTOn He- noDbNxKHO bypea.
NyckaHe B eKcINoaTaunia
Φnγpa 2
3a yctoynBOCT nocTaBete ypeDa B ctaHnraTa 3a napknpahe.
MOHTIpaHe Ha BaJIaIcIte
Φnγρa 3
NocTabete NOUcTBaUHTe BAJIuN B Hocaya Do ynop.
→ CneJeTe 3a UBeTHOTo CbBnaDeHHe Ha BbTpEshHaTa CtpaHa Ha BaJauNTe N DbpxKaHa NM Ha ypeDa (Ha np.CnHbO KbM CnHbO).
→ CneM MONTaKa npOBePeTe daIIN noNCTBaUHTe BAJIaCn CToRr HEnOdBNUKHO.
Ppoec 3apekdahe
Φnrgpa 4
BkIIOyTe Ka6eNa 3a 3apeKdaHe Ha 3apAHOTo yCTPOINCTBO B rHe3doTO 3a 3apeKdaHe Ha ypeDa.
NocTaBeteIeNcEHaHa3apAnHOyCTpOInCTBO B KOHTaKTA.
Φnrgpa 5
KoHTPOHHTe IaMnIcBc CBeToIDIO NOKa3BaT aK-TyaIHOTo CbCTOHNHe Ha 3apeXdAHe Ha akyMynpaUata 6atePna.
Pn3apejdahe Ha HanbIHO npa3HaT akyMyIpa7a 6atepna BCNUKITE 3 KOHTPOHn IaMn CbcCBeToIOoM MIRAT NocJeOBATeJHO OTDOy Harope.
■ПиЗapянHaakymynupaata6aTepeЯ1/3HaIДОЛHNYATCBETODNODCBETNIOCTOHHO,ДВATAropHN CBETODNODApODbJxKaBaT DaMIRaT.
■ПиЗapянHaakymynupaata6aTepeRn2/3Dbata DOJHNCBETODINOa CBETT NOCTOARHNO,HAI-ROPNITCBETODIOI npOdbJIkaBa Da MURA.
CneI kaTo akymunupaata 6aTepeHs 6bHe HnHnHO 3apeHeHa, Tpnte KOHTpOHn IaMn cbc CBeTOIOd CBETT NOCTOARHNO OSe 60 MNHyTN. Cnei TOBa BpeMe KOHTpOHnTE IaMn cbc CBeTOIOD n3rACBaT.
Φurypa 6
→ Cπeɪ 3apexkaHéTO n3BaIeTe Μεncεηa OT KONTaKta n Ka6ena 3a 3apexkaHé O T rHe3dOTo 3a 3apexKaHaHe.
Пьлне He Na pe3epBoapa 3a YnctTa Boda
Φuγpa 2
NocTaBeTe ypeDa B cTaHunrTa 3a npKnpaHe.
Φurypa 7
XbaHetepe3epBoapa 3a uCTa BOda 3a yIbI6oehneTO 3a XBaUaHe nTo I3BaIeTe OTypeJa.
Φnrgpa 8
→ OToBopTe KaNaUkata Ha pe3epBoapa n 3aBbPteTe HAcTpaHn.
Φurypa 9
DonbJIHeTe NOUcTBaaTa TeuHOCT
BHIMAHHE
Ppe du haHbIhme pe3epeoapa 3a yucma boda, moIy, u3npa3Heme pe3epeoapa 3a Mpbcha boda. Taka ce u362ea npelueaHemo Ha pe3epeoapa 3a Mpbcha bOda.
Bx. rnaBa , HanbIbaHe Ha pe3epBoapa 3a YnctTa BOda". BnKTe rnaBa , N3npa3BaHe Ha pe3epBoapa 3a Mpbcha BOda".
N3npa3BaHe Ha pe3eBOapa 3a Mpbcha Boda
Φnrgpa 2
NocTaBeTe ypeDa B CTaHcIyraTa 3a napKipaHe.
Фигура 15
→ HataHcHete 6IoknpoBkata Ha KaNaka Ha INaBaTa 3a noi.
→ CbaJeTe Kanaka Ha rnaBaTa 3a noD.
Фигура 16
→ ɪЗbaɪdete pe3epBoapa 3a Мрьса BoJa OT rɪnaBa-ta 3a noɪd.
Фигура 17
OTbOpTe KaNaUte HaI DBeTe KaMepn Ha pe3epBOapa 3a Mpbcha BOda.
→ ɪnʒpɑaʒhætpe3epBoapá 3a MþbchA Bɔda.
Фигура 18
→ NocTeKe Kanaka Ha rnaBata 3a noi npe3epBo-apa 3a Mpbcha BOda C BOda OT BOOnpoBOda cnopei 3ambpcaBaHTo.
KanauTe Ha DBeTe KaMepn Ha pe3epBoapa 3a Mpbcha BOda MORAT Da Ce CBaIaT IN NOUcTBaT OT- denHo.
NocTaBete OTHOBO KanaCHTe Ha DBeTe KaMepn Hape3epBoapa 3a MpbCHA BODa n Tn 3aTBOpTe.
Φuγpa 21
NocTabepe3epBoapa 3a Mpbcha BOJa B rnaBa-ta 3a nD.
Φnγρa 22
→ HaTnCHeTe 6nOKnPOBkataHa KaNaka Ha rnaBaTa 3a nOu nOcTabeTe Kanaka Bbpxy rnaBaTa 3a nOd, CneD TOBa OTnyCHeTe 6nOKnPOBkata.
Pe3epBoaapbT 3a MpbchA BoDa n KanakbT Ha rnaBata 3a NOD Tp86Ba Da CTOAT HEnoDbNkHO B, pecn. Ha ypeda.
PpeKbcBaHe Ha pa6oTa
BHIMAHNE
Ipu no-npodbnxkumehnu npekbcseahnha paobomama npenopbyeame ypedm da ce nocmaea 8 cmanuyma 3a napkupahe, 3a da ce u3beesham noepedu ha yecmbumehnu nodoe om enaxhume banyu.
Фигра 11
→ ɪnkrɪŋʊte ypeə, 3a ɛŋTa ḤaɪncHete npeKbCba-ya Bkʌ./ɪnkrʌ.
Φnγpa 2
TocTaBete ypeDa B CTaHcIraTa 3a napKupaHe.
I3KIOUOte ypeda
Hnrypa 11
→ ɪnɪŋypeɪa, 3a ueɪtə haɪnchete npekbcba-ya Bkɪ./ɪnɪ.
Φnγpa 2
NocTaBete ypeDa B cTaHcIyra Ta 3a napKupaHe.
BHIMAHHE
Cne npuknouhe Ha paobomama noucmeaume ype-da.
Фигра 14
AkoBpe3epBoapa 3a YnCTa BOJa NMa OSe BOJa, n3neIeTe J.
Φnγpa 15b 24
→ Πочисте peэзервога за мрьсна boда,kanaka ha rJaBaTa 3a NOД И NOчиствашиte BaJЯц.
Bx. rnaBa ,NouchTbaHe Ha pe3epBoapa 3a MpbcHa BODa".
Bx. rnaBa, NocntBaHe Ha rnaBaTa 3a noD".
Bx. TjIaBa, "OuNCTBaHe Ha BaJraUte".
CbxaheHne Ha ypepa
BHIMAHNE
3a da npedomepamume obpaayeaHemo Ha Mpu3Mu npu cknadupaHemo Ha ypeDa, hezoeume peepoapu 3a uMpca h oda mpr6ba da 6bdam Hanbno u3mooyenu.
Ocmae me mokpume banyu da u3cbxham Ha eb3dyx (Hanp. ebyx cmanzma 3a napkupahe), He cnaaume mokpu banyu da cbxham 8 zambepehu wkafoee.
Фигра 2
NocTaBeTe ypeDa B cTaHunrTa 3a napKupaHe.
Фигра 24
3a n3cyuabaHe noCTaBeTe MOKpuTe BaJauN Bbpyx CTaHnraTa 3a napKupaHe.
→ CbXpaHbAaIe ypeDa B cyxn NomeuHn.
PnKn nOaDpBxKa
NOMOUIpH HEN3npaBHOCTN
Mhoro yecTo npuHHnte 3a NOBpeDa ca enementapHn C NOMOHTA Ha cIeHNTE yka3aHn MOKe camn Da Tg OTCTpaHnte. Ako He cTe cnrypHn nN NOBpeDnte He ca ONNCAH TYK, ObPHeTe Ce KbM OTOpu3npaHn cepBu3.
Akymynpaata 6aTepy He ce 3apekda
IeNceTb3aapeXdaHe/uePcTHe e Cbbp3an npabnHO.
→ CbpxTe npabuHNo uencela 3a 3apeKdahe/ uencela.
YpeBbT He MoXe Da ce BkJIIOUH
Akymnynpaata6aTepe npa3Ha.
3apepeypeea.
PpOBepeTe daHn Ka6eNbT 3a 3apeXdaHe oue e npxHaT byepa.
→ 3BaTeKa6eNa3a3apeXdaHe, Tb KaTo pa6o-TaTa He e Bb3MOxHa npn PbXnat Ka6eN 3a 3apeXdaHe.
CBeToOnoHa HnDnKaun 3a nobpeda
PnB BKJIOUbaHTo Ha ypeHa HAI-DONHnT CBeTOINoM Mna N ypebT He cpa60Ta.
Akymynipaaata6aTepe npa3Ha.
3apepeypea.
BcUckn CBeToDIOOn MmTaT eHOBpeMeHHo 6b30.
YpeBt c6IoknapI dBrarTeI (Hap.nopaTn TBbpIe CInneH HATNCK BbPxy BaJIaIte IIN DBNJxHHe CpeUy CteHa/bTbJI).
→ ɪn3kʌŋoʊteɪ n Bkʌŋoʊteɪ OTHOBO ypeɪda.
I IOn3BaHe Ha HEnpaBnEn HIn DepeKTeH MpeXOB 1eNceI.
→ 3nnoJI3BaIteOpurHauJIeH MPeKOB uenCeJ/CMe-Hete DeΦeKTHMa MPeKOB uenCeJ.
Tpnte CBeToDnOda CBETT NocneIOBaTeHNO npe3 1 ceKyHda.
YpeBt e TBpIe HarpT no Bpeme Ha ynoTppe6a (Hanp. npn noJ3BaHe npn BucOKn OKoJIHn Tempepatyp).
→ HanpaBete nay3a n octabete ypeda da ce oxna- nn.
AkoocbeHToBa ypeBt ce n3KnIouBa:
→ HanpaBete nay3a n octabeTe ypeDa da ce oxJa- dN.
YpeBbT MoKe Da Ce BKNIOH OTHOBe EBa CneKaTO ce e OXnAaN IOCTaTBHO.
BaIaIcTe ca TBbPde cyXn
BanaIte He ca doctatbHNO oblaJxHeHn.
ObnaxhnaHe Ha BnAunTe Ype3 HeKoJIKKpaTHO DnHexHe HnpeD n Ha3aHa eHNO MRCTO.
YpeBt He Noema Mpbcotna
HЯma BOda Bpe3epBoapa 3a YnCTa BOda.
→ DOnbNaHe C B0da
Pe3epBoaPbT 3a YnCTa BOda He NoctabEn npabNIO HO ypeJa.
→ NocTaBete pe3epBoapa 3a YnCTa BOda Taka, Ye da cTOn HEnoDbNkHo B ypeJa.
IOnuCTBaUnte BaJIaUNIJIINCBaT IJIH He Ca IIOCTaBEHN npaBUNHO.
Nocabete nouchBaunte BaJau, peCn. 3aBnTe nouchBaunte BaJau Bbpxy Hocayd oynop.
IOncTbAunTeBaJnCa3ambpceHnnnnNHOceHn.
→Поунстete ПОУСТВациTe BAJIЯц.
→ Cmehete nouHCTBaUHTe BaJIaU.
3a6paBEN, HnnpBUNHO Do3npan NoocCTBaU npenapat nn e 6nn n3noJ3BaH HnnpBUNeH noocCTBaU npenapat
→ I3noI3BaIte cAmo nouIcTbaIu npenapaTu KARCHER n cneJeTe 3a npabUnHaTa Do3npoBka.
KanaKbT Ha rnaBata 3a noD He e npabnHO MOHTnpaH
PpOBepTe dani KanakbT ha rnaBata 3a noD e B npabINHO NOJXeHne. 3a ceNTa CBAIe Te KanaKa n ITO NOCTABeTe OTHOBO.
O6pa3yBaHe Ha nHa B rJaBaTa 3a noi Bbpxy noda
Yka3aHne
Iekoto 6pa3yBaHe Ha nHa B rnaBata 3a noD no BpeMe Ha ekCnNoaTaun e HOpMaHNO He BOuDo CMyueHnHa cyHKunra. Camo npn npekomepHo 6pa3yBaHe Ha Iha (Haep. IBuOn OT Iha No noDa) ca Heo6xoDMN DOJIbHNHTeJHn MEPKn.
HenpaBnIeN nouchTbau npenapat nn HennpaBnHa do3npOBka.
→ H3noJ3BaIte cAmo noUcTbAun npenapatn KARCHER n CneTe 3a npabunHaTa do3npOBka. HaHHT haФyHKuOnHpaHe Ha ypea ce ochobaba Ha n3CTbprBaHTo HA MPbcOTnraT a OT noUcTbaUnte BaJIaUN. PnTOBa MPbcOTnraT a OCTaTBUN OT noUcTBAUN ppenapATn OT noOBoNTe HAcTNKnCe cb6upat B pe3epBOapa 3a MpbCHA BOa. Pn OnpeJeHN o6-CToRrTeJCTBa TOBA MOKe Da DoBede Do o6pa3yBaHe Ha Iha.
NocTeOcHbOcB0daBaIaIeTeOTMpcoTnNOCTaTbUOnOTNoCtBaUnpenapaTu.
Φnγpa 25
Φnγpa 26
Φnγpa 27
→ PnCnHNO 6pa3yBaHe Ha nHa npeiHaayanoTo Ha npoceca Ha nouCTBaHe cInete FoamStop B npa3Hnpe3epBoap 3a MpbCa Boda. MoJ, cb- 6nIoudaBai Te HOpopMaunra 3a Do3npaHe, nocOeHa Ha eTnKeta Ha 6ytNkata.
Pe3yntaTbT OT nouchTaHHeTo He e do6bp
BanaIte ca 3ambpceHn.
→ TnouncTeTeBaIaIte.
Banrnte He ca doctaTbUHO OBJaxHeHn.
→ OblaxHbAHe Ha BaIaIe Ype3 HeKoJIkoKpaTHO DnBxKeHne HAnpei Ha3aHa eDHO MrcTo.
HenpaBnEn nouchTbau npenapat nn HennpaBnHa do3npOBka.
→ I3non3BaIte cAmo nouicTbaI npenapatn KARCHER n cneJeTe 3a npabunHaTa Do3npobKa.
Ha noda mma ocTaTbCn OT dpyrn nouchTbaun npena-paTu.
→ Πочистете Oсновно C Вoga валяцпес OT OCTaTB-LИ NTочистваши пpenapatn.
HЯколкпьтпочистete noda cype da nchtn BaJIaun,6e3 da nI3noI3BaTe nouchCTBaU npenapat. IToTo3nHaunCe npemaxBaT ocTaTbU nO nOuNCtBaUnn npenapATBbpxy noDa
BalaunTe He Ce BbptT
Banaune 6Joknapa.
→ Cbaane BaIaIe I npOBepeTe daII B Tx He ce e 3akneunnpedmet.
Повере Te Дди ВаляцITE ca 3abTu Do ynp Bbpxu Hocaya.
PpOBepeTe dAn KanakbT Ha rnaBata 3a noE B npabuHNO nOJoxHe. 3a ceNTa cBaIe Te kanaka n ro NoCTabeTe OTHBO.
IpoemaHTo Ha Boda He e ontmamnHO
KanakbT Ha rnaBata 3a noD He e npabnHO MOHTnpaH
→Поверете далиkanakbT ha rnaBata 3a noD e B npabINHO NOJOKeHne.3a ceNTa cBaIeTe kanaka n ro NOCTaBeTe OTHOBO.
Banrnte ca n3Hocen.
→ CmeheTeBaIaIte.
UpeBbT n3nycka MpbchA Boda
Pe3epBoaBt 3a MpbCnBa BOna e npenbJIHeH.
He3a6abHNO n3npa3Hete pe3epBoapa 3a mpbcha BOda.
Pe3epBoapbT 3a MpbcHa B0da He e B npabnHNo nolokHe Bypeda.
→ PpOBepTe daJI KanaKbT Ha rIaBaTa 3a NOI CTOn HEnoDbNkHO Ha pe3epBoapa 3a MpbCHa BOda.
PpOBepeTe DaJI NaKanAunTe Ha pe3epBoaap 3a MpbchA BOda ca npabuHIO 3aTbOpEHN.
CbaJrHe Ha pBkoXBaTKaTa OT OCHOBHnyaypei
BHIMAHHE
Cned canaobaeHem He cbaIme nooepe pbkoXbamKama om ochOBHua yped.
CeanHemHa pbKxamkama om ochOBnur yped MoKe da 6bde u3BpweHo cAmo Kozamo ypeBm ce u3npauna 3a o6cnykeane.
Φnrgpa 28
Bx. fnypata B kpar Ha pkoBOcTBOTO 3a ekcnnoata
NocTabete OTBepTKata noB bbl 90 rpaYca B MaIKn8 OTBOP OT 3aHaTcTpaHa Ha pbkoXBtKaTa nra CbaNeTe.
BHUMAHNE
Bhumabaune da he 6bde noepedeen cebp3eaumk Ka6en mexdy ochoehura yped u pbkoxaamkama.
TexHnueckn daHHN
| Еnéкtripочescу 3axpanbahe | |
| Hаржени 100-240 V | |
| 1~50-60 Hz | |
| Градус на зашита IPX4 | |
| Уре́d | |
| Клас зашита III | |
| Зарядно устroduстvo кlac заши- ta | II |
| Hоминална мошност уре́d 40 W | |
| Hоминално наржени 6bate- рия | 7,2 V |
| Тип батерия Li-Ion | |
| Вре'mе з ecspлноатць рprn пълно зараздане на заелета | 20 мин |
| Вре'mе з зараздане рprnpраз- на заерия | 4 h |
| Изхожащ наржени на за- радно устroduстvo | 9,5 V |
| Изхожащ ток на зараздною ус- туристvo | 0,6 A |
| Данни за мошностtra | |
| Овороти на валяц阴道 в минута 500 U/min | |
| Колчесстvo на пьленье | |
| Рezерbooар чinctа вoda 360 мл | |
| Рezерbooар мльсан вoda 140 мл | |
| Размeperи | |
| Терло (бeз посядожимости и почистваши точности) | 2,4 кг |
| Дылжina на 305 мл | |
| Широчина 226 мл | |
| Височина 1220 мл | |
| Дылжina на kaбега | |
| Зaporдану устroduстvo 1800 мл | |
3ana3eame cu npaeomo ha mexHuYeCKu U3MeHeHua!
Sisukord
Uldmärkusi ET6
Ohutusalased markused ET 6
Seadme osad ET 9
Paigaldamine. ET 10
www.kaercher.com/REACH
Tarnekomplekt
Selle seadme tarnekomplekt on kujutud pakendil.
Kontrollige lahti pakkides paki sisu.
Valtside monteerimine
Joonis 3
www.kaercher.com/REACH
Piegades komplekts
www.kaercher.com/REACH
Komplektacija
TexhiHxapakTepeNtKuUK15
3araIbHI Bka3IBKn

Ipeed nepuim 3actocybaHHm npi-ctpO npouHTaTn cIO opurihanbHy IHctpykciio 3 ekcnlyataqii, nicra zuoro diTn BiINOBiHO do Hei Ta 36epertn II dIra IoJaIbWoTO KopncTyBaHHa 60 daHacTyHOro BlaChnka.
PpabnIbHe 3actocybaHH
IolomnHa MaunHa npn3haeHa BKNIOUHO nIy Iu- HnBDOCTiKnx TBepnX niIIOROBn NOKPNTTIB y DOMaHbOMy rocnoapCTBi.
He BnKopncToBvBaTn dny uHEnr rirpockOniHnx noKpnTTIB, HapnKnad Heo6pOBeHnx KOpKOBx niIIOr (MOxNtBiCTb npocOeHHra BOJOrn i NOsKOdKeHHa NoKpTTT.
Pnpctpi npdaTn DnA qHHe HNBX, nHoneMy, Kepamuoi nnTKN, kameHo, npocoeHoro OOnBOIO Ta BOUeHoro napKeTy, lamHaTy, a TAKoK 6yNb-jkNx NiJI NorOBHX NOKpTTIB, He yUTINBnx Do BODn.
3axnt HABKoJIuHbOrO cepeDoBnua

MaTepiAnynyaKOBn nidaHbCn nepepo6ci dna nobTopHoro BnKOpucTahnn. Bynb naCa, He BnKaJaTe nakyBaNbHi MaTepiAn pa30m i3 do
MaHIM CMITTM, BiDnAte IX IIN NOBTOPO BIKOPNCTAHNA.
CTapi npncptoi MicTb KoWtOBHi MaTepiAnu, 10 nepepeo6nHcBcra, i peOBOHN, kI He nobHHi noTpanJrtn y HABKOnnHc cepeDobuue.3 1iEi npuHH npncptpi Ta akymyIaTOp, 0Mi
CTNtbcB HIM, He MOxHa yTnIi3yBaTu pa30m 3 N6yToBbMn BiXoDAMn. YTnIi3aUIO MOxHa npOBecTu 6e3-KoWTOBHO uepe3 MicueBi CnCTemPeunpkyIaI Ta 36Opy BiXoDiB.
Ihctpykuii i3 3acTocybaHHa KOMnoHeHTIB (REACH)
AkyaJIbHI BiIDOMOCTI IPO KOMNOHEHTN HabeJeHi Ha Be6-By3NI 3a aJpecoU:
www.kaercher.com/REACH
KomnJIeKTI noCTaHaHHa
KomnkeTaia npncTopo 3a3NaeHa Ha ynaKoBui. Pnpo3nakyBaHni npncToPO nepeBipuN KOMnKeTauio. Y pa3i HectaI DoaTKOBOro 6blaHaHHa 60 yUkoJXeHb, OTPmAHx Ni dac TpaHCnOpTyBaHHra, cNi nOBIomTe npo ue B ToproBehHy oprHa3auio, kA npodaIana anapat.
3aapanchi yactnHH
CniD BnKOpNCToBvBaTn NlWe opurHaJIbHi KOMPJIeKTyIoui Ta opurHaJIbHi 3anachi DeTani, TOMy IIOcame BOHr rapaHTyIOTb 6e3neuHy Ta 6e3nepe6iHy ekCnPyataciIO npunady.
IhOpMaJzI uOIO KOMNKeTyuOuNX Ta 3anachnx DeTaNei Micntbca Ha caTi www.kaercher.com.
TapaHTia
Y KOKHI KpaHII DiIOb yMOBn rapaHTII, HadaHOI BiNoB BIDHOO fipMOIO-npOaBcEM. HenoiaKn B po60ti npiCTPOIO MN ycBaEMO 6e3KOuTobHO npOTAROM TepMHy DII rapaHTII, kUIO BOH N BuKNKAnki Hi paKom MaTepiany Y NiOMNJkAMN BINOTOBHeHH. Y BInaKy UHHOI raPapHTII 3BePTITbcra Do npOaBcua Yn Hau6JIHKyABTOpN3OBAHm CepBicHNI cHTp 3 DOKymeHTaNbHM NiTBEpIXKeHHM NOKyKn.
(Adpecn nB. Ha 3Bopoti)
CnmboHnHa npucTpoi

ATTENTION
YBAGA
Ppu 3anoBHeHHI 6aka dny yucmoi bodu nid cac npubpanna dodepkyeamucmako2o nopadyk di:
1.
CnoaTky cnopoxHnTu pe3epByap dny 6pydnoi BOu.
2.
Iotim 3anOBHHTn pe3epByap dny chctoi BOIN.
ПразвILA 6e3пекn
- Pa30m i3 ekaziekamu e ui iHcmpykuii dny ekcnnyamaui cniD bpaoxoyamu 3a2aIbHi npabuna mexniku be3neku ma Hopmu dny nonepedxehn HneuaCHux bunaDKi8 32iHO 3aKOHoDaCmey.
Ha8hi Ha npuna di nonepedkybaIbHi 3NaKu ma ma6nucu daombeaxnuei bka3ieku dne 6e3neuoi eKcnnyamaui npuna dy.
Pibehb He6e3nekn
HEBE3NEKA
Bka3iBa Ka uoDo He6e3neKu, Ka 6e3nocepedHbO 3a2poKyE ma npu380dumb do mJxKux mpaM Yu cmepmi.
△NONEPEJXEHH
Bka3iBa uo do nomenuho MoxIuBoI He6e3neuHoi cumya- uii, uo moKe npu3Beecmu do mJkuxmpaM Yu cMepmi.
△OBEPEXHO
Bka3i8ka 0o0o nomeuHno He-6e3neuHOcmyaui,ka MoKe cnpuuhmu ompumahnna neKuxmpaM.
yBAGA
Bka3iBa uOdo moKJIueoI noMeHciUHO He6e3neuHi cUmya-ui, uO MoKe cnpuHuMu MaMepiaIbHi 36umku.
EneKtpnHi KOMNoHEnTn
HEBE3NEKA
He 3aHypioamu npucmpiu y body!
■Перед bukopucmaHЯmpebipme HaJexHu cmaH npucmpo10 ma obnaDHaHnY. JaKUO obnaDHaHHa 3haxo-dumbcy y He6e3do2aHHOMy cmaHi, uO2O He MoXHa buKOpucmoByamau.
YbunaDkyaH02o nowkod-JxHHa3apdH02o npucmpo1o 33apdHUMKa6eIemix mpe-6a HezaHObamihumu opuziHaJIbHUMU yacmuHaMu.
IiD yac npoBeDeHn86yob- kux po6im 3 do2Jy ma mexHiHo2o Obcny2OByBaH
HЯ anapam cnid bumkhymu, a Mepekebu wHyp - bumraMu 3 p03emku.
Pobomu 3 peMoHmy npunaody moKymb npoBodumucra nuwe aemopu308aHOIO cIyX6OIO obcIy2OByaHnRA KJIeHmIB.
■ Пучши мас[eilekmpuHi KOHcmpykmuHi eIemehmu, momy uO2o He moXHa Mumu nid npomouHO bODO!
He cmaaImu cmpymonpoBidhi npedMemu (Haep., BuKpymka a6o noDiHe) y 2Hizdo 3apAeku.
He mopkamucra do KOhmaK-mie a6o mpybo npofoiB.
3a3haeHa Happya Ha 3a-6oocbkiu ma6luuci i NobuHna 36iamucr 3 HappyoU y po-3emui.
He myaHymu 3'edHyeaJIbHu uHyp yepe3 zocmpi kymu ma He 3amuckamu uO20.
△NONEPEJXEHH
I Ipucmpiu moxe 6ymu nioe Hauu nuwe do eJeKmpuHoi Mepeksi, uo Maec 6ymu 3MOHmobaHa eJeKmpoHmePom biOnobHO do cmaHapmy MixnapoHOeKeKpmo-mexHiUHOi Komicii (MEK) IEC 60364.
Ppucmpiu cnid emukamu nuue do 3miHHo2o cmpymy. Happya noBuHna biDnoBida-mu bKa3aHUM Ha fipMoBiu ma6nuyi npucmpoO daHm uOdo Happyu.
3 MipkyeHaHb 6e3neku, Mu peKomeHdycMo buKOpucmo-
eyama npucmpiu 3 aemomamom 3axumy bi cmpymy bumoky (bumoky 30 mA).
3apdHn npncpti
HEBE3NEKA
He6e3neKa ypaXeHnEr eJeKmpuHm cmpymom.
Hikou He mopkaumecb Mepexno 0umekepy ma po3emku BOIO2UMu pykamu.
He kopucmyu mecra 3abpyd-HeHUM Yu MOKpum 3aprOHM npucmpoE M.
He ekcnyamyume 3apraHnupucmpiu y u6byxone6e3-neuHomy cepedobuui.
He hocimb 3apraHnU npucmpiu, mpumauu uo2o 3a KaebIb.
Bukopucmooyamu ma 36epizamu 3apadhu npucmpiu mibku e cyxux npumiuHnX.
3axuzaume Mepekeeu Ka-6eB bD bucokoimmemepa-mypu, ocmpux kpaie, Ma-cmuna ma pyxomux yacmuH npucmpoie.
Cπid yhukamu 3acmocybaHnnaoobkybaIbHo2o Ka6eJIIO 3 KjIbKOMa po3emKaMu ma npu oDhoyacHomy eHou-yeHHi kJbKOx npucmpoie.
Hemoxha bumayama Mepekeu wmekep i3 po3emku 3a ka6enb.
He hakpuaume 3apjdyBaHnui npucmpiu i mpuMaume biokpummu u02oBeHmuaiHi ombopu.
He biokpuabaume 3apdHu npucmpiu. Bukohyamu pe
MOhm npucmpoIO MOxymb luwe cneuaicmu.
BukopucmoByume 3apdHu npucpiu nuue dnyapku donyuueHX akymymaopHX 6Jokie.
YbunaDkyaHNO20 NowKOd-JXeHHa3apHO2o npucmpo1o 33apHum KaBemEix mpe-6a HeaHoo 3amHmu opuziHaIbHUMu YacMuHaMu.
AkymyjTop
△HEBE3NEKA
He6e3neKa ypaXeHnE eJeKmpuHm cmpymom.
He niðdaamu akymyarnop CunbHomy COHryHOMy BuNPo-MiHIOBaHHIO, Ha2piEy u 60-2HIO.
△NONEPEJXKEHHY
3apjdxamu akymyarnop do380nembcs nuwe 3a do-nom2o1o opuziHaJIbHO2o 3apjHO2o npucmpo, uO exo-dumb6 kompkeM, yu 3apjHO2o npucmpo, donyueneHO2o fipmo1o Karcher.
Iorna TaTexHicHe 06cnyroByBaHHa
OuHHeHHpe3epByapaIg6pydHOI BODn
YBAGA
Iio6 6pyd He ocidae y 6aky, Heo6xioHO peaynpno npomubamu 6ak dna 6pydoi eodu.
YBAGA
He Mumu Koxye i6pauiHoi 20noBu 8 nocydomuHi MauH: ochoBa fynKjra npucmpoIO moKe npuyuMucra, kkuo Koxye i6pauiHoi 20noBu deopmycBc 8 pe3yIb mami Mumm i KpOMka He npumuckamMembc npaeunbHO do uinHdpuHux uimok. NospuMbca pe3ynb mam npubupanHa.
PncyHok 11
BumKHytn npucptpi, nra zboro haTncHyTu Ha nepeMnkaq npucptpo YbIMk./BumK.
PncyHOK 2
TocTaBnTn npncTpiy cTaHcIIO npKyuBaHHa.
ManHOHOK 15b 18
→ BnHrtn pe3epByap nra 6pydHOI BOu i3 npi- cTpoIO. IINB. rnaBy «BuaJIeHHa BMicTy 3 pe3epByapa dna 6pydHOI BOU»
→ Ppomnt Koxy BipauiHoi roNobKn, 6ak dny 6pydHoi BOu i 3acniHKn 6aka dny 6pydHoi BOu BOOpOBiHOBOHO.
3acJIHKn DBOX KaMep 6aka dIy 6pydHOI BOIMMOxHa 3HrTNI npOMTu OKpEmo.
BakДЯ 6pydHoi BODN i 3acniHKn MOxHa TaKoX MHTN B NOcyDOnMHi MaunHi.
Bka3iBka
Bpe3yIbTaTI MNTT B NocyDomHHi MaunHi rymKn 3aCNIHOK MOkyTb CTATN JINKNMn, aIe repMeTHuHicTh npuyheHa He 6yJe.
ManHOHOK 13b 20
→KaIIO noaJIbwa ekCnnyatai npIcTpoI He nepeI6aayetbcra, TAKoX NOMTN uNInHdpNHi utTKN. IINB. rIaby «OuHueHHuNInHdpNHyx utOK.
ManIOHOK 21D 22
Picnry ouuueHHBCTaBHTN 6ak dnybdo3 3acniHKamn i koxyx BiopauiHOI roIOBKn B npntpii.
OuHennbBibpauiHoHroNobKn
YBAGA
Y pa3i 3a6pydHeHHr Ouchumu eibpauiHy zonobky. YB4A
He Mumu Koxyex eibpauiHoi 20noBku e nocydouuHi MauuHi: ochoBa hkyi npucmpoIO moKe npuyuMucra, kkuo Koxyex eibpauiHoi 20noBku deopmycBc 6 pe3yIb mami Mumm i Kpomka He npumuckamMembc npasunbHo do uinHpuhux uimok. Poipwumbcpe3yIb mam npubupanna.
PncyHOK 11
Bumkhny npucptpi, nla zbofo HaTnchytn Ha nepeMukay npucptoO YbIMk./Bumk.
PucyHok 2
IocTaBnTn npncTpiny cTaHnIO npKyBaHHa.
PncyHOK 15
→ Hatachnytn pfikcatop koxyba bi6pauiHoi roJOBKn.
→ 3HrTn KoxyX Bi6pauii Hoi rOIOBKn.
PncyHok 18
→ PpOHTn Koxy BIBpauiHoiI rONOBKn iD npOTOHOIO BOIOIO.
OuHCTnTb6akIpa6pydHoBODiUcNlIHdpnuH uitkn.
IINB. rnaBy «OuHnHpe3epByapa dnn6pydHoi BOUN>.
Inb. rnaBy «OunueHHa nnHnnpuHnx uitok.
OuHCTHTn npINBOd cHNIiHdpNHyNX 10K BONORHO TKAHHHO.
PucyHok 22
BCTaBnTn Koxy B Bi6pauiHy roIOBky.
OuHHeHHaIJIiHdpnHnx 1tOK
YBARA
Lunihdpuhi zimku cnid bumubamui nd kpanom nicn Koxho 6ukopucmaHHa 6 npabHI MauH, uo6 Hux He hakonuyeanucb 3auuKu Muoux 3acobie, Aki 320dom moKymb npuecmu do ymeopeHH niu. Raio npcmpiu cmaumbcna Ha niDnoay dne 3HimaHHa imok, heo6xido 3nuMu oody 3 bakie dny uycmoi i 6pydHO bdu. Takum uHOM BOHa He bumee 3 baki nd qac yknadaHH npucmpoHa niDnoay.
PncyHok 11
BumKHytn npucptpi, Dnla zboRo HaTnchTyH na nepeMnkaay npucptpoU YbIMk./BumK.
PncyHok 2
IocTaBnTn npucptiy u cTahu npapKyBaHHa.
PncyHok 19
BnKpyTnTn 1tKn, TpImaHOniX 3a3xAbaTHn na3.
PncyHok 20
→ Nomtnu zitkn nid npotouHO BOIOO.
a60
ⅢiTkn Mntn y npaBHi MaunHi 3a Tempepatyn 60^.
yBAGA
Iid y mumy npalbhiu MaunHi He bukopcmoyeamu ononickyaui. Ie do3oJre yhukhymu nowKodxehnMikpoBolokOH, a uimku 36epiaomb bucoky efekmueHicmb ouuenceHH.
Llimku He MoXHa cyuumu y cyuapui.
MaIIOHOK 23D 24
Picn ounuennn nomictntu uninHnpuHni iitkn Ha ctaHn npkkyBaHH i Bucywntix HA nobiTpi.
PonepeHbO BiJXaBUn cIINHdpNHy iITKn, MoXHaCKopoTnTuac cyiHHra.
RaKuo noaIbwa eKcnIyataui npucTpo He nepe6aueHa, taKoX ouNCTnTu KoKyx Bi6pauiHoi roJIOBKn i 6ak dnn 6pydHo BODn.
OuHCTHTn npINBOd UINiHDPNHyX UITOK BONORIO TKAHNHO.
AkymnyTop He 3apJkaeTbcra
3apnHm wTekep / mepeKeBa wTenceJbHa BnIka nikNoeHa HnpaBnBHO.
→ PpaBnIbHo NiikNIOuHTn 3apAHN WTeKeP / MepeXeBy WTeNCelbHy BUNKy.
Pnctpi He BMnkaeTbcra
AkyMnyTop po3pJxHn.
3apAunT npucTpI.
IpepeBipuTu, uBCTaBHeHn 3apAHN Ka6eJIb B npucTpi.
Bi'd'edHaTn 3apAHH Kabe, ockiBkn 3a nikHIOyeHoro 3apAHHo Ka6eHpo pObota npuctpo HEMOXKNBa.
CbitIOioDHH iHnKaTOP HecnpaBHOtei
Hainxkun CbiTIOJIO6JIUMaE nIac BMKHaHn npntpoU, a npncptpi He 3anyckaetbcra.
AkyMnyTop po3pJxHn.
3apAunT npucTpi.
Bci cbiioiwn WbNko 6nmaotb oHouacHO.
■ DnHyH npCtpo3a6IokOBaHn (HaNPKlaD,pe3 HaMipHn TnCK Ha cNInHpNHi a6ope3 Hai3d Ha CTHy/KyT).
BumKHyTu Ta 3HOB yBimKHyTu npunctpi.
a60
BnKOpncTaHHHe npabHbHoro a6o HecnpabHoro 6NOKy XINBneHH.
BukopncToByBaTn opurihbHn 6nok KINBneHHa/ 3amHHTn HecnpabHn 6nok KINBneHH.
TpncBtioiO3aropotbcno cep3i 3 iHTepBaIOM B1cekyHdy.
Pnucpii 3aHaTo rapuN niUac BnKOpncTaHHa (HanpuknaI, nId uac po6Otn 3a BnCOKx Tempeatyp HABKOJINHbOro cepeOBOu).
3po6ntn nepepBy i DaTn npncTpOo OxIoHHTN.
Kkpo npncpi ue i BmNkaetbca:
3po6nTn nepepy i DaTn npncTpOo OxJOnHyTN.
→ PtncTpiH He BMnKaεTbCra, NOKn Hc OxOJIoHe.
UinHnpnHi zitkn 3aHaTo cyxi.
LuninHdpnHi zitKHeIOCTaTHbO 3BOJoxKeHI.
3BONOXeHHaUNIHINPHNIXIITOKJINXOM6araTopa3OBOROpepemiueHHBnepeidHa3adHaOHNMyMicci.
Pnncpti He 36npae 6pyd
B6aKy dIy uHcToI BOnu BiDcyTHra BOna.
→ ΠΟΝΤΗ BΟΥ
Pe3epByap IJIy YIcToI BODN BCTaHOBJIeHn y npNCtpoI HENpaBUNbHO.
BCTaHOBtIN pe3epByap dny NcToI BOH TaKIM HOM, 06 BIn MiUHO TpImaBCy npncTpoi.
Uitkn BiDcyTHi a60 BCTaHOBneHi HnpaBnIbHO.
BctaHOBHTn 1iTKn a6o BkpyTHTn ix do ynpa y TpImaui.
Zitkn 3a6pydnehi abo 3nowehi.
→ OuHCTnTn UjITKn.
a60
3amHHTuITKn.
MnOCh 3ac6 He doaHO, HnPaBnBHo Do3oBaHO a60 BnKOpNCTOByBaBCr HnPaBnBnHmNIOCh 3ac6
BnKOpNCToBvBaTu TijbKn MmIoCi 3acO6n KARCHER iCTeKuTn 3a npaBnIbHm Do3yBaHnM.
KoJyX Bi6pauiHOi rOIOBKn BCTaHOJIeHn HEnpaBnJIb-HO
Ipebeipntn npabunbHictb KpinneHHKoxyxa Bi- 6pauiHOI rOIOBKn. Ira cboRo 3HrTn KOxyx i BCTaBHTN Ioro 3HOBy.
YTBOPENHNIH B roJIbci i Ha niIIO3i
Bka3iBka
He3NaHHe NiHOyTBOpEHn y Bi6pauiHnI roNoBci nIac po6oTu E HopMaJIbHM Ta He po6uTb HeraTINBHorO BnNBy Ha p6oTy npicTpO. DoaATKOi 3axOHi Heo6xDi HtbnKn 3a HAdMipHOrO NiHOyTBOpEHn (HaPnKnad, Cmyr n iHn Ha niDno3i).
HenpaBnblbHmNouH 3ac6 a6o HnpabnIbHe do3- yBaHHa.
BukopncToByBaTu TiIbKn MmUoyi 3acO6n KARCHER iCTeKHTu 3a npaBnIbHm Do3yBaHNAM.
PnHnni di npncptpo 3aCHOBAHn Ha BuaJeHHI 6pydy 3i uTOK. Pn Ubomy 6pyd Ta 3aNnKm MIOuHx 3ac06ib 3 niDnorn 3bnpaOTbcra y 6aui dnnr 6pydHOI BOHN.3a neBnX yMOB MOKe Bi6yBaTnca YTBOpEHn NiHn.
→ PetelbHO Ounchntu cuninHprnHi ciTkn BiD 6pydy Ta 3aIIuKIB MIOOHOrO 3ac06y.
PcCyHOK 25
PcCyHOK 26
PcCyHOK 27
Y pa3i cunbHoro nHIOyTBOpENHnpeN noaTkom npouecy npnbupanHn HauNTn FoamStop B npoKnHi 6ak dJa 6pydHOI BOIN. DToPmByATncb IHopMaui npo Do3yBaHHn Ha eTNKeTu nnuKn.
He3aOBIbHn pe3yIbTaT np6upanH
LuninndpnuHi 3aItkn 3a6pydneHi.
OuHCTnTn UuninHdpnuH niTkn.
LnniHnpnHi 1tKHeNoctaTHbO 3BOLOXeHi.
3BOJIOXeHHaIINIHpHnHX IITOK JNaxOM 6araTopa3OBOro nepeMiueHHaBnepei Ha3aHa OHMy Micci.
HenpaBnbln MmOuyn 3acio a6o HnpaBnIbHe do3- yBaHH.
BukopncToBvBaTu TiIbKn MInOuI 3acO6n KARCHER iCTeKHTn 3a npaBnIbHm Do3yBaHnM.
Ha niDno3i npCuyTHi 3aJIMuKn CTOpOHHX MInOuNx 3ac06iB.
PeTeJIbHO ouHCTnTuIJIiHdpNHyI uITKn BiD 3aIIuKIB MIOUOrO 3acO6y.
→ KInbka pa3iB nomHTn iDnory 3a donomoro npnCTPOIO IcNtux cNIIHdpuHnx uTOK 6e BNKOpnCTAHH MNoOro 3acOby. Lc denomoxe ycHytn 3aNNIKMNOUOro 3acOby 3 nIOnr
Iitkn He nobepTaHbC
LITK3a6JIOKOBaHI.
3HrTu cunihdpnHi ciTkn i npeBipuTN, HHe 3a-CTPRA B HNX 6yDb-akn npedmet.
→ IpeBipuTn, uo6 uHnIHpNHi uitKn 6yIn yTBnH-uehi B yTpmyBaui uitok do ynopy.
IpebeipuTn npabunbHictb KpinnneHHKoKyxa Bi- 6pauiHOi rOIOBKn. Dna Cboro 3HrTu KOkyx i BcTa-BuTN NOrO 3HOy.
BodonorlinHaHH He onTImaJIbHe
Koxyx BiopauiHOI rOIOBKn BCTaHOBJIeHn HnnpabNJbHQ
Ipebebipu npabunbHicb KpinneHHKoxyxa Bi- 6pauiHOI rOIOBKn. Nla cboRo 3HrTu KOxky i BcTa-BnTu NoO 3HOY.
LnniHnpnHi zitkn 3HOWeHI.
3amHHTnIJIHdpNHiJITKn.
3 npnctpoB BntiKae 6pyDHa Boda
Pe3epByap dIy 6pydnoI BOni nepenOBHeHn.
Bipa3y BnnpoxHHTn pe3epByap nla 6pydHOI BO- Dn.
Pe3epByap IJIa 6pydHoi BoIN BCTaHOBneHn y npNCTpoI HnpaBnBHo.
→ IpepeBipuTn, uu jinbHo npJrae KoKyx Bi6paui-HoI rONOBKn Do 6aKy dJa 6pydHOI BODn.
→ IpeBipuTn, uo6 3acniHKn 6aka dna 6pydHoI BODn 6ynn npabunbHo 3akpnti.
3Himahnnypukn36a3oBoro npncTpo
YBARA
Iicna 36upaHnHe 3himamu pyky 6a3o8o2 npucmpoio.
3Himamu pyky 3 ba3oeo20 npucmpoio do3e0nnaembcra liue y momy pa3i, kkuo npucmpiu eidnpaaenmaehcna ha cepeiche ocbny2oeeyeaHH.
PncyHok 28
INB.MaHIOHK HApNKIHU iHCTpyKu3 EKCNyatau
BCTaBttn BnKpyTky niD kyTom 90 rpaDyciB y HeBeNikn OTBip Ha 3aHni CTOPOHi pyuKn i 3HrTu pyuKy. YBAI
Cniokyamu 3a mum, uo6 He nowkodumu 3'edhyanbHu Ka6ebmix6a0obm npucmpoe m ipyukoio.
TexHiChi xapaKTepeNCTnKN
EneKtpnue nIDKnHoueHHa
Hanpyra 100-240 V
1~50-60 Hz
CTynihb 3axucty IPX4
Pnncpi
III
Knac 3axucty
Knac 3axncty 3apnHoro npnCTPOI
11
HomHaBHa noTyXHicTb npnCTpo
40BT
HomHaJIbHa HAppya akymyIraTopa
7.2V
Tn akymyraTopa Jitii
IOHHN
Yac po6oTn npn nobHni 3apdci akymyIaTopa
20XB
Yac 3apAKn npOxHbOro akMy- nTota
4r
BuxiHa HAnpyra 3apAHorO npnCTpOIO
9.5V
BuxiHn Ctpym 3apAHoro npntpo10
0.6A
Po6oqi xapakTepeNtukn
06epTb 3a XBnHny 500 o6/xB
Mictkictb pe3epByapa
Pe3epByap uHcToi BOOn 360 Mn
Pe3epByap 6pydHoi Boi 140 Mn
Po3Mipu
Maca (6e3 npnaT Ta MIOUHX piH)
2.4K
IOBxHa 305 MM
UINPINA 226 MM
BNCOTA 1220 MM
DobkHa Ka6eJIIO
3apdHn npnctpi 1800 MM
Moxjus3miu y KOhcmpykuii npucmpoio!
Ma3MyHbI
Kannbl HycKaynap. KK 6
Kayinciik Hycaynapbl. KK 6
Eyibim CnnaTtMaCbi KK 11
Ophaty K K 11
BvIbIMdbI icKe Kocy. KK 11
PaiDanaHy. KK 11
KyTMy MeH TexHnKaIbIK TeKcepy XyMbICTapbl. KK 13
Kepeprinep 6oJFaHda KeMeK any . . . . . . . . . . . . . . . . . . . . . . . . . . . . . . . . . . . . . . . . . . . . . . . . . . . . . . . . .
TexHnKaJIbIK MaJMyMaTTap. .KK 15
Xannbl HycKaynap

BmybmbHb3dbI aflaw pet kondahy andbihda ocb tyhcyka naiaaahy 6oohwHa hckaynbiktb Myknt OKbin wbfbhb3, HcKaynapdbOpbHdAn,
KeiH naIanaHny yuiH Hemece ocb6yibIMdb KeiH naIanaHaTbIH TynFaJnap yuiH caKTan KObiHbI3.
BmybIMdbMaKcaTbHa counkec KonJaHy
EeH Ta3aIaNbIbIbIH TeK yI wapyaIbIbIFbIHdaIbI KaTbI eEHdi Ta3aIay yuIH XeHE TEK cyFa Te3imDi eEHepDe fHa KONDaHbIHbI3.
Cyra ceiMTan TceMeIepi, MbICaNb, TO3bl eHepdi Ta3aJamaHb3 (bnf an eHeRe ciHn, OHbl 3aKbIMdayb MyMKIH).
KypbInfbl PBX,INHoneym,KaΦenb,Tac,MaiNaHfaH KHe JyblFaH napKeTTi, NamHaTTbl XeHe 6apJIbIK cyFa ce3imTan eDeH TecemDepiH Ta3aJayra apHanfA.
KopwafaH opTaHbI KoprFay

KanTay MaTePnAaIapbEkiHwi eHdeyre
JapamDbI. KanTaMaHbI yN KObICbHa
JaKTbpMaybHbI3dbI cypaMbl3, OApDbI eKi
YuIN BSeNEK KObIHbI3.
NanJaHaBnIraH KypaIapdaKopwaIahOpTaTactaImaybI Tnic KyHdbI, eHdeyre 6eim MaTePnaIap MeH 3aTTap 6ap. CoHbIKTaH, KypaI MeH OHbIH KyATaHDbIPbIbIH y
KOKbcbHa Tactayfa 60MaMnDbI. OnapdbI JxeprinikTi KOKbCTapdbTancbipy KHe XnHay Kynepeine Ta5bcie tety Kepek.
Kypambihdaftb3aTTapTypaJIbI aHbIKtAmanap (REACH)
BmymbHbH KypambHdaFb3aTapTypaIbCoHfbMafymattapdblaactbdaKepcetiren INHTepHet6eTTepim3e OKn aJacbi:
www.kaercher.com/REACH
KanTama iwiHdere 6JweKTeP
C3iIN 6yibIMbIH3dbH XeTki3iny KeNEMI KOPaWada
6eHHeHReH. 6yibIM KOpaWacbH AwKaHda KOpaW
iHiDer i 6yibIM MeH 6nWeKTePiH ToJIbIK XaHe
6y3bIMFaH Tpyde 6oNfAHybIFbH TeKcePIn AnbHb3.
Erep KeBip Ka6DbIKTap KO60nCa Hemece
TacbIMaJday KeiHderi Akaynap 6Onca, annapattbl
catkAH FnpMaHbXabapap etIH3.
Kocankb6eNeWekTeP
TeK TynHcycka Kepek-kaapakTap MeH TynHcycka KocanKbI 6eJWeKTePdi KOnDaHbIHb3, Ce6eBi Onap 6yBIMHbIH Kayinci3 XHe akaycbI 3 KymbcIbHa KeninDik 6epei. Kepek-kaapakTap MeH KocanKbI KypaIdap Typanbl aKnapaT www.kaercher.com Be6-caNTbIHa konKeTImDi.
Keninme
BvibIMapbIMb3 ywiH ep ene jayanTbI eTIM cepikTecepim3 TapanbIHAN bIFapbInaTbIH KeiINMe wapTTapbl KyuTe 6onaBl. Erep MaepnAnapdbH akaylbfb Hemece daBHday 6apbcihdafti KATEJIkTe Ta6blnca, 6i3 bIKTMaJI aKaybIKTapbl Kenil MEP3imi iwiHde aKbICb3 XeHdEmi3. Kenil MEP3mi iwiHne hapa3blbIKTapblb3 6oNca, acnTbI caTKah cayda MekeMeCHe Hemece xakBHdaBI ekinETTI cepBnCTIK KbImET Kepcety OPhbHa caTbIN any YerIH KepcTeIN, xaBapNaCbIHbI3.
OHyI KepceTInreH Typ KecTeciHne
Keke caHapdbin MaBihacb KeNecicde bona dbi:
Mbizanb:30190
3 ΘHdpipirehkbilbl
0 EhdpinreH racbpi
1 EHdpipinreH OHXbINdbIK
9 EHdpinreHaibHbHekihu caHbI
0 ΘHπipinreHaibHbH6piHsi caHb
COhBIMeH 6yI MbICaIJa 30190 KoIbI 09/(2)013 eHdipinre H KyHIN 6iInipeJI.
(MeKeHkaBb apTkbl XaftbIHda 6epiJreH)
BvibIMdafbI cMBOJnap MeH 6eJIrIep

ATTENTION


HA3AP AYdAPbIHbI3
Tasa cyra apHaJrH 6akmi MbHa mApminneH monmbipbHb3:
- AndbimEn Kip cy 6aibH 6ocatbHb3.
- Cogah Kein Ta3a cy 6abh TOITbIpbHbI3.
Kayinci3dk HycKaynapbl
- Naúdañany HýckaybIHóarfbl epéxelepmeH Koca, JαJIbI 3aHObI Kayinci3δik JxHe Jx3amaubIM OKufaHbI aJbIH any mananmapbIH caKamaFah JxH.
-Буubimfao ophambnifah
eckepmy XaHe Hycay
6enaiinepi 6yubimdbi kayinci3
KoIdaHy ywiH MaHbI3dbi
Hyckaynapdbi bepedi.
Kayin deHreNi
KAYIN
Aybip kapaKammaHyra He
eJIMze anapbIn cofambIH
mikeNeu mype myce anambyH
moyekelze Hycay.
△ECKEPTY
Aybip kapaKammaHyra He
eJIMze anapbIn cofambH
bIKmMaJ Kayinmi Kafoaunapra
Hyckay.
△ABAHJIAHbI3
KeHin JapaKammaHyra anapbin cofambih bikmumai Kayinmi KaFdaufa Hycay.
HA3AP AYdAPbIHbI3
Mamepuanobik 3uHf a anapbin cofambih bikmumai kayinmi karaufa Hycay.
3neKtpnik Kypamdaactap
KAYIN
KypbIINfbIHbI cyFa caImaHbI3!
KoIdaHy aIdbIHda Kypblfbl MeH KepeK-kaPakmapdbIH dypbic Kyuih meKcepH3. Eep OHbIH Kyui KaKcbI 60Imaca, KoIdaHyfambluBIM caJIbHaDbI.
3aprdmay ka6eni meh 3aprdmay kypblfbcihda 6y3bIraH Jepnep 6ap 6oIca, OHbI depey mype 6yubIM wbiFapywbiHbIH KaHa Kypblfbcih aIbIn, aybICMbipbIHbI3.
БуubIM 60bIHwa
emkiinemin 6apIbIK
KyMbICmap yaKbImbIHda
6yubIMdbi MHDemmi mypde
3neKmp mofbiHaH uBIFapbIN,
3neKmp awacbIH
po3emKaadah uBIFapbInbI
aNbHybl muic.
БуubIMdbI KeHdey
KymbICmapbI mek ekinemmi
KbI3Mem Kepcemy
opmaJIbIFbIHbIH mapaIbIHah
OpbIHdaIybi KepeK.
БуubIM KypaMbIHda əneKmpuKaIbIK 6oIweKmepi 6ap - OHbl aFbIHObI cyMeH ma3aJaMaHbI3.
ToImbipyKepiHe mok emki3e anambIH 3ammapdbi (MbicaJIbI bpaFbIu HeMece yKcac 3ammapdbI) eH2i36eHi3.
KoHmakmiJepae Hemece 6auiNaHbIc JeJIinepeiHe Koi mu2i36eHi3.
Bvubm myp biaicihdei Kepcemianen KepHey KOndaHbIraH 3neKmpnik mok KepHeyine caukec 6onybl muic.
KeJIiIK Ka6eIbDi emKip 6yuipeH mapbIn HeMece KbcBn omKi3y2e 6oJMaUdbI.
ECKEPTY
ByuimdbmeK 3neKmpwHlIEC60364 cmaHdapmbHa caukec KOHdbipfAH 3neKmp po3emkacbHa JkaIayFa 6oana.
Bvubimdbmekaybicnablmokka xanraHBi3.Kephey6yubIMHbIH myp kecmeciHdeKopcemilzhen Kepheye cukec bonymuic.
Kayinci3diKmi kammamacb13 emy MaKcambihda KypblfbiHbI aBmomammbI axbipamkbiw (MaKC. 30 mA) apKbIbIKoJDAhydbI yCbIHAmbl3.
3apdTay Kypblfbcbl
KAYIN
3neekmpik mokmbin cory kayni.
KabelbawacbIMeH3neKmp po3emkacbIHewkaaHa h bInFaIobI KOImeH ycmamahbI3 He mypmnHei3.
KypbIINfbIHbI JmacmaHfAH HeMece bINfaN KyUde naudanaH6aHbI3.
3apay KpypbIrfbcIH kapykayni 6ap opmaanaHbI3.
3apay KypbIfbcIH Kyam 6epy cbIMbHaH mapmaHbI3.
3apaykypbIFbcIH meK KaHa KypraK Jepnepde KOndaHbI. Jepnepde caKaMaHbI3.
Kyam bepy cbIMbIH KbI3y K03depiHeH, oMKip wemmepeH, MaDaH XaHe acnAnMbIH KbInXbIMaJIbI 6eJueKeMepiHeH aJIbIC yCmaHbI3.
Ken awanby 3apmkbiwmapdbjxhe 6ipHewe acnannmapdbi6ip yaKbimma naudanaHbaHbI3.
AwaHbI po3emkaDAH kyam 6epy cbIMbIHaH mapmbIN wblfapMaHbI3.
3aprdmay KypbIINfbICbIH XaIINaHbI3 XHe OHbIH XeIeMkiw caHbIaynapbIH aWbIK YcmaHbI3.
3apmay KypbIINfbICbIH aunahbi.KeHdey KymbicmapbIH meK MaHaDap opbIHdaybIKepeK.
3apay KypbIFbcIH meK pyKcam emiJzeh aKKymyIop 6nokmapbIH 3apay ywiH KOJdaHbIHbI3.
3aprdmay ka6eni meh 3aprdmay Kypblfbcihda 6y3bIraH Jepnep bap 6oIca, OHbI depey mype 6yubIM wbiFapywbiHbIH KaHa Kypblfbcih aIbI, aybICMbipbIHbI3.
AkkymyTop
KAYIN
3neKmpik mokmbIH cofy kayni.
Akkymympblk
bamapeHb i mkeJe u KyH
cayneci, Kofapbl
mempeamypa XHe
ommbiH acepiHe
yubipamnaHbI3.
△ECKEPTY
Akkymympoblmek KUnHaKmafbI mynHycaBbIK 3apmday KypalbImeH Hemece KARCHER pyKcam 6epzeh 3apmday KypalbImeH 3apmdahb13.
Keleci aadamepoi naudanahbIHbI3:
PS02
Akkymymaopdbiaunahb3,oumkehi Kbickamyuibikmany MymkIH,cohdaaKo3dbipfbiw by Hemece Kyudipaiu cyubikmap afyblMymkiH.
Kayinci3 kOJdaHy
KAYIN
I NaudanahywbI 6yubIMdbI HbicaHbHa 6aunahbcmbI KOndaHybI KepeK. BybIMMeH Kymbic icmey ke3iHde Kepziniikmi wapmmapra Ha3ap aydapybI KepeK, KaKbIHda KypzeH aadamapdbI eckepyikaxem.
Kapbiny Kayni bap Kepnepe naaandahyra mbiubim caNbHaDbI.
Bvubimobi kayinmi aumakma kondahy ke3ihde muicmi kayinc3ik epexelepih cakmay kaxem.
Bvubim anobihda Kynambinfahn 6oJca, OHbH ycminde 3aKbIM 6eJzinepi KepiHce HeMece KeMyJep 6ap 6oJca, OHbl naDanaH6aHbI3.
Kanmama Kara3bIH
6anaapdaH aynaK
YcmaHbi3, mHyHwbIfbIn KaIy
Kayni 6ap!
△ECKEPTY
Banaapra Hemece Hycay 6epinzeHxok adamdapra 6y1 6yubimdbi naudanahyfa 6oImaodbl.
BvI KypbIrfbIHbI qU3uKaIbIK, ceHCOPJIbIK HeMece akbl-ou dambyi weKmeJzEHemec moxipubeci XaHe/Hemec 6bnikminizjok adamdap 6nikmi MAMAHHbIH 6akblaybIHda 6oImaHaH Ke3de Hemece OcbI MAMAHap mapanbHaH 6yubIMdbI KOndaHy mocini XaHE oraH kambicmbI kayinmep mycihdipipimzeH Ke3de naDanaH6aybi muic.
Bana napra KypbInfBIMeH ouHayra pyKcam bepMeHi3.
Bana napra KypbIINfBIMeH ouHayra Kon cepmey ywiH oJapdbI bKaBInan ombypekeK.
Byuibim owiipinmeeHHeMece cybImaraH Ke3de, OHbl 6anaapdaH anwaK ycmahbI3.
Bana nap KypbIINfbiHbI mekepecekmepoih 6aKbIaybIHda ma3aaybl XHe naUdaHaHybl MyMkiH.
Bvubimdbimek cunammamara Hemece cypemke caukec KOJdaHbIHbI3 HeMece caKmaHbI3!
△ABAHJIAHbI3
Kayinmi karaanap Meh 6yubIM 3aKbIMdaanybIHbIH aOdbH any ywiH 6yubIMDbI naOdaHny aOdbHda kayinci3dk wapapanapbH caKmay kaxem.
EpiinDiepdi,epimHdi KocbiHaH cyubikmbikmapbo
Hemece epiminmezeh KbiuKbIapdbi (MbicaJIb, ma3anaftbiu KypaI, 6eH3uH, 6oarbiu epimkiwmepe JHe aueHmoH) cy basaHa ewkaWah KyumahB13, ce6eBi onap 6yubIMda KOJDAHbINFaH mamepuanapdbIH 6y3blYbHa anapbn COfaDbI.
Bvubimobiewkaaah KocyblkuiHde KaIdbipyfa6oMaoubl.
■ DeHe MyweJepiH (MbIcJIbI, waw, caycaKmap) auHaJIMaJIbI ma3aJIaFbIw 6JIikweJepDeH aJIwaK yCmaHbI3.
Iipindi 6acbH ma3aHaHaDa KOJIbIbI3Obl a6aUHaHbI3, ce6e6i OHbl emKip 3ammapMeH (MbicaJIb, KOHNkaMeH) Japalan any Kayni 6ap.
BaunahbicmbipfbiwcbIMbIH Kbl3yK03depineH,emkip wemmepdeH,MaudanXHe acnannbIH,XblJXbIMaJIbI 6oIweKmepiHe h anbc ycmaHbI3.
HA3AP AYДAPbIHbI3
BvubIMdbmeKma3a cy 6a2b1 MeH Kip cy 6a2bl Ophambinfah Ke30e KOCbIHbI3.
Acnan emkip Hemece ipi 3ammapdbI (Mbicalbl, cbIHbikmapdbI, Kymbip macmapdbI, OubIHwblK 6enwekepeH) xuHayfa apHaJMaFaH.
Ta3a cyra apHaIraH 6akKe cipke KblWkbInbIH, kMacombl Kemipyze apHaIraH KypaIadapdbI, aOpup MaubIH XHe YKcac 3ammapdbI KocnahbI3. OI 3ammapdbIH ciHipinyiHe Jokl 6epMeHi3.
BvubimdbmeK cyra m3imdi KaabHbI bap kammbl eHepde (MbicaJIb, JaKneH 6oJrFaH napKem, KblmbipHaHfAH Kaqelen, NUHOJeM) KOJaHbIHbI3.
BybIMdbi KInemdepoi Hemece KInem mecenzeen edeHdepoi ma3anay ywiH naudanaHbI3.
BvubimdbieedeH mopbl apKbIbIK KOHeEKMopJIbIK KblbImyfa 6aFbImmaHa3. UbIFbn KemKeH cy mop apKbIbI 6aFbImmaHaH Ke3de, OHbl 6vubIMHaH Kemipy MymKnH bOJaDbI.
Kymbic y3ak mokman mypfaHda xHe naudanaHbIn 6oJraH COH, KypblfblHbI 6acMbI aXbipamKbiWneH axbipambl, 3apyday KypblfblcBiHbIH awacblH mokmaH cybipblbI3.
TeMnepamypa 0 ^ C -deH meMeH 6oJFaHda 6yubIMdbI KOJDAHbI3.
ByuibIMdbI KaHbipdaH caKmaHbI3. DanaDa aWbIK acnah acMbIHda caKmayra 6oMaUdbI.
Bynbim cHnTaTamaCbI
1 Kockbiw/axkbipaTkbiw
2YctayTtkacbl
3 TyTkahbIH XkblNxybHaH Kopray
4Ta3a cy 6arbl
5 Ta3a cyfa apHaJIFaH 6aKTI H 6aTbIbPbINFaH TyTKacB
6 3apTay KpybIYfBiCbi KocBIIaTbIH YawbIK
7 Kip cy 6arbl
8 Ta3anaarbii 6inikwehi TTKbllbl
9 Ta3anaBbIb 6iikwenepe
10 Diipindi 6acbHbH KaKNaFbI
11 Dipindi 6acbi KaKaNaFbHbIHΦnKCaTOpbl
12 AkMyIaTOpdbH INHdNkaTOpbl
13 Tontbipy Ka6eni 6ap Tontbipy Kypblfbcbl
14 TypakTaTy CTaHcIaCbI
15 Biniikwenepei caKray opHbI
16*Ta3aJarbiu 3aT RM 536 30 m
17**Ta3anaftbiu 3aT RM 534 30 M
18**Ta3aIarfbuW 3aT RM 536 500 M
19 Ke6ik ceHdpriu FoamStop 30 mN
9 **Ta3aJfblu
- FC 3 Cordless
** FC 3 Cordless Premium
Ophaty
Cypet 1
Tytka xnerin heri3ri 6yibimf a wepty dbicbmeH tipenreHwe ehrizhi3.
TyTKa Jneri 6yibIMfa 6epik opHaTbIybl KepeK.
BvIbIMdbickeKocy
Cyper 2
TypaKtblbIfbl ywiH KpybInfbHbI TypaKaTaty CTAHncaBHaOpHaTbHb3.
Bilikwepepi opHaTy
Cyper 3
Ta3anaarbiu 6iikweneepdi tipenreHwe 6iikwe 6ekitkiine 6ypan 6keiti3.
Biniikwenepein iwiKjXaftMeH 6yibmdaftb 6iniKwe yCTaftbIbIHbTHyCTepi cKeKec eKeHirHe Ha3ap aydapbIbI3 (MbCaJIb, KeK neK KeK).
CanbIn KoiRan coH, Ta3anaFbIi 6iJikwenepe 6epiK opHaTbInBn TpyraHbIH TeKcepiH3.
3apay npoueci
Cyper 4
3apTay Kypblfbcihh cbimbH Kypblfdaft 3apTay ycbHa eHri3iH3.
3apTay KypblfbcihbH aWacbiH po3eTKara KOcbHb3.
Cypet 5
KapbIKdIOtbl6aKbIay WAmbl AKKMyJrTop 3apAdbHbIH HAcTbI KyINH KepCeTeJI.
3apnToBbIme6iTKeAkkymyTopDbI 3apntaraHda yu6ipdeJxapblnoTb6akbnay WamApblTeMeHHen Xofapbifa kapan Ke3ekne HkbInbNtaiDbI.
AkkymyIaTOpbIH 1/36niri 3apraTaNFaHda actbIHbI WAM TypaKbI XaHbIn, Xorapfbl Eki WAm XbINbIKaybIH XanrFactbipaBl.
AkkymyIaTOpdbH 2/36eNiri 3apraTaNFaHa da actbHfbl eki WAM TypaKTbI XaHbIn, XOFapFbI WAm XbINbIKbTaybH XanrFaCTbIpaDbI.
AkkymyIaTOp TOnbIK 3apraTaNrHaH KeiH,3 XapbIKNIOdTBI 6akblay WAmBI TaBBI 60 MmHyT 6oBi KaHbIN TypaDbI. OcbI yaKbIT eTKeHHen KeiH XapbIKNIOdTBI WAmDap eWedi.
Cypet 6
3apraTbnB 6onfah coa ahaHb po3eTKadaH XaHe 3apraTay cbIMbH 3apraTay yacbHaH cyblpbHb13.
Ta3a cy 6arbH ToJtBipy
Cyper 2
KypbIbIbHbI typaKaTaty cAhUraCbHa opHaTbHb3.
Cypet 7
Ta3a cyfa apHaJFaH 6aKti 6aTbIpbJFaH TyTKacbIHah YCTan, OHbl KypblfdaH WbIFapbln aJIbHbI3.
Cypet 8
→ BaKTH iIMeKTI Kypblfbcih aubin, OHbI 6ip KaKa kapan 6ypbHbI3.
CypTe 9
Ta3a cy 6arbiH cybIK Hemece Xblipak K6bp cybIMeH TOIbipbIH3.
Kaxet 6oJca, KARCHER Ta3aJafbiu 3aTTapbH Hemece Kytimre apHaJraH KypalJaBbH Ta3a cy 6arbiHa KyIora 6oJadbl.
ToTbipraHKe3e "MAX"6eJriciHeH acbipyra 6oImaIdbI.
Bak KyinbH XaybIn KOnbHbI3.
Cyper 10
Ta3a cy 6aBbH 6yBbIM iWHe caBbIN KObHbI3.
Ta3a cy 6arbl 6ymbffa 6epik opHaTbIybl Kepek.
HA3AP AYdAPbIHbI3
*Ta3anaarbu 3ammapbI Hemece Kymimae apHaanraH kypandaapbI Mennepney BoBuHua ycBihcmapbI opbHdaHbI3.
PaiandaHny
KoIaHy 6OuBInHa KaIbI Hyckaynap
HA3AP AYdAPbIHbI3
Cyper A
Acnan mek KypraKip MeH cyubikmbjXuHaJ aJadbi (EH Ke6i 140 m).
Cyper B
Kymcbmbi6acmay andbihda eedehi cbinbipbH3
Hemece wahhincpbr3bHbI3.Ocbnauwa bInraJb
ma3apmyd6yphH eeh nac nen 6emeh 3ammapa
ma3apmbnadbl.
Byubmbicke Kocnac 6bpbH, eedeHHiEneyci3 KeipHde cy mypaikmbibfbin mekcepin kepiiz. Hdennmezeh mo3dbieeHep cuKmbci cyra me3imdi mecemepdi ma3anamahbi3 (blraedehzeehin, orh 3aKbIM kenmipyi MymkiH).
Cypet C
Tasa Jyblfah eDeHde aK i3epiH kAnDbipMay yuH, ecikke kapan kepi 6aftnEh Kymbic icTeHi3.
EeHt Ta3anay epekeTi 6ynbIMbI waH copymeH 6ipdeyn KblnDaMdbkneH anfa-apTKa KblNkbity apKblnblOpbHdaJaBl.
→ KaTbI KipneHReH KepnepDe 6yibIMdbI eDeH 6oBihwa 6aay cbipfbTbIHb3. Kypblfba KaTbI Kyu CanMaHb3.
(\rightarrow) KEtkiinTeiH XnbIHTbIKKa cyp XeHe capbl TycI 6ilikwelep kipei: BiliKwenepe k6bIHbIn (\phi yHKqIaIapbl6ipdei, aanaDa onapdbH apTypni MaKcatta KondaHbIybl MyMKIN (Mbicanbl, TypniTycTI 6ilikwelep acyre XeHe BaHHara KondaHbIaIbI).
Xymbictbi 6acTay
HA3AP AYdAPbIHbI3
Byubim icke kocbinrah coh, ma3anaarbiu biinikwenep bipdeh auHana bacmaobbl. ByubimhbH e3iHeH-3i KbnKn KaynbHa kon 6epMey yuiH, mykAnb 6epik ycman mpy kepk.
Ta3a cy 6a2b1 cymeh moJmbipbIraHbHa, an Kip cy 6a2b1 6yubIMFa opHamblbn myPfaHbHa Ke3 Xemki3iHi3.
Cypet 11
→ ByibIMdbKocy yuih 6YnbIM KockbIuBH (Kocy/ Θwipy) 6acblHb3.
BiniKwenepe kaxketihwe bInfanaHfHaWaa KypbIbHbI 6ipHeWe pet anra-apTka XblXbItbHb13.
AkkymyIaTOPdbIH KymbIC yaKbITbIHbIH HdNKaTOPbl
Cypet 12
-3JapbIKnOdbIKaHaDbI-3/33apraDbI(ToJIbIK Kymblc yaKbITbI).
-2JapbIKnOdbkaHaNbbl-2/3zaprabl.
-1 kapbiknIOntbl waM kaHaNbI - 1/3 zapn.
AkkymyIaTOPdbIH 3apnbl TOIbIK 6Ityre DeiH WAmamEH 2 MNHy IwIHde aCTbIHfbl XapbIKNIOdTbl WAM XbINbIKTaB6actaIbI.
AkkymyIaTOpdbIH 3apraDbI TOnbIK 6itIn, KpybIuFbl eWKeHHHeH KeiH, acTbIHfbl XapbIKDIOoTbI WAm 60 cekyHdiWiHHe Te3 XblnbIbIKTaIbI.
Ta3anaFbIw cynbIKtbIKtbe celenkyo
HA3AP AYdAPbIHbl3
Ta3a cy 6a2bH monmbipmac 6ypbH, kip cy 6a2bH 6ocambib13. Ocbinauwa kip cy 6a2bHbH apmbik monybHa kon 6epinmeudi.
Kip cy 6arbiH 6ocaty
Cyper 2
→ KypbINfbIHb TpyaKaTaTy CtaHcNcBHa OPhaTbIHbI3. Cypet 15
→ Dipindi 6acbl KaKaNaFbIHbIH φnKCaTOPbIHbIH yCTiHeH 6acblHbI3.
→ DipinDi 6acbHbH KaNaFbH weWIn anBHB13.
Cypet 16
lac cyra aphanran 6akti dipindi 6acbihan Wblraptbn anbHb3.
Cypet 17
Jiacyfa apHaHan6aKtiEkiKaMepacbHbHyctiHderi KaNaKTbl KaBipbn KOblb3.
Kip cy 6aBbH 6ocatbHbI3.
Cypet 18
NaCTaHy DeHreInHe Kapai dipinDi 6acbl KaKNaFbIH XHe Iac cyFa apHaJFaH 6akTi Ky6bIp cyBIme H Kyblbl3.
lac cyfa apHaJraH 6aKTIe eKi KamepaCbIbIH KaKaNaFbH wein anBn, 6eNeK Ta3anayFa 6oNabl.
lac cyra aphanran 6aktiH eki kamepa cbihk KaKaNaFbIH opHbHa 6eKITin, Ka6bHb3.
Cypet 21
lac cyfa apHaHan 6aktri diipindi 6acbHa Kuri3iH3.
Cypet 22
DipinDi 6acbKaKnaftbHbHfNkCaTOpbHbH yCTiHeH 6acbIn, KaKnaKTbI dipinDi 6acbHa Knri3iH3 De, fNkCaTOpDb6ocatBhl3.
JIac cyra aphanran 6ak khehe dipindi 6actbH KaKnafb HbIfb3daBn 6ekitijyKepek.
БунбIMHbIH xMbIC icTeyih yaKbitwa TOKTaty
HA3AP AYdAPbIHbI3
Kymbc y3ak mybIn Kanfahda BinrAdbi
binikueenepmeh ceimmaI edeH Ka6biHapbHa 3aKbIM
Keinnipmey yuH KpybInhBi mypaKmamy
cmaHucsbHa opHamy ycBihna dbI.
Cypet 11
→ BybIMdbI eWipy ywH, 6YbIM KockblbIH (Kocy/ eWipy) 6acbIH3.
Cypet 2
KypbIfBiHbI TypaKaTaty CTAHUNcBHaOpHaTbHbI3.
BvibimdbicTeH wbirapy
Cyper 11
ByibMbI eWipy ywiH, 6YbIM KockblBih (Kocy/ eWipy) 6acbiHb3.
Cypet 2
KypbIyBihI TypaKaTaty CtaHcNcBiHa opHaTbIHbI3. HA3AP AYdAPbIHbI3
Kymbc aakmanraHHa KeuiH KypblfnbHb ma3aHaHb3.
Cypet 14
Ta3a cyra apHaJIraH 6akTe eI cy 6oJca, OHbTeriHi3.
Cyp. 15 24
JIac cyfa apHaIraH 6aKTI, diipinDi 6aCb KaKaNaFbIH XeHe Ta3anaFbiW 6iNikwenePdi Ta3anaHbI3. «JIac cyra apHaIraH 6aKTI Ta3anay» 6eImiH KapaHbI3.
KypbINfbl KocblMaHdbl
AkkymyIaTOpdbH 3apJbI JOK.
→ KypblfblHb3apraTaHb3.
3apraTay cbIMbIHbIH KypbINfbIfA KOcbINFaHbIH TEKcepiH3.
3apnaycbmbih axbipatbHb3,ce6e6i 3apnaycbmbi kocybl6oJFaHda naJaHaMyMki H emec.
AkaayIbIKTap INHdNkaCuaCsbIHbIH KapbIKdNOdTapbl
ActbHfbjKapbIKJNOIDTbI WAM KypblfBihIOCKaHaJa XblbIKTaNDbI, aJI KypblfBIXMbIC ICTeMeiDi.
AkkymyIaTOpdbH3apraIbIJok.
→ KypblfblHb3apraTaHbI3.
Bapnbik kapbIKnOHTbI waMap 6ip yaKbTTa Te3 KblblblkTaNbl.
KypbIfblKO3FaTbIbI KyIbIITaNFAH (MbIcJIbI, 6JIiIKwere KaTbI KbICbIM TYCKEHHeH Hemece Ka6bIpra/6ypbiuKa Kein TipeJIreHHeH).
BiyibIMdbI eWipiH3 XaHTa KocbIHbI3. Hemece
Caikec emec Hemece 3aKbIMdaJFaH Kyat 6epy 6norbin naJaIahy.
Tynhycanbkyat6epy6norbH naDanaaHbHb3/ akaynb kyat 6epy 6norbH aybictbpiHb3.
YwJkapbIKnOITbI WAM CekyHdTbIK TaKTneH bipineH coH 6ipi XaHaDbI.
Kymbicapbcihda KpybifbTbIM Kb3bIN KeTKeH (MbIC, KopwafahOpTa TemnepaTypacbl Xorapbl 6onfahnaanadaaHaR HkaFdaJa).
Y3inic kacan, KypbIfBihBhCaJIkBHdaybIH KyTiH3.
KypbnfBewipince:
Y3iic kacan, KypbIfbHbH caJIkbHdaybH KyTiH3.
→ Kypbblfbl caankbHdaFaH coH KaTaNah KocbIaBbl.
Biiikwenepe TbIM KypraK
Binikwenep dypbic cynah6araH.
→ KypbInfbHb6ip opbHa aHa-aptKa XblNkbIty apKbHb6iikwneepdi cynHa3.
BmybIM kipdi keTIpMeiDi
Ta3a cyfa apHaHraH 6akTe cy kok.
→ CydbI TOJIbIPbIN KybIBHb3.
Ta3a cy 6aIbI 6yIbIMFa dypbc opHaTbImMaFaH.
Ta3a cy 6arbH 6yBIMda 6epiK opHaTbIaNbIHdai etin canbHb3.
TasaIarbIi6 biikwenepeKOK Hemece dypbc opHaTbImaHaH.
Ta3anaftbiw 6iikweenerpi canbn KoiibHb3 da, Ta3anaftbiw 6iikweenerpi tipenreHwe 6iikwe 6ekitkiine 6ypan 6ekitiH3.
Ta3aNaftbi6iikwenepeJactHaHhemecTo3fAH.
Ta3aIarbi6iikwenepei Ta3an uibfbHbI3. Hemece
Ta3aJarbi6iikwenerepdiaybictbipbHbI3.
KocbImmafah, KATE MeIWepe De KOcblnfaH Hemece Kapamcb13 Ta3aJafBw Kypan
TeK KARCHER Ta3aIaNbIu KypalbIH naIdaIaNbI, dypbIC MeIWepeDe KocblYbIH KaIaranaHbI3.
Dipindi 6acbi KaKaNaBfK Ke opHaTbInFaH
→ Diipinj6acblKaKnaTbI dypbIC opHaTbINFaHbIH TeKcepiH3. On ywih KaKnaKTbI wewi, KaTadaH Kri3iH3.
DipinDi 6acbHda xhHe eDeHde K6ikTiH Ty3inyi
HycKay
Kymbic 6apbcihda eHne duamabk e6iktiH
KHHanyb KaibntbKaafdai 6oBn Ta6bladbl KHe
fynKcnn MyMKinirHe ew6ip wektey KeTTipMei.
Ke6ik WeKTeh Tbc Ken XHaJca fHa (MbicaJIb, eEHde
Ke6ik KOnaKTapb naJa 6oNca) KocbIMwa wapa
KoJdaHy kaxet 6oJaNbl.
Kapamcb3 Ta3anafbil Kypan Hemece OHbI KaTe MeIwepney.
TeK KARCHER Ta3aIaNbIu KypaJIbH naJaIaNbI, DypbIC MeIWepeDe KocblNybl KaJaRaIaNbI3.
KypblfnHbH Jxmbicb Ta3aJnfa6iikwenepeeri KOKbCTapDb Ta3apTyFa Heri3deJireh. EdeHHy YcIHe KINHaFah KObCTap MeH Ta3aJnfa6W KypaldbH KaJbIKTapbI nac cy caybTbHa JxHnHaJaB. KeNbip HaKTb JkaDaJnapda 6yN KenipWyre Akenyi MymkiH.
BiniKwenepi Ta3anaFbIu KypanDapBbH KaNbIKTapbi MeH KObICTapdAn MyKnT Ta3aNay KepeK.
Cypet 25 Cypet 26 Cypet 27
Ta3anay apekeTin 6actamai Typbin kaTbI KenipwikTeHy kafdaBb 6aKanca, FoamStop KypalbH 6oc TpyraH lac cy caybTBHa KIO KepeK. WEnMeKTIn XancbIPmacbIHda KepcetirreH naDanaHMy MeIsePiHe acbIPma KOnDaHbHbI3.
KaHaFaTaTaHfbicb3 Ta3aJay HtNXkeci
BinikweepnactaHraH.
BiniikweenepTa3anaHbI3.
BinikwenepeDpybCcynah6araH.
KypblfHb6ip opbiHa aIra-apTkakxblkblty apkbbl6inikwnepepi cynab3.
Kapamcb3 Ta3anaftbll Kypan Hemece OHbl KaTe MenwepeNey.
TeK KARCHER Ta3aJalbfu KypalbH naJaIaNbIn, dypbic MeIWepeDe KocblNybl KaIaranaHbI3.
EeHae 6aca Ta3aIaBbI KypanIapdbH KaIbIKTapbI 6ap.
BiniKwenepei Ta3anaftbIu KypanDapbIH KaNDbIKTapbIHAn DypbICTan Ta3anaHbI3.
EeHdi Ta3apTkbl Kypanbl naJanaHa6a, Kypbnfbl XHe Ta3anaftbI 6iikwenepe Kemerim6ipHepe pet Ta3aJaanbI. OcblaJnwa, Ta3aJaNbIu KypandapdbH KaNDbIKTapbI eEHHeKetipiJei
BilikwelepeaHaMaIdbI
Binikwenepeyfattanfah.
BiniKwenepeiwein anbIn, onapdbH apacbHda KaHdaa da 6ip 3aTTbIH TypbIN KaJMaFaHbIH TeKcepiH3.
→ BiniKwenepein yCTaftbIkwHa HbIfb3daJIbIn 6ypaIraHbIH TeKcepiH3.
Dipindi 6acbl kaKaNaTbI dypbIC opHaTbINFaHbIH TekcepiH3. On yuHn KaKaNaTbI weuH, KaTadaH Kuri3iH3.
OHTaIbI eMec cy XnHay
DipinDi 6acbi KaKnaBfKaTe opHaTbnFaH
Dipindi 6acbl KaKnaTbI dypbIC opHaTbINFaHbIH TeKcepiH3. On ywiH kaKaNTbI weWIn, KaTadaH Kuri3iH3.
Bilikwelep To3raH.
Biniikwenepei aybICtbipbIHbI3.
BvibmHaH Kip cy wbfbn KeTTi
Kip cy 6aBbI 7amaHaH apTbIK TOITbIPbINFaH.
Kip cy 6aBbH 6ipDeH 6ocTaHbI3.
Kip cy 6aIbI 6yIbIMFa dYpbIC opHaTbIMaFah.
→ Dipindi 6acbi KaKnaftbHbH lac cyfa apHaHanFaH 6aKeOpHbIKtB 6ekitiReHH TEkcepH3.
Jiac cyfa apHaJIFaH 6aKTIH KaKaNaKTapbl Dypbc Ka6bInFaHbIH TeKcepiH3.
TytKaHbI Heri3ri KypblfBidaH WbIFapbIn any
HA3APAYdAPbIHbI3
TymkaHbOphamKaH coH heiz3e KypblrfaH wifapbn anyra 60maudbi.
KypbInHbcepBucmik KbImem Kepcemy
MaKcambImeH xibepaeh Ke3de rHa mymKaHbI Heiz3z
KypbInBdaH wIrarpbn anyra 6onaabi.
Cypet 28
Painanany HcyaynbihbIH COhbiHaBcypetTkapaH3
BypaybIbTI b90 rpaDyctbIK 6ypbiWneH TyTKaHbIH apTkbl XaftbIHdaftbl Wafbl H caHbINayra eHri3in, TyTKaHbI WbIFapbln aJIbHbI3.
HA3AP AYdAPbIHbI3
Heizi KypbInfbi MeH mymka apacbiHaBfa6aunahbic Ka6einiH 3akbIMdAmnFaHbHa Ke3 Xemki3iHi3.
TexHnKaIbIK MaFJyMaTTap
3neKtp KeniciHe Kocy
3neKtp Kepehyi 100-240 V
1~50-60 Hz
Kopray dapekeci IPX4
BvibIM
Kopray knaccbi III
3apnay KpybInfbicbl 1800 MM
TexHukaiBik 3e2epicmepe naa da 6onbIn KaIybl MyMkiH!
| a## |
| .### |
| #.##/j# |
| #.##/j# |
| #.##/j# |
| #.##/j# |
| 28 # |
| J#J#J#J#J#J#J#J#J#J#J#J#J#J#J#J#J#J#J#J#J#J#J#J#J#J#J#J#J#J#J#J#J#J#J#J#J#J#J#J#J#J#J#J#J#J#J#J#J#J#J# #90 #J#J#J#J#J#J#J#J#J#J#J#J#J#J#J#J#J#J#J#J#J#J#J#J#J#J#J#J#J#J#J#J#J#J#J#J#J#J#J#J#J#J#J#J#J#J#J#J#J#J #J#J#J#J#J#J#J#J#J#J#J#J#J#J#J#J#J#J#J#J#J#J#J#J#J#J#J#J#J#J#J#J#J#J#J#J#J#J#J#J#J#J#J#J#J#J#J#J#J# |
| #.##/j# |
| a## |
| #.##/j# |
| #.##/j# |
| #.##/j# |
| #.##/j# |
| #.##/j# |
| #.##/j# |
| #.##/j# |
| #.##/j# |
| #.##/j# |
| #.##/j# |
| #.##/j# |
| #.##/j# |
| #.##/j# |
| #J#J#J#J#J#J#J#J#J#J#J#J#J#J#J#J#J#J#J#J#J#J#J#J#J#J#J#J#J#J#J#J#J#J#J#J#J#J#J#J#J#J#J#J#J#J#J#J#J# J#J#J#J#J#J#J#J#J#J#J#J#J#J#J#J#J#J#J#J#J#J#J#J#J#J#J#J#J#J#J#J#J#J#J#J#J#J#J#J#J#J#J#J#J#J#J#J#J#J# |
JkS JsJlssll jll llc 1n o sL 45g lalgljldall i d
Jg, JwJrJgJrJgJy
ab + b > 10
J 1 J 1 J 1 J 1 J 1 J 1 J 1 J 1 J 1 J 1 J 1 J 1 J 1 J 1 J 1 J 1 J 1 J 1 J 1 J 1 J 1 J 1 J 1 J 1 J 1 J 1 J 1 J 1 J 1 J 1 J 1 J 1 J 1 J 1 J
KARCHER aBll sgo swo y 2 all oclj g
Jg Jg Jg Jg Jg Jg Jg Jg Jg Jg Jg Jg Jg Jg Jg Jg Jg Jg Jg Jg Jg Jg Jg Jg Jg Jg Jg Jg Jg Jg Jg Jg Jg Jg Jg Jg Jg Jg Jg Jg Jg Jg Jg Jg Jg Jg Jg Jg Jg Jg Jg
aill sgo lga g 1g jol kll a
aJaa JI JFQoojGoofoofofofofofofofofofofofofofofofofofofofofofofofofofofofofofofofofofofofofofofofofofofofofofofofofofofofofofofofofofofofofofofofofofofofofofofofofofofofofofofofofofofofofofo
LED
aal
jglj
m = 311
| x1| = | x2| = | x_3| = 1
la>UNio) j>all abzoo ojgej u jge J 10 gil lslg dssllbdoal yI.(a9
a
.
m = 311
m = 311
13/14
.
m = 311
( x - 2x) t - xy^2 = ( x - 2x) f^ t
A
:
←
S
<1
←
a
←
a
←
aLa>Uyio) JjJyabzoo oJgJy jJgJy 1 gJ, cJyLc dSdWbZaiI yI.(a
. 10000000000000000000000000000000000000000000000000000
J5 1yIg>lg cLED
山
图
1
←
( x - 2x) t - xy^2 = ( x - 2x) f^ t
V
:
J1
S
<
a
。
←
Jg JkJl 100000000000000000000000000000000000000000000000000000000
J 1
.ooJolololj 0o y
.1aJUjIjJI sJo JoSsiWl
Jkss sbsa aall oall j
jIg>Jl
←
S
aewlio aee 1/0y/13
.aa//p/2wU
24 23 J
ggo 1sll goo aalac
yI.ogll JgJgJg
//s2g//g//S//g//la//1go
.
1/2
olal/oljg odla//olal/
JgU/1uW/ uXpA Ug.iaua
y/1 Jgjgog 1
10g
←
y|/j.
2 0g
←.
19 oJg
aIbI I 1000000000000000000000000000000000000000000
←
JkW J00g aIbll w/2w
20 0g
.
←
g
J
aio a>60 JJ Joo
4
abw 1go a/ alluiz//puiuivcbuillic
gagdllaaJ1j
a//le//le//e//b///
.
aIgA
aaiallollljz
4
y 10bwl aai/olal j
Lwyl 4
4
aJluwclawllwJfIeIbC aByy
iic jgeVkaalag//jia 19:blb
y 19, caiu// aLac eli/ lau// wJ// ellac
J5u,1J5.11 10012wllg>baioS
.
11
0
90
< 1c b2ol dly pllg jgej Jf
yJjJj.
2
a
←
18
15
J5
.
jgljol aaiolol jz
."aaiololjz" Jabil
olall jzjg jwll lbc
olpoololololololololololol
1
olaljz j 1
Jaeio Jsw, gabug le6g ssaaiaa
olal jj 1000
aJwE g aaiol oal oIolaoog aaii
abg
aalolall jololal aalll oal
jJgJgS JrJrJrJrJrJrJrJrJrJrJrJrJrJrJrJrJrJrJrJrJrJrJrJrJrJrJrJrJrJrJrJrJrJrJrJr
LwlllJrI Jp
gogo 1eao allall sll
.
.1j 100 j
4
JawwJwJwJwJwJwJwJwJwJwJwJwJwJwJwJwJwJwJwJwJwJwJwJwJwJwJwJwJwJwJwJwJwJwJwJwJwJwJwJwJwJw
4
aJluwclawI wJllcIbC aee
iic jgeykaalaglljia 19:
y 19, cblw/ aIac sll / laW// wJ// cIboc
S. 1 S. 11
.
J
4
JaeI Jc aIgblI gglI I
y/8290 jg//829
V/1c.
10g
←
y|/Jj#j.
20g
jglj
11 oJgO
←
< 1c b2ol ldu pIaIg jlg>J Jg
yj/1jzwiJJj.
20g
<
4
jgljll 1
14 oJgO
←
.olalg
15 Jswj
←
.
"aaalolal jzab" Jzjbl
"J 1
"uljai jai jai
jglj1njj
4
a//olal/1j> g//lgl
jgl11 jji pij 1j0 Jols JSuiaJg
gioo )c/9g//.62j/ alla//1S//
Lij 1j alla// S// g y. (Sla)
aoleo
2 0g
←
gio aasaaaiaaiiipipipipipipipipipipipipipipipipipipipipipipipipipipipipipipipipipipipipipipipipipipipipipipipipipipipipipipipipipipipipipipipipipipipipipipipipipipipipipipipipipipipip
20
←
L
←
aJlJoo
12 ojg
o3/3aJUJL JED3
.(alolJzwiill
Jaa aCjAaJI - JaoLED 2
.2/3
Jzoo 1/3- oio LED aJ
aJU
JLLED
aJbJIgJoo
aJgjglgJgJgJg
.60 60 LED
abll JlsweJall JlaSawl
du
a/ jj 11111111
pugg.1i9.aaia/olga//j
.aaia//olla//jfo b/
"aaololol jso J
"aaalolal jzjg j
aalollll j>
2 0g
.1yIgogjge
15 0jg
Jawll wJll cIbC Jg Joo
JawwJwJgLc gsl
16 ojgo
Jl 100000000000000000000000000000000000000
Jawll
17 ojgo
.
.aaalolal jg
18 ojgo
wJllc b c b b 1w y 2g
olpoIaawly aawll olall 1j>g.
.
olall jzjgj aolll olaal
59 11
cglalb2iaaI cIaI Ij> 151j lao
jgl//sfoaia//olla//j
y/1 yg/ 0 y/2
10jg
/1jwJzJcIbawJgJj
. j ≤ j ≤ j, j > 0 (ON/OFF)
oo ploUg alJgljI IxwI Jx
J5 JSSB
#
4 0jg
i>J>J>J>J>J>
jIJI
LwUJxKwUJWp
Jgill
5 0jg
.aaLLaJIJLLED
JolJIi aJJIaJIJI Jxic
f 1s yS yS yS yS yS yS yS
jLgJl
4
10g 1/8
.ayie//g 1
jglj
Jz/1jz
2
3
aaiolai j 4
aIolalJzJzJzJ 5
jwll aJc 6
oJzllolJIj7
auii o, 100 jao 8
9
Jswll jrrll cllac 10
J 11
aJUJ Jg 12
J>J1Jg>J1 13
jglggo 14
15
J30 RM536 16
30 RM 534 山 _ 山 17
500 RM 536 山 _ 山 ^ 山 18
30 FoamStop 19
2x 9
*
**
J
1 ojj
←
yjgjll
.8gaoo gaa
S 1
j_L = 2l = L
J
2 0g
<
J
3 0g
←
yog.
()jgJgJgJgJgJgJgJgJgJgJgJgJgJgJgJgJgJgJgJgJgJgJgJgJgJgJgJgJgJgJgJgJgJgJgJgJgJgJgJgJg
ylyg
ailll 1sla Ila lo gge kss
LJSSaS
Lau//u//a/bcl/12y//la>0
o//c/11/11/11/11/11/11/11/11/11/
12x//1501, 1jq//1Jaaiw/
y
a>0.6 c 15 g/ a>0.9 c 15
y1,b2 = 1,g_2
13/14
gJlab/1 Joo jge// 2gauno μc
Jg 100 pIu2iWU aauo uC jge//li 100
g/9 oJy//pJy/9//y/0 g/ aJL2//g/
Jg/0 pJcI cJy//pJy/3//y/ aJzA//
1g/9 pgiolw ggiol, aiio
JiW 11/10 JcIaIe Ic agg> 11/10 p/21w/ a.
jgeJy Cey JIabUcaay y 1
pucy puc jlaia/JIabY/ a0 1
jgeJIy
15 laIb JIeB/ 12 c jge// 12/ 12
a/b/ a/ae Jb/ y/ g/ jy y 1g/c /w/ y/ i/s/ y/ ai/
2uall lagg y/ jge//jz/ g/ jz/ y 10g//g/ a
a/2xuwjglge//Jacl/aJcJg Jg 1g/ll jglge//Jg
1g0g/ayio sga,cla//jS 1oLgj g
c jla/ajio sgo Jc agzoo dlw
Wog, jy9, aBtu//sgo Jio) aa2o
Igai /gl2o/ pUw y/g (uguWy/g n/gy
Jg.// aodiuall
jge//15laIb jge//aJol o laIaIc 2
JU/1 JIO) pUJ// 1j>1 JI JU 1 JU 1 JU 1 JU 1 JU 1 JU 1 JU 1 JU 1 JU 1 JU 1 JU 1
aalal aalalal alalal
jglJl jddw nn nnnn g. aIaI JlaIg b
J 1
gbg aalssll lalll alalal alal
. www.kaercher.com :JgJg
laal
Ieaii Iaia Ibgw w sIg Js Jg WJn .LJIaIJIaIaI aicilq gswll A K W Jg Jg Jc Jb Jd Jbc JIbcl
J
aallll lalll
abu jy y a o y abio y 1y
clJ J aoglaJI
Joo clalaw>JI baiy pei Jllwun kaaaln a) aJlal
.(aioyUjig aogbJl
LwIbawl Iy JgJyI yIyI bIyI g aIyI yIyI yIyI yIyI yIyI yIyI yIyI yIyI yIyI yIyI yIyI yIyI yIyI yIyI yIyI yIyI yIyI yIyI yIyI yIyI yIyI yIyI yIyI yIyI yIyI yIyI
aIla>
Jlac/ sIw/ aai// oal/ 1j> Jo sic :a// aB// oIc/ j,
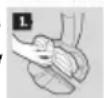
AATTENTION
JgAaIolalIjz
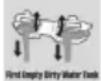
aall aal jj 101
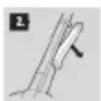
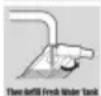
aXwlld
J2.11 J/3 001g//1111110c - aolll oIe// 1c/g// 0cl/oic /i
.
yizllclosg jzgo 0aagol
Jb>JgW JgogU
.11xolg yg xll al,1g 1211
alw g oogall no aolll pge j
Lgll lgaedlc klg aJiaa

aIgJgJc ggsjaaJdall oge Jy I Jau jg JgoggJdIddLg JgJgJgJgJgJgJgJgJgJgJgJgJgJgJgJgJgJgJgJgJgJgJgJgJgJgJgJgJgJgJgJgJgJgJgJgJgJgJgJgJgJgJgJgJgJgJgJgJgJgJg
jgljooal jkaag.ajjiaal Xaal
1.11111111111111111111 )1g>1d2l0
00000000000000000000000000000000000000000000000000
www.kaercher.com/REACH


THANK YOU!
MERCI! DANKE! iGRACIAS!

Register your product and benefit from many advantages.
www.kaercher.com/welcome


Rate your product and tell us your opinion.
www.kaercher.com/dealersearch
Alfred Kärcher SE & Co. KG
Alfred-Karcher-Str.28-40
71364 Winnenden (Germany)
Tel.: +49 7195 14-0
Fax: +49 7195 14-2212