Diablo 151 - Phone TOPCOM - Free user manual and instructions
Find the device manual for free Diablo 151 TOPCOM in PDF.
User questions about Diablo 151 TOPCOM
0 question about this device. Answer the ones you know or ask your own.
Ask a new question about this device
Download the instructions for your Phone in PDF format for free! Find your manual Diablo 151 - TOPCOM and take your electronic device back in hand. On this page are published all the documents necessary for the use of your device. Diablo 151 by TOPCOM.
USER MANUAL Diablo 151 TOPCOM
This product is in compliance with the essential requirements and other relevant provisions of the R&TTE directive 1999/5/EC. The Declaration of conformity can be found on :
http://www.topcom.net/support/cedeclarations.php
Dialling options:DTMF (tone) and Puls
Batteries: 2 x 1.2V, 550 mAh AAA Type
Max. standby time: approx. 100 hours
Max. talk time: 10 hours
Ambient temperature: +5^ to +45^
Permitted relative air humidity: 25 to 85%
Power supply base adapter: 220/230V, 50 Hz
Memories 10 indirect with max. 25 digits
up to 5
NEDERLANDS
5.1.2 Call setup with dial preparation
7.4 Commanda distance
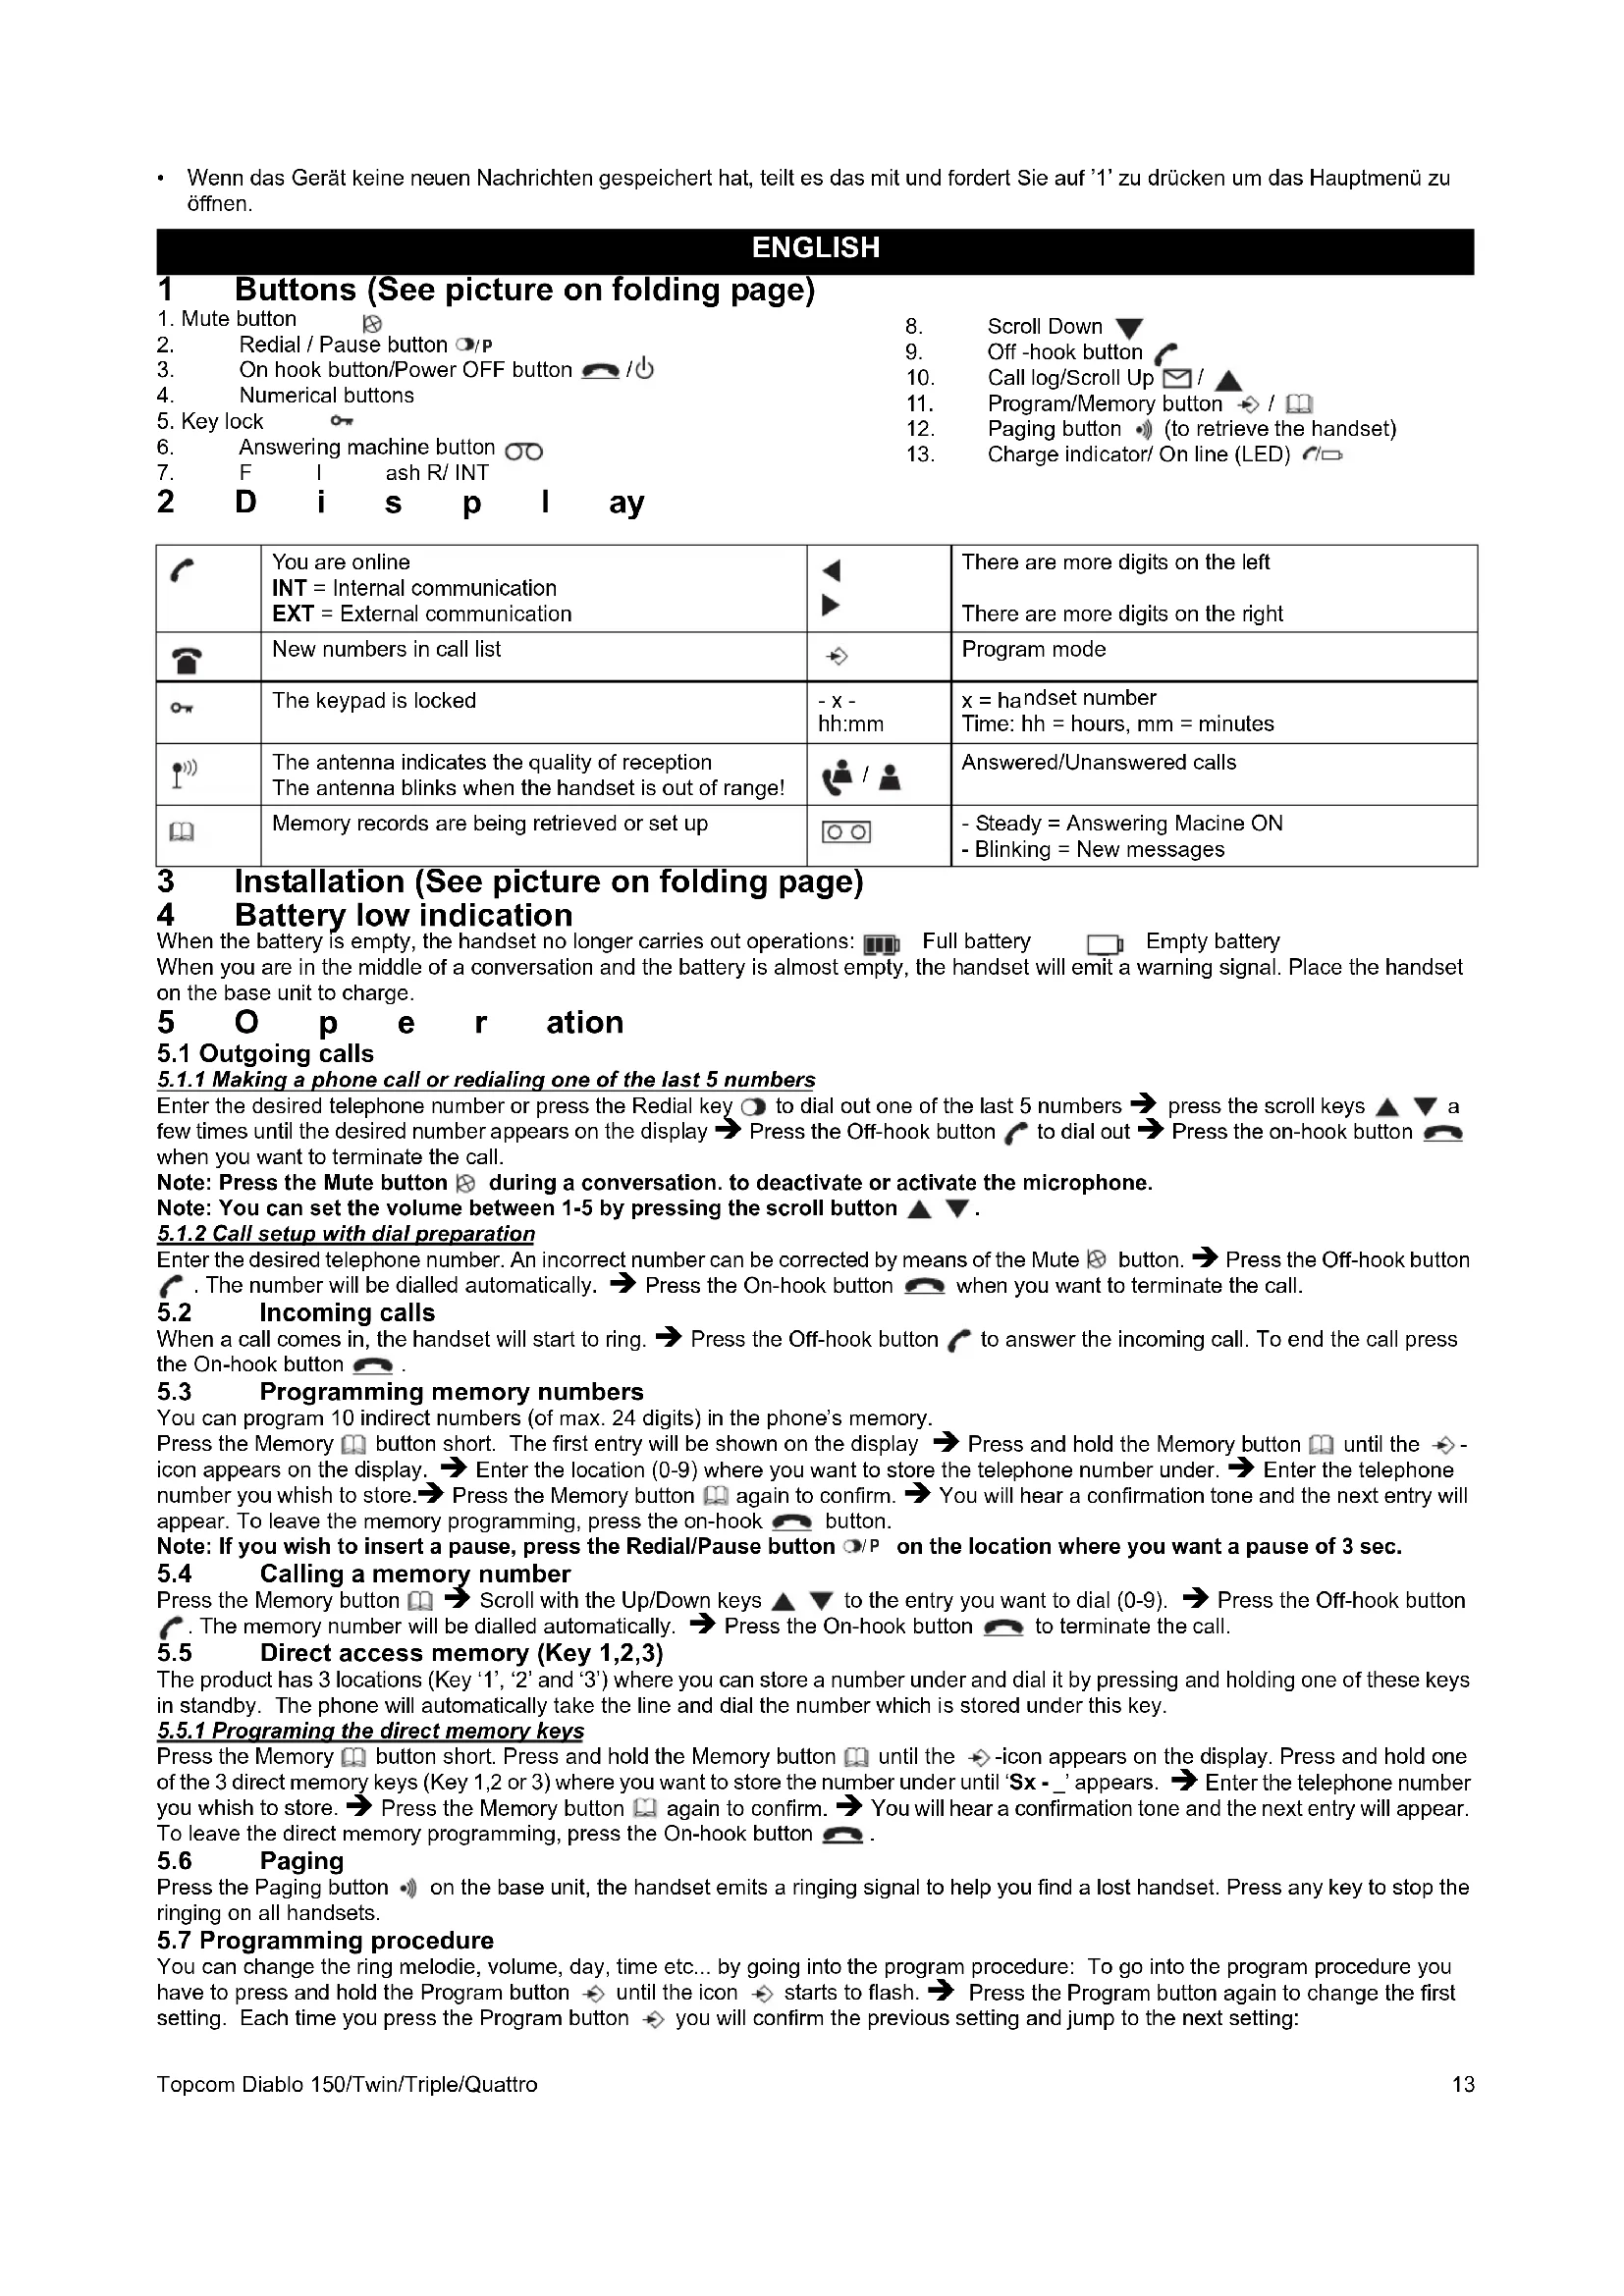
1 Buttons (See picture on folding page)
- Mute button
Redial / Pause button O/P
-
On hook button/Power OFF button
-
Numerical buttons
5.Key lock
- Answering machine button
7.
F
1
as
R/ INT
2 D i s p l ay
8.
Scroll Down
Off -hook button
m = 311
- Call log/Scroll Up
- Program/Memory button /
- Paging button (to retrieve the handset)
- Charge indicator/ On line (LED)
| √ | You are online INT = Internal communication EXT = External communication | ▲ | There are more digits on the left There are more digits on the right |
| New numbers in call list | ↔ | Program mode | |
| ∞ | The keypad is locked | -x- hh:mm | x = handset number Time: hh = hours, mm = minutes |
| 1) | The antenna indicates the quality of reception The antenna blinks when the handset is out of range! | /▲ | Answered/Unanswered calls |
| Memory records are being retrieved or set up | ○○ | - Steady = Answering Macine ON - Blinking = New messages |
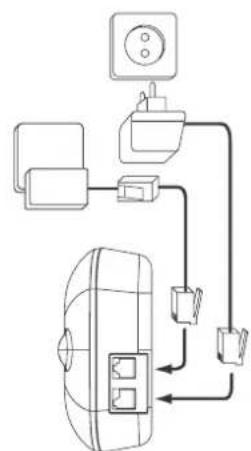
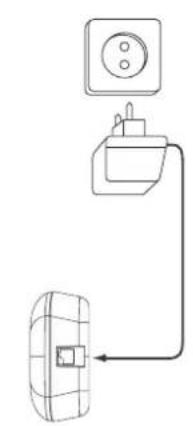
3 Installation (See picture on folding page)
4 Battery low indication
When the battery is empty, the handset no longer carries out operations: Full battery Empty battery When you are in the middle of a conversation and the battery is almost empty, the handset will emit a warning signal. Place the handset on the base unit to charge.
5 O p e r a t i o n
5.1 Outgoing calls
5.1.1 Making a phone call or redialing one of the last 5 numbers
Enter the desired telephone number or press the Redial key to dial out one of the last 5 numbers press the scroll keys a few times until the desired number appears on the display Press the Off-hook button to dial out Press the on-hook button when you want to terminate the call.
Note: Press the Mute button 串 during a conversation. to deactivate or activate the microphone.
Note: You can set the volume between 1-5 by pressing the scroll button ▲▼.
5.1.2 Call setup with dial preparation
Enter the desired telephone number. An incorrect number can be corrected by means of the Mute button. Press the Off-hook button. The number will be dialled automatically. Press the On-hook button when you want to terminate the call.
5.2 Incoming calls
When a call comes in, the handset will start to ring. Press the Off-hook button to answer the incoming call. To end the call press the On-hook button
5.3 Programming memory numbers
You can program 10 indirect numbers (of max. 24 digits) in the phone's memory.
Press the Memory button short. The first entry will be shown on the display Press and hold the Memory button until the icon appears on the display. Enter the location (0-9) where you want to store the telephone number under. Enter the telephone number you wish to store. Press the Memory button again to confirm. You will hear a confirmation tone and the next entry will appear. To leave the memory programming, press the on-hook button.
Note: If you wish to insert a pause, press the Redial/Pause button on the location where you want a pause of 3 sec.
5.4 Calling a memory number
Press the Memory button Scroll with the Up/Down keys to the entry you want to dial (0-9). Press the Off-hook button. The memory number will be dialled automatically. Press the On-hook button to terminate the call.
5.5 Direct access memory (Key 1,2,3)
The product has 3 locations (Key '1', '2' and '3') where you can store a number under and dial it by pressing and holding one of these keys in standby. The phone will automatically take the line and dial the number which is stored under this key.
5.5.1 Programming the direct memory keys
Press the Memory button short. Press and hold the Memory button until the -icon appears on the display. Press and hold one of the 3 direct memory keys (Key 1,2 or 3) where you want to store the number under until 'Sx-' appears. Enter the telephone number you wish to store. Press the Memory button again to confirm. You will hear a confirmation tone and the next entry will appear. To leave the direct memory programming, press the On-hook button
5.6 Paging
Press the Paging button on the base unit, the handset emits a ringing signal to help you find a lost handset. Press any key to stop the ringing on all handsets.
5.7 Programming procedure
You can change the ring melody, volume, day, time etc... by going into the program procedure: To go into the program procedure you have to press and hold the Program button until the icon starts to flash. Press the Program button again to change the first setting. Each time you press the Program button you will confirm the previous setting and jump to the next setting:
5.7.1 Handset External/Internal melody and volume
Press and hold the Program button until the icon starts to flash. Press the Program button again, the external melody is heard and the EXT-icon is flashing. Select the desired melody (1-5) by entering a number (1 - 5). Use the scroll keys to select the desired volume (Off or 1-5) Press again to confirm the setting and to go to internal melody and volume (same as above).
5.7.2 Date time setting
DD-MM HH:MM (DD=day, MM=month, HH=hour and MM=minutes)
Enter the date and time using the number key. The flashing cursor can be moved by the scroll keys . Press again to confirm the setting and to go to the next setting below.
5.7.3 Setting the Dial mode
There are two types of dialling mode: - 1 - DTMF/Tone dialling (the most common) (default) OR - 2 - Pulse dialling (for older installations) Press '1' or '2' and press again to confirm the setting and to go to the next setting below.
5.7.4 Setting the Flash time
There are two flash times: -1 - 100ms OR -2 - 250 ms
Press '1' or '2' and press again to confirm the setting and to go to the next setting below.
5.7.5 Base melody and volume
The base ringer is heard. Select the desired melody (1-5) by entering a number (1 - 5). Use the scroll keys to select the desired volume (Off or 1-5) Press again to confirm the setting and to go back to standby.
5.8 Keypad lock
When the keypad is locked, pressing any key will have no effect during standby (except holding the O key). Press and hold the O key. appears on the display and the keypad is locked. Press twice the O key again to unlock the keypad.
5.9 Turning handset ON/OFF
Press and hold to turn off. Press for 2 seconds to turn back ON.
6 Caller-ID function (Display the telephone number of incoming calls)
This function is only possible if you are subscribed to a telephone operator that provides this service. When you receive a call, the numbers are saved in a Call list. This list can hold 10 telephone numbers (each of max. 20 digits). When you've received a new unanswered call, the CLIP symbol will blink on the display.
6.1 Consulting the Call list
Press the Call Log button. The last received call is shown on the display. If the list is empty, '-----' is shown on the display. For answered calls the -icon appears and unanswered calls the -icon appears Press the program key to show the other digits (if longer then 12) or to show the date and time. Use the scroll keys to scroll to the previous call. When you reach the top or bottom of the list an error tone will be sounded You can leave the Call list by pressing the on-hook button. You can dial out the number by pressing the Off-hook button.
7 Answering machine
The Diablo has a built-in digital answering machine with a recording capacity of 11 min. The answering machine can be operated from the handset and remotely. It features the possibility of recording two outgoing messages (OGM 1 and OGM 2) (maximum of 3 min).
There are 2 possibilities:
- With OGM 1, the caller has the possibility to leave a message.
- With OGM 2, only the outgoing message is given without the caller having the opportunity to leave a message
An internal voice will state various information, such as day and time of the call, as well as settings such as Security code, ringer tones,... The language of the internal voice is depending from the country sold (English or German).
The max. recording time for each incoming message = 2min
7.1 Display
The TAM icon will appear when the answering machine is turned ON. It's starts flashing if new messages have been received (regardless of the answering ON/OFF mode). If the answering machine is switched Off, the icon will not appear. The icon will flash fast if the internal memory is full and no new messages can be recorded.
When entering the answering machine mode (see below) the display will show the following if:
If no new messages are received: ' and a flashing -icon.
- If new messages are received the unit will start playing the messages and show ' -NN- -MM-'. NN = total of messages and MM= number is message currently played.
7.2 Entering the Answering contro mode
To start operating the answering machine you have to press the answering machine key . If you have new messages the messages will be played to the handset. If all new messages are played the new messages can be deleted if is pressed within 8 seconds of the end of the last message.
To leave the answering contro mode, press the -key again. In no instruction is received for 8 seconds, the unit shall return to idle. Following functions are available under each numerical key:
1' To hear main menu
2' Play all messages
3' Play new messages
4' Skip back during message playback
5' Deleting messages
6' Skip forward during message playback
7 Set answer On or Off
8' Hear the outgoing message menu
9' To set the security code
To set the day
Set the answering delay
To record a memo
7.2.1 Turning Answering Machine On/Off
If the answering machine is On, the O -Icon appear on the display in standby (or blink when there are new messages) and the machine will automatically pick up the line after a number of rings (7.2.2). To turn it On or Off, press 'T'.
Even if the answering machine is Off, it will automatically pick up after 10 rings to enable remote activation (§ 7.4)
7.2.2 Setting Number of Rings
The number of rings after which the answering machine will answer calls can be set from
2-9 and TS (Toll saver). The standard setting is 6 rings. In Toll saver mode, the machine will answer after 6 rings if there are no new messages, and after 2 rings if there are new messages. If there are no new messages and you call your machine to check your messages remotely (§ 7.4), you can hang up after the 2nd ring. You do not need to pay connection fees and you know that you do not have any new messages.
To check the actual number of rings, press the *key twice. A voice will playback the current number of rings.
Press the * key followed by the #-key to set the number of ringing tones. Enter the number of ring you want (2-9) or press 1' for Toll saver.
7.2.3 Day setting
Press '0' followed by * to hear the actual day.
Press '0' followed by '#' to set the day. Enter the day '1= Sunday, 2= Monday...7= Saturday'
If the day is correctly entered, the unit will announce the new setting.
7.2.4 Memory Full
If the memory is full, the answering ON/OFF icon will flash on the display rapidly (0,5 sec.
ON/OFF). If the answering machine is turned On and a call comes in, the machine will automatically play OGM 2 (answering machine function without recorded caller message).
When listening to the messages, the internal voice will announce that the memory is full and then play back the messages.
Erase some or all the messages after listening to them. The memory is free again.
7.2.5 Programming the security Code
The security code is a 3-digit code used to operate the machine remotely (§ 7.4). The security code is set to '123' by default. You can hear the current security code by entering '9' followed by the #-key.
To set a new security code press 9 + 11 . Enter the new code (3 digits) after the tone and confirm with the # -key.
7.2.6 Recording and selecting a Outgoing message
Press '8' to enter the outgoing message menu. The following options are available:
To hear main menu
2' To play current set OGM
3' To record OGM 1
4' To record OGM 2
'5' To select OGM 1
6' To select OGM2
'8' To hear OGM menu again
7.3Operation
If a call is received and the answering machine is turned ON, the answering machine will automatically answer the call after the set number of rings. If outgoing message 1 has been selected, the message will be played, a beep will be heard and the caller can leave a message (max. 3 minutes). If outgoing message 2 has been selected, after the beep, the line will automatically be disconnected. The caller doesn't have the possibility to leave a message.
Note: If, during pick-up, nothing is said for 8 seconds, the line will be automatically disconnected.
7.3.1 Call screening
This function is convenient if you only want to answer certain calls. During incoming call it is possible to screen the call and hear who is calling. You can hear the outgoing message and the caller who is leaving a message by pressing the Answering machine key....
7.3.2 Recording a Memo
A memo is considered as an incoming message that can be picked up later by the user. The max. recording time for a memo is 3 minutes.
Press the Answering machine key 00 and 1. Start speaking after the tone and press # to stop the recording.
7.3.3Playback of Incoming Messages and Memos
Press the Answering machine key to enter the Answering mode.
Press to play all the messages and memos.
Press to play only the new messages and memos.
For each message, the internal voice announce the day and time when the message was recorded.
During playback, you can:
Go to the beginning of the current message by pressing once.
Go to the previous message by pressing twice.
Interrupt playback by pressing . Press again to restart playback.
Go to the next message by pressing
7.3.4 Deleting Messages
a. Deleting one by one during playback
Start message playback as explained above.
During playback of the message to be erased starts, press
The machine will start playing the next message.
b. Deleting all messages
After you have listened to all messages, the internal voice will ask you to delete all the messages.
Press to confirm. After pressing delete, the internal voice confirms that all the messages have been deleted.
7.4 Remote operation
The answering machine can be operated remotely using a touch-tone phone (DTMF tone selection system).
The remote control is menu operated.
7.4.1 To enter the remote operation
Call your machine.
The answering machine picks up the line, you hear the outgoing message and a beep.
After the beep, press ** long. The unit will ask to enter the VIP code.
- Slowly dial the Security code (default 123).
If the Security code is incorrect, the unit will confirm and ask you to re-enter. If the Security code is correct and the unit has new messages, it will start to pronounce the amount of new messages an also play them. When all messages are played, the unit will ask you to press '5' to delete current played messages, or '1' to hear main menu.
If the unit doesn't have any new messages, it will say so and ask you to press '1' for main menu.
ITALIANO
5.6 TbpceneHa cnyuwaankata (Paging)
HaTnCHeTe 6yToHa "Paging" Bbpxy OCHOBHOTo TAno, CnyuAaKata N3daBa 3BbHraU cnHaN, KOITO Ie BN NOMORHe Da a OTKpneTe. HaTnCHeTe KoITo n da e ot 6yToHInTe, 3a da cnpTe 3BbHeHTo Ha cnyuaKata.
5.7 PpoceDypa Ha nporpaMpaHe
Moxete da npomeHnte MeIIOJnraHa 3BbHeHe, cIIaTa Ha 3Byka, dAtata, yaca n T.H. KaTo Bne3eTe B npOeDpyata 3a nporpaMPahe: 3a da Bne3eTe B pexm Ha nporpamnpahe, Tp8Ba Da HATncHEte n 3aDbpxKeT6yToHa "Program" DOKato Ha DCNner He 3anoHe da Mira IKoHaTa HatncHEte OTHOBO 6yToHa "Program", 3a da npomeHnte NpBaTa HAcTpOka. BCEK nT, KORato HAChHeTe 6yToHa "Program" , BVE NOTBpbXdAbate npeduHATA HAcTpOka n IpemnHabate KbM n CNeDBaUata HAcTpOka:
Cuna Ha 38yka/Menodur Ha 8bHnHO obaoHa 38yka/Menodur Ha eBmpeuHo obaxdahe Hacmpouka Ha dama/aca Hacmpouka Ha pexkuma 3a Ha6upahe Hacmpouku 3a "flash"epeme Cuna Ha 38yka/Menodur Ha ochobhomo mno
5.7.1 Menodura/cuna Ha 3eyka Ha cnyuwaankama 3a 8bhuho/8bmpewho 3ebHehe
HaTnCHete npOdbIknTeHNO 6yToHa "Program" ,doKato 3anoue Ha Mira IKoHaTa HaTnCHete OTHOBo 6yToHa "Program" - cyBa ce MeIOJrTa 3a BbHNo 3BbHeHe 3aIOYBa DA Mira IKoHaTa EXT. N36peTe JenaHata MeIOJra (1-5), kato BBBeTe CbOTBeTHnH HOpE (1-5) N3NON3BaTe KnaBnUHTe 3a npeBbPtaHe ▲ 3a da N36peTe JenaHata CnJa Ha 3Byka (Off (N3KNIOUeH 3Byk) IIN 1-5) HATnCHete OOE BeDhX 3a NOTBbPxjDaBaHe Ha HAcTpoiKaTa n IpemMHABe He KbM MeIOJrTa n CnJaTa Ha 3Byka HA BbTpseH No 3BbHeHe (npoeDypaTa e cbJata KaTO no-rope).
5.7.2 Hacmpouka Ha dama u yac
DD-MM HH:MM (DD=Дeн, MM=Мeceu, HH=Час MМ=MmHyTu)
BbBeTe DaTata N uaca, KaTo n3No3BaTe 6yToHnTe 3a CbOTBeTHnTe Homepa. Miraunr KypCop MoKe da Ce MeCTn C nomouTa Ha KnaBmUHe 3a npebpTa HATncHe Oe BeHbX 3a NotBbPkDaBaHe Ha HAcTpOka T nPemHaBaHe KbM CneBaAuta HAcTpOka No-doJy.
5.7.3 Hacmpouka Ha pexkma 3a Ha6upahe
Ima IBa peKIma 3a Ha6pahe: -1 -DTMF/ToHOBO Ha6pahe (Ha-ueTo n3no3BaH) (HaCTpoe Hn no npda36pahe) IIN -2 -Iyncobo Ha6pahe (3a no-ctapmpexu)
HaTnchTe "1" nnn "2", a noCne HaTnchTe Oe BEdhBX 3a NtBbpxkDaBaHe Ha HacTpOikKaTa I npemHabaHe KbM CneBaAata NaCTpOka No-dony.
5.7.4 Hacmpouka Ha epememo 3a Flash
Ima IBa I36opa 3a BpeMeTo 3a "flash": -1 - 100Mc IJN -2 - 250 Mc
HaTnchTe "1" nnn "2", a noCne HaTnchTe Oue BeDhBx 3a NOTBbpxkDaBaHe Ha HacTpOikKaTa I npemHabAe KbM CneDbauata NaCTpOka No-dony.
5.7.5 Menodua/cuna ha 38yka Ha ochoeHomo mno
UyBa ce 3BbHeHTo Ha OCHOBHO TAno. N36peTe JeJHaTa MeJIOJn (1-5), KaTO BbBeTe CbOTBEHn HOpE (1-5).
N3non3BaIte KJIaBnWITE 3a npeBbPtaHe 3a Ja n36peTe JeJHaTa CnHa Ha 3Byka (Off (nKJIIOueH 3ByK) nIn 1-5) HATNCHeTe
OuE BeINbX 3a NOTBbPxJaBaHe Ha HAcTPOKaTa I pEmNHAbAbe OTHOBKm peKIM "rotOBHOCT".
5.83akIIOUbaHe Ha 6yToHnTe
Korato KlaBnAtypata e 3aknOHeHa, HATNcKaHTo Ha KOTo N da 6nlo 6yToH Nma Da Nma HnKaKbB eΦeKT nO BpeMe Ha pexIM
"rotobhocT (OCBEN HATNCKAHe N 3aIbpxKaHe Ha KNABnua 一 _ 一 ).HaTNCHEt N 3aIbpxKte KnaBnua 一 _ 一 .Ha Dnucnpe ce noBA KnaBnataypata e 3aknoueHa HATNCHETe Dba nTn KnaBnua 一 _ 一 , 3a da OTKnIOHTe KnaBnataypata.
5.9 BkIIOUbaHe/IM3KIIIOUbaHe Ha CnywaJkata
HaTnCHeTe npOdbJIknteHoo 3a da n3KnHouHTe. HaTnCHeTe 3a 2 cekyHdN, 3a da BKJIOHTe OTHOB.
6 ΦyHKUa 3a ndeHTnΦnKaUaHa nOBuKBaHeTo (Ioka3Ba TeJeΦoHHn HOMep, OT KOITo NocTbNBA BXODaTO o6aXdaHe)
Ta3nФyHKUeEOCTbHNaEaHcHTBeHOaOcAte a6oHaT HaeTepeOHHeOnepaTOp, KoTo npedocTabra Ta3Nuycnyra. Korato nonuHTe NOBkBAHe, HomepaTa ce 3ana3BaT B "CnncbKa H a NOBkBAHnTa" (Call list). To3n CnncbK MoKe Da 3ana3Ba Do 10 TepeOHn Homepa (BceKn OT MaKc.20 uΦpn). Korato noIyHTe HOBO HePneto NOBkBAHe, CmBONbT CLIP npemrBa Ha dncnnner.
6.1 PpOBepBaHe Ha cnncbKa c NOBnKbaHn
HaTnCHete 6yToHa Call Log. NocneHto noIyHeNo nobKbaHe ce nok3Ba Ha dnCnJIe. Ako cnncbKbTe npa3eH, Ha nucnner CE noBBA, . 3a noIyHeH noAxKaDaHna ce noBBA nKOHaTa , a 3a HeOTROpeHn nobKbaHna ce noBBA nKOHaTa HATnCHete KlaBnHa 3a nporpamnpahe 3a da Bnnte dpyrnte uOppn (ako HomepbTe nobEe ot 12 uOppn) nn da n3BnKate Ha
Icnnnn daTata n 3a da npebpnto do npdunhoTo oaxdahe. Korato CTnHHeTe Do IbpBn HnIOncEHNHOmeb B cnscba H He MoKeTe Da npebpTaTe NOBeYe, Ue Ce ue 3Byk 3a rpeka aact nM MoKeTe da n3ne3eTe OT cncsbKa C obaxdanHH, KaTO haTNCHTe 6yToHa . MoKeTe da HaabepeTe Homepa, KaTO hATNCHTe 6yToHa 3a AKTNBIPAHe Ha cnUaNkata.
7 Tenepeohen cekpeTap
Diablo mBa BrpaedH uHpOB TepeoHcKepetap c KanauTet 3a 3anCbaHe Ha 11 Mn. Cb6eHnTepeHHrT cKePap Moke da ce nnon3Ba KaKTo OT cnUaKATA, Taka n OT pa3ctOHNHe. PpeJnara Bb3MOXHOCT 3a 3anCbaHe Ha DBe n3xoJaun Cb6eHnna (OGM 1 n OGM 2) (MaKcIMyM OT no 3 MNH. BCaKO).
VMa2Bb3MOXHOCTN:
-
PnOGM 1 oaxdaunr Ce mBa Bb3MOxHocT da octaBn cb06eHne
-
Ppn OGM 2 ce npedaba camo n3xoxaio cbo6eHne, 6e3 oaxdaunr ce da hma Bb3MOKHOCT da OCTaBn cbo6eHne
BpaenrncBn daaba paunuHn HOpmaueKaTo n uac Ha o6aJdHeTo, KaTO n HactpoKn KaTo KOd 3a cnHyphocT, 6pO n03bHBnaHn... E3NkT Ha To3n rnaC 3aBNCn OT DpbKabata, B KOrTo e npoJaeh anapatbT (ahrnnckn nn HeMckn e3NK).
MaKcImaHToBpeMe3a3aNc3aBCaKONoCTbNIOcbo6uHeNe=2MnH.
7.1 Duscnnei
Korato TelefoHHnAT ckepeTap e BkIOueH, Ha nCInJe CE NOBBA IKoHaTa 0. Ta 3anoBa da Mira, ako ca noJyehn HOBN Cbo6uHnRA (He3aBNCMO daIIN B MOMeHTA TelefoHHnA CkepeTap e BkIOueH INI IN3KIOueH). Ako the TenefoHHnTc kepTeap e N3KnOueH IKoHaTaO He ce NoBBA.
IkoHaTa npemrBa 6bp3o, ako BbTpueHata nameT e nbHnHe Morat da 6bDaT 3aNcBaan NOBue HOBn Cbo6eHn. PnBvBxEdaH He pexima 3a TelefoHHn CeKeTap (BX. no-DoJy) Dncnner TOKa3Ba CneHOTO:
AkoHamaNoIyueHnHOBNcbo6eHnra:IMrMaHaIKoHaO
Ako ca nonyuhen HOBn cbo6eHnra, anapaTb 3anOyBa da Bb3npo3BexJa cbo6eHnra Tn oka3Ba -NN- -MM- . NN = o6u 6pou Ha cbo6eHnraTa, a MM= HOMep Ha cbo6eHneto, KOEt Ce Bb3npo3BexJa B MOMeHTa.
7.2 Bnnahe B pexm 3a KOHTpOHa TelefoHHra cekpeTap
3a Da BKNIOHHTe TeneoHHNcKpeTAP, Tp6Ba Da HATNCHEe KnaBnla 3a TeNEoHEn CKePETAP O. Ako IMATE HOBN cbo6ueHnA, Te Ce Bb3npON3BeXdAOT CnyuAnkata.AKO CTe NPOClyuAnn BCNUKn HOBN cbo6ueHnA,MOKeTe Da n3TpneTe Cbo6ueHnA, KaTO HATNCHEe DO 8 CEkyHm CneI Kpar Ha NoCleHnO To Cbo6ueHnE.
3a da n3ne3eOT pexmma 3a KOHTpon Ha TelefoHHn cekpeTap, HATNCHEte OTHOBKnaBnla . Ako He noIyu "HCTpyKun"do 8ceynanapatbT ce BpBua B pexm "rotobnoct".
CneHnTe yHKunn OTRObaprHa BCEKNOT KnaBnHTe C nO
1' PpocJyWBaHe Ha OCHOBHTo MeHIO
2' PpocnyBaHe Ha BCnKc Cbo6eHna
3' PpocnyBaHe Ha HOBnTe CbO6eHn
4' Bpbuahe c eHc bObueHne Ha3a n o BpeMe H npocnyBaHe
5' N3TpBnBaHe Ha cbo6eHnA
6' Ppemnhabahe c eHNO cbo6eHne Happe n Bo peme Ha npocnyBahe
7' BkIIOUbaHe n 3KIOUbaHe Ha 3aInc OT o6aJdaunr ce
8' PpocnyBaHe Ha MeHIOTo 3a n3XoHNTe CbO6eHn
9' HactpoBaHe Ha KaOJa 3a CnIpyHocT
0' HactpoynkaHa deH
* HactpoKa Ha BpeMeTo 3a n3uKBaHe npEnn AKTNBpaHe Ha TeNefoHHna cekpeTap # 3anncBaHe Ha HanomHrao Cbo6ueHne
7.2.1 BkNIOyBaHe/u3KNOyBaHe Ha menefoHHua cekpemap
Ako TeJIeOHHnRT CeKpeTape BkHouEn, IKOHATA OCe NOBBA Ha DCINNEB R peKIM "rTOBHOCT" (NJN Mmra, KORATO HOBN Cbo6ueHn) IN MaunHata ABTomATuH0 3aema JInHnTa CJeI ONpeDeHe 6poI N03BbHnBaHn (S 7.2.2). 3a BkHouBaHe n N3KIOUHaHe HATNCHEtE '7'.
Dopn aKo TenefoHHnT cKepeap e n3KnHoyeh, Toa aBToMaTuHNo 3aeMe JInHra Ta Cne10 no3BbHbAHn, 3a da no3BOJn AKTNBipane oT pa3CTOHNHe (S 7.4)
7.2.2 Hacmpoueahe ha 6por no38bHraHua
BpoT no3BbHbAHn, cneI KOTo TeNefoHHrT cekpeTap "OTROBaP" Ha BXOJaTO ObaJdaHe, MOKe Ja ce HAcTpon OT
2-9 n Ha TS ("Toll saver", Функцяза песене на телегоньрем). Стандатота нахтука e 6 no3bняваня. В поюмчeh pexIM ("Toll saver") машината оговарс слд 6 no3bняваня, akо hyma hoBN cbo6шени, и слд 2 no3bняваня, akо hyma hoBN cbo6шени. Аку hyma hoBN cbo6шени и вe ce obaxdate на телегонь, за дпpoberite сбобшенида сп OT pa3ctoHme (S 7.4), можete на заторite слд,BTOPO NO3bняване. He ce hyana da палate takca 3a CBp3Bahe n 3haete, che hymaTe HOBN cbo6шени.
3a da npobepnte Hactpoehn B MOMeHTa 6poi no3BbHraHHa, HATNCHTe DBA nTn KnaBua **.Ie yyeTe rnaC, KoTo cbo6uaba 6poHa Hactpoehn B MOMeHTa 6poi no3BbHraHHa.
HaTNCHETe KnaBnua *a cneToBa KnaBnua #, 3a da Hacponte 6poHa no3BbHbAHnra. BBeDeTe JeJAHn 6poI NO3BbHbAHnra, (2-9) nIu HaTNCHeTe '1 3a IKOHOmUeH peXIM ("Toll saver").
7.2.3 Hacmpouka Ha deH om cedMuqama
HaTnchete 0' a cneI TOBa *3a da cyyeTe HAcTpOeHmB MOMHTa DeH.
HaTnchete 0', a cnei TOBa #', 3a da HacTponte DeH. BbBeTeTe DeHra 1= HeDeHra, 2 = noHeDenHnk...7=c6bota
Ako DeHrTe npabuJHo BbBedeH, anapaTb T Cbo6aaba HObITE HAcToPiKn.
7.2.4 Namemma e 3aBHeHa
Ako nameTt a 3aBHeHa, INoKHata ON/OFF mHa ha dncnpe 6bp30 (0,5ceK. ON/OFF). Ako TeJefoHHnTc kepETap e BkHouen I NOCTbN BxOdAIO NOVKBaHe, MaunHata aBtOMaTHNO 1e Bb3npOn3BeDe OGM 2 (fynKzra 3a TeJefoHen cKePETap 6e3 3anCbaHe Ha Cbo6uHne o OBaxdaunCe).
Dokato npocnywba cboeHnet, Brpaednrt nac ue cboeun, ye naemTa e nbna, n cneTobaae Bb3npo3Bede cboeHra 3a npocnyBahe.
I3TpHnTe HnKOn nIn BCnKn CbO6eHn, Cne KaTo r npocnywate. NaMeTTa OTHOBo e oCBO6oDeHa.
7.2.5 Ipoaspamupahe Ha koda 3a cuayphocm
KoIbT 3a cnpyhOCT e 3-uzfpob KO, KOIto ce n3noJI3Ba, 3a da nonyHte Doctbn DO MaunHata ot pa3cToHne ( § 7.4). IIO noIpa36npahe KOnbT 3a cnpyhOCT e Hactpoeh Ha '123'. MoXeTe da yyeTe BaJIuHnB MOpEHTa KOd 3a cnpyhOCT, KaTO BBeJeTe '9', NocJedBaHOOT KJIaBnua #'.
3a da hactponTe HOB KOd 3a cnryphocT, HATNCHeTe ^ + ^ . BBeTeHOBnKOd (3uΦpn) cJeI 3ByKOBn CnHaJI I NOTBbPDeTe C HAITNCKaHe Ha KnaBnua #.
7.2.6 3anucbahe u u36op Ha u3Xo8uO cbo6ueHue
HaTnCHeTe '8', 3a Ja BnE3eTe B MeHTo 3a NxOJaun CbO6UeHNr. Pa3noJarate Cbc CneHnTe BB3MOXHOCTN:
1'3a da npocnywate OCHOBHOTo MeHIO
2' 3a da npocnywate HAcTpoEHO TO MmOeHTa OGM
3'3a Da 3aennTe OGM 1
4'3a da 3anwete OGM2
5'3a da n36epete OGM 1
6'3a da n36peTe OGM2
8' 3a da yyeTe OTHOBo MeHTo 3a OGM
7.3n3no3BaHe Ha yHKnraTa
Ako noJyUHTe o6aKdane H TelefoHHnT CekpeTap e BkHouen, TelefoHHnT CekpeTap aBOMaTHNO OTRObApra Ha o6aKaHaTe Ocne HacToeHN 6poi no3BbHbAHn. Ako cTe n36paHn n3XoJaIcO bO6JeHne 1, c06Be Hb3Pon3BeDeHO, cNe d KoEto ue ce yye 3ByKOB CNrHan, a o6aKaunrT ce ye moKe da ocTabn CbO6JeHne (MaKc. 3MnHyTu). Ako cTe n36paHn n3XoJaIO c06SeHne 2, Bp3kata 6bJe npeKbChata aBOMaTHNo CneD 3ByKOBn CNrHan. ObakdaunrCe He nOnyHaba B3MoKHOCT Da OCTABn Cbo6SeHne
3a6eJekka: Ako cnei otBapare Ha TelefoHHata NINHry QOBkBT OTCpea He KaXe Hnio B npOdbjXeHne Ha 8 ceKyHn, INHHraTa ce npeKbCBA aBTOMATuHO.
7.3.1 PpeBahe Ha exOaume obaaHua (Call screening)
TAsn FyHKuE yO6Ha, aKo NCKaTe Da OTROBAPrTe cMo HA ONpeJeHn NOBKNBaHn. IIO Bpeme Ha NoCTbNBAUo NOBKNBaHe e Bb3MOxHO da npOBepnte NOBKNBaHEnTo n Da YyeTe KOI Ce 06Akd. MoKeTe Da YyeTe 3XoJIoTO CbO6UeHne n O6AkdAunrCe, KoITO OCTABr CbO6UeHne, KATO HATNCHEr KNaBnHa 3a TelefoHEn CekpeTap...
7.3.2 3anuceaHe Ha HanomHrauO cbo6ueHue
Hanomnto cboche He ce TpeTnpa kato noctbnao cboeHne, KOeTo MoKe da ce npocnya no-Kbcho ot notpe6nteJra.
MaKcMmaHTo BpeMe 3a 3anncBaHe 3a HAnOMnHIO cBQSeHneE 3 MNHyTN.
HaTnCHHe KnaBnIa 3a TeNeΦoHEn cekpeTap OO n. 3anoyheTe da roBOpnte CneD 3ByKOBnCnHaJI n HaTnCHete #' 3a KpaI Ha 3aIIca.
7.3.3 Pocnywae Ha noctbnunme cbo6eHua HAnomnau cbo6eHua
HaTnCHHe KnaBnua 3a TeJefoHEn CekpeTap, 3a Da Bne3eTe B peKIM "TeJefoHEn CekpeTap".
HaTnCHHe 3a da npocnyata BCNUK BxOJaUN HAnOMHauN CbOSeHNA.
HaTnchTe 8a da npocnywate camo HOBNTe BXODAUN HAnOMHAAu cboSeHHa.
3a BcraKO CbO6eHHe BrpaedHrT AToMaTuHrIac CbO6uBa DeH uac Ha 3aNcBaHe Ha CbO6eHHeTO.
Pn npocnywBaHe MoKeTe:
Ja ce BbpHeTe KbMaHaJIoTO Ha 3BvuaIooT B MoMeHt a cbo6ueHne, KaTo HATNCHeTe BeHNbK.
a ce BbPHeTe He npEiHnHOTo CbO6eHne KaTO HtNCHeTe DBa nTt.
Ia npekbcheTe npocnywbaHeto, kaTo HATNCHETe . HATNCHETe OTHOBo, 3a da 3anoCHeT npocnywbaHeto OTHaJaNo.
Ja npemHeTe KbM CneBaIoTO CbOSeHNe, KaTo HaTnCHeTe
7.3.4 N3mpueaHe Ha cbo6ueHua
a.ИЗТРИВАЕ endo no endo no BpeMe Ha npocnyuBaHe
No-rope e o6acheHo kak da 3anoyheTe npocnyuBaHeto Ha cbo6eHnra.
3a da n3tpne Te cbo6eHne no BpeMe Ha npocnywbaHeTo, HATNCHe O.
MaunHata 3anoYBa Da Bb3npOn3BexJa CneDbaUTo Cbo6uHeHe.
b. N3tpnBaHe Ha BCnUKN Cbo6eHn
Cne KaTo Cte npocnyuann BCNUKn Cbo6ueHn, BrpaedHnT ATOMaTuHn Tnac Ie BN NOnNTa DaNN NCKaTe da N3TpNeTe BCNUKn Cbo6ueHn.
HaTnCHete O 3a noTbBpKdAbAhe. CneI HaTnCKaHe Ha KnaBnla 3a n3TpNBaHe BrpaDeHnT ATOMaTHueH rIac nOTBbPkDaBa, He BCnKcCbo6eHHra n3TpNTn.
7.4 PpocnyuBaHe OTo pa3cToHnE
TepeHHrT ckeptap moke da ce npocnyBa oT pa3ctoHne c nOmoTu Ha ToHOB TepeOH (CnCTema 3a u36op Ha DTMF TOH). YnpabneHneTo OT pa3ctoHne CTaba C nOmoTu Ha MeHIO.
7.4.1 3a da ene3eme e pekum "om pa3cmohue"
- ObaTe Ce Ha TepeOHnCn Hmep.
TelefoHHnT cekptap OTbapr NHHnTa, yBaTe n3XoDraIcTO Cbo6eHne n 3ByKOB CnHaJ.
Cne3ByKOBn HnHan HATncHete npOdbJnxTeNHO *AnapatbT ue noncKa ot Bac da BBeDeTe VIP KO.
BaBHO n36epete Koa 3a cnrypnoct (no noopa3bnpahe 123).
Ako kOdbT 3a cnpyhocT kOe hne npabnEn, anapatbT ue cbo6uToBa n ue Bn nomOn da ro BbBeTe OTHOB. Ako kOdbT 3a cnpyhocT e npabnEn n B TepeoHa ca 3anaeHn HOBn Cbo6UeHn, anapatbT 3anoBa da cbo6uaBa 6poR ha HOBtce bO6eHn, cIeD KoETo ige n Bb3npo3Bede 3a npocnyuBaHe. Korato Ca npocnyuHaH BCuKn Cbo6UeHn, anapatbT Bn npinnomHn da HATNCHeTe '5', 3a Da n3TpneTe npocnyuBaHO To B MOMTa Cbo6UeHne nn '1' 3a da yyeTe OCHOBTO MeHIO.
Ako Hama 3a nicaHn HOBc bO6eHn anapaTbT ue Bn cbo6u Toba n ue BN npiz3OBe da HATNCHETe '1' 3a OCHOBHTO MeHIO.
Magyar
Pictograma TAM ❷❸❹❺❺❺❺❺❺❺❺❺❺❺❺❺❺❺❺❺❺❺❺❺❺❺❺❺❺❺❺❺❺❺❺❺❺❺❺❺❺❺❺❺❺❺❺❺❺❺❺❺❺❻❸❸❸❸❸❸❸❸❸❸❸❸❸❸❸❸❸❸❸❸❸❸❸❸❸❸❸❸❸❸❸❸❸❸❸❸❸❸❸❸❸❸❸❸❸❸❸❸❸❸❽⃗⃗⃗⃗⃗⃗⃗⃗⃗⃗⃗⃗⃗⃗⃗⃗⃗⃗⃗⃗⃗⃗⃗⃗⃗⃗⃗⃗⃗⃗⃗⃗⃗⃗ ⋅ ⓹ ⋅ ⓹ ⋅ ⓹ ⋅ ⓹ ⋅ ⓹ ⋅ ⓹ ⋅ ⓹ ⋅ ⓹ ⋅ ⓹ ⋅ ⓹ ⋅ ⓹ ⋅ ⓹ ⋅ ⓹ ⋅ ⓹ ⋅ ⓹ ⋅ ⓹ ⋅ ⓹ ⋅
Pictograma 00 clipeoste des dacamemoria internaeste plina sinnu mai pot fi inregister alte mesaje.
4 Hndnkaunn Hn3KOro 3apra aKKymyIaTOPOB
Korda aKKymyTopbI caaTcR, Tpy6ka 6oJIbWe He MoXeT BblONHrTb CBOI cyHKUIN. AkyyMnyrTOp 3apJxKeH AKKymyIaTOp pa3pJxKeH
EcnBbpa3roBaepaete, aakymyIop B 3To Bpem caIITcA, TO Tpy6ka nOaCT npedynpeKdauoui cnHan. Nomectnte Tpy6ky B 6a308bMOnyNb dna 3apJKn AkkMyIaTOPOB.
5Функци
5.1 NcxOJaune Bbl3OBbl
5.1.1 Coepueheue 3eOHka unu noemopbui Ha6op odHO2o u3 nocJeHux 5 Homepe
BBeHTe HxHbI TepeHHbI Homep HnH HaxMTE KJIaBnUy NOBTOHO Bb3OBA DnHa6opa OJHO rNocHeHX5 Homepo HaxMaTe KJIaBnUIN POKpyTKN ▲▼ , Noka Heo6xoDnMbI Homep He BbcETNTcH HaKpaHe HaxMTE KJIaBnUy CHrTn Tpy6Kn ,ДЯ erO H6opA DnI 3aBepWeHnB bI3OBA HaxMTE KJIaBnUy 3aBepWeHn pa3roBopa
PpmeaHHe:BoBpempa3roBopaMOxHOOTKIOHTbNCHOBA BKIOHTbMKNPOoOH,HaxKaB KnaBnuy
PpmeaHHe: MoXHO yCTaHOBnTb yPoBeHb rpoMKoCTn MeXdy 1 n 5 npn noMoOn KnabuNn npokpyTKA
5.1.2 PpedapumelbHbHa6Op Homepa
BBeINTe Heo6xOuMbH OHomep.Ecn BbI DoynCTnN Own6ky,To CnΦpy MoXHO CTepeTB,Haxab KNBuOy OTKIOUeHnMnKPOoHa . Haxmte KnaBnU CHaTn Tpy6Kn .BBeHeHbH NHomep 6yDet Ha6paH ABTomAtNuYeCKnIO IJra 3aBepueHnBa Haxmte KnaBnU 3aBepueHn pa3roBOpa
5.2 BxOJaIe Bbl3OBbl
PnBxOJaEM BbIOBe Tpy6Ka HauHHaet 3BOHHTb. →ДЯ OTBaTe Ha 3BOHOK HaxMITE KJIaBnUy CHrTna Tpy6Kn .ДЯ 3aBepSeHnBbIOBA HaxMITE KnabNsu 3aBepSeHnpa3ro
5.33aHncb HmepoB B namrTb
BbMOKeTe 3aHcTaB 10 HnpeMbIX HmepOB (do 24 uΦp) B namrTbeJefoHa.
BbICpo HaxMNTe KnaBnuy namrTa .Ha 3kpaHe BbcBETnTc npBaar 3anncb HaxMnte u ydepKnBaTe KnaBnuy namrTa , noka Ha 3kpaHe He nOraBnTc 3Hohok BBeDnTE Homep ryeKe nnamrTa (0-9), B kOTopoJxenaete CoXpAHnTB HOMep n CHOBa HaxMNTe KnaBnuy namrTa BBeDnTE Homep, KOtOpBn XeNaete COXpAHnTB. CHOBa HaxMNTe KnaBnuy namrTa n OoTBePXDehnra . Bby ycbluHTe CnHAn NODTBePXDehnna H na 3kpaHe BbcBETnTc cneDyUo7a 3anncb. Dnra BBixOda n3 peXmMa nporpaMMnpOBAHnnaMrtn HaxMNTe KnaBnuy 3abepeHnra pa3rcopa
PnmeaHHe: Ecn Heo6xOIMMO BBeCTn nay3y, To HaxMITE KnaBnuy nobTOPOHa6opa/nay3bI P B MecTe, rDe Heo6xOIMMa 3-ceKynDaHnay3a.
5.4 3BOHOK NO HOMepy n3 namrTn
HaxMMTe KJabuNy lamrTn KJabuWamn npokpyTKn ▲ nepeiDnte K 3aNNCH Homepa, KOtOpBj XeJaTe Ha6paTb (0-9). HaxMMTe KJabuNy ChrTn Tpy6kn . Homep n3 lamrN tydET ha6paH aBTOMaTHueckn. ⅡIra 3aBepWeHn BA Bb3OBA HaxMMTe KJabuNy 3aBepWeHn pa3roBOpa
5.5 PpmaoN doctyn k naamrTn (KnaBn1,2,3)
Imeetc3yueKn(KJabuHn‘1,'2'n3),B KOTOpbIE MoXHO 3aNcAtb Homep n Ha6paTb erO,HaXaB n ydepXNBaO OHy n3 3TNX KJIABuHn n3 peKmuaOxUdAHn. Annapat ABTomatueckn BbIeT Ha NHHIO n Ha6epet Homep, npncBOEHbI dIra 3TOI KJIABuHn.
5.5.1 Ipoaspammuoeaue Knae u npmao docmnu Ka narnmu
BbICrpo HaxMNTe KnaBnUy namrtn .HaxMNTe N ydepKnbAte KnaBnUy namrtn ,noKa Ha 3kpaHe He BbCBeTtCT3aOHOK . HaxMNTe N ydepKnbAte OndHy n3 Tpex KnaBnU nprrmOro Doctyna K naMrtn (KnaBnU 1,2 nnn 3), noN KOtopoJ keJaete 3anuCaTB Homep, noka Ha 3kpaHe He Noarntc Sx - .BBeDnTe Homep, KOTOpB JKeJaete CoXpaHtB. CHOBA HaxMNTe KnaBnUy namrtn Dnra noDTBepKdEHH. BBy YcNbIwTe CnHaI NOdTBePckDeHH N Ha 3kPaHe BbCBeTtCTCneDyUOaJ 3aINCb. DInra BbIXOda n3 pexkMa nporpammpOBAHnnpaONn PAMrTN HaxMNTe KnaBnUy 3aBepSeHH paStBopa
5.6 POnsck Tpy6kn
HaxMNTe KJIaBnUy NOnCKOBOro Bbl3OBA Ha 6a3OBom MoDyne, n Tpy6ka HauHET m3daBaTb CnHAn, no KOtOpomy Bbl cMOKeTe onpeDenIb ee MeCtoHaxOxKdHeNe. HaxMNTe IIO6byo KJIaBnUy dny PnekpaueHnra CnHana Ha BCex Tpy6kax.
5.7 PpOeCC nporpaMMnpOBaHn
BbMOxTe N3MeHnTb MeIOuHO BbI3OBA, rpoMkoCTb, DaTy, Bpemr n T.D. npn noMoOni nporpaMMnpoBaHnna: IJra HauaIaporpaMMnpoBaHnna HaxMtte u ydepXnBaIte KnaBnU nporpaMMnpoBaHnna , noka Ha 3KpaHe He 3amraet 3NaOH CCHOBaHaxMtte KnaBnU nporpaMMnpoBaHnna DnA CmHb IpepBoHacToPkn. KaXdbIM HaxaTneM KlaBnI nporpaMMnpoBaHnna BblNoTBePckdaTe npdeBdyuTu HoCTpoNk cNeDyIouee:
PomKocmb/Menodua 6b308a no EheuHne JnupomKocmb/Menodua BHympHeNo 6b308a YcmaHOe daMbIepMeHu YcmaHOBka peKUMa HabOp YcmaHOBka epemHu c6poca (fN3w) FpOMKocmb/Menodua 6a308o2o Modyn
5.7.1 Menodur u apomkocmb eheuhezo/ehympeHHezo b30a Ha mpy6ke
HaxMMTe uYdePbNBAuTE KNaBnUy npOrpAMMnPOBaHnRA , noka Ha 3KpaHe He 3aMnraeT 3aHoc K. ChOba HaxMMte KnaBnUy nporpAMMnPOBaHnI yCbIUnTE MeNoDIO DnA BHeUHero BbI3OBA, noka MraE T3aHoc EXT. BbI6epITE JeaEMyIO MeNoDIO (1-5), BBeJa COOTBeCTByUoJHn Homep (1 - 5) KnaBnUamn IpokpyTK A BB6epITE Heo6XoDMbI yPoBeHb rPOMKcTn (OTKn.IJN 1-5) CHOBa HaxMMte KnaBnUy DnI NaTBePjDeHn I nepeJeTe B pexm YcTaHOBKn MeNoDIn I rPOMKcTn dJI BHyTpEHero BbI3OBA (npraDOK DeiCTBn TAKO Jke).
5.7.2 YcmaHoKa dambu u spemeHu
DD-MM HH:MM (DD=чисно, MM=мecя, HH=чась and MM=MнHyтBI)
BBeTe DaTy N BpemY HcNIOBbIMn KJIaBnIaMn. Mraiou3HaOK KypCopa MoKHO nepeMeuaTb KJIaBnIaMn npokpyTKn △
CHOBA HAKMITE KnaBnWy DnI NOITBepKdEHHaCtPoEK INIe NpeXoJa K CneDyUoSeH aCtPoKe HNke.
5.7.3 YcmaHoeka pexuma Habopa Homepoe
CyueCTbYOT DBA Tnna Habopa HomepOB: -1 -DTMF/ToHOBBI Ha6op (Ha6OJee paCnpocTpaHeN) (no yMOUaHHIO) IIN - 2 -IMnIbChBn Ha6op (IJI B6OJee CtapbIX ATC)
HaxmTe 1' nIIN 2' n CHOBA haxmTe KnaBnWy DnI NOITBepKdEHHN I dIe npexoA K cneDyIOUe HAcTPOKe Hnke.
5.7.4 YcmaHOeKa BpeMeHu c6poca (fN3w)
EcTb DBA BapnHaTb BpeMeHn c6poca: -1-100 Mc NIN -2-250 Mc
HaxMTe 1' nIIN 2' n CHOBA HaxMTe KnaBnUy DnI NOITBePKeHnI n Ia nepeXoKa CneDyUeHnAcTpoKe Hnke.
5.7.5 Menodua u apomkocmb 6a3080o Modyn
Ba30Bb moDyIb n3daet CnHAn 3BOHka. Bb6epnte XeJnaemYIO MeIoNIO (1-5), BBeJa COOTBETCTBYIOUH HOMep (1 - 5). KnaBnAmn npokpyTkn YcTaHOBnTe Heo6XoIMMbI ypOBeHb rPOMKoCTn (BbIKn.IIN 1-5) CHOba HaxMITE KNaBnUy Dnra noTBePjXDeHn HaCTpoEk N BO3BpaueHn B pexm OxNDAHn.
5.8Блokировka knaBnAtypbI
Korda knabnata 3a6loKnupoBaHa, Ho HaxtaTne kaoi-Ni6o KnaBnWb Pexkme OxuaHn Hn K yEme He npboDnt (KpOme ydepXnBaHn KnaBnUo.). HaxmTe n ydepXnBaTe KnaBnUw . → o noBnTc Ha 3kpaHe n KnaBnAtya 3a6loKnpyETc. → DbaJdbI HaxmTe KnaBnUw dIra ChrTna 6loKnupOBKn KnaBnAtypbl.
5.9 BkIIOueHne/BbIKIOueHne, Tpy6Kn
HaKMITE n ydepXnBaIe KnaBnUy , qTo6bl BBKIOuHTb Tpy6ky . HaxMnte n ydepXnBaIe KnaBnUy B TeueHne 2 cekyHd, qTo6bl CHOBA BKIOuHTb ee.
6 ΦyHKzna onpeJeHnHa Homepa 3BOHJzero (Poka3bIbaeT Ha 3KpaHe Homep BXODaJzero Bbl3OBA)
Dahna yHKnna pa6oTaT toBko ecn BaW onepaTop TepeHHoCBA3n npEOCTabIeT Takyu ycnyr. PnBxOJaE M BbIOBe Hmepa coXpaHraOTcB CnCKe BbIOB. CnCKo MoKET CoepKaTb Do 10 TepeHHbx HmepOB (kAkdH He 6onee 20 uΦp). Korda y Bac HObH HeOTBeHeHHb Bbl3OB, To Ha 3kPaH e Mtraet 3HaQOK
6.1 PocmOt p cncka Bbl3OB0B
Hajmte KnaBnuy CnCKa Bb3OBov Ha 3kpahe BbcBETCRA HOpem nocneHero noyehHoro 3BOHka. Ecn CnCOK nyT, To HA 3kpaHe BbCBETTCRA ----.OTBeueHHbIE Bbl3OBbI NOMeHbI 3NaKOM a npOnyUeHHbI - 3NaKOM HaJMeTe KnaBnuy npOrpamMnPOBaHn YTO6bI yBnDEb OCTaJIbHbI cNcPbI HOepa (ecnn x BoJe e 12-Tn) ININ dIn npOCMOtpa DaTb INBpeMeHN Bbl3OBa. KnaBnAMn npokpyTK MoKHO nepeITN KnpdeBlyuEmy B3OBy. KorDa Bbl DoiJeTe DO hauana ININ KOHa CnCKa, TO Tpy6Ka NODact CNHAn OLIOBBI MOKeTe 3akpbITb CnCOK Bbl3OBov HaxKaTHm KnaBnUI 3aBepSeHnra pa3ROBopa . HaxaTNem KnaBnUI ChrTNA TpyKn MoKHO HabpaTb HOpem IN 3 CnCKa.
7 ABTOOTBETYHK
Tepeoh Diablo nMeet BCTpoehhbl ABTOOBETNk, No3BOJIAHOUI 3ANCAb COO6UHHe npoDOnKInTeBHO 10 11 MHyT.
ABTOBETUOKOMMOXHOynpabTbHEnOCpeDCTBEHHoC Tpy6Kn N DnCTaHcHNOHHO. OH daeT BO3MOXHOCTb 3aNtCaTb DBA NCxOJaIINX COO6ueHn (OGM 1 n OGM 2) (MaKc. do 3 MIn.). CyueCTByIO T 2 BO3MOXHOCTn:
Bnaorapra OGM 13BOHRAUMOKeT OCTaBHTcoo6ueHne
C OGM 2 MOKHO 3aHcA Tb Nb NCXoJruee COO6uEHNe 6e3 BO3MOxHOCTn 3BOHrUeMy OCTaBtB COO6uEHe
BcTpoEHnA rONOCOBa CNTema npeoCTabnt pa3nnHyo HOpMaUIO: DaTy N BpEmra 3BOHa, a TaKke HAcTpOky KoJa 6e3OnaCHOCT, MeNoDn BbIOBa... RaBk rONOCOB CNTembl 3aBNCIT O CTpaHb, B KOTopo npOdaetc annapaT (aHnNckn nnHemeKKn).
MaKcHmAbHn npoDOnJxnteBHOCTb 3aNNC KaKaDoR BxOJaUeRo COOSeHHra = 2 MInH.
7.1 3KpaH
3Naouk TAM 00nOBtCra Ha 3KpaHe npBKnOueHHOM aBTOBETUKe. PnpnoCTynneHn HObIX COo6eHn OH NaHnaet MrraTb (He3aBNCmIO OT TORO, BKnOueH INN BBIKNOueH aBTOBETUKN). Ecnn ABTOOTBEuNK BBIKNOuHTb, To 3HaouK 00 He 6yJeT BBICBeuHBaTcR.
3NaOck 6yDcTbMgTaB,ecnBByHTpeHHaNpMaTb nepeonHeHa HET Bo3MOxHcTn 3anCaTb HOBbIe COo5ueHna.
PnBKnHueHH npKIma ABTOOBETUka (cm. Hxke) Ha 3KpaHe BbCBeNTTCr CneDyHouee:
EcnHOBbIX COo6eHn HET:IMMraOuI 3NaOH
- Ecnn noyuhenb HOBbIe COo6uHnra, To annapat NaHET BOCpOIN3BOIDInb nx, Noka3bBaJ -NN- -MM- . NN = Bcero coo6uHn, a MM= Homep BocPOn3BOIDmORo B daHHbI MOMeHT COo6uHn.
7.2 BkIIOueHHe pexHMa ynpaBJIeHn aBTOOTBeTcNKOM
IHaHactpoKn ABTOBtBuNkA Heo6xOIMHO HaxaTb KONIKy ABTOBtBuNkA O。EcnIOCTyINNIHOBIIe COO6UeHNr,To OHn 6yDyT BOCpON3BOIDNTBCryepe3 DnHAMNK Tpy6Kn.EcIN BCE HOBIIe COO6UeHNr BOCpON3BeDeHb,TO INMOXHO CTepeTB,HAXAB KONIKY 0He No3dHe8 cekHyndnocne 3aBepuEHNA BOCpON3BeDEHnNocNeDhro COO6UeHNr.
IINBbIXOaH3peKIMaYnpabJIeHHaBTOOBETcHKOMCHOBaHAKMTEOO.EcnBTeueHHe 9eHNHMAeTcHnKaKHX DeiCTBn,TO annapat BepHTcBpeKIM OxuaHH.
Kakda KnaBnua COOTBeTCTBye TneDyoueI yHKun
1' PocnywataOBCHBHO MeHIO
2' Bocnpo3BecTn BCE coo6eHnra
3' Bocnpoun3BecTn HOBbIe COO6ueHnA D
4' Nepemotab Ha3aB Bo BpMa BocPon3BeJeHn Coo6eHn
5' CTepeTb coo6eHnA
6' Iepemotatb BnpeB Go Bpem Bocnpon3BeHncoo6eHn
7' YcTaHOBnTb OTBet Ha BKJI. nN BblKJI.
8' PpocnyaTb MeHIO XcOJauxx COo6eHn
9' YcTaHOBnTb KoD 6e3OnaCHOCTN
0' YcTaHOBtB daTy
* YctAHOBtB 3aIepKky OTbeta
3aHcTaB rOIOCOBy 3aMeTky
7.2.1 BkIIOueHue/8bIKIOueHue aamooIeumyuka
IpiBKNIOHOM ABTOOTBeTNKe B pEXMME OKINDAHNA HA 3KpaHE ROpNT 3NaOHOK (NIM MInraET,ecnEcTBHOBBie COo6eHNA) ABTOOTBeTNIK ABOTMATNUeCKN OTBeNT Ha 3BOHOK Yepe3 ONPeJEnHoe KOINueCTBO rYdkOB (CM.7.2.2 "YcTaHOBKa KOnueeCTBa rYdkOB"Ha cTp.6).IIaBKNIOUeHNA INN BBKIOUeHNA ABTOOTBeTNKa HaxMNTE '7'.
Daxke ecn ABTOOBtuk BbIKIOueH, TO OH ABOTAMUeCKn Cpa6oTaet nocne 10 rykoB dIyKIOuEHn yHKmN DnCTaHIOHOB BKIOUeHn (cm.7.4 "IuctaHIOOHoe ynpabNeHne" Ha ctp.6).
7.2.2 YcmaHoEka KOnuYeCeMea 2ydkos
KoIInueCTBO rdkOB, nocJIe KOTOPOABTOOBETNk OTBtHn HA 3BOHOK, MOxHO yCTaHOBNTb N3
2-9 n TS (PexnM 3Kohomn). CtaHapThoe Bpema OTbTa coCTabIeT 6 rydkOB. B pexmme 3Kohomnn ABTOBtBuK CHmMe Tpy6ky nocne 6 rydkOB, ecnB namrtn Het HObIX COO6eHn, n nocne 2 rydkOB npn HauuHn TaKobix. EcnHObIX COO6eHn HET n Bbl 3BOHnTe Ha CBO ABTOOTBeYnK DnA nCTaHcHNOHNO npOBepKn COO6eHn (cm.7.4 "DInCTaHcHNOHHe ynpabNeHne" Ha ctp.6), TO MoKeTe NOJoxNt b Tpy6ky yke nocne 2 rydkOB. He hyxho PnATNb 3a JImHee Bpema CoeHHeHn N Bbl ToHo 3Haete, YTO HObIX COO6eHn HET. UTo6bI y3HaTb yctAHOBnEHoe KOINHECTBO rydkOB dBaXdbI haxmnte KNaBnWy *CnCTema rONOCOM COO6uNT KOINHECTBO rydkOB.
HaxMMTe KnaBnuy *, a 3aTEM #' dnn yctahOBKn KOINueCTBa rydkOB. BBeDInTe KeNaemoe KOINueCTBO rydkOB (2-9) nnn HaxMMTe 1' dnn BKIOUeHHa Pekmua 3KoHOMm.
7.2.3 YcmaHOBka dHa Hedenu
Haxmte 0', a 3aTeM * dI npocnyuBaHn IHa HeJeI.
HaxmTe '0', a 3aTe m #' dIy yctaHOBN dIy HeIeIIN. BBeIte IeHb HeIeIIN '1= BOckpeceHbe, 2= noHeIeIbHNK...7= cy66Ota' EcnIeHb HeIeIIN BBeIeH BepHo, To annapat coo6uT O coxpaHeHHN HOBn HAcTpOKn.
7.2.4 NepenolHeHue nammu
Ecnn namrTb 3anonHeHa, to 3kpahe 6bictpo 3amiraet 3naohok BkIIOueHn/BykIIIOueHn ABTOOBETnka (c HtePbaNOM B 0,5ceK.). Ecnn aBTOOTBeTnK BkIOueHn Bam KTO-TO 3BOHnT, TO aBtOMaTHeCKn 6ydet npOIRpbBaTbcra COo6uHne OGM 2 (abTOOTBeTnK 6e3 BO3MOXHOCTn 3ANCA Tb COo6uHne 3BOHnJero).
Pn npocnyuBAHn COo6eHn CnCTema rOLOCOM COo6uHT, YTO nAMrTB 3aONHeHa, NIMb NOcNE 3TORO BOCpOn3BeDeT COo6eHn. YdAnTE BCE HnHEckonbKO COo6eHn NOcNE pocnyuBAHn nAMrTB CHOBa 6yET CBO6OHa.
7.2.5 BsoD koda 6e3onacHocmu
KoI 6e3onacHocTn COCTOIT N3-IXuPp INpeHa3haueH IINr IINCTaHIOHOY npabHeHRA BTOOTBeTuKOM (CM.7.4 "IInCTaHIOHOHoe ynpabHeHne" Ha cTp.6).IIO yMOJUahHIO YCTAHOBJIEN KO, 6e3onacHocTn '123'.BbIMoKeTe npocnytaTB TekyuN KoI 6e3onacHOCTM, HAKAB '9', a Notom #'.
IyCTaHOBKn HOBOrO KOJa 6e3OnaCHOCTn HaxMNTe '9' +'.Pocne 3ByKOBOrO CnHaJa BBeDnTe HOBbIKoD (3 uOpbl) n noDTBepdnte KnaBnWei #'.
7.2.6 3anucb u eb6op ucxodraeoo coo6uehe
Haxmte 8' nBxOa B MeHIO xCoxOaIcx COo6eHn (OGM). IocTyne H cNe dyuOuN BBbOp:
1' Pocnywatab OCHOBHOe MeHIO
2' Bocnpon3Becn Tekyuee OGM
3' 3aɪncaTb OGM 1
4' 3aNaCaTb OGM 2
5' Bb6paTb OGM 1
6' BblbpaTb OGM2
8' Choba npocnywaTb MeHIO nCXOJauxx coo6eHH
7.3ДeIeCTBnE
EcNn Bam 3BOHrT npR BkIIOHcHOM ABTOOBETHKe, TO ABTOOBETHcK ABOTMAUeCK CNHMET Tpy6ky nOcne OnpdeJIeHHORo KONuCCTBa rydkob. EcNn Bb6paHO NcXODaIe Coo6JHHe 1 (OGM 1), TO nocne BOCpOn3BeDeHnA COo6JHnA 3BOHauy yCbIuNT 3ByKOBoi CnHaJI M oKet OCTabITb COo6JeHne (MaKC. 3 MHyt). EcNn Bb6paHO NcXODaIe COo6JHHe 2 (OGM 2), To nocne CnHaIa CoeINHeHne npePBcTc. B 3tOM cnyae 3BOHsHn He CMOxET OCTaBt b COo6JeHne.
BHHMaHHe: EcJn nocJe CHaTnA Tpy6Kn ABTOOBETyHKOM 3BOHJI MOnUHT B TeueHHe 8 ceKyH, To coeHNHeHne ABTomATuCeCKn npepbIbaeTcR.
IpepbTaB BOCpOn3BeDeHne, HaxaB ▷. CHoBa HaxMITE ▷ nra BO3O6HOBJIeHnB BOCpOn3BeHnA.
IpeenK cJeNyUoIeMy coo6eHnIO, HaxaB
7.3.4 YdaenHeue coo6eHu
a. YdaJIeHne coo6ueHH no-ODHOMy BO Bpem npocnyuBaHn
HaHnTe Bocnpoun3BeDeHne COo6uEHHa, KaK yKa3aHO BbIe.
Bo Bpemr BoCnpon3BedeHnna Haxmnte IydaJeHnny Tekyuero coo6uhenra.
ABTOBtueHK HauHET BOCnpon3BODHTb CneDuOe e coo6uene.
b.YdaenHe Bcex coo6eHn
Iocne npocnyuBauHn Bcex coo6eHn, cnCTema cnpocnt 06 ydaJeHn Bcex coo6eHn.
Haxmte ⅢnnoTbepxdeHn. Nocne haxatna knabun ydaenHn ciTeMa roIocom coo6uNT o6 ydaJeHHn Bcex coo6eHn.
7.4 DuctaHcnoHHoe ynpabJeHne
ABTOOBETHOKOM MOXHO ynpabTb DnCTaHcNOHH npn NMOU TeJefoHa C TOHaJIbHbIM Ha6Opom (DTMF-peKIM).
HCTAHIOHOHe ynpabJeHne OcyueCTBnRETCpN NOMOuMeHIO.
7.4.1 Ixoda pekum ducmauOHoo ynpaeHeu
- 03BOHnTe Ha CBOB aBTOBTbTuK.
- ABTOBETYHK CHIMET Tpy6ky N Bby yCblIuNTe IcxOJaUee Coo6UeHne n 3BykoBoi CnHaJ.
- NocIK CnHnHa NaXmTe n ydepknBaIe *CnCTema 3anpocnt BBeCTn KOI.
He cneuHa6epnte KoD 6e30nacHocTn (no ymoJuaHnIO 123). - EcN KOD 6e30NaChOCTN BBeH eBepHO, CnCTema NOBTOPO 3aIpocNT erO. EcN KOD 6e30NaChOCTN BBeH eBepHO IN CnCTema ecTb HOBtte COo6uHn, OHa COo6uHT KOINueCTBO HObIX COo6uHn IN BOCpON3BeET IN. PocIe npocnyuBaHnR BcEx COo6uHn, CnCTema nonpocNT Haxatb '5' dIn ydaHnra TeKyuero COo6uHn, INI '1' dIn BxOda B OCHOBHe MeHIO
- EcnB CnCTeme HET HOBbIX COO6UeHn, OHa COo6UHT O6 3Tom n nonpocnt HaxaTB '1'ДЯ BXODA B OCHOBHOE MeHIO.
CESKY
5.5 Pikanappaimet (Nappain1,2,3)
7.2.2 Stille inn antall ring
visit our website www.topcom.net