KG 2399 - Grill plate SEVERIN - Free user manual and instructions
Find the device manual for free KG 2399 SEVERIN in PDF.
| Brand | Severin |
| Model | KG 2399 |
| Product type | Contact grill plate |
| Dimensions (W x D x H) | 35 x 32 x 13 cm |
| Weight | 4.2 kg |
| Power supply | 220-240 V~, 50-60 Hz, 1800 W |
| Cooking surface | 30 x 22 cm |
| Plate coating | Ceramic |
| Temperature range | 90 - 230 °C |
| Timer | 1 minute to 4 hours |
| Automatic programs | 5 (vegetables, sausages, fish, chicken, steak) |
| Display | Digital screen with heat and time indicators |
| Fat collection tray | Removable |
| Removable cooking plates | Yes (upper and lower) |
| Safety | Automatic shut-off after 2h15, overheating protection |
| Cleaning | Plates and tray washable with soapy water; appliance wiped with damp cloth |
| Spare parts available | Cooking plates, fat collection tray |
| Repairability | Do not repair yourself, contact after-sales service |
| Warranty | Warranty statement included |
| Usage | Indoor only, on a flat and heat-resistant surface |
Frequently Asked Questions - KG 2399 SEVERIN
User questions about KG 2399 SEVERIN
0 question about this device. Answer the ones you know or ask your own.
Ask a new question about this device
Download the instructions for your Grill plate in PDF format for free! Find your manual KG 2399 - SEVERIN and take your electronic device back in hand. On this page are published all the documents necessary for the use of your device. KG 2399 by SEVERIN.
USER MANUAL KG 2399 SEVERIN
2 Scope of supply 20
3 Description 21
4 Before the first use. 23
Unpacking 23
Cleaning. 23
Installation. 23
Grill plates. 24
Grease drip tray 25
5Grilling 27
Without automatic program. 28
With automatic program 28
6 Cleaning. 30
7 Recommendations for use 30
8 FAQ 31
Error codes 32
9 Disposal 32
10 Technical Data. 32
1 About this manual
General information
These instructions are an integral part of the appliance.
- Read them carefully before setting up, installing and using the appliance and keep them for future reference.
Pass them on to any subsequent owner or user of the product.
The appliance must only be used by those familiar with the instructions below.
Relevant documents
- Quick start guide
- Safety manual [Safety]
Warranty declaration (Warranty)
Warning notices

Signal word
Type, source and consequences of the hazard
Measures to avoid the hazard.
Signal word Description
| Danger Imminently | hazardous situation which, if not avoided, will result in death or serious injury. |
| Warning Potentially | hazardous situation which, if not avoided, could result in death or serious injury. |
| Caution Potentially | hazardous situation which, if not avoided, could result in minor injury. |
| Attention Potentially | hazardous situation which, if not avoided, can result in property damage. |
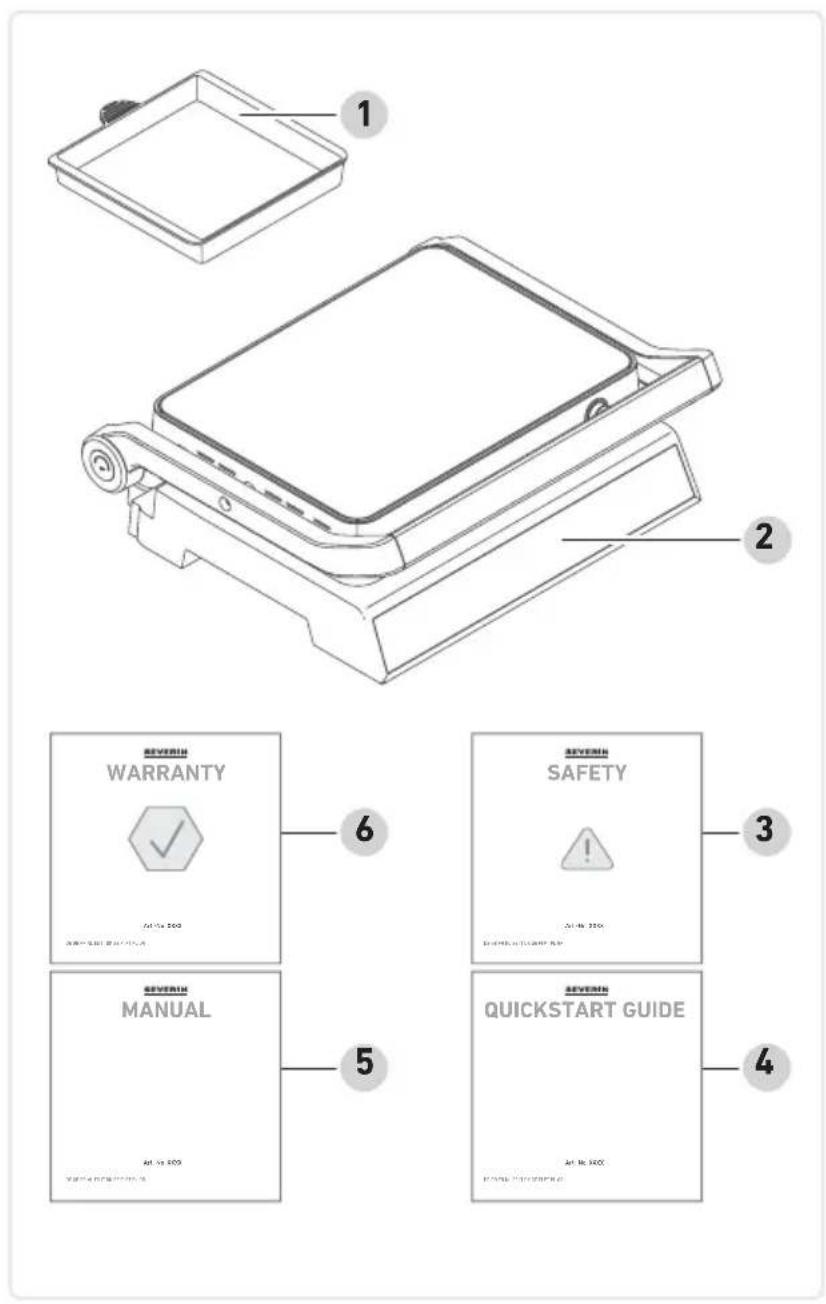
2 Scope of supply
1 Grease drip tray
2 Contact grill
3 Safety instructions
4 Quick start guide
5 Instruction manual
6 Warranty declaration


www.severin.com
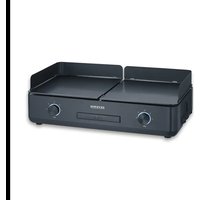
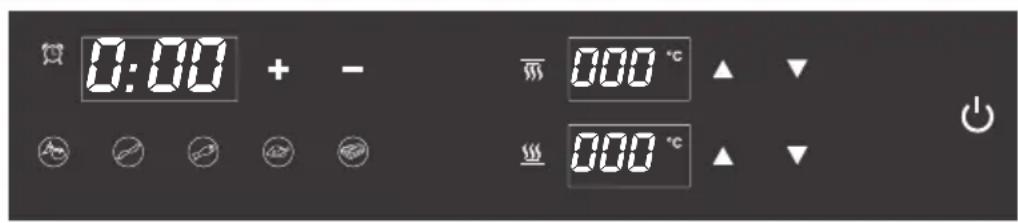
3 Description
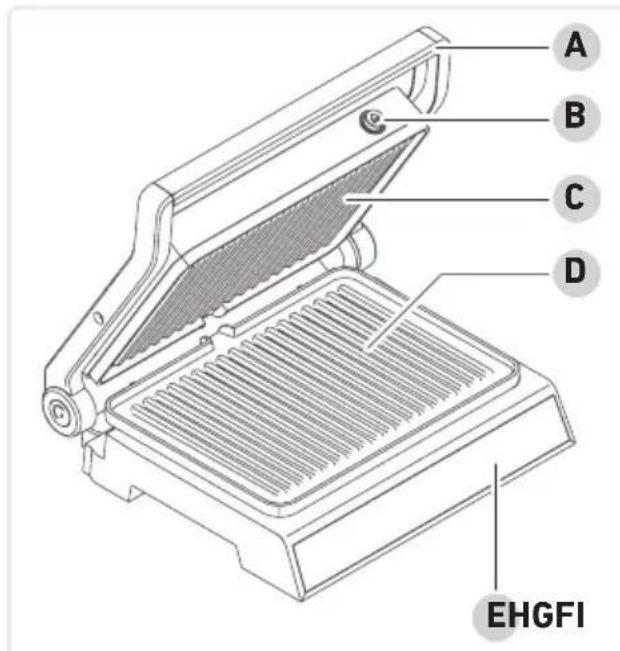
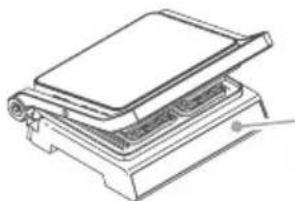
A Handle
B Upper grill plate release
C Upper grill plate
D Lower grill plate
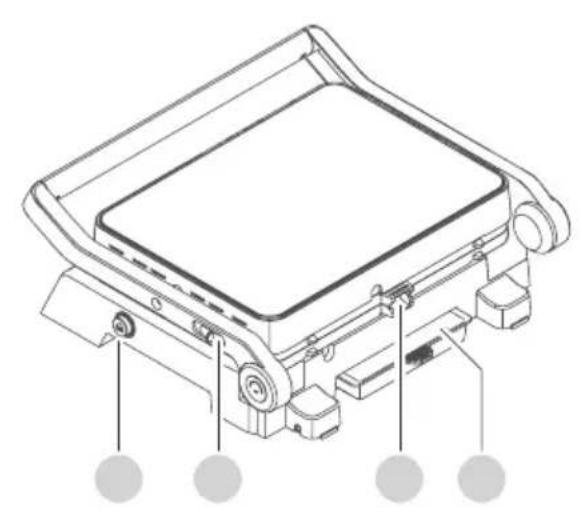
E Display
F Lower grill plate release
G Lid release
H Grease outlet
I Grease drip tray
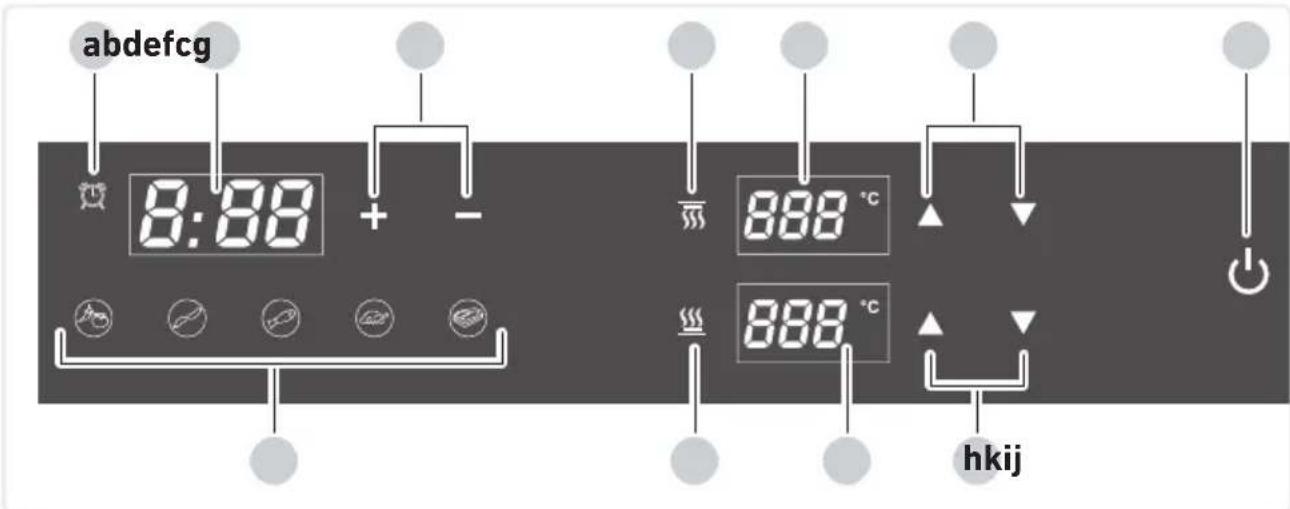
a Time status display
b Time display*
c Timer
d Upper grill plate heat indicator
e Upper grill plate temperature display**
f Upper grill plate temperature control
- The minimum cooking time is 1 minute, and the maximum is 4 hours.
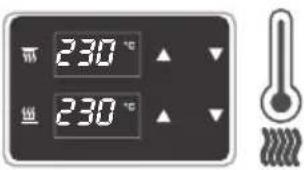
** The temperature can be set between 90 and 230^ .
g On/Off button
h Lower grill plate temperature control
i Lower grill plate temperature display**
j Lower grill plate heat indicator
Automatic
| program | Time | Temperature |
| Vegetables | 8 minutes | 200 °C |
| Sausage | 10 minutes | 220 °C |
| Fish | 8 minutes | 210 °C |
| Chicken | 7 minutes | 230 °C |
| Steak | 8 minutes | 230 °C |
4 Before the first use
Unpacking
Remove all parts from the packaging.
Remove all packaging material, protective film and stickers.
! Never remove the rating labels; they must always remain on the appliance.
Check the scope of delivery for completeness and damage.
Cleaning

Caution!
Risk of injury from electric shock and damage to the appliance.
Do not immerse the appliance in water.
Wipe the appliance with a damp cloth and dry.
Clean the grill plates and grease drip tray with warm soapy water and dry them.
Installation

Only use the appliance indoors.
Place the appliance on a flat, heat-resistant surface.
Ensure adequate ventilation.
The appliance must only be connected to a properly installed socket.
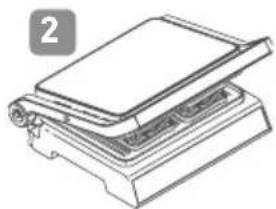
Grill plates
Removing the grill plate:
Pull the catch on the handle forward.
Open the lid completely.
Press the release button.
Remove the grill plate.
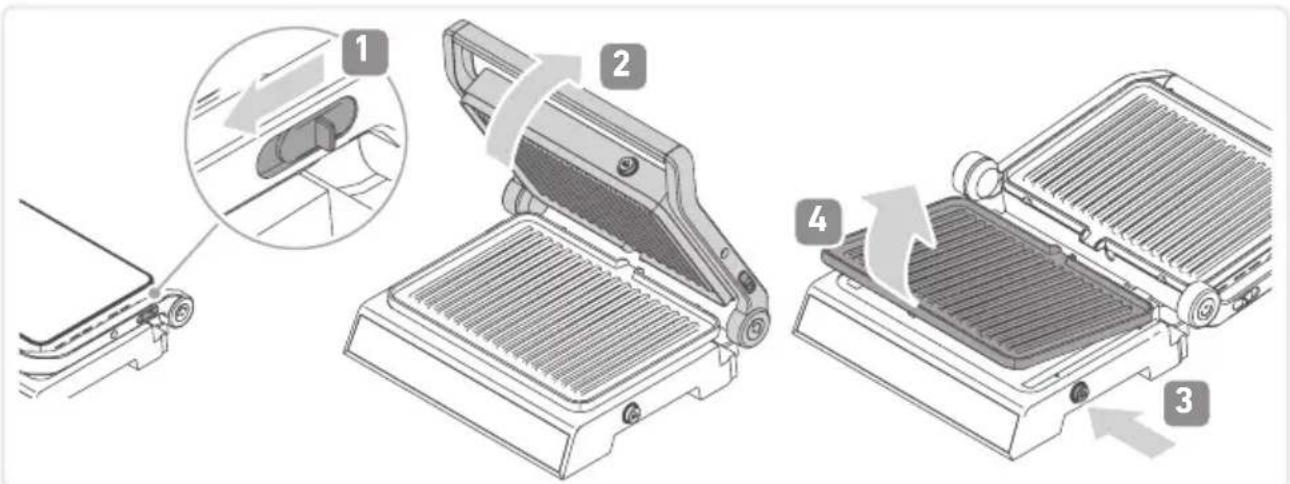
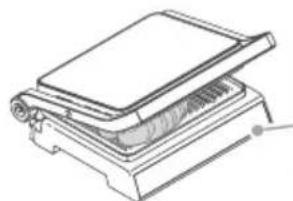
Inserting the grill plates:
Push the latching lugs into the openings.
Lower grill plate: Press the grill plate down until it audibly clicks into place.
Upper grill plate: Press the grill plate up until it audibly clicks into place.
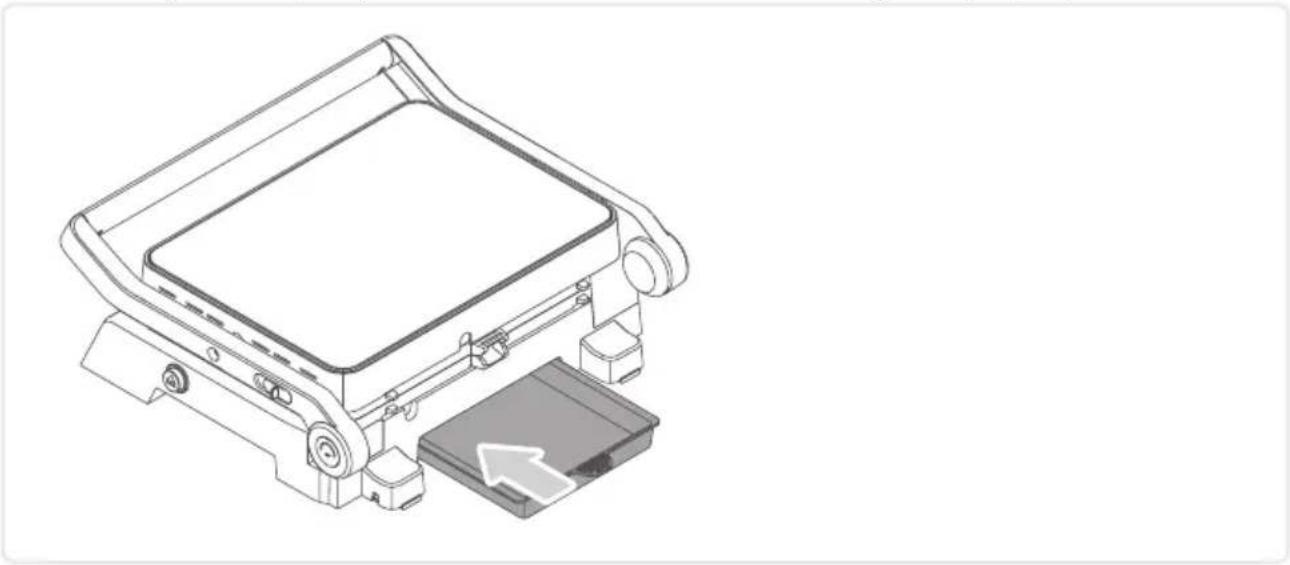
Grease drip tray
Before each use, check whether the grease drip tray is in place and fitted correctly. If it is not in place, insert the grease drip tray.
Check the level of the grease drip tray at regular intervals.
- When the grease drip tray is full, remove it and discard the used grease properly.
First use

Caution!
Risk of injury from slight build-up of smoke. Inhaling smoke can cause damage to your health.
Open the windows or doors.
Insert the grease drip tray at the back of the appliance.
Fit the upper and lower grill plates into the appliance.
- Close the appliance and connect the power plug to the socket.
When you switch on the appliance, you will hear a short beep, and the On/Off button will light up.
Pressing the Vegetables and Steak buttons at the same time turns off all button tones and beeps. Press the two buttons again simultaneously to switch the tones back on.
- Let the appliance heat up for approx. 15 minutes at maximum temperature [230^] without food to allow any unpleasant odour to dissipate.
Settings: see page 28, Without automatic program


Switch off the appliance after 15 minutes, unplug it and let it cool down when closed.
Wipe the upper and lower grill plates with a damp cloth.
5 Grilling
Set up the appliance in a suitable place, see page 23fallation.
Insert the grill plates and grease drip tray into the appliance.
Close the appliance and insert the power plug into the socket.
You will hear a beep.
All icons will flash briefly, and then the On/Off button will light up.
Pressing the Vegetables and Steak buttons at the same time turns off all button tones and beeps. Press the two buttons again simultaneously to switch the tones back on.
Press the On/Off button briefly.
All icons on the display will light up.
Without automatic program
Setting the temperature and time manually
Use the temperature control buttons to set the temperature for the upper and lower grill plates.
After pressing the button, the display jumps to 200^ . From here, set the temperature by tapping or holding down the temperature control buttons. Each button press increases or decreases the temperature by 5^ .
Wait until the heat indicators flash red.
Use the timer buttons to set the desired cooking time.
Wait for the settings to take effect. The timer status display lights up green, and the heat indicators flash.
The heating starts.
With automatic program
Press and hold the button for the desired program for approx. 2 seconds
- The selected program lights up green.
The time and temperature presets are displayed.
The heat indicators flash red.
The timer status display lights up green.
The heating starts.
Temperature and cooking time can be adjusted manually before, during and after the heating phase; see page 28. Setting the temperature and time manually.
You can change your current automatic program to any other program at any time.
Press and hold the program button until it lights up green.
After the set temperature has been reached
- you will hear three beeps,
- the heat indicators will light up red.
- the dots on the time display will flash and
- the timer countdown will start.

Attention!
Frozen food can cause damage to the grill plate due to excessive temperature differences.
Only place completely thawed food on the grill plate.
- Open the lid of the appliance, lightly grease the grill plates and place food on the lower grill plate.
Close the lid.
During grilling, check the grill progress at regular intervals.
After the cooking time has elapsed
- you will hear four beeps,
- all icons on the display will light up white and
- the temperature control buttons will flash.

Warning!
Risk of burns from hot parts of the appliance and accessories.
Do not touch hot parts of the appliance or its accessories.

Attention!
Pointed or sharp metal objects can damage the coated surfaces of the appliance when removing the food.
To remove the food, use a wooden or plastic spatula.
Remove ready-made food with a wooden or plastic spatula.
Press and hold the On/Off button for 3 seconds to turn off the appliance.
Unplug the appliance and let it cool down while closed.
All beeps normally heard after preheating and cooking can be switched off by briefly pressing the On/Off button.
If the appliance is not in use, it switches to standby after 2 hours and 15 minutes.
6 Cleaning
Clean the appliance after each use.
Before each cleaning, unplug the appliance and let it cool down.
Remove the grill plates and grease drip tray.
Empty the grease drip tray.
Clean the grill plates and grease drip tray with rinse water.
Use a soft cloth or sponge and water with a mild detergent. Do not use metal sponges and abrasive cleaning agents.
- Clean the appliance with a damp cloth. They must not be immersed in liquids or even allowed to come into contact with them.
Dry all parts.
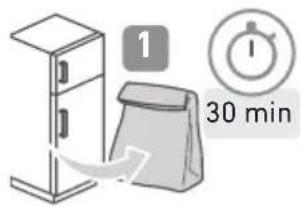
7 Recommendations for use
Remove the food from the fridge at least 30 minutes before grilling.
For grilling, set the temperature between 200 and 230^
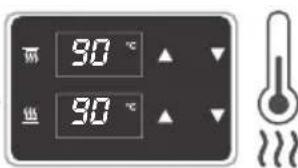
To keep warm, set the temperature to 90^

Warning!
Risk of injury from operating a faulty appliance. Operating a faulty appliance can lead to electric shock.
Never use a faulty appliance.
Do not attempt to repair the appliance yourself.
Contact our customer service in the event of a defect.
Before contacting our customer service, check the table below to see if you can rectify the problem yourself.
Question / problem Possible cause Solution
| The appliance is not responding. | • No power. Check whether • The heating elements are factory-treated with a care product that evaporates during initial preheating. | • the appliance is connected to the power supply. • the mains socket is energised. |
| Smoke comes out of the appliance during preheating. | If smoke develops only during initial preheating, this is normal. The care product is non-toxic and harmless. Nevertheless, ensure good ventilation. | |
| Some foods burn, others are undercooked. | • Food is not in the middle of the grill plate. | Make sure that the food is placed centrally on the grill plate and the optimal temperature has been selected for the preparation. |
Error codes
Display What to do?

The appliance is overheated.
Switch it off, allow it to cool down completely and then try again.

Contact customer service immediately.

Contact customer service immediately.
9 Disposal
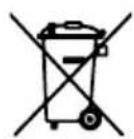
Appliances marked with this symbol must be disposed of separately from household waste. These appliances contain valuable raw materials that can be recycled. Proper disposal of these items protects the environment and public health. Your local authority or retailer can provide detailed information on proper disposal.
10 Technical Data
| Power 1,800 W | |
| Voltage/Frequency 220-240 V~, 50-60 Hz | |
| Type of grill surface Ceramic coating | |
| On/off switch Button | |
| Temperature control Thermostat-controlled | |
| Grill surface 30 x 22 cm | |
| Weight approx. 4.2 kg | |
| Appliance dimensions 35 x 32 x 13 cm |
Contenu
www.severin.com/socials

MANUAL KG 2399 03/24
Model specifications are subject to change.