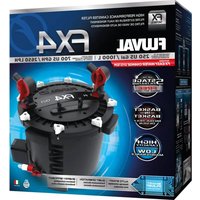
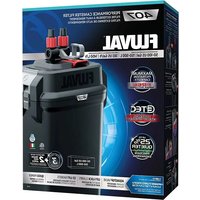
UVC - Water filter Fluval - Free user manual and instructions
Find the device manual for free UVC Fluval in PDF.

| Product Type | UVC Clarifier for External Aquarium Filter |
| Brand | Fluval |
| Model | UVC |
| UVC Bulb Power | 3 W |
| Power Supply | Power Supply 100-240 V / 24 V |
| Input Voltage | 100-240 V AC |
| Output Voltage | 24 V DC |
| Built-in Timer | 24 h cycle with continuous and intermittent modes (4, 6, 8, 10 or 12 h) |
| Compatible Hose Diameter | Inner 16 mm, outer 19 mm |
| Supplied Hose Length | 47 cm (18.5 in) |
| Included Accessories | Ribbed hose, 2 lock nuts, 2 mounting screws, timer |
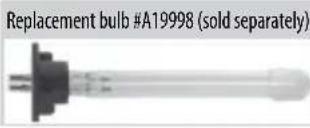
| Replacement Bulb | Part #A19998 (sold separately) |
| Protection Rating | Non-submersible |
| Maximum Water Temperature | 35 °C |
| Intended Use | Domestic Ornamental Aquariums |
| Electrical Safety | Requires a residual current device (30 mA max) |
| UV Warning | Never look directly at a UV bulb while in operation |
| Maintenance | No maintenance required, do not clean or disassemble |
| Repairability | Not repairable, complete replacement required in case of failure |
| Warranty | 3 years (subject to conditions) |
Frequently Asked Questions - UVC Fluval
User questions about UVC Fluval
0 question about this device. Answer the ones you know or ask your own.
Ask a new question about this device
Download the instructions for your Water filter in PDF format for free! Find your manual UVC - Fluval and take your electronic device back in hand. On this page are published all the documents necessary for the use of your device. UVC by Fluval.
USER MANUAL UVC Fluval
MANUAL DE INSTRUCTIUNI
NAVOD NA OBSLUHU
BRUKSANVISNING
BRUGERVEJLEDNING
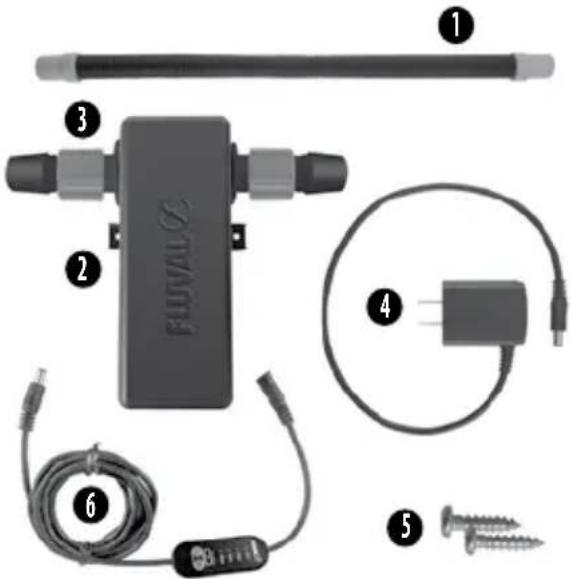
- 18.5^ / 47 cm Non-Kink Ribbed Hosing
- 3W UVC In-Line Clarifier Unit
- Two (2) Lock Nuts
- 100-240V/24V Power Supply
- Two (2) Mounting Screws
- 24-Hour Timer
IMPORTANT SAFETY INSTRUCTIONS
WARNING- To guard against injury, basic safety precautions should be observed, including the following:
- READ AND FOLLOW ALL SAFETY INSTRUCTIONS
And all the important notices on the use and maintenance of this appliance. Disregarding this advice may result in damage to the appliance or personal injury.
- DANGER - To avoid possible electric shock, special care should be taken since water is employed in the use of aquarium equipment. For each of the following situations, do not attempt repairs yourself; return the appliance to the store where it was purchased if still under warranty. If the appliance shows any sign of abnormal water leakage, immediately unplug it from the power source.
A. This is a NOT a submersible product. Do not immerse the product in water! If the appliance falls into the water, DON'T reach for it. First unplug it and then retrieve it.
B. If the appliance shows any sign of abnormal water leakage or if RCD (or GFCI- Ground Fault Current Interruptions) switches off, disconnect the power supply cord from mains (main power supply).
C. Carefully examine the appliance after installation. It should not be plugged if there is water on parts not intended to be wet. If electrical components of the appliance get wet, unplug the appliance immediately.
- CAUTION - NEVER LOOK INTO A UV LAMP WHEN SWITCHED ON.
Direct exposure to ultraviolet light can damage eyes and skin.
- WARNING - Close supervision is necessary when any appliance is used by or near children. This appliance can be used by children ages 8 years and above and persons with reduced physical, sensory or mental capabilities or lack of experience and knowledge if they have been given supervision or instruction concerning use of the appliance in a safe way and understand the hazards involved. Children shall not play with the appliance. Cleaning and user maintenance shall not be made by children without supervision. To avoid injury, do not touch moving parts or hot parts.
- CAUTION - Always unplug or disconnect all appliances in the aquarium from the electrical supply before placing hands in water, before putting on or taking off parts and while the equipment is being installed, maintained or handled. Never yank the cord to pull the plug from outlet. Grasp the plug and pull to disconnect. Always unplug an appliance from an outlet when not in use.
- This appliance cannot be repaired. Do NOT try and disassemble this unit, it is sealed and NOT serviceable. Whole unit must be replaced.
- This appliance comes with a 3 watt bulb that can be replaced.
- This appliance requires no cleaning and is maintenance free. Do NOT attempt to clean unit using water or other substance.
- This appliance should only be used with the power supply unit provided.
- The supply cord cannot be replaced. If the cord is damaged the appliance should be disposed of in the proper manner.
-
Do not operate any appliance if it has a damaged cord or plug, or if it is malfunctioning or it is dropped or damaged in any manner. The power cord of this appliance cannot be replaced. If the cord is damaged, the appliance should be discarded. Never cut the cord.
-
To avoid the possibility of the appliance plug getting wet, position the tank to the side of a wall mounted receptacle to prevent water from dripping onto the receptacle. A "drip loop", should be arranged by the user for each cord connecting an aquarium device to the receptacle. The "drip loop" is the part of the cord below the level of the receptacle or the connector if an extension cord is in use, to prevent the water from travelling along the cord and coming into contact with the receptacle. If plug or receptacle gets wet, DO NOT unplug the cord. Disconnect the fuse or circuit breaker that supplies power to the receptacle then unplug the transformer and examine for the presence of water in the receptacle.
-
This appliance contains a UVC emitter. Unintended use of the appliance or damage to the housing area may result in radiation exposure, even in small doses, may cause harm to eyes and skin. Damaged units should not be in operation.
-
WARNING – Disconnect all appliances when performing maintenance.
-
The appliance is to be supplied through a residual current device (RCD) having a rated residual operating current not exceeding 30mA .
-
This appliance is a UVC water clarifier for use in ornamental household items. Do not use the appliance for any purpose other than that for which it is intended. The use of attachments not recommended or sold by the appliance manufacturer may cause an unsafe condition.
-
Do not use this product in swimming pools or other situations where people are immersed.
- This product is suitable for use with water temperatures up to 35^ .
- Do not use this product with inflammable or drinkable liquids.
-
To avoid overheating, always ensure the filter is pumping water through the unit while the UVC is plugged in.
-
This product should not be placed where it can fall into the water. It should be placed in a dry and protected place, with sufficient ventilation around it.
-
If an extension cord is necessary, ensure connection is watertight and dust proof. A cord with proper rating should be used. A cord rated for less amperes or watts than the appliance rating may overheat. Care should be taken to arrange the cord so that it will not be tripped over or pulled. The connection should be carried out by a qualified electrical installer.
WARNING - Do not connect power to unit unless unit is fully and correctly assembled. The unit must always be fully filled with water when operating.
- Do not cut hose.
SAVE THESE INSTRUCTIONS
PREPARING YOUR FILTER (EXISTING SETUP)
- Ensure your canister filter is unplugged.
- Ensure your canister and its hoses are empty of water and the hoses are removed from the aquarium before beginning UVC unit installation.
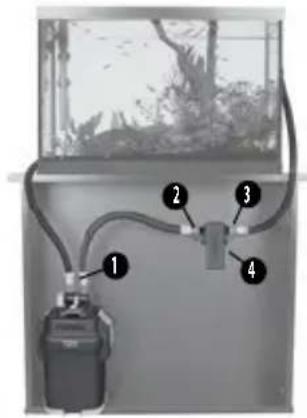
UVC INSTALLATION
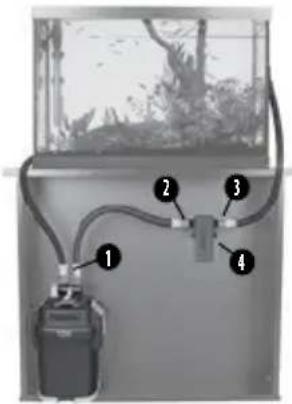
The UVC unit is compatible with Fluval 06 and 07 series canister filters, in addition to those with output hose inner diameter of 5/8'' (16 mm) and an outer hose diameter of 1/8'' (19 mm).
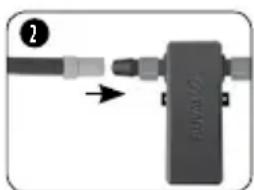
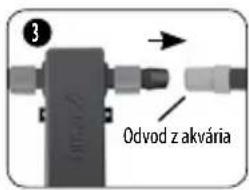
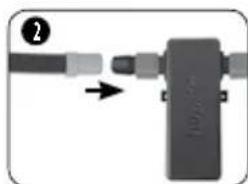
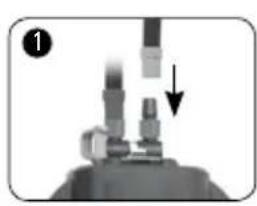
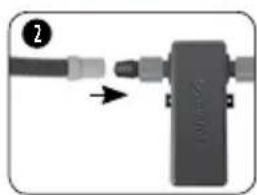
- Insert ribbed hosing supplied with your UVC unit into the output nozzle of your canister filter and tighten nut.
- Connect other end of UVC supplied hosing into one side of UVC unit and tighten nut.
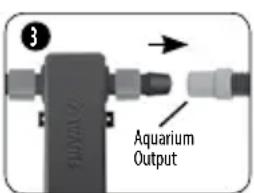
NOTE: The UVC unit is multidirectional and will operate in either direction.
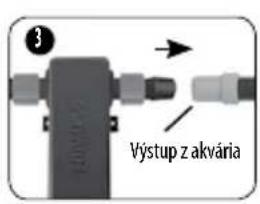
- Connect filter output hosing to the opposite (unused) UVC nozzle and tighten nut.
- To ensure maximum flow, DO NOT install UVC unit above the aquarium water line. To make sure the output hose reaches the aquarium with no kinks or loops, trial mount the UVC unit and hose before making any final cuts or holes. NOTE: The UVC unit is supplied with (2) mounting screws for easy installation.
- Attach filter output and intake assembly to aquarium (Refer to filter manual for proper installation).
- Prime your canister filter.
- Plug in your canister filter to electrical outlet and ensure that water is flowing in and out of the canister filter.
- Plug in the UVC unit to electrical outlet.
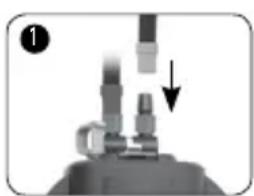

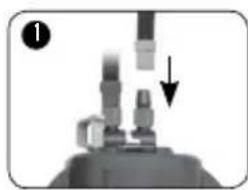
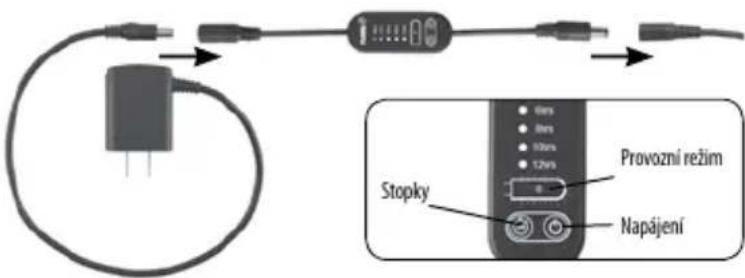
To install, connect timer power supply to timer, and then the timer to the base of UVC unit as shown in the image.

To run UVC unit continuously:
Press the timer Power button. The Operating Status light should illuminate in Green to indicate normal functionality.
To run the UVC unit intermittently:
After turning the timer power on, continue pressing the Stopwatch button to cycle through the various operating time periods: 4, 6, 8, 10 and 12 hours. A Blue light will appear next to the operating time currently engaged.
Operating Status Light:
This indicates the life cycle of the UVC bulb/unit. A Green light represents proper UVC bulb functionality. A Red light designates the bulb has expired, requiring complete UVC unit replacement.
Power Interruption:
If the timer is unplugged or endures a power failure, the UVC unit will revert to the same operating time that was initially selected once it is reconnected to a power source. For example, if the timer was set to operate for 4 hours within a 24-hour period, it will continue to operate for 4 hours from the moment power is re-established. As the timer does not keep track of the time of day, if you want the UVC unit to continue running for 4 hours as of 8 am, for example, the unit should be connected to a power source at 8 am. To switch from a specific timer period to continuous 24-hour operation, press the Power button off and then on again. This will re-establish the UVC unit to run full time.
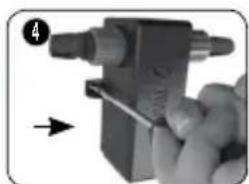
REPLACING THE BULB
CAUTION: This appliance must be unplugged when not in use and prior to the changing of any parts. Never yank the cord from the outlet.
- Ensure the canister filter is unplugged.
- Ensure the UVC unit is unplugged.
- Remove power cord from unit.
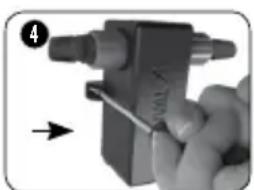
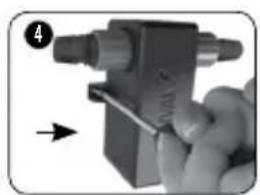
- Slide open the door to access bulb.
-
Gently release the bulb connector
-
Remove the bulb from its holder.
- Insert the new bulb into place.
- Reconnect the bulb connector.
-
Slide the door closed until it clicks
into place. -
Plug in the power cord into unit.
- Plug in the filter and the UVC unit into the electrical outlets.
(Replacement bulb #A19998)
FOR AUTHORIZED WARRANTY REPAIR SERVICE
QUESTIONS? If you have a problem or question about the operation of this product, please let us try to help you before you return the product to your dealer. Most problems can be handled promptly with a phone call. Or, if you prefer, you can contact us on our web site at www.fluvalaquatics.com. When you call (or write), please have all relevant information, such as model number and/ or part numbers available.
USA CALL US ON OUR TOLL-FREE NUMBER:
1-800-724-2436 between 9:00 a.m. and 4:00 p.m.
Eastern Standard Time. Ask for Customer Service.
CANADA CALL US ON OUR TOLL-FREE NUMBER:
1-800-554-2436 between 8:00 a.m. and 4:30 p.m.
Eastern Standard Time. Ask for Customer Service.
UK Helpline Number 01977 521015. Between 9:00 AM and 5:00 PM, Monday to Thursday and 9:00 AM and 4:00 PM on Friday (excluding Bank Holidays).
Ask for Customer Service. FOR AUTHORISED WARRANTY please return (well packaged and by registered post) to the address below enclosing dated receipt and reason for return. Customer Service Department Rolf C. Hagen (UK) Ltd, California Drive, Whitwood Ind Est., Castleford West Yorkshire WF10 5QH
RECYCLING
This product bears the selective sorting symbol for waste electrical and electronic equipment (WEEE). This means that this product must be handled pursuant to European Directive 2012/19/EU in order to be recycled or dismantled to minimize its impact on the environment. For further information, please contact your local or regional Authorities.
Electronic products not included in the selective sorting process are potentially dangerous for the environment and human health due to the presence of hazardous substances.
3 YEAR STANDARD WARRANTY
The Fluval UVC in-line Clarifier is guaranteed for defective parts and workmanship for a period of 3 years from the date of purchase. This guarantee is valid with proof of purchase only. The guarantee is limited to repair or replacement only and does not cover consequential loss, loss or damage to livestock and personal property or damage to animate or inanimate objects, irrespective of the cause thereof. This guarantee is valid only under normal operating conditions for which the unit is intended. It excludes any damage caused by unreasonable use, negligence, improper installation, tampering, abuse or commercial use. The warranty does not cover wear and tear, breakage of glass or parts which have not been adequately or correctly maintained.
THIS DOES NOT AFFECT YOUR STATUTORY RIGHTS.
DEUTSCH
WAS IST ENTHALTEN?
JnHnpepbBHO np60paQC:
HAXMMTE KONIKY NITAHNA HA TAIMepe. lamna pa6oery cTAtyca 3arOpWTCr 3eneHbIM CBetOM, COOUIAR, YTO yCTpOHTBO pa60TaET HOPMaJIbHO.
Длп подунческй pa6obtbl рибopa yФС:
NOCB KINOUHNEI NTAHNA TAIHEM, NPOJONJIaHTe HAXMMb KHOKNy XPOHOMETpa, NOCLJEIOBaTeNbHO NepeKINOVAcMbEMxNy pa3HBIM NEpNOAMn pa6oYero BpeMeHH: 4, 6, 8, 10 n 12 cAcOB. PAnOM C DeECTByIOUmm B HAcTOUmm MOMeHTpa6OUM BpeMeHem NoBHTcCmHm HNDkAtoP.
Hndkatoppaoboyeroctatya:
yka3bIaBt pa6ooyn pecypn lamblpnp60pa OFC.3enehHmHdkatop noka3bIaBt HopmaIbHyO p60ty lammbly OFC. KpaChHnHdkatop 03aHaet, UTO cPCK cnKbI lambln3akOHunr TpebyerTc 3aMeHt Becb np60p OFC.
OTKIOUeHne NITAHN:
Ecn Taimep otKIOUey Hnn npOn3oWen C60n 3eKtponHTAHN,TO nocne nOaKIOUeyHn K hCTOHNy NtAHn 6nOK YO-6bnyehn Bepetra K TOMy JKe BpemHn paobtB, KOtpoe bIbNo bblpaHO mHaayanbHO. HanpImep, cinn TaIMep 6bn HAcTPOEH Ha pabOTy B TeueHHe 4 aocOB B pamkax 24-aCBOrO nepnoa, OH ByET TAK JKe paobatb B TeueHHe 4 acOB C MOMENTA NOBTOPHOR BKNIOUYEHn NITAHN. NcKOJIbky TaIMep He OTcNEKbMaEt BPEMA CYTOK, TO, HanpImep, eCN Bbl XOTITE, 406bl 6NOK YO-6bNyehn MaobT B TeueHHe 4 aocOB C 8:00, OH DOnJHK 6bTB NODKIOUey H K CTouHNY NtAHNA B 8:00. 706bl nepeKIOuYb TaIMep C peKIMa PaoBT B TeueHHe onPeDeneHHOro BpeMeHn Ha HenpePBHyIO 24-hacBOyO pAOby, HAXMITE KONKNY NtAHN dJa BBKIOUeyHn A pexMM NoCTOHHo PAOBtB.
3AMEHA JAMIIOKIN
BHMAHVE:3OT np60pOIOJKe 6b1b OTKIOueH OT cETn, KOrda OH He mCNOB3yETcA, a TAKKe IpeEaMeHO KaKHX-N6o DeTaneH. HkORda HE BbIeprBaIte WHyP 3po3eKn.
1.Y6eHNTecb,HTO KaHNCPTPOBBmΦHbTpOTKHOHYOHOTcETN.
2.Y6eAUNTEcB,HTO 6nOK UVCOTKIOHCHOT CEN.
3. OToCoEHNHHTe UHHyP NITaHnNOr yCTpOCTBA.
- OtkpoIte Deepu, YTObIb NOnyUHTb DOCTyn KNaMne.
5.Akkypatno oToCoeMHInTe pa3bem NAMnbl
6.ɪəBnEKeHrTe NaMnOuKyɪ n3 nAtpoHa. - BCTABBTE HOBYIO NAMNOKY HA MECTO.
8.CHOBAIOCoEOHINHTpea3beMJaIMbI.
9. 3akpoiTe DBepy Do eHnka.
10. NIOKNIHOHTE WHHP NTAHM KYCTPOICTBY.
11. POKKIOUHTe 0mNbTp N6oK UVC K3NEKTPMueCKM pO3ETkAM.
INSTALACE UV STERILIZATORU
UV sterilizator je kompatibilni s nadrz Kami s filtrim, jejchz vypousteci hadice ma vnitri prumer 5/8" (16 mm) a vnejsi prumer 1/8" (19 mm), a rovné taki nadrz Kami série Fluval 06 a 07.
- Vlozte zebrovanou hadici, ktera byla dodana zaroven s UV sterilizatorem, do pripojky na vypousteci hadici na nadrce s filtrema utahnete matici.
- Zapojte druhy konec teto hadice do pripojky na strane UV sterilizatoru a utahnete matici.
POZNÁMKA: UV sterilizador je obousmémný,MZe tedy fungovat v obou smerech.
- Zapojte vypousteci hadici nadrzky do protejsi (zatim nepouzite) pripojky na UV sterilizatoru a utahnete matici..
- NEINSTALUJE UV sterilizator nad uroven hladiny vody v akvuriu. Tak zajistne maximali mozny prutok vody sterilizatorem. Aby vypousteci hadice na své ceste k akvuriu netovila zadné smycky, doporučujeme UV sterilizator i hadici nejprve zkusmo nainstalovat a pak tepre udélat definitivni upravy (napr odstrženi nebo vyrezani otvoru). POZNÁMKA: Abychom svym zakaznikum usnadnili instalaci UV sterilizatoru, dodávame símí dva (2) vruty.
- Pripevnete privodni a vypousteci hadici nadrzky s filtrek akvariu. (Podrobnjejisi informace o nalezite instalaci najdete v manualu k filtru.)
- Nechte nadrzku s filtrm napnilitvodou.
- Zapojte nadrzku s filtrem do elektricke site a ujistete se, zda do ni a zi proudi voda.
- Zapojte UV sterilizator do elektrické site.
INSTALLACE A POUZITICASOVAGE
Casovac nainstalujete tak, zenemu pripojite privod elektrickho proudu a pote casovac pripevnite ke spodni strane UV sterilizatoru tak, jak je naznaceno na obrzku.
UV sterilizator nastavite k trvalé cinnosti takto:
PRIPRAVA FILTRA (EXISTUJUCA ZOSTAVA)
- Skontrolujte, āj e nádržkovy filter odpojeny.
- Pred montazou Jednotky UVC zabepeche vyprzdznenie vody z nadrzky a jej hadic o odstranenie hadic z akvaria
MONTAZ UVC
Okrem nadrzkovych filtrov s vnutornym priemerom vystupnej hadice 5 / 8'' (16 mm) a vonkajsim priemerom hadice 1 / 8'' (19 mm) je jegnotka UVC kompatibilna s nadrzkovymi filtrami radu Flual 06 a 07.
- Rebrovanú hadicu dodanú spolu s jegnotkou UVC nasunte na vystupnú hubicu vasho nadržkového filtra a utiahnite maticu.
- Druhý koniec hadice dodanej spolu s UVC zapojte do jaknej strany Jednotky UVC a utiahnite maticu.
POZNÁMKA: Jednotka UVC je viacsmerová a funguje ktorymkolvek smerom. - Vystupnú hadicu filtra zapojte do protifahlej (nepouzitej) hubice UVC a utiahnite maticu.
- Pre zabepezecie maximalneho prietoku NEMONTUIJE Jednotku UVC nad hladinu vody v akvariu. Aby ste sa uistili, ze yustupà hidacia dosiahne do akvaria bez ohybov alebo slučiek, pred vykonanim konečných rezov alebo dier vykonajte skusobnu montáž Jednotky UVC a hadice. POZNÁMKA: Jednotka UVC sa pre jegnoduchú instaláciu dodáva s dvomi (2) montáznymi skrutkami.
- Pripevnite dostavu ystupu a privodu filtra k akvariu (Pre spravnu monta z pozite manuai filtra).
- Naplnte nadrzovy filter.
- Zapojte nadrzkovy filter do elektrickej zasuvky a zabepezte, aby voda prudila do nadrzkoveho filtra a z neho.
- Zapojte jegnotku UVc do elektrickej zasuvky.
MONTAZ A PREVÁDZKA CASOVÉHO SPÍNÁCA
KLARGORGING AF DIT FILTER (EKSISTERENDE OPSAETNING)
Whitwood Industrial Estate,
Castleford WF10 5QH,
West Yorkshire
Tel: 01977 521015
GERMANY
Hagen Deutschland
GmbH & Co. KG
Lehmweg 99-105
25488 Holm
Tel: 04103/960-0
MALAYSIA
Rolf C.Hagen (Sea) Sdn.Bhd.
Lot 14A, Jalan 3A,
Kawasan Perusahaan
Cheras Jaya,
Balakong 43200 Cheras,
Selangor Darul Ehsan
Tel: +603 9074 2388