
MQ3137WH - Blender BRAUN - Free user manual and instructions
Find the device manual for free MQ3137WH BRAUN in PDF.




| Product type | Multifunctional hand blender with accessories |
| Brand | Braun |
| Model | MQ3137WH |
| Power supply | 220-240 V, 50/60 Hz |
| Power | 700 W |
| Chopper bowl capacity | 500 ml |
| Variable speed | Yes, with regulator and turbo button |
| Included accessories | Blending shaft, whisk, potato masher, 500 ml chopper, measuring cup |
| Blade material | Stainless steel |
| Cord length | 1.2 m |
| Weight | 1.5 kg |
| Functions | Blend, whip, mash, chop |
| Maintenance | Dishwasher safe for most parts; wipe motor unit with damp cloth |
| Safety | Removable blades, EasyClick locking, non-slip base |
| Color | White |
| Repairability | Authorized Braun service center |
Frequently Asked Questions - MQ3137WH BRAUN
User questions about MQ3137WH BRAUN
0 question about this device. Answer the ones you know or ask your own.
Ask a new question about this device
Download the instructions for your Blender in PDF format for free! Find your manual MQ3137WH - BRAUN and take your electronic device back in hand. On this page are published all the documents necessary for the use of your device. MQ3137WH by BRAUN.
USER MANUAL MQ3137WH BRAUN
Register your product www.braunhousehold.com/register
Hand blender
German 6
English 10
French 14
Spanish 18
Portuguese 22
Italian 26
Dutch 30
Danish 34
Norwegian 37
Swedish 40
Finnish 43
Polish 46
Czech 50
Slovak 53
Hungarian 56
Croatian 60
Slovenian 63
Turkish 66
Romanian (RO/MD) 70
Greek 74
Bulgarian 78
Kazakh 82
Russian 86
Ukrainian 90
96
De'Longhi Braun Household GmbH
Carl-Ulrich-Straße 4
63263 Neu-Isenburg/Germany
5722112634/01.17
MQ3100-3137 INT
DE/UK/FR/ES/PT/IT/NL/DK/NO/SE/FI/PL/CZ/SK/HU/
HR/SI/TR/RO/MD/GR/BG/KZ/RU/UA/Arab

* certain models only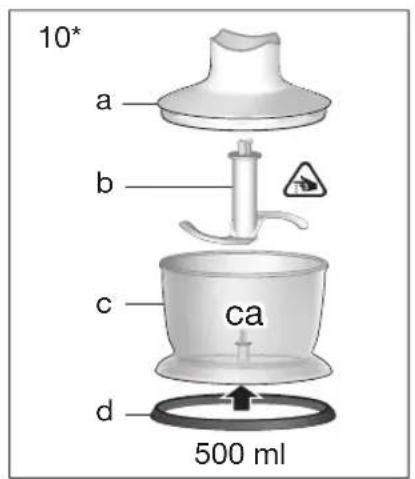
C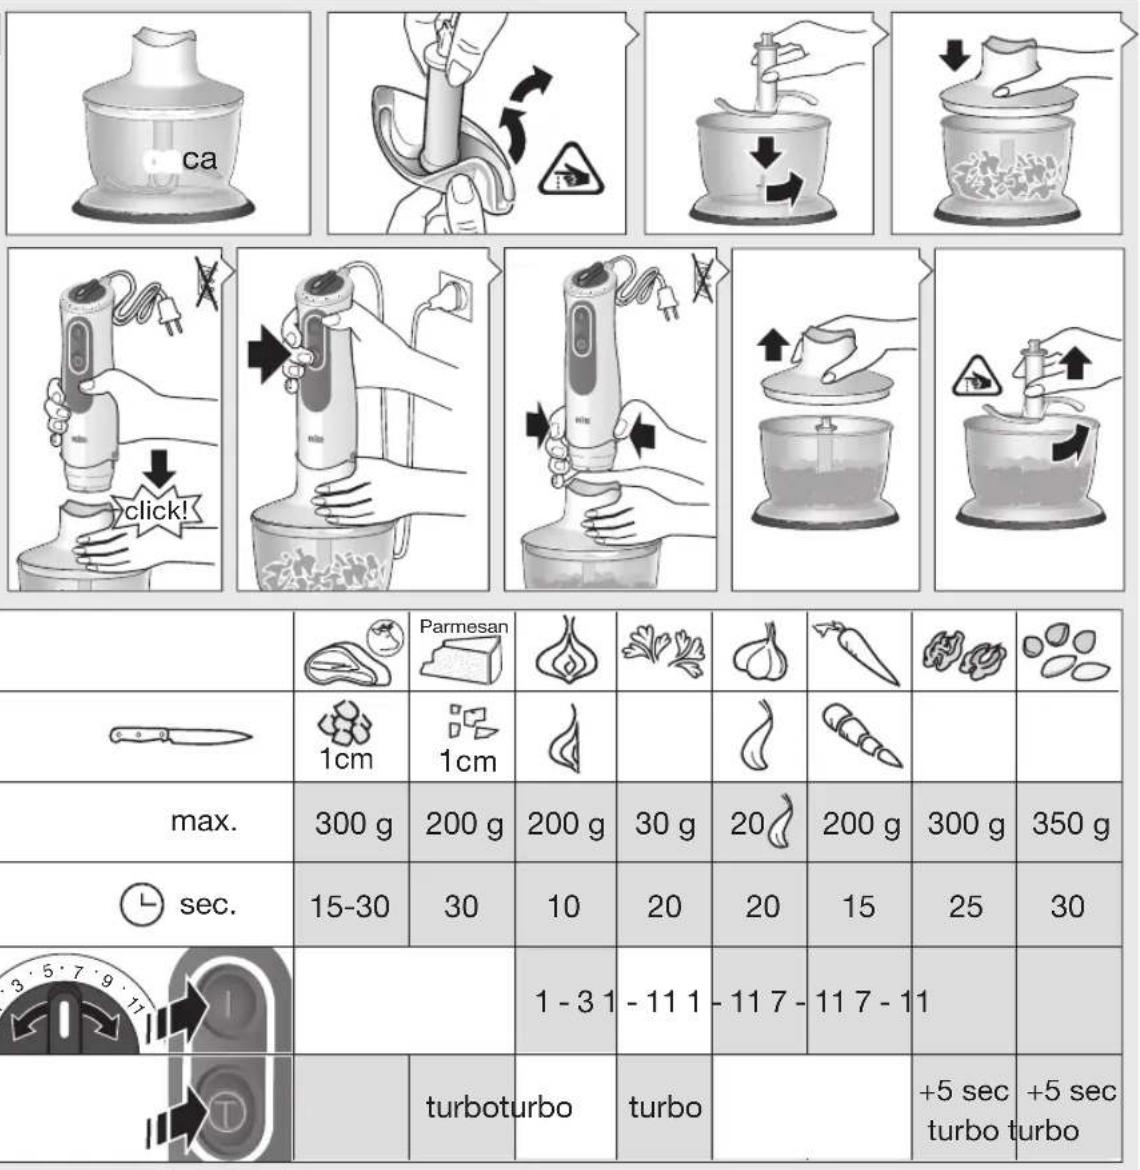
D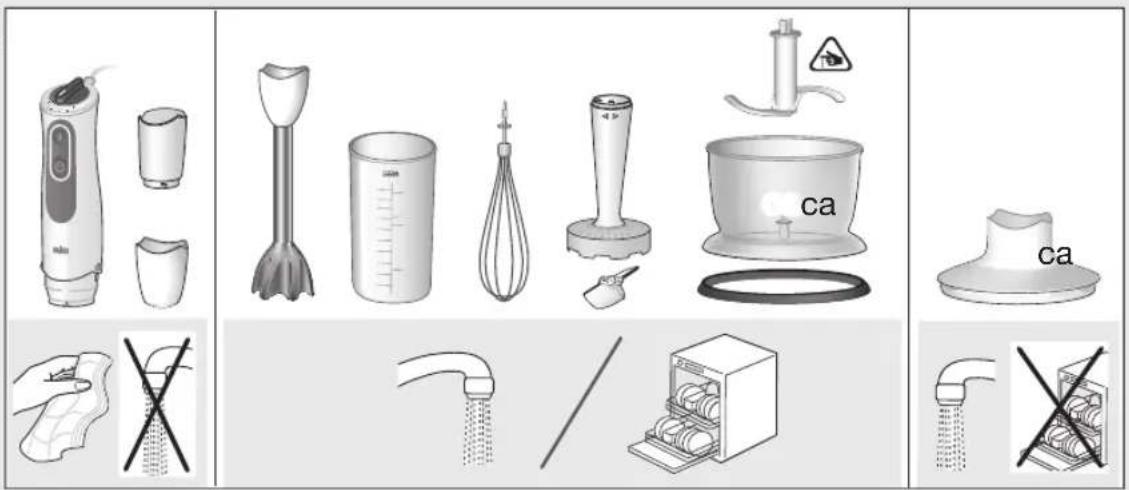
German
Our products are engineered to meet the highest standards of quality, functionality and design. We hope you thoroughly enjoy your new Braun appliance.
Before use
Please read instructions carefully and completely before using the appliance.
Caution
The blades are very sharp! To avoid injuries, please handle blades with utmost care. - Care shall be taken when handling the sharp cutting blades, emptying the bowl and during cleaning. - This appliance can be used by persons with reduced physical, sensory or mental capabilities or lack of experience and knowledge if they have been given supervision or instruction concerning use of the appliance in a safe way and if they understand the hazards involved. Children shall not play with the appliance. - This appliance shall not be used by children. Children shall be kept away from the appliance and its mains cord. - Cleaning and user maintenance shall not be made by children without supervision. - Always unplug or switch off the appliance when it is left unattended and before assembling, disassembling, cleaning and storing. - If the supply cord is damaged, it must be replaced by the manufacturer, its service agent or similarly qualified persons in order to avoid a hazard. - Before plugging into a socket, check whether your voltage corresponds with the voltage printed on the bottom of the appliance.
- This appliance is designed for household use only and for processing normal household quantities.
- Do not use any part in the microwave.
- Cleaning of the appliance should follow the instructions in the relevant section.
Parts and Accessories
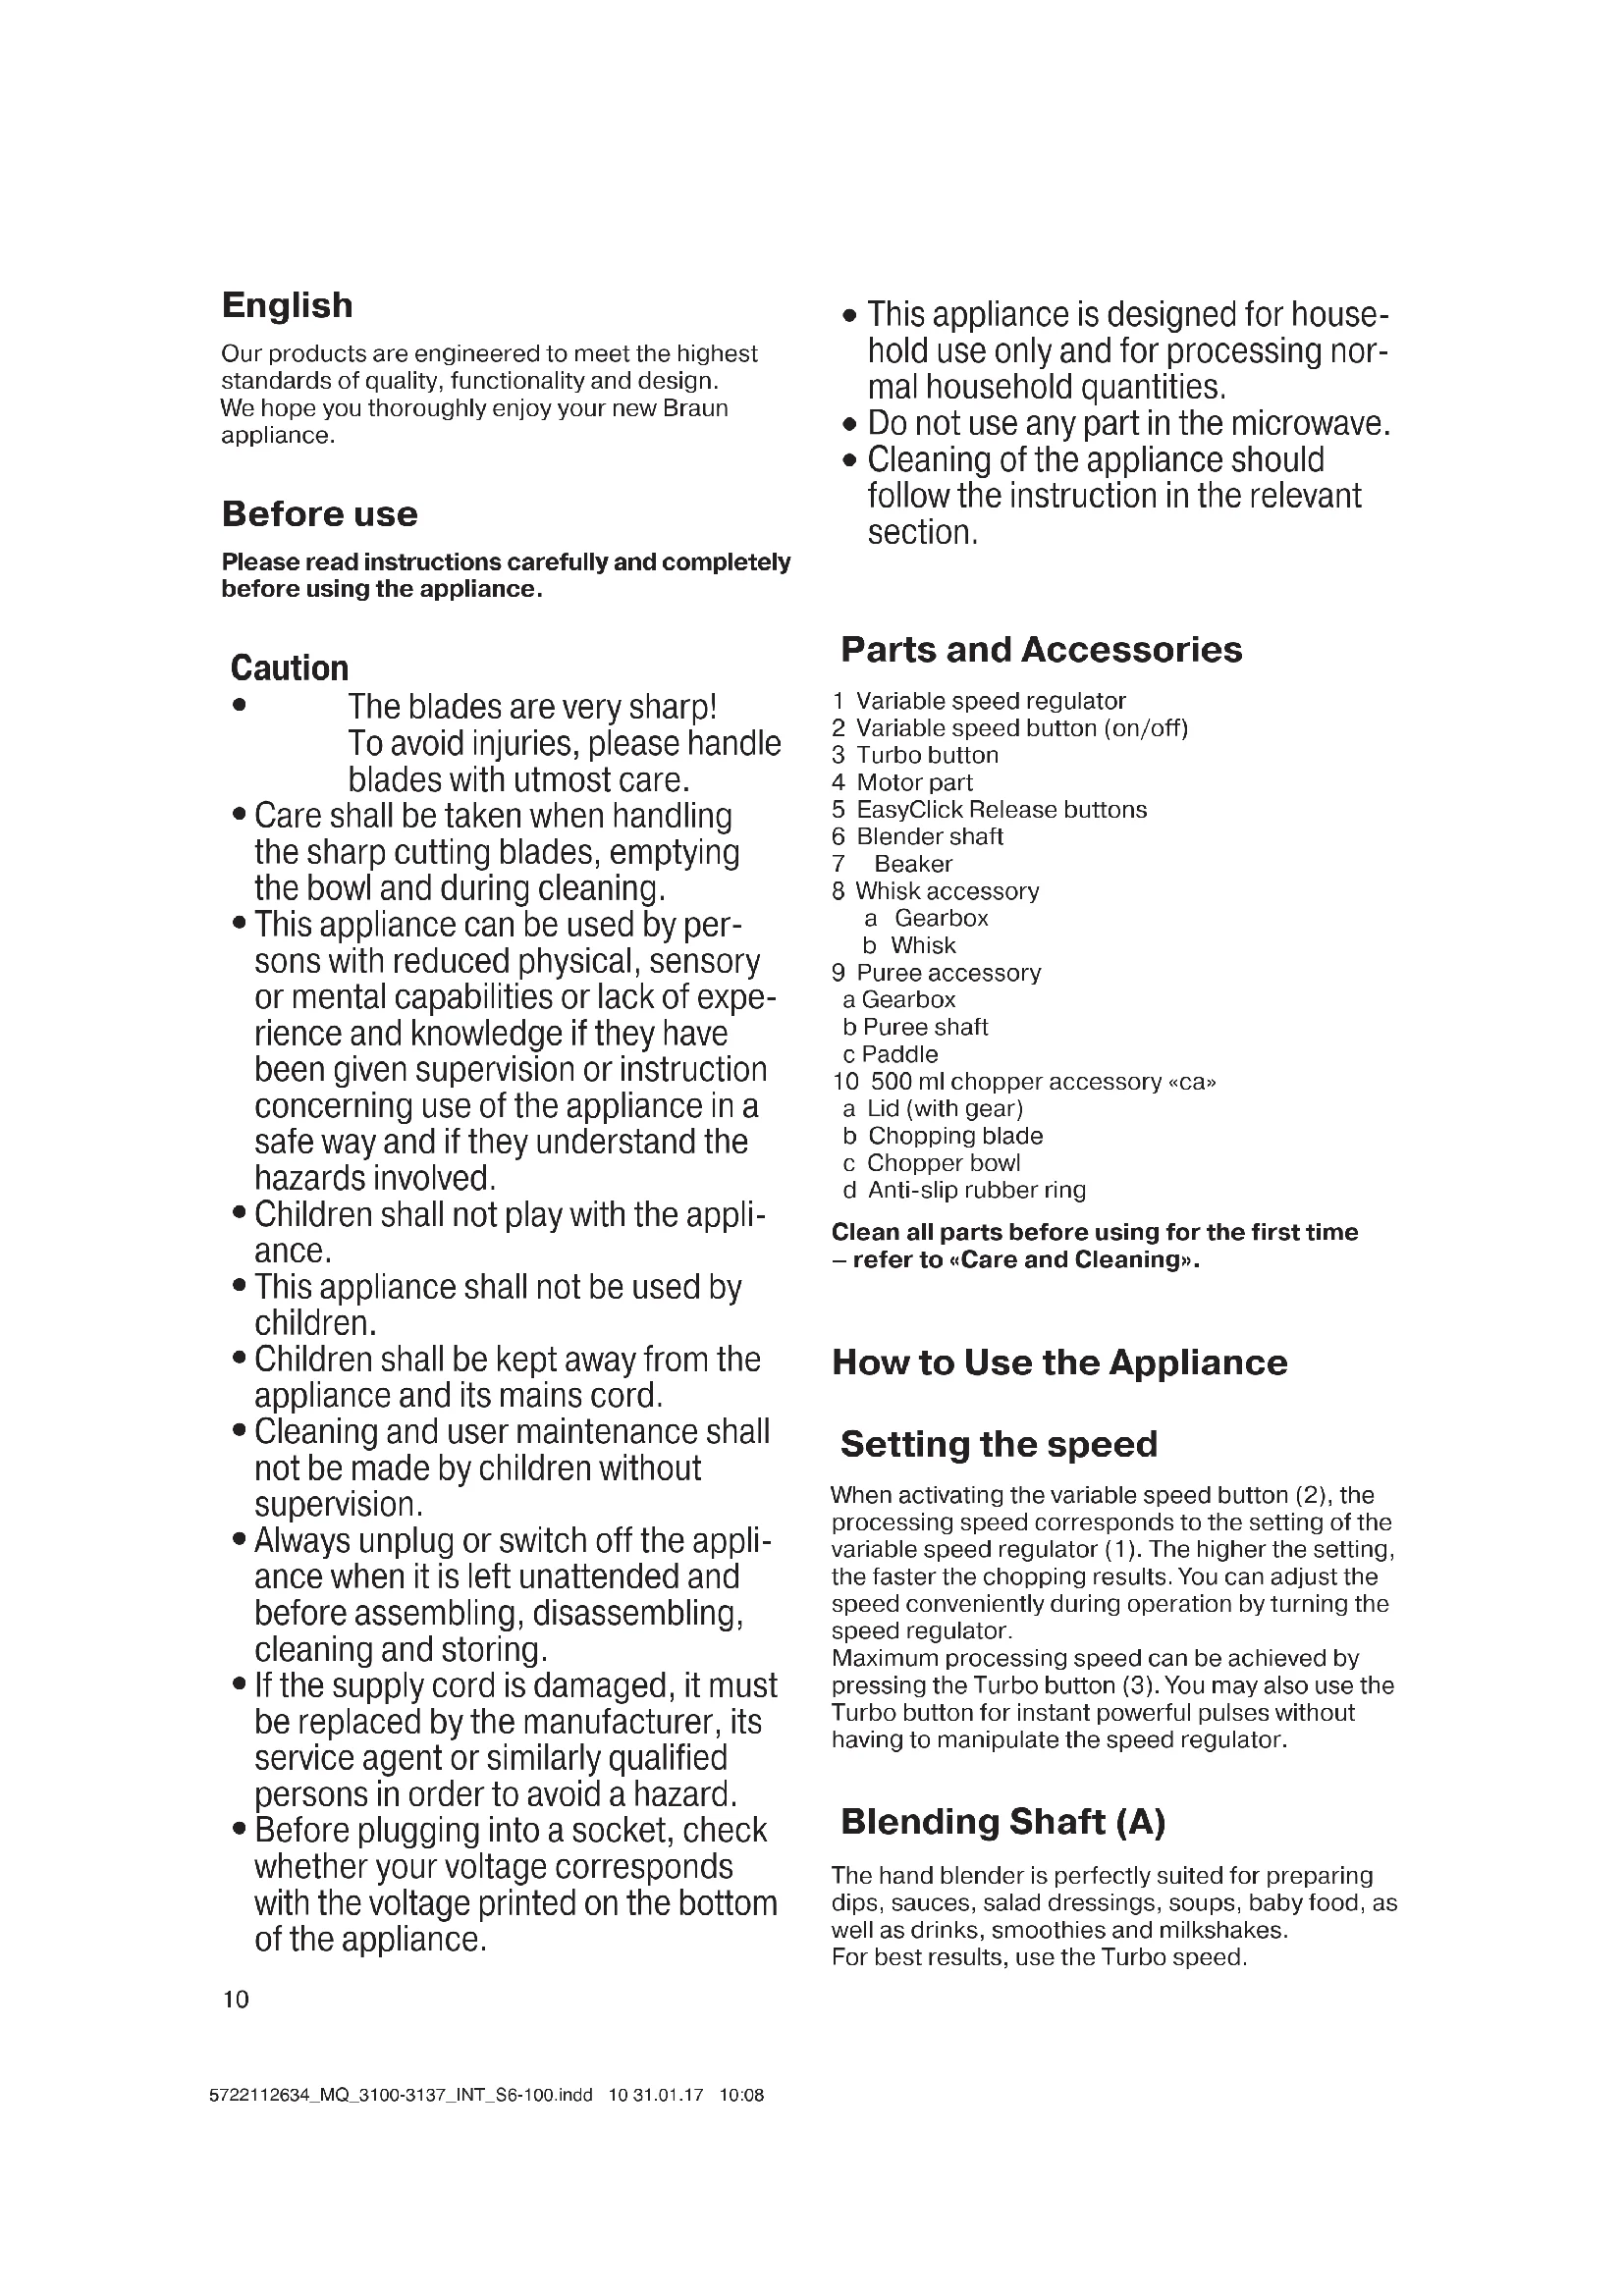
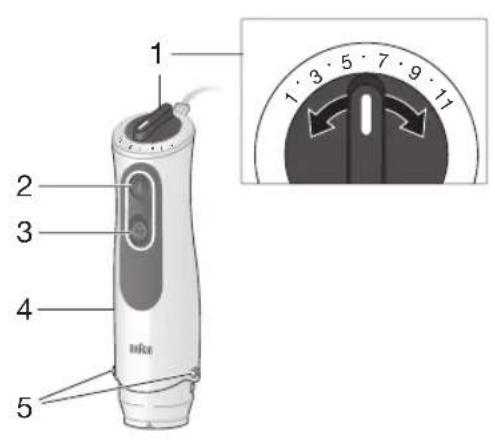
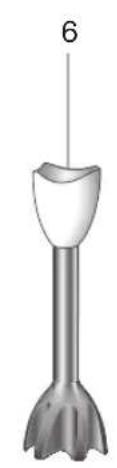
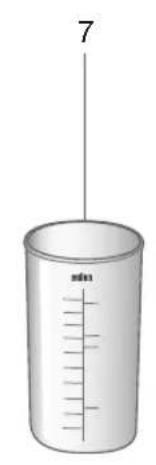
1 Variable speed regulator 2 Variable speed button (on/off) 3 Turbo button 4 Motor part 5 EasyClick Release buttons 6 Blender shaft 7 Beaker 8 Whisk accessory
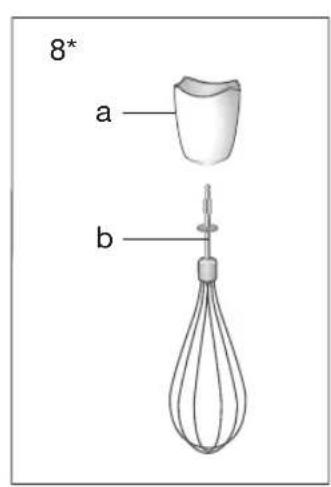
a Gearbox
b Whisk
9 Puree accessory
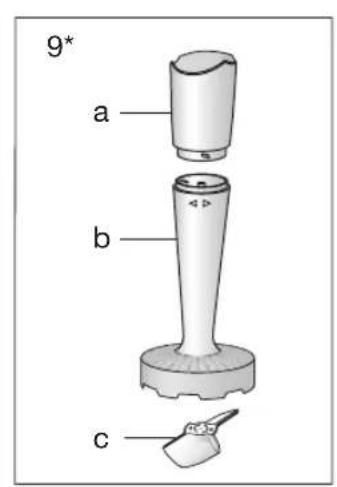
a Gearbox
b Puree shaft
c Paddle
0 500 ml chopper accessory «ca»
a Lid (with gear) b Chopping blade c Chopper bowl d Anti-slip rubber ring
Clean all parts before using for the first time
- refer to «Care and Cleaning».
How to Use the Appliance
Setting the speed
When activating the variable speed button (2), the processing speed corresponds to the setting of the variable speed regulator (1). The higher the setting, the faster the chopping results. You can adjust the speed conveniently during operation by turning the speed regulator.
Maximum processing speed can be achieved by pressing the Turbo button (3). You may also use the Turbo button for instant powerful pulses without having to manipulate the speed regulator.
Blending Shaft (A)
The hand blender is perfectly suited for preparing dips, sauces, salad dressings, soups, baby food, as well as drinks, smoothies and milkshakes.
For best results, use the Turbo speed.
Assembly and Operation
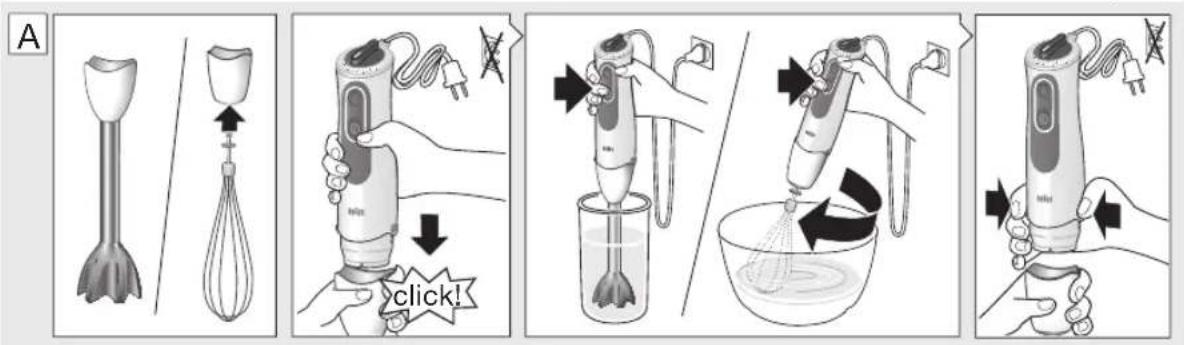
- Attach the blending shaft (6) to the motor part until it clicks.
- Place the blending shaft into the mixture to be blended. Then switch the appliance on.
- Blend ingredients to the desired consistency using a gentle up-and-down motion.
- After use, unplug the hand blender and press the release buttons (5) to detach the blending shaft.
Caution
- If using the appliance to purée hot food in a saucepan or pot, remove the saucepan or pot from the heat source and ensure the liquid is not boiling. Allow hot food to cool slightly to avoid risk of scalding.
- Do not let the hand blender sit in a hot pan on the cooktop when not in use.
Recipe Example: Mayonnaise
250 g oil (e.g. sunflower oil)
1 egg and 1 extra egg yolk
1-2 tbsp. vinegar
Salt and pepper to taste
- Place all ingredients (at room temperature) into the beaker in the order as above.
- Place the hand blender at the bottom of the beaker. Blend at Turbo speed until the oil starts emulsifying.
- With the hand blender still running, slowly raise the shaft to the top of the mixture and back down to incorporate the rest of the oil.
NOTE: Processing time: approx. 1 minute for salads and up to 2 minutes for a thicker mayonnaise (e.g. for dip).
Whisk Accessory (A)
Use the whisk only for whipping cream, beating egg whites, making sponge cakes and ready-mix desserts.
Assembly and Operation
- Attach the whisk (8b) to the gearbox (8a).
- Align the motor part with the assembled whisk attachment and push the pieces together until they click.
- After use, unplug and press the release buttons to detach the motor part. Then pull the whisk out of the gearbox.
Tips for Best Results
- Move the whisk clockwise while holding it at a slight incline.
- To prevent splattering, start slowly and use the whisk attachment in deep containers or pans.
- Place the whisk in a bowl and only then switch the appliance on. Always ensure the whisk and mixing bowl are completely clean and free of fat before whisking egg whites. Only whip up to 4 egg whites.
Recipe Example: Whipped Cream
400 ml chilled cream (min. 30% fat content, 4 - 8 °C)
- Start with low speed and increase the speed while whipping. Always use fresh chilled cream to achieve greater and more stable volume when whisking.
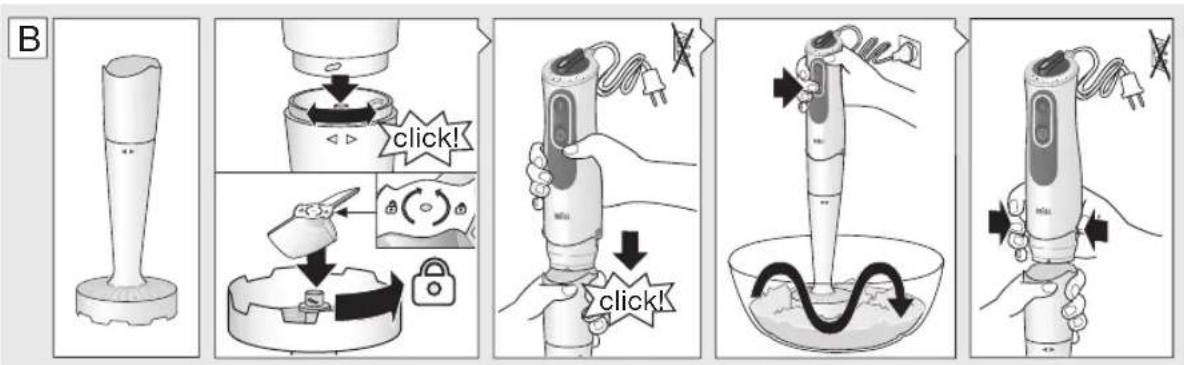
Puree Accessory (B)
The puree accessory can be used to mash cooked vegetables and fruits such as potatoes, sweet potatoes, tomatoes, plums and apples.
Before Use
- Do not mash hard or uncooked food, as this may damage the unit.
- Peel and remove any stones or hard parts; cook and drain then mash the food.
Assembly and Operation
- Fit the gearbox (9a) to the shaft (9b) by turning in a clockwise direction until it locks into place.
- Turn the puree accessory upside down and fit the paddle (9c) over the central hub and turn counter-clockwise to locate. (If the gearbox is not fitted properly, then the paddle will not secure in place).
- Align the assembled puree accessory with the motor part and click the two parts together. Plug in.
- Dip the puree accessory into the ingredients and switch on the appliance at speed 11.
- Using a gentle up and down motion, move the puree accessory through the ingredients until the desired texture is achieved.
- Release the variable speed button and ensure the puree accessory has completely stopped turning before removing it from the food.
- After use, unplug the appliance. Remove the paddle (9c) by turning clockwise.
- Press the release buttons to detach the puree accessory from the motor part. Separate the gearbox from the shaft by turning counterclockwise.
Caution
- Never use the puree accessory in a saucepan over direct heat. Always remove the saucepan from the heat and allow to cool slightly.
- Sit the saucepan or bowl on a stable, flat surface, and support it with your free hand.
- Do not tap the puree accessory on the side of the cooking vessel during or after use. Use a spatula to scrape excess food away.
- For best results when mashing never fill a saucepan or bowl more than half full with food.
- Do not process more than one batch without interruption.
- Let the appliance cool down for 4 minutes before you continue processing.
Recipe Example: Mashed Potatoes
1 kg cooked potatoes
200 ml warm milk
- Place the potatoes in a bowl and mash for 30 seconds with speed 11.
- Add the milk. Resume mashing for another 30 seconds.
Chopper Accessory (C)
The chopper (10) is perfectly suited for chopping meat, hard cheese, onions, herbs, garlic, vegetables, bread, crackers, and nuts.
Refer to the Processing Guide C for maximum quantities, recommended times, and speeds.
Maximum operation time for the chopper: 2 minutes for large amounts of wet ingredients, 30 seconds for dry or hard ingredients or amounts less than 100g. Immediately stop processing when motor speed decreases and/or strong vibrations occur.
Before Use
- Pre-cut foods into small pieces for easier chopping.
- Remove any bones, tendons, and gristle from meat to help prevent damage to the blades.
- Make sure the anti-slip rubber ring (10d) is attached to the bottom of the chopper bowl.
Assembly and Operation
- Carefully remove the plastic cover from the blade.
- The blade (10b) is very sharp! Always hold it by the upper plastic part and handle it carefully.
- Place the blade on the center pin of the chopper bowl (10c). Press it down and give it a turn so that it locks into place.
- Fill the chopper with food and put on the lid (10a).
- Align the chopper with the motor part (4) and click together.
- To operate the chopper, switch on the appliance. During processing, hold the motor part with one hand and the chopper bowl with the other.
- Always chop harder foods (e.g., parmesan cheese) at Turbo speed.
- When chopping is complete, unplug and press the release buttons (5) to detach the motor part.
- Lift the lid up. Carefully take out the blade before pouring out the contents of the bowl. To remove the blade, slightly turn it then pull it off.
Caution
- Do not use the chopper accessories to process extremely hard foods, such as unshelled nuts, coffee beans, grains, or hard spices e.g., nutmeg. Processing these foods could damage the blades.
- Never place the chopper bowl in the microwave oven.
Recipe example: Honey-Prunes (as a pancake stuffing or spread):
50 g prunes, 70 g creamy honey, 10 ml water (vanilla-flavoured) - Fill the chopper bowl with prunes and creamy honey. - Chop 4 seconds at maximum speed - Add 10 ml water (vanilla-flavoured). - Resume chopping for another 1.5 seconds.
50 g prunes, 70 g creamy honey, 10 ml water (vanilla-flavoured) - Fill the "hc" chopper bowl with prunes and creamy honey. - Chop 4 seconds at maximum speed - Add 10 ml water (vanilla-flavoured). - Resume chopping for another 1.5 seconds.
Use the chopper accessory «hc» (optional accessory available at your Braun Service Center; however not in every country).
Always clean the hand blender thoroughly after use. - Unplug hand blender before cleaning. - Do not immerse the motor part (4) or gearbox (8a, 9a) in water or any other liquid. Clean with a damp cloth only. - The lid (10a) can be rinsed under running water. Do not immerse in water, nor place in a dishwasher. - All other parts can be cleaned in a dishwasher. Do not use abrasive cleaners that could scratch the surface. - You may remove the anti-slip rubber ring from the bottom of the bowl for an extra thorough clean. - When processing foods with high pigment content (e.g., carrots), the accessories may become discolored. Wipe these parts with vegetable oil before cleaning them.
Always clean the hand blender thoroughly after use. - Unplug the hand blender before cleaning. - Do not immerse the motor part (4) or gearbox (8a, 9a) in water or any other liquid. Clean with a damp cloth only. - The lid (10a) can be rinsed under running water. Do not immerse it in water, nor place it in a dishwasher. - All other parts can be cleaned in a dishwasher. Do not use abrasive cleaners that could scratch the surface. - You may remove the anti-slip rubber ring from the bottom of the bowl for an extra thorough clean. - When processing foods with high pigment content (e.g., carrots), the accessories may become discolored. Wipe these parts with vegetable oil before cleaning them.
Both the design specifications and these user instructions are subject to change without notice.
Do not dispose of the product in household waste at the end of its useful life.
Materials and accessories coming into contact with food conform to EEC regulation 1935/2004.


For UK Only
Guarantee Information
All Braun Household products carry a minimum guarantee period of two years. The rights and benefits under this guarantee are additional to your statutory rights which are not affected.
Please keep your receipt as this will form the basis of your guarantee.
In the unlikely event of a breakdown you have access to professional help from our team simply by calling: 02392 392333
For service in the Republic of Ireland please call: 012475471
Braun Household undertakes within the specified period to repair or replace any part of the appliance, free of charge (with the exception of any glass or porcelain-ware incorporated in the product) found to be defective provided that;
- We are promptly informed of the defect.
- The product is used and maintained in accordance with the User Instructions.
- The appliance has not been altered in any way or subjected to misuse or repair by a person other than an authorised service agent for Braun Household.
- No rights are given under this guarantee to a person acquiring the appliance second hand or for commercial or communal use.
- Any repaired or replaced appliance will be guaranteed on these terms for the unexpired portion of the guarantee.
- The need for repair has not been caused by insufficient aftercare or cleaning: or damage caused by the chemical or electrochemical effects of water.
Under no circumstances shall the application of this guarantee give rise to the complete replacement of the appliance or entitle the consumer to damages.
Braun Household, New Lane, Havant, Hampshire PO9 2NH
www.braunhousehold.co.uk
Thank you for choosing Braun. We are confident that you will get excellent service from this product.
TO IMPROVE YOUR EXPERIENCE
Register now at www.braunhousehold.co.uk. By registering, we may send you from time to time details on exclusive offers, promotions, recipes and inside tips.
Use the chopper accessory «hc» (optional accessory available at your Braun Service Center; however not in every country).
10 ml water (vanilla-flavoured)
- Fill the chopper bowl with the ingredients.
- Run for 4 seconds at maximum speed. Add 10 ml water (vanilla-flavoured).
- Let it run for another 1.5 seconds.
Nozzle for early CS (nozzle optional, available at your CS service center; not valid for all countries)
Cleaning and care (D)
After use, unplug the appliance. Before cleaning, disconnect the motor from the power supply. Do not immerse the motor unit in water or other liquids. Clean it with a damp cloth. The lid (10a) can be rinsed under running water. Do not immerse in water and do not put in the dishwasher. All other parts can be washed in the dishwasher. Do not use abrasive cleaning agents that may scratch the surface. You can remove the anti-slip ring from the bowl for more thorough cleaning. When processing foods with high pigment content (e.g., carrots), the accessories may become discolored. Wipe these parts with vegetable oil before storing.
The product specification, as well as these instructions for the consumer, are subject to change without prior notice.
Do not dispose of the product together with household waste at the end of its service life. It can be disposed of at a service center for your device or at the appropriate collection points provided in your country.
Material items intended for use with food products comply with the requirements of European Regulation 1935/2004.


If the power cord is damaged, it must be replaced by the manufacturer, its service agent, or similarly qualified persons to avoid a hazard.
Do not allow children to play with the appliance.

This appliance can be used by children aged from 8 years and above and persons with reduced physical, sensory or mental capabilities or lack of experience and knowledge if they have been given supervision or instruction concerning use of the appliance in a safe way and understand the hazards involved. Children shall not play with the appliance.
- Cleaning and user maintenance shall not be made by children without supervision.
- Keep the appliance and its cord out of reach of children less than 8 years.
- If the supply cord is damaged, it must be replaced by the manufacturer, its service agent or similarly qualified persons in order to avoid a hazard.
- WARNING: If the door or door seals are damaged, the oven must not be operated until it has been repaired by a competent person.
- It is hazardous for anyone other than a competent person to carry out any service or repair operation that involves the removal of a cover which gives protection against exposure to microwave energy.
- Liquids and other foods must not be heated in sealed containers since they are liable to explode.
The structure of the device, its operation, and the rules for safe use are described in this manual. - This device is intended for use only for the purposes specified in the technical data and for the applications described in the operating instructions. - Do not use the device for any other purposes. If the device is used improperly, contact the manufacturer.
Components and accessories
1 On/off switch 2 On/off button (on/off) 3 Turbo button 4 Motor unit 5 Speed control buttons 6 Blender jug 7 7 8 Separator lid
a Device body b Separator
Blender jug
a Device body b Blender jug lid
c Lid
10 500 ml measuring cup "CA"
a Lid (with gasket)
b Measuring scale c Measuring cup
d Rubber gasket for the lid
Before first use, wash all parts that will come into contact with food. - Check the device and accessories for damage.
The device must be assembled correctly
On/off switch
Press the on/off button (2) to switch the device on. To switch off, press the on/off switch (1). If the device is not working properly, the on/off switch may be faulty. If the device is not working, the on/off switch may be defective and should be replaced.
(3) Close the valves. Turbo TymMeHi
XbIaMdbfBn peTtey yHKunrcbH bypamai Kyat IMnylbctepin depey bepy ywiH ne KOndaHyfa 6oJa.
Control unit (A)
The control unit, sensors, actuators, relays, fuses, wiring, and connectors must be checked for proper operation. To ensure good performance, the control unit must be checked.
Control check
- With the engine running, check for oil leaks.
- For control, check the oil level. Do not overfill. If the oil is low, add oil of the recommended consistency. After checking, close the oil filler cap securely.
Lubrication
If the oil level is below the minimum mark, add oil through the oil filler opening. After adding oil, check the oil level again. For the correct oil level, use the dipstick. Do not overfill.
Recommended oil: MaioHe3
250 g oil (Mysal, Kynbagys Mai)
1 tablespoon of salt and 1 tablespoon of sugar
1-2 cups of water
For cooking, use low heat.
The hot water heater (white temperature) must be connected to the cold water supply. The boiler must be connected to the cold water pipe. Do not start the heater without filling it with water. If the boiler is in operation, do not turn on the heating element until it is completely filled with water.
If the water is cold: for taps, wait at least 1 minute, and for small appliances, wait at least 2 minutes (for washing machine, dishwasher).
Disconnect (A)
Disconnect the appliance from the power supply, close the water inlet valve, and disconnect the hoses and cables from the device.
Maintenance and care
- Disconnect the appliance (B) from the water supply (A).
- To clean the motor housing, disconnect the appliance from the power supply and remove the hoses. After cleaning, dry the motor housing with a cloth. Then disconnect the appliance from the water supply.
Safety instructions
The appliance must be installed and used in accordance with the instructions. - To avoid damage, do not operate without water and do not connect the appliance to the power supply without water. - Do not operate the appliance without water, only after filling it with water. - Check the water inlet valve for leaks and ensure that the appliance is not damaged. Do not use the appliance if the water inlet valve is damaged.
Cleaning the filter
400 ml of water for the filter (for models with 30% less water, 4-8°C)
Do not start the heater without water, and do not operate it without water. - When operating, to avoid damage, do not run the pump without water. Fill the filter with water before starting.
Fuse (B)
The fuse is used to protect the appliance from overcurrent, short circuit, and other electrical faults.
Under the cover
The contents of the table are given below, and you can use them as needed. The items are listed in the table; take the language and terms, and use them as needed.
Operation
The ship's bell (9a) is used to signal the time. According to the schedule, the bell (9c) is struck on the upper part of the bell with a hammer, and the time is announced. (If the bell is not available, use a metal plate instead.) To operate, hold the motor housing with one hand and strike the bell with the other. Then, use the necessary language and terms as needed, and follow the instructions.
After the bell has been struck, move it up and down to achieve the desired consistency. If the consistency is not correct, adjust it using the necessary language and terms. Then, the bell is ready for use. The bell (9c) is struck with a hammer. According to the schedule, the motor housing is used for adjustment. The bell is struck and the time is announced.
Cleaning
According to the schedule, the sprayer is used. - First, remove the cap and pour out the liquid. Then, rinse it. The sprayer should be placed in a dry place and stored upright. When not in use, according to the schedule, the sprayer should be cleaned. To avoid damage, clean the sprayer. If it is not working properly, check the sprayer and clean it. - After cleaning, dry it and store it properly. The sprayer should be kept dry for 4 minutes.
Recipe: Carbon paper
1 kg of carbon paper
200 ml of water
- Add the carbon paper and mix for 30 seconds. Then, let it sit for 30 seconds.
Troubleshooting (C)
Troubleshooting (10) includes: battery, fuse, wire, cable, connector, switch, and other components.
Check the tobacco products, packaging, and other components for damage.
The maximum operating time for the device: 2 minutes for small components, and 30 seconds for large or heavy components or those less than 100g. Stop the motor if it becomes hot or if there is any malfunction.
Under the table
- The device is designed for safe operation.
To ensure safe operation, follow the instructions and warnings below. The manufacturer (10d) is not liable for damage caused by improper use.
Installation and connection
Install the device on a flat surface. (10b) Do not operate the device! Do not place it near flammable materials or heat sources. Install the device in the (10c) ventilation opening. Turn the device over and secure it with one screw. - Place the device on a flat surface and connect the power cord (10a). Connect the motor connector (4) and tighten it. Do not operate the device without the motor. Do not use the device with a damaged motor connector or a damaged power cord. Use only original spare parts (e.g., gaskets, seals) for repairs. - After use, unplug the device and clean the motor connector (5) with a dry cloth. Do not immerse the device in water. If the device is wet, dry it before storing. To store the device, wrap the cord around the base.
Cleaning
To remove stubborn dirt, grease, food residues, or odors from the device, use the cleaning brushes (8/9/10) with the device. Do not use abrasive cleaners. Do not immerse the device in water.
Recipe idea: For a thick consistency (e.g., for dips or sauces):
50 g of thick yogurt
70 g of soft cheese
10 ml of water (for thinning)
- Add the thick yogurt to the device. Blend for 4 seconds. Add 10 ml of water (for thinning). Blend for 1.5 seconds.
The device is not suitable for crushing ice (unless the appliance is equipped with a special ice-crushing function; however, it may not work properly).
Care and maintenance (C)
After each use, clean the device thoroughly.
When cleaning the device, unplug it. - Do not immerse the motor unit (4) or the attachments (8a, 9a) in water or any other liquid. Wipe them with a damp cloth. The blades (10a) are sharp; handle with care. Do not immerse in water and do not place the device in the dishwasher. - The blades are sharp; handle with care. To avoid injury, clean the blades carefully. Use a brush to remove food residues. Do not touch the blades with bare hands. If the blades are damaged, replace them with original spare parts.
Technical specifications may change without prior notice.
The manufacturer reserves the right to make changes without prior notice. We are not liable for any errors or omissions in this document.

Disposal
For disposal, follow the local regulations for electronic waste. The crossed-out wheeled bin symbol indicates that the product must be disposed of separately from household waste. The product should be recycled in accordance with local regulations. For more information, contact your local waste disposal service.
EU
10 pcs. blades, 500 ml "Ca"
a Cover (with transmission mechanism)
b Blade with blade guard d Rubber ring, preventing
slipping
Before first use, clean all parts - see (Maintenance and cleaning).
Using the appliance
Speed setting
Adjusting the speed control knob (2) sets the processing speed according to the speed mode selector (1). The higher the setting, the faster the chopping. Turn the speed mode selector
to conveniently change speed during operation.
Maximum processing speed can be set by pressing the Turbo button (3). Additionally, the Turbo button can be used for short powerful pulses without the need to adjust the speed selector.
Hand blender (A)
Hand blender is a versatile device for preparing soups, sauces, dressings for salads, purees, baby food, and even drinks, with a smooth consistency. For best results, use Turbo speed.
Assembly and operation
-Attach the blender shaft (6) to the motor unit; the correct connection can be recognized by the click. -Place the blender shaft into the food to be mixed. Then turn on the appliance. Mix with the up and down movement. -After use, unplug the hand blender from the mains and press the button on the blender.
Caution
- When blending hot food in a pot or saucepan, be careful with steam. Ensure that the liquid does not boil. Let hot food cool slightly to prevent possible burns. Do not leave the unused hand blender in a hot container on the stove.
Recipe: Mayonnaise
250 g of vegetable oil (e.g., sunflower oil)
1 egg yolk and 1 additional egg yolk 1-2 tbsp. of vinegar
Salt and pepper to taste
- Place all ingredients (at room temperature) in a measuring cup in the order indicated above.
- Immerse the hand blender to the bottom of the measuring cup. Blend at Turbo speed until a mayonnaise emulsion forms.
- Slowly raise the shaft of the working blender to the top of the mixture, then lower it again to dissolve the remaining oil until a homogeneous mixture is obtained.
NOTE: Preparation time: approximately 1 minute for sauces and up to 2
minutes for thicker mayonnaises (e.g., aioli).
HacaKa-BeHcK (A)
NcnoB3yIe BEHnK TOnbKO JIaB B36nBaHna CInBOK,AnHybIX 6eIKOB,piNROTOBHeHna 6uCKBNTa N DecepTOB IV3 rOTOBbIX CMecei.
C60paKn3KcPnyataun
-ПодсоeДинTeВeнчК(8b)КpeДукTору(8a). - CobmectHTe MOTOPHbI 6JIOK c CObpaHHo HacaJIke-BEHUNKOM IN CdBINbTe OBe YAcTn BMeCTe; IpaBUNbHOe COEINHeHne MOxHO paCNo3HaTb NO UeJIky. - Iocne nCOnb3OBAHnB BbIKIOUHTe np6Op n3 cTe n HaxMNTe Ha KHOKN fNkCatopa, YTO6bl OTcOeINHnTb MOTOpHbI 6JOK. 3aTeM BbITAHNTE BEHNK n3 peDyKTopa.
CobetbI dIyIuXnx pe3yIbTaTOB
- IepemeuaTe BeHnK No yacobOn CTpeJIke, ydepKnBaERo BCJIeRka HAKJIOHNHom NIOJOKeHn. BzIeJx npEIOTbpaueHn pa36pb3rBaHnHaunHaHTe C MeIeHHoN CKOPOCTn INcNoJIb3yIte HacaKy-BeHNUK C rIy6OKMIMMNCKAMNI KAcTpOJIaMNI.
- TomecHTe BeHcNk B YaShy N TOJIbKO 3aTeM BKJIIOHTe npI6Op.
- IpeepB36nBaHHeM RnHbIX 6eIKOB BcerJa CJeDyET y6eIITbcR B TOM, YTO BeHnK UaSha AIN CMEuINBaHnRA HxOJrTcR B YUCTOM COCToHnn n He CoOpExat MacJa. B36nBaIte He 60JIee 4 6eIKOB 3a OdnH pa3.
PpimeppeTtA:B36ntbIe cInBkI
400MnOxnaJHbIXCINBOK(MNH.30% XnHocTn,4-8°C)
- ChaçaJa 3aDénCTbTe Hn3KyIO CKOpocTb, a NOTOM NOBbIaNte ee B npoCeCE B3bBaHn. Bcerda nCnoB3yTe CBexne OxJaXDeHHbIe CnIBK, YTO6bl npn B36nBaHnn NOJyHTb 6OJIbWiN O6bem N 6OJee cTa6nJIbHyIO KOHCNUCTEHcNIO.
Hacádka Дя пиpe (B)
HacaKyIJI NIOpe MoXHO IcNoJb3OBaTb IJI NIOpIPOBaHnBapeHbIX OBOUeNΦpyKTOB, TAKNX KAKaPtoΦeJI, CJIaDKN KApToΦeJI, NOMIOpBI, CINBblIJIYI6JIOKI.
Ipeed nCnoB3OBAHnEm
He nCnoB3yIte IJn npriroTOBJIeHnI NIOpe JXCTKNE ININ CbIPbIE npOdyKTbI, TAK KAK 3TO MOxET pNIBECTN K NOBpeKdEHNIO YCTPOINCTBa. OuCTnTe OT KOKypbl N ydaJIte BCE KOCTOKIN TBePbIe 3JIeMeHtbl; CBAPTE IN CJIeTIe BOy, a 3aTEM pNIROTOBbTe HOpE.
- Install the reducer (9a) onto the rod (9b), turning it clockwise until it locks.
- Press the nozzle for puree and install the blade (9c) onto the central bushing, then turn it counterclockwise to the desired position. (If the reducer is not installed correctly, the blade will not lock in place.)
- Align the assembled nozzle for puree with the motor unit and lock them together. Connect the appliance to the mains.
- Place the nozzle for puree into a container with ingredients and turn on the appliance at speed 11. Move the appliance smoothly up and down along the container with ingredients until the desired consistency is reached.
- Release the speed control button and make sure that the rotation of the nozzle for puree has completely stopped before removing it from the product.
- After use, disconnect the appliance from the mains. Remove the blade (9c) by turning it clockwise.
- Press the release buttons to detach the nozzle for puree from the motor unit. Separate the reducer from the rod by turning it counterclockwise.
Caution
- Do not place the nozzle for puree in a saucepan that is directly on a heat source. Always remove the saucepan from the heat first and let it cool slightly. Place the saucepan on a stable, non-slip surface and hold it with one hand. Do not use the nozzle for puree against the wall of the saucepan while in use. To remove food residues, use the blade. To achieve the best results when preparing puree, do not fill the saucepan (bowl) with products more than half full. Do not process more than one batch at a time without a break.
- Before continuing processing, let the appliance cool down for 4 minutes.
Example: Potato puree
1 kg of boiled potatoes
200 MJI TENJIO MOJOKA
- Place the cartridges and start warming up for 30 seconds at speed 11. - Add the milk. Continue warming up for another 30 seconds.
How to use the device
Selecting speed
Press the speed change button (2); the processing speed corresponds to the setting of the speed regulator (1). The higher the setting, the faster the processing. The speed can be adjusted during operation by turning the speed regulator.
The maximum processing speed can be achieved by pressing the "turbo" button (3). The "turbo" button can also be used for short powerful pulses instead of switching the speed regulator.
Blender attachment (A)
The blender attachment is ideal for making purees, sauces, dressings, soups, smoothies, and also fillings, milk and other cocktails.
Use the whisk attachment for whipping cream, eggs, making biscuits and sauces from ready-made mixes.
| ### | ### |
| ### | ### |
| ### | ### |
| ### | ### |
| ### | ### |
| ### | ### |
| ### | ### |
| ### | ### |
| ### | ### |
| ### | ### |
| ### | ### |
| ### | ### |
| ### | ### |
| ### | ### |
| ### | ### |
| ### | ### |
| ### | ### |
| ### | ### ### |
| ### | ### |
| ### | ### |
| ### | ### |
| ### | ### |
| ### | ### |
| ### | ### |
| ### | ### |
| ### | ### |
| ### | ### |
| ### | ### |
| ### | ### |
| ### | ### |
| ### | ### |
| ### | ### |
| ### | ### |
| ### | ### |
| ### | ### |
| ### | ### |
| ### | ### |
| ### | ### |
| ### | ### |
| ### | ### |
| ### | ### |
| ### | ### |
| ### | ### |
| ### | ### |
| ### | ### |
| ### | ### |
| ### | ### |
| ### | ### |
| ### | ### |
| ### | ### |
| ### | ### |
| ### | ### ### |
| ### | ### |
| ### | ### |
| ### | ### |
| ### | ### |
| ### | ### |
| ### | ### |
| ### | ### |
| ### | ### |
| ### | ### |
| ### | ### |
| ### | ### |
| ### | ### |
| ### | ### |
| ### | ### |
| ### | ### |
| ### | ### |
| L | L | L | L | L | L | L | L | L | L | L | L | L | L | L | L | L | L | L | L | L | L | L | L | L | L | L | L | L | L | L | L | L | L | L | L | L | L | L | L | L | L | L | L | L | L | L | L | L | L | |
| plu#yj |
| Jauwigcbauo ovoe bae u## pla#ll guezy p# |
| Cul###all yoo sel### pooll jno c##la#g a##wifg plbc zj ljj |
| L###l joo |
| ### |
| ### 30% ### |
| ### 2014 ### |
| ### 400 |
| ### 4-8 |
| ### • |
| ### • |
| ### • |
| ### • |
| plu#yll L |
| cll y c##y ## ## ## y. gaball y # y all plabll w##y y • .##y |
| plabll ### yab p # :dlo ## lgl y # all y # ### y # • .##y |
0.24 mol 15.4 mol 0.16 mol
Turbo 3
4
5
6
b0 = 0 3 θ
15 22 由 15 22 得
aewj a
a i aai 分母最小值为 k .
w0 = 0 90 °
aewwjjaaea
Wzgab
C
ca 500 a do 10
( wy 1 + wy 2) = 10√5a
z.bddj.b
The device must be used in accordance with the instructions in this manual. (1) The device must be used only for the purpose for which it was designed. The manufacturer is not responsible for any damage caused by improper use.
(3) The Turbo must be operated only by qualified personnel. The Turbo must be maintained regularly.
The device must be kept clean and free of dust. The device must be stored in a dry place.
The Turbo must be used only with the original accessories.

- | x - 2| = 5/2 .
4.4.15
.
[1]
a
20 1


- GERMAN
- BEFORE USE
- CAUTION
- PARTS AND ACCESSORIES
- HOW TO USE THE APPLIANCE
- SETTING THE SPEED
- BLENDING SHAFT (A)
- ASSEMBLY AND OPERATION
- RECIPE EXAMPLE: MAYONNAISE
- WHISK ACCESSORY (A)
- TIPS FOR BEST RESULTS
- RECIPE EXAMPLE: WHIPPED CREAM
- PUREE ACCESSORY (B)
- RECIPE EXAMPLE: MASHED POTATOES
- CHOPPER ACCESSORY (C)
- ALWAYS CLEAN THE HAND BLENDER THOROUGHLY AFTER USE. - UNPLUG HAND BLENDER BEFORE CLEANING. - DO NOT IMMERSE THE MOTOR PART (4) OR GEARBOX (8A, 9A) IN WATER OR ANY OTHER LIQUID. CLEAN WITH A DAMP CLOTH ONLY. - THE LID (10A) CAN BE RINSED UNDER RUNNING WATER. DO NOT IMMERSE IN WATER, NOR PLACE IN A DISHWASHER. - ALL OTHER PARTS CAN BE CLEANED IN A DISHWASHER. DO NOT USE ABRASIVE CLEANERS THAT COULD SCRATCH THE SURFACE. - YOU MAY REMOVE THE ANTI-SLIP RUBBER RING FROM THE BOTTOM OF THE BOWL FOR AN EXTRA THOROUGH CLEAN. - WHEN PROCESSING FOODS WITH HIGH PIGMENT CONTENT (E.G., CARROTS), THE ACCESSORIES MAY BECOME DISCOLORED. WIPE THESE PARTS WITH VEGETABLE OIL BEFORE CLEANING THEM
- FOR UK ONLY
- PLEASE KEEP YOUR RECEIPT AS THIS WILL FORM THE BASIS OF YOUR GUARANTEE
- TO IMPROVE YOUR EXPERIENCE
- CLEANING AND CARE (D)
- COMPONENTS AND ACCESSORIES
- THE DEVICE MUST BE ASSEMBLED CORRECTLY
- ON/OFF SWITCH
- CONTROL UNIT (A)
- CONTROL CHECK
- LUBRICATION
- RECOMMENDED OIL: MAIOHE
- DISCONNECT (A)
- MAINTENANCE AND CARE
- SAFETY INSTRUCTIONS
- CLEANING THE FILTER
- FUSE (B)
- UNDER THE COVER
- OPERATION
- CLEANING
- RECIPE: CARBON PAPER
- TROUBLESHOOTING (C)
- UNDER THE TABLE
- INSTALLATION AND CONNECTION
- CARE AND MAINTENANCE (C)
- DISPOSAL
- USING THE APPLIANCE
- SPEED SETTING
- HAND BLENDER (A)
- RECIPE: MAYONNAISE
- HACAKA-BEHCK (A)
- C60PAKN3KCPNYATAUN
- COBETBI DIYIUXNX PE3YIBTATOB
- PPIMEPPETTA:B36NTBIE CINBKI
- HACÁDKA ДЯ ПИPE (B)
- IPEED NCNOB3OBAHNEM
- EXAMPLE: POTATO PUREE
- HOW TO USE THE DEVICE
- SELECTING SPEED
- BLENDER ATTACHMENT (A)
Brand : BRAUN
Model : MQ3137WH
Category : Blender