Unlimited Zoo BBS1ZOO - Vacuum Cleaner BOSCH - Free user manual and instructions
Find the device manual for free Unlimited Zoo BBS1ZOO BOSCH in PDF.
Download the instructions for your Vacuum Cleaner in PDF format for free! Find your manual Unlimited Zoo BBS1ZOO - BOSCH and take your electronic device back in hand. On this page are published all the documents necessary for the use of your device. Unlimited Zoo BBS1ZOO by BOSCH.
USER MANUAL Unlimited Zoo BBS1ZOO BOSCH
- je nach Ausstattung45 Congratulations on your purchase of a Bosch vacuum cleaner from the BCS1/BBS1 "Unlimited" series. This instruction manual describes various BCS1/ BBS1 "Unlimited" models, which means that some of the equipment features and functions described may not apply to your model. You should only use genuine Bosch accessories – these have been specially develo- ped for your vacuum cleaner to achieve the best possi- ble vacuuming results. Please fold out the illustrated pages. 1 Floor nozzle with electric brush 2 Replacement nozzle for electric nozzle* 3 Replacement nozzle for electric nozzle/furniture* 4 Electric nozzle for furniture* 5 2-in-1 furniture brush with upholstery nozzle* 6 Flexible crevice nozzle* 7 XXL upholstery nozzle* 8 Adapter* 9 Suction tube 10 Fluff filter 11 Plate filter 12 Battery status indicator 13 Turbo switch 14 On/off switch 15 Battery* 16 Dust box 17 Dust box release button 18 Charging cable* 19 Docking station* 20 Quick charger with additional battery* Before using for the first time Fig.
Insert the battery into the vacuum cleaner by means of the guide rail and click it into place.
To release the connection, press the release button and pull the battery out from the back of the appli- ance.
Please note: Charge the battery fully before using it for the first time.
- Depending on model46 Charging There are three different ways you can charge the bat- tery – directly using the charging cable ( Fig.
), in the fitted docking station ( Fig.
) or using an original quick charger. Charging with a charging cable only Fig.
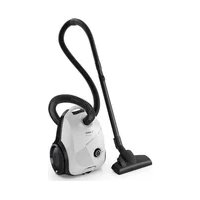
To charge the vacuum cleaner, place it near to a so- cket.
Plug the charging cable into the connection point at the bottom of the appliance.
Plug the charging cable plug into the socket.
The vacuum cleaner's indicator light will slowly flash green as it charges. Once the battery is fully charged, the indicator light will remain continuously lit for a few minutes before going out. Disconnect the appliance from the mains briefly to check it. The indicator will then light up green again.
It is normal for the charging cable and vacuum clea- ner to heat up and this is not a cause for concern.
You can charge the vacuum cleaner whenever it is not in use. Fitting the docking station Fig.
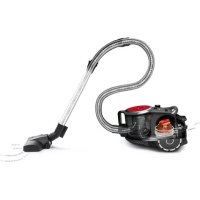
Fit the docking station close to a socket.
To do this, remove the front plate from the docking station. Insert your finger into the docking station from below, and push the front plate from the inside and out of the locking mechanism. Use the screws provided (or equivalent screws) to mount the do- cking station on the wall.
Insert the small connector on the charging cable into the docking station from below, and then up and into the preformed recess.
Put the front plate back on and lock it in place to secure the connection in place.
Plug the charging cable's mains plug into the socket. Charging in the docking station Fig.
Place the vacuum cleaner into the docking station from above.
The vacuum cleaner's indicator light will start to flash slowly once the vacuum cleaner is connected to the mains power supply via the docking station.
The vacuum cleaner's indicator light will flash green as it charges. Once the battery is fully charged, the indicator light will remain continuously lit for a few minutes before going out. Disconnect the appliance from the mains briefly to check it. The indicator will then light up green again.
It is normal for the charging cable and vacuum clea- ner to heat up and this is not a cause for concern.
You can charge the vacuum cleaner whenever it is not in use.
- Depending on model Charging using the quick charger*
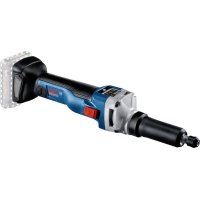
To use the quick charger for charging, the battery must be removed from the appliance ( Fig.
Please see the user manual provided for more infor- mation on how the quick charger works. Charge time The charge time stated here may vary due to charge status, battery temperature and battery age. For one 3,0Ah Bosch Power for ALL battery Via charging cable or do- cking station (80%) approx. 4 h Via charging cable or do- cking station (100%) approx. 5 h Via Bosch quick charger Reference to quick char- ger manual Assembling the appliance Fig.
Fit the end of the suction tube onto the vacuum cleaner's connection port and lock it in place.
To release the suction tube, press the release button and pull the suction tube down to remove it Fig.
Insert the end of the suction tube into the floor nozz- le and lock it into place.
To release the floor nozzle, press the release button and pull the suction tube out of the floor nozzle. Vacuum-cleaning Fig.
The vacuum cleaner can be switched on and off by pushing the On/Off switch on the handle in the direc- tion of the arrow. When the vacuum cleaner is switched on, the indicator light will be lit green. Fig.
When the appliance is running the turbo function can be activated by pushing the turbo switch on the vacu- um cleaner in the direction of the arrow. The indicator light will flash green rapidly.47 Runtime Like every other Li-Ion battery the Power for ALL bat- tery is subject to natural wear as well. That means the battery capacity and thus runtime decrease over time. This is a natural aging process and not the result of a material/production failure or a product defect. For one 3,0Ah Bosch Power for ALL battery On normal mode with non-electrical accesso- ries for cleaning furniture etc. Up to 60 min. On normal mode with electrical nozzle for normal cleaning tasks Up to 45 min. Turbo mode with elec- trical floor nozzle and for demanding cleaning tasks Up to 7 min. The natural wear can be prolonged with the following measures:
Charge the battery only within a temperature range between 0 °C and 45 °C.
Store the battery only within a temperature range between -20 °C and 50 °C.
Do not store the battery fully-charged or completely discharged over a long period of time. Fig.
Vacuum-cleaning with accessories Attach the nozzles to the suction tube or the appliance's connection port as required: a) Crevice nozzle for vacuuming crevices and corners, etc. b) 2-in-1 furniture brush with upholstery nozzle for vacu- um-cleaning window frames, cupboards, furniture, etc.
After use, reinsert the crevice nozzle and 2-in-1 fur- niture brush with upholstery nozzle into the acces- sories holder. After using the appliance
Switch off the appliance once you have finished va- cuuming. Fig.
Emptying the dust container In order to achieve the best possible vacuuming re- sults, the dust container should be emptied after every use or, at the latest, when dust at one point in the dust container has reached the mark. We recommend that you do not fill the dust container beyond the mark as this may lead to the filter becoming clogged with dust.
- Depending on model When emptying the dust container, always check how much dust there is in the filter unit and, if necessary, clean it as detailed in the "Filter care" instructions.
Caution: The filter can only be cleaned if the appli- ance is switched off. Never vacuum-clean without the filter unit in place. Fig.
Use the release button to release the dust container, and remove the dust container from the appliance. Fig.
Remove any dirt that may have been lodged under- neath the container ejector opening.
Insert the filter unit into the dust container, making sure it is correctly seated.
Insert the dust container into the appliance, so that it clicks audibly into place.
Caution: If you notice any resistance when inserting the dust container, check that the filter is complete and that the filter unit and dust container are correct- ly seated. Filter care The filters should be cleaned at regular intervals in or- der to ensure that the vacuum cleaner operates opti- mally.
Please switch off the appliance to clean the filters.
Caution: The filter can only be cleaned if the appli- ance is switched off.
Remove the dust container from the appliance. Fig.
Cleaning the plate filter
To clean the plate filter, turn the knob at least three turns through 180°.
Then remove the plate filter from the outer filter unit and empty the dirt. We recommend that you clean the plate filter each time you empty the dust container. Fig.
Tapping the dirt out of the plate filter If the plate filter is particularly dirty, the dirt can also be tapped out.
To do this, remove the plate filter from the outer fil- ter unit and tap it out over a dustbin.
Once you have cleaned the plate filter, it is ready for use immediately.
Please note: The filter does not need to be rinsed out.48 Fig.
Cleaning the fluff filter
a) It is usually sufficient to lightly shake or tap out the fluff filter when the dust container is emptied in order to dislodge any particles of dirt. b) If this is not sufficient, you can use a dry cloth to remo- ve dirt particles from the surface. Fig.
Insert the plate filter into the outer filter unit and lock it in place by turning it clockwise.
Insert the filter unit into the dust container, making sure it is correctly seated. Insert the dust container into the appliance, so that it clicks audibly into place. Fig.
Cleaning the floor nozzle Before carrying out any maintenance, switch off the vacuum cleaner and disconnect it from the charging cable. Fig. 18* a) Turn the rotary brush anti-clockwise to unlock it and pull it out to the side of the floor nozzle. b) Use scissors to cut through threads and hairs wound round the brush and then remove them. c) Slide the rotary brush in at the side of the floor nozzle and along the guide bar, and turn it clockwise to lock it in place.
Please note: The floor nozzle must only be used with the rotary brush fitted. Troubleshooting Problem Possible solution Product doesn´t work and/or no signal from battery status indicator Please ensure that bat- tery is assembled in cor- rect way and/or battery is charged. Product doesn’t work or continuos red battery status indicator for 10 sec. Battery/appliance might be over/under heated. Please wait until bat- tery/appliance reaches suitable temperatures.
- Depending on model Care Make sure that the cordeless handheld vacuum clea- ner is switched off and disconnected from the charging cable before cleaning it. The vacuum cleaner and plas- tic accessories can be cleaned with standard plastic cleaner.
Caution: Do not use abrasive, glass-cleaning or all-purpose cleaning products. Never immerse the vacuum cleaner in water. Subject to technical modifications. Battery state-of-charge indicator Operating status LED indicator Normal mode Green LED lit Turbo mode Green LED flashing quickly Battery capacity redu- ced by 20% Red LED flashing slowly Battery flat LED off Charging Green LED flashing slow-
%6+,NLDNHV6\VNHYHV6HUYLFH
(JRPL1LNRVLD/HINRVLD
PDLOWR&$8%RVFK#EVKJFRP
%6++RPH$SSOLDQFHV/LPLWHG
8QLWUG)ORRU North Block, Skyway House,
- Mo-Sa: 8.00am to 8.00pm
PDLOWRRDVWD¿HY#DYVHUYLFHN]
0D0DDGKHOL0DMHHGKHH0DJX
BOSCH Service centre,