
BGM1020 - Grinder Ferm - Free user manual and instructions
Find the device manual for free BGM1020 Ferm in PDF.
| Product type | Grinder (bench grinder) |
| Brand | Ferm |
| Model | BGM1020 |
| Power supply | 230 V ~ 50 Hz |
| Rated power | 180 W (S1), 250 W (S2) |
| No-load speed | 2980 rpm |
| Wheel dimensions | Ø 150 x 20 mm and Ø 150 x 40 mm |
| Axle hole diameter | 12.7 mm |
| Weight | 8.5 kg |
| Sound pressure level (Lpa) | 80.7 + 3 dB(A) |
| Sound power level (Lwa) | 91.7 + 3 dB(A) |
| Duty cycle (S2) | 30 minutes (then cooling) |
| Package contents | Grinder, protective guard, left and right tool rests, manual, safety instructions, warranty card |
| Main functions | Sharpening, grinding, deburring |
| Maintenance and cleaning | Clean the housing with a soft cloth and soapy water; do not use solvents |
| Safety | Safety glasses mandatory; protective screen; adjustable tool rests at 1-1.5 mm from wheel; automatic stop after 30 min |
| Spare parts and repairability | Replacement wheels available; repairs by qualified technician (service center) |
| General information | Domestic and light professional use; mandatory attachment to a workbench |
Frequently Asked Questions - BGM1020 Ferm
User questions about BGM1020 Ferm
0 question about this device. Answer the ones you know or ask your own.
Ask a new question about this device
Download the instructions for your Grinder in PDF format for free! Find your manual BGM1020 - Ferm and take your electronic device back in hand. On this page are published all the documents necessary for the use of your device. BGM1020 by Ferm.
USER MANUAL BGM1020 Ferm
Thank you for buying this Ferm product.
By doing so you now have an excellent product, delivered by one of Europe's leading suppliers. All products delivered to you by Ferm are manufactured according to the highest standards of performance and safety. As part of our philosophy we also provide an excellent customer service, backed by our comprehensive warranty. We hope you will enjoy using this product for many years to come.
The numbers in the following text refer to the pictures on page 2

Read the operating instructions carefully before using this device. Familiarise yourself with its functions and basic operation. Service the device as per the instructions to ensure that it always functions properly. The operating instructions and the accompanying documentation must be kept in the vicinity of the device.
Contents
- Machine data
- Safety instructions
- Installation
- Operation
- Maintenance
1. Machine data
Technical specifications
Voltage 230 V
Frequency 50 Hz
Power input 180W S1, 250W S2
Rotational speed, not loaded 2980/min
Duty time S 30 min
Grinding wheel dimensions 150x20 mm 150x40 mm
Spindle hole diameter 12.7 mm
Weight 8.5 kg
Lpa (Sound pressure level) 80.7 + 3dB(A)
Lwa (acoustic power) 91.7 + 3 db(A)
Load factor
A load factor of S_2 = 30 min (intermittent periodic duty) means that you may operate the motor continuously at its nominal power level for no longer than the time stipulated on the specifications label (30 minutes ON period). If
you fail to observe this time limit the motor will overheat. During the OFF period the motor will cool again to its starting temperature.
Vibration level
The vibration emission level stated in this instruction manual has been measured in accordance with a standardised test given in EN 62841; it may be used to compare one tool with another and as a preliminary assessment of exposure to vibration when using the tool for the applications mentioned
- using the tool for different applications, or with different or poorly maintained accessories, may significantly increase the exposure level
- the times when the tool is switched off or when it is running but not actually doing the job, may significantly reduce the exposure level
Protect yourself against the effects of vibration by maintaining the tool and its accessories, keeping your hands warm, and organizing your work patterns
Contents of the package
1 Bench grinder
2 Sets spark guard bracket ^+ spark guard
1 Tool rest (right)
1 Tool rest (left)
1 Instruction manual
1 Safety instructions
1 Guarantee card
Check the machine, loose parts and accessories for transport damage.
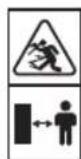
Features
Fig. A
- On/off switch
- Tool rest (right)
- Spark guard
- Spark guard bracket
- Screw
- Tool rest (left)
2. Safety instructions
Explanation of symbols

Denotes risk of personal injury, loss of life or damage to the tool in case of non-observation of the instructions in this manual.
Indicates the presence of an electrical voltage.
Keep bystanders away.
Wear eye and ear protection.
Special safety instructions
When using the machine for the first time:
-
Check the following:
-
Does the voltage rating of the bench grinder correspond to the power supply?
Is an earthed mains power socket available? -
Are the power cord and plug in good condition (solid, without fraying or other damage)?
-
Avoid the use of long extension cords. The extension cords you use must always be earthed.
- A grinding wheel is a brittle tool piece. The stone is not resistant to knocks.
Always grind on the front edge of the grinding wheel, and never on the side of the grinding wheel. Never fit a cracked grinding wheel. Replace it immediately, as the high rotational speed could cause the stone to fly apart, causing a serious accident.
Always wear safety glasses when grinding. - Never grind without the cover fitted over the grinding wheel.
Always fit the grinding wheel cover and tool rest tightly, and with the correct clearance. - Never allow more than 1 - 1.5mm clearance between tool rest and grinding wheel.
- Only use the grinding wheel for the work it was designed for (for example sharpening tools), and NOT for heavy construction work.
- The following information must be available, before you fit any new grinding wheel:
Details about the manufacturer.
- Binding material.
- Dimensions.
- Permissible rotational speed.
- Never ream out the hole in a grinding wheel to a larger diameter.
-
The maximum rotational speed of the grinding wheel should never be allowed to exceed the maximum speed given for the wheel.
-
Never use any grinding wheel that is damaged or deformed.
- In order to be able to grind safely, the machine must be firmly bolted to a workbench.
- The tool rest should be replaced whenever the width of the tool rest measures less than 20mm .
- The recommended depth of the recess in the flange (T) is 2mm and the diameter of the spindle hole is 13mm (see Fig. B).
Whenever using the machine
- Check that the switch is NOT in the 'ON/1' position before connecting the machine to the power supply.
- Always keep the power cord out of the way of the tool's moving parts.
Immediately switch off the machine when:
- The plug or power cord is defective or damaged.
- The switch is defective.
- You smell smoke or burning insulation
Electrical safety
When using electric machines always observe the safety regulations applicable in your country to reduce the risk of fire, electric shock and personal injury. Read the following safety instructions and also the enclosed safety instructions.

Always check that the power supply corresponds to the voltage on the rating plate.
Replacing cables or plugs
Immediately throw away old cables or plugs when they have been replaced by new ones. It is dangerous to insert the plug of a loose cable in the wall outlet.
Using extension cables
Only use an approved extension cable suitable for the power input of the machine. The minimum conductor size is 1.5mm^2 . When using a cable reel always unwind the reel completely.
3. Installation
The grinder must be firmly bolted to a workbench. The length of the fixing bolts will depend on the thickness of the workbench. If the workbench is made of steel, it is advisable to use a wooden block or plank between the grinder and the bench, to insulate it and prevent vibration.
Assembly and adjustment of spark guard bracket and spark guard
Fig. B

The spark guard bracket and spark guard should only ever be assembled/adjusted with the grinding wheel stationary, and the machine disconnected from the power supply.
Fix the spark guard bracket (4) with attached spark guard to the grinding wheel cover, using the screw provided (A).
- Set the spark guard bracket at the correct height. The clearance (B) between the wheel and the spark guard bracket should be 1 to 1.5mm .
- Next tighten the screw (A) firmly.
- Position the spark guard to give maximum protection when working.
Always wear safety glasses.
Fitting and adjusting tool rest

The tool rest should only be adjusted when the grinding wheel is completely stationary, and the machine is disconnected from the power supply (the wall socket).
- Fit the tool rest as shown in Fig. C.
Fix it as tightly as possible in position, with a maximum clearance (C) of 1 to 1.5mm between the tool rest and the grinding wheel.
Replacing the grinding wheel
Fig. C
Required tools:
19 mm spanner
- 8 mm spanner
- Screwdriver

Only ever replace the grinding wheel when the motor is at a standstill and the power is completely disconnected.
- Remove the grinding wheel guards using the tools listed above. The spindle nut on the right-hand side has a right-handed thread. The spindle nut on the left-hand side has a left-handed thread. Keep this in mind when you are replacing the grinding wheels.
- Loosen the nut using the correct spanner. Remove the old wheel from the spindle.
- Clean the flanges. Place one flange (A) back on the spindle, with the hollow side facing the
grinding wheel. Slide the new wheel onto the spindle. Place the second flange (A) on the spindle, again with the hollow side facing the grinding wheel. Now tighten the nut on the spindle. Do not overtighten! Now refit the grinding wheel cover, and again adjust the tool rest correctly. Run the motor briefly, without grinding.
4. Operation
Selecting the grinding wheel
Coarse grinding wheels will in general remove the most material, and fine grinding wheels are used for finishing. If the surface is uneven, begin by using a coarse grinding wheel, and grind the workpiece until it is smooth. Next use a fine grinding wheel to remove the grooves and scratching left by the coarse wheel, and finish off the workpiece.
How to grind
To prevent the grinding surface from blocking up, avoid holding wood, lead or any other soft material or metal against the grinding wheel. To avoid creating grooves, do not press the workpiece too firmly on the grinding wheel. Use water to regularly cool the workpiece being ground. Wood chisels and the like should never be sharpened 'blue'. Take care not to lose your grip on the object being ground, as it may suddenly become jammed between the tool rest and the grinding wheel. This can cause the stone to shatter, the motor to seize, or the workpiece to fly off, all of which can cause injury and damage. Whenever the machine has been in use for 30 minutes, it should be switched off. Allow the machine to cool down to room temperature.
- Switching the machine on
- Check that the switch is in the "OFF/0" position before connecting the machine to the power supply.
- Press the power switch into the "ON/1" position to start your bench grinder.
Always keep the power cord out of the way of the tool's moving parts.
5. Maintenance

Make sure that the machine is not live when carrying out maintenance work on the motor.
This machine has been designed to operate over a long period of time with a minimum of maintenance. Continuous satisfactory operation depends upon proper machine care and regular cleaning.
Troubleshooting
Should the machine fail to function correctly, a number of possible causes and the appropriate solutions are given below:
1. The electromotor becomes hot
- The motor has become overloaded.
- Give the motor a chance to cool down.
- The motor is defect.
- Please contact the service address on the warranty card.
2. Machine switched on, but will not run
- Interruption in the mains connection.
- Check mains connection for fracture.
- The switch may be damaged.
- Please contact the service address on the warranty card.

Repairs and servicing should only be carried out by a qualified technician or service firm.
Cleaning
Regularly clean the device's casing with a soft cloth, preferably after each use. Keep the fan slits free of dust and dirt. Remove stubborn dirt using a soft cloth, dampened with soapy water. Do not use solvents such as benzene, alcohol, ammonia, etc, which might damage the plastic parts.
Lubrication
The device does not need any additional lubrication.
Defects
If a defect appears due to a part wearing out, please contact the service center on the warranty card. At the end of these instructions there is an exhaustive overview of the parts that can be ordered.
Environment
To prevent damage during transport, the appliance is delivered in a solid packaging which consists largely of reusable material. Therefore please make use of options for recycling the packaging.

Damaged and/or disposed of electrical or electronic devices must be dropped off at recycling stations intended for that purpose.
Only for EC countries
Do not dispose of power tools into domestic waste. According to the European Guideline 2012/19/EU for Waste Electrical and Electronic Equipment and its implementation into national right, power tools that are no longer usable must be collected separately and disposed of in an environmentally friendly way.
Warranty
Read the warranty conditions on the separately supplied warranty card.
The product and the user manual are subject to change. Specifications can be changed without further notice.
Heo6xoDnIMnHnCTpyMeHTn:
9MMraeueH KJIIOU
8MMraeueHKnIOU
OTBepTKa

Hukozha He cmeheme konenomo 3aunauphahe, Kozamo Momopbme cnprn u 3axpaehaemoe HantbnHO uKJIOUeHo.
MaxheTe 3aunTHoTo KOJEno Ha IJnaiPfaneC HnCTpyMeHTnte, N36poEHN NO-rope. RaKaTa Ha BpeTeHOTo OT DaChata CTrpaHa IMa pe36a C DaChata PbKa. RaKaTa Ha BpeTeHOTo OT JIbBATA CTrpaHa IMa pe36a C JIbBATA PbKa. ImaIte PpeBnD ToBa, KOrato NoDMeHrTe UINIOOBvHIne KOJena.
Pa3xna6ete rainkata c npabunnna rauehen KIOU. 3BaTe cTapTO KOeNo OT UHHdena.
IOnucTeTe fPhaHcHTe. IocTaBeTe eHNfHaHeu (A) Ha Bbpxa Ha WnIHDeJa, KaTo KxOTo My Nlue e HacOueHO KbM KOJIIoTO 3a WnaiFaHe. IIb3HeTe HOBOTO KOJIeIO Bbpyx WnIHDeJa. IocTaBeTe Btopra fPaHeu (A) Bbpxy WnIHDeJa, OTHOBc Kxata CTpaHa
KbM KOJIeIOTO 3a WIIINFOBaHe. Cera 3aTeHHTe raikata Ha WIIINHDeJa. He npekanraBnte! Cera pemOHtnpaTe kanaka Ha WIIINFOBcHnA INCK N OTHOBpeYInpaTe npabINHO NOUBkata Ha HNCTpyMeHa. PycHeTe DBIRatJIe 3a KpATko,6e3 da ro WIIaNfoate.
4. Onepaçania
N36npaHe Ha KOJEnoTo 3a WJaHpaHe
Ipy6nte IuNFOBvH N KOJIa O6nKHOBeHO npemaxBaT Ha-MHOro MaTePnaJIn uΦHH uOBOvH N KOJIa Ce n3nON3BaT 3a DOBbPwHTeHN pa6OTn. Ako NOBbpXHOCTTa e HepaBH, 3aNoyHeTe C NOMUta Ha rpy6o IuNFOBaHe n CMnJaTe DeTaJNa, DOKaTO 6bJe rJaDbK. CneT TOBA n3nON3BaTte pINHO IuNFOBvH O KOJIe, 3a Da n3BaJNTe XNe6OBete H NaDpaCKBaHe HAnrBO OT rpy60To KOJIe N 3aBbPwTe DeTaJNa.
Kak da MeJeHe
3aДпpeIoTOBpATHTe 6IOKupaHeTo Ha NOBbpxHOCTTaHa IJNAHpaHe, N368BaHTe DaIbpxNITE DbPBO, OIOBO ININ Dpyr MeK MaTePnAIn IIN MTeAIN BbPxY KOJIeNOTo 3a IJNAHpaHe.3a DA IN36ERHeTe Cb3dABaHETo HA KaHAn, He npITcKaIte O6pa6OtBAeMOTO I3DeIIne PpeKanEHO 3dPaBO BbPxy K0JIeNOTO 3a IJNAHpaHe. INONJ3BaIte BOJa 3a peDOBHO OXJAAKeHHe Na IOJROBeHnRA DeTaN. JbPBeHInTE DNeTa INO6bHn HE Tp8Ba HNKOra DA 6bDaT 3aTOUeHN "CINH".BHMMABaIte Da He 3aRy6nte CcENNEHHeTO Ha OBeKaT, TbKATO ToIMoKe BHe3aNHO Da ce 3aDPbCTn MExdy ONopTa Ha INHCtpymEnTa INJINΦOBbYHOTo KOJIeNo. TOBa MOKe Da IOBeDe Do pa3dpo6raBaHe Ha Kamka, 3a 3axBaUaHe Ha DBVaTeJIЯ INIg 3a IN3NJtAHe Ha DeTaN, KOINTOMorAT Da INPNHHrT HapAHBaHe IN NobpeDa.KORAto MAuHnAta Ce IN3NOJ3Ba 3a 30 MNHyTN, Ta Tp8Ba Da ce IN3KNIOUCh. OCTaBeTe MAuHnAta Da ce OXNaDN DO CTaNHa TEMNepaTypa.
BkIIOUyBaHe Ha MaUSHHaTa
- Поберете далпразькюватей в положене "OFF / 0", празда в BKючуte урда в зхсановeto.
- Hatnche Te npebkIIOUbaTeTnHa 3axpaHbAHeTo B noJIoKeHne "ON / 1", 3a da cTaptnpate nepoTo.
BnHaH npbXte 3axpaHbaunna Ka6eI n3BbH nbTg Ha dBHXeUNTe ce yactn Ha HhCTpyMeHTa.
5. PoiDpBjXka

YBepete ce, ye npn n3BbPwBaHe Ha pa60tn no noDpBxKkata Ha MOTopa MaunHaTa He e aKTNBHa.
Ta3n MaunHa e npoeKtnpaHa da pa60Tu 3a DbIbI nepno OT BpeMe C MHNMaJIHa noIdpbXka. HenpeKbchato 3aIOBOJNTeJIHa pa60ta 3abnc OT npabUNHOTO oCnykBaHe Ha MaunHaTa I peOBHOTo NOUCTBaHe.
OctpaHbAhe Ha npo6JIemn
Ako MaunHaTa He pa60n npabuHNO, no-dony ca daJeHN HRAKO K Bb3MOxHn pnuHn n NOxOJaUte peueHna:
1. EJektpomotopbT nperpraBa
MotopbTe npetobapeH.
Jaume 8b3MOxHocm Ha obuzamena da ce oxnaodu.
- MotopbTe epekeTHe.
Mona, cebpxeme ce cbc cepu3nuapec Ha zapaunOHama Kapma.
2. MaunHaTa e BkIoueHa, Ho HMa da Pa6oTu
- PpeKbcBaHe Ha MpeXOBaTa Bpb3Ka.
-Прoeepeme Мржobama 6рьзka 3a cuynbahe.
- PpeBknHouBaTeJrT MoKe da Ce NOBpeNi.
Mona, cebpxeme ce cbc cepu3nuaopec ha zapaanhouhama Kapma.

Pemohmume u cepu3hme pa6omumpa6ea da ce u3ebpweam camo omkaunuucupan mexnuk unu cepu3hafupma.
NouchBaHe
PerynnpaTe peoBHO kOpnyca Ha yCTpoiCTBOTo C MeKa Kbpna, 3a npednoHTaHe cIeB BcKa yNoTpe6a. DpbXTe BeHTnlaauOHnTe OTBOpN 6e3 npax n MPbCOTn. IpemaxHete yNOPiTata MPbCOTn, KATO n3NOJ3BaTe MeKa Kbpna, Hanoeha CbC canyHeHa BOda. HeDei n3NOJ3BaTe pa3TBopNTen KaTO 6eH3eH, aIKOXOJI, aMOHrK, T.H., KOITO MORaT da NOBpejT PNaCTMacOBtte Yactn.
Cma3BaHe
YcTPOIcTBOTo He ce Huykdae OT DOnblHITeHOCMa3BaHe.
DepekTu
AkoBb3HnKHe DepeKT nopadn 3HocBaHe Ha qact, MoJra ObpHeTe ce KbM cepBn3HnI ueHTbp Ha rapaHcUOnHata KapTa. B kpaHa Te3n INCTpyKmIMa N3eepNaTeJeH pereJeHa qactnte, KOtO MoRat da 6bDat npbuaHn.
3a06nkaJpa cpeda
3a da npedotbpaTne NOBpeDa no Bpeme Ha TpaHcnpTnpaHETo, ypeBt ce doctabB TBbpda ONAKOBKa, KOrTO ce cBCTOn NpeDmHO OT MaTePnAa 3a MHOKpaTHa yNOTpe6a. 3aToBa INoJ3BaIte ONUITE 3a peuNKIpaHe Ha ONAKOBkata.

IoepeheHume u/ unu u3x8bpneHume enekmpueecku unu enekmpoHnu ycmpoucmea mpa6ea da 6bdam u3x6bpeneHu peuknupauuime cmaHuu, npedHa3naueHu 3a ma3u ueJ.
Camo 3a ctpaHnTe ot EO
He n3xBbpynIte eJektpoHnCTpymeHTne B 6ntobu OTnpabu. CbrnacHo Ebponeckata Hacoka 2012/19 / EC 3a OTnpabuTe ot eJektpnuYecko n eJektpoHNO o6OpyDbAhe n HeHOTO npnilarahe B HaunohHnHOTo npabo eJektpnuYeCKnTe INcTpyMeHTN, KOnTO Beue He Ce n3no3BAt, Tp6Ba Da ce Cb6bupat OTdEInHO n da ce n3XBpbIANT NO ekolorocbo6pa3EH NaHH.
TapaHcH
IpoDyKTbT n pBKOBOcTBOTo 3a Notpe6nteTa ca o6ekt ha da ce npomeH. CneuФnkaunTeMoraT da ce npomeHr 6e3 no-HataTbUHO N3BecTne.
PpoyeTe rapaHcnoHHte ycNoBna Ha OTdeIHO npedocTaBeHaTa rapaHcnoHHa kaPa.
HACTOJIbHbI JIINΦOBaJIbHbI CTAHOK 250BT - 150MM
Blaoradapm Bac 3a nokynky 3Toro npodykTa
Ferm. TaKIM o6pa3OM, Bbl NOIyuaTe npBocxOndbI INPOdyKT, NOCtABnIeMbI ODNHM I3 BeDyUnx NOCtABuNkoB EBpOnbl. Bcra PNOdyKzry, NOCtABnIeMaB BAM KOMnHaNei Ferm, I3rOTaBnIBaETCB COOTBETCTBUN C BbICoayuMM CTAHdApTAMN INPOIN3BOIDNTbHOCTN I 6e30NaChOCTN. B pAmkax HaWei FNIIOcoOpMn Ml TAKKe O6ecneuNbAem OTINuHoe O6CnyXnBaHne KIneHTOB, NOdkpenJIeHHOe HaWei BCEo6bEmJIOUe rapaHTne.Mbl HAneEMc, YTO Bbl 6yDeTe NOlyuAtb yDOBOJbCTBNE OT INCNoJIb3OBaHnI 3TOIPOdyKT aDJIne rObl.
UHbB CNeDyUoE M TeKCTe OTHOcTcK n306paXeHHa CTpaHnue 2.

Ipeed ucnnoB3o6aHuem 3mo20
ycmpoucmea BHMamelbHo npoumme
Uncmpykuu no 3Kcnnyamauu.
O3hakombmecb c e2o 4yHKuaMu u
OCHOBIMu npuunamu paobmbi.
BbinoNnmae o6cnykuueaue ycmpoucmea
8 cooBemcmbu C uncmpykuuMa,
ymobby y6ebumbcra, ymo oNo 8ce2da
paBomaem npaeunbNo. Hcmpykuu no
3Kcnnyamau uu u copoeodumeMbHyU
doKymehmauuo cnedyem xpanmb pRdom
C ycmpoucmeom.
CoepkaHne
1.Инфорmaцьообидени
2.правидахнicken6e3onachoctn
3. YctaHOBka
4. 3Kcnpnyataun
5.06cJyXnBaHne
1. INHΦOPMALIЯ OБИЗДЕЛIM
TexHueckne xapaKTepeNtKN
HanpaKeHne 230B
Yactota 50
BxOHaMoUHocTb 180BT S1,250BT S2
Ckopoctb BpaueHn,6e3 Harpy3Kn 2980/MNH
Джурhoe Врем S2=30 mH.
Pa3mepbI uHnfoBaHbHorO kpyra 150x20 MM 150x40 MM
DnAmEtPoTBepCTNaNNdEe 12,7 MM
Bec 8,5 K
Lpa (ypoBHe 3BykoBOrO daBJeHn) 80,7+3d5(A)
Lwa (akcytnecka MouHoctb) 91,7+3d5(A)
Ko3ΦΦnueHT Harpy3Kn
Ko3ΦΦnueHT HaRpy3Kn S2= 30 MIn (npepbIBNCTbI nepNoDnueckn peXIM) O3Haayet, YTO Bbl MoXeTe 3KcPiIyAtnpOBaTb DBrIaTeJIb HEnpepbIBHO Ha eO HomHHaJIbHOM yPoBHe MOUHOCTH He DOJIbWe BpemeH, yKa3aHHOrO Ha Ta6JIuYe cTexHnueckmX npakTePncTikamn (pePNOB BKJIOUeHn 30 MNHyT). EcNI Bbl He co6JIIOdaTe 3TO orpaHnueHne nO BpemeH, DBIrTaJIb 6yDet nepePebaTcb. Bo Bpemr nepNoDa BblIKJIOUeHn DBrIaTeJIb ChOBA OCTbIHET Do CBOeH NaaJIbHO TEmnPepaTypbl.
UpoBHeB Bu6paCmN
YPOBHeB Bn6paCIn, yKa3aHHb IN KOHcE DaHHOrO pyKOBODCTBa IIO 3KcPiNyataCIN 6bl IN3MpeH B COOTBeTCTBmC O CTaHApTn3uPoBAHHbIM NcblTaHEm, CoepXaUmmcB EN 62841; DaHHa XapakTePncTnKa MoKeT nCNoIb3OBaTbcr DnA cpABHeHn OJHO rHCTpyMeHTa C dpyrM, a TaKke InI npEdBapNTeNbHO OueHKn BO3dEInCTBnBn6paCIn npN nCNoIb3OBaHn DAnHHo INCTpyMeHTa Iy Ka3aHHbIX cJeIe:
-при ИСПОЛБЗОВАнИНСТРУМЕNTAВДPyRnx
ЧеляХИИСДPyRUMN/HeINCnPaBHBIMN
BCPOMOraTeJIbHbIMN ПИСПОСOBЛeHNYM
уразовь BO3ДeENCTBЯВИБрацIN MОЖET
3HAчITeJIbHO NOBbIшATbCS;
B nepnobl, KOrda HnHCTpymeHT OTKlIOUeHnn yHKuOHpyeT 6e3 qakTNueckoro BbINOJIHeHnpaObTbI, yPOBeHb BO3JeNCTBnBn6paun MoKeT 3HaunTeJbHO CHNKaTbcra.
3aunuainTe ce6oT Bo3deicTBnBn6paun, noDepxnbA nHcTpymENT erOBCNOMOratEnbHbIe npncnocobHeN B nCnpabHomCOCTOHN, noDepxnbA pyKn B TeIne, a TaKKe npabNbHO orpaHn3OByra CBO paOchn npocceC.
B KOMNJIeKTe
1 HactoIbHbI uNIOBaIbHbI cTahOK
2 KomnJIeKtIb KPOHHTeHa NCKporacnteJ+ NCKporacnteJIA
1 POnctabka dIy INHCTpyMeHTa (npaba)
1 POnCTaBkaIINHcTpymeHTa(NEBa)
1 INHCTpykLNA NO 3KcNlyaTaauu
1 PpaBnJaTexHnK6e3oNaCHOCTN
1 TapaANTnHaNkapTa
Проверпь Maшину, He3akpenlleHbIe DeTaIIu npHaIaJIeXHocTn Ha npEaMTe NOBpeKdEHN npI TpaHCnOpTIpOBKe.
Oco6eHHoCTn
Puc.A
- NepekeJIIOUaTeJIb BKJIIOUeHnI / BBKJIIOUeHnI
2.Подставka ДЯ ИНСТРУМЕТА (празвая)
3.ИckporacntTeIb
4.KpOnuTeH NcKpOaUHTbI - BnHT
- NocTabka IJn HNctpMeHTa (neBa)
Heo6xoIIMbIe HNcTpymEnTbI:
- Raeyhnyi KInou Ha 19 MM
- FaeuHbI KJIIOU Ha 8 MM
- OTBepTka

3aMeHnme uufoBaBbHbI Kpy2 monbko npu Hepabomaiouem deuzamene u Ko2da numaune noHNocmbIO omKnIOyeHO.
CHIMITE 3aUHTbIe KOxyxu IINFOBaJIbHOKpyra C NOMOUIIO NEpeuNCJIeHHbIX Bblwe HCTpyMeHToB. RaIka UINHdEJIc C npaBOI CTOPoHbI IMeET npaBYIO pe3b6y. RaIka UINHdEJIc C IeBOI CTOpOHbI IMeET JEBYIO pe3b6y. POMHInTe 06 3TOM pRn 3aMeHe UINFOBaJIbHbIX KpyROB.
Ocna6bTe raKy c nOMoUbIIO NOxOJaIero raeyHoro KInOa.CHMnTe cTapoe KOleco co ⅢnnHdJIa.
OuHCTnTe fHaunCbI. YcTaHOBInTe OINH fHaHeuC(A) 6oPaTHo Ha IINHDeJIb TaK, UTo6bl nona cTOpOna 6bIa O6paueHa K
JHIOHOE KOIEO Ha IINHdIb. YcTAHOBtE BTOPOI OHeA (A) Ha IINHdIb TaK, Yo6bl erO nona cTOpOHa 6bIa ObpaueHa K IINofoBaHOMy Kpyr. Tepeb 3aTaNHTe raKy Ha IINHdIe. He nepetraBaHTe! Teppb yCTaHOBtE KpbIshky IINFOBaNBO HOrO Kpyra n ChOBa npabInbHo OTpeYnnpyTe onopy dIra IHCTpMeHTa. DaIte DBrarTeJIIO npap60TaTB HeHaOnIro, 6e3 CkpeXeTa.
4. 3KcπΠγATAUη
Bb6op wHFOBaHoro kpya
Kpyr nI py6oro 7nHPOBaHnO obHyHO ydaIyOT
6oNb7uO YAcTb MaTePnAna, a Kpyr nI ToHkOrO
7nHPOBaHn HcONb3yOtC dIy NCTOB0B
6pa60TK. Ecnn NOBepxHOctb HepoBHnA, NaHnTe
c rpy6oro 7nHPOBaHnHO Kpyra n OT7nHpyuTe
3aROTOBky, noka OHa He cTaHET rnaDko. 3aTeM
HCNOb3yUte TOHKn 7nHPOBaHbHKn Kpyr, YTO6bl
ydaIITb KaHaBKn U qapAnHbl, OCTaBHeHHbE
rpy6bIM Kpyrom, n 3aKOHHTb 3aROTOBky.
KaK n3MeJbUHTb
Bo n36exaHne 3a6bAHnI uNFOBaJIbHOJ NOBepxHOCTn DEpXHTe DEpeBO, CBnHeu IINI IIO6oIpyrO MArKn MaTePnA INI MeTAn HApOTNB uNFOBaJIbHOrO Kpyra. YTO6bl I36exaTb O6pa3OBaHnI BOpO3dOK, He HaKImaIte CInUKOM CInbHO Ha uNFOBaJIbHbIKpyr. IcNoB3yIte BOy dIy peYJrAphoro OxJaXdEHNs UINFyEmo 3arOTobKn. DOnota no DepeBy n aHaONUHbIe N3DeJIH NkOrDa He DoJXHbI 6bITb 'CINHM'. ByIbTe OCTOPOXHbI, YTO6bl He Noteprtb CcENIIeHne C uNFOyEmbIM PpeMeTOM, TAK KaK OH MOxET BHe3aHNO 3aCtPraTb MExdy Onopoi dIy INCTpyMeNTa IuNFOBaJIbHbIM Kpyrom. 3TO MOxET pINBeCTN K packOJy KamH, 3aKlIHIBaHIo DBIRATEJIY INI OTJeTy 3aROTBKn, YTO MOxET cTaTb npuHHO TpaBM n NobpeXKeHn. KaXdbI pa3, KOrDa MaUNHa uCNoJIb3OBAJnacB TeYeHne 30 MNHyT, ee CNeDyET BbIKIOChITb. DaIte MaUnHe OCTbIb DO KOMHaTHOH TempePaTybl.
BkHueHneMaunHbI
- Ppei noKIOHueHnEM MaHHb K NCTOHNky nHTAHy y6eINTecb, yTO nepeKnOuateJIb HaxoNTcB B NOJoxHn «OFF/0».
- IpebeDnte BbIKIOuateIb NITAHINB NOIOXHeHne «ON/1》,yTO6b3anyCTnTB ⅢNΦOBaJIbHyIO MaunHy.
Bcerda depknte uHyp nHaBnA BdAn O T DnKyuXcyaCTeN HcTpymEnta.
5. OBCJNYXINBAHNE

Ipu npoeedeenu pa6om no
mexHuueckomy 06cnykuaHuo
deuzamey ybedumecb, ymo MaunHa He
haxodumcno HnpanKeHuem.
3Ta MaHHa 6bIa pa3pa6ToHa dIra pa60TbI B TeueHne IInTeJbHO BpeMeHN pRIMNHIMaJIbHOM TexHnueCKOM OScJyXnBaHN. PpOdoJnxTeJbHa yDObJIeTBOpITeJbHa pa6oTa 3aBnCtOT npaBnJbHO rXoJa 3a MaHnHO n peYJrPHOH ONUCTKn.
Ponck npo6nmbi
EcnMaunHa He pa6oTaET OJXHbIM o6pa3OM, HNKe npINBOIDTCpA DBO3MOXHBIX npuHN COOTBeTCTByUOxN peueHn:
1. 3neKtpoBnuratelbHarpeBaetcra
-Диагателперрунж.
Jaume Momopy ocbimb.
- DnurataTeNb HeucnpaBeH.
Poxaynucma,obpamumecb no apecy o6cnykuhaHua yka3aHHomy 8 eapaHmuHOM manoHe.
2. MaunHa BkJIOueHa, Ho He pa6Otae
- PpepbBaHne ceTeBOro noKJIoueHn.
- Ppoeepumb nooknueHue K cemu Ha npedmem noJomku.
- IpeeknioateIb MoKeT 6bIb NOBpeKeH.
- Poxanyucma, obpamumecb no adepcy o6cnykuhaHua, yka3aHHomy e 2apaHmuHOM manoHe.

Pemohm u obcyxuaHue doJXhbl
bInonnmbc moIbKO
KeanuphiupoBaHHbIM cneuaunucmOM
Unu cepuechou dpmu.
y6opka
Perynapno ouuau Te Kopnyc ycTpoNCTBa
MrkOn TKaHbIO,KeNaTeJIbHO NocNe KaKdOrO
NCNoIb3OBaHn. He donyckaIte nonadHnra
NbInn n rpaesB n pOpe3n BeHTnAToPa. YdaInTe
CToIKne 3aRpa3HeHnMaRKO TKAHbIO, CMOeHHoN
MbIbHO BDOJ. He nCpONb3yIte pactBOpNTen,
Takne KaK 6eH3oJ, cNPT, aMMnA K T. D., TaK KaK
OH MOrTy NOBpeDntb PnaCTNKOBbIe DeTaII.
Cma3ka
YcTpoIcTBo He Tpe6yeT DoONHHTeJIbHOm Cma3Kn.
DepekTbI
Ecni DepekT NOBJIeTcN 3-3a N3HocA
TeTAn, O6paNTecb B cepBnCHbI CEHTp IO
rapaHTnHOMy TaHOHy. B KOHcE 3ToN INCTpyKcIMn
PnIBoDnTCNcHepNbIBaHOuN O63Op DeTaJeN,
KOTOpbl MoXHo 3aKa3aTb.
OKPYKAIOLA CPEDA
YTo6blIpeD0TBpaTnTbIOBpeKDeHHe BO BpeM TpaHCnpOpTnpOB npCTaBnEeTcB IpoCHoYyNAKOBE,COCTOJeuB OCHOBHOM N3 MaTePnAJa MHOropa3OBOrO NcNoJIb3OBAHnI NO3OMy BOCNOJb3yNTEcb pa3NJUHbIMN BapNaHTAMu YtINn3aCmN yNAKOKn.

IoepeKdeHHbIe u / unu ymuun3upo6aHHbIe 3neKmpueckue unu 3neKpmoHHbIe ycmpoucmba Heo6xodmo camb Ha cmaHcu yymuu3auuu, npedHa3NaueHHbIe dna 3mo uenu.
Tolbko dIra cTpaH EC
He Bb6paBbIaIe 3JIeKTPoHnCTpyMeHTbI
BMecTe C 6blTOBbIMN OTXODAMN. CoIpaCHO
EbponeckOupeKTnBE 2012/19 / EU no
yTIN3aunn 3JIeKTPnuueCKOrO u 3JIeKTPoHHoro
obopyoBaHnue H ee BHeJpeHIO B HaUHOHaJIbHOe
npabo, 3JIeKTPoHnCTpyMeHTbI, KOToPbIE 6OJIbWe
He MOrTy NcNoB3OBAtbcra, DOnJXHbI CO6UpaTbcra
OTdJIbHO u yTIN3InpOBaTbcra 3KOJIoRnueckn
6e3OnaChbIM cnocO6om.
TAPAHNTY
O3HaKOMbTeCb C yCNoBnM rapaHTn Ha npunaeraemom OTdEhHO rapaHTnHOM TaIIOHe.
PpOdyKT npKOBODCTBO nOJb3OBaTeJI MOryt 6bITb N3MeHeHbI. TexHnueckne XapaKTEpcntNkMOryt 6bITb N3MeHeHbI 6e3 PpeBapuTeJIbHorO yBeDOMneHnI.
CTOJIHA BPYCUNIKA 250W-150MM
Блардаме 3a Куваьeto Ha OBOJ FERM npoIN3BOD. Co ToA IMATE OdInuyeH npoIN3BOD, nCnpoayan Od eDeH Od BODeyKInTe Do6abYBaun BO Ebpona.Cnte npoIN3BODn DOCTabeHN Od CTpHa Ha FERM ce npoIN3BeDEH CNopei HajBnCOkInTe cTaNapDn Ha nepOpMaHcN i 6e36eHnOCT. KaO DeN Od HauWata FInIO30ΦnJa e 0be36eDyBaIbe Ha OdInueyn CpBnC 3a KIneHTnTe, co NOnDpShKa CO HauWite CeONpaTHn rapaHcN. Ce NaDeBame Deka Ke yXNBaTe KopNCtejKn ro OBOJ npoIN3BOD MHOry HapeDNrOINH.
Epoeaume eo mekcmom ce odhecyeaam Ha dujaapamume Ha cmp.2

BHumamenno npouumajme zu ynamcmbama 3a pa6oma nped da 20 kopucmume ypedom 3ano3hajme ce co fynkquume u ochOBume onepauu. Cepucapjme zo ypedom cnped uncmpykquume, 3a da ce ocuypame deka cekozau npaeunho Ke fynkuoHupa . Ynamcmbama 3a pakybahe u npudpyxhama dokymenmauja mpe6a da ce yybaam 6nuzuna Ha ypedom.
CoDpKnHa
1 POnaToCu 3a MaunHaTa
2 Be36eHocn ynaTCTBa
3 NocTaByBaHe
4 PakyBaBe
5 OndKyBaBe
Bne3Ha MoKHOCT 180W S1,250W S2
Bpoj Ha BpTeKn, 6e3 onTepetyBaHe 2980/min
Bpeme ha pa60Ta S2 = 30 min
ДиMuH3nHa 6pyceH nck 0 150x20 mm
0 150x40 mm
Диамета Na OTbOр 3a BpeTeHo 12,7 mm Текина 8,5 kg
Lpa (HnBO Ha 3ByeH npTtcoK) 80,7+3 dB(A)
Lwa (AkyctnHa MoKHOcT) 91,7+3 db(A)
ΦakTop Ha onTepeTyBaHe
ФakTop Ha onTOBAPyBaHBe S2 = 30 min 3NaU ndeKa MOTOP CO HOMHaJIHaTAt MOKHOCT CMee da pa6OTn HENpeKNHaTo He NOJIOr Od BpeMeTo ONpeDeJeHo HA JIeHKeTa Co KapaKTepNCTNIK (30 min BKJYueH nepnoD).Ako He ro 3ana3nte OBA BpeMeHcKO OrpaHNUyBaHe, MOTOP Ke ce nperee.3a BpeMe Ha NCKnyeHnot nepNOd, MOTOP Ke ce n3nAn Do noOHTHa TEMnePaTypa.
HnBO Ha Bn6paqnn
HnBOTO Ha emncjata Ha Bn6paunTe, HabeJeHO BO yNaTCTBOBO, e n3MepeHO BO corgaCHOCT coCTaHapn3npan TecT daen Ho EN 62841; Toj MOKe Da CE KopnCTn 3a CnopeyBaHe Ha eEHa aNAT CO npY KAKO N 3a npEnmHapHa npoCeHa HA n3IOXeHOCT Ha Bn6paunn PnKopnCTeHe Ha aNATOT BO CNOMeHaTNe aPINKaUn
KopncTeHeTo Ha anaTOT 3a pa3nHn anikauu Hn CO pa3nHn nn Cna6o OdpXyBaH np6Op,MOKe 3HaUHTeJHO da ro 3roJIemn HNBOTO Ha n3IOXeHOCT.
BpeMeTo kora anaTOT e NCKJyueH nn Kora pa60Tu, HOhe ja Bpuu pa60TaT, MOKe 3HaHTeJIHO Da ro HamaN HNBOTO Ha 3IOXKeHOCT
3aunTeCe oed eeknte Ha Bn6paunnte co OopkyBahe Ha aIaNt N npnbopot, paute da BN 6nat TOnnn n opraHn3npajte ng pa60THne HABNK.
CoDpxnHa Ha naKyBaBeTo
1 CToHa 6pyCnKa
2 Komnnet pKxay 3a wTHTHK 3a ONU + wTNTHUK 3a ONU
1 Notnnpa 3a anat (decen)
1 Notnnpa 3a anat (neB)
1 YnataCTBO3a paKyBaHe
1 YnataCTBa 3a 6e36eHocT
1「apaHTHa KapTmUka
PpOBepTe ja MaunHaTa,OTCTeHnatte DeNoBN np6bOpT da He ce OwTeTeHN npn TpaHCnopt.
KapakTepeNtKN
Cn.A
1 On/off npeknHyau
2Notnnpa3a anat(deceH)
3 UTTHNK 3a ONU
4Држача 3a WHTTNK 3a OOU
5 3aBpTka
6 Notnnpa 3a anat (neB)
2.Бe36eHocn yNaTCTBa
O6jachyBaHe Ha cM60JNTe

O3nayea pu3uk od noepeda, 2ybeHe Ha Xueom unu owmemyeahe Ha anamom so cnyaj Ha Henoumybahe Ha ynamcmeama.

YkaKyba Ha npucymeo Ha enekmpuueH HANO.
Ppucymhme luca da cmojam nodaJeKy.

Hoceme 3aumuma 3a ouume u 3a cnyxom.
Noce6Hn 6e36eHocn yNaTCTBa
Kora npbnat ja Kopnctnte MaunHaTa:
- PpOBepTe ro cneHTo:
Danu npedbudehuom Hanoh 3a 6pycankama oedeobapa Ha HanoHom Ha HanojHamaMpexa?
-ДанuHa pacnonaahe uma 3a3emjeHa npuknyHuca?
- Danu ce ucnpaehu ka6enom u npuknyokom (eenu, 6e3 a6ehe unu dpyu owmemyba?a)?
- 136erHybajTe KopncTeHe Ha dOnrN npoDoJxHn Ka6n. PpOdoJXHnTe Ka6n ceKoraw da 6nDaT 3a3emjeHn.
-БуснOT kAmeH e KpUJIb. KAmeHOT He e OTnOpeH Ha yIapu.
CekoraawbpyceTe co yenHaTa,HNKoraawco 6oHataIOBpUHa oD 6pyCHNOT DnCK.HNKORAw He MOHTnpajTe Hanykhat 6pycen DnCK.BedHaW 3aMeHeTe ro,6nJeKn Bucokata potaunja MoKe Da npEni3BnKa IetaBe Ha napuNbA, npEni3BnkyBajKn cepno3Ha HecpeKa. - Cekoraw HocTe 3aWHTHn OUnna Kora 6pycnte.
- Hikorai He 6pycnte 6e3 noctabeh Kanak Bp3 6pychnot dck.
Lbpcto moHTnpajTe ro 6paHukot Ha NcKOT nNotnnpaOH 3a anat, co ToeH 3aj.
He do3BoneTe 3jaj noroJem od 1-1.5 mm nomery dpkaoy 3a anat n 6pychnoT dNCK.
KopncTe6pyceH nck Koje npedBndeH 3a pa6oTata koja ja u3BeDyBaTe (Ha npimep 3a ocTpeHe Ha anat), a HE 3a rpyb np60tN.
CneHnBe HOpMaun Mopa Da 6nDaT Ha pacnonaraHe, nped da MOHTnpaTe HOB 6pyceH DNCK:
- Nodamou 3a npou38o0dumenom.
Bp3ueeH mamepujan. -
DumeH3uU.
-ДоЗвонибpoи ha bpeku. -
HnkoraH He ro npounpybajTe hacaHnOT OTBOP Ha NDCKOT Ha NORJem IppeHnik.
- MakcmaJIHnOT 6poj Ha BpTeKn HIKoRaU He Cmee Da Iro HaDMnHe Do3BOJeHnOT 6poj Ha BpTeKn Ha DnCKOT.
- HnkoraH He KopncTeTe OWTeTeH nnn DeΦopMnpan 6pyceH dNCK.
3a6e36eHNO 6pyceHbe, MaunHaTa Mopa da 6nnde UBCPTO NOCTaBeHa Bp3 pa6oTHa Maca.
-ПOTирачOTааТТpe6aДа ce 3amEH ako shupnHaTMye nOmaJa nOman od 20 mm.
-Прелорачан далбочина Н поценOT Ha npupa6nucata (T) e 2mm Идиаметapot Ha hacaDHNOt OTbOp e 13 mm (BnDn cn .B).
Cekoraw kora ja KopncTe MaunHata
- Поверете ro npeknHyBaOT da He e BO "ON/1" noJox6a, nped BkIyUyBaHbe Ha Ka6eNoT Bo cTpyja.
-Држete ro Ka6eNoT noJaNeKy od noBnKnHTe DeNoBn Ha anaTOT.
Bēnhaùncknyuheje maunHaTa ako:
- PππKπIyOκOT nπι Ka6eJIOT e HeuCπpaBεH nπι OΘTETeH.
-П配电ИиВачOT e HeINcnpaBeH. - Мира на чад пол ropeпе на Изолацида.
EneKtpnHa 6e36eHocT
Pn KopncTeHe Ha eNeKtpnHm MaunHn
noHTyBaJTe r6e36eHNOCHNte npaBnla BO
Baata 3emja, 3a da ro HAmAnTe pN3IKOT od
noXap, cTpyen yIap n Nobpei. PpOHTajTe r
cneHNTE 6e36eHOCn yNaTCTBa n npInoKeHNTe
6e36eHOCn yNaTCTBa.

Cekozau npoepybjme daNu HanoHom Ha HanojyeBaHemo oO2oBapa Ha HabeDeHuom HAnOH Ha IIOvKama.
3aMeHa Ha Ka6JIn Nm npKnyHnCn
Béndaa da rnpnte ctapnte ka6n nn npnknyHnci, Kora Ke r n 3ameHnte co HOBN.
OnacHo e da ja BknyuHte npNKnyHncaTa ako Ka6enot e na6ab.
KopncTepeoDOnxHn ka6JIn
KopncTeTe cAmO Odo6peHn PPOdoJIxHn Ka6n IoroHN 3a Bne3HaT a MOkHOCT Ha MaunHata. Hajman nonpehen npecek e 1,5 mm2. Kora ce KopncTN Ka6eN BO pONHa, cekoraw ceJIOcHo da ro ODMOTate.
3. NocTaByBaHbe
Бpyсика мора дбид ecBpcto 3aшрафehaВр работн маса.Долхината на 3abrtknte3aBnCOn OД De6eHnHata Na pa60Thata Maca.Ako pa60Thata Maca e od cheNk,преторapJINBO eda ce KOpIcTN dPBeN 6bOK nII NtTuca NOMeFy6pyсикata n Macata,napaIn n3Olaцija n da ce cnpevat Bn6paun.
MOHTaKa I DoTepyBaHBe Ha DpKaYoT 3a WHTTHNK 3a OUY N WHTTHNKOT
Cπ.B

Држачом за ушumнuk за оч u WMumHukom ce mohmupaam/ domepyeaam koza duckkom He epmu u KOza e MauuHama ucknyeHa od Hanojyeahe.
- PπuBpCTeTe ro dpxka7a wTNTHNK (4) co NOCTaBeH wTNTHNK, Bp3 KanaKOT Ha DnCKOT, CO NOCTaBeHaTa 3aBpTKa (A).
- IocTaBeTe ro dpxkaOT Ha ToUHa BnCnHa. 3jajOT (B) NomeIy nIckOT n dpxkaOT Ha WITNTHNKOT Tpe6a da n3HecyBa od 1 do 1,5 mm.
- Ποτα cterHete ja ΑβρcTo 3aBpTkata (A).
-Пoctabete ro wTNTHNKOT Taka da OBO3MOxyBaMAKcImaJIHa 3aWTnTa npu pa6ota.
CekorawHocete3aWHTTHOuJla.
NoctaByBaHe n DotepyBaHe Ha NotnnpaHT 3a aJaT

Pomnpaoy 3a anam mpe6a da ce
domepyea koza duckom e BO nomnonHO
mpyeahe, a MauuHama e ucknyeHa
od cmpya.
- NocTabete ro notnnpaoyt cnope cn. C.
- Cterhete ro Ubpcto BO herobata noonok6a, co maksmaHpo pactojaHne (C) od 1 do 1,5 mm od DnCKOT.
3aMeHa Ha 6pyceH nnck
Cn.C
Iotpe6eHaJat:
19 mm knyu
- 8 mm Knyu
- OdBpTyBa

Duckom ce MeHyBa cAmo Koza Momopom e 60 Mupyeahe u cmpyjama e ueNoCHO UcknyHeHa.
- OtctpaheTe ro 6paHnKOT Ha DNCKOT co NOMOu HA npETXoJHO HabeJeHnot KnyU. Habptkata od BpeTeHOTO od DecHaTa cTpaHa mMa DeceH HABoj. Habptkata od BpeTeHoto od NeBaTa CtpaHa mMa neB HABoj. Kora rM MeHyBaTe DNCKOBHTa MmajTe ro Ha yM CNeEDHOTO.
- Ondbpybajte ja haBpTKaTa co COOdBeteH kny. OtCTpaHeTe ro CTapNt dNCK od BpeTeHOTo.
IcHCTeTe rnpapabHnUte. IocTabeTe ja eHaTApapabHnua(A) 3aBpeTeHOTo, co WypnIBaTa CtpaHa CBpTeHa KOH DnCKOT. HataKHeTe ro HOBnOT DNCK Bp3 BpeTeHOTo. IocTabeTe ja BTOpaTa npipabHnua(A) Bp3 BpeTeHOTo, NOBTOpHo CO WypnIBaTa CTPaHa CBpTeHa KOH DnCKOT. CTeHHeTe ja HABpTKaTa Ha BpeTeHOTo. He pceTerHybajTe! BpateTe Ro KanaKOT Ha DnCKOT N DotepaJTe ro NOTnnpaOHT 3a aNaT. CTapTybajTe ro HaKpaTko MOTOPOT, 6e3 6pyceHe.
4. PakyBaHbe
H36op Ha 6pyceH dNCK
Ipy6nte nckOBn rehepaHNO oTcTaHyBaat NOBeKe MaTePnJa, a cHnTe nCKOBn ce KOpNCTa3a 3abPsHa 06pa6oTKa. Ako NobpunHaTa e HepamHa, 3anOuHeTe co rpy6 nck N 6pyceTe DOdeKa pa6oTHOTO napYe He ce n3Ma3HN. Iotoa ynoTpe6Te nn DnCK 3a OTCpaHyBaBe Ha Jxleobn n rpe6HaTHn octaHaTN od rpy6nOT nck n 3abPWeTe ro pa6oTHoTo napYe.
Kakoce6pycu
3a da ce n36erHe 3aTHyBaHbe Ha DNCKOT,
OD6eHyBajTe Da 6pyCnTE dpBO, ONOBO Nn 6nlo
KoJ dpYr Mekan MaTepnjAn nn Metan.
Da ce n36erHe co3daBaHbe Ha 6pa3dn, He ro
npNTNcKaJte pa60THOTo napYe npemHory Bp3
DNCKOT. KopNCTeTe BOda 3a NaJeBe Ha pa60THOTO
napYe. DNeTa 3a dpBO n CnUHo HNKORAu He
Tpe6a da ce HAOCTpeH "CnHO". TpIXeTe ce da He ro n3ry6nte dpXeHeTo Ha pa60THOT napYe, KOe OeHNaW MoKe Da ce 3aRnABn NOMery DpxaOT ha anat N 6pyCHNOt KameH. Oba moKe Da npEIN3BnKa KpSeHBe Ha dNCKOT, 3actoJ Ha MOTOPOT INI IeTaHbE Ha pa60THOT napYe, ITO MoKe Da npEIN3BnKa NOBpeHn OwTETyBaHa. CekoraW kora MaunHata e BO ynotpe6a 30 min, Taa Tpe6a Da ce NCKnyu. OBO3MOKeTe MaunHata da ce n3paN Do co6Ha TemnepaTypa.
BkJyute ja maunHaTa
- PpOBepTe ro npEKNHyBaHT daJIne e BO "OFF/0" noNoX6a, nped BkIyUyBaHbe Ha Ka6eIOT BO cTpyja.
- PnTnCHeTe ro npKeKHyBaUOT BO „ON/1" noNoX6a 3a da ja cTapTyBate 6pyCaIkaTa.
-Држete ro Ka6eNoT noJaNeKy OJ noBnKHnTe DeNoBn Ha anaTOT.
5. OdpxByBaHbe

Ybepe me ce deka Maunama e ucknyeHa koza 2o odpxkyame Momopom.
ObaMaunHa e KOHCTpyupaHa da pa6oTn
doJI nepnoC o MmHmAlHo OdpXyBaHe.
HenpeKHaTOTo ycNeuHO pa6oTeHe 3aBcN Od
rpnKaTa Ha MaunHaTa n peDOBHTo YIcTeHe.
DekekTaKa
Ako MaunHaTa He cyHKUOHpa npaBUNHO, MOxHnTe npuHn H COoBETHe peSeHnJa ce daDeHn POnOJy:
1. EnektpomTopoT cTaHyBa Jekxok
Motopot 6nI npeontobapeH.
-Дajme My wahca Ha Momopom da ce u3naDu.
- MotopoTe epekeTHe.
- Konhmacmupajme zo cepucom Ha daedeHama adpeca 6o zapaHnHama kapmuuka.
2. Maunha e BknyeHa Ho He ce cTapTyBa
- PpeKHaTo rIaBHO HanojyBaHe
- PpOsepeMe 20 27aEHuom npuknyok da He e cKpwEH.
- Moxe da e ouTeTeH npeKnHyBaTuT.
- KoHmakmupajme zo cepuecom Ha daedeHama adpeca eo zapaHmHama Kapmuqka.

Nonpaekume u cepuucupaheompe6a da zu u3eoyea camoKeauuukyeaHO luue unu cepeuc.
UncTeHe
PeIOBHO YICTeTe Ro KyKuHTeTo CO MeKaHa KpNa, PO MOxHOCT NocNe CeKOE KOpICTHe. CyBaJTe rN OTBOPHTe 3a BeHTnlaCunJa YIcTn, 6e3 npaunHa. OTCpaHete ja TBpDOKOpHATA HeYNCOTOnJa co MeKaHa KpNa, HAToneHa BO canyHua. He KOpCTePe pactBOpyBaUn KaKO uTO e 6eH3eH, anKOxOJ, aMOHJa ITH. KOI MOXaT Da rN OWTeTaT PIIaCTNuHIne DeIOBN.
PonMaCyBaHbE
YpeIOT He Tpe6a dononHnTeHNo da ce IOnMaCyBa.
Дeф ekTn
Ako depeKT HacTaHyBa nopAn aBeHe Ha den, o6paTeCe Bo cepBuceH ueHTap od rapaTHaTa kaTnUka. Ha Kpajot OJ OBne yNaTCTBa daDeH e EKcNo3HNHOHe nperIeD Ha DeIOBn KOI MOxAT Da ce Hapaat.
KuBOTHa cpeHnHa
3a da ce cnpeu OwTeYBaHe 3a BpeMe Ha TpaHcnpToT, ypeDoT ce nCnopaUyBa BO TBpdo NaKyBaHe KOe ce cocToN oM MaTePnJaI 3a eHNokpTaHa yNoTppe6a. 3aToa Be MoNIme da rN KOpNCtnte OnUnite 3a peuKnIPAhe Ha amBaJaxata.

Owmemenu u/unnu uckopucmenu enekmpuHu u enekmpoHcK ypeDu mopa da ce denohupaam 80 cmaHcu 3a peuknupahe.
Cama 3a 3emjno EY
He n deonopajte anatnte BO domaueH OTnad. CnopeE Bpocckoto YnatCTBO 2012/19/EU 3a OTnadHa eNektpuHa n eNektpoHcKa onpema HrOBAta MMJIeMeHTaunja BO HaUNHOHOT O npaBO, eNektpuHNTe aJATn KOn BeKe He ce ynotpe6nBm Mopaat Da ce cobpaat OndenHO I da ce OTCTpaHyBaat Ha ekolowKn HauHH.
TapaHunja
PpOHTajTe rI rapaHTHnTE yCNoBn BO npINOxKeHaTa rapaHTHa KapTuKa.
PpOn3BODOT yNaTcTBOTO ce npEmdet Ha npomeha. KapakTepeNCTKNTe MoXaT da ce npomeHaT 6e3 HataMoUHO N3BeCTyBaHe.
Exploded view
Spare parts list
| Position Description No |
| 206403 Switch 1 |
| 206454 Tool support (right) 2 |
| 101079 Protection glass (small) 3 |
| 206408 Protection glass holder(right) 4 |
| 206132 Protection glass holder (left) 6 |
| 206405 Tool support (left) 7 |
| 206143 Rubber foot 8 |
| BGA1055 Grinding stone 150x20x12,7mm |
| BGA1056 Grinding stone 150x40x12,7mm |
CE
DECLARATION OF CONFORMITY
BGM1020 - BENCH GRINDER
(EN) We declare under our sole responsibility that this product is in conformity with directive 2011/65/EU of the European parliament and of the council of 8 June on the restriction of the use of certain hazardous substances in electrical and electronic equipment is in conformity and accordance with the following standards and regulations:
(DE) Der Hersteller erklärt eigenverantwortlich, dass这点 Produkt der Direktive 2011/65/EU des Europäischen Parlaments und des Rats vom 8. Juni 2011 über die Einschränkung der Anwendung von bestimmten gefährlichen Stoffen in elektrischen und elektronischen Geräten entspricht. den folgenden Standards und Vorschriften entspricht:
(NL) Wij verzleragen onder onsone volledige verantwoerdelijkheid dat dit product voldoet aan de conform Richtlij 2011/65/EU van het Europees Parlement en de Raad van 8 Juni 2011 betreffende beperking van het gebruik van bepaalde gevaartlijke stoffen in elektrische en elektronische apparatuur en in overeenstemming is met de volgende standardaen en regulieren:
(FR) Nous déclarons sous notre seule responsabilité que ce produit est conforme aux standards et directives suivants: est conforme à la Directive 2011/65/EU du Parlement Européen et du Conseil du 8 juin 2011 concernant la limitation d'usage de certaines substances dangereuses dans l'équipment électrique et électronique.
(ES) Declaramos bajo esta exclusiva responsabilidad que este produit cumple con las asignéticas normas y estandables de configuración; se enquiryca conforme con la Directiva 2011/65/UE del Parlamento Europeo y del Consejo de 8 de junio de 2011 sobre la restricción del uso de determinadas sustancias peligrosas en los equipos electricos y electrónicos.
(PT) Declaramos por esta total responsabilité-de que este produits esté en conformidade e cumpe as normas e regulamentacoes que se seguem: está em conformidade com a Direcva 2011/65/EU do Parliamento Europeu e com o Conselho de 8 de Junho de 2011 no que respeita a restricoe de'utilização de determinadas substancias perigosas existentes em equipoamento eletrico e electrónico.
(II) Dichiariamo,除去la nostra responsabilità, che questo prodotto è conformale alle normative e ai regolamenti segunti: è conforme alla Direttiva 2011/65/UE del Parliamento Europeo e del Consiglio dell'8 giugno 2011 sulla limitazione dell'uso di determinate sostanze pericolose nelle appearecathètè elettriche ed elettroniche.
(SV) Vi garanterar p eget ansvar att denna produkt uppyfller och foljer foljande standarder och bestammlser: uppyfler direktiv 2011/65/EU fran Europeiska parliamentet och EG-radel fran den 8 Juni 2011 om begransningen av anvandning av fariga substanser i elektrisk och elektronik ultrustning.
(FI) Vakuutamme yksinomaan omalla vastuullamme, etta tama tuote tayttaa seuraavat standardit ja saedokset: tayttaa Europon parlementin ja neuvoston 8. kesaikuota 2011 paviyn direktivin 2011/65 EU wa timukset koskien vaarllisten aineiden kayton rajaotista sahkojaelektronisissa laiteiissa.
(NO) Vi erkräer under vär tegel ansvar at dette produktel er i samsvar med folgende standarder og regler: er i samsvar med EU-directedtivet 2011/85/EU fra Europa-parliamentet od Europa-radet, pr. 8 Juni 2011, om begrensning ibruken av visse farlige stoffer i elektrisk og elektronisk utstyr.
(DA) Vi erkräner under eget ansvar, at dette produit er i overensstammelse med falgende standarder og bestemmelser: er i overensstammelse med direktiv 2011/65/EU fra Europa-Parliamentet og Rädet af 8. Juni 2011 om begraensing af anvendelsen af visse farlige stofferi e elektrisk og elektronik odstyr.
(HU) Feileösségunk teljes tutadān kijelentjū, hovy ez a termek teljes mertékben megfele az alabbi szabsványokn ak esoliraskon: je v souladu se smermici 2011/65/EU Evropskeho parliamentu a Rady EU zse dne 8. cerniva 2011, kteră se týká omezeni použil určitych nebepezchny中断 k v elektrickych a elektronickych zařenichen.
(CZ) Na nasi vlastni zodpovednost prohlasujeme, ze je tento vyrobek v souladusnasledujici standardny a nomami: Je v sullade s normou 2011/65/EU Europskeho parlementa a Rady z 8. juna 2011 tykajucej sa obmedzenia pouzivania uritichy nebepezchnyt latak v elektrikom a elektronikom vybaveni.
(SK) Vyhlasujeme na nasu vyhradnú zodpovednost, ze tento vyrobok je v zhode a sulade snasledujuci nominami a predpisim: Je v suldace s normou 2011/65/EU Europskeho parlementu a Rady z 8. juna 2011 tykajucej sa obmedzenia pouzivania urcitychnebezepechnych lákov e elektrikkom e elektronickom vyavení.
(SL) S polno odgovornosto izjavljamo, da je tizdelek v skladu in da odgovarja nasledn-jim standardom terpredispom: je v skladu z direktlo 2011/65/EU Evropskega para-menta in Sveta z dne 8. junii 2011 o omejevanju uporabe dolocenih nevarinh snovi v elektricni in elektronski opremi.
(PL) Deklarjemy na wlasna odpowiedzialnosc, ze ten produkt spelnia wymogi zawarte w nastepujacny normacln imprzejac: jest zgodny z Dyrektywq 2011/65/UE Parla mentu Europejskiego I Rady z dria 8 czerwa 2011 r. w spraweogranozenia stosowania nektorych niebepezcjnych stancbjc w sprzechie elektrycznym i elektroniczynm.
(LT) Prisiimdami visà atsakomybe deklaruojame, kad sis gaminys atitinka zemiau paminétus standartus arba nuostatus: atitinka 2011 m. birzeiio 8 d. Europos Parliamento ir Tarybos direktlyva 2011/65/EB del tam tikru pavojingu medziagu naudoijmo elektrós ir elektronínej irangoi apriboimo.
(LV) Ir atbiłstósa Eiropas Parliamenta un Padomès 2011. gada 8, jünija Direktfväi 2011/65/ES par dzau bistamu vielu izmantošanas ierobezošanu elektriskás un elektroniskás ekjartás.
(ET) Agpalvojam ar visu atibidbu, ka sis produits ir saskaan un atbilst sekojoism stand-ariem un nolikumim: ir atiblstoa Eiropas Parliamenta un Padomes 2011. gada 8. junja Direktivai 2011/65/ES par da zu bistamu villi izmantoisanas ierobezoisanu elektriskas un elektroniskas iekartas.
(RO) Declaram prin aceasta cun raspunderea deplina c produsul acesta este in conformitate cu urmatoarele standarde sau directive: este in conformitate cu Direcva 2011/65/UE a Parlamentului Europeani si a Consiliulii din 8 iunie 2011 cu privire la interizcerea utilizari anumitor substanje periculoase la echipamentele electrice si electronec.
(HR) Izjavljemo pod vlastitom odgovorno, su da je strojem ukladan sa slijeedesim standardima ili standardiziranim Dokumentima i u skladu sa odredbama: usklaedeno si Direktivom 2011/65/EU europskog parlamenta i vija izdanom 8. lipna 2011. oograničenji koriženien odredjenih opasijh tvari i elektrćni i elektronickoj opromi.
(SRL)Pod punom odgovrohscu izjavlujemdo ja usaglasen sa sledecim standardima ili nomama: usaglasen sa direktivom 2011/65/EU Evropskog parlamenta i Saveta od 8.juna.2011.godine za restrkciju upotrebe odredenih opasnih materija u elektricnoj i elektronskoj opremi.
(RU) IIOcBcOIO TBETCTBEHHOCb 3aRnBnEM, YTO daHHeN H3eIne COOTBeTcTByET cnJdyouuM CTanapTAM n HOpMM: COOTBeTcTByET Tpe6oBaHnIM DnpeKTHnBB 2011/65/EU Ebponeckoro napnAmehTa nCoBETA oT 8 noHa 2011 r. no ORpaHnEHHmIC NObnOBaHnONpEeNEhBxOnaChbX BueCtB a3NeKTPnEckOM mNIEKTPCHNO60bpDobAHm
(UK) Ha cBIO BnACHy BiIDNObIaIbHcIbTb 3aBnIeMo, 10 Daane 6bnaHaHH HbiDnobiae NaCTHINm CTAndaptam I HOPMATiBAM: 3aDOBnBHe BIMOnr DInpeKTHBN 2011/65/ CC Cbponebcko NaplameHTy Ta PaDi B 8 YepBn 2011 pOky Ha oMeKeHH HbOKPCTAHN DEeHX N Hebe3neHnx peoBH B eNEkTPuHOMy Ta eNEkTPOHOMy 0bNaHnHI.
(EL) Anuouue UteBua dt To Tpoiv auto auvei kai Tneipou Tou paoata Kavoviaouk Cai Tnpura: uuppuovwetai Te Nv Omyla 2011/65/EE Tou Eupmtaikou Kavovbaiou KQTou Lusboulou Tng Bn louvi 2011 yioTnvpepiopio nns xanans3piaevuv enikivuwv oue e naektpko kai naekpoviko eoatlauo.
EN 62841-1, EN 62841-3-4, EN55014-1, EN55014-2,
EN61000-3-2, EN61000-3-3
2006/42/EC, 2014/30/EU, 2012/19/EU, 2011/65/EU
Zwolle, 01-02-2021

H.G.F. Rosberg
CEO Ferm
Ferm · Lingenstraße 6 · 8028 PM · Zwolle The Netherlands