
BGM1021 - Grinder Ferm - Free user manual and instructions
Find the device manual for free BGM1021 Ferm in PDF.


| Product type | Electric garden shredder |
| Brand | Ferm |
| Model | BGM1021 |
| Power supply | 230 V / 50 Hz, 2400 W |
| Max cutting capacity | 40 mm diameter |
| Cutting system | Rotating steel blade |
| Collection bag volume | 50 litres |
| Weight | 12.5 kg |
| Dimensions (L × W × H) | 65 × 40 × 90 cm |
| Noise level (LpA) | 94 dB(A) |
| Thermal protection | Yes, with automatic reset |
| Safety switch | Two-hand emergency stop |
| No-load speed | 4500 rpm |
| Type of branches | Fresh branches and softwood |
| Blade maintenance | Regular sharpening recommended |
| Cleaning | Clean after each use, avoid pressure water |
| Spare parts available | Yes, blades and collection bags |
| Warranty | 2 years (parts and labour) |
| Certifications | CE, GS |
Frequently Asked Questions - BGM1021 Ferm
User questions about BGM1021 Ferm
0 question about this device. Answer the ones you know or ask your own.
Ask a new question about this device
Download the instructions for your Grinder in PDF format for free! Find your manual BGM1021 - Ferm and take your electronic device back in hand. On this page are published all the documents necessary for the use of your device. BGM1021 by Ferm.
USER MANUAL BGM1021 Ferm
natural_image
Industrial FERM tool with circular components and a blue base, no visible text or symbols on the device itself.BGM1021
EN Originalinstructions03
natural_image
Technical diagram of a mechanical assembly with labeled parts A, showing components like a shaft, washer, and nut (no text or symbols beyond labels)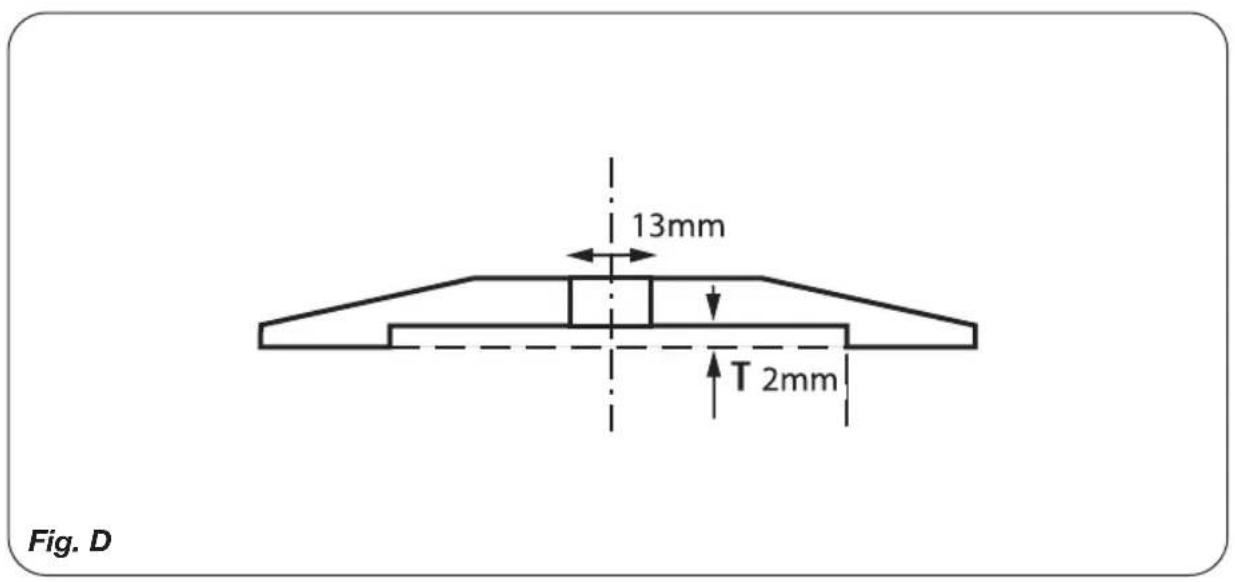
WET & DRY BENCH GRINDER
The numbers in the following text refer to the drawing on page 2

For your own safety and for the safety of others, please read these instructions carefully before using this appliance. It will help you understand your product more easily and avoid unnecessary risks. Keep this instruction manual in a safe place for future use.
Contents:
- Machinedata
- Safetyinstructions
- Installation
- Operation
- Maintenance
1.MACHINEDATA
Technical specification
Voltage 230 V\~
Frequency 50 Hz
Power input 180W S1, 250W S2 30 min
No load speed 2980/min
Grinding stone dimensions ∅ 150x20 (12.7) mm
Wet grinding stone dimensions ∅ 200x40 (20) mm
Weight 8.5 kg
Lpa (sound pressure level) 80.7 +3 dB(A)
Lwa (acoustic power) 91.7 +3 db(A)
Vibration
< 2.5 m/s ^4
Load factor
A load factor of S2 = 30 min (intermittent periodic duty) means that you may operate the motor continuously at its nominal power level for no longer than the time stipulated on the specifications label (30 minutes ON period). If you fail to observe this time limit the motor will overheat. During the OFF period the motor will cool again to its starting temperature.
Vibration level
The vibration emission level stated in this instruction manual has been measured in accordance with a standardised test given in EN 62841; it may be used to compare one tool with another and as a preliminary assessment of exposure to vibration when using the tool for the applications mentioned.
- using the tool for different applications, or with different or poorly maintained accessories, may significantly increase the exposure level
- the times when the tool is switched off or when it is running but not actually doing the job, may significantly reduce the exposure level
Protect yourself against the effects of vibration by maintaining the tool and its accessories, keeping your hands warm, and organizing your work patterns.
Contents of packing
1 Wet & dry bench grinder
1 Sets eye shield bracket + eye shield
1 Toolrest
1 Usersmanual
1 Guaranteecard
Check the machine, loose parts and accessories for transport damage.
Features
Fig. A
- On/offswitch
2.Support
3.Coverglass - Cover glass holder
5.Screw - Grinding stone wet
- Waterreservoir
2.SAFETYINSTRUCTIONS
In this manual and/or on the machine the following symbols are used:

Denotes risk of personal injury, loss of life or damage to the tool in case of non-observance of the instructions in this manual.

Indicates electrical shock hazard.

Immediately unplug the plug from the mains electricity in the case that the cord gets damaged and during maintenance

Keep bystanders away

Wear ear and eye protection
Special safety instructions
When using the machine for the first time
- Never use the tool without the PRCD delivered with the tool.
- Keep water clear off the electrical parts of the tool and away from persons in the working area.
- If the mains cable has been damaged, it must be replaced with a special mains cable. These can be obtained from the manufacturer or the manufacturer's customer service department. The mains cable may only be replaced by the manufacturer, the manufacturer's customer service department or equally qualified persons.
- Checkthefollowing:
- Does the voltage rating of the bench grinder correspond to the power supply?
• Is an earthed mains power socket available? - Are the power cord and plug in good condition (solid, without fraying or other damage)?
- Avoid the use of long extension cords. The extension cords you use must always be earthed.
- A grinding wheel is a brittle toolpiece. The stone is not resistant to knocks. Always grind on the front edge of the grinding wheel, and never on the side of the grinding wheel. Never fit a cracked grinding wheel. Replace it immediately, as the high rotational speed could cause the stone to fly apart, causing a serious accident.
• Always wear safety glasses when grinding.
- Never grind without the cover fitted over the grinding wheel.
- Always fit the grinding wheel cover and tool rest tightly, and with the correct clearance.
- Never allow more than 1-1.5 mm clearance between tool rest and grinding wheel.
- Only use the grinding wheel for the work it was designed for (for example sharpening tools), and NOT for heavy construction work. The following information must be available, before you fit any new grinding wheel:
• Details about the manufacturer.
- Bindingmaterial.
- Dimensions.
- Permissiblerotationalspeed.
- Never ream out the hole in a grinding wheel to a larger diameter.
- The maximum rotational speed of the grinding wheel should never be allowed to exceed the maximum speed given for the wheel.
- Never use any grinding wheel that is damaged or deformed.
- In order to be able to grind safely, the machine must be firmly bolted to a workbench.
- The tool rest should be replaced whenever the width of the tool rest measures less than 20 mm.
- The recommended depth of the recess in the flange (T) is 2 mm and the diameter of the spindle hole is 13 mm (see Fig. D).
Whenever using the machine
- Check that the switch is NOT in the 'ON/1' position before connecting the machine to the power supply.
- Always keep the power cord out of the way of the tool's moving parts.
Immediately switch off the machine whenever:
- The plug or power cord is defective or damaged.
• The switch is defective. - You smell smoke or burning insulation.
Electrical safety
When using electric machines always observe the safety regulations applicable in your country to reduce the risk of fire, electric shock and personal injury. Read the following safety instructions and also the enclosed safety instructions.

Always check that the power supply corresponds to the voltage on the rating plate.
Replacing cables or plugs
Immediately throw away old cables or plugs when they have been replaced by new ones. It is dangerous to insert the plug of a loose cable in the wall outlet.
Using extension cables
Only use an approved extension cable suitable for the power input of the machine. The minimum
conductor size is 1.5 mm2. When using a cable reel always unwind the reel completely.
3.INSTALLATION
The grinder must be firmly bolted to a workbench. The length of the fixing bolts will depend on the thickness of the workbench. If the workbench is made of steel, it is advisable to use a wooden block or plank between the grinder and the bench, to insulate it and prevent vibration.
Mounting and adjustment of eye shield bracket and eye shield
Fig. B

The eye shield bracket and eye shield should only ever be assembled/adjusted with the grinding wheel stationary, and the machine disconnected from the power supply.
- Mount the eyeshield bracket together with the eye shield itself, by means of the screw (A).
- Adjust the height of the eyeshield bracket of the eyeshield by loosening a bit screw. The free space between the stone and the eyeshield bracket of the eyeshield will amount to 1 - 1,5 mm.
- Fasten well screw (A).
- Adjust the eyeshield in such a way that your face will be protected, at the utmost.
- Use always safety glasses.
Adjusting tool rest
Fig. B

The tool rest should only be adjusted when the grinding wheel is completely stationary, and the machine is disconnected from the power supply (the wall socket).
Secure the tool rest, allowing a maximum clearance (C) between the tool rest and the grinding stone of 1 -1.5 mm.
Replacing the grinding stone
Fig. C
Required tools:
- 19 mm Spanner
- 8 mm Spanner
- Screwdriver

Only ever replace the grinding wheel when the motor is at a standstill and the power is completely disconnected.
- Remove the guards, using the above tools. When replacing the stones, remember the right-hand spindle is fitted with right-hand thread, the left-hand spindle with left-hand thread.
- Loosen the nut by means of the spanner. Remove the stone.
- Clean the flanges. Replace one flange, with the concave side facing the grinding stone. Slide the new grinding stone on to the spindle. Replace the se cond flange on the spindle, with the concave side facing the grinding stone. Tighten the nut securely, but not too tightly! Replace the guards and adjust the tool rest. Let the motor run for a few seconds before you start to grind.
4. OPERATION
Selecting the grinding wheel
Coarse grinding wheels will in general remove the most material, and fine grinding wheels are used for finishing. If the surface is uneven, begin by using a coarse grinding wheel, and grind the workpiece until it is smooth. Next use a fine grinding wheel to remove the grooves and scratching left by the coarse wheel, and finish off the workpiece.
Grinding
The grinding machine comes with one grinding disc for dry grinding and one for wet grinding. In principle, the dry-grinding disc is suited for corase grinding and the wet-grinding disc for fine grinding where it suffices to press the workpiece lightly against the grinding stone. This grinding machine has been especially designed for treating and grinding tools with cutting edges such as knives, scissors, chisels, etc. For best results, fill the water container with tap water.
To prevent the grinding surface from blocking up, avoid holding wood, lead or any other soft material or metal against the grinding wheel. To avoid creating grooves, do not press the workpiece too firmly on the grinding wheel. Use water to regularly
cool the workpiece being ground. Wood chisels and the like should never be sharpened 'blue'. Take care not to lose your grip on the object being ground, as it may suddenly become jammed between the tool rest and the grinding wheel. This can cause the stone to shatter, the motor to seize, or the workpiece to fly off, all of which can cause injury and damage. Whenever the machine has been in use for 30 minutes, it should be switched off. Allow the machine to cool down to room temperature.
Operation
- Check that the switch is in the "OFF/0" position before connecting the machine to the power supply.
- Press the power switch into the "ON/1" position to start your bench grinder.
- Always keep the power cord out of the way of the tool's moving parts.
5. MAINTENANCE

Make sure that the machine is not live when carrying out maintenance work on the motor.
These machines have been designed to operate over a long period of time with a minimum of maintenance. Continuous satisfactory operation depends upon proper machine care and regular cleaning.
Trouble shooting
Should the machine fail to function correctly, a number of possible causes and the appropriate solutions are given below:
• The electric motor becomes hot
- The motor has become overloaded.
- Give the motor a chance to cool down.
• The motor is defective.
- Contact the service point.
• Machine switched on, but will not run
- There is a break in the power supply to the machine.
- Check whether there is a break in the power cord.
• The switch may be damaged.
- Contact the service point.

Repairs and servicing should only be carried out by a qualified technician or service firm.
Cleaning
Keep the ventilation slots of the machine clean to prevent overheating of the engine. Regularly clean the machine housing with a soft cloth, preferably after each use. Keep the ventilation slots free from dust and dirt. If the dirt does not come off use a soft cloth moistened with soapy water. Never use solvents such as petrol, alcohol, ammonia water, etc. These solvents may damage the plastic parts.
Faults
Should a fault occur, e.g. after wear of a part, please contact the service address on the warranty card. In the back of this manual you find an exploded view showing the parts that can be ordered.
ENVIRONMENT
To prevent damage during transport, the appliance is delivered in a solid packaging which consists largely of reusable material. Therefore please make use of options for recycling the packaging.

Faulty and/or discarded electrical or electronic apparatus have to be collected at the appropriate recycling locations.
Only for EC countries
Do not dispose of power tools into domestic waste. According to the European Guideline 2012/19/EU for Waste Electrical and Electronic Equipment and its implementation into national right, power tools that are no longer usable must be collected separately and disposed of in an environmentally friendly way.
WARRANTY
The guarantee conditions can be found on the separately enclosed guarantee card.
KOMBISCHLEIFMASCHINE NASS / TROCKEN


- BGM1021
- WET & DRY BENCH GRINDER
- The numbers in the following text refer to the drawing on page 2
- Contents:
- 1.MACHINEDATA
- Technical specification
- Load factor
- Vibration level
- Protect yourself against the effects of vibration by maintaining the tool and its accessories, keeping your hands warm, and organizing your work patterns.
- Contents of packing
- Features
- Fig. A
- 2.SAFETYINSTRUCTIONS
- Special safety instructions
- Whenever using the machine
- Immediately switch off the machine whenever:
- Electrical safety
- Replacing cables or plugs
- Using extension cables
- 3.INSTALLATION
- Mounting and adjustment of eye shield bracket and eye shield
- Adjusting tool rest
- Replacing the grinding stone
- OPERATION
- Selecting the grinding wheel
- Grinding
- Operation
- MAINTENANCE
- Trouble shooting
- Cleaning
- Faults
- ENVIRONMENT
- Only for EC countries
- WARRANTY
- KOMBISCHLEIFMASCHINE NASS / TROCKEN
Brand : Ferm
Model : BGM1021
Category : Grinder