
EN6084MOX - Fridge ELECTROLUX - Free user manual and instructions
Find the device manual for free EN6084MOX ELECTROLUX in PDF.
| Product Type | Refrigerator-freezer (bottom freezer) |
| Brand | Electrolux |
| Model | EN6084MOX |
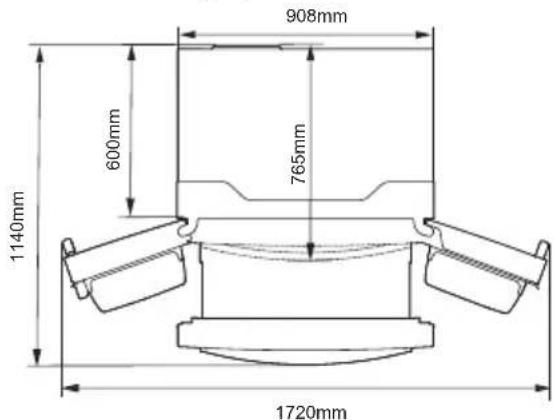
| Dimensions (H x W x D) | 1766 x 912 x 765 mm |
| Net Weight | Approximately 100 kg |
| Power Supply | 220-240 V, 50 Hz |
| Refrigerant | R600a (isobutane) |
| Water Tank Capacity | 4 liters |
| Number of Compartments | 2 (refrigerator and freezer) |
| Refrigerator Temperature Range | 2°C to 8°C |
| Freezer Temperature Range | -14°C to -24°C |
| Special Functions | Fast Cool, Super Freeze, ECO Mode (Holiday), Open Door Alarm, Child Safety, Humidity Control for Vegetable Bin, Fresh Zone (0/3/5°C) |
| Cold Water Dispenser | Yes, integrated in the left door |
| Flexible Ice Cube Tray | Yes |
| Interior Lighting | LED (not user-replaceable) |
| Recommended Cleaning | Every two months |
| Spare Parts | Original parts available from after-sales service |
| Climate Class | SN, N, ST, T (ambient temperature from +10°C to +43°C) |
| Temperature Rise Time | 12 hours |
| Warranty | See terms and conditions of sale |
Frequently Asked Questions - EN6084MOX ELECTROLUX
User questions about EN6084MOX ELECTROLUX
0 question about this device. Answer the ones you know or ask your own.
Ask a new question about this device
Download the instructions for your Fridge in PDF format for free! Find your manual EN6084MOX - ELECTROLUX and take your electronic device back in hand. On this page are published all the documents necessary for the use of your device. EN6084MOX by ELECTROLUX.
USER MANUAL EN6084MOX ELECTROLUX
Thank you for choosing this Electrolux product. We have created it to give you impeccable performance for many years, with innovative technologies that help make life simpler features you might not find on ordinary appliances. Please spend a few minutes reading to get the very best from it.
Visit our website to:

Get usage advice, brochures, trouble shooter, service information: www.electrolux.com

Register your product for better service: www.electrolux.com/productregistration

Buy Accessories, Consumables and Original spare parts for your appliance: www.electrolux.com/shop
CUSTOMER CARE AND SERVICE
Always use original spare parts.
When contacting our Authorised Service Centre, ensure that you have the following data available: Model, PNC, Serial Number.
The information can be found on the rating plate.
Warning / Caution-Safety information.
i General information and tips
Environmental information.
Subject to change without notice.
1. SAFETY INFORMATION
Before the installation and use of the appliance, carefully read the supplied instructions. The manufacturer is not responsible if an incorrect installation and use causes injuries and damages. Always keep the instructions with the appliance for future reference.
1.1 Children and vulnerable people safety
- This appliance can be used by children aged from 8 years and above and persons with reduced physical, sensory or mental capabilities or lack of experience and knowledge if they have been given supervision or instruction concerning use of the appliance in a safe way and understand the hazards involved.
- Do not let children play with the appliance.
- Cleaning and user maintenance shall not be made by children without supervision.
- Keep all packaging away from children.
1.2 General Safety
-
This appliance is intended to be used in household and similar applications such as:
-
Farm houses; staff kitchen areas in shops, offices and other working environments
-
By clients in hotels, motels, bed and breakfast and other residential type environments
-
Keep ventilation openings, in the appliance enclosure or in the built-in structure, clear of obstruction.
- Do not use mechanical devices or other means to accelerate the defrosting process, other than those recommended by the manufacturer.
- Do not damage the refrigerant circuit.
- Do not use electrical appliances inside the food storage compartments of the appliance, unless they are of the type recommended by the manufacturer.
- Do not use water spray and steam to clean the appliance.
- Clean the appliance with a moist soft cloth. Only use neutral detergents. Do not use abrasive products, abrasive cleaning pads, solvents or metal objects.
-
Do not store explosive substances such as aerosol cans with a flammable propellant in this appliance.
-
If the supply cord is damaged, it must be replaced by the manufacturer, its service agent or similarly qualified persons in order to avoid a hazard.
- If the appliance is equipped with an ice maker or a water dispenser, fill them with potable water only.
- If the appliance requires a water connection, connect it to potable water supply only.
- The inlet water pressure (minimum and maximum) must be between 1 bar (0,1 MPa) and 10 bar (1 MPa)
2. SAFETY INSTRUCTIONS
2.1 Installation

WARNING!
Only a qualified person must install this appliance.
- Remove all the packaging.
- Do not install or use a damaged appliance.
- Obey the installation instruction supplied with the appliance.
Always be careful when you move the appliance because it is heavy. Always wear safety gloves. - Make sure the air can circulate around the appliance.
- Wait at least 4 hours before connecting the appliance to the power supply. This is to allow the oil to flow back in the compressor.
- Do not install the appliance close to radiators or cookers, oven or hobs.
- The rear of the appliance must stand against the wall.
- Do not install the appliance where there is direct sunlight.
- Do not install this appliance in areas that are too humid or too colds, such as the construction appendices, garages or wine cellars.
- When you move the appliance, lift it by the front edge to avoid scratching the floor.
2.2 Electrical connection

WARNING!
Risk of fire and electrical shock.
- The appliance must be earthed.
- Make sure that the electrical information on the rating plate agrees with the power supply. If not, contact an electrician.
Always use a correctly installed shockproof socket. - Do not use multi-plug adapters and extension cables.
- Make sure not to cause damage to the electrical components (e.g. mains plug, mains cable, compressor). Contact the Service or an electrician to change the electrical components.
- The mains cable must stay below the level of the mains plug. Connect the mains plug to the mains socket only at the end of the installation. Make sure that there is access to the mains plug after the installation. Do not pull the mains cable to disconnect the appliance. Always pull the mains plug.
2.3 Use

WARNING!
Risk of injury, burns, electrical shock or fire.
- Do not change the specification of this appliance.
- Do not put electrical appliances (e.g. ice cream makers) in the appliance unless they are stated applicable by the manufacturer.
- Be careful not to cause damage to the refrigerant circuit. It contains isobutane (R600a), a natural gas with a high level of environmental compatibility.
This gas is flammable.
- If damage occurs to the refrigerant circuit, make sure that there are no flames and sources of ignition in the room. Ventilate the room.
- Do not let hot items to touch the plastic parts of the appliance.
- Do not put soft drinks in the freezer compartment. This will create pressure on the drink container.
- Do not store flammable gas and liquid in the appliance.
- Do not put flammable products or items that are wet with flammable products in, near or on the appliance.
- Do not touch the compressor or the condenser. They are hot.
- Do not remove or touch items from the freezer compartment if your hands are wet or damp.
- Do not freeze again food that has been thawed.
- Obey the storage instructions on the packaging of frozen food.
2.4 Internal light
The type of lamp used for this appliance is not suitable for household room illumination.
3. ENVIRONMENT CONCERNS
Recycle the materials with the symbol Put the packaging in applicable containers to recycle it. Help protect the environment and human health and to recycle waste of electrical and electronic
2.5 Care and cleaning

WARNING!
Risk of injury or damage to the appliance.
- Before maintenance, deactivate the appliance and disconnect the mains plug from the mains socket.
- This appliance contains hydrocarbons in the cooling unit. Only a qualified person must do the maintenance and the recharging of the unit.
- Regularly examine the drain of the appliance and if necessary, clean it. If the drain is blocked, defrosted water collects in the bottom of the appliance.
2.6 Disposal

WARNING!
Risk of injury or suffocation.
- Disconnect the appliance from the mains supply.
- Cut off the mains cable and discard it.
- Remove the door to prevent children and pets to be closed inside of the appliance.
- The refrigerant circuit and the insulation materials of this appliance are ozone-friendly.
- The insulation foam contains flammable gas. Contact your municipal authority for information on how to discard the appliance correctly.
- Do not cause damage to the part of the cooling unit that is near the heat exchanger.
appliances. Do not dispose appliances marked with the symbol with the household waste. Return the product to your local recycling facility or contact your municipal office.
4. DESCRIPTION OF THE APPLIANCE
4.1 View 1 of the appliance
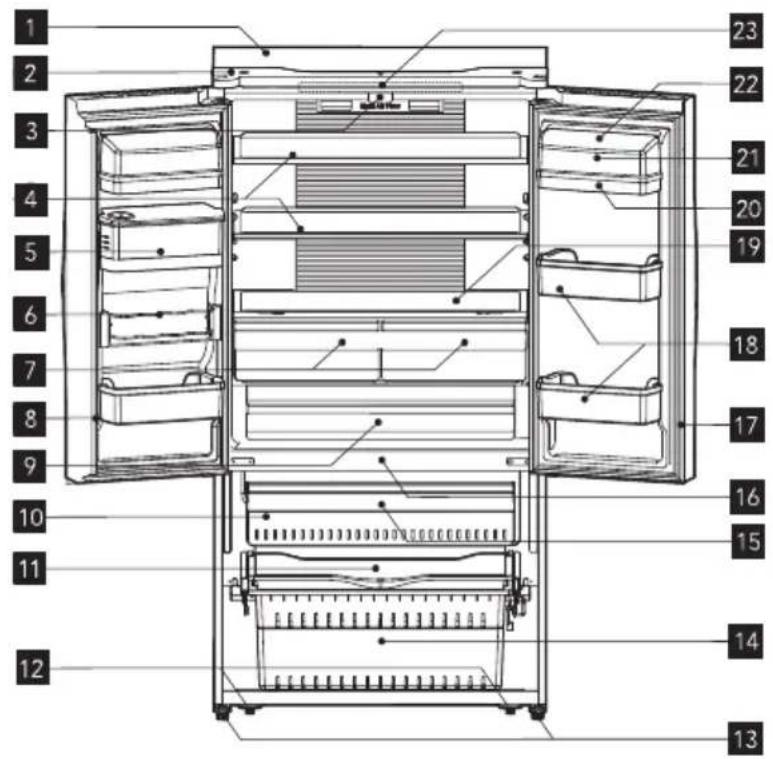
1 Cabinet
2 Top cover
3 Vertical baffle guide block
Glass shelf
5 Water storage box
6 Flexible pop can rack
7 Fruit and vegetables crisper
8 Vertical baffle part
My fresh choice
Twistable ice tray (inside)
11 Serving tray
12 Rollers
13 Adjustable bottom feet
14 Lower freezer drawer
15 Upper freezer drawer
16 Freezer LED light (inside)
17 Refrigerator door seal
18 Lower rack
19 Crisper cover
20 Upper rack
21 Egg tray (inside)
22 Rack cover
23 Refrigerator LED light (inside)
4.2 View 2 of the appliance

24 Display board
27 Freezer door
25 Cold water dispenser
Note: Due to constant improvement of our products, your refrigerator may be slightly different from the above illustration, but its functions and using methods remain the same.
Note: To get the best energy efficiency of this product, please place all shelves, drawers and baskets on their original position as the illustration above.
5. INSTALLING YOUR NEW APPLIANCE
This section explains the installation of the new appliance before using it for the first time. We recommend reading the following

WARNING!
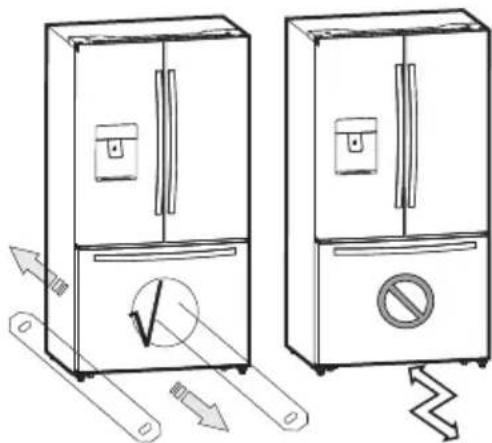
For proper installation, this refrigerator must be placed on a level surface of hard material that is the same height as the rest of the flooring. This surface should be strong enough to support a fully loaded refrigerator, or approximately 266 lbs. (120 kg). When moving, be sure to pull out and push back the unit in straight tips.
| Class Symbol | Ambient Temperature rage(℃) | |
| Extend Temperate | SN +10 to +32 | |
| Temperate N +16 to +32 | ||
| Subtropical ST +16 to +38 | ||
| Tropical T +16 to +43 | ||
5.1 Leveling of appliance
For proper leveling and avoid vibration, this appliance is provided with adjustable feet in front. Please adjust the level by following below instructions:
- Roll the refrigerator into place.
-
Turn the adjustable feet (with your fingers or a suitable spanner) until they touch the floor.
-
Tilt back the top backwards for about 10 - 15mm by turning the feet 1~2 turn further. This will allow the doors to self-close and seal properly.
- Whenever you want to move the appliance, remember to turn the feet back up so that the appliance can roll freely. Reinstall the appliance when relocating.

WARNING!
The rollers, which are not castors, should be only used for forward or backward movement. Moving the refrigerator sideways may damage your floor and the rollers.
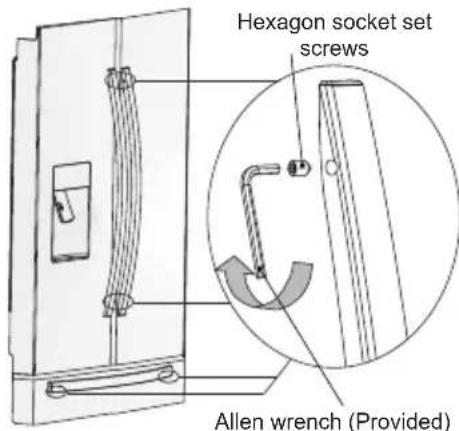
5.2 Adjusting the door handle
Before you use the appliance, please check the refrigerator handles. If the handles are loose, please adjust them by using an Allen wrench in the clockwise direction until handles are securely in place. Each one of the handles is fitted with 2 screws.
5.3 Adjusting the doors
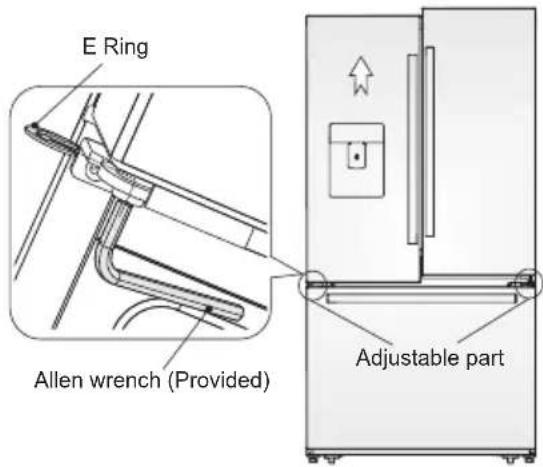
- Both left and right doors are equipped with adjustable axes, which are located in the lower hinges.
- Before adjusting its doors, please ensure that the refrigerator is level. Please review the previous section on "Leveling appliance". If you find the top of the doors are uneven, insert the Allen wrench into the hinge axis, and turn it clockwise to the door or anticlockwise to lower the door, and insert an E Ring into the gap.
5.4 Ventilation of appliance
In order to improve efficiency of the cooling system and save energy, it is necessary to maintain proper ventilation around the appliance for heat dissipation. For this reason, sufficient space should be provided around the refrigerator and the area should be clear of any obstruction that affects the air circulation.
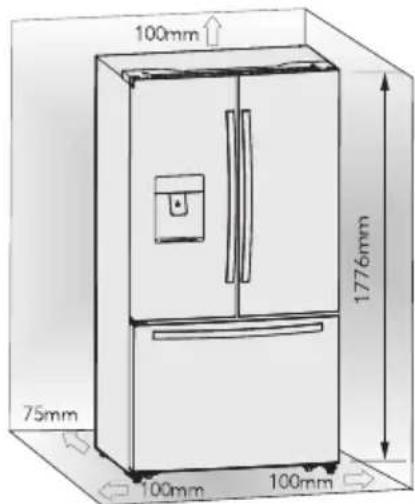
Suggestion: to ensure a proper functioning of the appliance keep the distances shown on the graphic above.
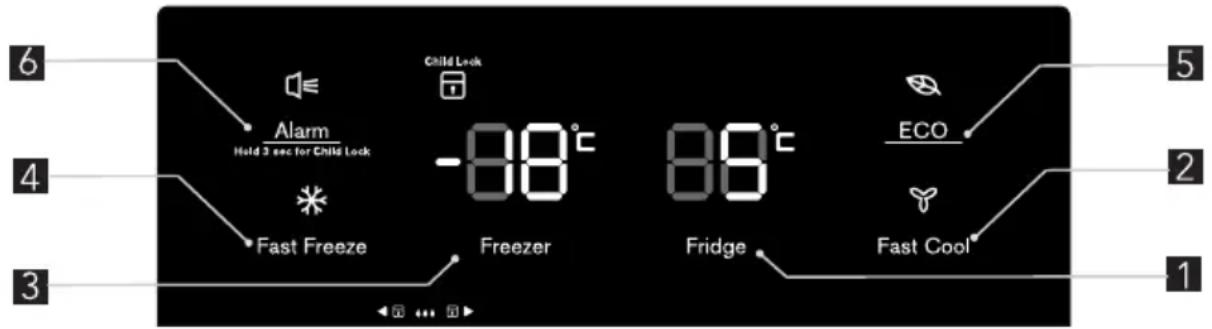
6. DISPLAY CONTROLS
All functions and controls of the unit are accessible from a control panel conveniently located on the door of the refrigerator. A keypad of touch buttons and a digital display allow easy configuration of features and settings in a simple and intuitive manner.
Important! Touch buttons require only a short press on a button to operate.
The operationoccurs when releasing your finger from the button, not while the button is pressed. There is no need for applying pressure on the keypad. Child
Lock function related to the "Alarm" button requires a long touch of a least 3 sec. Please refer to those related sections of this Manual for detailed instructions. The control panel consists of two indicating temperature areas, five icons representing different modes and six touch buttons. When the appliance is powered on for the first time, the backlight of the icons on display panel turns on. If no buttons have been pressed and the doors remains closed, the backlight will turn off after 60 sec.
6.1 Controlling the temperature
We recommend that when you start your refrigerator for the first time, the temperature for the refrigerator is set to 5^ and the freezer to -18^ . If you want to change the temperature, follow the instructions below.

CAUTION!
When you set a temperature, you set an average temperature for the whole refrigerator cabinet. Temperatures inside each compartment may vary from the temperature values displayed on the panel, depending on how much food you store and where you place them. Ambient temperature may also affect the actual temperature inside the appliance.
6.2 Fridge
Press "Fridge" button repeatedly to set your desired fridge temperature between 8^ and 2^ , the temperature will decrease 1^ degrees with each press and the fridge temperature indicator will display corresponding value according to the following sequence.

6.3 Fast Cool

If you need to insert a large amount of warm food, for example after doing the grocery shopping, we suggest
activating the Fast Cool to chill the products more rapidly and to avoid warming the other food which is already in the refrigerator.
- Press "Fast Cool" button to activate this function. The Super Cool icon will light up and the Fridge temperature indicator will display 2^ .
- Super cool automatically switches off after 6 hours.
- Press "Fast Cool" or "Fridge" to cancel super cool mode and revert to previous temperature settings.
6.4 Freeze
Press "Freezer" button to set the freezer temperature between -14^ and -24^ to suit your desired temperature, and the freezer temperature indicator will display corresponding value according to the following sequence.

6.5 Fast Freeze

Super Freeze can rapidly lower frozen temperature and freeze your food substan. substantially faster than usual.
Press "Fast Freeze" button to activate the super freeze function. The Super Freeze icon will be illuminated and the freezer temperature setting will display -24^ .
- For first time use, or after a period of inactivity, allow 6 hours of normal operation before using Super Freeze mode. This is particularly important if a large amount of food is placed in the freezer.
Super freeze automatically switches off after 26 hours of usage and the freezer temperature goes to below -20^ - Press "Fast Freeze" or "Freezer" to cancel Super Freeze mode and revert to previous temperature settings. Note: When selecting the Super Freeze function, ensure there are no bottled or canned drinks (especially carbonated drinks) in the freezer compartment. Bottles and cans may explode.
6.6 ECO

This function is designed to minimise the energy consumption and electricity bills while the Fridge is not in use for a long period of time.
You can activate this function by pressing "ECO" button for a short until the Holiday light icon is illuminated.
Important! Do not store any food in the refrigerator chamber during this time.
- When the holiday function is activated, the temperature of the refrigerator is automatically switched to 15^ to minimise the energy consumption. The refrigerator temperature setting displays " - " and the freezer compartment remains on.
- Press "Holiday" button to cancel Holiday mode and revert to previous temperature settings.
6.7 Alarm

In case of alarm, "Alarm" icon will light up and a buzzing sound will start. Press "Alarm" button to stop alarm and buzzing then
"Alarm" icon will turn off.

CAUTION!
When the refrigerator is turned on after a period of inactivity, the Alarm may be activated. In this case, press "Alarm" button to cancel it.
Door Alarm
The alarm light on and a buzzing sound indicate abnormal conditions, such as accidentally a door left open or that a power interruption to the unit has occurred.
- Leaving any door of refrigerator or freezer open for over 2 minutes will activate a door alarm and buzzer. The buzzer will beep 3 times per minute for 10 minutes. Closing the door cancels the door alarm and buzzer.
- To save energy, please avoid keeping doors open for a long time when using refrigerator. The door alarm can also be cleared by closing the doors.
Temperature alarm
This is an important feature that alerts users of potential damage to stored food. If a power failure occurs, for example a blackout in your area of residence while you are away, the temperature alarm will memorize the temperature of the freezer when power was restored to the unit; this is likely to be the maximum temperature reached by frozen items.
A temperature alarm condition will be indicated by Alarm light and buzzer when the temperature reading is warmer than -9^ , then
a- The Alarm icon lights up;
b- The freezer temperature indicator displays "H";
c- The buzzer beeping 10 times when the alarm is triggered and stop automatically.
Child Lock

Press and hold the "Alarm" button for 3 seconds to activate the child lock. This will disable the display to prevent accidental changes
to settings. Meanwhile, the "Child Lock" icon will be illuminated.
- To turn the child lock off, press and hold the "Alarm" button for 3 seconds. The "Child Lock" icon will be turned off.
7. USING YOUR APPLIANCE
7.1 Cold water dispenser
The cold water dispenser, located in the left refrigerator door, is used for storing drinking water. This feature provides chilled water easily without opening the door.
- Cleaning
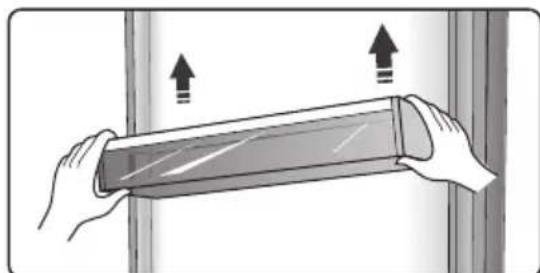
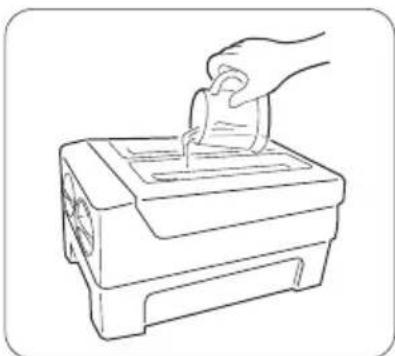
Please clean the water dispenser before using it for the first time. step 1: pull out the water dispenser step 2: wash with clear water step 3: dry it
- Assembling
Please refer to the following instruction to reassemble the dispenser.
- Hold tightly both sides of the water container then lift it up and put it out from the door.
- Unscrew the head in counterclockwise direction.
- Insert them back on the door and push the container until you hear a click sound.
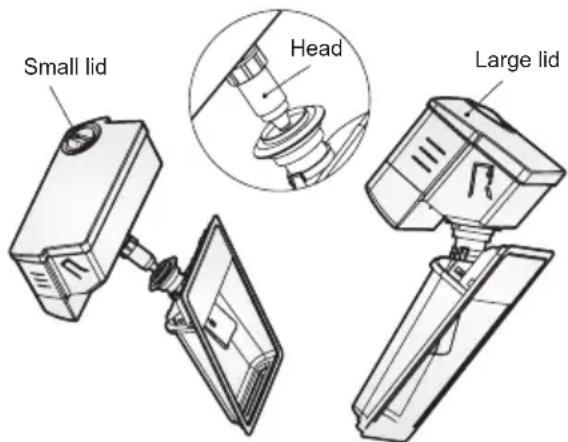
WARNING!
When inserting the water container, ensure the head sits correctly into the hole first.
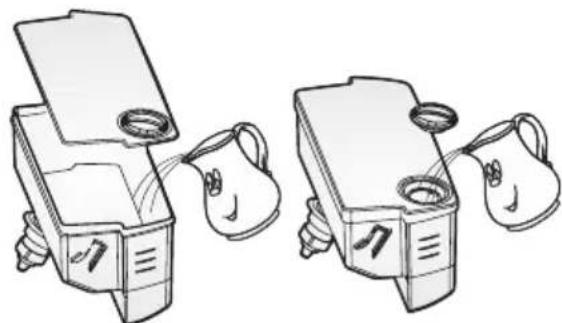
Filling water
Before you fill the drinking water into the water container, ensure that the water container is steady and placed into a correct position. To prevent water from overflowing and spilling, fill the water container below the maximum level mark which is approximately about 4.0L. There are two ways to fill the water container:
- By removing the small lid and fill water from the inlet of the large lid.
- By removing the large lid of the tank, and then fill water directly.

CAUTION!
Do not ll any other liquid than water inside the water container.
- Lock
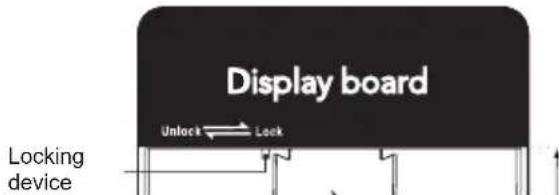
Before you dispense the water, ensure that the dispenser is in "unlock" position. The locking device is under the display board as the picture:

WARNING!
The lock feature is used to lock the device. Don't push strongly the dispenser lever when the dispenser is in "lock" position, this may damage and break the dispenser.
- Using water dispenser
You should use a suitable cup size to fill the water underneath the water dispenser.

WARNING!
Don't pull the dispenser lever out without a cup underneath; this may cause the water leak from the dispenser. Keep the water supply device installed when the water dispenser is out of use to prevent cold air leakage.
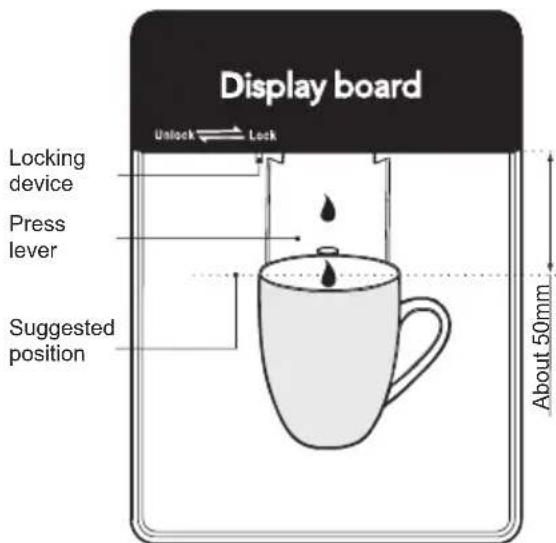
Note: Frequently usage of the water dispenser could spill drops on the tray which may overflow. Dry the tray with a towel as required.
7.2 Door rack
The refrigerator chamber is fitted with door racks suitable for storing canned liquid, bottled drinks and packed food. Do not place a large amount of heavy food and items inside door racks.
- The middle door rack is designed to adjust at different heights according to your requirements. Please empty the rack before lifting upward to remove it. Then reposition the rack at the desired height.
Note: There is an egg tray provided that should be located in the upper rack.
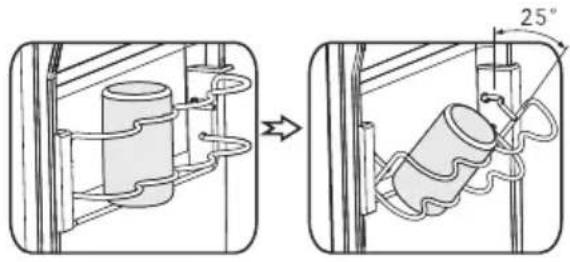
7.3 Pop can rack
- This rack stores up to 4 cans of standard size, but it is not suitable for cans with diameter smaller than 50mm . The rack also can rotate 25^ along the shelf if required, to facilitate storing or taking drinks.
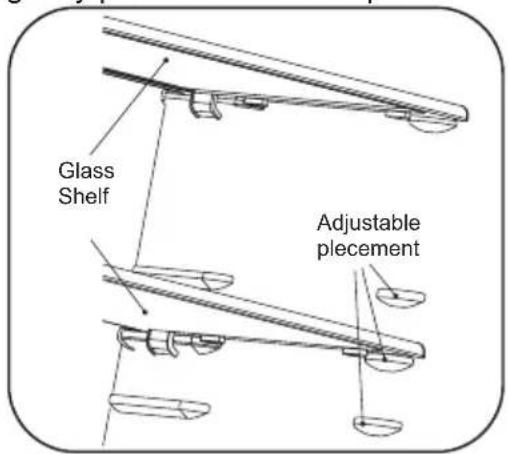
7.4 Glass shelves
The refrigerator chamber is provided with two glass shelves. While the top shelf is designed to be fixed, the lower shelf is adjustable. There are three placements for relocating the lower shelf. Adjust the height of the shelf according to your need:
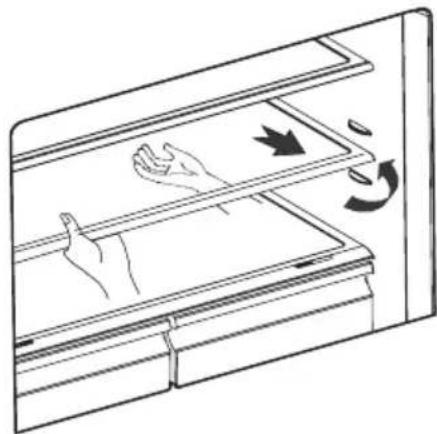
- When removing the shelves, gently pull them forward until they exit the guides.
- When you return the shelves, make sure there is no obstacle behind and gently push them into the position.

7.5 Crisper and humidity control
The crisper, mounted on telescopic extensionslides, is for storing vegetables and fruits. You can adjust the humidity inside by using the sliding block.
- The humidity control adjusts the airflow in the crisper; higher airflow results in lower humidity. Slide the humidity control to the right in order to increase humidity.
- High humidity settings are recommended for vegetables, while low humidity is suitable for preservation of fruit
- Follow these simple instructions to remove the crisper chamber, or freezer drawer, for cleaning. Empty the crisper chamber; pull it out to fully open position. Lift the crisper from the lateral slides. Push the slides fully in to avoid damage when closing the door.
7.6 FRESH ZONE. Precision control of temperature (Optional)
Food can be preserved fresh for longer periods when stored at their optimal temperature, but different types of food require different storage temperatures. There is a chilli drawer display on the right of the drawer. The temperature of the compartment can be set at 0^ , 3^ and 5^ to suit either meat, or fruits and vegetables, or deli products respectively by using "FRESH ZONE" buttons. Please refer to the table below for the recommended settings to suit your storage needs.
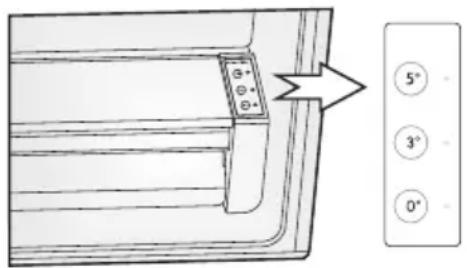
| Deli [5°C] Vege. [3°C] 0°C [0°C] |
| Cheese Cucumber Steaks |
| Ham Lettuce Fish |
| Salami Oranges Cold cuts |
| Olives Corn Poultry |
7.7 Using the refrigerator chamber
The refrigerator chamber is suitable for storage of vegetable and fruits. Separate packing of different foods is recommended to avoid losing moisture or flavor permeating into other foods.

CAUTION!
Never close doors while the shelves, crisper and/or telescopic slides are extended. It may damage the unit.
7.8 Using the freezer drawer
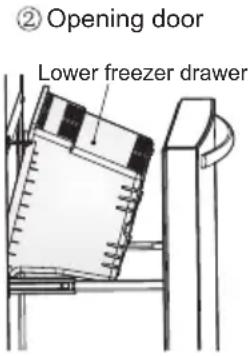
Freezer drawer is suitable for storing food required to be frozen, such as meat, ice cream, etc. To remove the freezer drawer pull it out fully, tilt up the serving tray and lift it out, then open the refrigerator doors to the maximum angle and the lower freezer drawer can be taken out, as shown in the following pictures.


CAUTION!
Do not allow babies or children go inside the refrigerator, as they could injure themselves or damage the refrigerator. Do not sit on the freezer door. The door may break. Do not allow children to climb into the freezer basket. If you remove the divider to clean the basket bin, you must reinstall the divider after cleaning to prevent children from getting trapped inside the basket.
7.9 Twistable ice tray
-
Twistable ice tray is placed in the upper freezer drawer to make and store ice cubes.
-
Fill with drinking water below the maximum level mark.
- Place the filled ice tray back to the bracket.
- Wait for around 3 hours, twist the knobs clockwise and the ice will drop into the ice box below.
8. HELPFUL HINTS AND TIPS
8.1 Energy saving tips
We recommend that you follow the tips below to save energy.
- Try to avoid keeping the door open for long periods in order to conserve energy.
- Ensure the appliance is away from any sources of heat (Direct sunlight, electric oven or cooker etc).
- Don't set the temperature colder than necessary.
- Don't store warm food or evaporating liquid in the appliance.
- Place the appliance in a well ventilated, humidity free, room. Please refer to Installing your new appliance chapter.
View 1 under the "Description of the appliance" section shows the correct arrangement for the drawers, crisper and shelves, do not adjust the combination as this is designed to be the most energy efficient configuration.
Hints for fresh food refrigeration
- Do not place hot food directly into the refrigerator or freezer, the internal temperature will increase resulting in the compressor having to work harder and will consume more energy.
- Do cover or wrap the food, particularly if it has a strong flavor.
- Place food properly so that air can circulate freely around it.
Hints for refrigeration
-
Meat (All Types) Wrap in polythene food: wrap and place on the glass shelf above the vegetable drawer. Always follow food storage times and use by dates suggested by manufacturers.
-
Ice cubes can be stored in the ice box, if you need them, you can pull out the ice box and take them out.
Note: If the ice tray is used for the first time or has not been used for a long time, please clean it before using.
Cooked food, cold dishes, etc.: They should be covered and may be placed on any shelf.
- Fruit and vegetables: They should be stored in the special drawer provided.
Butter and cheese: Should be wrapped in airtight foil or plastic film wrap.
Milk bottles: Should have a lid and be stored in the door racks.
8.2 Hints for freezing
- When first starting-up or after a period out of use, let the appliance run at least 2 hours on the higher settings before putting food in the compartment.
Prepare food in small portions to enable it to be rapidly and completely frozen and to make it possible to subsequently thaw only the quantity required. - Wrap up the food in aluminum foil or polyethylene food wraps which are airtight.
- Do not allow fresh, unfrozen food to touch the food which is already frozen to avoid temperature rise of the latter.
- Iced products, if consumed immediately after removal from the freezer compartment, will probably cause frost burns to the skin.
- It is recommended to label and date each frozen package in order to keep track of the storage time.
Hints for the storage of frozen food
- Ensure that frozen food has been stored correctly by the food retailer
- Once defrosted, food will deteriorate rapidly and should not be re-frozen. Do not exceed the storage period indicated by the food manufacturer.
9. CLEANING AND CARE
For hygienic reasons the appliance (including exterior and interior accessories) should be cleaned regularly at least every two months.

CAUTION!
The appliance must not be connected to the mains during cleaning. Danger of electrical shock! Before c leaning switch the appliance off and remove the plug from the mains socket.
9.1 Exterior cleaning
To maintain good appearance of your appliance, you should clean it regularly.
-Wipe the digital panel and display panel with a clean, soft cloth.
-Spray water onto the cleaning cloth instead of spraying directly on the surface of the appliance. This helps ensure an even distribution of moisture to the surface.
Clean the doors, handles and cabinet surfaces with a mild detergent and then wipe dry with a soft cloth.

CAUTION!
-Don't use sharp objects as they are likely to scratch the surface.
- Don't use Thinner, Car detergent, Clorox, ethereal oil, abrasive cleansers or organic solvent such as Benzene for cleaning. They may damage the surface of the appliance and may cause fire.
8.3 Switching off your appliance
If the appliance needs to be switched off for an extended period, the following steps should be taken to prevent mould on the appliance.
- Remove all food.
- Remove the power plug from the mains socket.
- Clean and dry the interior thoroughly.
- Ensure that all the doors are wedged open slightly to allow air to circulate.
9.2 Interior cleaning
- You should clean the appliance interior regularly. It will be easier to clean when food stocks are low. Wipe the inside of the fridge freezer with a weak solution of bicarbonate of soda, and then rinse with warm water using a wrung-out sponge or cloth. Wipe completely dry before replacing the shelves and baskets. Thoroughly dry all surfaces and removable parts.
-
Although this appliance automatically defrosts, a layer of frost may occur on the freezer compartment's interior walls if the freezer door is opened frequently or kept open too long. If the frost is too thick, choose a time when the supply of food stocks are low and proceed as follows:
-
Remove existing food and accessories baskets, unplug the appliance from the mains power and leave the doors open. Ventilate the room thoroughly to accelerate the thawing process.
- When defrosting is completed, clean your freezer as described above.

CAUTION!
Don't use sharp objects to remove frost from the freezer compartment. Only after the interior is completely dry should the appliance be switched back on and plugged back into the mains socket.
9.3 Door seals cleaning
Take care to keep door seals clean. Sticky food and drinks can cause seals to stick to the cabinet and tear when you open the door. Wash seal with a mild detergent and warm water. Rinse and dry it thoroughly after cleaning.

CAUTION!
Only after the door seals are completely dry should the appliance be powered on.
WARNING!
The LED light must not be replaced by the user! If the LED light is damaged, contact the customer helpline for assistance.
10. TROUBLESHOOTING
If you experience a problem with your appliance or are concerned that the appliance is not functioning correctly, you can carry out some easy checks before calling for service, please see below. You can carry out some easy checks according to this section before calling for service.

WARNING!
Don't try to repair the appliance yourself. If the problem persists after you have made the checks mentioned below, contact a qualified electrician, authorized service engineer or the shop where you purchased the product.
| Problem Possible cause & Solution | |
| Appliance is not working correctly | Check whether the power cord is plugged into the power outlet properly. |
| Check the fuse or circuit of your power supply, replace if necessary. | |
| It is normal that the freezer is not operating during the automatic defrost cycle, or for a short period of time after the appliance is switched on to protect the compressor. | |
| Odours from the compartments | The interior of the refrigerator may need to be cleaned. |
| Some food, containers or wrapping cause odours. | |
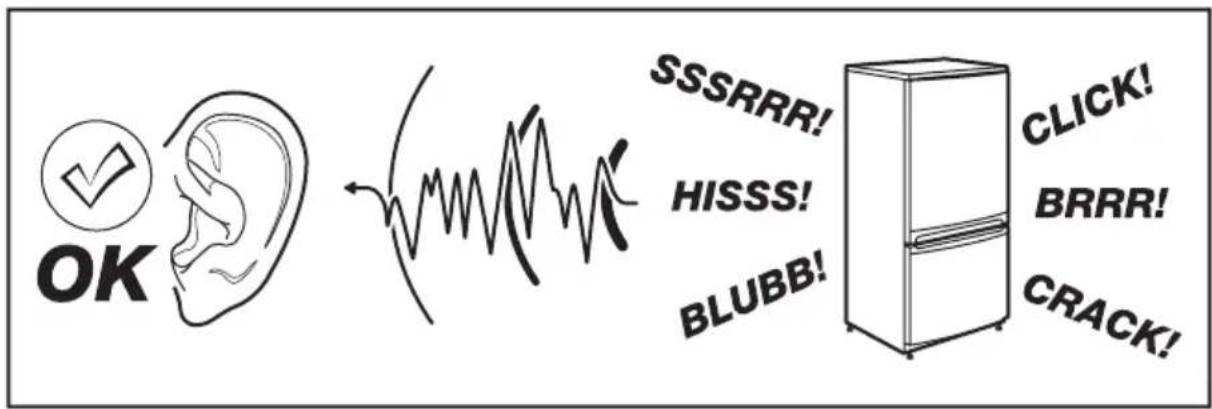
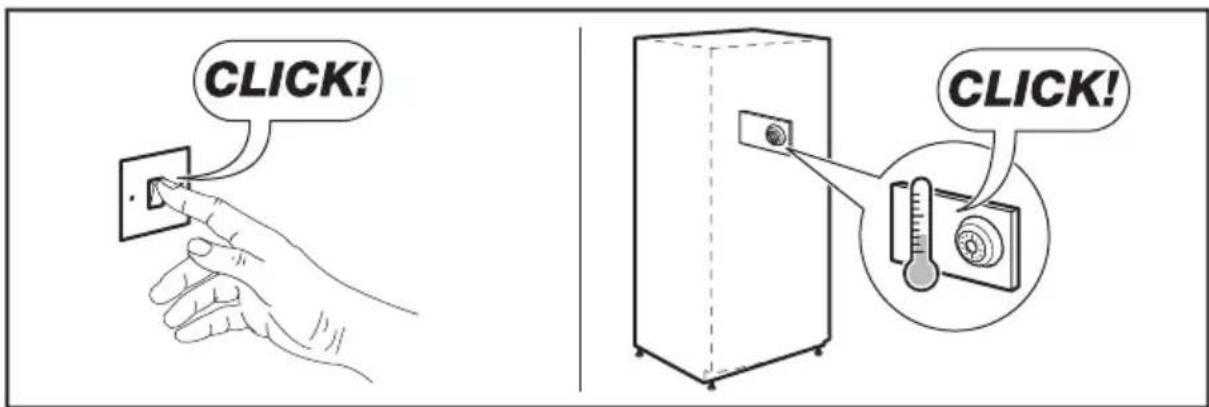
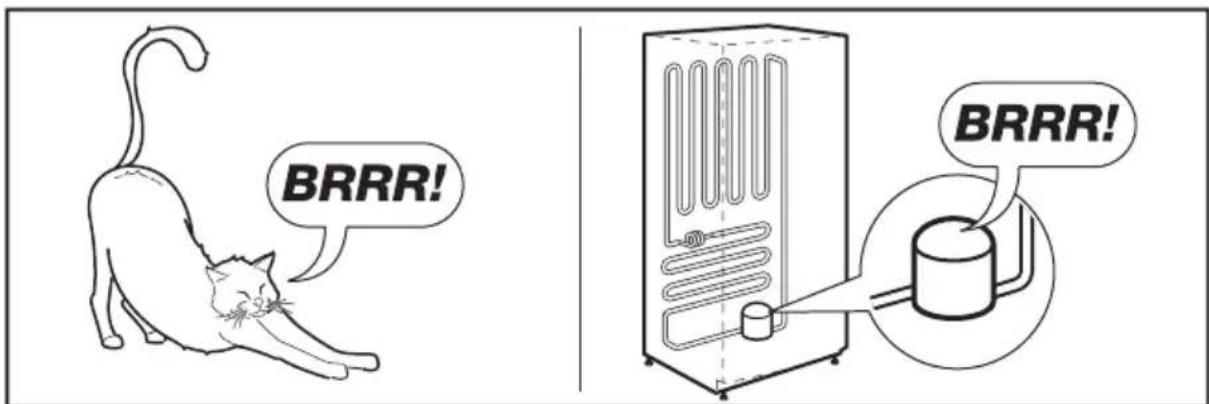
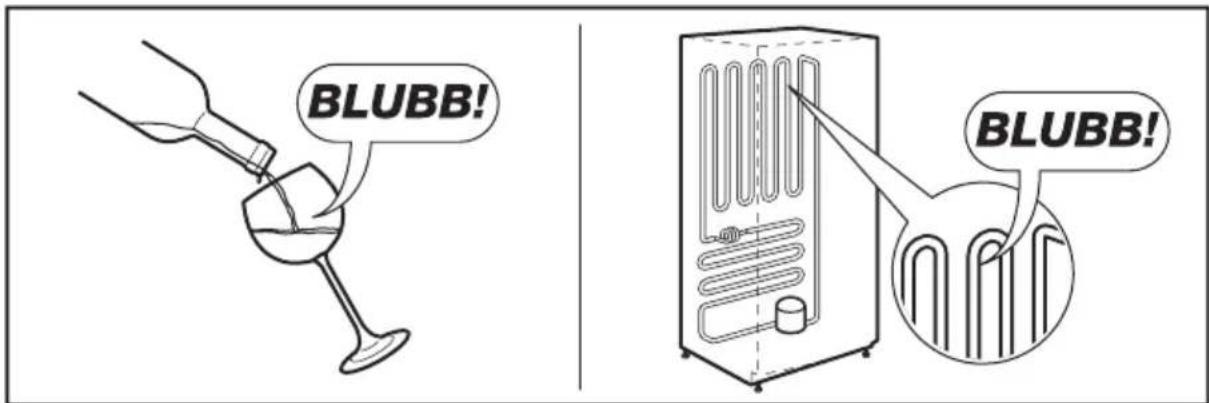
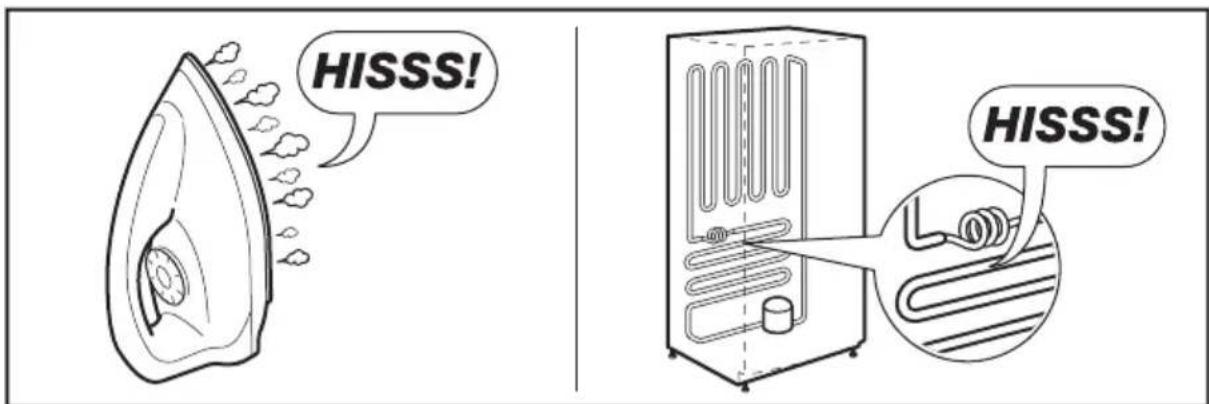
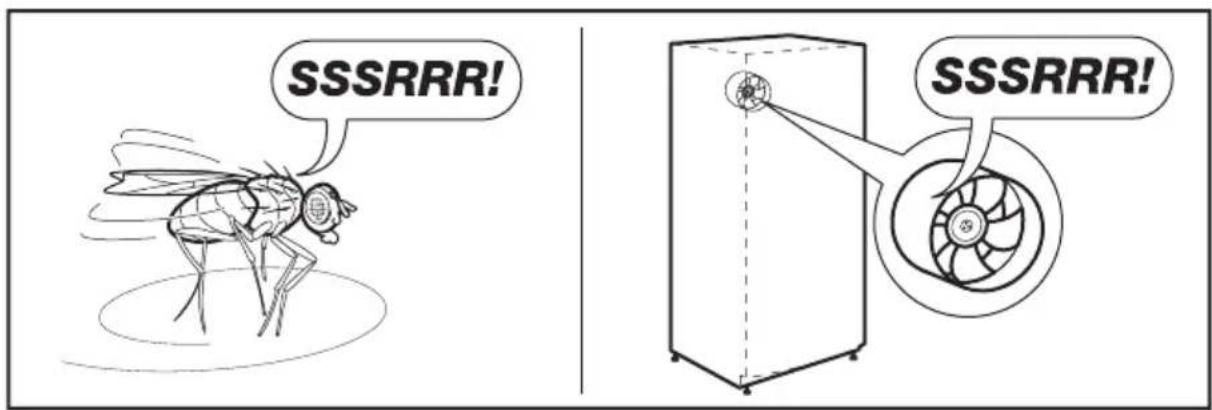
| Noise from the appliance | The sounds below are quite normal: Compressor running noises. • Air movement noise from the small fan motor in the freezer compartment or other com-partments. • Gurgling sound similar to water boiling. • Popping noise during automatic defrosting. • Clicking noise before the compressor starts. |
| Other unusual noises are due to the reasons below and may need you to check and take action: The cabinet is not level. The back of appliance touches the wall. Bottles or containers fallen or rolling. | |
| The motor runs continuously | It is normal to frequently hear the sound of the motor, it will need to run more when in following circumstances: • Temperature setting is set colder than necessary • Large quantity of warm food has recently been stored within the appliance. • The temperature outside the appliance is too high. • Doors are kept open for a long period. • After your installing the appliance or it has been switched off for a long time. |
| A layer of frost occurs in the compartment | Check that the air outlets are not blocked by food and ensure food is placed within the appliance to allow sufficient ventilation. Ensure that door is fully closed. To remove the frost, please refer to “cleaning and care” section. |
| Temperature inside is too warm | You may have left the doors open too long or too frequently or the doors are kept open by some obstacle; or the appliance is located with insufficient clearance at the sides, back and top. |
| Temperature inside is too cold | Increase the temperature by following the “Display controls” chapter. |
| Doors can’t be closed easily | Check whether the top of the refrigerator is tilted back by 10-15mm to allow the doors to self close or if something inside is preventing the doors from closing. |
| Water drips on the floor | The water pan (located at the rear bottom of the cabinet) may not be properly leveled, or the draining spout (located underneath the top of the compressor depot) may not be properly positioned to direct water into this pan, or the water spout is blocked. You may need to pull the refrigerator away from the wall to check the pan and spout. |
| The light is not working | The LED light may be damaged. Refer to replace LED lights in cleaning and care chapter. The control system has disabled the lights due to the door being kept open too long, close and reopens the door to reactivate the lights. |
| Doors does not open smoothly | Check the door seal, and if it is necessary clean the rubber gasket seal around the edges of the door using dish soap and warm water. Dirt and grime can collect here and cause door stick to the fridge. |
11. DISPOSAL OF THE APPLIANCE
The refrigerator is built from reusable materials. It must be disposed of incompliance with current local waste disposal regulations. The appliance contains a small quantity of refrigerant (R600a) in the refrigerant circuit. For your safety please refer to the section of "the refrigerant and risk of fire" in this Instruction Manual before scrapping the appliance.
Please cut off the power cord to make the refrigerator unusable and remove the door seal and lock. Please be cautious of the cooling system and do not damage it by puncturing the refrigerant container and/or bending the tubing, and/or scratching of the surface coating.
Correct Disposal of this product
This symbol on the product or in its packing indicates that this product may not be treated as household waste. Instead, it should be taken to the appropriate waste collection point for the recycling of electrical and electronic equipment. By ensuring this product is disposed of correctly, you will help prevent potential negative consequences for the environment and human health, which could otherwise be caused by the inappropriate waste handling of this product. For more detailed information about the recycling of this product, please contact your local council your household waste disposal service, or the shop where you purchased the product.
12. TECHNICAL DATA
| Dimension |
| Height 1766 mm |
| Width 912 mm |
| Depth 765 mm |
| Rising Time 12 h |
| Voltage 220-240 V |
| Frequency 50 Hz |
The technical information are situated in the rating plate on the internal left side of the appliance and in the energy label.
13. NOISES
There are some sounds during normal running (compressor, refrigerant circulation).
SISUKORD
- OHUTUSTEAVE 25
- OHUTUSJUHISED 26
3.JAATMEKAITLUS 27 - SEADME KIRJELDUS 28
- UUE SEADME PAIGALDAMINE 30
- EKRAANI JUHTNUPUD 32
- SEADME KASUTAMINE 34
- KASULIKKE NAPUNAITEID 38
9.PUHASTAMINE JA HOOLDUS 39
10.VEAOTSING 40
11.SEADME KORVALDAMINE 41 - TEHNILISED ANDMED 42
- HELID 42
TÄIUSLIKE TULEMUSTE SAAVUTAMISEKS
www.electrolux.com/productregistration

10. PROBLEMU NOVER'SANA
5.3 Ajustar as portas
Queijo Pepinos Bifes
1. CBEENI PO TEXHnke B3OpACHOCTN
Ipeed yctaHOBkoN n 3KcPnlyatauNei np6opa BHNMaTeNbHO O3HaKOMbTECb C npINIOxEHHbIM pyKOBOdCTBOM. IpON3BOIDNTeJIb He HecET OTBeTCTBeHHOCTb 3a TpaBMbl N IOBpeXdEHHa, NOJyueHHbIe/ Bbl3BaHHbIe HENpaBNlbHOYCTaHOBkoN n 3KcPnlyatauNei.
I03a60TbTeCb O TOM, yTO6bl DaHHoe pyKOBODCTBO 6blno y Bac noD pyKoH na npOTJKeHN BCero cPoka cnjX6bl npi6opa.
1.1 Be3oNaCHOCTb DeTei n IuC OOrpaHnueHHbIMN BO3MOXHOCTaMn
-Данньи рпбор может ксрлуатиpoBaTBcA DeTbMn CTapшe 8 leT nIuamN C OgpAHueHHbIMNФИЗUECKIMN,CEHCOPHbIMN IIN yMCTBeHHbIMN CNoCO6HOCTaMn N C HeIOCTaTOUHbIM ONbITOM IIN 3HaHnA MTOJIbKO NOI PPNCMOrPOM JNuca,OTBeuaIOSeIro 3a INx 6e3ONaCHOCTb,IIN NOcJIe NOJyEHNRA COOTBETCTBYIOUX INHCTpyKcIy IN yKa3aHn,PO3BOJIAOux IM 6e3ONaCHO 3KcPlyaTnpoBaTB pRbOp IN daHOux IM PpeICTabJIeHne O COpJXeHHoC eRO 3KcPlyaTaUcNei ONaCHOCTN.
He no3B0JTe Detam nrgatb c np6opom.
- OuNTka n DoCTyHoe noIb3ObaTeJIIO TexHnueCKoe 6cJyXnBaHne He DOJIxHbI npOn3BOAnTbCra DeTbMn 6e3 npncMOtpa.
XpaHnte BCE ynaKOBOHbI MaTePnAbI B HeIOCTyHOM dJa DeTeMecTe.
1.2 06uine npabnla texnkn 6e3oanachoctn
- Прибор предназанец Ддя 6ытOBOrи и санлогчHOrо рпимеони, наример:
9.2 OuInCTka BHyTpEnHnX nobEpxHoCTeI np60pa
OuNCTky BHyTpeHHNX NOBepxHocTei np6opa cNeDyET npoBOintb perynapHO. Lyuwe BCero 3TO DeNaTb, KOrDa B XOnOAnIbHNKe XpaHNTcMaIO npOdyKToB. IpOTpnte BHyTpeHHIO NOBepxHocTb MOpO3nIbHOJ KaMepbl TKAHbHO, CMOueHHoB B Cna6oM pactBope coDbI, a 3aTeM npOTpnte
ry6koN nIIN TkaHbIO, CMOueHHoB TEIIOB OBe. IpOtpnTe Hacyxo Npeed yCTaHOBKO HA MeCTO NOJOK I KOp3HN. TuaTeNbHO npocuWnte BCE NOBepxHOCTN IN CbeMHbIE DeTaJIi.
HeCMOTpHaTo,TOXOJIOJIbHnK OCHaUeH cyHKuIneA BtOMaTnueCKoRo pa3MopaxINBaHnRA,HaCTeHKax MOp03INbHOJ KAmepbl MoKeT 6pa3OBbIBaTbcra HaJeB,ecnI DBepca KaMepbl OTKpbIBaETcra CNIuKOM YACTO INI DOnIRO OCTaETcra OTKpbITOI. Ecnn cNoi Hanei CNIuKOM TOJCTbI, BblONHHTe ONICAHHyIO HIXe IpoUeDpy, KOrda B MOp03INbHOJ KAmepE 6yDeT MaNo PPOdykTOB.
- BbHbTe npOdykTbI IN KOp3nHbI, OTKnHouHTe np6Op OT 3JIeKTPocEtN OCTaBbTe DBepCy OTKpbITOn. TuaTeJbHO npOBETpnte NOMeUHeHne, YTObbl yCKOpNTb PPOucec pa3MopaxnBaHnA.
- После 3abepseHnpa3MopaxNBaHnOuNCTnteMopo3nIbHyIOKaMepy,CneDyI npBEdeHHbIM BblSe yka3aHnM.

BHIMAHNE!
He noJIb3yIeTcB ocTpblMN
npeImetamn dJa ydaJeHnra
HaJIeN C NOBepxHOCTe
MOpO3INbHOK KAMEpbI.
Y6eINTeCb, YTO BHyTppeHHne
IOBepxHOCTn KAMEpbI NOLHOCTbIO
BbICOXII, NOkJIIOHTe PnIbOp
K 3JIeKTPOcETn IN BKNIOHTe
NTaHHe.
9.3 OuInCTka yIIOHTHnTeJIa DBeRcbl
CneHnte 3a YnCTOTOYnNtHTeJIy DBePbI. NInKHe npOdyKTbI n HAnNTKN, NOnaBwne Ha yNnOTHTeJIb, MOrYT npNBecTn K npJINHaHIO yNlOTHTeJIa K KopnyCy XoJOniNbHnKa; npN 3TOM BO3MOxHO NOBpeXdHne yNlOTHTeJIe BO BpMa OTKpbIBaHnA DBePbI. IOMoITe yNlOTHTeJIb TEnNoB BoOIM C MArKMm YnCTaUM CpeDcTBOM. OOnIoCHnte YnCTOu BOOu N BbITpuTe Hacyxo.

BHIMAHNE!
Pnp6op MOxHO BKNHouaTb TOnbKO NocJIe NOHoro BbICbIXaHnYNlOTHTeJIe.

PNEyPPEKDEHNE!
3aMeHa 3JIeMeHToB
CBETOIOHOHOOCBeUeHn
He DOJXHa OCyUeCTBnTbC
IOnb3OBaTeJeM! B cnyae
HeNCnPpABHOCTN B pa6Ote
CNCTEmbl CBETOIOHO
OCBeUeHn OBpaNTecb B cnyk6y
NoDepKKn KIneHTOB DnA
NoLyueHn COOTBeTCTByIoUx
peKOMeHdaun.
10. ПОИСК И UYSTPAHEHNE HENCSРABHOCTEД
EcnBbCTOJKNHyIincb C KaKoJ-Ni60 npo6nemOB B npocece 3KcNpyataun npnbopa nnCHTaTe, YTO np6op He cyHKUHOHPyET DOJXHBIM O6pa3OM, MOxHO CdeJaTB HeCKOJIbKO HeCLOXHbIX npOBepOK, PpexJeYem O6paAusbcra B cepBncbI yENTp. Npeed Tem kak o6paAusbcra B cepBncbI yENTp, npOBepbTe, HeNb3r IyUCTpaHNTb HEuCnpaBHOCTb ONuCAHHbIM HNXe cnOCo6amn.

PPEyPPEKDEHNE!
Hn npk KaKx 06CTOaTeNbCTBax He nbTaIaTEc b OTpeMOHTnpoBaTb np6op camocToaTeNbHO. Ecnn nocJe BbIOJHeHry yka3aHHbIX Hnke npOBepok npo6nema He ycTpaHeHa, o6paTntecb K KBaINΦuNUPOBAHHomy 3NeKtpNKy, CneUaJIncTy aBTOpN3OBaHHORO cepBnCHOrO ueHTpa INN B MaRa3nH, rDe 6bl npno6peTeH 3TO T np6op.
| HenschpabHQocTb Bo3mOxHnA priunHnA i cnoc6b yctpaHnHnA | |
| Прибор He pa6oTaetdoJXHbIM o6pa3OM | Y6eIInTeB,чTO CeTeBoi Ka6eB IOdkIouChE K Po3eTke эл ektpocetN HaJIpeKauIm MOBa3OM. |
| ПровьTe ppeOxpaHnTeB ИПИ abTomatUcckn BvIKIouaTeB эл ektpocetN. Ппr Heo6xOДmOCTN 3aMeHnTe PpeOxpaHnTeB IПИ BkIIOuHTe ABTomatUcckn BvIKIIOuHTeB,ecIIOn OH cpa6oTaN. | |
| ВentIJЯToP MOpO3IbHNo KAmepbI He pa6oTaET B TeuchHe NcIckla aBTomatUcckOro pa3MopaxHbAHnI INI HeNPoOJoxHtBHe Bpemr IocNe BkIIOUeHnI XoIodIbHnKa IJIg 3aIITbI KOMnpceccopa -3TO HopMaJIbHoe YABLeHnE. | |
| В OTdIeHnIaX xolo- dIINbHnKa npIscyTCTBy-et HxekJIaTeMbHbI 3aIax | Bo3MoXHo, Heo6xOДmO ppoBeCTn OuyCtKb BVHyTpEHNIX nobErXHOCTeXoIodIbHnKa. |
| 3aIax MoXe TncXoIuTb OT oppeJeIeHHbIX IpoDyKTob, KOHTeHepOB IПИ yIakOBKn. | |
| Прибор ИЗдaEt Shum | Пri NaHpaMbHNo pa6oTe XoIodIbHnKa MOrTy BV3Hn-KaTb CJIeDyUOuIe Zhymbl N 3ByK: ·Shym pa6oTb KOMnpceccopa; ·Shym, BvI3BaHbI NOTOKOM BO3dUxHa B Mopo3IbHNo Kamepe IПИ dpyrIcx OTdeIeHnIX XoIodIbHnKa (He- 6OJIbSbW BeHTIaTOpHbI 3JIeKTPoDBIrAteJIb OcyIeCT- BJIaET ZIrpKUJIaUIO BO3dUxHa); ·6yJIbKaHbe, IOxOJee Ha 3ByK KINJaIeB VODI; ·NotpeCKBaHnE BO Bpemr ABTomatUcckOro pa3Mopa- JxIBaHnI; ·ПОSeIKNBaHnEперd 3aIpyckOM KOMnpceccopa. |
| ПriUnHbI IOraBJIeHne DpyrIX Heo6bIuHbIX ShUMOB nepeuIcJIeHbI HIXKe. 3TI 3ByKl MOrTy Uka3bIbATb Ha Heo6xOДmOCTb IpoBeIeHnI OpeIeIeHnHO IpoBepKIN I BvIIOJIeHnIA COOTBETCTBvOuIeX MeR. XoIodIbHnK He BvIPOBHeN. 3aIaHnA CTeHKn XoIodIbHnKa CoPruKacAeTcSO CTeHOn.I BytIaIKI INI KONTeHepBl yIaJIIN IINI NepeKaTbBAIoTcB BVHTPrN XoIodIbHnKA. | |
| ПостянHo pa6oTaet dIvIraTeNb | B cIeDyUOuIX CNTyaIaIX DVBraTeNb pa6oTaET DoJIbIe, IIO3TOMy COOTBETCTBvOuIeN 3ByK pa3DaETcY aUeIe. ·UcTaHOBJIeHa CIIuKOM HIN3Kae TEmpepaTypa. ·B XoIodIbHnK HeIaBHO NOMeCTNI IN CIIuKOM MHOTo TEIIbIX IpoDyKTOB. ·TempepaTypa OkpykaIooIero BO3dUxA CIIuKOM BvIco-KaI. ·ДВeprZbIocAOTcR OTKpbITbIMN CIIuKOM DoJIro. ·ПосLE yctaHOBKn pri6bopa IПИ dIvIteHbHOrO pOcSTORe B BVIKJIIOUeHHOM COCTOHNII. |
| Ha BnytpenHHx steh-Kax obpa30BaJACb haJeB | Y6eHITcB,чTO BeHTnJIaONHbIe OTBepCTnI He nepe-KpbItbI prOduKtAmN i pa3MeueHne IprOduKToB IO3BOJAreT obecneuHb DoCTaTOUHy BOHTnJIaONu BHYTpI KAMepbl. Y6eHITcB,чTO DBepCuI pIoTHo 3akPbIta. Инстукuzn no ydaJIeHIO HaJeDn CM.В pa3dEne "OChSTka u yXOD". |
| Temnepatypa BNYtrpnpnbopa cIIshKom BlyCOKa | Bo3MOxHO, Bbl cIIshKom qacto OTKpbIBaTe DeBepCuI nII depKjte IN OTKpbITbIMn CIIshKom DOJIro, nIIy UTO-TO Me7aet 3akPbITNo DBepCuI; nIIy BOKpyr XOJOnIJNbHnKa HeDOCTaTOUHO CBO6OHDoro MeCTa. |
| Temnepatypa BNYtrnpnbopa cIIshKom Hn3Ka | YBeJIuMbTe TemnepaTypy, cIeDyra INHCTpyKzHm pa3Deena "PAnelb ynpabLeHnra". |
| Дерць 3akPbIBaIOTcC TrPyDm | ПрOBeRbTe, HabLOHeHa LIn BEpxHЯ qactb XOJOnIJbHnKa hazad Na 10-15 MM dIЯ obecneueHnca camocToTseIb-Horo 3akPbIBaHnA DBepe. ПрOBeRbTe, He Me7aet li KaKoI-IIIbОPreDmet 3akPbIBaHnU DBepe. |
| Boda kanaet Na noI | Bo3MOxHo, EmKocTb DnI c6opar TaIoi BoDs (pacnoLoXe-Ha B HIXHei qactn 3aIHei CTeKn KOpNyCa) yctaHOBNeHa HepOBHo, nIIy HOCNK BODDOTBOHDn Tpy6Kn (pacnoIoo-JxHn Pd BepXHei qactbIb 6a3bI KOMnPeeCCopa) HeBepHO yCTaHOBNeH dIy CJIbBA BoDi B 3Ty EMKOCTb, nIIy HOCNK 3acOpIINc. Bo3MOxHO, Bam noHaIob6ITcR OTOdBHNyTb XO-JIOnIbHnK OT CTeHb I dIy pOBePKI NIOJoxHnem EMKoCTn I HOCnKa. |
| He pa6oTaet OCBeIe-Hne | Bo3MOxHo, 3IeMent CBETOIOIDHO rCBSeHnien Nobpe-JxdEN. INHCTpyKzHm IIO ZamEne 3IeMenta CBETOIOIDHO OCBeIeHnCM. B pa3dIeI NO ONUCTKe I yXOy. CnCTema ynpabLeHnI BbIKJIOUChIa OCBeIeHnme, TAK kaK DBePza OCTaBaJalacb OTKpbITOn CIIshKom DOJIro, 3akPoyTe n CHOBa OTKpoIte DBePuy, YTObI BkJIIOUHTb OCBeIeHnE. |
| Дерца He OTKpbIBaEt-Cry Плавно | ПрOBeRbTe COStOAHnE yIJIOTnIeTЯ DBePczI. Рп Neob-XOДIMOCtN ONUCTIe pe3INHOBV yIJIOTnIHTeNb IIO nepri-Metpy DBePczI C NOMOZbI c PEOCTBv IDAЯ MblTb I NOCyIb I TeIIOI BODI. EsIy DBePza пIJIINaET K KOPnCy xOJOn-DIIbHnKa, To, cKopee Bcero, yIJIOTnIHTeNb 3aIrpA3HeH. |
11. YTNJIIN3AUZIЯ ППБОРА
Pn npOn3BODCTBe daHNOr
XONoIbHnKa IcNoIb3OBaIncB
MaTePnaJIb MHOrOKpaTHoro npImeHHeNr.
YtINn3aun DaHHoro np6oRa DOJxHa
OCuIeCTBnTbcra B COOTBeTCTBn C
npAInlAmn MeCTHO 3aKOHoDaTeJIbCTBa
no ytINn3aun OTxoIOB.B XoIOAnlbHom
KoHType np6oPa coDepxntcra
He6ObnWoE KOInueCTBO XJaadareHTa
(R600a).B ceJax oBeCneueHnra
IInHON 6e3OpacHOCTn O3HaKOMbTEcB C
IHΦopMaun, npUBeDEHNO B pa3deJe
"XlaadareHn pNCK BO3ropaHna" DaHHoro pykoBOndBa nO 3KcNpyaTuu, nepeyTIN3auee np6opa.ObpexbTe Ka6JIb NITAHNA np6opa, yTO6bl BbIECTn erO n3 CTPOr, CHMNTe yIIOHTHe DBepuBn 3amok.CnCTema OXIAJxHeN Tpe6yeT OCTOPOXHO O6paueHn: cTapaNTecb He Hapuyatb ueoCTHOtck KOHTeHepa XlaadareHtA, He CIn6aTb Tpy6Kn Hne NobpeKdAtb POKpbITNe, HaHeceHHORo Ha NOBepxHOCTb CNCTEMbl.
PpaBnIbHa yTtnn3aunu n3denn
DaHbI CmB0n Ha np6ope nHyyakOBke yka3bIbAeT Ha To, YTO np6Op HeJb3aYtINn3npoBaTb BMeCTe C 6bITOBIMN OTXODAMN. BMeCTO 3TORO, ero cneDyET cdaBaTb B COOTBeTCTBYIOUcNI IyHK TpHema 3JIeKTPnuECKOTO n3JIeKTPoHHoro O6OpyDoBAHnRA DJIa NocJeDyUOeYtINn3aUu. ObecneueNB npabINbHyU OytINn3aUHO DAHHORIO 3dEINNA, Bbl NOMOKeTe PpeDTBpaNTb NOTEHuaNbHbIE HerATINBHeI NOCEndTBnI dJIr OKpyKaIOUe CpeDbI IN 3DopOBBy QeNoBeka, KOToPbIE BO3MOxHbI Prn HEnpaBnIBHO YtINn3aUu. BoJee NoDpo6HyIO NHΦOpMaUIO NOBTOPH IOpepa6OTKe DaHHORIO np6Oba Bbl MOxTe NOJyHTB M MeCThBIX OPraHAX BJaACTN, CnyK6e NO BbIO3y I YtINn3aUu OTXODOB NII B MaRa3InHe, rDe 6blIO npno6peTeHO 3dEIne.
12. TEXHnueCKne DAHHbIE
5. MONTERING AF DIT NYE PRODUKT
www.electrolux.com/productregistration

5. MONTERE DITT NYE PRODUKT
Dette avsnittet forklarer monteringen av det nye produktet for du bruker det for forste gang. Vi anbefaler at du leser fologende

ADVARSEL!

- Visit our website to:
- CUSTOMER CARE AND SERVICE
- SAFETY INFORMATION
- Children and vulnerable people safety
- General Safety
- SAFETY INSTRUCTIONS
- Installation
- WARNING!
- Electrical connection
- Use
- Internal light
- ENVIRONMENT CONCERNS
- Care and cleaning
- Disposal
- DESCRIPTION OF THE APPLIANCE
- View 1 of the appliance
- View 2 of the appliance
- INSTALLING YOUR NEW APPLIANCE
- Leveling of appliance
- Adjusting the door handle
- Adjusting the doors
- Ventilation of appliance
- DISPLAY CONTROLS
- Controlling the temperature
- CAUTION!
- Fridge
- Fast Cool
- Freeze
- Fast Freeze
- ECO
- Alarm
- Door Alarm
- Temperature alarm
- Child Lock
- USING YOUR APPLIANCE
- Cold water dispenser
- Filling water
- Door rack
- Pop can rack
- Glass shelves
- FRESH ZONE. Precision control of temperature (Optional)
- Using the refrigerator chamber
- Using the freezer drawer
- Twistable ice tray
- HELPFUL HINTS AND TIPS
- Energy saving tips
- Hints for fresh food refrigeration
- Hints for refrigeration
- Hints for freezing
- Hints for the storage of frozen food
- CLEANING AND CARE
- Exterior cleaning
- Switching off your appliance
- Interior cleaning
- Door seals cleaning
- TROUBLESHOOTING
- DISPOSAL OF THE APPLIANCE
- Correct Disposal of this product
- TECHNICAL DATA
- NOISES
- SISUKORD
- TÄIUSLIKE TULEMUSTE SAAVUTAMISEKS
- PROBLEMU NOVER'SANA
- Ajustar as portas
- CBEENI PO TEXHnke B3OpACHOCTN
- OuInCTka BHyTpEnHnX nobEpxHoCTeI np60pa
- BHIMAHNE!
- OuInCTka yIIOHTHnTeJIa DBeRcbl
- PNEyPPEKDEHNE!
- ПОИСК И UYSTPAHEHNE HENCSРABHOCTEД
- PPEyPPEKDEHNE!
- YTNJIIN3AUZIЯ ППБОРА
- PpaBnIbHa yTtnn3aunu n3denn
- TEXHnueCKne DAHHbIE
- MONTERING AF DIT NYE PRODUKT
- MONTERE DITT NYE PRODUKT
- ADVARSEL!
Brand : ELECTROLUX
Model : EN6084MOX
Category : Fridge