
Multiquick 9 MQ 9045X - Blender BRAUN - Free user manual and instructions
Find the device manual for free Multiquick 9 MQ 9045X BRAUN in PDF.
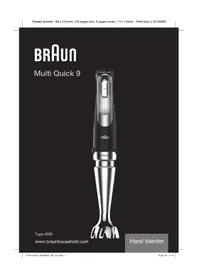



| Product type | Immersion blender |
| Brand | Braun |
| Model | Multiquick 9 MQ 9045X |
| Power | 1000 W |
| Power supply | 220-240 V ~ 50/60 Hz |
| Cable length | 1.2 m |
| Variable speed | Yes, via SmartSpeed (variable pressure) |
| Unlock button | Yes, safety |
| ActiveBlade shaft | Yes, blade extends to the bottom |
| Included accessories | 600 ml graduated beaker, whisk, potato masher, 350 ml, 500 ml and 1250 ml choppers (with ice crusher) |
| Blade material | Stainless steel |
| Graduated beaker | BPA-free plastic, graduations |
| Indicator light | Yes, status indicator (flashing red/solid green/solid red) |
| Overheating protection | Yes, progressive shutdown and cooling |
| Cleaning | Shaft and accessories dishwasher safe (except motor block, covers and drives) |
| Weight | Approx. 0.8 kg (motor unit only) |
| Shaft length | Approx. 40 cm |
| Usage | For household use only |
| Warranty | 2 years (depending on country) |
| Spare parts available | Yes, through Braun after-sales service |
| Repairability | Repairability index not specified, but parts available |
Frequently Asked Questions - Multiquick 9 MQ 9045X BRAUN
User questions about Multiquick 9 MQ 9045X BRAUN
0 question about this device. Answer the ones you know or ask your own.
Ask a new question about this device
Download the instructions for your Blender in PDF format for free! Find your manual Multiquick 9 MQ 9045X - BRAUN and take your electronic device back in hand. On this page are published all the documents necessary for the use of your device. Multiquick 9 MQ 9045X by BRAUN.
USER MANUAL Multiquick 9 MQ 9045X BRAUN
*certain models only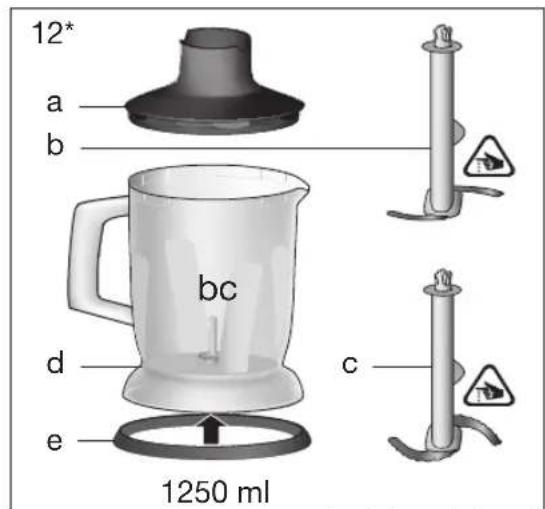
A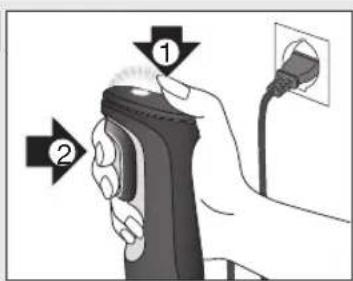
B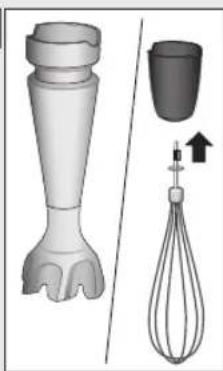
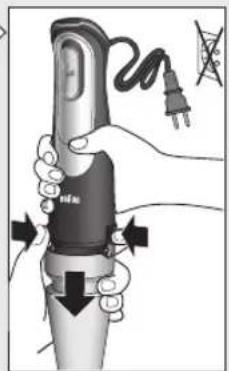
C
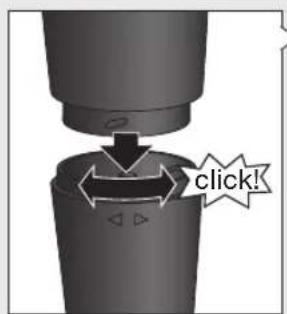
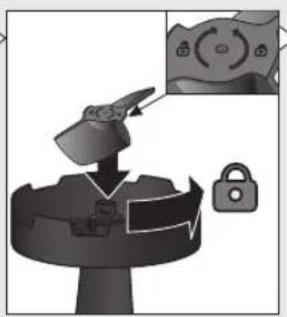
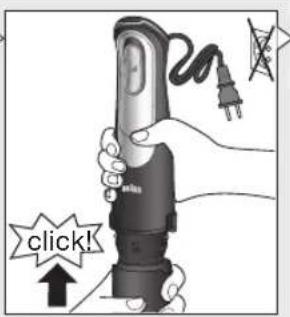
D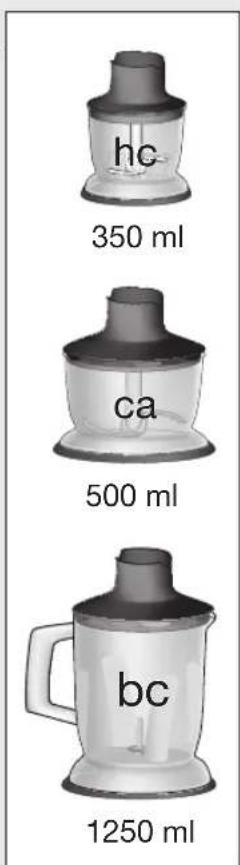
German
Our products are engineered to meet the highest standards of quality, functionality and design. We hope you thoroughly enjoy your new Braun appliance.
Before use
Please read instructions carefully and completely before using the appliance.
Caution

The blades are very sharp! To avoid injuries, please handle blades with utmost care.
- This appliance can be used by persons with reduced physical, sensory or mental capabilities or lack of experience and knowledge if they have been given supervision or instruction concerning use of the appliance in a safe way and if they understand the hazards involved. Children shall not play with the appliance.
- This appliance shall not be used by children. Children shall be kept away from the appliance and its mains cord.
- Cleaning and user maintenance shall not be made by children without supervision. Always unplug or switch off the appliance when it is left unattended and before assembling, disassembling, cleaning and storing.
- If the supply cord is damaged, it must be replaced by the manufacturer, its service agent or similarly qualified persons in order to avoid a hazard.
- Before plugging into a socket, check whether your voltage corresponds with the voltage printed on the bottom of the appliance.
- Be careful if hot liquid is poured into the food processor or blender as it can be ejected out of the appliance due to a sudden steaming.
- This appliance is designed for household use only and for processing normal household quantities.
- Do not reach into the filling shaft when the appliance is plugged in, especially while the motor is running. Always use the pusher to guide food through the shaft.
- Do not use any part in the microwave.
Parts and Accessories
1 Pilot light 2 Safety button 3 Smart Speed switch / variable speeds 4 Motor part 5 EasyClick Release buttons 6 ActiveBlade shaft 7 Beaker 8 Whisk accessory
Gearbox
b Whisk
9 Puree accessory a Gearbox
b Puree shaft
c Paddle
10 350 ml chopper accessory «hc» a Lid b Chopping blade c Chopper bowl d Anti-slip rubber ring 1 500 ml chopper accessory "ca" a Lid (with gear) b Chopping blade c Chopper bowl d Anti-slip rubber ring 2 1250 ml chopper accessory «bc» a Lid (with gear) b Chopping blade c Ice blade d Chopper bowl e Anti-slip rubber ring
Clean all parts before using for the first time - refer to «Care and Cleaning».
Pilot Light
The pilot light (1) shows the status of the appliance, when it is connected to an electrical outlet.
Pilot light Appliance / Operating status
Flashing red Appliance is ready for use.
Solid green Appliance is released (switch release button is pressed) and can be switched on.
Solid Red Early warning about overheating. Motor slows down, step by step, till shut off. Let the device cool down. It is ready for use again when the pilot light flashes red.
If the maximum speed decreases under high load and long running time you can still finish your preparation, however you should let the appliance cool down afterwards.
How to Use the Appliance
Smart Speed Switch for Variable Speeds
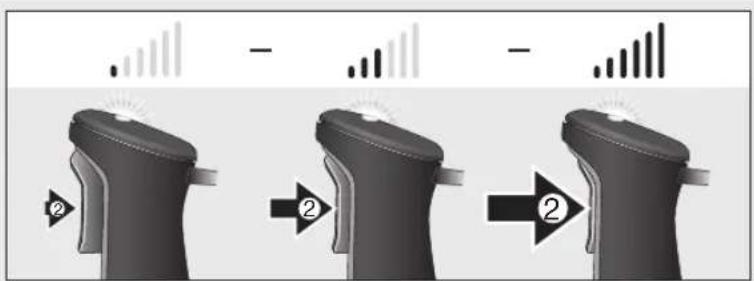
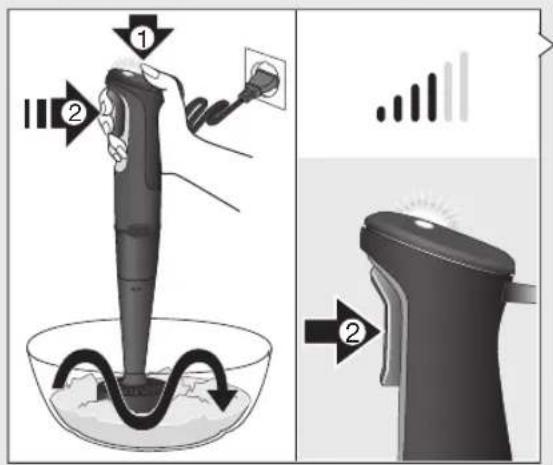
One squeeze, all speeds. The more you press, the higher the speed. The higher the speed, the faster and finer the blending and chopping results.
One handed operation: the Smart Speed switch (3) allows you to turn on the appliance and control the speed with one hand.
Operating your Hand Blender
First use: Remove the transportation lock from the motor part (4) by pulling it at the red strap.
Switching On (A)
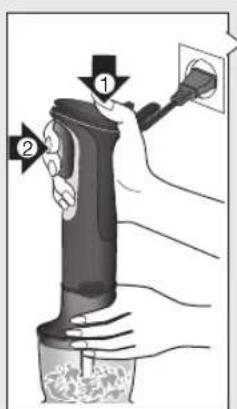
The appliance comes equipped with a safety button for releasing the Smart Speed switch. To safely turn it on, follow these points:
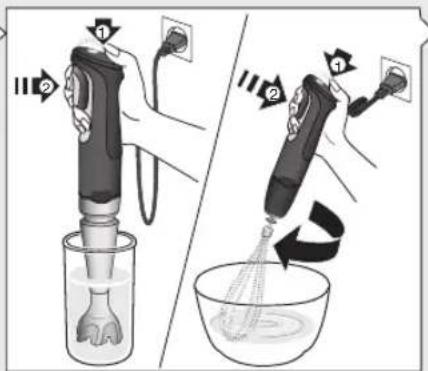
- Press the safety button (2) with your thumb. The Pilot Light will turn solid green.
- Immediately press the Smart Speed switch and adjust to the desired speed. Note: If the Smart Speed switch is not pressed within 2 seconds, the appliance cannot be switched on for safety reasons. The pilot light will flash red. To switch the appliance on, start again with first step.
- During operation you do not need to keep the safety button pressed.
ActiveBlade Shaft (B)
The hand blender is equipped with an ActiveBlade shaft, which enables the knife extend to the bottom of the bell. The adjustment is made automatically by pressure required in blending tasks, especially suited to mix hard foods e.g raw fruits and vegetables.
12
It is also perfectly suited for preparing dips, sauces, salad dressings, soups, baby food, as well as drinks, smoothies and milkshakes.
For best results, use the highest speed.
Assembly and Operation
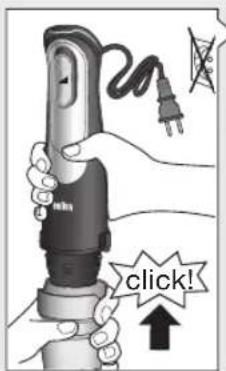
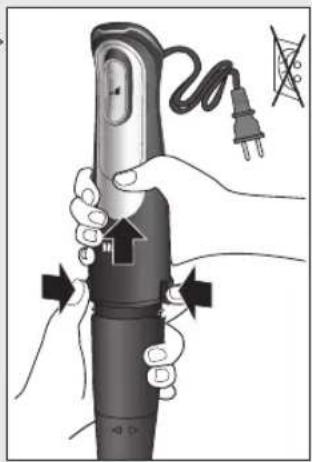
- Attach the ActiveBlade shaft (6) to the motor part until it clicks.
- Place the ActiveBlade shaft into the mixture to be blended. Then switch the appliance on as described above.
- Blend ingredients to the desired consistency using a gentle up-and-down motion. Depending on the pressure applied, the ActiveBlade shaft will depress and blade will extend.
- After use, unplug the hand blender and press the release buttons (5) to detach the ActiveBlade shaft.
Caution
- Do not let liquids or ingredients overlap the green line of the blending shaft. If using the appliance to purée hot food in a saucepan or pot, remove the saucepan or pot from the heat source and ensure the liquid is not boiling. Allow hot food to cool slightly to avoid risk of scalding.
- Do not let the hand blender sit in a hot pan on the cooktop when not in use.
- Do not scratch the ActiveBlade Shaft over the bottom of pans and pots.
Recipe Example: Mayonnaise
250 g oil (e.g. sunflower oil),
1 egg and 1 extra egg yolk,
1-2 tbsp. vinegar,
Salt and pepper to taste
- Place all ingredients (at room temperature) into the beaker in the order as above.
- Place the hand blender at the bottom of the beaker. Blend at maximum speed until the oil starts emulsifying.
- With the hand blender still running, slowly raise the shaft to the top of the mixture and back down to incorporate the rest of the oil.
NOTE: Processing time: approx. 1 minute for salads and up to 2 minutes for a thicker mayonnaise (e.g. for dip).
Whisk Accessory (B)
Use the whisk only for whipping cream, beating egg whites, making sponge cakes and ready-mix desserts.
Assembly and Operation
- Attach the whisk (8b) to the gearbox (8a).
- Align the motor part with the assembled whisk attachment and push the pieces together until they click.
- After use, unplug and press the release buttons to detach the motor part. Then pull the whisk out of the gearbox.
Tips for Best Results
- Move the whisk clockwise while holding it at a slight incline.
- To prevent splattering, start slowly and use the whisk attachment in deep containers or pans.
- Place the whisk in a bowl and only then switch the appliance on. Always ensure the whisk and mixing bowl are completely clean and free of fat before whisking egg whites. Only whip up to 4 egg whites.
Recipe Example: Whipped Cream
400 ml chilled cream (min. 30% fat content, 4 - 8°C)
- Start with low speed (light pressure on the switch) and increase the speed (more pressure on switch) while whipping. Always use fresh chilled cream to achieve greater and more stable volume when whisking.
Puree Accessory (C)
The puree accessory can be used to mash cooked vegetables and fruits such as potatoes, sweet potatoes, tomatoes, plums and apples.
Before Use
- Do not mash hard or uncooked food, as this may damage the unit.
- Peel and remove any stones or hard parts; cook and drain then mash the fruit/vegetable.
Assembly and Operation
- Fit the gearbox (9a) to the shaft (9b) by turning in a clockwise direction until it locks into place.
- Turn the puree accessory upside down and fit the paddle (9c) over the central hub and turn counter-clockwise to locate. (If the gearbox is not fitted properly, then the paddle will not secure in place).
- Align the assembled puree accessory with the motor body and click the two parts together. Plug in.
- Dip the puree accessory into the ingredients and switch on the appliance.
- Using a gentle up and down motion, move the puree accessory through the ingredients until the desired texture is achieved.
- Release the Smart Speed switch and ensure the puree accessory has completely stopped turning before removing it from the food. After use, unplug the appliance. Remove the paddle (9c) by turning clockwise.
- Press the release buttons to detach the puree accessory from the motor part. Separate the gearbox from the shaft by turning counterclockwise.
Caution
- Never use the puree accessory in a saucepan over direct heat. Always remove the saucepan from the heat and allow to cool slightly.
- Sit the saucepan or bowl on a stable, flat surface, and support it with your free hand.
- Do not tap the puree accessory on the side of the cooking vessel during or after use. Use a spatula to scrape excess food away.
- For best results when mashing never fill a saucepan or bowl more than half full with food.
- Do not process more than one batch without interruption.
- Let the appliance cool down for 4 minutes before you continue processing.
Recipe Example: Mashed Potatoes
1 kg cooked potatoes
200 ml warm milk
- Place the potatoes in a bowl and mash for 30 seconds (3/4 way on the Smart Speed switch)
- Add the milk. Resume mashing for another 30 seconds.
Chopper Accessory (D)
The choppers (10/11/12) are perfectly suited for chopping meat, hard cheese, onions, herbs, garlic, vegetables, bread, crackers and nuts.
Use the «hc» chopper (10) for fine results.
Use the «ca» and «bc» chopper (11/12) for larger quantities and for hard foods.
Furthermore, the «bc» chopper (12) offers a variety of other applications like shakes, drinks, purées, batter or crushed ice.
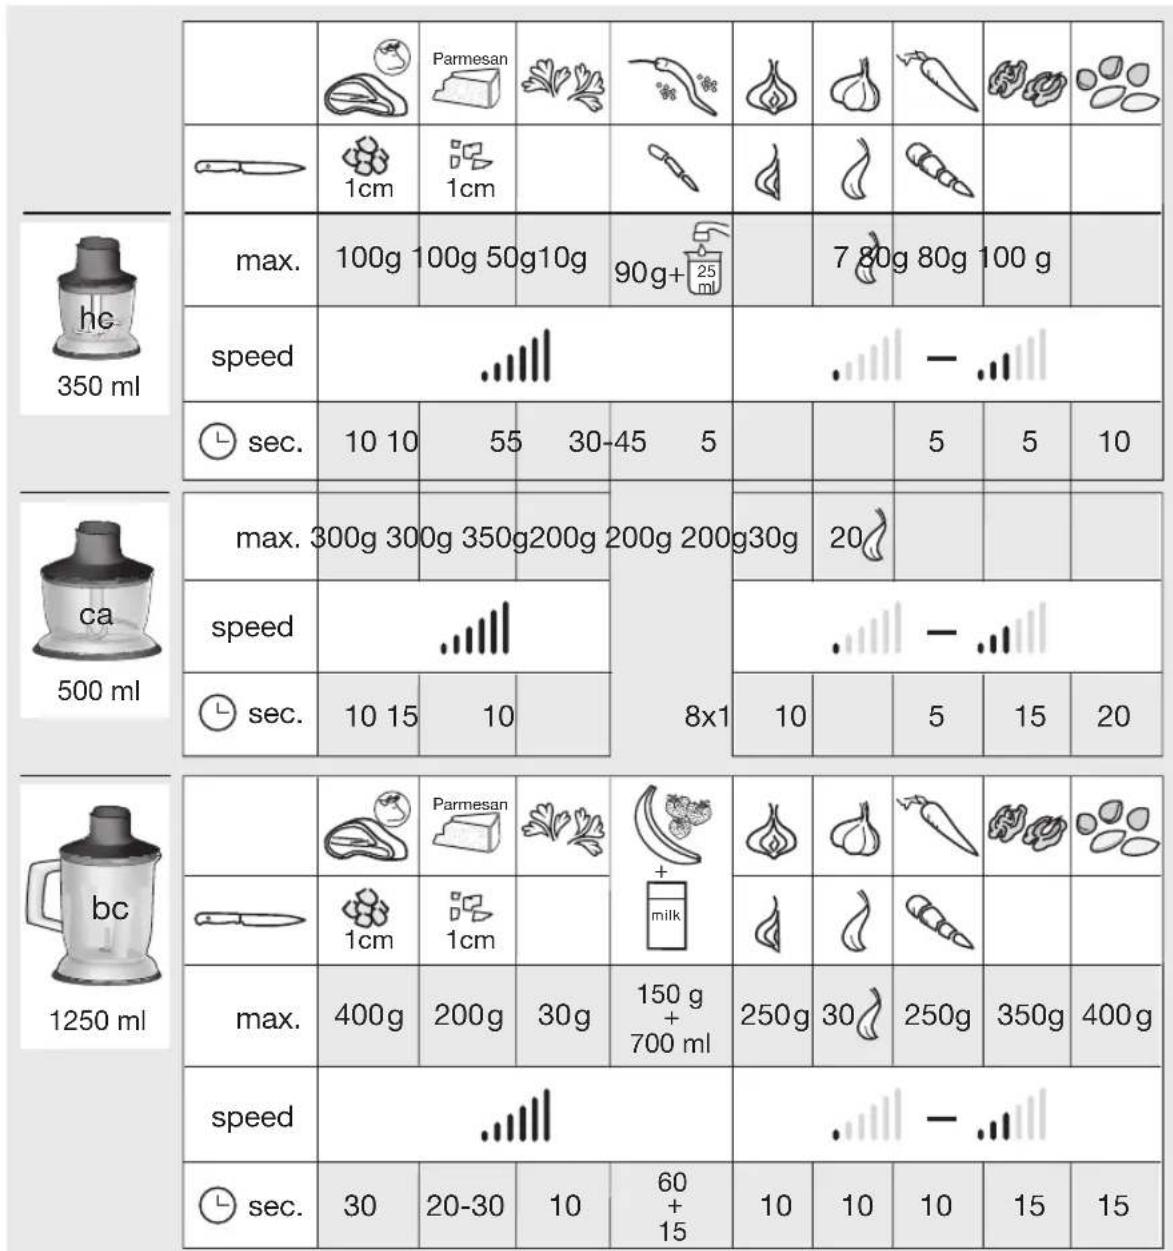
Refer to the Processing Guide D for maximum quantities, recommended times and speeds.
Maximum operation time for the «hc» chopper: 2 minutes for large amounts of wet ingredients, 30 seconds for dry or hard ingredients or amounts
< 100g. Immediately stop processing when motor speed decreases and/or strong vibrations occur.
Before Use
- Pre-cut foods into small pieces for easier chopping.
- Remove any bones, tendons and gristle from meat to help prevent damage to the blades.
- Make sure the anti-slip rubber ring (10d/11d/12e) is attached to the bottom of the chopper bowl.
Assembly and Operation
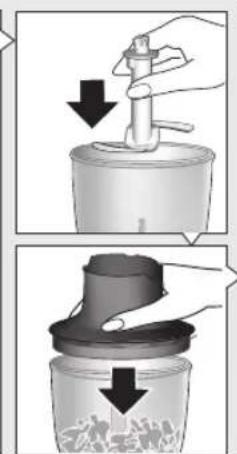
- Carefully remove the plastic cover from the blade.
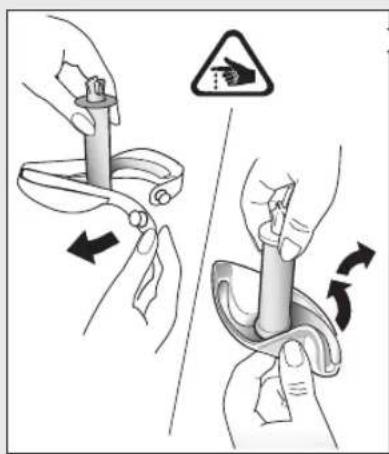
- The blades (10b/11b/12b, 12c) are very sharp! Always hold them by the upper plastic part and handle them carefully.
- Place the blade on the center pin of the chopper bowl (10c/11c/12d). Press it down and give it a turn so that it locks into place.
- Fill the chopper with food and put on the lid (10a/11a/12a).
- For ice crushing, use the special ice blade (12c) and fill up to 7 ice cubes into the chopper bowl (12d).
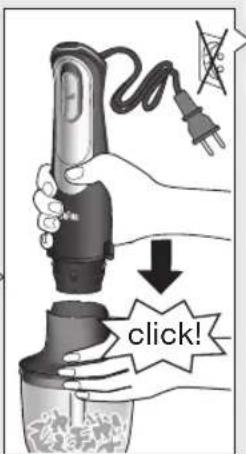
- Align the chopper with the motor part (4) and click together.
- To operate the chopper, switch on the appliance. During processing, hold the motor part with one hand and the chopper bowl with the other. Always chop harder foods (e.g. parmesan cheese) at full speed.
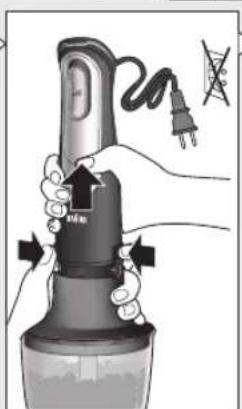
- When chopping is complete, unplug and press the release buttons (5) to detach the motor part.
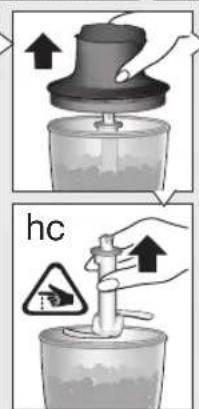
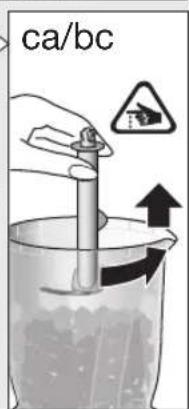
- Lift the lid up. Carefully take out the blade before pouring out the contents of the bowl. To remove the blade, slightly turn it then pull it off.
Caution
- Do not use the chopper accessories (10/11/12) with chopping blades to process extremely hard foods, such as unshelled nuts, ice cubes, coffee beans, grains, or hard spices e.g. nutmeg. Processing these foods could damage the blades.
- Only the «bc» chopper accessory (12) with the special ice blade is allowed to crush ice cubes.
- Never place the chopper bowls in the microwave oven.
«bc» Recipe Example: Pancake Batter
375 ml milk
250 g plain flour
2 eggs
- Pour milk into the «bc» bowl, then add flour and finally the eggs.
- Using full speed, mix the batter until smooth.
Recipe example: Honey-Prunes (as a pancake stuffing or spread):
50 g prunes
100 g creamy honey
- Fill the «hc» chopper bowl with prunes and creamy honey.
- Store at 3°C in refrigerator for 24 hours.
- Chop for 1.5 seconds at maximum speed (fully press the Smart Speed switch).
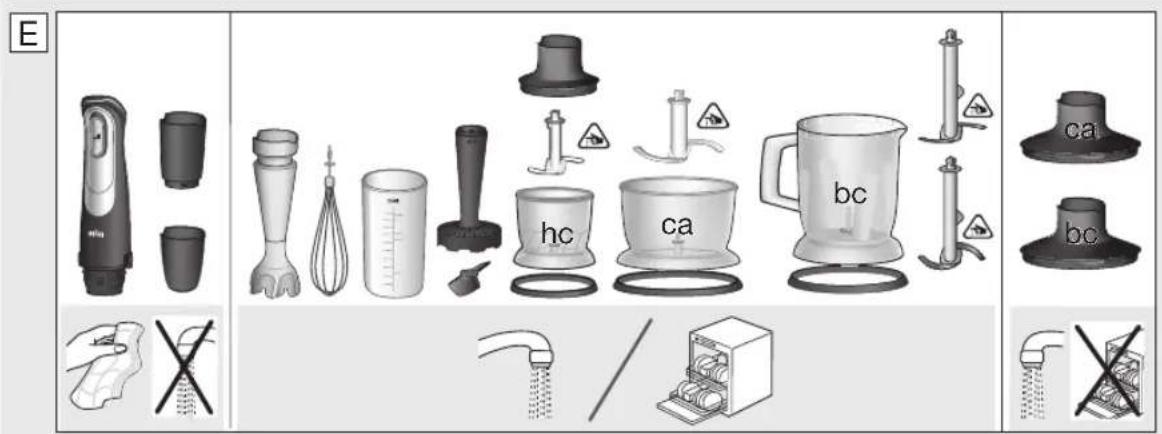
Care and Cleaning (E)
Always clean the hand blender thoroughly after use. - Unplug hand blender before cleaning.
14
- Do not immerse the motor part (4) or gearboxes (8a, 9a) in water or any other liquid. Clean with a damp cloth only.
- The lid (11a/12a) can be rinsed under running water. Do not immerse in water, nor place in a dishwasher.
- All other parts can be cleaned in a dishwasher. Do not use abrasive cleaners that could scratch the surface.
- You may remove the anti-slip rubber rings from the bottom of the bowls for an extra thorough clean.
- When processing foods with high pigment content (e.g. carrots), the accessories may become discolored. Wipe these parts with vegetable oil before cleaning them.
Both the design specifications and these user instructions are subject to change without notice.
Subject to change without notice.
Please do not dispose of the product in the household waste at the end of its useful life. Disposal can take place at a Braun Service Centre or at appropriate collection points provided in your country.
Materials and accessories coming into contact with food conform to EEC regulation 1935/2004.


For UK Only
Guarantee Information
All Braun Household products carry a minimum guarantee period of two years. The rights and benefits under this guarantee are additional to your statutory rights which are not affected.
Please keep your receipt as this will form the basis of your guarantee.
In the unlikely event of a breakdown you have access to professional help from our team simply by calling: 02392 392333
For service in the Republic of Ireland please call: 012475471
Braun Household undertakes within the specified period to repair or replace any part of the appliance, free of charge (with the exception of any glass or porcelain-ware incorporated in the product) found to be defective provided that;
- We are promptly informed of the defect. The product is used and maintained in accordance with the User Instructions.
- The appliance has not been altered in any way or subjected to misuse or repair by a person other than an authorised service agent for Braun Household.
- No rights are given under this guarantee to a person acquiring the appliance second hand or for commercial or communal use.
- Any repaired or replaced appliance will be guaranteed on these terms for the unexpired portion of the guarantee.
- The need for repair has not been caused by insufficient aftercare or cleaning: or damage caused by the chemical or electrochemical effects of water.
Under no circumstances shall the application of this guarantee give rise to the complete replacement of the appliance or entitle the consumer to damages.
Braun Household, New Lane, Havant, Hampshire PO9 2NH
www.braunhousehold.co.uk
Thank you for choosing Braun. We are confident that you will get excellent service from this product.
TO IMPROVE YOUR EXPERIENCE
Register now at www.braunhousehold.co.uk. By registering, we may send you from time to time details on exclusive offers, promotions, recipes and inside tips.
b Potato masher foot c Paddle
d Non-slip rubber ring
11 500 ml chopping accessory «ca»
d Non-slip rubber ring
12 1250 ml chopping accessory «bc»
e Non-slip rubber ring
d Non-slip rubber ring
d Non-slip rubber ring
e Non-slip rubber ring
ActiveBlade attachment (B)
1-2 tablespoons of vinegar,
salt and pepper to taste
b) Sharp blade for sharpening
d) Blade for cutting resistant materials
After unpacking, before first use, read the "Safety and Instructions".
Control lamp
The control lamp (1) indicates the state of the device when it is plugged into the electrical outlet.
| Контулна ламма | Урета/разовно състорни уреьт erotob 3a уnotpe6a. |
| Мira в червано | Урета eocboбoden (натиChat e byonb t 3a ocbofoxdaBaHe) и може д a sbde BKliюveH |
| Свети в зелего | Предун探测дение за пэр代表大会. Двигалей постenenho ce 3abави и сира. Оставе урета дa ce oxlaши. Тош отоюе e rotob 3a уnotpe6a, KогаTO KOнтулhalta Ламма започе дa мira в червано. |
If under heavy load and prolonged use the maximum speed decreases, you can increase the work speed, but after that you must let the device cool down.
How to use the device
Speed control switch for variable speed
All speeds - with a single press. The more you press, the more the speed increases. The higher the speed, the faster the result from sanding and cutting.
One-hand operation: the speed control switch (3) allows you to turn on the device and control the speed with one hand.
Working with the attachment
First use: Remove the transport lock from the motor (4), then press the red button.
Button (A)
Check the equipment and the safety button before releasing the
intuitive speed control. To turn it on safely, follow the steps:
- Press the safety button (2) with your foot. The control lamp will light up green.
- Then press the intuitive speed control switch and adjust to the desired speed. Note: If the intuitive speed control switch is not pressed within 2 seconds, the device cannot be turned on for safety reasons. The control lamp will blink red. To turn on the device, start again from the first step.
- During operation, it is not necessary to keep the safety button pressed.
ActiveBlade blending shaft (B)
The appliance is equipped with an ActiveBlade blending shaft, which allows you to reach the bottom of the blending container. It adjusts automatically by pressing, necessary for blending, especially suitable for mixing solid foods, such as raw vegetables and greens.
This is also very suitable for preparing purees, sauces, salad dressings, soups, baby food, as well as drinks, smoothies, and milk and egg dishes.
To achieve the best results, use the highest speed.
Operation
- Connect the ActiveBlade blending shaft (6) to the motor unit until it locks. - Place the ActiveBlade blending shaft into the container when blending. Then turn on the device as described above. - Move the shaft up and down to the desired consistency. Depending on the pressure applied, the ActiveBlade blending shaft lowers, and the blade increases the cutting area. After use, disconnect the appliance from the power supply and press the release button (5) to detach the ActiveBlade blending shaft.
Warning
- Do not allow heat to build up and the green line on the blending shaft to overheat. If you use the device to blend hot food in a pot or bowl, remove the pot or bowl from the heat source and ensure that the heat does not.
Let the hot food cool down to avoid the risk of burns.
Do not use the appliance if it has been dropped or shows visible signs of damage. Do not use the accessory for blending ActiveBlade if the appliance is not fully assembled.
Example recipe: Mayonnaise
250 g oil (e.g., sunflower oil),
1 egg yolk and 1 tablespoon of mustard,
1-2 tablespoons of vinegar or lemon juice,
Salt and pepper to taste.
- Place all ingredients (at room temperature) in the beaker in the order listed.
- Place the hand blender at the bottom of the beaker. Blend at maximum speed until the mixture starts to emulsify. Then slowly move the blender up and down to mix the remaining ingredients.
NOTE: Working time: approximately 1 minute for salad dressings and up to 2 minutes for thicker mayonnaise (e.g., for dips).
Whisk attachment (B)
Use the whisk only for whipping cream, egg whites, and for preparing desserts from ready-made mixes.
Assembling the whisk
Attach the whisk (8b) to the drive unit (8a). Press the two parts together until they click into place. After use, disconnect from the mains and press the release buttons to detach the whisk from the drive unit. Then pull the whisk off the drive unit.
Xa6bIKTaIHa. OHbl Kayinc3 Tpyde Kocy ywiH KeJIeCi KaamdApDblOpbIHdaHbI3:
Kayinci3ik tymecin (2) 6ac 6apMaKeH 6acbHb3. Backapy wambl 6ipbHfain Xacbl 60bln XaHaDbI. AkbIbI JxblIaMblk aybICtbIPfblBn Depey 6acbl, KaIaNah XblIaMblkTbTaHdaHb3. EciH3ne 6oIcblH: Erep aKblblXblIaMblk aybcTbIPflbH 2 cekHyN iwiHne 6acnacaHb3, Kayinci3IK MaKCaTbIHda KypblfblKocblMaHbl. BaKapy IaMbI KbI3bl 60JIbN XblIKTaHbl. KypblfbHbI Kocy yuH anFaWKblKaJaMaDbI KaNTa OpblHaHb3. XyMbIC icTeY Ke3iHne Kayinci3ik TynMeciH 6acbI NTypy KaKeT emec.
ActiveBlade canTamacbi (B)
KoI 6JIeHepi ActiveBlade canTamaBImeH Xa6blkTaJFaH, COI apKbIbI nbIwaK Ta6aKbIH Ty6iHe deiH y3apaIbI. PeTeyIep apanaCTbpy MaKcaTbIHda KaKeT 6OJaTBiH KbICbIMFa BaIIaHaBlcTbI ABTomaTTbI TypDe XacanaIbI. Ocipece, WIKI KEMic NEH KeKehICTep CnAKTbI KaTbI TaFAMdbI apanaCTbpy YwIH KOJaIbI.
Ty3dbkTbI, dAmdeiyiUTePi, canat dEmdeiyiUTePiH, KxKenePi, bala TaMaKTapbH, CycbHnapDbI, XeMIC KOKTeINbIepIH XaHe CYT KOKTeINbIepIH a3ipJeYre KOJaNbl.
BapbHwaXakcbHHTnxKeIepReKoJxETki3y yuH XOFapFbXbJIaMdbIKTbKOJaHaHbIHb3.
Kypactbipy KHeN KOJaHy
ActiveBlade caTamaBn (6) MOTOP 6JIirHe caIFaHda, cblpt etKeH dl6bcE cTeiYi Tnic. Apanaactbipy yuih ActiveBlade canTamacbH KocnabH, ihihe caIbHb3. CoaH KeiH, KypblfbiHj Kofapbda KepceTirReHdei KOCblHb3. XaIaan XOFapbl-TeMeH KO3FaTbIn, INHpeJeHHTepi KaKeTTI KOHCnCTeHcIraFa Kxetki3iH3.ActiveBlade cantamacbl TycipireH Kyuke 6aunlAbtB TeMeHden, Ky3i y3apaBbl. KoJdaHbIcTah KeiH, KOI 6neHepi Kyat Ke3iHeh cybpBIn, ActiveBlade canTamacbiH axbipaty ywiH 6ocaty TynMepeiH (5) 6acbIb3.
CaKaTahDbipy!
CytbIKtbKTap HeMece INHpeDneHTTep apaIactbpy caNTaMaChbIH, Xacbl Cbl3bIFbHaH acnaybi Tnic. Erep KypblfnHbI bIcTbIK TaFamblKcctpEniH Hemece Ka3aHHbIH iWIIHe MbIXy yuIH KOJaHaTBnB 60lCaHbI3, KcCTpeJIi Hemece Ka3aHbI KbI3Y OwAfbHah aIbIN TAcTaHbI XaHE CybIKTBtIH, KaHay YpdiCIOKTAybIH KyTiH3. Kyin KaJMac yuH bICTbIK TaMaKTbI a3dAn CybITbI aBlHbI3. blctbik ka3aH neuTih yctiHne Typca, KOI 6JeHepin Ka3aHHbIH iuiHne KaJNbIPMaHbI3.
ActiveBlade canTamacbImeKactpeIepiH HeMece Ka3aHdapdbIH Ty6IH cbIpbln aImaHbI3.
PeIeNTMbICJIb:MaHOHe3
250 g MaI (MbICaJIbI, KYHδaFbIC MaJIbI),
1XyMbiptKa XaHe KocbIMwa 1XyMbiptKaHbIH capbICbl,
1-2acKacbIKcipKe cybl,
- The temperature sensor (temperature sensor) must be installed in the highest place of the boiler. If the boiler is installed below the highest point, the sensor may not work correctly. When the boiler is started from a cold state, the sensor may be damaged by overheating, so it is necessary to follow the instructions and keep the required distance.
WARNING: Operating time: 1 minute for salads and 2 minutes for small items (meat, vegetables).
Separator (B)
The separator is used only for separating the cream from the milk and for preparing cottage cheese and other dairy products.
Assembly and disassembly
- Attach the separator (8b) to the drive unit (8a).
- To assemble the motor housing with the separator, align the marks and insert the drive shaft. After insertion, turn it clockwise to secure the motor housing. Then remove the separator from the drive unit.
Safety instructions
- Before using the separator, check that it is clean and free of damage.
- To remove the bowl, press the release button and lift the bowl and the lid together.
- Do not operate the separator without the bowl, as this may damage the separator. If the cream does not separate properly, check that the separator and the bowl are clean and not damaged. Do not use the separator for more than 4 minutes continuously.
Recipe: Sour cream
400 ml of cream (with a fat content of at least 30%, 4-8°C) - pour into the bowl (add a little salt if desired) and stir
Stir until the cream thickens (add more salt if desired). - Stir until the cream thickens, then refrigerate for at least 2 hours before serving.
IIOpe Xa6DbIfbl (C)
Iope Jaa6dbfbH KAPTON, TETTI KAPTON, Kb13aHaK, Kapaepik XeHe ANMa CnKTbIXemICTep MeH nicipinreH KeKeHiCTepdi e3y yuiH KOJaHyFa 6oJana.
KoIdaHap aIbIHa
KaTbI Hemece nicnereh TaFamDbI KOJdaH6aHbI3, ce6eBi KpypbIFbIHbI6y3bIyMbIMKIN. Tactap Hemeke KaTbI 3aTAPdbI aBbIN TactaHbI3; Xemicti/Kekehicti Mbyx yuH, aIbIMeH nicipin, OdaH KeIH CyBH TerH3.
Kypactbipy kHe KOJdaHy
- Bepinic Kopabh (9a) canTama (9b) caT TiniMeH 6pyan opHaTbHb3. IIOpeKa6bIbH TeHKePin, KaIakwaHbI (9c) opTaIbIK Topa6bIbHIn YCTiHeh Acbipa DaJIen caIbIN, caFAT TIIHe KapCbI 6pyaHbI3. (Erep6epiic Kopa6bl Dypbc OPhaTbIMaca, KaIakwaOpHbIHDa HbIK TypMaJbI). KypacTbipbIFaH HIOpe Xa6bIFbIH MOTOP KOpnycbIMeH KaTAPlan KObIN, eKI 6JIWeKTI 6ipikTipiH3. KaFaHbI3. E3riuKocbIMwacbiH INHrpneHTepdiH iUHe 6aTbipbHb3 XHe KpybnfBhlKOCbHb3. E3riu KocbIMwacbH aKbipbHan XOFapbl-TeMeH KO3Fa, INHpeDneHTTep KaXeTTi KOHCnCTeHcNfA JxETKeHwe e3iHi3. AkbIbI bI kblIaMlbI aybiCTbIFbIWBH xibepi3 XHe NIOpe Ka6dbIfb aiHaJIyBH TOIbIFbIMe H TOKTAkHaFaHa OHb TaFAMHa aJIbHbI3. KoJdaHbIcTah KeiH KypblfBiHbI po3eTkadaH axbipaTbIHb3. KaJaKaHaHbI (9c) caFaT 6aftbIMeH 6ypan aJIbIHbI3. IIOpe JxabfbH MOTOP KOpnycbHaH axbipaty yuH 6ocaty Tymenepin bacbHb3. Bepinic KopabH canTaMaHaH caFAT tIIHe Kapcb 6ypan, axbipaTbIn aJIbHb3.
CaKaTaNDbpy!
- IIOpe Xa6bIbH KAcTpEre caIbI, ticEn neu yCTiHe KObH KOnDaHyFa 60ImaIbI.
- AIIbIMeH COYC aIbIH OTaH Tycipin, cyblbI aIbIHbI3. KacptpeHemece aarktbI TypaKtbI api teric Xepre opHaTbIHb3 XaHE OHb6OC KOJIbIHb36EH YCTAN TypbIHb3. KoJdaHbIc Ke3IHpe Hemece KOJaHaBicTaH KeiH IIOpe Xa6DbFbIH TaMaK Nicipy bIDbcIBHbIH, WetIHe COFBIN KaKaNaHbI3. ApTbIK TaMaKbI aJIy yWiiH KaJaKaHaHbI KOJaHaBHbI3.
- Hətnkeci jaxcbi 60ny yuH, a3ipney bapbcihda KcctpeIre Hemece bIbicka TaFAMbl TOITbIPMaJ caJIbHI3.
- 3p calbIMHaH KeiH KjipreH KeH, y3dkci3 KOJaHyFa 6OImaJbI. XaIFactbIPmac 6ypbIH Kypblfbl cybifaHla4 MNHYT KYTIi3.
Peuent Mbicalb: Kapton iopeci
1kg nicipiIJIreH kapTON 200 ml kblc cytT
- KaptonTbI bIbIcTbI h iWiHe caIbIn, 30 ceKyHntaMbIXbIH3 (akblNblXblnAmdbIKaybICTbIPfblTbIH XblnDaMdbIFbl 3/4) Cytti KocbiHb3. Tafta 30 cekyHmBkHb3
Typay Xa6DbIfbl (D)
TpaybIHTap (10/11/12) et, KaTbI ipimuik, nna3, WEN, capbIMcK, KeKeHicTeP, HAn, KpeKep XaHe XaHaFk, TypayFa KOJaJIbI.
XaKcbI H3TINKe YuIH «hc» TypaybIuBnH (10) KOJIaHaHbIHbI3.
Mennepi KEN TaFAM yuHxHe KaTbTaFamap yuHIn «Ca» XaHE «bc» TypaybIHTapbH (11/12) KOJIdaHbIHbI3.
Ofah Koca 四 _ 三 TpybIbI (12) KOKTeJIbIepdi, CcBihIapDiI, nOpelepdi, cybIK KaMbIpDl HeMece YHTaTJFaH My3DbI a3ipJeY CNIAKTbI KOCBIMwa MYMKHIDIePdi YCbIHAdbl.
Tamak MeIepi, yaKbIT KHe XbIJaMdbIK KaIbI KeHeCTepDi D HcKaynbIfHaH KapaHbI3.
Hc TypaybIbH MaKcMaJIbI KOJaHy yaBtIb: MeIwepi KEN bIfAaIbI INHpeJeNHeTTeP yWIn 2 MNHT, aJ KYPFAK Hemece KaTbI INHpeJeNHeTTeP yWIn Hemece < 100r MeIwepi yWIn 30 cekyHd. Motop XbIaNAMdbIb6aYnaFaH Ke3ne JxHe/ Hemece Tep6eJic NaJa 6oJFaH Ke3de eHNey 6apbcih Depey TOKtaTbIHbI3.
KoJdaHap aIdbiHda
- Ohai Tpyany yuih TaFamdbi aIdbIH-aIa ycaKtan Typan aIbIH3. Ky3depHe 3aKbIM KeJmey yIiH eTITcYneKTepiH, ciHipIN XeHne WemipWekTepiH aIbIn TaCTaHbI3. CbipyfKaKapcbCaKnHa(10d/11d/12e)Typay Ta6aFbHbH, Ty6iHe 6ekitin TpyFaHbHa Ke3 XETk3iH3.
Kypactbipy kHe KOJaHy
- Kyy3iH nlaCTNK Ka6bIH a6aJIan aIbIHbI3. Xy3epi (10b/11b/12b, 12c) eTe etKip! Onapdbi epdaibIM IJIaCTNKTeH XacaJfAH KOFapFbl 6eJiriHeH yCTaHbI3. Ky3i typay tabakwacbHbH (10c/11c/12d) optabik 6ilirihe opHaTbHb3. TeMeH kapa 6acbl, opbHa 6ekitinyuinbip pet bypaHb3.
100
- Typay bIDbICbHa TaFamDbI CaJbIn, KaKnaFbIH Xa6bIH3 (10a/11a/12a). My3blIyHTaKtay yuH My3Fa apHaJIHaH apHaNbi I Ky3di (12c) KOnJaHBiHBi3 XeHe Typay bIDCbHa (12d) 7 My3 wapwbcihA npTbIK caMaHbI3. TpyaybIu neH MOTop 6eJIirH (4) KaTAP KOIN, OJapDbI 6ipikTIpiH3. TypaybIbTbKOJaHaYyHINKpybINFbHbIKocbIHbI3. Xymbc Ke3iHne MOTop 6eNirih bip KOnblHb136eH, an Typay bIDbcBnEkiHw KoJIbHb36eH yCTan TypbHb3.
- KaTbIay TaFamDapDbI (MbICaJIb, napMe3aH ipimwi) apKaawah XOFaPfBi XblIaMdbIKneH TypaHbI3. Typan 60JFaH COH, Kyat Ke3iHeH cybipbIn, MOTOp 6eJIirH axbipaty yuH 6ocaty Tymenepin (5) 6acblbl3. KaKnaKbI XoFapbi KeTepiH3. bIbICTb6ocatnac 6ypbIH, Ky3di a6aIan aIbIn IuHbHbI3. Ky3di aIbIN uBIFy yuH OHbCAn 6ypbHbI3, cOaN KeiH TapTbIN aIbHbI3.
For storage containers, musical instruments, coffee grinders, grinders and other household appliances and accessories, use a damp cloth and dry thoroughly. Do not immerse in water. - Only the storage container (12) and the blender jug can be placed in the dishwasher. The blender jug cannot be placed in the dishwasher.
Recipe: yeast dough
375 ml milk
250 g wheat flour
2 eggs
Pour the milk into the blender jug, then add the eggs. Mix until smooth. If the dough is too thick, add a little water.
Recipe: shortcrust pastry (for pies, tarts or quiches):
50 g butter
100 g sugar
- Add the butter and sugar to the blender jug. Mix for 24 seconds at 3°C. Then mix with the flour until crumbly (do not overmix).
Cleaning and care (E)
After using the blender, clean it thoroughly.
After cleaning the blender, dry it with a soft cloth. - Do not immerse the motor base (4) or the drive shaft (8a, 9a) in water or other liquids. Wipe with a damp cloth. The lid (11a/12a) can be washed in warm soapy water, but do not put it in the dishwasher. Do not immerse in water and do not put the appliance in the dishwasher. The measuring cup can be washed in the dishwasher. To avoid damage, remove the rubber seal from the lid before cleaning. Some parts may be stained by food (e.g., carrots), but this is harmless. Wipe the parts with a soft cloth.
Technical specifications are subject to change without notice.
This manual must be kept in a safe place for future reference. If the device is transferred to another owner, please pass this manual on to the new owner.

Safety instructions
To identify the safety instructions, the following symbols and signal words are used in this manual. The signal word indicates the degree of danger. If the safety instruction is not followed, the following dangers may occur. The signal words and their meanings are as follows: DANGER, WARNING, CAUTION. Example: 30421-This manual was printed in April 2013.
DANGER
WARNING
Multi Quick 9
Type 4200
230-240 V, 50-60 Hz,
1000 W
For household use only
DeLonghi Braun Household GmbH
Made in Germany:
DeLonghi Braun Household GmbH
Carl-Ulrich-Straße 1
63263 Neu-Isenburg
Service to customers in the Republic of Kazakhstan is provided by the official importer. For service and warranty inquiries, please contact the company's hotline at 8 800 200 5262.
The product must be used in the country where it was purchased. The warranty period starts from the date of sale to the consumer.
Importer:
De'Longhi LLC, Moscow, 127055,
Moscow city, Sushchevskaya Street,
27/3 (building 27, building 3)
Tel.: +7 (495) 781-26-76
Troubleshooting
| Акayльк Себебi | Шешimi | |
| Кол блидері куmbіс icontемі Тур. | Куат жok | Курьлfbын.TOKka КосылfaынTekсеріи3.Уйderі са��ыдьрfyыштby/Kыicka ТуьылТаыштыTekсеріи3.Eream оларын ewkaісысы akayныБогмaca, Braun ceрвисoptалыфын xaбapласынiz. |
Russian
Our products meet the highest standards of quality, functionality, and design. We hope you enjoy your new Braun appliance.
Before use
Please read this instruction manual carefully before using the appliance.
Warning

The blades are very sharp! To avoid injury, please handle the blades with extreme care.
- This appliance can be used by persons with reduced physical, sensory, or mental capabilities or lack of experience and knowledge if they have been given supervision or instruction concerning use of the appliance in a safe way and understand the hazards involved. Children shall not play with the appliance.
- The appliance is not intended for use by children. Store the appliance and its main connecting cable out of reach of children.
- Cleaning and user maintenance shall not be made by children without supervision. Always disconnect the appliance from the supply if it is left unattended and before assembly, disassembly, or cleaning.
- If the connecting cable is damaged, it must be replaced by the manufacturer, its service agent, or similarly qualified persons in order to avoid a hazard.
- Before connecting, check that the mains voltage matches the voltage indicated on the appliance.
- Be careful when pouring hot liquids into the kitchen machine or blender, as steam may escape. This appliance is intended for household use only, for processing food quantities typical for home use. When the appliance is plugged in, especially during operation of the drive, use only the pusher to load food. The appliance parts are not intended for use in microwave ovens.
Appliance parts
1 Indicator light 2 Safety button 3 Speed selector / speed control 4 Motor unit 5 EasyClick release button 6 ActiveBlade shaft 7 Measuring cup 8 Whisk attachment
a Gearbox b Whisk
9 Blender attachment
a Gearbox b Shaft of blender attachment with blades
10 Chopper attachment, 350 ml “M”
a Lid b Chopper blade c Chopper bowl d Rubber ring preventing slipping
11 Chopper attachment, 500 ml “Ca”
a Lid (with transmission mechanism) b Knife chopper
chopper shaft
d Rubber ring preventing sliding
12 Chopper attachment, 1250 ml "Ca"
a Lid (with transmission mechanism) b Knife chopper
With knife for chopping
d Chopper shaft e Rubber ring preventing
sliding
Before first use, clean all parts. (Care and cleaning).
Indicator light
Indicator light (1) shows the operating state when it is plugged into the power supply.
Troubleshooting
6 Chopper attachments
Chopper attachments
12 Chopper attachment 1250 ml "bc" a Lid (with container for liquids)
protein shakes are cloudy
Before first use, read all details in the section "Safety and Operation".
Signal lamp
The signal lamp (1) shows the status of the device when it is connected to the electrical outlet.
Use the whisk attachment for whipping cream, eggs, frosting, and desserts from ready-made mixes.
Braun 5
100 g
Therefore, m = 3/11
.401
(204 250
(3) The dot product of vectors a and b is 1/4 times the difference of the squares of (2-1) and (3+1).
.05
(B)
Therefore, a4 = 1/2.
Therefore, (x + 1)(y - 1) = 0.
Lg 1
1
joljj 2
3
2x - y = 8
5
ActiveBlade 6
10 × 5 = 5(5)
8
b
( xt2 + x) θ = 0
θ = x - 1/2y
C
bc350 10
b: a
a b 0 a b
∴ a 1 = 2,a 2 = - 3/5,b 1 = 3/5,b 2 = - 3/5
"ca" 500
( wy 1 - wy 2 - y 1y 2) · Ub · a
"bc" 1250 a, 12
a a b
JU 1
a0,20e1g d
yjwaaiaablaae
ailll 1110gj-0yJgJ plaoayll J 1jyI gaa
.
1
gjzssiaaogjie jglall (1) gdlll


- GERMAN
- BEFORE USE
- CAUTION
- PARTS AND ACCESSORIES
- PILOT LIGHT
- HOW TO USE THE APPLIANCE
- SMART SPEED SWITCH FOR VARIABLE SPEEDS
- OPERATING YOUR HAND BLENDER
- SWITCHING ON (A)
- ACTIVEBLADE SHAFT (B)
- ASSEMBLY AND OPERATION
- RECIPE EXAMPLE: MAYONNAISE
- WHISK ACCESSORY (B)
- TIPS FOR BEST RESULTS
- RECIPE EXAMPLE: WHIPPED CREAM
- PUREE ACCESSORY (C)
- RECIPE EXAMPLE: MASHED POTATOES
- CHOPPER ACCESSORY (D)
- CARE AND CLEANING (E)
- FOR UK ONLY
- PLEASE KEEP YOUR RECEIPT AS THIS WILL FORM THE BASIS OF YOUR GUARANTEE
- TO IMPROVE YOUR EXPERIENCE
- ACTIVEBLADE ATTACHMENT (B)
- CONTROL LAMP
- HOW TO USE THE DEVICE
- SPEED CONTROL SWITCH FOR VARIABLE SPEED
- WORKING WITH THE ATTACHMENT
- BUTTON (A)
- ACTIVEBLADE BLENDING SHAFT (B)
- OPERATION
- WARNING
- EXAMPLE RECIPE: MAYONNAISE
- WHISK ATTACHMENT (B)
- ASSEMBLING THE WHISK
- ACTIVEBLADE CANTAMACBI (B)
- KYPACTBIPY KHEN KOJAHY
- CAKATAHDBIPY
- PEIENTMBICJIB:MAHOHE
- SEPARATOR (B)
- ASSEMBLY AND DISASSEMBLY
- SAFETY INSTRUCTIONS
- RECIPE: SOUR CREAM
- IIOPE XA6DBIFBL (C)
- KOIDAHAP AIBIHA
- KYPACTBIPY KHE KOJDAHY
- CAKATANDBPY
- PEUENT MBICALB: KAPTON IOPECI
- TYPAY XA6DBIFBL (D)
- KOJDAHAP AIDBIHDA
- KYPACTBIPY KHE KOJAHY
- RECIPE: YEAST DOUGH
- RECIPE: SHORTCRUST PASTRY (FOR PIES, TARTS OR QUICHES)
- CLEANING AND CARE (E)
- DANGER
- RUSSIAN
- APPLIANCE PARTS
- INDICATOR LIGHT
- SIGNAL LAMP
- (B)
- LG
Brand : BRAUN
Model : Multiquick 9 MQ 9045X
Category : Blender