STG 1200 A1 - Grill plate SILVERCREST - Free user manual and instructions
Find the device manual for free STG 1200 A1 SILVERCREST in PDF.
| Product type | Tabletop dishwasher |
| Brand | SilverCrest |
| Model | STG 1200 A1 |
| Dimensions (H x W x D) | 43.5 x 42.0 x 43.5 cm |
| Power supply | 220-240 V ~ 50 Hz |
| Power consumption | 730 - 860 W |
| Capacity | 2 standard place settings (ø 24 cm) |
| Wash programs | 5 (Rapid, Intensive, ECO, Glassware, Baby bottles) |
| Water consumption (ECO program) | 5 liters |
| Energy consumption (ECO program) | 0.396 kWh |
| ECO program duration | 2 h 40 min |
| Noise level | 58 dB(A) - Class D |
| Energy efficiency class | G |
| Water pressure | 0.04 - 1.0 MPa |
| Max hot water connection | 70 °C |
| Special functions | Extra drying, salt indicator light |
| Integrated salt reservoir | Yes |
| Manual water filling | Possible |
| Package contents | Dishwasher, basket, cutlery basket, hoses, measuring cup, manual |
| Warranty | 36 months |
| Customer service | France hotline: +33 1 70383158, Belgium: +32 2 2903192, Switzerland: +41 44 2006089 |
Frequently Asked Questions - STG 1200 A1 SILVERCREST
User questions about STG 1200 A1 SILVERCREST
0 question about this device. Answer the ones you know or ask your own.
Ask a new question about this device
Download the instructions for your Grill plate in PDF format for free! Find your manual STG 1200 A1 - SILVERCREST and take your electronic device back in hand. On this page are published all the documents necessary for the use of your device. STG 1200 A1 by SILVERCREST.
USER MANUAL STG 1200 A1 SILVERCREST
natural_image
White kitchen appliance with control buttons and a digital display (no visible text or symbols)
text_image
PDF ONLINE www.lidl-service.comTISCH-GESCHIRRSPÜLER / TABLE TOP DISHWASHER / MINI LAVE-VAISSELLE SGW 860 A1
DE AT CH
TISCH-GESCHIRRSPÜLER
Kurzanleitung
FR BE
MINI LAVE-VAISSELLE
TABLE TOP DISHWASHER
Quick Start Guide
NL BE
TAFEL-VAATWASSER
Korte handleiding
PL
ZMYWARKA STOŁOWA
Before reading, unfold the page containing the illustrations and familiarise yourself with all functions of the device.
FR BE
natural_image
Line drawing of a faucet connected to a rectangular device (no text or symbols)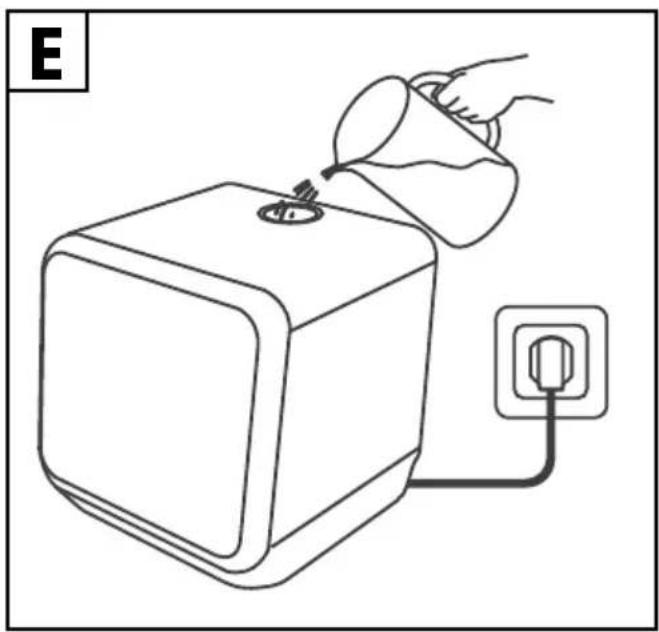
natural_image
Line drawing of a hand pouring liquid into a cube with an electrical outlet connected to it (no text or symbols)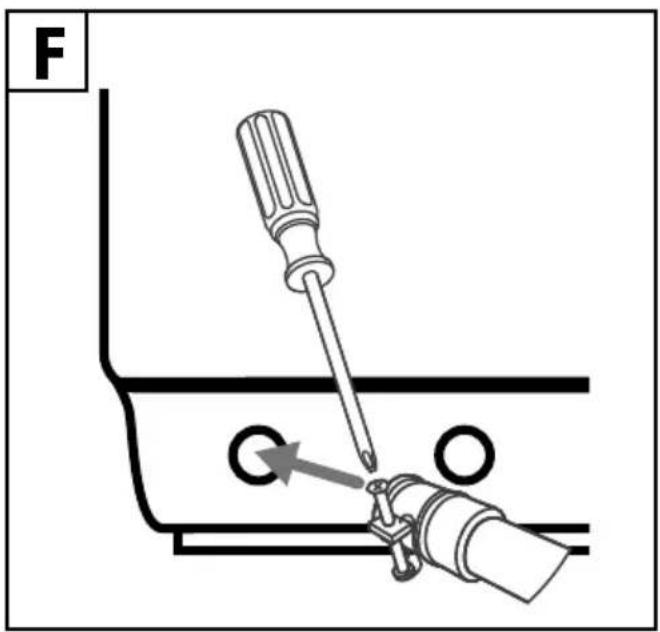
text_image
F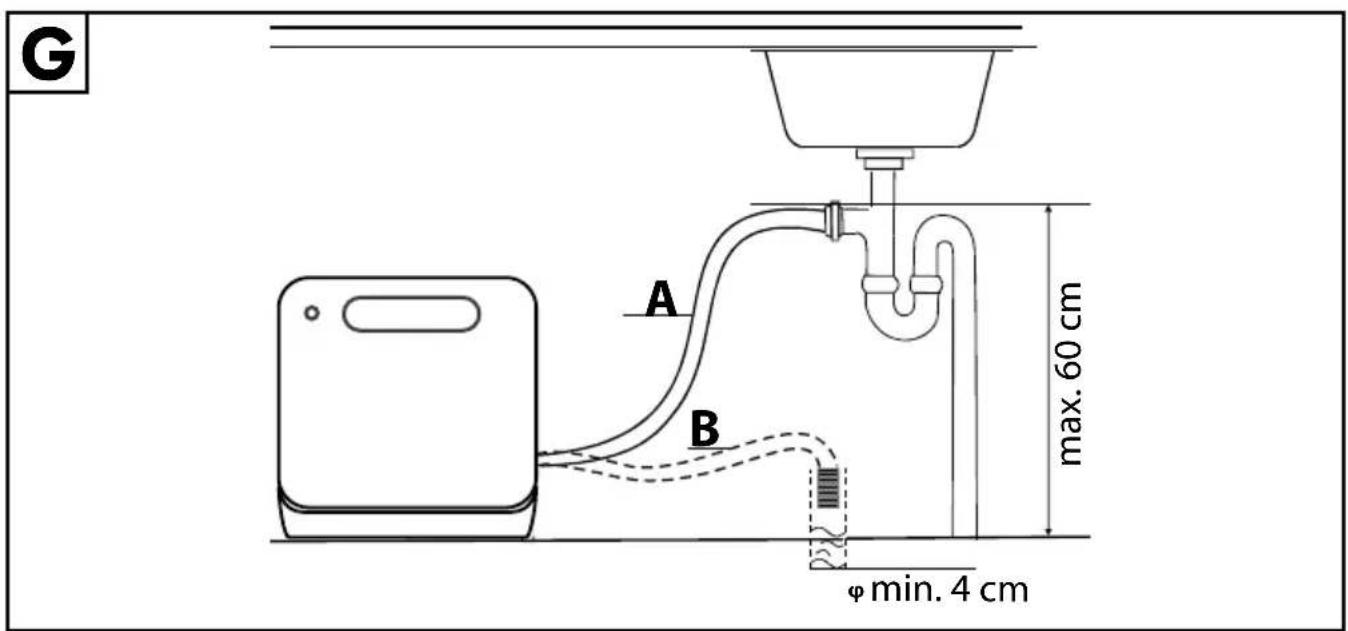
text_image
G A B max. 60 cm φ min. 4 cmInhaltsverzeichnis
1. Einführung 6
natural_image
Line drawing of a medical procedure setup with a device, tubing, and magnified view of a tool inserted into a tube (no text or symbols)Abb. H
natural_image
Two technical diagrams showing a kitchen sink and a bucket with a tube inserted, both without any text or symbols.Abb. I Abb. J
natural_image
Line drawing of a hand pressing down on a square device with an arrow indicating rotation (no text or symbols)Abb. K
flowchart
graph LR
    A["Hand holding a container"] --> B["Step 1: pouring liquid into a jar"]
    B --> C["Step 2: adding salt to a container"]
    C --> D["Step 3: adding salt into a salt container"]
    D --> E["Step 4: adding salt into a salt container"]
Abb. L
natural_image
Line drawing of a kitchen sink with a spoon and a bowl of food being poured into it (no text or symbols)Abb. M
natural_image
Diagram showing a mechanical or fluid system with an arrow, a circular component, and a droplet on a surface (no text or symbols)Abb. N
text_image
Diagram illustrating hand positioning and movement of a vehicle, showing left and right views with tool positions and directional arrows.Abb. P
flowchart
graph LR
    A["Device with arrow"] --> B["Bar chart with arrow"]
    B --> C["Square with arrow"]
    C --> D["Thumbbell with thumbbell"]
    D --> E["Pound with thumbbell"]
    E --> F["Leg with thumbbell"]
Abb. R
1.1. Information about this quick start guide 38
1.2. Explanation of symbols 38
2. Proper use 4
3. Safety information 41
4. Description of components ....45
4.1. Front 45
4.2. Control panel
4.3. Back of the appliance 46
5. Package contents 46
6. Technical specifications ....47
6.1. Product data sheet 47
7. EU declaration of conformity ....48
8. Installation....49
8.1. Setup and levelling....49
8.2. Connecting to a water supply 49
8.3. Filling with water manually 50
8.4. Connecting the water outlet....50
8.5. Connection to power supply 52
9. Preparations for use ....52
9.1. Opening the door....52
9.2. Closing the door 52
9.3. Adding salt to the appliance 52
9.4. Setting salt consumption 53
9.5. Adding detergent....55
9.6. Arranging the dishes and cutlery 56
10. Using the dishwasher 59
10.1. Potential operating lights....59
10.2. Switching on the appliance 60
10.3. Selecting a wash program....61
10.4. LED indicator for the wash program 63
10.5. End of the wash program....63
11. Disposal 64
12. Service....64
12.1. Supplier/Producer/Importer 65
SILVER CREST®
1. Introduction
1.1. Information about this quick start guide

This quick start guide is part of the user manual. The complete user manual is available for download at https://www.lidl-service.com. Keep this quick start guide in a safe place, together with the user manual. If you give this product to someone else, ensure that you also hand over all the documents. Read through the user manual before use and comply with the safety instructions in particular.
1.2. Explanation of symbols

DANGER!
Warning: risk of fatal injury!
■ Follow the instructions to avoid situations that will lead to fatal or serious injuries.

DANGER!
Warning: risk of electric shock!
■ Follow the instructions to avoid situations that will lead to fatal or serious injuries.
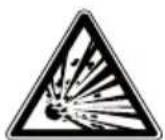
WARNING!
Warning: risk of explosive materials!
■ Follow the instructions to avoid situations that will lead to fatal or serious injuries.

WARNING!
Warning: risk of possible fatal injury and/or serious irreversible injuries!
■ Follow the instructions to avoid situations that may lead to fatal or serious injuries.

CAUTION!
Warning: risk of minor and/or moderate injuries!
■ Follow the instructions to avoid situations that may lead to moderate or minor injuries.

NOTICE!
Follow these instructions to prevent damage to the appliance!
■ Follow the instructions to avoid situations that may damage the appliance.

Notes regarding assembly or operation

Follow the instructions in the user manual!
■ Instruction to be followed to prevent hazards
• Bullet point/information on steps during operation
▶ Instruction to be carried out

CE labelling
Products that feature this symbol meet the requirements of the EU directives (see section entitled "EU Declaration of Conformity").

Tested safety: Products that feature this symbol meet the requirements of the German Product Safety Act.

Symbol for alternating current (AC)

Indoor use
Appliances with this symbol are intended solely for indoor use.
IPX1 The appliance housing is resistant to water droplets.
Dispose of the appliance in compliance with environmental regulations (see "Disposal")
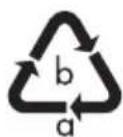
Packaging material label regarding waste separation
Label includes abbreviations (a) and numbers (b) with the following meaning: 1–7: plastics/20–22: paper and cardboard/80–98: composite materials.
SILVER CREST®

Dispose of packaging in compliance with environmental regulations (see section "Disposal")
Dispose of packaging in compliance with environmental regulations (see section "Disposal")
2. Proper use
This appliance may only be used for washing dishes and cutlery.
■ Only use dishwasher-safe dishes. Look for markings such as "Dish-washer safe" or "Suitable for dishwashers" when purchasing dishes.
This appliance is designed for use in private households and similar household applications, such as
- in kitchens, for staff in retail outlets, offices and other commercial areas
• on agricultural estates
• by customers in hotels, motels and other accommodation facilities
• in bed-and-breakfast establishments
The appliance is not intended for commercial or industrial use.
Please note that we shall not be liable in cases of improper use:
■ Do not modify the appliance without our consent and do not use any auxiliary equipment that we have not approved or supplied.
■ Only use replacement parts or accessories that we have supplied or approved.
■ Comply with all the information in this user manual, especially the safety information. Any other use is considered improper and can cause personal injury or property damage.
3. Safety information
IMPORTANT SAFETY INSTRUCTIONS – READ CAREFULLY AND KEEP FOR FUTURE REFERENCE!

WARNING! Risk of injury!
Risk of injury to children and persons with limited physical, sensory or mental abilities (for example, partially disabled people or older people with limited physical and mental abilities) or to those without experience and knowledge (such as older children).
- Keep the appliance and its accessories out of the reach of children.
This appliance can be used by children over the age of 8 and by persons with reduced physical, sensory or mental abilities or by those with limited experience and/or knowledge, provided that they are supervised or have been instructed in how to use the appliance safely, and have understood the associated risks.
■ Children must not be allowed to play with the appliance.
■ Cleaning and user maintenance must not be carried out by children unless they are supervised.
■ Supervise children in the vicinity of the dishwasher at all times. There is a risk of children becoming trapped in the dishwasher.

DANGER! Risk of injury!
There is a risk of choking and suffocation due to swallowing or inhaling small parts or plastic wrap.
- Keep all packaging materials used (bag, pieces of polystyrene etc.) out of reach of children.
■ Do not let children play with the packaging material.
SILVER CREST®

WARNING! Risk of injury!
There is a risk of injury. Detergents for dishwashers are highly alkaline, therefore dangerous if swallowed and may cause burns.
■ Avoid contact with the eyes and skin.
■ Always keep detergents out of reach of children.
- Keep children away from the appliance door when open, there could be detergent in the appliance.

WARNING! Risk of injury!
There is a risk of injury due to sharp objects.
■ Knives and other utensils with sharp tips must be placed in the basket with the tip downwards or in a horizontal position.

WARNING! Risk of electric shock!
There is a risk of electric shock due to live parts.
■ Only connect the appliance to a properly installed and freely accessible socket. The local mains voltage must correspond to the technical specifications for the appliance. The socket must have a fuse rated at min. 10 ampere.
■ Do not use an extension cable.
■ The appliance is switched on or off using the switch. It only ceases to be live when you pull the plug out of the socket. The socket must be easily accessible at all times.
■ Make sure that the power cable is undamaged and does not run underneath the appliance or over any sharp edges.
If the mains cable of this appliance is damaged, it must be replaced by the manufacturer (or relevant customer service) or other suitably qualified person. This is to avoid hazards.
■ Only install the appliance in a protected dry room.
WARNING Risk of explosion!
Under certain conditions, hydrogen gas may be produced in a hot water system that has not been used for two weeks or more. HYDROGEN GAS IS HIGHLY EXPLOSIVE!
If you have not used the dishwasher for an extended period of time, open all hot water taps and allow the water to flow for several minutes before using the dishwasher. This releases pent up hydrogen gas from the system.
As hydrogen gas can ignite, avoid naked flames during this time and do not smoke.

CAUTION! Risk of scalding!
There is a risk of scalding if hot surfaces are touched. Hot water/hot steam can escape and cause burns if the door is opened while a program is running.
■ The appliance works with high water temperatures. Children may only use the appliance when supervised by adults owing to the high temperatures and resultant water vapour.
■ Allow the appliance to cool down before emptying. Do not touch the heating element in the dishwasher during or immediately after use.
■ Only operate the dishwasher once the door has been closed firmly.
- Do not open the dishwasher door fully straight away – instead wait for about 3 seconds until the spray arm stops rotating and then open the door completely.

CAUTION! Risk of injury!
There is a risk of injury due to improper use of the appliance.
■ Close the appliance door again after a wash cycle has finished, as an open door could pose a trip hazard.
SILVERCREST®
■ Do not place any heavy objects on the door if it is open. The appliance could tip forwards.

NOTICE!
Possible material damage!
Incorrect loading can damage the dishes.
■ Only use dishwasher-safe dishes. Look for markings such as "Dish-washer safe" or "Suitable for dishwashers" when purchasing dishes.
■ Ensure that plastic dishes do not come into contact with the heating element when the appliance is in use.

NOTICE!
Possible material damage!
There is a risk of material or water damage if the appliance is installed or used incorrectly.
- Do not install the appliance in rooms prone to frost, as considerable damage can result if the pipes burst.
The appliance must be installed on a level, stable surface, which can bear the weight of the appliance plus that of the dishes contained in it.
If the appliance is to replace an old appliance, never use old hose sets for the connection. Connect the appliance with the new hose sets provided.
■ Connect the appliance to a drinking water pipe up to 70 °C.
■ Only use the accessories supplied or accessories which are described as suitable in this user manual.
■ Only use dishwasher-safe detergent. Do not use soap, laundry detergent or hand wash.
■ The appliance is designed as a free-standing appliance and must not be built into kitchen units.
■ Use the appliance indoors only.
■ Do not expose the appliance to extreme conditions. Avoid:
- high humidity or wet conditions
- extremely high or low temperatures
- direct sunlight
- naked flames.
■ Do not place the appliance near heat sources.
■ The appliance is designed for up to 2 place settings (dia. 24 cm). Do not overload the appliance.
Chemical additives in furniture coatings may corrode the material of the appliance feet and create a residue on the furniture surface.
■ If necessary, place the appliance on an underlay that is insensitive to heat and moisture.
4. Description of components
4.1. Front
See Fig. A
1) Recessed grip
2) Control panel
3) Upper spray arm (in inner compartment)
4) Lower spray arm
5) Filter
6) Measuring container
7) Dish rack
8) Dishwasher detergent compartment
9) Cutlery tray
10) Salt container
11) Interior lighting
12) Water tank opening with cover
4.2. Control panel
See Fig. B
13) ▷II button, starts or interrupts the wash program
14) 🕒 button, extra dry
15) operating light, extra dry
16) warning light, top up salt
17) P button, program selection
SILVER CREST®
18) button, switch the appliance on/off
19) Cleaning program operating light
4.3. Back of the appliance
See Fig. C
20) Mains cable with mains plug
21) Connection for water supply
22) Connection for water outlet
5. Package contents

DANGER!
Risk of choking and suffocation!
There is a risk of choking and suffocation due to swallowing or inhaling small parts or plastic wrap.
- Keep the plastic packaging out of the reach of children.
■ Do not let children play with the packaging material.
Remove the product from the packaging and remove all packaging material.
▶ Check your purchase to ensure that all items are included and in perfect condition. If anything is missing or damaged, please contact us within 14 days of purchase.
The following items are supplied with your product:
- Dishwasher
- Dish rack
- Cutlery tray
• Water supply hose with hose connection - Drain hose
• Measuring container - User manual with warranty information

A test operation with water was carried out after production of the appliance. It is normal if there is still some water in the appliance.
6. Technical specifications
Power supply 220–240 V\~ 50 Hz
Power consumption 730–860 W
Capacity Up to 2 place settings (dia. 24 cm)
Inlet water pressure 0.04–1.0 MPa (0.4–10 bar)
Hot water supply Max. 70 °C
Protection class I

6.1. Product data sheet
| Supplier's name or trademark: SilverCrest® | |
| Supplier's address: MLAP GmbH | Meitnerstr. 970563 StuttgartGERMANY |
| Model identifier: | SGW 860 A1 |
| General product parameters | ||||
| Parameter | Value | Parameter | Value | |
| Rated capacity* (ps) | 2 | Dimensions in cm | Height | 43.5 |
| Width | 42.0 | |||
| Depth | 43.5 | |||
| EEI* | 62.9 | Energy efficiency class* | G | |
| Cleaning performance index* | 1.13 | Drying performance index* | 0.86 | |
| Energy consumption in kWh [per cycle] based on the eco program with cold fill. The actual energy consumption will depend on how the appliance is used. | 0.396 | Water consumption in litres [per cycle] based on the eco program. The actual water consumption will depend on how the appliance is used and the water hardness. | 5.0 | |
SILVER CREST®
| General product parameters | |||
| Parameter Value | Parameter Value | Value | |
| Program duration (a) (h:min) 2:40 Type Tabletop appli-ance | |||
| Airborne noise emissions*(in dB(A) re 1 pW) | 58 Airborne noise emis-sions class* | D | |
| Power consumption when switched off (W) | 0.49 Power consumption when switched on (W) | N/A | |
| Start delay (W) (if applica-ble) | N/A Home network stand-by mode (W) (if appli-cable) | N/A | |
| Minimum duration of the war-ranty offered by the manufac-turer: | 36 months from date of purchase | ||
| Additional information: | Scan the QR Code shown on the energy la-bel to download the complete product data sheet. | ||
| * For the eco wash cycle (the ECO program is used for the test operation according to EN 60436). | |||
7. EU declaration of conformity

MLAP GmbH hereby declares that the product conforms to the following European requirements:
• EMC Directive 2014/30/EU
• Low Voltage Directive 2014/35/EU
• Ecodesign Directive 2009/125/EC
• RoHS Directive 2011/65/EU
• Regulation (EU) 2019/2022
• Regulation (EU) 2019/2017
8. Installation

WARNING! Risk of electric shock and material damage!
There is a risk of electric shock as well as material damage if the appliance is connected improperly.
■ The electricity and water supply should only be connected by a qualified expert.
8.1. Setup and levelling
▶ Install the appliance on a stable, flat surface close to a drain and water connection:
-on a table/work surface
- in a ventilated cupboard.
▶ Only connect the mains plug (20) to a properly installed and freely accessible socket if the water supply and outlet have been connected correctly (see next section).
8.2. Connecting to a water supply

NOTICE! Damage to the appliance!
If the appliance is connected improperly, there is a risk of damage to the appliance.
■ The hose must be free of kinks and connected carefully.
Connect the water supply hose (21) to a cold water tap with a 3/4" thread (see Fig. D). You can also connect the supply hose to a hot water tap if the water temperature does not exceed 70 °C.
This reduces wash time by about 15 minutes.
▶ Screw the hose connection hand tight.
The water hose is designed for a water pressure of up to 10 bar. We recommend closing the water supply off after use, especially if your house connection does not have a pressure reducer.
SILVER CREST®
8.3. Filling with water manually

Before adding water, press the 📍 button (18) to switch on the dishwasher.
As an alternative to using the water supply via a water tap, you can also fill up the appliance with water manually (see Fig. E).
It is always necessary to fill up the appliance as soon as the acoustic signal sounds.
▶ Fill the measuring container (6) with clean tap water.
▶ Remove the water tank cover (12).
▶ Fill the water tank with water (min./max. 5 litres). Take care to pour the water into the water tank opening slowly and carefully to avoid splashing.
An acoustic signal will sound as soon as the water tank is full.
▶ Put on the water tank cover.
8.4. Connecting the water outlet
Insert the drain hose with the connection for the water outlet (22) to the back of the appliance and secure it using a clamp (see Fig. F).
You can connect the outlet hose in different ways:
- connect the hose to a special connection on the outlet pipe,
– feed the hose into an outlet pipe,
- or run into a sink/container.
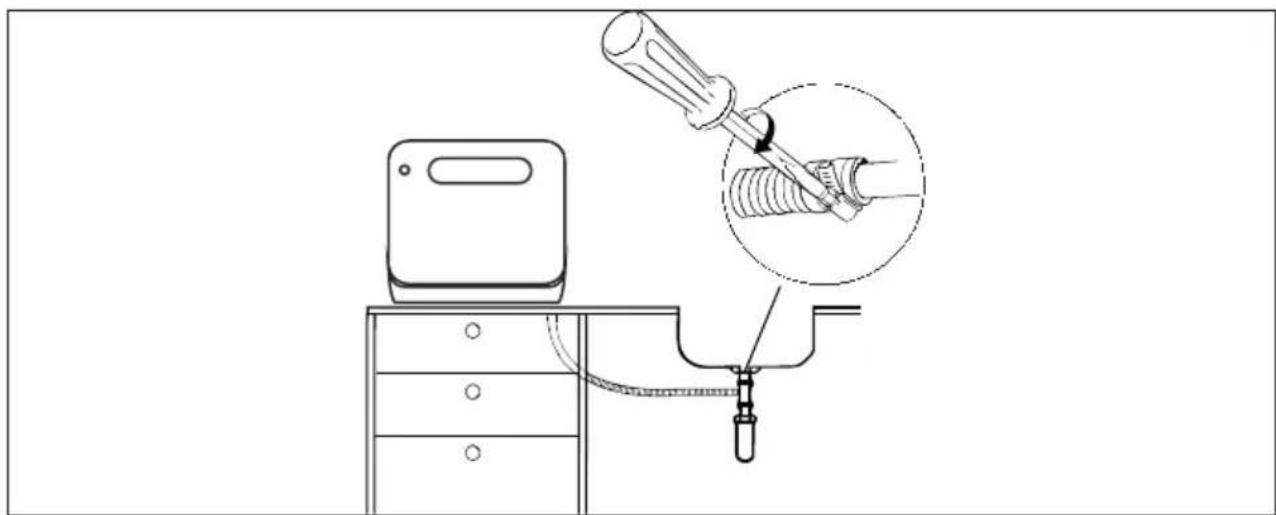
8.4.1. Connecting the hose with the siphon on the sink
Connect the drain hose with the outlet pipe siphon (for washing machines) underneath the sink (see Fig. G). Ensure that the drain hose is inclined sufficiently. The appliance is to be positioned at least 4 cm higher than the drain.

In case of connection to a siphon, an adapter is required for the connection to the drain hose depending on the siphon design. This is available from specialist retailers.
natural_image
Line drawing of a medical procedure setup with a device, tubing, and magnified view of a tool inserted into a tube (no text or symbols)Fig. H
▶ Secure the hose end so that the hose cannot slip (see Fig. H).
8.4.2. Feeding the hose into an outlet pipe

NOTICE!
Possible material damage!
Material damage is possible in the event of water leakage.
■ Make sure that the outlet hose is always introduced into an outlet at a height of 60 cm, as otherwise the pump capacity would be impaired.
■ Under no circumstances may the hose end lie under water.
■ Ensure that the supply and drain hoses are not kinked or crushed.
You can also feed the drain hose into a drain pipe. Mount the hose in the outlet pipe in such a way that it cannot come loose and that water can flow downwards freely.
The drain hose can be extended by max. 100 cm. Use an extension with an internal diameter that is at least the diameter of the original hose or a suitable connecting piece.
The hose extension should run along the floor – only the pipe section in the proximity of the outlet point should run upwards.
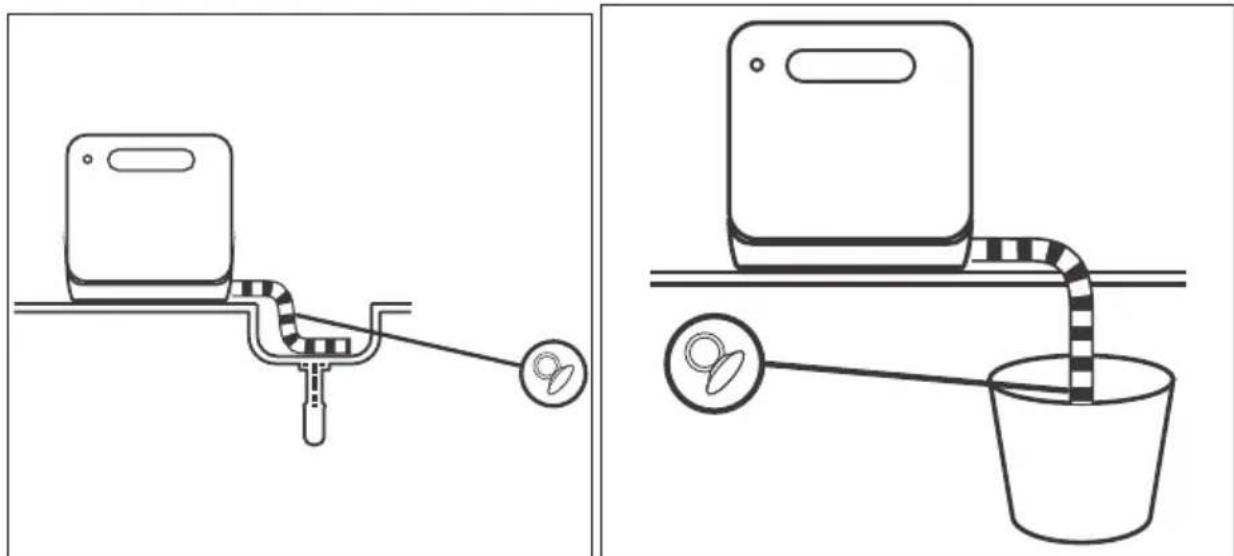
8.4.3. Running the hose into a sink/container
natural_image
Two technical diagrams showing a kitchen sink and a bucket being inserted into a container (no text or symbols present)Fig. I Fig. J
▶ Hang the end of the drain hose into a sink (see Fig. I) or an appropriately sized container (see Fig. J).
▶ Ensure that the drain hose is inclined sufficiently. The appliance is to be positioned at least 4 cm higher than the sink/container.
SILVER CREST®
▶ Use, e.g., a retaining bracket or hose guide with suction cup (supplied) to hang the drain hose to ensure that the drain hose is firmly attached.
8.5. Connection to power supply
Once you have connected the dishwasher to the water supply and drainage, connect the mains plug (20) to a power socket.
The power socket must be easily accessible so you can unplug the appliance from the mains quickly if necessary.
9. Preparations for use
9.1. Opening the door

natural_image
Line drawing of a hand pressing down on a device with an arrow indicating rotation (no text or symbols)Fig. K
Hold the recessed grip (1) and open the door by pulling it towards you. Open the door out fully (see Fig. K).
If the door is opened during operation the wash cycle will automatically be interrupted.
9.2. Closing the door
▶ Push the dish rack (7) fully into the appliance.
▶ Press on the door until you hear it lock into place.
9.3. Adding salt to the appliance
Dishwasher salt (regeneration salt) is used to harden water from a water hardness of 1-2 "medium".
It is advisable to add dishwasher salt.

NOTICE!
Possible material damage!
Damage to the appliance is possible if incorrect salt additive is used.
■ Always use dishwasher salt/regeneration salt that is suitable for the dishwasher.
■ Normal household salt is not suitable and can damage the appliance.
flowchart
graph LR
    A["Hand holding lid"] --> B["Step 1: Insert a cup into a container"]
    B --> C["Step 2: Extract a glass with liquid from a pot (no text or symbols on the diagram itself)"]
    C --> D["Step 3: Extract a salt can into a container"]
    D --> E["Step 4: Add salt to a container with a salt can being added"]
Fig. L
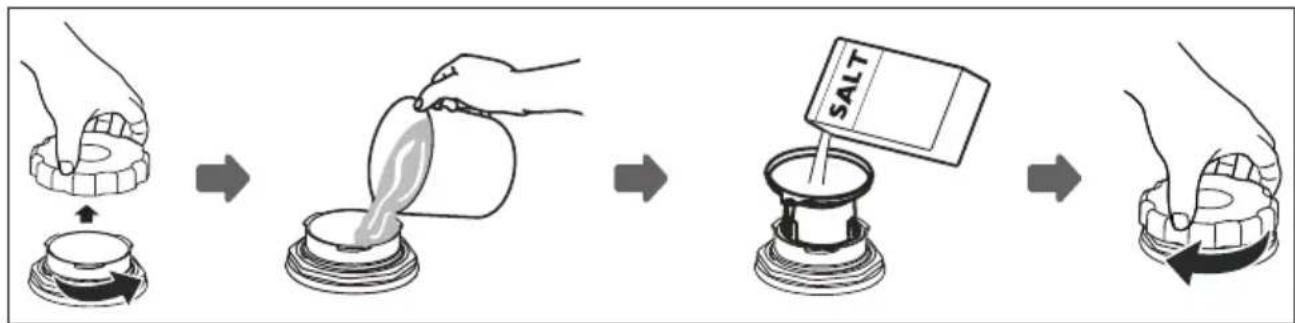
Remove the dish rack (7) and twist the lid off the salt container (10).
▶ Fill the salt container (10) with 0,5 l water before the first use (see Fig. L).
▶ Use a suitable aid such as a normal household funnel to pour 130 g of dishwasher salt into the opening on the salt container (10). It is normal if water escapes from the salt container (10).
▶ Once the salt container (10) has been filled, twist the lid clockwise to tighten (see Fig. L).
To avoid damage to the appliance, always start the quick program without dishes after adding salt (see section "10.3. Selecting a wash program" on page 61).

The salt container (10) must be filled up when the salt warning light switches on. Once the salt consumption has been set according to "9.4. Setting salt consumption" on page 53 and the salt container (10) has been filled, the salt warning light goes out.
If there are salt residues in the appliance, start a quick program to rinse these out.
9.4. Setting salt consumption
For good dishwashing results, the dishwasher needs low-lime water. Adding regenerating salt helps to achieve the required water hardness with the aid of the softening system. To maintain the function of the softening system, regeneration is performed regularly, resulting in higher water and energy consumption during the process (see table below).
▶ Set the required salt consumption, depending on the local water hardness.
The table below shows what setting is necessary for your local water hardness.
SILVER CREST®

Ask your water utility about the water hardness.
| Water hardness | Regeneration at every X programme sequence* | Salt consumption P must be pressed | Display LED ON/LED OFF | ||||
| dH (degree of German hardness) | mmol/l (milli-mole per litre) |  | ECO |  | |||
| 0-5 0-0 | 94 H1 - Press 1 x | OFF OFF ON | |||||
| 6-11 1.0 | -2.0 H2 10 | Press 2 | x OFF ON OFF | ||||
| 12-17 2.1 | -3.0 H3 5 | Press 3 | x | (Factory set-tings) | OFF ON ON | ||
| 18-22 3.1 | -4.0 H4 3 | Press 4 | x ON OFF | OFF | |||
| 23-34 | 4.1-6.0 H | 5 2 Press 5 x | ON OFF ON | ||||
| 35-55 | 6.1-9.8 H | 6 1 Press 6 x | ON ON OFF | ||||
| * When regeneration is carried out during a programme, an additional 2.2 l of water is required, the energy consumption increases by 0.01 kWh and the programme is extended by 4 minutes. | |||||||
▶ Close the appliance door.
▶ Press the ⏻ button (18) to switch on the appliance and make settings.
▶ Press and hold the P button (17) for approx. 5 seconds.
Then press the P button (17) several times in accordance with the table above to set the salt consumption.
If you do no press any button within 5 seconds, the appliance switches to standby mode.
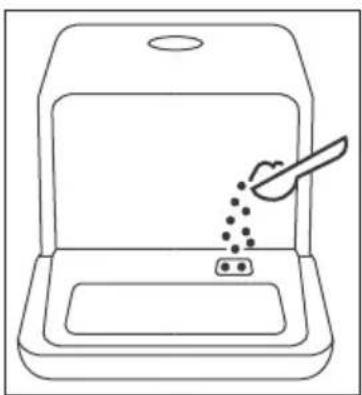
9.5. Adding detergent

DANGER! Risk of chemical burns!
Detergents are chemicals containing caustic and abrasive ingredients.
- Keep detergent out of reach of children!
Dishwasher detergent must be added before each wash cycle. Only add as much detergent as indicated in the table in section "10.3. Selecting a wash program" on page 61. The appliance normally needs less detergent than a conventional dishwasher. One tablespoon of detergent is usually enough to wash a complete load of dishes. Depending on the degree of dirt, more can also be required.
Always add the detergent immediately before the wash cycle so that dishwasher powder does not become moist and dissolves properly later.
▶ Open the appliance door.
natural_image
Line drawing of a kitchen sink with a spoon and a bowl of food being poured into it (no text or symbols)Fig. M
▶ Add the dishwasher detergent into the dosing chamber (8) marked with the symbol.

For further information on dishwasher detergents, see section "About dishwasher detergents" in the full user manual.
SILVER CREST®
9.6.Arrangingthedishesandcutlery

WARNING! Risk of injury!
There is a risk of injury due to sharp objects.
■ Knives and other utensils with sharp tips must be placed in the basket with the tip in a horizontal position.
9.6.1. General information
Only use dishwasher-safe dishes and cutlery. Look for markings such as "Dishwasher safe" or "Suitable for dishwashers" when purchasing dishes.
▶ Use mild detergent that is also suitable for sensitive dishes.
natural_image
Diagram showing a mechanical or fluid system with an arrow indicating direction, no text or symbols presentFig. N
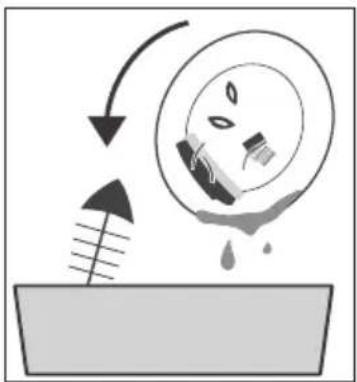
Remove large amounts of food residue from the dishes and soak dried on food residue (such as dried on egg or spinach) (see Fig. N). However, it is not necessary to rinse the dishes under running water before the wash cycle.
To prevent damage to glass or cutlery, do not remove these from the dishwasher directly after the wash program has finished. Allow the dishes to cool down slightly first.
▶ Arrange hollow objects such as cups, glasses, pans etc. with the opening downwards, so that water cannot collect inside.
Dishes must not be put inside each other or cover another dish.
▶ Place large dishes on the dish rack (7)
Do not overfill the dishwasher so as to achieve good washing results.
9.6.2. Unsuitable or partially suitable dishes Unsuitable dishes
• Dishes with elements made from wood, horn, mother-of-pearl
• Plastic parts not resistant to heat
- Bonded dishes
- Pewter or copper dishes
- Crystal glass
• Non-stainless steel parts
Partially suitable dishes
• Some types of glass can become dull after many wash cycles
• Silver and aluminium parts can lose colour
- Glazed forms can become pale after many wash cycles
9.6.3. Dish loading example
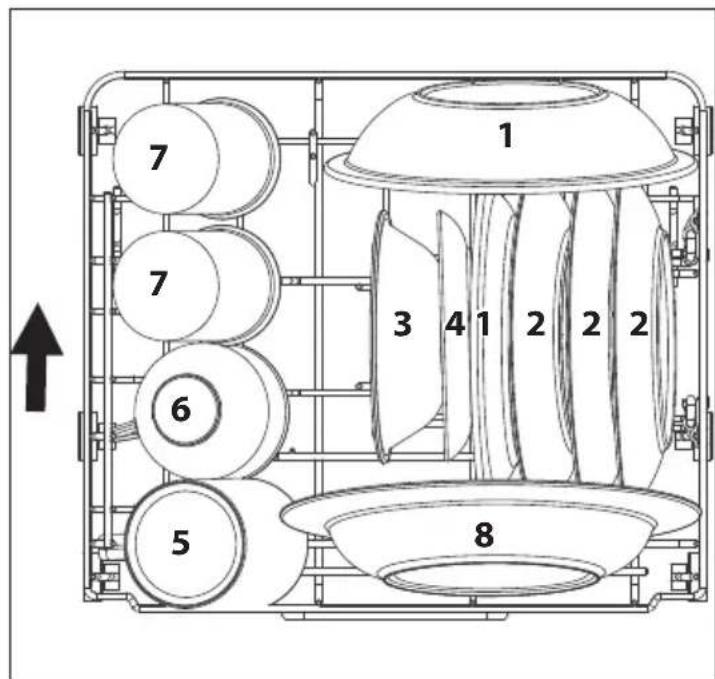
▶ Load the dish rack (7) as shown in the example Fig. O. The arrow shows the slide-in direction.
▶ Dishes should be placed in the positions provided to attain the best washing result.
text_image
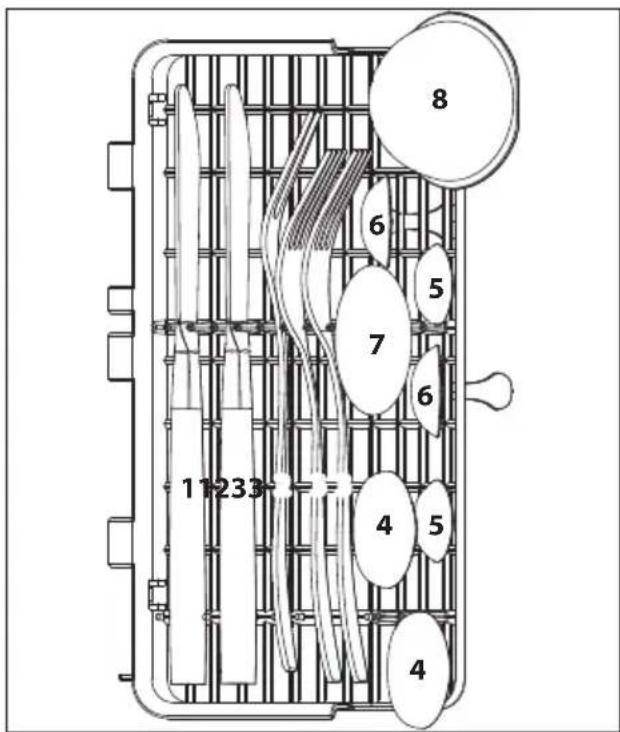
1 7 7 3 4 1 2 2 2 6 5 81) Melamine dessert plates
2) Dessert plates
3) Dessert bowls
4) Saucers
5) Tumblers
6) Cups
7) Glass
8) Soup plates
Fig. O
SILVER CREST®
natural_image
Two-panel diagram showing hand positioning on a grid surface, with no visible text or symbolsFig. P
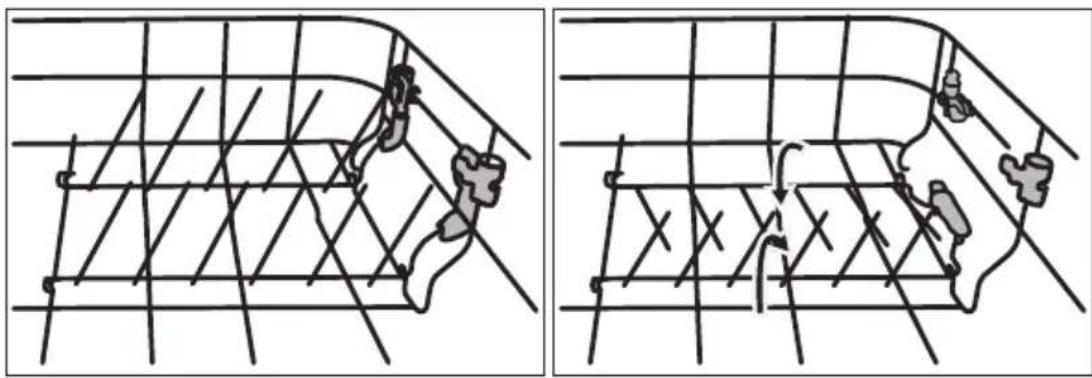
If the plate holders are not required, they can be folded down to create space for pots (see Fig. P).
▶ Unclip the plate holders from the blue fixtures and fold down the plate holder.
9.6.4. Cutlery loading exam ple
▶ Clip the cutlery tray (9) on the left edge of the dish rack (7).
Place long/sharp knives and cutlery horizontally in the cutlery tray.
▶ Ensure that nothing protrudes beneath the cutlery tray (9).
▶ Ensure that items of cutlery are not positioned too closely together or on top of one another.
text_image
8 6 5 7 6 4 5 4 11 23 3Fig. Q
10. Using the dishwasher

flowchart
graph LR
    A["Device with monitor icon"] --> B["Bar chart with arrow indicating left side"]
    B --> C["Square object with arrow indicating right side"]
    C --> D["Finger pointing to hand gesture"]
    D --> E["Pinger pointing to index finger"]
    E --> F["Foot with triangle symbol"]
Fig. R
10.1. Potential operating lights
 | Extra dry active (see Fig. B, 15) | |
 | Warning light: too little special salt (see Fig. B, 16) | |
 | Quick program selected (top LED lights up) (see Fig. B, 19) | Quick program active (top LED flashes) (see Fig. B, 19) |
 | Intensive program selected (middle LED lights up) (see Fig. B, 19) | Intensive program active (middle LED flashes) (see Fig. B, 19) |
| ECO Eco | program selected (bottom LED lights up) (see Fig. B, 19) | Eco program active (bottom LED flashes) (see Fig. B, 19) |
 | Glass program selected (both top LEDs light up) (see Fig. B, 19) | Glass program active (both top LEDs flash) (see Fig. B, 19) |
 | Baby bottle program selected (both bottom LEDs light up) (see Fig. B, 19) | Baby bottle program active (both bottom LEDs flash) (see Fig. B, 19) |

Potential error messages are indicated by flashing or illuminated operating lights. For more information, see section "Error messages" in the full user manual.
SILVER CREST®
10.2. Switching on the appliance
To start the appliance, proceed as follows:
▶ Add the detergent, rinse aid and, if necessary, salt depending on the desired program.
Insert the dish rack (7) and cutlery tray (9) (see section "9.6. Arranging the dishes and cutlery" on page 56) and push the dish rack into the dishwasher.
▶ Plug the mains plug (20) into the socket.
▶ Press the button (18) to switch on the appliance.
▶ Turn on the water supply fully or fill the water tank manually.
▶ Press the program selection button P (17) several times to select the required program: Quick, glass, baby bottle, intensive or ECO cleaning program.
You can also choose to switch on an extra drying cycle for these programs (except the quick program). Press the button (14).

The program duration increases when the extra dry function is switched on.
The control light (19) for the selected program lights up (see also "10.4. LED indicator for the wash program" on page 63).
▶ Press the button (13) to start the program.
The control light (19) for the selected program flashes.
10.3. Selecting a wash program
The following table shows the various wash programs and their applications.
Set an energy saving or quick program if possible, e.g. the "ECO" or "Quick" program.
| Program | Suitable for Sequence | Detergent (Left/right dos-ing chamber) | Runt-ime** in minutes | Energy/ water con-sumption [kWh/l] | Water con-sumption [litres] | |
| Quick Dishes with light dirt Wash (45 °C) | Rinse Rinse (55 °C) | 6 g 29 0.35 5 | ||||
| Intensive Pots, pans etc. and dishes with dried-on dirt | Wash (62 °C) Rinse Rinse (70 °C) Dry | 6 g 160 0.5 5 | ||||
| ECO* | Items with normal dirt such as plates, glasses, bowls and lightly soiled pots | Wash (50 °C) Rinse Rinse (72 °C) Dry | 6 g 160 0.396 | 5 | ||
| Glass Items with light dirt such as glasses, porcelain | Wash (50 °C) Rinse Rinse (65 °C) Drying | 6 g 85 0.4 5 |
| * | The ECO program is the standard program for cleaning dishes with normal dirt and is the most efficient in relation to the combined energy and water consumption. The ECO program is used for the test operation according to EN 60436. |
| ** | Runtime calculated at a water temperature of 15 °C from the water supply |
| Program | Suitable for sequence | Detergent (left/right dos- ing chamber) | Runf- ime * in minutes | Energy/ water con- sumpition [litres] |
| Baby bottles Suitable for baby bottlesClean baby bottles without loading addi- thoral dishes to ensure hygienic cleaning. | ||||
10.4. LED indicator for the wash program
The flashing LED indicator (19) shows which program is currently running according to the following table:
| Program | DisplayLED ON/LED OFF | ||
 | ECO |  | |
| Quick OFF OFF Flashing | |||
| Intensive Flashing OFF OFF | |||
| ECO OFF Flashing OFF | |||
| Glass Flashing OFF Flashing | |||
| Baby bottles Flashing Flashing OFF | |||
10.5. End of the wash program

WARNING!
Risk of scalding!
Hot water/hot steam can escape and cause burns if the door is opened while a program is running.
- Do not open the door immediately – wait instead until the appliance has cooled down.

CAUTION!
Risk of tripping!
The opened door constitutes a trip hazard.
■ Close the appliance door again after a wash cycle has finished.
Once the program has ended, acoustic signals sound.
SILVERCREST®
▶ Switch off the appliance using the button (18).
▶ Turn off the water supply.
The appliance switches off automatically a short time after the end of the wash cycle.
▶ Open the door slightly so that the steam can escape and air can continue to circulate for a little while.
▶ Wait a short time before removing the cutlery/dishes so that the dishes cool and dry more quickly and the heat can escape. Hot dishes are sensitive to impacts.
Remove the dishes and cutlery. It is normal if the appliance is moist inside.

For more detailed information about your product, please refer to the user manual. The complete user manual is available for download at https://www.lidl-service.com.
11. Disposal

PACKAGING
Your appliance has been packaged to protect it from damage in transit. The packaging is made of materials that can be recycled in an environmentally friendly manner.
APPLIANCE
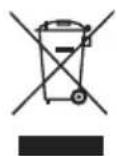
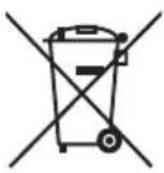
All old appliances marked with the symbol shown must not be disposed of in normal household waste.
In accordance with Directive 2012/19/EU, the appliance must be properly disposed of at the end of its service life.
This involves separating the materials in the appliance for the purpose of recycling and minimising the environmental impact.
Take old appliances to an electrical scrap collection point or a recycling centre.
Contact your local waste disposal company or your local authority for more information on this subject.
12. Service
text_image
PDF ONLINE www.lidl-service.comYou can download this user manual and many other manuals, product videos and installation software from www.lidl-service.com.
Scan this QR code to be directed straight to the Lidl Service website (www.lidl-service.com) where you can open your user manual by entering the article number (IAN) 360253_2010.
| GB | Service United KingdomHotline1 +44 20 34811602Mon - Fri: 09:00 - 17:00Please use the contact form at www.mlap.info/contact |
| IE | Service IrelandHotline1 +353 1 6533859Mon - Fri: 09:00 - 17:00Please use the contact form at www.mlap.info/contact |
| IAN : 360253_2010 |
12.1. Supplier/Producer/Importer
Please note that you cannot use the address below for returns. Please contact the Service Centre mentioned above.
Supplier / Producer / Importer for EU market:
MLAP GmbH
Meitnerstr. 9
70563 Stuttgart
GERMANY
Importer for the UK market:
Lidl Great Britain Ltd · Lidl House
14 Kingston Road · Surbiton · KT5 9NU
GREAT BRITAIN
SILVERCREST®
Sommaire
1. Introduction 68
natural_image
Line drawing of a medical procedure setup with a screwdriver inserted into a tube, connected to a bed and sink (no text or symbols present)Fig. H
natural_image
Simple line drawing of a mechanical device with a handle and base, no text or symbols presentFig. I
natural_image
Simple line drawing of a washing machine connected to a bucket with a tube inserted (no text or symbols)Fig. J
natural_image
Line drawing of a hand pressing down on a square device with an arrow indicating rotation (no text or symbols)Fig. K
flowchart
graph LR
    A["Hand holding a container"] --> B["Step 1: pouring liquid into a jar"]
    B --> C["Step 2: adding salt to a container"]
    C --> D["Step 3: adding salt into a salt container"]
    D --> E["Step 4: adding salt into a salt container"]
Fig. L
natural_image
Line drawing of a kitchen sink with a spoon and food being poured into it (no text or symbols)Fig. M
natural_image
Diagram showing a droplet inside a circular container with arrows indicating flow or interaction (no text or symbols)Fig. N
natural_image
Diagram of a crane structure with two human figures, no text or symbols present
natural_image
Diagram of a grid-based structure with directional arrows and symbols, no readable text or labelsFig. P
flowchart
graph LR
    A["Device with left-hand rule"] --> B["Bar chart with arrow indicating movement"]
    B --> C["Square button with arrow indicating rotation"]
    C --> D["Finger with thumb and index finger placement"]
    D --> E["Pinger with thumb and index finger placement"]
    E --> F["Foot stimulation with thumb and index finger placement"]
Fig. R
natural_image
Line drawing of a medical procedure setup with a tool inserted into a tube, connected to a bed and sink (no text or symbols present)Afb. H
natural_image
Two technical diagrams showing a kitchen sink and a bucket with a tube inserted into the cup (no text or symbols present)Afb. I Afb. J
natural_image
Line drawing of a hand pressing a button on a square device (no text or symbols)Afb. K
natural_image
Line drawing of a kitchen sink with a spoon and food being poured into it (no text or symbols)Afb. M
natural_image
Diagram showing a container with liquid and particles being poured into a container, with arrows indicating flow direction (no text or symbols)Afb. N
natural_image
Diagram of a person climbing a rope structure with diagonal braces (no text or symbols)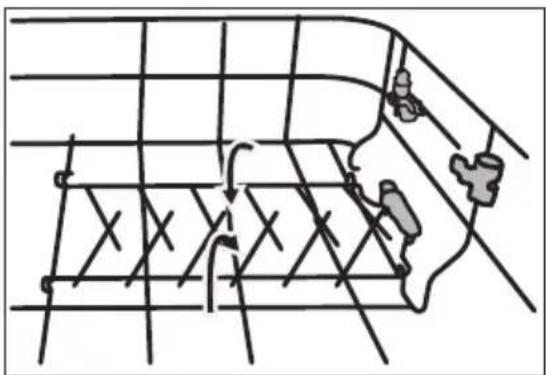
text_image
Diagram showing a grid with labeled points and directional arrows, possibly illustrating a spatial or mechanical concept.Afb. P
natural_image
Line drawing of a medical procedure setup with a screwdriver inserted into a tube, connected to a bed and sink (no text or symbols present)Obr. H
natural_image
Two technical diagrams showing a kitchen sink and a bucket with a tube inserted, both without any text or symbols.Obr. I Obr. J
natural_image
Illustration of a hand inserting a button into a device with an arrow indicating rotation (no text or symbols)Obr. K
flowchart
graph LR
    A["Hand holding a cup with a lid"] --> B["Step 1: Insert a cup with liquid"]
    B --> C["Step 2: Extract a glass with liquid"]
    C --> D["Step 3: Add salt into a container"]
    D --> E["Step 4: Transport to salt into a container"]
    E --> F["Step 5: Return to salt"]
Obr. L
natural_image
Line drawing of a kitchen sink with a spoon and a bowl of food being poured into it (no text or symbols)Obr. M
natural_image
Diagram showing a container with liquid and a circular object inside, with arrows indicating flow or interaction (no text or symbols)Obr. N
natural_image
Diagram of a person climbing a rope with diagonal lines, no text or symbols present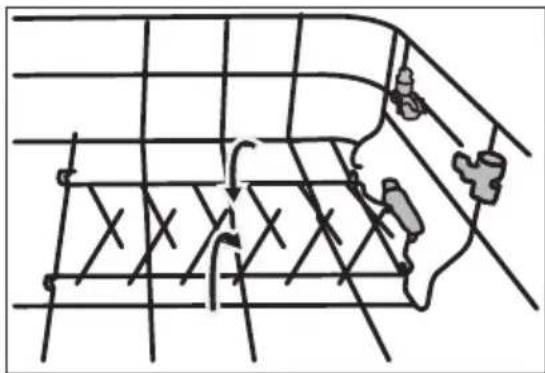
natural_image
Diagram of a grid-based structure with directional arrows and symbols, no readable text or labelsObr. P
natural_image
Line drawing of a medical procedure setup with a screwdriver inserted into a tube, connected to a bed and sink (no text or symbols present)rys. H
natural_image
Two technical diagrams showing a kitchen sink and a bucket with a tube, both without any text or symbols.rys. I rys. J
natural_image
Line drawing of a hand pressing down on a square device with an arrow indicating rotation (no text or symbols)rys. K
flowchart
graph LR
    A["Hand holding a cup with a lid"] --> B["Transfer from cup into a jar"]
    B --> C["Add liquid into a tube"]
    C --> D["Add salt into a tube with a salt container"]
    D --> E["Transfer from tube into a ring with a salt container"]
rys. L
natural_image
Line drawing of a kitchen sink with a spoon and a bowl of food being poured into it (no text or symbols)rys. M
natural_image
Diagram showing a container with liquid and particles being poured into a container, with arrows indicating flow direction (no text or symbols)rys. N
natural_image
Diagram of a grid structure with two hand-like figures, no text or symbols present
text_image
Diagram showing a grid with directional arrows and labeled points, possibly illustrating a spatial or mechanical concept.rys. P
natural_image
Diagram of a medical procedure showing a screwdriver inserted into a tube, with a monitor and tubing nearby (no text or labels)Obr. H
natural_image
Two technical diagrams showing a kitchen sink and a bucket with a tube inserted, both without any text or symbols.Obr. I obr. J
natural_image
Line drawing of a hand pressing a button on a square device (no text or symbols)Obr. K
flowchart
graph LR
    A["Hand holding a container"] --> B["Step 1: pouring liquid into a jar"]
    B --> C["Step 2: adding salt to a container"]
    C --> D["Step 3: adding salt into a salt container"]
    D --> E["Step 4: adding salt into a salt container"]
Obr. L
natural_image
Line drawing of a kitchen sink with a spoon and a bowl of food being poured into it (no text or symbols)Obr. M
natural_image
Diagram showing a container with liquid and particles being poured into a container, with arrows indicating flow direction (no text or symbols)Obr. N
natural_image
Diagram of a grid structure with two hand-like figures, no text or symbols present
text_image
Diagram showing a grid with directional arrows and labeled points, possibly illustrating a spatial or mechanical concept.Obr. P
natural_image
Line drawing of a medical procedure setup with a tool inserted into a tube, connected to a bed and sink (no text or symbols present)Fig. H
natural_image
Simple line drawing of a mechanical device with a handle and base, no text or symbols present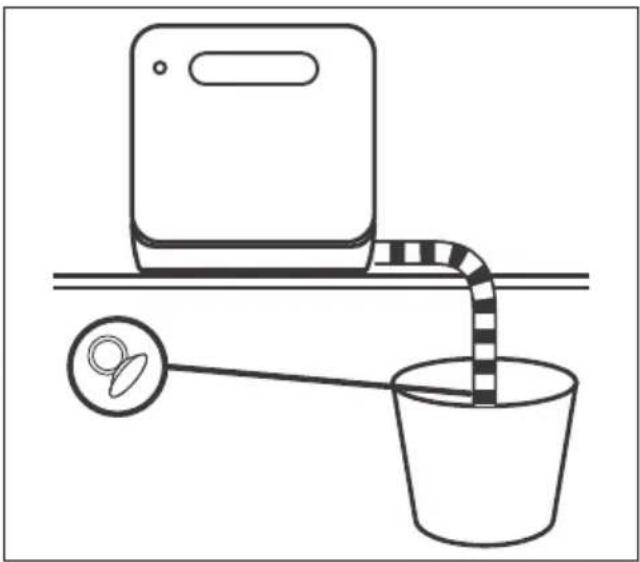
natural_image
Simple line drawing of a kitchen sink with a bucket and a water tap, no text or symbols presentFig. I Fig. J
natural_image
Line drawing of a hand inserting a button into a device with an arrow indicating rotation (no text or symbols)Fig. K
flowchart
graph LR
    A["Hand holding a container"] --> B["Step 1: pouring liquid into a jar"]
    B --> C["Step 2: adding salt to a container"]
    C --> D["Step 3: adding salt into a salt container"]
    D --> E["Step 4: adding salt into a salt container"]
Fig. L
natural_image
Line drawing of a kitchen sink with a spoon and food being poured into it (no text or symbols)Fig. M
natural_image
Diagram showing a container with liquid and particles being poured into a circular container, with arrows indicating flow direction (no text or symbols)Fig. N
natural_image
Diagram of a grid structure with two hand-like figures, no text or symbols present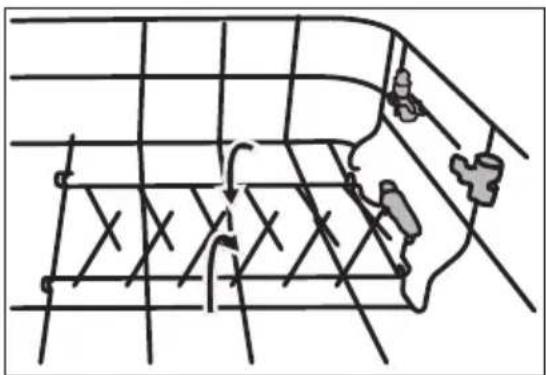
text_image
Diagram showing a grid with directional arrows and labeled points, possibly illustrating a spatial or mechanical concept.Fig. P
flowchart
graph LR
    A["Device with open lid"] --> B["Bar chart with vertical stripes"]
    B --> C["Phone with square icon"]
    C --> D["Hand gesture pointing to 'P' icon"]
    D --> E["Close-up of hand with '||' symbol"]
Fig. R
Symbol for vekselstrøm

Anvendes indendørs
natural_image
Line drawing of a medical procedure setup with a screwdriver inserted into a tube, connected to a bed and sink (no text or symbols present)Fig. H
natural_image
Two technical diagrams showing a kitchen sink and a bucket with a tube inserted, both without any text or symbols.Fig. I Fig. J
natural_image
Line drawing of a square-shaped device with a hand inserting a button, showing motion arrows (no text or symbols)Fig. K
flowchart
graph LR
    A["Hand holding a cup with a lid"] --> B["Step 1: Insert a cup with liquid"]
    B --> C["Step 2: Extract a glass with liquid"]
    C --> D["Step 3: Add salt into a container"]
    D --> E["Step 4: Transport to salt into a container"]
    E --> F["Step 5: Return to salt"]
Fig. L
natural_image
Line drawing of a kitchen sink with a spoon and a bowl of food being poured into it (no text or symbols)Fig. M
natural_image
Diagram showing a mechanical or fluid system with an arrow, a circular component, and a droplet on a surface (no text or symbols)Fig. N
SILVERCREST®
Delvist egnet service
natural_image
Diagram of a person climbing a rope over a grid, with no visible text or symbols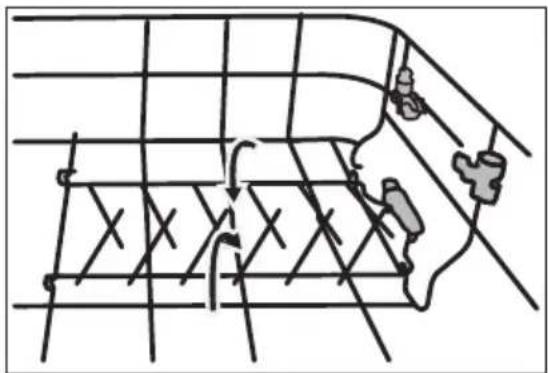
natural_image
Diagram of a grid-based layout with directional arrows and symbols, no readable text or labelsFig. P
flowchart
graph LR
    A["Device with open lid"] --> B["Hand gesture: bar chart"]
    B --> C["Phone with square icon"]
    C --> D["Hand gesture: finger pointing down"]
    D --> E["Hand gesture: finger pointing up"]
    E --> F["Hand gesture: finger pointing down"]
Fig. R