
SKM 1000 A1 - Grill plate SILVERCREST - Free user manual and instructions
Find the device manual for free SKM 1000 A1 SILVERCREST in PDF.

| Product Type | Electric grill plate with contact grill and table grill function |
| Brand | SilverCrest |
| Model | SKM 1000 A1 |
| Dimensions (approx.) | 30 x 30 x 15 cm (closed) |
| Weight (approx.) | 3 kg |
| Power supply | 220 - 240 V ~, 50 Hz |
| Power consumption | 1000 W |
| Plate material | Non-stick coating |
| Main functions | Contact grill (closed) and table grill (opened to 180°) |
| Indicator lights | Red 'Power' light (on) and green 'Ready' light (ready) |
| Compactness | Safety lock for vertical storage |
| Maintenance and cleaning | Manual cleaning of plates with a damp cloth; dishwasher-safe drip tray |
| Safety | Hot surface (caution), automatic shut-off not indicated, mains disconnection required after use |
| Spare parts and repairability | Original parts available via after-sales service; repair by authorized professional |
| General information | 3-year warranty, domestic use only, supplied with instruction manual and drip tray |
Frequently Asked Questions - SKM 1000 A1 SILVERCREST
User questions about SKM 1000 A1 SILVERCREST
0 question about this device. Answer the ones you know or ask your own.
Ask a new question about this device
Download the instructions for your Grill plate in PDF format for free! Find your manual SKM 1000 A1 - SILVERCREST and take your electronic device back in hand. On this page are published all the documents necessary for the use of your device. SKM 1000 A1 by SILVERCREST.
USER MANUAL SKM 1000 A1 SILVERCREST

natural_image
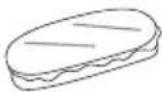
Black and white photo of a D. Johnson's grater with open lid and side grates (no text or symbols visible)MINI CONTACT GRILL, MINI-KONTAKTGRILL, MINI GRIL DE CONTACT SKM 1000 B1
GB IE NI CY MT
MINI CONTACT GRILL
Operating instructions
FR BE CH
MINI GRIL DE CONTACT
Mode d'emploi
CZ
MINI KONTAKTNÍ GRIL
Návod k obsluze
SK
KONTAKTNÝ MINIGRIL
Návod na obsluhu
DK
MINI KONTAKTGRILL
English Operating instructions Page 1
| Deutsch | Bedienungsanleitung | Seite | 17 | |
| Français | Mode d'emploi Page 33 | |||
| Nederlands | Gebruiksaanwijzing | Pagina | 51 | |
| Češki | Návod k obsluze Strana | 67 | ||
| Polski | Instrukcja obstugi Strona | 81 | ||
| Slovaška | Návod na obsluhu | Strana 97 | ||
| Español | Instrucciones de uso | Página 111 | ||
| Dansk | Betjeningsvejledning | Side 127 | ||
| Italiano | Istruzioni per l'uso | Pagina 141 | ||
| Magyar | Használati utasítás | Oldal 157 |
A

Contents
1. Introduction 2
2. Intended use 2
3. Warnings and symbols used 2
4. Safety 3
4.1. Basic safety guidelines 3
5. Operating elements 6
6. Technical data 6
7. Package contents 6
7.1.First use 7
8. Setting up and using the appliance 7
8.1. Use 7
8.2. "Contact grill" position 7
8.3. "Table grill" position 8
8.4. Cooking table 8
9. Cleaning and care 10
10. Storage 10
11. Recipes 10
11.1. Mediterranean chicken breast 10
11.2. Lemon and herb-crusted salmon.... 11
11.3. Grilled vegetables baguette.... 11
11.4. Beef steak with herb butter.... 11
11.5. Grilled fruit with maple syrup 12
11.6. Mediterranean chicken skewers.... 12
11.7. Halloumi & vegetable packets (vegetarian).... 12
11.8. Grilled vegetables with chickpea marinade (vegan) 12
11.9. Grilled scampi skewers with garlic-lemon marinade.... 13
11.10. Stuffed sea bream 13
12. Disposal 13
Congratulations on the purchase of your new appliance. You have selected a high-quality product.
The operating instructions are part of this product. They contain important information on safety, usage and disposal. Before using the product, familiarise yourself with all handling and safety guidelines. Use the product only as described and for the range of applications specified. Please also pass these operating instructions on to any future owner.
2. Intended use
This appliance is intended exclusively for grilling food indoors. The appliance is not intended for any other purpose, nor for use beyond the scope described. The appliance is not intended for use in commercial or industrial environments.
The manufacturer accepts no responsibility for damage caused by failure to observe these instructions, improper use or repairs, unauthorised modifications or the use of unapproved replacement parts. The operator bears sole liability.
3. Warnings and symbols used
The following warnings and symbols are used in these operating instructions, on the packaging and on the appliance (where applicable):
| DANGER! A warning with this symbol and the signal word “DANGER” indicates an imminently hazardous situation that will result in death or serious injury if not avoided. | |
| WARNING! A warning with this symbol and the signal word “WARNING” indicates a potentially hazardous situation that could result in death or serious injury if not avoided. |
 | CAUTION! A warning with this symbol and the signal word “CAUTION” indicates a potentially hazardous situation that could result in a minor or moderate injury if not avoided. |
 | ATTENTION! A warning with this symbol and the signal word “ATTENTION” indicates a potential situation that could result in property damage if not avoided. |
 | Note: A note identifies additional information that facilitates the use of the appliance. |
| AC current/voltage | |
 | Read the instructions. |
 | All of the parts of this appliance that come into contact with food are food-safe. |
 | Dishwasher-proof. |
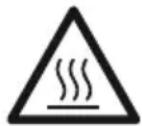
 | Caution! Hot surface! |
 | This product satisfies the requirements of the applicable European and national regulations. |
 | Do not dispose of electrical appliances in the household waste! |
 | Dispose of the packaging in an environmentally-responsible manner. |
 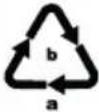 | The packaging is made of recyclable materials. Observe the labelling on the packaging material when sorting for disposal: The material is labelled with abbreviations (a) and numbers (b) with the following meanings: 1-7: plastics, 20-22: paper and cardboard, 80-98: composites. |
  ES/PT ES/PT | The packaging contains paper and/or cardboard components.The packaging contains plastic and/or metal components. |
4. Safety
In this section, you will find important safety instructions for using the appliance.
This appliance complies with statutory safety regulations. Improper use may result in personal injury and property damage.
4.1. Basic safety guidelines
To ensure safe operation of the appliance, follow the safety guidelines set out below:
■ Prior to use, check the appliance for visible external damage. Do not operate an appliance that has been damaged or dropped.
■ To prevent accidents, have defective plugs and/or power cables replaced immediately by an authorised specialist technician or our Customer Service department.
■ This appliance may be used by children of the age of 8 years or more and by persons with reduced physical, sensory or mental capabilities or lack of experience and/or knowledge if they are being supervised or have been instructed with regard to the safe use of the appliance and have understood the potential risks.
■ Children must not play with the appliance.
■ Cleaning and user maintenance tasks must not be carried out by children unless they are supervised.
■ All repairs must be carried out by authorised specialist companies or by the Customer Service department. Improper repairs may put the user at risk. It will also invalidate any warranty claims.
■ Repairs to the appliance during the warranty period may only be carried out by a customer service department authorised by the manufacturer. Otherwise, no warranty claims will be held for any subsequent damages.
■ Defective components must always be replaced with original replacement parts. Compliance with safety requirements can only be guaranteed if original replacement parts are used.
■ Do not allow the power cable to come into contact with hot appliance parts. NEVER use the appliance near naked flames, a hotplate or a heated oven.
■ After use, allow the appliance to cool down completely before cleaning it. Risk of burns!
■ Install the appliance as close as possible to an electrical power socket. Ensure that the power plug is quickly reachable in case of danger, and also that there is no danger of tripping over the cable.
■ Provide a stable location for the appliance.

RISK OF ELECTRIC SHOCK!
■ The appliance should only be connected to correctly installed and earthed mains power sockets. Ensure that the rating for your local power supply corresponds with the details on the rating plate of the appliance.
- Arrange for customer service to repair or replace connecting cables and/or appliances that are not functioning properly or have been damaged.
■ Do not expose the appliance to rain, and never use it in a humid or wet environment.
■ Ensure that the power cable never becomes wet or moist during use.
■ NEVER immerse the appliance in water or other liquids! This would bring about the risk of a potentially fatal electric shock upon the next use of the appliance should moisture be present in the voltage conducting elements.
■ Always take hold of the plug when handling the power cable. Do not pull on the cable itself and never touch the power cable with wet hands, this could result in either a short circuit or an electric shock.
■ Do not place the appliance itself, furniture items or similar objects on the power cable, and take steps to ensure it cannot become jammed or trapped in any way.
■ Do not open the appliance housing or attempt to repair or modify the appliance. If the housing is opened or improper modifications are made, you run the risk of receiving a potentially fatal electric shock and the warranty will be void.
■ Protect the appliance from drips or splashes of water. Thus, do not place any vessels containing liquid (e.g. flower vases) on or near the appliance.
■ Always pull the plug out of the power socket during each interruption, as well as after use and before any cleaning.

WARNING! RISK OF INJURY!

Caution! Hot surface!
■ The surfaces of the appliance become extremely hot during use. Touch the appliance using only the handle.
■ Do not allow children to play with packaging materials. There is a risk of suffocation.

CAUTION! MATERIAL DAMAGE!
■ Do not use an external timer switch or a separate remote control system to operate the appliance.
■ Never leave the appliance unattended during operation.
■ Ensure that the appliance, the power cable and the plug do not come into contact with heat sources such as hotplates or naked flames.
■ Do not use charcoal or similar fuels to operate the appliance!
■ To protect the non-stick coating, do not use metallic tools such as knives, forks, etc. Should the non-stick coating become damaged, stop using the appliance.
■ Only operate the appliance with the original accessories supplied.
5. Operating elements
1 Handle
② Drip opening
③ Safety catch
4 Unlocking button 180°
⑤ Green "Ready" indicator light
6 Red "Power" indicator light
7 Lower griddle
8 Drip tray
9 Upper griddle
6. Technical data
| Power supply 220 - 240 V | ~, 50 Hz |
| Power consumption 1000 W |
7. Package contents
This appliance is supplied with the following components as standard (see fold-out page):
- Contact grill
- Drip tray
- Instructions for use
◆ Remove all parts of the appliance and the operating instructions from the box.
◆ Remove all packaging materials and any films and labels.
i Note
▶ Check the package for completeness and signs of visible damage.
- If the delivery is incomplete or damage has occurred as a result of defective packaging or during transport, contact the Customer Service hotline (see section 13.1. Service).
7.1. First use
1) Clean the appliance and the drip tray ⑧ as described in section 9. Cleaning and care to remove any production residues.
2) Unlock the appliance by moving the safety catch ③ to the 🔒 position.
3) Open the appliance.
4) Wipe the griddles ⑦/⑨ with a moist cloth.
5) Close the appliance.
6) Plug the plug into a mains power outlet.
7) Allow the appliance to heat up for approx. 5 minutes.
i Note
The first time the appliance heats up, a small amount of smoke and odour may result from production-related residues. This is normal and is completely harmless. Ensure sufficient ventilation; for example, by opening a window.
8) After heating, pull the plug from the mains socket and allow the appliance to cool down completely.
9) Clean the appliance again with a damp cloth.
8. Setting up and using the appliance
8.1. Use
1) Close the appliance lid using the handle ①.
2) Slide the drip tray ⑧ into the appliance.
3) Replace the plug in the mains power socket. The red "Power" indicator light ⑥ lights up.
4) The green "Ready" indicator light ⑤ lights up when the appliance has warmed up.
i Note
▶ You can use this grill in two different ways:
- With the movable upper griddle ⑨ as a contact grill so that, for instance, meat or fish is grilled from both sides.
- Fully open so that both griddles 7/9 can be used as a table grill.
8.2. "Contact grill" position
i Note
▶ Due to its sliding hinge, the upper griddle ⑨ always lies parallel to the lower griddle ⑦, even if the food to be grilled is thick. This guarantees an optimal grilling result.
1) Slide the lock to the 🔒 position, if you have not already done so.
2) Open the appliance with the handle ①.
3) Place the food on the lower griddle ⑦.
4) Close the appliance lid using the handle ①.
5) Check the browning of the food after a short time. To do this, open the appliance lid using the handle ①.
i Note
▶ Start with short grilling times and increase these until you have found the correct duration. For your orientation, please also refer to section 8.4. Cooking table.
6) Once you are satisfied with the level of browning, remove the food.
ATTENTION!
▶ Do not use pointed or sharp objects to remove the food. They could damage the surfaces of the griddles ⑦/⑨!
7) Pull the mains plug out of the power outlet.
8.3. "Table grill" position
1) With the appliance closed, slide the lock to the position.
2) Then open the appliance lid while pressing the unlocking button 180^ .
3) Open the appliance lid fully so that the handle ① rests on the table surface and both griddles ⑦/⑨ can be used.
4) Place the food you want to grill on the griddles ⑦/⑨.
5) If necessary, turn the food from time to time during grilling and remove it from the griddles 7/9 once it is cooked.
! ATTENTION!
▶ Do not use pointed or sharp objects to turn/remove the food. They could damage the surfaces of the griddles ⑦/⑨!
6) Pull the mains plug out of the power outlet.
8.4. Cooking table
The following table is intended as a guide for cooking. It provides examples of cooking times for various foods. Adjust the amounts according to the recipe and your individual taste. Various factors – in particular, the respective nature of the food, such as size, thickness or quality – may affect the cooking time.
| cm min |  | ||||
 |  | 3 6-8 | 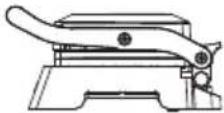 | - Vary the meat patties by mixing in some cheese or olives. | |
 | 2 3-4 | - If it is not marinated, grease the food to be grilled with some oil. | |||
 | 4 9-11 | ||||
 |  | 1-2 7-9 | |||
 |  | 3 | 2 x3-4 | 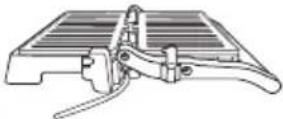 | - Turn the food after half the cooking time has elapsed.- You can also add vegetables to the skewers. In this case, take care that they do not burn! |
 | 3 2x4 | - Turn the food after half the cooking time has elapsed. | |||
| cm min |  | ||||
 | 3 | 2 x 5-8 | 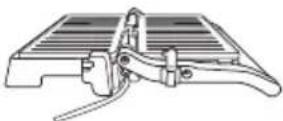 | -Turn the food after half the cooking time has elapsed.-You can also add vegetables to the skewers. In this case, take care that they do not burn! | |
 | 7 25-30 |  | -Marinate the food to be grilled and place it skin side up. | ||
 | 8 10-15 | -When grilling whole fish, make sure they are not too large for the griddles. | |||
 | 5 9-12 | -Grease the food to be grilled with some oil. | |||
 | 3 2x3 | 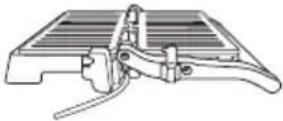 | -Turn the food after half the cooking time has elapsed. Alternatively, you can also grill the bratwursts in the "contact grill" position. | ||
 | 1 2x7 | -Turn the food after half the cooking time has elapsed.-Grease the food to be grilled with some oil. | |||
 | 2 2x8 | ||||
 | 8 4-5 | 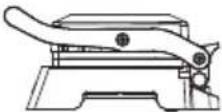 | -Coat the outer surfaces with some herb butter. This lends the food a tasty crunch. | ||
 | 8 7-9 | -If the baguette is too thick for the contact grill position, simply remove the top half and grill the top and bottom halves at the same time in the "table grill" position. | |||
9. Cleaning and care
DANGER!
▶ Before cleaning, pull out the plug and wait until the appliance has completely cooled down. Risk of injury!
▶ Never clean the appliance under running water and never immerse it in water. The appliance could be irreparably damaged!
! ATTENTION!
▶ To avoid irreparable damage to the appliance, ensure that no moisture gets into it duringcleaning.
▶ Do not use abrasive or chemical cleaners to clean the surfaces of the appliance. Also avoid using sharp or scratchy objects.
1) Use a piece of kitchen paper or the like to remove any excess grease or juice that has not run into the drip tray ⑧.
2) Wipe the griddles 7/9 with a slightly damp cloth and a mild detergent.
3) Then wipe off the griddles 7/9 with a damp cloth without detergent.
■ To clean the outer surfaces of the appliance, wipe it down with a damp cloth and a small amount of washing-up liquid. Wipe off any detergent residues using a cloth moistened with clean water. Ensure that all parts are completely dry before reusing the appliance.
- Clean the emptied drip tray ⑧ in hot water and washing-up liquid. Rinse off detergent residues with fresh water and dry it well.
i Note

For gentle cleaning of the drip tray ⑧, we recommend that you wash it by hand as described above. However, you can also clean the drip tray ⑧ in the dishwasher.
10. Storage
Store the cleaned appliance in a dry location. Lock the appliance by pushing the safety catch ③ to the 🔒 position.
11. Recipes
i Note
▶ Depending on the properties of the ingredients, the specified temperature settings or times in the recipes may vary!
11.1. Mediterranean chicken breast
Ingredients:
◆ 2 chicken breast fillets
◆ 3 tbsp. olive oil
◆ 1 tsp. paprika powder (mild)
◆ 1 tsp. Italian herbs (e.g. oregano, thyme)
Salt, pepper
♦ Lemon slices (optional)
Preparation:
1) Pound the chicken breast flat (uniform thickness).
2) Rub with oil, spices and herbs.
3) Place in the preheated contact grill.
4) Grill for about 6–8 minutes in the "contact grill" position until the meat is fully cooked and lightly browned.
5) Serve with lemon slices.
11.2. Lemon and herb-crusted salmon
Ingredients:
◆ 2 salmon fillets (without skin)
◆ 1 tbsp. lemon juice
◆ 1 tsp. dill
◆ 1 tsp. parsley
Salt, pepper
◆ 3 tbsp. cooking oil
Preparation:
1) Marinate the salmon with oil, lemon juice, herbs, salt and pepper.
2) Grill in the contact grill for about 9-12 minutes until the fish is tender.
3) Season with some additional lemon juice.
11.3. Grilled vegetables baguette
Ingredients:
♦ 12 courgette
♦ 12 bell pepper
♦ 12 aubergine
◆ 4 tbsp. olive oil
♦ Salt, pepper, garlic powder
◆ 2 rustic baguettes
Preparation:
1) Mix the vegetables with the oil and seasoning.
2) Grill for about 7-8 minutes on both sides in the "table grill" position until soft and browned.
3) Cut open the baguettes and place the grilled vegetables inside.
4) Close the baguettes and place on the lower griddle ⑦.
5) Grill in the "contact grill" position for about 7-9 minutes until the baguettes are lightly browned.
11.4. Beef steak with herb butter
Ingredients:
◆ 2 beef steaks
(e.g. rump steak, about 200 g each)
◆ 2 tbsp. olive oil
♦ Salt (e.g. coarse sea salt)
◆ Freshly ground black pepper
For the herb butter:
◆ 100 g soft butter
◆ 1 clove of garlic (crushed)
◆ 1 tsp. lemon juice
◆ 1 tsp. mustard (medium)
◆ 1 tbsp. freshly chopped herbs (e.g. parsley, chives, thyme)
♦ Salt and pepper to taste
Preparation:
1) First prepare the herb butter: Mix all ingredients and stir well.
2) Wrap in cling film, shape into a roll and chill.
3) Take the steak out of the refrigerator at least 30 minutes before grilling and dab dry with kitchen paper.
4) Rub lightly with olive oil and season generously with salt and pepper on both sides.
5) Place the steaks on the lower griddle ⑦ and close the lid.
6) Grill for about 3-4 minutes according to the desired level of doneness.
7) Then remove the meat from the grill and let rest for 3–5 minutes, loosely covered with aluminium foil.
8) Add a slice of herb butter to the steak before serving.
11.5. Grilled fruit with maple syrup
Ingredients:
◆ Fruit (e.g. banana, pineapple, apple or pear)
◆ 1 tbsp. maple syrup or agave syrup
♦ Cinnamon
♦ Vanilla ice cream
♦ Aluminium foil
Preparation:
1) Cut the fruit into slices.
2) Lay on aluminium foil, drizzle with maple syrup and sprinkle with cinnamon to taste.
3) Fold the aluminium foil closed to create small packets.
4) Place the packets on the lower griddle ⑦ and grill for about 3–5 minutes in the "contact grill" position.
5) Serve with vanilla ice cream - perfect as a dessert.
11.6. Mediterranean chicken skewers
Ingredients:
◆ 1 chicken breast fillet, cut into chunks
◆ 1 bell pepper, cut into chunks
◆ 1 courgette, in slices
◆ 1 small red onion, in pieces
◆ 4 tbsp. olive oil
◆ 1 tsp. paprika powder
◆ 1 tsp. dried oregano
Salt, pepper
◆ Wood skewers (softened in water)
Preparation:
1) Marinate the meat and vegetables in a bowl with the oil and seasoning (at least 15 minutes).
2) Stick onto the skewers.
3) Grill in the "table grill" position for about 10–16 minutes, turning occasionally, until the meat is done.
11.7. Halloumi & vegetable packets (vegetarian)
Ingredients:
◆ 200 g halloumi, in slices
◆ 1 small courgette, in slices
◆ 1 red bell pepper, in strips
◆ 1 tsp. thyme (fresh or dried)
◆ 1 tbsp. olive oil
♦ Pepper
♦ Aluminium foil
Preparation:
1) Mix the vegetables with the oil, pepper and thyme.
2) Wrap with the halloumi in aluminium foil.
3) Grill the packets on the grill for about 10-12 minutes until the cheese is soft and the vegetables are cooked through.
11.8. Grilled vegetables with chickpea marinade (vegan)
Ingredients:
◆ 1 small aubergine, in slices
◆ 1 yellow bell pepper, in strips
◆ 1 small sweet potato, cut thin
◆ 100 g boiled chickpeas, puréed
◆ 1 tsp. lemon juice
◆ 1 tsp. maple syrup
◆ 1 tsp. soya sauce
◆ 1 tsp. paprika powder
Preparation:
1) Mix the seasoning into the chickpea purée, then coat the vegetables with the mixture.
2) Place on the griddles ⑦/⑨ in the "table grill" position and grill for 10–15 minutes, turning occasionally.
11.9. Grilled scampi skewers with garlic-lemon marinade
Ingredients:
◆ 200 g scampi or king prawns (peeled and deveined)
◆ 1 garlic clove, finely chopped
◆ 1 organic lemon (juice + a little zest)
◆ 2 tbsp. olive oil
◆ 1 tsp. honey or agave syrup
◆ 1 pinch chili powder
Salt, pepper
♦ Fresh parsley
◆ Wood skewers (softened in water)
Preparation:
1) Mix the lemon juice, lemon zest, olive oil, garlic, honey, chilli powder, salt and paper in a bowl.
2) Marinate the scampi for 10-15 minutes.
3) Stick onto the skewers.
4) Grill for about 2–3 minutes per side in the "table grill" position until pink and lightly browned.
5) Sprinkle with parsley and serve.
11.10. Stuffed sea bream
Ingredients:
◆ 1 small sea bream (gutted and scaled)
◆ 1 clove of garlic
♦ 12 lemon
◆ 1 tbsp. olive oil
♦ Fresh thyme, fresh dill
Salt, pepper
Preparation:
1) Wash sea bream thoroughly inside and out. Cut lightly into the surface of both sides three times.
2) Peel the garlic and cut into slices.
3) Press the garlic into the slits to prevent it from burning on the grill.
4) Cut the lemon into slices.
5) Fill the belly with the fresh herbs, place the lemon slices inside.
6) Brush the fish with oil, sprinkle with salt and pepper.
7) Grill about 10–15 minutes in the "contact grill" position until the skin is crispy and the meat is white.
12. Disposal

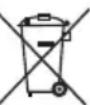
The symbol of the crossed-out wheelie bin means that this appliance may not be disposed of in regular household waste at the end of its service life. The
appliance must be deposited at an established collection point, recycling centre or disposal company.
Please erase all personal data before returning an appliance.
The packaging is made from environmentally friendly material which can be disposed of at your local recycling plant.
Dispose of the packaging in an environmentally friendly manner.
13. Kompernass Handels GmbHwarranty
Dear Customer,
This appliance has a 3-year warranty valid from the date of purchase. If this product has any faults, you, the buyer, have certain statutory rights. Your statutory rights are not restricted in any way by the warranty described below.
Warranty conditions
The warranty period starts on the date of purchase. Please keep your receipt in a safe place. This will be required as proof of purchase.
If any material or manufacturing fault occurs within three years of the date of purchase of the product, we will either repair or replace the product for you or refund the purchase price (at our discretion).
This warranty service requires that you present the defective appliance and the proof of purchase (receipt) within the three-year warranty period, along with a brief written description of the fault and of when it occurred.
If the defect is covered by the warranty, your product will either be repaired or replaced by us. The repair or replacement of a product does not signify the beginning of a new warranty period.
Warranty period and statutory claims for defects
The warranty period is not prolonged by repairs effected under the warranty. This also applies to replaced and repaired components. Any damage and defects present at the time of purchase must be reported immediately after unpacking. Repairs carried out after expiry of the warranty period shall be subject to a fee.
Scope of the warranty
This appliance has been manufactured in accordance with strict quality guidelines and inspected meticulously prior to delivery.
The warranty covers material faults or production faults. The warranty does not extend to product parts subject to normal wear and tear or to fragile parts which could be considered as consumable parts such as switches or parts made of glass.
The warranty does not apply if the product has been damaged, improperly used or improperly maintained. The directions in the operating instructions for the product regarding proper use of the product are to be strictly followed. Uses and actions that are discouraged in the operating instructions or which are warned against must be avoided.
This product is intended solely for private use and not for commercial purposes. The warranty shall be deemed void in cases of misuse or improper handling, use of force and modifications / repairs which have not been carried out by one of our authorised Service centres.
Warranty claim procedure
To ensure quick processing of your case, please observe the following instructions:
■ Please have the till receipt and the item number (IAN) 494689_2504 available as proof of purchase.
■ You will find the item number on the type plate on the product, an engraving on the product, on the front page of the operating instructions (below left) or on the sticker on the rear or bottom of the product.
If functional or other defects occur, please contact the service department listed either by telephone or by e-mail.
■ You can return a defective product to us free of charge to the service address that will be provided to you. Ensure that you enclose the proof of purchase (till receipt) and information about what the defect is and when it occurred.

You can download these instructions along with many other manuals, product videos and installation software at www.lidl-service.com.
This QR code will take you directly to the Lidl service page (www.lidl-service.com) where you can open your operating instructions by entering the item number (IAN) 494689_2504.
13.1. Service
GB Service Great Britain
Tel.: 0800 404 7657
E-Mail: kompernass@lidl.co.uk
IE ServiceIreland
Tel.: 1800 101010
E-Mail: kompernass@lidl.ie
MT ServiceMalta
Tel.: 80062230
E-Mail: kompernass@lidl.com.mt
IAN 494689_2504
13.2. Importer
Please note that the following address is not the service address. Please use the service address provided in the operating instructions.
KOMPERNASS HANDELS GMBH
BURGSTRASSE 21
44867 BOCHUM
GERMANY
www.kompernass.com
Inhaltsverzeichnis
1. Einleitung 18
KOMPERNASS HANDELS GMBH
BURGSTRASSE 21
44867 BOCHUM
DEUTSCHLAND
www.kompernass.com
Table des matières
1. Introduction 34
2. Usage conforme 34
KOMPERNASS HANDELS GMBH
BURGSTRASSE 21
44867 BOCHUM
ALLEMAGNE
www.kompernass.com
Inhoud
1. Inleiding 52
WAARSCHUWING! LETSELGEVAAR!
KOMPERNASS HANDELS GMBH
BURGSTRASSE 21
44867 BOCHUM
DUITSLAND
www.kompernass.com
Obsah
1. Úvod 68
KOMPERNASS HANDELS GMBH
BURGSTRASSE 21
44867 BOCHUM
NĚMECKO
www.kompernass.com
Spis treści
1. Wstep 82
KOMPERNASS HANDELS GMBH
BURGSTRASSE 21
44867 BOCHUM
NIEMCY
www.kompernass.com
Obsah
1. Úvod 98
KOMPERNASS HANDELS GMBH
BURGSTRASSE 21
44867 BOCHUM
NEMECKO
www.kompernass.com
Índice
KOMPERNASS HANDELS GMBH
BURGSTRASSE 21
44867 BOCHUM
ALEMANIA
www.kompernass.com
Indholdsfortegnelse
1. Introduktion 128
2. Anvendelsesområde 128
3. Anvendte advarsler og symboler 128
4. Sikkerhed 129
KOMPERNASS HANDELS GMBH
BURGSTRASSE 21
44867 BOCHUM
TYSKLAND
www.kompernass.com
Indice
1. Introduzione 142
2. Uso conforme 142
KOMPERNASS HANDELS GMBH
BURGSTRASSE 21
44867 BOCHUM
GERMANIA
www.kompernass.com
Tartalomjegyzék
1. Bevezető 158
KOMPERNASS HANDELS GMBH
BURGSTRASSE 21
44867 BOCHUM
NÉMETORSZÁG
www.kompernass.com

KOMPERNASS HANDELS GMBH
BURGSTRASSE 21
44867 BOCHUM
GERMANY
www.kompernass.com
Last Information Update · Stand der Informationen · Version des informations
Stand van de informatie · Stav informací · Stan informacji · Stav informácií
Estado de las informaciones · Tilstand af information · Versione delle informazioni

- MINI CONTACT GRILL, MINI-KONTAKTGRILL, MINI GRIL DE CONTACT SKM 1000 B1
- MINI CONTACT GRILL
- MINI GRIL DE CONTACT
- MINI KONTAKTNÍ GRIL
- KONTAKTNÝ MINIGRIL
- MINI KONTAKTGRILL
- Contents
- Introduction 2
- Intended use 2
- Warnings and symbols used 2
- Safety 3
- Operating elements 6
- Technical data 6
- Package contents 6
- Setting up and using the appliance 7
- Cleaning and care 10
- Storage 10
- Recipes 10
- Disposal 13
- Intended use
- Warnings and symbols used
- Safety
- Basic safety guidelines
- RISK OF ELECTRIC SHOCK!
- WARNING! RISK OF INJURY!
- Caution! Hot surface!
- CAUTION! MATERIAL DAMAGE!
- Operating elements
- Technical data
- Package contents
- i Note
- First use
- Setting up and using the appliance
- Use
- "Contact grill" position
- "Table grill" position
- ! ATTENTION!
- Cooking table
- Cleaning and care
- DANGER!
- Storage
- Recipes
- Mediterranean chicken breast
- Ingredients:
- Preparation:
- Lemon and herb-crusted salmon
- Grilled vegetables baguette
- Beef steak with herb butter
- For the herb butter:
- Grilled fruit with maple syrup
- Mediterranean chicken skewers
- Halloumi & vegetable packets (vegetarian)
- Grilled vegetables with chickpea marinade (vegan)
- Grilled scampi skewers with garlic-lemon marinade
- Stuffed sea bream
- Disposal
- Kompernass Handels GmbHwarranty
- Warranty conditions
- Warranty period and statutory claims for defects
- Scope of the warranty
- Warranty claim procedure
- Service
- Importer
- Inhaltsverzeichnis
- Einleitung 18
- Table des matières
- Introduction 34
- Usage conforme 34
- Inhoud
- Inleiding 52
- WAARSCHUWING! LETSELGEVAAR!
- Obsah
- Úvod 68
- Spis treści
- Wstep 82
- Úvod 98
- Índice
- Indholdsfortegnelse
- Introduktion 128
- Anvendelsesområde 128
- Anvendte advarsler og symboler 128
- Sikkerhed 129
- Indice
- Introduzione 142
- Uso conforme 142
- Tartalomjegyzék
- Bevezető 158
- KOMPERNASS HANDELS GMBH
Brand : SILVERCREST
Model : SKM 1000 A1
Category : Grill plate