
SRGS 1400 E2 - Grill plate SILVERCREST - Free user manual and instructions
Find the device manual for free SRGS 1400 E2 SILVERCREST in PDF.

User questions about SRGS 1400 E2 SILVERCREST
0 question about this device. Answer the ones you know or ask your own.
Ask a new question about this device
Download the instructions for your Grill plate in PDF format for free! Find your manual SRGS 1400 E2 - SILVERCREST and take your electronic device back in hand. On this page are published all the documents necessary for the use of your device. SRGS 1400 E2 by SILVERCREST.
USER MANUAL SRGS 1400 E2 SILVERCREST
natural_image
Exterior view of a portable electric stove with a black tray and control panel (no visible text or symbols)RACLETTE-GRILL SRGS 1400 E2 RACLETTE GRILL SRGS 1400 E2 RACLETTE-GRIL SRGS 1400 E2
TARGA GMBH
Coastorweg 45
GERMANY
Vare on the information
Operating Instructions and safety Instructions
M
GOURMETSET
Handeliding en verlicheidsaunwitzinger
②
BACLETTE CPU
Deutsch....2
English 20
Français 37
Nederlands....58
Polski....75
Česky 92
Slovenčina 108
Español 125
Dansk....142
Italiano....159
Magyar 176
Inhaltsverzeichnis
natural_image
Top-down schematic of a device enclosure with internal components and ventilation slots (no text or labels)9. Rezeptvorschläge
- Intended use....21
- Package contents.... 21
- Technical Data....22
- Safety instructions....22
- Before initial use 26
- Initial use ....26
6.1 Initial use....26
6.2 Operation....26
6.2.1 Switching on/off 26
6.2.2 Heating times....27
6.2.3 Increasing/decreasing the temperature 27
6.3 Using the raclette grill 27
6.3.1 Using the raclette....27
6.3.2 Using the grill plate [1] and stone plate [2] 28
- Cleaning....28
- Storing the device when not in use 29
- Recipe suggestions....30
- Environmental and waste disposal information....34
- Marks of conformity 35
- Warranty information....35
Congratulations!
By purchasing the SilverCrest SRGS 1400 E2 raclette grill, hereinafter referred to as raclette grill, you have opted for a high-quality product.
Familiarise yourself with the raclette grill before using it for the first time and read these operating manual carefully. Observe the safety instructions and only use the raclette grill in the manner described in these operating manual and for the indicated fields of application.
Keep these operating instructions in a safe place. Hand over all documents in the event that you pass on the raclette grill to a third party.
1. Intended use
This raclette grill is designed to grill and scallop foodstuffs such as meat, fish and vegetables. Use the raclette grill solely for private purposes; any other use is deemed improper. It is not intended for business or commercial use.
This also includes:
• in staff kitchens in shops, offices and other work situations;
• in agricultural situations;
• for guests in hotels, motels and other similar accommodation;
• and in bed and breakfasts.
In addition, the raclette grill must not be used outside of closed rooms or in regions with a tropical climate. This raclette grill meets the requirements of all relevant standards related to CE conformity. Compliance with these standards is no longer guaranteed if a change is made to the raclette grill without the authorisation of the manufacturer. The manufacturer shall not be liable for any damages or faults arising as a result.
Please observe the national regulations and/or laws of the country in which the device is used.
2. Package contents
Unpack the • raclette grill and all of the accessories. Remove all packaging materials and check all of the components for completeness and signs of damage. If any parts are missing or damaged, please contact the manufacturer.
- Raclette grill
- Grill plate
- Stone plate
- Eight small pans
- Eight spatula
- Operating manual
The inside of the cover provides a schematic of the raclette grill and all controls. The numbers identify the following parts/functions:
| 1 Grill plate [can be used on both sides] | |
| 2 Stone plate [with grease drainage] | |
| 3 | Handle |
| 4 Cable rewind [on the underside] | |
| 5 Temperature knob [with on/off switch] | |
| 6 Heat indicator light [green] | |
| 7 Power indicator light [red] | |
| 8 Guide rail | |
| 9 Power cable | |
| 10 Spatula [8 pcs.] | |
| 11 Small pans [8 pcs.] | |
3. Technical Data
| Manufacturer TARGA GmbH | |
| Designation SilverCrest SRGS 1400 E2 | |
| Power supply 220–240 V~, 50–60 Hz | |
| Power consumption 1,400 W | |
| Protection class | I |
| Safety tested: SGS |  |
The specifications and design are subject to change without notice.
4. Safety instructions
Before using the device for the first time, please read the following instructions carefully and observe all warnings, even if you are familiar with using electronic and household devices. Keep this operating manual in a safe place for future reference. If you give the device away or sell it, please ensure that you also pass on this operating manual. It is part of the device.
Key to symbols

DANGER! This signal word indicates a hazard involving a high level of risk, which if not avoided, may result in severe injury or death.

WARNING This signal word indicates danger involving a medium level of risk, which if not avoided, may result in severe injury or even death.

CAUTION! This warning indicates important information for protection against damage to property.

DANGER! This symbol indicates hazards to health and/or property posed by an electric shock, potentially including risk of death.

DANGER! This symbol indicates health hazards due to burns.

This symbol indicates that the raclette grill is designed for indoor use only.

Harmless to health in terms of contact with foodstuffs in accordance with EC 1935/2004.

This symbol indicates further information on the topic.

Manufacturer's address
Foreseeable misuse
- This raclette grill is not intended for operation with an external timer or a separate remote control system. Do not leave the raclette grill switched on or unattended. There is a risk of fire!
Personal safety
- This device may be used by children aged eight and over and by people with reduced physical, sensory or mental abilities or who lack experience and knowledge, provided that they are supervised or have been instructed in the safe use of the device and understand the resulting dangers.
• Children must not play with the device.
- Children must not clean or carry out maintenance on the device unless they are over eight years of age and supervised by an adult.
- Children under eight years of age are to be kept away from the device and the power cable [9].

DANGER! The packaging material is not a toy. Children must not play with plastic bags. There is a risk of suffocation.
Store the device out of reach of children.
General safety instructions

Risk of injury!
- Use the raclette grill as intended. Misuse of the device may result in injury.
- Place the device near a power socket. Ensure that the power socket is easily accessible in case of danger. Lay the power cable (9) in such a way that nobody can trip over it.
- Ensure that the raclette grill is positioned securely.

DANGER of burns!
- The surfaces of the raclette grill can become very hot during operation.
- Only touch the temperature knob (5) and the side handles (3) during and immediately after operation.

CAUTION: Potential damage to property!
- Protect the non-stick coating of the small pans and the grill plate [1] by avoiding the use of metal implements such as knives, forks, etc.
- Only use the original accessories that came with the raclette grill.
- Clean the raclette grill and accessories after each use as described in the ‘Cleaning’ section.

DANGER of electric shock!
- Check the connecting cable for damage before using the device for the first time. Do not use the raclette grill in the event of damage.
- If the device's power cable is damaged, it must be replaced by the manufacturer, their service department or by a similarly qualified person in order to prevent any hazards.
- To prevent damage, protect the connecting cable from coming into contact with product parts that may become hot. Make sure the power cable [9] is not jammed or squashed.
- Always unplug the device from the power socket by pulling on the plug, and never by tugging on the power cable [9].
- Never open the housing of the raclette grill, as this contains parts to be maintained. If the housing is open, there is a risk of electric shock.
- Protect the raclette grill from rain and never use it in a damp or wet environment. Ensure that the connecting cable does not become wet or damp during operation.

Never immerse the raclette grill in water or any other liquid!
- If you notice any smoke, unusual noises or smells, switch the raclette grill off immediately and remove the plug from the power socket. If this happens, you must stop using the raclette grill until it has been checked by a technician. If the device catches fire, do not inhale any resulting smoke. If you do inhale any smoke, seek medical attention. Inhaling smoke can be harmful to your health.

RISK of fire
- Never operate the raclette grill under wall-mounted cabinets or next to curtains, cupboard walls or other flammable objects.
- Only operate the raclette grill on a flat, stable and heat-resistant surface.
5. Before initial use
Remove the raclette grill and all accessories from the packaging and check the completeness of the delivery. Remove the protective film. Keep the packaging material away from children and dispose of it in an environmentally-friendly manner.
6. Initial use

Clean all parts as described in the ‘Cleaning’ section before using the raclette grill for the first time.
Do not place the raclette grill directly against a wall during operation. Always place it so that all small pans (11) are always easily accessible and within reach.

The grill plate (1) can be used on both sides. When using the ribbed cooking surface, you achieve the typical charred grill pattern on the food.
The milled channel for grease drainage must face upwards when using the stone plate [2].
Caution! Hot surfaces!

Only touch the handles (3) and the temperature knob (5) during operation.
Only hold the small pans [11] by the handle.
- Place the raclette grill on a heat-resistant, clean and level surface.
- Place the grill plate (1) and stone plate (2) between the guide rails (8) from above. You can choose which side you want to use which plate.
- Slide the small pans (11) into the raclette grill.
6.1 Initial use

A small amount of smoke and slight odours may develop when heating up the device for the first time; these are due to residues left over from production. This is completely normal and harmless. Ensure adequate ventilation and open a window, if necessary.
- Insert the plug into a power socket. The power indicator light (7) lights up red.
- Turn the temperature knob (5) to the 'MAX' position. The heat indicator light (6) lights up green and the raclette grill heats up.
- Allow the raclette grill to heat up for 20 minutes and then turn the temperature knob [5] to the '0' position in order to switch off the raclette grill.
- Remove the plug from the socket. The power indicator light (7) goes out.
- Allow the raclette grill and all accessories to cool down completely.
- Clean the raclette grill and all accessories as described in the 'Cleaning' section.
6.2 Operation
6.2.1 Switching on/off
- Turn the temperature knob (5) to the '0' position and connect the raclette grill to the mains network. The raclette grill is switched off and the power indicator light (7) lights up red.
- Switch on the raclette grill by turning the temperature knob [5] clockwise. The heat indicator light [6] lights up red.

The heat indicator light [6] lights up and goes out at irregular intervals during operation. This indicates that the raclette grill has reached the temperature you have selected and is maintaining it. It does not indicate that the device is defective.
- Switch off the raclette grill by turning the temperature knob (5) anti-clockwise to the '0' position. The heat indicator light (6) switches off and the power indicator light (7) lights up red.
6.2.2 Heating times

The heating time is approx. 10 minutes when using the grill plate (1) and the small pans (11).
When using the stone plate [2], the heating time is approx. 30 minutes. It takes this amount of time for the stone plate [2] reach the desired temperature due to its mass.
6.2.3 Increasing/decreasing the temperature

To increase the temperature: Turn the temperature knob [5] clockwise.
To reduce the temperature: Turn the temperature knob (5) anti-clockwise.
6.3 Using the raclette grill

Heating can start in different positions of the temperature knob [5], depending on the ambient temperature.
Wait until the raclette grill has heated up before inserting the small pans [11], enabling your ingredients to be cooked to the desired temperature.
- Select the side of the grill plate [1] that you want to use. This side must face upwards.
- Lightly grease the upper surface of the grill plate [1], the stone plate [2] and the insides of the small pans [11].
- Insert the plug into a power socket. The power indicator light [7] lights up red.
- Turn the temperature knob (5) to the 'MAX' position in order to heat up the raclette grill. Please bear in mind that the preheating times are approx. 10 or approx. 30 minutes, depending on you plan to use it.
6.3.1 Using the raclette

Do not overfill the small pans (11); otherwise, the food could get too close to the heating element or even touch it.
Check regularly whether the contents on your small pans [11] have reached the desired cooking point in order to prevent the food from overcooking or even burning.
If you want to reuse a small pan (11) that has already been used, make sure it has no food residue on the inside or outside, as it could become burnt-on. The small pans (11) feature a non-stick coating and so it is not necessary to add more grease before preparing additional portions.
The small pans (11) also feature coloured dots on the handle so you can keep track of them more easily. This ensures that you can easily recognise which small pan (11) belongs to which person.
- Fill the small pans [11] with the desired ingredients and slide them into the corresponding recesses in the raclette grill.
- Use the temperature knob (5) to set the desired temperature.
-
Remove the small pans [11] when the ingredients are properly cooked.
-
Use a spatula [10] to slide the contents of the small pans [11] onto a plate.
- If desired, refill the small pan (11) and slide it back into the raclette grill.
- Turn the temperature knob (5) to the '0' position and remove the plug from the power socket if the raclette grill is no longer in use.
- Allow the raclette grill and accessories to cool down completely before cleaning them.
6.3.2 Using the grill plate (1) and stone plate (2)

- You can use the grill plate (1) and stone plate (2) to prepare other foods and side dishes, including meat, vegetables, potatoes, fruit, etc.
- Do not use metal objects to turn or remove food when using the grill plate [1]. This could damage the non-stick coating of the grill plate [1].
- The stone plate [2] may become slightly discoloured over time. This is not a defect and does not have a negative effect on how it works.
-
Make sure that the milled channel for grease drainage of the stone plate [2] does not overflow.
-
Place the food on the grill plate (1) and/or on the stone plate (2).
- Use the temperature knob (5) to set the desired temperature.
- Turn the food from time to time.
- Remove the food as soon as it is properly cooked.
- Turn the temperature knob (5) to the '0' position and remove the plug from the power socket if the raclette grill is no longer in use.
- Allow the raclette grill and accessories to cool down completely before cleaning them.
7. Cleaning

DANGER of burns
Wait until all components have cooled down completely before cleaning them. Otherwise you could burn yourself.

DANGER of electric shock
Always remove the plug from the power socket before cleaning commences. Otherwise, there is a risk of electric shock.

WARNING – potential damage to property
Do not use any scratching or abrasive cleaning agents or abrasive objects (such as a metal scourer) for cleaning purposes. This could result in damage to the surfaces.

The grill plate (1), small pans (11) and spatulas (10) are also dishwasher-safe.
Raclette grill (basic unit)
- Remove dirt with a hand brush or a plastic scraper.
- Wipe down the housing parts and heating element with a damp cloth. If necessary, apply a little washing-up liquid to the cloth and wipe with clean water.
Accessories
- Wash the grill plate (1), small pans (11) and spatulas (10) in warm water with soap. Rinse the parts with clean water and dry everything thoroughly.
• Alternatively, the following parts can also be cleaned in the dishwasher:
Stone plate [2]
- The stone plate [2] can be cleaned in warm water with soap. Use a sponge to clean it and then rinse with plenty of clean water to completely remove any residue from the washing-up liquid.
- In the case of stubborn burnt-on residues, it may be helpful to place the stone plate [2] in warm water with soap for a longer period of time to loosen up the sticky food mess.
- Allow the stone slab [2] to dry thoroughly after cleaning.
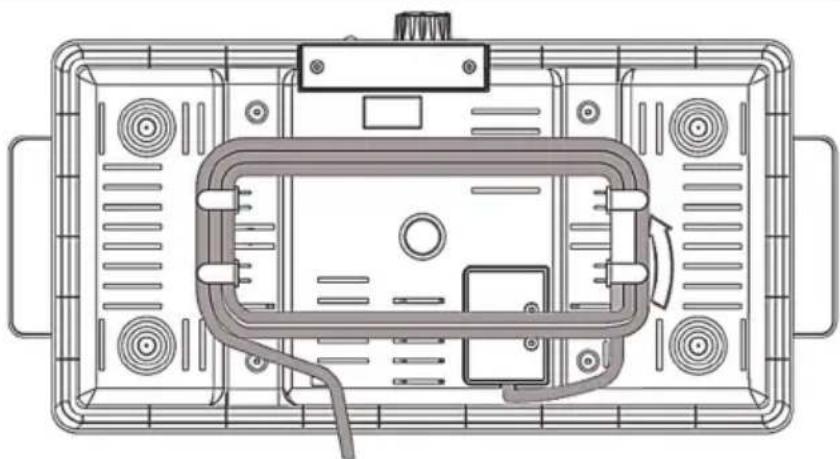
8. Storing the device when not in use
- If the raclette grill will not be used for a longer period of time, clean it and store it in a clean and dry place.
- Wrap the power cable [9] around the cable rewind [4] in the direction of the arrow.
natural_image
Top-down schematic of a device enclosure with ventilation grilles and control panel (no text or labels)9. Recipe suggestions
Grilled chicken tenders
| Ingredients | |
| 1 chicken breast [defrosted, approx. 200 g] 2 tsp paprika powder or chicken spice | |
| 1 tsp salt 5 g butter | |
How to make the recipe:
Use the grill plate [1] to prepare this dish.
➢ Preheat the product for 10 minutes on the 'MAX' position.
➢ Cut the chicken breast into strips approx. 1 cm thick.
➢ Season the chicken tenders in a bowl with salt and paprika powder or chicken seasoning. Leave the seasoned chicken tenders to rest for 30 minutes.
Melt the butter on the grill plate [1] and use a spatula [10] to spread it around.
Place the chicken tenders on the grill plate [1] and cook for approx. 3 minutes per side.
The chicken tenders are cooked when they are golden brown.
Tip: You can also gratinate the grilled chicken tenders in a small pan [11].
Grilled pork fillet
| Ingredients | |
| 200 g pork fillet (defrosted) 1/2 tsp pepper | |
| 1 tsp salt 5 g butter | |
How to make the recipe:
Use the grill plate [1] to prepare this dish.
➢ Preheat the product for 10 minutes on the 'MAX' position.
➢ Slice the pork fillet into pieces approx. 1 cm thick.
➢ Season the meat with salt and pepper and leave to rest for 10 minutes.
Melt the butter on the grill plate [1] and use a spatula [10] to spread it around.
Place the fillet slices on the grill plate [1] and cook them for approx. 3 minutes per side.
The pork fillet is ready to serve when it is lightly roasted.
Tip: You can also use fillet of beef instead of pork fillet. Then reduce the grilling time by 1 minute per side.
Scrambled eggs with bell pepper or tomato
| Ingredients | |
| 4 eggs 1/2 tsp salt | |
| 1/2 bell pepper or 1 tomato 5 g butter | |
How to make the recipe:
➢ Grease the small pans [11] with some vegetable oil and place them under the grill plates.
Preheat the product for 10 minutes on the 'MAX' position.
In the meantime, beat the eggs in a bowl and add the salt. Whisk the eggs briefly with a whisk or mixer.
➢ Cut the bell pepper (or tomato) into small pieces (approx. 5 x 5 mm) and add them to the egg mixture.
Pour the egg mixture into the small pans [11]. Note: fill the small pans only to half the height of the pan!
▶ Slide the small pans (11) into the raclette grill.
The egg is ready to serve when it is cooked through.
Tip: The cooked egg also tastes great on sandwich bread.
Grilled salmon
| Ingredients | |
| 2 pcs. 100 g salmon fillet (defrosted) 1/2 tsp pepper | |
| 1 tsp salt 10 g butter | |
How to make the recipe:
➢ Use the stone plate [2] to prepare this dish.
➢ Preheat the product for 25 minutes on the 'MAX' position.
➢ Season the salmon fillet with salt and pepper.
Melt the butter on the stone plate [2] and use a spatula [10] to spread it around.
Place the salmon on the stone plate [2] and fry the salmon for 3 to 4 minutes per side.
The salmon is ready to serve when it easily flakes when lightly pressed with a fork.
Leave the pieces of salmon to rest for 3 minutes before eating. The salmon should have reached an internal temperature of 60^ C.
Grilled bacon [smoked or untreated]
| Ingredients | |
| 8 slices of bacon (thinly sliced) 1/2 tsp pepper | |
| 1/2 tsp salt | |
How to make the recipe:
Use the grill plate [1] to prepare this dish.
➢ Preheat the product for 10 minutes on the 'MAX' position.
➢ Cut the bacon into strips approx. 15 to 20 cm long.
You can season untreated bacon with salt and pepper to taste, but this is not necessary with smoked bacon.
Place the bacon on the grill plate [1].
Fry the bacon for 2 to 3 minutes per side.
The bacon is ready to serve when it is golden brown.
Tip: Grilled bacon tastes great in combination with grilled pork fillet or mini burgers prepared on a raclette grill.
Grilled vegetables
| Ingredients | |
| 1/2 onion 1/2 tsp salt | |
| 1 bell pepper A pinch of pepper | |
| 3 mushrooms 20 g butter | |
How to make the recipe:
➢ Use the grill plate [1] to prepare this dish.
➢ Preheat the product for 10 minutes on the 'MAX' position.
➢ Cut the onion, bell pepper and mushrooms into slices approx. 5 mm thick. Halve or quarter the slices again so that you have bite-sized pieces.
▶ Melt the butter on the grill plate [1].
Place all the vegetable slices on the grill plate [1].
Turn and stir the vegetables every 2 minutes. Use two spatulas (10) to do so.
➢ Season to taste with salt and pepper.
The vegetables are ready to serve when they are lightly browned and have reached the desired softness.
Grilled mushrooms au gratin
| Ingredients | |
| 6 mushrooms 100 g grated cheese (your choice) | |
| 1/2 tsp salt 20 g butter | |
How to make the recipe:
Use the grill plate [1] to prepare this dish.
➢ Preheat the product for 10 minutes on the 'MAX' position.
Clean the mushrooms and remove the stems.
▶ Melt the butter on the grill plate [1].
Place the mushrooms on the grill plate [1] and fry for approx. 3 to 4 minutes per side.
Use a spatula [10] to spread the butter over the mushrooms. Allow the mushrooms to absorb the butter.
➢ Season to taste with salt and pepper.
When the mushrooms are fried, place them in a small pan (11) with the rounded edge facing down and fill the mushrooms with the grated cheese.
▶ Slide the small pan (11) into the raclette grill.
The mushrooms are ready to serve when the cheese is melted and lightly browned.
| Ingredients | |
| 250 g lean minced meat 1 tsp mustard | |
| 1 egg 1 onion (finely diced) | |
| 1/2 tsp salt 10 g butter | |
| 1/2 tsp pepper Tomatoes or cucumbers, cut into thin slices | |
| 4 tbsp breadcrumbs 8 slices of cheese (your choice) | |
How to make the recipe:
Use the stone plate [2] to prepare this dish.
➢ Preheat the product for 25 minutes on the 'MAX' position.
In a mixing bowl, mix the minced meat, salt, pepper, egg, breadcrumbs, mustard and finely diced onions.
➢ Gather the patty mix and press firmly into 8 equally sized hamburger patties (max. 1 cm in thickness).
Place the patties on the stone plate [2] and cook for 3 minutes per side until they are nicely browned.
Place each patty in a small pan (11) and garnish with a slice of tomato or cucumber. Place a slice of cheese over everything.
Slide the small pan (11) into the raclette grill. Make sure that your mini burgers are not too high and touching the heating elements.
The mini burgers are ready to serve when the cheese has melted.
Tip: You can place the 'Raclette Mini Burger' between two slices of toast and eat it like a real burger.
Potato gratin
| Ingredients | |
| 2 large potatoes 50 g whipping cream | |
| Approx. 50 g grated cheese 1/2 tsp salt | |
| 1/2 onion (finely diced) A pinch of pepper | |
| 1/2 clove of garlic (finely chopped) A pinch of nutmeg | |
| 80 g sour cream 1 tsp Italian herbs, dried | |
How to make the recipe:
▶ Slide the small pans [11] into the raclette grill.
Preheat the product for 10 minutes on the 'MAX' position.
Boil the potatoes in water for 20 minutes until they are done. Pour out the water and leave the potatoes to cool.
Whisk the cheese, onion, garlic, sour cream and whipping cream together with the spices in a mixing bowl and make a sauce.
➢ Peel the cooled potatoes and cut them into thin slices.
Remove the small pans [11] and layer the thinly sliced potato so they overlap somewhat in the small pans [11]. Pour the sauce over the potatoes until they are lightly covered.
Return the small pans [11] to the raclette grill. The potato gratin is ready to serve when the surface has turned a golden brown colour.
Sweet or savoury pancakes
| Ingredients | |
| 60 g wheat flour 85 ml milk | |
| 15 g sugar 15 g butter | |
| 1 medium egg A pinch of salt | |
How to make the recipe:
▶ Slide the small pans [11] into the raclette grill.
Set the temperature knob (5) to 3/4 of the 'MAX' position and preheat the device for 10 minutes.
In a mixing bowl, mix the flour, sugar, salt and egg.
- Add the milk slowly so that no lumps form.
Leave the dough to rest for at least 20 minutes.
Spread the butter around the small pans [11], allowing it to melt.
Divide the batter evenly between the pans [11] so that the base is covered.
The pancakes are ready to serve when the edges turn golden brown.
Top the pancakes as you wish.
Tip: Spread thinly with fruit spread and garnish with fresh fruit.
10. Environmental and waste disposal information
 | Devices marked with this symbol are subject to the European Union Directive 2012/19/EU. Electrical and electronic devices may not be put in the household waste, but must be disposed of via designated public disposal centres. By properly disposing of the old device, you can avoid environmental damage and hazards to health. Further information regarding proper disposal of the old device can be obtained from your local authority or the shop where you purchased the device. | |
 | Make sure that the packaging is disposed of in an environmentally friendly manner. Cardboard packaging can be put out for waste-paper collection or taken to public collection points for recycling. The plastic packaging used for your device will be collected by your local waste management company and disposed of in an environmentally friendly manner. | |
 | ||
Relevant for France only:      Points de collecte sur www.quefairedemesdechets.fr Privilégiez la réparation ou le don de votre appareil !‘Sorting made easier’This product, including all accessories, its printed material and packaging components, can be recycled. They are subject to an extended producer responsibility and are sorted and collected separately. Points de collecte sur www.quefairedemesdechets.fr Privilégiez la réparation ou le don de votre appareil !‘Sorting made easier’This product, including all accessories, its printed material and packaging components, can be recycled. They are subject to an extended producer responsibility and are sorted and collected separately. | ||
 | Please pay attention to the labels on packaging materials when you separate waste; these are marked with abbreviations (a) and numbers (b) that mean the following: 1-7: Plastics/20-22: Paper and cardboard/80-98: Composite materials. | |
 | ||
| Relevant for Spain and Portugal only: Please separate the packaging material and dispose of it in the relevant collection containers in accordance with the symbols on the packaging: |    | |
Relevant for Spain and Portugal only:
| Symbol | Material | This product contains the following packaging components |
 | Corrugated cardboardSales packaging, inner box | |
 | Low-density polyethyleneFoam, plastic bag | |
 | PolypropylenePlastic bag |
11. Marks of conformity

This product meets the requirements specified in the applicable European and national policies. This product's conformity has been verified. The declarations and documents are stored with the manufacturer.

This product fulfils the requirements specified in the applicable national policies for the Republic of Serbia.
You can download the full EU declaration of conformity under the following link:
https://www.targa.gmbh/downloads/conformity/484416_2501.pdf
Contact address according to the Product Safety Regulation [EU] 2023/988: ce@targa.de
12. Warranty information
Warranty of TARGA GmbH
Dear Customer,
This device is sold with three years warranty from the date of purchase. In the event of product defects, you have legal rights towards the seller. These statutory rights are not restricted by our warranty as described below.
Warranty conditions
The warranty period commences upon the date of purchase. Please keep the original receipt in a safe place as it is required as proof of purchase. If any material or manufacturing faults occur within three years of purchase of this product, we will repair or replace the product free of charge as we deem appropriate.
Warranty period and legal warranty rights
The warranty period is not extended in the event of a warranty claim. This also applies to replaced and repaired parts. Any damage or defects discovered upon purchase must be reported immediately when the product has been unpacked. Any repairs required after the warranty period will be subject to charge.
Scope of warranty
The device was carefully manufactured in compliance with stringent quality guidelines and subjected to thorough testing before it left the works. The warranty applies to material and manufacturing faults. This warranty does not cover product components which are subject to normal wear and which can therefore be regarded as wearing parts, or damage to fragile components such as switches, rechargeable batteries or components made of glass. This warranty is void if the product is damaged, incorrectly used or serviced. To ensure correct use of the product, always comply fully with all instructions contained in the user manual. The warnings and recommendations in the user manual regarding correct and incorrect use and handling of the product must always be observed and
complied with. The product is solely designed for private use and is not suitable for commercial applications. The warranty is rendered void in the event of incorrect handling and misuse, if it is subjected to force, and also if any person other than our authorised service technicians interfere with the device. No new warranty period commences if the product is repaired or replaced.
Submitting warranty claims
To ensure speedy handling of your complaint, please note the following:
- Before using your product for the first time, please read the enclosed documentation carefully. Should any problems arise which cannot be solved in this way, please call our hotline.
- Always have your receipt, the product article number as well as the serial number (if available) to hand as proof of purchase.
- If it is not possible to solve the problem on the phone, our hotline support staff will initiate further servicing procedures depending on the fault.
- You can find this and many more manuals, product videos and installation software available for download at www.lidl-service.com. This QR code takes you directly to the LIDL service page [www.lidl-service.com]. There, you can enter the item number (IAN) to access your operating manual.


Service

Phone: 0800 404 7657
E-Mail: targa@lidl.co.uk

Phone: 1800
101010
E-Mail: targa@lidl.ie

Phone: 800
62230
E-Mail: targa@lidl.com.mt

Phone: 8009
4241
E-Mail: targa@lidl.com.cy
IAN: 484416_2501

Manufacturer
Please note that the following address is not a service address. First contact the service point stated above.
TARGA GmbH, Coesterweg 45
59494 Soest, GERMANY
Table des matières
Prudence! Surfaces chaudes!
natural_image
Top-down schematic of a device enclosure with internal components and ventilation slots (no text or labels)https://www.targa.gmbh/downloads/conformity/484416_2501.pdf
Cher client, chère cliente,
Cher client, chère cliente,
natural_image
Top-down schematic of a device enclosure with ventilation grilles and control panel (no text or labels)9. Recepten
Gegrilde kipfiletreepjes
natural_image
Top-down schematic of a device enclosure showing internal components and wiring (no text or labels)https://www.targa.gmbh/downloads/conformity/484416_2501.pdf
natural_image
Top-down schematic of a device enclosure with ventilation grilles and control panel (no text or labels)9. Návrhy receptů
https://www.targa.gmbh/downloads/conformity/484416_2501.pdf
natural_image
Top-down schematic of a device enclosure with ventilation grilles and control panel (no text or labels)9. Návrhy receptov
natural_image
Top-down schematic of a rectangular electronic device with internal components and ventilation slots (no text or labels)natural_image
Top-down schematic of a device enclosure showing internal components and wiring (no text or labels)https://www.targa.gmbh/downloads/conformity/484416_2501.pdf
natural_image
Top-down schematic of a rectangular electronic device with internal components and ventilation slots (no text or labels)9. Ricette consigliate
https://www.targa.gmbh/downloads/conformity/484416_2501.pdf
natural_image
Top-down schematic of a device enclosure with internal components and ventilation slots (no text or labels)9. Receptjavaslatok
https://www.targa.gmbh/downloads/conformity/484416_2501.pdf

- RACLETTE-GRILL SRGS 1400 E2 RACLETTE GRILL SRGS 1400 E2 RACLETTE-GRIL SRGS 1400 E2
- Inhaltsverzeichnis
- Rezeptvorschläge
- Congratulations!
- Intended use
- Package contents
- Technical Data
- Safety instructions
- Key to symbols
- Foreseeable misuse
- Personal safety
- General safety instructions
- Risk of injury!
- DANGER of burns!
- CAUTION: Potential damage to property!
- DANGER of electric shock!
- Before initial use
- Initial use
- Initial use
- Operation
- Switching on/off
- Heating times
- Increasing/decreasing the temperature
- Using the raclette grill
- Using the raclette
- Using the grill plate (1) and stone plate (2)
- Cleaning
- DANGER of burns
- DANGER of electric shock
- WARNING – potential damage to property
- Raclette grill (basic unit)
- Accessories
- Stone plate [2]
- Storing the device when not in use
- Recipe suggestions
- How to make the recipe:
- Environmental and waste disposal information
- Relevant for Spain and Portugal only:
- Marks of conformity
- Warranty information
- Warranty of TARGA GmbH
- Warranty conditions
- Warranty period and legal warranty rights
- Scope of warranty
- Submitting warranty claims
- Service
- Manufacturer
- Table des matières
- Recepten
- Návrhy receptů
- Návrhy receptov
- Ricette consigliate
- Receptjavaslatok
Brand : SILVERCREST
Model : SRGS 1400 E2
Category : Grill plate