
1100MP - Projector DELL - Free user manual and instructions
Find the device manual for free 1100MP DELL in PDF.
| Product Type | DLP Projector |
| Brand | Dell |
| Model | 1100MP |
| Display Technology | Single-chip DLP™ DDR |
| Brightness | 1400 ANSI lumens (max) |
| Contrast Ratio | 2000:1 typical (Full On/Full Off) |
| Native Resolution | SVGA (800 x 600 pixels) |
| Number of Colors | 16.7 million colors |
| Lens | F/2.5, f=28.8-34.5 mm, 1.2x manual zoom |
| Screen Size (Diagonal) | 69 cm to 6.9 m (27 to 275 inches) |
| Projection Distance | 1.2 m to 10 m (3.9 to 32.8 ft) |
| Lamp | 200 W UHP, user-replaceable |
| Lamp Life | 2000 hours (normal), 2500 hours (eco mode) |
| Power Supply | 100-240 V AC, 50-60 Hz |
| Power Consumption | 250 W (full power), 200 W (eco mode) |
| Audio | 1 x 2 W speaker |
| Noise Level | 34 dB(A) full power, 32 dB(A) eco mode |
| Weight | 2.2 kg (4.85 lbs) |
| Dimensions (W x H x D) | 251 x 101 x 213 mm (9.9 x 3.96 x 8.4 in) |
| Video Inputs | VGA (D-sub), S-Video, composite (RCA), component (via VGA) |
| Audio Inputs | 3.5 mm audio jack |
| Connectivity | USB, RS232, VGA output (monitor loop) |
| Keystone Correction | Manual +/-16 degrees, semi-automatic |
| Image Formats | 4:3, 16:9, 1:1 |
Frequently Asked Questions - 1100MP DELL
User questions about 1100MP DELL
0 question about this device. Answer the ones you know or ask your own.
Ask a new question about this device
Download the instructions for your Projector in PDF format for free! Find your manual 1100MP - DELL and take your electronic device back in hand. On this page are published all the documents necessary for the use of your device. 1100MP by DELL.
USER MANUAL 1100MP DELL
Del™ 1100MP Projector
Owner's Manual
Notes, Notices, and Cautions

NOTE: A NOTE indicates important information that helps you make better use of your projector.

NOTICE: A NOTICE indicates either potential damage to hardware or loss of data and tells you how to avoid the problem.

CAUTION: A CAUTION indicates a potential for property damage, personal injury, or death.
Information in this document is subject to change without notice.
© 2006 Dell Inc. All rights reserved.
Reproduction in any manner whatsoever without the written permission of Dell Inc. is strictly forbidden.
Trademarks used in this text: Dell and the DELL logo are trademarks of Dell Inc.; DLP and Texas Instruments are trademarks of Texas Instruments Corporation; Microsoft and Windows are registered trademarks of Microsoft Corporation; Macintosh is a registered trademark of Apple Computer, Inc.
Other trademarks and trade names may be used in this document to refer to either the entities claiming the marks and names or their products. Dell Inc. disclaims any proprietary interest in trademarks and trade names other than its own.
Restrictions and Disclaimers
The information contained in this document, including all instructions, cautions, and regulatory approvals and certifications, is based upon statements provided to Dell by the manufacturer and has not been independently verified or tested by Dell. Dell disclaims all liability in connection with any deficiencies in such information.
All statements or claims regarding the properties, capabilities, speeds, or qualifications of the part referenced in this document are made by the manufacturer and not by Dell. Dell specifically disclaims any knowledge of the accuracy, completeness, or substantiation for any such statements.
Contents
1Your Dell™ Projector
About Your Projector 6
2Connecting Your Projector
Connecting to a Computer 8
Connecting a DVD Player, Set Top Box, VCR, or TV 8
Connecting With a Component Cable 8
Connecting With an S-Video Cable 9
Connecting With a Composite Cable 9
Connecting to a Wired RS232 Remote Control 9
Connecting to a Computer 10
Connecting With a Commercial RS232
Control Box 10
3Using Your Projector
Turning Your Projector On 11
Turning Your Projector Off 11
Adjusting the Projected Image 12
Raising the Projector Height 12
Lowering the Projector Height 12
Adjusting Projection Image Size 13
Adjusting the Projector Zoom and Focus 14
Using the Control Panel 15
Using the Remote Control 16
Using the On-Screen Display 17
Main Menu. 18
All Images Menu 18
Audio Menu 19
Management Menu 20
Language Menu 21
Factory Reset Menu 21
Computer Image Menu 21
Video Image Menu 22
4Troubleshooting Your Projector
Changing the Lamp 26
5Specifications
6Contacting Dell
7Glossary
Your Dell™ Projector
Your projector comes with all the items shown below. Ensure that you have all the items, and contact Dcll if anything is missing.
Package Contents
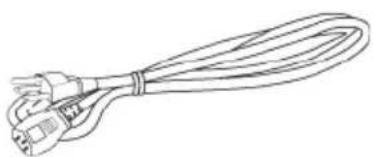
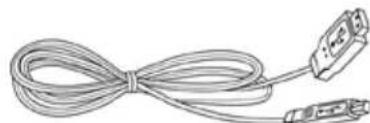
Power cable (1.8m) VGA cable (D-sub to D-sub) (1.8m)
S-Video cable (2.0m) USB cable (1.8m)

Composite cable (1.8m) VGA to component cable (1.8m)


RCA to audio cable (1.8m) Mini pin to Mini pin cable (1.8m)
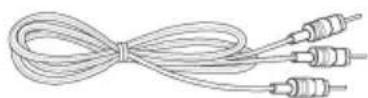


NOTE: Cable lengths are for the Americas only.
Package Contents (continued)
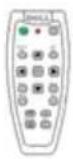
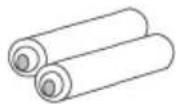
Remote control Batteries

Carrying Case Documentation

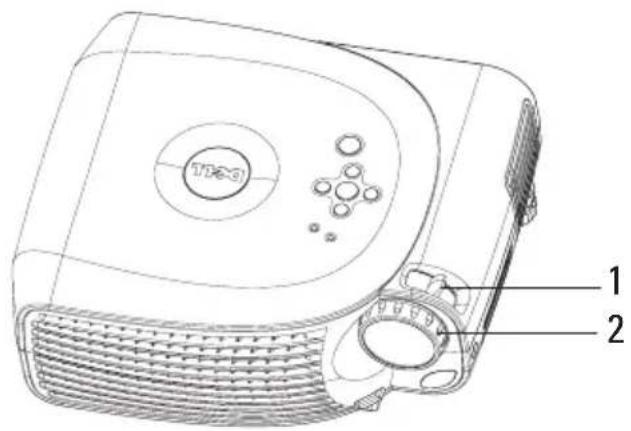
About Your Projector
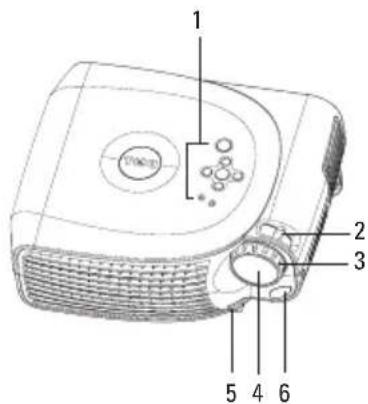
| 1 Control panel |
| 2 Zoom tab |
| 3 Focus ring |
| 4 Lens |
| 5 Elevator button |
| 6 Remote control receiver |
2
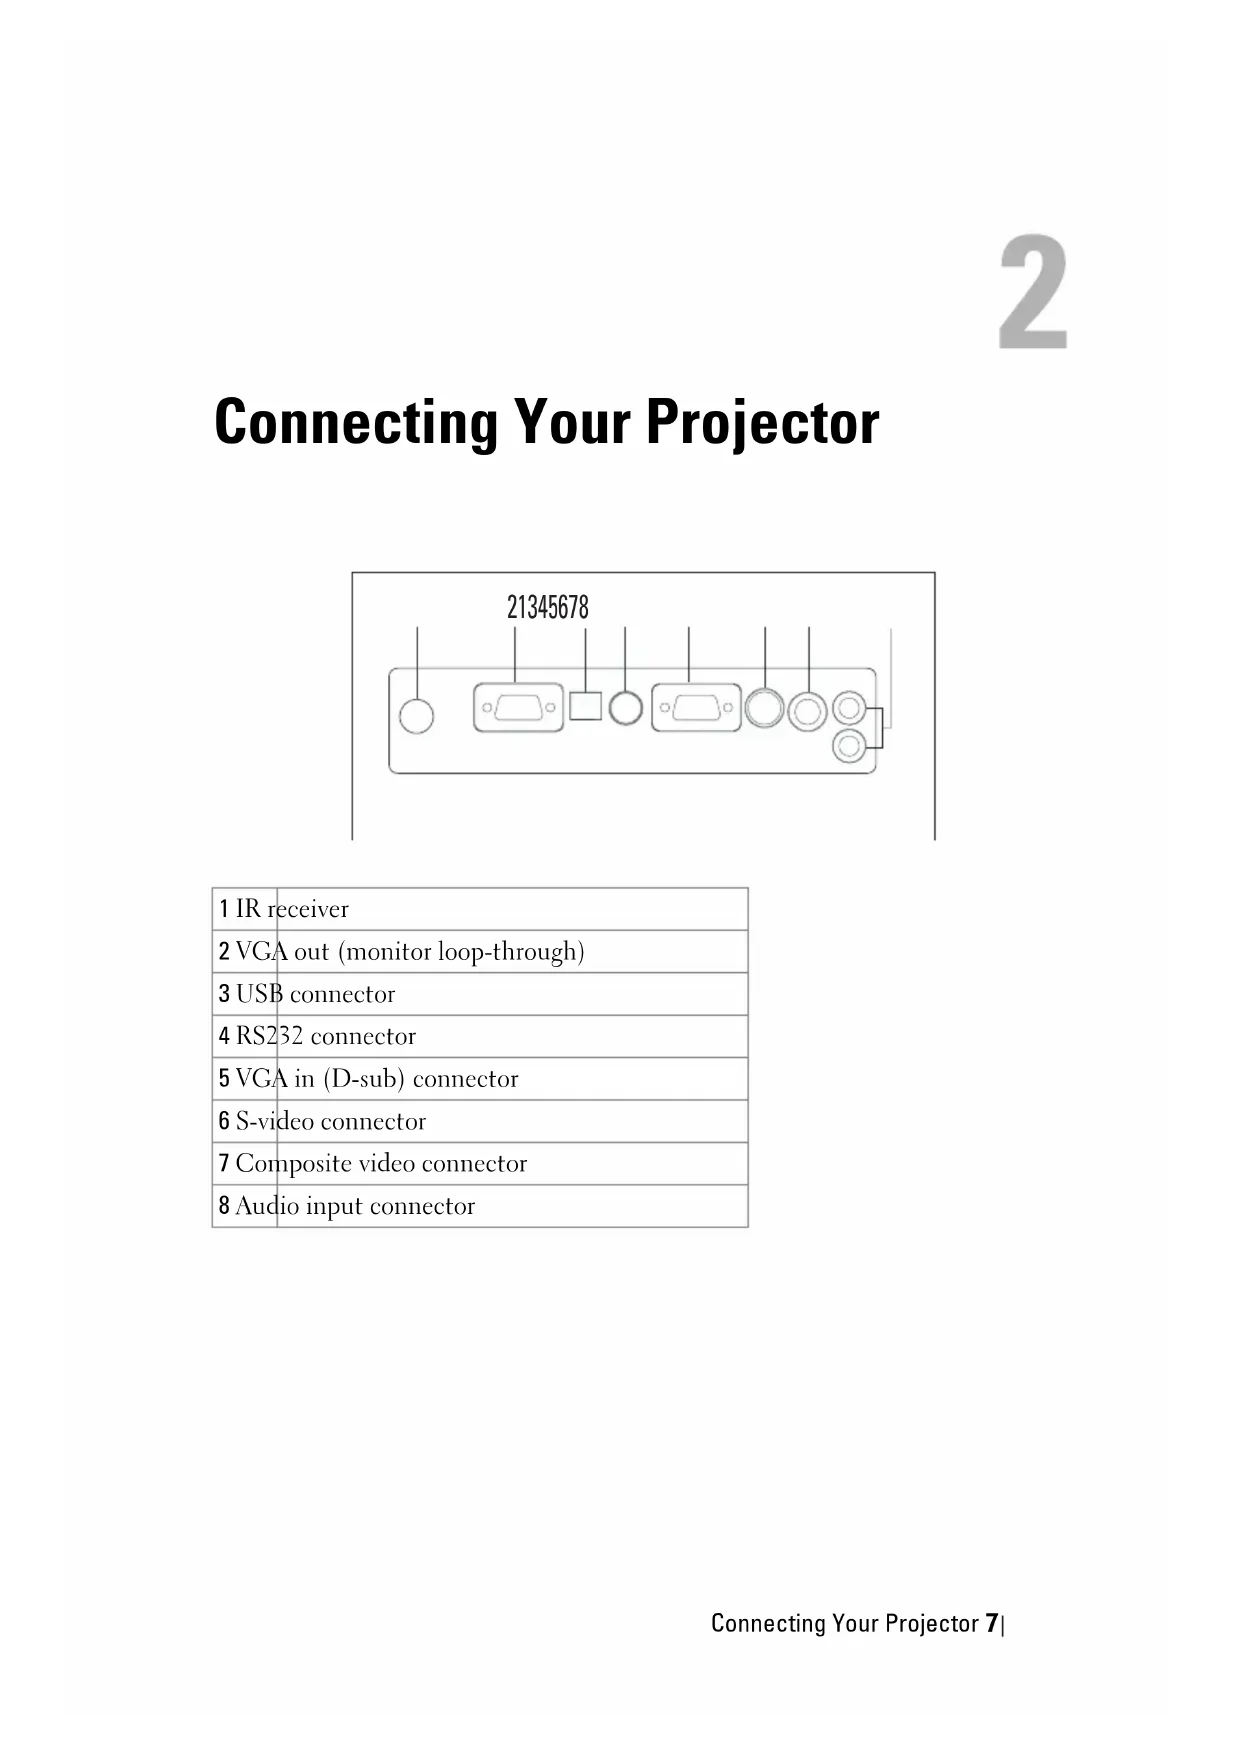
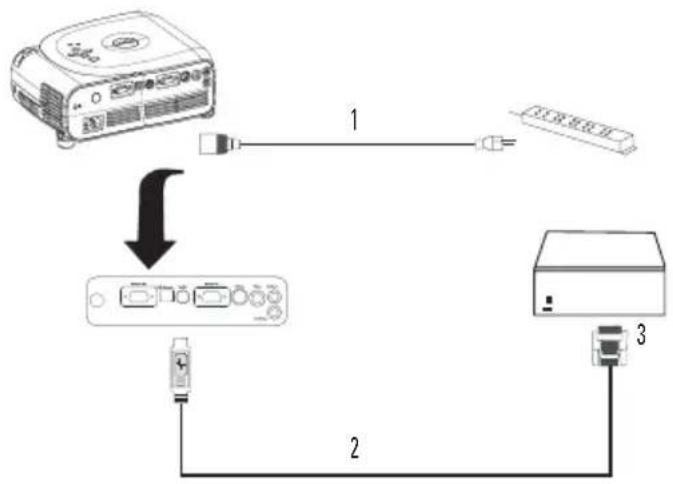
Connecting Your Projector
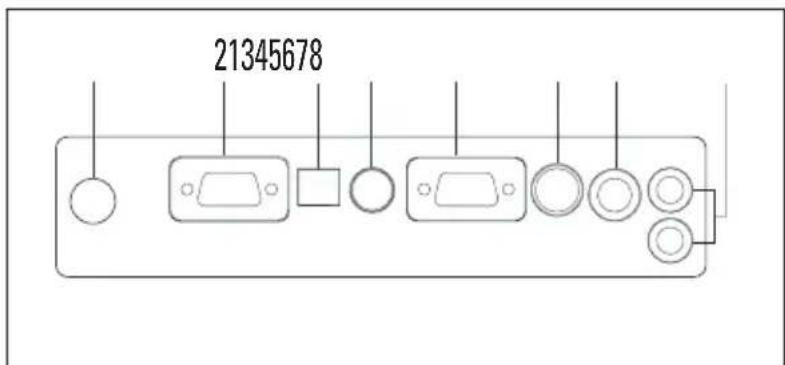
| 1 IR receiver |
| 2 VGA out (monitor loop-through) |
| 3 USB connector |
| 4 RS232 connector |
| 5 VGA in (D-sub) connector |
| 6 S-video connector |
| 7 Composite video connector |
| 8 Audio input connector |
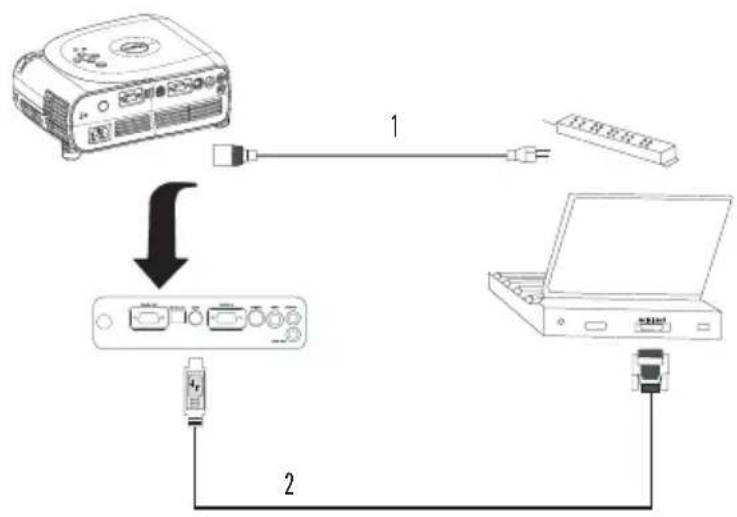
Connecting to a Computer
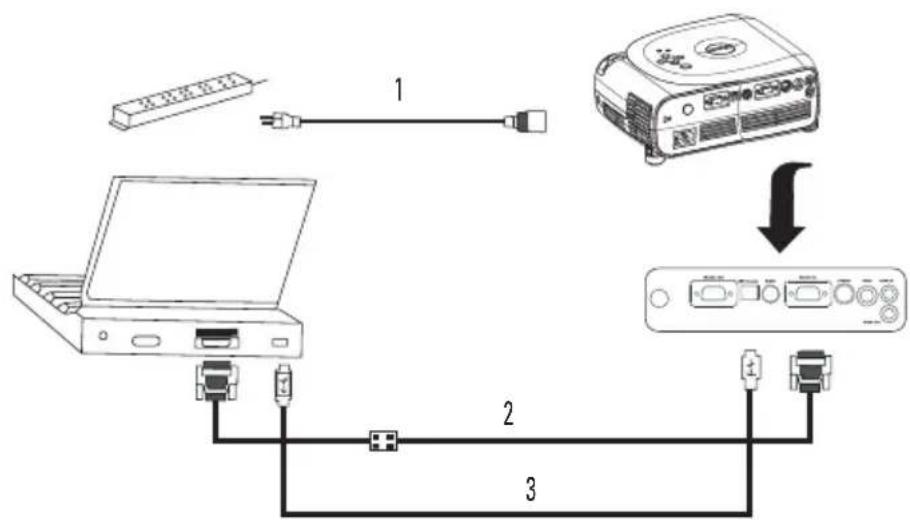
| 1 Power cord |
| 2 VGA to VGA cable |
| 3 USB to USB cable |

NOTE: The USB cable must be connected if you want to use the Next Page and Previous Page features on the remote control.
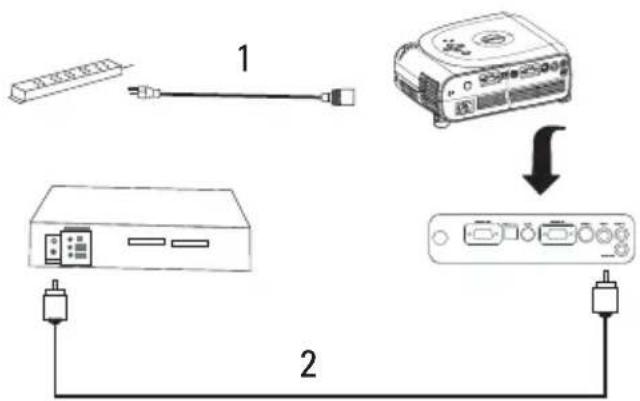
Connecting a DVD Player, Set Top Box, VCR, or TV
Connecting With a Component Cable
| 1 Power cord |
| 2 D-sub to IIDTV/Component cable |
8Connecting Your Projector
Connecting With an S-Video Cable
1 Power cord
2 S-video cable
Connecting With a Composite Cable
1 Power cord
2 Composite video cable
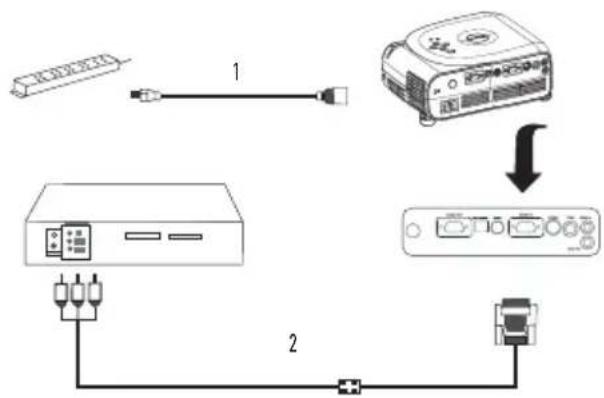
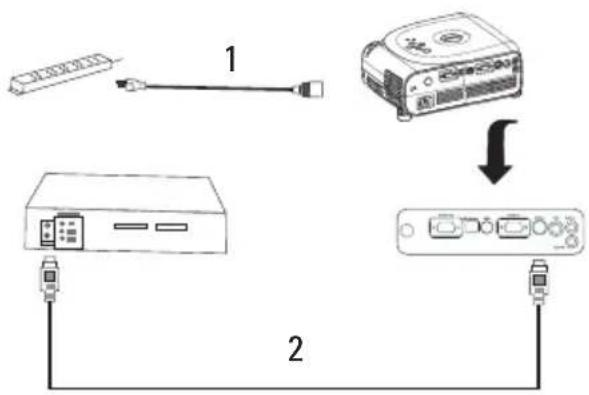
Connecting to a Wired RS232 Remote Control

NOTE: The RS232 cable is not provided by Dell. Consult a professional installer for the cable and RS232 remote control software.
Connecting to a Computer
| 1 Power cord |
| 2 RS232 cable |
Connecting With a Commercial RS232 Control Box
| 1 Power cord |
| 2 RS232 cable |
| 3 Commercial RS232 control box |
Using Your Projector
Turning Your Projector On

NOTE: Turn on the projector before you turn on the source. The Power button light blinks green until pressed.
1 Remove the lens cap.
2 Connect the power cord and appropriate cables. For information about connecting the projector, see "Connecting Your Projector" on page 7.
3 Press the Power button (see "About Your Projector" on page 6 to locate the Power button). The Dell logo displays for 30 seconds.
4 Turn on your source (computer, DVD player, etc.). The projector automatically detects your source.

NOTE: Allow the projector some time to search for the source.
If the "Searching..." message appears on the screen, ensure that the appropriate cable(s) are securely connected.
If you have multiple sources connected to the projector, press the Source button on the remote control or control panel to select the desired source.
Turning Your Projector Off

NOTICE: Do not unplug the projector before properly shutting down as explained in the following procedure.
1 Press the Power button.
2 Press the Power button again. The cooling fans continue to operate for 90 seconds.
3 Disconnect the power cord from the electrical outlet and the projector.

NOTE: If you press the Power button while the projector is running, the following message appears:
"Press Power button to Turn Off Projector. Projector must cool down for 90 seconds before unplugging or restarting." The message disappears in 5 seconds or you can press any button on the control panel.
Adjusting the Projected Image
Raising the Projector Height
1 Press the elevator button.
2 Raise the projector to the desired display angle, and then release the button to lock the elevator foot into position.
3 Use the tilt adjustment wheel to fine-tune the display angle; if necessary, press the side elevator buttons to raise the rear side of the projector to the desired display angel.
Lowering the Projector Height
1 Press the elevator button.
2 Lower the projector, and then release the button to lock the elevator foot into position.
| 1 Elevator button |
| 2 Elevator foot |
| 3 Tilt adjustment wheel |
Adjusting Projection Image Size
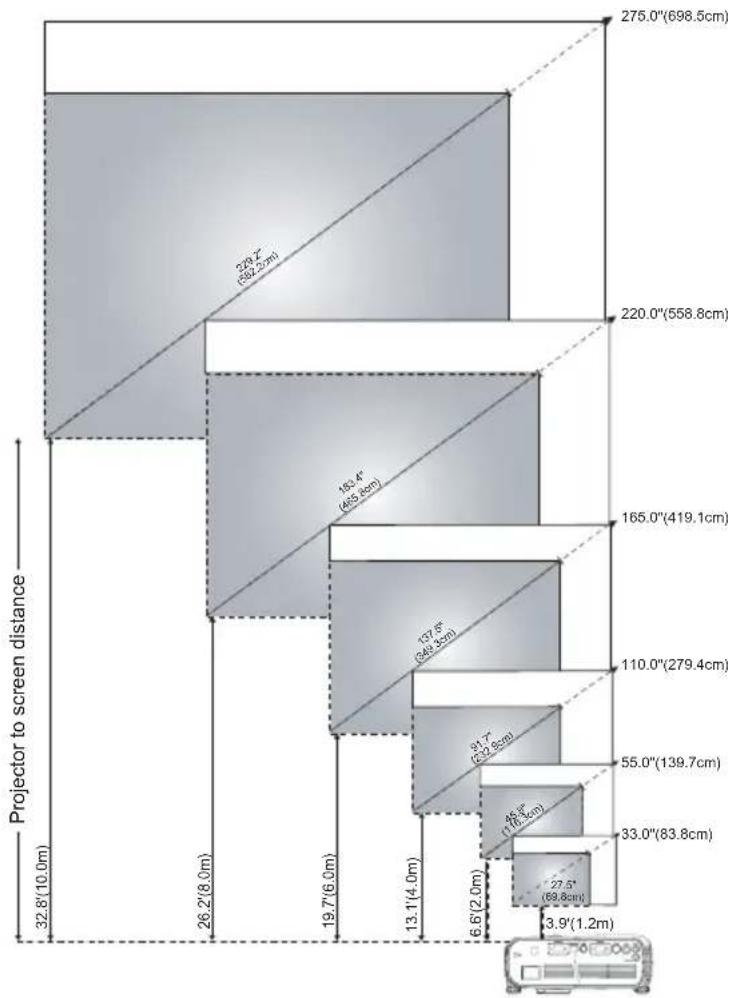
| Screen (Diagonal) | Max. | 33.0"(83.8cm) | 55.0"(139.7cm) | 110.0"(279.4cm) | 165.0"(+19.1cm) | 220.0"(558.8cm) | 275.0"(698.5cm) |
| Min. | 27.5"(69.8cm) | 45.8"(116.3cm) | 91.7"(232.9cm) | 137.5"(349.3cm) | 183.4"(465.8cm) | 229.2"(582.2cm) | |
| Screen size | Max. | 26.4"x19.8" | 44.0"x33.0" | 88.0"x66.0" | 132.0"x99.0" | 176.0"x132.0" | 220.0"x165.0" |
| (WxH) | 67.1cm x 50.3cm | 111.8cmx83.8cm | 223.5cmx167.6cm | 335.3cmx251.5cm | 447.0cmx335.3cm | 558.8cmx419.1cm | |
| Min. | 22.0"x16.5" | 36.7"x27.5" | 73.3"x55.0" | 110.0"x82.5" | 146.7"x110.0" | 183.4"x137.5" | |
| (WxH) | 55.9cmx41.9cm | 93.2cmx69.8cm | 186.2cmx139.7cm | 279.4cmx209.6cm | 372.6cmx279.4cm | 465.8cmx349.3cm | |
| Distance | 3.9ft(1.2m) | 6.6ft(2.0m) | 13.1ft(4.0m) | 19.7ft(6.0m) | 26.2ft(8.0m) | 32.8ft(10.0m) | |
| *This graph is for user reference only. | |||||||
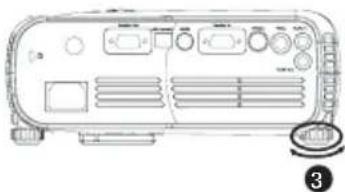
Adjusting the Projector Zoom and Focus

CAUTION: To avoid damaging the projector, ensure that the zoom lens and elevator foot are fully retracted before moving the projector or placing the projector in its carrying case.
1 Rotate the zoom tab to zoom in and out.
2 Rotate the focus ring until the image is clear. The projector focuses at distances from 3.9ft to 32.8ft (1.2m to 10m).
1 Zoom tab
2 Focus ring
Using the Control Panel
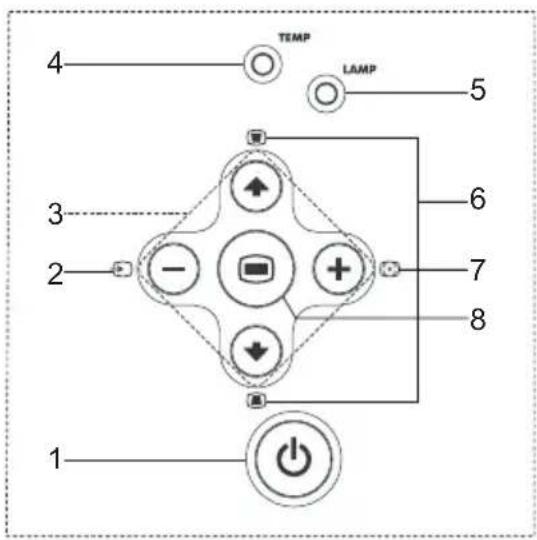
| 1 Power Turn the projector on and off. For more information, see "Turning Your Projector On" on page 11 and "Turning Your Projector Off" on page 11. | |
| 2 Source Press to toggle through Analog RGB, Composite, Component-i, S-video, and Analog YPbPr sources when multiple sources are connected to the projector. | |
| 3 Four Directional Keys | The four directional keys ⊙ can be used to toggle through the tabs in the OSD. |
| 4 TEMP warning light | ·If the Temp light is solid orange, the projector has overheated. The display automatically shuts down. Turn the display on again after the projector cools down. If the problem persists, contact Dell. ·If the Temp light is blinking orange, a projector fan has failed and the projector automatically shuts down. If this problem persists, contact Dell. |
| 5 LAMP warning light | If the Lamp light is solid orange, replace the lamp. |
| 6 Keystone adjustment | If your image is not perpendicular to the screen, then it does not appear square. Press to adjust image distortion caused by tilting the projector. (±16 degrees) |
| 7 Resync | Press to synchronize the projector to the input source. Resync does not operate if the on-screen display (OSD) is displayed. |
8 Menu Press to activate the OSD. Use the directional keys and the Menu button to navigate through the OSD.
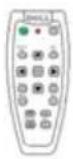
Using the Remote Control
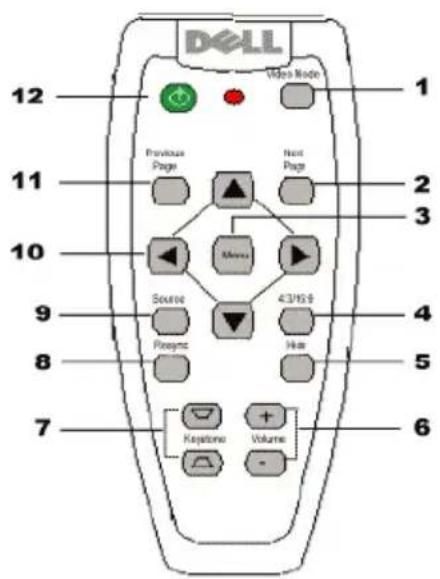
1 Video Mode Press once to show the current display mode.
Press the button again to toggle between PC,
Movie, sRGB, or User mode.
2 Next Page Press to move to the next page.

NOTE: The USB cable must be connected to use this function.
3 Menu Press to activate the on-screen display (OSD).
Use the directional keys and the Menu button to navigate through the OSD.
4 4:3/16:9 Press to switch the aspect ratio: 1:1, 16:9, 4:3.
5 Hide button Press to hide the image, press again to display the image.
6 Volume + / - Press to increase (+) or decrease (-) the volume or toggle through the OSD tabs.
| 7 Keystone adjustment | If your image is not perpendicular to the screen, then it does not appear square. Press to adjust image distortion caused by tilting the projector (±16 degrees). |
| 8 Resync Press to synchronize the projector to the input source. Resync does not operate if the OSD is displayed. | |
| 9 Source Press to toggle through Analog RGB, Composite, Component-i, S-video, and Analog YPbPr sources when multiple sources are connected to the projector. | |
| 10 Directional keys | Use the ▲ or ▼ button to select OSD items, use the ▲ and ▲ button to make adjustments. |
| 11 Previous Page Press to go to the previous page. | |
| NOTE: The USB cable must be connected to use this function. | |
| 12 Power Turn the projector on and off. For more information, see "Turning Your Projector On" on page 11 and "Turning Your Projector Off" on page 11. | |
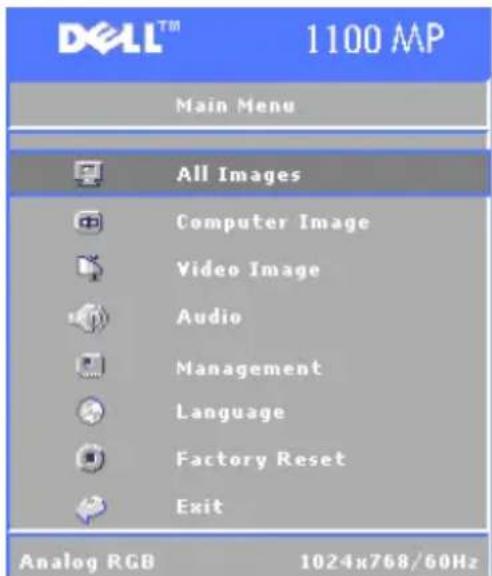
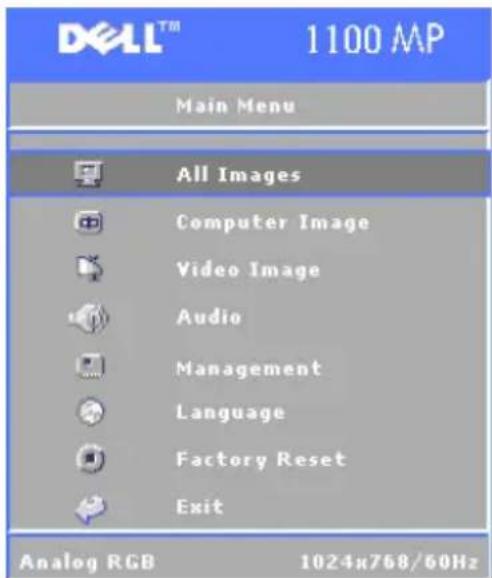
Using the On-Screen Display
The projector has a multi-language On-Screen Display (OSD) that can be displayed with or without an input source present.
In the Main Menu, press the or button on the control panel or the or button on the remote control navigate through the tabs. Press the button on the control panel or the Menu button on the remote control to select a submenu.
In the submenus, press the or button on the control panel or the or button on the remote control to make a selection. When an item is selected, the color changes to dark gray. Use the or button on the control panel or the and button on the remote control make adjustments to a setting.
To exit the OSD, go to the Exit tab and press the button on the control panel or the Menu button on the remote control.
Main Menu
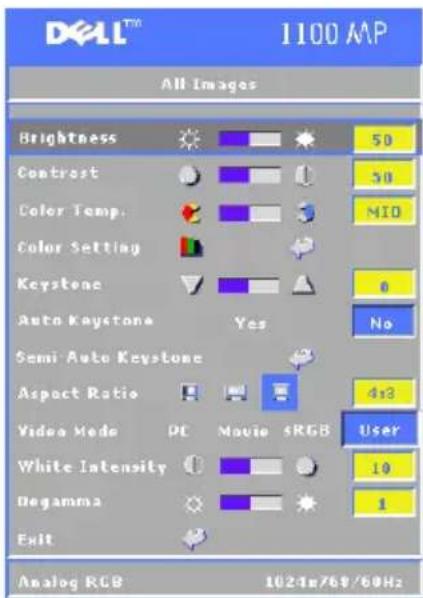
All Images Menu
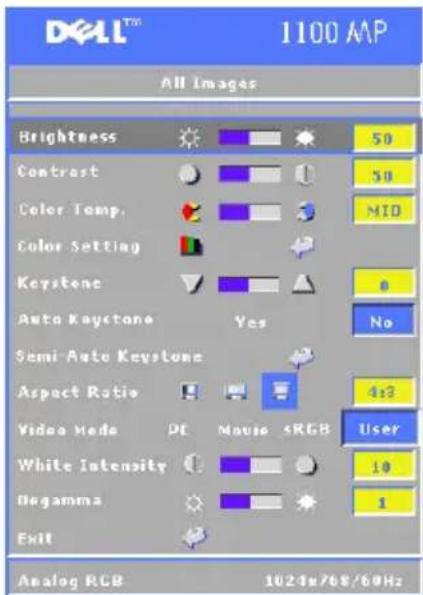
BRIGHTNESS—Use and button on the control panel or the or button on the remote control to adjust the brightness of the image.
CONTRAST—Use and button on the control panel or the or button on the remote control the degree of difference between the brightest and darkest parts of the picture. Adjusting the contrast changes the amount of black and white in the image.
COLOR TEMP—Adjust the color temperature. The higher the temperature, the bluer screen appears; the lower the temperature, the screen redder the screen appears.
User mode activates the values in the color setting menu.
COLOR SETTING—Manually adjust red, green, and blue color.
KEystone—Adjust the image distortion caused by tilting the projector ( ± 16 degrees).
AUTO KEystone—Select Yes to enable the auto correction for vertical image distortion caused by tilting the projector. To manually adjust the keystone, press the button on the control panel or the Menu button on the remote control.
SEM-AUTO KESTONE—Press the button on the control panel or the Menu button on the remote control, the Auto Keystone will do once.
ASPECT RATIO—Select an aspect ratio to adjust how the image appears.
- 1:1 - The input source displays without scaling.
Use 1:1 aspect ratio if you are using one of the following:
VGA cable and the computer has a resolution less than XGA (1024 x 768)
- Component cable (576p/480i/480p)
S-Video cable
- Composite cable
16:9 The input source scales to fit the width of the screen.
- 4:3 — The input source scales to fit the screen.
Use 16:9 or 4:3 if you are using one of the following:
- Computer resolution greater than XGA
- Component cable (1080i or 720p)
VIDEO MODE—Select a mode to optimize the display image based on how the projector is being used: Movie, PC, sRGB (provides more accurate color representation), and User (set your preferred settings). If you adjust the settings for White Intensity or Degamma, the projector automatically switches to User.
WHITE INTENSITY—Select 0 to maximize the color reproduction and 10 to maximize the brightness.
DEGAMMA—Adjust between 1 and 6 to change the color performance of the display. The default setting is 0.
Audio Menu
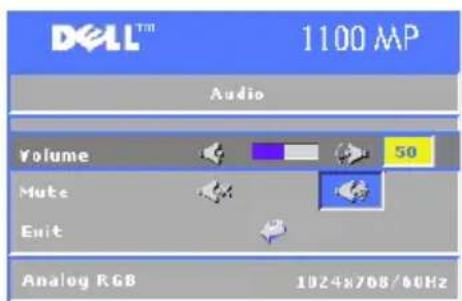
VOLUME—Press the button on the control panel or the - button on the remote control to decrease the volume and press the button on the control panel or the + button on the remote control to increase the volume.
MUTE—Allows to mute the volume.
Management Menu
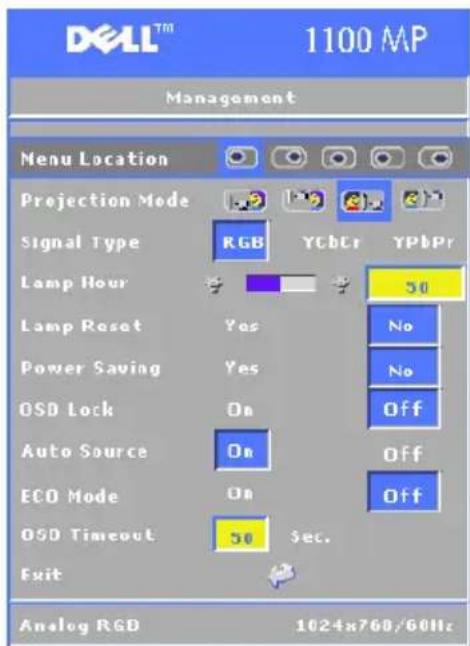
MENULocationSelect the location of the OSD on the screen.
PROJECTION MODE-Select how the image appears:
- Front Projection-Desktop (the default).
- Rear Projection-Desktop - The projector reverses the image so you can project from behind a translucent screen.
- Front Projection-Ceiling Mount - The projector turns the image upside down for ceiling-mounted projection.
- Rear Projection-Ceiling Mount - The projector reverses and turns the image upside down. You can project from behind a translucent screen with a ceiling-mounted projection.
SIGNAL TYPE—Manually select the signal type (RGB, YCbCr, or YPbPr)
LAMP HOUR—Displays the operating hours since the last timer reset.
LAMP RESET—After you install a new lamp, select Yes to reset the lamp timer.
Power Saving—Select Yes to set the power saving delay period. The delay period is the amount of time you want the projector to wait without signal input. After that set time, the projector enters power saving mode and turns off the lamp. The projector turns back on when it detects an input signal or you press the Power button. After two hours, the projector turns off and you need to press the Power button to turn the projector on.
OSD Lock—Select Yes to enable the OSD Lock for hiding the OSD menu. (Or pressing the button on the control panel or the Menu button on the remote control for 15 seconds).
AUTO SOURCE—Select On (the default) to autodetect the available input signals. When the projector is on and you press Source, it automatically finds the next available input signal. Select Off to lock the current input signal. When Off is selected and you press Source, you select which input signal you want to use.
Eco MODE—Select On to use the projector at a lower power level (150 Watts), which may provide longer lamp life, quieter operating, and dimmer luminance output on the screen. Select Off to operate at noraml power level (200 Watts).
OSD TIMEOUT—Use this function to set the duration OSD menu stay active (at idle state).
Language Menu
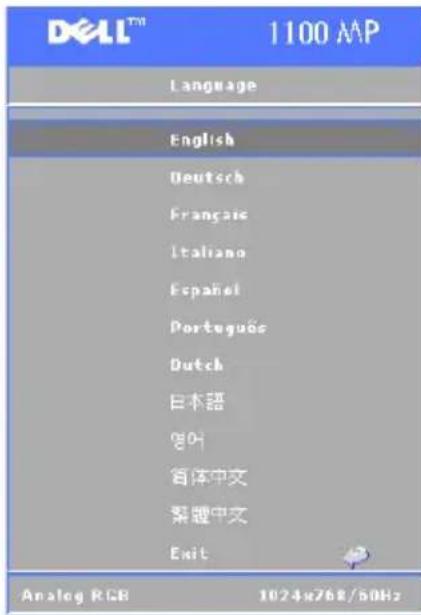
Press the or button on the control panel or the or button on the remote control to select the preferred language for the OSD.
Press the on the control panel or the Menu button on the remote control to confirm the language selection.
Factory Reset Menu
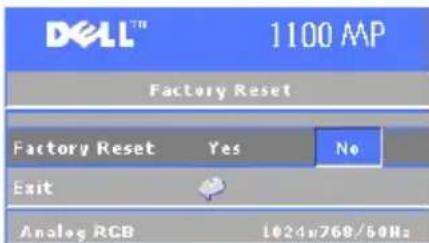
Select Yes to reset the projector to its factory default settings. Reset items include both computer image and video image settings.
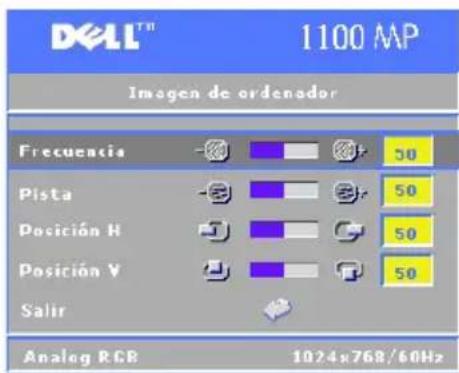
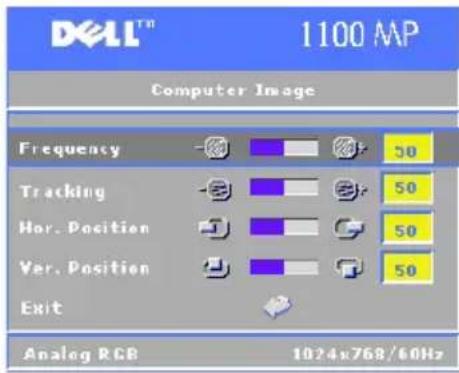
Computer Image Menu

NOTE: This menu is only available connected to a computer.
FREQUENCY—Change the display data clock frequency to match the frequency of your computer graphics card. If you see a vertical flickering bar, use Frequency control to minimize the bars. This is a coarse adjustment.
Tracking—Synchronize the phase of the display signal with the graphics card. If you experience an unstable or flickering image, use the Tracking to correct it. This is a fine adjustment.

NOTE: Adjust the Frequency first and then the Tracking.
HOR. POSITION—Press the button on the control panel or the button on the remote control to adjust the horizontal position of the image to the left and press the button the control panel or the button on the remote control to adjust the horizontal position of the image to the right.
VER POSITION—Press the button on the control panel or the button on the remote control to adjust the vertical position of the image down and press the button the control panel or the button on the remote control to adjust the vertical position of the image up.
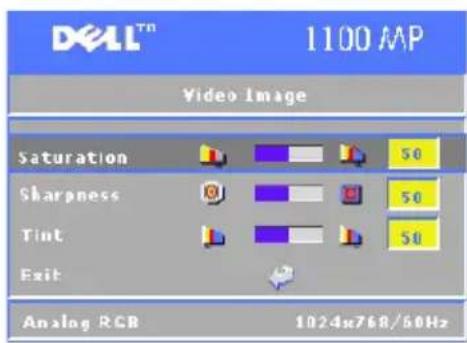
Video Image Menu

NOTE: This menu is only available with S-video, Video (composite) signal connected.
SATURATION—Press the button on the control panel or the button on the remote control to decrease the amount of color in the image and press the button the control panel or the button on the remote control to increase the amount of color in the image.
SHARPNESS-Press the button on the control panel or the button on the remote control to decrease the sharpness and press the button
the control panel or the button on the remote control to increase the sharpness.
TINT—Press the button on the control panel or the button on the remote control to increase the amount of green in the image and press the button the control panel or the button on the remote control to increase the amount of red in the image.
Troubleshooting Your Projector
If you experience problems with your projector, see the following troubleshooting tips. If the problem persists, contact Dell.
| Problem Possible Solution | |
| No image appears on the screen | ·Ensure that the lens cap is removed and the projector turned on. ·Ensure the external graphics port is enabled. If you are using a Dell portable computer, press for other computers, see your documentation. |
| NOTE: Allow the projector some time to search for the source. ·Ensure that all the cables are securely connected. See "Connecting Your Projector" on page 7. ·Ensure that the pins of the connectors are not bent or broken. ·Ensure that the lamp is securely installed (see "Changing the Lamp" on page 26). | |
| Problem (continued) | Possible Solution (continued) |
| Partial, scrolling, or incorrectly displayed image | 1 Press the Resync button on the remote control or the control panel. 2 If you are using a Dell portable computer, set the resolution of the computer to XGA (1024 x 768): a Right-click the unused portion of your Windows desktop, click Properties and then select Settings tab. b Verify the setting is 1024 x 768 pixels for the external monitor port. c Press F# F# D#t#o#. |
| If you experience difficulty in changing resolutions or your monitor freezes, restart all the equipment and the projector. If you are not using a Dell portable, see your documentation. | |
| The screen docs not display your presentation | If you arc using a Dell portable computer, press F# F# D#t#o#. |
| Image is unstable or flickering | Adjust the tracking in the OSD Computer Image tab. |
| Image has vertical flickering bar | Adjust the frequency in the OSD Computer Image tab. |
| Image color is not correct | · If your graphic card output signal is sync on Green, and you would like to display VGA at 60Hz signal, please go into the OSD select Management, select Signal Type, and then select RGB. |
| Image is out of focus 1 | Adjust the focus ring on the projector lens. 2 Ensure that the projection screen is within the required distance from the projector (3.9ft [1.2m] to 32.8ft [10m]). |
| The image is stretched when displaying a 16:9 DVD | The projector automatically detects 16:9 DVD and adjusts the aspect ratio to full screen with a 4:3 (letter-box) default setting. If the image is still stretched, adjust the aspect ratio as follows: ·If you are playing a 16:9 DVD, select 4:3 aspect ratio type on your DVD player (if capable). ·If you cannot select 4:3 aspect ratio type on your DVD player, select 4:3 aspect ratio in the All Images menu in the OSD. |
| Image is reversed | Select Management from the OSD and adjust the projection mode. |
| Lamp is burned out of makes a popping sound | When the lamp reaches its end of life, it may burn out and may make a loud popping sound. If this occurs, the projector does not turn back on, and displays Lamp Defective in the LCD display until the lamp is replaced. To replace the lamp, see "Changing the Lamp" on page 26. |
| The remote control is not operating smoothly or in very limited range | The battery may be low. If so, replace it with 2 new AAA batteries. |
| OSD display window does not appear on the screen after pressing Menu button on the remote control or on control panel | Try the following procedures: 1 Press the Menu button on the remote control or on the control panel for 15 seconds until OSD pops up. 2 Select Management from the OSD. Set OSD Lock to "Off". |
Changing the Lamp
Replace the lamp when the message "Lamp is approaching the end of its useful life. Replacement suggested! www.dell.com/lamps" appears on the screen. If this problem persists after replacing the lamp, contact Dell.

CAUTION: The lamp becomes very hot when in use. Do not attempt to replace the lamp until the projector has been allowed to cool down for at least 30 minutes.

CAUTION: Do not touch the bulb or the lamp glass at any time. The bulb may explode due to improper handling, including the touching of the bulb or the lamp glass.
1 Turn off the projector and disconnect the power cord.
2 Let the projector cool for at least 30 minutes.
3 Loosen the 2 screws that secure the lamp cover, and remove the cover.
4 Loosen the 2 screws that secure the lamp.
5 Pull up the lamp by its metal handle.
6 Reverse steps 1 through 5 to install the new lamp.
7 Reset the lamp by usage time selecting the left Lamp Reset icon in the OSD Management tab.

NOTE: Dell may require that lamps replaced under warranty be returned to Dell. Otherwise, contact your local waste disposal agency for the address of the nearest deposit site.

NOTE: The lamp contains mercury. Disposal of this material may be regulated due to environmental considerations. For disposal or recycling information, please contact your local authorities or the Electronic Industries Alliance: www.eiae.org.
Specifications
Light Valve Single-chip DLP™ DDR (double data rate) technology
Brightness 1400 ANSI Lumens (Max)
Contrast Ratio 2000:1 Typical (Full On/Full Off)
Uniformity 80% Typical (Japan Standard - JBMA)
Lamp 200-watt user-replaceable UHP 2000-hour lamp(up to 2500 hours in eco mode)
Number of Pixels 800 × 600 (SVGA)
Displayable Color 16.7M colors
Color Wheel Speed 100 127.5Hz (2X)
Projection Lens F/2.5, f = 28.8 34.5 ~mm with 1.2 × manual zoom lens
Projection Screen Size 27-275 inches (diagonal)
Projection Distance 3.9 32.8 ft (1.2m 10m)
Video Compatibility NTSC, NTSC 4.43, PAL, PAL-M, PAL-N, SECAM, and HDTV (1080i, 720P, 576i/P, 480i/P) compatibility Composite video, Component video and S-video capability
II. Frequency 15kHz - 70kHz (Analog)
V. Frequency 43Hz-85Hz (Analog)
Power Supply Universal 100-240V AC 50-60Hz with PFC input
Power Consumption 250 Watts full power (typical), 200 Watts in eco mode
Audio 1 speaker, 2 Watts RMS
Noise Level 34dB(A) Full-on mode,
32dB(A) Eco-modc
Weight 4.85 lbs (2.2 kgs)
Dimensions (W x H x D) External 9.9 × 3.96 × 8.4 ± 0.04 inches
(251× 101× 213± 1mm)
Environmental Operating temperature: 0
^ - 35^
(32^ - 95^)
Humidity: 80% maximum
Storage temperature: -20^ to 60^
(-4^ to 140^)
Humidity: 80% maximum
Regulatory FCC, CF, VCCI, UL, cUL, TuV-GS,
ICES-003, MIC, C-Tiek, GOST, CCC,
PSB, NOM, TuV-S/Argentina
I/O Connectors Power: AC power input socket
Computer input: one D-sub for analog/component, IIDTV input signals
Computer output: one 15-pin D-sub
Video input: one composite video RCA and one S-video
USB input: one USB connector
Audio input: one phone jack (diameter 3.5mm )
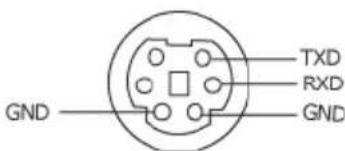
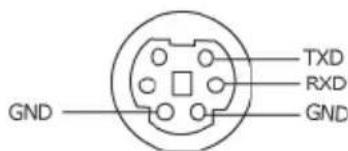
One mini-DIN RS232 for wired remote projector control from PC
RS232 Pin Assignment
RS232 Protocol
- Communication Settings
| Connection settings Value | |
| Baud Rate: 19200 | |
| Data Bits: 8 | |
| Parity None | |
| Stop Bits 1 |
Control command Syntax (From PC to Projector) [H][AC][SoP][CRC][ID][SoM][COMMAND]
Example: power on the projector Enter the following code: 0xBE 0xEF 0x10 0x05 0x00 0xC6 0xFF 0x11 0x11 0x01 0x00 0x01
Control Commands List
| Control Commands List | Address Code (BYTE) | Size of the Payload (WORD) | CRC16 for the entire packet (WORD) | MsG ID (WORD) | MsG size (WORD) | Command code (BYTE) | Command Description |
| 0xefbe 0x100x0005 | 0xffc6 0x11 | 11 0x0001 | 0x01 Power | + Volume- | |||
| 0xbfc7 0x02 Menu | |||||||
| 0x7c07 0x03 Up | |||||||
| 0x3fc5 0x04 Down | |||||||
| 0xfc05 0x05 Lcf | |||||||
| 0xbe04 0x06 Right | |||||||
| 0x7fc4 0x07 Rcsync | |||||||
| 0x3fc0 0x08 Source | |||||||
| 0xfc00 0x09 Volume | |||||||
| 0xbc01 0x0A Volmc- | |||||||
| 0xffc3 | 0x0D | Mute | |||||
| 0xbfc2 0x0E Frecczc | |||||||
| 0x7e02 | 0x0F | Hide | |||||
| 0x3fca | 0x10 | Vidco Mode | |||||
| 0x7fcb 0x13 | V. | Keystone Up | |||||
| 0x3e09 0x14 | V. | Keystone Down | |||||
| 0x7e08 0x17 Aspect | ratio (4:3/16:9) |
Compatibility Modes
| Mode Resolution (ANAIOG) | |||
| V. Frequency (Hz) H. Frequency (KHz) | |||
| VGA 640x350 70 31.5 | |||
| VGA 640x350 85 37.9 | |||
| VGA 640x400 85 37.9 | |||
| VGA 640x480 60 31.5 | |||
| VGA 640x480 72 37.9 | |||
| VGA 640x480 75 37.5 | |||
| VGA 640x480 85 43.3 | |||
| VGA 720x400 70 31.5 | |||
| VGA 720x400 85 37.9 | |||
| SVGA 800x600 56 35.2 | |||
| SVGA 800x600 60 37.9 | |||
| SVGA 800x600 72 48.1 | |||
| SVGA 800x600 75 46.9 | |||
| SVGA 800x600 85 53.7 | |||
| XGA 1024x768 43.4 35.5 | |||
| XGA 1024x768 60 48.4 | |||
| XGA 1024x768 70 56.5 | |||
| XGA 1024x768 75 60.0 | |||
| XGA 1024x768 85 68.7 | |||
| SXGA 1280x1024 60 63.98 | |||
| SXGA+ 1400x1050 60 63.98 | |||
| MAC LC13" 640x480 66.66 | 34.98 | ||
| MAC II 13" 640x480 66 68 35 | |||
| MAC 16" 832x624 74 55 49.725 | |||
| MAC 19" 1024x768 75 60.24 | |||
| MAC 1152x870 | 75.06 | 68.68 | |
| MAC G4 640x480 60 31.35 | |||
| MAC G4 640x480 120 | 68.03 | ||
| IMac DV 640x480 117 | 60 | ||
| IMac DV 800x600 95 | 60 | ||
| IMac DV 1024x768 | 75 | 60 | |
| IMac DV 1152x870 | 75 68.49 | ||
| IMac DV 1280x960 | 75 | 75 | |
Contacting Dell
To contact Dell electronically, you can access the following websites:
www.dell.com
- support.dell.com (technical support)
- premiersupport.dell.com (technical support for educational, government, healthcare, and medium/large business customers, including Premier, Platinum, and Gold customers)
For specific web addresses for your country, find the appropriate country section in the table below.
NOTE: Toll-free numbers are for use within the country for which they are listed.
When you need to contact Dell, use the electronic addresses, telephone numbers, and codes provided in the following table. If you need assistance in determining which codes to use, contact a local or an international operator.
| Country (City) International Access Code Country Code City Code | Department Name or Service Area, Website and E-Mail Address | Area Codes, Local Numbers, and Toll-Free Numbers |
| Anguilla General Support | toll-frcc: 800-335-0031 | |
| Antigua and Barbuda General Support | 1-800-805-5924 | |
| Argentina (Buenos Aires) | Website: www.dell.com.ar | |
| International Access Code: 00 | E-mail: us_latin-services@ Dell.com | |
| Country Code: 54 | E-mail for dscskip and portable computers: la-techsupport@ Dell.com | |
| City Code: 11 | E-mail for scrvers and EMC: la-enterprise@ Dell.com | |
| Customer Care | toll-free: 0-800-444-0730 | |
| Tech Support | toll-frcc: 0-800-444-0733 | |
| Tech Support Services | toll-free: 0-800-444-0724 | |
| Sales | 0-810-444-3355 | |
| Aruba General Support | toll-free: 800-1578 | |
| Australia (Sydney) | E-mail (Australia): au_tech_support@dcll.com | |
| International Access Code: 0011 | E-mail (New Zealand): nz_tech_support@dcll.com | |
| Country Code: 61 | Home and Small Business | 1-300-655-533 |
| City Code: 2 | Government and Business | toll-free: 1-800-633-559 |
| Preferred Accounts Division (PAD) | toll-frcc: 1-800-060-889 | |
| Customcr Care | toll-frcc: 1-800-819-339 | |
| Technical Support (portables and dsctps) | toll-frcc: 1-300-655-533 | |
| Technical Support (servers and workstations) | toll-free: 1-800-733-314 | |
| Corporate Sales | toll-frcc: 1-800-808-385 | |
| Transaction Sales | toll-free: 1-800-808-312 | |
| Fax | toll-frcc: 1-800-818-341 | |
| Austria (Vienna) | Wcbsitc: support.euro.dell.com | |
| International Access Code: 900 | E-mail: tech_support_central_curopc@dell.com | |
| Country Code: 43 | IHome/Small Business Sales | 0820 240 530 00 |
| Home/Small Business Fax | 0820 240 530 49 | |
| IHome/Small Business Customer Care | 0820 240 530 14 | |
| Prcfcrred Accounts/Corporate Customer Care | 0820 240 530 16 | |
| Home/Small Business Technical Support | 0820 240 530 14 | |
| Preferred Accounts/Corporate Technical Support | 0660 8779 | |
| Switchboard | 0820 240 530 00 | |
| Bahamas General Support | toll-free: 1-866-278-6818 | |
| Barbados General Support | 1-800-534-3066 | |
| Belgium (Brussels) | Wcbsitc: support.euro.dell.com | |
| International Access Code: 00 | E-mail for French-speaking Customers: | |
| Country Code: 32 | support.euro.dell.com/be/fr/emailldell/ | |
| City Code: 2 | Technical Support | 02 481 92 88 |
| Technical Support Fax | 02 481 92 95 | |
| Customer Care | 02 713 15 65 | |
| Corporate Sales | 02 481 91 00 | |
| Fax | 02 481 92 99 | |
| Switchboard | 02 481 91 00 | |
| Bermuda General Support | 1-800-342-0671 | |
| Bolivia General Support | toll-free: 800-10-0238 | |
| Brazil | Wcbsitc: www.dell.com.br | |
| International Access Code: 00 | Customer Support, Technical Support | 0800 90 3355 |
| Country Code: 55 | Technical Support Fax | 51 481 5470 |
| City Code: 51 | Customer Care Fax | 51 481 5480 |
| Sales | 0800 90 3390 | |
| British Virgin Islands General Support | toll-frcc: 1-866-278-6820 | |
| Brunei | Customer Technical Support (Penang, Malaysia) | 604 633 4966 |
| Country Codc: 673 | Customer Service (Penang, Malaysia) | 604 633 4949 |
| Transaction Sales (Penang, Malaysia) | 604 633 4955 | |
| Canada (North York, Ontario) | Online Order Status: www.dell.ca/ostatus | |
| International Access Code: 011 | AutoTech (automated technical support) | toll-frcc: 1-800-247-9362 |
| Customer Carc (Homic Sales/Small Business) | toll-free: 1-800-847-4096 | |
| Customer Carc (mcd./large business, government) | toll-free: 1-800-326-9463 | |
| Technical Support (Home Salcs/Small Business) | toll-free: 1-800-847-4096 | |
| Technical Support (med./large bus., government) | toll-free: 1-800-387-5757 | |
| Sales (Home Sales/Small Business) | toll-free: 1-800-387-5752 | |
| Sales (med./large bus., government) | toll-frcc: 1-800-387-5755 | |
| Spare Parts Sales & Extended Service Sales | 1 866 440 3355 | |
| Cayman Islands General Support | 1-800-805-7541 | |
| Chile (Santiago) | Salcs, Customer Support, and Technical Support | toll-free: 1230-020-4823 |
| Country Code: 56 | ||
| City Code: 2 | ||
| China (Xiamen) | Technical Support website: support.dell.com.cn | |
| Country Code: 86 | Technical Support E-mail: cn_support@dell.com | |
| City Code: 592 | Customer Care E-mail: customer_cn@dell.com | |
| Technical Support Fax | 592 818 1350 | |
| Technical Support (DellTM DimensionTM and InspironTM) | toll-free: 800 858 2969 | |
| Technical Support (OptiPlexTM, LatitudeTM, and Dell PrecisionTM) | toll-free: 800 858 0950 | |
| Technical Support (servers and storage) | toll-free: 800 858 0960 | |
| Technical Support (projectors, PDAs, switches, routers, and so on) | toll-frcc: 800 858 2920 | |
| Technical Support (printers) | toll-frcc: 800 858 2311 | |
| Customer Care | toll-free: 800 858 2060 | |
| Customer Care Fax | 592 818 1308 | |
| Home and Small Business | toll-frcc: 800 858 2222 | |
| Preferred Accounts Division | toll-free: 800 858 2557 | |
| Large Corporate Accounts GCP | toll-free: 800 858 2055 | |
| Large Corporate Accounts Key Accounts | toll-frcc: 800 858 2628 | |
| Large Corporate Accounts North | toll-frcc: 800 858 2999 | |
| Large Corporate Accounts North Government and Education | toll-free: 800 858 2955 | |
| Large Corporate Accounts East | toll-free: 800 858 2020 | |
| Large Corporate Accounts East Government and Education | toll-frcc: 800 858 2669 | |
| China (Xiamen) Country Code: 86 | Large Corporate Accounts Qucuc Team | toll-free: 800 858 2572 |
| City Codc: 592 (continued) | Large Corporate Accounts South Large Corporate Accounts West Large Corporate Accounts Spare Parts | toll-free: 800 858 2355 toll-free: 800 858 2811 toll-frcc: 800 858 2621 |
| Colombia General Support | 980-9-15-3978 | |
| Costa Rica General Support | 0800-012-0435 | |
| Czech Republic (Prague) International Access Code: 00 Country Code: 420 | Wcbsitc: support.euro.dell.com E-mail: czech_dell@dell.com Technical Support | 22537 272722537 270722537 271422537 272822537 2711 |
| Customer Care | ||
| Fax | ||
| Tech Fax | ||
| Switchboard | ||
| Denmark (Copenhagen) International Access Code: 00 Country Codc: 45 | Wcbsitc: support.euro.dell.com E-mail: support.euro.dell.com/dk/da/ema ildell/Technical Support | 7023 01827023 01843287 5505 |
| Customer Care (Relational) | ||
| IHome/Small Business Customer Care | ||
| Switchboard (Relational) | 3287 1200 | |
| Switchboard Fax (Relational) | 3287 1201 | |
| Switchboard (IHome/Small Business) | 3287 5000 | |
| Switchboard Fax (Home/Small Business) | 3287 5001 | |
| Dominica General Support | toll-frcc: 1-866-278-6821 | |
| Dominican Republic General Support | 1-800-148-0530 | |
| Ecuador General Support | toll-frec: 999-119 | |
| El Salvador General Support | 01-899-753-0777 | |
| Finland (Helsinki) | Website: support.euro.dell.com | |
| International Access Code: 990 | E-mail: support.euro.dell.com/fi/fi/email | |
| Country Code: 358 | dell/ | |
| City Code: 9 | Technical Support | 09 253 313 60 |
| Customer Care | 09 253 313 38 | |
| Fax | 09 253 313 99 | |
| Switchboard | 09 253 313 00 | |
| France (Paris) (Montpellier) | Wcbsitc: support.euro.dell.com | |
| International Access Code: 00 | E-mail: support.euro.dell.com/fr/fr/email | |
| Country Code: 33 | dell/ | |
| City Codes: (1) (4) | IHome and Small Business | |
| Technical Support | 0825 387 270 | |
| Customer Care | 0825 823 833 | |
| Switchboard | 0825 004 700 | |
| Switchboard (calls from outside of France) | 04 99 75 40 00 | |
| Sales | 0825 004 700 | |
| Fax | 0825 004 701 | |
| Fax (calls from outside of France) | 04 99 75 40 01 | |
| Corporate | ||
| Technical Support | 0825 004 719 | |
| Customer Care | 0825 338 339 | |
| Switchboard | 01 55 94 71 00 | |
| Salcs | 01 55 94 71 00 | |
| Fax | 01 55 94 71 01 | |
| Germany (Langen)International Access Code:00Country Code: 49City Code: 6103 | Website: support.euro.dell.com | |
| E-mail:tch_support_central_europe@dell.com | ||
| Technical Support | 06103 766-7200 | |
| Home/Small Business Customer Care | 0180-5-224400 | |
| Global Segment Customer Care | 06103 766-9570 | |
| Prefcurred Accounts Customer Care | 06103 766-9420 | |
| Large Accounts Customer Care | 06103 766-9560 | |
| Public Accounts Customer Care | 06103 766-9555 | |
| Switchboard | 06103 766-7000 | |
| GreeceInternational Access Code:00Country Code: 30 | Website: support.euro.dell.com | |
| E-mail:support.euro.dell.com/gr/en/emailIdell/ | ||
| Technical Support | 00800-44 14 95 18 | |
| Gold Service Technical Support | 00800-44 14 00 83 | |
| Switchboard | 2108129810 | |
| Gold Service Switchboard | 2108129811 | |
| Sales | 2108129800 | |
| Fax | 2108129812 | |
| Grenada General Support | toll-fcc: 1-866-540-3355 | |
| Guatemala General Support | 1-800-999-0136 | |
| Guyana General Support | toll-fcc: 1-877-270-4609 | |
| Hong Kong | Wcbsitc: support.ap.dell.com | |
| International Access Code: 001 | Technical Support E-mail: apsupport@dcll.com | |
| Country Code: 852 | Technical Support (Dimension and Inspiron) | 2969 3188 |
| Technical Support (OptiPlex, Latitude, and Dcll Precision) | 2969 3191 | |
| Technical Support (PowerAppTM, PowerEdgeTM, PowerConnectTM, and PowerVaultTM) | 2969 3196 | |
| Customer Care | 3416 0910 | |
| Large Corporate Accounts | 3416 0907 | |
| Global Customer Programs | 3416 0908 | |
| Medium Business Division | 3416 0912 | |
| Home and Small Business Division | 2969 3105 | |
| India Technical Support | 1600 33 8045 | |
| Sales (Large Corporate Accounts) | 1600 33 8044 | |
| Sales (Home and Small Business) | 1600 33 8046 | |
| Ireland (Cherrywood) | Websites: support.euro.dell.com | |
| International Access Code: 16 | E-mail: dcll_direct_support@dcll.com | |
| Country Code: 353 | Technical Support | 1850 543 543 |
| City Code: 1 | U.K. Technical Support (dial within U.K. only) | 0870 908 0800 |
| Homic User Customer Carc | 01 204 4014 | |
| Small Business Customer Care | 01 204 4014 | |
| U.K. Customer Carc (dial within U.K. only) | 0870 906 0010 | |
| Corporate Customer Carc | 1850 200 982 | |
| Corporate Customer Care (dial within U.K. only) | 0870 907 4499 | |
| Ireland Sales | 01 204 4444 | |
| U.K. Sales (dial within U.K. only) | 0870 907 4000 | |
| Fav/Sales Fax | 01 204 0103 | |
| Switchboard | 01 204 4444 | |
| Italy (Milan) | Website: support.euro.dell.com | |
| International Access Code: 00 | E-mail: support.euro.dell.com/it/it/email | |
| Country Code: 39 | dell/ | |
| City Code: 02 | Home and Small Business | |
| Technical Support | 02 577 826 90 | |
| Customer Care | 02 696 821 14 | |
| Fax | 02 696 821 13 | |
| Switchboard | 02 696 821 12 | |
| Corporate | ||
| Technical Support | 02 577 826 90 | |
| Customer Care | 02 577 825 55 | |
| Fax | 02 575 035 30 | |
| Switchboard | 02 577 821 | |
| Jamaica General Support (dial from within Jamaica only) | 1-800-682-3639 | |
| Japan (Kawasaki) | Wcbsitc: support.jp.dell.com | |
| International Access Code: 001 | Technical Support (servers) | toll-free: 0120-198-498 |
| Country Code: 81 | Technical Support outside of Japan (servers) | 81-44-556-4162 |
| City Code: 44 | Technical Support (Dimension and Inspiron) | toll-frcc: 0120-198-226 |
| Technical Support outside of Japan (Dimension and Inspiron) | 81-44-520-1435 | |
| Technical Support (Dell Precision, OptiPlex, and Latitude) | toll-free:0120-198-433 | |
| Technical Support outside of Japan (Dell Precision, OptiPlex, and Latitude) | 81-44-556-3894 | |
| Technical Support (PDAs, projectors, printers, routers) | toll-frcc: 0120-981-690 | |
| Technical Support outside of Japan (PDAs, projectors, printers, routers) | 81-44-556-3468 | |
| Faxbox Service | 044-556-3490 | |
| 24-Hour Automated Order Scrivicc | 044-556-3801 | |
| Customer Care | 044-556-4240 | |
| Business Sales Division (up to 400 employees) | 044-556-1465 | |
| Preferred Accounts Division Sales (ovcr 400 employccs) | 044-556-3433 | |
| Large Corporate Accounts Sales (ovcr 3500 employees) | 044-556-3430 | |
| Public Sales (government agencies, educational institutions, and medical institutions) | 044-556-1469 | |
| Global Segment Japan | 044-556-3469 | |
| Individual User | 044-556-1760 | |
| Switchboard | 044-556-4300 | |
| Korea (Seoul) | Technical Support | toll-frcc: 080-200-3800 |
| International Access Code: 001 | Sales | toll-free: 080-200-3600 |
| Country Code: 82 | Customer Service (Penang, Malaysia) | 604 633 4949 |
| City Code: 2 | Fax | 2194-6202 |
| Switchboard | 2194-6000 | |
| Technical Support (Electronics and Accessories) | toll-frcc: 080-200-3801 | |
| Latin America Customercr Technical Support (Austin, Texas, U.S.A.) | 512 728-4093 | |
| Customer Scrivcc (Austin, Texas, U.S.A.) | 512 728-3619 | |
| I'ax (Technical Support and Customer Scrivcc) (Austin, Texas, U.S.A.) | 512 728-3883 | |
| Sales (Austin, Texas, U.S.A.) | 512 728-4397 | |
| SalesFax (Austin, Texas, U.S.A.) | 512 728-4600 or 512 728-3772 | |
| Luxembourg | Website: support.euro.dell.com | |
| International Acccess Code: 00 | E-mail: tech_be@dell.com | |
| Country Code: 352 | Technical Support (Brussels, Belgium) | 3420808075 |
| Homc/Small Business Sales (Brussels, Belgium) | toll-free: 080016884 | |
| Corporate Sales (Brussels, Belgium) | 02 481 91 00 | |
| Customer Care (Brussels, Belgium) | 02 481 91 19 | |
| Fax (Brussels, Belgium) | 02 481 92 99 | |
| Switchboard (Brussels, Belgium) | 02 481 91 00 | |
| MacaoCountry Code: 853 | Technical SupportCustomer Service (Xiamen, China)Transaction Sales (Xiamen, China) | toll-free: 0800 10534 160 91029 693 115 |
| Malaysia (Penang)International Access Code: 00Country Code: 60City Code: 4 | Website: support.ap.dell.comTechnical Support (Dcell Precision, OptiPlex, and Latitude)Technical Support (Dimension, Inspiron, and Electronics and Accessories)Technical Support (PowerApp, PowerEdge, PowerConnect, and PowerVault)Customer Service (Penang, Malaysia)Transaction SalesCorporate Sales | toll-free: 1 800 88 0193toll-free: 1 800 88 1306toll-free: 1 800 88 138604 633 4949toll-free: 1 800 88 202toll-free: 1 800 88 213 |
| MexicoInternational Access Codc: 00Country Code: 52 | Customer Technical SupportSalesCustomer ServiceMain | 001-877-384-8979or 001-877-269-338350-81-8800or 01-800-888-3355001-877-384-8979or 001-877-269-338350-81-8800or 01-800-888-3355 |
| Montserrat General Support | toll-fcc: 1-866-278-6822 | |
| Netherlands Antilles General Support | 001-800-882-1519 | |
| Netherlands (Amsterdam) | Wcbsite: support.euro.dell.com | |
| International Access Code: 00 | Technical Support | 0206744500 |
| Country Code: 31 | Technical Support Fax | 0206744766 |
| City Code: 20 | Homc/Small Business Customer Care | 0206744200 |
| Relational Customer Care | 0206744325 | |
| Home/Small Business Sales | 0206745500 | |
| Relational Sales | 0206745000 | |
| Home/Small Business Sales Fax | 0206744775 | |
| Relational Sales Fax | 0206744750 | |
| Switchboard | 0206745000 | |
| Switchboard Fax | 0206744750 | |
| New Zealand | E-mail (New Zealand): nz_tech_support@dell.com | |
| International Access Code: 00 | E-mail (Australia): au_tech_support@dell.com | |
| Country Code: 64 | Technical Support (for desktop and portable computers) | toll-free: 0800 446 255 |
| Technical Support (for servers and workstations) | toll-frcc: 0800 443 563 | |
| Home and Small Business | 0800 446 255 | |
| Government and Business | 0800 444 617 | |
| Sales | 0800 441 567 | |
| Fax | 0800 441 566 | |
| Nicaragua General Support | 001-800-220-1006 | |
| Norway (Lysaker) | Wcbsitc: support.euro.dell.com | |
| International Access Code: 00 | E-mail: support.euro.dell.com/no/no/ema ildell/ | |
| Country Code: 47 | Technical Support | 671 16882 |
| Relational Customer Care | 671 17575 | |
| IHomc/Small Busincss Customer Care | 23162298 | |
| Switchboard | 671 16800 | |
| Fax Switchboard | 671 16865 | |
| Panama General Support | 001-800-507-0962 | |
| Peru General Support | 0800-50-669 | |
| Poland (Warsaw) | Website: support.euro.dell.com | |
| International Access Codc: 011 | E-mail: pl_support_tech@dell.com | |
| Country Code: 48 | Customer Service Phone | 57 95 700 |
| City Codc: 22 | Customer Care | 57 95 999 |
| Sales | 57 95 999 | |
| Customer Service Fax | 57 95 806 | |
| Reception Dcsk Fax | 57 95 998 | |
| Switchboard | 57 95 999 | |
| Portugal | Wcbsitc: support.euro.dell.com | |
| International Access Codc: 00 | E-mail: support.euro.dell.com/pt/en/ema ildell/ | |
| Country Codc: 351 | Technical Support | 707200149 |
| Customer Care | 800 300 413 | |
| Sales | 800 300 410 or 800 300 411 or 800 300 412 or 21 422 07 10 | |
| Fax | 21 424 01 12 | |
| Puerto Rico General Support | 1-800-805-7545 | |
| St. Kitts and Nevis General Support | toll-free: 1-877-441-4731 | |
| St. Lucia General Support | 1-800-882-1521 | |
| St. Vincent and the Grenadines | General Support | toll-free: 1-877-270-4609 |
| Singapore (Singapore) | Website: support.ap.dell.com | |
| International Acccess Code: 005 | Technical Support (Dimension, Inspiron, and Electronics and Accessorics) | toll-frcc: 1800 394 7430 |
| Country Code: 65 | ||
| Technical Support (OptiPlex, Latitude, and Dell Precision) | toll-frcc: 1800 394 7488 | |
| Technical Support (PowerApp, PowerEdge, PowerConnect, and PowerVault) | toll-frcc: 1800 394 7478 | |
| Customer Service (Penang, Malaysia) | 604 633 4949 | |
| Transaction Sales | toll-frcc: 1 800 394 7412 | |
| Corporate Sales | toll-free: 1 800 394 7419 | |
| Slovakia (Prague) | Website: support.euro.dell.com | |
| International Acccess Code: 00 | E-mail: czcch_dcll@dcll.com | |
| Country Code: 421 | Technical Support | 02 5441 5727 |
| Customcr Care | 420 22537 2707 | |
| Fax | 02 5441 8328 | |
| Tech Fax | 02 5441 8328 | |
| Switchboard (Sales) | 02 5441 7585 | |
| South Africa (Johannesburg) | Wcbsite: support.euro.dell.com | |
| International Access Code: 09/091 | E-mail: dcll_za_support@dcll.com | |
| Country Codc: 27 | Gold Queue | 011 709 7713 |
| City Code: 11 | Technical Support | 011 709 7710 |
| Customer Care | 011 709 7707 | |
| Sales | 011 709 7700 | |
| Fax | 011 706 0495 | |
| Switchboard | 011 709 7700 | |
| Southeast Asian and Pacific Countries | Customer Technical Support, Customer Scrvice, and Sales (Penang, Malaysia) | 604 633 4810 |
| Spain (Madrid) | Website: support.euro.dell.com | |
| International Access Codc: 00 | E-mail: support.euro.dell.com/es/es/emai ldell/ | |
| Country Code: 34 | ||
| City Codc: 91 | Home and Small Business | |
| Technical Support | 902 100 130 | |
| Customer Care | 902 118 540 | |
| Sales | 902 118 541 | |
| Switchboard | 902 118 541 | |
| Fax | 902 118 539 | |
| Corporate | ||
| Technical Support | 902 100 130 | |
| Customer Care | 902 115 236 | |
| Switchboard | 91 722 92 00 | |
| Fax | 91 722 95 83 | |
| Sweden (Upplands Vasby)International Access Code:00Country Code: 46City Code: 8 | Website: support.euro.dell.comE-mail:support.euro.dell.com/se/sv/emailldell/Technical SupportRelational Customer CareHomc/Small Business CustomerCareEmploycc Purchase Program(EPP) SupportTechnical Support FaxSales | 08 590 05 19908 590 05 64208 587 70 52720 140 14 4408 590 05 59408 590 05 185 |
| Switzerland (Geneva)International Access Code:00Country Codc: 41City Code: 22 | Website: support.euro.dell.comE-mail:Tech_support_central_Europe@dell.comE-mail for French-speaking HSBand Corporate Customers:support.euro.dell.com/ch/fr/emailldell/Technical Support (IHomc andSmall Business)Technical Support (Corporate)Customer Care (Home and SmallBusiness)Customer Care (Corporatc)FaxSwitchboard | 0844 811 4110844 822 8440848 802 2020848 821 72102279901900227990101 |
| TaiwanInternational Access Code:002Country Code: 886 | Wcbsitc: support.ap.dell.com | |
| E-mail: ap_support@dell.com | ||
| Technical Support (OptiPlex, Latitude, Inspiron, Dimension, and Electronics and Accessories) | toll-fcc: 00801 86 1011 | |
| Technical Support (PowerApp, PowerEdge, PowerConnect, and PowerVault) | toll-fcc: 00801 60 1256 | |
| Transaction Sales | toll-free: 00801 65 1228 | |
| Corporatec Salcs | toll-free: 00801 651 227 | |
| ThailandInternational Access Code:001Country Code: 66 | Website: support.ap.dell.com | |
| Technical Support (OptiPlex, Latitude, and Dell Precision) | toll-fcc: 1800 0060 07 | |
| Technical Support (PowerApp, PowerEdge, PowerConnect, and PowerVault) | toll-fcc: 1800 0600 09 | |
| Customer Service (Penang, Malaysia) | 604 633 4949 | |
| Corporatec Sales | toll-free: 1800 006 009 | |
| Transaction Sales | toll-free: 1800 006 006 | |
| Trinidad/Tobago General Support | 1-800-805-8035 | |
| Turks and Caicos Islands General Support | toll-free: 1-866-540-3355 | |
| U.K. (Bracknell)International Access Code:00Country Code: 44City Code: 1344 | Websites: support.euro.dell.comCustomer Care website:support.euro.dell.com/uk/en/ECare/Form/Home.asp | |
| E-mail:dell_direct_support@dell.com | ||
| Technical Support(Corporate/Preferred Accounts/PAD |1000+employccs|) | 0870 908 0500 | |
| Technical Support (direct and general) | 0870 908 0800 | |
| Global Accounts Customer Care | 01344 373 186 | |
| Home and Small Business Customer Care | 0870 906 0010 | |
| Corporate Customer Care | 01344 373 185 | |
| Preferred Accounts (500-5000 employccs) Customer Care | 0870 906 0010 | |
| Central Government Customer Care | 01344 373 193 | |
| Local Government & Education Customer Care | 01344 373 199 | |
| Health Customer Care | 01344 373 194 | |
| Home and Small Business Sales | 0870 907 4000 | |
| Corporate/Public Sector Sales | 01344 860 456 | |
| Home and Small Business Fax | 0870 907 4006 | |
| Uruguay General Support | toll-fcc: 000-413-598-2521 | |
| U.S.A. (Austin, Texas)International Access Code:011Country Code: 1 | Automated Order-Status Scrivcc | toll-frec: 1-800-433-9014 |
| AutoTech (portable and desktop computers) | toll-free: 1-800-247-9362 | |
| Consumer (Home and Home Office) | ||
| Technical Support | toll-frcc: 1-800-624-9896 | |
| Customer Service | toll-free: 1-800-624-9897 | |
| DellNet™ Service and Support | toll-frcc: 1-877-Dellnct(1-877-335-5638) | |
| Employcc Purchasc Program(EPP) Customers | toll-free: 1-800-695-8133 | |
| Financial Services website: www.dellfinancialservices.com | ||
| Financial Services (lease/loans) | toll-free: 1-877-577-3355 | |
| Financial Services (Dell Preferred Accounts [DPA]) | toll-free: 1-800-283-2210 | |
| Business | ||
| Customer Service and Technical Support | toll-frcc: 1-800-822-8965 | |
| Employcc Purchasc Program(EPP) Customers | toll-free: 1-800-695-8133 | |
| Printers and Projectors Technical Support | toll-free: 1-877-459-7298 | |
| Public (government, education, and healthcare) | ||
| Customer Service and Technical Support | toll-frec: 1-800-456-3355 | |
| Employcc Purchasc Program(EPP) Customers | toll-frec: 1-800-234-1490 | |
| Dell Sales | toll-free: 1-800-289-3355or toll-free: 1-800-879-3355 | |
| Dell Outlet Store (Dell refurbished computers) | toll-free: 1-888-798-7561 | |
| Country (City) | Department Name or Service Area, Website and E-Mail Address | Area Codes, Local Numbers, and Toll-Free Numbers |
| International Access Code | ||
| Country Code | ||
| City Code | ||
| U.S.A. (Austin, Texas) | Software and Pcriphcrals Salcs | toll-frcc: 1-800-671-3355 |
| International Access Code: | Spare Parts Sales | toll-free: 1-800-357-3355 |
| 011 | Extended Service and Warranty Sales | toll-frcc: 1-800-247-4618 |
| Country Code: 1 | ||
| (continued) | Fax | toll-frcc: 1-800-727-8320 |
| Dell Services for the Deaf, Hard-of-Hearing, or Spccch-Impaired | toll-free: 1-877-DELLTTY(1-877-335-5889) | |
| U.S. Virgin Islands General Support | 1-877-673-3355 | |
| Venezuela General Support | 8001-3605 | |
Glossary
ANSI Lumens—A standard for measuring light output, used for comparing projectors.
Aspect Ratio—The most popular aspect ratio is 4:3 (4 by 3). Early television and computer video formats are in a 4:3 aspect ratio, which means that the width of the image is 4/3 times the height.
Backlit (Backlight)—Refers to a remote control, or a projector control panel, that has buttons and controls that are illuminated.
Bandwidth—The number of cycles per second (Hertz) expressing the difference between the lower and upper limiting frequencies of a frequency band; also, the width of a band of frequencies.
Brightness—The amount of light emitting from a display or projection display or projection device. The brightness of projector is measured by ANSI lumens.
Color Temperature—A method of measuring the whiteness of a light source. Metal halide lamps have a higher temperature compared to halogen or incandescent lights.
Component Video—A method of delivering quality video in a format that contains all the components of the original image. These components are referred to as luma and chroma and are defined as Y'Pb'Pr' for analog component and Y'Cb'Cr' for digital component. Component video is available on DVD players and projectors.
Composite Video—The combined picture signal, including vertical and horizontal blanking and synchronizing signals.
Compression—A function that deletes resolution lines from the image to fit in the display area.
Compressed SVGA—To project an 800x600 image to a VGA projector, the original 800x600 signal must be compressed down. The data displays all the information with only two thirds of the pixels (307,000 vs 480,000). The resulting image is SVGA page size but sacrifices some of the image quality. If you are using an SVGA computers, connecting VGA to a VGA projector provide better results.
Compressed SXGA—Found on XGA projectors, compressed SXGA handling allows these projectors to handle up to 1280x1024 SXGA resolution.
Compressed XGA—Found on SVGA projectors, compressed XGA handling allows these projectors to handle 1024x768 XGA resolution.
Contrast Ratio—Range of light and dark values in a picture, or the ratio between their maximum and minimum values. There are two methods used by the projection industry to measure the ratio:
1 Full On/Off—measures the ratio of the light output of an all white image (full on) and the light output of an all black (full off) image.
2 ANSI - measures a pattern of 16 alternating black and white rectangles. The average light output from the white rectangles is divided by the average light output of the black rectangles to determine the ANSI contrast ratio.
Full On/Off contrast is always a larger number than ANSI contrast for the same projector.
dB—decibel—A unit used to express relative difference in power or intensity, usually between two acoustic or electric signals, equal to ten times the common logarithm of the ratio of the two levels.
Diagonal Screen—A method of measuring the size of a screen or a projected image. It measures from one corner to the opposite corner. A 9ft high, 12ft wide, screen has a diagonal of 15ft. This document assumes that the diagonal dimensions are for the traditional 4:3 ratio of a computer image as per the example above.
DLP—Digital Light Processing — Reflective display technology developed by Texas Instruments, using small manipulated mirrors. Light passes through a color filter is sent to the DLP mirrors which arrange the RGB colors into a picture projected onto screen, also known as DMD.
DMD—digital Micro- Mirror Device — Each DMD consists of thousands of tilting, microscopic aluminum alloy mirrorsmounted on a hidden yoke.
DVI-Digital Visual Interface - Definces the digital interface between digital devices such as projectors and personal computers. For devices that support DVI, a digital to digital connection can be made that eliminates the conversion to analog and thereby delivers an unblcmitted image.
Focal Length—The distance from the surface of a lens to its focal point.
Frequency—It is the rate of repetition in cycles per seconds of electrical signals. Measured in Hz.
Hz—Frequency of an alternating signal. See Frequency.
Keystone Correction—Device that will correct an image of the distortion (usually a wide-top narrow-bottom effect) of a projected image caused by improper projector to screen angle.
Laser Pointer—A small pen or cigar sized pointer, that contains a small battery powered laser, which can project a small, rcd (typically), high intensity beam of light that is immediately very visible on the screen.
Maximum Distance—The distance from a screen the projector can be to cast an image that is useable (bright enough) in a fully darkened room.
Maximum Image Size—The largest image a projector can throw in a darkened room. This is usually limited by focal range of the optics.
Metal Halide Lamp—The type of lamp used in many medium and all high end portable projectors. These lamps typically have a "half-life" of 1000-2000 hours. That is they slowly lose intensity (brightness) as they are used, and at the "half-life" point, they are half as bright as when new. These lamps output a very "hot" temperature light, similar to mercury vapor lamps used in street lights. Their whites are "extremely" white (with slight bluish cast.) and make Halogen lamp's whites look very yellowish by comparison.
Minimum Distance—The closest position that a projector can focus on image onto a screen.
NTSC—The United States broadcast standard for video and broadcasting.
PAL—A European and international broadcast standard for video and broadcasting. Higher resolution than NTSC.
Power Zoom—A zoom lens with the zoom in and out controlled by a motor, usually adjusted from the projector's control panel and also the remote control.
Reverse Image—Feature that allows you to flip the image horizontally. When used in a normal forward projection environment text, graphics, etc, are backwards. Reverse image is used for rear projection.
RGB—Red, Green, Blue — typically used to describe a monitor that requires separate signals for each of the three colors.
S-Video—A video transmission standard that uses a 4 pin mini-DIN connector to send video information on two signal wires called luminance (brightness, Y) and chrominance (color, C). S-Video is also referred to as Y/C.
SECAM—A French and international broadcast standard for video and broadcasting. Higher resolution than NTSC.
SVGA—Super Video Graphics Array — 800 x 600 pixels count.
SXGA—Super Ultra Graphics Array, — 1280 x 1024 pixels count.
UXGA—Ultra Extended Graphics Array — 1600 x 1200 pixels count.
VGA—Video Graphics Array — 640 x 480 pixels count.
XGA—Extra Video Graphics Array — 1024 x 768 pixels count.
Zoom Lens—Lens with a variable focal length that allows operator to move the view in or out making the image smaller or larger.
Zoom Lens Ratio—Is the ratio between the smallest and largest image a lens can projector from a fixed distance. For example, a 1.4:1 zoom lens ratio means that a 10 foot image without zoom would be a 14 foot image with full zoom.
Index
A
Adjusting Projection Image Size, 26
Adjusting the Projected
Image, 12
Adjusting the Projector
Height, 12
lower the projector
Elevator button, 12
Elevator foot, 12
Tilt adjustment wheel, 12
Adjusting the Projector Zoom and Focus, 14 Focus ring, 14 Zoom tab, 14
C
Changing the Lamp, 26
Connecting the Projector
Commercial RS232 control box, 10
Composite video cable, 9
Connecting with component cable, 8
Connecting with composite cable, 9
Connection with Commercial RS232 control box, 10
Connection with PC, 10
D-sub to D-sub cable, 8
D-sub to HDTV/Component cable, 8
Installation for wired RS232 remote control, 9
Power cord, 8-10
Professional Installation Options, 9
RS232 cable, 10
S-video cable, 9
To Computer, 8
USB to USB cable, 8
Connection Ports
Audio input connector, 7
Composite video connector, 7
IR Receiver, 7
RS232 connector, 7
S-video connector, 7
USB connector, 7
VGA in (D-sub) connector, 7
VGA Out (monitor loop-through), 7
Control Panel, 15
D
Dell contacting, 33
M
Main Unit, 6
Control panel, 6
Elevator button, 6
Focusring,6
Lens, 6
Zoom tab, 6
0
On-Screen Display, 17
All Images, 18
Degamma, 19
White Intensity, 19
Audio, 19
Computer Image, 21
Frequency, 21
Tracking, 21
Language, 21
Management, 20
Video Image, 22
P
Powering On/Off the Projector
Powering Off the Projector, 11
Powering On the Projector, 11
R
Remote Control, 6, 16
RS232 Pin Assignment
RS232 Protocol, 29
Communication
Settings, 29
Control Command
Syntax, 29
Control Commands
List, 30
s
Specifications
Audio, 28
Brightness, 27
Color Wheel Speed, 27
Compatibility Modes, 31
Contrast Ratio, 27
Dimensions, 28
Displayable Color, 27
Environmental, 28
H. Frequency, 27
I/O Connectors, 28
Lamp, 27
Light Valve, 27
Noise Level, 28
Number of Pixels, 27
Power Consumption, 27
Power Supply, 27
Projection Distance, 27
Projection Lens, 27
Projection Screen Size, 27
Regulatory, 28
RS232PinAssignment,29
Uniformity, 27
V. Frequency, 27
Video Compatibility, 27
Weight,28
support
contacting Dell, 33
T
Troubleshooting, 23
contact Dell, 23
remote control, 25
Del^TM 1100MP-Projektor
Benutzerhandbuch
ICES-003, MIC, C-Tick, GOST, CCC,
PSB, NOM, TUV-S/Argentinien
Distance de projection, 171
Cable video composite, 146
ICES-003, MIC, C-Tick, GOST, CCC,
PSB, NOM, TuV-S/Argentina
elevator, pie del, 222
projector,apagado del,221
projector, encendido del, 221
R
Menu Imagine computer

NOTA: Anything you like is always available for sale.
NOTA: Anything you like can be found in the book.
ICES-003, MIC, C-Tiek, GOST, CCC,
PSB, NOM, TuV-S/Argentina
SVGA (Super Video Graphics Array): 800x600 pixel.
UXGA (Ultra Extended Graphics Array): 1600x1200 pixel.
VGA (Video Graphics Array): 640x480 pixel.
collegamenti in series), 287
R
SVGA—Super Video Graphics Array—Telt 800 x 600 pixels.
SXGA—Super Ultra Graphics Array—Telt 1280 x 1024 pixels.
UXGA—Ultra Extended Graphics Array—Telt 1600 x 1200 pixels.
VGA—Video Graphics Array—Telt 640 x 480 pixels.
XGA—Extra Video Graphics Array—Telt 1024 x 768 pixels.
I/O-connectoren, 386
lamp, 385
lichtklep, 385
omgeving, 386
2 SuV8eOToU TPOoAIOu OuaTnMaTOc
AvtikataoTnTo 1aamptnpa otav to mnuva "Lamp is approaching the end of its useful life. Replacement suggested! www.dell.com/lamps" 1uovotet i oynv oovn. Eav to npobaa napauevu tnv avtikataoTaon tov aamptnpa, eikovwnote u Tnv Dell.

PPOsOXH: O aunnpac uTepepaivetai kata tn xpno. Mny eipite va avikataoTneTo auntnpaa Ppota aqnoTe va Kpuwoi to ppoBoIKO ouTnma yia ToulaxioTov 30 aeTTa.

IPOsOXH: Mny ayviciE TE TOTe TO aamptnpa n to yuaai Tns Luxviac. O aamptnpac mTOpEi va ekpayei Eaiaic akataaanlou Xepioou, ouuTepiaaBavovEvns kai Tns eTAPnC ME To aamptnpa n to yuaai Tns Luxviac.
1 Anevepyoonotc to npofo k aaoovdeoe to kaawdo tpoqodoi.
2 ApnoTe to npoBoIko o6oTma va kpuooei tovlaXioToV yia 30 IeTua.
3 XaIapowte 2 biocnov aovaiov to kauuua tou aunnpa kaia paepote to kauuua.
4 Xaapowte 2 bi8c nov aov aoipaiqov to
5 Aφαρεστε το λαμπτήρα κρατώντας τον από τη μεταλική λαβή του.
6 Akovthoavtiotpopa ta hmuata 1 eoc 5 yia va eykataostoe tov veo laannpa.
7 MnoevioTe to xpovo xponc tov laumntpa eunéyovtac to apiotepo ekovidio Eanavopα λaumntpa stny kaptéλa Management tov OSD.

\SHMEIQsH: 1oWc aTtTeiTa n
ETIOPTPOpN TwV LAMTTnpWv TOU
aVTIKaIOTAVTai OTNV Dell, Eav
n aVTIKaTaoTaN KALUTTEAI
ATTO Tnv Eyyunon. Aiaqopetika,
ETIKOIVWvNOte ME Tnv TOTIKn
apxdiaxepionc aTROBANTWv
YIA Tnv PAnoiEOTepn TEpioxn
aToppipns.


HMEI H H TEPiEx1 uOpapyuO. Ia Tnv aToppipn autou Tou uAIKO EVDEXeai va IOxUoov OuyKekpiEvoI TepiBaAlovTKoi Kavovioi. Ia TAnpoopiec aToppipns n avakukawonc, ETIKOIVWvnoTe TIC TOPIKec apXec n Tnv Evwn Biounxaviw HAEKTPOVIKWv (Electronic Industries Alliance): www.eiae.org.
PpOδiaypaΦες
Bαβiδα φωτός
2000:1 Tovikoc (Full On/Full Off)
TaoTnTaXpOaTuKoΦaOaToC
100~127,5Hz (2X)
Φακός προβολής
F/2,5,f=28.8\~34.5mm 0 k o xipokivntn 1.2x
FCC, CE, VCCI, UL, cUL, TóV-GS, ICES-003, MIC, C-Tick, GOST, CCC, PSB, NOM, TóV-S/Argentina
AkpodekTeεiOoov/εxodov
Tpoopodostia:Ynooyn EIOoDBOu p6oataoc AC
Eioooc vnoooyiosth:muia eioooc D-sub
yia oma avaoyoikocoviootwoov,
onma eioodou HDTV
Egoc oioooyiostn: ia eXodoc D-sub 15 akiodov
Eioooc bivtco: ia eioooc oovotou 0maotoc bivtco RCA kaia S-video
Eiooos USB: evac akpoedekntns USB
Eioooc nov: eva a tNtAeovv (diaetpov 3,5mm)
One mini-DIN RS232 for wired remote projector control from PC
Avtioixion akiδωv RS232
πρωτόκολλο RS232
Pouoioic eikovovia
White Intensity, 445
Audio, 445
Computer Image, 448
Frequency, 448
Tracking, 448
Language, 447
Management, 446
Video Image, 449
o , 457
Tao'nta xpwataikov
,457
προβολής, 457
, 457
#
IIvαkaç ελεγχον, 440
Piopoiaypaqεc
AkpodekTeC
/ , 458
Avtoioaikov
RS232,459
Aiooataon npoBoaic, 457
Apo pixel, 457
Bαβiδα φωτός, 457
Bapoc,458
i a 昌, 458
Commercial RS232 508
3Utilizar o projector
Ligaro projector 509
Desligar o projector 509
ICES-003, MIC, C-Tick, GOST, CCC,
PSB, NOM, TuV-S/Argentina
Conectores de E/S Alimentacao: conector de entrada AC
Entrada para computador: um conector D-sub para analógico/componente, sinais de entrada de HDTV
Saida para computador: um conector D-sub de 15 pinos
SVGA—Super Video Graphics Array—800 x 600 pixels.
VGA—Video Graphics Array—640 x 480 pixels.
Ecradeconfiguraoc,515
All Images,516 Degamma,517 White Intensity,517
Audio,517
Computer Image,520 Frequency,520 Tracking,520
Language,519
Management,518
Video Image,520
Freq. horizontal, 527
Freq. vertical, 527
Lampada, 527
Commercial RS232, 508
LigaraoPC,508
Ligar com cabo
composto, 507
Ligar com cabo de
components, 506
Desligar o projector, 509
Ligor projector, 509
M
Mudaralampada,524
P
Painel de controlo, 513
Portas de ligaçao
Pakkens indhold (fortsat)
Fjernbetjening Batterier
Hovedmenuen Main Menu
Menu All Images
BRIGHTNESS—Juster billedets lysstyrke vha. knappen © clcr 日 kontrolpanclct clcr knappcn eller pa fjcrnbctjceningcn.
Menuen Computer Image

BEMAERK! Menuen er kun tilgengelig, nar projektoren er tilsluttet en computer.
FREQUENCY—Rediger Projektorens clock-frekvens, sa den svarer til clock-frekvensen for computerens grafikkort. IIvis der vises en lodret, flimrende bjelke, kan du minimere bjelken ved at indstille Frequency. Dette er en grovjustering.
Udskift lampcn, narr mcddlcIscn "Lamp is approaching the end of its useful life. Replacement suggested! www.dell.com/lamps" vises pa skaernen. IIvis problemet fortsetter, after at lampen er skiffet, kal du kontakte Dell.

ICES-003, MIC, C-Tick, GOST, CCC,
PSB, NOM, TuV-S/Argentina
I/O-stik Strøm: Vekselstrømsstik
Computerindgang: En D-sub til analog/komponent, IIDTV-inputsignaler
Computerudgang: Ft 15-benct D-sub-stik
White Intensity, 587
Audio, 587
Computer Image, 590
Frequency, 590
Tracking, 590
Language, 589
Management, 588
Video Image, 590
P
Primarenhed,572
Elevatorknap, 572
Fokusring, 572
Kontrolpanel, 572
Linsc,572
Zoomgreb, 572
s
All Images-valikko 651
Audio-valikko 652
Management-valikko 652
Language-valikko 654
Factory Reset-valikko 654
Computer Image-valikko 655
Video Image-valikko 656
Computer Image -valikko

Video Image -valikko

NTSC, NTSC 4.43, PAL, PAL-M,
PAL-N, SECAM ja HDTV (1080i,
720p, 576i/P, 480i/P)
ICES-003, MIC, C-Tick, GOST, CCC,
PSB, NOM, TuV-S/Argentiina
White Intensity, 652
Audio, 652
Computer Image, 655
Frequency, 655
Tracking, 655
Language, 654
Management, 652
Video Image, 656
0
Ohjauspaneeli, 647
P
"Press Power button to Turn Off Projector.
Bytt ut lampen Near meldingen Lamp is approaching the end of its useful life. Replacement suggested!
www.dell.com/lamps vises på skjermen. Hvis dette problemet vedvarer när lampen er byttet ut, kontakter du Dell.

HDTV (1080i, 720p, 576i/P, 480i/P)
ICES-003, MIC, C-Tick, GOST, CCC,
PSB, NOM, TuV-S/Argentina
I/U-kontakter Strøm: Kontakt for vekselstrøm
Datamaskininngang:énD-sub
for analog/komponent, HDTV-
innatasignaler
Datamaskinutgang: en 15-pinners D-sub
Videosignaler, inn: en
komposittvideo-RCA og en S-video
USB-inngang: cn USB-kontakt
Lydinngang: en telcfonkontakt
(3,5 mm diameter)
En mini-DIN RS232 for tilkoblet
White Intensity, 719
Audio, 719
Computer Image, 721
Frequency, 722
Tracking, 722
Language, 721
Management, 720
Video Image, 722
R
ICES-003, MIC, C-Tick, GOST, CCC,
PSB, NOM, TuV-S/Argentyna
White Intensity, 789
Audio, 789
Computer Image, 792
Frequency, 792
Tracking, 792
Language, 791
Management, 790
Video Image, 793
P
HDTV (1080i, 720p, 576i/P, 480i/P)
Kapacitet for kompositvideo,
ICES-003, MIC, C-Tick, GOST, CCC,
PSB, NOM, TuV-S/Argentina
VGA-ingang (D-sub), 847
VGA-utgang
White Intensity, 859
Computer Image, 861
Frequency, 862
Tracking, 862
Language, 861
Ljud,859
Management, 860
Video Image, 862
Byta lampan, 866
D
Dell kontakta, 873
F
Felsökning, 863
fjarrkontroll, 865
kontakta Dell, 863
Fjarrkontroll, 846, 856
H
NTSC, NTSC 4.43, PAL, PAL-M,
PAL-N, SECAM a HDTV
(1080i, 720p, 576i/P, 480i/P)
kompozitni video, componentni
video a S-video
Horizontal frekvence
15 až 70 kHz (analog)
Vertikánlí frekvence
43 až 85 Hz (analog)
Zdroj
Zvuk 1 rePRODUCTOR, 2 W RMS
Hlučnost 34 dB (A) plny vykon,
ICES-003, MIC, C-Tick, GOST, CCC,
PSB, NOM, TuV-S/Argentina
VstupnivystupnikonektoryNapajeni:vstupni zasuvka
strédavého napétí

- Del™ 1100MP Projector
- Owner's Manual
- Notes, Notices, and Cautions
- Contents
- 1Your Dell™ Projector
- 2Connecting Your Projector
- 3Using Your Projector
- Adjusting the Projector Zoom and Focus 14
- Using the Control Panel 15
- Using the Remote Control 16
- Using the On-Screen Display 17
- 4Troubleshooting Your Projector
- Changing the Lamp 26
- 5Specifications
- 6Contacting Dell
- 7Glossary
- Your Dell™ Projector
- Package Contents
- Package Contents (continued)
- About Your Projector
- 2
- Connecting Your Projector
- Connecting to a Computer
- Connecting a DVD Player, Set Top Box, VCR, or TV
- Connecting With a Component Cable
- Connecting With an S-Video Cable
- Connecting With a Composite Cable
- Connecting to a Wired RS232 Remote Control
- Using Your Projector
- Turning Your Projector On
- Turning Your Projector Off
- Adjusting the Projected Image
- Raising the Projector Height
- Lowering the Projector Height
- Adjusting Projection Image Size
- Adjusting the Projector Zoom and Focus
- Using the Control Panel
- Using the Remote Control
- Using the On-Screen Display
- Main Menu
- All Images Menu
- Audio Menu
- Management Menu
- Language Menu
- Factory Reset Menu
- Computer Image Menu
- Video Image Menu
- Troubleshooting Your Projector
- Changing the Lamp
- Specifications
- RS232 Pin Assignment
- RS232 Protocol
- Contacting Dell
- Glossary
- Index
- A
- C
- D
- M
- 0
- P
- R
- s
- T
- DelTM 1100MP-Projektor
- Benutzerhandbuch
- Menu Imagine computer
- PpOδiaypaΦες
- Avtioixion akiδωv RS232
- πρωτόκολλο RS232
- #
- 3Utilizar o projector
- Pakkens indhold (fortsat)
- Fjernbetjening Batterier
- Hovedmenuen Main Menu
- Menu All Images
- Menuen Computer Image
- Computer Image -valikko
- Video Image -valikko
- F
- H
Brand : DELL
Model : 1100MP
Category : Projector