Protalker 1016 - Radio TOPCOM - Free user manual and instructions
Find the device manual for free Protalker 1016 TOPCOM in PDF.
Frequently Asked Questions - Protalker 1016 TOPCOM
User questions about Protalker 1016 TOPCOM
0 question about this device. Answer the ones you know or ask your own.
Ask a new question about this device
Download the instructions for your Radio in PDF format for free! Find your manual Protalker 1016 - TOPCOM and take your electronic device back in hand. On this page are published all the documents necessary for the use of your device. Protalker 1016 by TOPCOM.
USER MANUAL Protalker 1016 TOPCOM
UK The OP hybrid motor motor car park on the road is now working on the
H
FR 1
DE Da Ccnnnttnng da Taan nndrnnnnae Anrnnnne rnrnnn
85 1
B
2
100000000000000000000000000000000000000
Laler aadhns PATTE-nd wneat raia, riln onvahscha CD-tred 1
PT
CCTFCEFTRNTF
PLSPWCTCnA
1000000000000000000000000000000000000000
F
Kraenragerpaldert
2017年1月1日(星期一)
DK TIRVAEL 1
NO.1087 246 35 1088
10
(1)拟投人研发费用的计划
Cn rnnnne nnnnne nnne nee
Pc
SPPp 1
Protalker 1016
1 Introduction
Thank you for purchasing the Topcom Protalker PT-1016. This PMR radio a high quality, long range and low powered radio communication device with a range of maximum 10Km in optimal conditions. It has no running costs other than the minimal cost of re-charging the batteries. The Protalker PT-1016 operates in the licence-free PMR 446 MHz frequency band and can operate on 8 different radio frequencies.
The rotatable channel selector has 16 positions :
-
Channel 1..8 : the 8 PMR446 frequencies + a pre-defined DCS sub-channel code.
-
Channel 9..16 : the 8 different PMR446 frequencies without any DCS sub-channel code.
In accordance with the PMR446 regulations, the radiated power of this radio is 0.5 Watts and the antenna cannot be removed from the body. The PT-1016 complies to the IP54 standard so it can operate in dusty environments and it can be used outdoor. Thanks to the high quality speaker you will always receive a very loud and clear audio signal.
2 C E M a r k
The CE symbol on the unit, user guide and giftbox indicates that the unit complies with the essential requirements of the R&TTE directive 1995/5/EC.
3 Safety instructions
3.1 General
Please read carefully through the following information concerning safety and proper use. Make yourself familiar with all functions of the device. Keep this manual in a safe place for future use.
3.2 Burning injuries
- If the cover of the antenna is damaged, do not touch because when an antenna comes in contact with the skin, a minor burn may result when transmitting.
- Batteries can cause property damage such as burns if conductive material such as jewellery, keys or beaded chains touches exposed terminals. The material may complete an electrical circuit (short circuit) and become quite hot. Exercise care in handling any charged battery, particularly when placing it inside a pocket, purse or other container with metal objects.
3.3 Injuries
- Do not place your device in the area over an air bag or in the air bag deployment area. Air bags inflate with great force. If a PMR is placed in the bag deployment area and the air bag inflates, the communicator may be propelled with great force and cause serious injury to the occupants of the vehicle.
- Keep the PMR at least 15 centimetres away from a pacemaker.
- Turn your PMR OFF as soon as interference is taking place with medical equipment.
3.4 Danger of explosion
- Do not replace batteries in a potentially explosive atmosphere. Contact sparking may occur while installing or removing batteries and cause an explosion.
Turn your PMR off when in any area with a potentially explosive atmosphere. Sparks in such areas could cause an explosion or fire resulting in bodily injury or even death. - Never throw batteries in fire as they may explode.

Areas with potentially explosive atmospheres are often, but not always, clearly marked. They include fuelling areas such as below deck on boats, fuel or chemical transfer or storage facilities; areas where the air contains chemicals or particles, such as grain, dust or metal powders; and any other area where you would normally be advised to turn off your vehicle engine.
3.5 Poisoning danger
- Keep batteries away from small children.
3.6 Legal
- In some countries it is prohibited to use your PMR while driving a vehicle. In this case, leave the road before using the device.
- Turn your PMR OFF when on board an aircraft when instructed to do so. Any use of the PMR must be in accordance with airline regulations or crew instructions.
- Turn your PMR OFF in any facilities where posted notices instruct you to do so. Hospitals or health care facilities may be using equipment that is sensitive to external RF energy.
- Replacing or modifying the antenna may affect the PMR radio specifications and violate the CE regulations. Unauthorized antennas could also damage the radio.
3.7 Notes
- Do not touch the antenna while transmitting, it could affect the range.
- Remove the batteries if the device is not going to be used for a long period.
4 Cleaning and maintenance
- To clean the unit, wipe with a soft cloth dampened with water. Don't use a cleaner or solvents on the unit; they can damage the case and leak inside, causing permanent damage.
- Battery contacts may be wiped with a dry lint-free cloth.
- If the unit gets wet, turn it off and remove the batteries immediately. Dry the battery compartment with a soft cloth to minimize potential water damage. Leave the cover off the battery compartment overnight or until completely dry. Do not use the unit until completely dry.
5 Disposal of the device (environment)

At the end of the product lifecycle, you should not throw this product into the normal household garbage but bring the product to a collection point for the recycling of electrical and electronic equipments. The symbol on the product, user guide and/or box indicate this.
Some of the product materials can be re-used if you bring them to a recycling point. By re-using some parts or raw materials from used products you make an important contribution to the protection of the environment. Please contact your local authorities in case you need more information on the collection points in your area.
6 Using a PMR 446 Mhz radio
To communicate between PMR devices they need to be set all on the same channel + sub-channel code and within receiving range (up to max. 10 km in ideal conditions). Since the PT-1016 operates on licence free 446 MHz frequencies, all other licence free 446 MHz PMR radio's will operate on the same radio frequencies. Therefore, privacy is not guaranteed. Anybody with a PMR set to your radio frequency can overhear the conversation. If you want to communicate (transmitting a voice signal) you need to press the PTT-button. Once this button pressed, the device will go into transmit mode and you can speak into the microphone. All other PMR devices in range, on the same channel and in standby mode (not transmitting) will hear your message. You need to wait until the other party stops transmitting before you can reply to the message. To reply, just press the PTT-button and speak into the microphone...

If 2 or more users press the PTT- button at the same time the receiver will receive only the stongest signal and the other signal(s) will be suppressed. Therefore you should only transmit a signal (press PTT- button) when the channel is free.

The range of radio waves is strongly affected by obstacles such as buildings, concrete/metal structures, the unevenness of the landscape, woodland, plants, ... This implies that the range between two or more PMR's may in some extreme cases be restricted to a maximum of a few tens of meters. You will soon notice that PMR works best when there is a minimum of obstacles between users.
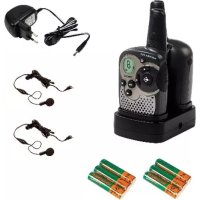
7 Included in the package
- 1 x Protalker PT-1016
- 1 x Beltclip
- 1 x Desktop Charger
- 1 x Power adapter
1 x Li-ion battery - 1 x User guide
8 Getting started
8.1 Installing the battery pack
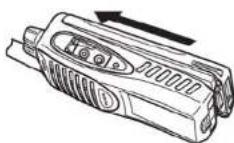
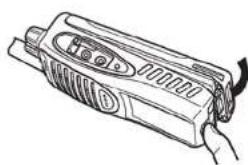
Align the battery pack with the back of the PMR body. Press the battery pack and PMR body firmly together until the release latch locks up the battery.
8.2 Removing the battery pack
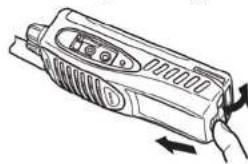
Lift the safety catch on the PMR body. Then press the release latch underneath the safety catch.
While pressing the release latch, pull the battery pack away from the PMR body.
8.3 Installing the belt clip
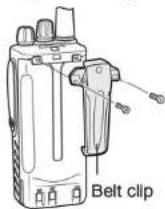
If necessary, attach the belt clip using the two supplied screws.
8.4 Installing the hand strap
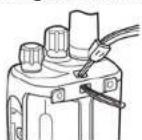
Slide the small loop of the hand strap through the eyelet on the upper rear of the PMR body.
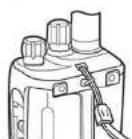
Pull the entire hand strap through the small loop to secure the hand strap in place.
Protalker 1016
8.5 Charging the battery
-
Connect the power jack of the power adapter to the back of the desktop charger.
-
Plug in the power adapter in an easy accessible power socket.
→The LED on the front panel of the desktop charger will turn green.
- Put in the PMR (with installed battery) or the separate battery into the charger.
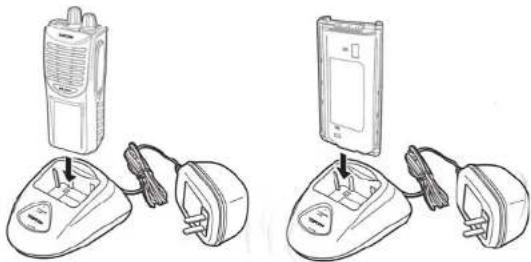
The LED colour will indicate the charging status of the battery:
Red:Charging
Light green: 90% full
Green: Fully charged
When the battery is fully discharged it will take about 4.5 hours to charge the battery to 90% of the full capacity. The remaining 10% charging will take about one hour. So, charging a fully discharged battery to 100% will take about 5.5 hours.

Do not use the PMR while charging the battery. Switch off the power of the PMR while charging.

Do not short-circuit the batteries or dispose in fire. Remove the batteries if this device is not going to be used for a long period.
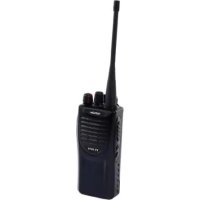
9 The PMR radio
- Channel selector (16 positions)
- On-Off/Volume knob
3.Status LED
Green:Receiving
Green flashing:Scanning
Red:Transmitting
Red flashing: Battery low
-
External Speaker/Microphone connectors
-
Speaker
- Microphone
- Function key #2: Monitor key
- Function key #1: Scan key
9.PTT-button - Fixed antenna
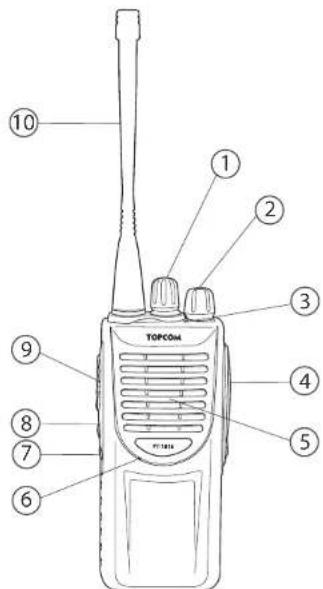

When the status LED is flashing red, battery needs to be recharged.
6
10 Using the PMR radio
10.1 Switching On/Off the PMR radio
Turn the "On-Off/Volume knob" clockwise.
A clicking sound will indicate that the PMR radio is switched on.
- Adjust the volume level by turning the knob
- Turn the "On-Off/Volume knob" (2) fully counter clockwise. The clicking sound will indicate that the PMR radio is switched off.
10.2 Selecting the channel
The PT-1016 is pre-programmed with 16 channels. It is recommended to use the first eight channels (1..8) as these are a combination of a radio frequency combined with a DCS sub-channel code. This way, there will be less interference of other PMR 446MHz users on your channel. Last eight channels (9..16) are the eight different radio frequencies and will allow you to speak/listen to users who are using PMR 446 MHz radio's that are not using sub-channel codes.
- Rotate the "Channel selector" to select the desired channel.
The table in Annex A shows how the PT-1016 channels are pre-programmed.
10.3 Transmitting a signal
Press the "PTT - button" and speak towards the microphone. The ideal distance between the microphone of the PMR radio and your mouth is 5 to 10cm .
The "Status LED" will turn red while transmitting.
10.4 Receiving a signal
When the PT-1016 is turned ON it will always be in receiving mode on the selected channel. While receiving a signal you can always adjust the volume by turning the knob. (2)
The "Status LED" will turn green when receiving a signal.
10.5 Monitor function
When you press the "Monitor key" you will be able to hear weaker signals.
When the PMR radio is set on one of the first eight channels (1..8), you will be able to hear nearby users, operating on the same radio frequency but on a different sub-channel, by pressing the "Monitor key"
10.6 Scanning
When you press the "Scan key" the PMR radio will scan for signals on the first 8 channels (1..8). In this way, the PMR radio will scan for signals coming from other PT-1016 users or from users operating on the same radio frequency with the same DCS sub-channel. (Annex A) The "Status LED" will blink green while scanning. When a signal is received you can answer just by pressing the "PPT-key". The scanning will resume automatically after 4 seconds.
- Press the "Scan Key" again to disable scanning.
Protalker 1016
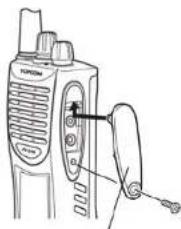
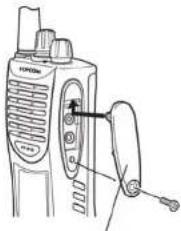
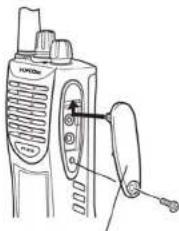
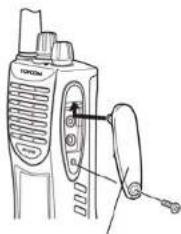
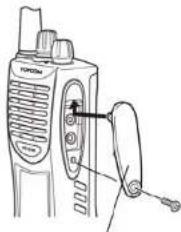
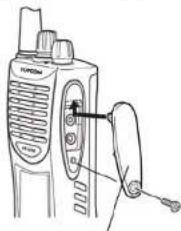
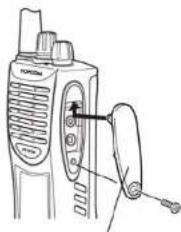
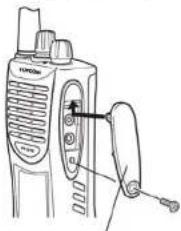
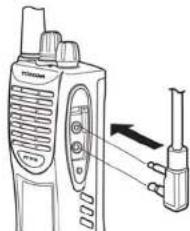
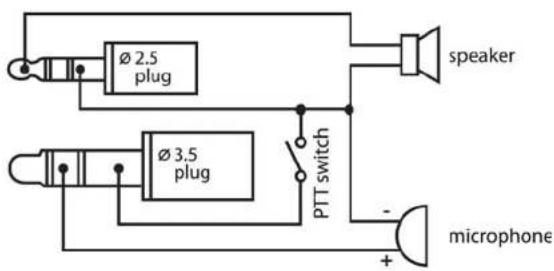
11 External speaker/microphone connection
You can connect an optional speaker/microphone (shoulder microphone, ear tube, PC programming cable,...) via the side panel connectors.

Speaker/microphone
jack cover
Remove the screw and take away the cover to have access to the speaker/microphone jacks.

If you are not using an external speaker/microphone, install the cover and put back in the screw.

Insert the speaker/microphone plug into the speaker/ microphone jacks of the PT-1016.

The PT-1016 is not fully water resistant while using an external speaker/ microphone.
The diagram in Annex B shows how the speaker/microphone is connected.
12 Technical specifications
Please refer to Annex C for the technical specifications.
Protalker 1016
13 Warranty
13.1 Warranty period
The devices have a 24-month warranty period. The warranty period starts on the day the new unit is purchased. There is no warranty on standard or rechargeable batteries. Consumables or defects causing a negligible effect on operation or value of the equipment are not covered. The warranty has to be proven by presentation of the original or copy of the purchase receipt, on which the date of purchase and the unit-model are indicated.
13.2 Warranty handling
A faulty unit needs to be returned to an authorized service centre including a valid purchase note and a filled in service card. If the unit develops a fault during the warranty period, the service centre will repair any defects caused by material or manufacturing faults free of charge, by either repairing or exchanging the faulty units or parts of the faulty units. In case of replacement, colour and model can be different from the original purchased unit. The initial purchase date shall determine the start of the warranty period. The warranty period is not extended if the unit is exchanged or repaired by the service centre.
13.3 Warranty exclusions
Damage or defects caused by incorrect treatment or operation and damage resulting from use of non-original parts or accessories are not covered by the warranty. The warranty does not cover damage caused by outside factors, such as lightning, water and fire, nor any damage caused during transportation. No warranty can be claimed if the serial number on the units has been changed, removed or rendered illegible. Any warranty claims will be invalid if the unit has been repaired, altered or modified by the buyer
8
1 Inleiding
Speaker/microphone jack cover
Speaker/microphone
jack cover

Speaker/microphone jack cover
Speaker/microphone jack cover
3.4 Risk for explosion
Speaker/microphone Jack cover
- Udskift违法犯罪
- Uddskift isn't a good idea to use the term in the context of an ecksplous service.
33
10.3 Afsendelse at signal
-Tryk pa "Scanningstasten" ifen for at deaktivere scanninge.
Speaker/microphone
jack cover
3.5 Fare for forgiving

Speaker/microphone jack cover

Speaker/microphone jack cover

Speaker/microphone
jack cover
Speaker/microphone
jack cover
10.3 Vysilani signalu
Speaker/microphone jack cover
Vyrsoubija sroubek a suntje kryt. Tim ziskate pristup ke konektorum reprodktoru a mikrofonu.

Speaker/microphone jack cover
Aapapeote Tj Bida Ka KATOTIN apapeete To kATTa, Yia va aTOKHTepe TPOBaon OTU TOOxEs OvDeanSc yeaqvovu/IKpokovvou.

EAVXPOIHOIOIE EOWTEPIKO YEAPWVOHIKPOWVO,TOITOBETNOTe TO KATAKI OTN θeON TOU KAI OTEPEWOT TO ME TBIIDA TOU.

ZUUVDETOBuaTouEwTePikoueYApovou/ kKpOoVouOTcavIaToxEcUTOooXeOuDeOncTouPT- 1016.
67

To PT-1016 8ev 1vai npiipw ciaippo xo stvo,otav xnoiioeite EgWepiko eYapwouikpOwvo.
To oxdiaypaumo Tnapptma B 6iXVE TOV pTOIO OUVDEOnc TOU EOTepikou eayapovou/ kipopovou.
12 TeYvikeS pOdiaypaqes
Tia Teyvikepiopoiaypapcs,avatpeTe OTo Napapntma C.
13 Eyyunon Topcom
13.1 Iepiodoc yyyunons
Ou oukeuec Topcom exouv 24unv dapkeia eyyunong. H TneiplooC nC eyyunanc apxiciytny npepa ayopac nC ouokeuhs. DEv napexetai eyyunon yia ttiKes n Eanavapopitiopevece ptatapic.
Avaawajra aataujata Tn TPOKAUAV qaeANTeE cTTTMOeC OTN AETOUYIA n TVAJA TNC OaKeuK,Dev KAATOTVaT.
H eyyunon trpeie va atoidekvueiai napouaovta nva ubeviikn atoideiyn ayopac n atypaopa autnc, atny otoia va paivotn nnepuomvia ayopac kai to voTeLo ts ouakeuic.
H E Y Y U O N J E K A L T E I T I CJI QIIEC T O U P E O A V O T I E DE E J U T E P I K O U C T P A P A Y O V E, O T U C K E P A O V O U, VEPO KAI QUTI N J C I QIIEC T O U T P I O A O A T T O M E T A P O P A.
H Evyunon dei xuei epiTnwn Tou o apBIOsc eipac om vovadexiaaAaxoiaapae0eI nataotaekupoc (m avvvooojoc).
OTIOAIEIOTAE AIEUACE EYUNANB EBEPOVATN JI EKUPCE OE TPIPTTINW TOU N VOBDA EEXIETIOKEAE, AAIAOHEI NTOPOTIOINIE ATTO VAOAPOT.
1 W s t e p

Speaker/microphone jack cover

Speaker/microphone
jack cover
Vyskrutkujte skruty a odstrante kryt. Tym ziskate pristup ku konektorom reproduktora/mikrofónu.

Ak nebudee dalej pouziva externy reproductor/mikrofon, nasadte a kryt a opa'ho priskrutkujte.
Pre - programmed channels
| LENNAH-C-BUSYCNEUQ | ||
| 1 446.00625 N130DzHM = DCS code 04 | ||
| 2 446.01875 N150DzHM = DCS code 08 | ||
| 3 446.0325 N270DzHM = DCS code 12 | ||
| 4 446.0475 N511DzHM = DCS code 16 | ||
| 5 446.0525 N231DzHM = DCS code 20 | ||
| 6 446.0675 N551DzHM = DCS code 24 | ||
| 7 446.0825 N271DzHM = DCS code 28 | ||
| 8 446.0975 N622DzHM = DCS code 32 | ||
| 9 446.0025 MHz | ||
| 10 446.01875 MHz | ||
| 11 446.0325 MHz | ||
| 12 446.04875 MHz | ||
| 13 446.0525 MHz | ||
| 14 446.06875 MHz | ||
| 15 446.0825 MHz | ||
| 16 446.09875 MHz |
Annex B
Speaker / microphone connection diagram
Annex C
Technical specifications
| Frequency range : | 446.00625 ... 446.09375 MHz |
| Channel spacing : | 12.5 KHz |
| Channels : | 16 |
| Maximum RF output power : | 0.5 W |
| Modulation : | FM - F3E |
| Antenna type : | Fixed |
| Audio output power : | <=500mW |
| Battery type : | 7.4V - 1200mAh (Li-ion) |
| Operation temperature : | -20 °C ... +55°C |
| IP-standard : | 4SP |
| Dimensions : | 142 x 57 x 41 mm (without antenna) |
| Weight : | 275 g (including battery, antenna, belt-clip) |
Annex D
CTCSS/DCSChart
| CTCSSCodeChart CodeFreq(Hz)CodeFreq(Hz)CodeFreq(Hz)CodeFreq(Hz) | ||||||
| 167 11 | 97,4 21 136,5 31 192,8 | |||||
| 271,9 | 2100 22 141,3 32 203,5 | |||||
| 374,4 | 3103,5 23 146,2 33 210,7 | |||||
| 477 14 | 107,2 24 151,4 34 218,1 | |||||
| 579,7 | 35 110,9 25 156,7 35 225,7 | |||||
| 682,5 | 36 114,8 26 162,2 36 233,6 | |||||
| 785,4 | 7118,8 27 167,9 37 241,8 | |||||
| 888,5 | 38 123 28 173,8 38 250,3 | |||||
| 991,5 | 39 127,3 29 179,9 | |||||
| 1094,8 | 0131,8 30 186,2 | |||||
| DCSCodeChart NoDCSCCodeNoDCSCCodeNoDCSCodeNoDCSCode | ||||||
| 21 D134N 42 D311N 63D516N | ||||||
| 1 D023N | 22 D143N 43 | D315N 64 D532N | ||||
| 2 D025N | 23 D152N 44 | D331N 65 D546N | ||||
| 3 D026N | 24 D155N 45 | D343N 66 D565N | ||||
| 4 D031N | 25 D156N 46 | D346N 67 D606N | ||||
| 5 D032N | 26 D162N 47 | D351N 68 D612N | ||||
| 6 D043N | 27 D165N 48 | D354N 69 D624N | ||||
| 7 D047N | 28 D172N 49 | D365N 70 D627N | ||||
| 8 D051N | 29 D174N 50 | D371N 71 D631N | ||||
| 9 D054N | 30 D205N 51 | D411N 72 D632N | ||||
| 10 D065N | 31 D223N 52 | D412N 73 D654N | ||||
| 11 D071N | 32 D226N 53 | D413N 74 D662N | ||||
| 12 D072N | 33 D243N 54 | D423N 75 D684N | ||||
| 13 D073N | 34 D244N 55 | D431N 76 D708N | ||||
| 14 D074N | N 35 | D245N 56 D432N 77 D712N | ||||
| 15 D114N | 36 D251N 57 | D445N 78 D728N | ||||
| 16 D115N | 37 D261N 58 | D464N 79 D731N | ||||
| 17 D116N | 38 D263N 59 | D465N 80 D732N | ||||
| 18 D125N | 39 D265N 60 | D466N 81 D733N | ||||
| 19 D131N | 40 D271N 61 | D503N 82 D744N | ||||
| 20 D132N | 41 D306N 62 | D506N 83 D754N | ||||
This product is in compliance with the essential requirements and other relevant provisions of the R & TTE directive 1999/5/EC.
The Declaration of conformity can be found on :
http://www.topcom.net/support/cedeclarations.php
TOPCOM
Visit our website
www.topcom.net