Power Maticccino 9000 Serie - Coffee machine CECOTEC - Free user manual and instructions
Find the device manual for free Power Maticccino 9000 Serie CECOTEC in PDF.
| Feature | Details |
|---|---|
| Machine type | Automatic coffee machine |
| Water tank capacity | 1.5 liters |
| Pump pressure | 15 bars |
| Coffee type | Whole bean and ground coffee |
| Features | Coffee preparation, cappuccino, latte macchiato, milk foam |
| Screen | LCD screen for intuitive use |
| Cleaning | Automatic cleaning program |
| Dimensions | Compact dimensions for space saving |
| Weight | Approximately 8 kg |
| Power supply | 220-240 V, 50-60 Hz |
| Safety | Overheat protection |
| Included accessories | Measuring spoon, water filter |
| Warranty | 2 years |
Frequently Asked Questions - Power Maticccino 9000 Serie CECOTEC
Download the instructions for your Coffee machine in PDF format for free! Find your manual Power Maticccino 9000 Serie - CECOTEC and take your electronic device back in hand. On this page are published all the documents necessary for the use of your device. Power Maticccino 9000 Serie by CECOTEC.
USER MANUAL Power Maticccino 9000 Serie CECOTEC
Safety instructions 20
- Parts and components
2.Before use - Operation 4. Execution
Technical specifications - Disposal of old electrical appliances
7 Technical support and warranty 57
SOMMAIRE
- Pécules et composants
Zwantunisation 59
5.10101 - NPPyage
- Specifications techniques
b. Hecylage des electromenagers - Garantie et Sow
INHALT
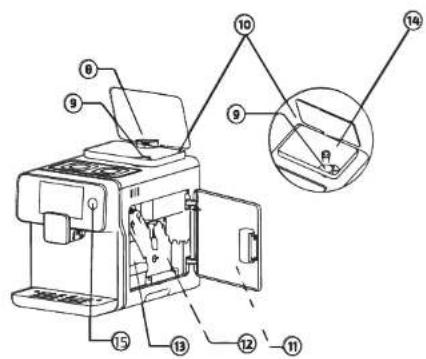
Fig./Img/Ahb/Afb/Rys/Obr.1

Fig/Img/Abb/Afb/Rys/Obr.2
Fig/Img/Abb/Afb/Rys/Dbr.3
Fig./img/Abb/Afb/Rys/Obr.4
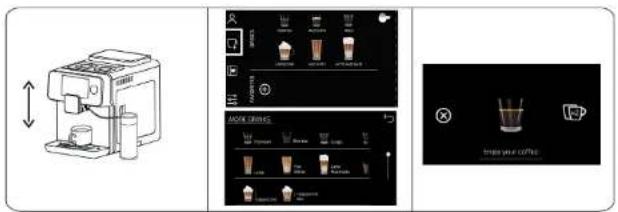
Fig./Img./Abb./Afb./Rys./Obr.5
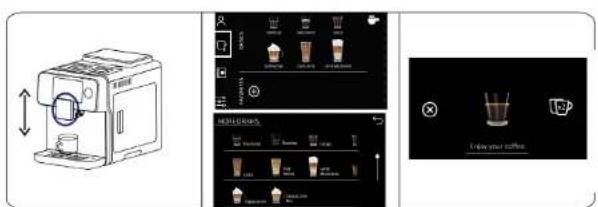
Fig./Img./Abb./Afb./Rys./Obr.6
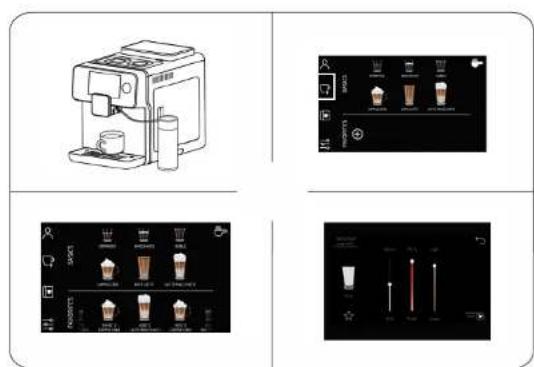
Fig./Img/Abb/Afb/Pys/Obr.7
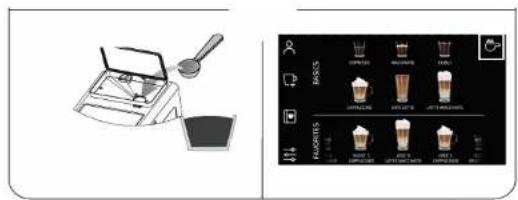
Fig./Img./Abb./Afa./Rys./Obr.8
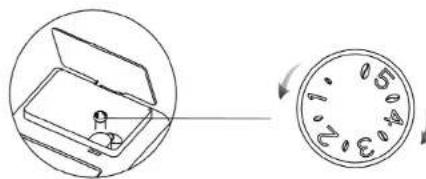
Fig./Img./Abb./Afb./Rys./Obr.9


Fig./Img./Abb./Afb/Rys/0br.10 Fig./Img./Abb./Afb/Rys/0br.11
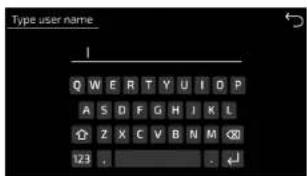

Fig./Img./Abb./Afb./Rys./Obr.11 Fig./Img./Abb./Afb./Rys./Obr.12
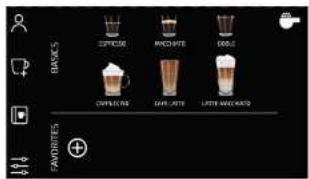
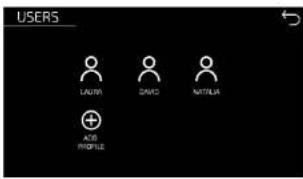


Fig./Img./Abh./Afb./Rys./Obr.13
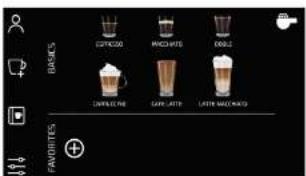

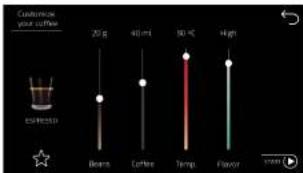

Fig./Img./Abb./Afb./Rys./Obr.14

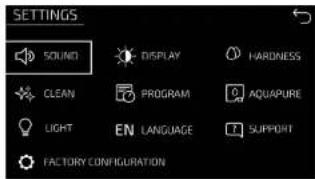
Fig./img/Abb/Afb/Rys/Obr.16
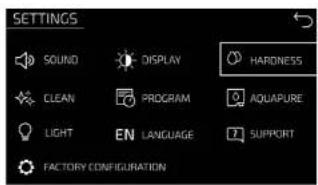
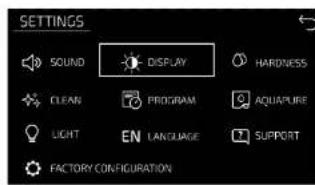
Fig./Img./Abb./Afb/Rys/Obr.17 Fig./Img./Abb./Afb/Rys/Obr.18
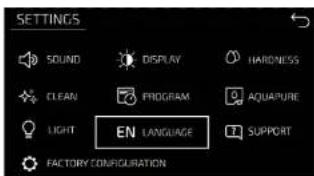
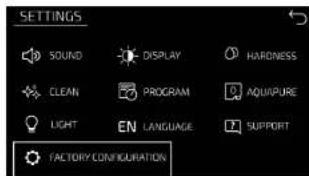
Fig./Img./Abb./Afb./Rys./Obr.19 Fig./Img./Abb./Afb./Rys./Obr.20
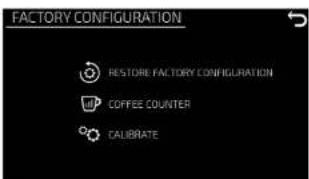

Fig./Img./Abb./Afb./Rys./Obr.21 Fig./Img./Abb./Afb./Rys./Obr.22


Fig./Img./Abb./Afb/Rys/Obr 23 24 Fig./Img./Abb./Afb/Rys/Obr.25
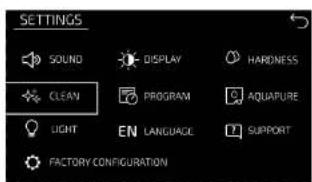
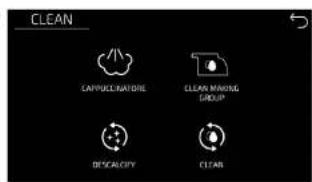
Fig./Img./Abb./Afb/Rys./Obr.26
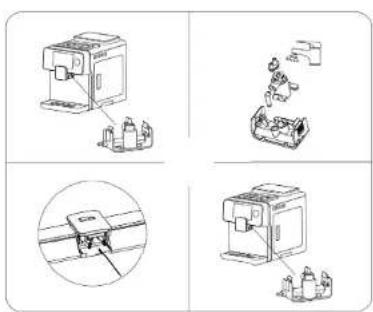
Fig./Img./Abb./Afb./Rys./Obr.27
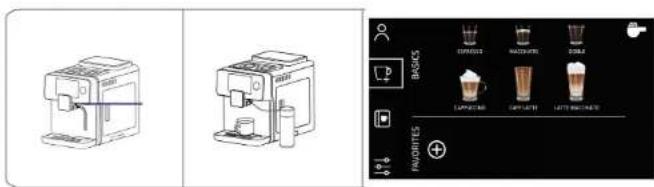

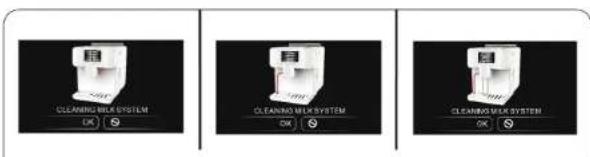
Fig./Img./Abb./Afb./Rys./Obr.28-29
Fig./Img./Aba./Afb/Rys/Obr.30
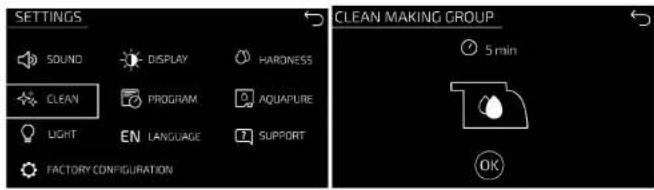
Fig./Img./Abb./Afb/Rys/Obr.31
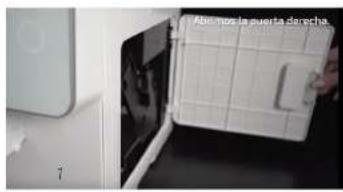


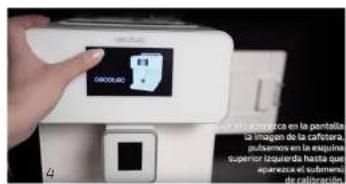
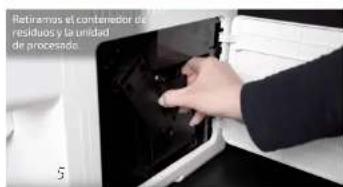


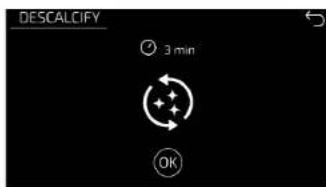
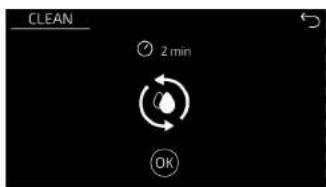
Fig./Img./Abb./Afb./Rys./Obr.33
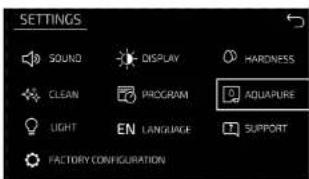
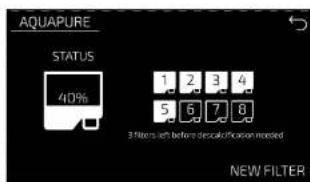
Fig./Img./Abb./Afb./Rys./Obr.34


Warning: It's vital to follow these steps and insert only number '0'. If not, it may modify other internal parameters and produce irreversible incidents in your machine.
Read these instructions thoroughly before using the appliance. Keep this instruction manual for future reference or new users. Make sure that the mains voltage matches the voltage stated on the rating label of the appliance and that the outlet is grounded.
This appliance is intended for domestic use only.
Place the appliance on a safe, flat and stable surface, close to a socket with ground connection.
Do not immerse the cord, plug, or any non-removable part of the appliance in water or any other liquid, nor expose the electrical connections to water. Make sure your hands are dry before handling the plug or switching on the appliance.
Check the power cord regularly for visible damage. If the cord is damaged, it must be replaced by the official Technical Support Service of Cecotec, in order to avoid any type of danger.
Do not twist, bend, strain, or damage the power cord in any way.
Protect it from sharp edges and heat sources. Do not let it touch hot surfaces. Do not let the power cord hang over the edge of table or counter top.
Do not let any electric parts to make contact with water.
Do not use the product outdoors, close to electric plates, gas, flames or inside an oven.
Do not expose the appliance to temperatures below 0.
The use of accessories not recommended by the product's manufacturer may cause risk of fire, electric shock or other damages.
Do not use hot water to fill the water tank, use natural water at room temperature.
Make sure your hands are dry before handling the plug or switching on the appliance.
Do not pull the wire for moving or transporting the appliance.
Do not use any caramel-coated coffee bean or nay other
flavour.
Do not point the steam nor the hot water at yourself or anyone to avoid scalds.
The appliance will be very hot during and immediately after being used. Use handles, gloves or other convenient protection accessories in order to avoid burns and injuries.
Do not remove the drip tray during operation, as hot water may cause damage to the machine, and place an empty cup under the dispensing spout when the machine is turned on or off.

In case of fire, use CO2 extinguishers. Do not use water or dry powder extinguishers.
Do not operate the product empty. Make sure there is enough water inside the device before using it.
The appliance is not intended to be used by children under the age of 8. It can be used by children over the age of 8, as long as they are given continuous supervision.
This appliance is not intended to be used by persons with reduced physical, sensory, or mental capabilities, or lack of experience or knowledge, unless they have been given supervision or instruction concerning the use of the appliance in a safe way by a person responsible for their safety, and understand the hazards involved.
Supervise young children to make sure that they do not play with the appliance. Close supervision is necessary when the appliance is being used by or near children.
This product has undergone a quality control previous to its commercialisation with the aim of ensuring its correct operating. After the quality control testing, the appliance is cleaned thoroughly, therefore, there could be rests of water drops or coffee in its inner parts.
FRANÇAISFRANÇAIS
INSTRUCTIONS DE SECURITÉ
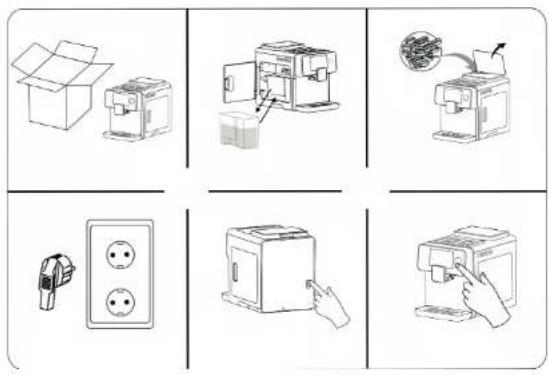
Take the product out of the box and remove all packaging material.
Make sure all the components are included, and if not, contact immediately the official
Technical Support Service of Cecotec.
Remove the water tank, fill it up with fresh water.
Fill the coffee bean tank with coffee beans.
Insert the power plug into the wall socket.
Press the power switch on the back of the machine once or twice if the screen is blank.
Place a cup under the drink dispenser.
Press the power button once or twice if the screen is white.
Allow the machine to warm up while performing the self-cleaning cycle.
The machine will enter standby mode and then will be ready for use.
Note: It is suggested to use bottled water in order to achieve optimal taste of coffee
(Fig.3)
3. OPERATION
Types of coffee and hot drinks
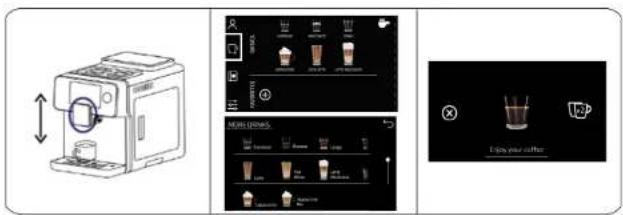
Adjust the height of the coffee spout and place the cups.
Press the icon of the desired coffee to brew 1 coffee automatically.
Press the x2 icon when displayed if you wish to brew a second coffee after the first one has
been brewed.(Fig.4)
Add milk to the milk tank. Note: The device is suitable for any type of milk, low-fat milk, organic, soy milk, etc. However, we recommend using cold whole milk to get optimum results.
Connect the transparent tube from the milk tank outlet to the milk frother inlet in the side of the device.
Adjust the height of the coffee spout and place the cups.
Press the icon of the desired coffee to brew 1 coffee automatically. (Fig. 5)
Press the x2 icon when displayed if you wish to brew a second coffee after the first one has been brewed.
White tea, Red tea, Black tea, Green tea, Rooibos, Herbal tea
Place a cup with the desired tea under the coffee spout.
Adjust the height of the coffee spout.
Press the icon of the desired hot drink.
Press the Cancel icon when you consider the correct amount of water has been dispensed. Or wait until the machine dispenses the default quantity (Fig. 6).
Hot milk/Milk froth
Connect the transparent tube from the milk tank outlet to the milk frother inlet in the side of the device.
Add milk to the milk tank.
Press the icon of the function you want to use. (Fig. 7)
Note: The device is suitable for any type of milk: whole milk, low-fat milk, organic, soy milk, etc. However, we recommend using cold whole milk to get optimum results.
Ground coffee
Open the coffee beans' hopper and remove the ground coffee's funnel lid. Add the desired
ENGLISH ENGLISH
amount of coffee using a funnel.
Press the Ground coffee icon.
Select the type of coffee. (Fig. 8)
Single-use inlet.
Add coffee with a spoon every time you want ground coffee.
Coffee grinder knob (Fig. 9)
Before or during operation, adjust the coffee grinder knob located inside the coffee bean tank. In order to select the grinding level.
Warning:
Do not introduce ground, instant coffee or any other substance in the bean tank.
Never use coffee beans that have been stored in the freezer. Avoid using high roast.
Slow coffee flow means ground coffee is ground too finely. Press and turn the coffee grinder knob clockwise in order to select a coarser level.
Fast and light coffee flow means coffee is ground too coarsely. Press and turn the coffee grinder knob anticlockwise in order to select a finer grinding level.
Level 1 × fine grinding level
Level 5 > coarse grinding level
We recommend using level 3.
We suggest cleaning the coffee grinder weekly, for removing all types of dirt.
Videos in: www.soportececotec.es
Users
This coffee maker can save up to 10 different users. Each user can customize and save every coffee or hot drink.
Create user account. Press the User icon. (Fig 10/11)
Then, press the + icon to add a profile.
Enter the name of the user and confirm. (Fig 12)
Note: Note: Once the user has been created, it can be edited or deleted. (Fig. 13)
Coffee customisation
Each user can customize the coffees and hot drinks to its liking.
The customizable parameters are the following:
Coffee 7-12 gr
Coffee: 20-250 ml
Temperature: 75-95°C
Flavour: Low-high
Milk: 15-250 ml
Froth: Low, little, medium, high
Water:20-250 ml
Order: Coffee milk or milk coffee
Customization modes:
From the profile (Fig. 14)
Press the icon to customize coffee.
Select the desired coffee or hot drink.
From the home page (Fig. 15)
Press the icon for Mare drinks
Select the desired coffee or hot drink
Once it has been customized, press the star icon and save this drink to one or more user's profile.
Coffee recipe book
This product includes a full coffee recipe book with step-by-step instructions to make the most out of it.
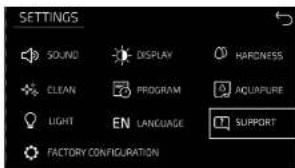
Settings
Sound (Fig. 16)
Press the Sound Icon to turn the coffee maker's sound on or off.
Water hardness (Fig. 17)
Press the water hardness icon and select the hardness level of the water being used. The machine will automatically suggest descending cycles depending on the type of water.
1 water drop: Soft. Descaling is required after 880 coffees.
2 water drops: Medium. Descaling is required after 400 coffees.
3 water drops: Hard. Descaling is required after 280 coffees.
Display contrast (Fig. 18)
Slide the bar to select the desired contrast.
Languages (Fig. 19)
Choose the desired language.
Factory settings (Fig. 20)
Reset the factory settings (Fig. 21)
Confirm to reset the factory settings. (Fig. 22)
Coffee counter (Fig. 23)
Check the number of coffees and other hot beverages. (Fig. 24)
Calibration (Fig. 25)
This function is only to be used by authorised technicians or following concrete instructions provided by Cecotec.
ENGLISH ENGLISH
Light
Choose if you want the coffee spout LED light to be always on, off or only on when coffee or hot drinks are being dispensed.
4. CLEANING
Unplug the cable from the power supply before start the cleaning. Do not immerse the appliance in water nor any other liquid during the cleaning.
Use a soft, dampened cloth to clean the outer part of the device.
The lack of maintenance and cleaning of the product may cause a deterioration on its surface and affect its lifespan.
Do not use strong detergents, gasoline, powder abrasives or metal brushes to clean the device.
Store the appliance in a safe, dry and clean place when it is not going to be used for a long time. Clean both the visible parts of the machine and the area beneath it in order to remove all residues (Fig 26)
Cappuccinatore (Fig. 27)
After dispensing milk, the coffee maker will display the below warning.
Place the milk frother as shown on the drawing.
Press Ok to activate the milk frother's cleaning cycle.
Warning: During the cleaning cycle, steam and hot water will be discharged through the milk frother and the coffee spout. Do not touch any of these elements until the cleaning cycle is completed.
Milk frother (1) (Fig. 28)
Insert the milk frother into the machine.
Place the milk frother inside a glass of water and place another one below the milk dispenser. Press the Milk icon to start cleaning.
Once the cycle is completed, empty the container and repeat the cleaning cycle until no milk rests are observed.
Milk frother (2) (Fig. 29)
Press both sides of the milk frother and take it out from the coffee spoul.
Introduce the milk frother in a glass of clean water.
Clean the wholes in the back of the device with the cleaning brush.
Reinstall the milk frother back to its position.
Note: The device will notify when this process is necessary.
Cleaning of the milk frother (3)
When "Cleaning of the milk system" is displayed in the screen, press Ok. This will be displayed after having used milk.
Place the milk frother as shown on the second drawing.
Press Ok to start the milk system automatic cleaning.
Fig. 30
Note: During the cleaning process, both the milk frother and the coffee outlet will emit hot water and steam. Do not remove nor touch any part of the device when the cleaning is over.
Brewing unit (1) (Fig. 31)
Access the Settings menu and press Cleaning icon.
Tap on the Processor icon.
Pour cleaning agent into the brewing unit through the ground coffee inlet.
Press Ok to activate the cleaning cycle.
The machine will return to standby mode once the cleaning is completed.
Cleaning of the brewing unit (2)
Open the right door.
Remove the waste container.
Remove the brewing unit by pressing the tab with your thumb and pulling outwards. Rinse it with abundant hot water.
Use the brush to remove possible coffee remains.
Insert the brewing unit back to its position. Wait until your hear a click to make sure it is placed correctly.
Fig. 32
It is suggested to clean the grinder every 350 coffees. On Settings, select Factory settings and press "coffee meter" and it will display the number of coffees served.
In order to clean the grinder, follow these steps:
Open the right door.
Remove all the coffee beans from the deposit.
Restart the coffee machine by pressing the On/off button twice. (fig. 2- fig. 3)
When the image of the coffee machine is displayed on the screen, press the top left side until the submenu pops up.
Remove the waste tank and the brewing unit to clean them manually. (fig. 5)
(fig. 5) Wash them under warm running water until removing all the scraps.
Place a big container under the coffee outlet. (fig. 6)
Turn right to maximum the coffee grinder knob. (fig. 7)
Pour the cleaning agent in the mill, the amount recommended by the manufacturer, in the coffee bean deposit. (fig.8)
Introduce the value '0' in the screen and press Ok repeatedly until no cleaning agent comes
ENGLISHENGLISH
from the device. (fig. 9-10)
Warning: It is very important to follow these steps and only introduce the value "0". If not, other internal parameters could be modified and produce irreversible incidents in your device.
Press the "Arrow" button and place the processing unit and the waste container in place. (fig.11)
Press On/Off.
Press On/Off button.
Add coffee beans in the coffee tank and prepare 3 espressos. Then throw them out to finish the cleaning.
Dscaling (Fig. 33)
Fill the water tank with fresh water and add some descaling agent following the proportions recommended by the manufacturer.
Press Ok in the Settings/Cleaning menu to activate the cleaning cycle.
The descending solution will be dispensed.
Once the tank is empty, the machine will conclude the descending process.
Remove the water tank and fill it again with water, the machine will start the rinse cycle.
Note: The machine might ask you to refill the water tank several times.
The machine will return to standby mode once the descending cycle is completed.
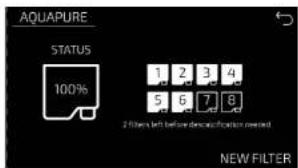
Aquapure (Fig. 34)
The coffee maker tracks the Aquapure filters usage. Depending on the water hardness selected, it will warn when to replace the filter. The descaling warning will be displayed after B filters have been used.
It is important to press New filter every time the filter is replaced in order for the coffee maker to correctly track the filter usage and to ensure proper operation of the device.
Note: The water tank is compatible with the installation of Cecotec's Malic-cino filter by Cecotec that ensures the usage of filtered water for a better maintenance and lifespan of the device's components, as well as for a better coffee flavour.
Filter non included
If the Aquapure filter is installed, we recommend that the "Soft water" option is selected. 1 water drop: Soft. Descaling is required after 880 coffees
If the Aquapure filter is not installed, we recommend that the "Hard water" option is selected. 3 water drops. Hard. Descaling is required after 280 coffees.
Note: The following parts are dish-washer safe: milk tank, water tank, waste container and drip tray.
5. TECHNICAL SPECIFICATIONS
01592 Cumbia Power Matic-ccino 9000 Serie Nera
01593 Cumbia Power Matic-ccino 9000 Serie Bianca
Power:1300W-1500W(Coffee),700W-760W(Steam)
220-240V~50/60Hz
Made in China | Designed in Spain
6. DISPOSAL OF OLD ELECTRICAL APPLIANCES

The European directive 2012/18/EU on Waste Electrical and Electronic Equipment (WEEE), specifies that old household electrical appliances must not be disposed of with the normal unsorted municipal waste. Old appliances must be collected separately, in order to optimise the recovery and recycling of the materials they contain, and reduce the impact on human health and the environment.
The crossed out 'wheeled bin' symbol on the product reminds you of your obligation to dispose of the appliance correctly.
Consumers must contact their local authorities or retailer for information concerning the correct disposal of old appliances and/or their batteries.
7. TECHNICAL SUPPORT AND WARRANTY
This product is under warranty for 2 years from the date of purchase, as long as the proof of purchase is submitted, the product is in perfect physical condition and it has been given proper use, as explained in this instruction manual.
The warranty will not cover the following situations:
The product has been used for purposes other than those intended for it, misused, beaten, exposed to moisture, immersed in liquid or corrosive substances, as well as any other fault attributable to the customer.
The product has been disassembled, modified, or repaired by persons, not authorised by the official Technical Support Service of Cecotec.
Faults deriving from the normal wear and tear of its parts, due to use.
The warranty service covers every manufacturing defects of your appliance for 2 years, based on current legislation, except consumable parts. In the event of misuse, the warranty will not apply.
If at any moment you detect any problem with your product or have any doubt, do not hesitate to contact Cercotec Technical Support Service at +34 963 210 728.
FRANÇAISFRANÇAIS
1. PIECES ET COMPOSANTS
Fig.1
Laitchaud/Mousse delail
Temperature: 75 - 95°C
Savour: Douce - Forte
Lait:15-250 mL
Nacisnj kone PROCESOR