USER MANUAL Power Espresso 20 Barista Maestro CECOTEC
- Parts and components
- Before use
- Operation 60
4.Cleaning and maintenance 66
- Troubleshooting
6.Technical specifications 78
- Disposal of old electrical and electronic
appliances 79
- Technical support and warranty 79
- Copyright 79
SUMMAIRE
Read these instructions thoroughly before using the device.
- Keep this instruction manual for future reference or new users.
- All safety instructions must be closely followed when using the appliance.
- This icon means "CAUTION: hot surface".
- Accessible surfaces are likely to heat up during use.
- Be careful not to burn yourself.
- This device is designed for domestic use only and is not intended for bars, restaurants, farmhouses, hotels, motels, and offices.
- The appliance must not be used by children. Keep this appliance and its power cord out of their reach.
- This appliance can be used by people with reduced physical, sensory, or mental capabilities or lack of experience and knowledge if they have been given supervision or instruction concerning the use of the appliance in a safe way and understand the hazards involved.
- Children must not play with the device.
- Cleaning and user maintenance should not be carried out by unsupervised children.
- WARNING: the filling opening must not be opened during operation.
- WARNING: take precautions to avoid spillage of liquids on the cable.
- WARNING: incorrect or improper use can be dangerous for
the user and damage the appliance.
- Use the device only for the purposes described.
- in this manual.
- The surface of the heating element is subject to residual heat after use.
- Switch off and unplug the appliance before changing accessories or nearby parts that move during use.
- Ensure that the mains voltage matches the voltage specified on the device rating label and that the plug is earthed.
- Do not immerse the cable, plug, or any other non-removable part of the device in water or any other liquid or expose electrical connections to water. Make sure your hands are dry before handling the plug or switching on the device.
- Warning: If the appliance falls accidentally in water, unplug it immediately. Do not touch the water!
- Check the power cable regularly for visible damage. If the cable is damaged, it must be repaired by the official Cecotec Technical Support Service to avoid any type of danger.
- Warning: do not use the appliance if its cable, plug, or housing are damaged, nor after it malfunctions or has been dropped or damaged in any way.
- Do not twist, bend, pull, or damage the power cable.
- Protect it from sharp edges and heat sources.
- Do not allow the cable to touch hot surfaces.
- Do not let the cable hang over the edge of the working surface or worktop.
- This appliance is not intended to be operated by means of an external timer or separate remote-control system.
- Turn off and unplug the appliance from the mains supply when not in use and before cleaning it. Pull from the plug, not the cable, to disconnect it from the outlet.
- Supervise children to prevent them from playing with the
apppliance.
- Close supervision is necessary when the appliance is being used by or near children.
- Place the appliance on a dry, stable, flat, heat-resistant surface.
- Do not use the appliance under the following circumstances:
- On or near a gas or electric hob, in heated ovens, or near open flames.
- On soft surfaces (such as carpets) or where it may tip over during use.
- Outdoors or in areas with high humidity levels.
- Do not cover the appliance during operation.
- Never leave the device unattended during use.
- Unplug it from the mains supply when you finish using it or when you leave the room.
- Do not try to repair the device by yourself.
- Contact the official Cecotec Technical Support Service for advice.
- Cleaning and maintenance must be carried out according to this instruction manual to make sure the appliance functions properly.
- Turn off and unplug the appliance before moving and cleaning it.
- Do not wash the appliance in dishwashers.
- No liability is accepted for any eventual damage or personal injuries derived from misuse or non-compliance with this instruction manual.
INSTRUCTIONS DE SECURITÉ
PASO 1. Empiece La descalcification
ESPANOLESPANOL
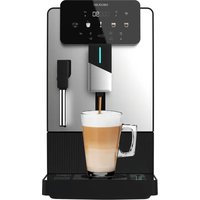
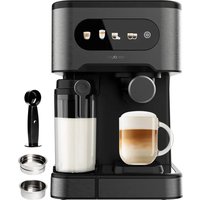
Fig. 1
1. Power button
2. Cleaning and descending indicator light
3.Grinding button
4. Pressure gauge
5. Single espressor button
6. Double espresso button
7. Steam and hot water indicator light
B. Grinding size knob
9. Removable drip tray
10. Buoy cover (full drip tray indicator)
11. Drip tray
12. Coffee bean hopper cover
13. Removable coffee bean hopper
14. Steam/hot water knob
15. Steamer rubber handle
16. Steamer and hot water rod
17. Foaming nozzle
18. Water tank cap
19. Water tank handle
20. Watertank
21. Filters (for single and double espressor)
22. Accessories storage box
23. Coffee presser
24. Filter holder
25. Filter holder handle
NOTE
the graphics in this manual are schematic representations and may not exactly match the device.
2. BEFORE USE
This appliance is packaged in a way as to protect it during transport. Take the device out of its box and remove all packaging materials. You can keep the original box and other packaging elements in a safe place. This will help you prevent damage to the device when transporting it in the future. In case the original packaging is disposed of, make sure all packaging materials are recycled accordingly.
ENGLISHENGLISH
- Make sure all parts and components are included and in good conditions if there is any piece missing or in bad conditions, contact the official Cecotec Technical Support Service immediately.
- Remove the silicone plug from the water tank, if the machine contains one, to facilitate the water drainage.
- Clean all detachable components.
STEP1
Remove the packaging. Make sure that all packaging has been removed and check that you have all the accessories.
NOTE:
Remove the orange silicone plug at the bottom of the water tank.
STEP2
Position the coffee machine. Make sure that the coffee machine is placed on a dry, stable, flat, and horizontal table.
STEP3
- Wash and dry the parts listed below with warm water and a mild detergent:
- Single stainless-steel coffee filter
Double stainless-steel coffee filter
Water tank
Filter holder
- Coffee bean hopper
Coffee presser
- Rinse and allow to air dry.
STEP4
- Attach the accessories.
- Store the accessories you have purchased in the accessory storage box behind the drip tray.
- Place the coffee presser in the cup warming tray.
STEP5
Install the coffee bean hopper.
- Ensure that the hopper latch is aligned with the front of the hopper.
- Push the hopper slightly downwards into the machine.
- Turn the hopper lock clockwise to lock the hopper into place.
This opens the hopper door releasing the coffee beans into the grinder.
- Fill the hopper with freshly roasted medium or dark roasted coffee beans.
- As a starting point for espresso extraction, try grind 5 or higher.
STEP6
Preparation of the coffee machine before its first use
NOTE: make sure that the water tank is clean and free of debris, as any fine particles can block the water flow.
- Make sure that the steam and hot water knob is in the vertical OFF position.
Insert the plug into a 220-240 V AC socket and switch the machine on.
Press the power button to turn the
- The power button will illuminate, and the grind, single espresso and double espresso buttons will flash to indicate that the thermoblock is heating up.
NOTE: when the hopper is installed in the correct position, the grinding button will fully illuminate after switching on. If the hopper is installed in the wrong position, the grinding button will flash rapidly after switching on.
NOTE: when the power button, the grinding button, the single espresso button, and the double espresso button are fully illuminated, the machine is ready to perform all functions or is in READY state.
Check the power supply
- The plug is inserted into the socket.
The steam and hot water knob is in the vertical OFF position.
- Press the power button to turn the machine on.
The coffee machine is switched on and in READY state.
Insert the filter holder
Insert the single or double coffee filter into the filter holder.
- Align the filter holder with the INSERT position to the left of the extraction head.
- Insert the filter holder against the extraction head, slowly turn the filter holder clockwise to the central LOCK position.
NOTE: turning the filter holder to the central position may be difficult due to its stiffness during the first few uses; this is normal.
ENGLISHENGLISH
STEP7
Making the first espresso
Press the single espresso button or the double espresso button without having put coffee in the filter and wait a few seconds. Water will start to flow out.
When the machine stops pumping water, you can pour the water into the cup and clean it thoroughly. Repeat the cycle several times and then you can start the extraction.
Press the espresso button to deactivate the function. The coffee machine will return to the READY state.
Pour the water into the cup.
NOTE: the first time the machine pumps water, it may make a louder noise than normal as it releases air and water. After 20 seconds, this noise will disappear and will be considerably reduced in the following uses.
- Place the steam and hot water rod over the hole in the drip tray.
- Turn the knob to the hot water position.
- Let water run for 20 seconds.
- Return the knob to the vertical OFF position.
The coffee machine will return to the READY state.
The espressomachine is now fully prepared.
Box content:
- Coffee machine
-Filter holder
Single coffee filter
Double coffee filter
- Accessories storage box
- Coffee presser
3.OPERATION
Grinding adjustment
You may need to vary the grind setting when using different coffee beans and depending on the freshness of the beans. The range of 20 geared grind settings allows for precision adjustment, controlling the grind size and ultimately the characteristics of the resulting extraction.
- You may have to make several gradual adjustments before you reach the optimum grinding level. Adjust the grind according to consumption time and taste.
NOTE:
After adjusting the degree of grinding it is important to clean (for 1 - 2 seconds) a small amount of ground coffee from the grinder. This removes the coffee beans from the previous setting ensuring that the next espresso extraction is performed entirely with the coffee beans from the new grind setting.
- Lower number settings provide a finer coffee grind and slower extraction.
- More settings provide a coarser grind and faster extraction.
NOTE: we suggest not to disassemble or remove the bean hopper when there are still coffee beans inside. Otherwise, the hopper could become jammed due to unintentional introduction of grain. Once the coffee beans inside the machine have been used up, the hopper can be removed.
NOTE: only adjust the grind level while the grinder is grinding coffee. Any adjustment while the grinder is not in operation could damage the grinder and cause it to stop working.
Grinding dosage and pressing force
For best results, the amount of ground coffee dosed should be consistent.
NOTE: It is normal for the correct dose of coffee beans to be overloaded in the filter before pressing. The coffee beans must be pressed evenly to the indicated level, with firm force. One cup = 10 - 12 g of ground coffee.
One cup = 16 - 18 g of ground coffee.
The coffee powder produced by the 1-2 gear grinding size adjustment is not very suitable for espresso because it is too fine. Based on the size reference of espresso ground coffee powder, the grinding size adjustment range is 3 8 . Higher setting ranges may be valid but are usually too coarse for optimal espresso.
NOTE: if you change the GRIND SIZE knob, the amounts of coffee powder volume required for a good result will also change.
Operation of the espresso coffee maker
Tip: for best espresso results, use cold filtered water and freshly roasted medium-roast coffee beans.
- Press the power button to turn the machine on.
The power button will illuminate, and the coffee and steam buttons will flash to indicate that the thermoblock is heating up.
- The grinding button will be fully illuminated after switching on.
ENGLISHENGLISH
- When the power button, the grinding button, the single espresso button, and the double espresso button are fully illuminated, the machine is ready to perform all functions or is in READY state.
Press the grinding button once to enter the mode and obtain the double amount of coffee. Press and hold the grinding button for 3 seconds to enter the single coffee grind mode.
-
Slide, insert the filter holder into the grinder holder. The filter holder shall be kept flat, unsupported, on the grinding stand.
-
Press the buttons for a single espresso or a double espresso, as desired, once. When the espresso is ready, the process stops, and the machine returns to the READY state.
NOTE: the espresso is about 30 mL/cup for single espresso and about 60 mL/cup for double espresso. The extraction time is a good indicator of the quality of the discharge. The optimum time per shot varies according to the type and freshness of the coffee beans. However, in general, the pouring time should be between 20 - 35 seconds for both one-cup and two-cup shots.
- After extraction, remove the used grindings. Rinse the filter and keep it clean to prevent clogging. When there is no ground coffee left in the filter, lock the filter holder in the machine and let hot water run to finish cleaning.
Customisable shot volume
Adjusting the espresso volume
Press and hold either the single espresso button or the double espresso button for 3 seconds, depending on which mode you want to set. You have now entered the setting mode. Then press the espresso button again; coffee will start to come out and the espresso button will flash at the same time. When you have reached the desired amount, press the espresso button again so coffee will stop coming out. The setting of the Individual espresso amount is now complete and is saved for the next operation.
- The individually adjustable amount of espresso coffee ranges from approx. 30 ml to approx. 400 ml.
Reset to factory volume
Simultaneously press and hold the single espresso button and the double espresso button for 3 seconds to restore the factory setting.
Customisable extraction temperature
The thermoblock heating system has an espresso extraction temperature of 92^ . But you can adjust the extraction temperature used for espresso coffee, in a 2^ setting between 92^ - 96^ , to suit different types of roasted coffee beans and personal preferences.
NOTE: higher temperatures increase bitterness and decrease acidity. Lower temperatures decrease bitterness and increase acidity.
- Press and hold the grinding button and the single espresso button simultaneously for 5 seconds; a beep will sound. The power button will start flashing rapidly. The extraction temperature setting is then started:
- Press the grinding button, the indicator will illuminate, and the extraction temperature will be 92^ .
Press the single espresso button, the indicator will light up and the extraction temperature will be 94^
- Press the single espresso button, the indicator will light up and the extraction temperature will be 94^ .
NOTE: if no button is pressed within 5 seconds after entering a custom mode setting, the machine will return to the READY state.
Espresso preparation
1. Heating the cup - hot water function
Place a cup on the table and insert the steamer. Turn the knob to the hot water position and heat the cup after 20 - 30 seconds. You can also heat the cup on the top of the machine when it is in the READY state (hotplate).
2. Head, filter holder and filter
- Hold the filter holder under the extraction head while the water is flowing. Clean the filter with a dry cloth.
- Dose the filter with the ground coffee beans and press it evenly to the indicated level.
NOTE: do not press too hard. Use the coffee presser lightly to avoid jamming the coffee machine, if the coffee beans are too tight. the water cannot flow through the filter holder and may cause blockages or leaks.
- Wipe off excess grindings to clear the edges.
- Hold the filter holder flat, align, insert, and rotate it into the extraction head. The filter holder must be in the central position.
NOTE: if the filter holder is not installed parallel to the machine, coffee will splash and drip out of the hole.
3.Cup position
- Place the cup in the drip tray under the filter holder.
ENGLISHENGLISH
- Place a cup in the drip tray. If the cup is high, you can remove the drip tray cover.
Press the single espresso button or the double espresso button: the extraction will start and stop automatically.
- The resulting coffee cream will be golden brown in colour with a fine mousse texture.
TIPS: the filter holder must be removed after a while to release the pressure. Otherwise, steam will splash out due to the strong pressure. Remove the filter holder in parallel. Due to the high pressure, the water will completely penetrate the coffee powder and it will take some time before it is poured out. It is therefore normal for leftover coffee to drip.
NOTE: when the coffee machine starts to operate, a noise will be heard as it pumps water under high pressure. During operation, if you suddenly hear beeps while the single espresso button and the double espresso button are flashing, it may be because there is not enough water in the tank for pumping. If so, pay attention to the volume of water and add it in time.
5. Cleaning the filter holder
Wait 20 seconds to remove the filter holder from the extraction head after pouring the coffee to avoid any splashing. Remove any coffee residue from the filter holder. Clean it with a damp cloth. Check if the drip tray needs to be emptied and wash the filter holder with lukewarm water.
Milk frothing
- Milk froth is the result of milk vaporisation. Properly foamed milk has a thick microfoam. Steps to follow include positioning the steamer, adjusting the position of the milk jug and reaching the correct temperature. Follow the steps below to create the microfoam.
- Add 100 - 150 ml of cold milk at about 4^ to a clean, cold stainless steel milk jug. Fill it to the bottom of the nozzle.
WARNING: the volume of milk will increase or stretch during frothing, so do not overfill the milk jug.
Turn the steam/hot water knob towards steam, the steam button will light up. When the steam button is fully illuminated, the machine is ready to froth.
NOTE: for best results every time, make sure that the steam has heated up before frothing the milk. Steam is ready when the light on the steam button is fully illuminated. Place a cup under the nozzle then turn the knob to froth. Wait a few seconds, water will come out of the nozzle. Be careful with the steam. Then pour the water out of the cup to release the excess water. Once the water has been cleaned, turn the steam off by turning the knob back to the
vertical OFF position. Be careful not to burn yourself with steam.
The way the air is introduced into the milk determines the consistency of the foam. If too much air is added to the milk, the foam will have large bubbles. The controlled and gentle introduction of air into the milk will ensure that the milk has a fine microfoam. You will also hear the water pump start to pump; this is normal.
- As the steam heats and foams the milk, the level of milk in the jug rises. While this is happening, keep the foam nozzle just below the surface. As the milk level rises, lower the jug to keep the nozzle just below the surface. When you get the desired microfoam, clip the sprayer halfway into the water. The milk is ready when the base of the jug is too hot to touch.
Tip
Milk temperature
Low: if it is not heated sufficiently, it will be lukewarm and untextured.
Optimal: 60 65^
- Too high: if heated for too long, it will start to boil at around 70^ , taste burnt and lose all texture.
Steamer purging and cleaning
- When the correct milk temperature has been reached, turn the knob to the vertical position and remove the milk jug from the steamer. Place the jug to one side. Place the steamer over the drip tray. Turn the knob to the hot water position for a few seconds and then return the knob to the vertical position. This will remove milk residue from the steamer nozzle.
- Wipe the steamer and its nozzle with a damp cloth to remove any milk residue. To maintain optimum foaming performance, always clean the steamer after use.
Hot water
When hot water is dispensed through the steamer, it will do so for 5 minutes and then stop automatically. Hot water can be used to prepare black coffee, hot drinks such as tea, instant soups and to heat cups before making espresso. To do that:
- Press the power button to turn the machine on. When the power button, grinding button, single espresso button and double espresso button are fully illuminated, the machine is in the READY state for all functions.
- Place the cup on the table and turn on the steam. Turn the steam/hot water knob clockwise to select the hot water function. Hot water will come out of the nozzle of the steamer.
To deactivate the hot water, turn the knob back to the vertical OFF position.
Auto switch-off
- If there is no operation after 25 minutes, the machine will switch to automatic switch-off mode. All button lights and indicator lights will go out.
ENGLISHENGLISH
- To reactivate the machine, press the power button and the machine will return to Standby.
Warning due to lack of water
During operation, if you suddenly hear boeps while the single espresso button and the double espresso button are flashing, this may be because there is not enough water in the tank for pumping. Due to water shortage, the machine may have high temperature and pressure in the filter holder, so we recommend that you follow the steps below:
- Press the single espresso button or the double espresso button to exit the coffee function.
- Remove the filter holder for cleaning and do not reuse ground coffee residues.
Turn the steamer so that it points to the drip tray. Turn the steam/water knob to the steam function to release the pressure.
- When you stop to release the pressure, turn the steam/water knob to the vertical OFF position.
- Fill the tank with cold filtered water. Do not exceed the MAX mark. Close the water cover and place it on the back of the machine.
- Press the power button, the machine will beep. When the power button, grinding button, single espresso button and double espresso button are fully illuminated, the machine is in the READY state for all functions.
Restore all default settings
You can easily reset all settings to factory defaults. To do this, press and hold both the single espresso button and the double espresso button at the same time for 3 seconds.
4. CLEANING AND MAINTENANCE
Purging water from the extraction head and steamer before and after each brew is the easiest way to keep the espresso machine clean.
NOTE: do not use alkaline, abrasive, or metallic cleaning agents or scouring pads as these will scratch the surface of the parts.
Dishwasher safe parts
- Removable drip tray
- Single stainless-steel coffee filter
Double stainless-steel coffee filter
Parts not suitable for dishwashers
- Water tank
-Filter holder
- Coffee bean hopper
Drip tray
- Coffee presser
Cleaning of the cup warming tray and the exterior
Clean the parts in lukewarm water with a mild detergent, rinse and dry.
Clean the coffee machine with a damp cloth, a mild detergent and dry it.
WARNING: do not immerse the machine in water or any other liquid. If the red water level indicator appears through the removable drip tray; empty it, otherwise the water will run out.
Weekly cleaning
Clean the parts in lukewarm water with a mild detergent, rinse and dry.
Clean the filter and filter holder every time you use them.
- Wash them after each use by rinsing them with warm water under running tap water.
Clean the extraction head with water using the double-coffee filter.
- Let the water run until it stops.
- Remove ground coffee residue from around the inner edge of the extraction head and the silicone gasket. Clean the extraction head with a damp cloth.
Silicone gasket
The silicone gasket is located in the extraction head and creates a seal that separates it from the filter when making expresso. When the machine is not in use, we recommend that you do not leave the filter holder inserted in the extraction head, as this will reduce the life of the silicone gasket.
- Over time, the gasket loses its elasticity and may need to be replaced. The gasket may need to be replaced when coffee leaks around the filter holder during extraction, or if the filter holder is loose when it is turned all the way to the centre position.
Cleaning the steamer
- After frothing the milk, clean the steamer by turning the steam/hot water knob to the steam function and turn it off after 10 seconds.
Clean the steamer with a damp cloth.
Monthly cleaning (every 2 - 3 months)
- Soak the steamer in the milk jug with warm water and descending solution overnight.
- In the morning, remove the milk jug and rinse it, making sure that all traces of the descending solution have been removed.
- Wipe the steamer with a damp cloth making sure that all traces of descaling solution have been removed.
Turn the steam/hot water knob to the steam function and switch off steam after 10
ENGLISHENGLISH
seconds.
If the frothing nozzle becomes clogged with milk residues:
Insert a pin through the hole in the foaming nozzle.
Turn the steam/hot water knob to the steam function and leave it for 10 seconds.
The steamer is still clogged:
- Unscrew the frothing nozzle and soak it overnight in the jug with lukewarm water and an espresso machine descaler.
Empty the drip tray.
In the morning, rinse the jug and the foaming rod under running water to remove all traces of descaler.
- Use the de-clogging rod to clean the foaming nozzle.
- Make sure that the gasket is undamaged.
Screw the frothing nozzle back onto the steamer.
Turn the steam/hot water knob to the steam function and Leave it for 5 seconds.
Filter cleaning (every 2 - 3 months)
- Let the filters soak overnight in the jug with warm water and a descending agent.
In the morning, rinse the jug and foaming rod with water to remove all traces of descaler.
- Place a filter in the filter holder (without coffee beans) and insert it into the milk jug.
- Press the single espresso button or the double espresso button. Then, the indicator of the single espresso button or the indicator of the double espresso button will keep the white light steady.
- Let the water run until it stops automatically.
Cleaning the filter holder bracket
Remove any ground coffee residue from the filter holder bracket and grinder spout. wipe it off with a damp cloth and dry it with a dry cloth.
Hopper cleaning (every 2 - 3 months)
- If the grinder is used frequently (e.g., every day) it is necessary to clean the hopper regularly.
WARNING: to prevent damage to the machine, do not use alkaline or abrasive cleaning agents or metal scouring pads.
NOTE: do not immerse the machine in water or any other liquid.
- Turn the machine off and unplug it from the mains socket.
-
Remove the hopper cover.
Turn the hopper lock counterclockwise to unlock the hopper.
-
Remove the hopper from the machine and store the remaining coffee beans in an alrtight container to preserve their freshness.
NOTE: we suggest not to disassemble or remove the hopper when there are still coffee beans inside. Otherwise, the hopper may jam. Once the coffee beans inside the hopper have been used up, the hopper can be disassembled and removed.
Dscaling cycle
- To ensure that your coffee machine works efficiently and provides good tasting coffee, it is necessary to periodically clean the internal piping with a descaling solution.
We recommend descending your espresso machine every 4 - 6 months, although this period will depend on the frequency of use.
- The descending warning will be displayed when the machine has been operated cumulatively for 500 cycles. At this point, the cleaning and descending indicator light will flash, which means that the machine needs to be descaled. After that, it will return to its normal state. The descending warning will be displayed every time you switch on the machine if you do not cancel it.
D escaling solution, we suggest 4 options:
a. A tablet for descending the espresso machine.
b. Liquid descaler
c. White vinegar/warm water
d. Descalng powders such as citric acid
For specific cleaning methods, please refer to the instructions of your descaling solution supplier.
Descending cycle
NOTE: if the descending cycle is not completed or stops in the middle of any of the descending steps, you will have to restart the cycle from the beginning.
- Fill the water tank with a descending tablet, liquid descaler, white vinegar or descending powder.
- Add cold filtered water and insert the water tank into position.
- Place two containers.
- Place a 1 litre container under the extraction head and another container under the vaporiser.
- Check the power supply.
- Insert the plug into the mains socket. switch on the machine and wait until it is in READY mode.
The steam and hot water knob are in the vertical OFF position.
ENGLISH ENGLISH
NOTE: you can exit the descending cycle at any time by pressing the power button.
STEP1 Start descending
Turn the steam/hot water knob to the hot water position.
- Press the double espresso button or the single espresso button.
- The pump will start, and hot water will come out of the extraction head and steamer. For a period of 2 minutes the pump will make different noises, this is normal.
- When no more hot water comes out of the extraction head and the steamer, the machine will beep once to indicate that this step has been completed.
Turn the steam and hot water knob to the vertical OFF position.
Repeat the above operation releasing the hot water from the extraction head and steamer.
STEP2 Preparation for the cleaning
NOTE: it is necessary to clean the steamer and extraction head with cold filtered water to remove the descaling solution.
- Remove the water tank and rinse it under running water, making sure that all traces of the descending solution have been removed.
- Fill the water tank to the MAX mark with cold filtered water and insert it into position.
- Empty the water from the containers and replace them.
STEP3 Start the cleaning
- Turn the steam/hot water knob to the hot water position.
The pump will start, and hot water will come out of the steamer.
- Repeat the above operation releasing the hot water from the extraction head and steamer.
STEP4 Descaling completed
Once descaling has been completed, you must deactivate this function.
- Turn the steam and hot water knob to the vertical OFF position.
- Press and hold the power button. The single espresso button, the double espresso button, and the steam button simultaneously for 3 seconds.
The machine exits the descending setting and returns to the READY state.
- Empty the water from the containers and clean them, making sure that all traces of the descending solution have been removed.
5. TROUBLESHOOTING
Troubleshooting the coffee machine:
| Problem Cause Solution | | |
| The coffee machine does not work properly | The coffee machine is not plugged in correctly. | Plug in the coffee machine correctly. |
| Acid (vinegar) taste in coffee | You have not properly cleaned the coffee machine with cold purified water to remove the descaling solution. | Clean the machine properly after descaling. |
| The coffee bean is stored in a warm and humid place for a long time. Coffee beans spoil. | Store ground coffee beans in a cool, dry place. After opening a bag of ground coffee, reseal it and store it in a refrigerator to keep it fresh. |
| Water seeps out of the bottom | There is too much water in the drip tray. | Clean the drip tray. |
| The sealing gasket of the water inlet orifice is deformed. | Contact the official Technical Support Service of Cecotec. |
| Coffee machine breakdowns. |
| When the water tank is removed after use, it is normal, for some water to remain on the table. | As the water outlet at the bottom of the water tank is a moving part, it is normal for it to drip. Dry it each time you remove the tank. |
| Ticking sounds after switching on the machine and tearing sounds after pouring the coffee | The sounds are caused by the water pump operating normally. | It is normal. |
ENGLISH ENGLISH
| The coffee machine makes coffee with little flavour | The coffee beans are not the right ones. | Use mixed coffee beans. |
| The size of the coffee beans is too coarse. | Use finer coffee beans. |
| The amount of coffee beans is not appropriate. | Not enough coffee beans. use more coffee beans. |
| The coffee beans are pressed very tightly. | Press harder. |
| The temperature is not suitable for brewing coffee. | Make sure the temperature is correct (92-96 °C/198-205 °F). |
| The amount of espresso is inappropriate. | Approximately 30 ml per dose.
Approximately 60 ml per dose. |
| Problem Cause Solution | | |
| The filter holder is too tight to rotate the extraction head | The silicone gasket on the extraction head is new and needs to be fitted. | Continue to use the machine normally. This gasket will settle during the first few uses and become easier to turn. |
| You have used too much coffee beans. | Use less coffee beans. |
| The filter holder is loose or comes out during espresso extraction | The filter holder is not fitted correctly or has not been tightened sufficiently. | Make sure that the filter holder tabs are fully inserted into the extraction head and rotated to the centre position. |
| The filter is not inserted in the filter holder | Be sure to insert a filter into the filter holder before inserting it into the extraction head. |
| The silicone gasket on the extraction head is damaged or worn. | Contact the official Technical Support Service of Cocotec. |
| Espresso drips or drips down the side during extraction | Coffee grind is too fine. Switch | a coarser grind setting |
| You have used too much coffee beans. | Use less coffee beans |
| Over-pressed ground coffee. Apply less force during pressing. |
| The upper edge of the filter has not been cleaned and coffee residues remain. | Clean around the top edge of the filter before inserting it into the extraction head. |
| The silicone gasket inside the extraction head is dirty. | Wipe the parts with a damp cloth. |
| The silicone gasket on the extraction head is damaged or worn. | Contact Customer Service. |
| The filter holder is not installed properly. | Install it correctly. |
| Both outlets of the filter holder are blocked. | Clean the outlets. |
| Filter holes are clogged. | Soak the filter in water for half an hour and clean it with a brush. |
| Problem Cause Solution | | |
| The espresso has no crema, or the crema is thin (low extraction) | The coffee bean is old or dry. Use fresh coffee beans of medium or dark roast. |
| The ground coffee is too coarse. | Switch to a finer grind setting. |
| Not enough ground coffee is used. | Use more ground coffee. |
| The coffee has not been sufficiently pressed. | Press harder. |
| Too much or too little espresso volume | Customisable tap volumes are used. | Restore the default shot volumes or change your custom volumes. |
ENGLISH ENGLISH
| Espresso tastes bitter | The type of coffee beans used. | Try different brands of coffee beans. |
| A customised extraction temperature is being used. | Use the default extraction temperature of 92 °C (197 °F). |
| The steam function has been used just before the espresso is extracted. | Allow time for the water to clean the thermoblock and cool down before extracting the espresso. |
| The coffee grounds used are moist | Some water will remain on top of the coffee grounds used. | Rest the filter holder on the drip tray for 5 seconds to allow the water to dissipate before removing the grounds. |
| Not enough coffee beans are being used. Use more coffee beans. | |
| The grain is not sufficiently pressed (compacted). | Press harder. |
| The espresso is poured into the cup in an irregular pattern | Uneven pressing | Make sure that the coffee beans are evenly pressed. |
| Blockage in the extraction head or filter holder. | Check that there is nothing obstructing the extraction head or filter holder and clean them. |
| Problem Cause Solution | | |
| The pump makes an abnormal noise | No water in tank. Fill the water | tank with cold filtered water. |
| Pour water through the extraction head and press the coffee button. Let the water flow. |
| The water tank is not correctly installed. | Place the water tank at the back of the machine. |
| The silicone stopper of the container is still inserted. | Remove the silicone plug at the base of the water tank. |
| There is water around the drip tray or on the table | Water overflow in the drip tray. | Empty it if the red water level indicator appears through the removable stainless steel drip tray. |
| The drip tray is not in place when the thermoblock is cleaned. | Keep the drip tray in place when it cools down. The steam button flashes, and water is poured into the drip tray. |
ENGLISH ENGLISH
Troubleshooting steamer problems:
| Problem Cause Solution | | |
| It is not possible to froth milk | The machine is not ready to froth milk. | Check if the machine is ready to froth milk. |
| The temperature of the milk is not appropriate. | Check the tips for milk frothing. |
| You use skimmed milk. Use whole milk. | Use semi-skimmed milk. |
| The steamer is too far away from the milk or is inserted too far into the milk. | The tip of the steamer barely touches the surface of the milk. |
| The steamer is clogged. | Clean the steamer immediately after each use with a damp sponge. |
| The latte is too cold | The milk may not be sufficiently heated. | Make sure that the milk is heated correctly during frothing, but not too much because the milk could burn. |
| No steam comes out of the steamer | The steamer tip is blocked. Clean and unblock the steamer. |
| No water in tank. | Fill the tank with cold filtered water. Pour hot water through the steamer to make sure the water runs. |
| The Espresso machine is Inlaid. | A descaling cycle is required. |
| The steamer makes a creaking noise | The tip of the steamer is too far into the milk. Or the steamer is too deep in the milk. | Lower the milk jug. Make sure that the tip of the steamer is positioned correctly during foaming. |
| It does not generate enough foam during foaming | The milk is not fresh. | Make sure the milk you are using is fresh and sufficiently fatty. |
| Problem Cause Solution | | |
| It does not generate enough foam during foaming | Milk temperature is too hot. | Be sure to start frothing with the milk at about 4 °C (40 °F). Make sure that the steam has heated up before frothing the milk. Steam is ready when the button is fully illuminated. |
| Type of milk jug being used. | For best results use a stainless-steel milk jug |
| Milk has been boiled. | Start again with fresh, cold milk and reduce steaming time. |
| Milk makes bubbles instead of microfoam. | Make sure that the tip of the steamer is positioned correctly during foaming. The tip of the steamer should only touch the surface of the milk. |
| Gently tap the jug on the table when finished to release trapped air bubbles. |
| Not enough air is introduced into the milk. | Keep the tip of the steamer just below the surface of the milk. This will help to introduce air into the milk to create the microfoam. |
Troubleshooting the grinder
| Problem Cause Solution | | |
| The light of the grinding button keeps flashing | The hopper is not installed. | Install the hopper properly. |
| Make sure that the locking position is aligned with the front part. |
| Do not remove the hopper during operation. | Do not remove the hopper before all the coffee beans have finished grinding. |
ENGLISHENGLISH
| The optimal grind setting results in low
espresso extraction | This is normal during the first
few uses due to the lack of
custom fitting | Change the setting to a finer
or coarser setting to maintain
optimal espresso extraction. |
| The coffee bean is losing
freshness. | Use fresh coffee beans of
medium or dark roast. |
| Not enough coffee beans
are used. | Use more coffee beans. |
| The coffee bean is not
sufficiently pressed. | Press harder. |
| The grinding light does
not illuminate after
pressing the power
button | The coffee machine is not
plugged into the mains socket. | Insert the plug into the power
socket and switch the machine
on. |
| No ground coffee
comes out of the
grinder outlet | Hopper dampers are closed or
not fully open. | The outlet of the grinder needs
to be cleaned. |
| The coffee beans are
coarse and are on the
fine grind setting | The grinding adjustment is not
correct. | Adjust the grinding settings. |
| Espresso is poorly
extracted even with a
fine coffee grind | Not enough coffee beans are
being used. Use more coffee beans. | |
| Coffee beans are too old. | The use of freshly roasted or
dark roasted coffee beans,
regardless of the grind
setting, will result in rapid and
insufficient espresso extraction. |
| The hopper cannot be
put in place | The hopper latch is not in the
correct position. | Make sure that the locking
position is aligned with the front
part. |
6. TECHNICAL SPECIFICATIONS
Product reference: 01729
Product: Power Espresso 20 Barista Maestro Espresso Coffee Machine
Voltage:220-240VAC
Frequency:50-60Hz
Power:Espresso Machine 2250 W,Grinder 1500 W
Technical specifications may change without prior notification to improve product quality.
Made in China Designed in Spain
7. DISPOSAL OF OLD ELECTRICAL AND ELECTRONIC APPLIANCES

This symbol indicates that, according to the applicable regulations, the product and/or batteries must be disposed of separately from household waste. When this product reaches the end of its shelf life, you should dispose of the cells/batteries/accumulators and take them to a collection point designated by the local authorities.
Consumers must contact their local authorities or retailer for information concerning the
correct disposal of old appliances and/or their batteries.
Compliance with the above guidelines will help protecting the environment.
B. TECHNICAL SUPPORT AND WARRANTY
Cecotec shall be liable to the end user or consumer for any lack of conformity that exists at the time of delivery of the product under the terms, conditions, and deadlines established by the applicable regulations.
It is recommended that repairs be carried out by qualified personnel.
If at any moment you detect any problem with your product or have any doubt, do not hesitate to contact the official Cecotec Technical Support Service at +34 963 210 728.
9. COPYRIGHT
The Intellectual property rights over the texts in this manual belong to CECOTEC INNOVACIONES, S.L. All rights reserved. The contents of this publication may not, in whole or in part, be reproduced, stored in a retrieval system, transmitted, or distributed by any means (electronic, mechanical, photocopying, recording or similar) without the prior authorization of CECOTEC INNOVACIONES, S.L.
FRANÇAIS FRANÇAIS
1. PIECES ET COMPOSANTS
Tension: 220,240 V AC
Frequenza 50-60 Hz
Potenza: caffe (2250 W), macinino (150 W)
5.PROBLEEMOPILOSSING
Productreference:01729
Product: Espressomachine Power Espensa 20 Barista Pro
Voltage:220-240VAC
Frequenie:50-60Hz
Vermogen: Koffie (2250W), Molen (150W)
ReSn problem's parnitrubka: