USER MANUAL Sikanda GXT 164 TRUST
Frequently asked questions: www.trust.com/21726/FAQ

Trust

SIKANDA
PC LAPTOP
MMO
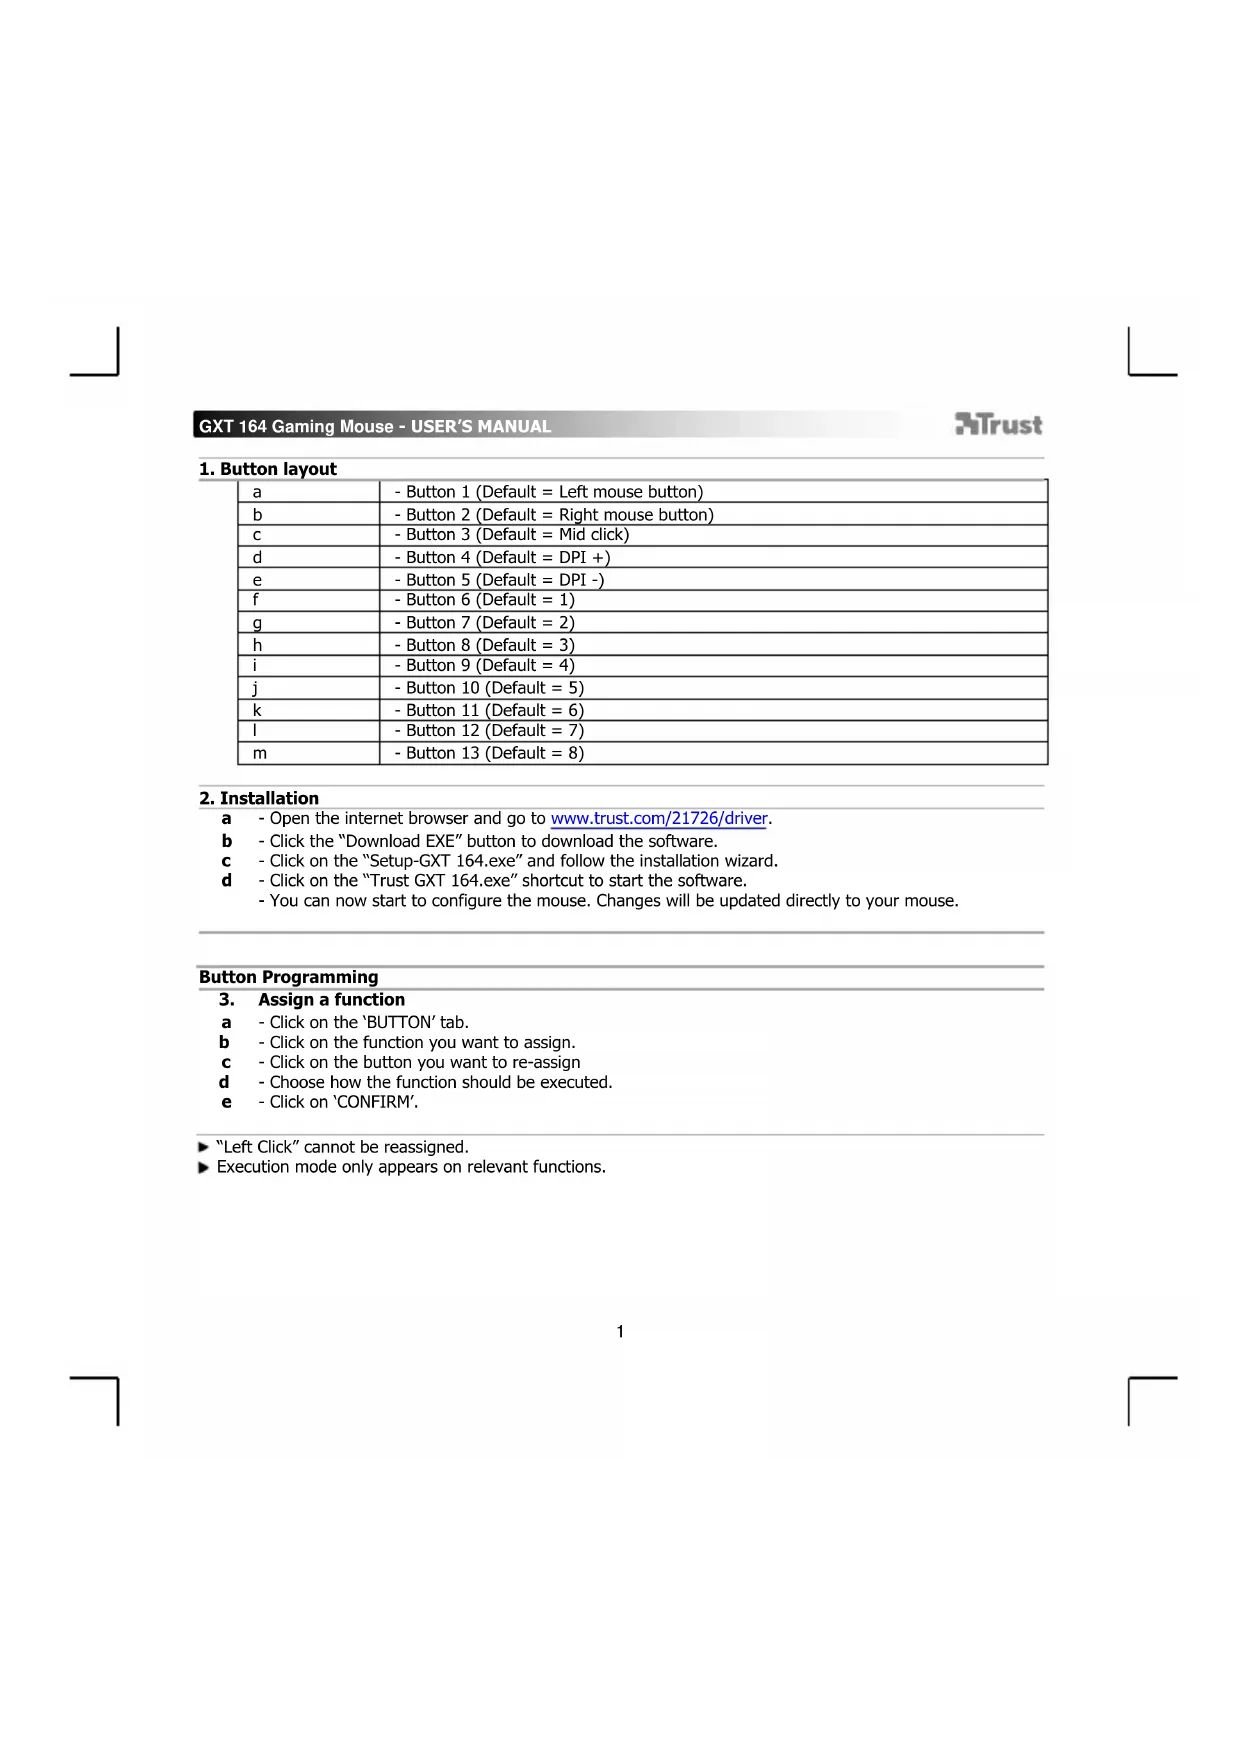
- Button layout
| a | - Button 1 (Default = Left mouse button) |
| b | - Button 2 (Default = Right mouse button) |
| c | - Button 3 (Default = Mid click) |
| d | - Button 4 (Default = DPI +) |
| e | - Button 5 (Default = DPI -) |
| f | - Button 6 (Default = 1) |
| g | - Button 7 (Default = 2) |
| h | - Button 8 (Default = 3) |
| i | - Button 9 (Default = 4) |
| j | - Button 10 (Default = 5) |
| k | - Button 11 (Default = 6) |
| l | - Button 12 (Default = 7) |
| m | - Button 13 (Default = 8) |
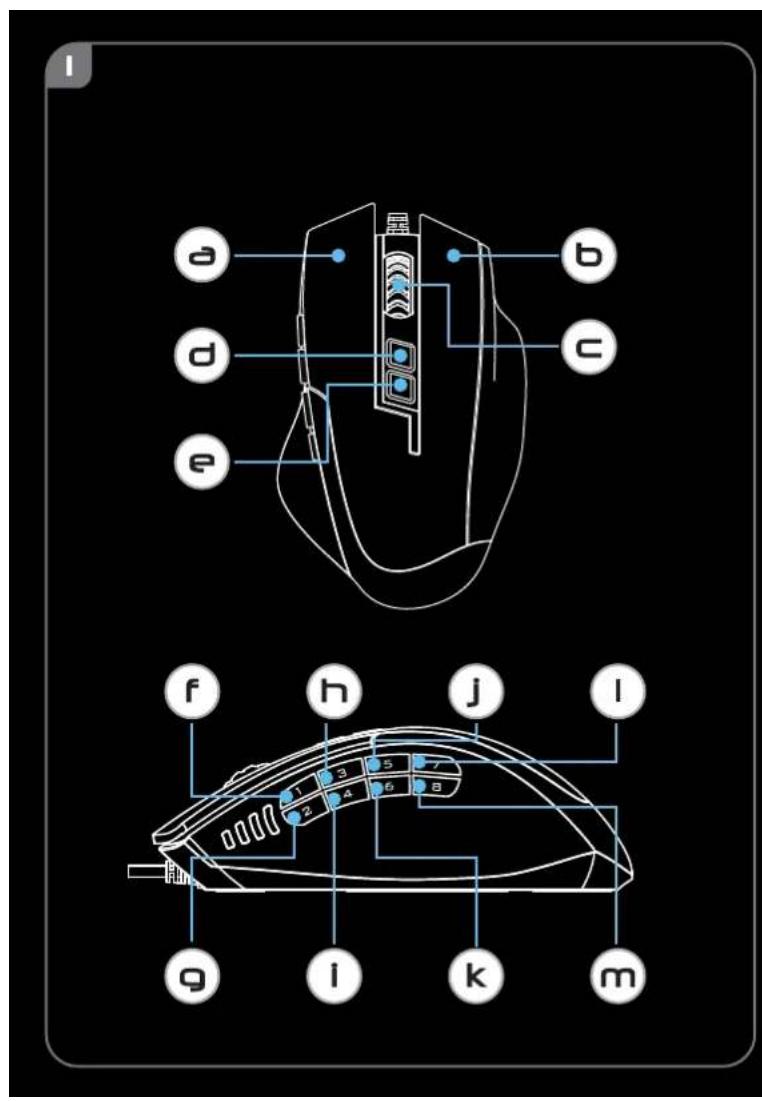
2. Installation
a - Open the internet browser and go to www.trust.com/21726/driver.
b - Click the "Download EXE" button to download the software.
c - Click on the "Setup-GXT 164.exe" and follow the installation wizard.
d - Click on the "Trust GXT 164.exe" shortcut to start the software.
- You can now start to configure the mouse. Changes will be updated directly to your mouse.
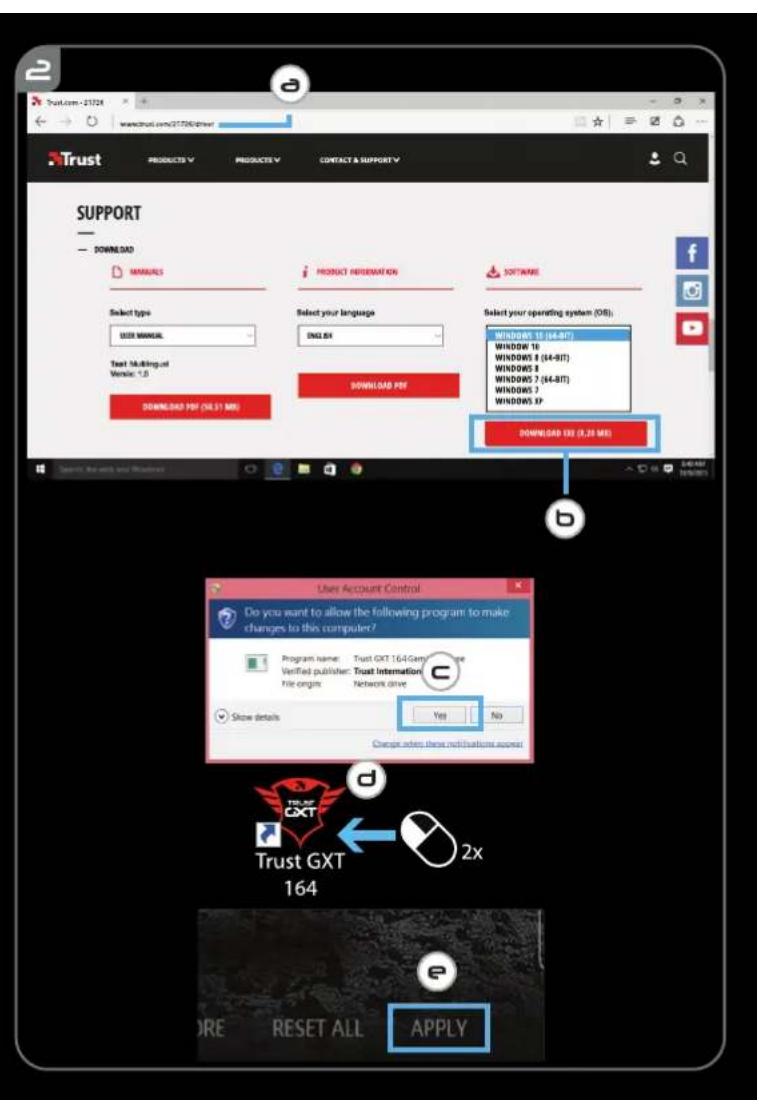
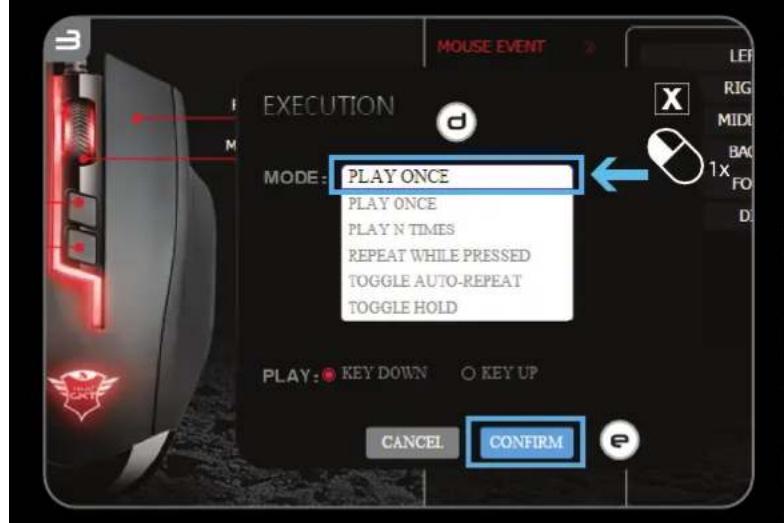
3.Assign a function
a - Click on the 'BUTTON' tab.
b - Click on the function you want to assign.
c - Click on the button you want to re-assign
d - Choose how the function should be executed.
e - Click on 'CONFIRM'.
"Left Click" cannot be reassigned.
Execution mode only appears on relevant functions.
GXT 164 Gaming Mouse - USER'S MANUAL
Trust
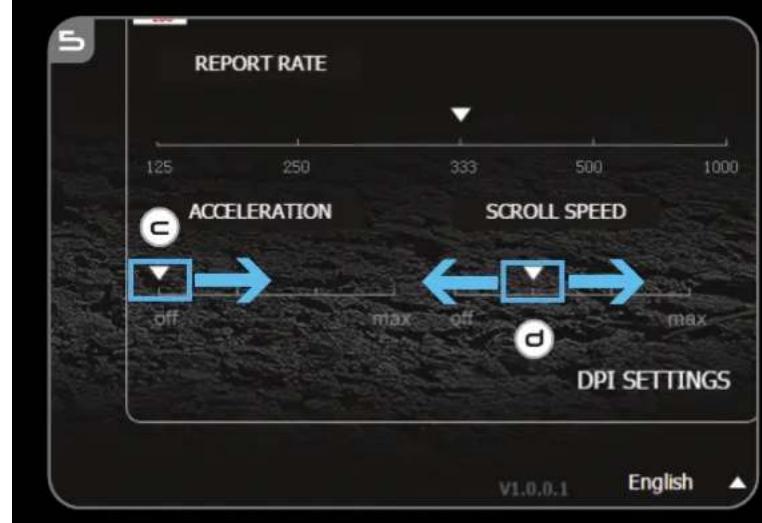
Report rate & DPI settings
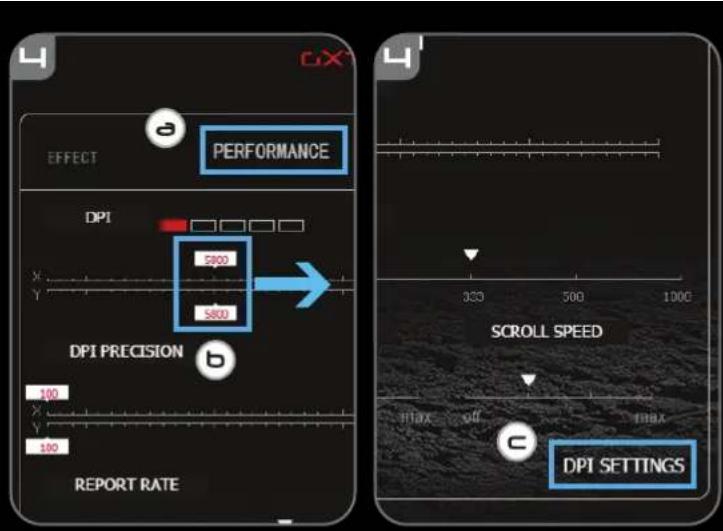
4. DPI setting
a - Click on the 'PERFORMANCE' tab.
b - Change the DPI settings by clicking the respective bar.
c - Click 'DPI SETTINGS' to enter advanced DPI settings.
d - Click the switch under the DPI number to enable or disable this DPI level.
e - Click on 'SAVE' to update the settings to your mouse.
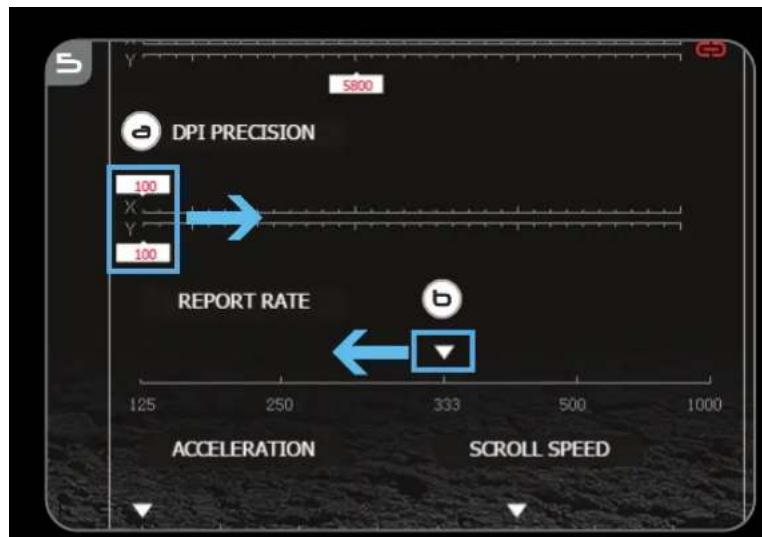
5. Other Settings
a - Change the DPI Precision rate by dragging the respective cursor. DPI precision can be found as function and can be assigned to a button (see Step 3.).
b - Change the Report Rate by dragging the respective cursor.
c - Change the Acceleration by dragging the respective cursor.
d - Change the scroll speed by dragging the respective cursor.
After assigning the DPI Precision function to a button, press and hold that button to increase the precision to the selected DPI level.
DPI Precision is linked to the active DPI level.
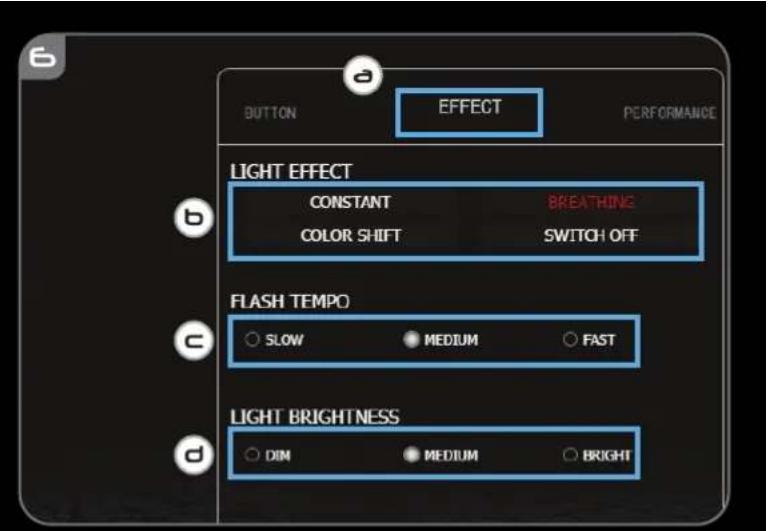
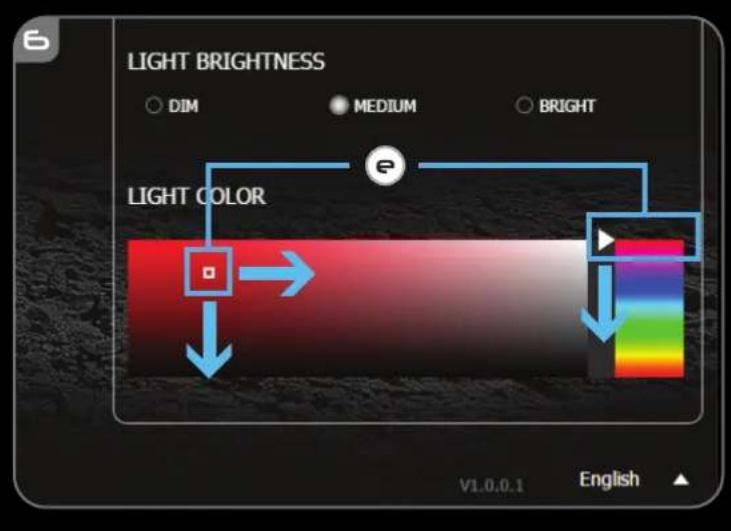
Light Settings
6. Change the Light Effect
a - Click on the 'EFFECT' tab.
b - Change the light mode.
c - Change the breathing speed.
d - Change the brightness level.
e - Select the desired LED color or pick a custom color by dragging the respective cursor.
Light modes;
O Constant = one solid colour
Breathing = one breathing colour
Colour shift = demo mode (brightness & colours not adjustable)
Switchoff = disableLED
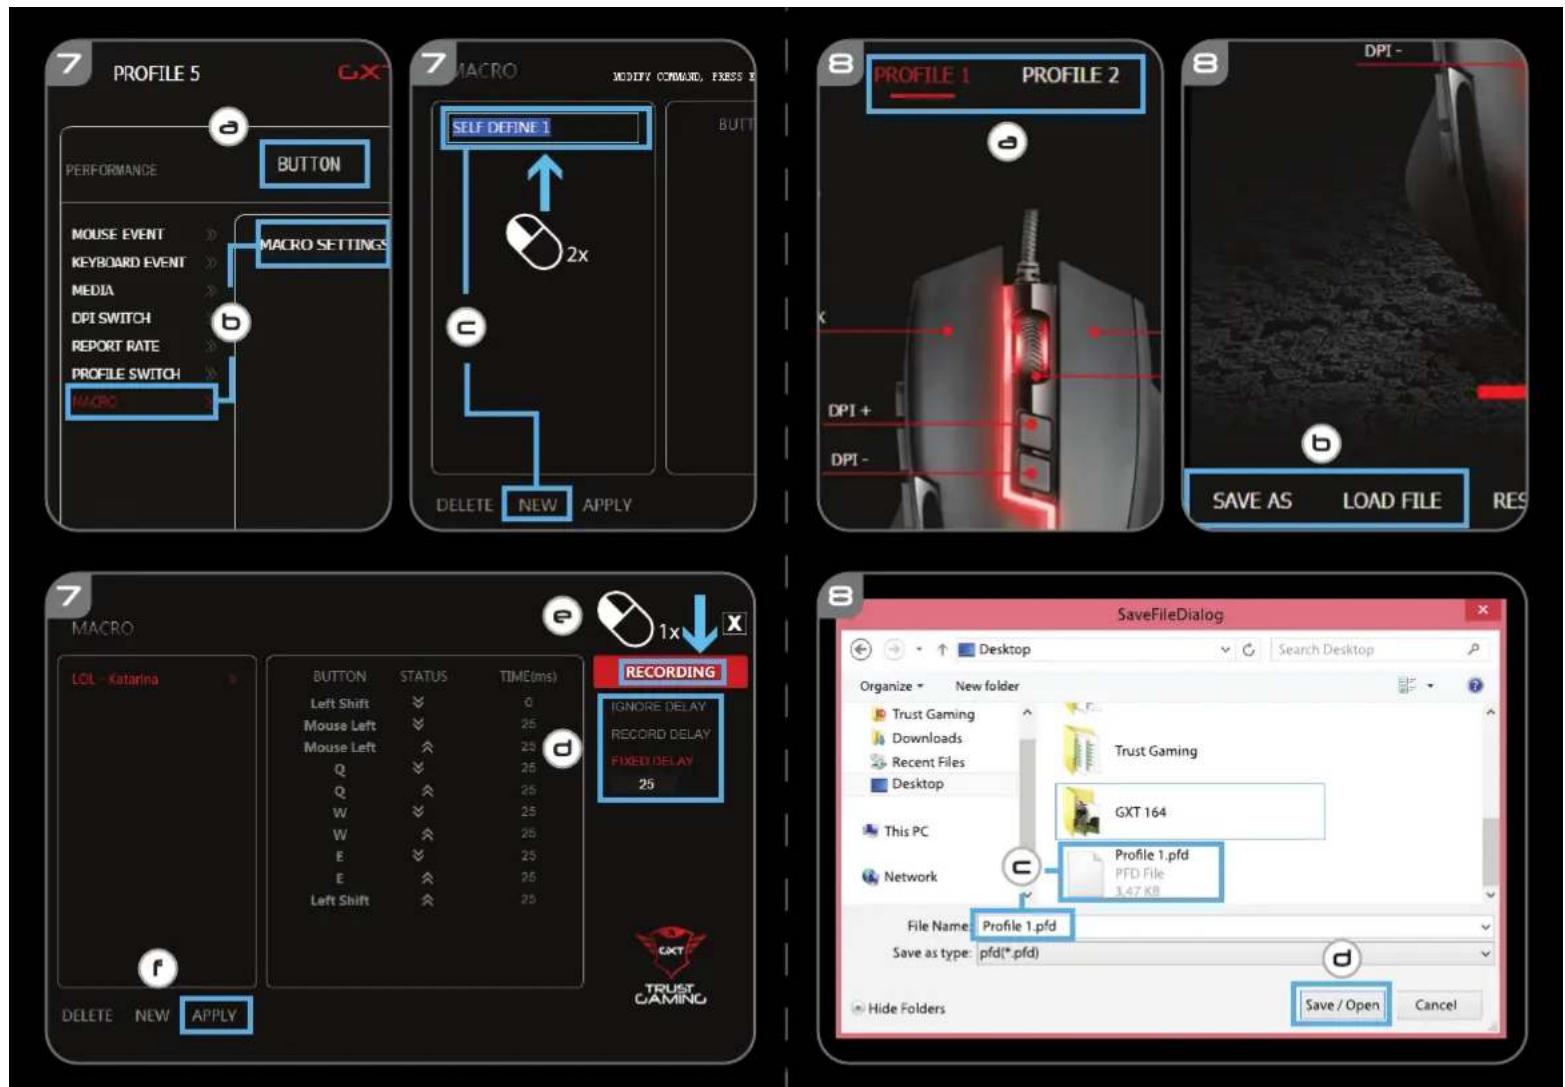
Macro Settings
- Create a Macro (Store a sequence of keys in the software)
a -Go to the 'BUTTON' tab.
b - Click on 'MACRO' and then on 'MACRO SETTINGS'.
c - Click on 'NEW' and double click on 'SELF DEFINE X' to rename the macro.
d - Set the delay time between each action.
e - Click 'RECORD' to start recording the macro. Now enter your preferred macro sequence. Click 'RECORD' again to stop recording the macro. (max. 34 actions)
f - Click on 'Apply' to save the macro.
To assign a macro follow step 3 of this manual.
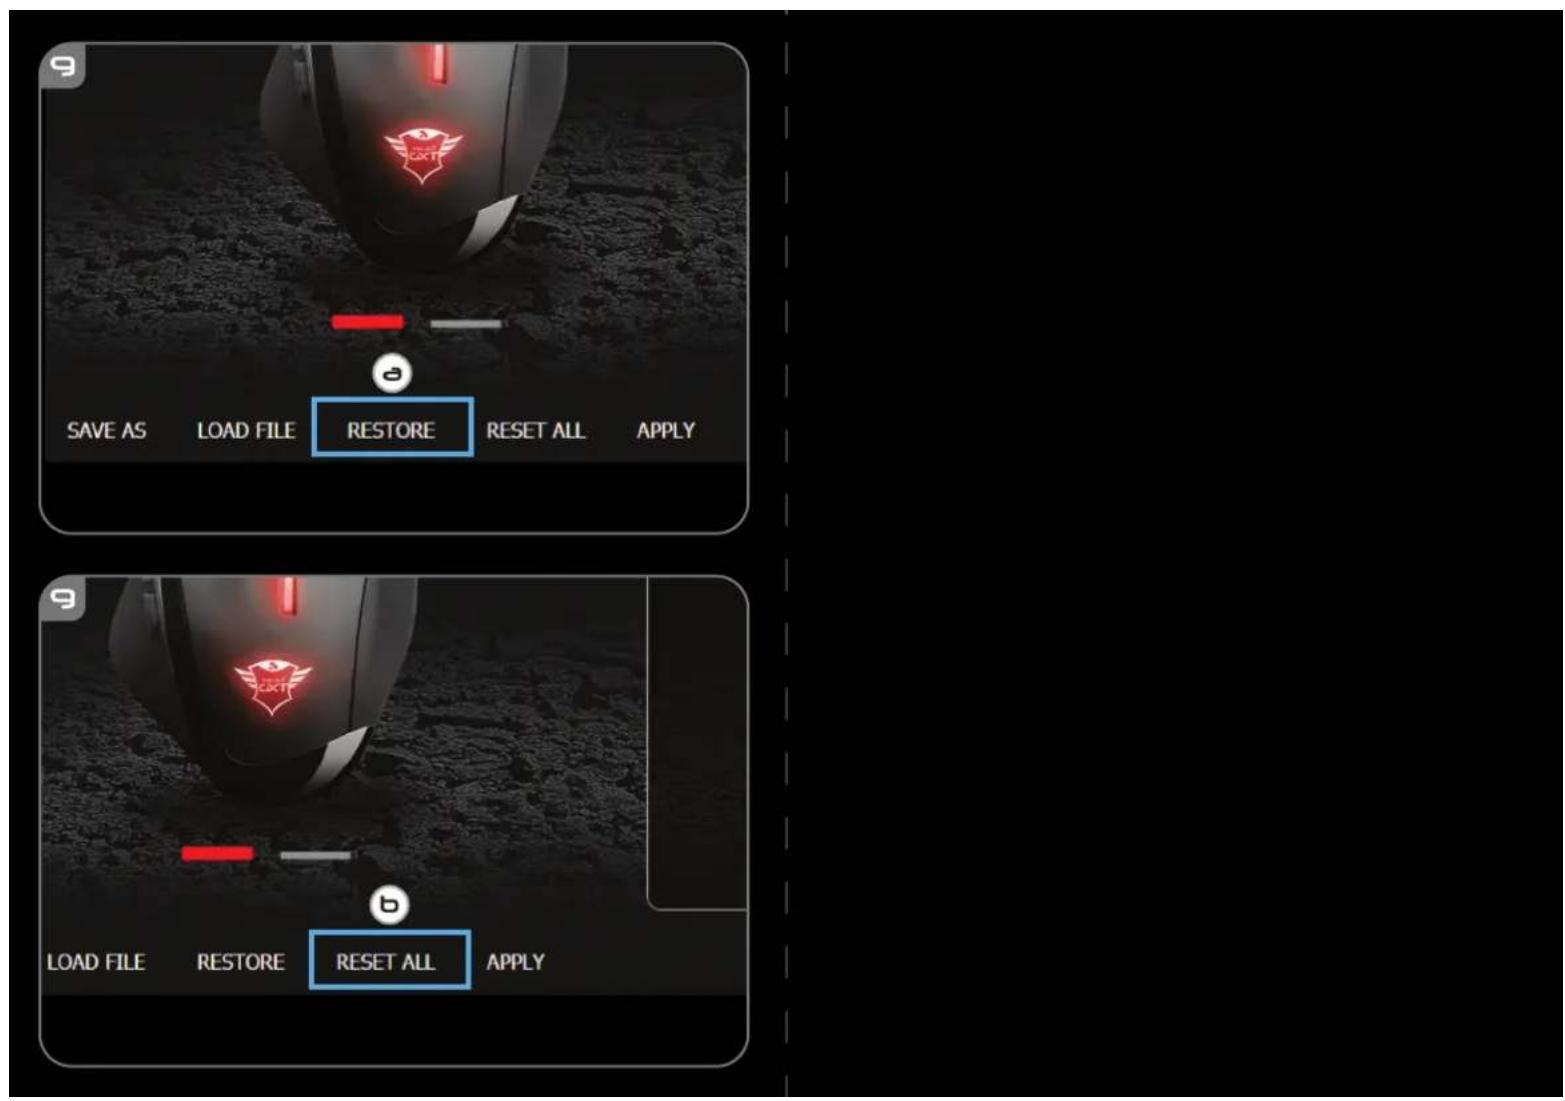
Profile Settings
- Select, Save or Load a profile
a - Select one of the 5 profiles by clicking on the preferred profile.
b - Click on 'SAVE AS' to save a setup, Click on 'LOAD FILE' to load a setup.
c - Enter a name for the mouse setup you want to save, or choose the preferred profile to load.
d - Click on 'Save' to save the setup, click on 'Open' to load the setup.
- Click on 'Apply' Your mouse setup is now saved or updated to your mouse.
a - Click on 'RESTORE' to reset the current profile to factory default.
b - Click on 'RESET ALL' to reset all profiles to factory default.
Report rate & DPI settings
4. DPI Setting
O Eteint = voyants desactives
Report rate & DPI settings
4. DPI-innstilling
| a | - Knapp 1 (standard = vänster musknapp) |
| b | - Knapp 2 (standard = höger musknapp) |
| c | - Knapp 3 (standard = mittenblick) |
| d | - Knapp 4 (Standard = DPI +) |
| e | - Knapp 5 (Standard = DPI -) |
| f | - Knapp 6 (Standard = 1) |
| g | - Knapp 7 (Standard = 2) |
| h | - Knapp 8 (Standard = 3) |
| i | - Knapp 9 (Standard = 4) |
| j | - Knapp 10 (Standard = 5) |
| k | - Knapp 11 (Standard = 6) |
| l | - Knapp 12 (Standard = 7) |
| m | - Knapp 13 (Standard = 8) |
2. Installation
Setári report rate.si DPI
4. Setarea DPI
○ NoctoHa =eINnNoCToHEnuBt
Pncaun =eHH nyncapaUcB
CMraHa Ha UBaT = DEMOHCTpaUHOHepeXIM (pKoCTTa uCBeTOBeTe He cepeYnPaT)
H3KlHueH = DeaekTNBnpaH CBeToIDNO
MaKpo NaCTpoKn
- Cb3daBaHe Ha MaKpOc (3anamememe nocledoeamenHcm Ha Knaeuwu e cofmyepa)
a -PpeMHHeTe KbM pa3dEn ,BUTTON".
b -LpaKHeTe Bbpxy,MACRO",a cnei ToBa Ha ,MACRO SETTINGS".
C -UpaKHeTe Bpyx,NEW"n DBA nTbN Bbyx,SELF DEFINE X",3a da npenMeHyBaTe MaKpoca.
d -3aadTe BpeMe 3a 3abAne Mejdy BCaKO DeICTBVE.
e -LpakheT,RECORD",3a da cTapTnpate 3anca Ha MaKpoc.Cera BBBeTe NcKaHaTa ot Bac nocJeIOBaTeJIHOCT Ha MaKpoc. LpakHeTe OTHOBo,RECORD",3a da cnpeTe 3anca Ha MaKpoc.(MaKc. 34 JeICTBn)
f -LpaKHeTe,Apply",3a Da 3ana3nTe MaKpoca.
3a da Ha3HaCHTe MaKPOC, CneBDAIe CTbNkA 3 HA To3n HApbHNIK.
HaetpoKn Ha npoΦn
- 36epete, 3ana3n nn 3apein npoФn
a -I36peTe eIN OH 5 Te npoФnla KaTo UpaKaHHeTe Bbpxy npednoHTaHnA.
b - ⅢpaKHeTe "SAVE AS", 3a da 3ana3nTe HacTpoiKaTa. ⅢpaKHeTe Bbpxy "LOAD FILE", 3a da 3apeiTe HAcTpoiKa.
C -BbBeTe Ime 3a HacTpoKata Ha MmIkaT, KOaTO NcKaTe Da 3aNa3nTe nIn N36peTe 3a 3apeXdaHe npednoHTAH npoHn.
d - UpaKHeTe ,Save", 3a da 3ana3nTe HactpoiKaTa. UpaKHeTe Bbpy,Open", 3a da 3apeiTe HactpoiKa.
- UpaKHeTe Bbpy,Apply Cera HactpoKaTa Ha MUskata Bn e 3ana3eHa nnakTyan3npaHa B MUskata.
- Bb3ctaHOBBAHe Ha HAcTpoKn no nOpa36npahe
a -UpaKHeTe Bbpxy ,RESTORE", 3a da HynipaTe Tekyu npoФn KbM fa6pnHnTe HaCTpOKn.
b -IpaKHeTe "RESET ALL", 3a Da hyIpaTe BCnUKN npOuN KbM fa6pnuHnte HactpoNk.
1.Cxema KhoNOK
| a | - Khonka 1 (ПО умочаши = Левая Кнока мыши) |
| b | - Khonka 2 (ПО умочаши = правая Кнока мыши) |
| c | - Khonka 3 (ПО умочаши = с篇文章 средnevий Кноков мыши) |
| d | - Khonka 4 (ПО умочаши = DPI +) |
| e | - Khonka 5 (ПО умочаши = DPI -) |
| f | - Khonka 6 (ПО умочаши = 1) |
| g | - Khonka 7 (ПО умочаши = 2) |
| h | - Khonka 8 (ПО умочаши = 3) |
| i | - Khonka 9 (ПО умочаши = 4) |
| j | - Khonka 10 (ПО умочаши = 5) |
| k | - Khonka 11 (ПО умочаши = 6) |
| l | - Khonka 12 (ПО умочаши = 7) |
| m | - Khonka 13 (ПО умочаши = 8) |
2. YctaHOBka
a - OtkpoiTe Be6-6pay3ep i nepeiDnte no ccbInke www.trust.com/21726/driver.
b - Κεικητε ΚΗΟΝΥ «Download EXE»对于我们3προραμΜΗΟ Μόςην.
c - LJIeKHTe faHJ «Setup-GXT 164.exe» n cIeHyTe IHCTpyKUmM MaCTepa yCTaHOBKn.
d - 《Trust GXT 164.exe》Дглэпогамногообсченя.
- Tenepb MoXHO HaaTb HAcTpOy KMy Mblu. N3MeHeHbIe npaMeTpbl 6ydyT O6HOBJIeHbI HeNOCpeCTBeHHo Ha MyIi.
PporpaMMNPOBaHne KHONoK
3. Ha3haeHne fynkun
a - Μεικητενλακγ« BUTTON».
b -LJeKHTe yHKUHO, KOtOpYIO Heo6xOIMo Ha3HaHTb.
C -HaXMMTe KHOHkY, KOtOpyIO Heo6xOIMn OpeHa3HaHTb.
d -BbI6epnte cnooc6 BblONHeHnФyHKnN.
e -LsEJIKNHTe «CONFIRM».
Функин «Left Click» HeIb3Я nepeHa3HaHTb.
Pexm BbIOnHeHn Execution mode oTo6paKaTcT OToBko IaI noXoJxNx FyHKn.
GXT 164 Gaming Mouse - USER'S MANUAL
Trust
Yactota onpoca nnapametpb DPI
4. NapaMeTpbl DPI
a -LeKHTe BknaKy «PERFORMANCE».
b -I3MeHnTe npaMeTpbl DPI, IeKHyB COOTBeTCTBvUO npHeNb.
C -LeKHTe «DPI SETTINGs»ДЯdoCTyNa KdoNoJIHTeNbHbIMnapaMeTpam DPI.
d -IeKHTe nepeKJIOATeINb NOH OHomepOM DPI, YTO6bl BKIOHTb NIN OTKIOHTb daHHb ypoBeHb.
e -UeIeKnTe «SAVE»ДЯOBHJIeHnI npaMeTpOBMbIuN.
5.Дугne napametpbI
a -ДяиИЗмeнгь CTeENH ToHocTN DPI nepeTaUHTe COOTBeTCTByIOUm KypcOp. -CTeENb TOnHOCTN DPI Precision moxho haTn CpeDnФyHKuN n Ha3HaunTB ODoHn 3 KhoNOK (Cm. war 3).
b -ДяиИЗМЕHENЯЧАТОТБI ONPОСAпеташиTE COOTBETCTBYЮNUKypCOP.
C -ДЯиИЗМeHENI yCKOpeHnI nepeTaunTe COOTBeTCTByIOuN KypCop.
d -ДяиИЗмehняckopocTn npokpyTk npeTaunTe COOTBETCTByUOuKypcop.
Ha3HaHbФyHKUo DPI Precision oHOn I3 KHOnOK, HaxMnte u ydepXnBaIte daHHyO KHONky dnyyBENueHnToHOCn Do Bb6paHNo CTeneHN DPI Precision.
CTeneHb DPI Precision cBra3aHa c aKTNHBbIM ypOBhem DPI.
NapaMeTpbl nOcbETKn
6. 3mehenne 3ΦΦeKTOB nOcCBETKN
a -LJIeIKHnTe BklaJky EFFECT>.
b -I3MeHHTe peXIM NOCDBeTKN.
c -Измehnte ckopoctb nybacun.
d -N3MeHHTe yPoBeHb npKoCTn.
e - Bb6epnte Tpe6yeMbI CBeT CBTeODnOda Hnn no6epnte noB3oBaTeBckn CBeT, nepeTaunB COOTBETCTBYUOnu KypCop.
PexmbIIOCBETK:
O NoctoHHa = OdH NoCToHHbI cBET
πyIbCnpyUoua =OdHnyIbCnpyUouiNüBET
CmeHa UBeTOB = DEMOHCTpaUHOHHbIpeKIM (RpKOCTb N UBeTa HepepyInpyIOTCa)
OTKJIIOHHTb =OTKJIOHHTb CBEOTNOObl
NapaMeTpbMakpocOB
- Co3dHne MaKPOca (coXpaHeHue nocnedeobamelbHocmu KnaBuu E npoaspMMHom o6ecneHu)
a -IpeennteHaBknaKky «BUTTON>
b -LJIeIKHnTe «MACRO», a 3aTeM «MACRO SETTINGS».
c - Κεικητε «NEW», a 3aTeM ἀναχάβλ «SELF DEFINE X» ἀπη περεμηMeHOBaHη MaKpoca.
d -YctaHOBHTe BpEm 3aepKm KxJy KaKdbIM DeCTBnEM.
e -LJIKNHTe «RECORD», yTo6bHaaTb 3aINCb MaKpOca. TeIepb BBeIInTe Tpe6yEmyo NocJeIOBATEJbHOCt b MaKpOca. LJIKNHTe «RECORD» eue pa3, yTo6bIOCTaHOBnTb 3aINCb MaKpOca. (MaKc. YncNo DeIcTBn - 34)
f -LJIeKHNTe «Apply», YTO6bI coXpaHnTb MaKpOc.
ДянэзачениmaKрoca bblnoJIHnTe 乌3HaCTOЯero pykoBOdCTBa.
Napametpbipnpofo
- Bb6op, coxpanenHe nH 3aRpy3Ka npoФnla
a -Bb6epnte OINH n3 5 npoΦnIe, ζεκΚhγВ Tpe6yeMbI n3 HNX.
b - Μεπκητε «SAVE AS» Дña coханеня有很大стpoек. Μεπκητε «LOAD FILE» Дña загузк有很大стpoek.
c -BBeIte IIMa HAcTpoEeMbIiN, KOToPbIe CneIyET COxpaHITb, INI Bbl6epuTe Tpe6yeMbl npOfHJIb 3arpy3Kn.
d - Μεικητε «Save» ДЯ COXPAHENH RAcTpoE; Μεικητε «Open» ДЯ 3aRpy3Kn HAcTpoE.
-
ⅢeIKNHnTe «Apply»→ HacTpoKmMbIu6ydyT coXpaHeHbI nnOsbHOJIeHbI.
-
BocstahOBJIeHne napametpoNo yMOnaHHIO