
SHMS 300 C2 - Hand blender SILVERCREST - Free user manual and instructions
Find the device manual for free SHMS 300 C2 SILVERCREST in PDF.
| Brand | SilverCrest |
| Model | SHMS 300 C2 |
| Product type | Hand blender with stand mixer |
| Rated power | 300 W |
| Rated voltage | 220-240 V ~, 50-60 Hz |
| Protection class | II (double insulation) |
| Mixing bowl capacity | Up to 3.4 L (max. 2.5 L content) |
| Main functions | Mix, knead, whisk, puree |
| Included accessories | 2 whisks, 2 dough hooks, hand blender, mixing bowl with lid, stand, spatula |
| Speeds | 5 speeds + Turbo button |
| Intermittent use time | Stand mixer: 10 min max; hand blender: 1 min max |
| Food contact materials | Suitable for food contact |
| Cleaning | Whisks and hooks dishwasher safe; bowl, lid and spatula dishwasher safe; body and stand wipe with damp cloth; lower part of hand blender rinse under running water |
| Safety | Double insulation, safety release, overload protection, automatic shut-off in case of overheating |
| Warranty | 3 years (conditions according to manual) |
| Intended use | Domestic use, food preparation: kneading, mixing, whisking, pureeing |
Frequently Asked Questions - SHMS 300 C2 SILVERCREST
User questions about SHMS 300 C2 SILVERCREST
0 question about this device. Answer the ones you know or ask your own.
Ask a new question about this device
Download the instructions for your Hand blender in PDF format for free! Find your manual SHMS 300 C2 - SILVERCREST and take your electronic device back in hand. On this page are published all the documents necessary for the use of your device. SHMS 300 C2 by SILVERCREST.
USER MANUAL SHMS 300 C2 SILVERCREST
HAND MIXER SET / HANDMIXER-SET / BATTEUR AVEC ACCESSOIRESHMS 300 C2
GB IE
HAND MIXER SET
Operating instructions
FR BE
BATTEUR AVEC ACCESSOIRES
Mode d'emploi
C
RUCNI MIXER
Návod k obsluze
SK
RUCNY MIXER
Návod na obsluhu
DK
HÄNDMIXERSAT
Before reading, unfold the page containing the illustrations and familiarise yourself with all functions of the device.
DE AT CH
GB/IE Operating instructions Page 1
Kneading and whisking 6
Pureeing 8
Table - Processing times 9
Cleaning. 10
Storage 10
Disposal 11
Kompernass Handels GmbH warranty 11
Service 12
Importer 12
Recipes 13
Braided yeast bun 13
Congratulations on the purchase of your new appliance.
You have selected a high-quality product. The operating instructions are part of this product. They contain important information about safety, usage and disposal. Before using the product, please familiarise yourself with all operating and safety instructions. Use the product only as described and for the range of applications specified. Please also pass these operating instructions on to any future owner.
Intended use
This appliance is only intended for kneading dough, mixing liquids (e.g. fruit juices), whipping cream and puréeing fruit. It is only suitable for processing foodstuffs. Do not use the blender to purée boiling food (e.g. soups). This appliance is intended solely for use in private households. Do not use it for commercial purposes.
Package contents
1 hand mixer set
1 mixer stand
1 mixing bowl with lid
2 kneading hooks
2whisks
1 blender
1 dough scraper
Operating instructions
NOTE
Check contents for completeness and damage immediately after unpacking. Contact Customer Services if necessary.
Appliance description
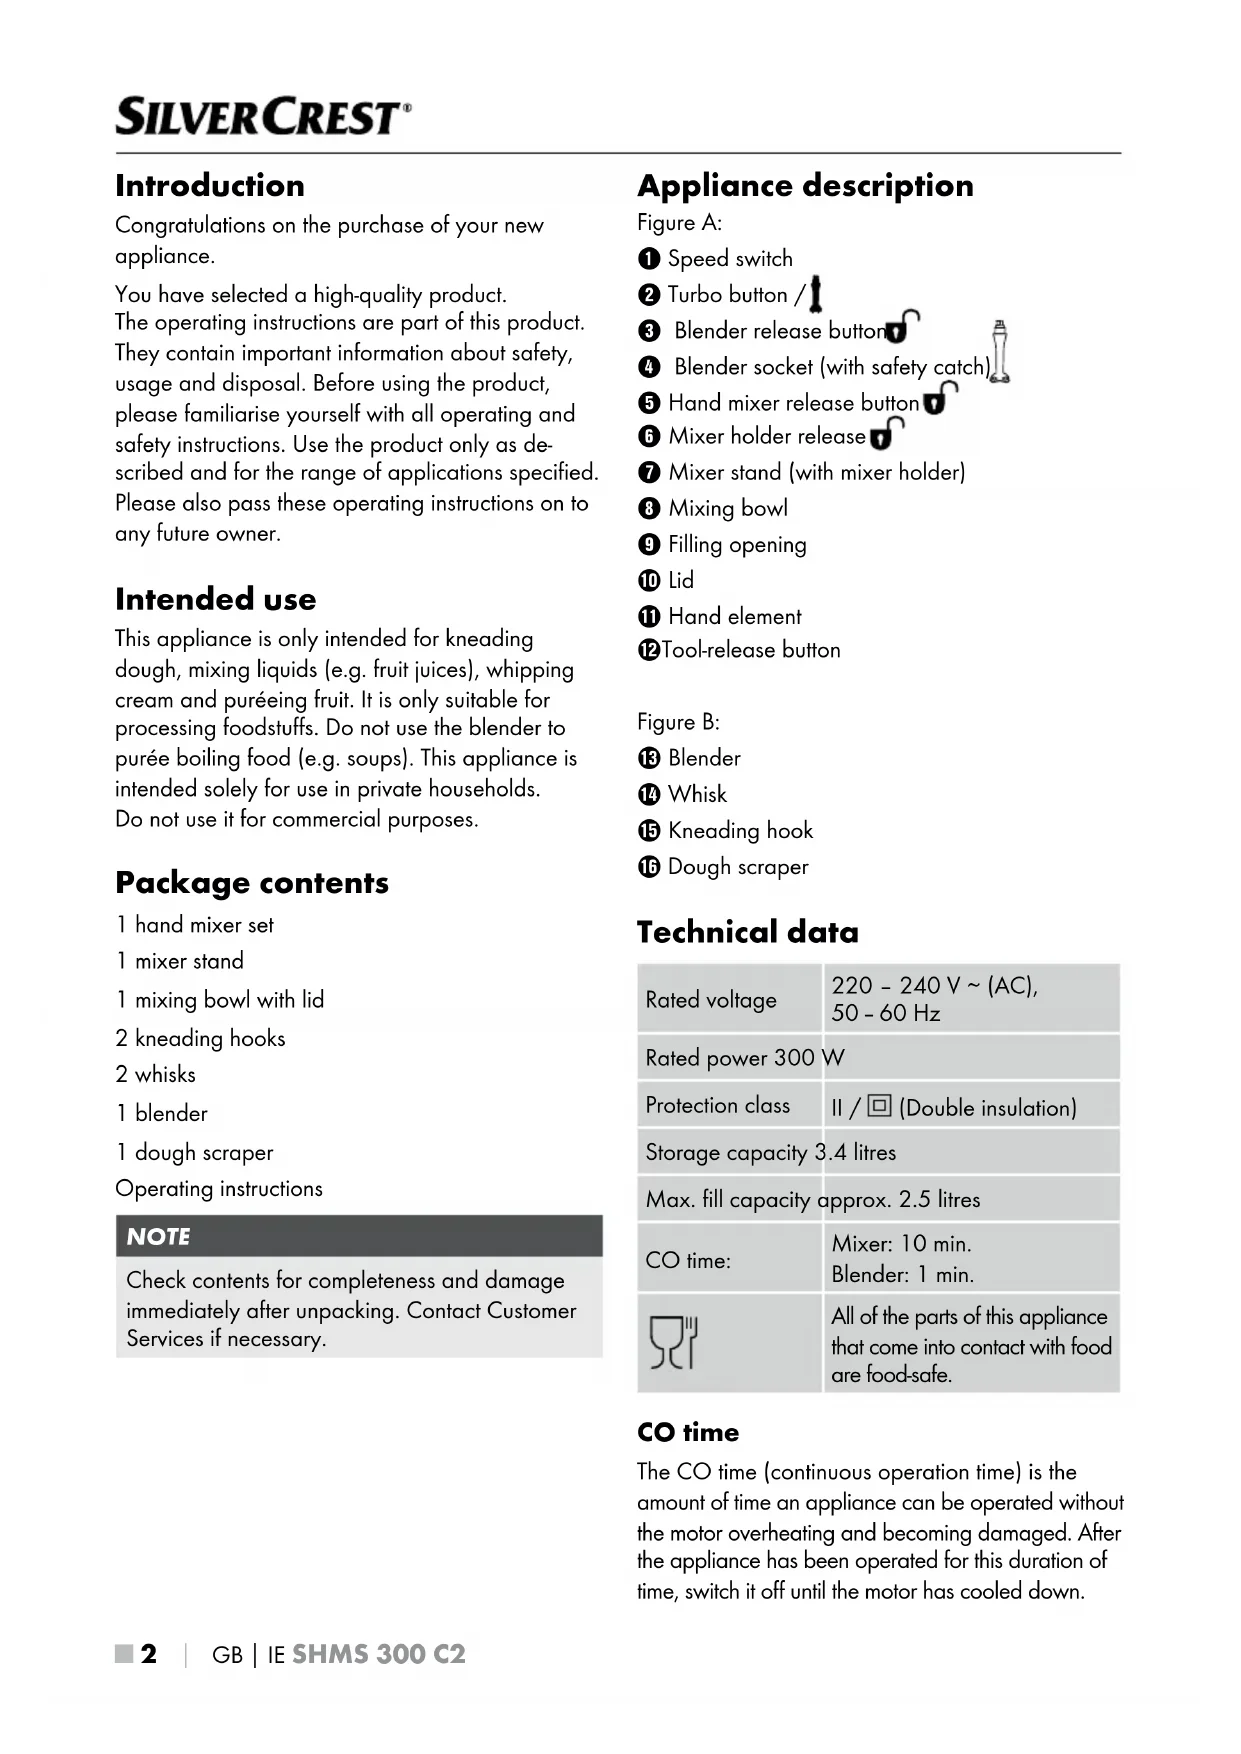
Figure A:
Speed switch
2 Turbo button /
3 Blender release button
4 Blender socket (with safety catch)
5 Hand mixer release button
Mixer holder release
Mixer stand (with mixer holder)
Mixing bowl
Filling opening
Lid
Hand element
12Tool-release button
Figure B:
13 Blender
14 Whisk
15 Kneading hook
16 Dough scraper
Technical data
| Rated voltage | 220 - 240 V ~ (AC), 50 - 60 Hz |
| Rated power 300 W | |
| Protection class | II / ∩ (Double insulation) |
| Storage capacity 3.4 litres | |
| Max. fill capacity approx. 2.5 litres | |
| CO time: | Mixer: 10 min. Blender: 1 min. |
| All of the parts of this appliance that come into contact with food are food-safe. | |
CO time
The CO time (continuous operation time) is the amount of time an appliance can be operated without the motor overheating and becoming damaged. After the appliance has been operated for this duration of time, switch it off until the motor has cooled down.
Safety information

- Keep the power cable away from hot parts of the appliance and other heat sources. Do not run power cable over sharp edges or corners.
- Do not kink or crush the power cable.
- Arrange for defective power plugs and/or cables to be replaced as soon as possible by a qualified technician or by our Customer Service Department to avoid the risk of injury.
Always hold the plug when disconnecting the appliance from the power supply, do not pull on the power cable. Otherwise the power cable could be damaged!

Never immerse the hand element in water or any other liquid! There is a risk of fatal electric shock if residual liquids come into contact with live components during operation.

WARNING! RISK OF INJURY!
- This appliance may be used by people with reduced physical, sensory or mental capabilities or lack of experience and/or knowledge if they are supervised and have been instructed in how to use the appliance safely and have understood the potential risks.
This appliance may not be used by children.
Do not allow children to play with the appliance.
The appliance and its connecting cable must be kept away from children.
WARNING! RISK OF INJURY!
The appliance should always be disconnected from the mains when unattended and before assembly, disassembly or cleaning.
- Do not touch the whisks, kneading hooks or the blender while the appliance is in use. The blender blade is sharp! Do not dangle long hair, scarves or the like over the mixing attachments.
- Never attempt to fit attachments with differing functions at the same time.
Unplug the appliance after every use and before cleaning to prevent it from switching on inadvertently.
Always unplug the appliance before changing the accessories to prevent it from switching on inadvertently.
- Switch off the appliance and disconnect it from the power supply before changing accessories or additional parts that move during operation.
- Do not touch moving parts of the appliance, always wait for them to come to a complete stop. Risk of injury!
Always check the appliance and all parts for signs of visible damage before use. The safety concept can work only if the appliance is in a faultless condition.
- Never use the appliance if parts are damaged, defective or missing. Doing so will increase the risk of accidents.
The appliance must always be supervised during use. If you need to leave the workplace, remove the plug from the mains power socket.
- Never use the appliance for purposes other than those described in these instructions. Otherwise there is a risk of serious injury!
- Be careful when handling and cleaning the blender. The blade is extremely sharp!
CAUTION! PROPERTY DAMAGE!
- Do not use the appliance outdoors. The appliance is intended exclusively for domestic indoor use.
Have all repairs carried out by trained personnel. If required, contact our service partner responsible for your country. - Do not use the blender to purée boiling food. This can lead to deformation of the blender!
- Never purée food in a cooking pot that is still on the hot stove! Contact between the hot bottom of the pot and the blender can cause damage to the blender!
Unpacking
Remove all components from the packaging.
Remove all packaging materials and transport restraints.
Check that all of the items listed are present and undamaged.
Clean all parts as described in the section "Cleaning".
Setting up
Place the mixer stand 7 on a level surface. There are 4 suction cups on the underside of the mixer stand 7 that prevent the appliance from slipping during use.
Ensure that the mains power socket is always easily accessible in the event of a fault.
Speed levels
| Level on the speed switch ❶ | Use |
| 0 Appliance | be is switched off. |
| 1 | Good starting speed for mixing "soft" ingredients such as flour, butter, etc. |
| 2 | For blending liquid ingredients. |
| 3 | For mixing cake and bread doughs. |
| 4 | For whipping butter, sugar, for desserts etc. |
| 5 | For beating meringue, icing, whipped cream, etc. |
Turbo button /12:
This button allows you to switch the appliance to full power immediately.
This button starts the blender if it is attached.
Operation
Kneading and whisking
ATTENTION! PROPERTY DAMAGE!
Do not operate the mixer continuously for longer than 10 minutes. After 10 minutes, take a break in order to allow the appliance to cool down.
NOTE
Put the attachments into the food to be beaten/ whisked/kneaded before turning on the appliance.
| Kneading hooks 15 for kneading heavy doughs, e.g. yeast dough. | Whisks 14 for stirring batter or cake mixture or for whipping cream. | Blender 15 for puréeing fruits/vegetables, e.g. apples. |
1) Clean the attachments (13, 14, 15) before first use.
2) Push the whisks 14 or the kneading hooks 15 into the slots on the hand element 11 until they click audibly and firmly into place.
| Always insert the kneading hook ⑤ or the whisk ⑩ with the toothed ring on the shaft into the intended slot on the appliance, which is marked with an icon. | |
| Insert the kneading hook ⑤ or the whisk ⑩ with the smooth ring on the shaft only into the intended slot on the appliance, which is marked with an icon. |
3) Release the mixer holder on the mixer stand by pressing the mixer holder release 6 and fold the mixer holder 7 upwards.
4) Remove the mixing bowl 8 and fill it with the ingredients. Quantities depend on the amount to be prepared.
ATTENTION! PROPERTY DAMAGE!
-
Never fill the mixing bowl ⑧ higher than the MAX marking (approx. 2.5 l). Otherwise, the ingredients will spill over the edge of the bowl during mixing.
-
Never knead dough containing more than 500g of flour with this appliance! Larger quantities of flour can result in overloading the appliance! If necessary, divide dough with higher flour quantities into several portions and knead them one after the other. However, do not exceed the specified CO time of 10 minutes.
Dough quantities (sum of all ingredients): -cake mixture: approx. 600 g max. approx. 200 g min.
-yeast dough: approx. 820 g max. approx. 320 g min.
5) Replace the mixing bowl 8 on the mixer stand 7.
6) Press the mixer holder release 6 and swing the mixer holder 7 back downwards.
7) Place the hand element 10 on the mixer holder 7 so that it firmly clicks into place.
8) Push the lid into the rails on the mixer stand so that it sits firmly in place.
NOTE
If you want to add ingredients during mixing, open the filling opening on the lid and add the ingredients. Close the filling opening afterwards to prevent ingredients from spraying out!
You can use the hand mixer without the mixer stand 7. We recommend using the hand mixer without the mixer stand 7 especially for small amounts of liquid. Otherwise, the mixer cannot reach all the liquid and it may not be properly mixed.

WARNING! RISK OF INJURY!
- Never use containers made from glass or other easily breakable materials. These containers may be damaged and cause injuries.
9) Insert the plug into a mains power socket.
10) To start up the appliance, move the speed switch ① to the desired speed setting. You can choose between 5 speed settings and also use the Turbo button (see section "Speed levels").
NOTE
If ingredients stick to the edge of the mixing bowl 8 and cannot be reached by the kneading hooks 15/whisks 14, switch off the hand mixer.
Remove the lid 10.Use the dough scraper to push the stuck ingredients back into the middle of the mixing bowl 3. Replace the lid 10. Switch the hand mixer back on.
11) To remove the contents of the bowl, switch off the hand mixer. Pull the lid ⑩ off to the side.
NOTE
For safety reasons, the whisks 14 and kneading hooks 15 can only be released if the speed switch 1 is set to the position "0".
12) Press the mixer holder release 6, flip up the mixer holder 7 and remove the mixing bowl 8 from the mixer stand 7. You can now remove the contents of the bowl.
NOTE
If you want to remove the whisks 14 or kneading hooks 15, you must first remove the hand element 1: To do this, press the hand mixer release 5 and remove the hand element 11. Then press the tool-release button 12 to release the whisks 14 or the kneading hooks 15.
For safety reasons, the whisks 14 and kneading hooks 15 can only be released if the speed switch 1 is set to the position "0".
Pureeing
WARNING! RISK OF INJURY!
- Never use containers made from glass or other easily breakable materials. These containers may be damaged and cause injuries.
ATTENTION! PROPERTY DAMAGE!
- Never use the blender ③ for hard foodstuffs such as: coffee beans, ice cubes, sugar, cereals, chocolate, raw/hard vegetables etc. This could result in serious damage to the appliance.
Do not use the blender to purée boiling food (e.g. soups). Remove the pot from the hotplate before puréeing.
1) Use the blender 13 to purée foods.
| Kneading hooks 15 for kneading heavy doughs, e.g. yeast dough. | Whisks 14 for stirring batter or cake mixture or for whipping cream. | Blender 15 for puréeing fruits/vegetables, e.g. apples. |
2) Open the safety catch of the blender socket 4 by pushing it to the side and holding it firmly.
NOTE
The blender 13 can only be used if the whisks 14 or the kneading hooks 15 are not installed.
3) Push the blender 13 into the blender socket 4 and push it down firmly. The blender 13 must audibly click into place.
4) To avoid overflowing, the container used for blending should only be filled to about 2/3 of its capacity. Select a suitably large container.
NOTE
- Ensure that there is a sufficient amount of liquid/purée in the purée container. To ensure effective mixing of the ingredients, the food should cover at least the lower section of the blender 13.
For the best result, add at least 50ml of liquid.
Do not switch the hand mixer on until the blender has been inserted into the ingredients.
5) Press the Turbo button / ②. Keep the Turbo button / ② pressed down during the whole procedure. The appliance stops as soon as it is released.
ATTENTION! PROPERTY DAMAGE!
Do not operate the blender for longer than 1 minute at a time. After one minute of use, allow the appliance to cool down fully.
6) When you have finished working with the blender 13, release the Turbo button/2 and remove the mains plug from the power socket.
ATTENTION! PROPERTY DAMAGE!
Clean only the lower section of the blender 3 under running water. Do not allow water to get inside the blender 13. This could result in damage to the appliance.
7) To remove the blender 3 from the blender socket 4, press the blender release button 3 on both sides of the hand element 1 at the same time. The blender 3 is now released from the blender socket 4
8) Remove the blender 13 with a snapping motion from the blender socket 4
NOTE
If the blender 13 still cannot be removed from the blender socket 4, pull the safety catch open a little. Then the blender 13 can be removed.
Table - Processing times
The following table serves as orientation by giving examples of the processing of different ingredients. Adjust the recommended amounts according to the recipe and your individual taste. If you want to process more than the recommended quantity, divide the total quantity into several portions and process them individually.
| ATTACHMENT INGREDIENTS | RECOMMENDED QUANTITY | SPEED TIME | |
| Boiled vegetables | 400-600 g | Turbo button/12 | 40-60 sec. |
| Shakes, milk drinks | 100-1000 ml | Turbo button/12 | 40-60 sec. |
| Cake mixture1 200-600 g Level 3 2-4 min. | |||
| Cream2 200 ml Level 5 approx. 60 sec. | |||
| Creme1 200-1000 g Level 4 1-2 min. | |||
| Yeast dough1 320-820 g Level 3 2-5 min. | |||
1 Depending on the recipe, ingredients and desired consistency, you may have to adjust the speed and time.
2 Without mixer stand 7, beaten with hand element 11.
Cleaning

DANGER!
RISK OF ELECTRICAL SHOCK!
Before cleaning the appliance, disconnect the power plug from the mains power socket! There is a risk of electric shock!

Never immerse the hand element 1 in water or other liquids!

WARNING! RISK OF INJURY!
Take care when cleaning the blender 13! The blade is extremely sharp!

Never submerge the blender 13
completely under water. Clean only the lower part with the blade under running water. Otherwise, the appliance could be irreparably damaged.
Clean the hand element 0 containing the motor using a damp cloth only; if necessary, add a little mild detergent.
Clean the mixer stand using a damp cloth only; if necessary, add a little mild detergent.
The whisks 14 and the kneading hooks 15 can be cleaned under running water or in warm water with detergent. Dry all parts thoroughly after cleaning.
We recommend cleaning the attachments directly after use. This removes food residue and reduces the risk of bacterial contamination.
NOTE

The whisks 14 and the kneading hooks 15 can also be cleaned in the dishwasher.
Clean the mixing bowl 8, the lid 10, the dough scraper 16 in warm water with a little washing-up liquid.
NOTE

You can also wash the mixing bowl 8, the lid 10 and the dough scraper 16 in the dishwasher.
If possible, place everything in the top basket of the dishwasher.
Clean the lower part of the blender in warm water with a little detergent or under running water. Wipe the upper part with a damp cloth. If necessary, add a little mild detergent onto the cloth. Afterwards, wipe off with a cloth moistened only with water to ensure that no detergent remains on the appliance.
ATTENTION! PROPERTY DAMAGE!
Clean only the lower section of the blender 3 under running water. Do not allow water to get inside the blender 3. This could result in damage to the appliance.
Storage
Store the cleaned appliance in a clean, dust-free and dry location.
Disposal
The adjacent symbol of a crossed-out dustbin means that this appliance is subject to Directive 2012/19/EU. This directive states that this appliance may not be disposed of in the normal household waste at the end of its useful life, but must be taken to specially set-up collection locations, recycling depots or disposal companies.
The disposal is free of charge for the user. Protect the environment and dispose of this appliance properly.

Your local community or municipal authorities can provide information on how to dispose of the worn-out product.

The product is recyclable, subject to extended producer responsibility and is collected separately.

The packaging is made from environmentally friendly material and can be disposed of at your local recycling plant.
Dispose of the packaging in an environmentally friendly manner. Note the labelling on the packaging and separate the packaging material components for disposal if necessary. The packaging material is labelled with abbreviations (a) and numbers (b) with the following meanings: 1-7: Plastics, 20-22: Paper and cardboard, 80-98: Composites.
This appliance has a 3-year warranty valid from the date of purchase. If this product has any faults, you, the buyer, have certain statutory rights. Your statutory rights are not restricted in any way by the warranty described below.
Warranty conditions
The warranty period starts on the date of purchase. Please keep your receipt in a safe place. This will be required as proof of purchase.
If any material or manufacturing fault occurs within three years of the date of purchase of the product, we will either repair or replace the product for you or refund the purchase price (at our discretion). This warranty service requires that you present the defective appliance and the proof of purchase (receipt) within the three-year warranty period, along with a brief written description of the fault and of when it occurred.
If the defect is covered by the warranty, your product will either be repaired or replaced by us. The repair or replacement of a product does not signify the beginning of a new warranty period.
Warranty period and statutory claims for defects
The warranty period is not prolonged by repairs effected under the warranty. This also applies to replaced and repaired components. Any damage and defects present at the time of purchase must be reported immediately after unpacking. Repairs carried out after expiry of the warranty period shall be subject to a fee.
Scope of the warranty
This appliance has been manufactured in accordance with strict quality guidelines and inspected meticulously prior to delivery.
The warranty covers material faults or production faults. The warranty does not extend to product parts subject to normal wear and tear or to fragile parts which could be considered as consumable parts such as switches, batteries or parts made of glass.
The warranty does not apply if the product has been damaged, improperly used or improperly maintained. The directions in the operating instructions for the product regarding proper use of the product are to be strictly followed. Uses and actions that are discouraged in the operating instructions or which are warned against must be avoided.
This product is intended solely for private use and not for commercial purposes. The warranty shall be deemed void in cases of misuse or improper handling, use of force and modifications / repairs which have not been carried out by one of our authorised Service centres.
Warranty claim procedure
To ensure quick processing of your case, please observe the following instructions:
Please have the till receipt and the item number (IAN) 389771_2201 available as proof of purchase.
You will find the item number on the type plate on the product, an engraving on the product, on the front page of the operating instructions (below left) or on the sticker on the rear or bottom of the product.
If functional or other defects occur, please contact the service department listed either by telephone or by e-mail.
You can return a defective product to us free of charge to the service address that will be provided to you. Ensure that you enclose the proof of purchase (till receipt) and information about what the defect is and when it occurred.

You can download these instructions along with many other manuals, product videos and installation software at www.lidl-service.com.
This QR code will take you directly to the Lidl service page (www.lidl-service.com) where you can open your operating instructions by entering the item number (IAN) 389771_2201.
Service
GB Service Great Britain
Tel.: 0800 404 7657
E-Mail: kompernass@lidl.co.uk
IE Servicelreland
Tel.: 1800 101010
E-Mail: kompernass@lidl.ie
IAN3897712201
Importer
Please note that the following address is not the service address. Please use the service address provided in the operating instructions.
KOMPERNASS HANDELS GMBH
BURGSTRASSE 21
44867 BOCHUM
GERMANY
www.kompernass.com
Recipes
Braided yeast bun
400 g flour
60 g butter
60g sugar
5g salt
42 g yeast (1 pack of fresh yeast)
170 ml milk
1 egg
1 egg yolk
Perhaps a little sugar
1) Place the yeast in a little lukewarm milk with sugar.
2) Once the yeast has raised a little, add all the ingredients to the mixing bowl 3.
3) Knead the ingredients thoroughly with the kneading hooks 15.
4) Allow the dough to stand for about 20 minutes.
5) Now form the braided bun and allow the dough to rise for another 30 minutes.
6) Paint the bun with a little egg yolk.
NOTE
If you like, you can sprinkle a little sugar on the braided bun.
7) Pre-heat the oven to around 200^ (convection) and bake the bread for approx. 25 minutes until it is golden brown.
1) Add the cream and the mascarpone to the mixing bowl 8 and mix it using the whisks 14.
2) Add the Amaretto, the honey and the nut-nougat cream a little at a time and mix everything thoroughly.
3) Fill the crème into dessert bowls and chill before eating.
Chocolate crème
300g cream
200 g plain chocolate
1) Heat up the cream.
2) Crumble the chocolate and melt it in the cream.
3) Put the chocolate mix into the refrigerator and allow it to cool until set.
4) Once the mix has cooled down and set, beat it with the whisks until creamy.
NOTE
You can also use this chocolate crème as a filling for other pastries.
Aioli
500gmayonnaise
1 cup of sour cream
50g garlic
2 tsp. mustard (medium)
1 pack of mixed herbs (frozen)
1 pinch sugar
1/2 tsp. salt
1/2 tsp. pepper
1) Peel the garlic and crush it in a garlic crusher.
2) Add the mayonnaise, the sour cream and the garlic to the mixing bowl 8 and mix it thoroughly using the whisks 14.
3) Gradually add the mustard, the herbs, the sugar, the pepper and the salt and mix everything thoroughly.
4) Finally, season to taste.
Herb vinaigrette
3-4 sprigs of flat-leaf parsley
3-4 sprigs of basil
1 lemon
1 tsp.mustard (medium)
1 clove of garlic
Salt, pepper
100 ml olive oil
1 pinch of sugar (optional)
1) Add the leaves of the herbs, the lemon juice, the mustard, the garlic, salt and pepper to a high-sided mixing container.
2) Mix everything using the blender 13 adding the oil slowly until the sauce is creamy.
3) Season the vinaigrette, adding a little sugar if desired.
Inhaltsverzeichnis
Einleitung 16
KOMPERNASS HANDELS GMBH
BURGSTRASSE 21
44867 BOCHUM
DEUTSCHLAND
www.kompernass.com
Rezepte
Hefezopf
Chere cliente, cher client,
Chere cliente, cher client,
KOMPERNASS HANDELS GMBH
BURGSTRASSE 21
44867 BOCHUM
ALLEMAGNE
www.kompernass.com
Recettes
Brioche tressée
WAARSCHUWING! LETSELGEVAAR!
WAARSCHUWING! LETSELGEVAAR!
WAARSCHUWING! LETSELGEVAAR!
WAARSCHUWING! LETSELGEVAAR!
WAARSCHUWING! LETSELGEVAAR!
KOMPERNASS HANDELS GMBH
BURGSTRASSE 21
44867 BOCHUM
NEMECKO
www.kompernass.com
Recepty
Kynuty pletenec
400 g mouky
60gmasla
60gcukru
5g soli
42g drozdi (1 balicek cerstveho drozdi)
170 ml mleka
1vejce
1zloutek
pripadne trochu granulovaného cukru
KOMPERNASS HANDELS GMBH
BURGSTRASSE 21
44867 BOCHUM
NIEMCY
www.kompernass.com
Przepisy
Chałka
KOMPERNASS HANDELS GMBH
BURGSTRASSE 21
44867 BOCHUM
NEMECKO
www.kompernass.com
Recepty
Vianočka
400 g muky
60gmasla
60g cukru
5g soli
42g drozdie (1 balicek cerstveho drozdia)
170 ml mlieka
1 vajce
1 zitok
pripadne trochu krystaloveho cukru
1) Vložte droždie do trochu vlažného mlieka s cukrom.
2) Vsetky ostatné prisady pridajte do misy na šl'ahanie 3, len co kvások trocha nakysne.
3) Prásady dobre premiesajte pomocou miesacieho háka 15.
4) Cesto nechajte cca 20 minut odpočívat.
5) Potom vytvarujte vianocku a nechajte pecivo kysnuf d'alsich 30 minut.
6) Vianocku potrite trochou zltka.
UPOZORNENIE
Ak chcete, mozete vianocku posypat trochou krystaloveho cukru.
7) Pec predhreje na cca 200 °C a vianocku peche cca 25 minut.
KOMPERNASS HANDELS GMBH
BURGSTRASSE 21
44867 BOCHUM
ALEMANIA
www.kompernass.com
Recetas
KOMPERNASS HANDELS GMBH
BURGSTRASSE 21
44867 BOCHUM
TYSKLAND
www.kompernass.com
Opskrifter
Fletbrød
400 g mel
60g smor
60 g sukker
5g salt
42 g gaer (1 pakke frisk gaer)
170 ml maelk
1 aeg
1 aeggeblomme
Eventuelt lidt perlesukker
KOMPERNASS HANDELS GMBH
BURGSTRASSE 21
44867 BOCHUM
GERMANIA
www.kompernass.com
Ricette
Treccia lievitata
KOMPERNASS HANDELS GMBH
BURGSTRASSE 21
44867 BOCHUM
NÉMETORSZÁG
www.kompernass.com
Receptek
Fonott kalács
KOMPERNASS HANDELS GMBH
BURGSTRASSE 21
44867 BOCHUM
NEMCIJA
www.kompernass.com
Pooblasceni serviser
SI ServisSlovenija
Tel.: 080 080 917
E-Mail: kompernass@lidl.si
IAN389771_2201
Garancijski list
KOMPERNASS HANDELS GMBH
BURGSTRASSE 21
44867 BOCHUM
GERMANY
www.kompernass.com
