
SHMS 300 B1 - Hand blender SILVERCREST - Free user manual and instructions
Find the device manual for free SHMS 300 B1 SILVERCREST in PDF.
| Product type | Electric hand mixer |
| Brand | SilverCrest |
| Model | SHMS 300 B1 |
| Power | 300 W |
| Power supply | 220-240 V ~ 50/60 Hz |
| Protection class | II |
| Speeds | 5 levels + turbo |
| Included accessories | 2 whisks, 2 dough hooks |
| Maximum operating time | 10 minutes |
| Maximum capacity (heavy dough) | 500 g flour |
| Eject button | Yes |
| Power cord | Detachable, retractable |
| Cleaning | Whisks and dough hooks dishwasher safe (70°C). Wipe motor unit with a damp cloth. |
| Safety | Immediate stop if blocked, do not immerse motor unit |
| Warranty | 3 years (France/Belgium) |
| Weight (approx.) | Approx. 1.2 kg |
| Dimensions (approx.) | 20 x 10 x 15 cm (without accessories) |
Frequently Asked Questions - SHMS 300 B1 SILVERCREST
User questions about SHMS 300 B1 SILVERCREST
0 question about this device. Answer the ones you know or ask your own.
Ask a new question about this device
Download the instructions for your Hand blender in PDF format for free! Find your manual SHMS 300 B1 - SILVERCREST and take your electronic device back in hand. On this page are published all the documents necessary for the use of your device. SHMS 300 B1 by SILVERCREST.
USER MANUAL SHMS 300 B1 SILVERCREST
natural_image
White hand mixer with coiled cord and stand mixer (no text or symbols visible)HANDMIXER SHM 300 D2 HAND MIXER SHM 300 D2 BATTEUR SHM 300 D2
GB Operating instructions
HAND MIXER
For EU market: Imported for GB market by:
HOYER Handel GmbH Lidl Great Britain Ltd
Tasköprüstraße 3 Lidl House · 14 Kingston Road
22761 Hamburg Surbiton - KTS 9NU
GERMANY
Stand der Informationen · Status of information · Version des informations · Stand van de informatie Stan informacji · Stay informaci · Stay informáci · Estado de las informaciones · Informationernes stand:
09/2021 ID: SHM 300 D2_21_V1.4
IAN 374144_2104 IAN 374144_2104
DE BE NL PL
CZ SK ES
Deutsch....2
English.... 16
Français 30
Nederlands...... 48
Polski 62
Česky 76
Slovenčina 88
Español.... 100
Dansk 114
Übersicht / Overview / Aperçu de l'appareil / Overzicht / Przegląd / Přehled / Prehlad / Vista general / Oversigt
natural_image
Line drawing of a manual mixer device with handle and control panel (no text or symbols)
Inhalt
- Overview 16
- Intended purpose 17
- Safety instructions 17
- Items supplied 20
- How to use 20
- Operation 20
6.1 Overview of functions.... 21
6.2 Inserting beaters / dough hooks 21
6.3 Remove beater / dough hook.... 21
6.4 Mixing/kneading.... 22
- Cleaning 22
- Storage 22
- Troubleshooting 23
- Recipes 23
- Disposal 25
- Technical specifications 25
- Warranty of the HOYER Handel GmbH 26
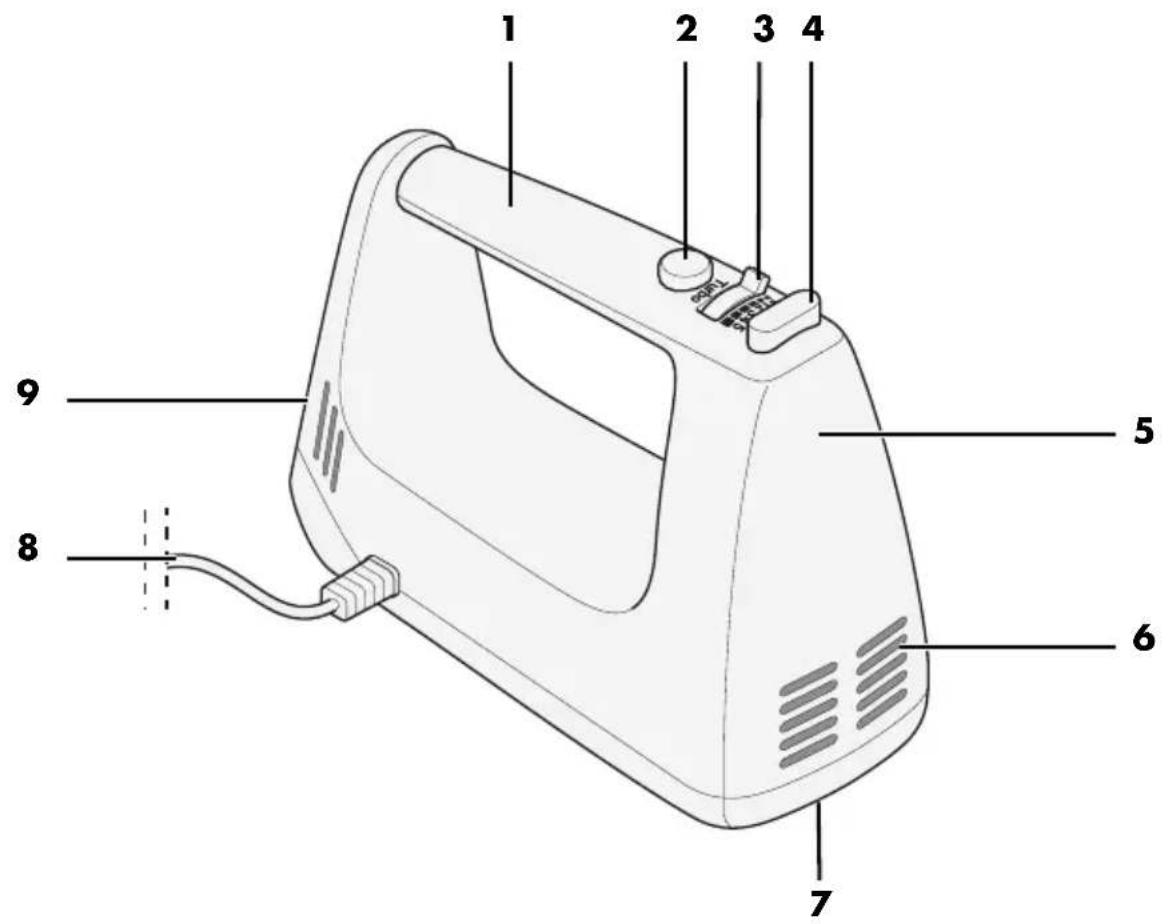
1. Overview
1 Handle
2 Pulse button
3 On/off switch and speed controller (5 levels)
4 Eject button
5 Hand mixer
6 Vents
7 Opening for accommodating the beaters and dough hooks:
larger hole / smaller hole
8 Power cable with mains plug
9 Base side with vents
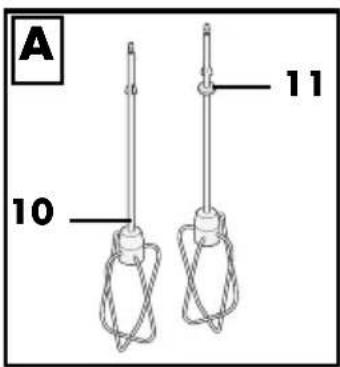
10 Beaters
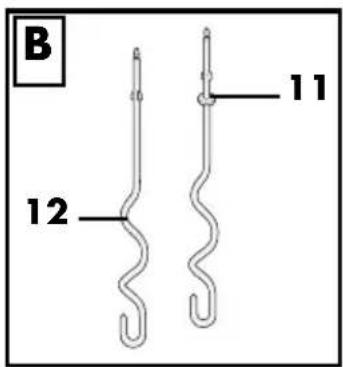
11 Marking ring (marks the beater or dough hook to be inserted in the larger hole of the hand mixer)
12 Dough hooks
Thank you for your trust!
Congratulations on your new hand mixer.
For a safe handling of the device and in order to get to know the entire scope of features:
- Thoroughly read these user instructions prior to initial use.
- Above all, observe the safety instructions!
- The device should only be used as described in these user instructions.
- Keep these user instructions for reference.
- If you pass the device on to someone else, please include this copy of the user instructions. The user instructions are a part of the product.
We hope you enjoy your new hand mixer!
2. Intended purpose
The hand mixer is exclusively intended for stirring and kneading dough, mixing of liquids and whipping cream.
The device is designed for private, domestic use. The device must only be used indoors. This device must not be used for commercial purposes.
3. Safety instructions
Warnings
If necessary, the following warnings will be used in these user instructions:

DANGER! High risk: failure to observe this warning may result in injury to life and limb.
WARNING! Moderate risk: failure to observe this warning may result in injury or serious material damage.
CAUTION: low risk: failure to observe this warning may result in minor injury or material damage.
NOTE: circumstances and specifics that must be observed when handling the device.
Symbol on your device

The food-safe material of devices with this symbol will not change the taste or smell of food.
Instructions for safe operation
- This device must not be used by children.
- Children must not play with the device.
- The device and the power cable must be kept away from children.
- This device can be used by people with restricted physical, sensory or intellectual abilities or people without adequate experience and/or understanding if they are supervised or instructed on how to use this device safely and if they are aware of the resulting hazards.
- If the mains power cable of this device should become damaged, it must be replaced by the manufacturer, the manufacturer's customer service department or a similarly qualified specialist, in order to avoid any hazards.
- Disconnect the mains plug from the wall socket...
... when it is not supervised, ... before you assemble or disassemble the device, and ... before you clean the individual parts. - This device is not intended to be operated using an external timer clock or a separate remote control system.
- Misuse of the device may result in injuries.
- Please take note of the chapter on cleaning (see "Cleaning" on page 22).
- The device is designed for a maximum operating time of 10 minutes without interruption. After this, the device must remain switched off until it has cooled down to room temperature.
- The device is designed for standard household quantities. It can process heavy doughs up to max. 500 g flour in one process step (10 minutes).
- Beaters and dough hooks can generally be used at all speeds. Note the information in the following chapters.
- Switch the device off and pull out the mains plug from the wall socket before you exchange auxiliary or additional equipment moving in operation.

DANGER for children!
- Children must not play with packing material. Do not allow children to play with plastic bags. There is a risk of suffocation.
- Please ensure that children are not able to pull the device down from the work surface with the power cable.
- Keep the device out of the reach of children.

DANGER to and from pets and livestock!
Electrical devices can represent a hazard to pets and livestock. In addition, animals can also cause damage to the device. For this reason you should keep animals away from electrical devices at all times.

DANGER! Risk of electric shock due to moisture!
- The device must never be operated in the vicinity of a bathtub, a shower, a filled hand basin or similar.
- The motor block, the power cable and the mains plug must not be immersed in water or any other liquids.
- Protect the motor block against moisture, water drips and splashes.
- If liquid gets into the device, remove the mains plug immediately. Have the device checked before reusing.
- Never touch the device with wet hands.
- If the device falls into water, disconnect the mains plug immediately. Only then is it safe to retrieve the device.

DANGER! Risk of electric shock!
- Only plug the mains plug into the wall socket after the device has been completely assembled.
- Only connect the mains plug to a properly installed and easily accessible wall socket whose voltage corresponds to
the specifications on the rating plate. The wall socket must continue to be easily accessible after the device is plugged in.
- Ensure that the power cable cannot be damaged by sharp edges or hot points. Do not wrap the power cable around the device.
- Even after it has been switched off, the device has not been completely disconnected from the mains. In order to fully disconnect it, pull out the mains plug.
- When using the device, ensure that the power cable cannot be trapped or crushed.
- When removing the mains plug from the wall socket, always pull the plug and never the cable.
- Disconnect the mains plug from the wall socket...
... if there is a fault, ... when you do not use the hand mixer, ... during thunderstorms.
- Do not use the device if there is visible damage to the device or the power cable.
- To avoid any risk, do not make modifications to the device.

DANGER from rotating parts!
- Do not touch rotating parts with spoons or similar utensils. Keep long hair or loose clothing away from rotating parts as well.
- Always ensure that the on/off switch is on 0 before you plug the mains plug into the wall socket.
- Switch the device off and pull out the mains plug from the wall socket before you exchange auxiliary or additional equipment moving in operation.
WARNING! Risk of material damage!
- In order to prevent damage to the device, interrupt the operation immediate-
ly if the dough hooks or the beaters are either turning with difficulty or not turning at all. Pull out the mains plug and check whether there is something in the bowl blocking movement or whether the food is too tough. Also check whether the device is assembled correctly.
- Ensure that the vents on the device are always free. Danger of overheating!
- Switch off the device before you pull out the mains plug.
- Only switch the device on when the utensils are correctly inserted and securely engaged.
Do not try to insert a beater/dough hook on its own or together with other utensils. - Never place the device on hot surfaces (e.g. hot plates) or near to heat sources or open fire.
- Do not use the device for boiling liquids or during the cooking process.
- Only hold the device on the handle and under no circumstances ever on the utensils.
- Only use the original accessories.
- All parts except for the motor block are dishwasher-safe up to 70 °C.
- Do not use any astringent or abrasive cleaning agents.
4. Items supplied
1 hand mixer 5
1 pair of beaters 10
1 pair of dough hooks 12
1 copy of the user instructions
5. How to use
- Remove all packing material.
- Check to ensure that all parts are present and undamaged.
- Clean the device prior to its first use! (see "Cleaning" on page 22)
6. Operation

DANGER from rotating parts!
- Only connect the mains plug 8 to a wall socket when the device has been completely put together.
- After switching off, wait until the dough hooks 12 and the beaters 10 are no longer turning before you take them out of the food.
- Do not touch rotating parts with spoons or similar utensils. Keep long hair or loose clothing away from rotating parts as well.
WARNING!
- Only switch the device on when the dough hooks 12 and the beaters 10 are correctly inserted and securely engaged.
- Always ensure that the on/off switch 3 is on 0 before you plug 8 the mains plug into the wall socket.
- In order to prevent damage to the device, interrupt the operation immediately if the dough hooks 12 or the beaters 10 are either turning with difficulty or not turning at all. Pull out the mains plug 8 and check whether there is something in the bowl blocking movement or whether the food is too tough. Also check whether the device is assembled correctly.
- The device is designed for a maximum operating time of 10 minutes without interruption. After this, the device must remain switched off until it has cooled down to room temperature.
6.1 Overview of functions
| Working tool Speed | Examples of use Notes | ||
Figure A:Beaters 10 | 1 - 2 | - At the beginning of the mixing process- Mixing of flour, sugar or other dry ingredients | max. quantity batter:500 gmax. operating time:10 minutesmin. quantity:For small quantities, choose a narrower blender jug so that the mixing tools are immersed in the food by at least 1 cm.Press the pulse button 2 to change from every speed to the highest speed for a short period of time. |
| 2 - 3 | - Stirring butter and sugar- Stirring dough | ||
| 4 - 5Turbo | - Whipping egg white/cream | ||
Figure B:Dough hooks 12- | 1 - 2 | - At the beginning of the kneading process- Mixing of flour, sugar or other dry ingredients- Kneading yeast dough | max. quantity yeast dough:500 gmax. operating time:10 minutesmin. quantity:For small quantities, choose a narrower blender jug so that the mixing tools are immersed in the food by at least 1 cm. |
| 2 - 3 | - Kneading short pastry | ||
| 3 - 4 | - Kneading minced meat mixture | ||
6.2 Inserting beaters / dough hooks
- Figure D: insert the beater 10 or the dough hook 12 with the marking ring 11 into the larger hole 7 of the hand mixer 5.
- Insert the other beater 10 or dough hook 12 into the smaller opening ✦ 7. Both beaters/dough hooks must firmly engage in position.
6.3 Remove beater / dough hook
- Turn the on/off switch 3 to 0.
- Pull out the mains plug 8.
- Press the eject button 4 down fully. The beaters 10 / dough hooks 12 are ejected.
6.4 Mixing/kneading
- Ensure that the on/off switch 3 is on 0.
- Connect the mains plug 8 with a wall socket.
- Immerse the beaters 10 / dough hooks 12 into the food.
- Switch the device on with the on/off switch 3 on level 1 first and then set desired speed according to the consistency of the food to be mixed.
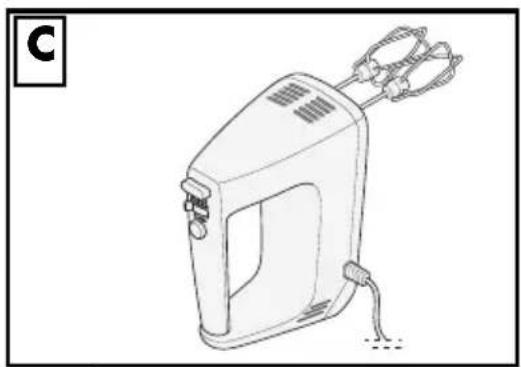
- Figure C: for short beaks, put the hand mixer 5 switched off on the base side 9.
- To switch off the device, turn the on/off switch 3 to 0.
- Pull out the mains plug 8.
- Hold the device over a bowl or a wash-basin.
- Press the eject button 4 down fully. The beaters 10 / dough hooks 12 are ejected.
- Clean the device immediately if possible.
7. Cleaning
Clean the device prior to its first use!

DANGER! Risk of electric shock!
- The hand mixer 5, the power cable and the mains plug 8 must not be immersed in water or any other liquids.
- Disconnect the mains plug 8 from the wall socket before each cleaning.
WARNING! Risk of material damage!
- Do not use any astringent or abrasive cleaning agents.
-
All parts except for the hand mixer 5 are dishwasher-safe up to 70 °C.
-
Disconnect the mains plug 8 from the wall socket.
- If necessary, wipe down the hand mixer 5 and the power cable 8 with a
damp cloth several times (if necessary, with a little detergent). Ensure no water or moisture gets into the device and that the motor unit is completely dry before the next use.
- The beaters 10 and the dough hooks 12 can be washed by hand or in the dishwasher.
- Let all parts dry completely before you put them away or use the device again.
Cleaning advice
- Clean the device and all parts as soon as possible after use in order to prevent food remnants from drying on.
8. Storage

DANGER for children!
- Keep the device out of the reach of children.

DANGER!
- In order to avoid accidents, the mains plug 8 must never be connected to a wall socket while in storage.
- Remove the beaters 10 or dough hooks 12 from the hand mixer 5 for storage.
- Wind the power cable 8 loosely around the hand mixer 5.
- Select a location where neither high temperatures nor moisture can affect the device.
9. Troubleshooting
If your device fails to function as required, please try this checklist first. Perhaps there is only a minor problem, and you can solve it yourself.

DANGER! Risk of electric shock!
- Do not attempt to repair the device yourself under any circumstances.
| Fault | Possible causes / Action |
| No function | Has the device been connected to the power supply?Is the device assembled correctly? |
| Beaters 10 / dough hooks 12 not turning or turning with difficulty | Turn off immediately and check:Blockage in the bowl?Food too hard, pieces to large?Dough too tough? |
| Beaters 10 / dough hooks 12 cannot be inserted. | Right and left beater 10 / dough hook 12 mixed up? The tool with the marking ring 11 must be inserted into the larger hole 7. |
| Beaters 10 / dough hooks 12 cannot be ejected. | Is the on/off switch 3 on 0? |
10. Recipes
Chocolate cream
For 4 people
Ingredients
350 g whipped cream
200 g dark chocolate (> 60 % cocoa content)
- Bring cream to boil, crumble the chocolate and melt it slowly at low heat. Scrape out the pulp from half a vanilla pod and stir into the mixture.
- Allow to cool and go solid in the fridge.
- Just before serving, stir up creamily with the beaters 10. Tip: Fresh fruit tastes great with it.
Mayonnaise
Ingredients
250 ml neutral vegetable oil, e. g. rapeseed oil
1 egg yolk
15 g mild vinegar or lemon juice
Salt and pepper to taste
Preparation
- Put the egg yolk and vinegar/lemon juice in a measuring cup, hold the beaters 10 vertically in the beaker, switch on the device and press the pulse button 2.
- Add the oil slowly in a thin, uniform stream (within about 90 seconds) to mix the oil with the other ingredients.
- Finally season to taste with salt and pepper.
Crêpes
Ingredients for approx. 6 crêpes:
125 g flour
50 g sugar
12 sachet of vanilla sugar
1 pinch salt
1 egg
200 ml skimmed milk
50 ml water
Preparation:
- Mix flour, sugar, vanilla sugar and salt in a mixing bowl and make a small depression in the middle.
- Pour the egg into the depression.
- From the centre, whisk with the beaters 10 on speed 1 - 2, gradually adding milk and water.
- When a smooth batter has formed, beat at a higher speed (3 - 4).
- Let the batter rest for about 1 hour.
- Then stir the batter again vigorously and check the consistency: the batter should have the consistency of coffee cream.
- Heat a large, heavy, coated frying pan with as shallow a rim as possible and grease with a little fat.
- Bake thin crêpes on both sides for about 30 seconds.
Suggestions for sweet fillings
- S u g a r
- Cinnamon and sugar
- Apple sauce
- Nut nougat creme
- Halved banana and chocolate sauce
- Jam, jelly, plum jam, compote
- Pieces of fresh fruit
- | c e c r e a m
Pizza dough
Ingredients:
250 g wheat flour
^3/_4 tsp salt
12 fresh yeast cube
120 ml warm water
12 tsp brown sugar
some flour for kneading and rolling
Preparation:
- Mix the flour and salt in a mixing bowl and make a depression in the centre.
- Mash the yeast and sugar in the water with a fork and stir until everything is dissolved. Pour this mixture into the depression.
- Use the dough hooks 12 on speed 1 - 2 until large lumps of dough have formed.
- Continue kneading by hand until the dough becomes smooth.
- Form a ball of dough and leave to rise under a cover in a warm place until it has doubled in size.
- Knead once more, roll out and cover as desired.
Pear tarte tatin
Ingredients for the dough:
200 g wheat flour
1 pinch salt
100 g cold butter (in flakes)
3 tsp fine sugar
4 tbs cold water
For blind baking:
dried peas or rice
Ingredients for the almond paste:
100 g soft butter
100 g sugar
2 eggs (room temperature)
100 g crushed almonds
For garnish:
approx. 3 ripe pears
Preparation:
- Put all the ingredients for the dough in a mixing bowl and mix with the dough hooks 12 on speed 2 - 3 until large lumps have formed.
- Quickly knead the dough by hand into a ball and roll it out with a little flour between two sheets of baking paper.
- Line a greased tart mould with the dough, cut off the protruding edge and place in the refrigerator for at least 30 minutes.
- Prick the base of the dough several times with a fork, place a piece of baking paper on the dough and fill the mould with dried peas or rice to weigh down the dough.
- Bake at 180 °C (convection oven) for 15 minutes, then remove baking paper and peas/rice and bake again for another 10 to 15 minutes.
- For the almond paste, beat the butter, sugar and eggs with the beaters 10. Increase the speed to level 5.
- Briefly stir in the almonds at speed 3.
- Pour the almond mixture onto the cooled tart base.
- Peel the pears, remove the core, cut them into slices and place them on the almond paste.
- Bake at 170^ C (convection oven) for approx. 35 minutes.
11. Disposal
This product is subject to the provisions of European Directive 2012/19/EC. The symbol showing a wheelie bin crossed through indicates that the product requires separate refuse collection in the European Union. This applies to the product and all accessories marked with this symbol. Products identified with this symbol may not be discarded with normal household waste, but
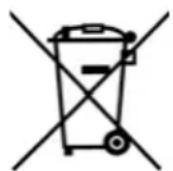
must be taken to a collection point for recycling electric and electronic appliances.
This recycling symbol marks e.g. an object or parts of the material as valuable for recycling. Recycling helps to reduce the consumption of raw materials and protect the envi

Packaging
When disposing of the packaging, make sure you comply with the environmental regulations applicable in your country.
- Technical specifications
| Model: SHM 300 D2 | |
| Mains voltage: 2 | 20 – 240 V ~ 50/60 Hz |
| Protection class: II | |
| Power rating: 300 W | |
| Max. continuous operation (KB): | 10 minutes |
| Max. load: | Heavy doughs up to 500 g flour |
NOTE: no action by the user is required to switch the product between 50 and 60 Hz. The product adjusts itself for both 50 and 60 Hz.
Symbols used
 | Double insulation |
 | Geprüfte Sicherheit (certified safety): devices must comply with the generally acknowledged rules of technology and the German Product Safety Act (Produkt-sicherheitsgesetz - ProdSG). (Not for UK) |
 | With the CE marking, HOYER Handel GmbH declares the conformity with EU guidelines. |
 | This symbol reminds you to dispose of the packaging in an environmentally friendly manner. |
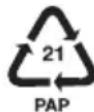 | Recyclable materials are marked with the recycling symbol (3 arrows). The material can be specified by the recycling number in the centre (here: 21) and/or an abbreviation (here: PAP). |
| ~ | AC voltage |
 | The symbol identifies parts that can be cleaned in the dishwasher. |
 | It is a recyclable product which is subject to an extended producer responsibility and for which the rules of waste separation apply. |
Subject to technical modifications.
13. Warranty of the HOYER Handel GmbH
Dear Customer, your device is provided with a 3 year warranty starting with the purchase date. In the event of product defects, you are entitled to statutory rights against the vendor. These statutory rights are not restricted by our warranty presented in the following.
Warranty conditions
The warranty period starts with the purchase date. Please keep the original purchase receipt in a safe place. This document is required to verify the purchase.
If within three years from the purchase date of this product a material or factory defect occurs, the product will be repaired or replaced by us – at our discretion – free of charge to you, or the purchase price will be refunded. This warranty implies that within the period of three years the defective device and the purchase receipt are presented, including a brief written description of the defect and the time it occurred.
If the defect is covered by our warranty, the repaired or a new product will be returned to you. No new warranty period starts with a repair or replacement of the product.
Warranty period and statutory claims for defects
The warranty period is not extended when the warranty has been claimed. This also applies to replaced and repaired parts. Any damages and defects already existing at the time of purchase must be reported immediately upon unpacking. Repairs arising after the expiration of the warranty period are subject to a charge.
Warranty coverage
The device was produced carefully according to strict quality guidelines and tested diligently prior to delivery.
The warranty applies to material or factory defects.
Excluded from the warranty are wear parts subject to normal wear and damages to fragile parts, e.g. switches, batteries, lamps or other parts manufactured from glass.
This warranty expires if the product is damaged, not used as intended or not serviced. For the proper operation of the product, all instructions listed in the operating instructions must be observed carefully. Any form of use and handling that is advised against in the operating instructions or warned against must always be avoided.
The product is only intended for private and not for commercial use. In the case of incorrect and improper treatment, use of force and interventions not performed by our authorised Service Centre, the warranty shall cease.
Handling in case of a warranty claim
In order to ensure prompt processing of your matter, please observe the following notes:
- Please keep the article number
IAN: 374144_2104 and the purchase receipt as a purchase verification for all inquiries. - The article number can be found on the rating plate, an engraving, the title page of your instructions (in the bottom left), or as a label on the rear or underside of the device.
- If faulty operation or other defects occur, first contact the Service Centre listed in the following by telephone or email.
- Then, you are able to send a product reported as defective free of charge to the service address specified to you, including the purchase receipt and the information on the defect and when it occurred.
At www.lidl-service.com you can download this and many other manuals, product videos and installation software.

This QR code takes you directly to the Lidl Service website (www.lidl-service.com), where you can enter the article number (IAN)
374144_2104 to open your user instructions.

Service Centre
GB Service Great Britain
Tel.: 0800 404 7657
E-Mail: hoyer@lidl.co.uk
IE Service Ireland
Tel.: 1890 930 034
(0,08 EUR/Min., (peak))
(0,06 EUR/Min., (off peak))
E-Mail: hoyer@lidl.ie
MT Service Malta
Tel.: 80062230
E-Mail: hoyer@lidl.com.mt
CY Service Cyprus
Tel.: 8009 4409
E-Mail: hoyer@lidl.com.cy
IAN: 374144_2104

Supplier
Please note that the following address is no service address. First contact the aforementioned Service Centre.
