
EY7271 - Screwdriver PANASONIC - Free user manual and instructions
Find the device manual for free EY7271 PANASONIC in PDF.
| Brand | Panasonic |
| Model | EY7271 |
| Product type | Impact driver |
| Power supply | Rechargeable Ni-MH 12 V battery (model EY9201) |
| No-load speed | Soft: 0 - 1000 rpm Medium: 0 - 1400 rpm Hard: 0 - 2300 rpm |
| Impacts per minute | Soft: 0 - 2000 ipm Medium: 0 - 2500 ipm Hard: 0 - 2800 ipm |
| Maximum torque | 165 Nm (1680 kgf·cm, 1460 in·lbs) |
| Screwing capacity | Wood screws: Ø 3,5 - 9,5 mm Self-tapping screws: Ø 3,5 - 6 mm |
| Bolting capacity | Standard bolts: M6 - M16 High strength bolts: M6 - M12 |
| Overall length | 177 mm |
| Weight (with battery) | 1.8 kg (4.1 lbs) |
| Drive type | Square drive (for sockets) + optional quick-change hex chuck |
| Impact modes | 3 modes: Soft, Medium, Hard |
| Brake | Motor brake: immediate stop when releasing the trigger |
| Lighting | Integrated LED with on/off switch, automatic shutoff after 5 min |
| Belt hook | Removable and reversible (left or right attachment) |
| Charger | Model EY0110, mains voltage, fast charging with indicator light |
| Charging time (3.5 Ah battery) | Approximately 65 minutes |
| Charging temperature | 0 °C to 40 °C |
| Maintenance and cleaning | Clean with a dry, clean cloth. Do not use water, solvents, or volatile products. |
| Safety | Switch lock (center position), overload protection, double insulation |
| Included accessories | Ni-MH battery EY9201, charger EY0110, socket, belt hook |
Frequently Asked Questions - EY7271 PANASONIC
User questions about EY7271 PANASONIC
0 question about this device. Answer the ones you know or ask your own.
Ask a new question about this device
Download the instructions for your Screwdriver in PDF format for free! Find your manual EY7271 - PANASONIC and take your electronic device back in hand. On this page are published all the documents necessary for the use of your device. EY7271 by PANASONIC.
USER MANUAL EY7271 PANASONIC
YkpaHcbKa CtopiHa 108
EY7271
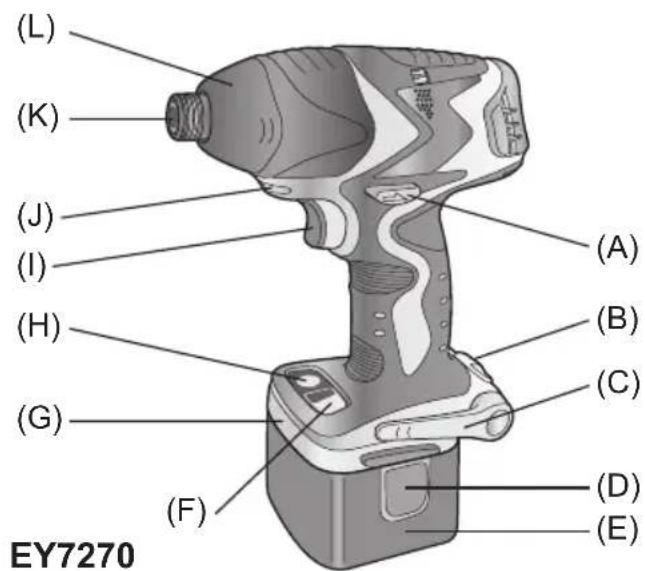
| (A) | Forward/Reverse lever Vorwärts/Rückwärtshebel Levier d'inversion marche avant/marche arrière Leva di avanzamento/inversione Links/rechtschakelaar Palanca de avance/marcha atrás Greb til forlaëns/baglæns retining Riktningsomkopplare Forover-/bakoverbryter Eteenpään/taaksepään vipu Pbýchar nepekniúchyene Bvpeed/Hazad Baxiǐb nepemikahan Hvpeed/Hazad | (B) | Belt hook lock lever Riemenhaken-Verriegelungshebel Levier de verrouillage du crochet de ceinture Leva di blocco gancio da cintura Borghendel voor riemclip Palanca de bloqueo del gancho de cinturón Låsehändtag til bæltekrog Låsknapp für bälteskrok Lásespak for beltekrok Vyölenkin luktusvipu Pbýchar φиκcaúnn noясноу крюka Baxiǐb φíckaúü noясноу крюka |
| (C) | Belt hook Riemenhaken Crocket de ceinture Gancio da cintura Riemclip Gancho del cinturón Bæltekrog Bälteskrok Beltekrok Vyölenkki Поснок Крюк Посний Крюк | (D) | Battery pack release button Akku-Entriegelungsknopf Bouton de libération de batterie autonome Tasto di rilascio pacco batteria Accu-ontgrendaltoets Botón de liberación de bateria Udløserknapp til batteripakning Frigöringsknapp für batteri Utløserknapp for batteripakke Akkupaketin irrotuspainike Конда овобождения вbatарыногу等相关 Конда вовьенни вbatарыногу等相关 |
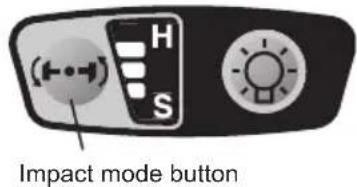
| (E) | Battery pack (EY9201) Akku (EY9201) Batterie autonome (EY9201) Pacco batteria (EY9201) Accu (EY9201) Batería (EY9201) Batteripakning (EY9201) Batteri (EY9201) Batteripakke (EY9201) Akku (EY9201) Батарейный等相关 (EY9201) Батарейный等相关 (EY9201) | (F) | Impact mode button Schlagmodustaste Bouton du mode d'impact Tasto modalità impatto Slagfunctietioets Botón de modo de impacto Knap til funktion med slag Slaglagesväljare Knapp for slagstyrke Iskumuodon painike Конда ржима уда Конда ржиму уда |
| (G) | Bit holder (inside of the body) Einsatzhalter (im Maschinenkörper) Porte-mèche (intérieur du corps) Portabit (all'interno della struttura) Bithouder (geintegreerd in de behuizing) Soporte de broca (en el interior del cierto) Bitholder (indvendig i værktøjet) Bitshàllare (inuti höjlet) Bitholder (inne i maskinhuset) Terän pidin (rungon sisällä) Опсек对孩子хашиема насадок (Вунтури корпua) Вidсік дэзберігань насадок (Всяревиki корпua) | (H) | LED light ON/OFF button LED-Leuchten-EIN/AUS-Taste Bouton Marche/Arrêt de la lumière DEL Tasto di accensione e spegnimento della luce LED Aan/uit-toets (ON/OFF) voor LED-lampje Botón ON/OFF de luz LED TÆND/SLUK-knap til LED-lys Strömbrytrare für LED-ljs PÁ/AV-knapp for LED-lys LED-valon kytkin/katkaisupainike Конда в�оченья/в�ковенья С蓝天леслой поcodet Конда вовькенья/в�ковенья С蓝天леслой поcodet Конда вовькенья/в�ковенья С蓝天леслой поcodet |
| (I) | Trigger switch (Variable speed control trigger) Elektronikschalter (Drehzahlregler) Commutateur de la gâchette (Gâchette de commande de vitesse) Interruttore a scatto (Grilletto di controlled velocity variable) Startschakelaar (startschakelaar met variabile toerentalregeling) Interruptor disparador (disparador de control de velocidad variable) Trykker (trykker til variabel hastighedskontrol) Avtryckare (med variabel varvitalsregering) Kontrollløser (Kontrollløser for variabel hastighet) Laukaisukytkin (nopeudensäätökytkin) Пусковий посяклоател (Пусковский посяпен碍уклоател) Пусковий посямкay (Пускемкay посяловань за мінhoeцости) | (J) | LED light LED-Leuche Lumière DEL Luce LED LED-lampje Luz indicatora LED-lys LED-lus LED lys LED-valo С被告оюдая посветка С被告оюдая посвотка С被告оюдая посвотка |
| (K) | 6.35 mm (1/4") hex quick connect chuck (EY7270), Square drive (Ball detent) (EY7271) 6.35 mm (1/4") Sechskant-Schnellaufspannffutter (EY7270), Futter (EY7271) Mandrin de connexion rapide hexagonal de 6,35 mm (1/4") (EY7270), Mandrin (EY7271) Mandrino esagonale di collegamento rapido da 6,35 mm (1/4") (EY7270), Mandrino (EY7271) 6.35 mm zeskantboorkop met selnkoppeling (EY7270), Boorkop (EY7271) Mandril hexagonal de conexión=rápida de 6,35 mm (1/4") (EY7270), Portabroca (EY7271) 6.35 mm (1/4") hexagonal borepatron til hurtig tilslutning (EY7270), Borepatron (EY7271) Snabbchuck med 6,35 mm sexkantshylsa (EY7270), Fyrkantig drivbult (med kulspärr) (EY7271) 6.35 mm (1/4") hex hurtigtilkoplingschuck (EY7270), Chuck (EY7271) 6.35 mm (1/4") kuusiopikaistukka (EY7270), Kiinnityslaite (EY7271) 6.35 mm (1/4") steichtgranhhýй патон 6bíttrpoу поcodoenhý (EY7270), 3aximно патон (EY7271) 6.35 mm (1/4") steichtgranhhýй патон 6bítdkoro поседанну (EY7270), 3atickно патон (EY7271) | ||
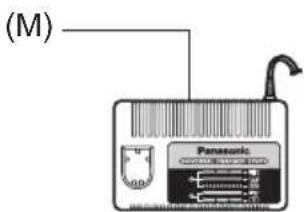
| (L) | Nose protector Frontabdeckung Protection du bec Protezione frontale Neusbeschermer Protector delorro Næsebeskyter Nosskydd Nesebeskyter Kärjen suojus PecnPapatop PecnPapatop | (M) | Battery charger (EY0110) Ladegerät (EY0110) Chargeur de batterie (EY0110) Caricabatteria (EY0110) Acculader (EY0110) Cargador de baterias (EY0110) Batteriplader (EY0110) Batteriladdare (EY0110) Batterilader (EY0110) Akkulaturi (EY0110) Зарадное устристwo (EY0110) Зарадно писстri (EY0110) |
Read "the Safety Instructions" booklet and the following before using.
I. ADDITIONAL SAFETY RULES
1) Wear ear protectors when using the tool for extended periods.
2) Be aware that this tool is always in an operating condition, since it does not have to be plugged into an electrical outlet.
3) When screwing or driving into walls, floors, etc., "live" electrical wires may be encountered. DO NOT TOUCH THE HEX QUICK CHUCK OR ANY FRONT METAL PARTS OF THE TOOL! Hold the tool only by the plastic handle to prevent electric shock in case you screw or drive into a "live" wire.
4) If the screw driver does not rotate anymore, immediately turn the trigger switch off for a longer period to prevent an overload, which can damage the battery pack or motor. Use reverse motion to loosen jammed bits.
5) Do NOT operate the Forward/Reverse lever when the trigger switch is on. The battery will discharge rapidly and damage to the unit may occur.
6)During charging, the charger may become slightly warm. This is normal. Do NOT charge the battery for a long period.
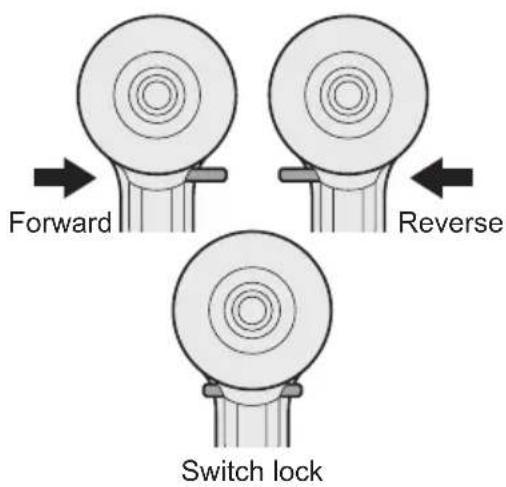
7) When storing or carrying the tool, set the Forward/Reverse lever to the center position (switch lock).
8) Do not strain the tool by holding the trigger switch halfway (speed control mode) so that the motor stops.
II. ASSEMBLY
NOTE:
When attaching or removing a bit or socket, disconnect battery pack from tool or place the trigger switch in the center position (switch lock).
Attaching or Removing Bit (EY7270)
- Hold the collar of the quick connect chuck and push it outwards.
- Insert the bit into the chuck.
- The collar will return to its original position when it is released.
4.Pull the bit to make sure it does not come out. - To remove the bit, pull back on the collar in the same way.
CAUTION:
If the collar does not return to its original position or the bit comes out when pulled on, the bit has not been properly attached. Make sure the bit is properly attached before use.
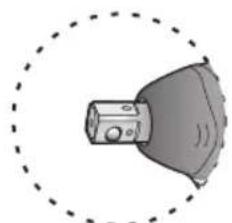
Attaching or Removing Socket (EY7271)
- Attaching Socket
Attach the socket by sliding the female detent on the bottom of the socket to the square drive on the body.
Make sure the socket is firmly connected to the body.
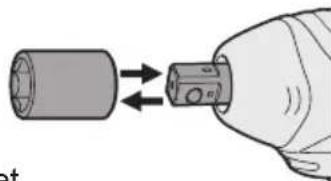
- Removing Socket
Pull out the socket.
NOTE:
Attaching or Removing Original Options and Sockets
Keep the body above freezing point (0^32^) when attach or detach original options and sockets to the square drive on the body. The cushion rubber in the square drive to push up the ball may get hard under freezing point. This requires extra force in detaching and attaching sockets.
If the hex quick connect chuck attachment (optional) is attached, the EY7271 impact wrench can be used in the same manner as driver model EY7270.
| Symbol Meaning | |
| V | Volts |
| --- | Direct current |
| n0 | No load speed |
| .../min | Revolutions or reciprocation per minutes |
Attaching or Removing Battery Pack
-
To connect the battery pack: Insert the battery pack. It snaps into place to indicate proper connection.
-
To remove the battery pack: Press the two battery pack release buttons on the sides of the battery pack. Slide the battery pack out of the tool body.
III. OPERATION
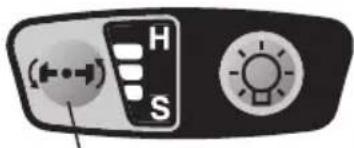
Select the Impact Mode
The tool has an impact mode selection feature. By pressing the impact mode button, the impact strength can be selected according to Hard, Medium or Soft. Pressing the button toggles the mode from Hard Medium Soft. (The factory default setting is the Hard impact mode.)
In the Soft impact mode the torque is lower to prevent damaging material caused by overtightening. This mode is recommended when you wish to minimize possible damage to small screw heads or to a soft material surface to be fastened by controlling the variable speed control trigger.
The Medium impact mode also has a lower torque setting to help prevent damage to materials caused by overtightening. This mode is recommended when you wish to minimize possible damage to screws and screw heads.
The Hard impact mode is for selecting maximum torque and rotational speed.
CAUTION:
Do not press the impact mode button before rotation has stopped completely.
Operation panel
Recommended work guideline table
| Impact Power Mode Display | Recommended Application |
| H Approx. 2800 R.P.M. (Max.) | For hard impact power mode. • Fastening long wood screws. • Tightening bolts when installing devices, etc. |
| M Approx. 2500 R.P.M. (Max.) | For medium impact power mode. • Fastening small diameter screws into hard materials. • Driving machine screws when installing devices. |
| S Approx. 2000 R.P.M. (Max.) | For soft impact power mode. • Installing gypsum board. • Installing soft metal window flame. • Installing interior finishings. |
Switch and Forward/Reverse Lever Operation
CAUTION:
To prevent damage, do not operate Forward/Reverse lever until the bit comes to a complete stop.
Forward Rotation Switch Operation
-
Push the lever for forward rotation
-
Depress the trigger switch slightly to start the tool slowly.
-
The speed increases with the amount of depression of the trigger for efficient tightening of screws. The brake operates and the bit stops immediately when the trigger is released.
-
After use, set the lever to its center position (switch lock).
Reverse Rotation Switch Operation
- Push the lever for reverse rotation. Check the direction of rotation before use.
- Depress the trigger switch slightly to start the tool slowly.
- After use, set the lever to its center position (switch lock).
CAUTION:
To eliminate excessive temperature increase of the tool surface, do not operate the tool continuously (using two or more battery packs consecutively). Tool needs cool-off time before switching to another pack.
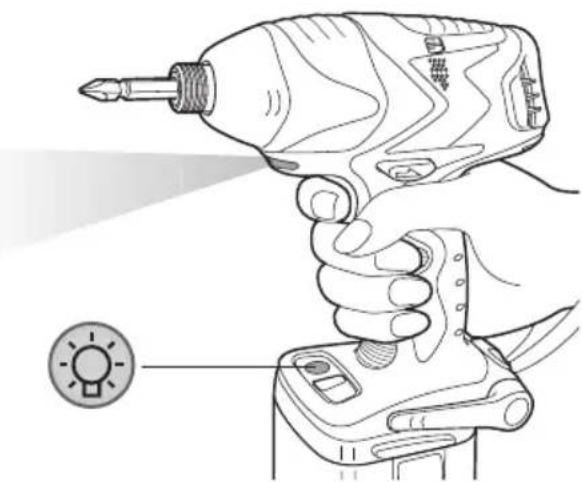
LED Light
CAUTION:
The built-in LED light is designed to illuminate a small work area temporarily.
Do not use it as a substitute for a regular flashlight, since it does not provide enough illumination.
Pressing the LED light ON/OFF button will turn the LED light on and off.
If the tool has not been operated for 5 minutes while the LED light is on, the light turns off automatically.
The light illuminates with a very low current, and it does not adversely affect the performance of the tool during use or its battery capacity.
The impact mode display on the operation panel will turn off in the following cases:
- 5 minutes have passed with no operation;
- During battery replacement.
If the variable speed control trigger is pressed, the impact mode display will return to the previous setting before the light turned off.
This product has a built-in LED light. This product is classified as a "Class 1 LED Product" under EN 60825-1.
CLASS 1 LED PRODUCT
Caution: DO NOT STARE INTO BEAM.
How to Use the Belt Hook
WARNING:
- Be sure to attach the belt hook securely to the main unit with the screw firmly fastened. When the belt hook is not firmly attached to the main unit, the hook may depart and the main unit may fall. This may result in an accident or injury.
-
Be sure to attach the belt hook firmly and securely onto a waist belt or other belt. Pay attention so that the unit does not slip off from the belt. This may result in an accident or injury.
-
When the main unit is held by the belt hook, avoid jumping or running with it. Doing so may cause the hook to slip and the main unit to fall. This may result in an accident or injury.
- When the belt hook is not used, be sure to return it to the storage position. Otherwise the belt hook may catch on something. This may result in an accident or injury.
- When the unit is hooked onto the waist belt by the belt hook, do not attach a bit other than driver bits to the unit. A sharp-edged object, such as a drill bit, may cause injury or an accident.
To Set the Belt Hook Angle Position
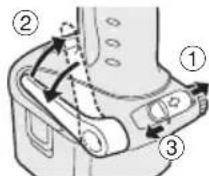
- Slide the belt hook lock lever ① and hold it to unlock the belt hook.
- Pull the belt hook from storing position ② and set it.
- Release the belt hook lock lever to lock the angle of belt hook.
- Make sure the belt hook is firmly locked. Also make sure the belt hook lock lever is firmly locked into position ③
The belt hook cannot be locked in this position. Firmly lock it into position before use.
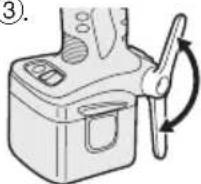
To return the belt hook to the storing position, Follow step 1. and 2. above, then lower the belt hook.
To secure the lock, follow 3 and 4 above.
To Change the Belt Hook Location Side
The belt hook can be attached to either side of the unit.
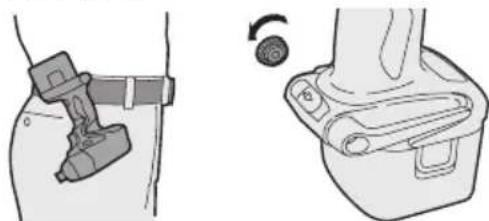
- Set the belt hook at storing position.
- Loosen the screw turning it counter
clockwise, using a flat metal or a flat blade screw driver.
- Take out the belt hook and insert into the other side of the slot on the main unit.
- Fasten the screw firmly, turning it clockwise.
The belt hook can be taken out from the main unit only when it is at storing position.
Appropriate Use of Battery Pack
Ni-MH Battery Pack (EY9201)
- Charge the Ni-MH battery fully before storage in order to ensure a longer service life.
- The ambient temperature range is between 0^ (32^) and 40^ (104^) . If the battery pack is used when the battery temperature is below 0^ (32^) , the tool may fail to function properly. In that case, charge the battery until charging is completed for appropriate functioning of the battery.
- When battery pack is not in use, keep it away from other metal objects such as paper clips, coins, keys, nails, screws, or other small metal objects that can make a connection from one terminal to another.
Short-circuiting the battery terminals together may cause sparks, burns or a fire.
- When operating with a Ni-MH battery pack, make sure the area is well ventilated.
Battery Pack Life
The rechargeable batteries have a limited life. If the operation time becomes extremely short after recharging, replace the battery pack with a new one.
Battery Recycling
ATTENTION:
For environmental protection and recycling of materials, be sure that it is disposed of at an officially assigned location, if there is one in your country.
Charging
NOTE:
When you charge the battery pack for the first time, or after prolonged storage, charge it for about 24 hours to bring the battery up to full capacity.
Battery charger (EY0110)
- Plug the charger into the AC outlet.
NOTE:
Sparks may be produced when the plug is inserted into the AC power supply, but this is not a problem in terms of safety.
- Insert the battery pack firmly into the charger.
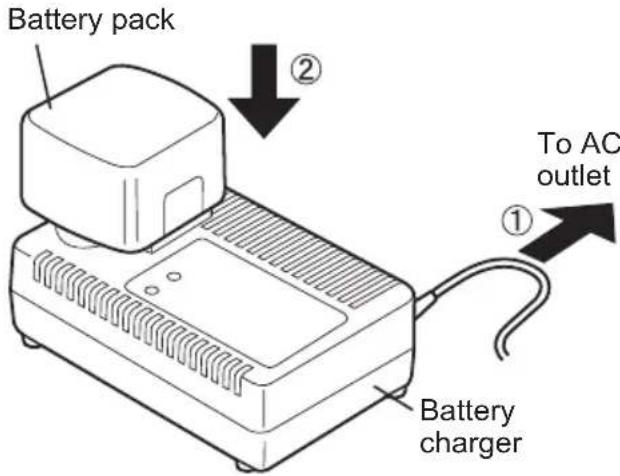
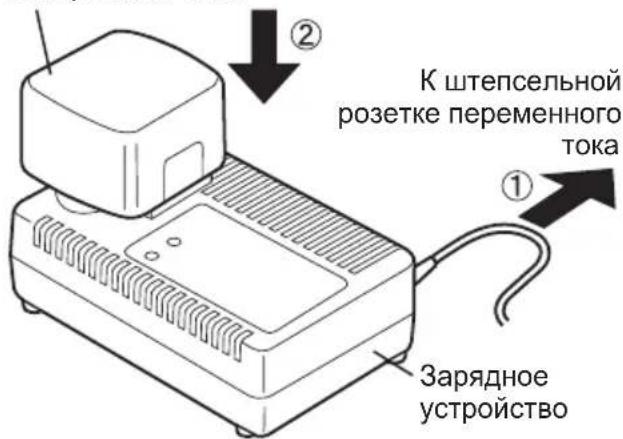
- During charging, the charging lamp will be lit.
When charging is completed, an internal electronic switch will automatically be triggered to prevent overcharging.
- Charging will not start if the battery pack is warm (for example, immediately after heavy-duty operation).
The orange standby lamp will remain on until the battery cools down.
Charging will then begin automatically.
-
When charging is completed, the green charging lamp will start flashing quickly.
-
If the battery pack is too cool, or the battery pack has not been used for a long time, the charging lamp will light up. In this case it takes longer than normal to fully charge the battery pack.
-
If a fully charged battery pack is inserted into the charger again, the charging lamp lights up. After several minutes, the charging lamp may flash quickly to indicate that charging is completed.
-
If the charging lamp does not light immediately after the charger is plugged in, or if, after the standard charging time passes, the lamp does not go off, consult an authorized dealer.
NOTE:
-
When charging a cool battery pack (below 5^ (41^) ) in a warm place, leave the battery pack in the place and wait for more than one hour to allow the battery to reach the ambient temperature. Otherwise battery pack may not fully charge.
-
Allow the charger to cool down when charging more than two battery packs consecutively.
-
Do not insert your fingers into contact hole when holding charger or at any other time.
CAUTION:
To prevent fire or damage to the battery charger:
-
Do not use an engine generator as a power source.
-
Do not cover vent holes on the charger and the battery pack.
-
Unplug the charger when not in use.
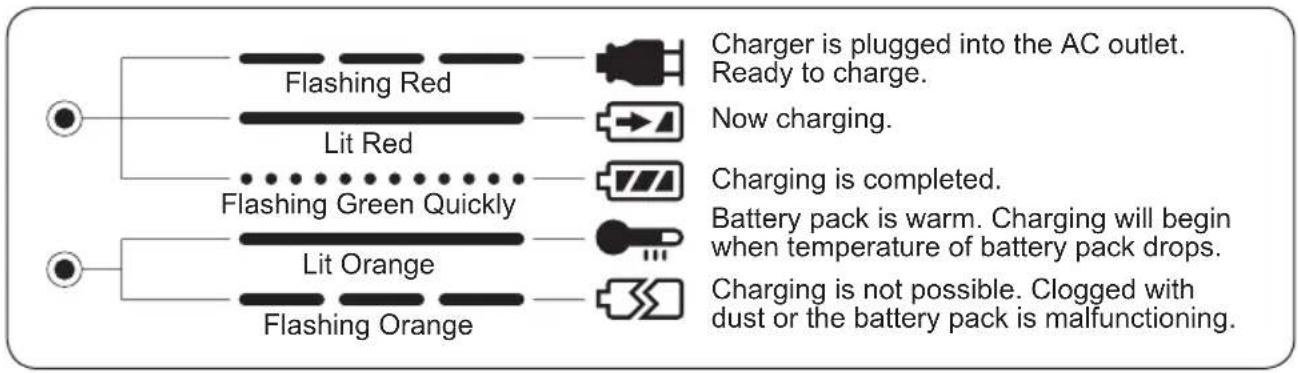
LAMP INDICATIONS
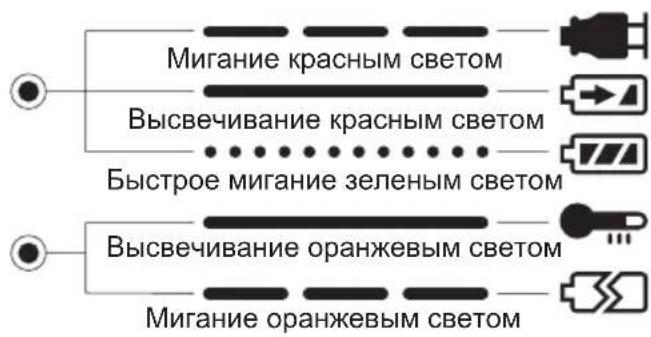
Information on Disposal for Users of Waste Electrical & Electronic Equipment (Private Households)
This symbol on the products and/or accompanying documents means that used electrical and electronic products should not be mixed with general household waste.
For proper treatment, recovery and recycling, please take these products to designated collection points, where they will be accepted on a free of charge basis. Alternatively, in some countries you may be able to return your products to your local retailer upon the purchase of an equivalent new product.
Disposing of this product correctly will help to save valuable resources and prevent any potential negative effects on human health and the environment which could otherwise arise from inappropriate waste handling. Please contact your local authority for further details of your nearest designated collection point.
Penalties may be applicable for incorrect disposal of this waste, in accordance with national legislation.
For Business Users in the European Union
If you wish to discard electrical and electronic equipment, please contact your dealer or supplier for further information.
Information on Disposal in Other Countries Outside the European Union
This symbol is only valid in the European Union.
If you wish to discard this product, please contact your local authorities or dealer and ask for the correct method of disposal.
IV. MAINTENANCE
Use only a dry, soft cloth for wiping the unit. Do not use a damp cloth, thinner, benzine, or other volatile solvents for cleaning.
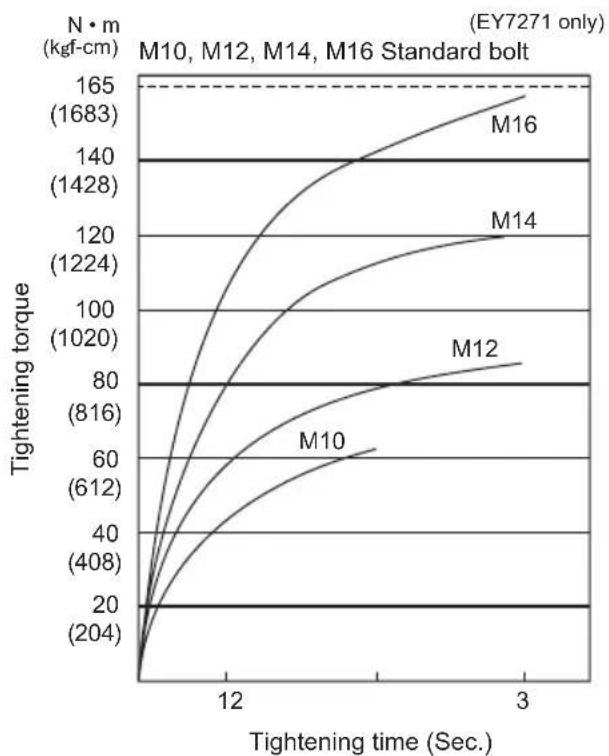
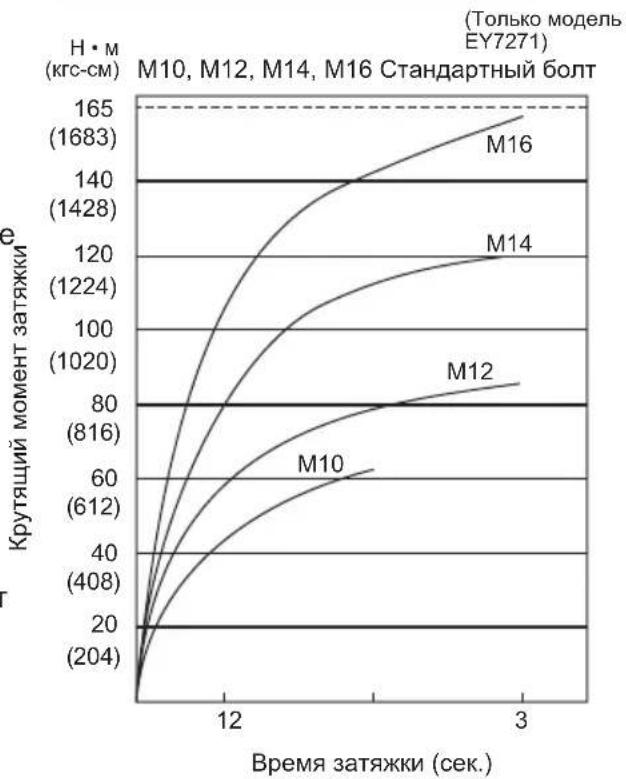
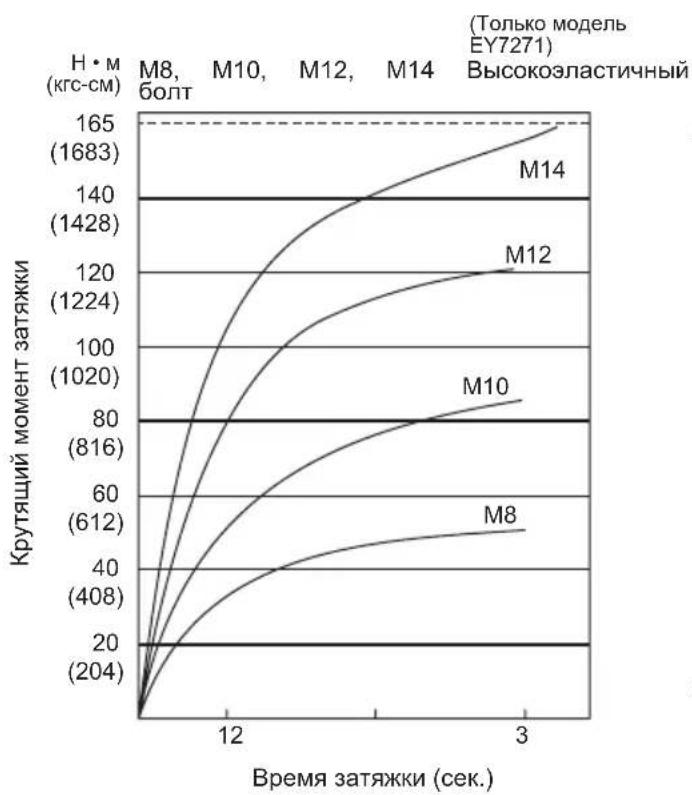
V. TIGHTENING TORQUE
The power required for tightening a bolt will vary depending on the bolt material and size, as well as the material being bolted. Choose the length of tightening time accordingly.
Reference values are provided below. (They may vary according to tightening conditions.)
Factors Affecting Tightening Torque
The tightening torque is affected by a wide variety of factors including the following. After tightening, always check the torque with a torque wrench.
1) Voltage
When the battery pack becomes nearly discharged, the voltage decreases and the tightening torque drops.
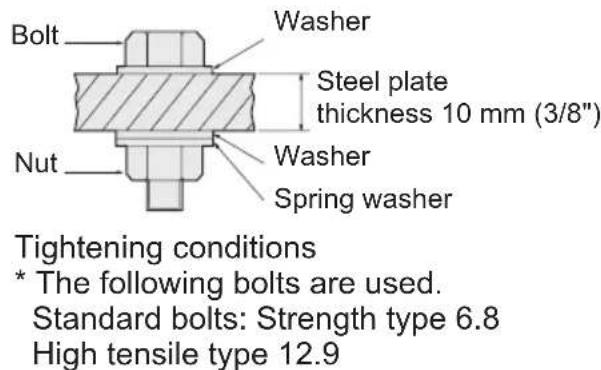
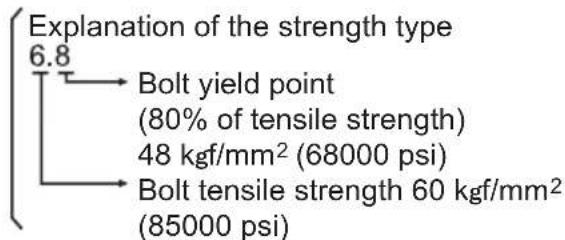
Bolt Tightening Conditions
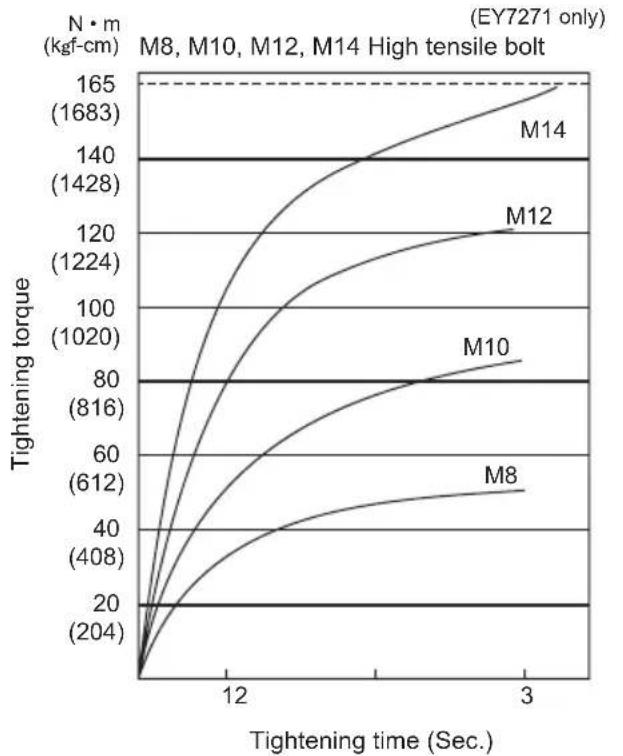
2) Tightening time
Longer tightening time results in increased tightening torque. Excessive tightening, however, adds no value and reduces the life of the tool.
3) Different bolt diameters
The size of the bolt diameter affects the tightening torque.
Generally, as the bolt diameter increases, tightening torque rises.
4) Tightening conditions
- Tightening torque will vary, even with the same bolt, according to grade, length, and torque coefficient (the fixed coefficient indicated by the manufacturer upon production).
- Tightening torque will vary, even with the same bolting material (e.g. steel), according to the surface finish.
- Torque is greatly reduced when the bolt and nut start turning together.
5) Socket play
Torque is lowered as the six-sided configuration of the socket of the wrong size is used to tighten a bolt.
6) Switch (Variable speed control trigger) Torque is lowered if the unit is used with the switch not fully pulled out.
7) Effect of connecting adaptor The tightening torque will be lowered through the use of a universal joint or a connecting adaptor.
VI. ACCESSORIES
Use only bits suitable for size of drill's chuck.
Use Panasonic original Optional Keyless drill chuck (EY9X003E) and Quick change chuck (EY9HX110E) for maximum performance.
MAXIMUM RECOMMENDED CAPACITIES
| Model | EY7270/7271 | ||
| Screw driving | Wood screw | φ 3.5 - φ9.5 mm (1/8" - 3/8") | |
| Tech screw | φ 3.5 - φ6 mm (1/8" - 1/4") | ||
| Bolt fastening | EY7270 EY7271 | ||
| Standard bolt: M6 - M12 M6 - M16 | |||
| High-tensile bolt: M6 - M10 M6 - M12 | |||
VII. SPECIFICATIONS
MAIN UNIT
| Model | EY7270 | EY7271 |
| Motor voltage | 12 V DC | |
| No load speed | Soft impact mode: 0 - 1000/min (rpm) | |
| Medium impact mode: 0 - 1400/min (rpm) | ||
| Hard impact mode: 0 - 2300/min (rpm) | ||
| Maximum torque | 135 Nm (1380 kgf-cm, 1190 in-lbs.) | 165 Nm (1680 kgf-cm, 1460 in-lbs.) |
| Impact per minute | Soft impact mode: 0 - 2000 ipm in Impact Mode | |
| Medium impact mode: 0 - 2500 ipm | ||
| Hard impact mode: 0 - 2800 ipm in Impact Mode | ||
| Overall length | 169 mm | 177 mm |
| Weight (with battery pack) | 1.8 kg (4.0 lbs) | 1.8 kg (4.1 lbs) |
BATTERY PACK
| Model EY9201 | |
| Storage battery Ni-MH battery | |
| Battery voltage 12 V DC (12 V x 10 cells) | |
BATTERY CHARGER
| Model EY0110 | |||||||
| Rating See the rating plate on the bottom of the charger. | |||||||
| Weight 0.78 kg (1.72 lbs) | |||||||
| Charging time | 7.2 V | 9.6 V 12 | V 15.6 V 1 | 8 V 24 V | |||
| 1.2 Ah | EY9065 | EY9080 | EY9001 | ||||
| EY9066 | EY9086 | EY9006 | |||||
| 20 min. | |||||||
| 1.7 Ah | EY9180 | EY9101 | |||||
| EY9182 | |||||||
| 25 min. | |||||||
| 2.0 Ah | EY9168 | EY9106 | EY9136 | EY9116 | |||
| 30 min. | 30 min. 60 min. | EY9117 | |||||
| 3.0 Ah | EY9200 | EY9230 | EY9210 | ||||
| 45 min. | 90 min. | ||||||
| 3.5 Ah | EY9201 | EY9231 | EY9251 | ||||
| 55 min. | 65 min. | ||||||
NOTE: This chart may include models that are not available in your area. Please refer to the catalogue.
ONLY FOR U.K.
VIII. ELECTRICAL PLUG INFORMATION
FOR YOUR SAFETY PLEASE READ THE FOLLOWING TEXT CAREFULLY
This appliance is supplied with a moulded three pin mains plug for your safety and convenience.
A 3 amp fuse is fitted in this plug.
Should the fuse need to be replaced please ensure that the replacement fuse has a rating of 3 amp and that it is approved by ASTA or BSI to BS1362.
Check for the ASTA mark or the BSI mark on the body of the fuse.
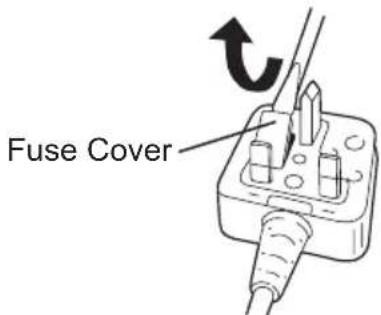
If the plug contains a removable fuse cover you must ensure that it is refitted when the fuse is replaced.
If you lose the fuse cover the plug must not be used until a replacement cover is obtained.
A replacement fuse cover can be purchased from your local Panasonic Dealer.
IF THE FITTED MOULDED PLUG IS UNSUITABLE FOR THE SOCKET OUTLET IN YOUR HOME THEN THE FUSE SHOULD BE REMOVED AND THE PLUG CUT OFF AND DISPOSED OF SAFELY.
THERE IS A DANGER OF SEVERE ELECTRICAL SHOCK IF THE CUT OFF PLUG IS INSERTED INTO ANY 13 AMP SOCKET.
If a new plug is to be fitted please observe the wiring code as shown below.
If in any doubt please consult a electrician.
IMPORTANT:
The wires in this mains lead are coloured in accordance with the following code:
Blue: Neutral
Brown: Live
As the colours of the wire in the mains lead of this appliance may not correspond with the coloured markings identifying the terminals in your plug, proceed as follows. The wire which is coloured BLUE must be connected to the terminal in the plug which is marked with the letter N or coloured BLACK.
The wire which is coloured BROWN must be connected to the terminal in the plug which is marked with the letter L or coloured RED.
Under no circumstances should either of these wires be connected to the earth terminal of the three pin plug, marked with the letter E or the Earth Symbol 1一
How to replace the fuse: Open the fuse compartment with a screwdriver and replace the fuse and fuse cover if it is removable.
This apparatus was produced to BS800.
-MEMO-
LED-PRODUKT DER KLASSE 1
VORSICHT: SEHEN SIE NICT IN DEN STRAHL.
Verwendendes Riemenhakens
WARNING!
ДляnpedOTbpaueHnnoBpeKdHnHe nCNoIb3yItepbYar nepeKnOuHnBnepeD/Ha3aI Do To Tex nop, NOKa HacaKaNONHOCTbIO He OCTaHOBTcR.
Cpok cnjx6bl 6aTapeHoro 6Joka
AkkymyIaTOPbIe 6aTapeu NMeOT
OrpaHnueHHbI cPOK cLyK6bl. Ecnn nocne
3apJKn BpemF yHKUHOHPoBaHnA
CTaHOBHTcay Ype3MepHo KOpOTKm,
3aMeHInTe 6aTapeHbI 6JIOK Ha HOBbI.
Yttnn3aun 6aTapeu
BHIMAHNE:
B ueJx 3aunTbI OKpykaUoSei cpebl no yTuJIIN3aunu MaTePnaIOB, yBeDInTEcB, UTO OHa yTuIN3nPOBaHa B OfNuaNBHO npEHa3NaueHHom MeCTe, eCNI TaKOBbie ectb B BaWei cTpaHe.
3apяdka
ПРИМЕЧАНЕ:
Ipn nepBoi 3apAKe 6aTapeHoro
6noka, nnn noCne dInTeJbHoro
XpaHeHHa, 3apJxaiTe erO B TeueHne
OKoNo 24 yacOB, yTO6bl DOBecTu
6aTapeIO qnoHq 3apAHO EMKOCtN.
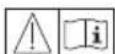
3apnHoe yctpoNCTBO (EY0110)
- BkIIOHnTe 3apJHoe yCTpOYCTBO B WTeNcENbHyTO po3ETky nepemEHORo TOka.
ПРИМЕЧАНЕ:
Pn NOKJIIOUeHm WTeNCeJIbHOB BUNK K 6 ToNky NtAHHaNEpeMeHHOR TOKa MOryT NoBtbcra NcKpbI, HO 3TO He npEcdTabniet npo6Jemy C TOnkN 3peHn8 6e3ONaCHOCTN.
2.Пnotho BCTaBbTe 6atapeHbI 6nok 3apndHOe yctpoiCTBO.
BaTapeHbI 6JIOK
3.BoBpeMzapAdkn6ydtropeTnaMnoUka 3apAdkn.
Iocne 3aBepshn ABTomatueckn cpa6oTaet BHyTpehn H 3JIeK TpoHbI N e p npedotBpaaqaype3MepHyu 3apyky.
3apKa He NaHcTc, ecn 6atapeHbI 6JOK cNlKOM ropuH (HaNPmep, HENOCPeDCTBeHHO nocJe cyHKUHOHPOBaHn npn 6oJIbwoi Harpy3Ke).
OpaHkeBaJ lamnoka peKIma OxuHaHn 6ydt ropeTdoTexnop, noka 6atape He octbIHet. 3aTeM 3apIka HaHHeTcA ABTomATUeCKN.
4.После 3aBepseHnЯ 3apAkn NaMNoUka 3apAkn HaHET 6bICTpo MInrTaTb 3eJIeHbIM CBETOM.
5.ПилбомиycLOBи,KOrda 6aTapeHbI 6JOK cNtHKOM XOJODHbI, 1n6o 6aTapeHbI 6JOK He nCNOJIb3OBaJIcR ДЛNTeNBHe BpeM,JaMNoUka 3aprKn 6ydet rOpetb.B TAKOM cnyae 3aprKa 3aImET 6OJee npOdoJXitbeHoe BpeM, noka 6aTapeHbI 6JOK NOnHOCTbIO He 3aprAnTcR, B cpabHEHn CO CTAHdApTHbIM BpeMeHem 3aprKn.
B·Ecni noH O CT b 3 apy 6batapeiHbI 6IOK CHOBA BCTaBNTb B 3apJdHoe yCTpoiCTBO, 3arOpHTcR lamnoUka 3apJdkn. Ypee3 HeckoJIbKO MInHyT lamnoUka 3apJdkn MoKet HaayTaB 6bICTPO MIRatb, IOKa3bIBaR, YTO 3apJdka 3aBepSeHa.
- Ecnn NaMnoUka 3apdKn He 3arOpntc HEnocpeDCTBHeHNO NOCJIe BKIOueHn 3apdHoro yCTPOJCTBa, INI ecN NaMNoUka He NorachET NO ICTeUeHN CTaHApTHoro BpemEH 3apdKn, O6paTInTeCb B yNoJHOMOeHHbI CepBnCHbI UeHTp.
ПРИМЕЧАНЕ:
- Pn 3apdKe xoJIoHoro 6aTapeHoro 6Ioka (c Tempeatypoi Hxke 5^ (41^) B TENlOM MeCTe, OCTaBBte 6aTapeHbI 6IOK B 3TOM MeCTe n NOOxDnte 6OJee OJHO raca, Ioka 6aTaper Harpeetcdo ypOBHraempepaHr kpykaHoue cpebl. B npOTNBOM Cnyae, 6aTapeHbI 6Iok EMOXkEM HeO3apdTaTcN NHOCTbIO.,
OxnaIte 3apJHoe yCTpoiCTBO npn nocJeIOBaTeNbHOJ 3apJKe 6oJIee Yem DByX 6aTapeINbIX 6LOKOB.
He BCTaBJIaIte Baun naIbUbl KOHTaKTHbIe OTBepCTnA, KOrDa Bbl DePKeTc3apdHoe yCtpoiCTBO,a TaKKe B Dpynx CnyaAx.
BHIMAHNE:
IpypeDOTBpaueHn pNcKa noXapa nIN NOBpeXdEHHa3apAHOrO yCTpOJCTBa.
He nCnoB3yIe B kaueCTBe nCTOuHnKa nHTaHn rHepaTOp DBNrAteJI.
He 6IOKpyuTe BeHTnJraUHOHbIe OTBepCTnHa 3apAnHom yCTpoNCTBe n 6aTapeHOM 6Ioke.
BbIKIOUHTe 3apJHoe yCTPOIcTBO n3 uTeNCEJIbHOI po3ETKN, ecn OHO He NCNOJb3yETc.
CBETOBbIE INHdNKATOPbl
3apdHoe yctpoCTBO NOdknOyeHO K
HTeNcBbHO p03eTKe nepemEHoro TOKa.
TOBO K 3apdke.
BbIOnHReTc3apdka.
3apraika 3aBepseHa.
BatapeHb6IokTopa.3apKaHaunetc, KOrda TemnepaTypa BatapeHoro 6loka yanaet
3apKa HeBO3MOxHa. BaTapeHbI 6nOK 3acOpEn NblbIO INN HeNCpPaBeH.
HhopmaunnoobpaueHIO COTXODAMN DnA CTpaH, He BXODaNX B Ebponeckn Coo3
Деи CTBne 3TO T O C N M pacnpoocTpa H ToIbKO Ha EBpOeNcKn Co03. Ecnn Bblco6bpaTeCb Bbl6pocNTb DaHHbI npOdyKT, y3HaIte B MeCTHbIX opraHax Bnactn nnn y dInepa,
Kak CneNyET NOCTynaTb C OTXoJaMn TaKOrO Tuna.
IV. OBCJIyXINBAHNE
Для npotnpaHn yctpoNCTBa nCNoJb3yIte cyxuO MmKyo TKaHb. He nCNoJb3yIte IЯ OUNCTK BnaXHy TkaHb, pa36abNTel, 6eH3nH nI npOue JeTyUne pactBopnten.
V. KPYTAYI MOMEHT 3ATJXKU
Cun, Heo6xOIma Dn 3aT8KK 60Ta MoKet OTNuaTbC B 3aBucHMOCTu OT MaTePnAna 60TaN er o pa3Mepa, a TaKKe OT MaTePnAna, KOtOpbl CKpeNpEeTc. COOTBeTCTBeHNO BbIbnpaETc dNHTeNb-HOCTb BPeMeHN 3aT8KK.
Hnke npedctaBneHbI pekomeHdyemble 3haueHna. (OhmoryT MeHrTbcB B 3aBNCMOCCT ycnoBni 3aTjKKn.)
1) HanpajkeHne KOrda 6atapeHbI 6IOK CTAHOBNTcNoHTn pa3pajkeHHbIM, HanpajkeHne CHIXKaETcN KpyTtM NOMeHT 3aTJkN nadaet
YcNoBn3aTgK6oJTa
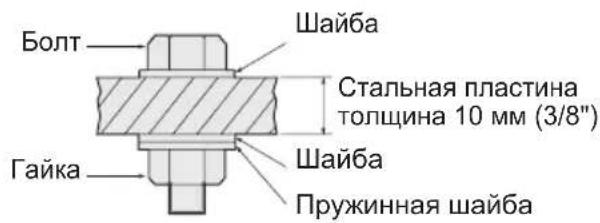
YcIOBn3aTJKKN
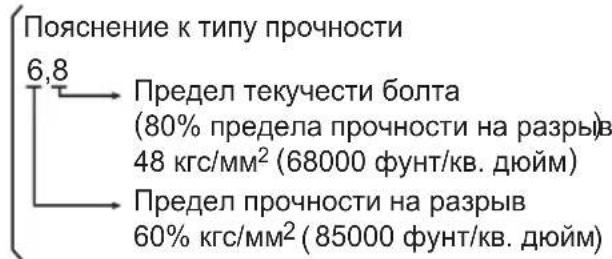
*IcnoJb3yOToC sJeDyUoUne 6oNTbl. CtaHdapTHbIe 6oNTbl: TnnpOuHocTn 6,8 BbICOKo3JaCTnHybI Tn12,9
2)Bpem3aTJKKn
Bolee npoDOnJxnteHbHoe BpeM npnBOOHT K Bo3pactaHIO KpyTaeero MOMeHTa 3aTAAKKu. Ype3MePna 3aTAAKka, OHaKO, He yIyUwAeT KaeeCTBO I COKpaAaET cPOK 3KcNlNyataun INHCTpymEHTa.
3)Pa3nHbIeDnaMeTpbl6oJTa
BéniuHa DnAmetpa 6oTa BnIeT Ha KpyTAnMOMeHT 3aTJxKn.
Kak npabnno, c yBeHnueHnem dnaMeTpap 6oTt a Bo3pactaet KpyTuuMOMeHT 3aTJKK.
4) YcnoBna 3aTAAKKn
KpyTaynn MOMENT 3aTJkN 6yTe OTn N Yatbc Ja Ze dN J 60 Odnak O BORO KnaCCa, Dn H bI Ko3oPfNueHNTa KpyTaeo MOMeHTa (IOCTO RAHHbIK KO3 yKa3bIBaEMbl npON3BOOnTeJIem Ha npOdykun).
Kpytaynn MOMENT 3aTAAKK 6ydet OTnuaTbcra daxe nla 6oTob n3 Ondoro MaTePnana (HanpImep, CTaJN), B 3aBNCIMOCTN OT DOBOkN NOBepxHOCTN.
KpyTAAHNC MOMEHT yMeHbHaETcA, ecn 6oT nraKa HauHahOT BpaaTaBcA BmecTe.
5) 3a3op B nTaTpoHe
KpyTAnMOMeHT CHNJaETcA,ecJIN
IJIa 3aTJxKn 6oNTa NCNoJb3yETcR
n a Tpo H W e C T N rpaH H
HEcoOTBcTCTByIOUeRo pa3Mepa.
6)Выключateb(nepepylnipOBKn nepemehHNockopocTu)KpyTAnMOMeHT CHNJaETcra,ecnUyCTPOIcTBO NcNoJb3YeTeC rHe NOJIHOCTbIO HaxKaTbIM BbIKNoHuATEJeM.
7) ΕΦΦeKT COeHINHTeHbHO aADAnTepa KpyTaeMOMeHT CHNXaETcA,ecnnpu NcNoJIb3OBAHN yHNBepCaJIbHO rpa3beMa NN COeHINHTeHbHO aADAnTepa.
VI. ПИнадлесховский
IcnoJb3yUTe TOJIbKO HacaKIN, NOxOJaUne
No pa3Mepy K 3aXIMHOMy NaTPOHy.
Dnma MAKCImMaJbHOIN POn3BOJNTeJIbHOCTN
NCNOJb3yUte OpRHaJIbHbI DOnONHTeJIbHbI
6eCKnIOueBOI 3axmHoi naTPOH Panasonic (EY9X003E) n NaTPOH 6bICTpoi 3aMeHbI (EY9HX110E).
MAKcIMAJbHbIE PEKOMEHdYEmbIe HArpy3Kn
| Модаль | EY7270/7271 | ||
| Завинчиновiche和社会аш汞па | Шурл даяdepeва | Φ 3,5-Φ9,5 мм (1/8" - 3/8") | |
| Шурл-cамоpeз | Φ 3,5-Φ6 мм (1/8" - 1/4") | ||
| Болковoe крелегпene | EY7270 EY7271 | ||
| Стандэртыний бOLT: M6 - M12 M6 - M16 | |||
| Выcockоэл actиньий сOLT: M6 - M10 M6 - M12 | |||
VII. TEXHnueCKne XAPAKTEPNCn
OCHOBHOE YCTPOICTBO
cKaIO MaHKeTa He NOBepTaEcTbcy CBOe NoyaTKOBe NIOXeHHa 6o KaHacAdKa BNTaRyEbCra, KOJI TgHyTb, Ue O3Haue, 1o HacAdKa He 6yna HaJeKHIM YINHom 3akpinHe. IpeD e PnKOpCTaHHMaTepeKaHaTecBa 1o HacAdKa HaJeKHIM YINHom 3akpinHe.
3akpinlenna 60 3Himannn naTpoHy (EY7271)
- 3akpinHnnaTpoHy 3akpinitb naTPOH uJnxOM HacaJxehnHOxOJIIOUOro oikCaTopa y HxHHi YactuHi naTPOHy Ha KBaDpaTHn XBOCTOBNK Ha Kopnyci.
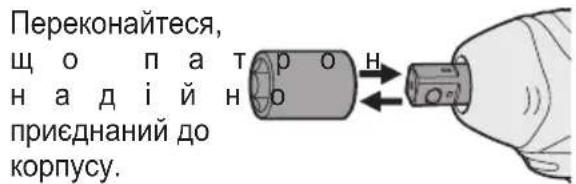
- 3HimaaHH naTPOHy BntaHnIb naTPOH.
ПРИМITKA:
3aKpiIJIeHnaOpnIHbHOToTaNpOHiBPiITpMHyTe TemepaTyPOpNcByBnue ToCKn 3Amp3AHn (0°C 32"PiJyac 3akPInHeHHa6o BiD'EDHaOpnIHbHOTo DDoAtKOBOTo npnlaDraTa NaTPOHb Ha KBaDpaTHn XBOCTOBNKHa Kopnyci. Fy6uata rMa dJaBnTOBxvBaHHa KybKn Y KBaDpaTHOMYXBOCTOBKy MoKe CTaTH JOPCTKIO npiTemnpaTypi HxKYe TOckn 3Amp3AHn.1e Notpe6ye DoAtKOBOr 3ycnnnPaIac BiD'EDHaHH Ta 3akpInNeHNaTPOHiB.
JaKo 3akpinHe OeCTnRpaHHn NaTPOH WbNdkoro npnc Hn Hn (npnada, ydapn raikOBepET EY7271 moKe BnKOpNCTOByBaTnca ananorichno wypynOBepTy moJeI EY7270.
| Символ 3начени | Вовъти |
| — | Посстий стум |
| n0 | ШвдikICTь бeз habаHTажени |
| .../XB | КльсICTь обертIBaabоЗворOTHO- пocуразальнix рухов наxbлиHy |
3akpinlennna a6o 3Himannn 6aTapeiHorO 6Ioky
1.ДЯ npEHaHn6bTapeHOro 6nOKy: BcTaBTe 6bTapeHn6nok.ПрnpEHaHHi HAnExHM YINHom BiH 3aunHeTbcra Ha Micci.
2.ДЯЗIMAHHЯ6aTapeHORO6JOKy: HatnchItbHa DBi KHOKN BNBiNbHeHHa 6aTapeHoro 6JOKy Ha 6iHynx CTOpOHx 6aTapeHoro 6JOKy.BTuYrHiTB 6aTapeHnB 6JOK3KOpNcyIHCpymEnTy.
III.ФУнкцIOHYBAHHaBn6ippexmyyapy
HaHn iHcTpymeHT Mae cykuio 3miH npexmMy
yap. HatncKaIOUH KNOpKy pexmMy yap,
MOxHa o6upatn cnIy ydpay BiINOBIHO Do
pexmIB M'akn, CepenHi a6o XOpCTKn.
HaTnCKaHH KONKn nepemNkae pexm My
HactynHIO nocIIOBHOCTi: XOpCTKn CepenHIO M'akn. (XOpCTKn pexm Udpay
E 3aBODCbKOIO YCTAHOBKOIO NO yMOBuaHHIO.)
Y M'KOMy pexmI ydapy KpyTnBnM MOMENT 3HnKeHo, 06 3anobiTn NOWKoDxKeHHo MaTepiany, BnKnKaHomy HaMipHO 3aTJXKOIO. DaHn peXm peKOMeHdyCTbCry V BNpaKy, kso Bn 6axaTe 3BeCTn Do MiHIMMy MOxNtBcTB NOWKoDxKeHHra TOnOBOK MaJIeHbKnx UypynIB a6o nobepxHi M'AKORO MaTepiany, 0o 3akpinHcTBcra 3a DonomorOu
Cepenippekm yapy TaKoMa 3HnKeHy yctahOBky KpyTnIbHO MOMHTy, 0c npnae 3anobirAHNO NOkOKeHH MaTepiNIB, 0BnIKnKaCTbcra HaMIPHO 3aTAAKOIO. DaHni pekm pekomEndyecy BnAky, kIo Bn 6baXaTe 3BeCTn Do MIHIMMy MoKnBicTB nookDkeHH wypnib a6o roNoBOK wypnib.
Kopctkni pekm ydapy npn3naeHn dIy Bn6opy MaKcImaJIbHO r KpyTINbHO rOMeHTy i WbNdkoCTi oBeptAHHa.
YBAGA:
He haTnCKaIe KhoNky pexnMy yIapy, DOKI o6epTaHHn NOBHiCTIO He 3yINHHTbcra.
PanaHb ynpabnHHa
Khoinkapekmyyapy
Tbniu Bka3iBok no poboti, zo peKomeHdyHTbcra
| Идения рекиму notyxhocstiy уdapy | Викорисань, по pekomehdючся |
| H Приблз.2800 ob/xb(MaKc.) | Для лорсткого рекиму notyxhocstiy уdapy. • 3arvinchuybaHHЯ дOBriX shypynib y depreBO. • 3atjxka boNTiB pri BCTahOBJIeHHI mexaHI3MiB, i T.I. |
| M Приблз.2500 ob/xb(MaKc.) | Для сеpeDHього рекиму notyxhocstiy уdapy. • 3arvinchuybaHHЯ shypynib ManORO diametpy y Tberdi MaTePIaII. • 3abNBA rBNHTiB對於КрINNeHня PRI BCTAHOBJIeHHI mexaHI3MiB. |
| S Приблз.2000 ob/xb(MaKc.) | Для м'якого рекиму п notyxhocstiy uDapy. • UctahOBkRa rincOBnIX naHeJIe. • UctahOBkA BIKOHnIX pam 3 M'якого MeTaNY. • UctahOBkA BHUTPIiSHbOrO OЗДОБПЕннЯ. |
OCHOBHNI IPIPNCPTPII
| Модаль EY7270 EY7271 | ||
| Мотор 12В постийHoro Stуруму | ||
| ШвдikICTь 6e3 наваHTажени | М'який реким у Dairy: 0 - 1000/xВ (ob/xВ) | |
| Середни реким у Dairy: 0 - 1400/xВ (ob/xВ) | ||
| Жорсткий реким у Dairy: 0 - 2300/xВ (ob/xВ) | ||
| Мakсималын Кртул bи_MOMeNT | 135 Hm (1380 Кгс-сM, 1190 Дюм-фУNT) | 165 Hm (1680 Кгс-сM, 1460 Дюм-фУNT) |
| Кільбiktь уdaporів на хВиПИнHy | М'який реким у Dairy: 0 - 2000 уД/хВ в рекимi у Dairy | |
| Середни реким у Dairy: 0 - 2500 уД/хВ | ||
| Жорсткий реким у Dairy: 0 - 2800 уД/хВ в рекимi у Dairy | ||
| Загалha довжina | 169 ММ 177 МM | |
| Bara (з батарейнIM等相关) | 1,8 кr (4,0 Фунта) | 1,8 кr (4,1 Фунта) |
БATAPEИнБЛOK
Matsushita Electric Works, Ltd.
Osaka, Japan


- ADDITIONAL SAFETY RULES
- ASSEMBLY
- NOTE:
- Attaching or Removing Bit (EY7270)
- CAUTION:
- Attaching or Removing Socket (EY7271)
- Attaching or Removing Battery Pack
- OPERATION
- Select the Impact Mode
- Switch and Forward/Reverse Lever Operation
- Forward Rotation Switch Operation
- Reverse Rotation Switch Operation
- LED Light
- How to Use the Belt Hook
- WARNING:
- To Set the Belt Hook Angle Position
- To Change the Belt Hook Location Side
- Appropriate Use of Battery Pack
- Ni-MH Battery Pack (EY9201)
- Battery Pack Life
- Battery Recycling
- ATTENTION:
- Charging
- Battery charger (EY0110)
- LAMP INDICATIONS
- Information on Disposal for Users of Waste Electrical & Electronic Equipment (Private Households)
- For Business Users in the European Union
- Information on Disposal in Other Countries Outside the European Union
- MAINTENANCE
- TIGHTENING TORQUE
- Factors Affecting Tightening Torque
- 1) Voltage
- 2) Tightening time
- 3) Different bolt diameters
- ACCESSORIES
- SPECIFICATIONS
- BATTERY PACK
- BATTERY CHARGER
- ONLY FOR U.K.
- ELECTRICAL PLUG INFORMATION
- FOR YOUR SAFETY PLEASE READ THE FOLLOWING TEXT CAREFULLY
- IMPORTANT:
- Verwendendes Riemenhakens
- WARNING!
- Cpok cnjx6bl 6aTapeHoro 6Joka
- Yttnn3aun 6aTapeu
- BHIMAHNE:
- 3apяdka
- ПРИМЕЧАНЕ:
- CBETOBbIE INHdNKATOPbl
- HhopmaunnoobpaueHIO COTXODAMN DnA CTpaH, He BXODaNX B Ebponeckn Coo3
- OBCJIyXINBAHNE
- KPYTAYI MOMEHT 3ATJXKU
- YcNoBn3aTgK6oJTa
- ПИнадлесховский
- TEXHnueCKne XAPAKTEPNCn
- 3akpinlenna 60 3Himannn naTpoHy (EY7271)
- ПРИМITKA:
- 3akpinlennna a6o 3Himannn 6aTapeiHorO 6Ioky
- III.ФУнкцIOHYBAHHaBn6ippexmyyapy
- YBAGA:
- PanaHb ynpabnHHa
- Tbniu Bka3iBok no poboti, zo peKomeHdyHTbcra
Brand : PANASONIC
Model : EY7271
Category : Screwdriver