EccoPro 300 - Aquarium EHEIM - Free user manual and instructions
Find the device manual for free EccoPro 300 EHEIM in PDF.
Frequently Asked Questions - EccoPro 300 EHEIM
User questions about EccoPro 300 EHEIM
0 question about this device. Answer the ones you know or ask your own.
Ask a new question about this device
Download the instructions for your Aquarium in PDF format for free! Find your manual EccoPro 300 - EHEIM and take your electronic device back in hand. On this page are published all the documents necessary for the use of your device. EccoPro 300 by EHEIM.
USER MANUAL EccoPro 300 EHEIM
IMPORTANT SAFETY INSTRUCTIONS
WARNING - To guard against injury, basic safety precautions should be observed, including the following.
a) READ AND FOLLOW ALL SAFETY INSTRUCTIONS.
b) DANGER - To avoid possible electric shock, special care should be taken since water is employed in the use of aquarium equipment. For each of the following situations, do not attempt repairs by yourself; return the appliance to an authorized service facility for service or discard the appliance.
1) If the appliance falls into the water, DON'T reach for it! First unplug it and then retrieve it. If electrical components of the appliance get wet, unplug the appliance immediately. (Non-immersible equipment only)
2) If the appliance shows any sign of abnormal water leakage, immediately unplug it from the power source. (Immersible equipment only)
3) Carefully examine the appliance after installation. It should not be plugged in if there is water on parts not intended to be wet.
4) Do not operate any appliance if it has a damaged cord or plug, or if it is malfunctioning or has been dropped or damaged in any manner.
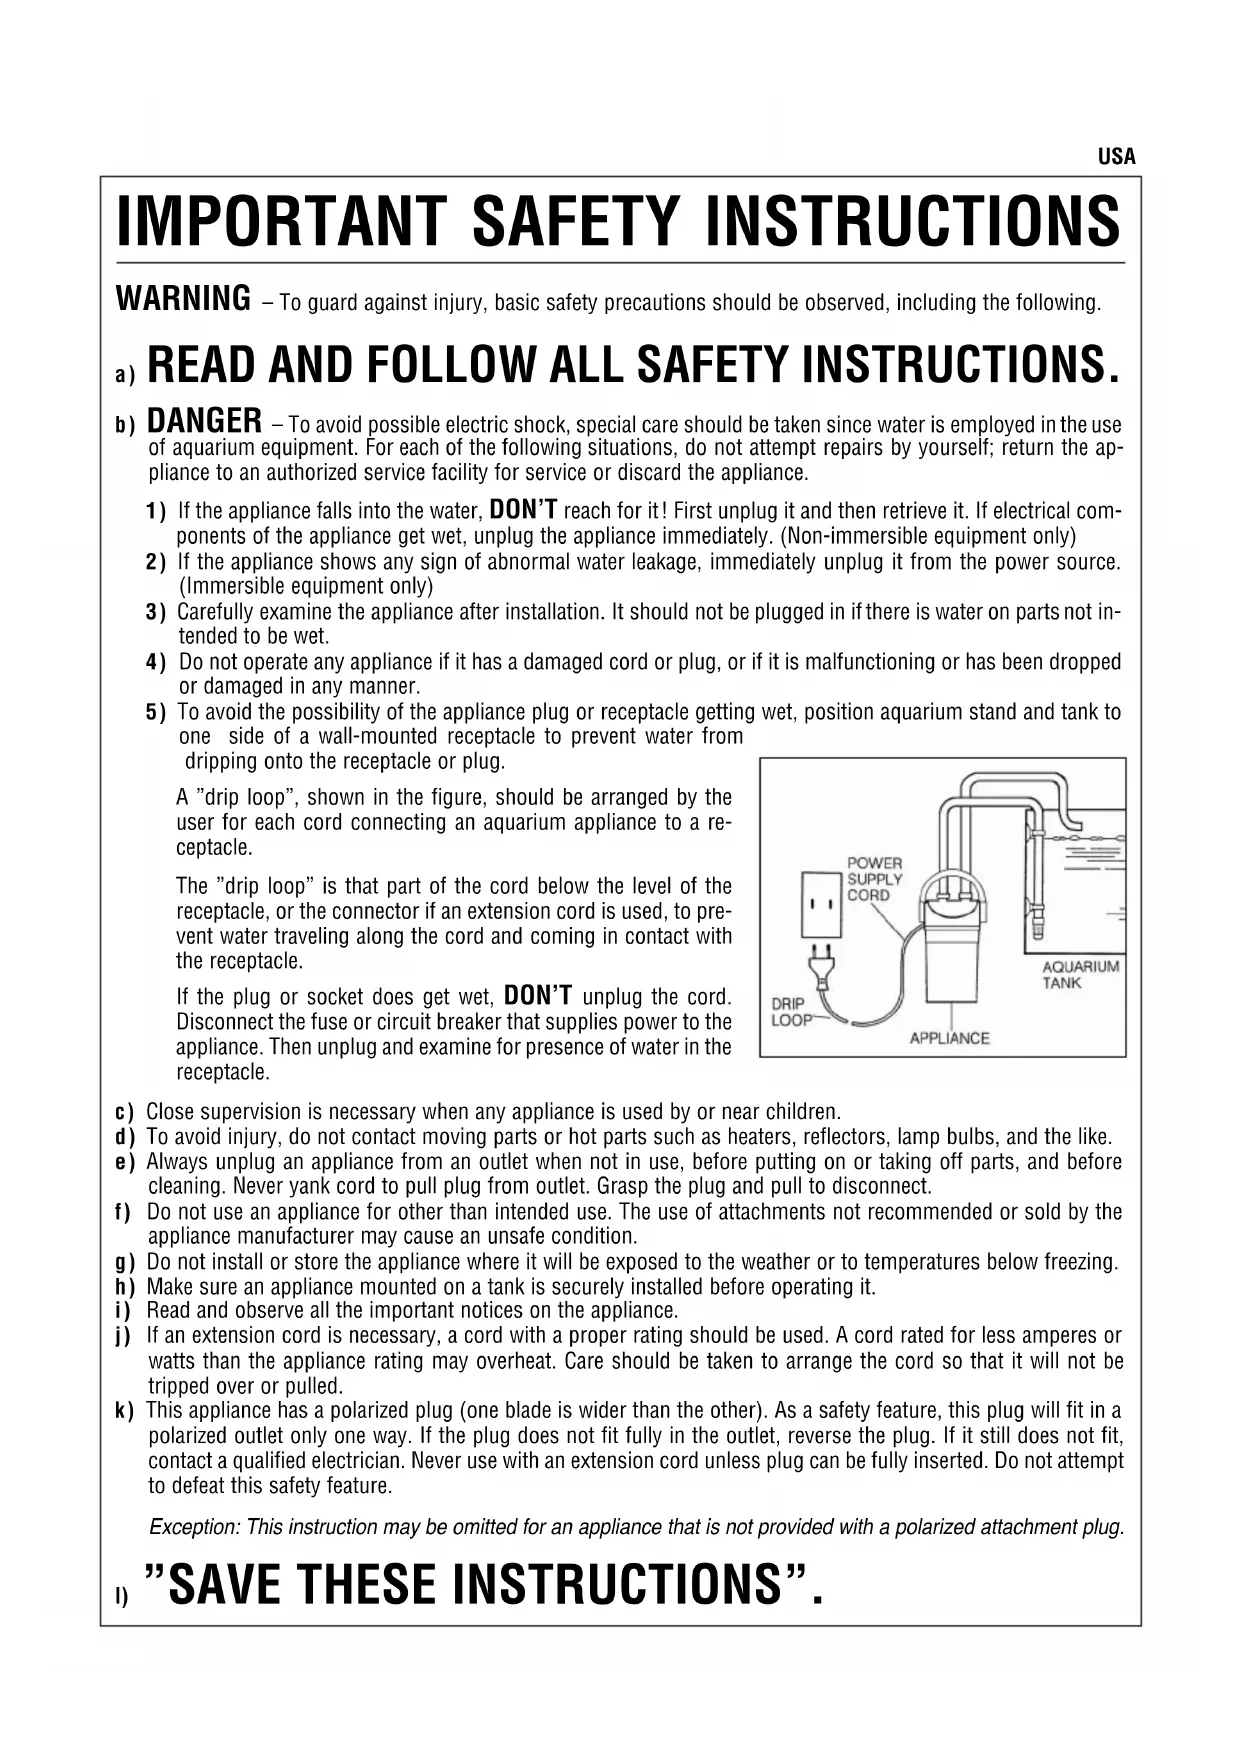
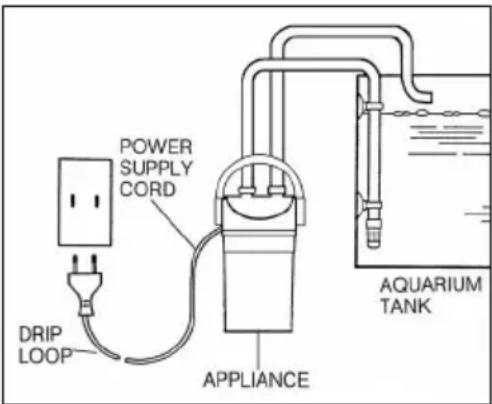
5) To avoid the possibility of the appliance plug or receptacle getting wet, position aquarium stand and tank to one side of a wall-mounted receptacle to prevent water from dripping onto the receptacle or plug.
A "drip loop", shown in the figure, should be arranged by the user for each cord connecting an aquarium appliance to a receptacle.
The "drip loop" is that part of the cord below the level of the receptacle, or the connector if an extension cord is used, to prevent water traveling along the cord and coming in contact with the receptacle.
If the plug or socket does get wet, DON'T unplug the cord. Disconnect the fuse or circuit breaker that supplies power to the appliance. Then unplug and examine for presence of water in the receptacle.
c) Close supervision is necessary when any appliance is used by or near children.
d) To avoid injury, do not contact moving parts or hot parts such as heaters, reflectors, lamp bulbs, and the like.
e) Always unplug an appliance from an outlet when not in use, before putting on or taking off parts, and before cleaning. Never yank cord to pull plug from outlet. Grasp the plug and pull to disconnect.
f) Do not use an appliance for other than intended use. The use of attachments not recommended or sold by the appliance manufacturer may cause an unsafe condition.
g) Do not install or store the appliance where it will be exposed to the weather or to temperatures below freezing.
h) Make sure an appliance mounted on a tank is securely installed before operating it.
i) Read and observe all the important notices on the appliance.
j) If an extension cord is necessary, a cord with a proper rating should be used. A cord rated for less amperes or watts than the appliance rating may overheat. Care should be taken to arrange the cord so that it will not be tripped over or pulled.
k) This appliance has a polarized plug (one blade is wider than the other). As a safety feature, this plug will fit in a polarized outlet only one way. If the plug does not fit fully in the outlet, reverse the plug. If it still does not fit, contact a qualified electrician. Never use with an extension cord unless plug can be fully inserted. Do not attempt to defeat this safety feature.
Exception: This instruction may be omitted for an appliance that is not provided with a polarized attachment plug.
"SAVE THESE INSTRUCTIONS".
THANK YOU
for purchasing of your new EHEIM ecco filter which has an impressive range of advantages in terms of function, handling and quality. Innovative technology combined with the simplest operation and characteristic design are the outstanding features of the latest EHEIM filter generation. EHEIM ecco is a result of intensive development, which does justice to all aspects of the practical requirements of aquarists.
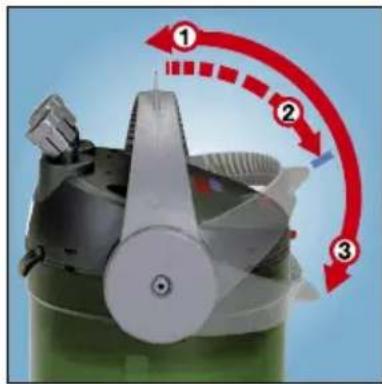
The very shape of the filter signals a new technical concept. The practical carrier handle is a multi-function lever, and as such, fulfils various functions. It serves to activate the integrated priming function 2, which facilitates start-up during installation and after cleaning. With the handle the filter can also be opened 3 or closed easily with a flick of the wrist - at the same time it is safely locked in place 1.
The device is supplied complete with filter material and is immediately ready for operation. Practical filter media containers, safety hose connections and shut-off taps
make operation and maintenance child's play. Thanks to the coordinated relationship between pump performance and volume, the EHEIM ecco filter ensures reliable long-term cleaning with a permanent circulation and simultaneous oxygen enrichment of the aquarium water - a guarantee for ideal water cleaning and a successful aquarium hobby.

Safety instructions

For indoor use only. For use with aquariums.

All electrical equipment in the water must be disconnected from the mains during care and maintenance work.

The connecting line of this device can not be replaced. When the line is damaged, the device must no longer be used. Never carry the pump by the cable; do not bend the cable.

This equipment is not intended for use by persons (including children) with limited physical, sensory or mental abilities or for persons with no experience or knowledge unless they are supervised by a person responsible for safety or unless they have received from such a person instructions on how to use the equipment.
Children should be supervised to ensure that they do not play with the equipment.

20 cm

Notice: These devices produce magnetic fields which might cause electronic and mechanical disturbances or damages. This also refers to pacemakers. Please consult the manuals of medical equipment for the required safety margins.

Attention: Maintenance work presents the risk of crushing th fingers due to high magnetic forces.

Do not dispose of this product as normal household waste. Take it to your local refuse collection site.

Since a wide variety of varnishes and polishes are used when processing timer, the appliance feet can leave visible traces on furniture or parquet floors as a result of chemical reactions. Therefore the device should not be placed on unprotected wooden surfaces.

The product is qualified in accordance with the respective national regulations and guidelines and meets EC standards.
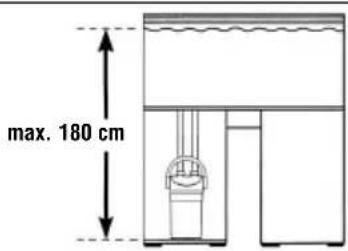
To achieve optimal operational safety there must be a maximum of 180 cm between the surface of the water and the bottom of the filter.

For your own protection, it is advisable to make a loop in the electrical cable to catch drips and prevent any water running along the cable from entering the socket.
If an extension socket is used, it must be placed above the filter mains connection.
See cover flap:
1 Threaded socket 2 suction and pressure joints 3 pump head 4 safety lock 5 sealing ring 6 preliminary filter pad 7 preliminary filter 8 lid 9 carbon filter pad 10 fine filter pad 11 filter media containers with filter material 12 slot 13 multi-function lever 14 filter canister 15 rubber feet 16 pump chamber 17 impeller 18 ball with ball cage 19 pump chamber cover 20 2 x union nuts 21 2 x shut-off taps 22 outlet elbow 23 intake pipe with intake strainer 24 suction holders.
A-D Installation
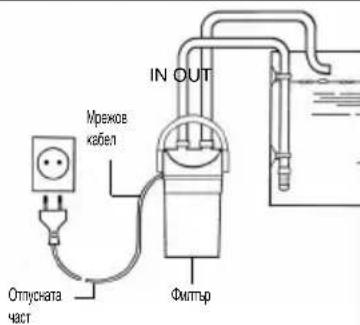
First stick the 4 rubber feet to the bottom of the filter canister. The shut-off taps are then screwed onto the suction and pressure joints of the filter - which can be rotated in the required direction of the hose - by means of the threaded sockets and are marked with the stickers IN/OUT (Fig. B).
Then fix the outlet elbow to the aquarium by means of the suction holders. Join the intake pipe with the intake strainer and attach them to the inside of the tank by means of the suction holders (Fig. C). Cut the hoses to the required lengths and push them onto the intake pipe and outlet elbow for at least 1 cm. Make sure the hoses do not sag.
Connect the intake pipe to the suction joint "IN" of the filter, and the outlet elbow to the pressure joint "OUT" (Fig. D). Secure hoses at both connections by tightening the union nuts in the direction of the pipe.

Note: All hose connections must be checked at regular intervals for correct fitting.
E-G Initial operation
The external filter already contains the necessary standard filter material made of special filter pads, a preliminary filter with filter foam, a carbon filter pad and a fine filter pad. Rinse the filter material in the basket und running water until the water runs off clear. When you have finished installing the hose, the device is completely ready for operation.
Suction function: Now open both shut-off taps on the hose connections (Fig. E) and slowly move down the multifunction lever until it is flush with the safety lock (Fig. F), lever position ②. Water is hereby sucked out of the aquarium and the overflow is established, so that the filter canister fills automatically.
As soon as the water begins to flow into the filter canister, slowly move the multi-function lever back to its vertical operating position until it locks noticeably into place (Fig. G), lever position ①. Once the system is completely filled, the filter is put into operation via the mains connection. WARNING: If the system is operated in lever position ②, mechanical and biological filtration cannot be guaranteed.
H - M Opening and closing the filter
Opening:
IMPORTANT. First close the shut-off tap on the suction side "IN" (Fig. H), and afterwards the tap on the pressure side "OUT" (Fig. I) before disconnecting the mains plug (Fig. J). Loosen both taps by turning the threaded sockets 1 to separate the hose assembly from the filter.

WARNING: If the taps are not separated from the pump head the filter cannot be opened.
Now slowly move the multi-function lever into its horizontal position ② and then release the safety lock by applying strong pressure (Fig. L) so that the lever can be pushed over until it is touching the filter canister (Fig. M), lever position ③ . The pump head is thereby automatically pulled out of its seal and can be taken off.
Closing:
IMPORTANT. Never fill the filter canister completely with water. For fitting the pump head the multifunction lever must be flush with the filter canister, lever position 3, so that the two side bolts on the pump head can be fitted into the slots of the lever. IMPORTANT. When closing, make sure that the sealing ring fits into its groove all round the canister.
Then move the function lever slowly over the safety lock back to its vertical operating position, lever position ①, whereby the upper part is automatically pulled into its seal.

Make sure of proper handling to avoid jamming your fingers.
N - R Cleaning and care
Wash out the filter media at regular intervals and replace it after every 2-3 cleaning operations. You will notice that it is time to exchange the filter material when the water outflow of the filter reduces noticeably.
For initial operation the filter contains a carbon pad, which is used for adsorbing residues of cleaning agents, amongst other things. Remove the carbon pad from the lid after approximately 2 weeks, since the cleaning power is then exhausted.
First close the shut-off tap on the suction side "IN" and then the tap on the pressure side "OUT" before you unplug the device from the mains (Figs. H-J). Unscrew the threaded sockets of the taps to separate the hose system from the filter. Then the filter is opened by means of the multi-function handle, as described above.
Remove the preliminary filter (Fig. N) and then the filter inserts (filter baskets), which are completely interlocked with each other (Fig. O) and which can be separated by a slight twist (Fig. P). Remove the preliminary filter and rinse it in lukewarm water (Fig. Q). Remove the white filter pad from the lid and renew it after every cleaning process (order no. 2616320).
Place the fine filter pad in the lid and then twist the lid on to the filter inserts (filter baskets). The preliminary filter is then installed on the lid (Fig. R).
The EHEIM ecco filter is particularly suited to water treatment by layer filtering which is approximately 30% more efficient than the method with standard filter media. For this purpose we recommend EHEIM filter media with mechanical, biological, adsorptive or chemical functions.
The layers in the filter inserts are always arranged according to the displayed model (see cover page).
S - U Pump chamber, ball valve and sealing ring
From time to time you should clean the pump chamber, ball valve and hoses in order to ensure the perfect functioning of your filter.
The pump chamber can be opened by pressing both cover plates together and simultaneously pulling upwards by the bearing (Fig. S). The pump wheel, chamber, cover and cooling channel are cleaned with a soft brush (order no. 4009560). Afterwards the cover is pushed back onto the pump head until the spring catches lock.
The ball valve is accessible when the pump chamber is open. It ensures automatic sealing during the suction phase when the filter is started up. Pull out the ball cage (Fig. U), extract the ball and clean the parts with a soft brush. When replacing the ball make sure that it is mobile.
To ensure proper functioning of the multifunction handle the o-ring must be dampened or lubricated with vaseline. If it becomes more difficult to move the multifunction handle after a while you should renew the o-ring (order no. 7314058).
For a convenient cleaning of the hose system of your aquarium we recommend the EHEIM Universal cleaning brush - order no. 4004570.
MERCI
TeNdoJXHbI 6bITb NOHa6nOHe HTo6bI He DoYCTMb BO3MOxHOCTN DnA DeTei rpaTb HAcOCOM.

20cm

MarHHthbIe NOIA 3THX yCTPOcTB MORY T npBecTn K 3JIeKTPoHHbIM Hm MexAHuecknM NOMEXAM NnIOBpeKdEHNM. 3To KacaetcA
B T.4. KapdnoctHmMyIaTOpOB. CoOTBeTCTByIOUme 6e3ONaChbIe dNCTaHcIM yKa3aHbI B pyKOBoDcTBax K 3TNM MednHckm npH6opam.

PnpnoBedeHmTexHMueckoro 06cnyKbAHMaCyueCTByET OnaCHocTbpnaDaBnBaHHn PnIbueB N3-3a BblCOKnx MarHHTbIX yCNII.

JaHHoe H3dene He BbI6paCbIBaTb C 06bIyHbIM DOMaUHM MycOpom. CdaIte N3dene B MeCThB IpyHK Tc6opa n yTuIN3aunn.

C yETOM MHOO6pa3n JAKOB N NOJINPOBOK, HcNOJb3yUHxCN Pn O6pa60Te DpeBecnHb, HE NCKIIOuYaeTc, YTO HOKKn YCTPOJCTBa MOrTyOCTaBtB CNeDbHa Me6eN NIN NapKeTe, BbI3BaAHHbIe XmHueckOpeakUne. No3Tomy He CTOnT yCTaHABJIuBaTb np6Op Ha depeBAHHyIONOBepXHOCTb 6e3 NoJIOKKn.

IpoNyKT anpOboBaH COOTBETCTBeHHO COOTBETCTByIOUIM HAHOHaJIbHbIM COOTBETCTByET HOpMaM EC.
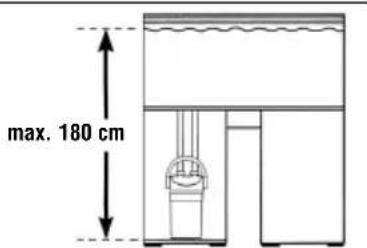
ДЯ ONTIMaJIbHOJ 3KcIpyatauOHHOH HAdEHXOCTn PACCTOAHHE MeKdN NOBepXHOCTbIO BObl N OCHOBAHmФЛbTpHa He dOJIxHO npeBbIaTb 180 cm.
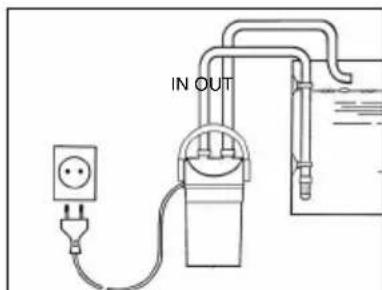
IaBae6e3oNaChOCTn peKomeHdyem 06pa3OBaTb n3 cTeBOrO Ka6eN KOJIbUc, YTO6bl NCKJIIOHTb BO3MOXHOCTb nonadaHn BObl B pO3ETKy.
Pn HcNoB3OBAHnn pacpepeHtneBHO pO3ETKn ee cIeYet pa3MeCTb HaD CeTBeBIM pa3bEMOM fNJIbTpA.
CM.pa3BOPOT:
1 BnHTOBa MyfTa 2 WtUepa ShnaHroB c HanopHO CTOpObH N CO CTOpOH b CacbBAHH 3 TOnOBKa Hacoca 4 3anop 5 YnIIOTHInTeJIbHoe KOJIbUo 6 XoNCT ΦINbTPa npeDbapNTeJIbHO OYNCTK 7 ΦINbTp npEbnBPteJIbHO OHCTKN 8 KpbIbka 9 AKTINBnPOBaHHb I yrObl 10 FInbTPyIOuM 3EnMeHT ToHKo OYNCTK 11 Kaccetbl dnn FInbTPyIOuero MaTePnAra 12 OTBepCTne 13 MHorOpyHKUoHaNbHaR pyKc 14 Kopnyc FInbtpa 15 Pe3INHOBle amOpTN3aTOpbl 16 Kamepa HACoca 17 PoTOp 18 POnIaBOK c wapNKOM 19 KpbIbka KamepbI HACoca 20 2 x 3axIMHbIe raIKN 21 2 x 3anOpHbIe KpaHbl 22 BbIXoHDHO NaTPy6ok 23 BcacbBAIOuM nATpy6ok c pacceKaTelem 24 PnpCockn.
A-D YcTaHOBka
HaKneIte Yetbipe pe3HOBbIX amOpTN3aTopa Ha dHO fNbTpA. YcTaHOBnTe Ha 7Tyuepa fNbTpA - nobopauBaIOuIeCra B HanpaBneHm UNaHROB - 3anOpHbIe KpaHbI HaKneIb CmBONbl IN/OUT (BXoJ/BbxOJ) cm.pnc.B.
PnKpEnIe BbIXoHoi naTpy6ok K CTeHKe aKBapNyma C NOMOuBIO npncocOK. HadeHbTe pacceKaTeNb Ha BCacbIBaUoUsn naTpy6ok N npKpEnIte erO K BHyTpEHHen CTeHKe aKBapNyma C NOMOuIO npncocOK (cM.pnc.C). OtpexbTe 7naHrN Heo6xOIMoN dInHbI HaneHbTe IH MmH.1cm Ha BxOHDn I BbIXoHoi naTpy6kn. CneDnte 3a TeM, YTO6bl 7nAHN He npOBnCann.
IOnCoeHNHte BxOHDn nATpy6OK K WtUepey 7naHra CO CTOpOHb BCacbIBaHn IN, a BBIXoHDn nATpy6OK - c HAnOpHO n CTOPOHb OUT (cm.pnc.D). 3aФнкCpYnTe 7naHn Ha 06Oux KpaHax n 3akpyTnTE 3axmHbIe raIKn.
E-G Nyc
Hapyxhblnbp yke coepknt Heo6xodmble cTaHdapThbIe nIbtpyioune MaTePnaJIbCneuaJIbHa
nIbtpyouaCpeDa, r6ytaBn nIbTp npedBapntelbHO ONUCTKN, XONCT N3 aKTNBnPOBaHNO YrJN I
XoNCT nIbTpa npedBapntelbHO ONUCTKN. PocJe 3TOr TOaTeJIbHO Ipomblb nIbtpyOuyo Maccy B
KOp3InHe npOTOnHO BOIO, noka BOda He cTaHET pOzpaHNo. PocJe NOdklUoyen HsJaHROB yCTPOiCTBO
TEXHnueCKn rOTOB K 3KcPnyatauIN.
BcacbBaHne: oKpOte 6a 3anOpHbIX KpaHa (cm.pnc.E) n MedJeHNO onyCTnTe MHOroФyHKUHOHaNbHyO pykY do ynopa, YTO6bl OHa KOchynacb 3anopa (cm.pnc F), nonoXeHne pykN. Ppn 3atom aBtOMaTHueckn 6ydet npOn3BODntbcr 3abop BODbl n3 akBapnMa n BOOC6poc.
Korda qnnbTp HAnonHntcra BDOJ, MedneHNO nepeBedeIte MHOROyHKUHOHaNbHyo pyuKy B rOpN30HTaIbHoe noIOXeHne (cm.pnc.F), npn 3tOM Bbl dOnxHbI OuyTntb, yTo pyka 3aФнксИрOBanacb (noIOXeHne ①). Nocne toro kak cNCTema nonHOCTbIO 3anONHNacb BOdO, nOdKnIOUHTe qnNbTp K 3NeKtpocetn. BHMaHne: ecnn qnnbTp 3KcnnyatnpyETc npn noIOXeHnn pyckn 2, to MexaHueckar n 6bnOnOrnueckar ouNCTka He rapaHTnpYOTc.
H-M OTKpbIbAHne 3aKpbITne fMbtpa
OTKpbBaHne:
BHIMAHNE! 3aKpOte 3anOpHbIe KpaHbI CO CTOpOHbI BCacbIBaHHa FmNbTpa IN (CM.pnc.H), a 3aTeM - KpaHbI co CTOpOHbI OUT (cm.pnc.l) do TORo, kak Bbl OTKnIOuHTe 3neKtpOnHTaHHe FmNbTpa (CM.pnc.J). CHIMITE KpaHbI, OTKpyTnte 3axMMhIE raIKN (18) n OTCoeDNHtE WnAHn. BHIMAHNE: He OTKpbIBaTb FmNbTp Do Tex nop, noKa He 6ydyT OTcoEDNHHeB I WnAHn.
MeIeHNO nepeBeNTe MHOOyHKUHOHaBHyO pyKy B rOpN3oHTaBHOe NOXeHne 2, de6nokpyte 3anop (CM.pnc.L) n onyCTnte pyKy B NOXeHne 3 (CM.pnc.M). T.o. npONCXODNT ATOmatueckar pa3repMetuaqna, n rONOBky HAcoca MoxHO CHrTB.
3akpbitrne:
BHUMAHNE! HnKOrda nonHocTbIO He 3aONHnIe FnIbTp BDOi. O6raTeNbHbIM ycNoBnEM nIpaBnIbHO yCTaHOBKn rONOBKn FnIbTp a RbIaTcR NIOTHoe npMbikHne MHorOFOyHKUHOHaBHO pyuK K KopNcy FnIbTp a, nonOKeHne ③. BHUMAHNE! Pn3aKpbITn FmIbTp a y6eINTecb, YTO yNlOTnHTeNbHOe KObUo yCTaHOBNeHO npabnIbHo. 3aTeM MeDneHNO BepHnte pyuKy B BePTnKaIbHOe nonOKeHne ①.
N-R Ounchka nyxoid
Perynpho npombBaTe fnnbtpyuOni MaepnAn n MeHnTe nocne 2-3 ouHCTOK. CbuDteBcTBOM TORO, yTO fnnbtpyUOni MaepnAn Heo6xOIMo 3aMeHHTb, rBnAETcra cnaI BODoc6poca.
Для поворо Incnoьзовая Фньтс codepxnt xoJCT n3 aktubnpoBaHoro yrJRA, norlouaIOUero OCTaTKI cpeDCTB ДЯ OChTkn I T.I. Y6paTb n3 KpbIshKn XOJCT n3 aktubnpobAHO rJRA npIMepHo uepe3 2 HeJIeN, tak KaK bYdET NcHepNaHa OOnuauaONa CnOCOBHocTb.
OTKnHouHTe 3nEKTponntaHne FInbTpa, 3akpoTe 3anOpHbIe KpaHbI CO CTopoHbI BCacBbAHn IN, a 3atEM c HAnopHO n CTopoHbI OUT (cm.pnc.H-J). OTcoeHNHTe WnaHn, OTKPOHTe, KAK ONNCAHO Bblwe, FInbTp.
BbHytbppeBapntelbHOn OunchKn (pnc. N) n 3aTeM - pInbtpyUoune 3JeMeHTbl (pInbtpyUoune Kop3nHb), KOTOpbIe coedHehJI MExdy Co60n (pnc. O) n pa3beDnHIOCTK kpyTbIM DBrHexHem (pnc. P). I3BLeueXoJcT pInbTpappeBapntelbHO OunchKn I npOMbITb Ero B TeNoBoB Boe (pnc. Q). Prn KaKdoN OunchKe BbIHMaTb 6JIbI pInbTpObaNbHbI XOJCT n3 KpbIuKN I 3aMeHrTb erO (apt. No 2616320).
BCTaBnTb XoJcT cInbTp a ToHkO uNCTKn B KpbIuKy i NocJe 3TOrO HaJeTb Ha cInbTppyIOUne 3JIeMeNTbI (cInbTpkyUOuNe KOp3uHbI). NocJe 3TOrO cInbTp npEaBapntbHOu OChCTKn MOHTnpyETcHa KpbIuKn (pnc. R).
ΦnNbTp EHEIMecco npekpacHo NOxOaHT dnn NOcNoHoi OoNCTKn, aΦΦeKTHBHOCTb KOtOp0 Ha 30% 60nbwe B cpaBHeHH C NcNoIb3OBaHne MCTaHdApTHbIX ΦnIbtpyUoXu MaTePnaIOB. DnA ΦnIbTaauM MbI peKOMeHdyem NcNoIb3OBaTb MExaHnueckNe, bNOIoRrueckne, aDCop6bpYooJe n XmNueckNe ΦnIbtpyOuJe MaTePnaIbI ΦnpMbI EHEIM. NocneobatEnbHOCTb yCTaHOBKn ΦnIbtpyOuNX MaTePnaIOB yka3aHa Ha pa3Bopote.
S - U Kamepa Hacocca, wapnkobbl KnanaH ynnloTHntelbHoe Koblco
Дя toro yto6bI Baw phnbTp pfynkunohnpoBan 6e3ynpueHNO, Heo6xOJMo peyraPHO OuetaTb Kamepy Hacocca, wapNKOBbI KnanaH uHaHrN.
Длг OTКьТИЯ Камерbl HAcOca HaxMITE Ha 3aMKn Ha KpbIwke KaMepbl n NOTAHNTe BBePx (cM.pnc. S). Potop, Kamepy, KpbIwky n KaHAn OxnaXdEHHa OYNCHTe C NOMOuBIO MArrkon 7etkn (apr.No 4009560). 3aTeM yCTaHOBnTE KpbIwky KaMepbl Ha MeCTo.
Pn OTKpbIToN Kamepe Hacoca Bbl nonyaeTe DocTyn K wapNKOBomy Klanahy, KOtOpBHy obecneHbAeT abTomatNueckoe 3aHpaHne BO Bpemr Nodaun BoDby. N3BneKHTe nonnaBOK (cm.pnc.U). 3aTEM wapNK n Ouchntte nx C nomoubEO epwnka. Bo3BpauaJr nonnaBOK Ha MeTO, CneNTe 3a TEM, YTO6bl wapNK OCTabANCR NOdBHXhIM.
YnnotHntenbHOe KOnbO Ha rONOBKe HAcoca CcenaHO n3 CamOCMa3bIbaUoeroCRA MATEPnana. Ecn co BpeMeHem DnXKeHne MHOROyHKunOHaNBHOpyKN 3aTpynHeTcR, To Heo6xOIMo 3aMeHHT b YnnotHntenbHOe KOnbO (apr. No 7314058). Dnra YnCTKn WnAHROB peKOMeHnyETcR hCnONb3OBaTb Ha6Op yHnBepcaNbHbIX epwnKOB (apr. Ne 4004570).
BJIAGOAPIM,
Ye 3akynIXe Baun HOB qinIbEHEIM ecco, KOITo Upe3 CBOITe pa3Hoo6pa3HN ppeIMCTBA NO OTHOHeHne Ha cyHKun, 6opabeHne n KaueeTBo ue Bn y6eDi BvB BnCOKIne cn KaueCTBa. INHOBatNBa TEXNka, CBp3aHa C nKIOUHTeHNO IeCHO N0JI3BaHn 3aONMHAu CE dN3aHn - TOBa Ca OTJNUHTeHNTE 6Be3n Ha hAI-HOBOTo NOKOIeHne qinItpn EHEIM. Pe3yIiTat OT mHTeHnBn PA3pa6OTKn, KOITo BBBCAko OTHOSeHne e Ha BNCOTata Ha CBp3aHInTe C npAKTKaTa n3NCKBaHn Ha npNTexKaTeINTE Ha aKBapnuMn.
Dopn CAmo BbHHaTpa HcHbpa HAcOyBa BHMaHHeTO KbM HObTa TEXHuecka KOHcIeIIN. B KaeeCTBOTO cN Ha MyTNPhyHKUHOHaJIHO Noc6ne, IpaKTHHaTA dpbXka 3a HOceHE N3TbHNBA pa3nnHn FyHKUIN: CnykN 3a 3aJeICTBaHe HA INTErpipaHaTc McyKaTeHn FyHKUIN 2, C KOHTO CE OCNpyRbA yIO6HO NyCkAHe B EKCIIIOatauPn pIn HCTaIIPAHe n CNeI NOHCTBaHe. OCBEN TOBa FmITbPbT LECHO Ce OTBapr H 3aTBapr CAmO C eHNO XbaUaHe Ha dpbXkKaTa 3 KaTO B CbIoTO Bpeme 3acToOpRaBaHeTo e DoCTaTbHNo Be3OnaCHO 1.
UcpoCTBOTO ce npednara 3aeHNO c Heo6xoMmNf pntbpeH MaTePnA N MoKe da Ce n3No3Ba BeHnara. IpaKTuHnTe pfntbprH KOuHnU, Bp3KnTe Ha npedna3HnTe Mapkyu n CnpaTeJHnTe KpaHO
Be n3KIOHHTeIHO yNECHBAt 06cnyXbaHTo I NOIDpBXkKaT. BlaROpApeHne Ha KoOpINHpaHOTo CbOTHOSeHne MOUHOCT Ha NOMTa/OBem,ФИNTbPbT EHEIM ecco oCnryprBa HAnEJxNHO IN TpaHNO IOuHCTBaHe C HEnpeKbChaTcNPKyNAuN I EHNOBpeMeHHo HacnUaHe HA BOHa Ta HA akBapyma c KncIopOd. TapaHnI3a ONTImaHNo ppeHCTBaHe Ha BOHa T yCneUHa AKBAPrCTNa.


Yka3aHn 3a6e3oNaCHOCT

Ipeyn nyckahe Ha yctpoictBTO B EKCNIOATAUIN IPOyete Hn-BHIMATEHNO pkoBOOCTBOTO 3a EKCNIOATAUIN CnA3BaIne Yka3aHmTA 3a6e3oNaCHOCT.3aDbJnxTeHNO e da cbx-paHBAte Do6pe Ta3n INCHtpkun 3a EKCNIOATAUIN.

Ia ce n3noJ3Ba cAmo B nomeueHn. 3a akBapncTnHn ceHn.

Ipei Da NotOnITE pKaTa CN BbB BODaTa Ha akBapnMa, n3KIOUeTe BCNUKn HAMpuAnCe B He enEKeTpoypei.

3axpaHbauNT ka6en Ha yctpoiCTBTO He ce noDMHe. BbHnHnT MPeKOB Ka6en nIa 3axpaHbauNT 6LOK He ce nonpABrA. Ako Ka6eNt e nobpeDeH, yctpoiCTBTO He TpR6Ba Da ce no13Ba NOBEe. Ppi NoBpeHa BaHsHnRA Ka6en nIa Ha 3axpaHbauNra 6loK He ce pa3peWaba Te da 6bDat no13BaHNo-HaTaTBK.CbpxKeTe c CBaunr TbpRoBeu nIa Cbc cepBn3 HA EHEIM. He npErbaaTe ka6ena.

TOBA yctpoiCTBO MOKeJa ce NoI3Ba OT Dea Ha8 rOdiuHa Bb3pact NnOT Iuca C orpaHnueHn Hn3uYeCKn, CETNBn NnYmCTBeHn CnOCo6HOCTN, CbOTBEHO OT Iua 6e3 DoCTaTbUHO ONIT N3HaHn, CaMO aKO TOBa CE cIyBa NOd HA3Opa HA o6yuHo Iuie, aKO caNHCTpyKtupanH 3a 6e3onachOTO 6opabHe C yctpoiCTBTO n pa3bnpaT onachocHTne, pOn3TNuaOn OT HerOBTo NOI3BaHe. He ce pa3peWaba Dea da Irpaart C yctpoiCTBTO. POnICTBaHeto NIOdpbXkata OT CTpHa Ha NoI3BaTeHa He TPr6Ba Da ce N3NbIHHBat OT Deua 6e3 HaI3Op.

20cm

MarHHTHe NOIeHa Te3n yctpoNCTBa MORa Da npedn3BnKAT eNeKtpOHn Hm MEXAHUHN CmUeHn N NOBpeN. Toba ce OTHacn 3a NeCMeKnbpTe. Heo6xOdmnte 6e30nachn pa3cTOnHHn ca nocOeHn B pkoBOdCTbata Ha Te3n MedunHckn ypeu.

Korato ce n3bJIHBAt DeHOCTHn NOIOdPbXkata, CbIeCTByBa ONaCHOCT OT npema3BaHe Ha npbcTne 3apaND rOJEMITE MRHNTHCIN.

To3 npOyKT He ce n3xBbPnA C 6ntOBnTe OTnabu. IpeaIe ro B MeCTHnR nyHKT 3a OTnabu.

Tb KaTo Ce 3n03BaT Hau-pa3Hoo6pa3H 6On n noJNTpy 3a o6pa6oTKa Ha dbpBecnHa, Kpaetata Ha yctpoCTBOTo MOrat Da ocTabr BnIMn CneI NO Me6eN nIN No napKeTa, KoTeO ce Ipeu3BnKBA OXmUHa peakun. 3aTOBa He Tp6Ba da OCTaRte yctpoCTBOTo Bpxy DpbBeHN NOBpXHOCTn, aKO To HE e 3aUnTeHo.

IpoodykTBt e oOobpen B CbOTBETCTBnE C HauNoHaJIHnTe pa3npoep6n N DnpeKTHBn N OTROBapra Ha cTaNdaptnte Ha EC.
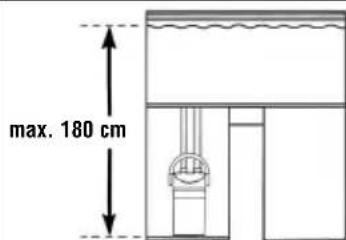
CnabaiTe N3NCKBaHOTo pa3cTOnHne 3a BnCOUHa. Mekdy BoDHaTaNOBbpxHOCT NdbHOTo HaΦmITbpa TpR6Ba Da HMa He NoBee O180 cm, 3a da ce NOCTMRe ONTMaJIe HauHH Ha pa6Ota.
3a Baawata co6cTBeHa 6e0nacHocTe npenOpbHTENHO MPexKOBnHT Ka6e Da ce pa3noLoXn Taka, Ye Da ce npedotBpatn nonadHe Ha eBentyaHOn CTuAaata Ce no Ka6eNa Boga B KOtAka. Ako Ce n3non3Ba pa3KnOHTen, ToT Tpa6Ba Da ce NoCTaHn MpeKOBata Bpb3Ka Ha fHNTbpa.
Bnx obpbuaa nce kanaK:
1 pe360baHa BtYka 2 CMyKATElen H HanopeH uCyep 3 TnaBa Ha NOMaTa 4 3aKJIIOUBAu MEXAHINbM 5 yIbTHHTeIeH NpBCTeH 6 npedfnnTbpHa NOJNOXKa 7 npedfnnTbp 8 Kanak 9 fNITbpeH NbIHeK aKTINBeH BtIeH 10 cHa fNITbPHa BAta 11 fNITnpaun eJeMeHTn C fNITbpeH MaTepnA 12 Boauch 13 MyTNcYHKUHOHaJeH IocT 14 fNITbpeH CbD, 15 rMaeh TaMNoH 16 Kamepa Ha NOMata 17 paBOTHO KOJIeHO HA NOMATA 18 CaMa C bOpd Ha CaMeH Jarep 19 KaNAK Ha KamepaTA Ha NOMnTa 20 2 X XoJIeHN DEPOBn RaIKN 21 2xCnPaTeHN KpaHOBE 22 N3NyCKaTeJeH OTBOP 23 CMyKATEnHa Tpb6a C fNITbPHa KOshnua 24 BakyUMn DtpxKaun
A-D MoHTax
Hai-Hanpei 3aIeTe YeItpuTe rEmHa TaBHOHa HbHTo Ha cHtbpHnCbD. CnpaTeHNHe KpaHObe ce 3akpenBaT npN DaTa 7yepa Ha cHtbpA, KOIO NO JeJAHHe MORa T da CE DnKAT B NocKaTa Ha BoJaHa Mapkya, KaTO 3akpenBaHoTo CTaba Ype3 3aTgAnHe Ha pe36oBaHIne Btynk1, MapKnpat ce cbc CTnKepn IN/OUT (fHr.B).
Iocne n3nyckatEnHnT OTbOp Ce MOHTnpa KbM aKBapNyma C NOMOHTa Ha BaKyyMn DpbXaH; cMykATEHaTa Tpb6a N pInTbpHata KOuHnUca Ce CbeDnHBaT N C NOMOHTa Ha BaKyyMn dukCaTOPn Ce dNKcnaprKaBm BbTpEuaHaCTeHa Ha akBapNyMa (pnr. C). OtpexTe MapkyuHte Do Heo6xOImata DblXnHa I rHaHeHeTe Ha nohe 1 cm Bbpxy cMykATEHaTa Tpb6a N npelNBHO KOJHo.BaxHo e MapkyuHte Da He npOBncBat.
CbpxkTe CmykATEHATA Tp6a CbC CmykATEHNA Uyep Ha cnilTbpa IN, a n3nyckateHnO TBOp c HanopnH uyeep OUT (mR. D). Obe3onacete MapkyHTe npi Dbata KpaHa, KaTO 3aterHeTe XoJIeHdePOBNTe raIKN B NOCOKA KbM MapkyHa.

Yka3aHHe: PeoBHO npOBepBaTe npaBnHTo nOLOXeHne Ha BCuKN uHaHBOv Bp3Kn.
E-G Pnyckahe B ekcnloataa
BbHnHrT pOkOMnKToBaN C Heo6XoIMM MaTePnA 3a CTaHApTHa PnITpaun Cbc CneuaHn PnITbPHN Macn, C npedpntbp c pntbphra b6a, pntbpeh nIhHex akTNBEH BbIeH N PnHa PnITbPha BaTa. CneT OBa npommTe MHorO do6pe PnITbPhata Maca B KOWHcata NoT Teuasa BODa, DOKATO pncTaHe da Teue MbTHa BOa. CneD CBbP3BaHe Ha Mapkya, yCTPOINCTBOTO e rTOBO 3a paobTa BTexHnuecko OTHOWeHne.
CmykaTeHaФyHKuHr:OTbOpTe Dbata CnnpaTeHNKpaHa Ha ⅢaHROBHe Bp3Kn (ΦnR. E) n6abHO cnYChTe MyIHTNcHIO-HaHnHa loCT,doKaTO CTnHete OgrAHueHneTo Ha 3akHouBaun MExaHn3bM (ΦnR. F),noNoXeHne Ha IocTa 2.3anOvBa 3acMyKBaHe Ha BOda OT aKBapHyMa, CTnra Ce Do npelNaHe, B pe3yNTaT Ha KOeTo ΦnITbPHnT CbD 3anOvBa ABOtMaTHUHO da ce IIbJIHn.
Bednara 10m BODaTn NOCTbNN BvB PnITbPNH CbD, 6abHO npemecTe MyNTuYHKUHOHaHN HIOCT BvB BEpTNKaHn paOToHa nO3uH, DOKato upaKHe (Pur. G), noLoXeHne Ha loCTa ①. Ako CnCTemata e HanbJIHeHa DOkpa, PnITbPbT ce NcCKa B EKCnloatauH, KaTO Ce BKNouH B MPexaTa. BHIMAHNE: Ako PnITbPbT paBOTn B noLoXeHne Ha loCTa 2, He CE OCNrypRABa bNOIorHuHa mExAHnuHa PnITpauH.
H-M OTbapnHe n 3aTbapnHe Ha qntbpa
OTbapnHe:
BAKHO. Han- Hanpe 3aTbOpTe CnpaTeHnKpaH OT CmyKaTeHaTcTaHa IN (pHr. H), cJeT OBa KpaHa OT HanopHaTcPaHa OUT (pHr. I), npEi Da n3IbPnate uenceLa (pHr. J). Pa3xnaBete Dbata KpaHa, kato 3abbpnte pe360BaHaTbTyNka 1, 3a da rO TdEnIte ot pInIbpa.

BHIMAHVE: Ako KpaHOBeTe He ca OTdeJeHn OT INaBaTa Ha NOMnTa, fJITbPbT Hama Da ce OTBOpN.
Cera 6aBHO npemecte MyIHTNFOHKUHOHINRAOCT B XOpH3OHTAINOJOXKeHNE 2 N CbC CNHe HATNCK OCB0OJeTe 3aKIOUBAuMEXAHn3bM (prr. L), Taka ye IocTbT da MOKe Da CE PJIb3He HaI Hero, DOKaTO ONpe PJIbTHO BbB QINITbPHnCbD (PmR. M), NOJoxHeHa NoCTa 3 . Iaabata HA NOMnATA ABOTMATNUHO Ce N3DbPnBa OT YnIbTHEHnETo Cn IMoKe Da 6bDe n3BaDeHa.
3aTbapHe:
BAXHO. HnKora He nbHHeTe fntbPnna CbD Dorope c Boda. 3a da noCTabte rnaBata Ha NOMnata, MyNTuYHKUHOHaHHnTIOCT Tp6Ba Da onnpa BvB fntbPnna CbD, NOLOKeHne Ha NoCTA 3, 3a da MOKeTe da CNOKeTe DBaTa CTpaHnHn BOIHa NOMHeNaTc rnaBa BvB BODaHTe Ha NoCTa. BAxHO. Ppi 3aTbapHe BHMaBaTe yNtBHeHneTo da lekN nIbTHO B KaHana.
CneI TOBA 6aBHO BbPHeTe cyHKUOHaHINJIOCT 3aKJIIOuBaUNM MExAHN3bM BBB BepTKaIHO pa60THO NOLOXeHne, NOLOXeHne Ha IocTa 1, KaTO rOpHaTc YAcT cama TpAba Da ce NOnuOHnpa BC0eTo yNtBTHEHne

Pa6oTe npabnHIO n cnopey yka3aHaTAt, 3a da npedOTbpaTne 3akIeUbaHe Ha npbCTnTe.
N-R POncTbaHe nPoaDpbXka
I3MBAtepeIOBHO mATEpna, a Cne 2-3 n3MBAHRA TO CMEHrTe C HOB. MoeHTbT 3a CMHa e HAcTBnJI, aKO OT fNITbpa 3aONoHHe da I3JIN3a DOCTa IO-MaIKO KOJNUcEeTO BODa.
3a nbpbohaaHTo Cn nyckahe B eKcNnoataaiae fntbptteobopydBaH c nntbpeH nIhHex aKTIBeH BbrHe, npe3 KOITo ce aDCop6npaOCTaTbUnte OT NOYNCtBaun npenapTu n dp. Cneq OKOLO 2 cEmNUu N3BaTee fNTbPnH NJIHHex aKTUBEH BBrJEN OT KanaKa, TbKATO pueuNCTBaUata My cnOCO6HOct e n3eepnaHa.
Ibpo 3aTbopete CnpaTeHnna KpaHa cmykaTeHnata ctpaHa IN, a nocne n KpaHa ot HanopHaTa ctpaHa OUT, npedn da n3dbpNaTe mpeKOBn uencen (prr. H- J). Pa3xna6eTe pe36oBaHnTe Btynn Ha KpaHOBeTe, 3a da OTdeJIte CnCTemata ot Mapkyu. Cnei TOBa fNITbptCe OTBaprpe3 MyNTnФyHKUHOHaHnata DpbXkKa, KaKTo e ONICAHO.
I3BaTe npedfntbpa (fur. N), a cnei TOB a n fuiTpnpaunte elementn (fuiTbpH KOWHn), KOIO Ca 3axBaHaTN edHa 3a dpyra (fur. O) moraT da ce otdeJrT camo c eHNO kpatko 3abptane (fur. P). I3BaTe npIoXkata Ha npedfuiTbpa OT npedfuiTbpa n H3PJIakHe T C XlaKa Boda (fur. Q). I3BaTe 6RNaT a fuiTbPa BaTa OT KanaKa n A CMeHnTe npn BCaKO nouchBaHe (kat. No 2616320).
IocTaBeTe fHa fntbpa BaTcB Kanaka (fR). Cnei Koeto ro 3aBbpte Bbpxy fntpnpaunte noDIOKKN (fNTbpHn KOHNu). Iocne npedfntbpbT ce MOHTnpa Bbpxy Kanaka.
ΦπΠtpbT EHEIM ecco e MHO NOxOJa 3a NOcNoHtpeTpHa He BODaTa, KaTO To3n MeToD ocNpyraBa OKoNo 30% no- rONAM KND B cpaBHeHne Cbc CTaHdApTHaTa ΦπΠbPha Maca. 3a Ta3n ZeI npenOpbVbAme Da ce yIOTpe6RaBt ΦπΠbPm Macn EHEIM cMexAnuHo, bNOJoruHno, aDCop6UOnHNo IIN XmNHyo DeiCTBne.
IocTaBHeTo BvB fHITpnpaunTe noDIOKKn Ce n3TbHnBa cNopei nOcoeHaTa CXema (BnK o6paTHaTa cTpaHa).
S - U Kamepa Ha nomnata, cfepuhen BeHTnI yynbTHnTeJen npbcTeH
OT Bpeme Ha Bpeme ce Hana rnoocmbaHe Ha KaemepaHa nomnata, Ha cpepuHn BeHTnI Ha MapkyuTe, 3a da ce ocunpynpabunhata paobTa Ha Baunr qntbp.
Kamepata Ha NOMATA ce OTBapra, KaTO DBeTe XaIKn Ha KANAKa Ha Kamepata Ce npITNCKaT IN eHOBpeMeHHO ce N3dbpNBat Harope npu cAnpata (Pur. S). Pa6oTHOTO KOJIeNo Ha NOMATA, KANAKa I OXJaNTeJIHNrT KAHAL CE NOUcTBaT C MEKA YeTKa (KaT. No 4009560). CneI TOBA KANAKbT Ha Kamepata Ha NOMATA OTHOBO Ce npITNCKa BbPxY rJabTa Ha NOMATA, DOkATO KyKNKITE Ha 3akONyAknTe UpaKHAT.
IocbIdo cfeepuHnBEHTINmA, KOraTO kamepaTaHa nomnataeOTBopeHa.To3n BEHTINOCNpyraBA ABTOMATUHOTo 3aTbaPHe npE3 CmykATEENHATA p3a npi CTapTnpaHe Ha pntbpa. IV3dbpnaTe caMehn60p (pnr.U), n3BaTe caMaTnOuncTe yactnte c meka YETKa. Korato rno nocTabrte OTHOBO, IneJaTe caMATA da ce DBNXn.
Habnaxhe ynlbTHnTeHNn Hpcteh Ha rnaBata Ha NOMnTa nnr Ho Hamaxete C MaNKo Ba3eHH, 3a da ce rapaHTnpa HerOBTo npabnHO dBXkeHne. Ako CBpeMeTO MyNTuKUHOHaHnT JocT 3aONoHne da CE OTmecTBA BCE NO-tpyDHO, Tpa6Ba da CmeHnTe ynlbTHnTeHNn PpCTeh (KaT.No 7314058).
3a nouchtahe Ha mapkyuite npenopbUbae yHnBepcaHaTa nouchtaa qetka EHEIM, kaT. No 4004570.
感谢您

① nasaHsK ② 1JHsHsHsHsHsHsHsHsHsHsHsHsHsHsHsHsHsHsHsHsHsHsHsHsHsHsHsHsHsHsHsHsHsHsHsHsHsHsHsHsHsHsHsHsHsHsHsHsHsHsH
A-D 电话
从者已早告4个而有必信,其一云。
上 1cm 1
① 1IN"J ^ 一 J ^ 一 J ^ 一 J ^ 一 J ^ 一 J ^ 一 J ^ 一 J ^ 一 J ^ 一 J ^ 一 J

:多在:
E-G
Reproduction or copying - even parts thereof - only with the express permission of the producer.