
TG100NC6 - Boiler GORENJE - Free user manual and instructions
Find the device manual for free TG100NC6 GORENJE in PDF.
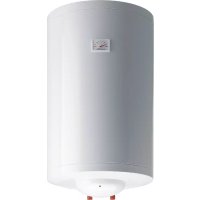



| Product type | Electric storage water heater |
| Brand | Gorenje |
| Model | TG100NC6 |
| Volume (capacity) | 100 liters |
| Nominal pressure | 0.6 MPa (6 bar) |
| Weight (empty) | 34 kg |
| Weight (full) | 134 kg |
| Connected power | 2000 W |
| Supply voltage | 230 V ~ |
| Heating time to 75 °C | Approximately 3 h 55 min |
| Mixed water quantity at 40 °C | 200 liters |
| Energy consumption (maintenance at 65 °C) | 2.20 kWh/24h |
| Anti-corrosion protection | Enameled tank + magnesium anode |
| Dimensions (H x W x D) | 926 x 715 x 200 mm |
| Water connection | Cold water inlet (blue) and hot water outlet (red) – compatible with open and closed systems |
| Electrical connection | Cable H05VV-F 3G 1.5 mm², minimum cross-section 1.5 mm² |
| Adjustable temperature | 20 °C to 75 °C (recommended factory setting) |
| Tank material | Enameled steel |
| Protection anode | Magnesium anode (check every 36 months) |
| Safety device | Safety valve, bipolar thermal fuse |
| Maintenance | External cleaning with mild solution; descaling and anode check by qualified technician |
| Protection class | Compliant with standards IEC 60364-7-701 (installation in wet rooms) |
Frequently Asked Questions - TG100NC6 GORENJE
User questions about TG100NC6 GORENJE
0 question about this device. Answer the ones you know or ask your own.
Ask a new question about this device
Download the instructions for your Boiler in PDF format for free! Find your manual TG100NC6 - GORENJE and take your electronic device back in hand. On this page are published all the documents necessary for the use of your device. TG100NC6 by GORENJE.
USER MANUAL TG100NC6 GORENJE
Dear buyer, we thank you for purchasing our product.
PRIOR TO INSTALLATION AND FIRST USE OF THE ELECTRIC WATER HEATER, PLEASE CAREFULLY READ THESE INSTRUCTIONS.
THIS APPLIANCE IS NOT INTENDED FOR USE BY PERSONS (INCLUDING CHILDREN) WITH REDUCED PHYSICAL, SENSORY OR MENTAL CAPABILITIES, OR LACK OF EXPERIENCE AND KNOWLEDGE, UNLESS THEY HAVE BEEN GIVEN SUPERVISION OR INSTRUCTION CONCERNING USE OF THE APPLIANCE BY A PERSON RESPONSIBLE FOR THEIR SAFETY.
CHILDREN SHOULD BE SUPERVISED TO ENSURE THAT THEY DO NOT PLAY WITH THE APPLIANCE.
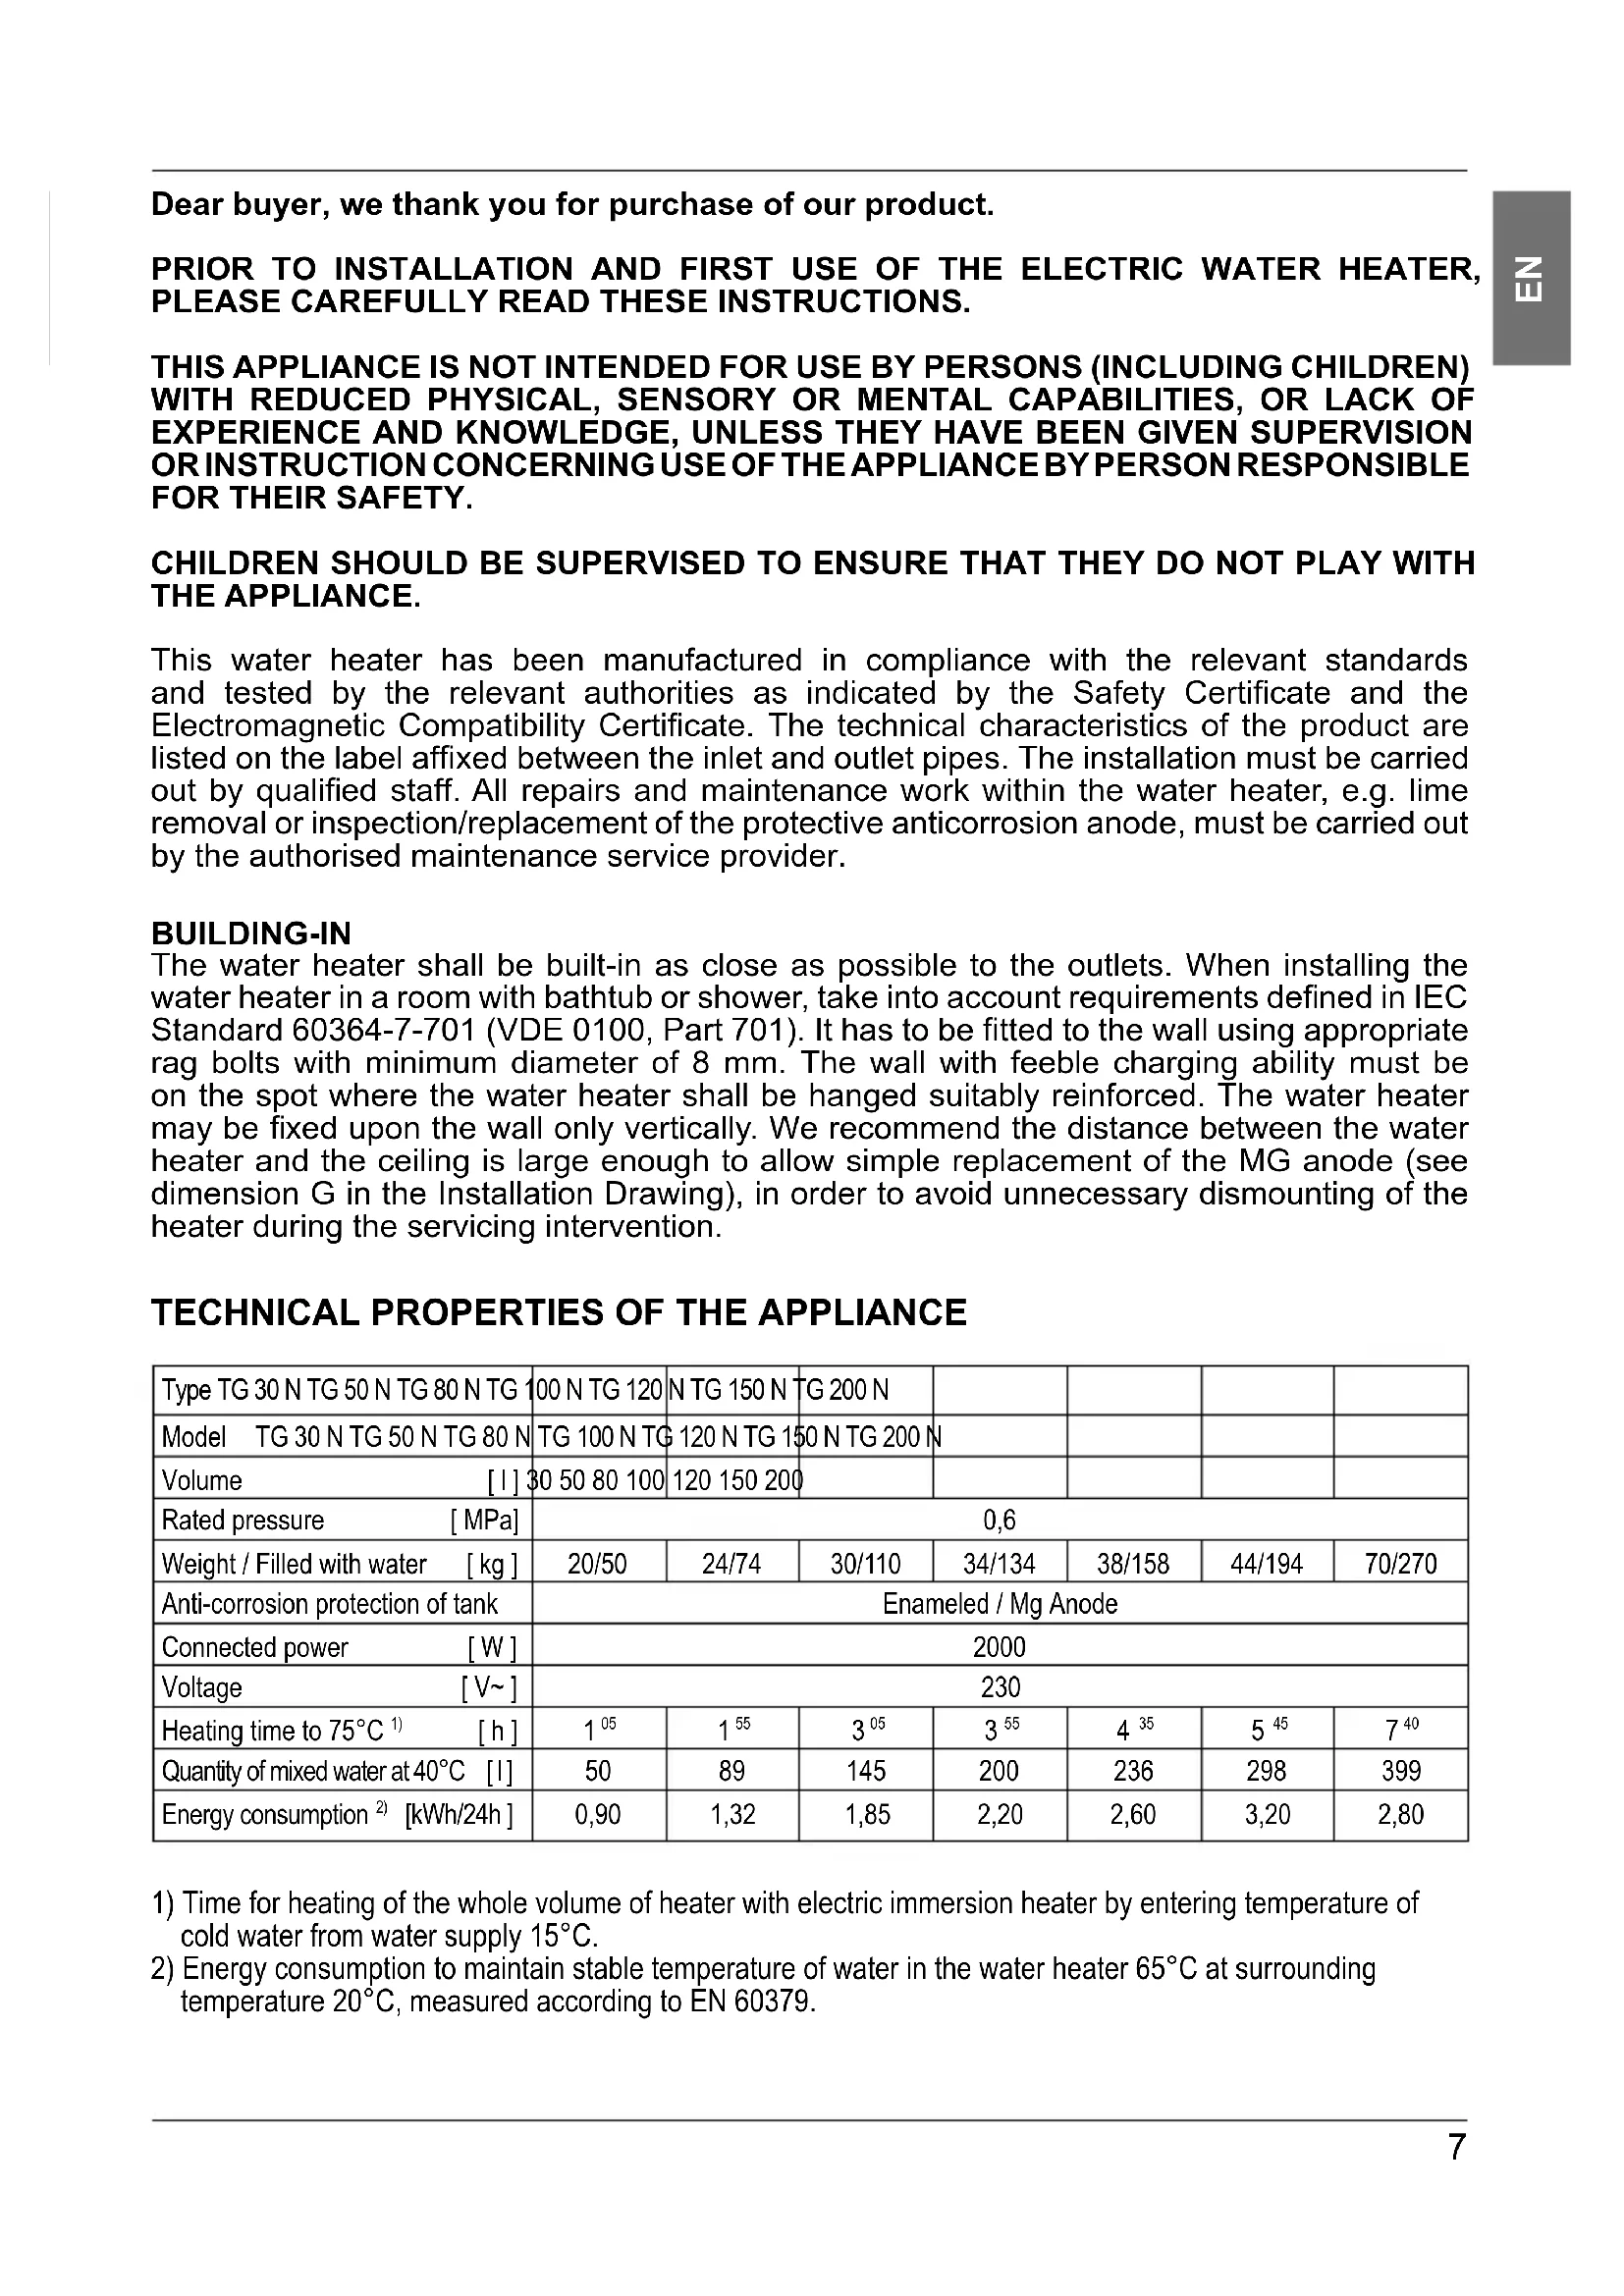
This water heater has been manufactured in compliance with the relevant standards and tested by the relevant authorities as indicated by the Safety Certificate and the Electromagnetic Compatibility Certificate. The technical characteristics of the product are listed on the label affixed between the inlet and outlet pipes. The installation must be carried out by qualified staff. All repairs and maintenance work within the water heater, e.g. lime removal or inspection/replacement of the protective anticorrosion anode, must be carried out by the authorized maintenance service provider.
BUILDING-IN
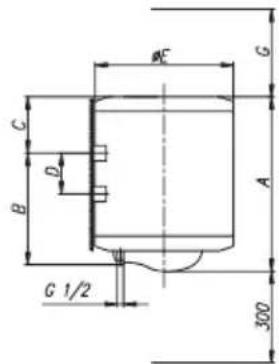
The water heater shall be built-in as close as possible to the outlets. When installing the water heater in a room with bathtub or shower, take into account requirements defined in IEC Standard 60364-7-701 (VDE 0100, Part 701). It has to be fitted to the wall using appropriate rag bolts with minimum diameter of 8 mm. The wall with feeble charging ability must be on the spot where the water heater shall be hanged suitably reinforced. The water heater may be fixed upon the wall only vertically. We recommend the distance between the water heater and the ceiling is large enough to allow simple replacement of the MG anode (see dimension G in the Installation Drawing), in order to avoid unnecessary dismounting of the heater during the servicing intervention.
TECHNICAL PROPERTIES OF THE APPLIANCE
| Type TG 30 N TG 50 N TG 80 N TG | 100 N TG 120 | NTG 150 N | TG 200 N | ||||
| Model TG 30 N TG 50 N TG 80 N | TG 100 N TG | 120 N TG 150 N | TG 200 N | ||||
| Volume [I] | 30 50 80 100 | 120 150 200 | |||||
| Rated pressure [MPa] | 0,6 | ||||||
| Weight / Filled with water [kg] | 20/50 | 24/74 | 30/110 | 34/134 | 38/158 | 44/194 | 70/270 |
| Anti-corrosion protection of tank | Enameled / Mg Anode | ||||||
| Connected power [W] | 2000 | ||||||
| Voltage [V~] | 230 | ||||||
| Heating time to 75°C 1) [h] | 105 | 155 | 305 | 355 | 435 | 545 | 740 |
| Quantity of mixed water at 40°C [I] | 50 | 89 | 145 | 200 | 236 | 298 | 399 |
| Energy consumption 2) [kWh/24h] | 0,90 | 1,32 | 1,85 | 2,20 | 2,60 | 3,20 | 2,80 |
1) Time for heating of the whole volume of heater with electric immersion heater by entering temperature of cold water from water supply 15°C. 2) Energy consumption to maintain stable temperature of water in the water heater 65°C at surrounding temperature 20°C, measured according to EN 60379.
| A | B | C | D | E | F | |
| TG 30 N 459 | 275 173 | - 454 46 | 1 80 | |||
| TG 50 N 561 | 365 185 | - 454 46 | 1 130 | |||
| TG 80 N 766 | 565 190 | - 454 46 | 1 180 | |||
| TG 100 N 92 | 6 715 20 | 0 - 454 46 | 1 260 | |||
| TG 120 N 10 | 81 865 2 | 05 - 454 | 461 260 | |||
| TG 150 N 12 | 96 1065 | 220 - 454 | 461 260 | |||
| TG 200 N 15 | 05 1050 | 444 800 | 500 507 | 260 |
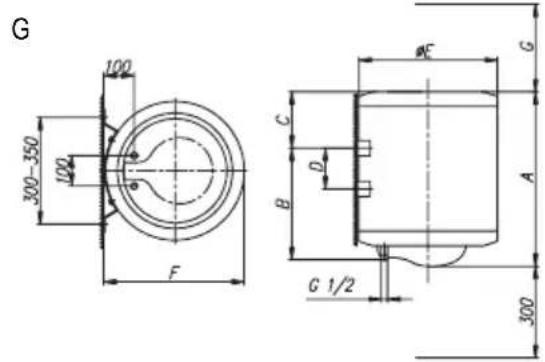
Connection and installation dimensions of the water heater [mm]
CONNECTION TO THE WATER SUPPLY
The water heater connections for the in-flowing and out-flowing water are color-coded. The connection for the supply of cold water is colored blue, while the hot water outlet is colored red.
The water heater may be connected to the water supply in two ways. The closed-circuit pressure system enables several points of use, while the open-circuit gravity system enables a single point of use only. The mixer taps must also be purchased in accordance with the selected installation mode.
The open-circuit gravity system requires the installation of a non-return valve in order to prevent the water from draining out of the tank in the event of the water supply running dry or being shut down. This installation mode requires the use of an instantaneous mixer tap. As the heating of water expands its volume, this causes the tap to drip. The dripping cannot be stopped by tightening it further; on the contrary, the tightening can only damage the tap.
The closed-circuit pressure system requires the use of pressure mixer taps. For safety reasons the supply pipe must be fitted with a return safety valve or alternatively, a valve of the safety class that prevents the pressure in the tank from exceeding the nominal pressure by more than 0.1MPa . The outlet opening on the relief valve must be equipped with an outlet for atmospheric pressure.
The heating of water in the heater causes the pressure in the tank to increase to the level set by the safety valve. As the water cannot return to the water supply system, this can result in the dripping from the outlet of the safety valve. The drip can be piped to the drain by installing a catching unit just below the safety valve. The drain installed below the safety valve outlet must be piped down vertically and located in the environment that is free from the onset of freezing conditions.
In case the existing plumbing does not enable you to pipe the dripping water from the return safety valve into the drain, you can avoid the dripping by installing a 3-litre expansion tank on the inlet water pipe of the boiler.
In order to provide correct operation of the relief valve, periodical inspections of the relief valve must be carried out by the user. To check the valve, you should open the outlet of the return safety valve by turning the handle or unscrewing the nut of the valve (depending on the type of the valve). The valve is operating properly if the water comes out of the nozzle when the outlet is open.
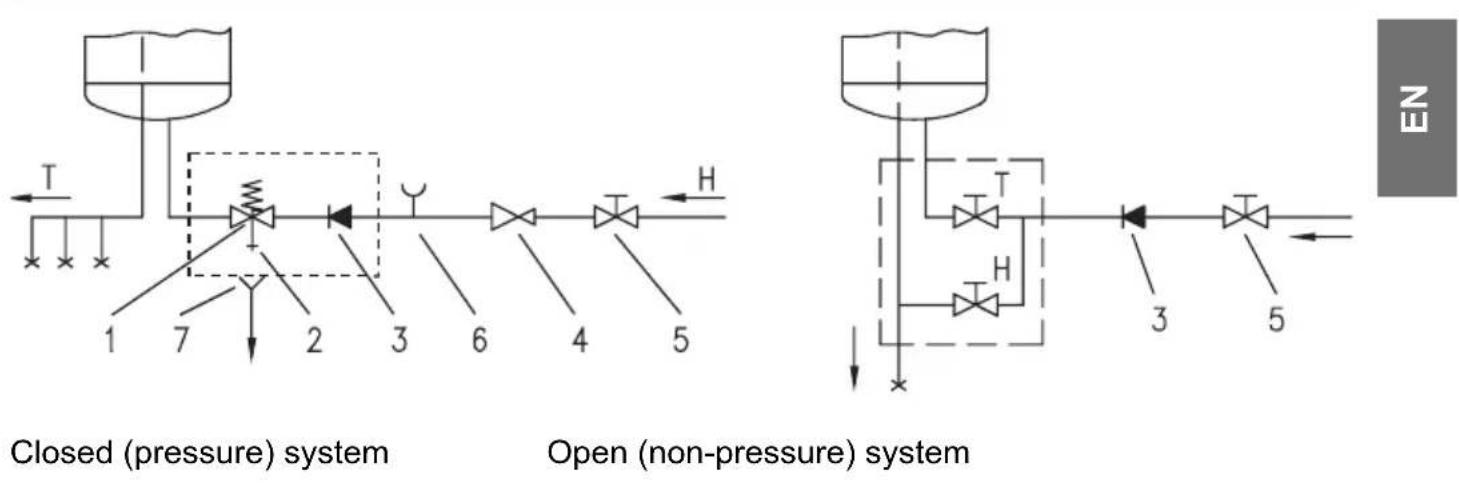
Legend:
1 - Safety valve 6 - Checking fitting 2 - Test valve 7 - Funnel with outlet connection 3 - Non-return valve 4 - Pressure reduction valve H - Cold water 5 - Closing valve T - Hot water
Between the water heater and return safety valve no closing valve may be built-in because with it the function of return safety valve would be impeded.
The water heater may be connected to the water network in the house without reduction valve if the pressure in the network is lower than 0.5MPa (5 bar). If the pressure exceeds 0.5MPa (5 bar), a reduction valve must be installed. Prior to the electric connection the water heater must obligatorily be filled with water. By first filling the tap for the hot water upon the mixing tap must be opened. When the heater is filled with water, the water starts to run through the outlet pipe of the mixing tap.
CONNECTION OF THE WATER HEATER TO THE ELECTRIC NETWORK
Before connecting to the power supply network, install a power supply cord in the water heater, with a minimum diameter of 1.5 mm² (H05VV-F 3G 1.5 mm²). For this, the protection plate must be removed from the water heater.
The connection of the water heater to the electric network must be performed according to standards for electrical installation. Install a disconnect switch (separating all poles from the power supply network) between the water heater and the permanent power connection, in compliance with national regulations.
Legend:
1 - Thermostat and bipolar thermal fuse 2 - Electric heater 3 - Connection terminal 4 - Pilot lamp
L - Live conductor
N - Neutral conductor
- Earthing conductor
Electric installation
CAUTION: Prior to each access to the interior of the water heater, it must absolutely be disconnected from the electric network!
USE AND MAINTENANCE
After connection to water and electric network, the water heater is ready for use. The temperature of water in the appliance is automatically controlled by the thermostat, which is adjusted by the manufacturer. The adjustment can be modified by turning the adjustment screw on the thermostat inside the water heater. The adjustment range is between 20°C and 75°C. We do not recommend any change to the manufacturer's adjustment, as this ensures the most economical consumption of electric energy and the smallest excretion of limestone. The operation of the electric immersion heater is shown by the pilot light. On the casing of the water heater, a bimetal thermometer is mounted, pointing clockwise (to the right) whenever there is hot water in the water heater.
When the heater is not to be used for a longer time, it must be disconnected from the electric network. At any risk of freezing of water in the water heater, the water must be emptied from it. Water is discharged from the heater via the inlet pipe. To this purpose, a special fitting (T-fitting) shall be mounted between the relief valve and the heater inlet pipe, or a discharge tap. The heater can be discharged directly through the relief valve, by rotating the handle or the rotating valve cap to the same position as for checking the operation. Before discharge, make sure the heater is disconnected from the power supply, and open the hot water on the connected mixer tap. After discharging through the inlet pipe, there is still some water left in the water heater. The remaining water will be discharged after removing the heating flange, through the heating flange opening.
The external parts of the water heater may be cleaned with a mild detergent solution. Do not use solvents and abrasives.
Regular preventive maintenance inspections ensure faultless performance and long life of your heater. The first of these inspections should be carried out by the authorized maintenance service provider about two years from installation in order to inspect the wear of the protective anticorrosion anode and remove the lime coating and sediment as required. The lime coating and sediment on the walls of the tank and on the heating element is a product of quality, quantity and temperature of water flowing through the water heater. The maintenance service provider shall also issue a condition report and recommend the approximate date of the next inspection.
Never try to repair any possible faults of the water heater by yourself, but inform the nearest authorized service workshop about it.
TECHNICAL CHARACTERISTICS OF THE APPLIANCE
| Вид TG 30 N TG 50 N TG 80 N TG | 100 N TG 120 N TG 150 N TG 200 N | ||||||
| Моden TG 30 N TG 50 N TG 80 N | TG 100 N TG 120 N TG 150 N TG 200 N | ||||||
| Обem [I] | 30 | 50 | 80 | 100 | 120 | 150 | 200 |
| Налгане [MPa] | 0,6 | ||||||
| Маса / Налълень с вoda [kg] | 20/50 | 24/74 | 30/110 | 34/134 | 38/158 | 44/194 | 70/270 |
| Аntникорозионен зашитей котел | Емайлиран / М.g катод | ||||||
| Мошист属实 Вкlioочвае [W] | 2000 | ||||||
| НарTEXени [V~] | 230 | ||||||
| Вреeme на заградан [h] | 105 | 155 | 305 | 355 | 435 | 545 | 740 |
| КолynchECTBO Смесна вoda属实 40°C [I] | 50 | 89 | 145 | 200 | 236 | 298 | 399 |
| ПOTразменце на[eilektpruchецво 2) [kWh/24h] | 0,90 | 1,32 | 1,85 | 2,20 | 2,60 | 3,20 | 2,80 |
1) Time for heating the entire volume of the boiler with electric heater at initial temperature of the cold water from the water supply of 15°C 2) Electricity consumption when maintaining a constant water temperature in the boiler of 65°C and at ambient temperature of 20°C, measured according to EN 60379.
| A | B | C | D | E | F | |
| TG 30 N 459 | 275 173 | - 454 46 | 1 80 | |||
| TG 50 N 561 | 365 185 | - 454 46 | 1 130 | |||
| TG 80 N 766 | 565 190 | - 454 46 | 1 180 | |||
| TG 100 N 92 | 6 715 20 | 0 - 454 4 | 61 260 | |||
| TG 120 N 10 | 81 865 2 | 05 - 454 | 461 260 | |||
| TG 150 N 12 | 96 1065 | 220 - 454 | 461 260 | |||
| TG 200 N 15 | 05 1050 | 444 800 | 500 50 | 7 260 |
G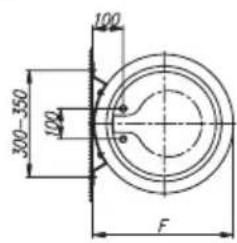
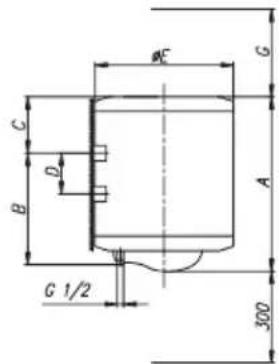
Switching on and installation dimensions of the boiler [mm]
CONNECTION TO WATER SUPPLY
The inlet and outlet water connections are marked on the boiler pipes with corresponding colors. The inlet for cold water is blue, and the outlet for hot water is red.
You can connect the boiler to the water supply in two ways. Closed method, under pressure, allows connection of several outlets. Open method, without pressure, allows only one outlet. Depending on the chosen connection system, you must also equip it with the appropriate number of mixers and valves. In the open method, without pressure, before the boiler it is necessary to install a valve that will shut off the water supply to the boiler if there is no water in the water supply. In this connection method, you must use a valve with a shut-off. When the water is shut off, the pressure increases and it may start to drip from the mixer tap. You will not be able to stop the dripping only by closing the valve on the boiler, as this will only make it worse. In the closed method, under pressure, on each outlet you must install a mixer valve. On the inlet pipe, for safety, it is mandatory to install a safety valve or group, which will prevent the pressure in the heater from exceeding more than 0.1 MPa above the allowed. The drain outlet of the safety valve must have an outlet to atmospheric pressure.
When heating the water in the boiler, the pressure in the boiler increases to the level set on the safety valve. Since the backflow of water into the water supply is prevented, it may start to drip from the drain outlet of the safety valve. The dripping water can be drained through the drain hose if you place it under the safety valve. The outlet pipe must be placed below the safety valve, so that it is directed downwards, in an environment where it does not freeze.
The safety valve may discharge water or steam if the pressure in the system exceeds the safety limit. To prevent this, the valve can be replaced with a pressure relief valve, or water can be added to the top of the heater.
For the safety valve to function correctly, you must periodically check it. When checking, by pulling the ring or lifting the lever (depending on the model), the safety valve should open. Water should flow from it, indicating that the valve is working without faults.
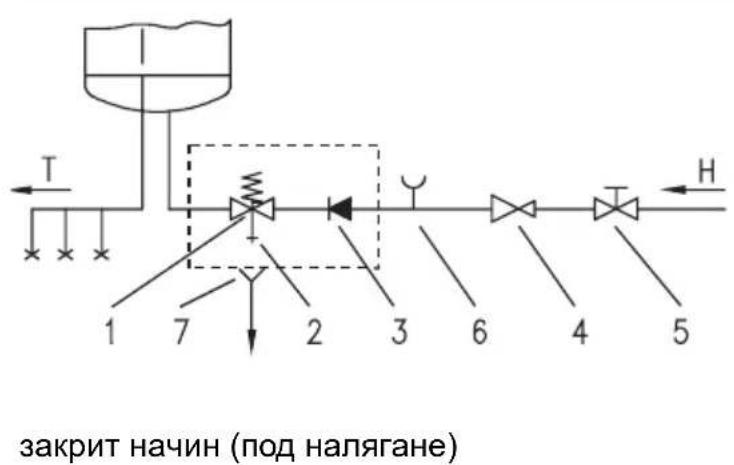
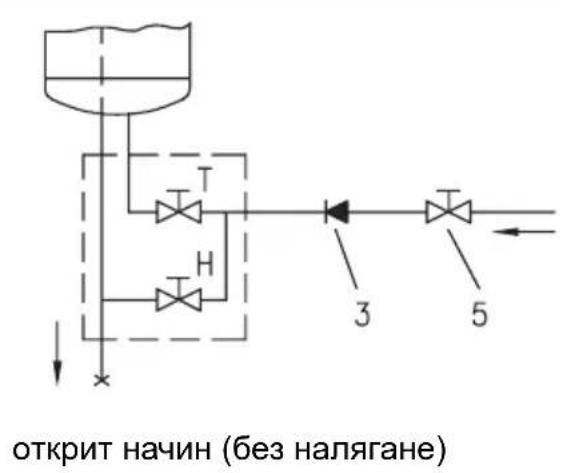
Legend:
1 - Safety valve 2 - Shut-off valve 3 - Non-return valve 4 - Pressure relief valve 5 - Shut-off valve
6 - Test part 7 - Functional part
C - Cold water H - Hot water
Do not install a shut-off valve between the water heater and the safety valve, as this would make the safety valve ineffective.
You can connect the boiler to the water supply in your home without a pressure relief valve if the water pressure is below 0.5 MPa (5 bar). When the pressure is higher than 0.5 MPa (5 bar), a pressure reducing valve must be installed. Before connecting the boiler, you must fill it with water. When filling for the first time, open the hot water tap on the mixer. The boiler is full when water flows steadily from the hot water pipe of the mixer.
CONNECTION TO THE ELECTRICAL MAINS
Before connecting to the electrical mains, the boiler must be earthed with a wire with a cross-section of at least 1.5 mm² (H05VV-F 3G 1.5 mm²). The connection to the electrical mains must be made in accordance with the diagram and the applicable standards. Between the water heater and the fixed installation, a double-pole switch must be installed to simultaneously disconnect both wires from the supply mains, in accordance with the installation instructions.
B
Legend:
1 - Thermostat, adjustable 2 - Heating element 3 - Terminal connection 4 - Control lamp
L - Phase wire N - Neutral wire - Earth wire
Electrical wiring diagram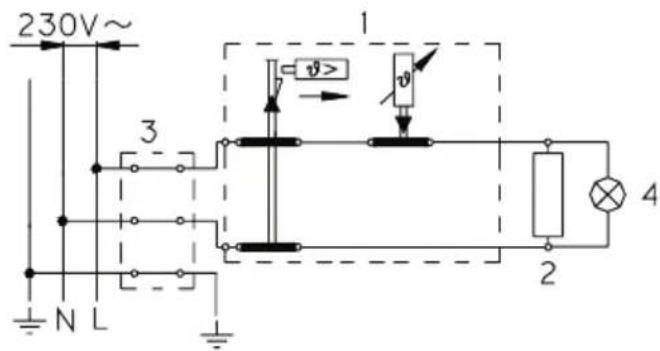
USE AND MAINTENANCE
After connecting to the power supply and water supply, the boiler is ready for use. The temperature inside the device is controlled by the thermostat inside, which is set at the factory to the most economical position, guaranteeing minimal electricity consumption, minimal heat loss, minimal steam emission on the housing, and minimal operating costs. According to your desire, the thermostat position can be changed by means of the screw located on the thermostat. The adjustment range is between 20 - 75°C. When you turn the knob fully to the left, you switch off the heating element. The factory setting is not interrupted.
The control lamp shows that the boiler is working. On the front surface of the boiler there is a bimetallic thermometer, which deflects in the direction of the clock hand when there is hot water in the boiler.
If the device is to be used for a long period of time, disconnect it from the electrical grid, but be careful that during this period freezing must be prevented. The water from the boiler is drained through the drain valve of the boiler. For this purpose, during installation, between the safety valve and the drain, a special fitting (tee) must be placed for the discharge valve. The water from the boiler can also be drained directly through the safety valve by turning the handle of the valve to the position as when checking its operation. Before draining, the heating element must be disconnected from the electrical grid and the cold water inlet valve must be closed. After draining the water through the drain valve, a small amount of water remains in the boiler, which is drained when the boiler's drain plug is removed through the boiler's opening.
Clean the boiler surface with a mild detergent solution. Do not use abrasive or aggressive cleaning agents.
Through regular service inspections, safe operation and long life of the boiler are ensured. The inspection must be carried out by an authorized service every two years after commissioning. During the inspection, the heating element must be checked and, if necessary, the water scale must be cleaned, taking into account the quality, quantity, and temperature of the water in the boiler. During the boiler inspection, depending on its condition, the service will recommend the following data for checking the condition.
In case of any damage to the boiler, do not repair it yourself, but contact the nearest authorized service.
Closed system (under pressure)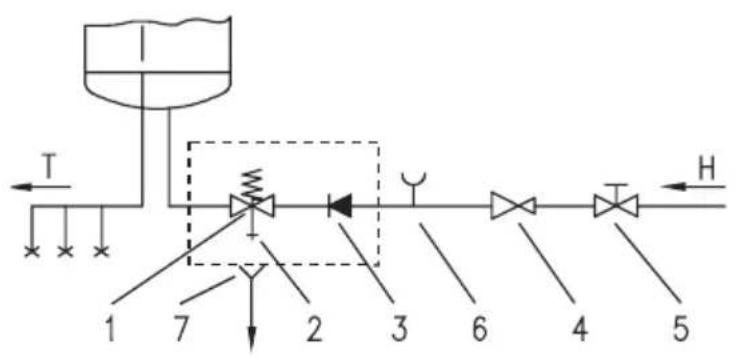
Open system (gravity)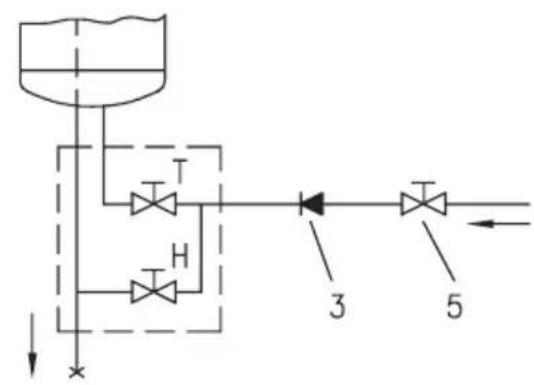
Legend:
1-Safety valve 2-Test valve 3-Non-return valve 4-Pressure reducing valve 5-Shut-off valve
6 - Test fitting 7-Expansion vessel with connection to the circuit
C-Cold water H-Hot water
Changing the boiler and the return safety valve must not be done with a shut-off valve for water, as this would impair the operation of the safety valve.
Before connecting the boiler to the water supply installation, check whether the pressure in the installation is not above 0.5 MPa (5 bar). If the pressure exceeds 0.5 MPa (5 bar), a pressure reducing valve must be installed.
Before connecting the boiler to the electrical grid, it is mandatory to fill it with water. When filling for the first time, open the hot water tap. The boiler is full when water starts to flow from the tap.
CONNECTION TO THE ELECTRICAL GRID
Before connecting to the electrical grid, it is necessary to install a fixed connection with a minimum cross-section of 1.5 mm² (H05VV-F 3G 1.5 mm²). To do this, remove the protective cover on the boiler. Connection of the boiler to the electrical grid must be carried out in accordance with the standards applicable to electrical installations. Between the heating element and the permanent installation, there must be a device for disconnecting all poles from the grid, in accordance with national installation regulations.
Legend:
1 - Thermostat with overheat protection 2 - Heating element 3 - Connection terminals 4 - Control lamp
L - Phase
N - Neutral conductor - Earth
Wiring diagram for electrical water heaters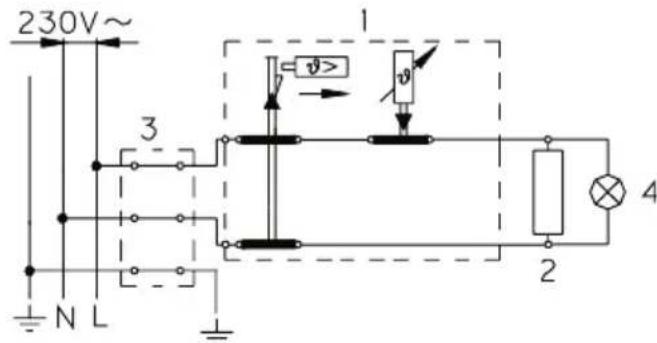
WARNING: Before any intervention inside the boiler, always disconnect the boiler from the electrical grid!
USE AND MAINTENANCE
Connect the water supply and electrical grid, then set the appliance for use. The water temperature in the boiler is automatically regulated by the built-in thermostat. The temperature can be adjusted by turning the knob on the thermostat inside the boiler. The recommended setting is from 20 to 75°C. We do not recommend that you change the factory-set temperature because it is the temperature at which electrical energy consumption is economical, and also scale formation is minimal.
The operation of the heating element is indicated by the control lamp. The heating element has a bimetallic thermostat that moves in the direction of the clock hand to the right when hot water is present in the heater. If you do not intend to use the boiler for a long time, disconnect it from the electrical grid. If there is a risk that the water in the boiler may freeze, drain the water from the boiler. The water from the heater is drained through the drain valve of the heater. For this purpose, it is recommended that when installing the safety valve, a fitting (T-piece) or a drain valve be installed on the drain line of the heater. The heater can also be drained directly through the safety valve by lifting the handle, i.e., by turning the valve cap to the position as when checking its operation. Before draining the heater, disconnect it from the electrical grid and then open the hot water tap on the connected water fitting. After draining the water through the drain line, a small amount of water remains in the heater, which evaporates when the heating flange is removed (the flange cover is unscrewed) through the opening of the heating flange.
Clean the heater with a mild detergent solution. Do not use abrasive or aggressive cleaning agents.
The heater must be serviced without fail by an authorized service center within the warranty period. The warranty for the heater is valid only if you have regularly followed the prescribed maintenance procedures for the protective anode. Replacement of the worn protective anode must not be delayed for more than 36 months. The heater must be serviced by an authorized service center, which will record the service in the warranty certificate. During the service, the condition of the protective anode against corrosion will be checked, and if necessary, it will be replaced. The service center will, based on the quality, quantity, and temperature of the water in the heater, determine the appropriate interval for the next check.
Please do not attempt to repair the heater yourself; instead, contact the nearest authorized service center.
Dear customer!
Thank you for the trust you have shown by purchasing our product. PLEASE READ THE INSTALLATION, USE, AND MAINTENANCE INSTRUCTIONS FOR THE ELECTRIC WATER HEATER CAREFULLY BEFORE INSTALLATION AND FIRST USE.
THE DEVICE IS NOT INTENDED FOR USE BY PERSONS (INCLUDING CHILDREN) WITH REDUCED PHYSICAL, SENSORY, OR MENTAL CAPABILITIES, OR LACK OF EXPERIENCE AND KNOWLEDGE, UNLESS THEY ARE UNDER SUPERVISION OR HAVE BEEN INSTRUCTED ON THE USE OF THE DEVICE BY A PERSON RESPONSIBLE FOR THEIR SAFETY.
CHILDREN MUST BE SUPERVISED TO ENSURE THAT THEY DO NOT PLAY WITH THE DEVICE.
The heater is manufactured in accordance with applicable standards and has been officially tested. It has been issued a safety certificate and an electromagnetic compatibility certificate. The basic technical characteristics of the water heater are given on the rating plate, which is affixed between the connection pipes. The water heater must be connected to the water supply and electrical network only by a qualified professional. Any interventions inside the heater for repair, descaling, inspection, or replacement of the protective anode against corrosion must be carried out exclusively by an authorized service center.
INSTALLATION
Install the heater as close as possible to the point of use. If you install the heater in a room containing a bathtub or shower, you must comply with the requirements of standard IEC 60364-7-701 (VDE 0100, Part 701). Attach it to the wall using two screws with a minimum nominal diameter of 8 mm. If the wall is not strong enough to support the heater, it must be reinforced appropriately. The heater must be mounted on the wall only in a vertical position. To facilitate inspection and replacement of the magnesium anode, we recommend leaving sufficient space between the top of the heater and the ceiling (see dimension G in the connection diagram). Otherwise, the heater will need to be removed from the wall for such maintenance.
TECHNICAL SPECIFICATIONS OF THE APPLIANCE
| Tip TG 30 N TG 50 N TG 80 N TG 100 N TG 120 N TG 150 N TG 200 N | |||||||
| Model TG 30 N TG 50 N TG 80 N | TG 100 N TG | 120 N TG 150 N TG 200 N | |||||
| Korisni volumen [I] | 30 | 50 | 80 | 100 | 120 | 150 | 200 |
| Nominalni tlak [MPa] | 0,6 | ||||||
| Masa grijalice/napunjene vodom [kg] | 20/50 | 24/74 | 30/110 | 34/134 | 38/158 | 44/194 | 70/270 |
| Zašita kotla od korozije | emajlirano / Mg anoda | ||||||
| Snaga elektricnog grijača [W] | 2000 | ||||||
| Prikljuci napon [V~] | 230 | ||||||
| Vrijeme zagrivanja do 75°C 1) [h] | 105 | 155 | 305 | 355 | 435 | 545 | 740 |
| Količina miješane vode pri 40°C [I] | 50 | 89 | 145 | 200 | 236 | 298 | 399 |
| Energetski gubici 2) [kWh/24h] | 0,90 | 1,32 | 1,85 | 2,20 | 2,60 | 3,20 | 2,80 |
1) Heating time for the entire volume of the heater using the electric heating element, with an inlet cold water temperature from the water supply of 15°C. 2) Energy losses when maintaining a constant water temperature in the heater of 65°C and an ambient temperature of 20°C, measured according to EN 60379.
| A | B | C | D | E | F | |
| TG 30 N 459 | 275 173 | - 454 46 | 1 80 | |||
| TG 50 N 561 | 365 185 | - 454 46 | 1 130 | |||
| TG 80 N 766 | 565 190 | - 454 46 | 1 180 | |||
| TG 100 N 92 | 6 715 20 | 0 - 454 4 | 61 260 | |||
| TG 120 N 10 | 81 865 2 | 05 - 454 | 461 260 | |||
| TG 150 N 12 | 96 1065 | 220 - 454 | 461 260 | |||
| TG 200 N 15 | 05 1050 | 444 800 | 500 50 | 7 260 |
G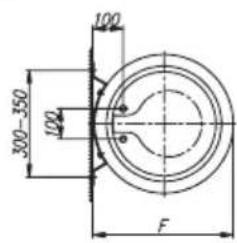


- BUILDING-IN
- CONNECTION TO THE WATER SUPPLY
- LEGEND
- CONNECTION OF THE WATER HEATER TO THE ELECTRIC NETWORK
- CAUTION: PRIOR TO EACH ACCESS TO THE INTERIOR OF THE WATER HEATER, IT MUST ABSOLUTELY BE DISCONNECTED FROM THE ELECTRIC NETWORK
- USE AND MAINTENANCE
- CONNECTION TO WATER SUPPLY
- CONNECTION TO THE ELECTRICAL MAINS
- CONNECTION TO THE ELECTRICAL GRID
- DEAR CUSTOMER
- CHILDREN MUST BE SUPERVISED TO ENSURE THAT THEY DO NOT PLAY WITH THE DEVICE
- INSTALLATION
Brand : GORENJE
Model : TG100NC6
Category : Boiler