
VLF410 - Wall mount SANUS - Free user manual and instructions
Find the device manual for free VLF410 SANUS in PDF.
Frequently Asked Questions - VLF410 SANUS
User questions about VLF410 SANUS
0 question about this device. Answer the ones you know or ask your own.
Ask a new question about this device
Download the instructions for your Wall mount in PDF format for free! Find your manual VLF410 - SANUS and take your electronic device back in hand. On this page are published all the documents necessary for the use of your device. VLF410 by SANUS.
USER MANUAL VLF410 SANUS
©2012 Milestone AV Technologies, a Duchossois Group Company. All rights reserved. Sanus is a division of Milestone. All other brand names or marks are used for identification purposes and are trademarks of their respective owners.
We are here to help!
Please contact
Customer
Service with any questions.
IMPORTANT SAFETY INSTRUCTIONS - SAVE THESE INSTRUCTIONS - PLEASE READ ENTIRE MANUAL PRIOR TO USE
Before You Begin

WARNING: This product contains a magnet. If an implanted medical device such as a pacemaker or implantable cardioverter defibrillator (ICD) is in use, magnetic fields may affect the operation of those devices, resulting in serious injury or death. If you have an implanted medical device, keep at least 13cm (5 in.) between your device and the magnet. Please consult with your physician or medical professional prior to using this product.
CAUTION: Avoid potential personal injuries and property damage!
Refer to the documentation that came with your TV for additional considerations
Do not use this product for any purpose not explicitly specified by manufacturer
The wall must be capable of supporting five times the weight of the monitor and mount combined
This product is not designed for use in metal stud walls
If you do not understand these instructions, or have doubts about the safety of the installation, assembly or use of this product, contact Customer Service or call a qualif ed contractor
Manufacturer is not responsible for damage or injury caused by incorrect assembly or use
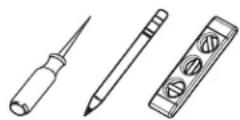
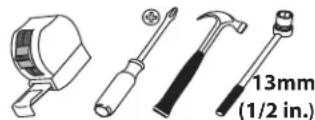
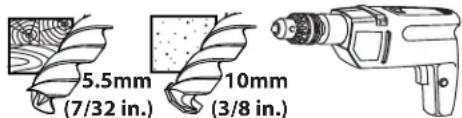
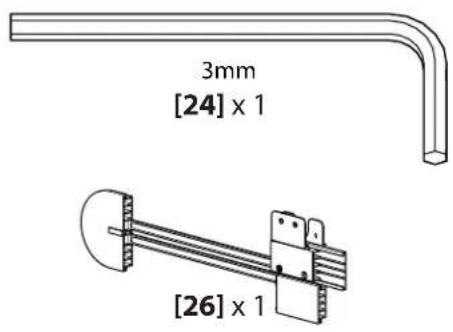
Required Tools
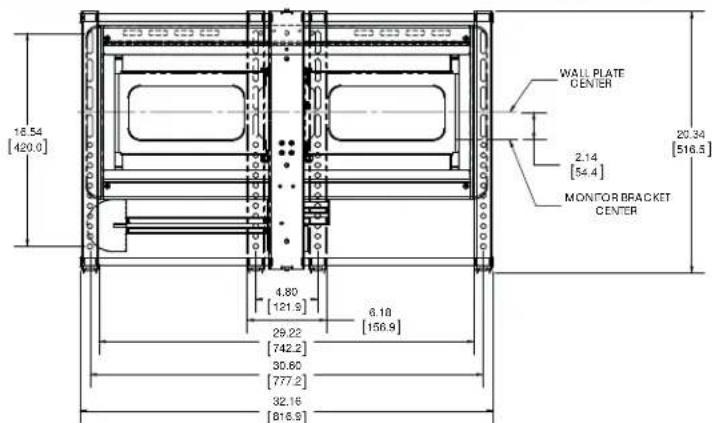
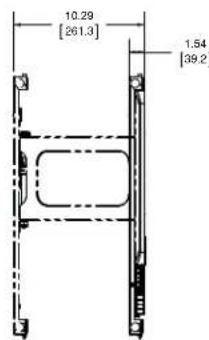
Specifications
Weight capacity-DO NOT EXCEED: 57 kg (125 lb.) includes TV and any accessories
Swivel: ± 30^
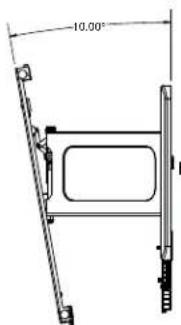
Tilt: +0^ to -10^
Level: ± 1.5^
Technical Specifications
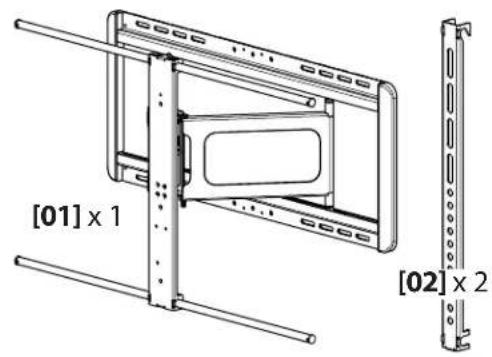
Supplied Parts and Hardware
WARNING: This product contains small items that could be a choking hazard if swallowed.
Before starting assembly, verify all parts are included and undamaged. If any parts are missing or damaged, do not return the damaged item to your dealer; contact Customer Service. Never use damaged parts!
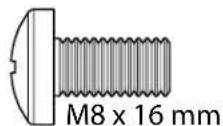
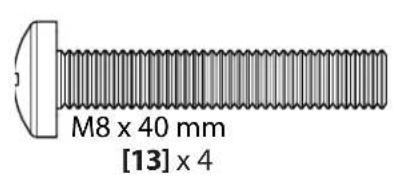
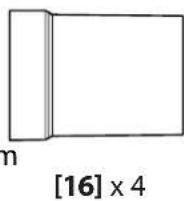
NOTE: M4, M6, or M8 describes the diameter, mm describes the length of screws that are labeled M# X ##mm. Not all hardware included will be used.
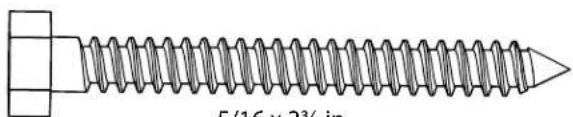
[03]x4
[05] × 4
M4 M6/M8
[06] × 4
[04] × 4
[07]×4

M4×12mm
[08] × 4

M4×30mm
[09] x 4

[10] x 4
[11]x4
[12]x4
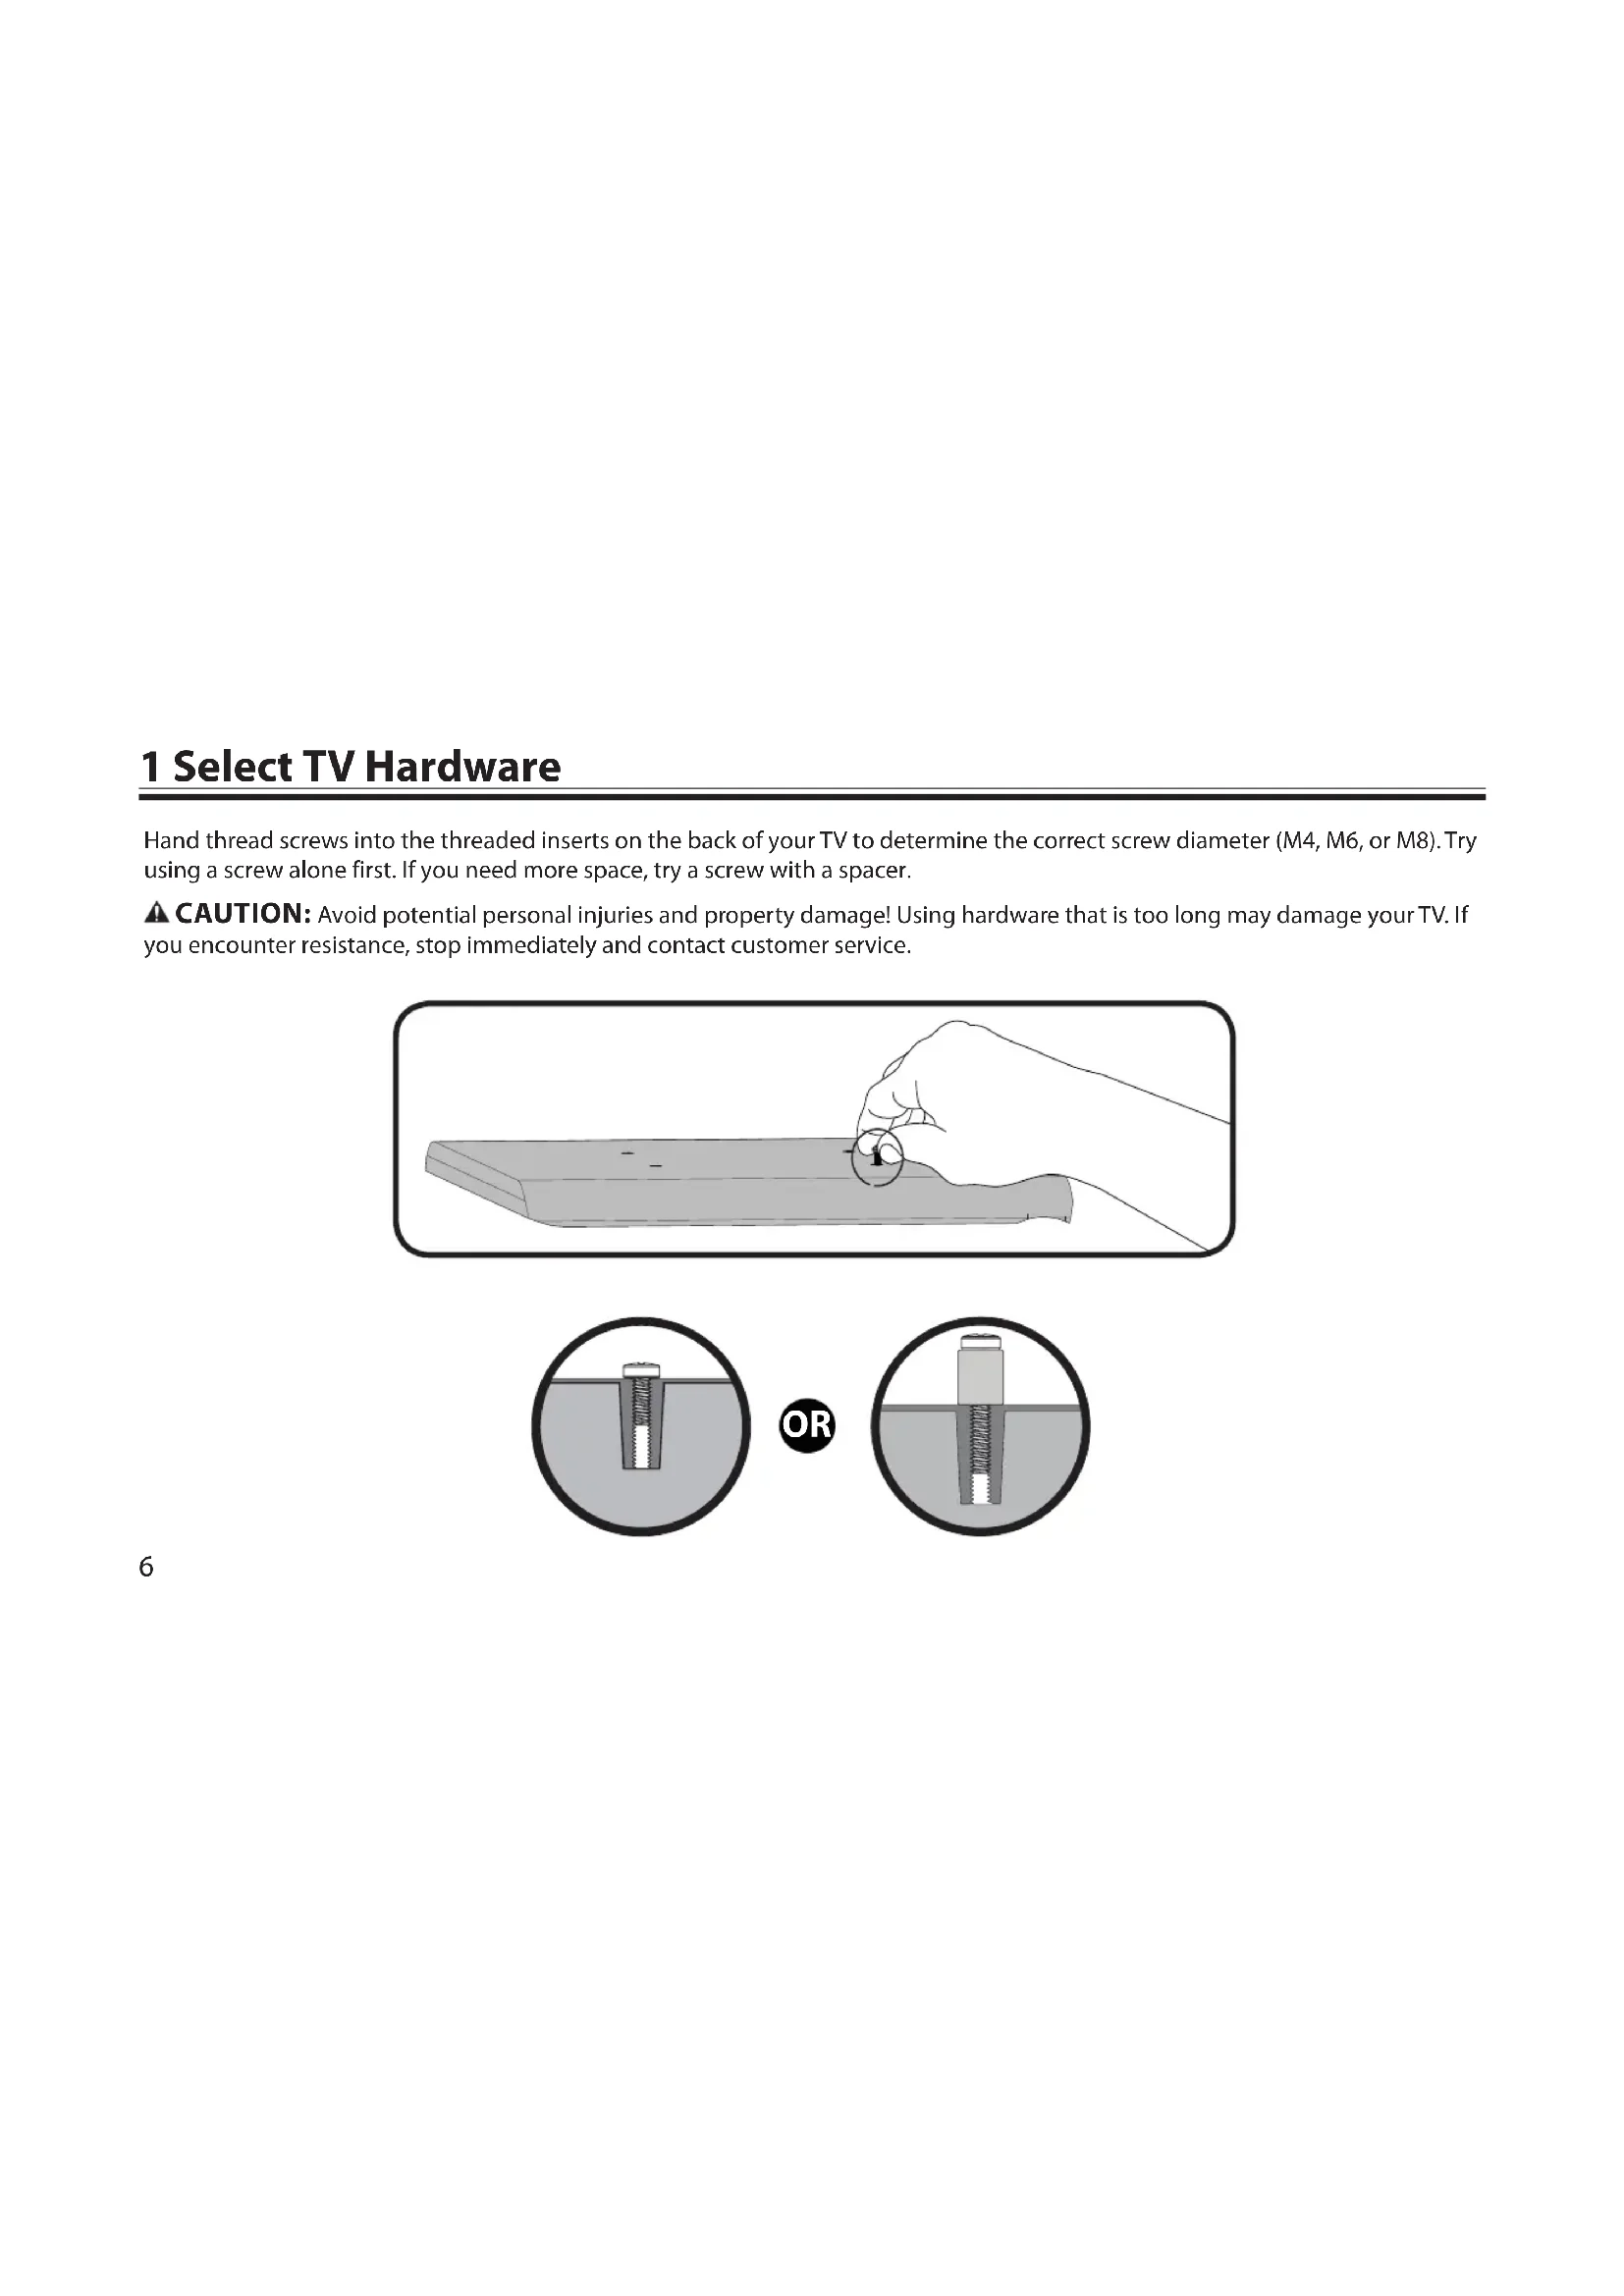
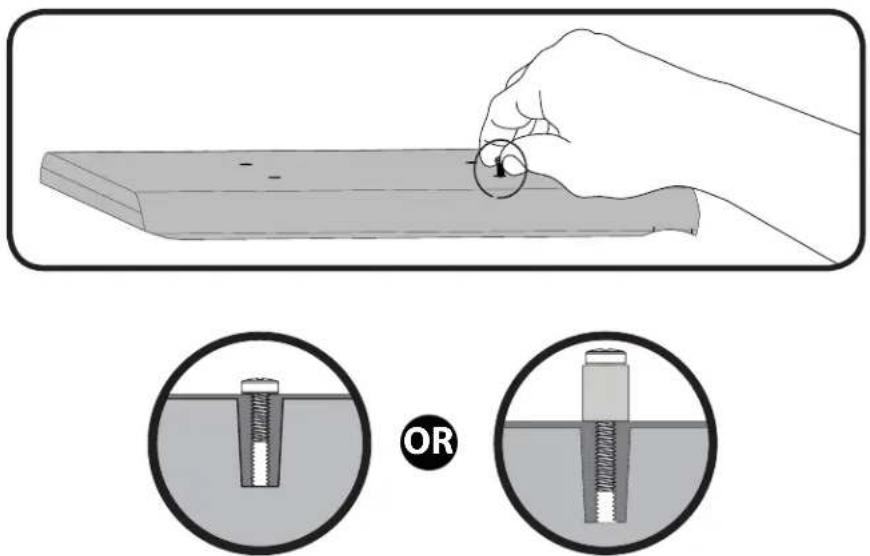
1 Select TV Hardware
Hand thread screws into the threaded inserts on the back of your TV to determine the correct screw diameter (M4, M6, or M8). Try using a screw alone first. If you need more space, try a screw with a spacer.
CAUTION: Avoid potential personal injuries and property damage! Using hardware that is too long may damage your TV. If you encounter resistance, stop immediately and contact customer service.
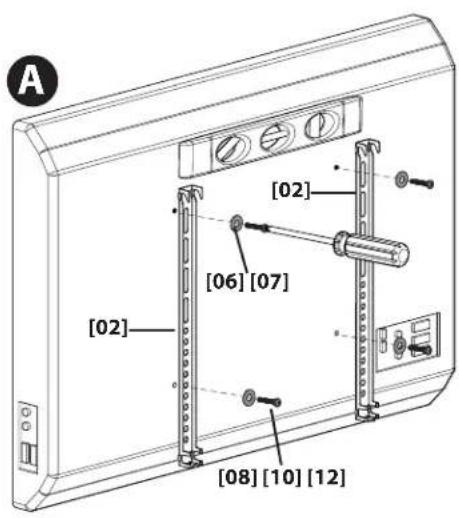
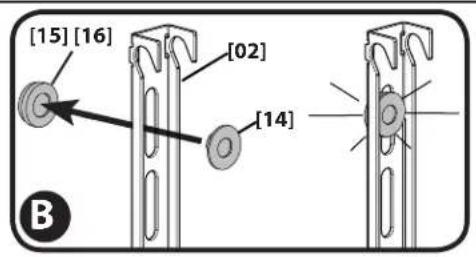
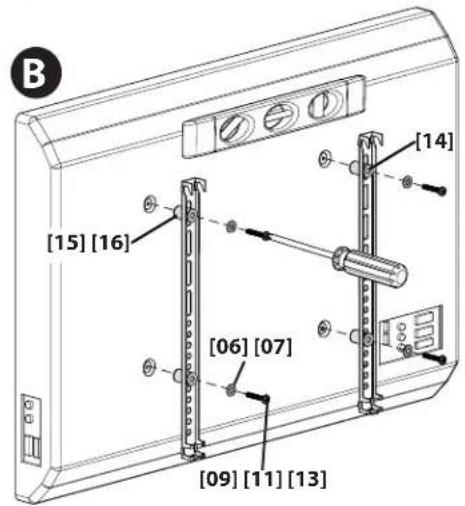
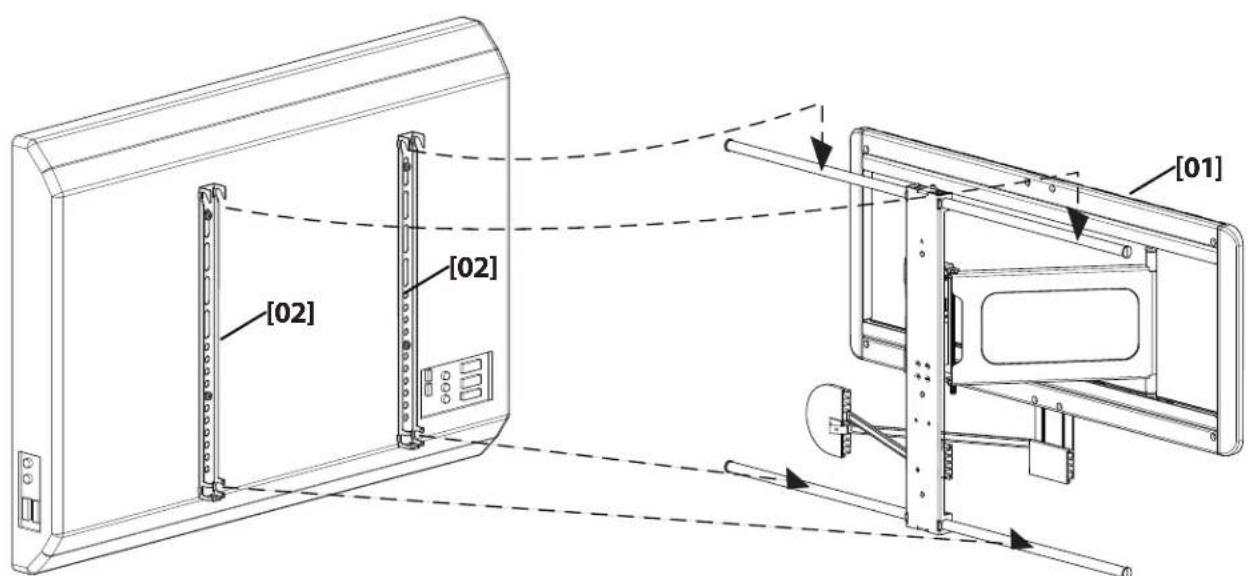
1-1 Attach brackets to TV
Using the hardware you selected in step 1, attach the brackets to your TV.
A. Use option A if your TV has a flat/unobstructed back.
B. Use option B if your TV has an irregular back, recessed mounting holes, or if you need more room for cables, recesses, or protrusions.
Confirm that the brackets are level on the back of the TV.

2 Mount the Wall Plate
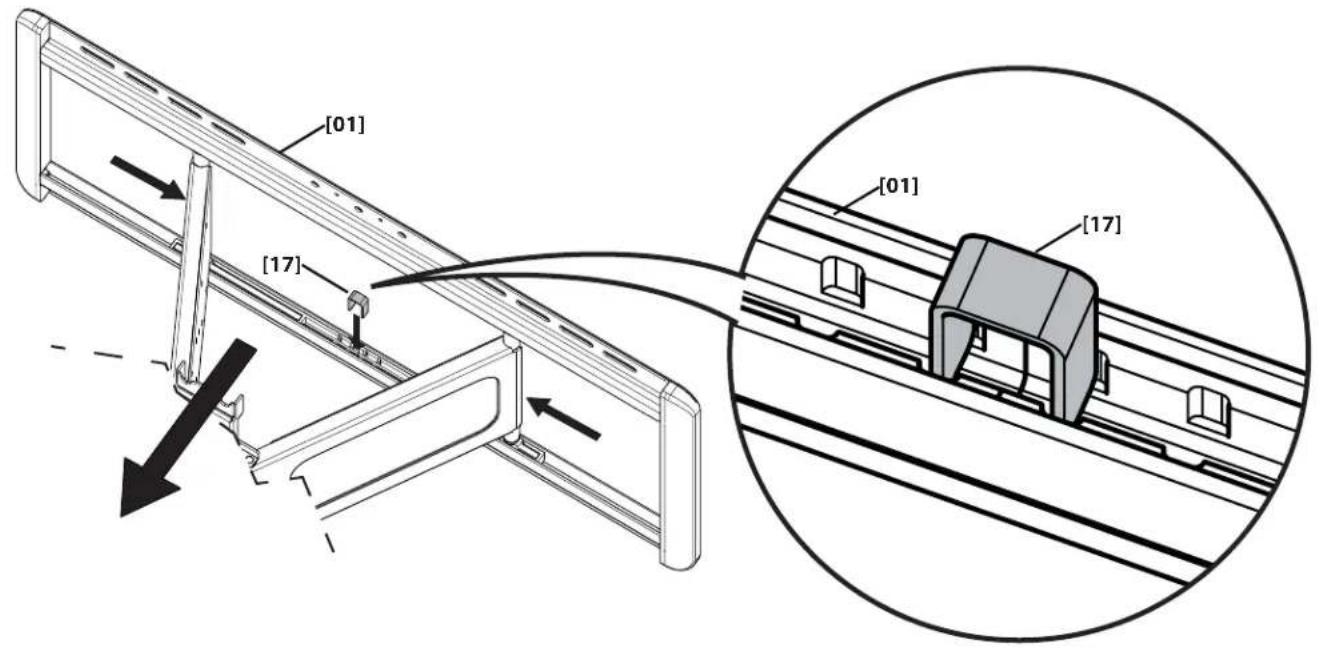
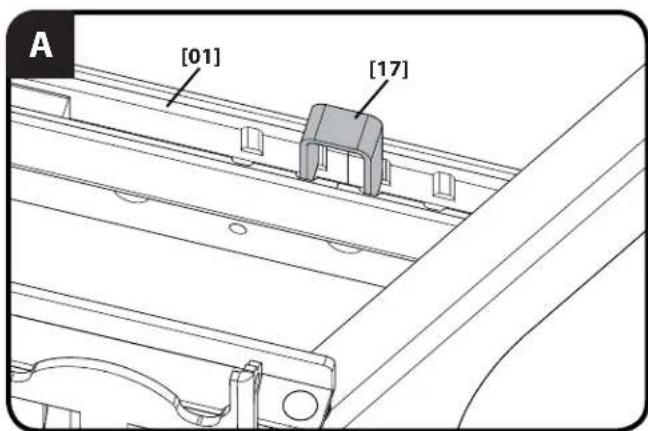
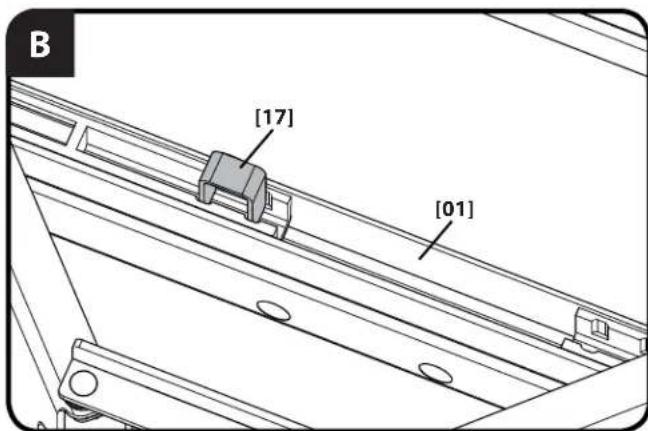
2-1 Prepare the Wall Plate for Mounting
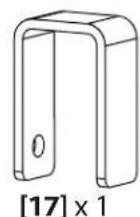
Slide the arms of the wall plate [01] together and insert the slide lock [17] into place. This will lock the arms into full extension making the wall plate mounting and TV attachment easier.
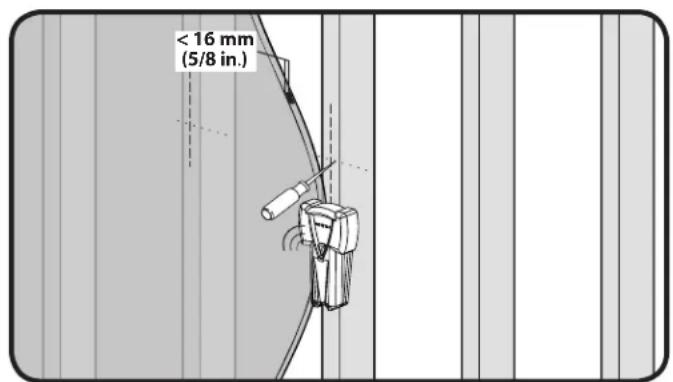
2-2 (Wood stud mounting) Locate studs and mark the wall
For assistance in determining wall plate location, see Height Finder at sanus.com.
CAUTION: Avoid potential personal injuries and property damage!
Any material covering the wall must not exceed 16mm (5/8 in.)
Minimum wood stud size: common 51 × 102 ~mm (2 x 4 in.) nominal 38 × 89 ~mm ( 1^1 / 2 × 3^1 / 2 in.)
- Locate studs. Verify the center of the stud with an awl or thin nail or use an edge to edge stud finder.
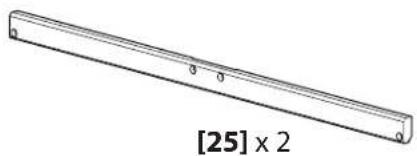
- Level the wall plate template [27] and mark the hole locations.

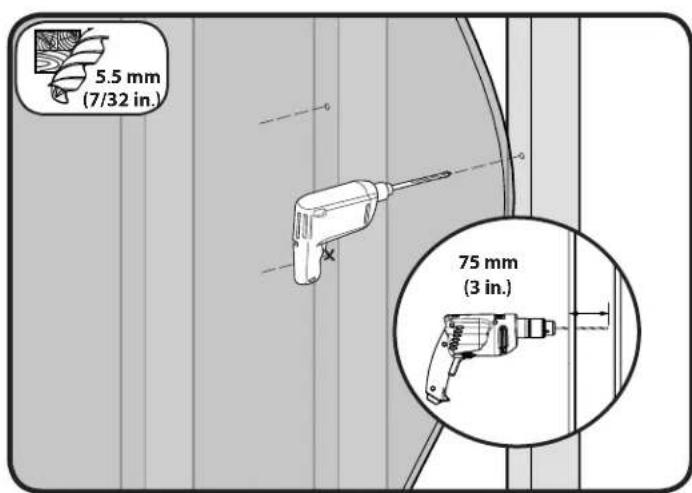
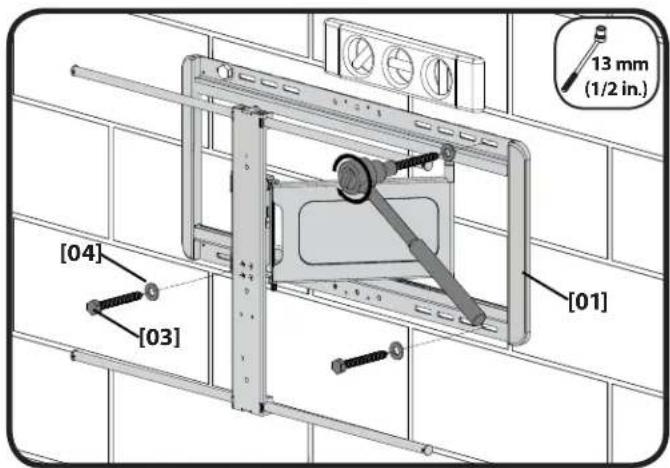
2-3 Drill pilot holes and attach wall plate
CAUTION: Avoid potential injuries or property damage! Pilot holes MUST be drilled to a depth of 75 mm (3 in.), using a 5.5 mm (7/32 in.) diameter drill bit.
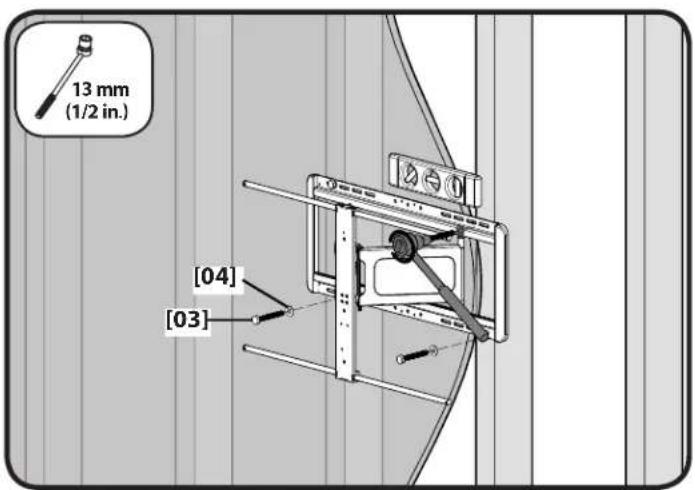
CAUTION: Improper use could reduce the holding power of the lag bolt.
DO NOT over-tighten the lag bolts [03].
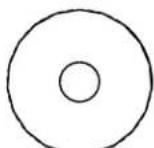
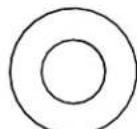
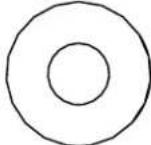
- Tighten the lag bolts [03] only until the washers [04] are pulled firmly against the wall plate [01].
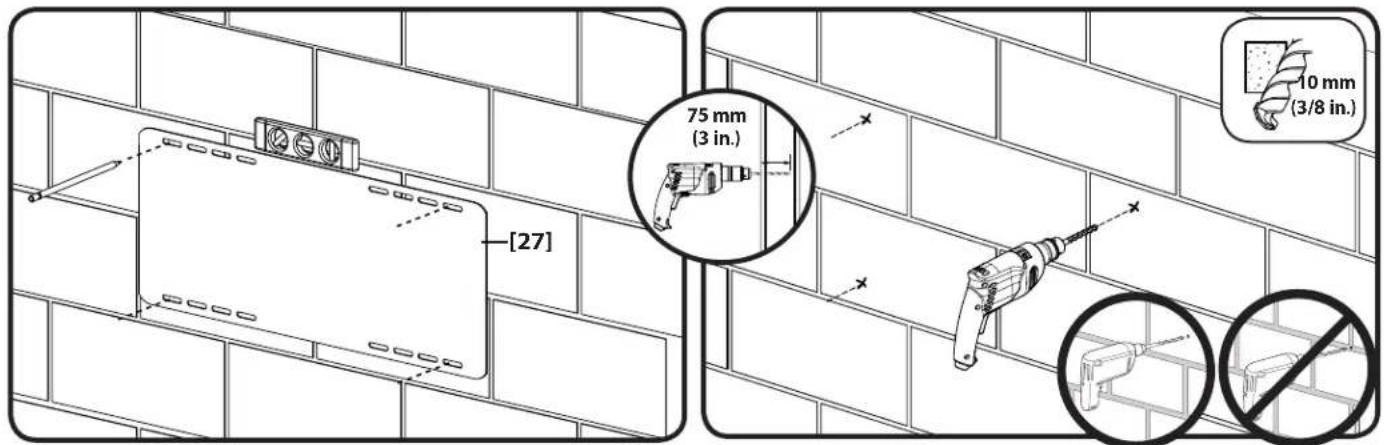
2-2 (Solid concrete or concrete block) Mark the wall and drill pilot holes
For assistance in determining wall plate location, see Height Finder at sanus.com.
See step 2-1 before performing this step.
Level the wall plate template [27] and mark the hole locations.
CAUTION: Avoid potential injuries or property damage!
Mount the wall plate [01] directly onto the concrete surface
Minimum solid concrete thickness: 203mm (8 in.)
Minimum concrete block size: 203 × 203 × 406 mm ( 8 × 8 × 16 in.)
Minimum horizontal space between fasteners: 406mm (16 in.)
× Pilot holes MUST be drilled to a depth of 75~mm (3 in.) using a 10~mm (3/8 in.) diameter drill bit
Never drill into the mortar between blocks
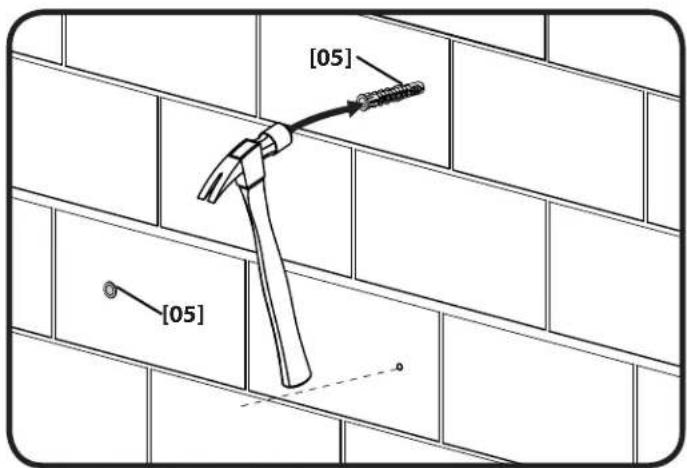
2-3 Insert anchors and lag bolts
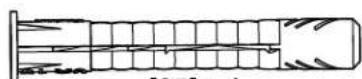
Insert lag bolt anchors [05]. Then insert lag bolts [03] through the wall plate [01] and into the anchors.
CAUTION: Improper use could reduce the holding power of the lag bolt. To avoid potential injuries or property damage:
- Be sure the anchors [05] are seated flush with the concrete surface
- Tighten the lag bolts [03] only until the washers [04] are pulled firmly against the wall plate [01]
DO NOT over-tighten the lag bolts [03]
SANUS
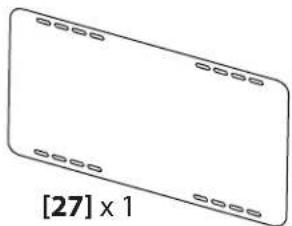
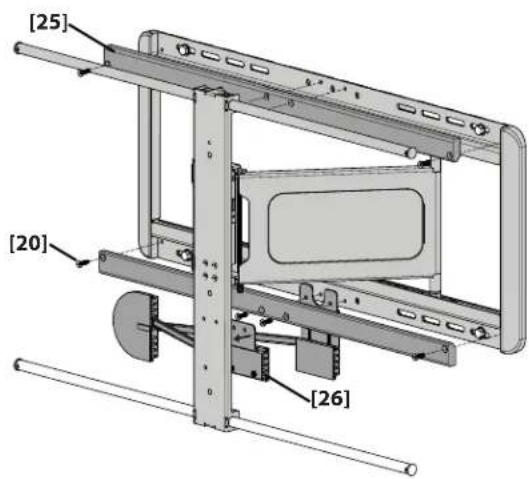
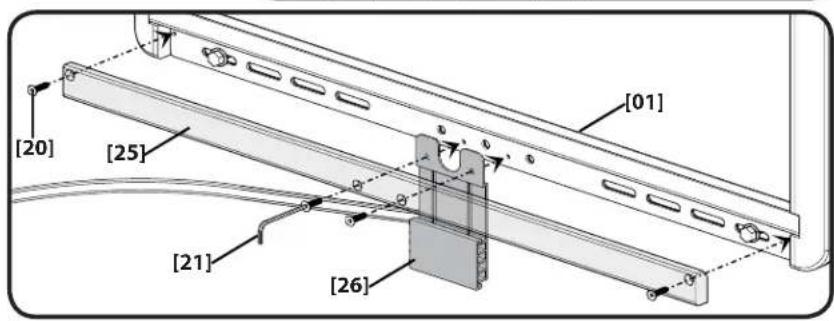
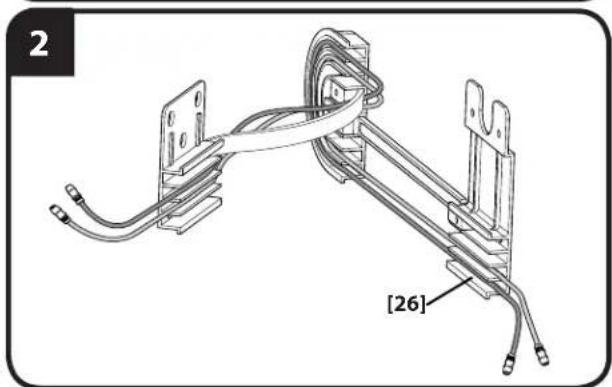
3 Install Wall Plate Covers & Cable Management Assembly
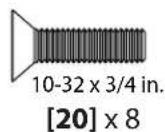
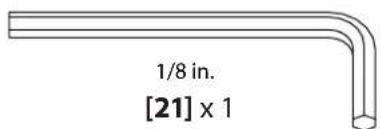
Mount the upper cover [25] using the 1/2 in. hex key [21] and four screws [20].
Place the rear plate of the cable management assembly [26] over the two smallest holes in the bottom of the wall plate [01].
Use the 1 / 8 in. hex key [21] and four screws [20] to secure the lower wall plate cover [25] and the cable management assembly [26] to the wall plate.
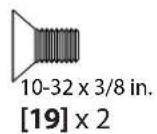
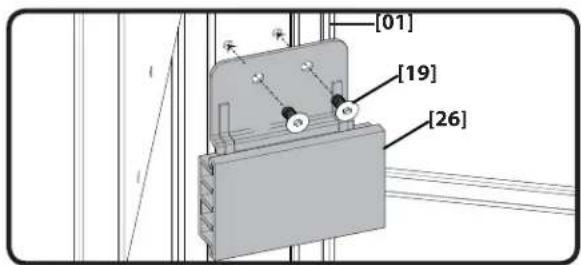
Use two screws [19] to secure the front plate of the cable management assembly [26] to the inside of the TV interface [01].
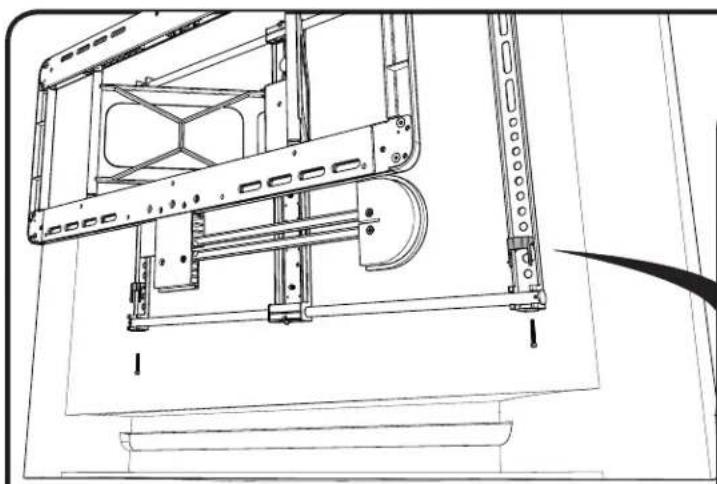
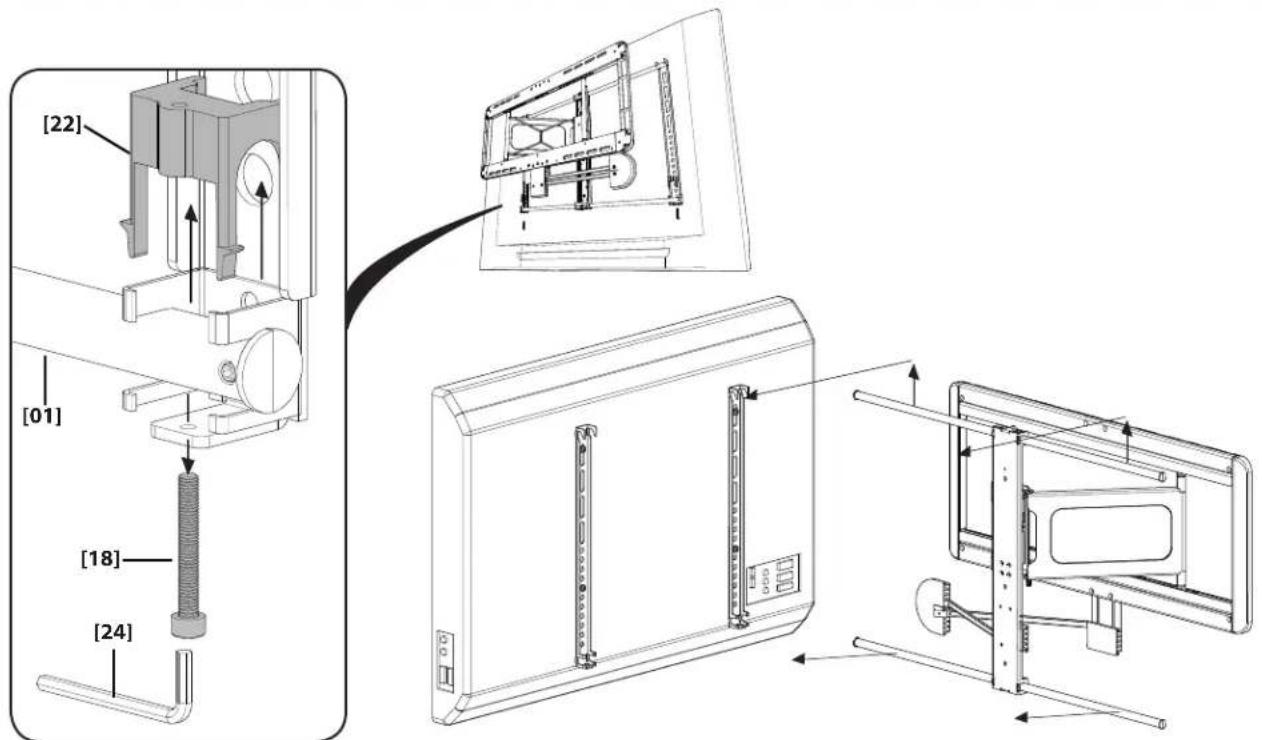
4 Attach TV to Wall Plate Assembly
Be sure to hook the TV brackets onto the interface, as shown.
CAUTION: Avoid potential injuries or property damage! HEAVY! You will need assistance with this step.
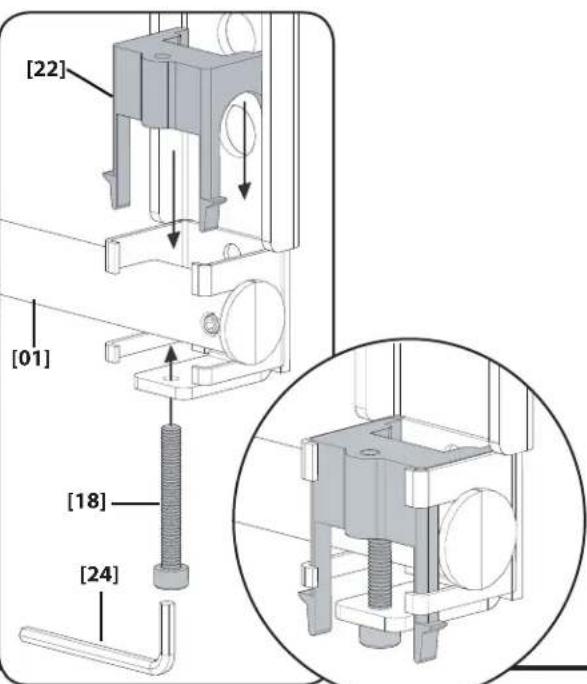
4-1 Attach caps
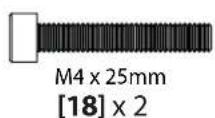
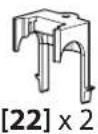
Attach click caps [22] to the interface [01] using screws [18].
5 Manage Cables

Plug the required wires and/or cables into the TV.
- Slide the three covers of the cable management assembly [26] off the front (face plate mount), rear (wall plate mount), and center (fl oating).
- Route the wires and/or cables through the three sections.
- Replace the covers.

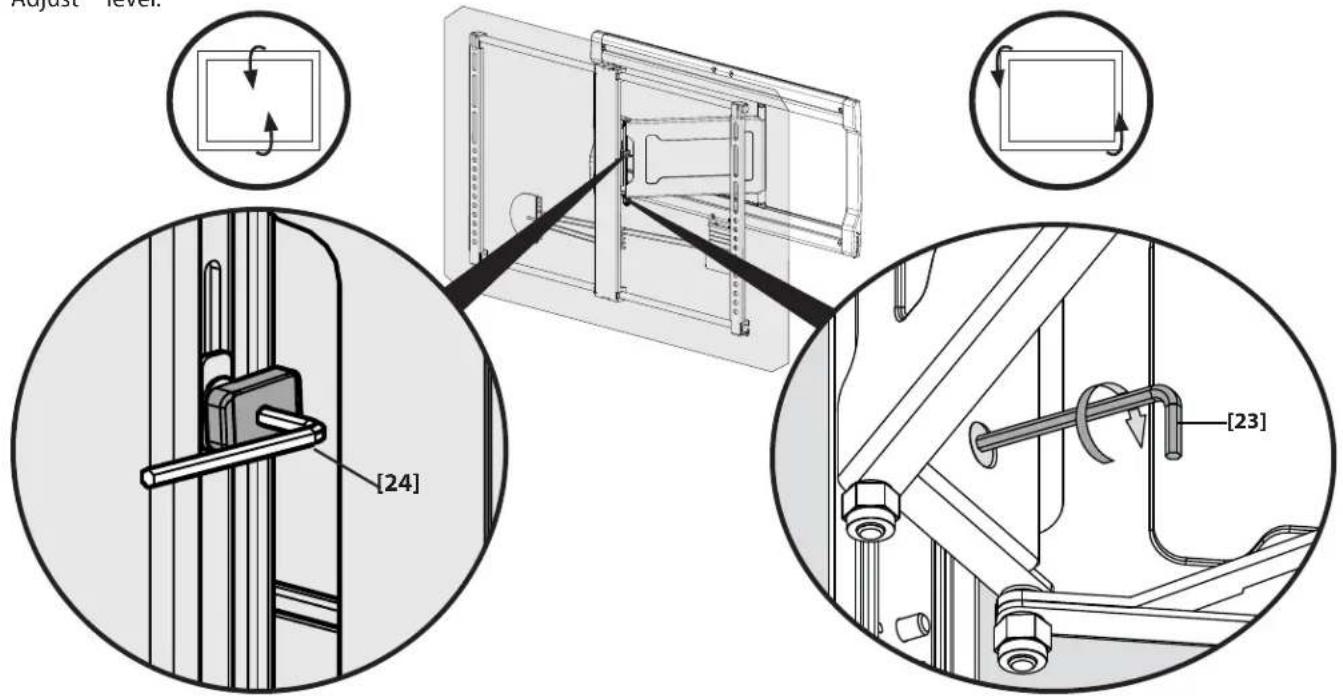
6 Adjust Tilt and Level
- Adjust up/down tilt tension by hand or using the M3 hex key [24].
- Adjust level.
After setup is complete:
A. Remove slide lock [17] from the locking position.
B. Fit the slide lock [17] into the grooves of one of the slides for storage.
Optional-Remove Your TV
SANUS
Français
CONSIGNES DE SECURITE IMPORTANTES - CONSERVEZ CES INSTRUCTIONS - VEUILLEZ LIRE ATTENTIVEMENT LE MANUEL AVANT D'UTILISER CE PRODUIT
4-1 Prenda as tampas-consulte a páginá 16
Prenda as tampas de clique [22] na interface [01] using os parafusos [18].
PPEDOCTEPEXHENE. Co6IIOJaTe npAByNa 6e3oNaCHOCTN, UTObI pNeD0TbpATNTB 03MOxHbIe TpABMbI NOBpeXdHne HMyueCTBa!
IJIINOLYeHnI DOnONIHHTenBHOH INHΦOpMauN O6paTInTeCb K DOKyMeHtAun, npinlaraeMoN K BaUeMy TeNeBn3Opy.
He nCnoB3yIte u3dJIeNe dIg KaKoI-NI6O cIeN, RaHb He orOBopeHHo npOn3BODHTeNEM.
CTeHa DoJIKHa BbIepKINBaTb Harpy3Ky, B IaTb pa3 npeBbIaOuIyO o6nI BEc MOHITOPa N KPOHITeHa.
JaHHoe m3JeIne He IpeHa3HaueHo nla yCTaHOBKn Ha CTeHy C MeTaJIInueCKnM Kapkacom.
BbHbHeNoHNMaTe npBeDeHbIe HNCTpyKmnn He yBpeHb B6e3oNaChocYcTahOBKn, C6pKn nn Kcnnyataun daHHoro mJednno, 6opatntecb BOTenTexHueckoNdoepkkn nn no3BOHNTKbaHnHnpoBaHHomO npdpaHky.
PnOIM3BODIeJIb He Hecet OTBeTCTBEHHOCTN 3a NOBpeJxDEHne O6OpdyoBaHnI INONyHeHnE TpaBMbl IIO npuHHe HnPaBUNbHO C6OpKn IIN NkCNIYATAUIN3dENII.
Heo6xOaMbIe HNCTpyMeHTbl-CM. cTp.2
TexHnueckne xapaKTepncTNKn -cm. cTp.2
Harpy3ka Ha n3dennne - HE I PEBblATb: 57 Kr (125 fynTOB), Bklnoua TeneBn3op n BCE Heo6xoDmBle npHaNDJeXHOCTN.
Yron nobopota: ±30°
YronHaKIOHa:OT+0°D0-10°
BbipabHBaHne:±1,5°
TexHnueckne xapaKTepeNTMKN -cm. ctp. 3
NocTaBlaeMbIe KOMnJIeKTyIOuZe N KpenExHbIe 3JeMeHTbl -CM. cTp.4 n5
PENyPExKDEHNE.Bn3dennecbMeKneTeaTI,KOTOpBEMOYCTaBnpuINHOUYueHEnpnpnonadAHBNdbxATEbHbIpyTN.
Ipeq c6bpokoyb6eHntecb,yTO BCE deTaNIMeIOTCB HAnuHmHn He nobPexdeHb. Ecn KaKe-Imo6 DeTaN OTCyTcBYOTn NIO nobPexdeHb, He BO3BaPaTaNE nobPexDeHNHyTeaNb npOdaBu; o6paTneCb B OTden texHnuecknoNDpeKnx.HNKOraHe nCnOlb3yte NoPbxdeHhie deTaN!
PIMMEAHUE. M4, M6 n M8 o6o3haaOT dAmepTp, "MM" o6o3haaet DnHbBuHTOB, KOtOpE MeOHT MapKpOBeMg M# X # MM. PmO MoTaKe TNCN0B3yIOCTe H CeB BKIOHeHbE B KOMIJIeK NOCTABK KpenExHbE JIEMeHTb.
1 Bb6op deTaeJen Kpenexa Jnra TeneBn3opa-CM. ctp. 6
BCTaBBTe BINTbBTB OBTBcTnA Cpe3b60H Na3aHne NaneHnTeBn3Opa
dAnOnpeDeneHn COOTBETCByUoero DAmetra BVHTa (M4,M6 INN M8).
Chauana nnonpo6yIte IcNoNb3OBaTb TOnbKO BVHT. Ecnn Tpe6yTeC 60bnle
MeTa, IcNoNb3yTe BVNTu BYTNK.
A PNEOCTEPEXEHNE. Co6nJaTe npaBnna 6eOnacHocTn, T0b6 npedotBpaTb BO3MOKHe BtpaMbI nOBpeXdeHne IMyueCTBa! NcnoJIb3oBAHne CmNkOM DInNHBX KpeneKHX bNeMeHTOB MOKET nPMBeCTN K NOBpeXdeHIO TEENBnO3A. Ecn BNtB 3aTaNIBaTCnNOx, HMeJeHHO npeKpateYcTahOBKY O6patnTceB OdTenTexHueckOKnDpeKnn
1-1 KpenneHne KpOHTeHOB Ha TeEnBn3Op-cm. ctp.7
Pn nomou Bb6paHHoroB ware 1 Kpenexa npnKpeNte KpoHtEnHbK TeneBu3opy.
A. BocnoB3yIteb BaPnAHTOM A, ecIn BaW TeLEBn3Op NMeET NIOCKyIO/POBHyIO 3aDHiIO CTHeKy.
B. BocnoIb3yItebc BapnaHToB,ecnBaW TeNeBnOp IMeet HepOBHyIO 3aDHIIO CTENK, yTOJIeHHbIe MOHTaXHbIE OTBepCTN IN IN Tpe6yTeCA donoHNITbHO nOpctpaHCTBO dIg Ka6eJeYOTONJIeHHbIX ININ BByNYkblx NOBEPXHOCTe.
Y6eINTeB TOM, YTO KPOHHTeHHb Ha 3aHeN PaHEn TEeBN3Opa yCTaHOBnEhbl NO yPBOHIO.
2YCTaHOBkaCTeHOBOI NAACTHHbI-CM.CTP.8
2-1 NpOtroBka CTeHOBOI nlaCTHbIK yCTaHOBKe-CM. cTp.8
CBeJNTe 7tAHnCTeHOBoN pAACTINHb [01] BmECTe, BCTaBbTe fikncATOP [17].3O t3AkpeHIT 7tAHnB NOHOCHTbO PAZDBHyTOM PNOJOKeHN, n O6JIeTHT MOtAX TcHOBo NpAChTINHs A3KpePHeNHMe Ha HeI TeneBn3Opa.
2-2 (yctahOBka cdepeBHHbIM KapkacOM) OnpeDeneHne nOIOXeHn CTOEK -cm. ctr. 9
Дя onpejenenpaacnojoxhen CTeHOBn nactnbHb nCnOb3yIte npnoxhene Height Finder ha caite sanus.com.
A PPEOCTEPEXHEHNE. Co6nIpaTe npaBnA 6eOnaCHOCTN, UTObI ppeoTbpNTb BO3MOXHbte TpabMbI NOBpeXHeHne IMyueCTBa!
TOniHnHa MaTePnAna, NOKpbIbAIOUeRO CTeHy, He DoJNkHa IpeBbIaTb 16 MM (5/8 JIoMa).
MnHMaBbNpaMePdepeBHHoN cOuM:51x102MM (2x4douHa;HomHNaBbHb:38x89MM(1/2x3/2DIOHa)
- OnpeelenHeNeNoJoxeHnCToEKn. OnpedEnIte UeHTP cToIKNc NOMOsbU HIN TOKOrO rBO3a, TaKke Iy 3TOrO MOxHOHcNIOb3OBaBt NcATEB KpaEB.
- BbpoBnHrTe 7a6noh cTeHOBo nIaCTnHb [27] nOTMeTbe paCNOJKeHne OTBePcTn.
2-3 CbepeHne HnpaBnaIOuX OTBepCTm n yctaHOkBa CTeHOBOI NpactnHbl -cm. ctp. 10
A PEPDOCTEPEXHEME. Co6nOaIe octopokHOCTb InpedotBpaueHn BO3MOxHbIX TpaBM UIN NOBpeXHeHIMyUeCTBA! HapraHIOuHne OTBepCTHN Fy6HoiH 75 MM (3 IOJMa) DONKHbI 6blT npocBepHeHc NOMOuHbO CBepNa dHaMeTpOM 5,5 MM (7/32IOJMa).
PPEOCTEPEXHEHNE.HenpaBnIbHOe nCNOJIb3OBaHHe MoKET yMeHbNtI pOuHOCTb COeMHENH 60NTA.
HE npnaraaTe qpe3MePbHie ycuiu npn 3aTARBAHN 6oTTOB [03].
3aTnBaiTe 60ntbI [03] ToIbKO Do Tex nop, noka Wai6bl [04] He 6ydyT noTnHyTbKCTeHOBOI pnaCTnHe [01].
2-2 (CteHa n3 6eToHa nnn 6eToHHbIX 6JIOKOB) Pa3MeTbTe cTeHy n npocBepnnte HappaBnaIoume OTBepCTnA -cm. ctp.11
Дя ор dedeHЯ paonolokhenr CTeHOBOI nactnHbI nCNoB3yTe npnoKHe Heigt Finder ha caite sanus.com.
Peped BbInonHeHnem daHHoI onepaunm cm. war 2-1.
BbipOBHnTe 1a6NoH CTeHOBo NpactnHbI [27] n OTMeTbe paCnoJoxKeHne OTBePCTn.
PNEOCTEPEXHEH. Co6nuaTe octopxHOCTbIa npedotBpaueHH BO3MOXhBIX TpABM nn NOBpeHH NmUeCTBa!
XyCTaHOBnTe CTeHOByIINACTINHy [01] HEnOcpeIcTBeHHO Ha 6eToHHyo NOBepxHOCTb.
MHHMaJIbHaTOnIuHa 6eToHHOCTeHbI:203MM(8dIOHMOB).
MHHMaHbHbIpa3Mep6eToHHoro6noka:203x203x406MM(8x8x16HIOHMOB).
MHHHbHOe rOpHTaIbHOe npocTpaHCTBO Mekdy KpenneHnMM: 406 MM (16 IOIMOB).
HappaBnpoune OTBepTnaIy6nHOH 75 MM (3HnMa) HEOBXOIMOPocBepNTb c NOMoBu CBepNa dAmETpOM 10 MM (3/8HnMa).
He donyckaetc CBepntb OTBepCTn B Wbax MeKdy 6nokam.
2-3 BCTaBka IIO6eJn 6oNTOB-CM.CTp.12
BCTaBBTe JIO6eENI JINI 60NTOB [05].3aTEM NPOcyHbTe 6OITbI [03] UpeE3 CTeHOYIO nactHy [01] IN BCTaBBTe BIO6eENI.
PPEOCTEPEXHEH. HenpaBnBHOe nCpONb3OBaHne MOxET yEmhwnbpnoHc coeHHn6oNTa.Bo n36eKaHne BO3MOxHbIX TpaBM nnNIOBpeKdHnUMyueCTBa:
y6eintecb,yTOIO6e[05]ycTaHOBnEhbl3aNOJINcOc6eTHOHNOBepxHOCTbIO.
3aTnBnBe 60ntb[03] TOnbKO DoTex np, Noka Wai6b[04] He 6ydyT NOIaHTbIKCTeHOBoIIpactHe[01].
He npunaraiTe 4pe3MeHbIe ycINnI npn 3aTARnBaHN6oNTOB [03].
3 UcTaHOBKa KpbIweK CTeHOBoi NpIaCTNHbI n y3eI pa3BODKn Ka6elen -cm. cTp. 14
YCTAHOBITE BEPXHIOKpbIHKy [25] c NOMOUIIO WIECTINrpaHHORO KIOUHa HA 18 IIOMa [21] n YETbIPex BNHTOB [20].
UCTAHOBITE 3aDIIIOO pIaTHINY y3a pa3BdoKu Ka6eBeN [26] Ha DaBaMaIbIX OTEBPcRbH V BHXeJtAACTn CTeHOBOI pIaTHINb [01].
UcnoIb3yte sctnrpanHbHJIuOHa ⅡIOMa [21] uYeTbpe BnHTa [20], UTO6bl 3aKpeINb HIXHQIO KpbIiKBy CTeHOBoI pAnCTInb [25] u3en pa3BODKn Ka6BeN [26] h CTeHOBoI pAnCTIne.
IcnoJb3yIteDBA BnHTa [19], 4TO6bl3AkpENMb nepeHIOO nlaCTHy y3na pa3BODKN Ka6ene [26] BHYtpn KpEnEKNHO INTEPpeCa TeneBu3opa [01].
4 3aKpenHne TeJeBn3opa Ha y3neCTeHOBOI nlaCTINbI -cm. ctp.15
Y6eNTecb, YTO KPOHHTeHb IINTeTBeH3Opa 3akpeIJIeHb Ha INTEpfeIce, KaK NOKa3aHO Ha pCvHke.
PNEOCTEPEXHE. Co6nOaIte octopokHOCTb Ipy npoTbpaeHb BO3MOKbIX TpaBm HIN NOBpeHdN IMyueCTBa! B0lbwo BEC! DByBbIOJIeHHe DaHHo onepaun Bam noHaOboNTc NOMOuB.
4-1 YctaHOBka 3arnyweK-CM. ctp.16
YCTAHOBNTe 3aueKnBaembte 3aIyuKn [22] Na KpeenXhBn HHTepfecn [01] C NOMOUBBOHHTOB [18].
PoiKIOUHe K TeeBUN3OpY Heo6xOaMlbIe npoBOa N Ka6eH.
- CHMITE TPN KpbIshKIN y3na pa3BOpKIN Ka6enei [26] cnepeN (cToNkA nIeBOH pNaCTnHb), c3aDn (cToNHa cTeHOBo pNaCTnHb) IN No CEHTpy (NoDBMHAA CTOnKa).
- Iponoxte npoBoa n/nn Ka6e nn no 3TNm TpeM ceknram.
- HaneHbTe KpbIuKn.
6 Perynupobka yrla HaKloHa uypOBH
- OTPerynpye ycuinne 3aTakkn npn HakoHne BBepx/BnI3 BpyHyo nnc NOMOsbU WeCTurpaHHoro KIOUa M3 [24].
- PerynipoBka ypoBna.
NocJIe 3aBepWeHn yCTaHOBKn:
A. Ι3BNEKNTe ΦNKcaTOp [17] n3 ΦHKcnpyIOuSeI NO3nUIN.
B. BctaBBte 0nkcatop [17] B na3bI OndHou n3 3aDbNuekeK JnXpaHeHH.
DononHnteBHO - ChTne TeneBu3opa-cm.ctp.20
Polski
WAZNE INSTRUKCJE BEZPIECZENSTWA - ZACHOWAC TE INSTRUKCJE - PRZED UZYCIEM PRZECZYTAC CALY PODRECZNIK
Milestone AV Technologies and its affiliated corporations and subsidiaries (collectively, "Milestone"), intend to make this manual accurate and complete. However, Milestone makes no claim that the information contained herein covers all details, conditions, or variations. Nor does it provide for every possible contingency in connection with the installation or use of this product. The information contained in this document is subject to change without notice or obligation of any kind. Milestone makes no representation of warranty, expressed or implied, regarding the information contained herein. Milestone assumes no responsibility for accuracy, completeness or sufficiency of the information contained in this document.