Expert UV 40 B - Lawn mower Wolf Garten - Free user manual and instructions
Find the device manual for free Expert UV 40 B Wolf Garten in PDF.


Frequently Asked Questions - Expert UV 40 B Wolf Garten
User questions about Expert UV 40 B Wolf Garten
0 question about this device. Answer the ones you know or ask your own.
Ask a new question about this device
Download the instructions for your Lawn mower in PDF format for free! Find your manual Expert UV 40 B - Wolf Garten and take your electronic device back in hand. On this page are published all the documents necessary for the use of your device. Expert UV 40 B by Wolf Garten.
USER MANUAL Expert UV 40 B Wolf Garten
Original operating instructions 10
natural_image
Line drawing of a manual lawn mower with directional arrows indicating motion (no text or symbols)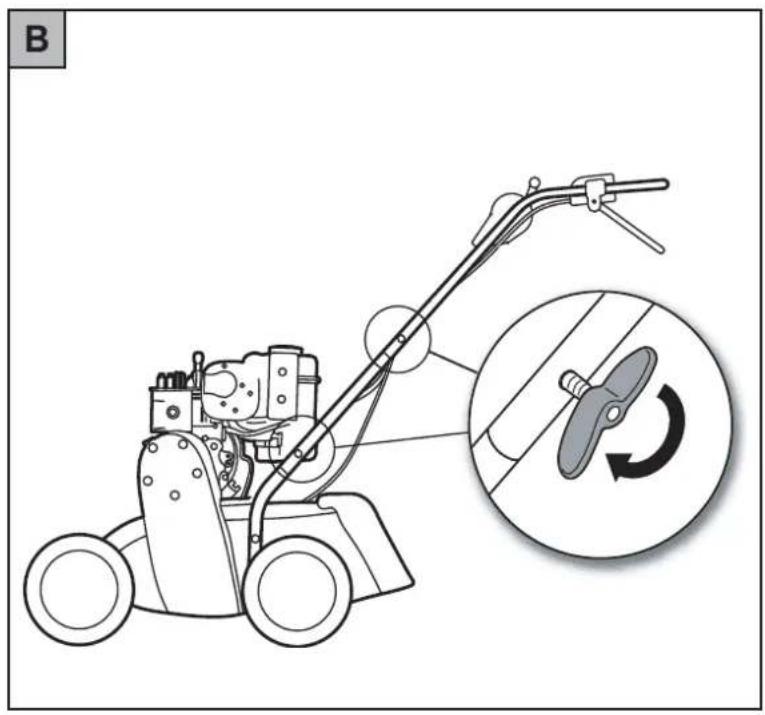
natural_image
Line drawing of a lawn mower with an inset showing the blade rotation mechanism (no text or symbols)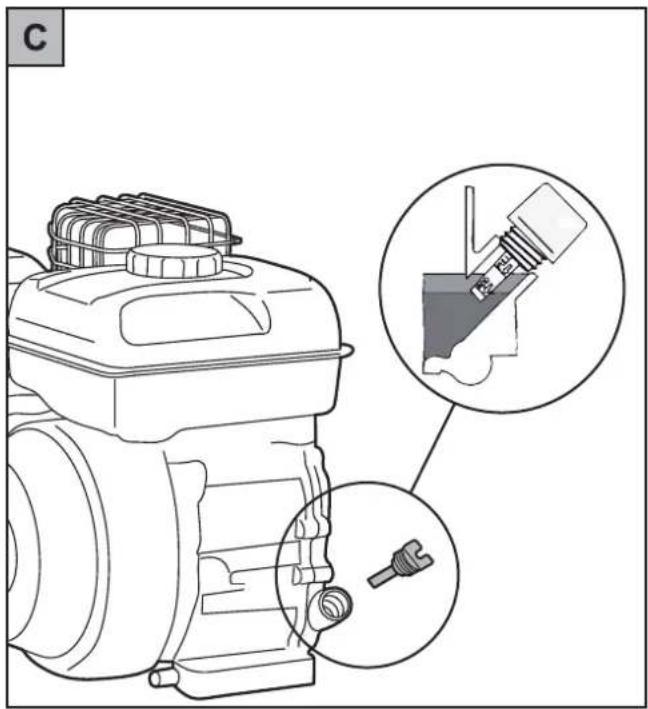
natural_image
Technical line drawing of an engine component with a magnified inset showing internal components (no text or symbols)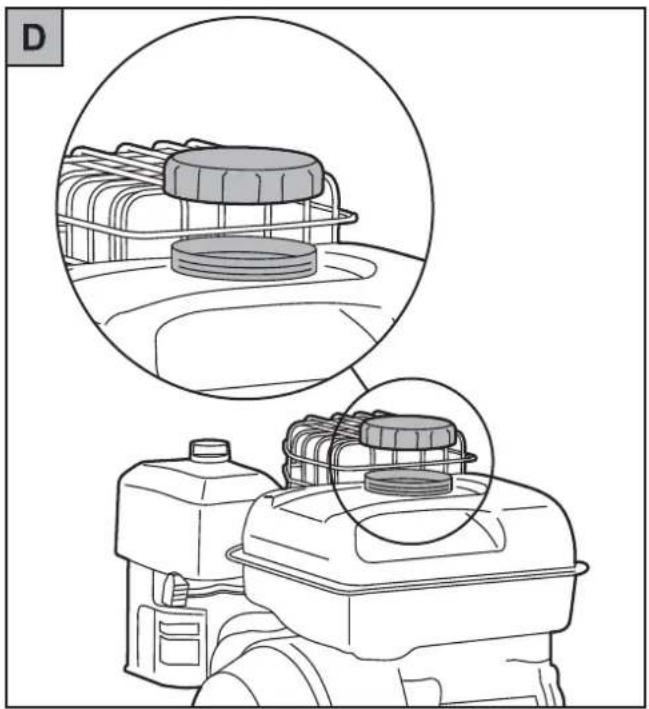
natural_image
Technical line drawing of a mechanical assembly with two views of a component (no text or symbols)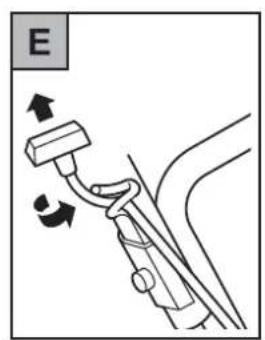
natural_image
Mechanical diagram showing a lever mechanism with directional arrows (no text or symbols)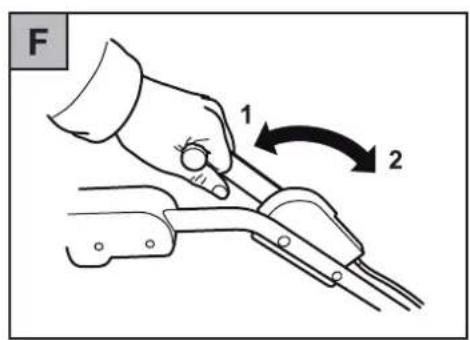
text_image
F 1 2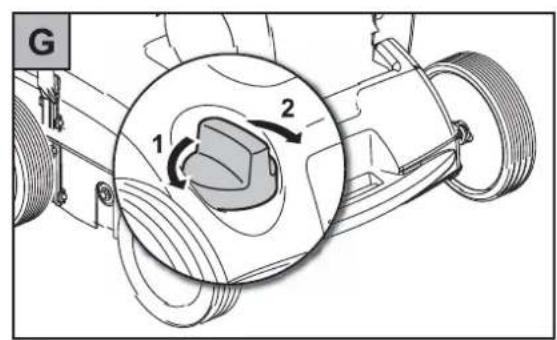
text_image
G 1 2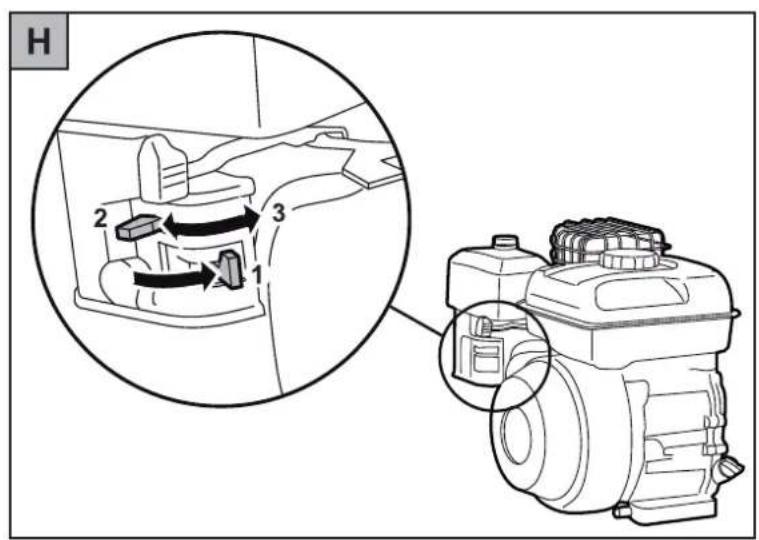
text_image
H 1 2 3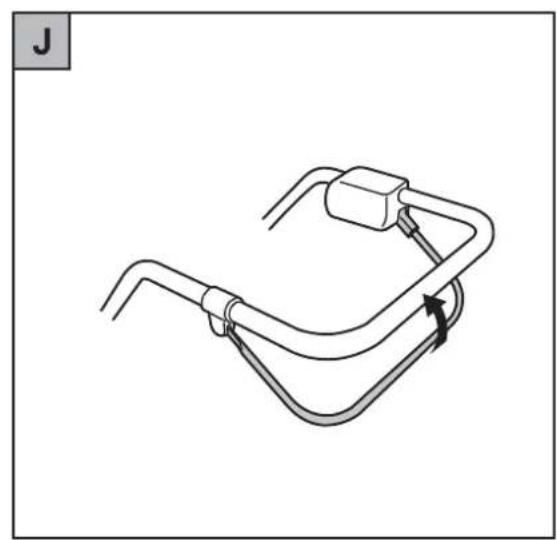
natural_image
Simple line drawing of a mechanical clamp or connector with a curved handle and lever (no text or symbols)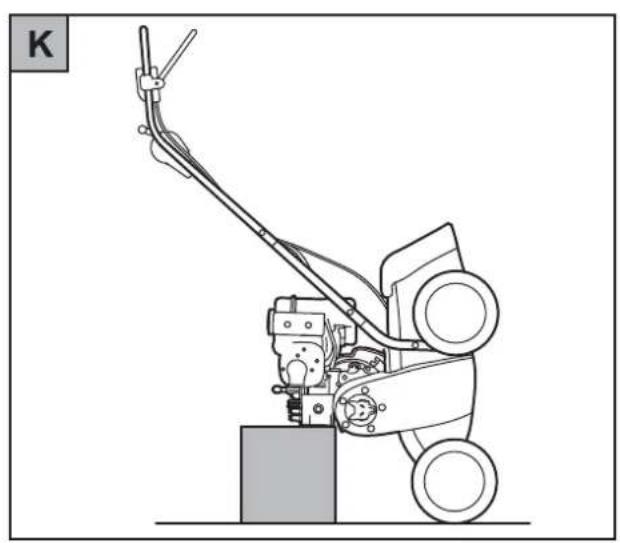
natural_image
Line drawing of a manual lawn mower with a cutting tool (no text or symbols)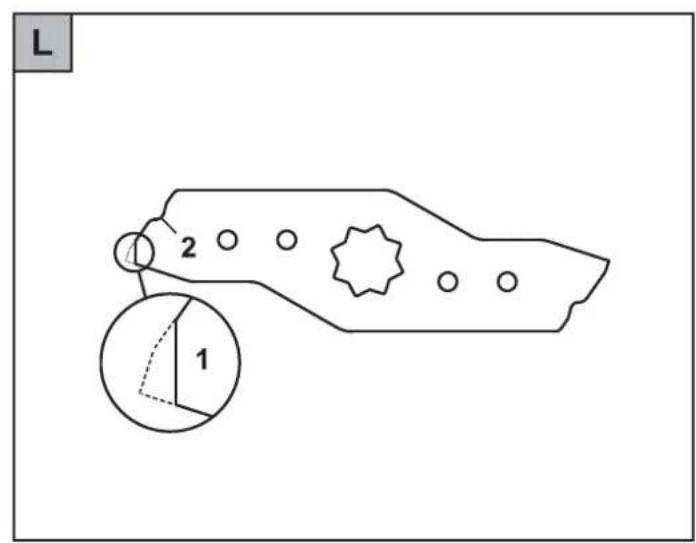
text_image
L 2 1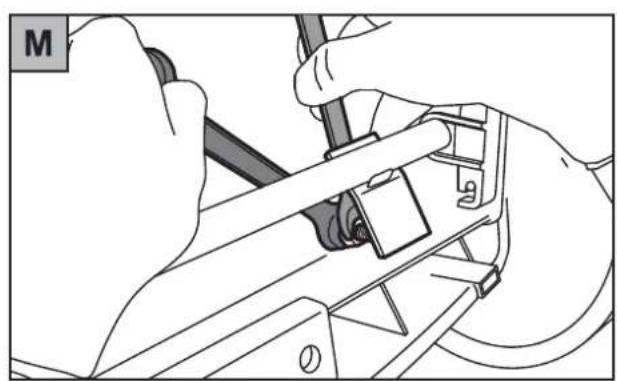
natural_image
Illustration of hands using a tool to adjust or install a mechanical component (no text or symbols visible)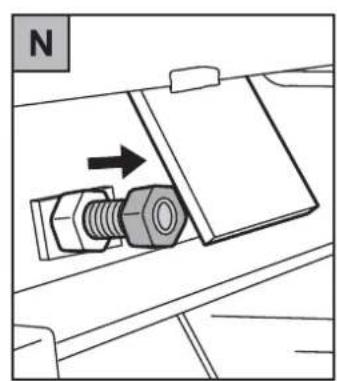
natural_image
Technical diagram showing a bolt inserted into a component with an arrow indicating direction (no text or symbols)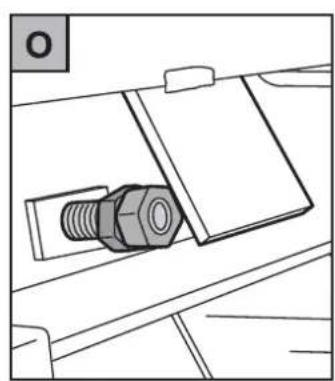
natural_image
Technical line drawing of a mechanical component with a hex nut and bolt, no text or symbols presentEXPERT UV 40 B
D
1 Setting lever working / transport position
2 Safety bracket
3 Starter handle
4 Cable anti-king protection
5 Air filter
6 Accelerator lever
7 C h o k e
8 Petrol valve
9 Cover
10 Handwheel "Working depth setting"
11 Petrol filling spout
12 Oil filling spout
13 Transport handle
F
text_image
Labeled diagram of a lawn mower with numbered parts for identificationNL
1 Stelhefboom werk-/transportstand
2 Veiligheidsbeugel
3 Starthendel
4 Kabel knikbeschermer
5 Luchtfilter
6 Gashendel
7 C h o k e
8 Benzinekra
9 Veiligheidsklep
10 Handwiel „werkdiepte-instelling“
11 Benzinevulsteunen
12 Olievulsteunen
13 Transporthendel
DK
natural_image
Red and black lawn mower with visible blades and wheels (no text or symbols)Congratulations on the purchase of your WOLF-Garten product

Read the user manual carefully and familiarise yourself with the operating elements and the correct operation of the equipment. The operator is responsible for accidents involving other persons and their property. Observe the notes, explanations and regulations.

Never allow children or other persons who are not familiar with the operating instructions to use the scari-fier. Young persons under the age of 16 may not use the equipment. Local regulations can limit the minimum age of the operator.
Contents
Safety instructions .....10
Assembly....11
Operation....11
Maintenance .....12
Spare parts .....13
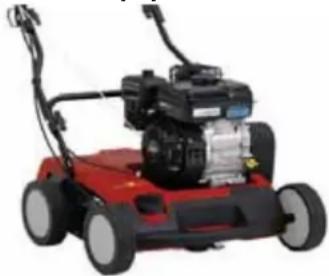
An overview of the equipment features
natural_image
Red and black lawn mower with visible engine and wheels (no text or symbols)— Folding handle for space-saving storage and ease of transport
- Powerful motors
- Comfort wheels carried in ball bearings
– High quality materials, excellent workmanship and attractive design.
- Ready-to-use: Ready for operation in 30 seconds (just add oil and petrol)
Safety instructions
Significance of the symbols

Warning!
Read the operating instructions before using for the first time!

Keep third per- sons away from the danger area

Caution! - Sharp cutting blades - remove plug lead before maintenance!
Before scarifying
●Never use the machine if persons, especially children or animals are in the vicinity.
●The operator is responsible for accidents or risks with other persons or their property.
- Wear ear protection and protective goggles when operating the machine.
●Only scarify wearing sturdy shoes and long trousers.
●Never scarify in bare feet or wearing sandals.
- Check the ground where the machine is to be used, and remove any items which could be picked up and thrown out.
WARNING - Petrol is extremely flammable
- Only store petrol in containers designated for that purpose.
- Only fill up with petrol in the open air and do not smoke during filling up.
- Fill up with petrol before starting the engine. When the engine is running or if the engine is hot, the petrol tank should not be opened and it should not be topped up.
- If petrol overflows do not try to start the engine. Instead, clean the machine. All attempts at starting are to be avoided until the petrol vapour has evaporated.
- For safety reasons, the fuel tank caps and silencer should be replaced if they are damaged.
●Before use, always check by visual examination whether the working tools are worn out or damaged. To avoid imbalance, worn or damaged working tools should only be replaced in complete sets.
When scarifying
- Do not run the engine in enclosed spaces where dangerous carbon monoxide could build up.
●Only mow the grass if the light conditions are suitable.
●Only guide the machine at walking pace. - If possible, avoid the use of the unit when the grass is wet otherwise exercise extreme caution to avoid slipping.
●Always ensure a good position when located on inclined ground.
●Always work at right angles to the incline, never up and down.
●Take particular care when changing direction on inclined ground. -
Do not work on ground which has an excessive incline.
●Take particular care when turning the machine or when pulling it towards you. -
Stop the working tools if:
— the machine needs to be tilted for transport. - if areas other than grass are to be crossed
— when transporting the machine.
●Never use the machine with damaged or removed protection devices.
●Make sure that there is adequate distance between your feet and the working tools. - When starting the engine do not tilt the machine, unless the machine needs to be lifted during this process. In this case tilt only as much as necessary, and only lift the side away from the operator.
●Never put your hands or feet near the rotating parts.
●Always keep away from the ejection opening.
●Never lift or carry the machine when the engine is running. - Stop the engine and remove the sparking plug lead:
— before removing blockages or obstruction in the ejection channel.
— before checking the machine, cleaning it or doing work on the machine - if foreign bodies are struck. Check the machine for damage and undertake the required repair before re-starting and working with the machine
- if the machine starts to vibrate excessively.
— when leaving the machine.
— before filling up with petrol.
Maintenance and storage

Caution! Rotating blades
Before all maintenance and cleaning tasks:
- Remove the sparking plug lead.
●Take care not to grab running cutters.
●Make sure that all nuts, bolts and screws are tightened properly in order for you to make sure that the machine is in a safe working condition.
●Never store the machine with petrol in the fuel tank inside a building in which it may be possible for petrol vapour to come into contact with fire or sparks.
- Allow the engine to cool down before storing the machine in enclosed spaces.
● In order to prevent fire, keep the engine free from grass, straw, moss, leaves or escaping grease.
- Check the machine regularly and replace worn or damaged parts for safety's sake.
- If the fuel tank needs to be emptied this should be done in the open air. The drained fuel must be stored in a special container for fuel or should be disposed of carefully.
Assembly
Fixing the grab handle A B

Caution!
When collapsing and unfolding the grab handle, the cable could be damaged.
●Take care that you do not kink the electrical cable and the Bowden cable.
- Fold the grab handle down in accordance with the illustration and tighten it in place with the wing nuts.
Operation
Operating times
- Please observe the regional regulations.
- Request the operating times from your local authorities.
Topping up the oil C
- Please check the oil level before scarifying.
- Before using for the first time, you must add 0.6 l. VO-4T four-stroke oil up to the mark.
Filling with fuel D

Caution! Rotating blades
Settings only to be carried out on the machine with the motor switched off and with the working tools at a standstill.
●Switch the motor off and pull off the sparking plug lead.
●Use only normal lead-free petrol (not Super unleaded).
●Avoid spilling petrol.
- Do not inhale the vapour.
Setting the working depth F G

Caution!Rotating blades
Settings only to be carried out on the machine with the motor switched off and with the working tools at a standstill.
●switch the motor off and pull off the sparking plug lead.
i Recommendations on working depth:
prepared areas with stone-free, soft ground conditions
- Match the working depth exactly to ground level (factory setting)
stony, unkempt areas
- Set the working tools to ground level
- If stones are thrown up, set a reduced working depth
rough ground, very mossy ground
●start with a small working depth -
do not overload the machine (if the motor stalls use a smaller working depth)
●scarify several times at right angles
●re-seed with WOLF-Garten Lawn Seed (e.g. "Loretta") -
Put the setting lever back into the transport position F (1)
2. Increasing the working depth (cutters towards the ground) G (1)
Turn the handwheel "Working Depth Adjustment" to the left.
Reducing the working depth (62)
Turn the handwheel "Working Depth Adjustment" to the right (One turn = 1.5 mm working depth)
-
Scarifying test:
-
Start the machine.
- Push the adjusting lever to the working position F (2).
- Push the machine slowly in the working direction.
- If there is a noise of stones being thrown up or if the cutters become blocked
●Switch the machine off immediately.
- Turn the handwheel "Working Depth Adjustment" to the right by 2-3 turns G (2).
●Carry out the scarifying test again.
Starting/Stopping

Caution! Rotating blades
Working / settings only to be carried out on the machine with the engine switched off and with the working tools at a standstill.
- Only start the engine when your feet are at a safe distance from the working tools.
- Start the engine on flat ground, if possible not in long grass.
Cold start
- Pull the adjusting lever to the transport position backwards F (1).
- Open gas cock. H (1).
- Pull the "Choke" back H (2).
- Lift the safety lever and hold in position . J
- Pull the starter handle and let it return slowly . E
- Push the choke back as soon as the engine has warmed up H (3).
- Push the adjusting lever to the working position F (2).
Hot start
- Pull the adjusting lever to the transport position backwards F (1).
- Lift the safety lever and hold in position . J
- Pull the starter handle and let it return slowly . E
- Push the adjusting lever to the working position (F).
Stopping the engine
- Release the safety lever . J
- Push the adjusting lever to the transport position F (1).
Maintenance
General

Caution! Rotating blades
Before all maintenance and cleaning tasks:
-
Remove the sparking plug lead.
●Take care not to grab running cutters. -
For safety reasons, replace any worn or damaged parts. When replacing, follow the instructions for installation
- Check all the visible fastening bolts and nuts regularly to be sure they are snug and tighten them.
- Only use spare parts made by WOLF-Garten; otherwise you do not have a guarantee that your scarifi er meets safety regulations.
Cleaning
●Always clean the scarifier after each use with a handbrush.
●Never spray the scarifier with water.
- Turn the scarifier on its side in accordance with the illustration K.
Changing the engine oil

Notes:
●Change the oil for the first time after 20 operating hours.
- Then change the oil every 100 operating hours, at the end of the scarifying season at the latest.
- When using the machine in very heavy applications or in dusty conditions, the oil should be changed more often.
●The oil should be drained when the engine is hot and the fuel tank is empty.
- Open the oil filling spout.
- Tilt the scarifier slowly to the front and allow the oil to flow into a suitable container.
-
Close the oil filling spout again.
-
Please dispose of the old oil in accordance with the local regulations.
●Old oil must not be allowed to enter the ground and must not be disposed of in the household waste.
Tilling blade wear
In order to compensate for signifi cantly worn tilling blades (1), the tilling depth can be increased.

Caution! Sharp blades and springs.
Protective gloves are to be worn for this work.
- Set the change lever in work/tilling) position (E).
- Jack the tiller up as shown in ill . K
- Using two open-jawed 13 mm spanners, loosen the front hex. nut M.
- Turn the front hex. nut until it is flush with the end of the threaded bolt N
- Firmly tighten the rear hex. nut against the front hex. nut . O

The blades must be replaced when the wear has reached the wear mark (2).
Storage in winter
- Drain the fuel tank.
●Drain the carburettor.
- This can be done by starting the engine and allowing it to run until it stops of its own accord.
●Clean the scarifier thoroughly.
- Change the oil.
●Preserve the engine:
- Unscrew the sparking plug and pour one dessert spoon of engine oil into the sparking plug opening
- Pull the starting cord slowly all the way (oil distribution in the cylinder)
- Screw the sparking plug back in position (do not replace the sparking plug lead)
●Store the scarifier in a cool and dry location.
●The scarifier should be checked by a WOLF-Garten customer service workshop in the autumn.
Spare parts
| Ordering Number | Designation of the item | Description of the item |
| 3635 068 TK 40 Collection bag | ||
| 3640 097 UV-EV 40 Replacement cutters (17 units) | ||
| 4180 091 VO-4T Special 4 stroke oil |
Rectifying faults
| Problem Possible cause | Help from (X) | ||
| WOLF-Garten Service Workshop | Yourself | ||
| No scarifying effect • Working depth set too small --- X | |||
| Running rough, heavy vibration of the unit | • Cutters damaged and/or loose | X | --- |
| Abnormal noises from the unit - clanking | • Cutters and/or bolts loose | X --- | |
| Engine will not start or has reduced power | • Insufficient fuel in the tank | --- X | |
| • Sparking plug lead not on the sparking plug | --- X | ||
| • Sparking plug not working | --- X | ||
| • Air filter contaminated or oiled up | --- X | ||
| • Accelerator lever has been moved (should be in the position "hare") | --- X | ||
If you are not sure, then always consult the WOLF-Garten service workshop.
Caution! Switch the scarifier off and pull the sparking plug lead off before checking or working on the cutters.
Warranty
The warranty rules issued by our company or the importer apply to every country. As part of the warranty, we remedy malfunctions on your appliance free of charge provided that this malfunction is caused by a material or manufacturing defect. In the event of a warranty claim, please turn to your dealer or the nearest branch office.
natural_image
Red and black lawn mower with visible motors and wheels (no text or symbols)Avant la scarification
natural_image
Red lawn mower with black and gray wheels, no visible text or symbolsnatural_image
Red and black lawn mower with visible mechanical components (no text or symbols)WAARSCHUWING - benzine is zeer brandbaar
natural_image
Red and black lawn mower with visible blades and wheels (no text or symbols)natural_image
Red and black lawn mower with visible blades and wheels (no text or symbols)natural_image
Red lawn mower with black and white body, no visible text or symbolsnatural_image
Red lawn mower with black and white blades, no visible text or symbolsnatural_image
Red and black lawn mower with visible mechanical components (no text or symbols)natural_image
Red lawn mower with black and gray body, no visible text or symbolsnatural_image
Red and black lawn mower with visible motors and wheels (no text or symbols)natural_image
Red and black lawn mower with visible motors and wheels (no text or symbols)— Specijalna drška za ostavu i jednostavan transport
- Jaki motori
- Komforni kotaèi s kuglagerima
- Materijali visoke vrijednosti, izvanredna obrada materijala i atraktivan dizajn
- Ready-to-use: Spreman za pogon u 30 sekundi (samo napuniti ulje i benzin)
Sigurnosne napomene
Znaèenje simbola

Pozor!
Proèitajte upute prije stavljanja stroja u pogon!

natural_image
Red lawn mower with black and white body, no visible text or symbolsnatural_image
Red and black lawn mower with visible mechanical components (no text or symbols)natural_image
Red and black lawn mower with visible mechanical components (no text or symbols)natural_image
Red and black lawn mower with visible blades and wheels (no text or symbols)natural_image
Red and black lawn mower with visible motors and wheels (no text or symbols)natural_image
Red and black lawn mower with visible mechanical components (no text or symbols)natural_image
Red and black lawn mower with visible mechanical components (no text or symbols)natural_image
Red lawn mower on grass, no visible text or symbols
natural_image
Close-up of a red cleaning brush with a yellow filter, mounted on a surface (no text or symbols visible)
natural_image
Agricultural field with lettuce and a hirsch tool, no visible text or symbols.
natural_image
Illustration of a red spray gun with a flame, mounted on a green hedge (no text or symbols)
natural_image
Red and black lawn shaver on grass, no visible text or symbols
natural_image
Woman cleaning a lawn with a broom and bucket in front of a wooden cabin (no visible text or symbols)
natural_image
Hand watering a red and yellow lawn tool in a garden setting with green grass and flowers (no text visible)
natural_image
Red and white lawn mower on grass under a blue sky with clouds (no text or symbols visible)