Protector Fix - Car seat CASUALPLAY - Free user manual and instructions
Find the device manual for free Protector Fix CASUALPLAY in PDF.
Frequently Asked Questions - Protector Fix CASUALPLAY
User questions about Protector Fix CASUALPLAY
0 question about this device. Answer the ones you know or ask your own.
Ask a new question about this device
Download the instructions for your Car seat in PDF format for free! Find your manual Protector Fix - CASUALPLAY and take your electronic device back in hand. On this page are published all the documents necessary for the use of your device. Protector Fix by CASUALPLAY.
USER MANUAL Protector Fix CASUALPLAY
GB:Keep up your leasipt in order to cxerses your light as a consumer
CET LERWEN A ECRN A 10000000000000000000000000000000000000000000000000
C: The ooviposse mth the tttis vioe wewss in the mooet 1000 houw to the oocpne iuef
Lamprope al rneal dtdi aegnnc modiee apoloioqip qauric naiis en maei panaide
124
F1. The maps are pre-Set as follows: A is a module of rank 2, and B is a module of rank 3.
Only suitable for use in the vehicles equipped with a lap 3 point safety belt with or without retractor approved to UN/ECE regulation no 16 or other equivalent standards.
REMARQUE
INSTRUCTIONS GENERALS
CASUALPLAY thank you for the confidence you have placed in us by purchasing this safety seat. This product has been designed, manufactured and accredited under the strictest safety regulations. We have thought about its ease of installation and use, but we need you to install it correctly for optimal operatingresults. Please read these instructions carefully before installing the seat in your car. The safety of your child depends on you using it correctly. Do not hesitate to contact us if you have any queries (Tel., e-mail, see the back of these instructions)
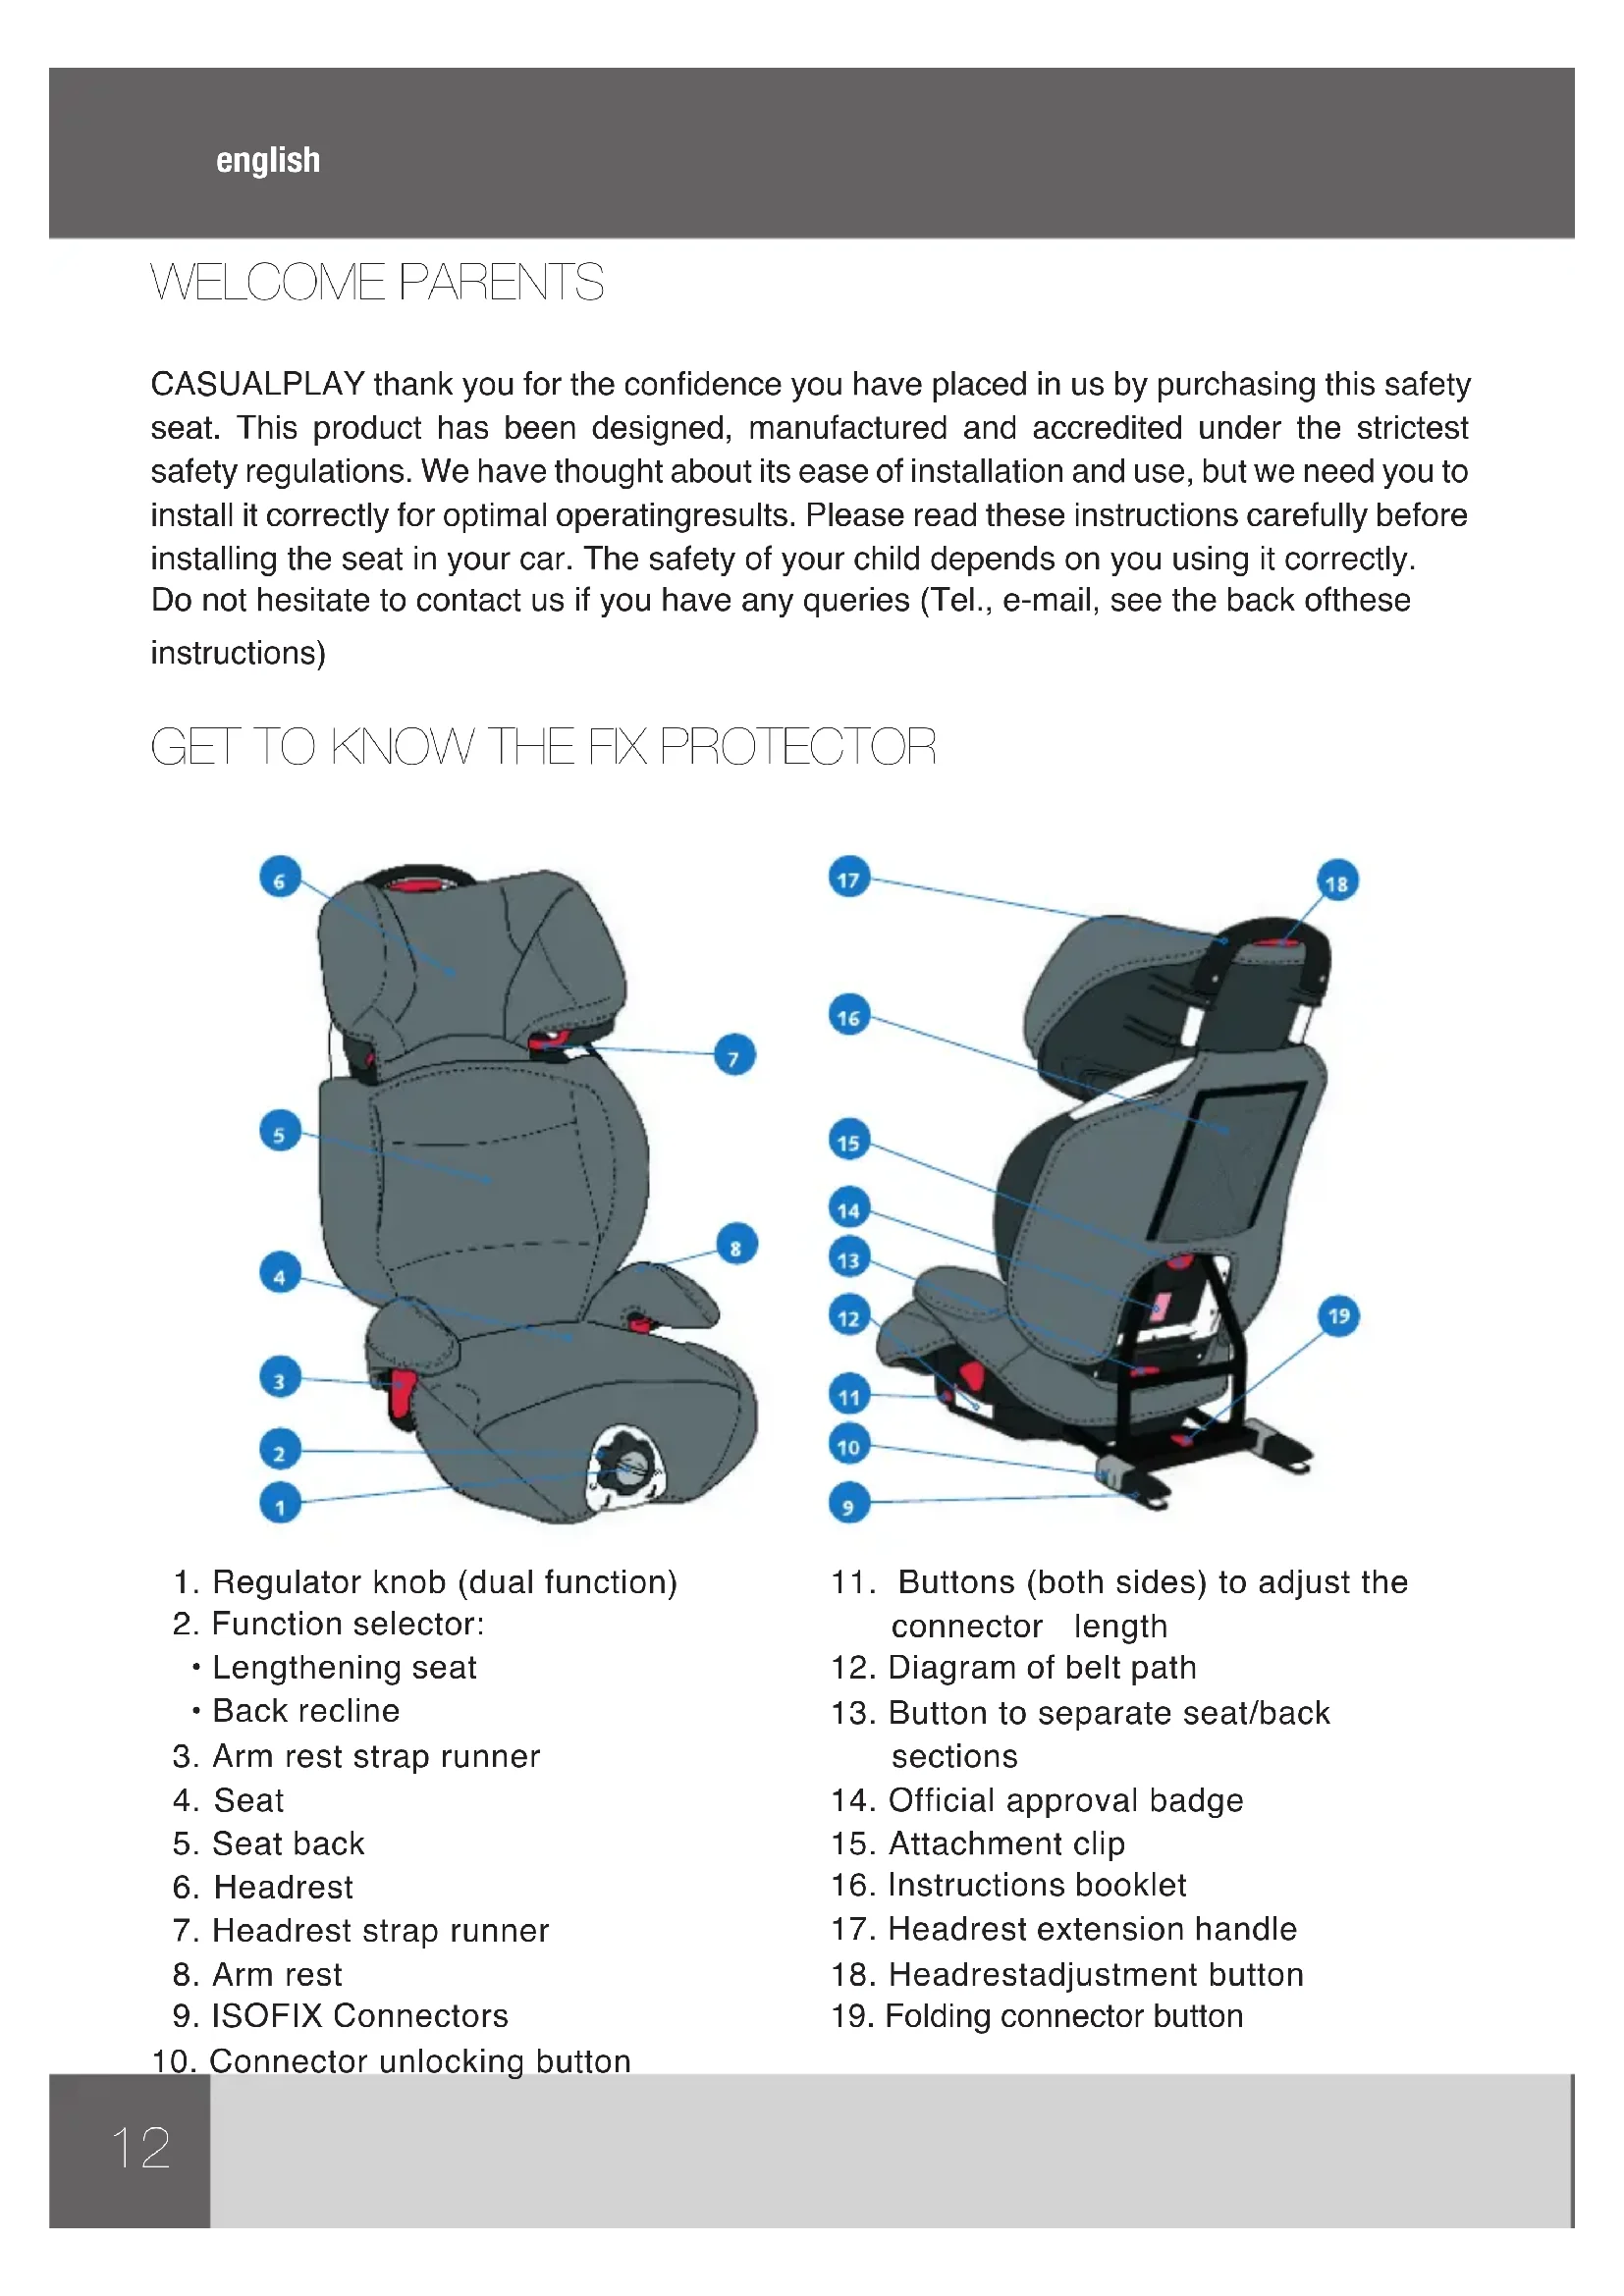
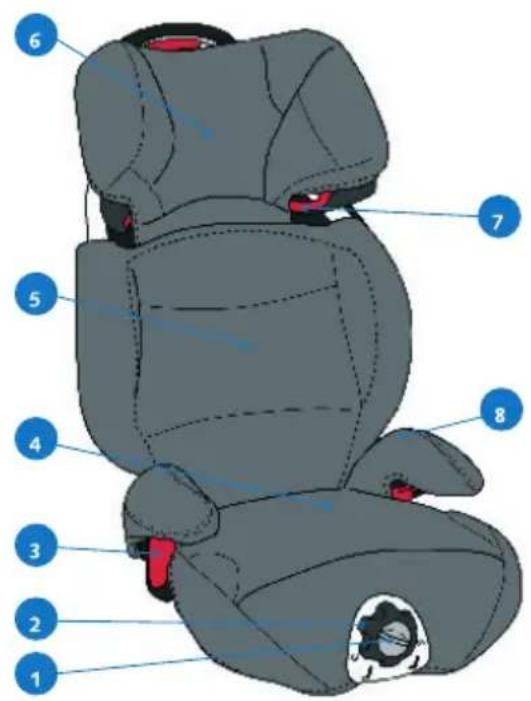
GET TO KNOW THE FIX PROTECTOR
-
Regulator knob (dual function)
-
Function selector:
Lengthening seat
- Back recline
-
Arm rest strap runner
-
Seat
- Seat back
- Headrest
- Headrest strap runner
- Arm rest
9.ISOFIX Connectors - Connector unlocking button
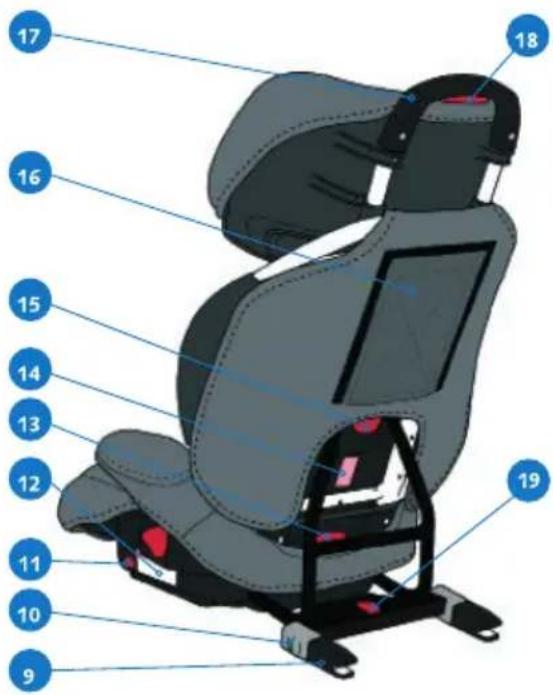
- Buttons (both sides) to adjust the connector length
- Diagram of belt path
- Button to separate seat/back sections
- Official approval badge
- Attachment clip
- Instructions booklet
- Headrest extension handle
- Headrestadjustment button
- Folding connector button
WARNING
- This is a "UNIVERSAL" retention system. It is certified under Regulation n°44, amendments series 04, for general use in vehicles and appropriate for the majority of car seats although not all.
- Correct installation is required if the vehicle manufacturer has stated in the instructions manual that the vehicle is suitable for a "UNIVERSAL" retention system for this age group to be installed.
- This retention system has been classified as "UNIVERSAL" according to stricter conditions than those that are applied to previous designs that do not carry this warning.
- If you have any queries contact the seat manufacturer or retailer.
WARNING AND SAFETY INFORMATION
THIS INSTRUCTION MANUAL MUST BE KEPT INSIDE THE PROTECTOR FIX DURING USE.
READ THESE INSTRUCTIONS CAREFULLY BEFORE USING THE DEVICE AND KEEP THEM FOR FUTURE REFERRAL. YOUR CHILD'S SAFETY MAY BE AFFECTED IF THESE INSTRUCTIONS ARE NOT FOLLOWED.
- The PROTECTOR FIX is a child seat belonging to Group 2-3 (15 - 36 kg.).
- The seat should be fastened onto the car seat using the 3-point seat belt with or without the retractor of the actual vehicle, certified in under the UN/ECE 16 Regulations or equivalent standards and by means of the ISOFIX connectors if it is fitted with the fasteners.
- The original equipment must not be modified.
- After any accident, the seat must be checked or changed.
- Protect any part of the seat from possible damage caused by a folding car seat or a vehicle door.
- Protect all metallic parts in contact with the child from the sun's heat.
- The straps must never be twisted.
- Use the seat for every journey, no matter how short, and never leave the child alone inside the vehicle.
- The safety seat should be secured with the 3-point seat belt or with the ISOFIX connectors if the fasteners are fitted even if the child is not travelling in it, if not it should be removed from the vehicle.
- It is recommended that any luggage or other objects that can cause injuries in a collision are made safe or securely fastened.
- We guarantee the safety of the device when it is used by the first-time buyer.
- We advise against using second-hand products for safety purposes.
- Be extremely careful when installing the child safety seat, since installing it correctly can save the life of your child if you have an accident (follow the manufacturer's instructions correctly).
-
It is important that the rest of the passengers in the vehicle are also strapped in with a seat belt. If not, they can be thrown around in an accident and damage the baby.
-
Check the different parts of the seat regularly.
- The seat should not be used without its cover.
- Only the cover supplied by the seat manufacturer should be used, as it is an important part of the product.
- You are responsible for the child's safety.
- The upholstery should be hand washed, using mild soap and warm water; or machine washed at a maximum temperature of 30^ C and WITHOUT SPINNING. Do not use chemical cleaners (dry-cleaning).
GENERAL INSTRUCTIONS
PROTECTOR FIX Assembly (see illustrations 01 - 04)
- The PROTECTOR FIX arrives disassembled for easier transport (fig. 01)
- Position the back so that the clamp is between the metallic structure of the PROTECTOR FIX base (fig. 02 - 03), never behind it (fig. 04). A "characteristic click" confirms that the attachment has been made successfully.
WARNING: Never use PROTECTOR FIX without the back section as it has been accredited as a unit. Using it without the back section will affect the health of the child.
PROTECTOR FIX Installation inside the car (see illustrations 05 - 12)
- PROTECTOR FIX must be installed in the back seat of the vehicle with a three point seat belt and the ISOFIX connectors.
- Remove the headrest from the seat where you are going to install the seat (fig. 05).
- Position the clips in front of both ISOFIX slots, which are situated between the seat and the backrest (fig. 06).
NOTE: If the vehicle came supplied with these connectors, it is not necessary to assemble them.
- Next press either the left or right button (fig. 07) and, while keeping it pressed down, extend the length of the connector bars (fig. 08).
- Put the PROTECTOR FIX in the back seat of the car (fig. 09) in front of the ISOFIX hooks.
- Push the safety seat with both hands in the direction towards the anchorages until a "click" tells you that the attachment on both sides has been made (fig. 10).
- Check the correct installation of the system, by verifying that a green line appears on the upper part of the connector unlocking devices (fig. 11). If a red line appears in one of the connectors, it indicates that it is not correctly attached. Re-start the operation.
- Finally, adjust the free play between the PROTECTOR FIX and the back of the car by pressing either of the side buttons on the base, and pushing the safety seat firmly towards
the back of the car (fig. 12).
Place the child in the PROTECTOR FIX seat (see illustrations 14 - 17)
- Adjust the headrest to its maximum height (fig. 14 - 15) and pass the diagonal part of the belt through the headrest runner. Re-adjust the headrest to the appropriate position for the height of the child.
- Fasten the seat belt by passing it over the PROTECTOR FIX so that the lap strap is as low as possible and the diagonal strap holds the child firmly (fig. 16).
- Fasten the belt and check that the lap strap is underneath both arm rests (area marked in red) and the diagonal strap is above the arm rest next to the buckle (fig. 17). Adjust the height of the headrest so that the diagonal strap of the car seat belt passes over the chest of the child and not across his/her neck.
Adjusting the PROTECTOR FIX height (see illustrations 18 - 19)
- The PROTECTOR FIX is height adjustable to adapt to the growth of the child (fig. 18). Once it is fitted in the car with the child, adjust the height of the PROTECTOR FIX so that the belt never goes across the child's neck.
- Press the button behind the top of the headrest to adjust its height (fig. 19).
Adjusting the PROTECTOR FIX base (see illustrations 20 - 21)
- The base of the PROTECTOR FIX is adjustable according to the growth of the child.
- When seated inside, adjust the base according to the length of the child's legs.
- Turn the selector knob to the left (fig. 20) and move to modify the length of the base according to the legs of the child (fig. 21).
Adjusting the PROTECTOR FIX recline (see illustrations 22 - 23)
- The back of the PROTECTOR FIX has a reclining adjustment to suit the requirements of the moment. If the child falls asleep or wants to adopt a more relaxed position, increase the recline of the PROTECTOR FIX seat.
- Turn the selector knob towards the right (fig. 22) and move the seat towards the desired position (fig. 23).
Removing the PROTECTOR FIX from the car (see illustration 24)
- Release the seat belt buckle in the vehicle, loosen it and remove it from the runner.
- Remove the child from the PROTECTOR FIX seat.
- Release the connectors on both sides (a red signal will appear) (fig 24).
- Detach the safety seat from the car seat.
Dismantling the PROTECTOR FIX (see illustrations 25 - 26)
- To dismantle the PROTECTOR FIX seat, press the button located on the lower part of the back section (fig. 25) and pull the back section away from the seat section (fig. 26).
PROTECTOR FIX connectors folding mechanism (see illustrations 27 - 28)
- While pressing the ridged part of the red button, lift it up slightly to release the mechanism and maintaining the pressure (fig. 27), turn either of the 2 connectors downwards.
- Release the button and continue turning (fig. 28). When the connectors reach the maximum folding position (180^) , the mechanism will click indicating that it is locked again.
- To unfold the connectors, repeat the process until it clicks again indicating that it is locked into place.
Removing and replacing the upholstery (see illustrations 29 - 30)
- Take the backrest off the base.
- For the upholstery on the backrest, unfasten the zips, undo the fastening straps and the plastic strips (fig. 29).
- For the upholstery on the base, undo the fastening straps underneath the base (fig. 30).
- Follow the same steps in reverse order to put the upholstery back on again.
FÉLICITATIONS AUX PARENTS
PPEyIeHnI MEpbI Be3OJACHOCTN
3TO PYKOBODCTBO NOJb3OBATEJIЯ DOJXHO HAXOINTbcR B DETCKOM ABTOMOBINbHOM KPECJIe IPN EFO NcNOJb3OBAHn.
BHIMATEJIbHO IPOUHTAITE 3TV NHCTPYKcIIO NEPEI NCNOJb3OBAHNEM IPOykTA N COXPAHNTE EEE JIA DAJIbHEuNX CnPABOK. BE3OpACHOCTb PEBEHKA MOKET NOBEPHyTbcr PNCKY, ECIN DAHHbIE NHCTPYKcIIN HE BblIOJIHATb.
PROTECTOR FIX npeicTaBnaret coboi deTCKoe cndeHbe, npHaJneJauee K rpynnam 2-3 (ot 15 do 36 kr).
- ΘTO CINDEHNE MOKET 6bITb 3aKpeIJIeHO B aBTOMO6nJIe NOMOuBIO TpEXTOUeHbIX peMHei 6e3ONacHOCTN, O6OpYIOBaHHbIX npeHaTJXHTeJIaMNI IIN 6e3 HNX I COOTBeTCTBYIOxN npaBnIam 6e3ONacHOCTN UN/ECE-16 IIN 3KBnBaIeHTHbIM cTaHdApTAM, a TaKKe C NOMOuBIO Isofix pa3bEMOB.
3aPpeaaeTcB HOCNTb N3MeHEnBa OPnHaNbHyIO KOHCTpyKcNIO Kpecna.
- После abapисденидолжно 6ыть ТшаTeьно поверно, BO3MOxH0, 3ameHeHO Na HOBOe.
- Y6eIITecb, yTO cKlaIbIbAIOUneCnIeHbI IIN DBepn aBTOMO6nJIr He MOryT npNBecTN K NOBpeJKeHIO NIO6bIe 3JIeMeHTOB CnIeHnI.
3auntte BCE MeTaNlueckne yactn, C KOTOpbIMN MOxET COpNKOCHyTBcR pe6EHOK, OT npMbx cONHeuHbIX Lyuei (BO n36exaHne OXora).
Cneinte, TTo6bI pemHn He 6bln nepeKpyeHbl.
- Bcerda noIb3yIeTcB cnIeHbEm, daxe npn e3de Ha KOpOTKne paCCTOaHn HNKoRda He ocTaBnaIte pe6eHka 6e3 npncMOtpa B aBTOMO6nHe.
- Chmnte cndeHbe n3 aBTOMo6nla, ecn OHO He 6ydet NcnoB3OBaTbCra DoJIROe BpeMn XpaHnte erO B HeIOCTynHom dIa DeTe MecTe.
- XeIaTeIbH0 3aФИKcIpoBaTb 6araX n npEIMeTbl, KOTOpbl E MOrY T npINBeCTN K TpaBMam B cIyuae aBapuN.
- Мы rapаHTиPyem 6e3ONaCHocTb TOnbKO npn nCNoJIb3OBaHn KpeCna nepBnUHbIM NOKyNaTeIeM.
- He nCloB3yIte noJepKaHHbIe aBtOKpeCna, 3TO He rapaHTnpyET 6e3OnaCHOCTb.
- OctaIbHbIe naccaxnUpbl B aBTOMO6nIe DOJXHbI 6bITb C 3aCTerHyTbIMN peMHAMn 6e3oNaChocTN, TAK KaB CcLyuae abapn OHn MOryT HeynpabJIReMo IepMeuaTbcn NO caHOHy n TpaBMnPoBaTb pe6eHaKa.
-При установке abtokPECлaВ abTomobиь 6удte BнмATEльны NВ TOUHOCTN coblnoадаite nHCTpyKuzn npOn3BOdnteЯ NO yCTaHOBKe. 3TO nOMOxET cnaCTN Xn3Hb Baшему peбенkyВ сCityae abapn. - ПобODиTe peYyRnBn Bn3yaJbHbN KOHTpOJb BCex Yacteyn ABTOKpeCna
- CnIeHBe He DoJIxKHO IcNoJIb3ObaTbcra 6e3 TeKCTnJIbHOJ O6NBKn.
ToIbKO opINHaJIbHaj TeKCTnJIbHaj O6NBka, NOCTaBJIeMaJ N3ROTOBtJeM aBtOKpeCna, DOJXHa IcNoJIb3OBAtbcH, TAK KaK OHa YBJIeTcB BaxHOJ qAcTbIO npOdykTa.
-ПOMHIne,чTO Bbl Hecete OTBETCTBEHHOCt b 3a 6e3OnachOcTb pe6eHka. - O6nBky MoXHo CTnPaTb BpyHyO B TeNIO MblbHOb BOe IIN B MaIInHe npN Tempeatype He Bblwe 30^ C n BE3 OTKIMA. He noDBepraTe o6NBky xmmucCTke.
OCHOBHBIE INHCTPYKUN
C6opka PROTECTOR FIX (cM. pnc. 01-04)
PROTECTOR FIX NOCTaBnaIeTcB pa3o6paHHom BnDe IJn o6JIerUeHn TpaHCnOpTnOpOBKn (pnc. 01).
- YctaHOBInTe CnHky TaKIM 6pa3OM, yTo6bl 3axm OXBtBbAl MeTaJIInueCKyIO KOHCTpyKcIIO OCHOBaHnA KpeCna PROTECTOR FIX (pnc. 02-03), a He OKa3aIcR no3aIe ee (pnc. 04). XapakTepHbI 9eJUOK cOpBOXJaET npabNlbHoe 3aKpePJIeHne.
ПЕДУПЕЖDEHNE: 3АРЕSUЕНО ИСПОЛБ3OBAHNE KPECЛA PROTECTOR FIX BE3 CПИнКи, TAK KAK OHO ПОХODИLO ИСПВITAHNY I CEPTNФИKALIIO, KAK EDINHA KOHCTPyKUЯ. ИСПОЛБ3OBAHNE KPECJI A Be3 CПИнКIMOЖET HAHECTN BPEД 3ДОPOВьIO PEBEHKA.
YctaHobka PROTECTOR FIX B aBtomobnle (cm. pnc. 05-12)
PROTECTOR FIXdoJxHO 6bITb 3aKepeIeHO Ha 3aHem cndHe be aBtOMo6nJIc NOMOsbIO TextOueHoro peMHa 6e3OnacHocTn KpeIeHn PLAYFIX.
- Chmunte noIroNoBnK cndeHbB B MeCTe npednoJaraemoy yctaHOBKn DetCKOROKpcna (pnc. 05).
BCTaBbTe OTKpbITbIe KOHcbl KpeJIeHn ISOFIX B cKO6bl ISOFIX, KoTOpbIe o6bIuHO paCNoJoxHeB I HnxHei qAcTn CnDeHbI, nOd onOpoi CnHKn CnDeHbI (pnc. 06).
ПРИМЕЧАНЕ: ECЛN ABTOMOBиль OCHAШЕH TAKIMN
KPEJIeHnA M, TO HET HEOBXOIMOCTN X YCTAHABJNBATb.
- Haxmnte Ha leByIO nII npaByIO KhoNky (pnc. 07), n, ydepxnBaI ee, haxmnte Bn3 n yBeInyte dInHy uTahr KpePleHna (pnc. 08).
- YcTaHOBInTe KpeCNo PROTECTOR FIX Ha 3aJHee CnJeHbe aBTOMoBnJI BnepeI IN KpeJIeHn ISO-FIX (pnc.09).
- ToIKNHnTe DeTCKoe KpeCNo DByMЯ pyKaMn B HnPaBJIeHn NKePJIeHn Do Tex nop, nOKa He pa3dAcTcN ⅢeJyOK, CBnDETeNbCTbYIOuN O 3aKpeJIeHn KpeCna C DByX cTOpOH (pnc.10).
-Проверпглбнocь установки Кресна, убдншис, чTo на Верхенч actm mexan3MOB pa36LOKINPOBKN крpenlenя повися Зелени сигнал (pnc. 11).Есни Ha odHOM n3 крpenlenи NOBUNCS KpacHyн сигнал, 3TO O3Haayet He npabunbHoe 3akpenleneКресна. Повторе занobо пpoceDpy yctahOBkn Кресна. - По okончани, отergyлneyte 3a3op мжду креслom PROTECTOR FIX И спнков сдения副市长а CBTOMOBИЯ, нажав на бOKOBbie KHONКИ НОСВАн N KреслЯ И сДьНОТOLKHУВ DeTCKOE Кресно K СПИНKE сdения副市长а CBTOMOBИЯ (pnc. 12).