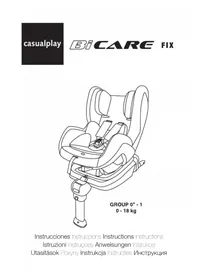
Multiprotextor Fix - Car seat CASUALPLAY - Free user manual and instructions
Find the device manual for free Multiprotextor Fix CASUALPLAY in PDF.
Frequently Asked Questions - Multiprotextor Fix CASUALPLAY
User questions about Multiprotextor Fix CASUALPLAY
0 question about this device. Answer the ones you know or ask your own.
Ask a new question about this device
Download the instructions for your Car seat in PDF format for free! Find your manual Multiprotextor Fix - CASUALPLAY and take your electronic device back in hand. On this page are published all the documents necessary for the use of your device. Multiprotextor Fix by CASUALPLAY.
USER MANUAL Multiprotextor Fix CASUALPLAY
text_image
Diagram illustrating three steps of car seatbelting: lifting a bag, adjusting the seatbelt, and adjusting the seatbelt with a green checkmark.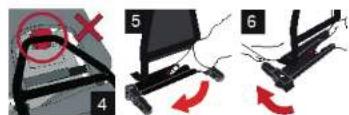
text_image
Diagram illustrating three-step mechanical assembly steps with red arrows indicating movement or change, labeled 4, 5, and 6.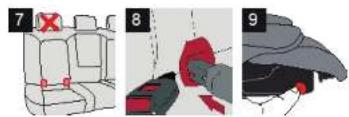
text_image
Diagram showing three steps of car seat cleaning: first with red X, second with red hand holding a red glove, and third with black jacket.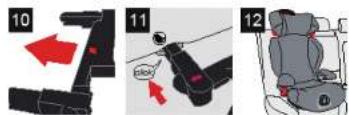
text_image
Diagram showing three steps of a seatbelt buckle adjustment, labeled 10, 11, and 12 with arrows indicating movement.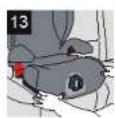


GB: Keep up your receipt in order to exercise your right as a consumer.
(8) The study was done to get the following materials as to prepare and regulation of complex molecules in this instruction manual.
P. C. 1960, 2015, 4: 30: 10:00 a 10:00 a 10:00 a 10:00 a 10:00 a 10:00 a 10:00 a 10:00 a 10:00 a 10:00 a 10:00 a 10:00 a 10:00 a 10:00 a 10:00 a 27:35
In fact, the following table is available for the fiscal year 2017: June 2018 (in € million) and June 2019 (in € million). The results are based on estimates.
- 4 (a) to form a pof, no, pof, pof, pof, pof, pof, pof, pof, pof, pof, pof, pof, pof, pof, pof, pof, pof, pof, pof, pof, pof, pof, pof, pof, pof, pof, pof, pof, pof, pof, pof, pof, pof, pof, pof
text_image
Technical diagram of a car seat with numbered labels pointing to different components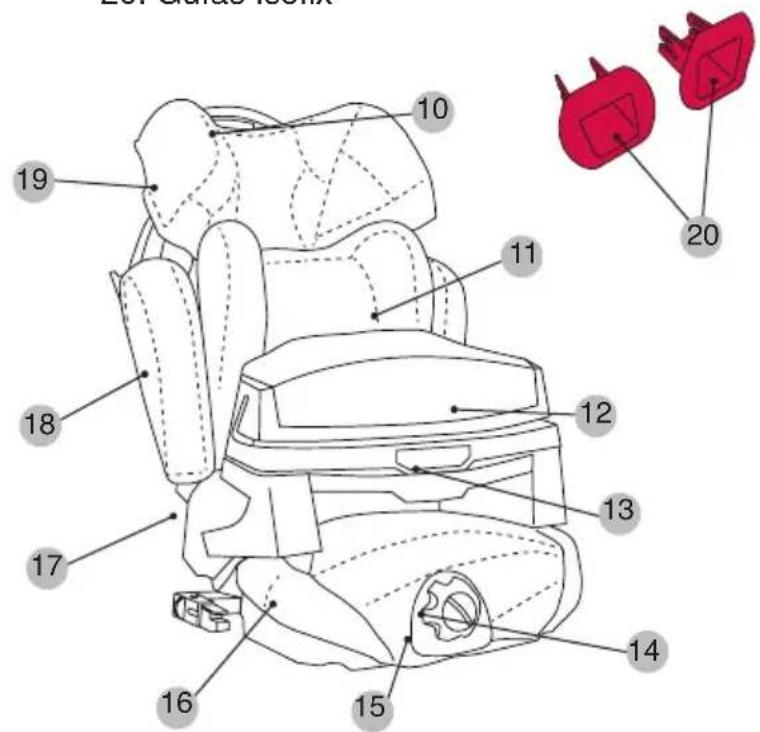
text_image
10 11 12 13 14 15 16 17 18 19 20IMPORTANTE
text_image
Technical diagram of a car seat with numbered labels pointing to different compartments or features.
text_image
20. Guies isofix 19 10 11 18 12 13 17 16 15 14 20IMPORTANT
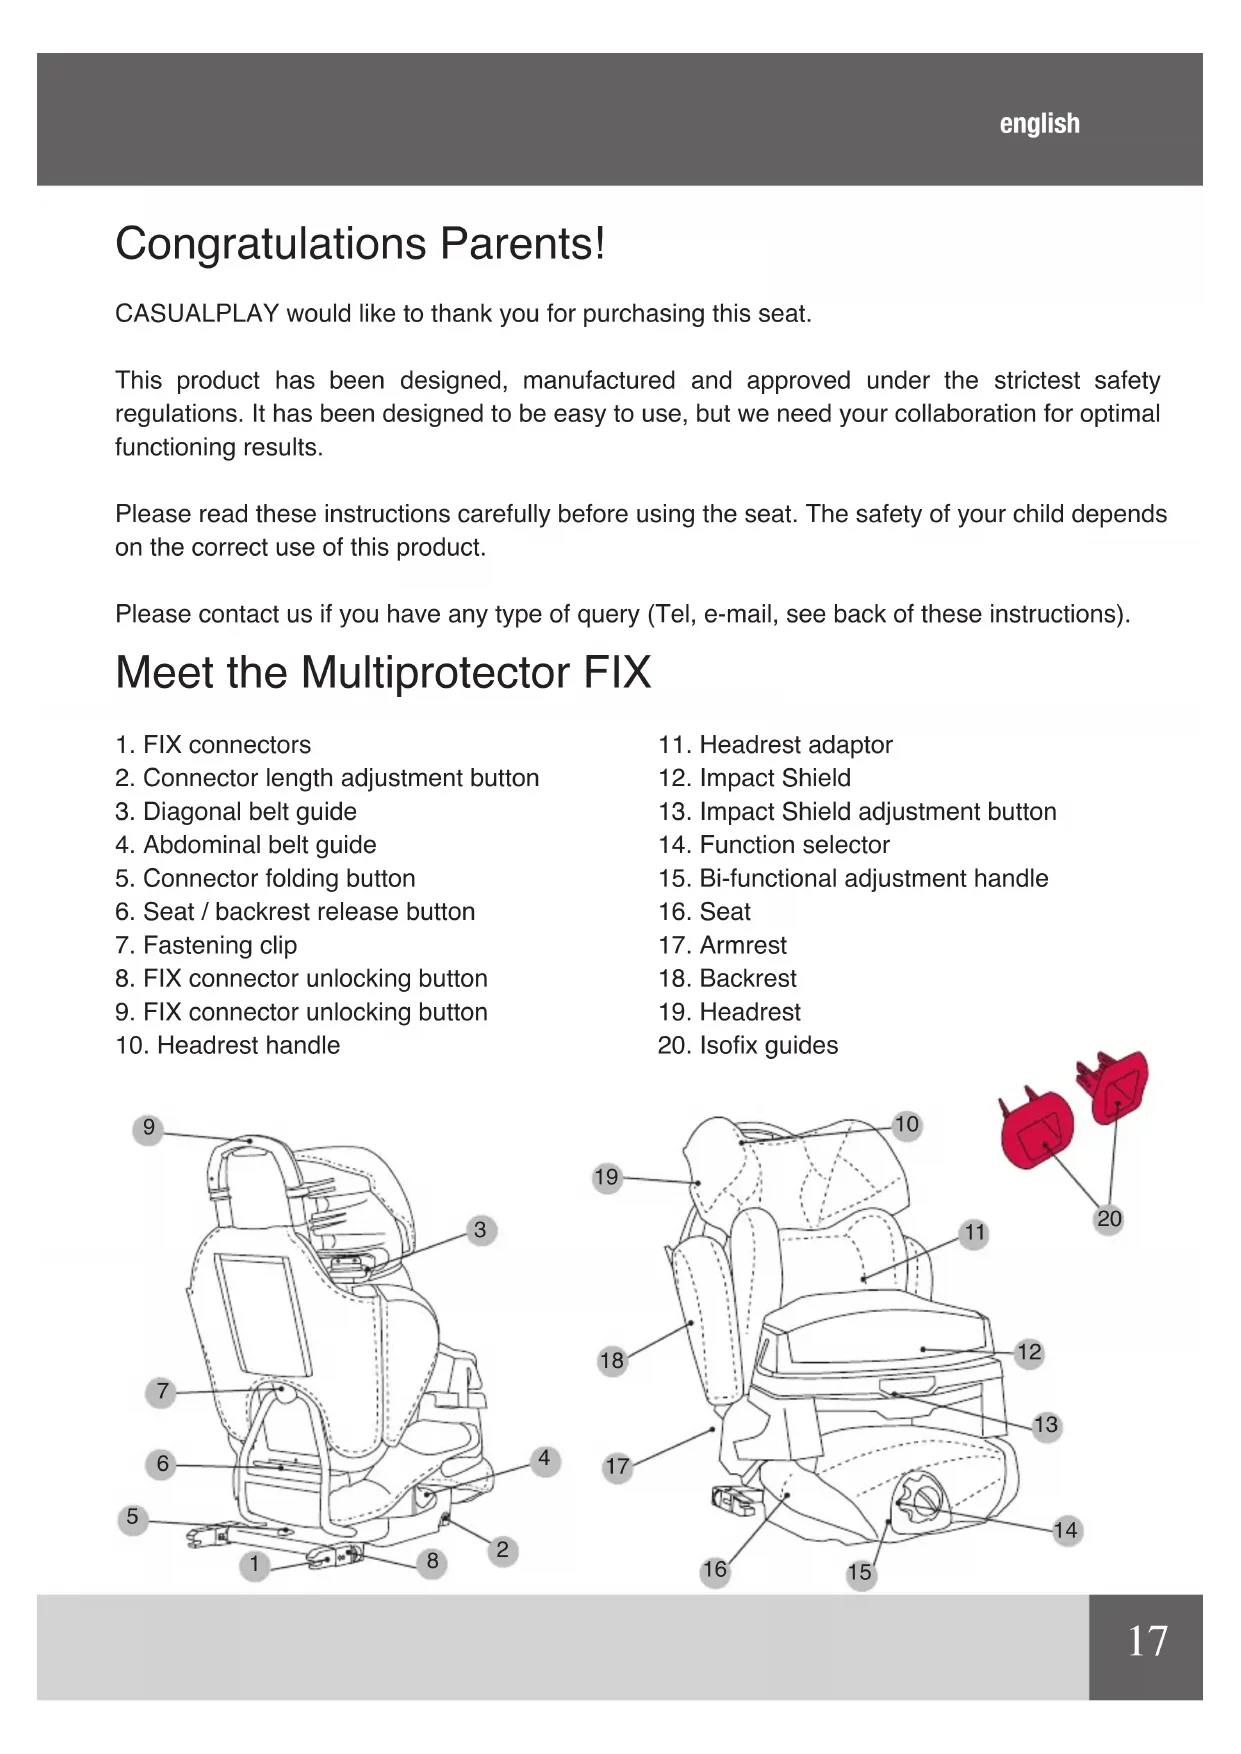
Congratulations Parents!
CASUALPLAY would like to thank you for purchasing this seat.
This product has been designed, manufactured and approved under the strictest safety regulations. It has been designed to be easy to use, but we need your collaboration for optimal functioning results.
Please read these instructions carefully before using the seat. The safety of your child depends on the correct use of this product.
Please contact us if you have any type of query (Tel, e-mail, see back of these instructions).
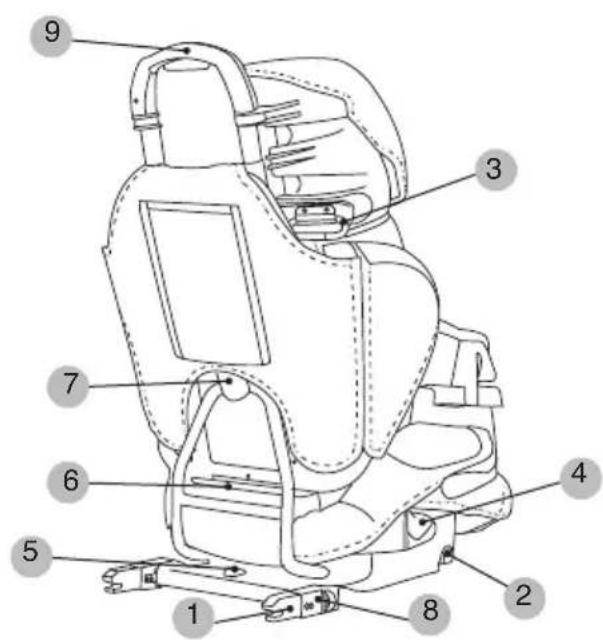
Meet the Multiprotector FIX
- FIX connectors
- Connector length adjustment button
- Diagonal belt guide
- Abdominal belt guide
- Connector folding button
- Seat / backrest release button
- Fastening clip
- FIX connector unlocking button
- FIX connector unlocking button
-
Headrest handle
-
Headrest adaptor
- Impact Shield
- Impact Shield adjustment button
- Function selector
- Bi-functional adjustment handle
- Seat
- Armrest
- Backrest
- Headrest
- Isofix guides
text_image
Technical diagram of a car seat with numbered labels pointing to different components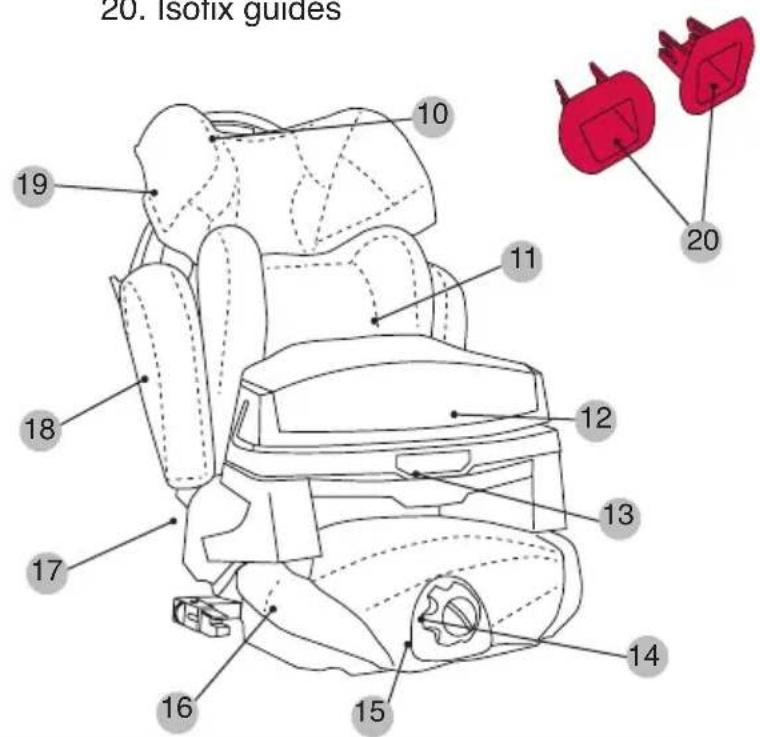
text_image
20. Isofix guides 10 11 12 13 14 15 16 17 18 19IMPORTANT
Only suitable for use in vehicles fitted with a three-point seat belt with retractor, approved under UN/ECE 16 or equivalent standard.
WARNING
- The category of this child restraint system is “SEMI-UNIVERSAL” and it is suitable for installation in the vehicles and in the seat positions indicated in the vehicle list inside this packaging.
- Other vehicles and seat positions may also be suitable for this restraint system.
- If in doubt, consult the manufacturer or retailer.
THE INSTRUCTION MANUAL SHOULD BE STORED WITH THE MULTIPROTECTOR FIX WHILE IT IS IN USE.
READ THESE INSTRUCTIONS CAREFULLY BEFORE USING THE ARTICLE AND KEEP THEM FOR FUTURE REFERENCE. THE CHILD'S SAFETY MAY BE AT RISK IF THESE INSTRUCTIONS ARE NOT FOLLOWED.
WARNINGS AND SAFETY NOTES
- The MULTIPROTECTOR FIX is a child restraint system belonging to Group 1 (from 9 to 18 kg), group 2 (from 15 to 25 kg) and group 3 (from 22 to 36 kg).
- The seat can be installed in the car with the three-point seat belt with or without retractor of the actual vehicle, approved under UN/ECE-16 or equivalent standards and with the fix connectors if the car is fitted with isofix fasteners.
• The original restraint system must not be modified.
• After an accident the restraint system should be inspected or replaced. - Make sure that the fold down seat or the doors of the vehicle can not damage any part of the restraint system.
- All the metal parts that come into contact with the child should be protected from the heat of the sun.
• The vehicle safety belt should never be twisted. - Always use the restraint system, even on short journeys, and never leave the child unattended in the vehicle.
• Take the restraint system out of the car whenever it is not going to be used
and keep it out of the reach of children.
- It is advisable to securely fasten any luggage or objects that may cause injury in the event of a collision.
• We guarantee the safety of the product when it is used by the original buyer.
• We do not recommend the use of second hand safety products. - It is important that the other passengers in the vehicle are also secured with their seat belts, as in the event of an accident they may get flung about and injure the child.
- If the restraint system is in the car and it is not going to be used, it should still be fastened with the seat belt or with the fix connectors.
• Regularly check the different parts of the product. - The restraint system should not be used without its upholstery.
- Only the upholstery supplied by the seat manufacturer should be used as it forms part of the car seat.
- You are responsible for the child’s safety.
IMPORTANT:
CONSULT THE INSTRUCTION MANUAL FOR YOUR VEHICLE TO LOCATE THE FASTENING POINTS OF THE ISOFIX SYSTEM. IF IN DOUBT, CONSULT YOUR CAR DEALERSHIP.
WARNING: Do not use the restraint system with a two-point seat belt or abdominal belt.
Assembling the MULTIPROTECTOR FIX
- The MULTIPROTECTOR FIX is supplied dismantled making it easier to transport (fig.1)
- Position the backrest so that the metal structure of the MULTIPROTECTOR FIX goes into the clip (fig.2-3), never behind it (fig.4). It will click when correctly in place.
WARNING: Never use the MULTIPROTECTOR FIX without its backrest as it has been approved for use with the backrest in place. If it is used without the
backrest, the child's safety will be affected.
MULTIPROTECTOR FIX connector folding mechanism
NOTE: The FIX connectors of the MULTIPROTECTOR FIX child restraint system can be folded.
- Press the red button and gently lift it to release the fastening mechanism. Keeping it pressed (fig.5), turn either of the 2 connectors downwards.
- Release the button and continue turning (fig.6). When the connectors reach the maximum folding position (180°), the mechanism will lick locked again.
- To unfold the connectors again, repeat the same operation until they click into place again.
NOTE: The MULTIPROTECTOR FIX can be installed on the front passenger seat or on the back seat of the vehicle, with the three-point seat belt of the vehicle and the option of the FIX connectors.
Installing the MULTIPROTECTOR FIX when the vehicle is fitted with ISOFIX fasteners
- Remove the headrest from the seat on which the child restraint system is going to be installed (fig.7).
- Position the clips in front of both ISOFIX slots, which are situated between the seat and the backrest (fig. 08).
NOTE: If the vehicle came supplied with these connectors, it is not necessary to assemble them.
- Then press either the right or left side button (fig.9) and keeping it pressed pull the connector bar outwards (fig.10)
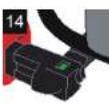
- Locate the ISOFIX fasteners and line the MULTIPROTECTOR FIX up with them (fig.11-12). Press the safety seat with both hands towards the fasteners until a click indicates that both sides have been fastened correctly (fig.13).
- Make sure that the system has been installed correctly by checking that there is a green line on the top part of the connector release devices (fig.14). If one of the connectors displays a red signal this means that it is not fastened correctly, complete the operation again.
- Lastly, adjust the space between the MULTIPROTECTOR FIX and the backrest of the vehicle by pressing either of the two side buttons on the base, and pushing it firmly against the backrest (fig.15).
Adjusting the height of the backrest
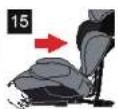
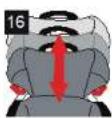
- The MULTIPROTECTOR FIX, is height adjustable so it adapts to the child's growth (fig.16). Once it is installed in the car with the child, adjust the height of the MULTIPROTECTOR FIX. The seat belt should never go across the child's neck.
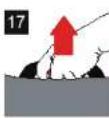
- Press the upper button and pull to adjust the height of the headrest (fig.17).
WARNING: For Group 1 place the headrest of the backrest in its lowest position.
Adjusting the base of MULTIPROTECTOR FIX
- The base is adjustable to adapt to the child's growth.
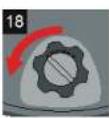
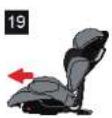
• While the child is seated, adjust the base to suit the length of his legs. - Turn the position selector on the front dial to the left (fig.18) and turn the dial to adjust the length of the base so that it adapts to the child's legs. (fig.19)
Adjusting the reclining position of the MULTIPROTECTOR FIX
- The position of the backrest can be adjusted. If the child is sleeping or want to be in a more relaxed position, recline the backrest.
- Turn the front position selector to the right (fig.20) and use the dial to adjust the reclining position of the backrest as required (fig.21).
GROUP 1 (from 9 to 18 kg)
WARNING: In order to use the MULTIPROTECTOR FIX as group 1 (from 9 to 18 kg) it should be used along with the Impact Shield.
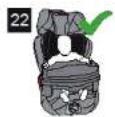
WARNING: The headrest adaptor should only be used as group 1 for those children whose head does not reach the headrest of the MULTIPROTECTOR FIX. When necessary, remove this headrest adaptor, consult the “removing the headrest adaptor” section (fig.22).
Installing the Impact Shield
WARNING: Do not fit the Impact Shield too tightly or too loosely to the child's body.
• Install the MULTIPROTECTOR FIX
- The MULTIPROTECTOR FIX is fitted with a headrest adaptor. This can only be used by children in Group 1, whose head does not reach the headrest of the restraint system.
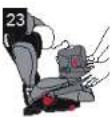
- Seat the child in the child restraint system and fit the Impact Shield (fig.23).
- The Impact Shield is designed to fit perfectly in the space between the base of the seat and the armrest.
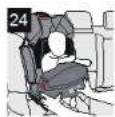
- Fit the Impact Shield to the child using the button found on the middle (fig.24).
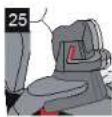
- The Impact Shield has 3 positions to suit the child's size (fig.25).
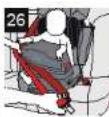
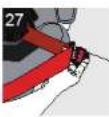
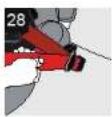
- Insert the abdominal part of the seat belt through the guide (displayed in red) of the Impact Shield (fig.26). Fasten the buckle and tighten the seat belt (fig.27-28).
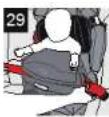
• Pass the diagonal part of the seat belt through the guide and tighten it again. (fig.29-30).
How to take the child out of the MULTIPROTECTOR FIX (group 1)
- Unfasten the vehicle seat belt, and open the Impact Shield.
• Take the child out of the restraint system.
• Fit the Impact Shield again and fasten the seat belt.
Removing the MULTIPROTECTOR FIX from the car (group 1)
• Unfasten the vehicle seat belt.
• Pass the seat belt through the guides on the Impact Shield and remove it.
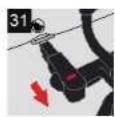
- If the fix connectors have been used to fasten the child restraint system to the vehicle seat, disconnect them by pulling the buttons on both sides of the release devices. If done correctly, a red signal will appear (fig.31).
• Take the MULTIPROTECTOR FIX off the vehicle seat.
GROUP 2–3 (from 15 to 36kg)
WARNING: Remove and store the Impact Shield and the headrest adaptor.
Removing the headrest adaptor
- Release the two elastic strips of the belt guide on the headrest.
- Remove the headrest adaptor situated between the backrest of the MULTIPROTECTOR FIX and the upholstery.
Installing the MULTIPROTECTOR FIX in the car
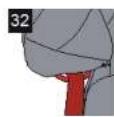
- Pass the diagonal part of the seat belt through the belt guide found on the headrest, to do this place it in its highest position (fig.32). Put the headrest back to the appropriate position for the child's height.
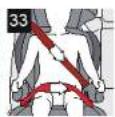
- Fasten the seat belt passing it over the MULTIPROTECTOR FIX so that the abdominal part is as low as possible and the diagonal part holds the child's trunk secure (fig.33).
- Fasten the seat belt making sure that the abdominal part goes underneath both armrests (zone marked in red) and that the diagonal part on the side of the buckle goes over the top of it (fig.34). Adjust the height of the headrest so that the car seat belt goes over the child's chest and not across his neck.
How to take the child out of the MULTIPROTECTOR FIX (group 2-3)
• Unfasten the vehicle seat belt.
• Take the child out of the restraint system.
- Fasten the seat belt again.
Removing the MULTIPROTECTOR FIX from the car (group 2-3)
- Unfasten the vehicle seat belt and pass it through the guides.
- If the fix connectors have been used, disconnect them by pulling the buttons on both sides of the release devices. If done correctly, a red signal will appear (fig.31).
• Take the restraint system off the vehicle seat.
Dismantling the MULTIPROTECTOR FIX
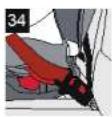
- If you want to store the MULTIPROTECTOR FIX, the backrest can be detached from the base by pressing the button found on the rear lower part of the backrest and pull the backrest upwards.
WARNING: When the child is not using the restraint system, do not leave the seat or the Impact Shield loose in the car. Fasten the seat belt.
Removing the upholstery
- Detach the backrest from the base.
- For the upholstery on the backrest, unfasten the zips, undo the fastening straps and the plastic strips.
- For the upholstery on the base, undo the fastening straps found underneath the base.
- For the upholstery on the Impact Shield, take the fabric out of the grooves and remove it.
- For the upholstery on the headrest, unfasten the 3 clasps and the 2 elastic strips found on the rear of the backrest. Lastly, pull the fabric cover downwards.
• To fit the different upholsteries, follow the same steps in reverse order.
Maintenance
- Clean the plastic parts with soap and warm water.
- Follow the washing instructions on the care labels sewn onto each fabric part.
Félicitation aux Parents
text_image
Technical diagram of a car seat assembly with numbered parts for identificationtext_image
Technical diagram of a car seat with numbered labels pointing to different components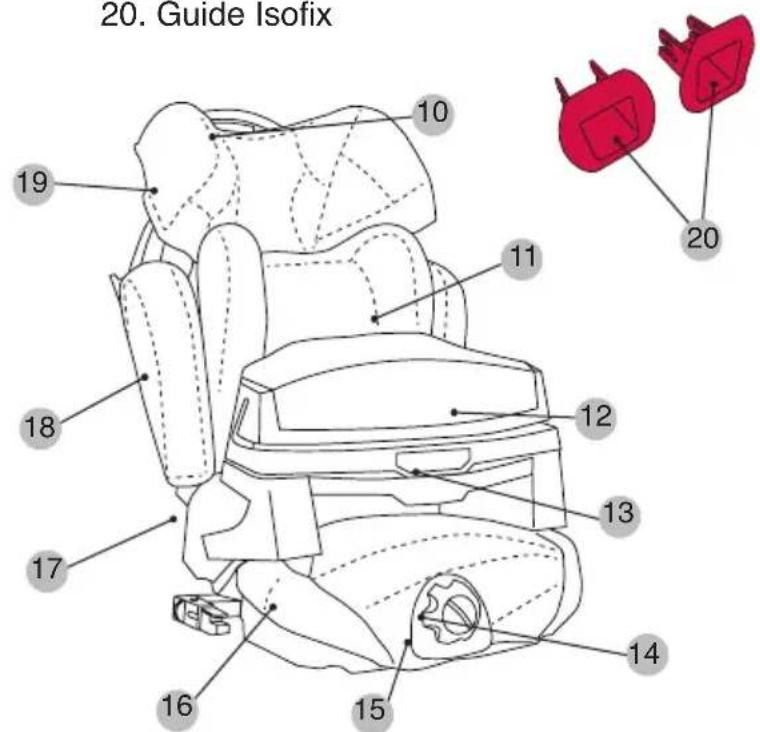
text_image
20. Guide Isofix 10 11 12 13 14 15 16 17 18 19IMPORTANTE
text_image
Technical diagram of a car seat with numbered labels pointing to different components
text_image
20. Guias Isofix 10 11 12 13 14 15 16 17 18 19IMPORTANTE
text_image
Technical diagram of a car seat with numbered labels pointing to different components
text_image
19. Ropistutze op 20. Guide IsofixWICHTIG
text_image
Technical diagram of a car seat with numbered labels pointing to different compartments or features.
text_image
Technical diagram of a car seat with numbered labels pointing to different components
1-ES CSOPORT (9-18 kg)
text_image
Technical diagram of a car seat with numbered labels pointing to different compartments or features.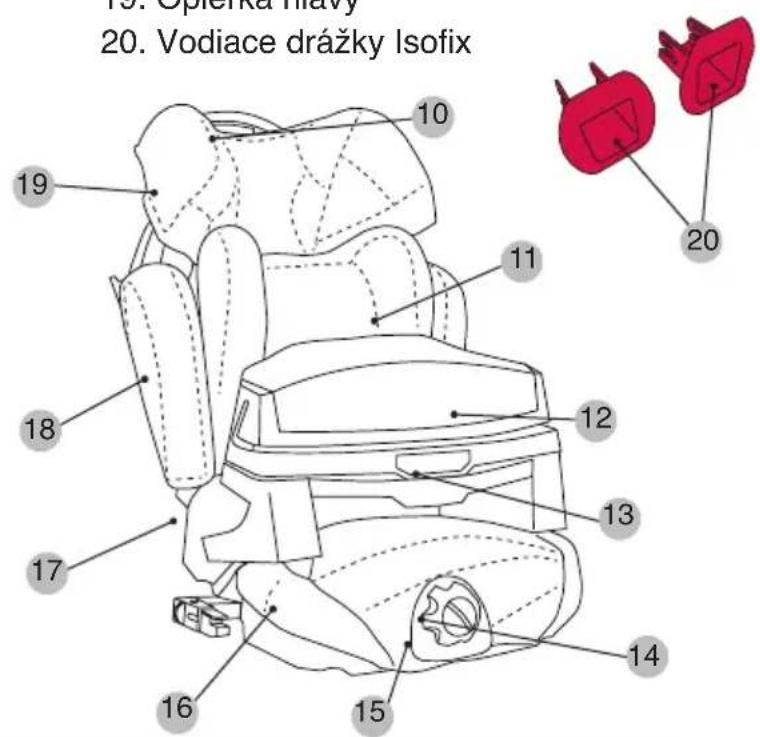
text_image
10. Opička heavy 20. Vodiace drážky Isofix 19 18 17 16 15 14 13 12 11 10DÔLEŽITÉ
text_image
Technical diagram of a car seat with numbered labels pointing to different compartments or features.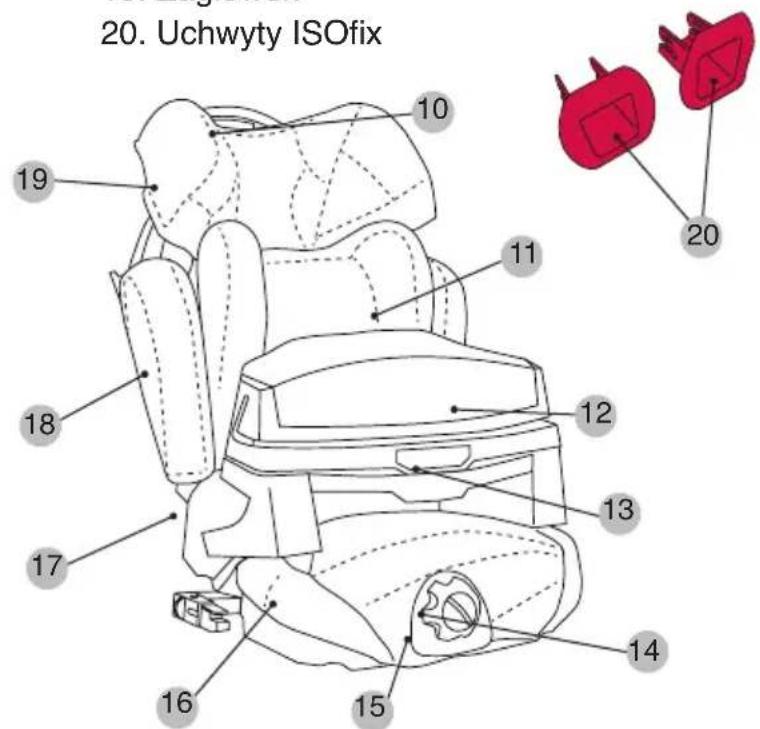
text_image
20. Uchwety ISOfix 19 18 17 16 15 14 13 12 11 10 20UWAGA
text_image
Technical diagram of a car seat with numbered labels pointing to different components