BFP 60 - Paint spray Meister Craft - Free user manual and instructions
Find the device manual for free BFP 60 Meister Craft in PDF.

| Product Type | Airless Paint Sprayer |
| Brand | Meister Craft |
| Model | BFP 60 |
| Power Supply | 230 V ~ 50/60 Hz |
| Rated Power Input | 60 W |
| Maximum Pressure | 140 bar |
| Flow Rate | 240 g/min |
| Tank Capacity | 800 ml |
| Standard Nozzle Diameter | 0.5 mm |
| Replacement Nozzle | 0.8 mm |
| Cable Length | 250 cm |
| Weight | 1.5 kg |
| Sound Pressure Level (LpA) | 81.8 dB(A) |
| Sound Power Level (LWA) | 94.8 dB(A) |
| Hand/Arm Vibration (awh) | 11.0 m/s² |
| Intended Use | Spraying of solvent-based and water-based paints for domestic use |
| Delivery Contents | Spray gun with tank, nozzle extension, viscosity cup, replacement nozzle 0.8 mm, cleaning needle, instruction manual, warranty certificate |
| Maintenance | Thorough cleaning after each use and oiling of orifices |
| Safety | Wear goggles, mask and hearing protection; do not point at people or animals; unplug before cleaning |
| Warranty | Keep the warranty certificate and receipt |
Frequently Asked Questions - BFP 60 Meister Craft
User questions about BFP 60 Meister Craft
0 question about this device. Answer the ones you know or ask your own.
Ask a new question about this device
Download the instructions for your Paint spray in PDF format for free! Find your manual BFP 60 - Meister Craft and take your electronic device back in hand. On this page are published all the documents necessary for the use of your device. BFP 60 by Meister Craft.
USER MANUAL BFP 60 Meister Craft
natural_image
Exterior view of a spray gun with black and white body, no visible text or symbols on the main subject
text_image
Abb. 1 5 3 4 2 6 1 7 8 11 9 10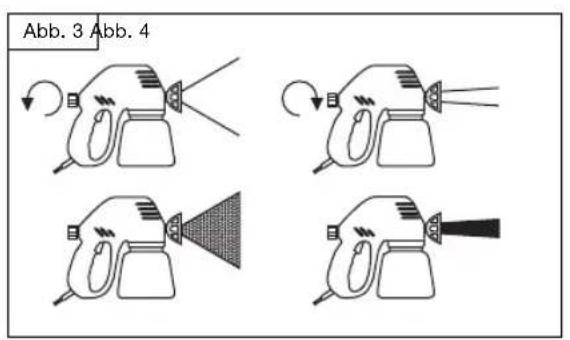
text_image
Abb. 3 Abb. 4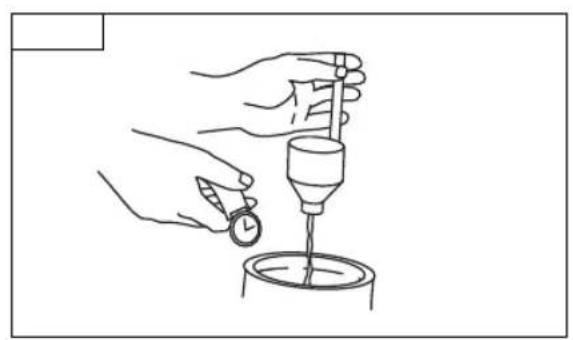
natural_image
Line drawing of hands using a pipette to measure a funnel into a container (no text or symbols)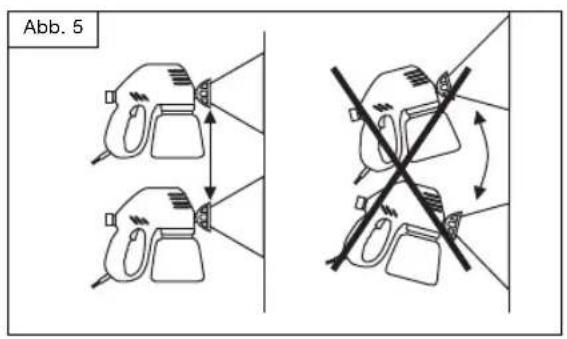
text_image
Abb. 5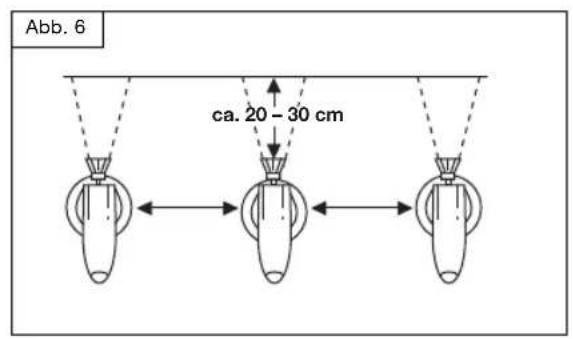
text_image
Abb. 6 ca. 20 - 30 cm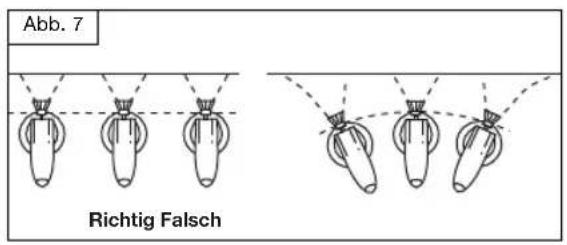
text_image
Abb. 7 Richtig Falsch
text_image
Abb. 8 Start Stop Stop Start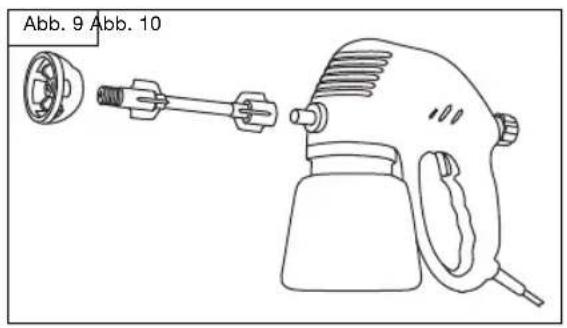
text_image
Abb. 9 Abb. 10
natural_image
Line drawing of hands using a tool to apply liquid into a mechanical component (no text or symbols)
natural_image
Symbol of a trash bin crossed with no text or numbers, representing waste sorting or disposal (no text present)natural_image
Symbol of a trash bin crossed with no text or numbers, representing waste sorting or disposal (no text present)Operating instructions & safety hints

WARNING! To reduce the risk of injury, please read the operating instructions through carefully before using the device, and then store with the machine! When passing the device on to another user, these operating instructions must also be included!
Contents
Page
1 - Scope of delivery 62
2 - Technical information 62
3 - Components 63
4 - Correct use 63
5 - General safety instructions 64
6 – Safety instructions relating specifically to the equipment 66
Page
7 - Handling instructions/Preliminary work 68
8 - Mode of operation 69
9 – Maintenance and environmental protection 70
10 - Service instructions 71
1 - Scope of delivery
• 1 spray gun with paint tank
• 1 spray nozzle extension
• 1 viscosity beaker
• 1 replacement nozzle 0.8 mm
- 1 cleaning needle
- Operating Instructions
- Guarantee
2 - Technical information
Technical data
Current supply 230 V\~/50/60 Hz 140 bar
Rated power
requirement 60 W
Discharge capacity 240 g/min
Paint tank 800 ml
Nozzle diam. 0,5 mm
Power cord 250 cm
Weight 1,5 kg
Technical changes reserved.
Noise emission/vibration
Noise emission
Measuring inaccuracy:
K_pA : 3.0 dB(A), K_WA : 3.0 dB(A)
Hand/arm vibrations
Measured values determined in accordance with EN 60745
- The specified vibration emission value was measured in accordance with a standardised test procedure and can be used in order to compare one electrical tool with another.
- The specified vibration emission value can also be used for an introductory evaluation of the exposure.
CAUTION! The vibration emission value may fluctuate from the specified value during actual use of the power tool. These fluctuations will depend on the way in which the power tool is used.
Safety measures must be taken in order to protect the operator. As a result, the evaluation of the influence must be made whilst taking account of the actual conditions of use. (All parts of the operating cycle must be taken into account for this purpose. This also includes times in which the power tool is switched off and times in which it is switched on, but is running without load.)
CAUTION! A certain amount of noise is unavoidable when using this device. Ensure you carry out noise-intensive work during permitted times. Maintain the quiet periods and limit your work to the absolute minimum.
CAUTION! The effects of noise may cause damage to the hearing. Only ever work with suitable ear defenders. Anybody else in the vicinity should thus also wear ear defenders.
3 - Components
1 Grip
2 ON/OFF switch
3 Control knob
4 Spray nozzle 0.5 mm
5 Motor housing
6 Tank cover
7 Intake tube with filter
8 Paint tank
9 Spray nozzle extension
10 Replacement nozzle 0.8 mm
11 Viscosity beaker
12 Cleaning needle
4 - Correct use
Suitable for applying materials on a solvent and water basis in airless technique, including paints on a latex, oil and alkyd basis. Observe the manufacturer's instructions. All other applications are expressly excluded.
This unit may not be used by people (including children) with reduced physical, sensory or mental capacities, with a lack of experience and without the appropriate knowledge, unless they are supervised by someone who is responsible for their safety or have been instructed by such a person with regard to how the unit is to be operated. Children should be supervised to ensure that they do not play with the device.
The machine is intended only for use in the household.
Improper use of the product
All applications carried out with the device that are not listed in the "Proper use" chapter will be considered improper use.
Uses for which the tool is not designed may cause risks and injury. Do not use accessories that are not intended specifically for this electrical tool.
Just because you can affix an accessory to your electrical tool, there is no guarantee it is safe to use.
There is a risk of injury. The user of the device is liable for all property and personal damages occurring as the result of incorrect use.
If other components or non-original components are used with the machine, the manufacturer guarantee is voided.
Remaining risks:
The operating instructions for this electrical tool contains comprehensive tips for the safe handling of electrical tools. However, every electrical tool has a certain level of remaining risks which cannot be excluded by the protective mechanisms on the device. Only operate electrical tools always with necessary care.
Remaining risks may be, for example:
- Touching rotating parts or tools.
- Injury caused by flying tools or tool parts.
- Risk of fire with insufficient ventilation of the motor.
- Adverse effects on the hearing caused by working without ear defenders.
The ability to work safely is dependant on the familiarity of the operator when it comes to handling the given electrical tool. Appropriate knowledge of the machinery and careful behaviour when working help to minimise the remaining risks.
WARNING! During operation, this power tool generates an electro magnetic field. This field may, under certain circumstances, influence active or passive medical implants. In order to reduce the risk of serious or deadly injuries, we recommend persons with such a medical implant to consult their doctor and the manufacturer of the medical implant before using the power tool.
5 – General safety instructions for handling power tools
WARNING! Read all safety warnings and all instructions.
Failure to follow the warnings and instructions may result in electric shock, fire and/or serious injury.
Save all warnings and instructions for future reference.
The term "power tool" in the warnings refers to your mains operated (corded) power tool or battery-operated (cordless) power tool.
1 Work area
a Keep work area clean and well lit.
Cluttered and dark areas invite accidents.
b Do not operate power tools in explosive atmospheres, such as in the presence of flammable liquids, gases or dust. Power tools create sparks which may ignite the dust or fumes.
c Keep children and bystanders away while operating a power tool.
Distractions can cause you to lose control.
2 Electrical Safety
a Power tool plugs must match the outlet. Never modify the plug in any way. Do not use any adapter plugs with earthed (grounded) power tools. Unmodified plugs and matching outlets will reduce risk of electric shock.
b Avoid body contact with earthed or grounded surfaces, such as pipes,
radiators, ranges and refrigerators. There is an increased risk of electric shock if your body is earthed or grounded.
c Do not expose power tools to rain or wet conditions. Water entering a power tool will increase the risk of electric shock.
d Do not abuse the cord. Never use the cord for carrying, pulling or unplugging the power tool. Keep cord away from heat, oil, sharp edges or moving parts. Damaged or entangled cords increase the risk of electric shock.
e When operating a power tool outdoors, use an extension cord suitable for outdoor use. Use of a cord suitable for outdoor use reduces the risk of electric shock.
If it is not possible to avoid using the electrical tool in a damp environment, use a residual current circuit-breaker. The use of a residual current circuit-breaker reduces the risk of an electrical shock.
3 Personal safety
a Stay alert, watch what you are doing and use common sense when operating a power tool. Do not use a power tool while you are tired or under the influence of drugs, alcohol or medication. A moment of inattention while operating power tools may result in serious personal injury.
b Use personal protective equipment. Always wear eye protection.
Protective equipment such as dust masks, non-skid safety shoes, hard hat, or hearing protection used for
appropriate conditions will reduce personal injuries.
c Prevent unintentional starting. Ensure the switch is in the off-position before connecting to power source and/or battery pack, picking up or carrying the tool. Carrying power tools with your finger on the switch or energising power tools that have the switch on invites accidents.
d Remove any adjusting key or wrench before turning the power tool on. A wrench or a key left attached to a rotating part of the power tool may result in personal injury.
e Do not overreach. Keep proper footing and balance at all times. This enables better control of the power tool in unexpected situations.
f Dress properly. Do not wear loose clothing or jewellery. Keep your hair, clothing and gloves away from moving parts. Loose clothes, jewellery or long hair can be caught in moving parts.
g Keep the handles dry, clean and free from oil and grease. Greasy, oily handles are slippery and will lead to a loss of control.
h If devices are provided for the connection of dust extraction and collection facilities, ensure these are connected and properly used. Use of these devices can reduce dust related hazards.
4 Power tool use and care
a Do not force the power tool. Use the correct power tool for your application. The correct power tool
will do the job better and safer at the rate for which it was designed.
b Do not use the power tool if the switch does not turn it on and off. Any power tool that cannot be controlled with the switch is dangerous and must be repaired.
c Disconnect the plug from the power source before making any adjustments, changing accessories, or storing power tools. Such preventive safety measures reduce the risk of starting the power tool accidentally.
d Store idle power tools out of the reach of children and do not allow persons unfamiliar with the power tool or these instructions to operate the power tool. Power tools are dangerous in the hands of untrained users.
e Maintain power tools. Check for misalignment or binding of moving parts, breakage of parts and any other condition that may affect the power tool's operation. If damaged, have the power tool repaired before use. Many accidents are caused by poorly maintained power tools.
f Keep cutting tools sharp and clean. Properly maintained cutting tools with sharp cutting edges are less likely to bind and are easier to control.
g Use the power tool, accessories and tool bits etc. in accordance with these instructions, taking into account the working conditions and the work to be performed. Use of the power tool for operations different from those intended could result in a hazardous situation.
5 Service
a Have your power tool serviced by a qualified repair person using only identical replacement parts. This will ensure that the safety of the power tool is maintained.
6 – Safety instructions relating specifically to the equipment
- Do not point the jet spray at people or animals! In case of injury, immediately consult a specialist doctor.
- Do not operate an empty spray gun. Pressure may lead to people or animals coming to harm.
- Never block the discharge nozzles of the spray gun with your body or parts of the body. The high discharge pressure might lead to sensitive injuries.
- Never allow paint in the gun or tank to start drying! Dried-on residual paint will affect how the discharge nozzle functions and may lead to the warranty claim being lost.
- Never use solids-polluted liquids with this tool, such as liquids with high fibre or particle content, metallic paints, fire-protection paints or liquids with asebstos particles.
- Do not use highly inflammable liquids. Always ensure adequately ventilated surroundings! Always observe the package insert of the particular materials concerned provided by the manufacturers!
- Do not use the spray gun outside closed rooms when it is raining!
- When using the spray gun, it is essential to wear a breathing mask, protective goggles and ear muffs.
- When work is interrupted or finished, disconnect the gun from the mains to prevent it being switched on again inadvertently.
- Only use three-wire extension cables!
• Always connect the appliance to the main or extension cable with the tripolar safety plug.
- Prevent children from having access to the spray gun!
- Do not take the appliance apart yourself! Risk of injury!
- While spraying, hold the gun where possible horizontally to prevent any spray liquid leaking! Should liquids come into contact with cables and contacts inside, electric shocks may be incurred!
• After use, clean the appliance painstakingly. Oil the appliance after use to ensure its perfect condition.
- Never immerse the appliance in water or any other liquids.
- Avoid any body contact with the jet spray!
• Always use the accessories or integral parts recommended by the manufacturer to largely preclude any risk of injury.
• To avoid hazards, damaged power leads must be replaced by the manufacturer or his customer service representative.
For safe operation
• Always keep your work area clean. Parts lying around in the immediate work vicinity represent a safety risk.
- Pay attention to appropriate surroundings to work in! Do not subject electrical appliances to excessive moisture or rain. Always keep your work area dry! Never use electrical appliances in explosion-prone environments.
- Avoid risks of electrical shocks! Where possible, avoid direct physical contact with earthed surfaces, e.g. cables, refrigerators, heaters.
- When not in use, keep the appliance in a clean, dry place out of the reach of children.
- Only ever use the appliance in the field of application it is designed for.
- When working, pay close attention to wearing appropriate working clothes with corresponding hand protection and non-slip footwear.
- Never carry the appliance by its mains cable. Always disconnect the appliance from the mains by pulling the plug, never the cable. Keep the mains cable well away from sharp edges, oil or sources of heat.
- When working, pay close attention to standing securely and maintaining your balance!
- Disconnect the appliance from the mains prior to all repair and maintenance work or before exchanging individual parts.
- When using outside closed rooms, use a mains cable extension designed for this.
• Always work in a concentrated manner! Use your common sense! Take a break if you get tired of working. - Repair work should only be done by appropriately qualified specialists. When exchanging individual parts, only use original parts or those expressly recommended by the manufacturers in order to largely preclude any potential danger.
- Do not spray highly inflammable liquids with this appliance.
- Do not clean the appliance with inflammable solutions.
DANGER! Risk of explosion or catching fire with paints or thinners! Injuries and serious damage might ensue! Rule out where possible any potential ignition sources, such as sparks, naked flames, cigarette lighters, cigarettes.
DANGER! When inhaled, paints and thinners have a toxic effect! Giddiness, fainting or other symptoms of poisoning may ensue!
DANGER! Never pull the plug from the power socket by the cable! Danger of electric shock!
ATTENTION! In case of injury, immediately consult a specialist doctor.
7 – Handling instructions/Preliminary work
ATTENTION! First of all, make a test application!
After mixing the paint, check the atomised spray from the spray gun on scrap paper to get a feeling of how the spray gun works.
Always ensure that the distance to the surface you are working on is about 30 cm.
-
Check to see whether the intake tube has been firmly installed in the pump housing. Check the atomiser valves and the secure fitting of the discharge nozzle.
-
The pressure of the liquid output can be checked using the control knob (3). Turn the knob clockwise to increase the pressure. Turn the knob counter clockwise to reduce the pressure. Select a central setting and find the appropriate pressure while test spraying.
With water discharge
- Paints on a water basis: Add thinner or mix with another low-viscous paint.
- Oil paints: Thin paints.
General spraying tips (Fig. 3)
- The 0.5 mm discharge nozzle that is preinstalled at the factory is completely adequate for most paint applications in and outdoors.
- Use the 0.8 mm discharge nozzle for more viscous and thick latex paints.
- Should the mist discharged seem very slight and unbalanced as far as
volume goes, the paint is too thick or too viscous. To get a better result, first of all try to change the pressure by adjusting the control knob. If this is not possible, thin the paint accordingly.
- Should the mist discharged appear too heavy with weak concentration, raise the pressure by turning the control knob clockwise or use a discharge nozzle with a smaller diameter.
Thinning (Fig. 4)

ATTENTION! Pull the mains plug, before filling the tank with paint.
Most paints are delivered ready-mixed and must be thinned before they can be sprayed. The manufacturer's instructions must be observed with regard to paint thinning for the spraying operation. The viscosity beaker will help to determine the correct viscosity for the paint used. To this end, fill the beaker with paint up to the brim. Time how long it takes for the beaker to be emptied into the paint tin. The table below shows the times recommended for various materials:
Artificial resin and latex paints 24–28 seconds Paints on a water basis 20–25 seconds Priming paints 24–28 seconds Clear varnishes 20–25 seconds Oil paints 18–22 seconds Enamel paints 18–22 seconds Aluminium paints 22–25 seconds Vehicle undersealing 25–35 seconds Wood primers 28–35 seconds Wood preservatives No thinning required
Wood varnishes No thinning required
Should emptying the paint take longer than the time recommended, then
further thinning will be necessary. To this end, add a small quantity of the suitable thinner and test its viscosity until the right one is reached. Some paints meant for spraying contain particles or lumps and should be sieved before the paint tank is filled.
8 - Mode of operation
The surfaces to be worked must be free of dust, dirt and grease. Surfaces that are not to be sprayed must be covered with good-quality adhesive tape. The paint or liquid to be sprayed must be mixed thoroughly and be free of any lumps or other particles. Numerous substances can be sprayed with this spray gun.
Spraying
Fill the tank with the correctly thinned and sieved paint.
Connect the spray gun to the mains power supply. Aim at a piece of scrap paper and actuate switch (2) until paint emerges. Set the control knob, so that the paint quantity required is discharged. Turn the knob clockwise to reduce the discharge flow and counter clockwise to increase it. The setting of the discharge flow will affect the spray pattern. With a flawed spray pattern, the paint is concentrated in the centre of the jet spray, which will lead to irregular paint distribution on the surface. The jet spray is correctly set, if the paint is uniformly distributed over the jet spray as a whole.
Spraying techniques
To obtain best possible results, the spray gun must always be held upright and parallel to the surface. Keep a distance of 20 to 30~cm between the spray nozzle and surface, and spray uniformly back-
wards and forwards, up and down. Do not spray at another angle to the surface, because the paint will otherwise run down. A gentle and uniform movement is important. Spray large surfaces crosswise (see Figs. 5, 6, 7 and 8).
Never switch the spray gun on or off, while it is aimed at the surface to be sprayed. Always move the spray gun at an unvarying rate. Rapid movement results in a thin layer of paint, slow movement in a thick layer. Only one layer should be applied per spray pass. Should another layer prove necessary, the recommendations of the paint manufacturer for drying times must be maintained. When spraying small surfaces, set the control knob (3) to low. This will avoid too much paint consumption and too thick application. When spraying, avoid switching the appliance on and off frequently, because too much or too little paint might be thus applied. Do not tilt the spray gun lower than 45°.
Mounting and use of the nozzle extension
The nozzle extension simplifies work at inaccessible places such as between the ribs of radiators. To mount the nozzle extension, unscrew the spray nozzle and screw on the extension instead. Now screw on the spray nozzle at the end of the nozzle extension and tighten it up (see Fig. 9).
9 - Maintenance and environmental protection
Cleaning and maintenance
ATTENTION! Be sure to pull the mains plug prior to cleaning the spray gun or paint tank.
- During use, paint particles and dried residual paint may block the spray nozzle. This can be removed carefully from the nozzle opening by using the cleaning needle (12).
- Clean the spray gun thoroughly each time after use. Omitting to do this will lead almost inevitably to blockages and consequently to malfunctions of the appliance in subsequent use. The guarantee does not include cleaning of the spray gun, which has not been thoroughly cleaned by the user.
ATTENTION! The following work must be carried out each time after use:
- Empty any paint still in the paint tank.
- Clean the tank thoroughly with the thinner used.
- Pour some thinner into the tank and spray with the spray gun until only pure thinner comes out of it.
- Clean the intake tube and the filter with thinner.
- Clean the basket and nozzle, and remove any dirt and paint remaining
- Place the spray gun on its head and pour a few drops of sewing machine oil into the two openings (see Fig. 10).
- Briefly switch on the spray gun.
- Keep the appliance's venting slots clean to prevent the motor overheating. Clean the housing regularly with a soft cloth, best after use. The venting slots must be free of dust and dirt. Should the dirt not be removed, use a soft cloth moistened with soapy water. Never use a solvent such as benzene, alcohol, ammoniac. These solvent may attack the parts made of plastic.
CAUTION! Electrical and battery operated units that no longer work should not be disposed of in the
household waste! They are to be collected separately, in accordance
with the 2002/96 EC directive for the disposal of electrical and electronic waste, and sent for proper and environmentally-friendly recycling.

natural_image
Symbol of a discarded trash bin with crossed lines and a blank rectangular base (no text or labels)Please discard power tools no longer usable at a local collection point. Collection and disposal of packaging materials separately by types complying with local rules and regulations. For details, please contact your municipal authority concerned.
10 - Service instructions
- Store the machine, operating instructions and where necessary the accessories in the original packaging. In this way you will always have all the information and parts ready to hand.
- Meisterbasic devices are to a large extent maintenancefree, a damp cloth being sufficient to clean the casing. Do not drop electrical machines in water. Please note additional hints given in the operating instructions.
-
Meisterbasic devices are subject to stringent quality control. If however a functional fault should occur, send the device to our servicing address. The repairs will be carried out in a short time.
-
A brief description of the defect speeds up the faulttracing and repair time. If within the guarantee period, please enclose the guarantee document and the proof of purchase.
- In so far as a repair under guarantee is not concerned, we will charge the repair costs to your account.
PLEASE NOTE! Opening of the device invalidates the guarantee claim.
IMPORTANT! We point out expressly that in accordance with the Product Liability Act we do not take responsibility for any damage caused by our appliances, in so much that said damage is caused by improper repair, or original parts or parts released by us not being used when parts are changed, or repairs not being conducted by Meister Werk zeuge GmbH, Customer Service or an authorised specialist! The same applies analogously to the accessories used.
- Pack the device well or use the original packaging in order to avoid transit damage.
- Even after the expiry of the guarantee period, we would like to help you and carry out any repairs at a favourable price.

natural_image
Symbol of a trash bin crossed with no visible text or labelsnatural_image
Symbol of a trash bin crossed with no visible text or labelsnatural_image
Symbol of a trash bin crossed with no visible text or labelsnatural_image
Symbol of a trash bin crossed with no text or labels, representing waste sorting or disposal (no text present)natural_image
Symbol of a trash bin crossed with no visible text or labelsGB - Storage of the technical documentation:
Hastener Straße 4 - 8
D-42349 Wuppertal