
VDR06 - Tumble dryer Ardo - Free user manual and instructions
Find the device manual for free VDR06 Ardo in PDF.
| Product type | Tumble dryer |
| Brand | Ardo |
| Model | VDR06 |
| Dimensions (W x H x D) | 59.5 x 85.0 x 60.4 cm |
| Maximum capacity (dry laundry) | 6.0 kg |
| Power supply | See rating plate (voltage and nominal power) |
| Control type | Mechanical timer |
| Drying programs | Sturdy (extra dry, ready to store, ready to iron, very damp) and delicate (max 3 kg) |
| Timer | Programs with adjustable duration (120 to 20 min) |
| Filter | Cleanable after each cycle |
| Air exhaust | Via exhaust hose to be connected at the rear |
| Door opening | Reversible (right or left, by technician) |
| Adjustable feet | Yes, for leveling |
| Child safety | Door closure after use recommended |
| Installation | Electrical connection with grounding; do not use an extension cord |
| Maintenance | Clean filter and damp drum interior |
| Indicative laundry weight | Table provided (e.g., sheet 550-600 g, towel 800 g, etc.) |
| Optional accessory | Stacking kit for front-loading washing machine |
Frequently Asked Questions - VDR06 Ardo
User questions about VDR06 Ardo
0 question about this device. Answer the ones you know or ask your own.
Ask a new question about this device
Download the instructions for your Tumble dryer in PDF format for free! Find your manual VDR06 - Ardo and take your electronic device back in hand. On this page are published all the documents necessary for the use of your device. VDR06 by Ardo.
USER MANUAL VDR06 Ardo
ITALIANO 3-10
GB ENGLISH 11-18
DE DEUTSCH 19-26
FRNCAIS 27-34
BESANOL 35-42
PORUGUES 43-50
NEDERLANDS 51-58
PL POLSKI 59-66
CZ CESKY 67-74
DcVENSKY 75-82
MAGYAR 83-90
UVIsKA 91-98
SR CPnCKn 99-106
UA YKPAIHcbsKA 107-114
RO ROMAN 115-122
Rusckn 123-130
Gentile cliente,
Thank you for choosing our product.
Please read these instructions carefully before connecting and using the appliance. Knowledge of the operating principles will help guarantee correct and safe use of the appliance.
This instruction booklet contains the technical characteristics of the drier and is full of useful information regarding its operation, all designed to help you get the best out of your appliance.
If the appliance is sold or handed over for use by others, remember to give the new user the instruction booklet.
CONTENTS


NOTES AND ADVICE FOR THE USER 11-12
Technical information 11

DESCRIPTION OF THE APPLIANCE 13

STALLING THE APPLIANCE 13-15
Installation 13-14
- Levelling the drier 14
- Connecting the air exhaust tube 14
- Electrical connection
15

SING THE DRIER
Description of the functions
- Opening the door and changing the opening direction
- Drying the washing correctly
- Precautions for fabrics types
Program table
- Weights of washing
15
16
16
17
17

AINTENANCE
- Cleaning the filter
- Fault finding
- Resolving problems
- Optional accessories
18
18
18
18
18

NOTES AND ADVICE FOR THE USER
TECHNICAL DATA
| Dimensions: | Width cm.: | 59.5 |
| Height cm.: | 85.0 | |
| Depth cm.: | 60.4 | |
| Max. capacity | 6,0 kg dry | |
| Power rating | see characteristics plate | |
| Voltage | see characteristics plate | |
MODEL:
SERIAL NUMBER:
DATE OF PURCHASE:
This appliance has been designed for use as a domestic drier. Any other use is to be considered as improper and therefore dangerous.
- Keep this instruction book near to the appliance at all times, so that it can be easily consulted when necessary.
Any modifications or attempts to interfere with the appliance can be dangerous for the user and may damage the product.
On delivery of the appliance, check that it has not been damaged during transport. If any damage is discovered, report the matter to the retailer immediately.
Do not cover the drier with washing or any other items.
When positioning the appliance, ensure that the power supply cable is not kinked or squashed and is accessible.
Always close the door after using the drier. This will prevent children from leaning on the door and possibly overturning the drier.
Remember that the exhaust tube will heat up during a drying cycle and can reach temperatures of up to 60^ . Do not touch this part before the cooling cycle has been completed.
Do not use the drier for drying dirty clothes.
Never dry items that have been soiled with substances such as cooking oil, petroleum, acetone, alcohol, petrol, kerosene, stain remove comma after turpentine, and wax.
Remove these substances in a hot wash using an additional quantity of detergent prior to loading the items in the drier.
- Do not dry items such as foam rubber, latex, raincoats, waterproof fabrics, rubber mats, preformed items, clothes or cushions with foam rubber inserts, as these may melt and damage other items or even the appliance itself.
Fabric softeners, or similar products, must be used respecting the manufacturer's instructions on the packaging.
If the appliance is sold or given away, remember to hand over this instruction book with it. This will help the new owner use the drier both correctly and safely.
Do not attempt to repair any appliance faults alone, repairs carried out by a non-professional may cause serious damage and will invalidate any rights to repairs under guarantee.
Repairs to the appliance can only be carried out by personnel authorised by the customer service centres. All repairs must make use of
original spare parts only.
Spin dry or wring the washing well before loading it into the drier. Spun dry washing will dry quicker.
Clean the filter thoroughly each time the drier is used in order to guarantee perfect air circulation.
Never insert or remove the plug from the mains socket with wet hands.
The drier must be connected to a mains socket fitted with an effi cients earth complying with current safety standards.
Do not use extension leads or multiple plug adapters to connect the appliance to the mains supply.
Do not expose the appliance to atmospheric agents.
When servicing or cleaning the appliance, remember to disconnect it from the mains supply. Do not pull the power supply cable to unplug the appliance from the mains supply. Pull the plug only.
This appliance is marked as complying with European Directive 2002/96/EC, Waste Electrical and Electronic Equipment (WEEE). Make sure that the product is disposed of in a correct manner. The user is obliged to contribute towards preventing any negative consequences for health and the environment.
affixed to the product.
uments signifi es that
be treated as normal
must be delivered to an
entre to enable the elec-.
pment to be recycled.
The symbol
or accompanying documents signifi es that the product must not be treated as normal domestic refuse, but must be delivered to an authorised collection centre to enable the electric and electronic equipment to be recycled.
When dispc
local waste disposal regulations. For further information on the treatment, recovery and recycling of this product, refer to the appropriate offies, local domestic waste collection service or the retailer from where the appliance was purchased.
THE MANUFACTURER WILL NOT BE HELD RESPONSIBLE FOR ANY INCIDENTS RESULTING FROM NON-COMPLIANCE WITH SAFETY STANDARDS OR THE REQUIREMENTS OF THIS INSTRUCTION BOOK.
DESCRIPTION OF THE APPLIANCE
The drier is a domestic appliance capable of drying any type of fabric at any time.
The drier has been constructed in steel panels, which have been treated and painted to guarantee that its aesthetic qualities remain unaltered over time.
The motor and all moving parts have been designed and manufactured to guarantee the minimum possible noise levels
The control panel has been designed to enable the user to run the desired drying program without difficulty.
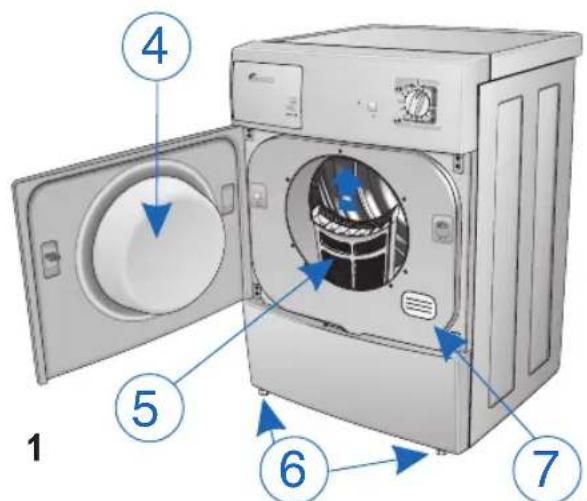
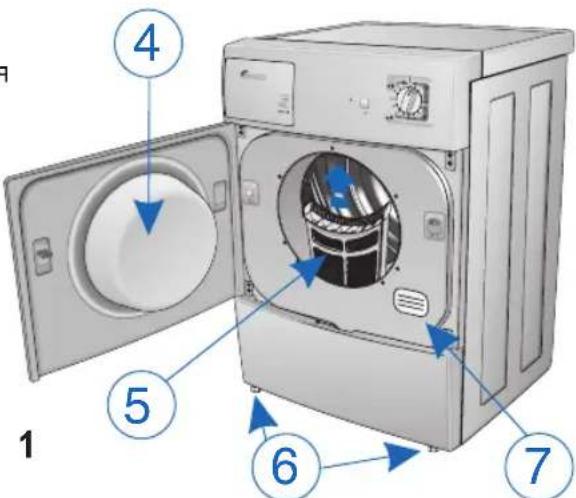
The wide door makes loading and unloading the washing much easier.
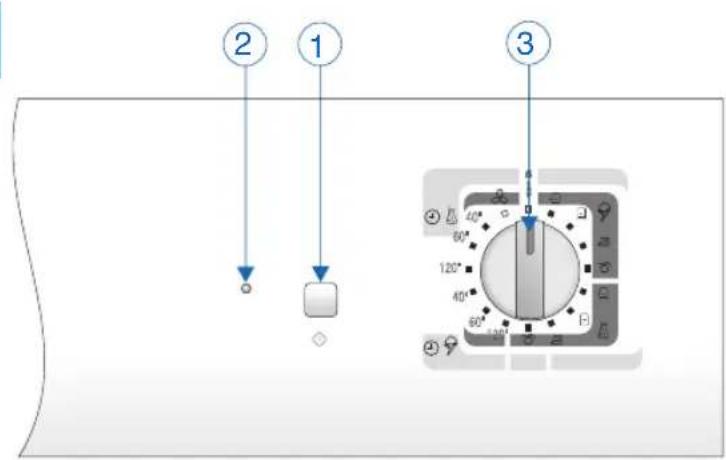
1 - Start button
2 - Spin function active indicator light
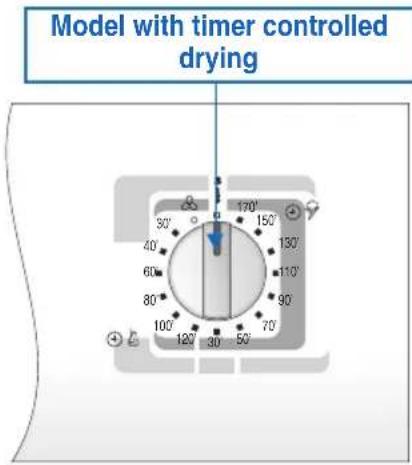
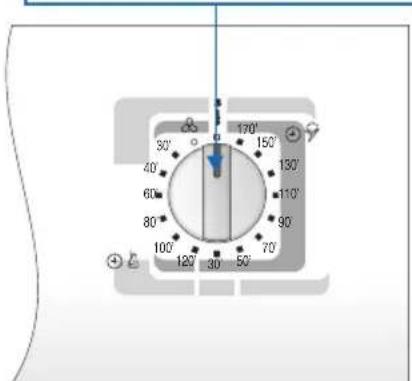
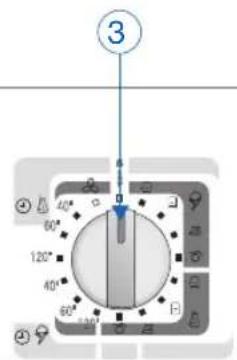
3 - Drying time control knob
4 - Door
5 - Filter
6 - Adjustable feet
7 - Rating plate
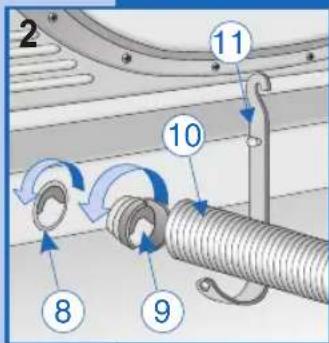
8 - Exhaust outlet
9 - Outlet coupling
10 - Exhaust tube
11 - Tube support
INSTALLING THE APPLIANCE
INSTALLATION
Installation must be carried out by qualified personnel in line with the instructions supplied by the manufacturer. Incorrect installation may result in damage and injury.
Install the drier near to a window to facilitate the evacuation of the damp air from the drier.
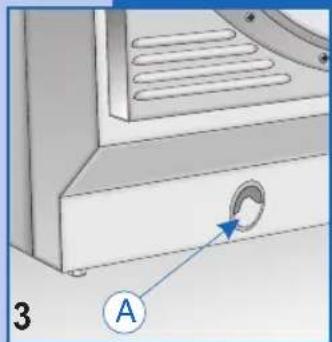
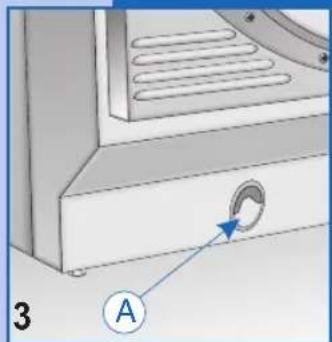
The exhaust tube must be used to prevent condensation, and must be inserted in hole A at the bottom of the back panel of the appliance (fig. 3).
INSTALLATION
Never cover the air intake on the back of the appliance.
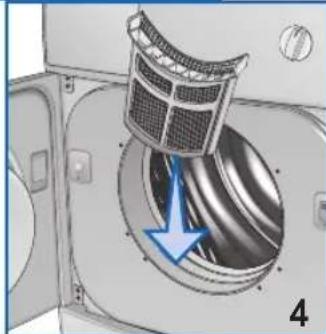
Place the fi iter in its normal position as shown (fi g. 4).
Clean the inside of the drum using a damp cloth to remove any dust deposits.
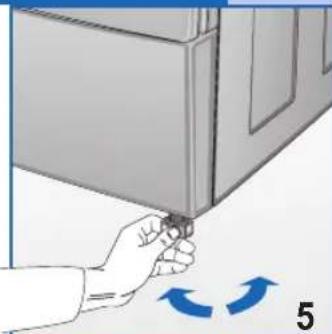
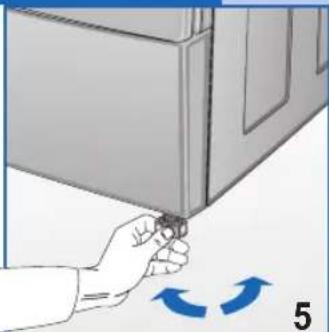
LEVELLING THE DRIER
Adjustable feet. Place the drier upright so that it rests firmly on all four feet. Level the drier by adjusting the feet as follows:
Lift the drier slightly.
Adjust the feet to the correct height (fi g. 5). (Do not unscrew the feet too much and do not use a screwdriver).
Lower the drier.
A badly levelled machine may cause damage to the bearings and lead to their premature wear. This drier does not need to be anchored to the floor.
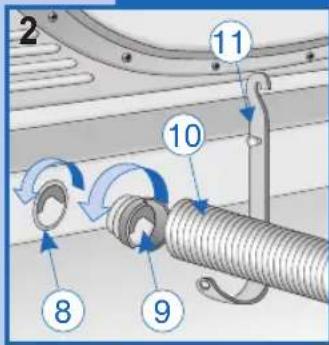
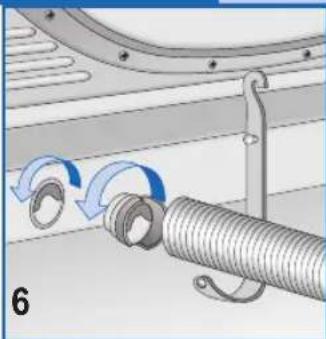
CONNECTING THE AIR EXHAUST TUBE
Connect the exhaust tube to the outlet on the back of the drier (fi g.6), as follows:
Connect one end of the tube to the connecting piece supplied.
- Rotate the connecting piece (together with the tube) anticlockwise in the drier outlet.
Feed the tube away from the back of the drier to the left or right through the recess at the bottom of the drier body.
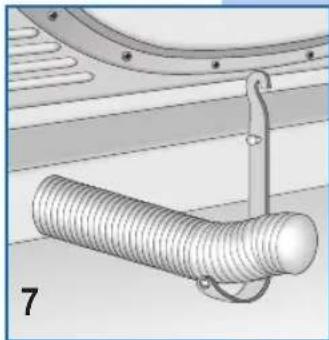
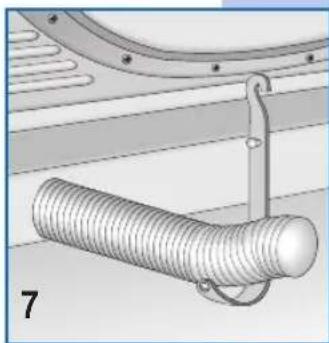
Position the other end of the tube near a window or a ventilation aperture on an external wall. If this is not possible, make sure that the room is well ventilated when the drier is being used. Use the support supplied to anchor the tube (fig. 7).
Important: The air exhaust tube must be connected even if the air is not discharged outdoors, otherwise the drier will re-absorb the discharged damp air and thus prolong the drying time.
Damp air can also damage the drier. Although the air discharged from the exhaust tube is only warm and damp and does not constitute a danger, it must never be directed towards people, animals or plants.
Important: The exhaust air must not be conveyed to a chimney discharging fumes generated by gas or other fuel burning appliances.
ELECTRICAL CONNECTION

Make sure that the voltage indicated on the identification plate attached to the back of the appliance corresponds to that of the mains supply.
On completion of the installation, the appliance must be connected to the mains supply through a two-pole switch.
All cutouts, electric wiring and mains sockets must have a rating such that enables them to support the maximum load indicated on the identifi cation plate.
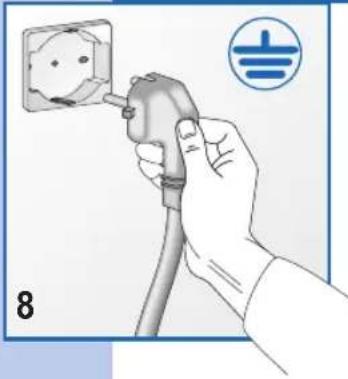
The mains supply to which the appliance is connected must be fitted with an earthing system. If this is not the case, the manufacturer will not be held liable for any incidents that may occur (fi g. 8).
If the power supply cable is damaged in any way, contact the nearest customer service centre.
The drier must not be connected to the mains supply using indirect methods such as extension leads or multiple adapters.
Position the appliance so that the power supply cable is easily accessible for disconnection when the need arises.
Important: On completion of the drying cycle, disconnect the appliance from the mains supply to prevent young children from operating the drier.
USING THE DRIER

USING THE APPLIANCE
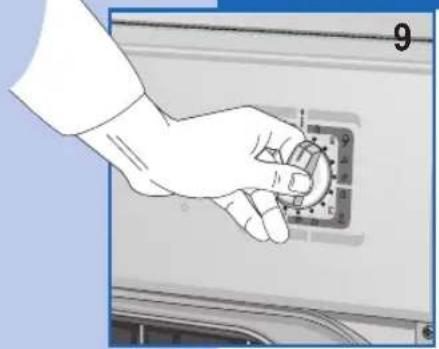
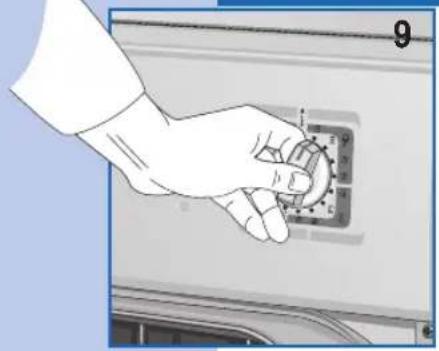
- Programmer knob Used to select the required programmes according to the types of fabrics and their specific needs. If, for any reason, you want to change the program or add more washing to the load during the drying cycle, simply place the programmer knob in the "STOP" position. Then re-position the knob on the required program and press the "START" button (fi g. 9).
NB. Warning!! Only use this function if strictly necessary and then only if the program to reset has been running for less than 3 minutes.
-
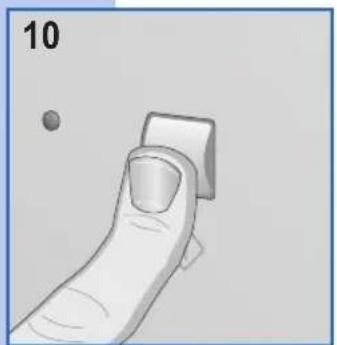
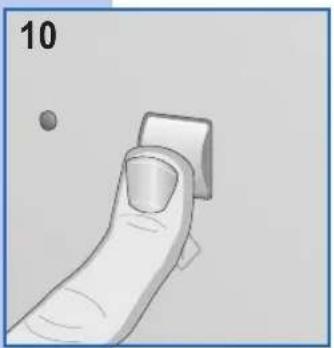
Start button Press this button to start the programmed drying cycle (fig. 10).
-
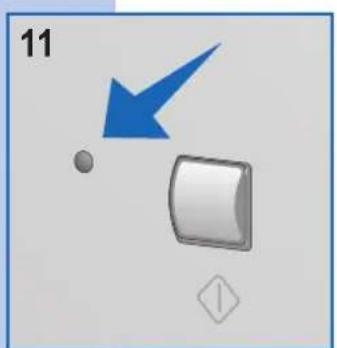
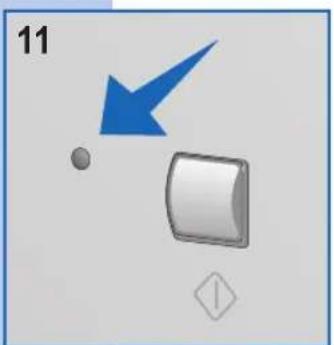
Start LED Off indicates the "STOP" position. On fixed indicates the cycle is running. Fast fl ashing indicates the set programme is ready to start. Slow fl ashing indicates the end of the drying programme (fi g. 11).
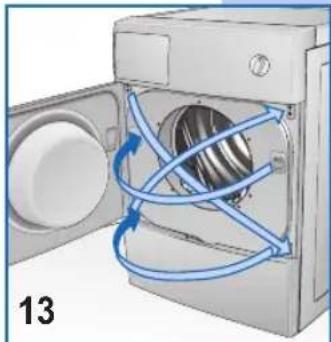
OPENING THE DOOR AND CHANGING THE OPENING DIRECTION
Press on the right side of the door (fi g. 12) to open it. If the direction of the door opening has been changed, press the left side.

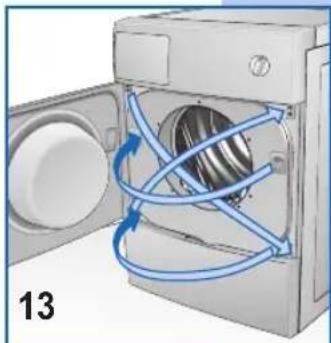
The opening direction of the door opening can be modified according to needs (fig. 13).
N.B.: This operation must only be carried out by a quali ed technician. Contact the customer service centre.
DRYING THE WASHING CORRECTLY
Proceed as follows:
A
Spin the washing.
B
Separate the items into types or fabrics.
Close any zips and fasten buttons and remember to empty the pockets of any clothing.
Turn jumpers inside out.
C
Open the door.
Load the washing in the drum and remember to load sheets from a corner first.
It is advisable to load small and large items together.
D
Close the door.
Dry your hands (never touch electric appliances with wet hands).
Insert the plug in the mains socket.
E
Position the Programmes knob on Stop to reset any previously set programme, then rotate knob to select the most suitable programme for the type of fabric, the quantity of washing loaded in the drier and the degree of dryness required
(seeProgrammeTable).
Press START to start the drying cycle.
F
To stop the machine during a drying cycle, simply open the door and the drum will slow down then stop. (Remember that when the door is opened, the internal parts of the drier and the washing may be very hot).
To resume the drying cycle, close the door and press the start button.
Once the drying cycle is over, the start led fl ashes and the alarm will sound; position the selector on STOP.
Open the drum door and take the washing out.
Close the door.
With dry hands unplug the drier from the mains supply.
PRECAUTIONS FOR FABRIC TYPES
In the case of doubt as to the type of fabric, read the label on the item itself. Almost all items that can be machine dried have this information specified on the label. To avoid static electricity being generated in the items, add a conditioner to the rinse cycle of the washing machine. Remove synthetic materials from the drum immediately to prevent them from creasing.
PROGRAMMETABLE
| ELECTRONIC DAMPNESS CONTROL PROGRAMMES | |||||
| Resistant | Max 6.0 kg. | Extra dry Warerobe dry | Iron damp Very damp | ||
| Delicates | Max 3.0 kg. | ||||
| TIMED PROGRAMMES | |||||
| Resistant | Max 6.0 kg. | min. 120 - 60 | min. 120 - 60 | min. 60 - 40 | min. 60 - 40 |
| Delicates | Max 3.0 kg. | ||||
| 20 min. | |||||
| PROGRAMMES FOR DRIERS WITH TIMED DRYING CONTROL | |||||
| Damp +/- Fabric type | Extra dry | Wardrobe dry | Iron damp | Very damp | |
| Max 6.0 kg. | * 150 min. **130 min. | *130 min. **110 min. | *110 min. **90 min. | * 90 min. **70 min. | |
| Max 3.0 kg. | * 110 min. ** 90 min. | * 90 min. ** 70 min. | * 70 min. ** 50 min. | * 50 min. ** 30 min. | |
| Max 3.0 kg. | * 100 min. ** 80 min. | * 80 min. ** 60 min. | * 60 min. ** 40 min. | - - - - - | |
| 20 min. | |||||
- Drying time necessary after spinning at 800 rpm.
** Drying time necessary after spinning at 1000 rpm.
Important: The drying depends on a number of factors: weight, size of the items, type of fabric, degree of dampness. Well wrung/spun items dry quicker. To prevent items from creasing, do not overload the drier.
WASHING WEIGHTS THE MANUFACTURER
The indicated weights are approximate and may vary according to their manufacturer, quality and finish.
| Bedding | |
| Quilt 700 g | |
| Bottom sheet 550 g | |
| Top sheet 600 g | |
| Pillowcase 180 g | |
| Household linen | |
| Tea towel (dishes) 90 g | |
| Tea towel (glasses) | 70 g |
| Flannel | 20 g |
| Hand towel | 200 g |
| Other linen items | |
| Bath robe | 1200 g |
| Bath towel | 800 g |
| Woman's blouse | 300 g |
| Man's shirt | 600 g |
| Blouse/shirt in synthetic material | 300 g |
| Table linen | |
| Tablecloth | 250 g |
| Large tablecloth | 1000 g |
| Napkin | 80 g |
| Men's clothing | |
| Wash 'n wear shirt | 250 g |
| Vest (sleeveless) | 120 g |
| Briefs | 80 g |
| Long johns | 250 g |
| Pyjamas | 480 g |
| Nightshirt | 400 g |
| Handkerchief | 25 g |
| Women's clothing | |
| Blouse | 100 g |
| Jumper | 100 g |
| Miniskirt | 80 g |
| Briefs | 80 g |
| Nightdress | 180 g |
| Pyjamas | 450 g |
| Handkerchief | 15 g |
CLEANING THE FILTER
In order to guarantee optimum drying results under all circumstances, remember that the fi iter must be cleaned regularly. Remember to check and clean the fi iter after each drying cycle.
Important:
The fi ler must only be cleaned when the appliance is cold! Clean the fi ler following the procedure described below:
Open the door.
Grasp the fiiter in both hands and push it upwards to remove it.
Carefully widen the top edge and open the fi lter.
Remove the fabric particles.
Close the filter, making sure that the catch closes at the correct position.
Clean the fi Iter slide guides on the appliance, using a vacuum cleaner if necessary.
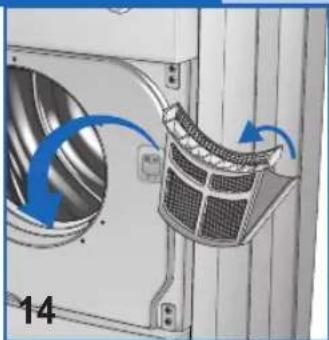
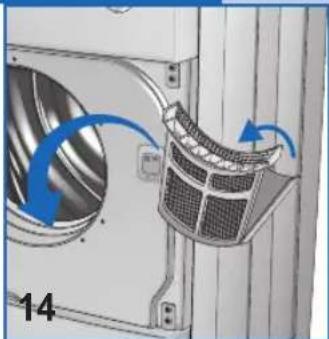
Reposition the fi Iter in the slide guides (fi g. 14).
FAULT FINDING
All electric appliances may breakdown at some point. Remember to call a qualified electrician in these cases. However, many problems can be resolved without the need for external intervention.
Important: If a fault occurs, disconnect the appliance from the mains supply immediately. Before calling the customer service centre, check the points listed below.
TROUBLESHOOTING IS ONE WORD
If the drier doesn't start
Check that:
1) The appliance is plugged into the mains supply.
2) The mains socket is working correctly:
2a) The fuse has not blown. (Check by plugging in another appliance such as a table lamp).
2b) All the instructions in the manual have been followed.
If the drier doesn't start
Check that:
1) The door is closed properly.
2) The "START" button has been pressed.
The washing does not dry
Check that:
1) The air exhaust tube is not twisted or kinked.
2) The filter is not blocked. (Remember that when the door is opened, the internal parts of the drier and the washing may be very hot).
If, after all these checks have been carried out, the appliance still does not work, inform the nearest customer service centre.
When contacting the service centre, inform them of the appliance model, serial number and type of fault.
This information will help the service centre operator in procuring the necessary spare parts, thus guaranteeing a speedy and efficient repair service.
OPTIONAL ACCESSORIES
To save space, the retailer can supply an accessory to enable the drier to be mounted on top of a front-loading washing machine. The installer can provide the information on the model of appliance on which this accessory can be fitted.
Verehrter Kunde,
ACCESSIONS EN OPTION
Seque as mados (nunca toque aparelhos elec. tricos com as mados molhadas).
Introduza a fi cha na tomada de corrente.
E
ESCHRIJVING VAN HET APPARAAT 53

INSTALLATIE VAN HET APPARAAT
Installatie
BESCHRIJVING VAN HET APPARAAT
INSTALLATIE VAN HET APPARAAT
INSTALLATIE
OPTIONELE ACCESSOIRES
ATSARGUMO NURODYMAI AUDINIU TIPAMS
PiδεηHHaHHa KO KaHaI3auiHoI CnCTeM
116
PiEHaHHdo eNektpuHoi Mepeksi
11

OPNUCTYBAHHCUYINJBHOO MAUNHOO
111-113
11
Onnc cyHKui
112
BiikpnTTa Dbepe Ta 3miHa HnOro HaPpAMky
11:
K npabnbo cyuun6iin3Hy
11:
3aTepeXeHHIIOIO BnDyTKaHHN
- Tablina nporpam
113
Bara 6iinn3n 113

EXHUYHE OBCJYTOBYAHHH
114
- YnctKa pInbTppy
114
BnABHeHH HeCnpaBHOCTe
114
UcyHeHH npo6Jem
114
-DoataKOBi cyHKuii
114
ПРИМITКИТАЗCTEPEXEHЯДЛКОПNUCTYBAU
TEXHIUHIDAHI
| Габати: | Широча, см.: | 59.5 |
| Висota, см.: | 85.0 | |
| Глобина, см.: | 60.4 | |
| Мakсимальна с明珠дь | 6,0 К. Сухоов Бли�н | 6,0 K. Сухоов Бли�н |
| Номінальна потужпICTь | ДИВ. Таблчу Тених данix | ДИВ. Таблчу Тених данix |
| Нарpyга онлайн诸葛亮урмУ | ДИВ. Таблчу Тених данix | ДИВ. Таблчу Тених данix |
MODEJIb:
CEPIHNI HOMEP:
DATA KYNIBNI:
HaWe 0bJaHahHH cCyunIbHOIO MaunHOIO IaDMaunHbOro KOpNCyBaHH. Byd-Ke iHwe 3AcTOcyBaHHo6NaDHaHHNoBnHBOBaxKaTnC HEBNaCTuBM, aOTke He6e3neuHM.
36epiraTe daHy IHcTpkykciio 3aBXKn nopAid 3 cyuINbHMoIaNHaHHM,IO6yBnIaKyIOTpeBn II MOxHa 6yIo 8uNko IPOKOHCyIbTyBaTN.
Будбякзмиab60cnpo6a nOuIKOJNTnO6laIHaHHaMOKyTB 6yTN He6e3neHIMN dIЯ KOpIcTyBaHa IliKIDINBIMM dIra camOro O6laIHaHHa.
YMOMEHTIOCTABKN ENEKTPONPnAaY3aneBHITcB, 106BInHE6yB NOLIKOJXeHNIiDacpepeBe3EHN. YBNIAkY BCTAHOBJIeHHMOXJIINBXN OLOKoJXeHb HeraHIO 3BepHITcBdoPiOdaBu.
He BkpuBaIte cyuunbHy maunHy 6iun3HOU cn iHUNMn npedmetam.
PiIyacpo3MiueHHo6JIaHaHHH3aneBHITc8,IO eIeKtpoUHyp He 6By 3irHyTu IN npuabNeHn a TaKox Ioo BIn JERKOIOCTynHn.
Nicn BnKOpncTaHH eNeKtpoPnpna3aBXKn 3aKpNaBte DBepuTa.
TakIM YINHOM Bu nepeWkoDInTe DiTAM BUNa3nTu Ha HIX, 10 MoKe PnBecTn Do nepeKeiDaHHa CyuINbHOI MaunHn.
He MoXHa KOpNCTyBaTnca ObNaHaHHaM dITrA, IIO He nepe6yBaIbTiI HarJIAOM.
He 3abyaTe, oio nIac uKny cyuHHn BnynckHa Tpy6a HarpiBaTbcra i moKe doCnHytn TemnepaTypu, BuOoi 60^ . He TopkaTecn ciEi YactHn ObnaDHaHHn Do 3aBepWeHHN cKny OxJOnOxKeHH.
He cyuunBc yuunbHi MaunHi 6pydHn OJr.
He cyuHTn OJrpy, kyn 6yB 3a6pydHEnn TaKIMN pO3HNAMN kX xpUOBa ONi, HcTa, aTeoH, aIKORONb, 6eH3nH, KepocnH, piINH nIra OUYueHH NpM, CKINNDap, BICK.
Ipeed Tm, k3aBaHTaXHTn NODHy 6JIN3Hy B cyuNbHy MaunHy, yCyHyTn ci peOBoHN 3a DonOMORo npAHy rapHn BOi 3doBaHHM NEBHOI KjIbKOcTI npAIBHOr PO3Hy.
He cyuHTny MaunHb Bnpo6ib 3ry6yatoi pe3HH, KayykoBOro NaTeKcy, BOHOENpOHNKHnx Bnpo6IB,TKaHH, 0 He npOnyckAOTb BOy,pe3NHOBNx MatpauiB, ppeMTeiB 3 UTAMNOBaHmK KOJIbOpamN, OJrIy TaNoDyWOK, HabNTX KayykoBIM NaTeKCOM, OCKJIbKN BOHMOKyTb PO3IIaBUTnC I NOWKOJITN iHUY 6iIN3Hy icam eNEkTpONoByTOBn npUJa.
IOM'AKUByBaJIbHI PO3uHn IJRA TKAHN a6o NOi6Hi IM peOBUHn IOBHHI BXNBaTcN 3riHO IHCTpyKci, Aki 3haxOJaTBcN y iYnaKOBu.
YBnnaKy npdaKy a6o nepeaCy no6yTOBOrO eNekTpponpnaLy y KOpNCyBaHHI HUNM NIOdbMN nAM'rTaNTe npTe, 10 pa3OM 3 Hm notpi6HO nepeDatu TAKOX i DaHy TexHcy IHCTpyKciIO, RkA DOnomOKe HAcTyNHOMy Bnachky KopNCyBaTnC cywnbHOOM MaunHO npabunboHO i HaDiHo.
He HamaraTecamocTiHo yCyHyn HecnpaBHOCTi Ha 6bnaHaHHi, TOMy 10 peMOHT, BUKOHAHn HeCneuaianCTAMN, MOXe
CπPnHHTNCa Do cepno3Hnx N0xKoJXeHb i NO36abNc npaba Ha rapaTINHH peMOHT.
Pemont 0bnaHnHaMOKe 3iINCHOBaTnCBAKJIIOUHO yNOBHOBaXeHMn npaizIBNkAmu cHTpiB TexHiHO O6cIyROByBaHH. IpeMOHTy NOBHHBI NKOPNCOTByBaTnCra TInbKnOpriHaJIbHI 3anachI YaCTnHn.
NpeTm, k3aBaHTaxkntu 6iin3Hy B cyunnbHy MaunHy, Heo6xio nponyctntu II uepe3 ueHtpny a6o do6pe BiXkaTu. Iobpe BiXkata 6iinn3Ha BnCOxHe WbNDwe.
IicnKoXHOrO BnKOpNCTaHH CyUINbHO'MaUNHn AkypaTHO OuNcTiB φInbTp, Uo6 rapaHTyBaTn 6e3nepeuKOnduPkyNuaIO nobITpr.
He niKJIouaIe I He BnMaIte WTeNceJIb 3 po3eTkn eJekTpOmepekIMOKpIMM pyKaMI.
CywnbHaMaunHaNoBHHaPiEHyBaTnCnDo 3a3emHeoi eNeKtpopo3eTKn, KaBiINOBiIac yim BmOram 6e3neKn.
He nid'cHnyTe MaunHy do eNeKtpopo3eTkn 3a DOnOMorO npoDobxbyaiv a60 po3ranyKeHN BXINOK.
He 3aHnwaTe o6naHaHHn iD nieo atmocepnX ABnU.
IpeedTMMK3diHCHNTTexOrJIAoBaHaHHa HIO MTT,He 3abyaTe Ioro BiDKHOHTN3 POeTKeIeKtpnHOrO cTpmy. UoB BiDnyuTH ObJaHaHHa 3 POeTKeIeKtpnHOrO cTpmy, He TArHtB 3a eJeKtpponpOiD, a 3a wTeNceJIb.
LcEobHaHnHaNo3HaueHe CmBOnAmu 3riHOBIMORCBponeCbKOI DnpeKtNBn npo BiXoDn eKeKtpnHOrO Ta eKeKtpoHHoro 6NaHaHH 2002/96/EC Waste Electrical and Electronic Equipment (WEEE).3aneBnItbcy Tomy, 00 1npOdykui 6yla npaBnblHo yTnNizBaHa. Cnoxnbau nobHene ncpnTu nonepdkeHHIO MOxNIBHX HeratNBHX HacniikB dnn 3doPOb' i HabkoNlHbOro cepeDoBnua.

3Ha Ka Hbnpo6i Ha CynpOBOJxUoyHn OTO DOKyMeHTaui Bka3ye Ha Te, 0u Ceu Bnpi6 He BBaxKaETCB3BnuAaHIM DomauHIM BiXODOM,a NOBHeH 3daBaTNCy BiDNOBIDHn nyHKT 36opy dny yTuNl3aui eNeKtpuHoi Ta eNeKtpoHHoI anapatypn.
Bupi6 noBHeH nepepo6nTncs 3riDHO Micuebux HOpM dnnnepeo6Kn BiXoDiB. DnOePkaHHN DoaTKOBoi iHfOpMaui npo 06xOJKeHH, pekyepauio Ta peuKlI3auio CboRo Bnpo6y 3BeptaItec y BiNobIHm MicuebN BiDIn, cnyk6y 36opy BiXoDiB Domauhboro KopntyBaHH a60 y MaraHN, y Akomy Bn npnDbani daHn eNeKTponpnuAid.
IINPNMCCTBO-BNPO6HVK BIXNJIAE Byb-RAKY BIDIOBIAJbHICTb 3A MOJKINBI HEUACHIBUNADKN, BNKJNUKAHI HEDOTPMAHHMR HOPM BE3NEKNTABUMOR, BKA3AHNX Y CII INCHTPYKJI.
ONICOBJIADHAHHA

CywnbHa MaunHa -e npnaIaI dIy DOMaunHbOro KOpNCyBaHH, RKn MoKe cyuHTn yci BnDn TKaHH.
CTpykTypa 06naHaHHcKlaJaTaBc3 BIDNObIOHO6pOBeHnx Ta noNAKObaHx CTaIbHnX nAHeJe, Aki 3aIIuAOTbcr HenoIKoJKeHMn IpOTAROM DOBROR Yacy.
BnHy Ta pyxomi YacTHH 6yJN CNPOeKTOBaHI Ta Bnpo6NeHi TaKIM YHOM,063a6e3neHTM MaKcImaJIbHO MOXJIbE O6MeKeHHa WMy.
NanheIb ynpabnHHaD03BONHe KOpNCyBaCy 6e3nepeWkoJHO BnKOHyBaTN yci nepeDbayehi nporpamc cyuHHa.
▼ BéniKi DBepTa 3HaUHO nOneruHb Ipouec 3aBaHTaxeHH Ta BnMaHH 6iIn3Hn.
MOneIb dIaCyuINH6iIN3HN 3 TaIMepom

1-Khonkannycky
2 - JAmnoUka-iHdNkATop pO60Tu 6nlaHaHHA
3 - Pyka BCTaHOBJeHHa cacy cyiHHa
4 -Деретабараыа
5 - ΦπbTp
6 - Hixk, 0o perynIOIbC
7 - Ta6nUka 3 TexHCHMn XapaKTePncTnKaMn.
8 - OTbip dIa Bnnycky napi
9-3'e,HyBaBnHΦpHaHeu
10-BuBipHa Tpy6a
11-CynnpTJnTpy6n
IHCTAJLACIOOBJADHAHH
IHCTAJIaLlI

Ihctanuia NOBHHa 3diuchOBaTnca KBaIiΦIKOBaHmN npaizBHKamn 3riHNO Bka3iBOK,HaadAHx Bnpo6HnKOM. NmJkoBa IHCTaJIaui MoKe 3aBdaTu WKOAn IIOJAM Ta npedMeTaM.
BcTaHOBIb cyuINbHy MaunHy Henoanik BiD BIKHa, 0o6 cnpytn BnBOy BOIrorO NOBITPra.
V 乌yHnKHyTN fOpMyBaHHKoHDeHcAty, KopNCTyTEcBnBiHOIO Tpy6O, nIeHaHOIO DO OTbOPy A, po3MiueHOro Bn3y Ha 3aDiHi NaHei O6NaDHaHH (pnc. 3).
IHCTAJIARJIA
He 3akpmbaTe doctyn nobitprdo 3aHb0i actHn O6laHaHHA.
BcTaHOBIb cInbTp y noJoxeHHn, nepe6aueHe 3riHNO Bka3iBOK Ha pnc.4.
OuHuaTe BHyTpHi npocTip cyunIbHoro 6apabaha 3a DonomorHO BONORI mAtKn, uo6 ycHyTu nn.

BnPIBHIOBAHHY CYUINJIbHOI MAUNHNI
Hixk, 0 peryIIOUbC. BctahOBiB cyuINbHy MaunHy y BepTKaJIbHe NOJIOXeHH TaKIM YINOM, 06 BOHa MiUHO CTOHnHa Ha ycIX YoTIPbOx HIXKax. 3roDom BupIBHnTe MaunHy, 3akPINBUn HiXKn, k ONCaHO HIXKye:
3nerka nDhimiTb 06naHaHHa
BidipeyHIOte HIXKN Ha Heo6XiHn BucOTi (pnc.5) (He BnKpyuYTe HaMipHO HIXKN Ta He KopNCTyTEcra 3aKpyTKOIO);
onycTiB 6nlaHaHH Ha niDnory.
IoroHO BnpiBnHa cyuINbHa MaunHa MOKe NOnKoDHTN niDuHNHKn i CnpuHHITcR DO HATo WBNDKORO 3HOWeHHa MExaHiHx qactH. Lc cyuINbHa MaUNHa He NOBuHHa KpInNTcR Do NiJIOrN.
ПД'ЕДHAHHЯ BNBIDHOITTPYБN
Пи'сднaite BnBiDHy Tpy6y Do OTbOpy,po3TaWOBaHOrO 3 3aHbOrO 60ky cyuHbHOI MaunHn (pnc.6), BUKOHyUOn HactynHl onepaui:
IiD'cHaHTe OINH KHeCb Tpy6n Do 3'cHbBbHoro fnaHc3 HAKOHeHHKOM.
NobepHtB 3'EnHyBaIbHn eneMeHT (pa3OM 3 Tpy6o) npOTn roHNHkoBOi CtpiKN BcepeDHI BNBIDHOrO OTBOPY.
BnBeiItb Tpy6y 3aAnhboro 60ky cyuunlhoI MaunHn BnIO a6o Bnpabo Yepe3 OTBip,po3aWOBAHn y HxNHi YactnHi KopnyCy MaunHn.
BctahOBiB iHwI KHeCb Tpy6n nopA3 BIKHom a6o BEHTNJUciHMM IOKOM. Raio ce HEMOXJINBO, 3aneBHITbcra, zo npMiuieHHN iD vac poBOTu cyuINbHOI MaunHn Do6pe npoBIrpoetbcra. KopncTyntecra cynnopTOM (pnc.7) dna 3akpinneHHra Tpy6n.

YBara: Tpy6a Bnnycky nobITpr noBHHa nID'edHyBaTncr TaKoX i y BnnaDky, KOH nobITpr BnnyckaTbcra Ha3OBHI; y npotnIeJxHOMy BnnaDky BnnyeHe BONore nobITpr MoKe NOBepHyTncr y MaunHy, 3aTaraOuH qac cyuHHa.
BoIore nobITp moKe taKoX noXKOHTn cyuHbHy MaunHy. He3BaXaOCh Ha Te, 10 NobITp, 10 BHXODITb 3 BnYCKHO Tpy6n, Ine rapAye i BOIore i He e Hebe3neHMM, BOHO HIKON He NOBHHo HapBaNATNCHa IIODei, TBAPIN Hn PocNIHN.
YBara: Nobitpa 3 Bunyckhoi Tpy6n HikoN He NOBHHO BNBODHTUCy y Dmoxi, AKN BHKOPNCTOBBycBcA DnRA BNVBOy dMMy, Oo Bnpo6bctbcra 06NaHaHHAM, AKe BHKOPNCTOByc ra3 Yu iHwi BVn nanbHorO.
ПИД'ЕДHAHHА ДОЕLEKTPИЧHOI MEPEXКI
3aneBHITbca, 0e eNEKtpnHa HAnpyra, kA BkazHa y Ta6nHcJ 3TexHiHMn DaHMM, BCTaHOBHeHn Ha 3aHn CTHU cOlaHaHHn, BiNobIdac HAnpy3i eNEKtpnHoi Mepeki.
IicnaHCTaJIoulaHaHHnOcTynDoMepeXeJeKTPoXNBHeHHnOBnHeH 3a6e3neYBaTnC3aralbHMnepemkauem.
Yci nepemkaqi, ekeKtpnHi shypu, a taKoK po3eTK eJekTpomepek i NOBHHI BiIOBIdaTu TAKIM NOKa3HnKaM, RKi DO3BOJIHOb BNTpMaTu MaKCmMaJIbHe HabaHTaKeHHa, Bka3aHe y Tabliu.
▼ EneKtpomepexa, do koi ni'd'edHa ha cyuunbHa MaunHa, noBnHa 6yTu 3a3emleha. Y npOTnEJXHomBy BnAdky, BnpO6Hk BiDxNJaE 6yDb-ky BiINoBIaIbHiCTb 3a MoKnBi HeauChi BnAdkn (pnc.8).
Kkpo eNeKtpoWHyp 6yB NowKOJxHn, 3BepHtbcy HaibJnxChn CneJIaIIOBAHm CEHTP TexHOrO oCcyroByBaHHa KIneHTiB.
He niDi'edHyTe cyuHbHy MaunHy do eJeKtpomepexi 3a donomoroTO TaKnx HnnpmNx eJeMeHTIB, NK npoobkByaHi n nepexiDi Hi 6araTOKaHaJIbHi pO3eTKI.
BcTaHOBIb 06NaIHaHH TaKIM YHOM, 06 WHyp eNEKtpuHoro KMBHeHH 6yB IerkoOCTynn DnA WBNKO R O BID'EDHaHH y BNAnky NOTpeBu.
Ue BaXnBO! Nicna 3aBepweHHNcKny cywiHH BmMitb eJektpoWHyp 3 eJekTpomepeKi, 06 nepeWKoNDt DITAM BnnaKOBO BKIOHTN O6laHaHH.
BVKOPNUCTAHNЯOBJIADHAHHY
BVKOPNUCTAHN OBJNAHHAHH
3.Pyka BCTAHOBHeHH nporpam clyxntb dny Bn6opy baxaHx nporpam 3 OrnaIy Ha BnTkAHmH iHa BlaChi notpeBn. Kkso 3 neBHO npuHN Bu baxaTe 3mHHTnporpamy abo BnpiHte doatn IHuy biN3Hy y cyuINbHy MaunHy nac uKJy cyuHH,doCTaTHbO BCTAHOBHT pyky nporpamyBaHH y noLoXeHH "STOP",nicra YORo Heo6xIDHO BCTAHOBHT pyky y noLoXeHH Bn6paOHi Bam nporpam i HATNCHT KNONKy "START"(pnc.9).
PIMITKA Ybara!! Kopnctyntecra iEo yHKciEIO tInbKn y dIiCHO Heo6xidnHex BnnaKkax i TInbKn ToDi, KOnn po6ota nporpamn, kky Bn nnaHyte nepepbatn, po3no7anacr He paHie 3-x XBnHH.
-
Khonka ncykHaTnCHiB tio KhoNky, 06 cyuNbHa MaunHa po3noyana BCTaHOBHeHm uKKn cyuHHra (pnc. 10).
-
BnKIOUeHa JAMIOUKA-1HINKATOP Start Bka3ye Ha noIooKeHHa "STOP". IanoUka, 10 noCTiHrO rOpNTb, Bka3ye Ha BnKOHaHHu KIKny. 1BnDke 6JIIMaHHraOBOpNTb npTo Te, 10 o6paHa npOrpama roTOBa do 3aNycky. NobInbHe 6JIIMaHHo3Haac KHeCb npOrpamn cyuHHa (pnc. 11).
BIDKPTTTA DBEPAT TA 3MIHA IORO HANPAMY
▼HaTnCHyTu Ha npabu 6ik DBepuT (pnc. 12), 0o6 ix BiDkpTu. RaKuo Hanpam BiDkpTTa DBepuT 6By 3MiHeHn, HATnCHiThb Ha Nibu 6ik.

HAnpM BiDkPnTTA DBepaT MoKe MiHaTcA 3riNo Notpe6 (pnc.13).
PIMITKA: La onepaig noBHHa BnKohyBaTcH TaibKn CneiaJi3OBAHm npaicBHKOM.
3BepTaIeTcayuHTpTexHIOO6ClyROyBaHHa6oNo npOaBu.

3 METOIO INPABUNbHOrO CyUHHB BIN3HN
Bukohai Te Hactyni onepaui:
A
BuxMItb6iJn3Hy.
B
IocopyTe OaR B 3aJexHocti BiD BuNy TkaHnH.
3aknTe 3amKn, rynkn i cnopoxHiYcKiNeHi.
BnBepHItcBETpn.
C
BidkpiTe DBepuTa.
BknaTb 6iin3Hy y 6apa6aH, He 3a6ybaOuN BknaCTn nepwIMn npoctnpaJa.
PaIMOBKnadaTNOHocHOBeNKiTaMaJI 3a po3MipOM Bnp6n.
D
3akpiIe DBepuTa.
BntpiB pyKn (hikoN He TopkaTecn eJekTpOnpuaDIB MOKpMn pyKam).
BVeDiItb wTeNceIb y eJeKtpopo3eTky.
E
V BctaHObITb pyky nporpamyBaHHHa BiDmitci Stop, u66 anyHOBATn MOxJIINBI nonepedHB0 BCTaHOBJIeHI nporpAMn, Ta nobepHtB II Ha nporpamy, Ra Ka Hai6IbJbe BiNobIDae BaWi TKAHNi, KInbKOcTI 6IN3HN, 3aBAHTaxEHOI y 6apabAH Ta 6axaHOMy CTynEHIO cyuHHA (INB.
Tabluiu nporpaM).
HaTnCHiB KHONKy START, 06 po3noaTu cnKJ cyuHHA.
F
3ynHnTPO6OyMaunnNiJac uKny cyuHHa,DOCHTb BiKpHTn DBepuTa, i6apabah nobIbHO 3ynHnTbcra. (He 3abyte,poi niJ cac BiKpTTa DBepuT BHyTpuiHi cactuHc yuNlHoMawHn MOxyt6ytn dyke rapaHm).
IIO6 npoOBNKNTu cNk cywHnH, 3aKnTe DBepuTAt i HATNCHTb KhONky "START".
Nicra 3aKiHcHHe cywIHn, npo rKe NOBIOMJIOb 6nMaOHa JAMNOyKa start Ta 3ymep, BCTAHOBiTb CeNEKTop y noLoXeHHr STOP.
BikpnTe DBepuTa 6apabaHa Ta BnMiTb 6iIn3Hy.
3HOBy 3aKpInTe DBepuTa.
CyxuMpykAMBnMIbWTeNCEb cyuK3 eNeKTpOmepeXi.
3ACTEPEXKEHHI OIO TKAHINH
Y BnnaKky CymHIBIb ⅢO O BnDy TkAHnH npeBipTe eTKeTky, Aka 3HaxoNtbc Ha Bnp6ax. MaJxe yci BnDn OJrpy, Aki MoKyTB cyuNTncy CyuINbHi MaunHi, MaOTb BiNobiDne N03NaueHHa eTKeTu. Ira TOrO, Uo6 yHnKHyTN eJeKtpn3yBaHHo OJr4y, Ni dacixNONocKaHH y npalbHi MaunHi doaAte nom'AKwBaH. HeraInHO BnMItb 3 bapabahy OJr 3 CnHTeTnHnx TkaHH, Uo6 BiH He NOM'ABcR.
TABJIINU INPOIgPAM
BAGA BIIIN3HN
| ПОГРМИ 3ЕLEKТPOHHIM KOHTPOЛEM BOJIOTOCTI | |||||
| Miuni TKaHINH | MAKC 6.0 Kr | Дуже суха C | Чухддя Зберигань | Волога дд прасунь | Дуж; ВOLORA |
| ДелICAL TKaHINH | MAKC 3.5 Kr | ||||
| ПОГРМИ 3 KOHTPOЛEM YACY | |||||
| Miuni TKaHINH | MAKC 6.0 Kr | XB. 120 - 60 | XB. 120 - 60 | XB. 60 - 40 | XB. 60 - 40 |
| ДелICAL TKaHINH | MAKC 3.0 Kr | ||||
| 20xb. | |||||
| ПОГРМИ ДЛЯ CSUINILbHOÖM MAUSIHN 3 TANMEPOM ДЛЯ KOHTPOJIO 3A YACOM | |||||
| Волora +/-BVD TKAHINH | Дужescyха | Суха дд Зберигань | Вологдд прасунь | Дуж; ВOLORA | |
| MaKC. 6.0 Kr | * 150xb. **130xb. | *130xb. **110xb. | *110xb. **90xb. | *90xb. **70xb. | |
| MaKC. 3.0 Kr | * 110xb. ** 90xb. | * 90xb. ** 70xb. | *70xb. **50xb. | *50xb. **30xb. | |
| MaKC. 3.0 Kr | * 100xb. ** 80xb. | * 80xb. ** 60xb. | *60xb. **40xb. | — — — | |
| 20xb. | |||||
* Yac cyuHHH, Heo6xHn nicna 3aCToCyBaHHn ceHTpnpyrr 800 o6opotB/xB.
**Cac cyiHHa, Heo6xIDHn nicna 3actocyBaHHa eHTpnpyn 1000 o6opotib/xb.
YBara: Yac cyuHHa 3anexHb BiD pndy fakTopiB: Bar, po3mipB 6iIN3Hn, BNDy TKAHHN, CTynHe BONorocTi. DObpe BiXkati Ta ceHTpNfpyroBaHI TKAHHN COxHyb WBNdIe. 0o6 yHKNHYTuTORO, 60 6iIN3Ha NOMHeTbcH, He nepeBaHTaxyute CyuHbHy MaunHy.
Bka3aHa Bara npn6n3Ha i Moke 3miHIOBaTncB 3aIeXKHOCTi BiD Bnpo6HnKa, AKOCTI ta 6pO6Kn.
NoctInbHa 6iin3Ha
Kobdpa 700 rp.
HnKHe npocTnpaNo 550 rp.
BepxHc npocTnpaAno 600 rp.
Habolouka 180
KyxohHa 6iJn3Ha
PuyHnK (Dna Tapinok) 90 rp.
PyuHnK (dna ctaKaHIB) 70 rp.
Umatka 20 rp.
PuyHnOck dny pK 200 rp.
IHHI BnDn 6iIN3Hn
Xanat 1200 rp.
PuyHnK BeJnKn 800 rp.
Copouka xiHoua 300 rp.
Copouka yonobiva 600 rp.
CopoKn YOIOBii XkHoi3 CInTeTNHX TkaHH 300 rp.
CTOJOB6iIN3Ha
CkateptnHa 250 rp.
CkaTeptHa BEnIka 1000 rp. CepBeTka 80 rp.
HonobiiuOdA
Copper Ka Ierka rp. 250 rp.
Maika (6e3 pyKaBIB) 120 rp.
Uoptn 150 rp.
Tpycn doBri 250 rp.
PiXkama 480 rp.
Copper Ka Hua 400 rp.
XyctOuKn 25 rp.
KiHoum ODAI
Copochka 100 rp.
Kocta 100 rp.
Kopotka cpiDnua 80 rp.
Tpysn 150 rp.
Copochka hiHa 180 rp.
Pikama 450 rp.
XycTo4ka 15rp.
CHNTKAΦIJIbTPY
ДлгТOrO,цo63aBXd3a6e3neuHTN BiDMHHe cyuHHa 6iIN3Hn, He 3a6yBaItepeRyIrpHo uCtHTnФinbTp. He 3a6yBaIte nepeBiprTn i,Якso Heo6xIDHO, uCtHTnФiIbTp nicra KoxHoro zKkny cyuHHa.
YBara:
YnCTka pInbtpy NOBHHA BUKOHByatncrnicrTOR, kO6JaHaHHOxOJHOHyNo!
IINa YnCTKNpInbtpy KOpNCTynteCh HXKHe HaBeDeHMM BKa3iBkAm:
BikpnTe DBepuTa.
3axonitb pInbTp dboma pykam Ta notarHtB noRo Bnepe, 06 BuHATN.
▼ДeиkaTHo po3uInpTe BepxHn Kpa PinbTpTy Ta BiKpnTe Noro.
BnMIb BOJOKHa TkaHH.
3aKpInTe pijbTp, 3aneBnBwncb, 03auiNka 3haxoNTbcr y npabHbHOMy nIOJKeHHi.
Ouictb HanpaBnaHoyi pIbTpHa 06NaHaHHi 3a DonomoroIO NINOOCcy, Akuo ce Heo6xIDHO.
3HOBy BCTaHOBiTp fInbTp Ha HnpaBnIouci (pnc. 14).
BNUABJIENHHAHECNPABHOCTEY
Yci BnDn eNEKtpo06IaHaHHa Yac BiI Yacy MOKyTb BHXOHTN 3 NaIy. Y CIXBnAdkax 3BepTaITecn Do KBAJIcipikOBaHoro eNEKtpnka. Tm He MeHSe, HcneHHi npoblemmoKyTb 6ytu cyuHeHi 6e3 BtpyAHnCneuaJnticTB.
YBara: Y BnnaKy HecnpabHocti HeraHb BiD'edHaIte 6bnadHaHHB iD eNekTpomepeKi. Nepw, HIX 3BepHyTncA Do ceHTpy TexO6cnyroByBaHH, nepeBiPeTe 6bnadHaHH 3riHNO BkasaHOro HxKHe.
UCYHEHHI PPOBJIEM
CywnJIbHa MaunHa He npaioc
- IpepeBipTe, u:
1) O6naHaHHa 6yNo Do6pe NiKluOHe Do eNeKTpomepeksi.
2) ⅢTeNceIb, yBIMKHyTn y eIeKTpOpepeJy, cnpaBHn:
2a) 3anobixnK He neperopib (Ipebeipte Ioro, nD'ednabu no eEKeTpomepekxi iHwe o6naHaHHa; Hapnikna, HactiBHy lamny).
2b) Bynn BnKoHaHi yci BKa3iBKn, BKa3aHi y iHCTpyKuii.
CyuINbHa MaunHa He npaioe
- Ipepebipte, qH:
1)DbepaTa6yIiNo6pe3akpiTi.
2) Byna haTnchyta KhoNka "START".
CyuNbHa MaunHa He cyuHtB
- IpepeipTe, qI:
1) BvBiHa Tpy6a IJnI NOBITpHe 6yNa npndaBHeHa YI nepekpyeHa.
2)Фльтг He 6yB 3a6uTn (nam'raTaIte, zu nID Yac BiDkPbBaHH ABepe BHyTppiHi yactHn CyuINbHOI MaunHm MoKyt b 6yTu dyXe rapAum).
Akuo nicra BnKoHaHb BnueBka3aHnx fynkui O6naHaHH 3aIlnaactbc HecnpabHM, NOiDMTe npo HecnpabHicTb y Ha6nnxu ChENTp TexHOrO 6cnyroByaHH.
Ppocmo y ubomy BnnaKy Bka3aTm MoeJIb, cepiHn Homep i Bn HecnpabHoctI.
IiHOpMaiaI DonOMOKe npaizBnky ceHTpy TexHrHoro 06cLyROyBaHH OChactNTCA Heo6XiHNM3aHacTnHaMn, 06 rapaHTyBaTu WbNkTu eEeKTHBn peMOHT.
IDODATKOBIФYHKLII
Lio6 3ekOHOMn npocTip, npoabeueb MOKe 3anpOnohyBaTu Bam DoaTKOBn npncTpiJ, kN nnomOKe BCTAHOBn TuunHy MaunHy Ha npalbHiMaunHi 3DbepaMn nepeHbOro 3abaHTaxeHHa MoHTaxHK Nopadntb Bam, Ha kky MoeJIb OblaHaHHa MOKe byTu BCTAHOBneHn cei npncTpiJ.
Stimate client,
NIVELAREA USCATORULUI
Picioruse reglabile. Puneti uscatorul in positie verticala astfel incat sa se sprijine bine pe toate cele patru picioruse, iar apoi puneti-l la nivel regland piciorusele dupa cum urmeaz:
Ridicatiusoruscatorul
Reglati piciorusele la inaltimea potrivita (fig. 5). (Nu insurubati prea strans piciorusele si nu utilizati o masina de insurubat).
Lasati in jus ascatorul.
PENTRU O CORECTA USCARE A RUFELOR
Ybaxaemblnokynatelb,
6JarOaapm Bac 3a BbIbOp hawero n3JeJIy.
IpexJe Yem NOdklouHb npNBecTn B pa6Otp np6Op, peKOMeHyEM BHIMaTeJbHO npOHTaB HAcToUe pyKOBOcTBo No 3KcNpyaTuM. 3HaHHe pInHcNIOB DeiCTBna MaunHb I oecneHT Bam npaBnJIbHOe n 6e3OnacHoe ee nCNoJIb3OBaHne.
B HacToIeM pyKOBOCTBe npUBeHeHbI TexHnueckne XapaKTepcNTKN CyuINbHO MaunHbI N ceNa cepna Ione3HO IHcOpMaun O ee pa6Ote, npedHa3HaueHHo dNra OKa3aHnBa Bam nOMou B cIax nOnyehn HaunyUnxpe3yNbTaTOB OT kCpNpyaTuAn np6Opa. B cnUae npOdaXn nn nepeDaun MaunHbI dpYROMy NtuCy He 3abYbTe OTdaTb HOBOMy NoJb3OBaTeIO HactoJeepyKOBOCTBO.
yKA3ATEJIb

OBETBI IN PEKOMEHDAUIN DIA NOJb3OBATEJIa
TexHuecka HOpMaUN
123-124


TINCAHNEIPIBOPA
125

YCTAHOBKA INPUEOPA
125-127
YCTaHOBka
BbCTaBHeHne cyuINbHO MaunHbI NO rOpN3OHTaJI
CoeHHeHc co cInBHO Tpy6KoI
- PoiKJIIOUeHne K 3JIeKTpUeCKoC cTeu
12

3KCNJYATAUCA CYUNJBHOM MAHNbI
127-129
Oncahne dyHKn
127
PaKpbTne DBePn n N3MeHeHne HAnpaBHeHne ee paKpbTnA
128
Ka npabnblbNo cywntb 6enbe 12
8
- PpeoctopoxkHcTn npn o6paueHN C pa3hblm TnnaMn TkaHei
129
- Tabnua nporpamM
129
Bec 6eIb1 129

TEXHNUECKOE OBCJUJKBAHNE
130
OuNTka qnIbTpa
130
Ponck HencpabHocTei
130
PeeHne npo6Jem
130
YTo6bOtKpbItb,HaXMnTe Ha npaByo CToPOHy DBePN (pnc. 12).Ecnn HAnpaBHeHne packPbITnA DbEPn N3MeHeHO,HaXMnTe Ha JEByIO CToPOHy.

▼ HanpaBHeHne packpbITnA DBepn MOxET 6bITb N3MeHeHO B CnIy Baunx nOTpe6HocTe (pnc.13).
PpM.:3TaOepaunIdoJXHa6bITb BbINOJIHeHaTObKoCneuaJIuN3IpOBaHHbIM nepcoHaIOM.
O6paTntecb B 06cnykBaioouni ceHTp dIepea.
KAK INPABNJIbHO CUsHTb BEJIbe
DeiCTbYrTe, KaK OINcaHO HnXe.
A
OTOKMITE 6eJIbe.
B
Paccoptnyte Benu no Tnny nNo mATEpnaNy, n3 KOTOPORO OHN cdeNaHbI.
3akpoTe 3aTeKKn-MoHnH, 3aTeHnTe nyROBnCbI ONOpOXHnTe KapMaHbl.
BbIePhHTe CBNTepa Han3HaHky.
C
OTKpoTe DBepb.
3arpy3nte Beun B 6apabah; chayana noJoxnTe 3a yroI npoctbHn.
PeKOMeHdyETcKJaCTbBMaunHy KpynHbIe IMeIKNe BcunBmecTe.
D
3akpoTe DBepb.
Bbtpnte pykn (HnKorda He TporaTe 3neKtpnueeckne npu6opbl MOKpbIMny pykam).
BCTaBbTe BnIKy B 3JNeKtpnHecky p03eTKy.
E
YcTaHOBnTe pyKny nporpamMnpoBaHnB nOJoxHe NcStOp, OTo6bI OTKnIOuHTb HAcTpoEHbI paHee nporpamMbI, 3aTEM
NOBepHnTe ee B NOJoxeHne nporpaMMbl, KOtopa HauboJe e NOxOaNT dJa Tnna MaTePnAJa, KOJIueCTBa NOJoxeHHbIX B 6apaabH Beuei N XeJaem O CTepeH IN CXuKn (cM. TabniCy nporpaMM).
HaxmTe KhoNky START, yTo6bHaayatb cyuKy Beuei.
F
VTO6bIOCTaHOBtMaUNHy BO BpEmaIKNa cyuKn,DOCTaTOUHOOTKpbITb DBepb,N 6apabAH MeJIeHNO OCTaHOBHTcA.(POMHNTe, 7TO npn packpbTIN DBepn BHYTpEHHe YACTN CyuINbHOJ MaunHbI MOyT 6bITb OyeHb ropAUM).
YTo6bI npoJnxNtB cIKn cyuK, 3aKpOte DBepb n HaxMnte KhoNky "Start".
No 3aBepeHn cyuKn, o Yem CnHaJn3npyET MURAHne Hndukatopa CTapT n CnHaJ 3ympepa, -PnBeNTe nepeKJIouaTeIb B noJoxHe STOP.
OTKpoTe DBepeb 6apabaHa N BbIhTe BeuN.
3aKpoTe DBepb.
CyxIMn pykAmn BbHbTe BNky cyuINbHO mAHINbI N3 3JIeKTPnuecko pO3ETKn.
IPEIOCTOPOXHOCTN IPN OBPAUEN C PA3HBIMTN TINAMNTKAHEI
PnHaJIuHm OTHcHTeBHO TnA TKAHN NOCMOTpTe 3TKKeTky Ha OJekJe. PpaKTueckn IIO6aH OJekJa, KOtopyMOxHc yUHb B MaUHne, IMeet o3TOM Yka3aHHe Ha 3TKKeTke. DIn ppeynpeKJDeHn B03HKnHOBeHn CTaTNHeCKOrO 3NeKtpuHecBa H a OJekJe BO BpEma LkKIOB NOIockaHn B CTnpaJIbHOm MaUNHe NCNoJIb3yIte KOHdUHOpE. Cpa3y Je BbIHb Te n3 bapabHa cINHeTtueckne BeU, UTo6bl OH He NOMAnCb.
TABJIINLCAIPOIPOPAMM
CynjlbhaMaunHa He BkIIOyaeTcA
- PpOBepbTe:
1) TTo6bl DBebp 6bIina xopo0o 3aKpbita;
2) TTo6bI 6bIa HaKaTa KhONka "START".
CywnbHaMaHHaHe cywn
- PpOBepbTe:
1) TTo6bI BbInyckHaT py6Ka Bo3dyxa He 6bla nepexkaTa nn cKpyeHa;
2)TO6bI He 6bl3a6ntΦnIbTp (NOMHInTe, TTO npn paKpbITm INBepn BHyTpeHHne ACTN CyuINbHOJ MaUNHbIMOryT 6blb OeHb roprMM).
Ecnn nocne BbINOJHHeHHyKa3aHHbIX npOBepOK, np6Op BCE je He pa6oTaET, o6paTntecbB 6nKaiuoum obcnykuao uen.
Co06uTe nepcoHaNy ceHtpa MoedeN b 3aObocko Homep np6opa n TnT NOpeKDeHH.
TakaH INΦOPMaunr IIO3BOJNT ONEpATOpy CEHTpa TEXHmecKOrO 06cIyXnBaHN HaHTN Heo6xOaMbte 3aNaChbte qactn, yTo6bl 6bICTpo n 3ΦΦeKTUBHO pOn3BecTN peMOHT MaunHbl.
DONOJIHNTEJIbHbIE PPNHAADJEXKHOCTN
ДяэКOHOMN CBO6OJHOr MecTaДИNEP MoKET ПЕДLOXKNb BAM CNEUJIbHyIO ПиHAДLEXHOCTb, KOTOPaI IO3BOJNT YCTaHOBnTcUINMbHyIO MaUNHy HA CTIpaJIbHyIO, OTKpbIbAIouYIOCApeDi. MoHTaXHNIK MOKET COO6UInb BAM MoDEnb MaUNHbI, C KOtOpOIMoKHO NcONJIb3OBaTb TaKyIO pINHaДLEXHOCTb.


- Gentile cliente,
- CONTENTS
- NOTES AND ADVICE FOR THE USER 11-12
- DESCRIPTION OF THE APPLIANCE 13
- STALLING THE APPLIANCE 13-15
- SING THE DRIER
- AINTENANCE
- NOTES AND ADVICE FOR THE USER
- DESCRIPTION OF THE APPLIANCE
- INSTALLING THE APPLIANCE
- INSTALLATION
- LEVELLING THE DRIER
- CONNECTING THE AIR EXHAUST TUBE
- ELECTRICAL CONNECTION
- USING THE DRIER
- USING THE APPLIANCE
- OPENING THE DOOR AND CHANGING THE OPENING DIRECTION
- DRYING THE WASHING CORRECTLY
- Proceed as follows:
- F
- PRECAUTIONS FOR FABRIC TYPES
- WASHING WEIGHTS THE MANUFACTURER
- CLEANING THE FILTER
- Important:
- FAULT FINDING
- TROUBLESHOOTING IS ONE WORD
- If the drier doesn't start
- The washing does not dry
- OPTIONAL ACCESSORIES
- Verehrter Kunde,
- ACCESSIONS EN OPTION
- ESCHRIJVING VAN HET APPARAAT 53
- INSTALLATIE VAN HET APPARAAT
- BESCHRIJVING VAN HET APPARAAT
- INSTALLATIE
- OPTIONELE ACCESSOIRES
- ATSARGUMO NURODYMAI AUDINIU TIPAMS
- OPNUCTYBAHHCUYINJBHOO MAUNHOO
- EXHUYHE OBCJYTOBYAHHH
- ПРИМITКИТАЗCTEPEXEHЯДЛКОПNUCTYBAU
- ONICOBJIADHAHHA
- IHCTAJLACIOOBJADHAHH
- IHCTAJIaLlI
- IHCTAJIARJIA
- BnPIBHIOBAHHY CYUINJIbHOI MAUNHNI
- ПД'ЕДHAHHЯ BNBIDHOITTPYБN
- ПИД'ЕДHAHHА ДОЕLEKTPИЧHOI MEPEXКI
- BVKOPNUCTAHNЯOBJIADHAHHY
- BVKOPNUCTAHN OBJNAHHAHH
- BIDKPTTTA DBEPAT TA 3MIHA IORO HANPAMY
- METOIO INPABUNbHOrO CyUHHB BIN3HN
- Bukohai Te Hactyni onepaui:
- 3ACTEPEXKEHHI OIO TKAHINH
- NoctInbHa 6iin3Ha
- KyxohHa 6iJn3Ha
- IHHI BnDn 6iIN3Hn
- CTOJOB6iIN3Ha
- HonobiiuOdA
- KiHoum ODAI
- CHNTKAΦIJIbTPY
- YBara:
- BNUABJIENHHAHECNPABHOCTEY
- UCYHEHHI PPOBJIEM
- CywnJIbHa MaunHa He npaioc
- CyuINbHa MaunHa He npaioe
- CyuNbHa MaunHa He cyuHtB
- IDODATKOBIФYHKLII
- Stimate client,
- NIVELAREA USCATORULUI
- PENTRU O CORECTA USCARE A RUFELOR
- Ybaxaemblnokynatelb,
- yKA3ATEJIb
- OBETBI IN PEKOMEHDAUIN DIA NOJb3OBATEJIa
- TINCAHNEIPIBOPA
- YCTAHOBKA INPUEOPA
- 3KCNJYATAUCA CYUNJBHOM MAHNbI
- TEXHNUECKOE OBCJUJKBAHNE
- KAK INPABNJIbHO CUsHTb BEJIbe
- DeiCTbYrTe, KaK OINcaHO HnXe.
- IPEIOCTOPOXHOCTN IPN OBPAUEN C PA3HBIMTN TINAMNTKAHEI
- CynjlbhaMaunHa He BkIIOyaeTcA
- CywnbHaMaHHaHe cywn
- DONOJIHNTEJIbHbIE PPNHAADJEXKHOCTN
Brand : Ardo
Model : VDR06
Category : Tumble dryer