
WG706E - Lawn mower WORX - Free user manual and instructions
Find the device manual for free WG706E WORX in PDF.
| Product type | Electric lawn mower |
| Brand | Worx |
| Model | WG706E |
| Rated voltage | 230-240 V ~ 50 Hz |
| Rated power | 1200 W |
| Cutting width | 33 cm |
| Cutting height | 20-60 mm (3 positions) |
| Grass collection bag capacity | 30 L |
| Weight | 10 kg |
| Double insulation | Yes |
| Sound pressure level (turbo mode) | 80 dB(A) (K=3 dB(A)) |
| Sound pressure level (silent mode) | 71 dB(A) (K=3 dB(A)) |
| Sound power level | 94 dB(A) |
| Measured vibration | 2.5 m/s² (K=1.5 m/s²) |
| Operating modes | Turbo and Silent |
| Rear discharge | Yes (without bag) |
| Bag full indicator | Yes (float) |
| Motor protection | Safety cut-off in case of overload |
| Safety switch | Lock button + control lever |
| Blade type | Rotary metal blade |
| Blade replacement | Every 50 h or 2 years |
| Maintenance | Cleaning with dry cloth; no water or chemicals |
| Storage | Foldable handle; store in dry place |
| Included accessories | Grass collection bag, safety key, cable ties |
| Standards | CE, Machinery Directive 2006/42/EC, EMC 2004/108/EC, Noise 2000/14/EC |
| Intended use | Mowing private lawns |
Frequently Asked Questions - WG706E WORX
User questions about WG706E WORX
0 question about this device. Answer the ones you know or ask your own.
Ask a new question about this device
Download the instructions for your Lawn mower in PDF format for free! Find your manual WG706E - WORX and take your electronic device back in hand. On this page are published all the documents necessary for the use of your device. WG706E by WORX.
USER MANUAL WG706E WORX
natural_image
Line drawing of a WORX lawn mower with extended blade (no text or symbols on the diagram itself)| Electric Lawn Mower | EN | P06 |
| Elektrischer Rasenmäher | D | P14 |
| Tondeuse à gazon électrique | F | P22 |
| Tagliaerba elettrico | I | P30 |
| Segadora de césped eléctrica | ES | P38 |
| Corta-relvas eléctrico | PT | P46 |
| Elektrische grasmaaier | NL | P54 |
| Elektrisk plæneklipper | DK | P62 |
| Sähköinen ruohonleikkuri | FIN | P69 |
| Elektrisk gressklipper | NOR | P77 |
| Elektrisk gräsklippare | SV | P84 |
| Elektrikli çim biçme makinesi | TR | P91 |
| Нлектріко хортокоптіко | GR | P99 |
| Электрическая газонокосилка | RU | P107 |
| Original instructions EN |
| Originalbetriebsanleitung D |
| Notice originale F |
| Istruzioni originali I |
| Manual original ES |
| Manual original PT |
| Oorspronkelijke gebruiksaanwijzing NL |
| Original brugsanvisning DK |
| Alkuperäiset ohjeet FIN |
| Original driftsinstruks NOR |
| Bruksanvisning i original SV |
| Orijinal işletme talimatı TR |
| Прштотипо обнүгішв хрήσης GR |
| Оригинальное руководст-во по эксплуатации RU |
text_image
WORX ① ② ③ ④ ⑤ ⑥ ⑦ ⑧ ⑨ ⑩ ⑪ ⑫ ⑯
natural_image
Diagram of a lawn mower with a mounted tool, showing mechanical components and wiring (no text or symbols)A1A2A3
natural_image
Mechanical assembly diagram showing pipe connections and a tool (no text or symbols)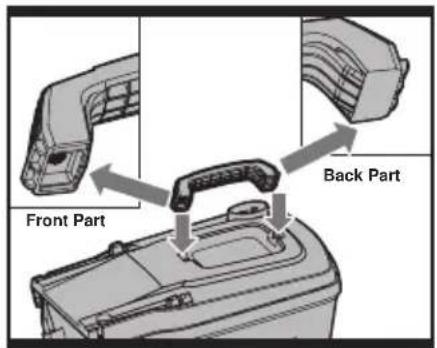
text_image
Front Part Back Part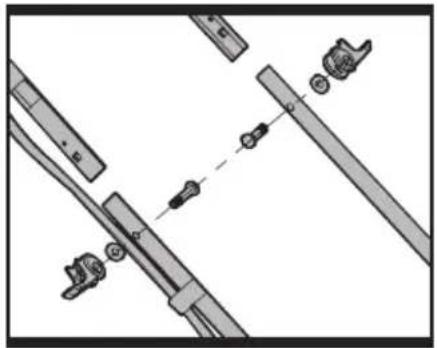
natural_image
Technical diagram showing mechanical assembly with no visible text or symbols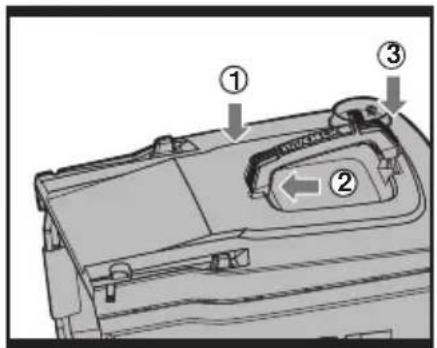
text_image
Diagram of a device's internal components with numbered labels pointing to specific areas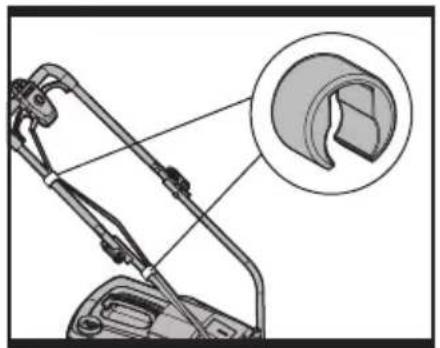
natural_image
Diagram of a mechanical arm with an inset showing a close-up of a curved component (no text or symbols present)A4B1B2
natural_image
Diagram of a car battery casing with internal components and airflow arrows indicating movement (no text or symbols)B3B4C1
natural_image
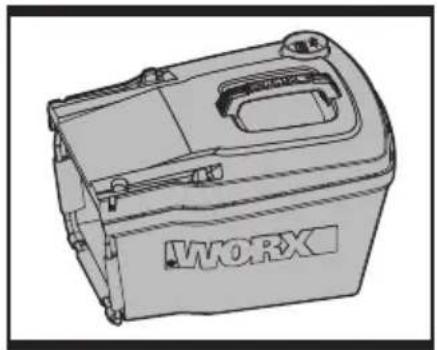
Line drawing of a WORX battery casing with handle and mounting bracket (no text or symbols on body)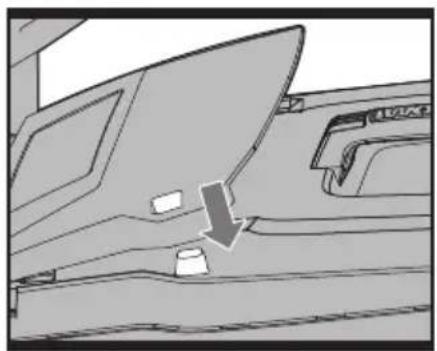
natural_image
Diagram of a car interior showing a door, seat, and window with a downward arrow indicating a component (no text or symbols present)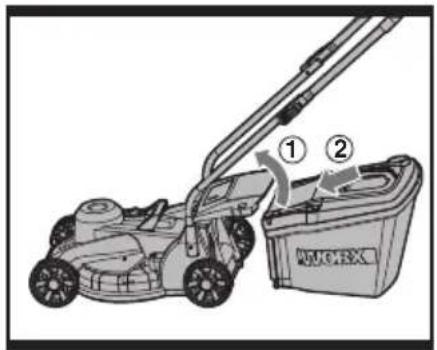
text_image
Diagram showing a lawn mower system with labeled components and directional arrows indicating movement or force.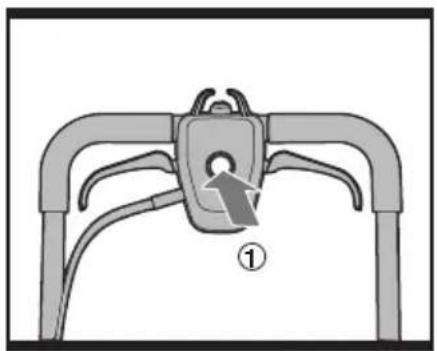
natural_image
Diagram of a bicycle seatbelt mechanism with a labeled component (①), no text or symbols present.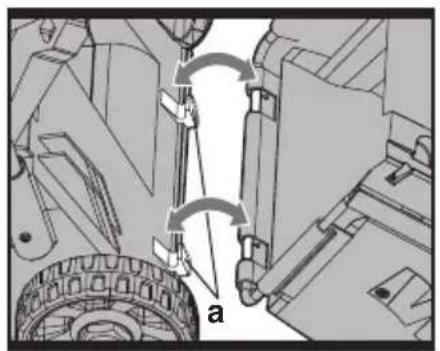
natural_image
Mechanical assembly diagram showing a vehicle with two curved arrows indicating motion or force directions, no text or symbols present.C2C3D1
text_image
Diagram showing a mechanical component with labeled parts and directional arrows indicating movement or forceD2EF

natural_image
Technical illustration of a mechanical device with two views (a and b) showing internal components, no text or symbols present.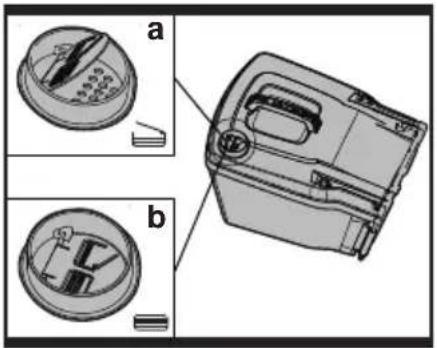
natural_image
Technical illustration of a mechanical device with two views (a and b) showing internal components, no text or symbols present.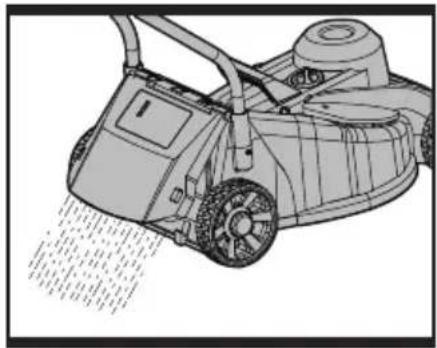
natural_image
Line drawing of a lawn mower with visible blades and wheel (no text or symbols)
natural_image
Line drawing of a lawn mower with visible blades and wheel (no text or symbols)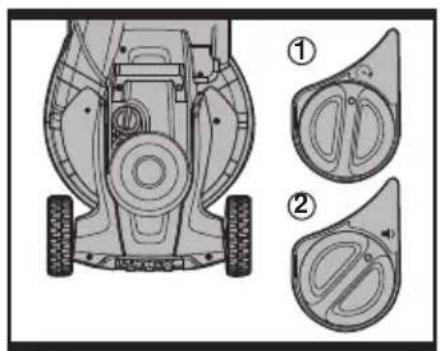
natural_image
Technical diagram of a vehicle's rear wheel assembly and two cross-sectional views (no text or labels)G
text_image
Diagram showing a lawn mower with directional arrows and labeled parts, including numbered annotations.H
text_image
14 1311
text_image
W000/0000/0000 [POSTEC]12
natural_image
Silhouette of a person pushing a mounted lawn mower (no text or symbols visible)J
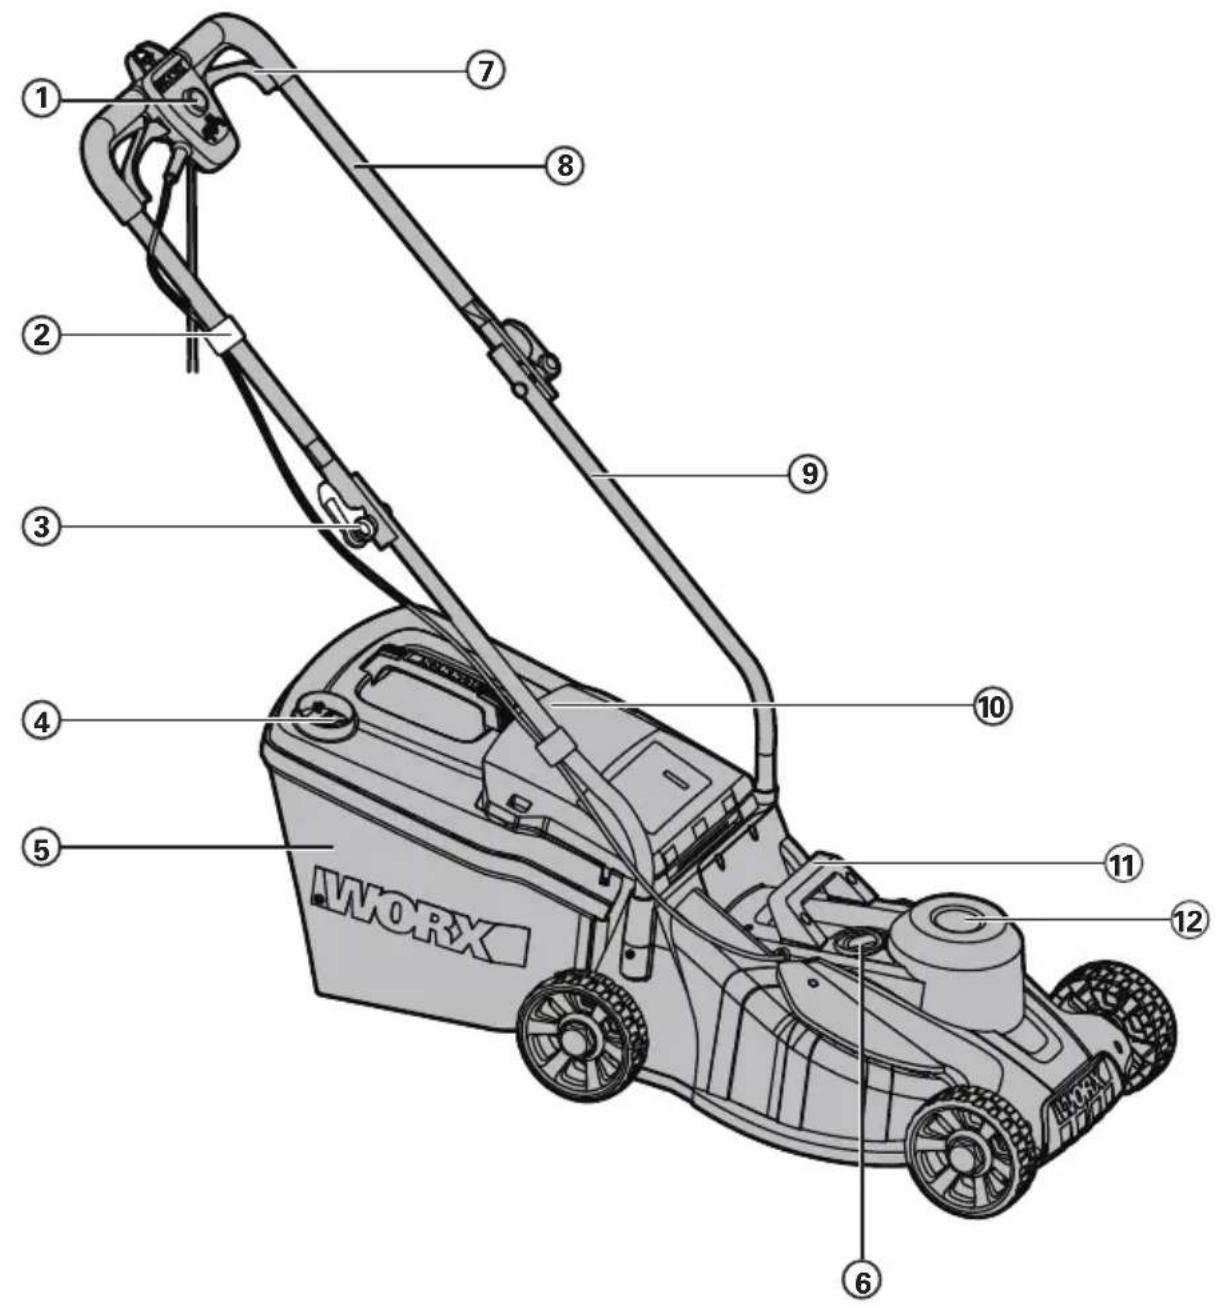
- SAFETY BUTTON
- CABLE CLIP
- LOCK CAM LEVER
- GRASS BAG FILLING INDICATOR
- GRASS COLLECTION BAG
- WORK MODE DIAL
- SWITCH LEVER
- UPPER HANDLE
- LOWER HANDLE
- SAFETY FLAP
- CARRY HANDLE
- MOTOR COVER
- BLADE BOLT (See Fig. I1)
- BLADE (See Fig. I1)
Not all the accessories illustrated or described are included in standard delivery.
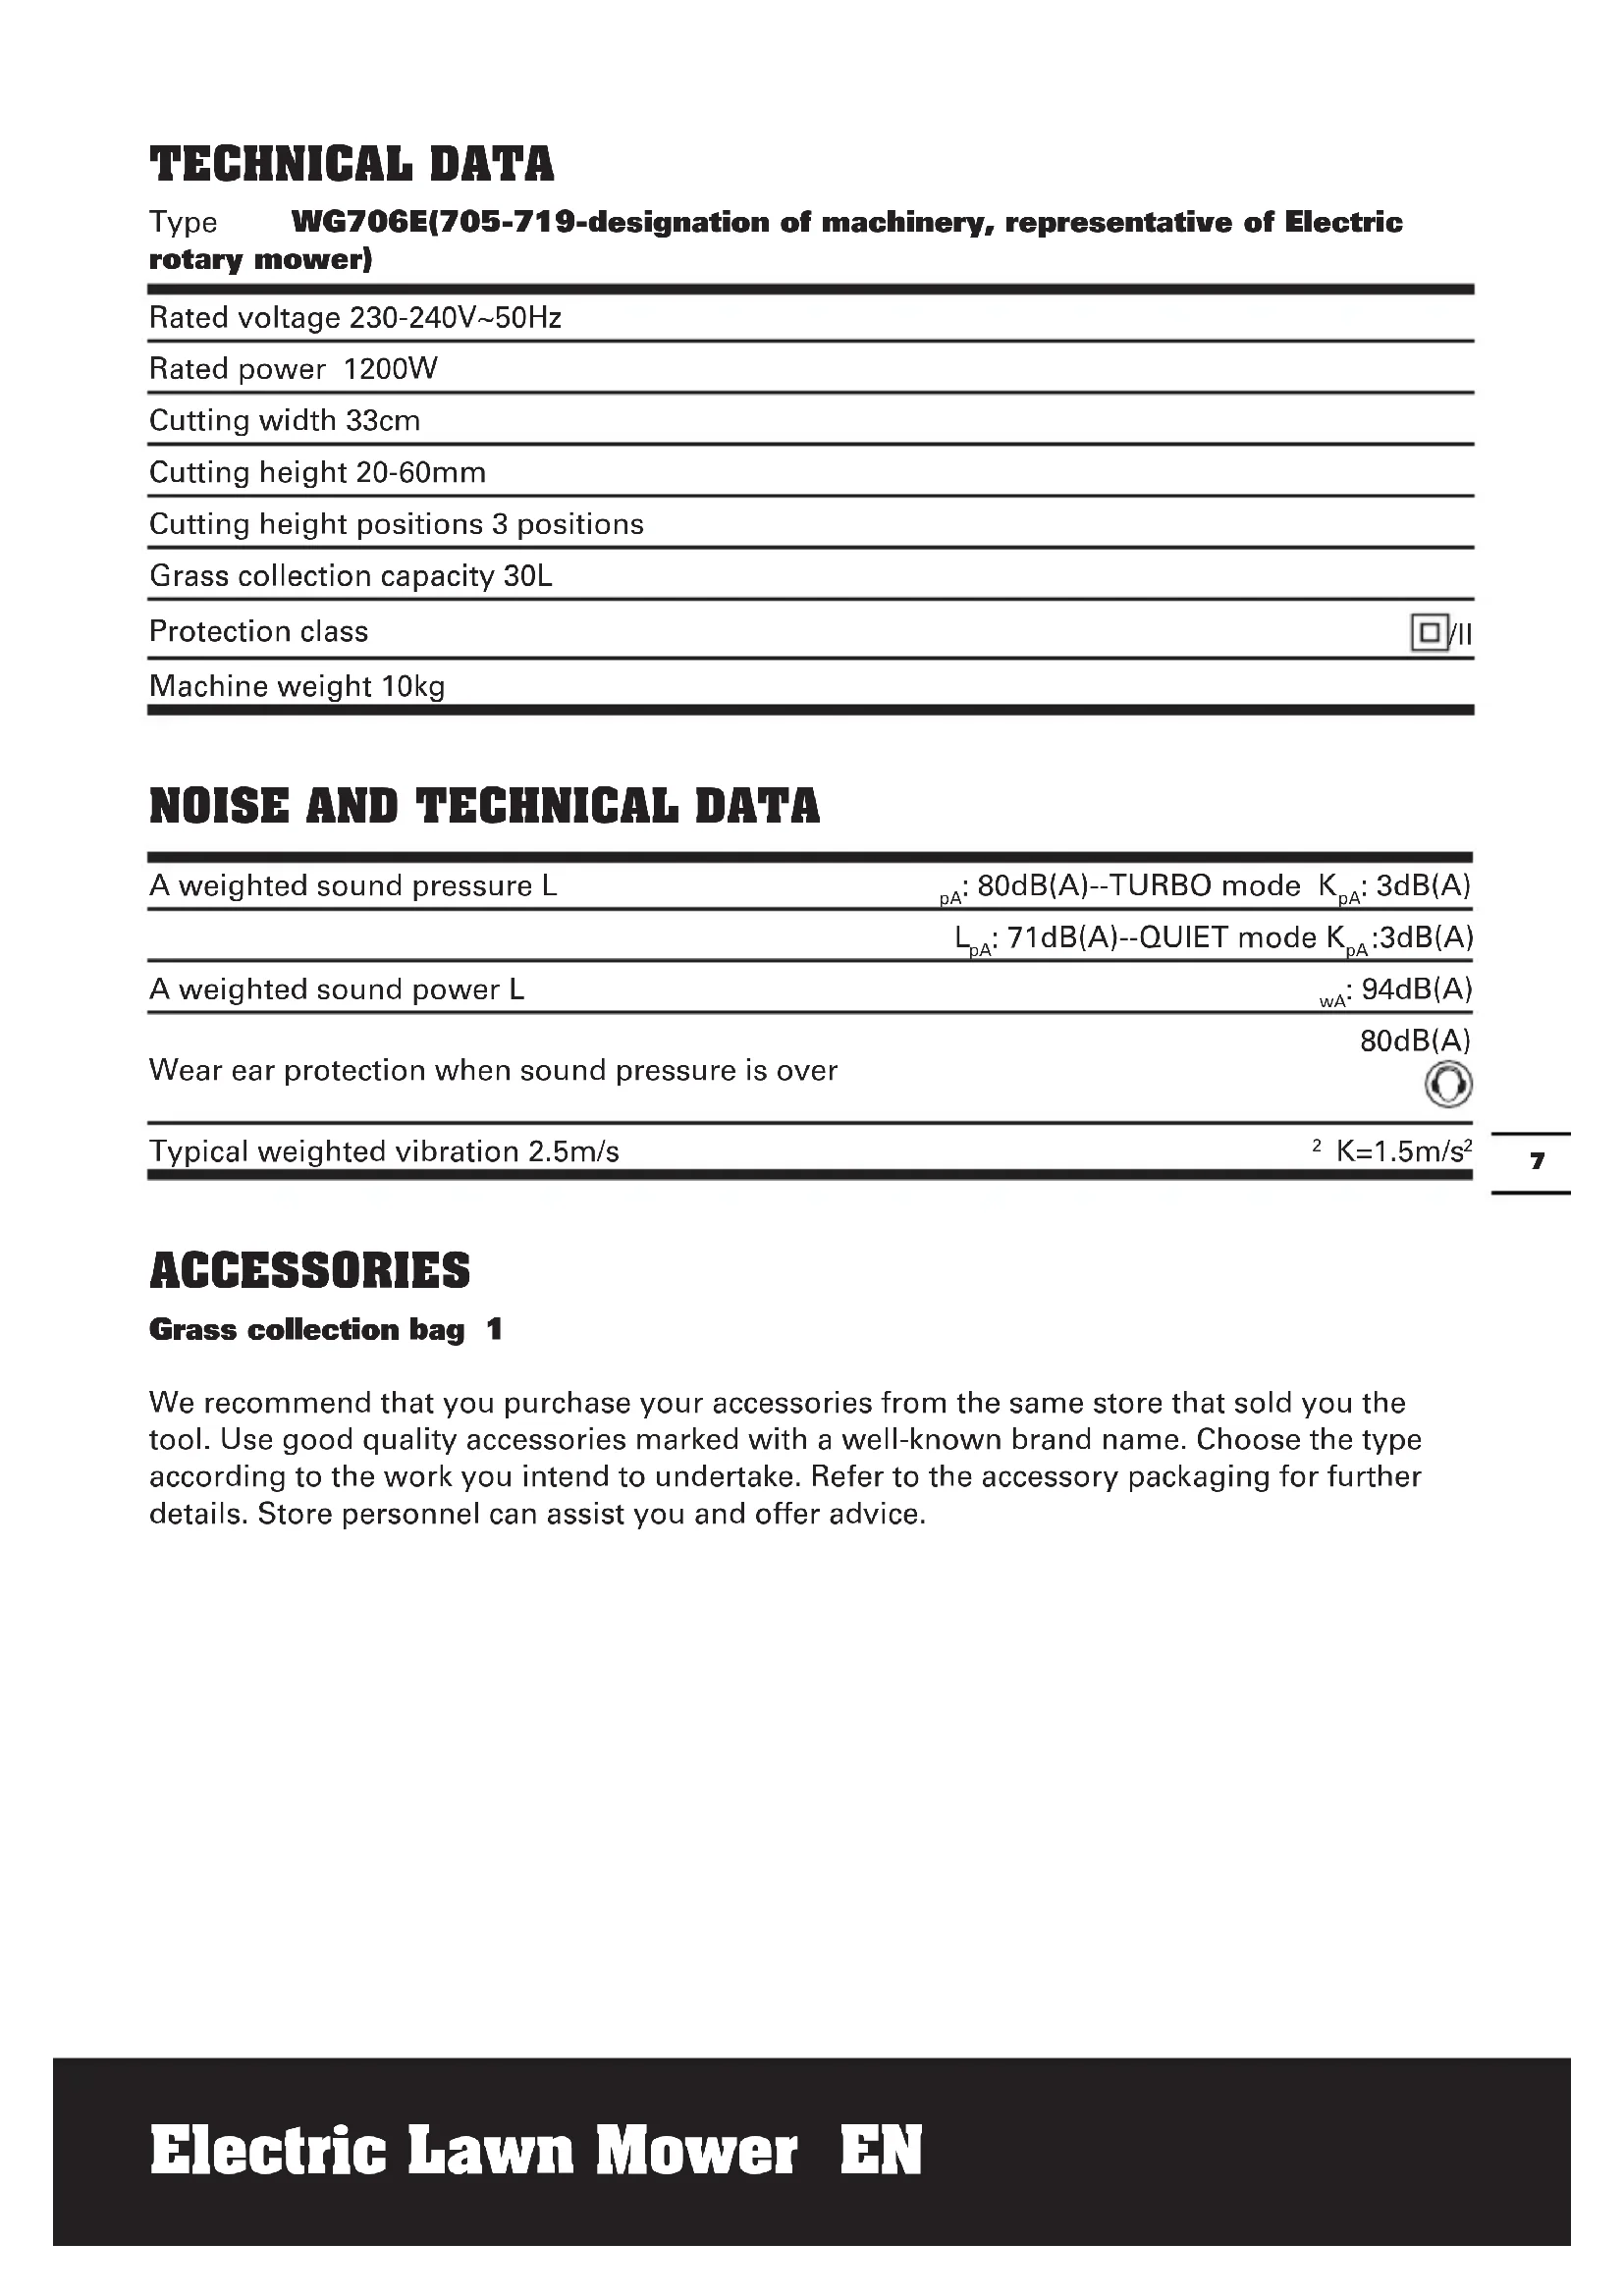
TECHNICAL DATA
Type WG706E(705-719-designation of machinery, representative of Electric rotary mower)
| Rated voltage 230-240V~50Hz |
| Rated power 1200W |
| Cutting width 33cm |
| Cutting height 20-60mm |
| Cutting height positions 3 positions |
| Grass collection capacity 30L |
| Protection class |
| Machine weight 10kg |
NOISE AND TECHNICAL DATA
| A weighted sound pressure L | _pA : 80dB(A)--TURBO mode K_pA : 3dB(A) |
| L_pA : 71dB(A)--QUIET mode K_pA :3dB(A) | |
| A weighted sound power L | _wA : 94dB(A) |
| Wear ear protection when sound pressure is over | 80dB(A) |
| Typical weighted vibration 2.5m/s | ^2 K=1.5m/s^2 |
ACCESSORIES
Grass collection bag 1
We recommend that you purchase your accessories from the same store that sold you the tool. Use good quality accessories marked with a well-known brand name. Choose the type according to the work you intend to undertake. Refer to the accessory packaging for further details. Store personnel can assist you and offer advice.
GENERAL POWER TOOL SAFETY WARNINGS

WARNING! Read all safety warnings and all instructions.
Failure to follow the warnings and instructions may result in electric shock, fire and/or serious injury.
Save all warnings and instructions for future reference.
- This appliance is not intended for use by persons (including children) with reduced physical, sensory or mental capabilities, or lack of experience and knowledge, unless they have been given supervision or instruction concerning use of the appliance by a person responsible for their safety.
- Children should be supervised to ensure that they do not play with the appliance. If the supply cord is damaged, it must be replaced by the manufacturer, its service agent or similarly qualified persons in order to avoid a hazard.
TRAINING
1) Read the instructions carefully. Be familiar with the controls and the proper use of the equipment;
2) Never allow children or people unfamiliar with these instructions to use the lawnmower. Local regulations can restrict the age of the operator;
3) Never mow while people, especially children, or pets are nearby;
4) Keep in mind that the operator or user is responsible for accidents or hazards occurring to other people or their property.
PREPARATION
1) While mowing, always wear substantial footwear and long trousers. Do not operate the equipment when barefoot or wearing open sandals;
2) Thoroughly inspect the area where the equipment is to be used and remove all objects which can be thrown by the machine;
3) Before using, always visually inspect to see that the blades, blade bolts and cutter
assembly are not worn or damaged. Replace worn or damaged blades and bolts in sets to preserve balance;
4) On multi-bladed machines, take care as rotating one blade can cause other blades to rotate.
OPERATION
1) Mow only in daylight or in good artificial light;
2) Avoid operating the equipment in wet grass, where feasible;
3) Always be sure of your footing on slopes;
4) Walk, never run;
5) For wheeled rotary machines, mow across the face of slopes, never up and down;
6) Exercise extreme caution when changing direction on slopes;
7) Do not mow excessively steep slopes;
8) Use extreme caution when reversing or pulling the lawnmower towards you;
9) Stop the blade(s) if the lawnmower has to be tilted for transportation when crossing surfaces other than grass, and when transporting the lawnmower to and from the area to be mowed;
10) Never operate the lawnmower with defective guards, or without safety devices, for example deflectors and/or grass catchers, in place;
11) Switch on the motor carefully according to instructions and with feet well away from the blade(s);
12) Never pick up or carry a lawnmower while the engine is running;
13) Do not put hands or feet near rotating parts while the lawnmower is being operated;
14) Stop the motor and disconnect the plug from the mains.
- Before checking, cleaning or working on the lawnmower;
- After striking a foreign object, Inspect the lawnmower for damage and make repairs before restarting and operating the lawnmower;
- If lawnmower starts to vibrate abnormally (check immediately);
MAINTENANCE AND STORAGE
1) Keep all nuts, bolts and screws tight to be sure the equipment is in safe working condition;
2) Check the grass catcher frequently for wear or deterioration;
3) Replace worn or damaged parts for safety.
4) Be careful during adjustment of the machine to prevent entrapment of the fingers between moving blades and fixed parts of the machine.

WARNING:
- Not to use the lawnmower if the cords are damaged or worn.
- Not to connect a damaged cord to the supply or touch a damaged cord before it is disconnected from the supply. A damaged cord can lead to contact with live parts.
- Not to touch the blades before the machine is disconnected from the supply and the blades have come to a complete stop.
- To keep extension cords away from the blades. The blades can cause damage to the cords and lead to contact with live parts.
- To disconnect the supply (i.e, pulling the plug from the socket)
- Whenever leaving the machine unattended,
- Before clearing a blockage,
- Before checking, cleaning or working on the machine,
- After striking a foreign object,
- Whenever the machine starts vibrating abnormally.
- To carefully read the instructions for the safe operation of the machine;
- Recommendations:
- Always connect the appliance to a supply circuit protected by a residual current device (RCD) with a tripping current of not more than 30mA.
SYMBOLS

Read instruction handbook before operation this machine.
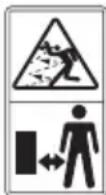
Keep bystanders away

Blade continues to rotate after the machine is switched off. Wait until all machine components have completely stopped before touching them.
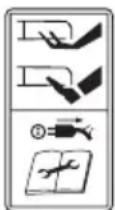
Beware of sharp blades. Blades continue to rotate after the motor is switched off.
Remove plug from mains before maintenance or if cord is damaged.
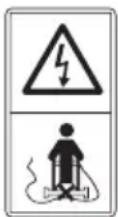
Keep the supply flexible cord away form the blades.
This product has been marked with a symbol relating to removing electric and electronic waste. This means that this product shall not be discarded with household waste but that it shall be returned to a collection system which conforms to the European Directive 2002/96/CE. It will then be recycled or dismantled in order to reduce the impact on the environment. Electric and electronic equipment can be hazardous for the environment and for human health since they contain hazardous substances.
INTENDED USE
This product is intended for domestic lawn mowing.
ASSEMBLY
IMPORTANT! Before you assemble the lawn mower, check the accessories according above information, make sure the accessories are completed.
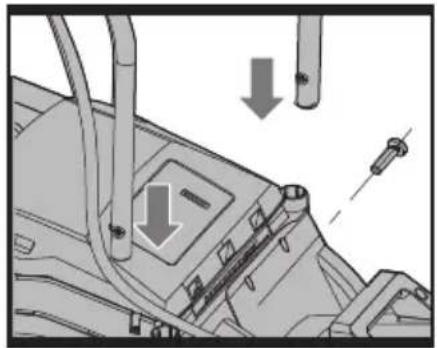
1. FITTING THE HANDLE (See Fig. A1, A2, A3, A4)
1) Remove the screws (X2) on the both side of deck (See Fig. A1).
2) Insert the lower handle (9) into the holes provided.
3) Secure with the screws provided (See Fig. A2).
4) Attach the upper handle (8) with the bolts and lock cam lever (3) to the lower handle (9) (See Fig. A3).
5) Tightening the two Lock cam levers. Check that the handle is FULLY secured.
The cam lever pressure can be adjusted by adjusting the lock cam lever (3) clockwise/counter-clockwise. DO NOT OVER TIGHTEN.
NOTE: Ensure the bolts are fully inserted through the handles before fitting the handle knobs.
6) Attach the cable clips (2) provided, to the upper and lower handle. Insert the cable into the clips ensuring there is enough cable slack (See Fig. A4).
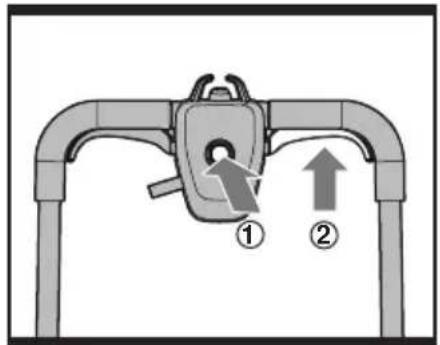
2. GRASS COLLECTION BAG ASSEMBLY
Connect the grass box handle to the box top as shown in Fig B1-B4.
Step 1. Press the front of the handle briefly (See Fig. B2).
Step 2. Then push it forward (See Fig. B2).
Step 3. Push down the back of the handle (See Fig. B2).
Step 4. Clip the plastic clips over the metal frame (See Fig. B3).
WARNING: Don't fit the handle in reversed direction. Fit the handle as shown in Fig B1.
3. GRASS COLLECTION BAG FITTING (See Fig. C1, C2, C3)
1) Turn the mower off, wait until blade stops.
2) Raise the safety flap (10) and hold it up.
3) Pick up the grass bag by the handle, and position grass bag on the lower hooks (a) on the mower deck (See Fig. C2).
4) Release the safety guard to lock the grass bag into position. Ensure the grass bag is installed securely (See Fig. C3).
NOTE: Depress the grass bag slightly to ensure that it is completely installed.
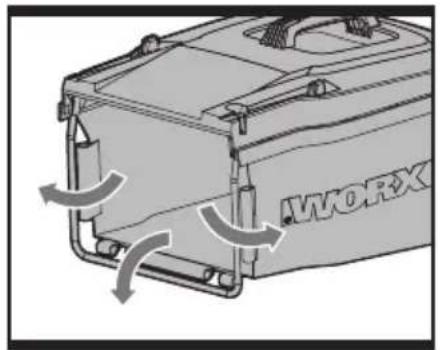
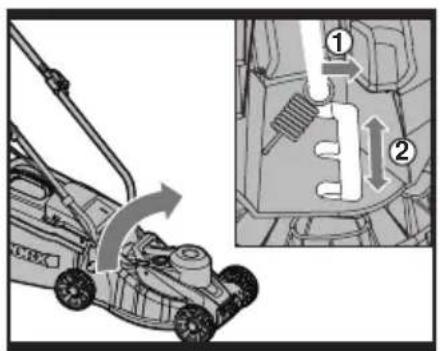
4. REMOVING/EMPTYING
Hold the grass bag, lift the safety flap (10) and hold up. Remove grass bag (5).
WARNING! Always check the safety flap can close the discharge outlet tightly before using. Never lift the safety flap (10) when the lawn mower is being used without fitted grass bag.
OPERATION
1. STARTING AND STOPPING (See Fig. D1, D2)
STARTING
Connect the plug to the mains and switch ON. The switch box is provided with a lock-off button to prevent accidental starting. With one hand press and hold the safety button (D1), with the other hand squeeze the switch lever (D2) towards the handle, and release the safety lock-off button. The machine is now started, wait until the product is at full speed before cutting the grass. Then use both your hands to hold the switch lever on both sides to keep it running.
STOPPING
Release the switch lever.
2. HOW TO MOW
For cutting convenience, it may be best to start mowing at a point close to the power supply and to work your way away from the supply. Mow the lawn at a right angle from the power supply and place the power cable to side which has already been cut.
NOTE: The motor is protected by a safety cut out which is activated when the
blade becomes jammed or if the motor is overloaded. When this occurs stop, remove the plug from the owner supply. Release the switch lever, Clear any obstruction, then restart it. If the mower cuts out again increase the height of cut to reduce the load on the motor.

WARNING! When mowing do not
allow the motor to labor particularly in heavy conditions. When the motor labors the speed of the motor drops and you will hear a change in the motor sound, when this occurs, stop mowing, release the switch lever and raise the height of cut. Failure to do so could damage the machine.
3. GRASS BAG FILLING INDICATOR (See Fig. E)
To remind you immediately to empty when the grass bag is full, we provide an indicator on the top of bag. And you can follow as below:
Empty status: Flap float (a)

Fully status: Flap fall down (b)

4. REAR DISCHARGE (See Fig. F)
The mower provides a rear discharge function, so that you can mower without bag collection. The debris will be discharged from the rear chute.
5. WORK MODE DIAL (See Fig. G) Status1: TURBO mode

Set the dial to TURBO mode when cutting dense or overgrown grass.
Status2: QUIET mode

Select QUIET mode when mowing in everyday conditions, removing approximately 20mm of grass at a time.
IMPORTANT! The TURBO function is only activated when mowing. When select TUROB or Quiet mode, the motor speed will have a change when mowing.
6. ADJUSTING THE CUTTING HEIGHT (See Fig. H)
WARNING! Before adjusting the mower height, wait for the mower to completely stop. Mower blades continue to rotate after the machine is switched off and a rotating blade can cause injury. Wait until all machine components have completely stopped before touching them.
Before your first cut, adjust the mower cutting depth to the desired position. The lawnmower can be set to 3 cutting heights between 20mm and 60mm.
Grip one wheel and pull it out of the groove and reposition it in the required height. All other wheels should be positioned at the same height.
MAINTENANCE
Remove the plug from the socket before carrying out any adjustment, servicing or maintenance.
Your power tool requires no additional lubrication or maintenance.
There are no user serviceable parts in your power tool. Never use water or chemical cleaners to clean your power tool. Wipe clean with a dry cloth. Always store your power tool in a dry place. Keep the motor ventilation slots clean. Keep all working controls free of dust. Occasionally you may see sparks through the ventilation slots. This is normal and will not damage your power tool.
If the supply cord is damaged, it must be replaced by the manufacturer, its service agent or similarly qualified persons in order to avoid a hazard.
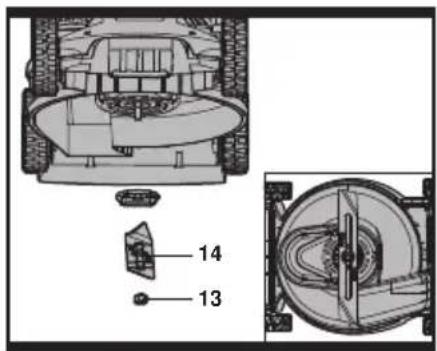
BLADE MAINTENANCE (See Fig. I1, I2)
WARNING! Never carry out any assembly operations or adjustments with the power connected to the mower.
Always ensure that the power button is in the off position and that the power plug is disconnected from the supply.
Always handle the blade with care-sharp edges could cause injury use gloves.
Follow these procedures to remove and replace the blade. You will need garden gloves (not provided) and a spanner wrench (not provided) to remove the blade. Hold the blade (14) and unscrew the blade bolt (13) anticlockwise using a spanner wrench.
Remove blade and attach a new one to the blade bolt.
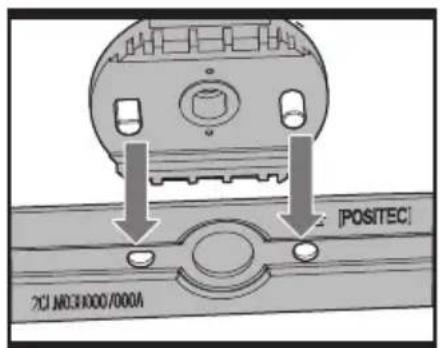
Ensure that the blade is properly positioned as seen in Fig.1, then firmly tighten the bolt. Do
not over tighten.
Renew your metal blade after 50hrs mowing or 2 years, which ever is the sooner-regardless of condition.
If the blade is cracked or damaged replace it with a new one.
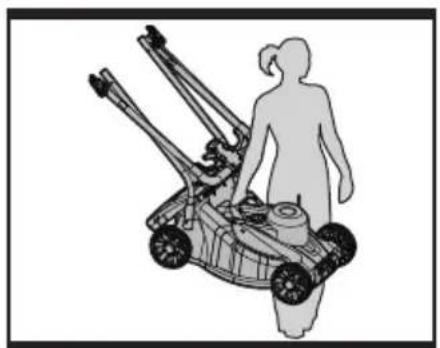
STORAGE: (See Fig. J)
Clean the exterior of the machine thoroughly using a soft brush and cloth. Do not use water, solvents or polishes. Remove all grass and debris, especially from the ventilation slots.
Turn the machine on its side and clean the blade area. If grass cuttings are compacted in the blade area, remove with a wooden or plastic implement.
Store the machine in a dry place. Do not place other objects on top of the machine.
To aid storage loosen the handle knobs and fold the handles.
You could carry the mower by carry handle (11).
Ensure cables are not stuck or entangled when folding or unfolding upper handles. Do not drop the handles.
ENVIRONMENTAL PROTECTION

This product has been marked with a symbol relating to removing electric and electronic waste. This means that
this product shall not be discarded with household waste but that it shall be returned to a collection system which conforms to the European Directive 2002/96/CE. It will then
be recycled or dismantled in order to reduce the impact on the environment. Electric and electronic equipment can be hazardous for the environment and for human health since they contain hazardous substances.
PLUG REPLACEMENT (UK & IRELAND ONLY)
If you need to replace the fitted plug then follow the instructions below.
IMPORTANT
The wires in the mains lead are colored in accordance with the following code:
Blue = Neutral
Brown = Live
As the colors of the wires in the electrical cord of this appliance may not correspond with the colored markings identifying the terminals in your plug, proceed as follows. The wire which is colored blue must be connected to the terminal which is marked with N. The wire which is colored brown must be connected to the terminal which is marked with L.

WARNING! Never connect live or
neutral wires to the earth terminal of the plug. Only fit an approved 13ABS1363/A plug and the correct rated fuse.
NOTE: If a moulded plug is fitted and has to be removed take great care in disposing of the plug and severed cable, it must be destroyed to prevent engaging into a socket.
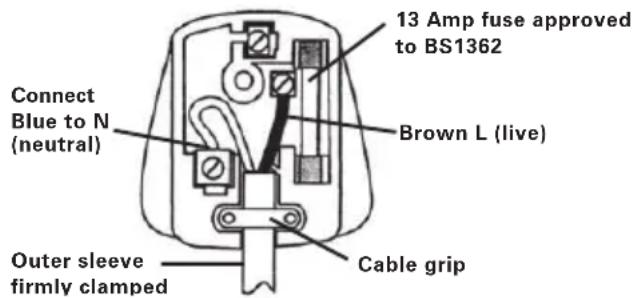
text_image
13 Amp fuse approved to BS1362 Brown L (live) Connect Blue to N (neutral) Cable grip Outer sleeve firmly clampedDECLARATION OF CONFORMITY
We,
POSITEC Germany GmbH
Declare that the product
Description WORX Electrical Lawn Mower
Type WG706E(705-719-designation of machinery, representative of Electric rotary mower)
Function Mowing grass
Complies with the following Directives,
Machinery Directive 2006/42/EC
Electromagnetic Compatibility Directive
2004/108/EC
RoHS Directive 2011/65/EU
Noise Emission in the Environment by
Equipment for Use Outdoors Directive
2000/14/EC amended by 2005/88/EC
Conformity assessment procedure as per
Annex VI.
Measured Sound Power Level 90dB(A)
Declared Guaranteed Sound Power Level
94dB(A)
The notified body involved
Name: Intertek Testing & Certification Ltd
Address: Davy Avenue, Knowlhill, Milton Keynes, MK5 8NL
Standards conform to,
EN 60335-1 EN 60335-2-77
EN 55014-1 EN 55014-2
EN 61000-3-3 EN 61000-3-2
EN ISO 3744 EN 62233
The person authorized to compile the technical file,
Name: Russell Nicholson
Address: Positec Power Tools (Europe)
Ltd, PO Box 152, Leeds, LS10 9DS, UK
$$ \text {ko.yue} $$

text_image
C€2013/01/07
Leo Yue
POSITEC Quality Manager
Name: Intertek Testing & Certification Ltd Anschrift: Davy Avenue, Knowlhill, Milton Keynes, MK5 8NL
Normen:
EN 60335-1 EN 60335-2-77
EN 55014-1 EN 55014-2
EN 61000-3-3 EN 61000-3-2
EN ISO 3744 EN 62233
The person authorized to compile the technical file,
DÉCLARATION DE CONFORMITÉ
Nous,
POSITEC Germany GmbH
Directive RoHS 2011/65/EU
Nom: Intertek Testing & Certification Ltd Adresse: Davy Avenue, Knowlhill, Milton Keynes, MK5 8NL
Et conforme aux normes:
EN 60335-1 EN 60335-2-77
EN 55014-1 EN 55014-2
EN 61000-3-3 EN 61000-3-2
EN ISO 3744 EN 62233
Nome: Intertek Testing & Certification Ltd Morada: Davy Avenue, Knowlhill, Milton Keynes, MK5 8NL
Ltd, PO Box 152, Leeds, LS10 9DS, UK

text_image
keo.yue2013/01/07
Leo Yue
Gestor de Qualidade POSITEC
- VEILIGHEIDSKNOP
- ELEKTRICITEITSSNOERKLEMMEN
- BLOKKERENDE CAMHENDEL
- INDICATOR VULNIVEAU GRASZAK
- GRASOPVANGZAK
- WERKMODUSSCHAKELAAR
- SCHAKELHENDEL
- BOVENSTE HANDVAT
- ONDERSTE HANDVAT
- VEILIGHEIDSFLAP
- DRAAGGREEP
- MOTORAFDEKKING
- BOUT VOOR HET MES (Zie I1)
- ZAAGBLAD (Zie I1)
ALGEMENE VEILIGHEIDS WAARSCHUWINGEN VOOR VERMOGENSMACHINE

richting. Monteer de handgreep zoals getoond in Fig B1.
3. MONTAGE AN DE GRASZAK (Zie C1, C2, C3)
4. ACHTERAFVOER (Zie F)
Naam: Intertek Testing & Certification Ltd Adres: Davy Avenue, Knowlhill, Milton Keynes, MK5 8NL
Standaards in overeenstemming met,
EN 60335-1 EN 60335-2-77
EN 55014-1 EN 55014-2
EN 61000-3-3 EN 61000-3-2
EN ISO 3744 EN 62233
Navn:Intertek Testing & Certification Ltd Adresse: Davy Avenue, Knowlhill, Milton Keynes, MK5 8NL
Standarder i overensstemmelse med:
EN 60335-1 EN 60335-2-77
EN 55014-1 EN 55014-2
EN 61000-3-3 EN 61000-3-2
EN ISO 3744 EN 62233
Adresse Positec Power Tools (Europe) Ltd, PO Box 152, Leeds, LS10 9DS, UK
$$ \text {ko.yue} $$

text_image
C€2013/01/07
Leo Yue
Nimi: Intertek Testing & Certification Ltd
Osoite: Davy Avenue, Knowlhill, Milton Keynes, MK5 8NL
ADVARSEL! Kontroller at
KNIV-VEDLIKEHOLD (Se I1, I2)

Navn: Intertek Testing & Certification Ltd Adresse: Davy Avenue, Knowlhill, Milton Keynes, MK5 8NL
Adresse Positec Power Tools (Europe) Ltd, PO Box 152, Leeds, LS10 9DS, UK
$$ \text {leo.yue} $$

text_image
C€2013/01/07
Leo Yue
Namn: Intertek Testing & Certification Ltd Adress: Davy Avenue, Knowlhill, Milton Keynes, MK5 8NL
Adi: Intertek Testing & Certification Ltd Adres: Davy Avenue, Knowlhill, Milton Keynes, MK5 8NL
text_image
WORX it's your natureCopyright © 2013, Positec. All Rights Reserved. 2GLM11APK11001A2