
WG914 - Lawn mower WORX - Free user manual and instructions
Find the device manual for free WG914 WORX in PDF.


| Product Type | Cordless Grass Trimmer |
| Brand | Worx |
| Model | WG914 (also referred to as WG183 / WG183.9) |
| Voltage | 40 V MAX (2 × 20 V Max)** |
| No-Load Speed | 6800 min⁻¹ |
| Cutting Diameter | 15 inches |
| Line Diameter | 0.065 inches (1.65 mm) |
| Line Length | 16 ft (dual-exit) |
| Machine Weight | 6.4 lbs (with batteries) / 4.7 lbs (without batteries) |
| Battery Type | Lithium-Ion |
| Battery Model | WA3525 (2.0 Ah) – 2 batteries required |
| Charger Model | WA3770 |
| Charging Time | Approx. 55 min for one 2.0 Ah battery; 130 min for two batteries (using dual-output charger) |
| Charger Rating | Input: 120 V~60 Hz, 150 W; Output: 120 V=±0 A (per port)** |
| Cutting Mechanism | Automatic line feed + manual feed button |
| Adjustable Handle | Yes, auxiliary handle with adjustment knob |
| Safety Guard | Included |
| Included Accessories | Battery pack(s) (2 or 1 per model), charger, spool, spool cap, safety guard, auxiliary handle |
| Spool Capacity | Approx. 16 ft of 0.065 in line (dual-exit) |
| Line Feed System | Automatic upon restart; manual button also available |
| Storage | Wall hanging slot provided |
| Operating Temperature Range | 0 °C – 45 °C (use & storage); charging 0 °C – 40 °C |
| Maintenance | No user serviceable parts; clean with dry cloth; keep ventilation slots clean |
| Safety Certifications | Complies with California Proposition 65 (lead and DEHP warning) |
Frequently Asked Questions - WG914 WORX
User questions about WG914 WORX
0 question about this device. Answer the ones you know or ask your own.
Ask a new question about this device
Download the instructions for your Lawn mower in PDF format for free! Find your manual WG914 - WORX and take your electronic device back in hand. On this page are published all the documents necessary for the use of your device. WG914 by WORX.
USER MANUAL WG914 WORX
Cordless Grass Trimmer
EN
P02
F
P15
PRODUCT SAFETY

WARNING: This product can expose you to chemicals including lead and Dl
(2-ethylhexyl) phthalate (DEHP) which are known to the State of California to cause cancer and birth defects or other reproductive harm. For more information go to www.P65Warnings.co.gov.
IMPORTANT SAFETY INSTRUCTIONS
WARNING: Read all safety warnings and instructions. Failure to follow the warnings and instructions may result in electric shock, fire and/or serious injury. WARNING: Read all instructions
FOR ALL APPLIANCES
1) Avoid Dangerous Environment - Don't use appliances in alarm or wet locations.
2) Don't Use In Rain.
3) Keep Children Away - All visitors should be kept at a distance from work area.
4) Dress Properly - Do not wear loose clothing or jewelry. They can be caught in moving parts. Use of rubber gloves and substantial footwear is recommended when working outdoors. Wear protective hair covering to contain long hair.
5) Use Safety Glasses - Always use face or dust mask if operation is dusty.
6) Use Right Appliance - Do not use appliance for any job except that for which it is intended.
7) Don't Force Appliance - It will do the job better and with less likelihood of a risk of injury at the rate for which it was designed.
8) Don't Overreach - Keep proper footing and balance at all times
9) Stay Alert - Watch what you are doing. Use common sense. Do not operate appliance when you are tired.
10) Store Idle Appliances Indoors - When not in use, appliances should be stored indoors in dry, and high or locked-up place - out of reach of children.
11) Maintain Appliance With Care - Keep cutting edge sharp and clean for best performance and to reduce the risk of injury. Fellow instructions for lubricating and changing accessories. Keep handles dry, clean, and free from oil and grease.
12) Check Damaged Parts - Before further use of the appliance, a guard or other part that is damaged should be carefully checked to determine that it will operate properly and perform its intended function. Check for alignment of moving parts, binding of moving parts, breakage of parts, mounting, and any other condition that may affect its operation. A guard or other part that is damaged should be properly repaired or replaced by an authorized service center unless indicated elsewhere in this manual.
FOR ALL BATTERY - OPERATED GARDENING
- Prevent unintentional starting. Ensure the switch is in the off-position before connecting to battery pack, picking up or carrying the appliance. Carrying the appliance with your finger on the switch or energizing appliance that have the switch on invites accidents.
battery pack may create a risk of fire when used with another battery pack.
-
Use appliances only with specifically designated battery packs. Use of any other battery packs may create a risk of injury and fire.
-
When battery pack is not in use, keep it away from other metal objects, like paper clips, coins, keys, nails, screws or other small metal objects, that can make a connection from one terminal to another. Shorting the battery terminals together may cause burns or a fire.
-
Under abusive conditions, liquid may be ejected from the battery; avoid contact. If contact accidentally occurs, flush with water. If liquid contacts eyes, additionally seek medical help. Liquid ejected from the battery may cause irritation or burns.
-
Do not use a battery pack or appliance that is damaged or modified. Damaged or modified batteries may exhibit unpredictable behavior resulting in fire, explosion or risk of injury.
-
Do not expose a battery pack or appliance to fire or excessive temperature. Exposure to fire or temperature above 130°C may cause explosion.
-
Follow all charging instructions and do not charge the battery pack or appliance outside of the temperature range specified in the instructions. Charging improperly or at temperatures outside of the specified range may damage the battery and increase the risk of fire.
-
Have servicing performed by a qualified repair person using only identical replacement parts. This will ensure that the safety of the product is maintained.
-
Do not modify or attempt to repair the appliance or the battery pack (as applicable) except as indicated in the instructions for use and care.
ADDITIONAL SAFETY RULES FOR LAWN TRIMMER AND EDGE TRIMMER
-
Keep guards in place and in good working order.
-
Keep hands and feet away from cutting area.
-
Do not use heavier lines than recommended in this manual.
-
Do not use line materials of other types – for example, metal wire, rope, and the like.
SAFETY WARNINGS FOR BATTERY PACK
a) Do not dismantle, open or shred battery pack. b) Do not expose battery pack to heat or fire. Avoid storage in direct sunlight.
c) Do not short-circuit a battery pack. Do not store battery packs haphazardly in a box or drawer where they may short-circuit each other or he short-circuited by other metal objects. When battery pack is not in use, keep it away from other metal objects, like paper clips, coins, keys, nails, screws or other small metal objects, that can make a connection from one terminal to another. Shorting the battery terminals together may cause burns or fire.
 | Wear protective gloves |
 | Make sure the battery is removed prior to changing accessories. |
 | Trimming |
 | Lock |
 | Unlock |
| [WT6Z] | Correct |
| [0TKT] | Incorrect |
| [HW6K] | Do not burn |
| [XTHS] | Batteries may enter water cycle if disposed improperly, which can be hazardous for ecosystem. Do not dispose of waste batteries as unported municipal waste. |
 | call ②recycle POST/TEC Inc. has established a partnership with the WIKC Corporation to recycle any Postsec batteries with the RAKC call/2recycle seal. For environmental protection, please do not discard batteries in the trash. After the batteries' life cycle is ended, then please call 1-800-822-8537 for a free service that will properly dispose of the battery. |
4
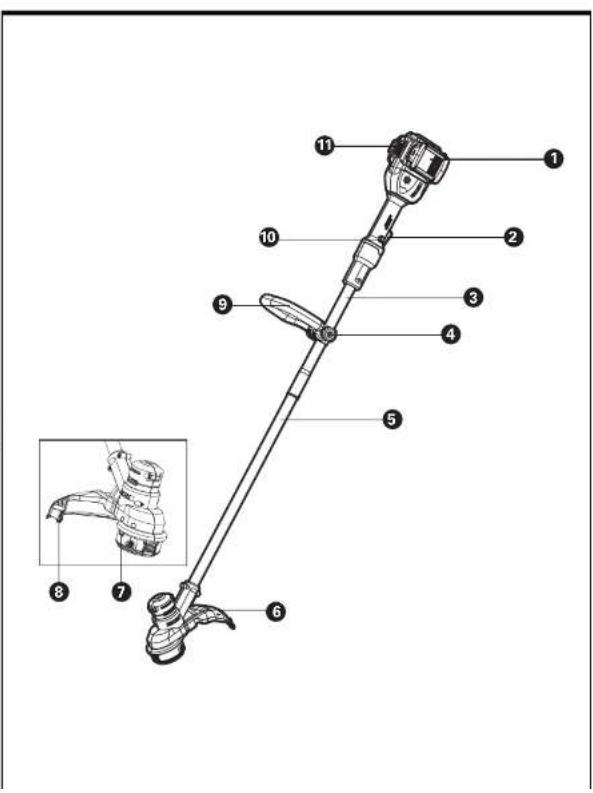
COMPONENT LIST
| 1. BATTERY PACK * |
| 2. ON/OFF SWITCH |
| 3. UPPER SHAFT |
| 4. HANDLE ADJUSTMENT KNOS |
| 5. LOWER SHAFT |
| 6. SAFETY GUARD |
| 7. LINE FEED BUTTON |
| 8. LINE CUTTER |
| 9. AUXILIARY HANDLE |
| 10. LOCK OFF SWITCH |
| 11. BATTERY INDICATOR LIGHT |
| 12. CUTTING HEAD (SEE FIG.I) |
| 13. SPOOL CAP (SEE FIG. J) |
| 14. CAP RELEASE LATCH (SEE FIG. J) |
| 15. SPOOL (SEE FIG.J) |
| 16. EYELET (SEE FIG.J) |
* Not all the accessories illustrated or described are included in standard delivery.
| Charging time (approx.) | ||
| Battery pack: | / | |
| 2.0Ah (1pc) | 55mins | |
| 2.0Ah (2pcs) | 130mins | |
| Machine Weight | 6.4 lbs | 4.7 lbs |
**Voltage measured without workload. Initial battery voltage reaches maximum of 20 volts. Nominal voltage is 18 volts. *** Charger output 1 and output 2 mean two pons with the same output voltage and current.
ACCESSORIES
| WG183 | WG183.9 | |
| Battery pack (WA3525) | 2 | / |
| Charger (WA3770) | 1 | / |
| Spool (WA0007) | 1 | 1 |
| Spool cap(WA0216) | 1 | 1 |
| Safety guard | 1 | 1 |
| Auxiliary handle | 1 | 1 |
Only use the appropriate accessories intended for this tool. Accessory information can be found on the product packaging, at a Work dealer or on our website at www.won.com
TECHNICAL DATA
| W0183 W0183.9 | ||
| Voltage 40 V MAX(2x20V Max)** | ||
| No Load Speed 6800 min | ||
| Cutting Diameter 15" | ||
| Line Diameter 0.0-65" | ||
| Line length | 16 ft (Dual-Exit) | |
| Battery type | Lithium-ion | / |
| Battery Modal | WA3625 (2.0 Ah) | / |
| Charger Modal | WA3770 | / |
| Charger rating | Input: 120 V~60 Hz, 150 WOutput: 120 V=±0 A**Output: 2.20 V=±0 A** | / |












| ACTION FIGURE | |
| Assembly | |
| Assembling the Trimmer Shaft Seat Fig. A | |
| Assembling the Auxiliary Handle See Fig. B | |
| Assembling the Safety Guard See Fig. C | |
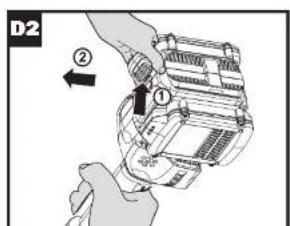
| Installing and Removing the Battery PackNOTE:This machine will only run when 2 batteries are installed.It is recommended to use the same two batteries and charge the two batteries at the same time.When you use two batteries with different power, the machine will only run to the lower common denominator. | See Fig. 01, D2 |
| Charging the battery packNOTE:The batteries are shippeduncharged. Each battery must be fully charged before the first use.Always fully charge the two batteries at same time. More details can be found in chargers manual. | See Fig. D3 |
| Battery power indicator on the machineSee details in BATTERY STATUS section | See Fig. D4 |
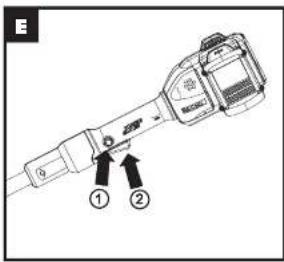
| On/Off SwitchWARNING: The cutting head continues to rotate after the trimmer has been switched off, wait until it has completely stopped then lay down the tool. | See Fig. E |
| Trimming See Fig. F | |
| -Adjusting the Auxiliary handle See Fig. G | |
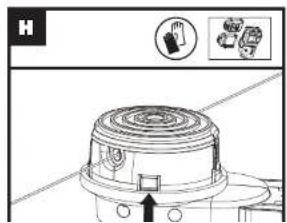
| Manually feeding the line See Fig. H | |
| Removing the Cap See Fig. I | |
| Cutting Head See Fig. J | |
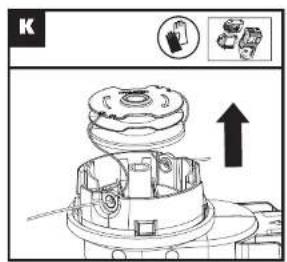
| Changing the line spot See Fig.K.L | |
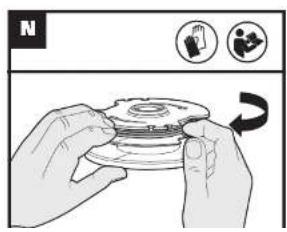
| Manually winding the line See Fig. M, L,C,P |
BATTERY STATUS (See Fig. D4)
| Before starting or after use, press the button beside the power indicator light on the machine to check the battery capacity. During operation, the battery capacity will be indicated automatically by the battery power indicator. The indicator constantly senses and displays the battery condition as follows.For the machine with 2 battery packs with different power, the power indicator light displays the battery condition with the lower one of the two batteries. |
| Battery power indicator status | Battery condition |
| Five green lights ( [●●●●●●] are illuminated. | The two batteries are in a highly charged condition. |
| Two, three or four | The two batteries have a remaining |
| Only one green light illuminated. | At least one battery is almost depleted and needs to be charged. |
| No light is illuminated. | At least one battery is not fully installed or battery may be defective. |
| Only one light is flashing twice per cycle. | At least one battery is over discharged (please refer to the battery charge conditional, please recharge the two batteries at once before use again or storage. |
| Only one light is flashing three times per cycle. | At least one battery is hot, wait for them cool down before start again. |
| Only one light is flashing four times per cycle. | The machine is overload. Raise the cutting height or push slowly. |
OPERATION INSTRUCTIONS
WARNING! The charger and battery pack are specially designed to work together so do not attempt to use any other devices. Never insert or allow metallic objects into your charger or battery pack connections because of an electrical failure and hazard will occur.
10
1.AUTOMATIC LINE FEED SYSTEM
When initially switching on the trimmer, a small length of line is fed out.
A 'clattering' noise will be heard for a short time. This is normal and is caused by the line being cut by the line cutter. Once the line is cut to the correct length, the 'clattering' noise will stop and the trimmer motor will run at full speed.
To lead more line, stop the trimmer completely, then restart, allowing the motor to reach full speed. Repeat this until you hear the 'clattering' noise of the line cutting. (Do not repeat this procedure more than 6 times)
2. MANUALLY FEEDING THE LINE (See Fig. H)
Press and release manual line feed cutter, whilst gently pull out the lines until the lines reaches the line cutter. When the required amount of line is fed out, gently pull on the second line (there is no need to press the manual line feed button again). If the line extends past the line cutter, too much line has been fed out. If too much line is fed out, removes the spool cap and rotate the spool anti-clockwise until the line is at the desired length.
Removing the Cap (See Fig. I)
Press and hold in the two latches. Pull the spool cap away from the Cutting Head. Keep the cap and spool holder clean from debris. To replace the cap, press it firmly towards the spool holder. Ensure that it is correctly
Changing the Line Spool (See Fig. K, L)
First take off the cap and remove the old spool. Place new spool into cutting head. Feed one line through the eyelet, then repeat for second line (See Fig. L).
Release line from cleat on the Spool. Reattach the cap. WARNING! Your Trimmer is designed to only use line with a maximum diameter of 0.065"(1.65mm). Only use nylon line IMPORTANT - Always wind the line onto the upper section of the spool first.
3. MANUALLY WINDING THE LINE (SEE FIO.M, N, O, P)
Take approximately 16ft (5 m) line and insert 5/8" (15 mm) of line into one of the holes in the upper section of the spool. Wind the line in the direction of the arrows on the top of the spool.
Leave approximately 3.8" (100 mm) of line unwound and place it into the cleat. Repeat on the lower section of spool. Care should be taken to ensure that the line is really coiled on the spool. Failure to do so will impair the efficiency of the automatic line feed. Then fit the spool as described above in "Changing the Line Spool".
STORING YOUR GRASS
TRIMMER
Always remove the battery pack from
your trimmer after use.
To store your grass trimmer The trimmer is provided with a hanging slot for storing the trimmer on the wall. (See Fig. Q) Store in a dry place where the trimmer and battery can be protected from damage.
MAINTENANCE
Always remove the battery pack from your trimmer after use.
Always check the product prior to being used for any
damage.
After use, disconnect the battery from the tool and check for damage.
Your power tool requires no additional lubrication or maintenance. There are no user serviceable parts in your power tool. Never use water or chemical cleaners to clean your power tool. Wipe clean with a dry cloth. Always store your power tool in a dry room temperature location. Keep the motor ventilation slots clean. Keep all working controls free of dust.
FOR BATTERY TOOLS
The ambient temperature range for the use and storage of tool and battery is 0°C-45°C.
The recommended ambient temperature range for the charging system during charging is 0° C- 40° C.
TROUBLESHOOTING
The following table gives problems and actions that you can perform if your machine does not operate correctly. If these do not identify and correct the problem, contact your Work Customer Service at 1-866-354-Worx.

Warning: Switch the machine off and remove the battery prior to any troubleshooting.
| Problems Possible Causes Corrective Action | ||
| Trimmer fails to operate. | Battery discharged. | Recharge battery; also see the content in charger manual |
| Battery too hot/cold. | Allow to cool/warm. | |
| Motor is broken. | Contact Service Agent. | |
| Internal wiring of machine damaged. | Contact Service Agent. | |
| Trimmer runs intermittently. | Motor is broken. | Contact Service Agent. |
| Battery not fully charged. | Recharge battery. | |
| On/off switch defective. | Contact Service Agent. | |
| Excessive vigoations/noise. | Machine defective. | Contact Service Agent. |
| Line spoil is not wound wall. | Rewind the line. See "MANUALLY WINDING THE LINE" | |
| Cutting time per battery charge: too short. | Battery has not been used for long period or only charged for short term. | Fully charge battery; also see the content in charger manual. |
| Grass too high. | Cut in stages. | |
| Battery defective. | Replace the battery. | |
| Machine does not cut. | Line broken. | Replace the line |
| Battery not fully charged. | Recharge battery; also see the content in charger manual. | |
| Motor is broken (speed is too low). | Contact Service Agent. | |
| Continuous lighting of the battery charge indicator. No charging procedure possible | Battery not (properly) inserted. | Properly insert battery into battery charger. |
| Battery contacts contaminated. | Clean the battery contacts or replace the battery. | |
| Battery defective. | Replace the battery. | |
| Battery charge indicator does not light up. | Plug of battery charger not plugged in (properly). | Insert mains plug (fully) into the socket outlet. |
| Socket outlet, mains cable or battery charger defective. | Check the mains voltage; have the battery charger checked by an authorized after-sales service agent. | |
| Auto feed does not work | Cutting line is not wound well. The line is tangled. | Manually feed the line, if still can not feed out, remove the spoil out and rewind the line. |
| Line is used up. | Replace with a new spoil of line. |



- PRODUCT SAFETY
- IMPORTANT SAFETY INSTRUCTIONS
- FOR ALL APPLIANCES
- FOR ALL BATTERY - OPERATED GARDENING
- ADDITIONAL SAFETY RULES FOR LAWN TRIMMER AND EDGE TRIMMER
- SAFETY WARNINGS FOR BATTERY PACK
- OPERATION INSTRUCTIONS
- 1.AUTOMATIC LINE FEED SYSTEM
- MANUALLY FEEDING THE LINE (SEE FIG. H)
- REMOVING THE CAP (SEE FIG. I)
- CHANGING THE LINE SPOOL (SEE FIG. K, L)
- MANUALLY WINDING THE LINE (SEE FIO.M, N, O, P)
- STORING YOUR GRASS
- TRIMMER
- ALWAYS REMOVE THE BATTERY PACK FROM
- YOUR TRIMMER AFTER USE
- MAINTENANCE
- FOR BATTERY TOOLS
Brand : WORX
Model : WG914
Category : Lawn mower