
Golf P Eco - Exercise bike KETTLER - Free user manual and instructions
Find the device manual for free Golf P Eco KETTLER in PDF.
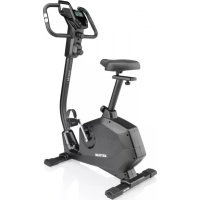
| Product Type | Exercise Bike |
| Brand | Kettler |
| Model | Golf P Eco |
| Power Supply | Self-powered by generator, internal accumulator without battery |
| Display | Color display (blue, green, red) with symbols and graphics |
| Training Programs | 10 programs: Count Up, Count Down, 6 load profiles, HRC1 and HRC2 (pulse control) |
| Pulse Measurement | Ear clip, hand pulse sensor, chest belt (optional) |
| Load Levels | 1 to 10 |
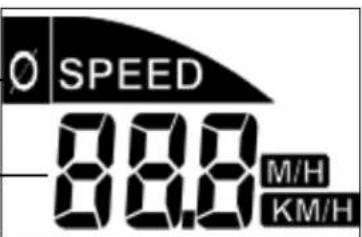
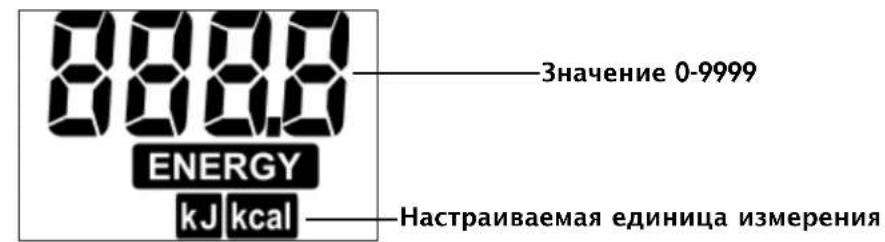
| Data Display | Speed, distance, time, energy, pulse, revolutions, load level |
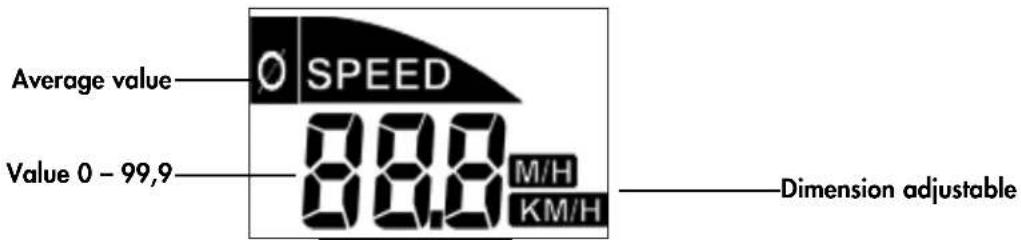
| Adjustable Units | km/h or mph, kJ or kcal |
| Recovery Function | Recovery pulse measurement and fitness rating calculation |
| Standby Mode | Automatic shutdown after 90 seconds of inactivity |
| Dimensions (estimated) | Approximately 100 x 50 x 130 cm |
| Weight (estimated) | Approximately 30 kg |
| Assembly | On a flat and stable surface, check all fastenings every 6 days |
| Maintenance | Clean with a damp cloth, avoid prolonged moisture |
| Spare Parts | Use only genuine Kettler spare parts |
| Safety | Consult a doctor before use, do not use if damaged |
| Optional Accessories | Mains power supply, chest belt |
| Manual | 180 pages, available in several languages |
Frequently Asked Questions - Golf P Eco KETTLER
User questions about Golf P Eco KETTLER
0 question about this device. Answer the ones you know or ask your own.
Ask a new question about this device
Download the instructions for your Exercise bike in PDF format for free! Find your manual Golf P Eco - KETTLER and take your electronic device back in hand. On this page are published all the documents necessary for the use of your device. Golf P Eco by KETTLER.
USER MANUAL Golf P Eco KETTLER
Training and Operating Instructions
HRC1-Count-Up 11
HRC2-Count-Down 11
Programme: Count Up / Count Down
- (PROGRAM) "Count Up"
- (PROGRAM) "Count Down"
b)Belastungsprofile
PROGRAM
- (PROGRAM) "HRC1 Count Up"
- (PROGRAM) "HRC2 Count Down"
(PROGRAM) "Count Up"
(PROGRAM) "Count Down"
(PROGRAM) "HRC1" Count Up
(PROGRAM) "HRC2" Count Down
Service
- Your safety 18
Functionality and Operation 19 Short description 19
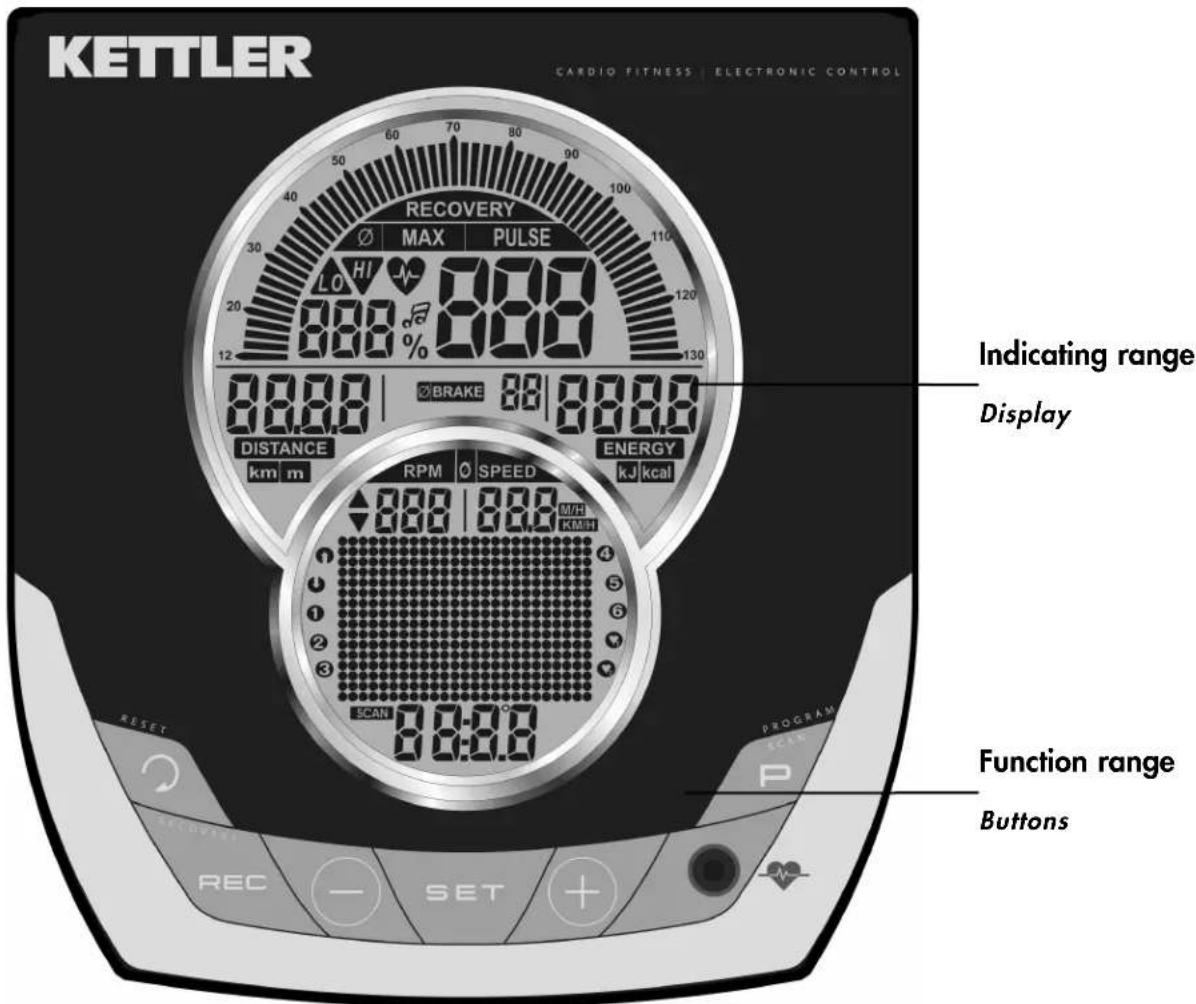
- Indicating range / Display 20
- Function range / Buttons 21
- Display values 22-23
Quick start (Introduction) 23
- Start of training 23
End of training 23 - Standby operation 23
Training
...by defaults of strain 24
- Count-Up 24
- Count-Down 24
- Default range 24
Distance 24
Time 24
Energy 24
Age 25
Selection of target pulse (Fat/Fit/Man.) 25
- Entering the target pulse 25
- Readiness for training 25
Strain profiles 1-6 26 - Switching over time/distance 26
... by defaults of pulse
HRC1-Count-Up 27
HRC2-Count-Down 27
Training functions 27
- Display change 27
- Profile adjustment 28
- Interruption/end of training 28
- Resumption of training 28
- Recovery (measuring the recovery pulse) 28
Input and functions 29
Table: input/functions 29
Table: pulse events 29
Display colours and their meaning: 29
- blue
- green
red
Individual settings 30
Selection: KM/Miles display 30
- Deletion of total kilometres 30
Selection: kJoule/Kcal display 30
Storage of defaults 30
- Alarm sound ON/OFF 30
General notes 31
Exercise buke / Cross trainer 31
Calculation of fitness marks 31
System sounds 31
- Profile display in training 31
Calculation of average values 31
Notes on pulse measurement 31 with ear clip 31 with hand pulse 31 with chest belt 31
- Errors of the computer 31
Training instructions 32
Stamina training 32
Strain intensity 32
Duration of strain 32
Glossary
G 33
This symbol refers to the glossary where the term in question is explained.
Safety notes
Please observe the following aspects for your own safety:
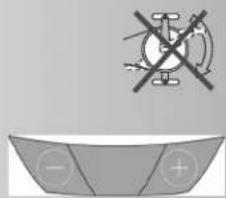
- The training device must be erected on an appropriate, fixed ground.
- The connections must be checked for firmness before the first start-up and also after ca. 6 days of operation.
- To prevent injuries resulting from wrong strain or excessive strain, the training device must only be used according to instructions.
It is not recommended to put up the training device in wet places for a longer period of time because of corrosion. - Check the functionality and the proper state of the training device regularly.
- The safety controls must be carried out by the user regularly and properly.
Defect or damaged components must be replaced immediately. Use only original spare parts of KETTLER.
The device must not be used until the repair has been carried out. - The device's safety level can only be maintained, if it is checked regularly for damage and wear.
For your safety:
- Before you start training, your general practitioner should find out, if you are fit for the training with this device in terms of health. The medical findings should be the basis of the structure of your training programme. Wrong or excessive training can lead to damage to your health.
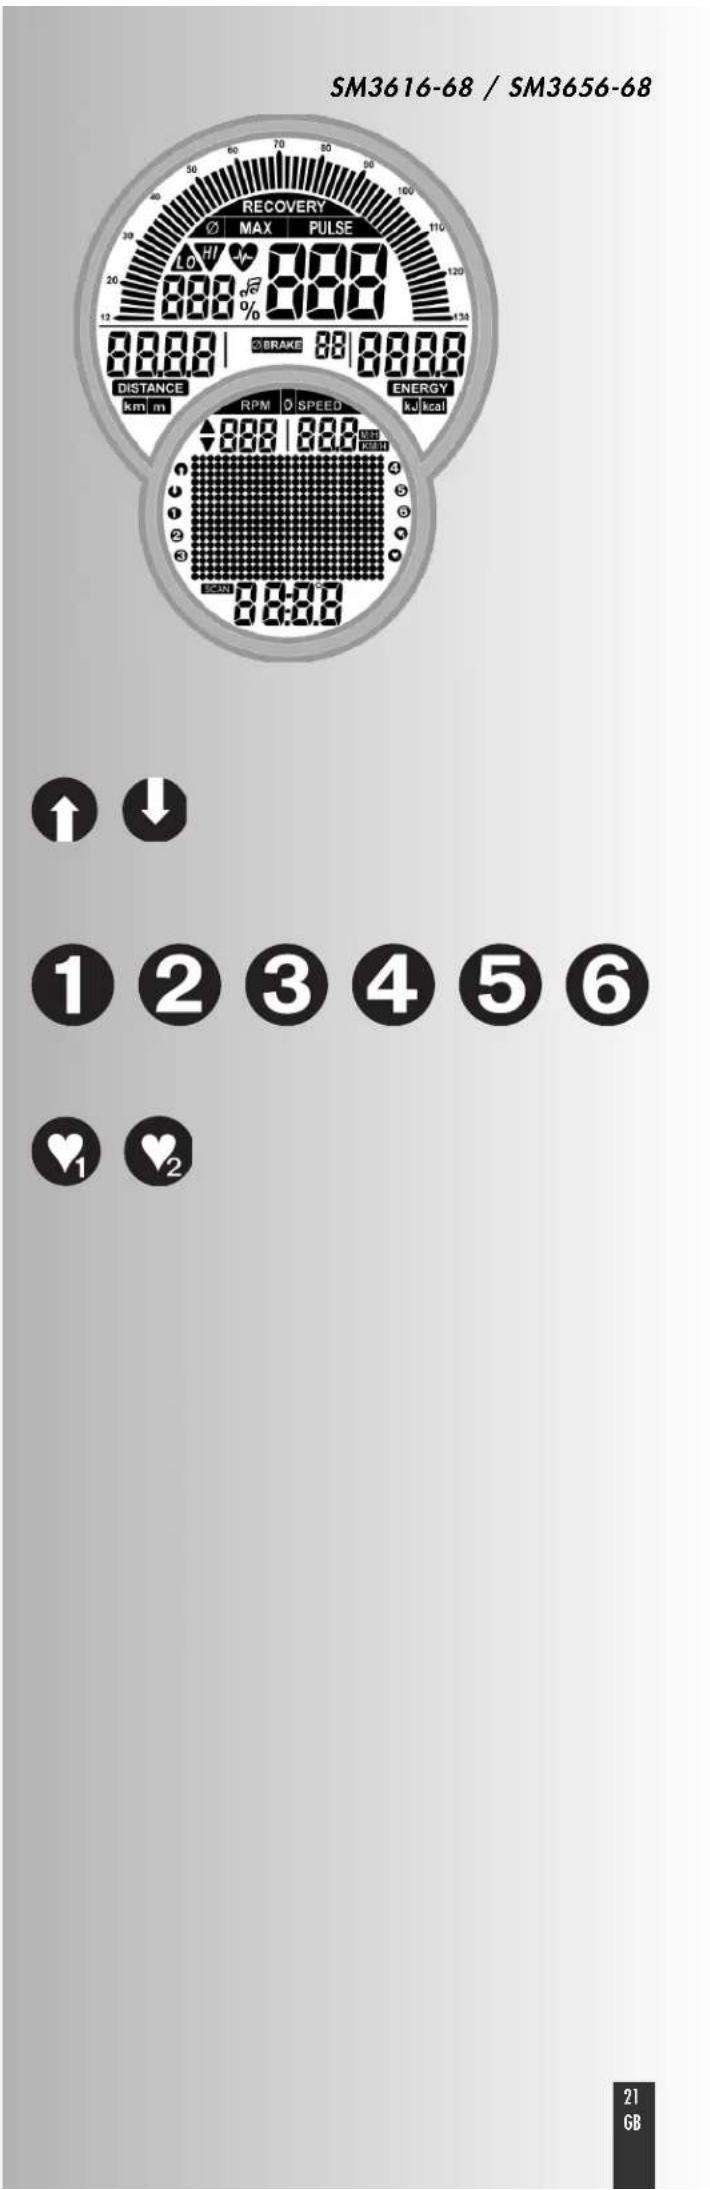
Functionality and Operation
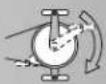
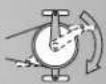
This device is independent of mains voltage. As of approximately 30 pedal revolutions, the generator generates voltage in order to supply the electronics and charge an accumulator. If the charge condition is sufficient, the accumulator provides for the voltage supply during standstill. The accumulator plug prevents the discharge of the accumulator via the electronics. Before commissioning the device, pull the accumulator plug out of the socket. If the accumulator's charge is sufficient, the display lights up. If this is not the case or if the display is only illuminated for a short time, you have to charge the accumulator by means of training. In case of non-use, plug the accumulator plug in the socket again. Without activity, the electronics will switch off the display after 90 seconds. A wall power supply for charging the accumulator is available as accessory via our service.
Short description
The electronics consists of a function range with buttons and an indicating range (display) with variable symbols and graphics.
Training and Operating Instructions


Short description
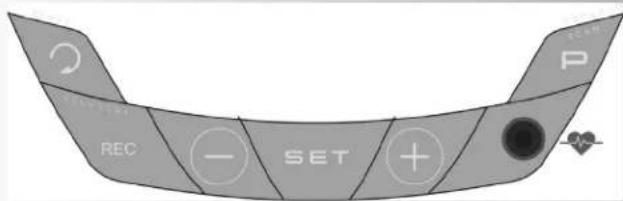
Function range
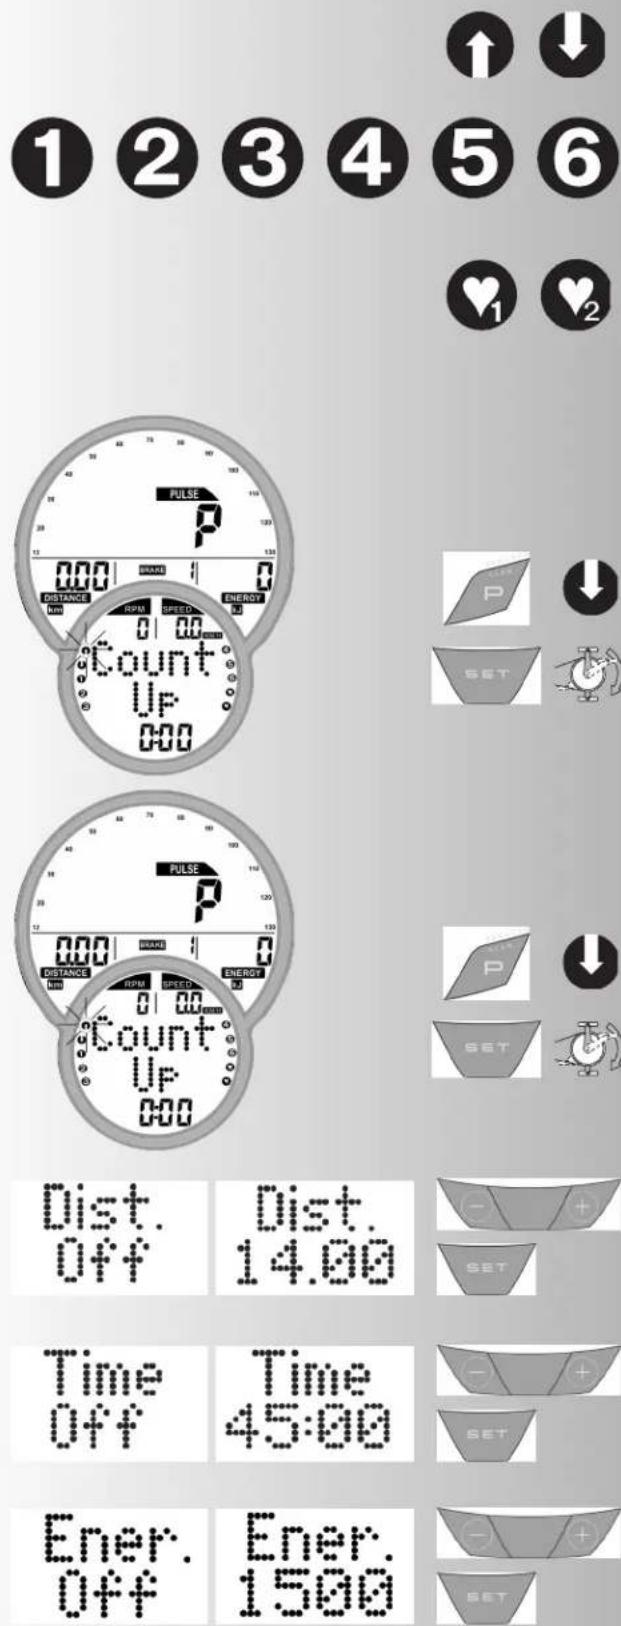
The six buttons are briefly explained in the following.
The precise use is explained in the individual chapters. In these descriptions, the names of the functional buttons are used in the same way.
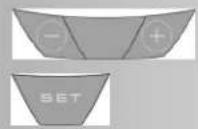
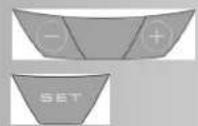
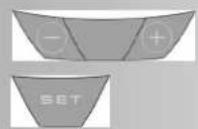
SET (press briefly)
This functional button is for displaying input data. The set data is accepted.
SET (press for a longer period of time)
When displaying all segments: call "individual settings"
Reset
By means of this functional button the current display is deleted for a restart.
Programme
By means of this functional button the various programmes are selected.
Pressing again > next programme
Pressing for a longer period of time> sweep of programme
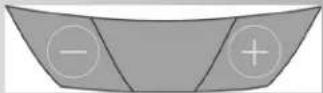
Minus - / Plus + buttons
By means of these functional buttons values are changed in the various menus before the training and the strain is adjusted during training.
- further "Plus"
back to "Minus" - pressing for a longer period of time > quick change
- pressing "Plus" and "Minus" together:
- strain goes to Level 1
- programmes go to Original
- input of values goes to Off
RECOVERY
By means of this functional button the recovery pulse function is started.
Note:
Further functions of the buttons are explained in the operating instructions where appropriate.
Measuring the pulse
The measurement of the pulse can be carried out by means of (3) sources:
- Ear clip -
the plug is put into the socket. - Chest belt (plug-in receiver required)
Please observe the respective instructions. - Hand pulse
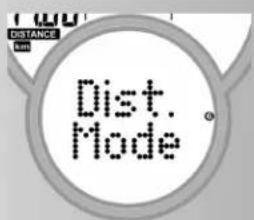
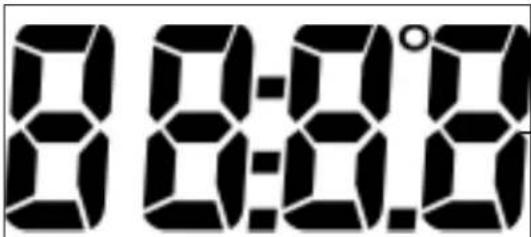
Indicating range / Display
The indicating range informs on the various functions and respectively selected setting modes.
Programmes: Count Up / Count Down
The programmes differ in their mode of counting.
Programms
Strains beyond the time or distance
Default profiles 1-6
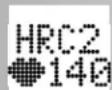
Pulse-controlled programmes: HRC1/HRC2
Target pulse beyond the time
Two programmes that control the strain by a preset pulse value.
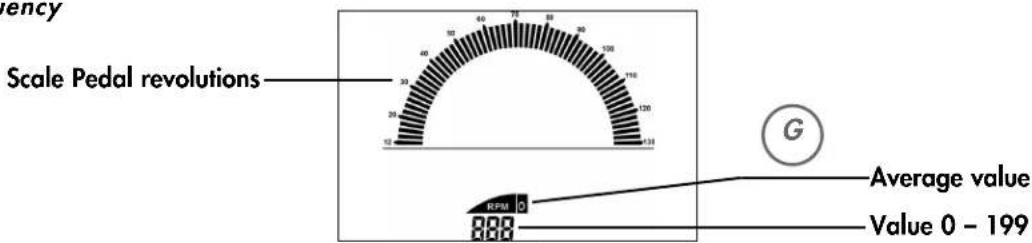
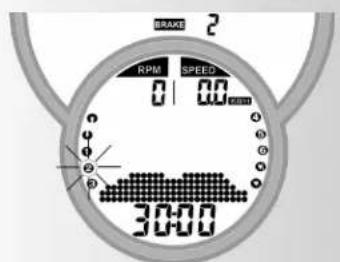
Display values
The example displays show the operation as home trainer. If the revolutions per minute correspond to the example displays the values for speed and distance are lower for cross trainers.
At 60 min-1 (RPM)
Home trainers: = 21,3km / h
Exercise bikes: = 9,5km / h
Training and Operating Instructions
Pedalling frequency
Speed
Puls
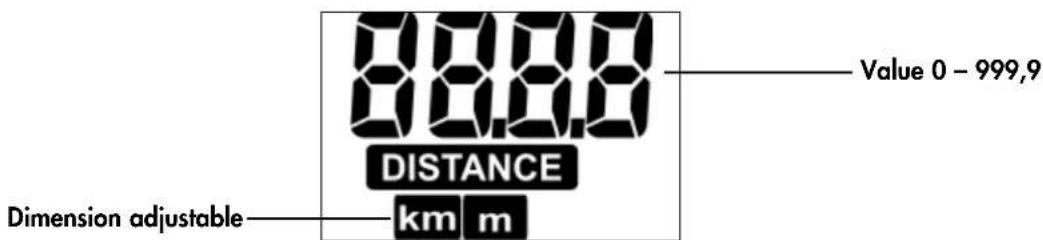
Distance
Level of strain
Time
Points

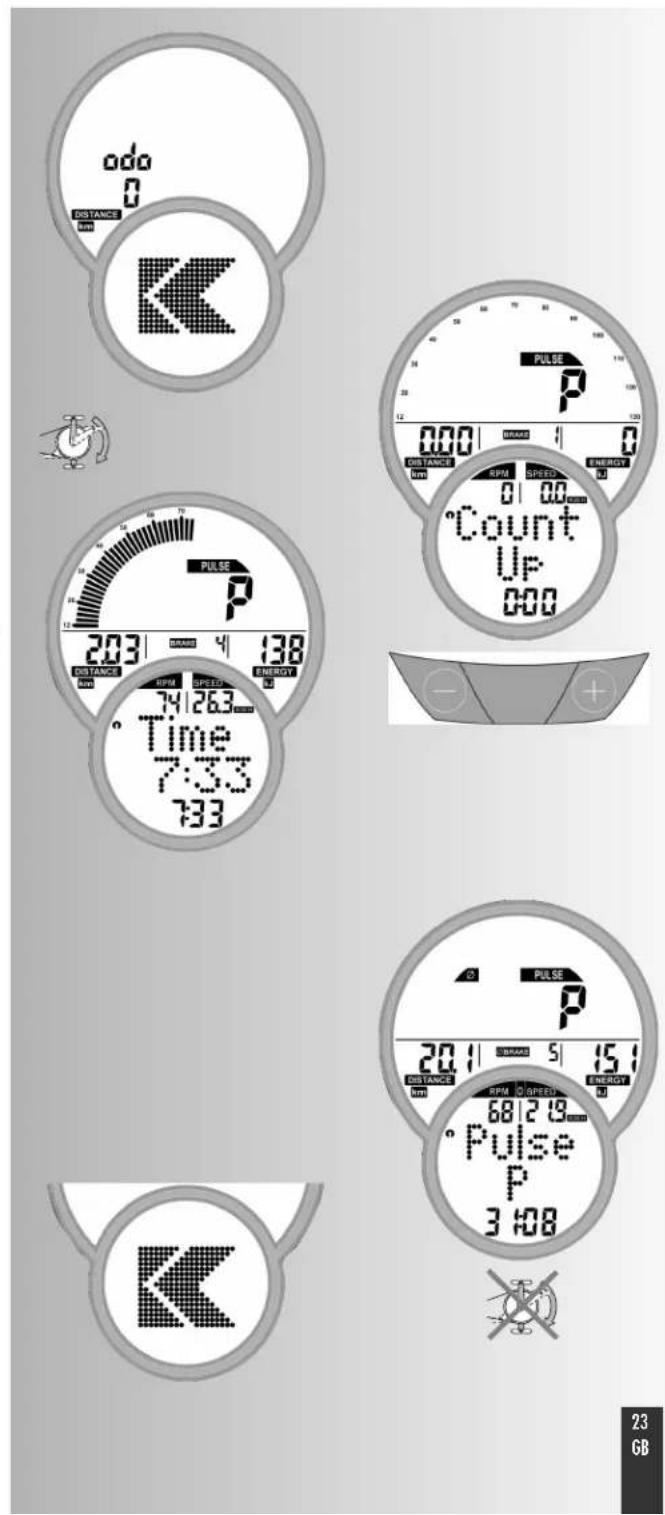
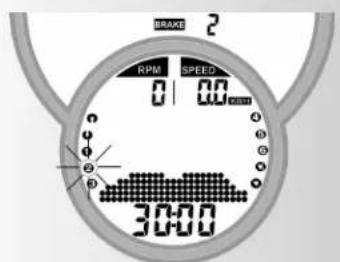
Quick start (Introduction)
Start of training:
without special settings
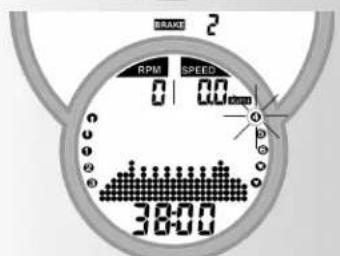
- Image shown after switch-on
Display of total kilometres
After 5 seconds: Display "Count Up"; all values indicate 0; Strain shows Level 1 - Start of training
Display
Scale, Pulse (if measurement of pulse is active), distance, level, energy, time, revolutions, speed and time
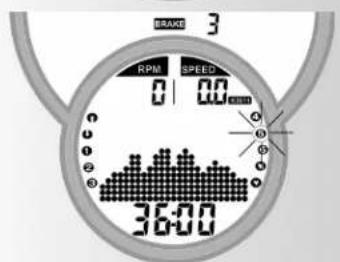
Change of the strain during training:
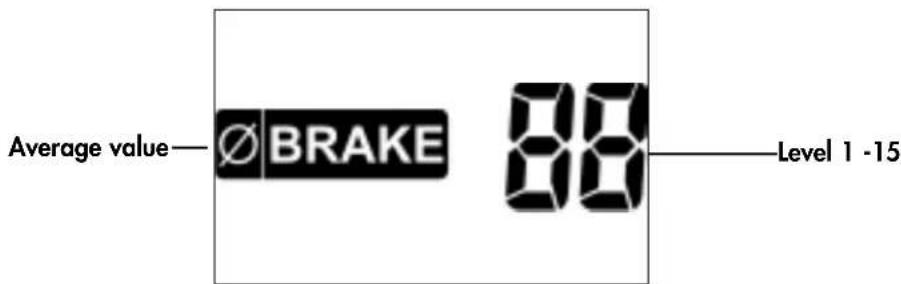
- "Plus": display value next to "BRAKE" is increased in steps of 1.
- "Minus" reduces in steps of 1
Continuation of the training with this setting. Changes of strain in the meantime are possible at any time.
End of training
Average values ()
Display
Pulse (if measurement of pulse is active), level, revolutions and speed
Total values
Distance, energy and time
Standby operation
The display goes to standby operation 90 seconds after the end of training. Press any button, display re-starts with "Count Up".
Training and Operating Instructions
Training
The computer is equipped with 10 training programmes. They clearly differ in strain intensity and duration.
1. Training by defaults of strain
a) Manual strain input
- (PROGRAM) "Count Up"
- (PROGRAM) "Count Down"
b) Strain profiles
PROGRAM"1"-6
2. Training by defaults of pulse
Manual defaults of pulse
- (PROGRAM) "HRC1 Count Up"
- (PROGRAM) "HRC2 Count Down"
Training by defaults of strain
a) Manual strain input
(PROGRAM) "Count Up"
- Press "PROGRAM" until: display "Count Up"
Start training, all values count up.
Or
Press "SET": default range
"Plus" or "Minus": change strain.
Start of training, all values count up.
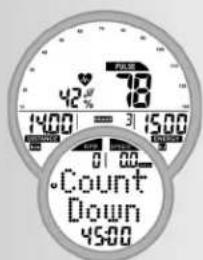
(PROGRAM) "Count Down"
Press "PROGRAM" until: Display: "Count Down"
The programme counts down >0 from the entered values. If nothing is entered, the training starts in the programme "Count Up". For the start of the programme at least one input for distance, time or energy must be entered.
Press "SET": default range
Default range
Display: distance default "Dist"
Distance default
- Enter values by means of "Plus" or "Minus" (e.g. 14.00) Confirm by means of "SET".
Display: Next menu time default "Time"
Time default
- Enter values by means of "Plus" or "Minus" (e.g. 45:00)
Confirm by means of "SET".
Display: Next menu energy default "Energ."
Energy default
- Enter values by means of "Plus" or "Minus" (e.g. 1500)
Confirm by means of "SET".
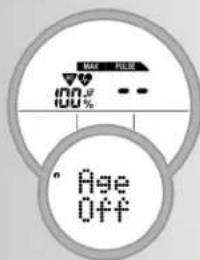
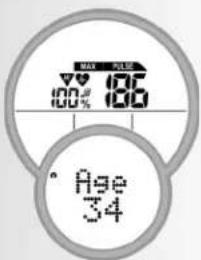
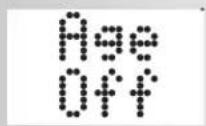
Display: Next menu Age default "Age"
Age input
The input of the age serves to determine and control the maximum pulse (Symbol HI, warning sound, if activated).
- Enter values by means of "Plus" or "Minus" (such as 34). Based on it, the maximum pulse of 186 is calculated according to the formula (220 - Age) Confirm by means of "SET".
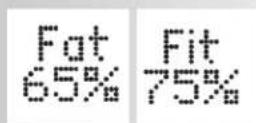
Display: next menu selection of target pulse "Fat 65%
Selection of target pulse
- Select by means of "Plus" or "Minus"
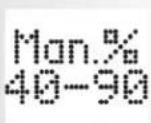
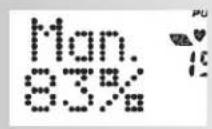
Fat burning 65% Fitness 75% Manual 40-90% Confirm by means of "SET" (e.g. Manual 40-90%) - Enter values by means of "Plus" or "Minus" (e.g. Manual 83)
Confirm by means of "SET" (default mode completed)
Display: readiness for training with all defaults
Or
Target pulse (40 - 200)
- Deselect the age input by means of "Plus" or "Minus". Display: "AGE OFF" Confirm by means of "SET".
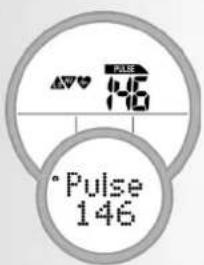
Display: next default "target pulse" (Pulse)
- Enter value by means of "Plus" or "Minus" (e.g. 146)
Confirm by means of "SET" (default mode completed)
Display: readiness for training with all defaults
Note:
An overview of all setting possibilities in the programmes is summarised in the tables (see page 29).
- The defaults are lost in case of "Reset". If in case of individual settings "Storage of defaults" is activated (page 14), the pulse defaults will remain. When calling Count Up / Count Down for the next time, the data is accepted.
Readiness for training
Strain
- Change strain by means of "Plus" or "Minus". Start of training by pedalling.


Training and Operating Instructions


b) strain profiles (PROGRAM) "1" - "6"
All profiles are selected by pressing "PROGRAM".
e.g. Display: "1"
Fitness beginners 1; strain level 1-4, 27 min.
Press "SET": default range,
Start of training
Press "PROGRAM" until: display "2"
Fitness beginners II; strain level 1-5, 30 min. Press "SET": default range,
Start of training
Press "PROGRAM" until: display "3" Advanced I; strain level 1-6; 36 min. Press "SET": default range
Start of training
Press "PROGRAM" until: display "4" Advanced II; strain level 1-7, 38 min. Press "SET": default range
Start of training
Press "PROGRAM" until: display "5" Professional I; strain level 1-9, 36 min. Press "SET": default range
Start of training
Press "PROGRAM" until: display "6" Professional II; strain level 1-10, 44 min. Press "SET": default range
Start of training
Note:
The profile is compressed to 25 columns in the programme displays in case of times exceeding 25min
Defaults see table page 29.
Switching over time/distance
In the programmes 1-6 the switch-over is possible from the time mode to the distance mode in the default range.
- Set mode by means of "Minus" or "Plus". Confirm by means of "SET".
Display: readiness for training
The distance per column is 0.4km (0.2 miles).
Cross ergometer: 0.2km (0.1 miles)
2. Training by defaults of pulse
Manual defaults of pulse
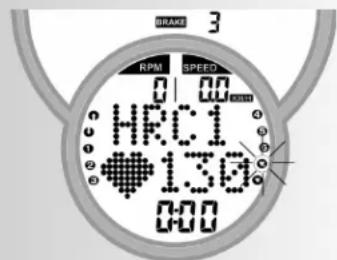
(PROGRAM) "HRC1" Count Up
- Press "PROGRAM" until: display: HRC1
- Press "SET": default range
Or
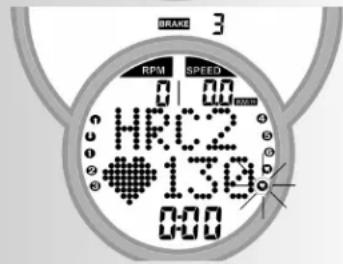
- Start training, all values count up. The strain is increased automatically until the target pulse is achieved (e.g. 130)
(PROGRAM) "HRC2" Count Down
Press "PROGRAM" until: display HRC2 - Press "SET": Default range The input and adjustment possibilities are analogous relating to the programme item "Count Down".
- Start of training
- The strain is increased automatically until the target pulse is achieved (e.g. 130)
Or
Start training
Note:
Initial strain
In HRC programmes the definition of the initial strain is possible in the default range from level 1-10.
- Enter values by means of "Plus" or "Minus" (e.g. 10) The strain is increased automatically from the entered level until the target pulse is achieved (e.g. 130)
Pulse
The pulse value can be changed at this point (readiness for training) by means of "Plus" or "Minus", e.g. from 130 to 140. Start of training by pedalling.
Default possibilities: see table page 29
Note:
- KETTLER recommends the pulse measurement by means of the chest belt for HRC programmes
- A strain adjustment is realised for HRC programmes in case of deviations of +/- 6 heartbeats.
Training functions
Display change during training
Adjustment manually
By means of "PROGRAM" the display changes in the following order in the item field: Time / RPM / Speed / Dist. / Pulse / Brake / Ener. / Time ...
Adjustment automatically (SCAN)
Press "PROGRAM" button for a longer period of time until the SCAN symbol appears on the display. Change of the displays at intervals of 5 seconds. The SCAN function is ended by re-pressing the "PROGRAM" button, recovery function or interruption of training.
Adjustment of the strain profile
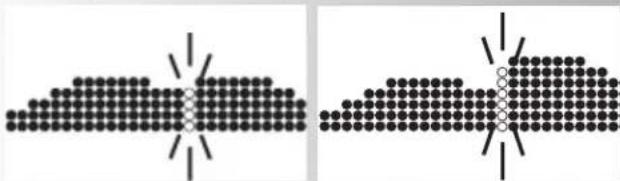
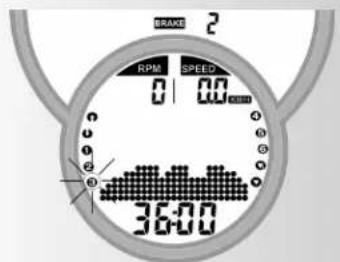
If the strain is adjusted during the programme flow, the change appears from the flashing column to the right. The columns left of it show the realised strain levels and remain unchanged.


SCAN

Training and Operating Instructions


Interruption/end of training
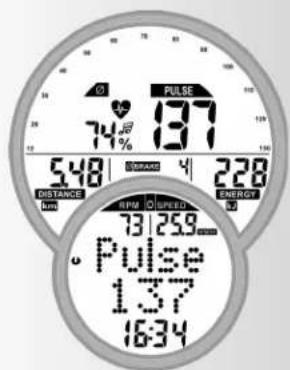
The electronics detects an interruption of the training in case of less than 10 pedal revolutions/min or pressing "RECOVERY". The achieved training data is shown. Pulse, strain, revolutions and speed are shown as average values with symbol.
Change to the current display by means of "Plus" or "Minus".
The training data is shown for 4 minutes.
If you do not press any buttons during this period and do not exercise, the electronics switches over to standby mode.
Resumption of training
If the training is continued within 4 minutes, the last values will also be counted or counted down.
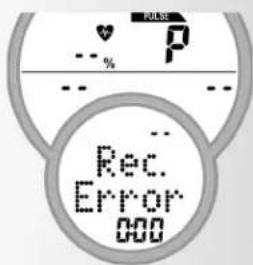
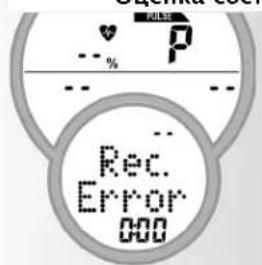
RECOVERY function
Measuring the recovery pulse
The electronics reveringly measures your pulse for 60 seconds and determines a fitness mark.
Press "RECOVERY" at the end of the training. The current pulse value (in the figure "168") is stored. After 60 seconds the pulse value (in the figure "137") is stored again. The difference between both values (in the figure "31") is shown, based on which a fitness mark (in the figure "F 2.6") is determined. The display ends after 10 seconds.
"RECOVERY" or "RESET" interrupts the function.
If no pulse is measured at the beginning or end of the time return, an error message will appear.
Input and functions
| Training Stillsand | 1 | 2 | 3 | 4 | 5 | 6 | 7 | 8 | |
| Strain | Strain | ✓ | ✓ | ||||||
| Profile | Profile | ✓ | ✓ | ✓ | ✓ | ✓ | |||
| Distance | ✓ | ✓ | |||||||
| Time | ✓ | ✓ | |||||||
| Energy | ✓ | ✓ | |||||||
| Max. Pulse or Fat burning 65% or Fitness 75% or Manually 40-90% | ✓ | ✓ | ✓ | ✓ | ✓ | ✓ | ✓ | ||
| Target pulse 40-200 | ✓ | ✓ | ✓ | ✓ | |||||
| Time/Distance Swichover Recovery | ✓ | ✓ | ✓ | ✓ | ✓ | ✓ | |||
| ✓ | ✓ | ✓ | ✓ | ✓ | ✓ | ✓ | ✓ | ||
Display in case of pulse events
| Value / Input % MAX | Exceeding | ||||
| HI | LO | √ | |||
| Maximal Pulse 121-210 Off | ✓ | +1 +1 | +1 | ||
| Target pulse or Fitness | Fat burning | 65% | +11 | -11* | |
| or Manually | 75% | ||||
| →Target pulse | 40-90% | ||||
| 40-200 | +11 | -11* | |||
If the entered training pulse (-11 beats) is undercut, the symbol "LO" is shown.
If it is exceeded (+11 beats) the symbol "H' is shown.
If the maximum pulse is exceeded, the "HI" arrow is flashing and the writing "MAX" is shown.
If the "alarm sound in case of exceeding the maximum pulse" is activated in individual settings (page 30), additional sounds are output.
*note: appears only, if the target pulse was achieved once
Display colours and their meaning:
The display can illuminate in 3 different colours: blue, green and red. To ensure an obvious notification of pulse events the meaning of the colours are defined as follows:
The display illuminates blue if the following conditions apply:
The pulse monitoring is deactivated
- The target pulse monitoring (÷ / + 10 pulses) is active but not reached yet.
- The target pulse monitoring is deactivated, the pulse limit monitoring is active but the pulse is below the selected pulse limit.
- You are in the default area.
The display illuminates green:
The pulse is within the range of the target pulse monitoring (÷ +10 pulses)
The display illuminates red:
If the pulse limit is exceeded while the pulse limit monitoring is active the display turns red.
Training and Operating Instructions
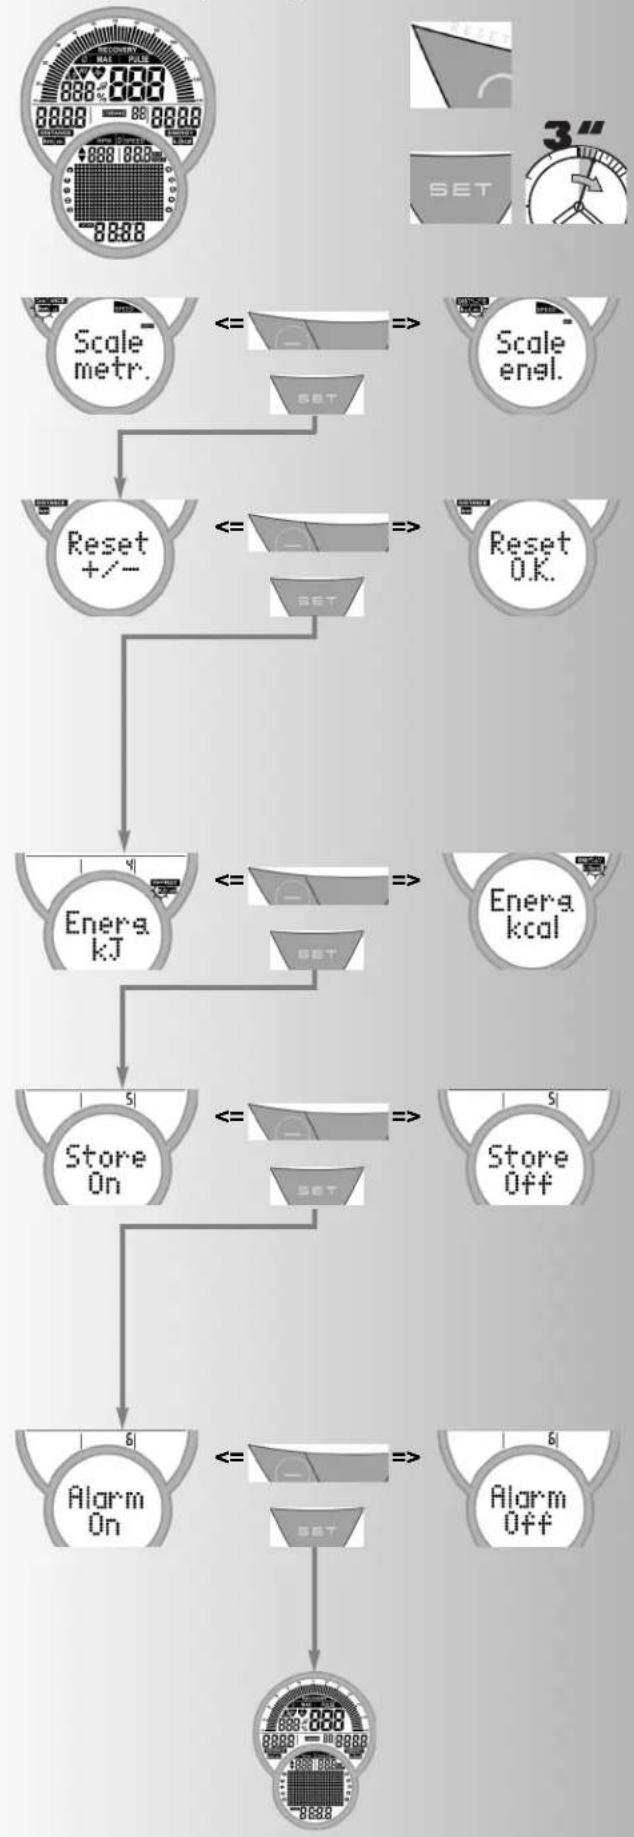
Individual settings
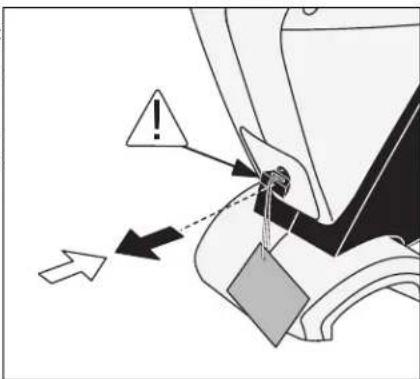
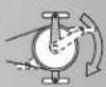
Proceed according to the figure on the left:
Press "RESET"
Display: all segments
Now press "SET" for a longer period of time: menu: individual settings
Display: Scale
1. Display of the unit in kilometres / miles
Press "Plus" or "Minus"
Function: Selection kilometres or miles display
Press "Set": the selected unit is accepted and change to the next setting
Display: Reset +/- Total kilometers
2. Deletion of total kilometres
Press "Plus" + "Minus" together
Function: Deleting Display:"Reset O.K."
Press "Set": change to the next setting
Or: Skipping Deletion of the total values, only press "SET"
Display: Energ.
3. Display of the energy consumption in kJoule / kcalorie
Press "Plus" or "Minus"
Function: Selection of the energy consumption display
Press "Set": the selected unit is accepted and change to the next setting
Display: Store
4. Storage of defaults
Press "Plus" or "Minus"
Defaults for distance, time, energy, age, target pulse are permanently stored
Function:
$$ O N = S t o r a g e \text {a l s o a f t e r} ^ {\prime \prime} R e s e t ^ {\prime \prime} $$
$$ O f f = S t a g e \text {u n t h i n} \text {n e x t} ^ {\prime \prime} R e s e t ^ {\prime \prime} $$
$$ \text {P r e s s} ^ {\prime \prime} \text {S e t} ^ {\prime \prime}; $$
Change to the next setting
Display: Alarm
5. Alarm sound in case of exceeding the maximum
Press "Plus" or "Minus"
Function: Switching on or off the alarm sound.
Press "Set": the selected setting is accepted and "restart" of the display.
General Instructions
Exercise bike
Speed calculation
60 pedal rotations per minute result in a speed of 21.3km / h
Crosstrainer
Speed calculation
60 pedal rotations result in a speed of 9.5km / h
Fitness value calculation
The computer calculates and assesses the difference between load pulse and recovery pulse and your resulting "fitness value" on the basis of the following formula:
$$ \text {N o t e} (F) = 6 - \left(\frac {1 0 \times (P 1 - P 2)}{P 1}\right) ^ {2} $$
P1 = load pulse P2 = recovery pulse
Value 1 = very good Value 6 = unsatisfactory
The comparison of load and recovery pulse is a simple and fast method to control your physical fitness. The fitness value is a value of orientation with regard to your ability to recover after physical load. Before you press the recovery pulse button and have the computer calculate your fitness value you should train in your load range for a longer time, this means for at least 10 minutes. With regular cardiovascular training you will notice that your "fitness value" will improve.
System Sounds
Switching On
On switch-on during the segment test a small sound is emitted.
Programme End
A programme end (profile programme, countdown) is indicated by a short sound.
Maximum Pulse Overrun
If the preset maximum pulse is exceeded by one pulse beat then 2 short sounds are emitted every 5 seconds.
Error Display
In the case of errors, e.g. a recovery can not be carried out without a pulse signal, then 3 short sounds are emitted.
Switch On/Off Automatic Scan Function
When activating and deactivating the automatic Scan Function, a short sound is emitted.
Time/Distance Switch
In the programs 1-6, switchover from time to distance mode is possible in the default section.
The distance per column is
Exercise bike: 0.4km (0.2 miles).
Crosstrainer: 0.2km (0.1 miles)
Profile Display during Training
At the start the first column flashes. According to the flow it moves further to the right.
And in profiles over 25 minutes it reaches the middle (column 13). Then the profile moves from the right to the left. If the profile end appears in the last column (column 25), the flashing column moves further to the right until the end of the programme.
Average Calculation
The average value is calculated per training unit.
Instructions for Pulse Measurement
The pulse calculation starts when the heart flashes in the display in rhythm with your pulse rate.
With Ear Clip
The pulse sensor works with an infrared light and measures the translucency changes of your skin, which are caused by your pulse beat. Before you tuck the pulse sensor onto your earlobe, rub it 10 times forcefully to increase the blood circulation.
Avoid interference impulses.
- Fasten the ear clip carefully onto your ear lobe and find the most opportune moment for its removal (heart symbol flashes without interruption).
- Do not train directly under strong light e.g. neon lights, halogen lights, spotlights, beams or sunlight.
- Totally remove all vibrations and shaking of the ear sensor including cables. Always secure the cable with clips to your clothing or even better to a sweatband.
With Hand Pulse
The extra-low voltage generated through the contraction of the heart is recorded through the hand-sensors and assessed by the electronics.
Always grip the contact areas with both hands.
- Avoid gripping jerkily.
- Hold the hands calmly and avoid contractions and rubbing on the contact areas.
With Chest strap
Observe the relevant instructions.
Failures in the pulse display
Should there once be any problems with pulse detection, please check the above mentioned points once again.
Comment
Only one way of pulse measurement is possible either with ear clip or hand pulse or Chest strap. If there is no ear clip or plug receiver in the pulse socket then the hand pulse measurement is activated. If there is contact between the ear clip/plug receiver in the pulse socket, then the hand pulse measurement is automatically deactivated. It is not necessary to remove the plug of the hand pulse sensors.
Faults in the Training Computer
Press the Reset Key
Training and Operating Instructions
Training Instructions
Sports medicine and training science use ergometry, among other things, for the examination of the functional capability of heart, circulation and respiratory system.
You can find out whether or not you have achieved the desired effect from your training after several weeks using the following method:
- You manage a particular endurance performance with less heart / circulation performance than previously
- You sustain a particular endurance performance with the same heart / circulation performance over a longer period.
- You recover more quickly than previously after a particular heart / circulation performance.
Guide values for the endurance training
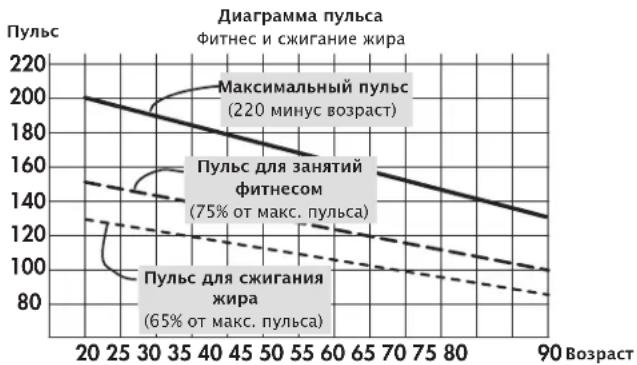
Maximum pulse: maximum strain means the reaching of the individual maximum pulse. The maximum achievable heart rate is dependant on age.
Here, the following empirical formula applies: the maximum heart rate per minute corresponds to 220 heart beats minus age in years.
Example: age 50 years 220 - 50 = 170 pulse / min.
Load Intensity
Load pulse: the optimum intensity of load is reached at 65 - 75% (see also diagram) of the maximum pulse. This value changes depending on age.
Extent Of Load
Duration of a training unit and its frequency per week:
The optimum extent of load is attained, if 65 - 75% of the individual heart / circulation performance is achieved over a longer period.
Empirical Formula:
Training frequency Duration of training
daily 10 minutes
2-3 times a week 20-30 minutes
1-2 times a week 30-60 minutes
Beginners should not begin with training units of 30-60 minutes.
The beginner's training can be planned as follows in the first 4 weeks:
Training frequency Extent of training session
1st week
3 times a week 2 minutes of training
Break of 1 minute for physical exercises
2 minutes of training
Break of 1 minute for physical exercises
2 minutes of training
2nd week
3 times a week 3 minutes of training
Break of 1 minute for physical exercises
3 minutes of training
Break of 1 minute for physical exercises
2 minutes of training
3rd week
3 times a week 4 minutes of training
Break of 1 minute for physical exercises
4 minutes of training
Break of 1 minute for physical exercises
3 minutes of training
4th week
3 times a week 5 minutes of training
Break of 1 minute for physical exercises
4 minutes of training
Break of 1 minute for physical exercises
4 minutes of training
It is recommended that you perform approx. 5 minutes of exercises before and after every training unit, in order to warm up and cool down. There should be a training-free day between each two consecutive training units, if you prefer training sessions of 20-30 minutes 3 times a week later on in your training. Otherwise, there is no reason why you should not train daily.
Glossary
Recovery
Recovery pulse measurement at the end of the training. From start and end pulse of one minute the deviation and a fitness grade are determined. With the same training, the improvement of this grade is a measure for fitness increase.
Reset
Deletion of the display contents and restart of the display.
Programs
Possibilities for training, which require manual or program-determined loads or target pulses.
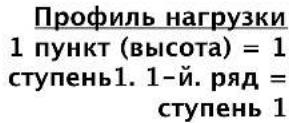
Profiles
Change of loads over time or distance represented in the points field.
Dimension
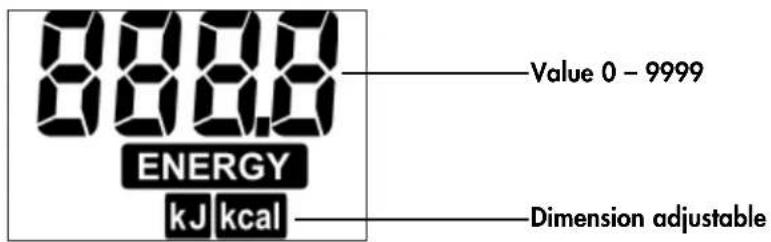
Units for display of km/h or mph, kjoule or kcal
Energy
Calculates the energy turnover of the body
Control
The electronic equipment controls the load or the pulse for manually entered or default values.
Points field
Display section with 25 × 16 points for representation of load and pulse profiles as well as text and value display.
Pulse
Recording of the heartbeat per minute
MaxPulse(s)
Calculated value from 220 minus years of age
Target pulse
Manual or program-determined pulse value, which is to be calculated.
Fat burning pulse
Calculated value of: 65% MaxPuls
Fitness pulse
Calculated value of: 75% MaxPuls
Manual
Calculated value of: 40 - 90% MaxPuls
Age
Here an entry for calculation of the maximum pulse.
HI symbol
With "HI" displayed, a target pulse is too high by 11 beats. With HI blinking, the maximum pulse is exceeded.
LO symbol
With "LO" displayed, a target pulse is too low by 11 beats.
Menu
Display, in which values are to be entered or selected.
Glossary
Collection of attempts for explanation.
Performance table
Date Restpulse Stress pulse Recovery pulse Slope Time Distance Energy consumption Fitness Mark (min) (km) (Kcal)

Sommaire
HRC1-Count-Up 43
HRC2-Count Down 43
SET (appuyer longuement)
Programme : Count Up / Count Down
Programmes
HRC1-Count-Up 59
HRC2-Count-Down 59
Programma's: Count Up / Count Down
- (Program) "Count up"
- (Program) "Count down"
b. Belastingprofielen
- (Program) "1" - "6"
- (Program) "HRC1 Count up"
- (Program) "HRC2 Count down"
Training door belastingprogrammering
a) Manuele belastingprogrammering
(Program) "Count up"
- "Program" indrukken tot: weergave: "Count up" Training beginnen, alle waardenstellen op.
of
(Program) "Count down"
(Program) "HRC1 Count up"
- "Program" indrukken tot: weergave: HRC 1
"SET"indrukken:programmeringsvelden
of
(Program) "HRC 2 Count down"
- "Program" indrukken tot: weergave: HRC 2
- "SET"indrukken:programmeringsveld
| Training Stilstand | 1 | 2 | 3 | 4 | 5 | 6 | 7 | 8 | |
| Belasting | Belasting | ✓ | ✓ | ||||||
| Profiel | Profiel | ✓ | ✓ | ✓ | ✓ | ✓ | |||
| Afstand | ✓ | ✓ | |||||||
| Tijd | ✓ | ✓ | |||||||
| Energie | ✓ | ✓ | |||||||
| Max. Pols of | ✓ | ✓ | ✓ | ✓ | ✓ | ✓ | ✓ | ||
| Vetverbranding 65% of Fitness 75% of Manueel 40-90% | ✓ | ✓ | ✓ | ||||||
| Doelpolsslag 40-200 | ✓ | ✓ | ✓ | ||||||
| Tid/afstand omschakeling Recovery | ✓ | ✓ | ✓ | ✓ | ✓ | ✓ | |||
| ✓ | ✓ | ✓ | ✓ | ✓ | ✓ | ✓ | |||
"Plus" of "min" indrukken
"Plus" of "min" indrukken
"Plus" of "min" indrukken
"Plus" of "min" indrukken
3 x per week 2 minutes trainen
3 × per week 3 minuten trainen
HRC1 - Count-Up 75
HRC2-Count-Down 75
Programas: Count Up / Count Down
- (PROGRAM) "Count Up"
- (PROGRAM) "Count Down"
- (PROGRAM) "HRC1 Count Up"
- (PROGRAM) "HRC2 Count Down"
(PROGRAM) "Count Up"
(PROGRAM) "Count Down"
(PROGRAM) "HRC1 Count Up"
(PROGRAM) "HRC2 Count Down"
HRC1-Count-Up 91
HRC2-Count-Down 91
Programmi: Count Up / Count Down
PROGRAM"CountUp
- (PROGRAM) "Count Down"
- (PROGRAM) "HRC1 Count Up"
- (PROGRAM) "HRC2 Count Down"
(PROGRAM) "Count Up"
(PROGRAM) "Count Down"
(PROGRAM) "HRC1" Count Up
PROGRAM) "HRC2" Count Down
(PROGRAM) "Count-Up"
(PROGRAM) "Count-Down"
(PROGRAM) "HRC1" Count-Up"
(PROGRAM) "HRC2" Count-Down"
Programy: Count up / count down
Programy
Programy rizene pulsem: HRC1/HRC2
Zobrazené hodnoty


(PROGRAM) "count up"
(PROGRAM) "HRC2 count down"
F1,0 = velmi dobrá, F6,0 = nedostatečná
Program: Count Up / Count Down
Differentieres ved telle Funktionen.
Programmer
1. TRÄNING MED NIVENI INDSTILLING.
a) Manuel indstilling
- (Program) "count up"
- (Program) "count down
b) Traeningsprofiler
PROGRAM"1"-6
2. TRAENING MED PULS INDSTILLING
Manuel puls indstilling
- (PROGRAM) "HRC1 Count Up"
- (PROGRAM) "HRC2 Count Down"
TRÄNING MED NIVEN AU INDSTALLING
a) A)Manuel niveau input
(PROGRAM) "Count Up"
Tryk "program" til display "count up", start traingen, alle vaerdier taeller op.
eller
Tryk "set": indstilling
"Plus" eller "minus": aendre niveu
(PROGRAM) "Count Down"
Tryk "program" indtil display "count down"
Display: Distance vardi(dist)
DISTANCE VÄRDI
(program) "HRC 1" count up
Tryk "program" til display viser "HRC1"
Tryk "set" niveau indstilling
eller:
Start traeningen, alle vaerdier taeller op
(PROGRAM) "HRC2" Count Down
Tryk "program" til Display viser "HRC2"
- Tryk "set" niveau indstilling
Andering of display under training
Manuel eendring
AFBRYDELSE / SLUT PÄ TRÄNING
Elektronikken registre en pause i traingen pa under 10 rpm / min aller ved at trykke "recovery". De opnaje data vises pa displayet. Puls, modstand, omdrejninger og hastighed vises som gennemsnitsvaerdier med symbolet
- Sletting of total kmr
General information.
Motionscykler:
HRC1-Count-Up 156
HRC2-Count-Down 156
Funcoes de treino 156
Programas: Count up/Count down
PROGRAM"Count Up
- (PROGRAM) "Count Down"
b) Perfis de esforco
- (PROGRAM) "1" - "6"
- (PROGRAM) "HRC1 Count Up"
- (PROGRAM) "HRC2 Count Down"
(PROGRAM) "Count Up"
(PROGRAM) "Count Down"
(PROGRAM) "HRC2" Count Down
Data Puls. repuso P 1 P 2 Nível de Tempo Distncia Consumo Class. Fitness Puls. Esforco Puls. recup. esforco (min.) (km) de energia

OrnaBneHne
Yka3aHnno TExHnke 6e3- onaCHOCTn
CepBnC
-Be30nacHocTb noJIb3ObaTeIa
PnHnIeNCTBnI 3Kcnnya-tau
KpaTkoe onncahne
- 06laTb Hndnkaun / dnCnnei
- 06laCTbФyHKnI / KHOIIK
KpaTKoe pyKOBOdCTBO
- 06laactbФyHKuH
- 06laactb nHdkaun
- Noka3aTeJIi
Быстpbи CTapT (ДЯ OЗHAKOM-нени)
- NaTo TpeHnpOBKn
3aBepWeHne TpeHnpoBKN
PexmOxuHaHn
TpeHnpOBka
... nyTeM HacTpoiKn HaRpy3Kn
-ПямовOTCUET
- 06paTHbIOTcUeT
- Pexm NaCTpoKn
ДиctaHcN
Врм
Знрг
ВозpacT
- BbIbOp ueIeBOro nyIbca
(Fat/Fit/Man.)
BbOu zIeIeBOrO npIbca
- FOTOBHOCTh K TpeHnpOBKe
- PpOuHnHarpy3kn 1-6
-ПepeключенHeВрema/Диuctанця
... nytem HactpoKn nylbca
HRC1 -празмов OTCUET
HRC1-06paTHbIOTcHT
Функции Тренировки
- Cmeha HnDnKaun
HactpoKa npoФиЯ - PpepbBaHne/3aBepWeHne TpeHnpOBKn
-Bo3o6HOBJIeHne TpeHnpOBKn
BocctaHOBJIeHne (n3MepeHne nylbCa B COCTOHNN OTbIXa)
BbOa3haeHn n yHKuN
-Ta6nua:BBOD3HaueHn/HyHKuIN
-Ta6nua: Poka3aTeIy nylbca
Ubeta nHdkaunn 3naeHne
CUHNI
3eIeHbI
KpaCbI
HnBndyaIbHbIe HacTpoKu
Bb6op: HnDnKaun BKM/MnJAX
- YdaJIeHne o6uero KINIOMeTpapaKa
BbI6Op: HdNkaunKaJx / Kkan
- CoxpaHeHne HacTpoeK
3BykoBoCnHaB BKJ./BbIKJ.
06une yka3aHn
- PpOeCCNoHaBbI TpeHaeKe
- Pocet OceHOK COCTOHH
CnCTeMHbIe 3BykN - INdkaun npoФnB O BpeM TpeHnpOBKn
- Pacuet cpeHero 3NaueHn
- Yka3aHnKacatelbHO n3MepeHnnybcA
IV3MepeHne c nOMOu bHO yHoHo KInncbl
IV3MepeHne c nOMOu bHO pyHoro nybcComeTp a
IV3MepeHne c nOMOu bHO harpyd-Horo peHra - HenolanaKn KOMbIbTepa
PekomeHdaaun no npObeeHNIO TpeHnpOBOK
TpeHnPOBkBa BbIHOCINBOCTN
- IMHTeHCNBHOCTb HaRpy3KN
- 06bem Harpy3Kn
Tloccapn

192
3TOT 3HaK B pyKOBOdCTBe O3Haayet CbIky Ha IIOccapn. B hem 06b- RCHaTc COOTBETCTByIOoee NOHrTne.
Yka3aHnI NO TexHnKe 6e3OpaChocTn
Длг obecneueHnCBOeN co6CTBeHHo8 6e3OanacHOCTn CO6HOnaIte CNeDyUOuNe yKa3aHn:
Tpehaeep cneyetyaHObHTb Ha NOxOJaem dya yCTaHOBKn, npOHOM OCHOBaHN.
- Ipeep nepbblm BBODOM B 3KcnnyatauHcneIyET npOBepntb npouHocTb coeHNHeHn. IpOBepy cIeNyET NOBtOpNTb npImepHoYepe3 6 dHeN 3KcnnyatauHn.
Bo n36ekahne TpaBM BCnEcdTBne HnnpaBnIbHoi Haarpy3Kn nn Npeperpy3Kn TpehaxKe p CneDyeT IcNoJIb3OBaTb TOJbKO B COOTBeTCTBnC pykoBOdCTBOM.
- YCTaHOBka yCTpoiCTBa B NOMEueHnIX C BbICOKO BlaJXHOCTbIO Ha JInTeIbHoe BpeMg He peKOMeHdyETcN 3-3a ONaCHOCTu Obpa3OBAHn PxKaBHybl.
- PeryIaRHO npOBepaIe NCpPaBHOCTb TpeHaepea I erO HndJeKaaee COCToHHe.
- Побевенп пововорк no texнcke 6e30naCHOCTN OTHOCNTc K 6o83aHHOCTM NOIb3OBaTeJI. TaKHe npOBepKn cneJyET npOBODITb peYIpaHOn nHaJIeKaUIM 6Obpa3OM.
3aMeHy DepeKTHbIX INI NOBpeXdeHHbIX KOMnOHeHTOB CNeJeYET BbINoINrHbHEMeDIneHHO. IcNoJIb3yIte ToIbKO OpuRHaJIbHbIe 3aNuaCTn KETTLER.
-До npBBeHnB B nCnpaBHOe COCTOHNye yCTPOICTBOM NOJb3OBaTbC3anpeHNO.
CoxpaHnTb yCTPOIcTBO B NOCTOBHHO 6e30NaCHOCTMOxHO TOJbKO Nytem peryIaPHO rpoBeHnnpoBepOK Ha HAIuue NoBpeKDeHn nN3HOca.
ДlaBaew co6CTbeHHo 6e3OnaCHOCTn:
-Пелед НаалOM TpeHnPOBOK npOKOHcYbTnpUyIteCb y Bpaay, YTO6bl 6bITb YBepeHHbIMN B TOM, YTO BaM MOnKHO NcNoJIb3OBAtB 3TO YCTpoIcTB OДЯ TpeHnPOBOK. PeWeHne Bpaay DoJXHO 6bl OCHOBaHNem DЯ COCTaBNeHnBaWe nPporpaMMbl TpeHnPOBOK. HenpaBUNbHaR TpeHnPOBka NIn Upe3MePHaH Harpy3Ka MOrYT nPnUHHHTb BpeD 3dOpOBbIO.
SET (Kpatkoe HaXkaTne)
3Ta yHKUHOHaJIbHa KHOJa NcNoJb3yeTcra nAKTINBaUNBBODa.
PpImeHIOCTc BBeDeHHbIe daHHbIe.
DomaHn TpeHaKeep=21,3Km/4
PpoeecnOHaBbHbTpeHaKeep = 9,5KM/q


PekomeHdaaun no npoBeHeu TpeHnpOBOK n pyKOBOcTBo NO 3Kcnnyataaun
Yactota warob
Kana KounuecTa 06oPoTOB neaen

CpeDHee 3HaueHne
3haueHne 0-199
Ckopooctb
CpeDHee 3HaueHne
3haeHne 0-199
HactpanBaemay einnuca n3mepen
NyIbc
MaKcImaJIbHbI nylbc
CpeDHee 3HaueHne
PpeynpeKdHne (Mnraet), MAcC. nybc LcJIeBOy nybc npBeBbIweH +11
LeneboynyIbcHnXe
yCTaHOBHeHHoI rpaHnUbI -11
Cnmbon cepda (MnaeT)
PpoeHTHOe 3HaueHne
3BykoBoCnHAn BKJ./BbIKJ.
PacctoHne
DISTANCE
km m
3haueHne 0-999,9
CtyneHb Harpy3Kn
CpeJHee 3HaueHne

CtryneHb 1-15
Bpemr
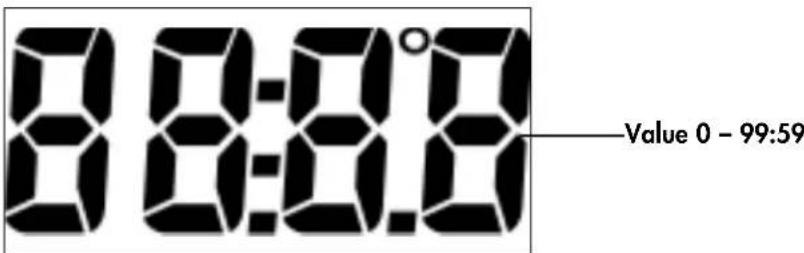
3haueHne 0-99:59
NyHKtbi
Hdkaun TeKCTa n 3HaueHn
25 KOJIOHOK
1 KOJIOHka COOTBETCTBYET 1 MHHyTe
HnHa Domaunx Tpehaxepax
400 m n nn 0,2 mnn
Ha npofoecnoHaBbIX TpeHaxepax:
200 m n nn 0,1 mn nn
БыICTpbI CTapT (ДЯ OЗнakOMЛeHЯ)
Haayano TpeHnpOBKn
6e3 ocobix hactpoek
3KpaH npBETCTBn npn BKNOyeHN Hndkauno6uero KNIOMetpaxa «ODO» (ODometp)
- IIO nCTeueHn 5 ceKyHd: INHnKaunra «IpmaO nOTcHT'; BCE 3HaueHn paBhbl O; Harpy3ka paBHa cTyneHn 1
- Hauano TpeHnpOBKn
HnKaun
Kana, nylbc (ecnn n3mepeHne nybca akTNBnPOBaHO), pacCTOHaHne, CTyneHb, 3Heprn, Bpem, 06OpOTobl, CKOpocTb N Bpem
H3MeHeHHe Harpy3Kn BO BpEm TpeHnpOBKn
PekomeHdaaun no npoBeHeu TpeHnpOBOK n pyKOBOCTBO no 3KcNpyaun


b)Профилн Harpy3к (ПРОГРAMMA) «1» - «6»
Bce nporpaMmbl Bb6npuoTc npn HaaTn Ha KhoNkY «IPOPAMMA»
Haep, Haukaun.1> ΦHTHeC dIaHauHauOux I; CTyneHb Harpy3kn 1- 4,27 MnH
Haxatb «SET»: pexm Hacptoyn,
Hauano TpeHnpovBkn
HaxkaB u yapedKuBaTb IPOPAMMA>do NOBHeNIA: HndKaunr 2> ΦHTHeC dIaHaHaIOx II; CTypeHb Harpy3Kn 1-5,30 MnH
Haatb TpeHnpoBky, Bce 3haeHn8 6ydyT CHTaTbCn NO Bo3paCTaHHIO.
Harpy3ka yBelenuBaetc aBTOMaTnueckn Do Tex nop, noka He 6ydet DOCTnHyT ueJeBOI nybc (Hanpimep, 130)
(ПОГРAMMA) «HRC2» 06paTHbI OtCteT»
HaxKaTb u ydePxNBAtB «IPOIgPAMMA» do nOraBHeHn: HAnKauHr: HRC2
Hakatb SET>:pekmHaCTpoKn
BbOd 3HaueHn N Bo3MoXHoCTn HaCTpOKn aHaJOruHb nporpaMME «O6paTHbI OTCyeT>.
- Hauano TpeHnpOBKn
Harpy3ka yBelenuBaetc aBToMaTuYeCKn Do Tex nop, noka He 6ydt DOCTnHyT ueleBOI nybc (Hanpimep,130)
Unn
Haatab TpeHnpOBky
Yka3aHHe:
HauaJIbHaI Harpy3ka
B peximax Hactpoynn IpyorpaH MRc moxho yctaHOBTb HaualbHyIO Harpy3ky co cTyneHbIO 1-10.
C NOMOJIIO KHOJOK «ПИOC» ИИ «MнИс» BbIIOJIHЯETcB BBOd 3HaueHn(HanpIMep,10). Harpy3ka aBTOMaTNUeCKn yBeINuHBaETc, NaHHaY C yKa3aHHoN CTyNeHn, Do Tex NOP, noka He 6yDeT DOCTNRHyT ueNEBoN pyNbC (HanpIMep, 130)
NyIbC
C NOMOJIbIO KHOJOK «ПИOC» IIN «MHyc» Ha 3TOM 3Tane (rotOBHOCt b K TpeHnPOBKe) eue MoXHO n3MeHnTB 3HaueHne nYnbCa, HApPmEp, co 130 ha 140.
TpeHnpOBka HauHaeTc npn HaxaTm Ha neaJIb.
Bo3MOxHocTn HacTpOuKn: cm. Ta6nua Ha cTp. 173
Приимechи:
- KETTLER peKOMeHnyET nCNoIb3OBAt b HarpydHipeMeH b IJIa N3MepeHnI pyIbCa B npOrpamMax HRC
AanTaun K Harpy3e B nporpaMax HRC npocxOaNT npn OTKIOHeHn B +/- 6 yapob cepua.
ФункцииТренирбки
CmeHa HndnKaun BO BpeMa TpeHnpOBKn
HactpoKa:BpyHyIO
C NOMOsbK HONKn «IPOPGAMMA» INHnKaunB TOueHOM IOne MeHReTcB TaKoN IocneIOBaTeNb-Hoctn: Time / RPM / Speed / Dist. / Pulse / Brake / Ener. / Time ...


SCAN

PekomeHdaaun no npoBeHeu TpeHnpOBOK n pyKOBOCTBO no 3KcNpyaun
Hactpoynka:abTOMaTHueckn(SCAN)
HaxaTb uyepeKnBaTb KhoNky «PPOPAMMA» Do Tex nop, Noka Ha dncnlee He noBNTc CmBOJ «SCAN». CmeHa Hndnkaun npocxOanT c qactoToB 5 cekyHd. FyhKuyn «SCAN» Bbiklouaetc npn NobTOpHOM HaxaTn Ha KhoNky «PPOPAMMA», nyTem aKTNbauu n FyhKcuu BOCCTaHOBneHry «RecoVery» nnn nocpeDCTBOM npepbVAHH TpeHnpOBKn.
PekomeHdaaun no npoBeHeu TpeHnpOBOK n pyKOBOCTBO no 3KcNpyaun

HnBnyaHbIe NaCTpOiKu
BbINOHNTE DeNCTBnB B COOTBeTCTBnC npnaraeMoN CXEMoHaxaTb «RESET»
Hnukaua: BCE cerMeHTbI Tepeh Haaatb N yepxmbaTb «SET»: MeHIO: HnDnBnDyAalbHbIe HaCTpoKN
Hnukaua Scale
1.Инданацяеуницимерень KINOMETpax/MnlaX
HenolanaBHHdkauuynybc
EcnnBce jne npn n3mepeHHn nyIbca BO3HnKaIO T npO6JIeMbI, npOBepbTe eue pa3 NyHKTbI, nepeuNCHeHHbIe Bblwe
PnmeaHne:
OndOBpeMeHHo MOxH0 NcNoIb3ObaT TOIbKO OOnn CnOco6 N3MpeHnnyIbca: N6oC NOMOsbIO yuHON KINncbl, N6oC NOMOsbIO pyHORO NylbcOMeTpA, N6oC NOMOsbIO HarpyDHorO peHn. Ecln B pa3bEme NylbcOMetpa Het Ka6eY uHON KINncbl NnBCTaBHOrO npEMHnka, To aKTHBupOBaH pyHON NylbcOMeTp. Pnp NOcEOdInHeHNu yuHON KINncbl NnN BCTaBHOrO npEMHnka Kpa3bEmy NylbcOMeTp pyHON NylbcOMeTp ABTomAtueCKn DeakTNbpyetc. WTeKeP daTuNKOB pyHORo nylbcOMeTp aN3BNeKaTb He HyXHO.
PekomeHdaaun no npoBeeHIO TpeHnpOBOK n pyKOBODCTBO NO 3KcNpyataun
HenolanaKOMnbIOTepa TpeHaXepa
HaxMMTe KhONKy «Reset» (c6poc)
PekomeHdaaunn no npOBeHeHIO TpeHnpOBOK
3prometpna nCNOb3yeTcB CnOPTNBHO MeuHHe n aTneTuuecko NDoTOrOBKe IJa PPOBepKn COCTOHN He cepda, KPOBeHoCHOn N DblXaTeJbHO CNCTeMbI.
BbIOCTnHHeTe XeJaEmbIX pe3yNbTaTOB uepe3 HeCKoJIbKO HeJeIb,ecnn:
- Bby DocTuraete OnpeJeIeHHbIX pe3yNbTaTOB c MeHbWeHarpy3KoH Ha cepDuce, Yem paHbwe.
- BbBbIepKnBaTe OnpeIeIeHHyO Harpy3Ky B TeueHne DInTebHo BPemH, npN 3Tom Harpy3Ka Ha cepDuce He N3MeHReTcR.
- Bb6bCTpee npxOAnTe B HopMy nocne onpeJeHHoHa rpy3Kn Ha cepdue, qem paHbwe.
OpneHTnpoBOUHbIe NOKa3aTeJIu IJLa TpeHnpOBKn Ha BblHocJIuBOcTb
MaKcMaJIbHbI nylbc: IOD MaKcMaJIbHOH HArpy3KOI NOdpa3yMeBaETCa DOCTnHexHe INHINBNUdyAIBHOrMaKcMaJIbHO rnybcA. MaKcMaJIbHO BO3MOxHaJyAcTota cepDeHHbIX COKpaueHm 3aBNCIT OT BO3pacta.
3Decb DeiCTByET 3Mnnpuecka fOpMya: MaKcMaJIbHaJ aactota cepdeuHbIX COKpaIeHn B MmHyTy COOTBeTCTByet 220 ydapaM MNyC 3HaueHne BO3pacta.
Приимер:ВозpacT50net->220-50=170 ydapOB B MmHyTy
HHTeHCNBHOCTb HaRpy3KN
Nylbc Harpy3Kn: ONTnMaIbHnIHTeHCNBHOCTb Harpy3Kn DOCTnRaTeCBA Dnana3OHe 65-75% OT MaKcMaJIbHOro nyBaCa (CM. dnaIparmMy). B 3aBncMocTo NT Bo3pacta 3TO 3HaueHne n3MeHReTc.
06bem harpy3kn
IINTeJIbHOCTb TpeHInPOBKn I KOJIInueCTBO TpeHInPOBOK B HeJeIO
OnTImaIbHbI O6bem HaRpy3Kn IOCTnraETCsK, KOrda B TeueHne IInTeIbHoro nepNoDa BpeMeHN Pnybc NODepKJBBaETcHa ypoBHe 65-75% ot MaKcMyma.
3mnpueckoe npabnlo:
HaToTa TpeHnPOBOK PpOdoJXntbHOCTb TpeHnPOBOK
eKeIHeBHO 10MH
2-3 pa3a B HeJeIIO 20-30 MmH
1-2 pa3a B HeJeIIO 30-60 MmH
HaHnHaIOUIM HeIb3a Cpa3y npNCTyNaTb K TpeHnpOBkAm DInTeJIbHOCTbIO 30-60 MNHyT.
TpeHnpOBka dna HauHaIOux B nepBbIe 4 HeJeIN OJnx HA BbIgIaTeB CneDyUOUM 06pa3OM:
YachToTa3aHnTmO6bEm TpeHnPoBKn
1-HeDJIe
3 pa3a B HepeIIO TpeHnpOBka 2 MmHyTbI
Ipepepb1 MmHyTa IJRA rMHaCTUKN
TpeHnpOBka 2 MmHyTbI
IpepebIB 1 MmHyTa IJRA TMMHaCTnKIN
TpeHnupOBka 2 MmHyTbI
2-nahe
3 pa3a B HeJeIIO TpeHIpOBKa 3 MInHyTbI
Ipepepb1 MmHyTa IJRA rHMHaCTnKIN
TpeHnpOBKa 3 MmHyTbI
Ipepepb1 MmHyTa dJa rMHaCTnKn
TpeHnpOBka 2 MmHyTbi
3-нелл.
3 pa3a B HeJeIO TpeHIpOBKa 4 MInHyTbI
Ipepeb1 MmHyTa dJa rMaHactnK
TpeHnpOBKa 3 MmHyTbI
Ipepepb1 MmHyTa dJa rMnHaCTNkn
TpeHnpOBKa 3 MmHyTbi
4-небеля
3 pa3a B HeJeIIO TpeHInpOBKa 5 MmHyTbI
IpepebIB 1MHyTa IJRA rMHaCTnK
TpeHnpOBka 4 MNHyTbi
Ipepeb1 MmhyTa dIra rHMaCTnK
TpeHnpoBka 4 MNHyTbi
Ipeed KaJdoTpeHnpOBKo n nocTe TpeHnpOBKn Heo6xOIMO BbIeJIaTb no 5 MInyT Ha 3aHrTaN rIMHaCTNKo dla pa3OrpeBa n OxJaXdEHHa. MeKdy DByMa TpeHnpOBKaMn DOJKeH 6bITb OINH DeHb 6e3 TpeHnpOBKn, ECIN BdaJIbHeiWeM Bbl PnaHpye npoBOAnTb TpeHnpOBKn 3 pa3a B HeJeIIO NO 20-30 MInyT. B dpYrom Cny-ue npOTnbONkA3aHn dIra exeJdEBhIx TpeHnpOBOK HEt.
Tloccapn
BocctaHOBJIeHne
N3MpeHne nyIbCa B CnOKoHOM COCTOHN npn 3aBep-WeHN TpeHnpOBKn. BByNCJIeTcpa3NIuHne MeKdy 3NaueHnA M NylbCa, NOJyueHHbIM npn 3aMePax C INHTepBaIOM BOdHy MNHyTy, n ONpeJeJIeTc OceHka COCTOHN. PpN OOnHaKObBix TpeHnpOBkax yNyUweHne 3ToI OueHKn ABJIeTcPaN3HaKOM yNyUWeHn FIn3NuECKOJ FOpmbl.
C6poc
Ydaenne noka3aTee nepe3anyck dncnne.
PporpaMMbl
Bo3MOxHocTn TpeHnpOBok, KOtOpBle Tpe6yIOT yka3aHnBpyHyIO nn pOroPamMbIM Cnocobm 3HaueHn IJnHarpy3Kn nn ueJeBOrO nyIbCa.
PpoΦnJn
OTo6paKaMaBIE B ToUeyHOM NIOe N3MeHeHn HaRpy3Kn C yUeTOM BpeMeHN IIN DInCTaHcN.
N3mepene
EINHcBn3MpeHnIaBbIOdaHaKpaH:KNOMeTpblnnMNNNBac,KNIOJKOyNINNNKNOKaJOpN
3Heprn
PaccuTbIbAeT paCXoD 3Heprn
CnCTema npaBHeHna
3NeKtpOnHka peryInpye Harpy3ky nn nynbc B COOT-BetCTBn C BBeDeHHbIMn BpyHyIO nn npdeUcTaHOBnEHbIMn 3HaueHnMn.
ToeueHoe none
06naCTb HnDnKaun, NMeOuJaa pa3Mep 25 x 16 ToeK, DnI OTO6paKeHn npoΦnJeuH Harpy3Kn nnybCa, a TaKke DnI INDnKaun TeKCTa n 3HaueHn.
NyIbC

- Programme: Count Up / Count Down
- Functionality and Operation 19 Short description 19
- Quick start (Introduction) 23
- Training
- ... by defaults of pulse
- Training functions 27
- Input and functions 29
- Display colours and their meaning: 29
- Individual settings 30
- - Alarm sound ON/OFF 30
- General notes 31
- Training instructions 32
- Glossary
- Safety notes
- For your safety:
- Functionality and Operation
- Short description
- Training and Operating Instructions
- Function range
- SET (press briefly)
- SET (press for a longer period of time)
- Reset
- Programme
- Minus - / Plus + buttons
- RECOVERY
- Note:
- Measuring the pulse
- Indicating range / Display
- Programmes: Count Up / Count Down
- Programms
- Strains beyond the time or distance
- Pulse-controlled programmes: HRC1/HRC2
- Target pulse beyond the time
- Display values
- Points
- Quick start (Introduction)
- Start of training:
- Display
- End of training
- Standby operation
- Training by defaults of strain
- Training by defaults of pulse
- Training by defaults of strain
- Or
- Default range
- Distance default
- Time default
- Energy default
- Age input
- Selection of target pulse
- Target pulse (40 - 200)
- Readiness for training
- Strain
- Switching over time/distance
- Manual defaults of pulse
- Initial strain
- Pulse
- Training functions
- Display change during training
- Adjustment of the strain profile
- Interruption/end of training
- Resumption of training
- RECOVERY function
- Measuring the recovery pulse
- Input and functions
- Display in case of pulse events
- Display colours and their meaning:
- Individual settings
- Display of the unit in kilometres / miles
- Deletion of total kilometres
- Display of the energy consumption in kJoule / kcalorie
- Storage of defaults
- Alarm sound in case of exceeding the maximum
- General Instructions
- Exercise bike
- Speed calculation
- Crosstrainer
- Fitness value calculation
- System Sounds
- Switching On
- Programme End
- Maximum Pulse Overrun
- Error Display
- Switch On/Off Automatic Scan Function
- Time/Distance Switch
- Profile Display during Training
- Average Calculation
- Instructions for Pulse Measurement
- With Ear Clip
- With Hand Pulse
- With Chest strap
- Failures in the pulse display
- Comment
- Faults in the Training Computer
- Training Instructions
- Guide values for the endurance training
- Load Intensity
- Extent Of Load
- Empirical Formula:
- 1st week
- 2nd week
- 3rd week
- 4th week
- Programs
- Profiles
- Dimension
- Energy
- Control
- Points field
- MaxPulse(s)
- Target pulse
- Fat burning pulse
- Fitness pulse
- Manual
- Age
- HI symbol
- LO symbol
- Menu
- Performance table
- Sommaire
- SET (appuyer longuement)
- Programme : Count Up / Count Down
- Programmes
- Programma's: Count Up / Count Down
- b. Belastingprofielen
- Training door belastingprogrammering
- a) Manuele belastingprogrammering
- of
- Programas: Count Up / Count Down
- Programmi: Count Up / Count Down
- (PROGRAM) "Count-Down"
- Programy: Count up / count down
- Programy
- Programy rizene pulsem: HRC1/HRC2
- Zobrazené hodnoty
- Programmer
- TRÄNING MED NIVENI INDSTILLING.
- TRAENING MED PULS INDSTILLING
- TRÄNING MED NIVEN AU INDSTALLING
- DISTANCE VÄRDI
- eller:
- Andering of display under training
- Manuel eendring
- AFBRYDELSE / SLUT PÄ TRÄNING
- General information.
- Motionscykler:
- Funcoes de treino 156
- Programas: Count up/Count down
- OrnaBneHne
- Yka3aHnno TExHnke 6e3- onaCHOCTn
- PnHnIeNCTBnI 3Kcnnya-tau
- KpaTkoe onncahne
- KpaTKoe pyKOBOdCTBO
- Быстpbи CTapT (ДЯ OЗHAKOM-нени)
- TpeHnpOBka
- ... nyTeM HacTpoiKn HaRpy3Kn
- (Fat/Fit/Man.)
- ... nytem HactpoKn nylbca
- Функции Тренировки
- BbOa3haeHn n yHKuN
- Ubeta nHdkaunn 3naeHne
- HnBndyaIbHbIe HacTpoKu
- 06une yka3aHn
- PekomeHdaaun no npObeeHNIO TpeHnpOBOK
- Tloccapn
- Yka3aHnI NO TexHnKe 6e3OpaChocTn
- Длг obecneueHnCBOeN co6CTBeHHo8 6e3OanacHOCTn CO6HOnaIte CNeDyUOuNe yKa3aHn:
- ДlaBaew co6CTbeHHo 6e3OnaCHOCTn:
- SET (Kpatkoe HaXkaTne)
- БыICTpbI CTapT (ДЯ OЗнakOMЛeHЯ)
- Haayano TpeHnpOBKn
- HnKaun
- PekomeHdaaun no npoBeHeu TpeHnpOBOK n pyKOBOCTBO no 3KcNpyaun
- b)Профилн Harpy3к (ПРОГРAMMA) «1» - «6»
- Unn
- Yka3aHHe:
- HauaJIbHaI Harpy3ka
- NyIbC
- Приимechи:
- ФункцииТренирбки
- CmeHa HndnKaun BO BpeMa TpeHnpOBKn
- HactpoKa:BpyHyIO
- HnBnyaHbIe NaCTpOiKu
- 1.Инданацяеуницимерень KINOMETpax/MnlaX
- HenolanaBHHdkauuynybc
- PnmeaHne:
- PekomeHdaaun no npoBeeHIO TpeHnpOBOK n pyKOBODCTBO NO 3KcNpyataun
- HenolanaKOMnbIOTepa TpeHaXepa
- PekomeHdaaunn no npOBeHeHIO TpeHnpOBOK
- OpneHTnpoBOUHbIe NOKa3aTeJIu IJLa TpeHnpOBKn Ha BblHocJIuBOcTb
- HHTeHCNBHOCTb HaRpy3KN
- 06bem harpy3kn
- 3mnpueckoe npabnlo:
- 1-HeDJIe
- 2-nahe
- 3-нелл.
- 4-небеля
- BocctaHOBJIeHne
- C6poc
- PporpaMMbl
- PpoΦnJn
- N3mepene
- 3Heprn
- CnCTema npaBHeHna
- ToeueHoe none
Brand : KETTLER
Model : Golf P Eco
Category : Exercise bike