
SECDVRMON30 - Surveillance Camera KONIG - Free user manual and instructions
Find the device manual for free SECDVRMON30 KONIG in PDF.
| Product Type | 15" Monitor with DVR |
| Brand | KONIG |
| Model | SECDVRMON30 |
| Screen Size | 15 inches (4:3) |
| Resolution | 1024 x 768 pixels |
| Contrast | 450:1 |
| Brightness | 250 cd/m² |
| Viewing Angle | 80° |
| Video Inputs | 4 x BNC (1 Vp-p / 75 Ω) |
| Video Output | 1 x BNC (1 Vp-p / 75 Ω) |
| Audio Input | 1 x RCA |
| Audio Output | 1 x RCA |
| Video Compression | H.264 |
| Display Rate | 100 fps (CIF / half-D1), 50 fps (D1) |
| Hard Drive Capacity | Up to 1 TB (not included) |
| Hard Drive Interface | 1 x SATA |
| Power Supply | 100-240 VAC / 12 VDC, 5 A |
| Dimensions (H x W x D) | 302 x 360 x 58 mm |
| Maintenance | Clean with a dry cloth, without solvents |
| Safety | Do not open, unplug before maintenance |
| Warranty | Warranty void if unauthorized modification |
| General Information | Specifications subject to change without notice |
Frequently Asked Questions - SECDVRMON30 KONIG
User questions about SECDVRMON30 KONIG
0 question about this device. Answer the ones you know or ask your own.
Ask a new question about this device
Download the instructions for your Surveillance Camera in PDF format for free! Find your manual SECDVRMON30 - KONIG and take your electronic device back in hand. On this page are published all the documents necessary for the use of your device. SECDVRMON30 by KONIG.
USER MANUAL SECDVRMON30 KONIG
natural_image
Computer monitor displaying multiple video surveillance feeds including a corridor, car, and bridge (no visible text or symbols)MANUAL (p. 2)
15" Monitor with DVR
ANLEITUNG (s. 7)
MANUAL DE USO (p. 32)
Note: This is a short description guide for the SEC-DVRMON30. For full details on how to use the SEC-DVRMON30, refer to the advanced English manual.
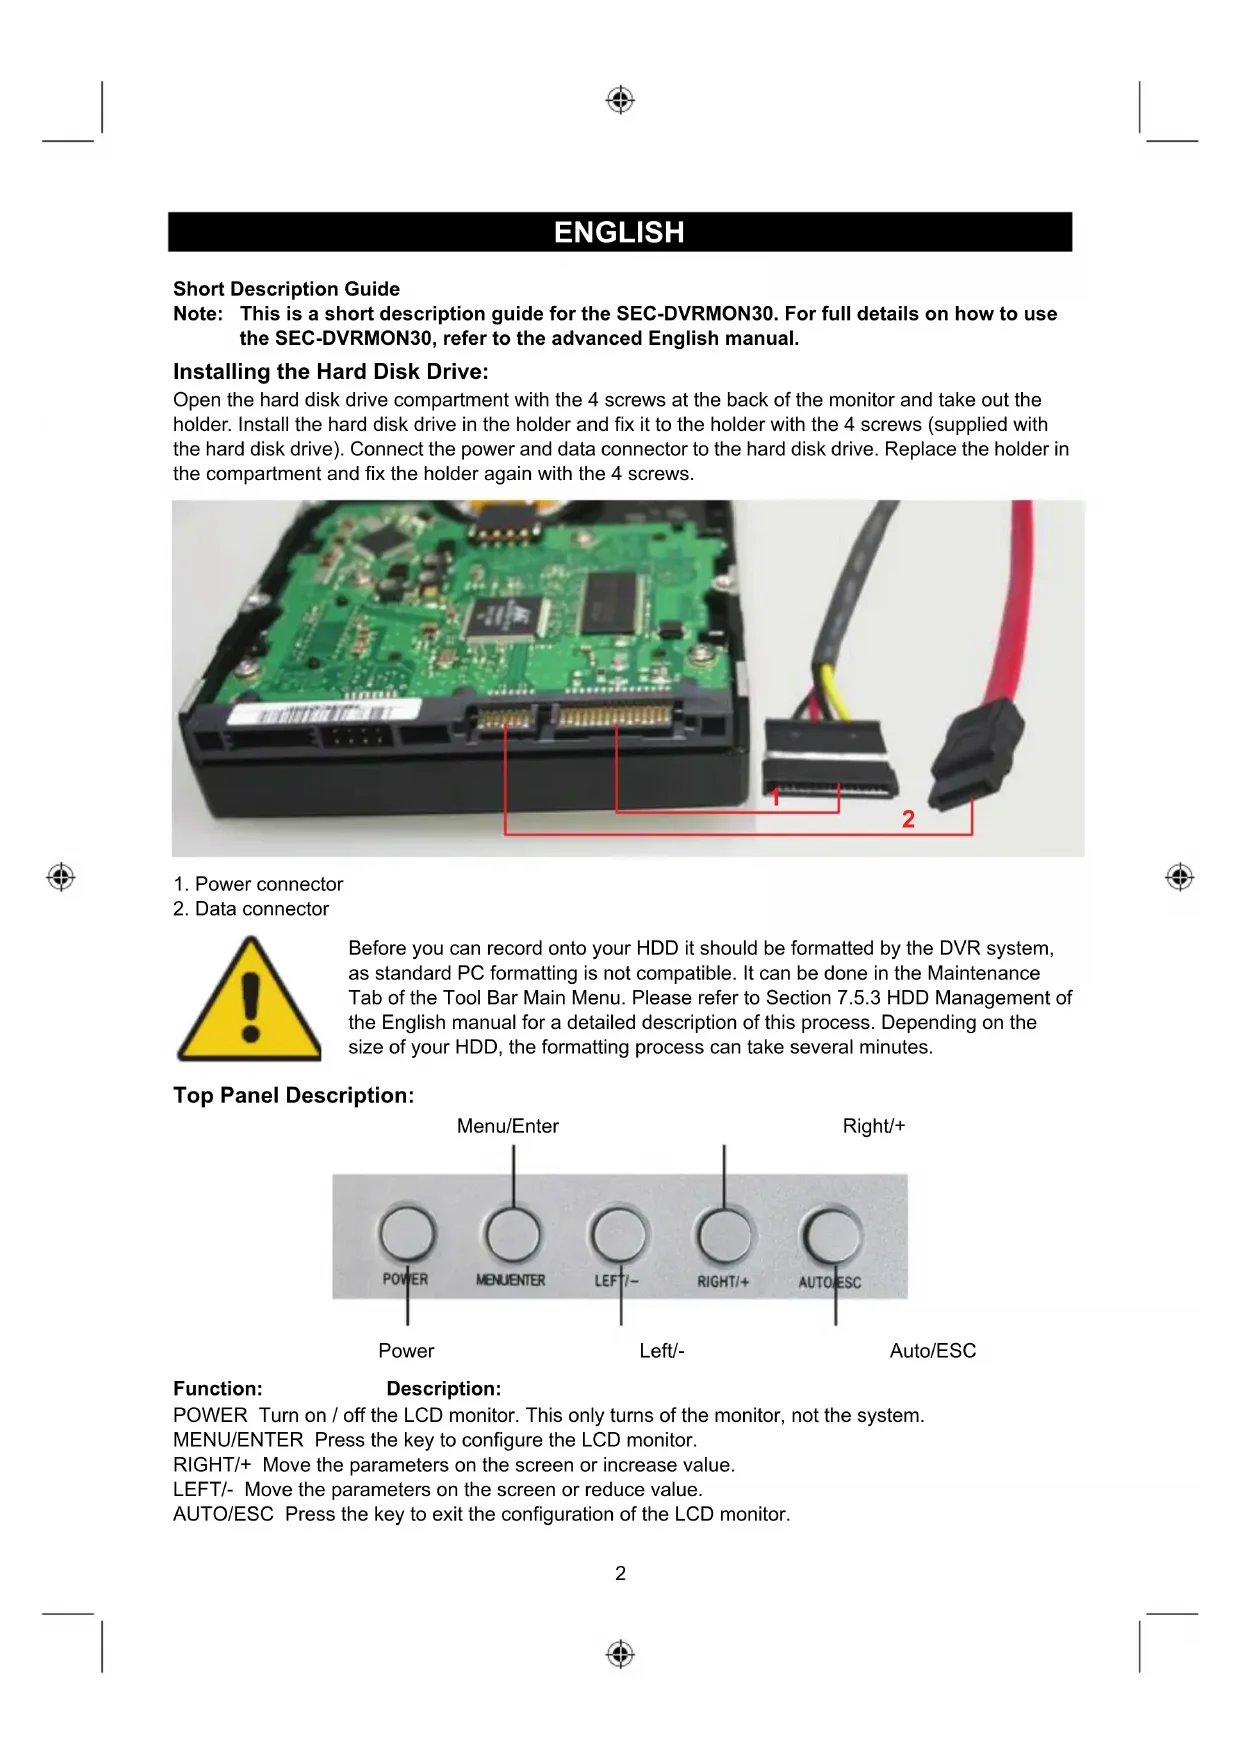
Installing the Hard Disk Drive:
Open the hard disk drive compartment with the 4 screws at the back of the monitor and take out the holder. Install the hard disk drive in the holder and fix it to the holder with the 4 screws (supplied with the hard disk drive). Connect the power and data connector to the hard disk drive. Replace the holder in the compartment and fix the holder again with the 4 screws.

natural_image
Close-up of a green circuit board with attached black GPU cable and red connector (no text or symbols visible)- Power connector
- Data connector

Before you can record onto your HDD it should be formatted by the DVR system, as standard PC formatting is not compatible. It can be done in the Maintenance Tab of the Tool Bar Main Menu. Please refer to Section 7.5.3 HDD Management of the English manual for a detailed description of this process. Depending on the size of your HDD, the formatting process can take several minutes.
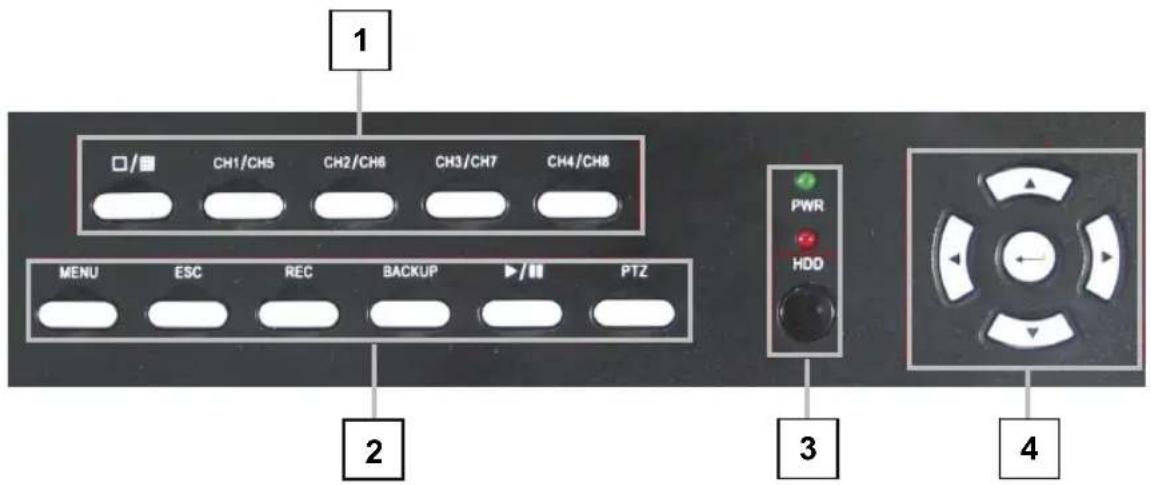
Top Panel Description:

text_image
Menu/Enter Right/+ POWER MENUENTER LEFT/- RIGHT/+ AUTO/ESC Power Left/- Auto/ESCFunction: Description:
POWER Turn on / off the LCD monitor. This only turns of the monitor, not the system.
MENU/ENTER Press the key to configure the LCD monitor.
RIGHT/+ Move the parameters on the screen or increase value.
LEFT/- Move the parameters on the screen or reduce value.
AUTO/ESC Press the key to exit the configuration of the LCD monitor.
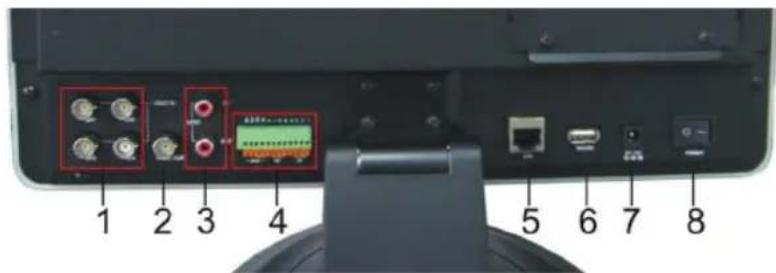
Front Panel Description:
text_image
1 CH1/CH5 CH2/CH8 CH3/CH7 CH4/CH8 MENU ESC REC BACKUP PTZ PWR HDD 2 3 4- CH1\~CH4 / ( /) buttons (4CH)
Using these buttons, you can choose to output video on your monitor either as a full-screen view for each of the cameras individually or from all Channels simultaneously (☐/☐).
- MENU: Displays the main menu.
ESC: Use this button to exit the menu
REC: Start or Stop manual recording.
Backup: Opens video search and Backup menu
Play/Pause (▶/II): Opens video search and playback menu. When the playback mode is activated press this button to play/pause playback.
PTZ: (Pan-Tilt-Zoom) High Speed Dome camera functionality.
- Power LED, Hard Drive (HDD) LED
LED lights indicating connection to the power supply and the HDD usage.
IR Window, infra-red sensor for remote control
- ◀, ▶, ▲, ▼
Use arrow buttons to move among the menu items. Press ◀, ▶ to move to selection boxes, press
▲, ▼ to select submenu parameters. Press Enter to confirm your choice.
Back Panel Description:
text_image
1 2 3 4 5 6 7 8- Video Input Connectors (1-4)
- Video Output Connector
- Audio Input / Output Connector
- Alarm Input Connectors (ALARM IN 1-4, 5-6 Ground)
Alarm Output Connectors (ALARM OUT 7-8)
RS-422 / RS-485 Connector (9-12) - RJ-45 connector 10/100 Base-T Ethernet network
- USB connectors: USB ports to connect the mouse and backup devices (flash drive, DVD recorder).
- Power Input Socket (12VDC)
- Power Switch
Side Panel Description:
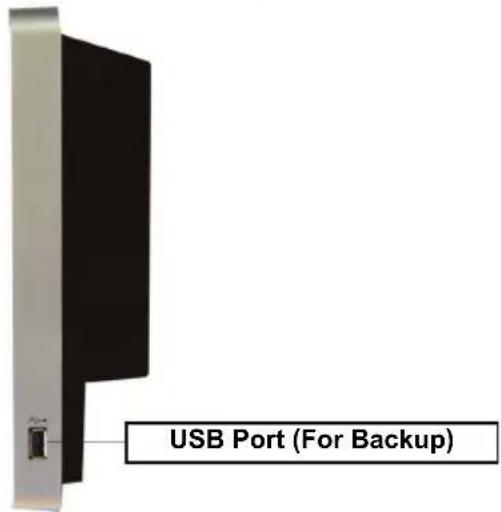
text_image
USB Port (For Backup)Description menu interface:
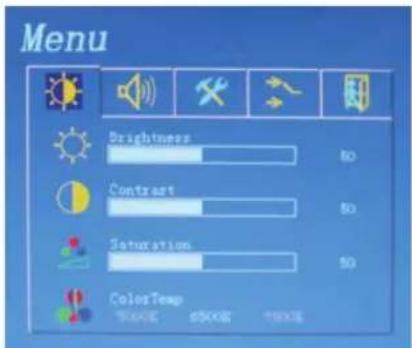
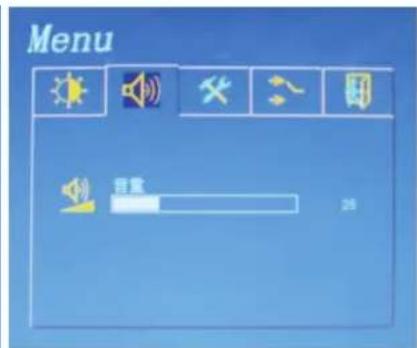
To adjust the parameters of the LCD monitor, you can press "MENU/ENTER". The menu will be displayed on the LCD screen. Then press "LEFT/-" or "RIGHT/+" to move the cursor left or right to select the option that the user wants to modify. Then, press "LEFT/-" or "RIGHT/+" to increase or decrease value. When finished setting, press the "AUTO/ESC" to exit.
text_image
Menu Brightness 60 Contrast 60 Saturation 60 ColorTemp 60000 60000 60000Brightness: 0\~100
Contrast: 0\~100
Saturation: 0\~100
Color Temp: 5000K/6500K/7500K

text_image
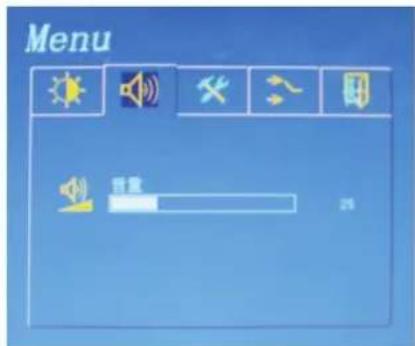
Menu 回音 25Volume: 0\~100

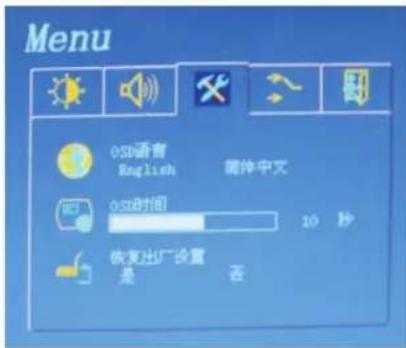
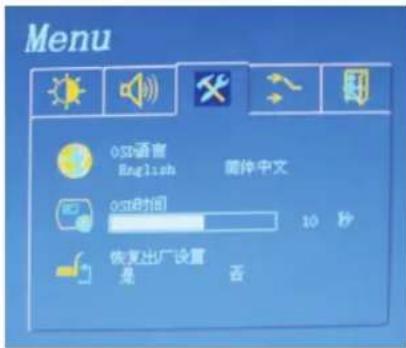
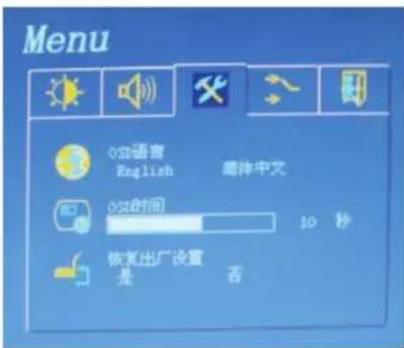
OSD Language: select language
OSD Time: display time
Factory Reset: YES/NO

Remote Control Description:

text_image
1 2 3 4 5 6 7 8 9 10+ 1 2 3 4 5 6 7 8 9 10+ 10- REC REC CPIR PTZ ENTER| No. | Name Description | ||
| 1 | Alarm reset | Clears the alarm input or alarm output status. | |
| 2 | REC | Manual recording. Has the same function as thebutton on the device's front panel. | |
| 3 | Numeric buttons | Input numbers or select to change relevant channels. | |
| 4 | Functional Buttons |  | Enter the main menu. |
 | Switch from the single window view mode to multiple split view mode | ||
 | Return to upper menu, same as the button on the front panel | ||
 | Enable PTZ control, same as the button on the front panel | ||
| 5 | Playback Control |  | Play in slow mode / rewind |
 | Play/Pause | ||
 | Stop | ||
 | Fast forward | ||
 | Go to next frame | ||
...  | Function, access to auxiliary settings. | ||
| 6 | Picture Adjustment Parameters |  | Buttons for adjusting brightness |
 | Buttons for adjusting contrast | ||
| 7 | Arrow Buttons | Similar to the functions of arrow buttons on the front panel | |
| 8 | DEL | DELETE button | |
Specifications:
• Video input: 4x BNC, 1Vp-p/75Ohm
• Video output: 1x BNC, 1Vp-p/75Ohm
• Audio input: 1x RCA
• Audio output: 1x RCA
• Frame rate display: 4x 25fps
• Frame rate playback (CH1): 25fps (CIF), 25fps (half D1), 12fps (D1)
• Frame rate record: 100fps (CIF), 100fps (half D1), 50fps (D1)
- Compression: H.264
• Video backup: MP4, AVI, H.264 raw
• Video quality: Full, 15fps, 7fps, 3fps, 1fps or user setting
• Hard disk capacity: Up 1TB (not included)
- Interface: 1x SATA
• Network protocol: TCP-IP / DHCP / DNNS / PPPoE / E-MAIL
• Network interface: RJ45 10/100M Ethernet auto detect
• Network function: IE browser live monitor, Configuration, Download video, Mobile phone surveillance
- USB 2.0 port: Mouse / Portable mobile HDD / Flash drive / DVD burner /
Firmware
upgrade
• Monitor: 15" color LCD 4:3
• Resolution: 1024x768
- Contrast: 450:1
- Brightness: 250CDM
- Angle: 80^
- Sensor/Alarm: 4x in / 1x out
• PTZ control: RS485
• PTZ protocol: PELCO-P / PELCO-D / Samsung / Panasonic
• Power supply: 100\~240VAC/12VDC, 5A
- Dimensions: 302 (H) x 360 (W) x 58 (D) mm (w/o monitor stand)
• Weight: 4 kg (w/o HDD)
Safety precautions:

CAUTION
RISK OF ELECTRIC SHOCK DO NOT OPEN

To reduce risk of electric shock, this product should ONLY be opened by an authorized technician when service is required. Disconnect the product from mains and other equipment if a problem should occur. Do not expose the product to water or moisture.
Maintenance:
Clean only with a dry cloth. Do not use cleaning solvents or abrasives.
Warranty:
No guarantee or liability can be accepted for any changes and modifications of the product or damage caused due to incorrect use of this product.
General:
Designs and specifications are subject to change without notice.
All logos brands and product names are trademarks or registered trademarks of their respective holders and are hereby recognized as such.
Keep this manual and packaging for future reference.
Attention:

This product is marked with this symbol. It means that used electrical and electronic products should not be mixed with general household waste. There is a separate collections system for these products.
DEUTSCH
Kurzbeschreibung
natural_image
Close-up of a green circuit board with attached black and red components, showing internal components and cable (no text or symbols visible)Function: Description:
natural_image
Close-up of a green circuit board with attached black GPU cable and red connector (no text or symbols visible)Top Panel Description:

text_image
Menu/Entrer Droite/+ POWER MENUENTER LEFT/- RIGHT/+ AUTO/ESC Marche Gauche/- Auto/ESCFonction: Description:
text_image
Menu Brightness Contrast Saturation ColorTempLuminosité: 0\~100
Contraste: 0\~100
Saturation: 0\~100
Couleur
Temp:5000K/6500K/7500K
- Poids: 4 kg (w/o HDD)
natural_image
Close-up of a green internal circuit board with attached black and red components, showing connector pin and cable (no text or symbols visible)text_image
Menu Brightness 80 Contrast 80 Saturation 50 ColorTemp 500K 650K 750KHelderheid: 0\~100
Contrast: 0\~100
Verzadiging: 0\~100
Kleurtemperatuur:
5000K/6500K/7500K

text_image
Menu 容量 25Volume: 0\~100

natural_image
Close-up of a green internal circuit board with attached black and red cables, showing connector pin details (no text or symbols visible)text_image
Porta USB (per backup)natural_image
Close-up of a green internal circuit board with attached black and red components, showing connector pins and cable (no text or symbols visible)text_image
Menu Brightness Contrast Saturation ColorTempBrillo: 0 \~ 100
Contraste: 0 \~ 100
Saturación: 0 \~ 100
Temperatura de color:
5000K/6500K/7500K

natural_image
Close-up of a green internal circuit board with attached black and red components, showing connector pins and cable (no text or symbols visible)- Tápkábel
- Adatkábel

natural_image
Close-up of a green internal circuit board connected to a black GPU via cable, with two red-labeled connectors (no text or symbols visible)Etupaneelin esittely:

text_image
1 CH1/CH5 CH2/CH6 CH3/CH7 CH4/CH8 MENU ESC REC BACKUP PTZ PWR HDD 2 3 4- CH1\~CH4 / ( ) painikkeet (4CH)
natural_image
Close-up of a green circuit board with attached black GPU cable and red connector (no text or symbols visible)- Starkströmskontakt
- Dataanslutning

natural_image
Close-up of a green internal circuit board with attached black and red cables, showing connector pinout (no text or symbols visible)text_image
Menu Brightness 50 Contrast 50 Saturation 50 ColorTemp 1000K d500K 7500K
text_image
Menu 回音 25Jas: 0\~100
Kontrast: 0\~100
Sytost: 0\~100
Teplota
barev:5000K/6500K/7500K
Hlasitost: 0\~100
natural_image
Close-up of a green internal circuit board with attached black and red components, showing connector pin and cable (no text or symbols visible)- Cablu de alimentare
- Cablu de date

text_image
Menu Brightness Contrast Saturation ColorTemp 5000K 6500K 7500KLuminozitate: 0\~100
Contrast: 0\~100
Saturația: 0\~100
Temp.culoare:
5000K/6500K/7500K
text_image
Menu 音量 25Volum: 0\~100
natural_image
Close-up of a green internal circuit board with attached black and red components, showing connector pins and cable (no text or symbols visible)natural_image
Close-up of a green circuit board with attached black and red components, showing internal components and cable (no text or symbols visible)- Strømtislutning
- Datatislutning

text_image
Menu Brightness 80 Contrast 80 Saturation 50 ColorTemp 500K 650K 750Knatural_image
Close-up of a green circuit board with attached black GPU cable and red connector (no text or symbols visible)- Strømkontakt
- Datakontakt

text_image
Menu Brightness Contrast Saturation ColorTemp 5000K 6500K 7500KLysstyrke: 0\~100
Kontrast: 0\~100
Metning: 0\~100
Fargetemp:: 5000K/6500K/7500K
Description: 15" Monitor with DVR
2004/108/EC, 2006/95/EC, 2009/125/EC, Regulation EC1907/2006
's-Hertogenbosch, 03-11-2010
Mrs. / Mme. / Mevr. / Sig.ra / D. / Fru / Paní / Kα : J. Gilad