
HCAH50 - Humidifier KONIG - Free user manual and instructions
Find the device manual for free HCAH50 KONIG in PDF.

| Product type | Air humidifier |
| Brand | Konig |
| Model | HC-AH50 |
| Power supply | 220-240 V / 50-60 Hz (AC) |
| Power consumption | 130 W |
| Tank volume | 7000 ml |
| Vaporization rate (maximum) | 370 ml/h (warm mist) / 330 ml/h (cool mist) |
| Maximum runtime | Approx. 20 hours |
| Dimensions (L x D x H) | 280 x 290 x 450 mm |
| Weight | 4930 g |
| Coverage area | 30 m² |
| Operating modes | Automatic, Sleep, Custom, Continuous |
| Warm mist function | Yes (integrated heating) |
| Adjustable nozzle | 360° rotation |
| Built-in humidistat | Yes |
| Timer | 0 to 8 hours |
| Anti-scale filter | Ion exchange filter (replaceable) |
| Filter lifespan | Approx. 400 liters or 180 days of normal use |
| Cleaning | Atomizer and tank 1 to 2 times per week |
| Water level indicator | Display and audible alarm |
Frequently Asked Questions - HCAH50 KONIG
User questions about HCAH50 KONIG
0 question about this device. Answer the ones you know or ask your own.
Ask a new question about this device
Download the instructions for your Humidifier in PDF format for free! Find your manual HCAH50 - KONIG and take your electronic device back in hand. On this page are published all the documents necessary for the use of your device. HCAH50 by KONIG.
USER MANUAL HCAH50 KONIG
MANUAL (p. 2) Air humidifier
Parts Description and Function
- Double misting nozzle can be rotated 360 degrees. A spray direction can also be set.
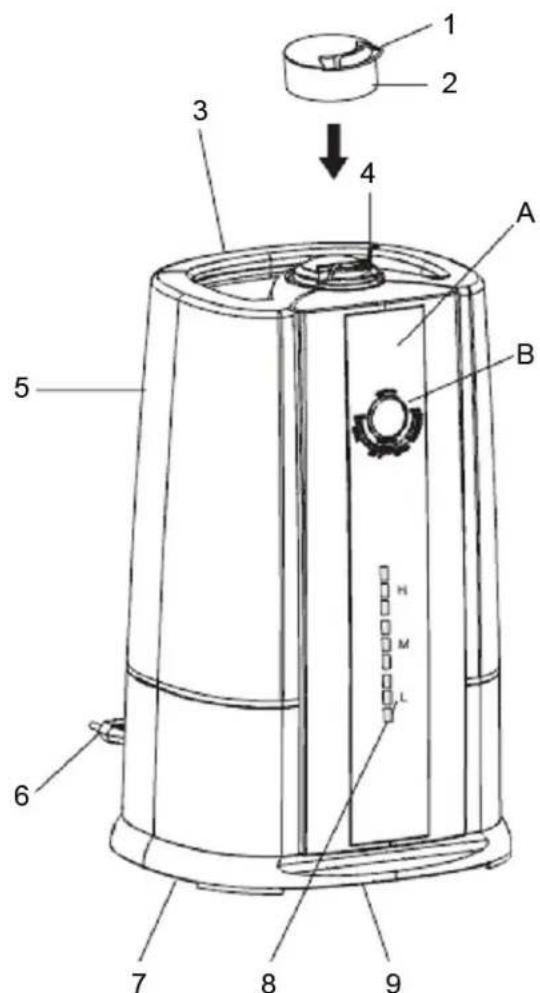
- Misting Nozzle
- Nozzle
- Water Tank Handle
- Nozzle Insert Position
- Water Tank
- Power Plug
- Air Inlet at the Bottom
- Misting Amount Display (HI, MED, LOW)
- Temperature and Humidity Sensor
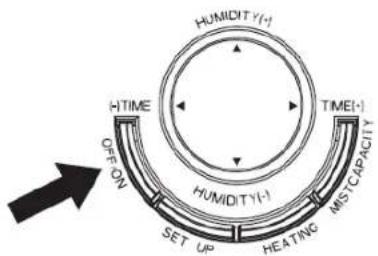
A. Display Screen
B. Operating Buttons
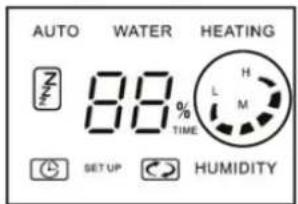
A. Display Screen
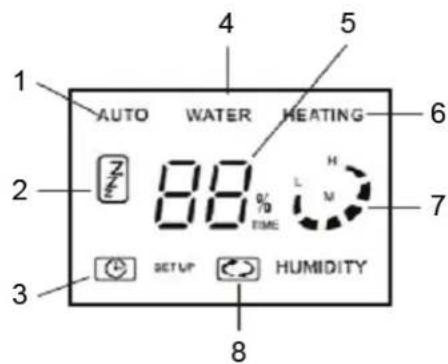
- Auto Mode
- Quiet Mode
- Timer
- Water Shortage Display
- Figure Display
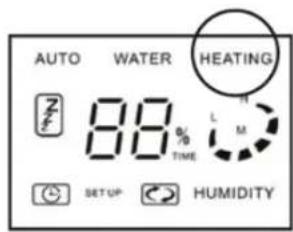
- Heating Display
- Misting Amount Display
- Continuous Operation
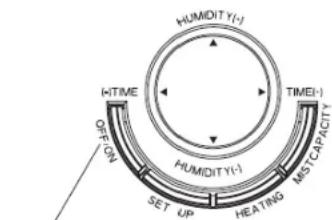
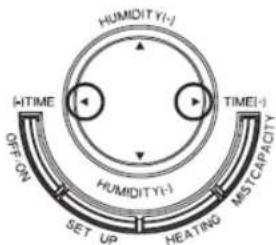
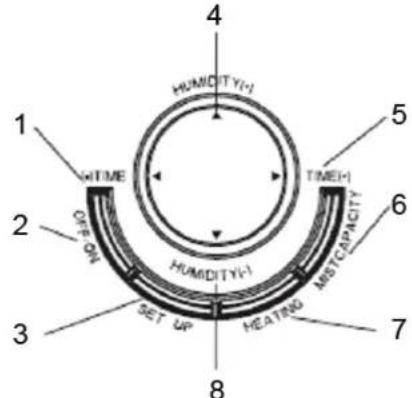
B. Operating Buttons
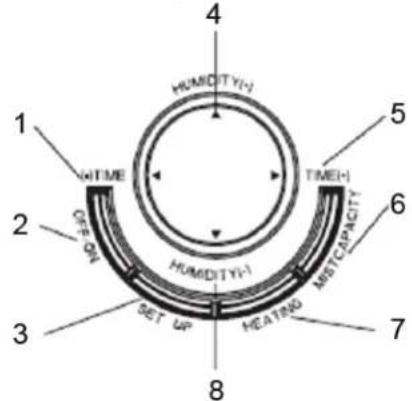
- Time Setup (-)
- Power Switch
- Mode Setup
- Humidity Adjust (+)
- Time Setup (+)
- Misting Amount Setup
- Heating Setup
- Humidity Adjust (-)
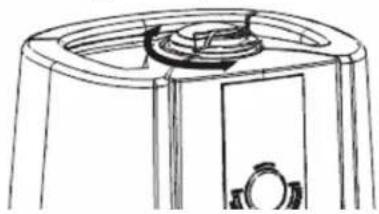
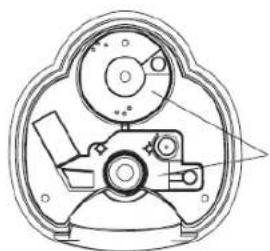
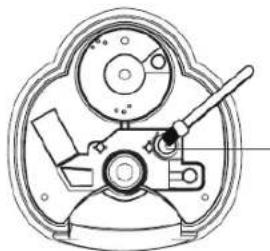
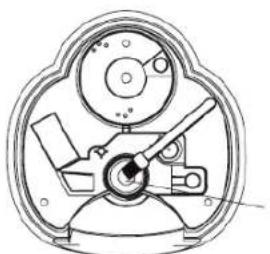
C. Interior
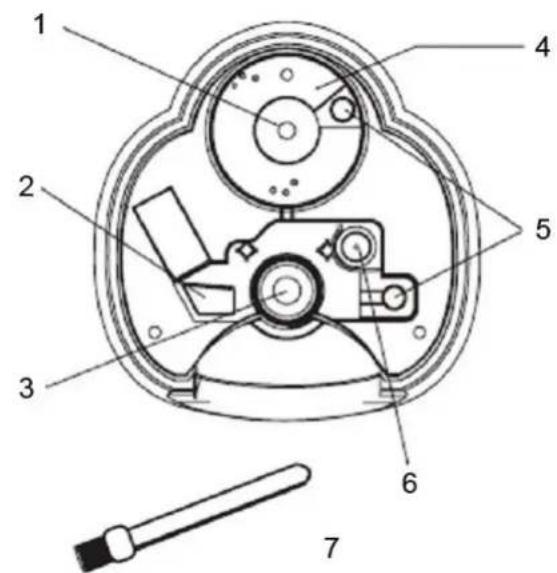
- Water Valve Mandril
- Air Outlet
- Atomizer
- Water Reservoir
- Water Inlet
- Buoy
- Cleaning Brush
How to Use
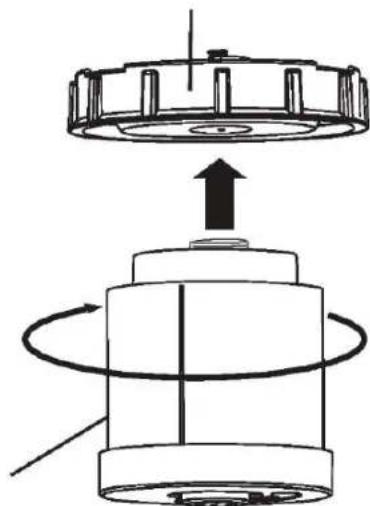
Filling the Water Tank
1. Take off the misting nozzle from the water tank
Ensure that the misting nozzle is taken off the water tank as it will fall off when the water tank is inverted.
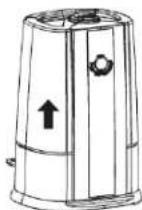
2. Taking the water tank off
- Grasp the handle of the water tank with your hand; pull up the water tank to take it off.
- Unscrew the tank cover anticlockwise
WARNING
To move the device, do not pull the handle of the water tank. Hold and support the humidifier from the base.
3. Filling with tap water
Do not fill the humidifier or water tank with substances such as essential oil, perfume, detergent, chemical, warm water (over 40 degrees) etc. The water tank and internal parts of the humidifier may be damaged causing malfunction.
Do not fill with any other liquid except tap water.
Do not fill with water directly into the interior of the humidifier or the misting nozzle. Water inside may cause the humidifier to malfunction.
Do not bump or throw the water tank. It may get broken and leak. Stop using the humidifier in case of heavy bumping of the water tank. You may have to contact your appointed maintenance or repair service centre.
Fill with clean water every day and keep it clean.
4. Make sure you screw the tank cover on firmly
Screw the tank cover clockwise.


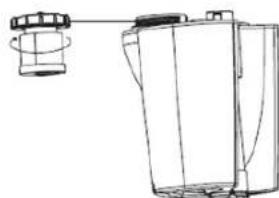
Tank cover
5. Put the water tank on and assemble the misting nozzle
Do not move the device after assembling the water tank and do not dismantle or assemble the water tank frequently, otherwise water may leak out and cause malfunction.
The water mist will wet the device and its surroundings if it is operated without installing the misting nozzle. Ensure the misting nozzle is installed correctly before operating the humidifier.

Operating Methods
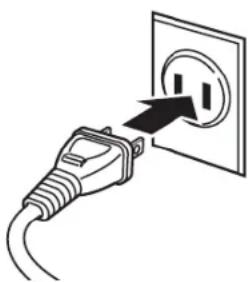
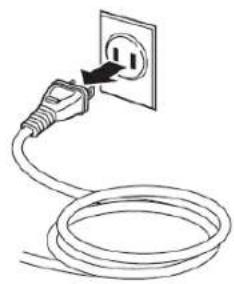
1. Plugging into the Power Supply
When you plug-in the humidifier, music will sound.
Warning
Please use the AC power supply as stated on the label. High voltage may lead to malfunction, causing fire or electric shock.
Warning
Do not use the humidifier when the power line or plug is broken, or the socket's gate is too loose. It may cause sparks, short-circuit or electric shock.
Warning
Do not power on when water has leaked out or when the humidifier is upside down. It may cause malfunction.
2. Push the "Power" Button
- Press the "Power" button. The humidifier will begin operating automatically
- The display screen will show "Auto", and mist will be emitted from the misting nozzle
- The display screen will show the current humidity status, warm misting mode will begin automatically
- Ten seconds after pushing the power button, the misting amount indicator light will flash on and off continuously (preparation for operation)
- At the beginning of its operation, the misting amount may be unstable which is caused by the difference in temperature and water quality. There will be a time delay for the atomizer to change water into mist at a steady rate, around 10-15 minutes
It takes about 10-20 minutes for the mist to become warm
Power
About Auto Operation
The temperature and humidity sensor is installed inside the product. It will adjust to the most appropriate humidity and begin operating according to the room temperature (surrounding temperature).
| Surrounding humidity The most appropriate humidity ratio | |
| <19°C | 65% |
| 20 ~ 21°C 60% | |
| 22 ~ 24°C 55% | |
| >25°C 50% | |
Misting amount during auto operation
- Misting amount during auto
- Misting amount is adjusted automatically according to the difference between a tested humidity and the ideal humidity.
For initial use or repeated use after filling the water, operation will begin automatically after 2-5 minutes. It takes this length of time for water to flow from the tank to the slot.
| Difference between the most appropriate humidity and the current humidity | Misting amount (operation display) |
| >11 | strong |
| 10 ~ 4 middle operation | |
| <3 | weak |
| The current humidity is higher than the most appropriate humidity | stop |
Push the "Mode Setup" button once. It will change to "Sleep", "Personal Setup" and "Auto Operation" modes respectively.
operation
operation
Quiet Operating Mode
Press the "Power" button, then press the "Sleep Setup" button once during auto operation to change to sleep operating mode.
- "ZZZ" indicates sleep operating mode
The most appropriate humidity for sleep operating mode is set at 50%
When at its sleep operation mode, warm misting operation (indicated by the "heat" sign) will continue for 6 hours. It will stop operating after 6 hours.

| Difference between the most appropriate humidity 50% and the current humidity | Misting amount (operation display) |
| >16 | strong |
| 15 - 4 medium operation | |
| <3 | weak |
| Current humidity is higher than the most appropriate humidity stop | |
| “Add water” sign will appear when water in the tank runs out during sleep operating mode and will stop. (Add water warning will not sound). |
| The humidity figure shown in the display screen is the amount calculated by the humidity sensor inside the humidifier. It is different from the actual humidity in the room. |
Personal Setup Operating Method
Press the "Power" button to start the humidifier. Press the "Mode Setup" button to change the personal setup operating mode.
During personal setup operating mode, you can freely adjust the misting amount, warm mist humidifying on/off, the most suitable humidity setup and timer setup.
Adjusting the misting amount
Press the "Misting Amount Setup" button to adjust to weak, middle and strong settings. The display screen will change accordingly.
When setting the misting amount, the misting nozzle will not spray when the room humidity is higher than the set humidity.
'On' or 'off' for humidifying with warm mist operation
Press the "Heating" button once. It will switch between "on" and "off" status for humidifying with warm mist operation.
During warm mist humidifying, warm mist will be produced by a built-in heater.
The most suitable humidity setup
The most suitable humidity can be adjusted by means of the upper or lower switch for "Humidity Setup".
The range is from 40% to 80% , with 5% increments.

The timer
By pressing the left or right "Time Setup" button, the time for stopping the operation can be set.
The range is from 0 (continuous operation) to eight hours, with each adjustment being 1 hour.
Combined function of the humidifier
With the help of an installed heater, water in the water tank is heated and transferred through the atomizer to produce a warm mist. Efficiency for humidifying will be increased with the help of the combined humidifier. The surrounding temperature will not be reduced due to the warm mist.
It takes approximately ten to twenty minutes to start emitting the warm mist. (The time needed for the heater to warm up the water)
The average temperature for the warm mist is 40 degrees. It is sometimes difficult to detect the mist temperature due to the difference in surrounding temperature and humidity
Stopping Operation
- Press the "Power" button, the music is on, the indicator light of the display screen will turn off and the operation is stopped.
- Unplug the plug from the socket.
Mist Capacity
When the tank is full of water
When the humidifier is under "Warm Misting" (high) operation, the maximum water usage can reach about 370ml / h . When the humidifier is under "Cold Misting" (high) operation, the maximum water usage can reach about 330ml / h .
- Continuous misting can last about 20 hours
When the water tank is empty
-
The humidifier will stop working when water in the water tank has emptied, the alarm sound for adding water will come on and the indicator light for "Add Water" will flash. After five seconds, the indicator light will stop flashing and the red light will come on
-
To continue using the device, add water according to the correct procedures
-
When lifting up the water tank, water at the bottom of the water tank may drip. Please dry the bottom with a towel when lifting it up to avoid wetting the floor or furniture.
- Please make sure not to drop or knock the water tank when adding water. The water tank will be broken and leak if it is subjected to misuse.
Attention
- There will be some water scaling in the water slot or atomizer after a period of operation. Continuous use of the device in this case may result in abnormal operation or malfunction. Please make sure to clean the water slot and atomizer once or twice a week and try to always use this device under clear conditions.
- Please change water in the tank every day, and make sure to maintain it regularly.
Consumable Parts
Ion Exchange Filter
White powder in the mist may be deposited on surrounding objects. These 'white powder' deposits are calcium and magnesium compounds found in ordinary tap water. Although they are not harmful, they may cause adverse effects and adhere to furniture. By means of an ion exchange filter, calcium and magnesium from the tap water are removed and in turn reduced the production of white powder.
An ion exchange filter (removable type, installed at the bottom of the water tank) may stain the water in the trough to the colour of tea at the beginning of operation. This has no effect on safety or performance. However, you can pour out the water if you wish and continue operation.
Filter replacement
The useful life of the ion exchange filter is about 400 litres. Continual use after its lifetime will lower its capability to remove the hardness components (calcium and magnesium) in tap water. As a result, there will be an increased build-up of scale.
The standard period of filter change is about 180 days under automatic mode of operation (heating - humidifying operation time of about 6 hours every day).
- Based on different frequency of use and quality of water, the time for changing the filter may be reduced. Please pay attention to the appearance of white powder deposits
- An ion exchange filter is installed on the water tank. When you change the filter, you should remove the cover by turning it anticlockwise, remove the filter by also turning it anticlockwise from the water tank. Now you can install the new filter by turning clockwise according to the diagram on the right. Finally you can screw the ion exchange filter at the bottom of the tank by screwing it clockwise.
- Please contact your distributor or authorized service centre if you need to purchase a new ion exchange filter.
Ion exchange filter
Cleaning and Maintenance
How to Clean
Attention
- Ensure you have unplugged the plug from the socket before you clean the device. Otherwise it may cause electric shock or accidents.
- Please wait until the water has cooled down before cleaning to avoid the risk of burns.
Maintaining the exterior of the device
Please use a soft damp cloth to wipe the outer surfaces.
Attention
- Do not clean the device completely, otherwise this will cause an electric shock.
- Do not use solvent, gasoline, xylene, talcum powder or brushes. They may cause deterioration or colour loss.
Water Slot Maintenance
- Wipe off water scale inside the water slot with a soft wet cloth
- You can use the brush supplied to brush away water scale or minute particles and wipe with a soft cloth
- Clean the device once or twice per week
Water reservoir
Buoy Maintenance
- Ensure any dust that collects on the buoy is cleaned off regularly
- You can use the brush attached to brush away water scale on minute parts and wipe again with soft cloth
Clean the buoy once or twice per week
buoy
Atomizer Maintenance
- Use the brush supplied to remove the scale on the surface of the atomizer and then wipe again with a soft cloth
- Clean the atomizer once or twice per week
atomizer
Attention
- Do not use a metal or abrasive brush, metal blade or talcum powder to wipe the surface of the atomizer. It may cause deformation, resulting in lower misting performance or other malfunctions.
Maintenance of Water Tank and Misting Nozzle
- Take off the misting nozzle and turn clockwise to remove the cover of the water tank located at the bottom of the tank and dispose of any remaining water. The misting nozzle will fall off if you dispose water in the tank without first taking it off.
- Clean the water tank and its cover with clean water. Clean the water tank cover carefully. Do not clean with force, or it may cause water leakage.
- Dry with a soft cloth after wiping off the scale on the surface of the misting nozzle. Clean the exterior of the device with a soft damp cloth.
Attention
- The water tank may leak if it is subject to misuse
- Stop using the humidifier immediately if water leakage occurs and contact an appointed maintenance centre
Maintenance after cleaning
-
Wipe off water after cleaning, air dry the water tank and body of the device until completely dry.
-
Make sure there is no water left inside the water tank or the body of the device.
- Assemble the water tank and body of the device and put into a plastic bag. Pack it in the original colour box and store in a place of low humidity.
Attention
- The humidifier will become mouldy and may develop malfunctions if it is stored when not completely dry.
Troubleshooting
- In case something abnormal happens, please refer to the troubleshooting guide
- If you cannot solve the problem(s), please contact your nearest maintenance centre
| Abnormal condition | Possible cause Correction method | |
| No misting | Has the plug been plugged into the socket correctly? | Plug in correctly |
| Is the red light on the "Add Water" indicator flashing on and off? (Is the water tank empty?) | Add water to the water tank | |
| Poor misting | Operating under weak mode?(Is the display screen show "weak"? ) | It is not a malfunction. If you want to change to strong operating mode, press the "Misting Amount" button under the personal setup mode and change to strong operation mode |
| Is there water scale on the surface of the atomizer? | Clean the atomizer | |
| Without warm mist | Have you chosen "Using Warm mist" under the personal setup mode? | Press the "Warm Mist" button under personal setup mode and change to using warm mist to humidifying operation |
| Has the operation just begun? | This is not a malfunction. It takes about ten to twenty minutes to emit warm mist. (The time needed for the heater to warm up the water after it has been turned on) | |
| The difference between current humidity and hygrograph is too big | Is there any dust inside the air inlet? | Clean the air inlet. Even in the same room, the humidity can vary |
| Is the device being operated in places easily influenced by the environment such as near a window? | Please put the device in places less likely to be influenced by the environment | |
| Mist with strange smell | Is stale water being used? | Please clean the device according to the instructions on cleaning and maintenance and replace with fresh water |
| Is there any water scale or rubbish inside the water slot or atomizer? | ||
| With 'pupu' sound | The sound of filling water from water tank to the body | It is not a malfunction, keep on using |
| with 'popo' sound | The sound for fan operation |
- Correct method: It is not a malfunction, please keep on using.
Product Specification
| Product Description Air | Humidifier |
| Model No. HC-AH50 | |
| Rated Voltage | AC power supply as stated on the label AC 220-240 V/50-60 Hz, AC100-120 V/50-60 Hz |
| Power Consumption 130 W | |
| Water Volume 7000 ml | |
| Misting Rate | Max. 370 ml/h (with warm mist humidifying) in high operation; Max. 330 ml/h (with cold mist humidifying) in high operation |
| Dimensions 280x290x450 mm | |
| Weight | 4930 g |
| Applicable area 30m | 2 |
For the purpose of product improvement, we sometimes will amend the specification without prior announcement.
- The pictures are for reference purposes only.
Safety precautions:


To reduce risk of electric shock, this product should ONLY be opened by an authorized technician when service is required. Disconnect the product from mains and other equipment if a problem should occur. Do not expose the product to water or moisture.
Maintenance:
Clean only with a dry cloth. Do not use cleaning solvents or abrasives.
Warranty:
No guarantee or liability can be accepted for any changes and modifications of the product or damage caused due to incorrect use of this product.
General:
Designs and specifications are subject to change without notice.
All logos brands and product names are trademarks or registered trademarks of their respective holders and are hereby recognized as such.
Keep this manual and packaging for future reference.
Attention:

This product is marked with this symbol. It means that used electrical and electronic products should not be mixed with general household waste. There is a separate collections system for these products.
DEUTSCH
A. Skaerm
B. Knapper
A. Skaerm

- Automatisk indstilling
- Lydløs indstilling
- Stopur
- Vandmangel skaerm
- Talskaerm
- Opvarmingsskaerm
- Forstøvningsmaengdeskaerm
- Lübende drift
B. Knapper
Mä参加会议, but he was not able to see the meeting.
Mä参加会议, but he was not able to see the meeting.