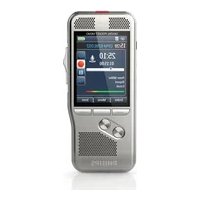
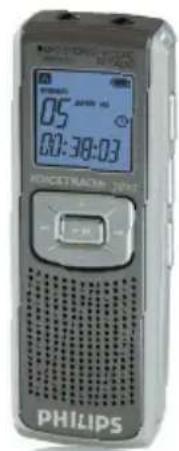
Digital Voice Tracer LFH 7780 - Voice recorder PHILIPS - Free user manual and instructions
Find the device manual for free Digital Voice Tracer LFH 7780 PHILIPS in PDF.
User questions about Digital Voice Tracer LFH 7780 PHILIPS
0 question about this device. Answer the ones you know or ask your own.
Ask a new question about this device
Download the instructions for your Voice recorder in PDF format for free! Find your manual Digital Voice Tracer LFH 7780 - PHILIPS and take your electronic device back in hand. On this page are published all the documents necessary for the use of your device. Digital Voice Tracer LFH 7780 by PHILIPS.
USER MANUAL Digital Voice Tracer LFH 7780 PHILIPS
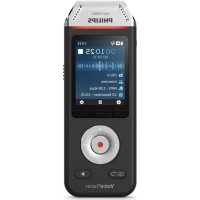
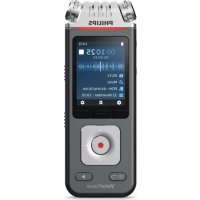
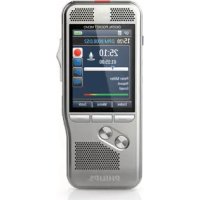
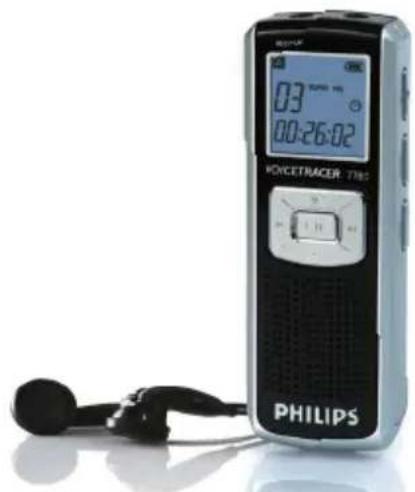
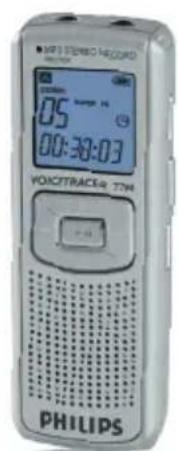
Digital Voice Tracer
LFH7780/LFH7790/LFH7890
www.philips.com/dictation
PHILIPS
EN User manual 3
DE Benutzerhandbuch 23
FR Manuel de l'utilisateur 43
ES Manual del usuario 63
IT Manuale di istruzioni 83
NL Gebruikershandleiding 103
CZ Uživatelská príručka 123
HU Felhasznaloi kezikonyv 143
PL Instrukcja obshugi 163
PT Manual do'utilizar 183
RU PykoBOOCTBO NIOb3OBaTeN 203
TR Kullanic El Kitabi 223
User manual
1 Your Digital Voice Tracer 3
1.1 What's in the box 3
1.2 Overview 4
1.3 LCD indicators and symbols 4
1.4 Features and benefits 5
2 Get Started 7
2.1 Replace the Batteries 7
2.2 Switch the Voice Tracer On 7
2.3 Set the Clock 7
2.4 Switch the Voice Tracer Off 7
2.5 Hold Function 7
3 Record 8
3.1 Record With the Built-in Microphone 8
3.2 Record With an External Microphone 9
3.3 Record From an External Device (7890 only) 9
3.4 FM Radio Recording (7890 only) 9
4Playback 9
4.1 Normal Playback 9
4.2 SlowPlayback 1 0
4.4 Repeat Playback 1 0
5 FM Radio Reception (7890 only) 1 1
5.1 Program up to 20 Radio Stations 1
5.2 Delete Programmed Stations 1 2
5.3 Radio Playback Through the Built-in Speaker 12
5.4 Button function overview - FM radio mode 12
6 MP3 Player Function 1 3
7 Menu 1 3
8Warnings 20
9 Troubleshooting 21
10 Specifications 22
1 Your Digital Voice Tracer
1.1 What's in the box4.3 Search 10

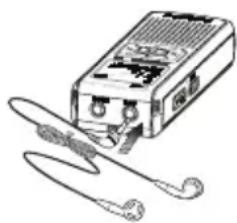
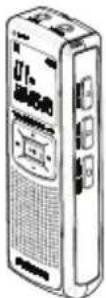
Voice Tracer
USB cable

Lapel microphone


Batteries

Stereo earphones
Neck strap

User manual

CD
3User man
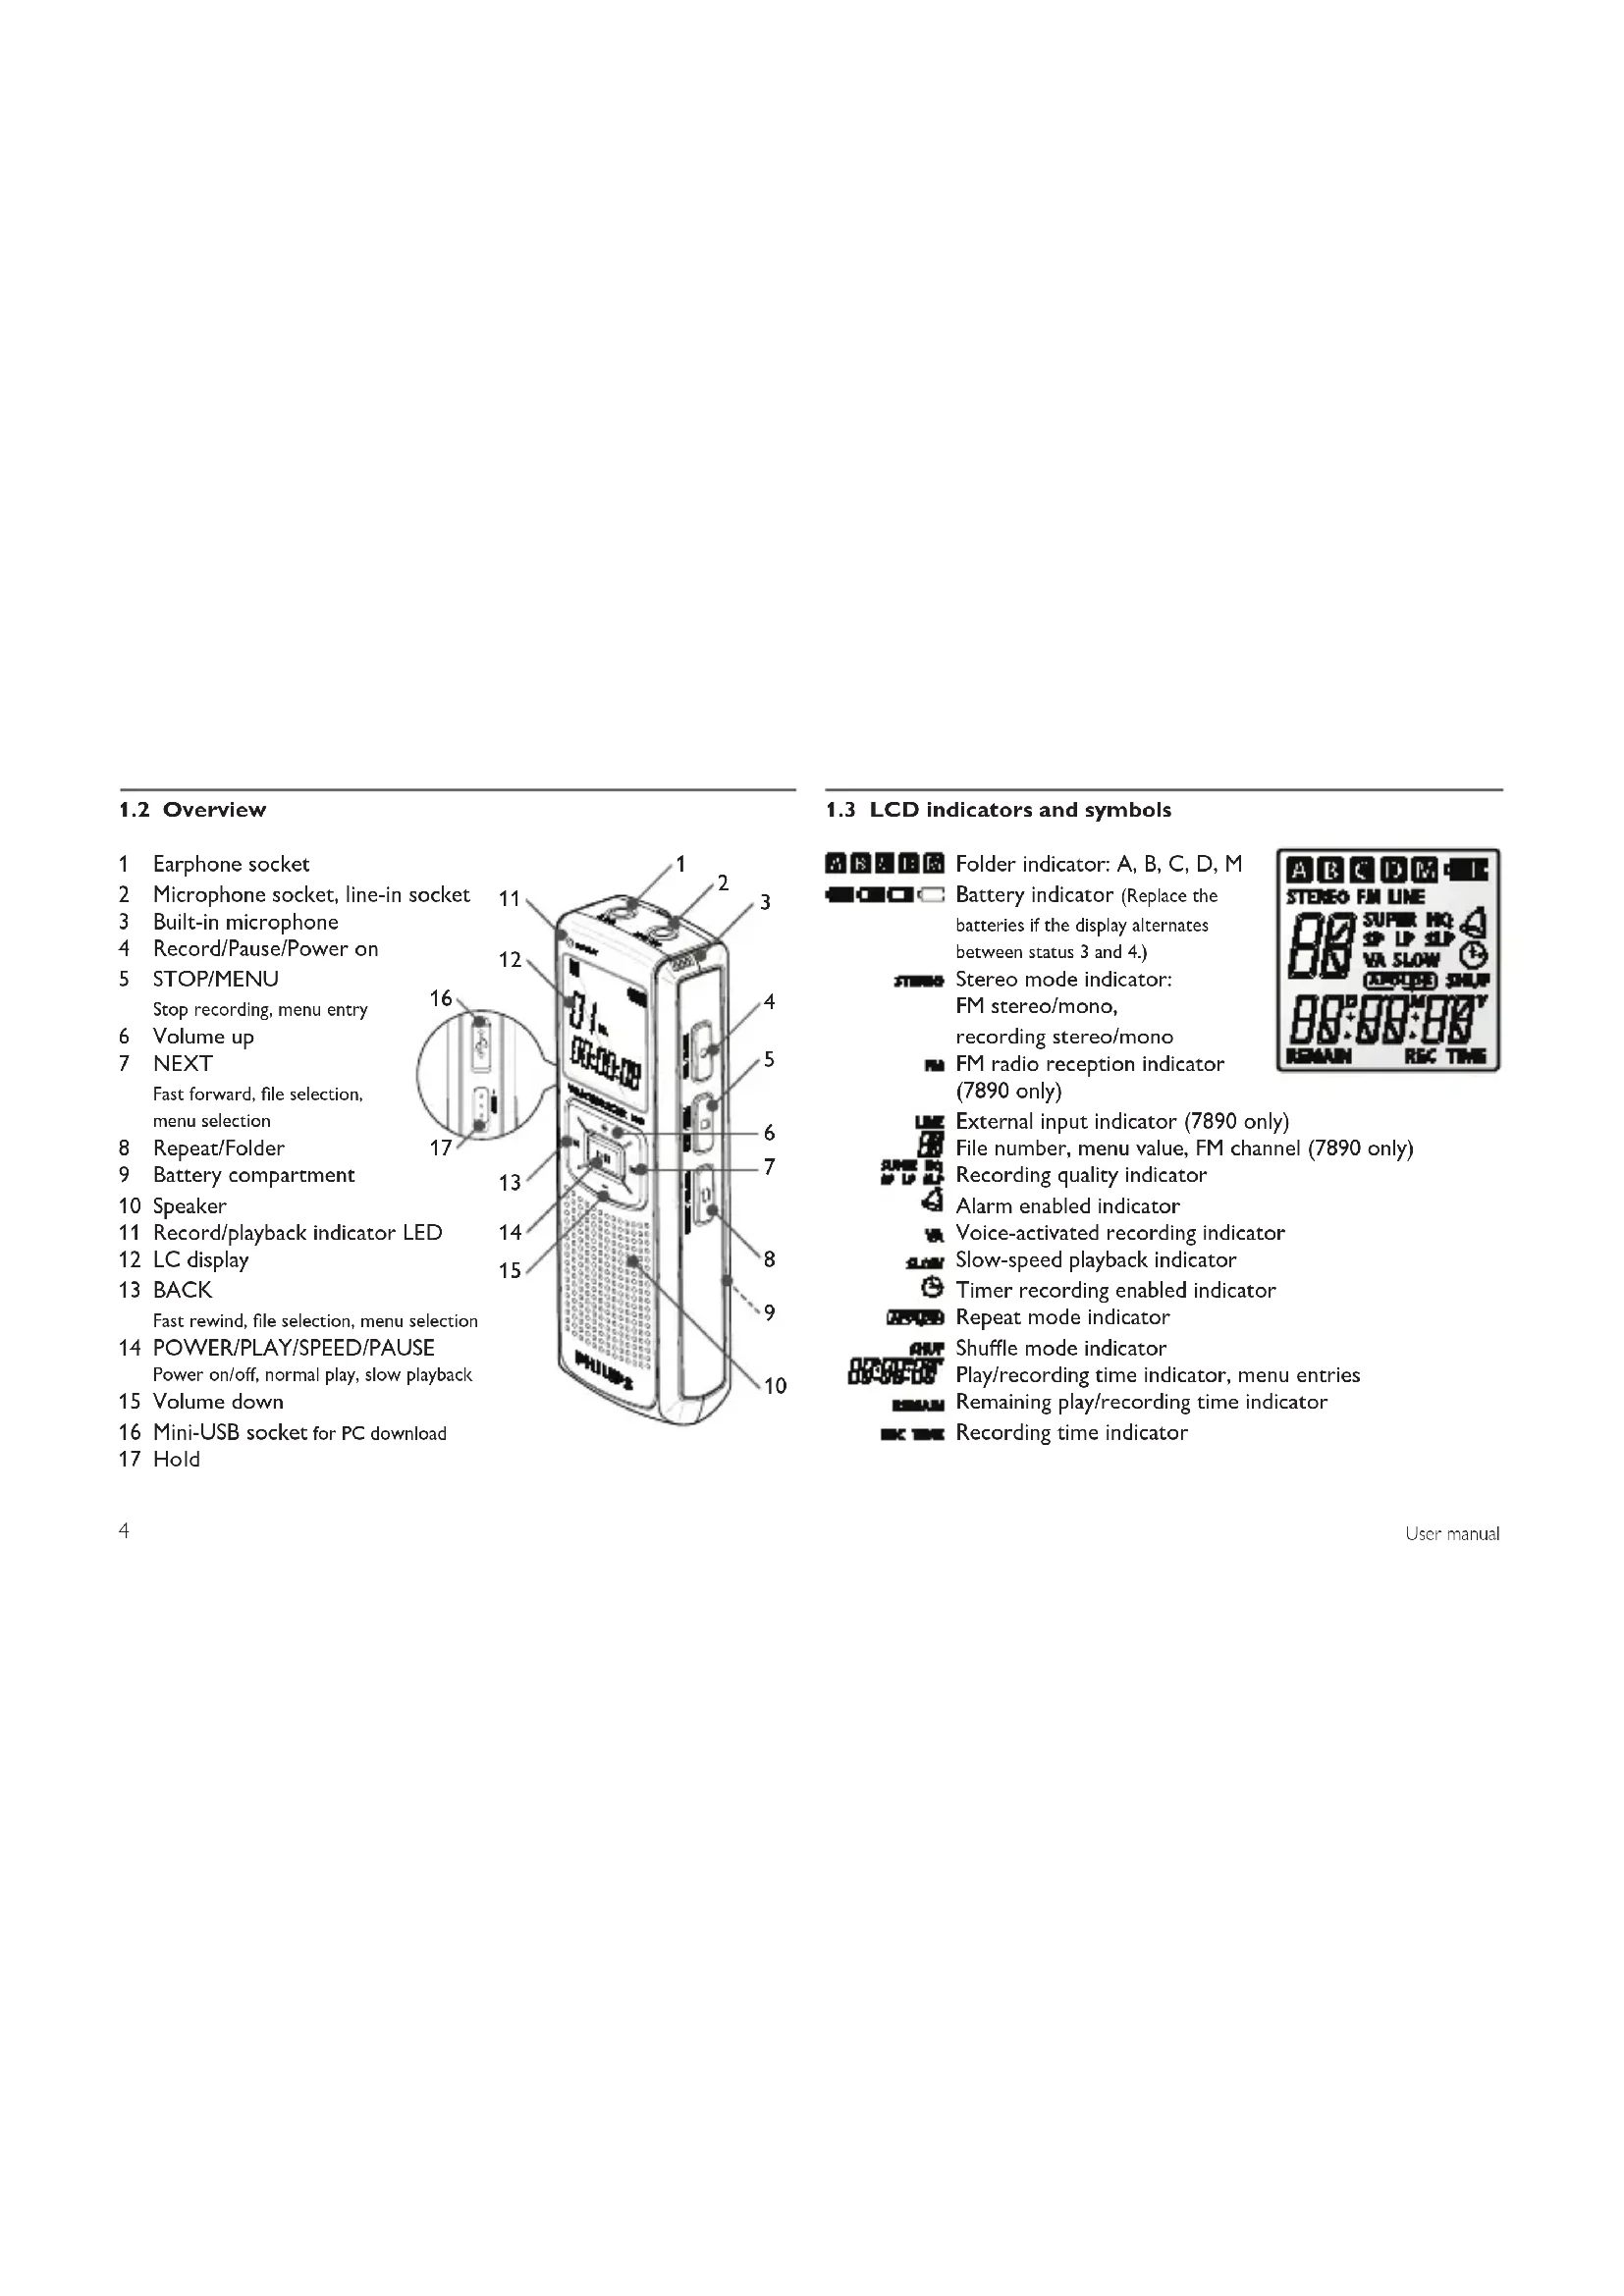
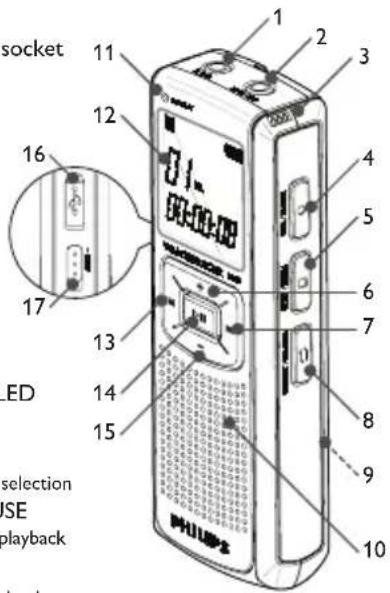
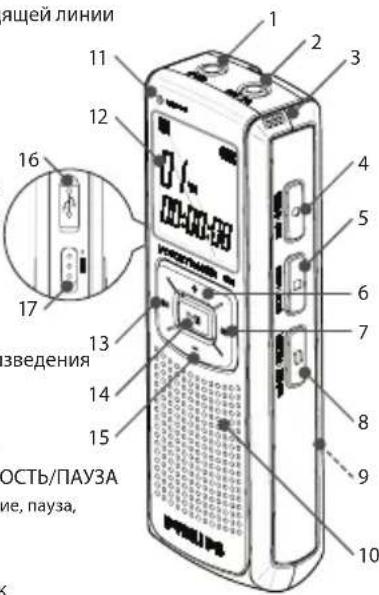
1.2 Overview
1 Earphone socket
2 Microphone socket, line-in socket
3 Built-in microphone
4 Record/Pause/Power on
5 STOP/MENU
Stop recording, menu entry
6 Volume up
7 NEXT
Fast forward, file selection, menu selection
8 Repeat/Folder
9 Battery compartment
10 Speaker
11 Record/playback indicator LED
12 LC display
13 BACK
Fast rewind, file selection, menu selection
14 POWER/PLAY/SPEED/PAUSE Power on/off, normal play, slow play
15 Volume down
16 Mini-USB socket for PC download
17 Hold
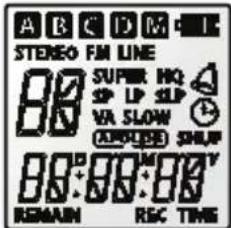
1.3 LCD indicators and symbols

Folder indicator: A, B, C, D, M

Battery indicator (Replace the batteries if the display alternates between status 3 and 4.)

Stereo mode indicator: FM stereo/mono, recording stereo/mono

FM radio reception indicator (7890 only)

External input indicator (7890 only) File number, menu value, FM channel Recording quality indicator

Alarm enabled indicator

Voice-activated recording indicator Slow-speed playback indicator

Timer recording enabled indicator Repeat mode indicator

Shuffle mode indicator
Play/recording time indicator, menu entries Remaining play/recording time indicator

Recording time indicator
1.4 Features and benefits
Recording
Recording sensitivity: To record sounds from all directions (record conferences, for example), switch to high sensitivity mode. When recording personal notes and you want to avoid recording noises from around you, switch to low sensitivity mode.
Super HQ recording mode: Outstanding recording quality for brilliant, clear playback.
Choice of recording modes: Select your choice of recording modes; you have the freedom of choice between long-lasting recording capacity and outstanding sound quality. Choose according to your needs, or switch to lower recording quality modes when you want to conserve memory capacity.
Large voice recording capacity: Ample internal memory allows the recording and storage of long voice recordings. There is no need to download or delete files to free up space.
Voice-activated recording mode: Use this convenient feature when you want to dictate hands-free. When enabled, recording will start automatically when the input level exceeds a certain threshold
- usually when you start speaking. Recording stops automatically after you stop speaking and restarts automatically when you start speaking again.
Auto divide: Automatically divide long recordings into separate files (30 or 60 minutes in length each). This makes it much easier to find, edit and archive long recordings of meetings or lectures.
External source recording (line recording): With this feature, record directly from an external audio source such as an audio CD player in good sound quality. Available with DVT 7890.
Recording while powered through USB: To record long conferences, power the Digital Voice Tracer through a USB port. Connect the USB cable to a notebook computer, then press and hold the record button until REC is displayed. Record the conference or meeting without draining the battery.
Playback
File preview / intro scan: This function scans through all recordings by playing back the first few seconds of each file. This makes it easier to search for a specific file or to browse through all recordings.
5User man
Slow playback: Recordings will be played back at slower speed, for example to make it easier to take notes.
A-B repeat playback: Let the DVT repeat a voice section between two points (A < > B). For example, make it easier to note a telephone number, an address or a remark made in a recorded conversation.
File repeat playback: Let the DVT play your recording over and over. For example, replay your favorite song.
Alarm playback: Schedule a voice alarm to remind you of an important meeting or event, or a telephone call you need to make.
Convenience
Large backlit LCD display: View all relevant information at a glance, even in low-light conditions.
Hold: Lock and protect the current state of the DVT to avoid unintentionally switching the device on or off during recording, playback or when carrying the DVT in your pocket.
Time stamp: The time stamp feature assigns a date and time to every recording. This makes it more convenient to locate and verify the recordings later on.
File split: With this feature, split a long recording into two separate files so they can be more easily archived or e-mailed, or so that part of a file can be deleted.
Timer recording: With timer recording, program the DVT to record an important event in advance. Once timer is set, the event will be recorded automatically at the scheduled time and date. There is no need to switch the Digital Voice Tracer to Record mode when the meeting begins.
USB drive: The DVT can also be used as a standard Microsoft Windows USB storage device, offering the convenient storage and sharing of files (letters, presentations or spreadsheets).
With USB mass storage support, the DVT is automatically displayed as an external drive when it is connected to the computer. It can then be easily accessed with any Microsoft Windows program as a regular drive. Since the Microsoft Windows operating system contains the generic mass storage-class driver, no separate driver needs to be installed for the device to be recognized.
2 Get Started
2.1 Replace the Batteries
Switch the Voice Tracer off by pressing the PLAY/PAUSE button for a few moments in Stop mode. Do not replace the batteries while the Voice Tracer is switched on, as this may cause the device to malfunction.
2 Open the battery cover.
3 Insert the batteries. Make sure that the batteries are inserted properly (size "AAA") and close the cover.
Press the PLAY/PAUSE button for a few moments to switch the Voice Tracer on.
Remove the batteries if you will not be using the Voice Tracer for an extended period. Leaking batteries may damage the Voice Tracer. If the Voice Tracer malfunctions, remove the batteries and re-insert them.
2.2 Switch the Voice Tracer On
Press and hold the PLAY/PAUSE button for a few moments to switch the Voice Tracer on. The Voice Tracer is in Stop mode ① or Clock Set mode ②. The Voice Tracer switches on in the same mode that it was in when it was switched off.
If the time is not set, the Voice Tracer will switch on in Clock Set mode. The Voice Tracer will change to Stop mode when the time is set or when the STOP/MENU button is pressed. Press and hold the REC button for a few moments to skip setting the clock and to begin recording immediately.
If the HOLD switch is in the Hold position, On Hold will be shown briefly on the display, and the display will turn off. Unlock the Voice Tracer by moving the HOLD switch to the Off position.

2.3 Set the Clock
Put the Voice Tracer in Stop mode.
Press and hold the STOP/MENU button for a few moments to enter Menu mode. Follow the instructions in the chapter Menu.
2.4 Switch the Voice Tracer Off
In STOP or FM Radio mode, you can switch off the Voice Tracer by pressing and holding the PLAY/PAUSE button for a few moments. Switch off your Voice Tracer when you are finished using it for recording or playback for maximum battery life.
2.5 Hold Function
When the HOLD switch (on the left side of the Voice Tracer) is in the Hold position, all buttons on the device are inactive.
1 Slide the HOLD switch to the Off position to enable the buttons on the Voice Tracer.
3 Record
- Press the REPEAT/FOLDER button to select the desired folder. The Voice Tracer will move to the next folder each time you press the button.
- Set the desired voice activation function and quality (Super HQ, HQ, SP, LP, SLP) before you start recording (see the Menu chapter for more details).
- Make a test recording to make sure that the Voice Tracer settings are correct.
- Press and hold the PLAY/PAUSE button during recording for a few moments to display the remaining recording capacity.
- The maximum number of files in each folder is 99, for a total capacity of 396 files (99 files × 4 folders).
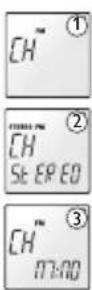
- If the recording time exceeds the available capacity or the number of files reaches 396, "FULL" will be displayed and recording cannot be continued ① ② . If this happens, delete a few recordings or move them to an external device (audio or computer).
- Do not remove the batteries during recording. This may

cause the Voice Tracer to malfunction.
- If recording for a prolonged period of time, replace the batteries before beginning.
- When the Voice Tracer is in voice activation mode, recording will stop automatically when no sound is detected. Disable the function when recording important conversations.
- Press the REC button while playing back an MP3 or WMA file in the M (Music) folder to enable the equalizer.
3.1 Record With the Built-in Microphone
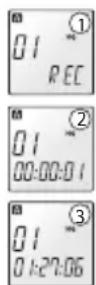
Press and hold the REC/PAUSE button for a moment to switch the Voice Tracer on and start recording ① ②. The red LED will light.
2 Point the Voice Tracer's built-in microphone towards the sound source. Press and hold the PLAY/PAUSE button during recording to display the remaining recording capacity.
Press the REC/PAUSE button to pause the recording. The red LED will blink, and "Pause" will flash on the display.
Press the REC/PAUSE button again to resume recording. The red LED will light again.
5 Press the NEXT button to create a new file during recording (file separation function).
6 The total time of the recording is displayed when you stop recording by pressing the STOP/MENU button


User manual
3.2 Record With an External Microphone
To record with an external microphone, connect the microphone to the microphone socket and follow the same procedure as for the built-in microphone.
3.3 Record From an External Device (7890 only)
Switch the Voice Tracer on. If the Voice Tracer is in FM Radio mode, press the REPEAT/FOLDER button for a few moments to exit this mode.
2 Go to Menu mode and set up the input source line (L). For details, read the explanation under Menu Entry - Recording Input Setup. "LINE" will be shown on the display ①.
3 Connect the line-in socket with the audio source by means of an audio cable.
Press the REPEAT/FOLDER button to select the folder you want to record to.
5 Press the REC/PAUSE button to begin recording.
To pause or stop recording, follow the same procedure as for recording with the built-in microphone.
3.4 FM Radio Recording (7890 only)
Switch the Voice Tracer on.
2 If not in FM Radio mode, press the REPEAT/FOLDER button for a few moments to enter this mode.
3 Select the station to be recorded. For details, read the FM Radio Reception chapter.
Press the RECORD button to record the currently selected FM radio station ①.

4 Playback
4.1 Normal Playback
Press the PLAY/PAUSE button for a few moments to switch the Voice Tracer on. If the Voice Tracer is in FM Radio mode (7890 only), press the REPEAT/FOLDER button for a few moments to exit this mode.
Press the REPEAT/FOLDER button to locate the folder where the desired file is stored.
Press the PLAY button. The playback time will be shown on the display, and the green LED will light.
4 Adjust the volume using the Volume Up and Down buttons.
Press the STOP/MENU button during playback to stop. The total playback time of the current file will be shown on the display.
6 Press the PLAY button again to continue playback from the previous position.
9User man
4.2 Slow Playback
Available for voice file playback only.
Press the PLAY button for a few moments to switch from normal playback to slow playback ①.
Press the PLAY button again for a few moments to return to normal playback.
4.3 Search
Press and hold the NEXT or BACK button for a few moments during playback to scan forward or backward in the current file at a fast speed.
2 When the NEXT or BACK button is released, playback will resume at the selected speed (normal or slow) from the point where the button was released.
Press and hold the NEXT button until the end of the current file. The Voice Tracer will continue scanning through the next file.
4.4 Repeat Playback
4.4.1 Repeat a Section
During playback, press the REPEAT/FOLDER button at the beginning of the section to be repeated. The A B indicator will
blink on the display ①.
Press the REPEAT/FOLDER button again at the end of the section to be repeated ②.
3 The selected section will repeat continuously until the STOP/MENU button is pressed.
Press the REPEAT/FOLDER button to stop Section Repeat mode and return to normal playback.


4.4.2 Repeat a File
Press the REPEAT/FOLDER button for a few moments during playback. The repeat indicator will be shown on the display.
The current file will be repeated when the repeat indicator is shown on the display ①.
Press the STOP/MENU button to stop playback. The Voice Tracer will remain in File Repeat mode.
4.4.3 Repeat a Folder
With the Voice Tracer in File Repeat mode, press the REPEAT/FOLDER button for a few moments.
FOLD" will be shown on the display inside the repeat arrow, and the current folder will repeat ①.

4.4.4 Shuffle Mode
With the Voice Tracer in Stop mode, press the REPEAT/FOLDER
User manual
button to select the M (Music) folder.
2 While the Voice Tracer is playing a song file, press the REPEAT/ FOLDER button three times for a few moments each.
3 "SHUF" will be shown on the display, and the files in the M (Music) folder will play in random order ①. Shuffle mode is only available in the M (Music) folder.
4 Press and hold the REPEAT/FOLDER button for a few moments during playback to exit Shuffle mode. When the STOP/MENU button is pressed to stop playback, the Voice Tracer will remain in Shuffle mode.

5 FM Radio Reception (7890 only)
With the Voice Tracer in Stop mode, press the REPEAT/FOLDER button for a few moments to activate the FM Radio mode.
2 Connect the earphones. FM reception is not possible if the earphones are not connected because they function as the antenna.
5.1 Program up to 20 Radio Stations
5.1.1 Frequency Scanning
Press the NEXT button for a few moments.
2 The Voice Tracer will scan the FM frequency band automatically, stopping at the first station it finds.
3 Press the PLAY button briefly to save the current station. Then repeat step 1.
5.1.2 Manual Programming
Press the NEXT button once. The frequency will increase by 50 khz.
2 Continue pressing the NEXT button briefly until the desired frequency is reached.
3 Press the PLAY button briefly to save the selected station.
Use the BACK button to search in the opposite direction.
5.1.3 Automatic Programming
1 Select the menu entry "AUTO" to enable Automatic Programming mode. See Menu Entry - Automatic Programming for more details.
Press the STOP/MENU button to exit Automatic Programming mode.
Undesired or weak stations may be saved depending on the reception conditions.
5.2 Delete Programmed Stations
Complete the following steps to delete undesired stations after Automatic Programming.
Press the REPEAT/FOLDER button briefly to change to Preset mode ①.
Press the NEXT button to select the station you want to delete.
3 Press the PLAY button briefly to delete the selected station.
4 Press the NEXT button to go to the next station.
5.3 Radio Playback Through the Built-in Speaker
Complete the following steps to switch between earphone and speaker output.
1 Connect the earphones. The earphones must be connected to use the FM Radio mode because they function as the antenna.
Press the STOP/MENU button for a few moments to change the FM radio output to the speaker.
The Voice Tracer will automatically return to earphone output when the FM Radio mode is exited.
5.4 Button function overview - FM radio mode
| Button function | FM radio reception mode FM scanning | mode |
| +, - | Volume Up, Volume Down No function | |
| PLAYshort press | Channel memory (Frequency mode),Delete channel (Preset mode) | No function |
| PLAYlong press | Power off Power off | |
| NEXTshort press | Increase frequency one step(Frequency mode), Next channel up(Preset mode) | No function |
| NEXTlong press | Scan up (Frequency mode),Increase channel number continuously(Preset mode) | No function |
| BACKshort press | Decrease frequency one step(Frequency mode),Next channel down (Preset mode) | Stop at frequency |
| BACKlong press | Scan down (Frequency mode),Decrease channel numbercontinuously (Preset mode) | Stop after finding next station |
| REC Record FM br | podcast No function | |
| STOP/MENUshort press | Switch between stereo and mono Exit FM | searchingmode |
| STOP/MENU long press | Menu entry Exit FM searching | mode |
| REPEAT/FOLDERshort press | Switch between Frequency andPreset mode | No function |
| REPEAT/FOLDERlong press | Exit FM Radio Reception mode No function |
6 MP3 Player Function
1 Copy MP3 or WMA files from your computer to the Voice Tracer. Consult the separate Download Manager program user manual for further details.
Press the REPEAT/FOLDER button to select the M (Music) folder ①.
Press the NEXT button to select the desired file, then press the PLAY button.
4 Press the REPEAT/FOLDER button to enable Repeat mode (File Repeat > Folder Repeat > Shuffle > Normal).
During playback, press the REC button to change the Equalizer mode (Normal ② > Jazz ③ > Rock ④ > Pop ⑤ > Classical ⑥ > Normal).
SlowPlaybackmodeisnotavailableforMP3orWMA files saved in the M (Music) folder.
Attention: Adjust the sound level with the volume control. Listening to music at high volumes can permanently damage hearing.
7 Menu
Menu mode is available in Stop mode or FM Radio mode. The available menu items differ depending on whether you are in a voice folder, a music folder or in FM Radio mode. The following description is based on Stop mode in a voice folder.
7.1 Delete a Single File or All Files in a Folder
7.1.1 Delete a file
1 With the Voice Tracer in Stop mode, select the file to be deleted.
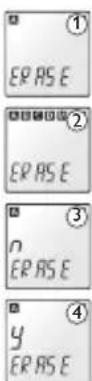
2 Press the STOP/MENU button for a few moments ①.
Press the PLAY button briefly. The file number (7) will blink, and "ERASE" is shown on the display ②.
Press the Play button again briefly. The file number indicator will be replaced with "n" (no) and will blink
5 Press the NEXT button to change the confirmation indicator to "Y" (Yes) 4.
6 Press the PLAY button briefly to delete the selected file.

13User mar
7.1.2 Delete the Files in a Single Folder or All Files
With the Voice Tracer in Stop mode, press the STOP/MENU button for a few moments.
2 Press the PLAY button briefly and the NEXT button to select the folder from which you want to delete all files. (A > B > C > D > M > A BCDM [all folders] >A) "ERASE" is shown on the display, and the indicator is shown for the chosen folder ① ②
Press the PLAY button briefly. The confirmation indicator "n" (no) will blink on the display ③.
4 Press the NEXT button to change the confirmation indicator to "Y" (Yes) ④.
5 Press the PLAY button to delete all files in the selected folder or folders.
Press the NEXT button to select the desired recording quality ③ 4 5 6.
Press the PLAY button to save the setting, then the STOP/MENU button to exit Menu mode.


7.3 Microphone Recording Sensitivity
This function is available only in voice folders.
With the Voice Tracer in Stop mode, press the STOP/MENU button for a few moments.
Press the NEXT button twice ①.
Press the PLAY button briefly. "SENSE" is shown and "HI" blinks on the display ②.
Press the NEXT button to select the desired microphone recording sensitivity ③ ②.
5 Press the PLAY button to save the setting, then the STOP/MENU button to exit Menu mode.


7.4 Beep Setting
1 With the Voice Tracer in Stop mode, press the STOP/MENU button for a few moments.
Press the NEXT button briefly 3 times ①.

3 Press the PLAY button briefly. "BEEP" is shown and "On" blinks on the display ②.
4 Press the NEXT button to select "OF" (off) or "On" ③.
5 Press the PLAY button to save the setting, then the STOP/MENU button to exit Menu mode.


"OF" blinks on the display ②.
Press the NEXT button to select "OF" (off) or "On" ③.
Press the PLAY button to save the setting, then the STOP/MENU button to exit Menu mode.


7.5 Enabling Voice Activated Recording (VA)
This function is available only in voice folders.
1 With the Voice Tracer in Stop mode, press the STOP/ MENU button for a few moments.
Press the NEXT button briefly 4 times
Press the PLAY button briefly. "VA" is shown and "OF" blinks on the display ②.
4 Press the NEXT button to select "OF" (off) or "On" ③.
5 Press the PLAY button to save the setting, then the STOP/MENU button to exit Menu mode.


7.7 Record From an External Device (7890 only)
This function is available only in voice folders.
1 With the Voice Tracer in Stop mode, press the STOP/MENU button for a few moments.
Press the NEXT button briefly 6 times
Press the PLAY button briefly. "INPUT" is shown and "V" blinks on the display ②.
4 Press the NEXT button to select "L" (line-in) or "V" (voice) ③.
Press the PLAY button to save the setting, then the STOP/MENU button to exit Menu mode.


7.6 Backlight Setting
1 With the Voice Tracer in Stop mode, press the STOP/ MENU button for a few moments.
Press the NEXT button briefly 5 times ①
Press the PLAY button briefly. "LIGHT" is shown and

7.8 Clock Set Mode
With the Voice Tracer in Stop mode, press the STOP/MENU button for a few moments.
Press the NEXT button repeatedly until "CLOCK" is shown on
the display ①.
3 Press the PLAY button briefly. The default system date is shown as "01" for the day and month, and "05" for the year ②.
4 Press the NEXT button to set the desired year, then press the PLAY button.
5 The month will now blink "01". Press the NEXT button to select the desired month and press the PLAY button.
6 The day will now blink "01". Press the NEXT button to select the desired day and press the PLAY button.
The time will now blink. Set the time in the same manner the date was set, using the NEXT and BACK buttons to select the desired values 3.
After the minutes are set, press the PLAY button to save the settings, then the STOP/MENU button to exit Menu mode. The clock will begin running when the time setting is saved.
7.9 Timer Set-up
1 With the Voice Tracer in Stop mode, press the STOP/MENU button for a few moments.
Press the NEXT button repeatedly until "TIMER" is shown on the display ①.
3 Press the PLAY button briefly. "OF" (timer setup off) blinks on the display ②.


4 Press the NEXT button to select "ON" (timer setup) ③.
5 Press the PLAY button briefly, then press the NEXT and BACK buttons to enter the desired hours ④. Once the hours have been set, press the PLAY button and then set the minutes.
6 Press the PLAY button to set up the recording interval 5.
Press the NEXT button to set the interval time.
Press the PLAY button, then press the NEXT button to select the folder to record to 6.
9 Press the PLAY button to save your settings, then the STOP/MENU button to exit Menu mode.


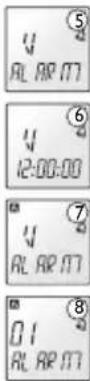
7.10 Alarm Setup
With the Voice Tracer in Stop mode, press the STOP/MENU button for a few moments.
Press the NEXT button repeatedly until "ALARM" is shown on the display ①.
3 Press the PLAY button briefly. "OF" (alarm setup off) blinks on the display ②.
4 Press the NEXT button to select "ON" or "V" (Voice). Select "ON" to use the beep tone as alarm or "V" (Voice) to use a recorded file or music file as alarm ③.


7.10.1 Set the alarm with a beep signal
Press the PLAY button briefly to set the alarm time 4.
Press the NEXT button to select the desired hour, then press the PLAY button to select the desired minutes in the same manner.
7 Press the PLAY button to save the settings, then the STOP/ MENU button to exit Menu mode.

7.10.2 Set the alarm with a voice or music file
5 Press the NEXT or BACK button to select "V" (Voice) 5.
6 Press the PLAY button briefly to set the alarm time 6.
7 Press the NEXT button to select the desired hour, then press the PLAY button to select the desired minutes in the same manner.
Press the PLAY button to select the folder ⑦.
Press the NEXT button to select the folder that contains the desired file.
10 Press the PLAY button to save the settings, then the STOP/MENU button to exit Menu mode 8.
7.11 File Preview: Play the First Seconds of Each File
With the Voice Tracer in Stop mode, press the STOP/MENU button for a few moments.
Press the NEXT button repeatedly using "SCAN" is shown on the display ①.
Press the PLAY button briefly and "N" blinks on the display ②.
4 Press the NEXT button to change the indicator to "Y" ③.
Press the PLAY/PAUSE button to play the first seconds of each file, starting with the first file of the current folder 4.
7.12 Format: Delete All Files
This function deletes all files on the Voice Tracer, including all programmed FM radio stations!
With the Voice Tracer in Stop mode, press the STOP/MENU button for a few moments.
Press the NEXT button repeatedly until "FRMAT" is shown on the display ①.
Press the PLAY button briefly and "N" blinks on the display ②.
Press the NEXT button to change the indicator to "Y" ③.
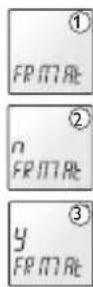
5 Press the PLAY button to format the Voice Tracer and to delete all files 4.

7.13 Display the Firmware Version and Release Date
1 With the Voice Tracer in Stop mode, press the STOP/MENU button for a few moments.
Press the NEXT button repeatedly until "VER" is shown on the display ①.
Press the PLAY button briefly to display the version number ②.
4 Press the NEXT button to display the firmware release date ③.
Press the PLAY button, then the STOP/MENU button to exit Menu mode.


7.14 Split: Splitting a File Into Two Files
This function is available only in voice folders.
1 Stop at the point where you want to split the file.
2 With the Voice Tracer in Stop mode, press the STOP/MENU button for a few moments.
3 Press the BACK button twice. "SPLIT" is shown on the


display ①.
4 Press the PLAY button briefly. The indicator "n" blinks on the display ②.
Press the NEXT button to change the indicator to "Y" ③.
Press the PLAY button, then the STOP/MENU button to exit Menu mode.
It is not possible to split a file when the Voice Tracer memory is full or when there are 99 files in the respective folder.

7.15 Automatically Record to a New File Every 30/60 Minutes
This function is available only in voice folders.
With the Voice Tracer in Stop mode, press the STOP/MENU button for a few moments.
Press the BACK button once. "DIVIDE" is shown on the display ①.
Press the PLAY button briefly. The indicator "n" blinks on the display ②.
4 Press the NEXT button to change the indicator to "Y" ③.


5 Press the PLAY button to set the automatic division settings 4.
6 Press the NEXT button to select 30 or 60 minutes.
7 Press the PLAY button to save the settings, then the STOP/MENU button to exit Menu mode.
7.16 Stereo/Mono Radio Sound Selection (7890 only)
This function is available only in FM Radio mode.
1 With the Voice Tracer in FM Radio mode, press the STOP/MENU button for a few moments.
Press the BACK button briefly 3 times. "STEREO" is shown on the display.
Press the PLAY button briefly. "STEREO" blinks on the display ②.
4 Press the NEXT button to select "MNO" (mono) ③ or "STEREO" ②.
5 Press the PLAY button to save the settings, then the STOP/MENU button to exit Menu mode.
7.17 Automatic Programming (7890 only)
This function is available only in FM Radio mode.
With the Voice Tracer in FM Radio mode, press the STOP/MENU button for a few moments.
Press the BACK button briefly twice. "AUTO" and "FM" are shown on the display ①.
Press the PLAY button briefly. The indicator "n" blinks on the display ②.
4 Press the NEXT button to change the indicator to "Y" ③.
Press the PLAY button to begin automatically saving FM radio channels.
Once the entire FM band has been scanned, the Voice Tracer will return to FM Radio mode. Press the STOP/MENU button to exit Automatic Programming mode.
7.18 Select FM Radio Output Through Earphone or Speaker (7890 only)
This function is available only in FM Radio mode. The earphone must be connected even when using the speaker.
1 With the Voice Tracer in FM Radio mode, press the STOP/MENU button for a few moments.
Press the BACK button briefly once. "OUTPUT" and "FM" are shown on the display ①.
Press the PLAY button briefly. "EP" blinks on the display ②.
4 Press the NEXT button to select "SP" ③.
5 Press the PLAY button to save the settings, then the STOP/MENU button to exit Menu mode.

8Warnings
- Do not attempt to open, repair, or modify the Voice Tracer.
- Do not use the Voice Tracer where the use of electronic devices is prohibited (such as in aircraft, etc.).
- Do not put the Voice Tracer or its accessories in your mouth.
- Do not immerse the Voice Tracer or spill liquids on it.
- Do not expose the Voice Tracer or its accessories to shocks, as this may cause malfunctions.
- Do not apply excessive force to the LCD display, as this may damage the display or cause malfunctions.
- Do not expose the Voice Tracer to direct sunlight or any source of heat for a prolonged period.
- Remove the batteries if the Voice Tracer will not be used for a long period of time.
- Do not pull attached earphone, micro-phone, or USB cables with excessive force.
7.19 Firmware Upgrade
Download the firmware update for your Voice Tracer model number from www.philips.com/dictation > Support Center > Software Downloads. Extract the file and place it in the Digital Voice Tracer root directory.
2 With the Voice Tracer in Stop mode, press the STOP/MENU button for a few moments.
3 Press the BACK button once. "UPGRAD" is shown on the display ①.
4 Press the PLAY button briefly. The indicator "n" blinks on the display ②.
Press the NEXT button to change the indicator to "Y" ③.
6 Press the PLAY button. The Digital Voice Tracer will install the new firmware file 4 and then switch off.

9 Troubleshooting
LCD is blank
Possible cause:
- The batteries are exhausted
- The batteries are not inserted correctly
Correction:
- Replace the batteries with new ones
- Insert the batteries correctly
I cannot record anything
Possible cause:
The Voice Tracer HOLD switch is engaged
- The batteries are exhausted
The maximum number of recordings has been reached or the recording capacity is full
Correction:
- Slide the HOLD switch to the Off position
-
Replace the batteries with new ones
-
Delete some recordings or move recordings to an external device
I cannot play recordings
Possible cause:
The Voice Tracer HOLD switch is engaged
- The batteries are exhausted
- Nothing has been recorded yet.
The volume is at the lowest setting
Correction:
- Slide the HOLD switch to the Off position
- Replace the batteries with new ones
- Check the number of recordings
- Adjust the volume
I cannot stop, pause, play or record
Possible cause:
The Voice Tracer HOLD switch is engaged
Correction:
- Slide the HOLD switch to the Off position
I cannot hear anything from the speaker
Possible cause:
- The earphones are plugged in
The volume is at the lowest setting
Correction:
- Remove the earphones
- Adjust the volume
I cannot hear anything from the earphones
Possible cause:
- The earphones are not plugged in properly
The volume is at the lowest setting
Correction:
- Plug in the earphones properly
- Adjust the volume
10 Specifications
| Device LFH 7780 LFH 7790 LFH 7890 | ||||
| Recording time / bit rate / sample rate | Super HQ (Encoder) | 9 h/64 kbps/16 kHz (ZVR Mono) | 16 h/128 kbps/44.1 kHz (MP3 Stereo) | 16 h/128 kbps/44.1 kHz (MP3 Stereo) |
| HQ (Encoder) | 12 h/48 kbps/16 kHz (ZVR Mono) | 24 h/96 kbps/24 kHz (MP3 Stereo) | 24 h/96 kbps/24 kHz (MP3 Stereo) | |
| SP (Encoder) | 16 h/36 kbps/8 kHz (ZVR Mono) | 64 h/36 kbps/8 kHz (ZVR Mono) | 64 h/36 kbps/8 kHz (ZVR Mono) | |
| LP (Encoder) | 90 h/6.4 kbps/8 kHz (ZVR Mono) | 360 h/6.4 kbps/8 kHz (ZVR Mono) | 360 h/6.4 kbps/8 kHz (ZVR Mono) | |
| SLP (Encoder) | 144 h/4 kbps/8 kHz (ZVR Mono) | 576 h/4 kbps/8 kHz (ZVR Mono) | 576 h/4 kbps/8 kHz (ZVR Mono) | |
| Stereo recording - Microphone / Line input - / - MP3 / MP3 MP3 / MP3 | ||||
| FM radio (87.5 - 108.0 MHz) - Reception / Recording - / - / - Yes / Yes | ||||
| Alarm function / Timer recording Yes / Yes | ||||
| Dimensions 102 mm / 37 mm / 19mm | ||||
| Power supply LR03 (AAA, UM-4) 2 alkaline batteries | ||||
| Battery life (hours) | Voice: Record / Playback earphone / Speaker 16 / 20 / 10 16 / 20 / 10 16 / 20 / 10 | |||
| MP3: Record / Playback earphone / Speaker | - / 16 / 9 | 11 / 16 / 9 | 11 / 16 / 9 | |
| FM Radio: Record / Playback earphone / Speaker | - / - / - | - / - / - | 9 / 17 / 13 | |
| Clock backup time | Approximately 4 minutes | |||
| Maximum number of recordings | Total 396 (99 per folder x 4) | |||
| Playback capacity - MP3 / WMA | All bit rates / 32 kbps - 192 kbps / no DRM supported | |||
| USB standard | 1.1 | 1.1 | 2.0 "high speed" | |
Benutzerhandbuch
Pulse una vez el botón SIGUIENTE. La Frequencia aumento en 50 kHz.
2 Continuées pulsando el botón SIGUIENTE brevamente hasta que统计数据 to the frequency of the frequency of the frequency of the frequency of the frequency of the frequency of the frequency of the frequency of the frequency of the frequency of the frequency of the frequency of the frequency of the frequency of the frequency of the frequency of the frequency of the frequency of the frequency of the frequency of the frequency of the frequency of the frequency of the frequency of the frequency of the frequency of the frequency of the frequency of the frequency of the frequency of the frequency of the frequency of the frequency of the frequency of
3 Pulse el boton REPRODUCCION/PAUSA brevamente para guardar la emisora seleccionada.
Puede pulsar el boton ANTERIOR paraocular en la direction contraria.
7.19 Firmware-upgrade
PykoBoOIOCTBO NOIb3OBaTeJIa
1 Digital Voice Tracer 203
1.1 Copepkmoe KomnneKta 20 3
1.2 O63op opraHOB ynpaBneHn pa3beMOB 20 4
1.3KK-dncnneHcNMBObl204
1.4 PpenmyeCTBa 20 5
2 Hauano pa6oTb1 20 7
2.1 3aMeHa 6aTaapeek 20 7
2.2 BkHoueHne uΦpOBO rIKTOΦoHa VoiceTracer 20 7
2.3 YctaHOBka Hacob 20 7
2.4 BbIKIOueHne uΦpOBOrO dNkToΦoHa VoiceTracer 20 7
2.5Функцн Hold 208
3 3aanncb 20 8
3.1 3aHcB CnOJIb3OBAHNEM BCTpoEHHO MKNKPOΦHa 208
3.2 3a\Pu\c b c nCpOJb3ObaHnEm BHeUHero MmKpOfoHa 209
3.3 3aIncb C BHeHrero yCtpoiCTBa (Tolbko 7890) 209
3.4 3aHcB FM paIIO (toIbKO 7890) 20 9
4 Bocnpoun3BeDenne 209
4.1ObbyHoe Bocpon3BedeHne 20 9
4.2 MeDneHHoe Bocnpoun3BedeHne 210
4.3ПОИСК 210
4.4 NOBTOP 210
5Ппсем FM paNo (Tolbko 7890) 211
5.1 PporpaMnroBaHne do 20-n paIOCTaHcN 211
5.2 ydaene nporpaMMPOBaHHbIX CTaHcui 212
5.3 Bocnpoun3BedeHne paJIOc
ИСПОЛьЗВаHиЕ МВСТроeHHOrO
ДИНAMИКa 212
5.4 O63op KhoNok - pexHm FM paIuo 21 2
6 Bocnpo3BedeHne MP3 21 3
7 MeHIO 213
9 YcTpaHeHne HncnpaBHOte 22 1
9Ппебостержени 222
10 Texnueckne xapaKTepcntukn 22 2
1 Digital Voice Tracer
1.1 CoepxHmoe KOMnEeKta

Voice Tracer

Ka6eJb USB
MnKpOΦOHnlaNaUkaHa


BaTapeKu

Ctepeohaynkn
WeHbI pEmoK


PykoBocBO nolb3OBaTeN
KOMNAKT-DnCK
1.2 063op opraHOB ynpaBneHn npa3beMOB
1 He3o HayuHnKOB
2 rhe3do MmKpOfoHa, rhe3do BxOpaueJInHnn
3 BcTpoeHHbIMNKpOfoH
4 3A\PiCb/PIAY3A/BKJI
5 CTON/MEHIO
OctaHOBka 3aHNC, MeHIO
6 NobbiueHne rpoMkoCTN
7 CNEyIOUIN BbICTpa nepeMOtKa Bnepen,3aMeHa faIana,3aMeHa MeHO
8 PANKA/IOBTOP N3MeHeHne nankn noBTOB Bocnpn3BeHn
9 BaTapeKa
10 DnHaMnK
11 INdikatop LED 3aNcN/BOcnpn3BedeH
12 LCD dncnnei
13 HA3AД b6IcTpaNepeMoTka, n3MeHeHne paima, n3MeHeHne MeHIO
14 BKNI/BOCPIPOUN3BEDEHNE/CKOPOCTb/PAY3A BKn/BblkN6ObuHoe BOCPON3BedeHne,nay3a, MeDnEHHOE BOCPON3BedeHne
15 NohneHnepromKoCTn
16 USB-haKoNTeNb dIa cKaaHnC nK
17.HOLD BKJIIOUeHHe
1.3KK-dncnnne n cunBONbl
Hdikatop nanok:A,B,C,D,M
Hnukatop6atapeKn(3aMeHnte 6ataepKncnncnnne Hmeet cTAtyc MeXy 3 n4)
HndkaTOp pexima stereo: HndkaTOp FM stereo/mono, HndkaTOp 3anncu stereo/mono
HndkaTOp npema paio FM (ToIbko 7890)
HnukatopBHeuHero BBOda(tonbko7890)
HnIkaTOp Homepa napiK, BENuHbI MeHIO, no3uN FM paNo (ToJIbKO 7890)
HdukatopKaueCTBa3aINcN Hdukatop6yDnblbHnka
Hndkatop 3aNNcN aKTHBUNPOBaHOHNO rOLOCOM
HnKaTOp MeNehHO BocnpOn3BeHeH
HnIaKTop 3aIncu C nCnOJIb3OBAHHeM TaIMepe
HnDkaTOppeKImaNoBToPa
HIMKaToppekMshuffle
HINDAKATOPBPEMEHNBOCPON3BEDEHNA/3aNNN MEHO

UHnka
on octah
BUIEROCB.PL
m - 1 0 ;
HnDnKaTOp BpeMeHN 3aInCn
1.4PpeMmyeCTBa
3anncb
YyBCTBnTeNbHocTb:ДЯЗANCS3Byka,NoCTyNAIOUeOcpa3HbIX CTOPOH(HaNPIMep,Ha KOHΦepeHUNx),BKIOHTe BblCOKm yPOBeHb YyBCTBnTeNbHocTn.BIeJAXN36EkaHnBHeuHnxWymOBbIX NOMEX BO BPemr 3aNICINLIuHbIX 3aMeTOKnepeiDnTe Ha HN3KNyPOBeHb YyBCTBnTeNbHocTn.
Pexm 3aunnc «Super HQ»: OTnHoe KaecToB 3aunnc rapaTnpyet KpuctalbHo UcToe 3BykoBo Bocpon3BeJeHne (ckopocTB nepeaun6ntob 128 K6nt/c, cactota dNckpeTn3aun 44.1 KfU, Koep MP3 ctepeo).
Pa3hble pexmbi 3annu: y Bac eTb Bb6op Mejdy npdoJIKTeBnHocTb 3aNcN u 3ByKOBbIM KaecTBOM. B 3aBNCMOCTN ot Baunx Notpe6HoCTe, Bbl, B cIax coXpAHEnHa mAmrtn, MoKeTe nepeKJIouHtbc Ha 60Iee Hn3Kn ypoBeHb KaecCTBa 3aNcN.
Pamr60bwoemKocn:MoHnaBcTpoehHaanmraTbno3BOJnE TAnCbBaTbXpAHnTBdHHhIe 3aHnCn. Het Heo6xOIMOCn cKaHnBaT b nn ydaTb aaiNb dI rTO, YTObI OcBo6OaNTb PAMrTb.
Pexum 3aHNC,AKTNBUNPOBAHHO rONOCM: 3a yD6Hna FyHKnua N03BOJAE TIKTOBaT co CBO6OHNbIM pykAM.3aNc hauHaetca ABTomATNUeCKN,Kak TOnbKO yPoBeHb CNHana npeBbIaet ONpeDeJIeHHbI
nopor (obuHOB TOT MOMENT, KOrDa BbHaunHaete dNkTObaTb).3anncb ABTomatMueckn PneKpaUaetcra, KOrDa Bb 3amOJaTe, HaunHaetc onrTa, KorDa Bb HaunHaete roBOpntb.
Функцг «abTopa3deneHne» abTomatueckn pa3bnaet dHHhble 3aHnHa OTdeBhle faHbI (no 30 nnn 60 MNHT), YTO cyueCTBeHHO 6bneraet nonck, peaKTupOBaHne n apxNBUPOBaHne 3aNcEe DInHHbIX DeNoBbX BCtpeu neKuH.
3aNcB c BHeuHnx NCToUHKnOB (line recording): 3Ta cyHKnIy No3BOJNT Bam KaueCTBeHHO 3aNNcBbAaTb 3ByK npRAO C BHeuHero nCToUHnKa (HaNPmep, CD-nneepa). IMeetcB MoDenn DVT 7890.
3anncb uepes USB-nopt: Pnp 3anncn npdoJnKnteBhX KOHphipeHnI nIphoBoN dIKtofoH moKeT nTaTbcraOT USB-nopTa. NpOcEINHTe USB-kaebn KhoTy6ky. KaT oBko nOdknoyehne 6ydet yctahOBneHo, Haxmnte KhoNky RECORD u yepKnaBaTe ee HeckoNko cekHy noka Ha dinCnnee He noBnTcA INDkaTop REC. Tenepb Bbl MoKeTe 3anncbAtb KOHphipeHnI nn DeIOBble pa3roBOpbl, He harpykai 6aTaPeIo.
Bocnpoun3BeDneHne
Korda BkHueHaФyHKua 6JoknpoBKN HOLD Ha JbeoCtopoHe Voice Tracer, BCE KhoNKe He JeCTByIOT.
I PnudBnHbTe fynKuH OHL Ha nO3uH Off YTo6bI aKTHBn3npoBaTb KhoNk Voicr Tracer.
3 3ainncb
Hakmtte KhoNky REPEAT/FOLDER, yTo6bI bbl6paTb Jekaemyo nAnky. Pn KaJdOM HkaTmN 3ToI KNKn CuΦpOBo DnKTOΦOH Voice Tracer nepexoDNT K cIeNyUoSei nAnke.
-Пелед наалом заимс установпг Зжеламь реким заимс, пankу,Функцю VA и реким скор检н (Super HQ, HQ, SP, LP, SLP). (IocmotprteHa Инструкци в галав Meию.) ①
CenaiTe KOHTpOblHyIO 3aINCb.
YTO6bI OTO6pa3nTb Ha DCINNEe OCTaBwyOcR DNITeNBHOCTb Tekyoero faina, haxMnte uyepeKNAIte KONKY BOCIPON3BEDEHNE/PAAY3A BO Bpem 3anCn.
- MakcimabHoe uncno faaiNoB KKaJdoi nAnKe DoXoDnT do 99, o6ee uncno 396 (99 faaiNoB x 4 nAnKn).
Korda uncno faioNB doouet do 396,Ha dncnnee noaBntca Hauinbc "FULL",N Bbl He cmoKeTe npoOnkntb 3anncb ① ②. B TaKOM cnuyae ydaJIte HeKOToPbIe 3anCn nn 3annuTe nx

HA BHeHHe yCTpoIcTBO (B Bnde ayno3annc nn Ha KOMnbIOTeP).
PncyHOK 6 nepenecnte nX Ha BHeuHHee ycTpoiCTBO (ayDnOuycTpoiCTBO nnPiK).
- He BbTacknBaIte 6aTapeiKu BO Bpemr 3aIncN. 3To MoKeT npNbEcTn K HENpaBunbHou pa6Ote dNKtOfoHa Voice Tracer.
EcnBbcoBpaTeCbOcUeCTBnTb3aNcB TeYeHneIINTeBHorOBpemHn,3aMeHnTE6aTaepKnpePdHaayamON3aNcN.
- Ecnn DnKToΦoH Voice Tracer HaxoDntcBpeKmVe VA ③nHe
0bHapyKuBaet 3ByKn, 3aNcB octaHaBnBaetcA bTOMaTneCKn.
BbIKNoaIte ΦyHKnIO VA npn 3aNcN BaXhIx pa3roBopOB.
- Haxmte KhoNkY REc npn Bocnpoun3beHnn faHnOB MP3 nnn WMA nnke M (Music) yTO6bI AKTNBn3npoBaT kBAJai3ep.
3.1 3aHcB cncNoJb3OBAHHem BCTpoEHORo MKNPOphiHa
HaxMMTe KhoNky REC/PAUSE yTo6bI BKJIOuNTb 3aNNcb ①② 3arOpntcKpaChbInHdkaTOpLED.
2 HanpaBbTe BCTpoEHbMnKpOoH yCTpoiCTBa B CTPOHY NCTOuHNka 3Byka. YTO6bI OTO6pa3NtHa DnCnpeocCTaBHyocdNITeNbHOCTb TEkyUero foAaNa, HaxMMte uYdepKbauTe KhoNKy BOCPION3BEDEHNE/IAV3A.
3 4To6bBpemeHHOocTaHOBnTB3aINcB,HaxMNTeKHOKNY REC/PAUSE.KpaChbInHIMNKaTOpHaHHeT MIRaTbN Ha dncnnee NOBnTCHaNNCb"Paay3a".
4 TTo6bI npOdoJnKtB 3aInCb, hAnMnte KOnKy REC/PAUSE. KpaChbI INHdkaTOp cHObA 3aropaeTcra.
Haxmte KhoNky CJIeDyHOuIyUTo6bI OTKpbITb HOBbI FO BpMa 3aNNc.
6 06uee Bpem3aHnncnnoBnEeTcHa nDCnnee npOOKHauHHn 3aHNC eCNn HaxMeTe KHMky STOP/MENU ③.
3.2 3aHc b cncnOb3oBaHHeM BHeHrero MmKpOfoHa
T06bI 3aINcBbATb C INcNoB3OBaHHeM BHeHrero MInKpOfoHa NOkIOUHTe MInKpOfoH K rHe3y I dEChByTe ToHO TaK Je, KaK npN 3aINCn C INcNoB3OBaHHeM BCTPoEHOro MInKpOfoHa.
3.3 3aanncb C BHeWHeRo yCtpoCTBa (TOnbko 7890)
BkIOuHTe Voice Tracer. EcnVoice Tracer B pexmme FM Radio, HAKMNTe KONky REPEAT/FOLDER.
2 BkIOUHTe peKIM MeHIO nIcTOHnK 3aINCN (L). ToXaYyCTa npOHTaTe HNCTpyKuIN B rnaBe MeHIO. Ha dncnnee noBNTCAHaNNCb "LINE" ①.
3 PnokIIOUHTe THe3Do BXoJaSei NINHn K NCTOCHky 3ByKa C NOMOJIbKa6eJ.
Haxmte KhoNkY REPEAT/FOLDER, uTo6bI bVb6paTb JKeMaMyIO nAnKy.
5 TTo6bHaaytB 3aInncb, HaxMnTe KhONkY REC/PAUSE.
YTo6bOCTaHOBnTbNINBO306HOBnTb3aNNcBdEINCTByNTeTOHOTAK Xe,KaK npu 3aNNCUCNCN0Nb30BaHNEMBCPTpeHHORo MMkofoHa.
3.4 3aHcB FM paHnO (tonbKO 7890)
BkIOuHTe Voice Tracer. EcIN Voice Tracer He B pexKmE FM Radio, HAKMITE KHOKNy REPEAT/FOLDER.
2 Bb6epuTe paNocTaHnIO. PoxaIyIcTa npOHTaTe HCTpyKUINB rnaBe FM paNo.
3 TTo6bHaayaTb 3aHnCb BbIbpaHHoPaHIOCTaHcHn HaxMNTe KHOKY REC ①
4 Bocnpon3BedeHne
4.1 06bIuHoe BocpOn3BeDHeHne
Haxmte u ydepxnbai Te KhoNky BOCPON3BENE/NAY3A BTeHeHne HeckoIbKHX CeKYd YTO6bl BKIOuHTb Voice Tracer.
EcnVioceTracerBpeKMeFMRadio(Tolbko7890) HAKMITEKHONKYREPEAT/FOLDERBTeueHneHeckOJbKxCekyHd.
3 Haxmte KhoNkRePEAT/FOLDER, yTo6bI bbl6paT JKeJaemyo nanky.
Haxmte KhoNky BOCPPOV3BEDEHNE.3arOpTc8eHeBn HndkaTop LED,HaDncnnee OTo6pa3ntc4 DnnteIbHoCTb BOCPPON3BeDEHn.
5 UcTaHOBnTe yPoBeHb rpoMkOcTn 3ByKa c NpMoUbIpeRyIpOBKn 3ByKa.
6 Haxmnte KhoNky STOP/MENU BO Bpemr Bocnpn3BedeHn. Ha nCnlee oTo6pa3ntcra 06uaa nnTebHOCTb Bocnpn3BedeHn.
7 TTo6bI npOIoJnxTb BOCnPOn3BeJeHne HaxMnTe KHOJIky BOCnPOU3BEJEHNE.
4.2 MeDneHHoe Bocnpon3BedeHne
Tolbko npn BOCPON3BedeHn BOICMeJIOB.

HaKMTe n ydpKaBae KhoNky BOCPPOUN3BEDEHNE qTo6bI nepeKnOHTb c pexMa o6blHoro BOCPPOUN3BeDEHnHa peXMMedHeHHORo BOCPPOUN3BeDEHn ①.
Haxmte uyepeknaBae KhoNky BOCnPOIN3BEDEHNE cHOBA yTo6bl nepeKIOuHTb Ha peXMM O6bUHOrO BOCnPOUN3BeDeHNA.
4.3 POnck
HaKMMTe n ydepKnBaIe KhoNkY HA3AД/CJIEDyIOUIN B TeueHne HeckoIbKnX cekynd YTO6bI 6bICTpo nepeuTn K cIeNyUOeMy IIn npedbyuemy fainy.
OTnycnte KhoNkY HA3AD/CJIEDIYIOUIN, YTO6bI BO3O6HOBNTB BOCnpo3BeDeHHe CNOHHKeHHOH NII HOPMaNbHO CKOPOCTbIO.
YTo6bI nepeMeMaTaBCaNo BcEmΦaJIaM HaxMnte N ydePknBaTe KhoNky HA3A/D/CNEyIOUIN.
4.4 Nobtop
4.4.1 Nobtop φparmenta
Bo BpemBocnpoun3BeDHeHnHaJMMTe uYepKnBaTe KhoNky REPEAT/FOLDER Tam, rIe BbXoTne HaaTa b NobTOP qacn 3annC.
INHdkatop A B Mmraet ①
CHOBA HAXMNTe N ydepxnBaIte KNONky REPEAT/FOLDER TAM, IDE BbXOTITE KOHHTb NOBTOp qACTN 3aNNC
Bb6paHbHpFpaMent NOBTopReTcH enpepbIBHO,TO6bIOCTaHOBTB BOCnpon3BeDeHHe, HaxMITE KHOIkySTOP/MENU.
4 TTo6bIOCTaHOBnTb NOBtOp φpaImeHTa N BepHyTCa K O6bIKHOBeHHOMy BOCnPOn3BeDeHIno, HaxMnte KONky REPEAT/FOLDER.
4.4.2 NOBTopaainla
Bo BpemBocIpoun3BeHnHaXmTe NydepKnBaIte KhoNky REPEAT/FOLDER B TeueHne HeckonbKnx CekyHd. Ha DnCnnee NOBNTcN HnDKaTOP NOBTopa.
2 Tekyun foan noBTopeTc noka Ha ducnnee BnDnHnDnKaTOp ①.
3 TTo6blOcTaHDoBnTb BocIpOn3BeJeHHe, HaxMMTe KhoNky STOP/MENU. Voice Tracer octaETCBpeKmE noBtopa.
4.4.3 NobTop nanku
Bo BpempeKIMmaIOBtopaHakMnteYyepKnBaIte KhoNky REPEAT/FOLDER B TeueHne HeckoJbKnX cekHyd.
2 INHnKaTOp "FOLD" NOABNTcHa IINCPIe N TeKyuIe FaiJIb6yDyT NOCTOARHNOBTOPArb


4.4.4 PekkM Shuffle ("nepeTacobka")
Bo BpempeKIMa ocTahOBKnVoiceTracer HaxMMTe KHOIky REPEAT/FOLDER YTO6bI BB6paTb faaiNb My3bKaIbHoI nnKn.
Bo BpemB OBCIpOn3BeDHeHn HaxMnte N ydepJnBaTe KhoNkY REPEAT/ FOLDER TPN pa3a B TeHeHne HeckOblKnx CeKYHd.
HnkiTop"SHUF"noBtcaHaDncJIe,ueBceaMybKaHOBn nnKn6ydyTBOcnpOn3BOOHTbcRbPon3BOhOMnopJKe ①.
1 NocToHHbI NOBTop pa6oTaET TOnbKo B nAnke M (My3bIka)?
5 Bo BpemB BocPon3BeDHeHn HaxMnte n ydepXnBaTe KhoNkY REPEAT/FOLDER B TeueHne HeckoIbKnx CeKynd YTo6bl BbInu n3 peXmShuffle. EcnHn HxMeTe KhoNkY STOP/MENU, Voice Tracer ocTaeTcBpeXmShuffle.
5.2 ydaene nporpaMMPOBaHHbIX cTaHcN
CnedyuOuHneMHCTpyKUINNo3BONaIOTydaJIeHHeNeHexeNaEMbIXCTaHcNIOncNEAbTomatNuYeCKORIporpaMMnpoBaHHNA.
HaKMTe KONKY REPEAT/FOLDER KpaTKOBpeMeHHO YTO6bl 3MeHHTb peXMM. ①.
Haxmte KhONky CJIeIyUOuIN YTO6bI Bb6paTb YaCTOTy, KOtopyIO JKeNaTe ydaNTb.
3 HaxmTe KhoNky BOCPON3BEDEHNE yTo6bl ydaNTb YaCTOy.
HaxmTe KhoNkCy CLEyOuM uTO6b bbl6paT bcneyuoyu acToTy.
5.3 Bocnpoun3BedeHne paDIO cncnoIb3OBAHnEM BCTpoEHNO DnHaMnKa
Cnedyuoune HNCTpykun NIO3BOJIAOT NepeKIOaTb MeKdy HayHnKaMn INDINHAMKOM.
BKNIOHTe HAYUHNIK. YTO6bI NCINONBJ3OBaTB FM paIIO Bbl DOJIHHBI BKIOHTb HAYUHNIK, OHN DeIeCTBYIOB KauEcTBe aHTEHBI.
2 Haxmnte KhoNky STOP/MENU 4to6bl BkIouHb BbIXoJ FM paNo KdHaMky.
VoiceTracerabTomatuecknBO3BpaaaeTcKHayuHnKaMecn BbIXoJTeN3peXmuFMpaio.
5.4 063op KhoNok -peKm FM paAno
7.2 CoxpaHeHMe BbI6paHHOrKaueCTBa
3Ta yHKnua YCTaHOBnHa TOnbKO BpeXmE 3aHnCe rOnca.
B pexime octaHOBKn Voice Tracer, HaxmTe KhoNky STOP/MENU.
KpaTkoBpeMeHHo HaxMnte KhONky CJIENyIOUHn NOtOM BOCPPON3BEDEHNE ①. Ha nucnnee oTo6pKaaeTcR“REC"n“SUPER HQ"Mnraet ②.
3 Haxmte KhoNky CLEyIOuIy To6bbl6paTb
Haxmte KhoNky BOCPON3BEDEHNE yTo6bicoxpaHnTB BaW Bb6Op nIOTOM KhoNky STOP/MENU yTo6bblBHTn3peXmu MeHO.


7.3 CybCTBntenbHocb MMKpOoHa npu 3aann
念 TAtyHKnIy yCTaHOBnEHa ToIbKo BpeXIMe 3aINCe rOInoca.
B peKmme octaHOBKn Voice Tracer, HaxMnTe KhoNky STOP/MENU.
HaxmTe KhoKy CLEyUOuIN DbaXkbI ①.
KpaTkoBpeMeHHO HaxMnte KhoNky BOCPON3BEDEHNE. Ha nncnnee oTo6pKaaeTcA“SENSE"n“HI"mraert ②
HaKMTe KHOHky CNEIYIOUIM NTO6bI Bb6paTb XeNAEMyO 3
Haxmte KhoNky BOCPON3BEHEHNE qTo6b coxpaHnTB BaBb6Op nNOTOM KhoNky STOP/MENU qTo6b BBInn n3 peXIMMa MeHO.
7.4 yctahOBka cnHana "6nn"
BpeKIMe octaHOBVKn Voice Tracer,HaKMnTe KhoNkY STOP/MENU.
Hakmte KhoNyUOuTpuXkb ①
KpaTKOBpeMeHHo HaxMnte KhoNky BOCPON3BEDEHNE.


Ha nncnnee oTo6paKaaetcBEEP"bHIn"nOn"mraet ②
HaxmTe KONky CLEyIOUuI yTo6bl Bb6paTb "OF" (off) nn "On" ③
Haxmte KhoNky BOCPON3BEDEHNE yTo6bI coxpaHnTb BaBbB6Op INOTOM KhoNky STOP/MENU yTo6bIBbItn n3 peKIMa MeHIO.


7.5ФункиVAДлзпснakтubnИрванHонгОCOM
3Ta yHKnIy UCTAHOBHe TOLbKO BpeKIMe 3aIncen roIocA.
B pexime octaHOBKn Voice Tracer, HaxMnte KHONKY STOP/MENU.
Haxmte KhoNky CLEyOuM N yetbpeKdb ①
KpaTkoBpeMeHHoHaxMnte KhoNkyBOCpPOn3BEHeHNE. Ha nncnnee oTo6paKaetc“VA"n“OF"mraet ②
Haxmte KhONky CLENYIOUu TTo6b Bbl6paTb "OF" (off) nn "On" ③.
5 Haxmte KhoNk BOCPON3BEHEHNE yTo6b coxpaHnTb BaB Bb6Op nIOTOM KhoNk STOP/MENU yTo6b BbInn n3 peXIMMa MeHO.


7.6 yctahOBka 3aHero cBeta
BpeKIMme ocTaHOBKn Voice Tracer,HaKMnTe KHONky STOP/MENU.
HaxmTe KhoNky CLENYIOUIN nTb pa3 ①
KpaTKOBpeMeHHo HaxMnte KhoNky BOCPON3BEDEHNE. Ha nncnnee oTo6pKaaeTc"LIGHT"CBET"mOFMnaet
Hakmte KONky CLEyIOUuIyTO6bBb6paTb"OF"(off)nn "On" ③.
Hakmte KhoNk BOCPON3BEHEHNE qTo6b coxpaHnTB Baw Bb6op n NOTOM KhoNk STOP/MENU qTo6b Bbltn n3 peXIma MeHIO.


7.7 YctaHOBka BBOda 3aNNc: 3aNNcb C BHeuHero yCTpoiCTBa (TOnbko 7890)
3Ta yHKnua YCTaHOBHeA TOnbKO B nAnke 3anCeR roNoCa.
Bpejnme octaHOBKn Voice Tracer, Haxmnte KhoNky STOP/MEN
HaKMITE KHOIky CLENYOUI WecTb pa3 ① .KpaTKOBpeMeHHo HaKMITE KHOIky BOCPONBDEEHNE. HaIMcNlee OTo6paKaetca "INPUT" n "V" Muraet ②
Hakmte KhoNky CLEyIOuM NTO6bBb6paTb "L" (BXoAaJnHn)nn "V"(ronoc) ③.
Hakmte KhoNkY BOCPON3BEDEHNE qTo6b coxpaHnTb BaW BbI6Op INOTOM KhoNkY STOP/MENU qTo6b BbIaTN n3 peKIma MeHIO.
7.8 YCTaHOBKa YaCoB
Bpejme ocTaHOBVKn Voice Tracer,HaKMnTe KHONky STOP/MENU.
HaxmaiteHaKhONkyCJIENyIOUIN,noKaHaDnCnnee He noaBntcO6o3NaueHe "CLOCK" ①.
KpaTkoBpeMeHHo HaxMnTe KhoNky BOCIPOUN3BEDEHNE.
Ha nncnnee oTo6paKaetcnaNo mecn "01"uTQo ^ 出 5 ^ 出
5 HaxmTe KhoNky CLEyIOUuYTO6bblBb6paTb rOu HaxmTe KhoNky BOCPON3BEDEHNE.
6 Haicnnee Mnaet Mea "01".Haxmte KhoNky CIEyIO TO6bblb6paTb Mea n Haxmte KhoNky BOCIPON3BEDE
7 Ha ncnnee mnae Tnnc0 "01". Haxmte KhoNky CLEnyOuINyTO6bl Bb6paTb Ncno Haxmte KhoNky BOCPION3BEDEHNE.
6 INHnKaTOp YacOB He MnaTe. UcTaHOBka YacOB npOnCXoND TEm-Je 6pa3OM KaK YCTaHOBka YncNa C NmOuBIO KhoNKn CJEyIOUIN H A3AID ③.
9 Pocne yctahOBKn MmHyT HaxMITE KhoNky BOCPON3BEDEHNE qTo6b coXpaHnTB BaW Bb6Op N NOTOM KHOKNy STOP/MENU qTo6b BblTN n3 peKIMMa MeHIO.ФYHKUaCobOcUeCTBJIeTcHMeDJIeHNO.
7.9 YctaHObKa TaMepa
BpeXime octaHOBKn VoiceTracer,HaXmTe KhoNky STOP/MENU.
HaxmaiteHaKhONkyCIEyIOuMn,noKaHaDncnnee He noaBntc o6o3haueHne "TIMER" ①.


KpaTKOBpeMeHHo HaxMITE KHOHky BOCPON3BEJEHNE. “OF" (BbIKIOueHe TaIMepa) MURaeT Ha DCNnee ②
Haxmte KhoNky CLEIyIOUuYTO6bBb6paTb"ON"(ycTaHOBka TaMepa) ③.
5 KpaTKOBpeMeHHo HaxMITE KhoNky BOCPON3BEDEHNE n NOTOM KhoNky CLEYIOUINn HA3ADyTO6bl 3aNNcaTB qacbl ④. Notom HaxMITE KhoNky BOCPON3BEDEHNE n 3aNNHTe MInHYtbl.
6 Haxmte KhoNky BOCPON3BEDEHVE nya yctaHOBkn INTEPBana 3annc ⑤.
7 HaxmTe KhoNky CLEyIOUIM IaI yCTaHOBKn INHTepBaIa.
HaKMTe KONky BOCIPON3BEDEHNE yTO6bbl6paTb nanky, B KOtopoJ xenaete 3aNaCAtb faai. DnB bIoopa nanku, B KOtopoJ xenaete 3aNaCAtb faai, HAKMTe KONky CLENYIOUIN.
Hakmte KhoNk BOCPION3BEDEHNE yTo6b coxpaHtB BaI Bb6Op I NOTOM KhoNk STOP/MENU yTo6b Bbltn n3 peKIMa MeHO.
7.10 yctahOBka 6yduNbHNka
BpeXmme ocTaHOBKn Voice Tracer,HaXMMTe KhoNky STOP/MENU.
HakmaiteHaKhONkyCJIENyIOUIN,noKaHaDnCnnee He NOABNTcO6O3NaueHne"ALARM" ①.
KpaTKOBpeMeHHo HaxMnTe KhoNky BOCPON3BEDEHNE.

"OF"(BbKIOHueHHe 6yDnIbHnKa)MnraET Ha nucnnee ②.
Haxmte KhoNky CLENYOUI NtO6bI BB6paTb "ON"
(YcTaHOBka 6yDnIbHnKa Tnna CnHnA"6n")nn "V"
(YctaHOBKa 6yDnIbHnKa Tnna 3aIncnn My3bIK)

7.10.1 YctaHObKa 6yDunbHnKa Tnna CurnHa "6nn"
5 Haxmte KhoNky BOCIPOU3BEDEHVE nyaHOBKn BpeMeH ④.
6 HaxmTe KhoNky CLEyIOUIN YTO6bBb6paTb YAC, NOTOM HaxmTe KhoNky BOCPON3BEDEHNE YTO6bBb6paTb MNHyTb.
Haxmte KhoNky BOCPOV3BEDEHNE yTo6bl coxpaHbBaW bHiOp nnotom KhoNky STOP/MENU yTo6bl BbItn N3 peKIma MeHO.

7.10.2 YcTaNOBKa 6yDnIbHnKa Tnna 3aIncnn My3bIKn
5 HaxmTe KhoNky CLEyIOuIN nn HA3AD YTO6bl BbI6paTb "V" ⑤.
KpaTKOBpeMeHHo HaxMnte KhoNky BOCPON3BEDEHNE DnYyCTaHOBKnBpeMeHN 6.
7 HaxmTe KhoNky CJElyIOUINyTO6b BbI6paTb Yac,NOTOM HaxmTe KhoNky BOCIIPOUN3BEDEHNE yTO6b BbI6paTb MNHyTb.
Hakmte KhoNky BOCPON3BEDEHNE T06bl BB6paTb nanky ⑦.
Haxmte KhoNky BOCPON3BEDEHNE UTo6bbl6paTb NaKy CKeJaeMbIM faHOM.


HaKMnTe KHNkY BOCIPOUN3BDEHNE YTO6bl COxpaHnTB BaW Bb6Op INOTOM KHNKSY STOP/MENU YTO6bl BBInTN 13 peXIMMa MeHIO
7.11 063op faIIOB:Bocpon3BeHHe HaaHa faIIOB
BpeKIMe ocTaHOBKn Voice Tracer,HaKMnTe KHONky STOP/MENU.
HaxmaiteHaKhONkyCNEIyIOUINn,noKaHaDncnnee He NOBNTcO6O3NaHeHne“SCAN"(ckaHnPOBaHne)①.
KpaTkoBpeMeHHO HaxMnte KhoNky BOCIPOIN3BEDEHNE n "N" Mmraet HaDCnnee ②.
Haxmte KhoNky CIEyIOuM NTo6bBb6paTb HndKATOp "Y" ③.
HaKmTe KhoNky BOCPON3BEDEHNE/NAy3A qTo6bl BOCPON3BecTn nepBbIe ckyHdbKaJdOro faaNa, HauHnaC nepBoro foaiNa Tekyuien nanKn 4.

7.12Функцу ydaeneHHBex nanok (peKIM φopMaTHpOBaHn)
PpOcXoJt ydaJeHne BceX nanok Voice Tracer n BceX nporpaMMnpOBaHHbxF FM paNIOCTaHcI!
Bpejme octaHOBKn Voice Tracer,HaKMnTe KhoNky STOP/MENU.

217PyKOBOP
HakimMaTe Ha KhoNky CJIeIyIOUIN, noka Ha DnCnlee He noaBNTcra 06o3HaueHne FRMAT" ①.
KpaTKOBpeMeHHO HAKMITE KONKY BOCIPON3BEDEHNE IN "N"Mnraet HaDCnnee ②.
Haxmte KhONky CLENYIOUIN YTO6bBb6paTb HnDnKaTOp "Y" ③
5 Haxmte KhoNky BOCIPON3BEDEHNE dny opMaTnPOBaHHaVoiceTraceru ydaeneHHBcex nanok 4


7.13 Bepn: BocnponBedeHne Bepn Fmware n CHTne daHHbIX
BpeKIMe octaHOBKn Voice Tracer,HaKMnTe KhoNky STOP/MENU.
HaxmaiteHaKhONkyCJIENyIOUIMn,noKaHaDnCnnee He NOBNTcO6o3NaHeHne"VER" ①.
KpaTkoBpeMeHHoHaKMITE KhoNky BOCPON3BEDEHNE 1BABOCPON3BedeHnHOmepaBepcn ②
Haxmte KhoNky CLENYOUIIN DnB BocnpOn3BeHeHH CHaTIN DaHbIX firmware ③.
HakmTe KhoNky BOCPON3BEHEHNE u NOTOM KhoNky STOP/MENU yTo6bl ByTu n3 peKIma MeHIO.


7.14 PackanbibaHne oDHoro faaHa Ha Dba faaHa ("Split")
3Ta yHKnua YCTaHOBHeA TOnbKO B nAnke 3anCe rIooca.
OctaHOBBTcB TaM, rE Bb JxenaTe pa3dennb faHn.
BpeKIMe ocTaHOBKn Voice Tracer,HaKMnTe KhoNky STOP/MENU.
HaxMMTe KhoNky HA3AД bαxNbI. H daicnnee oTo6paKaetae“SPLIT”①.
KpaTKOBpeMeHHo HAKMITE KHONKY BOCIPPOIN3BEDEHNE. INHnKaTOp "n" Mraet Ha DcNnee ③.
Haxmte KhONky CIEyIOuM NTO6bBb6paTb HnDnKaTOp "Y" ③.
6 HauKmTe KhoNky BOCPON3BEDEHNE u NOTOM KhoNky STOP/MENU yTo6bl BbTu n3 peXmu MeHIO.
PacanbIbATb faIN HeBO3MOxH0, KOrJa nAmTb VoiceTracer NOHaN KOrJa B NaKe HaxOaTc99 aaiIOB 4


7.15 Pa3deneHHe: ABToMaTHuecka 3aIncb Ha HObbl aII uepe3 30/60 MmHyr ("Divide")
3Ta yHKnua YCTaHOBnHa TOnbKO B nAnke 3anCeI rOloca.
BpeXMe ocTaHOBKn VoiceTracer,HaXMMTe KOnKy STOP/MENU.
2 Haxmte KhoNky HA3Apa3. Ha ducnnee oTo6pkaeTc "DIVIDE" ①.
KpaTkoBpeMeHHoHaKMITE KhoNkyBOCIPPOUN3BEDEHNE. HndkaTop "n" Muraet HaDCnnee ②
HaxmTe KONKy CIEIYIOUIN YTo6bI BbI6paTb INHnKaTOp "Y" ③
5 HaxmTe KhoNky BOCPON3BEDEHNE yTo6bBlb6paTb aBTOMaTuueckyo yCTaHoBky pa3deneHH 4.
6 HaxmTe KhoNky CLEyIOuN uTo6b Bb6paTb 30nn 60 MNHT.
Haxmte KhoNkBOCnPON3BDEEHNE yTo6bI coxpaHnTb BaW Bbl6op INOTOM KhoNkY STOP/MENU yTo6bIBblTN n3 peXIMMa MeHO.
7.16 BbI6Op KaueCTBa 3ByKa paAnonepeaun Stereo/Mono (ToIbKO 7890)
3Ta yHKnYyCTaHOBHeHa TOnbKO BpeKmE FM paNo.
BpekmmeFMpaHnoHaKmnteKhONkySTOP/MENU.
2 Haxmte KhoNkY HA3AD TpNxkbI. Ha nncnnee oTo6paKaetcra"STEREO".
KpaTKOBpeMeHHoHaxMITE KhoNkyBOCPPOUN3BEJDEHNE. HnDnKaTOp"STEREO"MnaeT Ha nCnnee ②
HaxmTe KhoNyUOuNyTo6bByBb6paTb"MNO"


(mono) ③ nn "STEREO" ②.
HaKMTe KONKy BOCPON3BEDEHNE yTo6b coxpaHtB BaW Bi6Op I NOTOM KONKy STOP/MENU yTo6b BiIITN n3 peKIMMa MeHO.

7.17 AToMaTmueckoe nporpaMMnPOBaHne (ToIbKO 7890)
3Ta yHKnua yCTaHOBHeHa TOnbKO BpeKmE FM paNo.
B pejkmfme FM paio haikmte KhoNky STOP/MENU.
HaxMMTe KhoNky HA3AD DbaXbI. Ha dncnnee OTo6paKaJIoTcA“AUTO”u“FM" ①
KpaTkoBpeMeHNO HaxMITE KhoNky BOCIPOUN3BEDEHNE. INHdkaTOP "n" Mraet Ha DCnnee ②
HaxmTe KONky CLEYIOUIN yTo6b BbIpaTb HnDnKaTOp "Y" ③.
HaxMnTe KhoNky BOCPON3BEDEHNE nA bTOMaTHueCKOro nporpammpoBaHn FM paHocTaHn.

Pocne Bb6opa paiaoctaHm FM Voice Tracer Bo3BpaaetcB peKIM FM paIIO. HaxMnte KHOkny STOP/MENU yTo6bl BbItn n3 peKIMa aTOMaTnueckoro nporpammpoBaHnA.
7.18 Bb6op BbIXoJa FM paIIO c HcIOnb3ObaHHeM HayuHKnOB nnnn nnHaMaKa (Tolbko 7890)
3Ta cyHKnIy cTahOBHeHa ToJIbKO BpeKIMe FM paJIO. Bbl DoJIxHbI BKIOuHTb HayUHNK DaKe KOrJa ICNoJIb3yeTe DnHaMK.
Bpexime FM paNo Haxmnte KhoNky STOP/MENU.
KpaTkoBpeMeHHoHaKMITE KHOHkY HA3AД pa3. HaДиCnIe OTo6paKaHOTcRA "OUTPUT" n FM" ①.
KpaTkoBpeMeHHO HaxMITE KhoNky BOCIPON3BEDEHNE. HnDnKaTop "EP" Mraet Ha DcNnee ②
HaxmTe KNONky CLEyIOuN YTO6bI Bb6paTb INdKATOP "SP" ③.
Haxmte KhoNky BOCPON3BEDEHNE yTo6bI coxpaHnTB BaW Bbi6Op I nOTOM KhoNky STOP/MENU yTo6bIBiTu n3 peKIma MeHIO.
7.19 Firmware Upgrade
1 CkaaTe firmware update dna Bawaero Tuna Voice Tracer Ha www.philips.com/dictation. Bb6epnte faunn noctabte ero B DnpekTopuN Voice Tracer.
BpeKIMeOCTaHOBKn HAXMMTe KhoNkY STOP/MENU.
Haxmte KhoNky HA3Apa3. Ha dinCnnee oTo6pKaaetcra "UPGRAD" ①.
KpaTkoBpeMeHHo HaxMITE KhoNky BOCPON3BEDEHNE.


Hndkatop"n"Muraet Ha dncnnee ②
HaKMnTe KNONky CLENYIOUINyTO6bI BbIbPaTb INHnKaTOp
6 HauMITE KhoNky BOCPON3BEDEHNE. Voice coBepwaet yctaHObky HOBOrO faIina firmware u NOTOM BblKnIOuAeTc4.


9 YcTpaHeHne HeNCnpaBHOCTe
KKdnyct
Bo3MOxHnA npuHa:
BaTapeKn pa3paXKeHbI
- BaTapeiKu BCTaBHeHbI He npabunbHo
Cnocob yctpaenHn:
3aMeHHTe 6aTapeKIN HOBIMN
BCTaBbTe 6aTapeKn npaBnblHo
He ocyuectbnjaetc zanncb
Bo3MOxHnA npuHa:
- Κιφροῦν Μικτοφούν Voice Tracer 3a6bokupoBaH (pexMM HOLD ON)
-БатAPEн pa3рженbl
CdenaHO MaKcMmaHbHoe KOINueCTBO 3aINceN INI NAMrTb 3aONHeHa
CnocobyctpaHnHa:
- BbIKIOUHTe fHyKcIIO 6NoKIpOBKn
3aMeHHTe 6aTapeKn HOBbIMN
- ydaIITe HeKoTOpBie 3aIncn IIN nepHeCInTe 3aIncn Ha BHeuHoe yCTpOcTBO
3aunH He Bocpon3BoATc
Bo3MOxHnA npuHa:
- ΚιφροBoι έπκτοΦοH VoicE Tracer 3a6λoKIpOvBaH (peXmHOLD ON)
- BaTapeiKn pa3PjKeHbI
3aHncn eue He cenaHbI - PerjIaTOp rPOMKoCTn ycTaHOBJIeH Ha MInHMMyM
Cnoco6 yctpaHnHa:
BbIKIOHTe fyHKUIO 6NOKPOBKN
3aMeHHTe 6aTaapeKINHOBbIMN
-Поберп Te KOnuYeCTBO 3aIncei
- OtperynnpyTe rpoMkoctb
PnBocnpOn3BeDeHnn nn 3annc He ydaetc npeptnBpeKmOctaHOBKn nn nay3bl
Bo3MOxHnA npuHnHa:
- ΚιφροBoι έπκτοΦοH VoicE Tracer 3a6λoKIpOBaH (peXIM HOLD ON)
Cnoc6yctpaHnHa:
BbIKIOUHTe yHKUNIO 6NOKPOBKN
HnhamHK He BOCINPOUN3BOUNT 3Bykn
Bo3MOxHnA npuHa:
IoiKJIIOUeH HauWHNK
PerynTOp rpoMkOCTN yctaHOBNeH MaMHIMyM
Cnoco6yctpaenHn:
OTKIOUHTeHAYUNK
- OTPerynnpyIe rpoMkoctb
HayshnK He Bocnpo3Bodnt 3Bykn
Bo3moKna npuHa:
UTekeh HuyuHnka BCTaBneH B rHe3do He NOHOCbIO
PerynTrop rpmKoCTn yctaHOBneH Ha MNHMym
Cnoco6 yctpaehn:
BCTaBbTe wTekep HayuHnka npabNlbHo
- OTPerynupyTe rpmKocTb
9 PpeiooctepekeHn
He bTaIteCb BCKpbIbATb, MuHITb MuMoDnHIpOBaTb BaWuΦpOBoB DNKTOfoh Voicr.
He nCnOJb3yIe Bawu cnΦpOBoN dNkToΦOH VoicETracerBMeCTax,1e 3aPpeJeHO nCnOJb3OBAHMe3NeKTPoHHbIX yCTpojCTB (HanpIMep,BcAMoTeTax).
He nomeuaiTe Bau ufofoBOn uKTooHVoice Tracer nero akcecyapbB Baw pot.
He norpykaTBe Bauu npfoBou nnKTooHVoic eTracerBxNdkOCTn He nponBaTe Hx Ha Hero.
He noBepraIte BaI uΦpOBoI dNkTofOH Voice Tracer I erO akceccaybI ydapam, NocKoJbky 3TO MoKET npuBeCTN K NOBpeXeHIno Uy cTpoiCTBa.
He npunaraTe qpe3mepHyu ciny KKK, nockoJIbky 3TO MOKET BblBaTb ero nobpeXeHne mIn He npaBnIbHyio pa6Oy.
He noDBepraTe Bau zHpOBoN dIKToΦoH Voic eTracer npoJIoJIHTeBHOByO3JeCTBnIO npAMOrO coJIHeuHOro CBeta NIN UCTOChNA TENla.
EcnuΦpOBoI dIKTOΦoH Voicr He 6yTeNcNOB3OBaTbC B TeueHne dINTEbHOro BpeMeHn, BbTaunte H3 Hero 6atapeKn.
He TaHInTe NoKIOUeHHb HauuHnK, MmKpOfoH uNk Ka6eIN USB C Upe3MepHoC cnnoi.
10 TexHnueckne xapaKTepcntuKN
Declaration of Conformity
Tested to comply with FCC standards
FOR HOME OR OFFICE USE
Model Number: LFH 7780, LFH 7790, LFH 7890
Trade Name: Philips Digital Voice Tracer 7780 / 7790 / 7890
Responsible Party: Philips Speech Processing
Address: 64 Perimeter Center East, Atlanta, GA 30346, USA
Telephone number: 888-260-6261
Website: www.philips.com/dictation
This device complies with Part 15 of the FCC Rules. Operation is subject to the following two conditions:
1) This device may not cause harmful interference.
2) This device must accept any interference received, including interference that may cause undesired operation.
Disclaimer and Notices
Philips performs extensive testing with the most popular configurations. However, since PC add-ons and device drivers are updated continually, conflict-free operation cannot be guaranteed.


Discover the comprehensive range of high-end dictation products from Philips www.philips.com/dictation
Specifications are subject to change without notice.
Trademarks are the property of Royal Philips Electronics or their respective owners. 念 2007 Royal Philips Electronics. All rights reserved.
Document version 1.0, 2007/06/30.