Voice Tracer DVT2810 - Voice recorder PHILIPS - Free user manual and instructions
Find the device manual for free Voice Tracer DVT2810 PHILIPS in PDF.
User questions about Voice Tracer DVT2810 PHILIPS
0 question about this device. Answer the ones you know or ask your own.
Ask a new question about this device
Download the instructions for your Voice recorder in PDF format for free! Find your manual Voice Tracer DVT2810 - PHILIPS and take your electronic device back in hand. On this page are published all the documents necessary for the use of your device. Voice Tracer DVT2810 by PHILIPS.
USER MANUAL Voice Tracer DVT2810 PHILIPS
For product information and support visit:
www.philips.com/dictation
POCKET MEMO
LFH0955
EN User manual 3
Downloaded from www.vandebore.be
User manual
1 Welcome 4
1.1 Product highlights 4
1.2 What's in the box 4
2 Important 5
2.1 Safety 5
2.2 Disposal of your old product 5
2.3 Technical support and warranty 5
3 Get started 6
3.1 Overview - controls and connections 6
3.2 Overview - display indicators and symbols 7
3.3 Install the batteries 8
3.4 Recharge the batteries 8
3.4.1 Recharge the batteries using the power supply 8
3.4.2 Recharge the batteries through the USB cable 8
3.4.3 Recharge the batteries through the docking station 9
3.5 Insert and eject the memory card 9
3.6 Format a new memory card 10
3.7 Activate the digital recorder 10
3.7.1 Set the language 11
3.7.2 Set the date and time 11
3.8 Power-saving mode 11
4 Using your meeting recorder 12
4.1 Before recording 12
4.1.1 Meeting recording: connect and position the meeting microphones 12
4.1.2 Connect the remote control 13
4.1.3 Interview recording: connect the click-on interview microphone 13
4.2 Recording 14
4.2.1 Create a new recording 14
4.2.2 Add to a recording (append) 15
4.2.3 Finish (lock) a recording 15
4.2.4 Change the recording format 15
4.2.5 Adjust the microphone sensitivity 16
4.2.6 Set the sound filter 17
4.2.7 Monitor recording 17
4.3Playback 18
4.3.1 Overview playback functions 18
4.3.2 Noise reduction 19
4.4Delete 19
4.4.1 Delete a file 19
4.4.2 Delete part of a recording 20
4.4.3 Delete all dictations 20
5 Use more of your meeting recorder 21
5.1 Use Philips SpeechExec software 21
5.1.1 Advanced configuration 21
5.1.2 Download recordings to the PC 21
5.2 Use voice-activated recording 22
5.3 Work with index marks 23
5.3.1 Insert an index mark 23
5.3.2 Delete an index mark 23
5.3.3 Delete all index marks 23
5.4 Assign an author's name 24
5.5 Display and sound functions 24
5.5.1 Setting the language 24
5.5.2 Setting date and time 25
5.5.3 Backlight 25
5.5.4 Record lamp 26
5.5.5 LCD contrast 26
5.5.6 Device beep 27
5.6 Menu list 27
Welcome1
Congratulations on your purchase and welcome to Philips!
To fully benefit from the support that Philips offers, visit our Website for support information such as user manuals, software downloads, warranty information and more: www.philips.com/welcome.
Product highlights1.1
Easy to use out-of-the-box solution
Elegant metal carrying case for portability
Quick set-up with innovative meeting microphones
360 degree sound pick-up for optimal recording
Boundary layer design using the sound pressure
Built-in wire storage and length adaptation Expandable through cascading
Automatic file download via USB for quick transcription
- Exchangeable memory card for unlimited recording
High recording quality in DSS, MP3 and PCM format
1.2 What's in the box

Digital recorder Docking station Remote control

AC charger
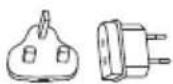
Power clips
Rechargeable batteries


USB cable
Memory card
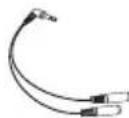
Splitter cable

Meeting microphones
Interview microphone

CD-ROM
User manual
Quick start guide
Important2
Safety2.1
To avoid short circuit, do not expose the product to rain or water.
Do not expose the device to excessive heat caused by heating equipment or direct sunlight.
Protect the cables from being pinched, particularly at plugs and the point where they exit from the device.
Active mobile phones in the vicinity may cause interference.
Back up your files. Philips is not responsible for any loss of data.
Disposal of your old product2.2
Your product is designed and manufactured with high quality materials and components, that can be recycled and re-used.
When this crossed-out wheeled bin symbol is attached to a product, it indicates that the product is covered by the European Directive 2002/96/ EC.

Please become informed about the local separate collection system for electrical and electronic products.
Please act according to your local rules and do not dispose of old products with your normal household waste. The correct disposal
of old products will help prevent potential negative consequences for the environment and human health.
- Batteries (including built-in rechargeable batteries) contain substances that may pollute the environment. All batteries should be disposed of at an official collection point.
2.3 Technical support and warranty
This Philips product was designed and manufactured to the highest quality standards. If your Philips product is not working correctly or is defective, contact your supplying Philips Speech Processing dealer who will provide you with the necessary information on how to proceed.
If you have questions that your dealer cannot answer or any other related question, visit www.philips.com/support to contact us.
No components are user-serviceable. Do not open or remove covers and do not insert objects not suitable for the specific connectors. Repairs may be made only by Philips service centers and official repair facilities. Failure to do so will void any warranty, stated or implied. Any operation expressly prohibited in this manual, any adjustments, or assembly procedures not recommended or authorized in this manual will void the warranty.
Get started3
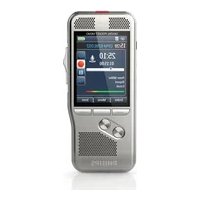
Overview - controls and connections3.1
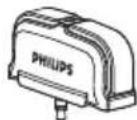
Interview microphone1
Remote control
REC (Record) button2
Index mark button3
EOL (end-of-letter) button4
Pocket Memo digital recorder
Built-in microphone5
Status LED6
EOL (end-of-letter) button7
REC (Record) button8
REW (Rewind) button9
FWD (Forward) button10
Menu button11
12 On/off switch
13 Microphone socket
14 Headphone / remote control socket
15 Display
16 Smart buttons
Index mark button17
18 Volume control, plus/minus and menu navigation buttons
19 Speaker
20 Memory card slot
21 Battery compartment
22 Docking station connection slot
23 Power supply connection slot
24 USB connection slot
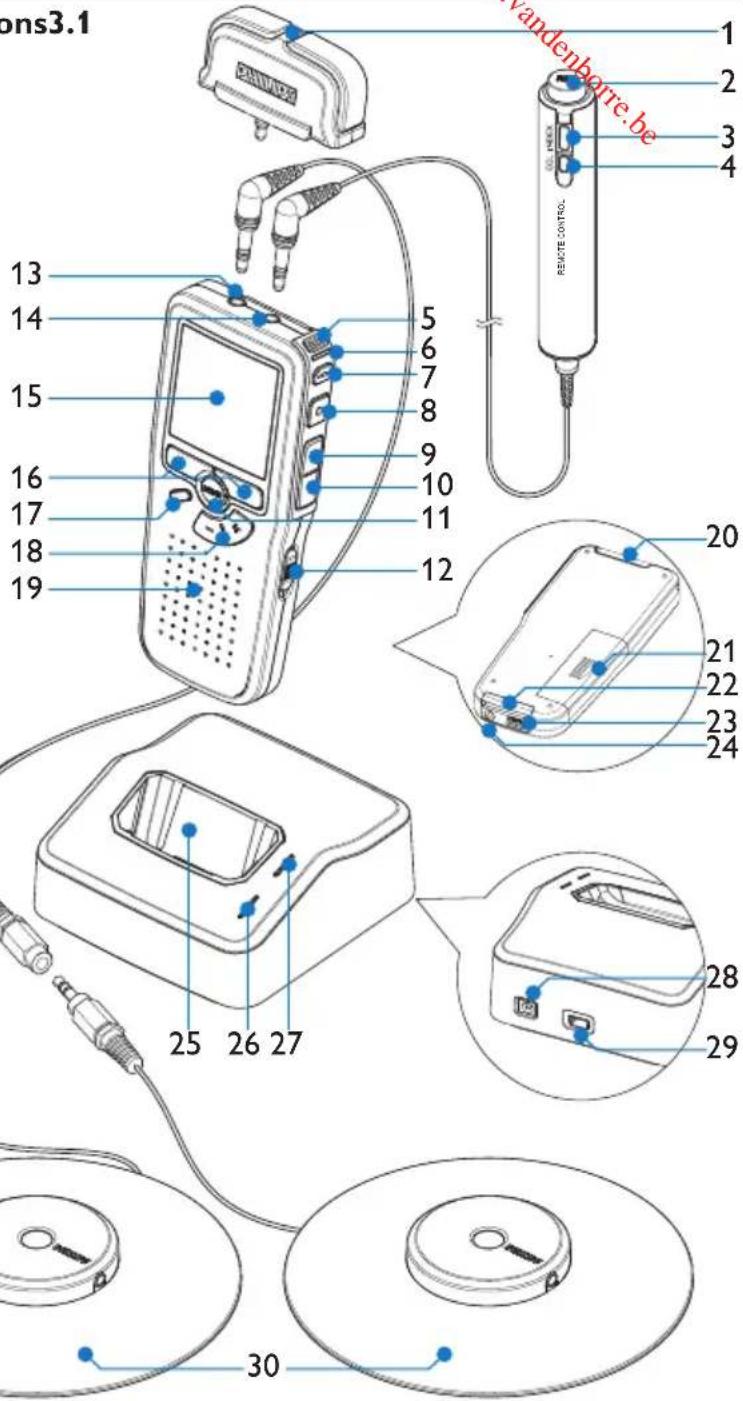
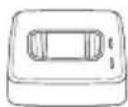
Docking station
25 Docking slot for the Pocket Memo
26 Charge indicator LED
27 Download indicator LED
28 Power supply socket
29 Mini-USB socket for connection to the PC
30 Meeting microphone
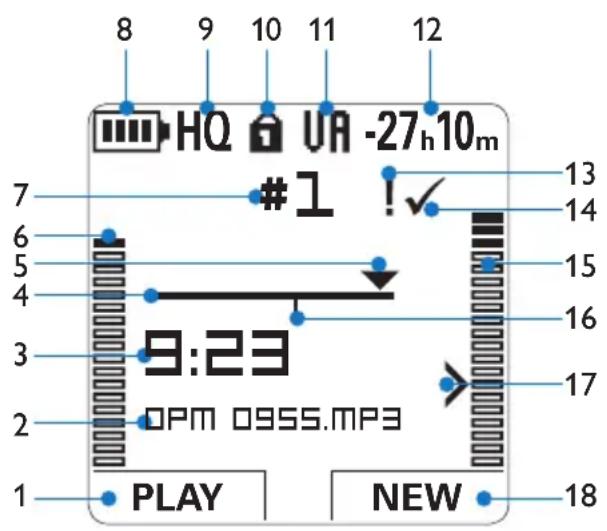
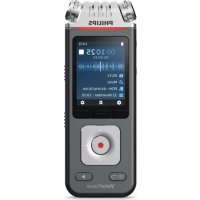
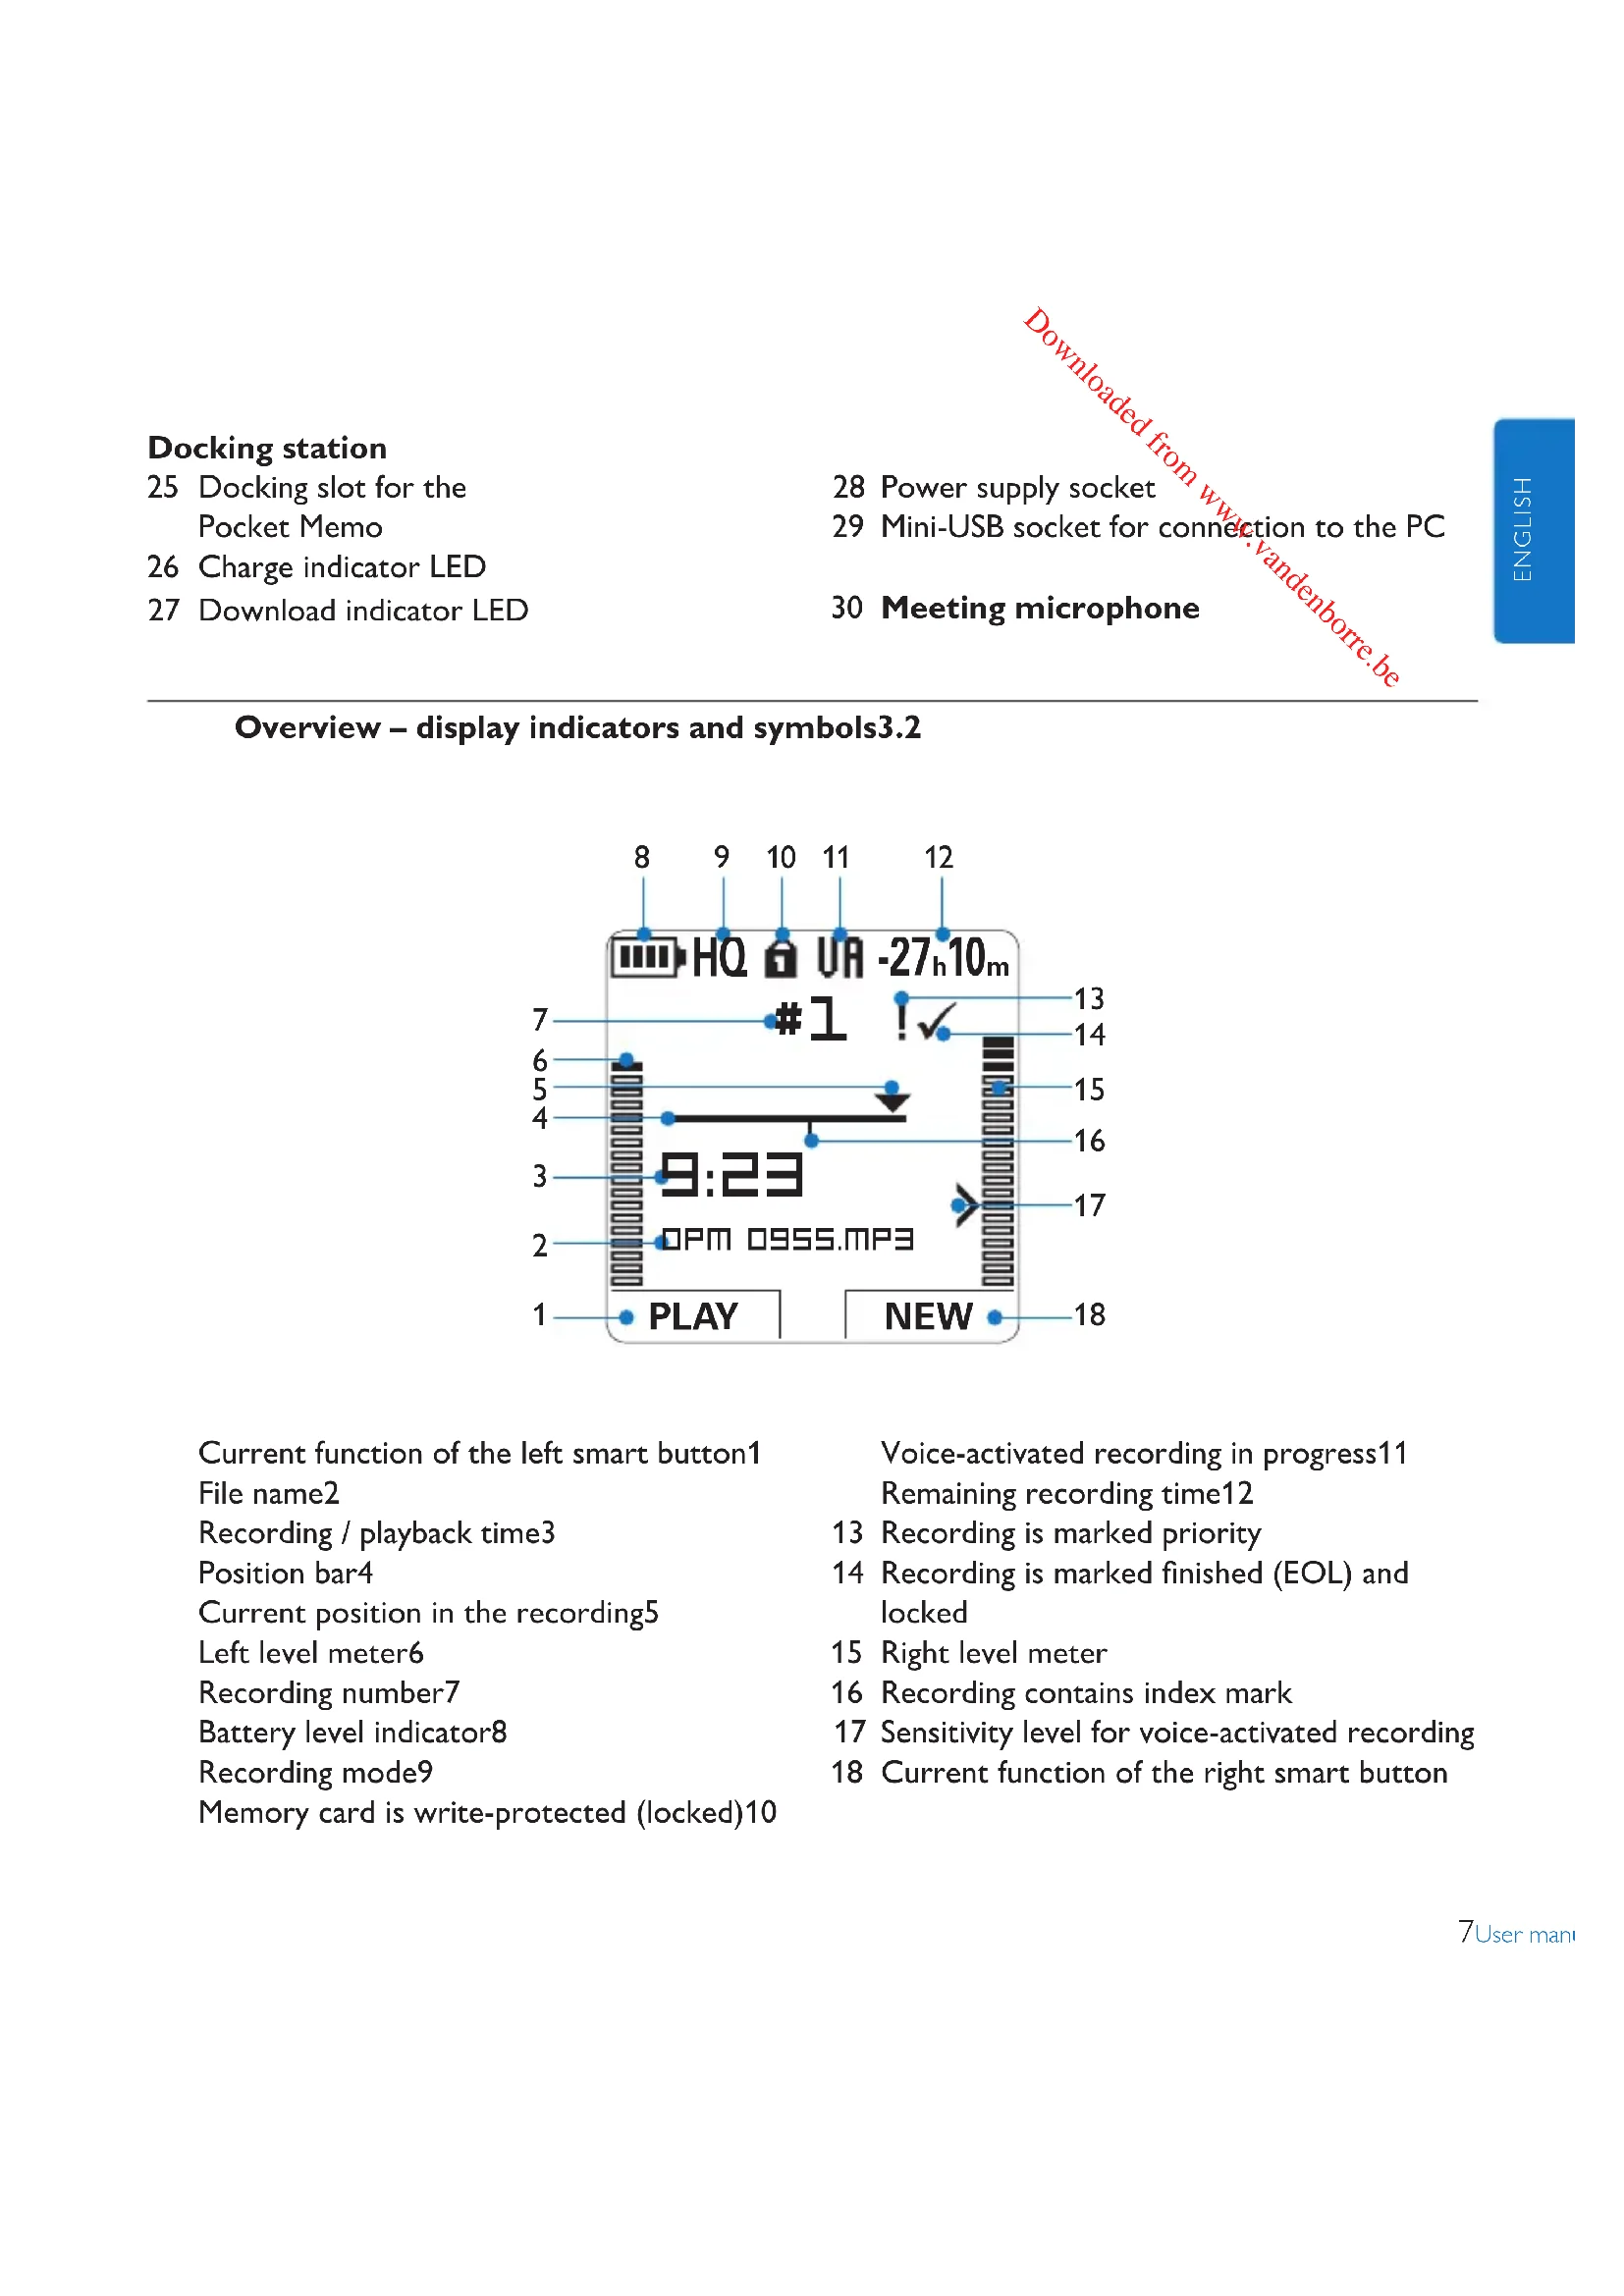
Overview - display indicators and symbols3.2
Current function of the left smart button1 File name2
Recording / playback time3
Position bar4
Current position in the recording5
Left level meter6
Recording number7
Battery level indicator8
Recording mode9
Memory card is write-protected (locked)10
Voice-activated recording in progress11 Remaining recording time12
13 Recording is marked priority
14 Recording is marked finished (EOL) and locked
15 Right level meter
16 Recording contains index mark
17 Sensitivity level for voice-activated recording
18 Current function of the right smart button
Install the batteries3.3
The digital recorder can be operated with the two rechargeable AAA batteries delivered with the product. Standard (non-rechargeable) AAA alkaline batteries may also be used.
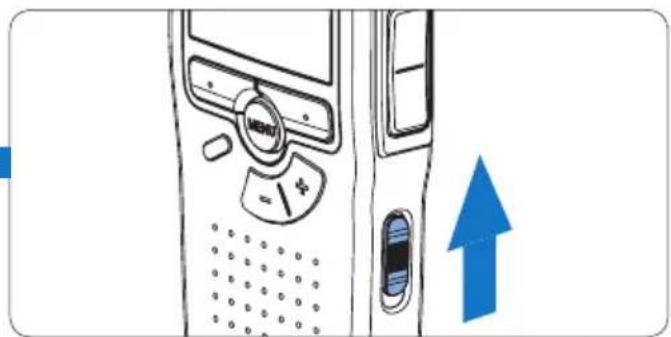
The on/off switch of the digital recorder 1 must be in the OFF position.
Open the battery compartment on the 2 back side of the digital recorder by sliding it outwards then folding it up.
Insert the two AAA batteries. The correct 3 polarity is indicated on the inside of the battery compartment cover. ① ②
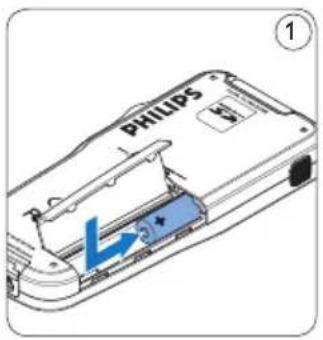
Close the battery compartment by folding 4 it back and sliding the battery compartment cover inside until it clicks.

Note
Do not mix battery types! Use two rechargeable batteries or two non-rechargeable alkaline batteries.
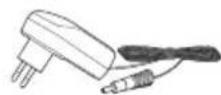
Recharge the batteries3.4
The digital recorder can be operated with the rechargeable Philips AAA batteries. To recharge these batteries, use the Philips power supply, the Docking Station or the USB cable.
Recharge the batteries using the 3.4.1 Philips power supply
Connect the Philips power supply to the main power supply.
Connect the digital recorder to the Philips 2 power supply.

Note
It is okay to continue using the digital recorder during recharge. The batteries will be recharged while you work, and will continue recharging even when the digital recorder is turned off.
3.4.2 Recharge the batteries through the USB cable
When the digital recorder is connected to a PC or notebook computer with the supplied USB cable, the rechargeable batteries are automatically recharged. If the USB port on the computer is high powered, a complete recharge cycle takes about 2.5 hours.
The digital recorder switches into PC Download mode and works like a loudspeaker and microphone for the connected PC. To continue recording on the digital recorder during USB charging, change the USB mode to USB supply by
pressing the REC button for three seconds while the digital recorder is connected to the PC. The digital recorder automatically switches back to PC Download Mode after being disconnected from the PC.

Note
The PC must be ON when charging battery via the USB cable connection. The digital recorder may become warm during fast recharging.

Important
If the USB port of the computer does not supply enough power capacity (500 mA), disable USB quick charge in the menu of the digital recorder and recharge the batteries using the power supply.
Recharge the batteries through the 3.4.3 docking station
Make sure that the docking station is 1 connected to the main power supply with the Philips power supply.
Insert the digital recorder into the docking slot of the docking station and press it down firmly until it locks. The green LED lights up, indicating that the batteries of the digital recorder are being recharged in fast recharge mode.
Record with the digital recorder from the 3 docking station, or switch it off when not being used.
When the green LED blinks, recharging is complete and you can remove the digital recorder from the docking slot.

Note
When the digital recorder is connected to the docking station, it is powered by the docking station and not by the batteries. If the digital recorder is operated with rechargeable batteries, the batteries are automatically recharged while the digital recorder is connected to the docking station.
3.5 Insert and eject the memory card
The digital recorder operates with an SD (Secure Digital) memory card and supports SDHC cards with storage capacities of up to 32 GB.
Your digital recorder is packaged with a memory card already inserted and formatted.
To eject the memory card:
Locate the memory card slot on the top 1 back side of the digital recorder.
Press the memory card in the digital 2 recorder until it clicks. ①
Release the memory card. It will slightly 3 emerge from the memory card slot. Simply slide it out.
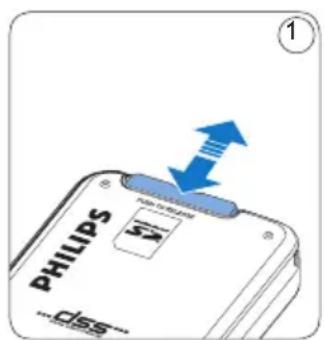
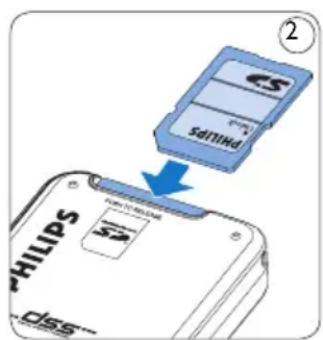
To insert a memory card:
Locate the memory card slot on the top 1 back side of the digital recorder.
Slide the memory card into the slot. A small illustration under the memory card slot indicates the correct orientation. ②
Push the memory card in until you hear a 3 click.

Note
If the digital recorder is turned to the ON position and there is no memory card inserted, a warning screen is displayed.
The memory card that is packaged with the digital recorder is already formatted and ready for use. If a memory card is inserted that is not formatted, the digital recorder will offer the option to format it. Refer to the next chapter for more information.
3.6 Format a new memory card
When a new, unformatted memory card (or a memory card that was formatted with a non-digital recorder device) is inserted, the digital recorder will display a prompt to format the memory card. A
To confirm and start the formatting process, press the OK smart button 1. To cancel the formatting process, remove 2 the memory card or press the CANCEL smart button 2.

The digital recorder will be unable to record without a properly formatted memory card. If a new card was inserted and the formatting process was cancelled, insert another card that can be formatted or has already been formatted.

Note
Formatting is not possible if the memory card is in read-only mode (locked).
Activate the digital recorder3.7
The digital recorder is turned on and off by sliding the ON/OFF switch. When using it for the first time, you will be prompted to set the language, date and time.
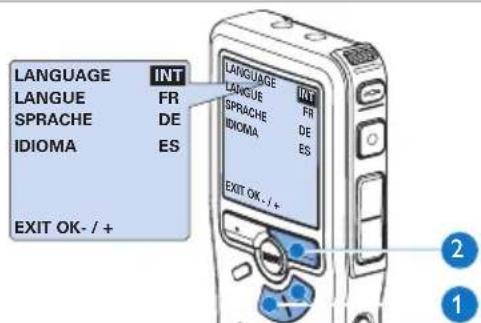
3.7.1 Set the language
When using the digital recorder for the first time, you will be prompted to set the language.
1 Press the + or - button ① on the digital recorder to select a language.
Press the 2 smart button ② to confirm your selection. The selected language will be displayed.

Note
It is possible to change the language later using the menu. See Setting the language on page 24 for more information.
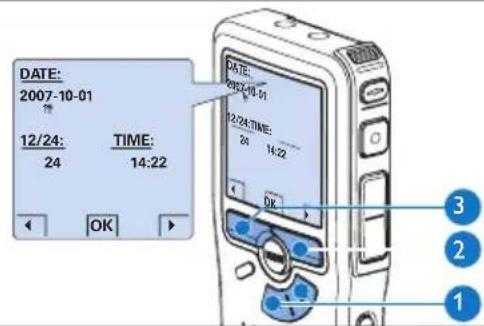
3.7.2 Set the date and time
After selecting the user interface language, the digital recorder will prompt you to set the current date and time.
1 Press the + or - button ① repeatedly to change the value for the year, month or day. Press the 2 smart butto advance the arrow (↑) to the next entry.
After setting the day, press the smart button 2 to advance the settings to the correct time.
4 Press the + or - button ① to select a 12-hour or 24-hour clock, AM or PM (if a 12-hour clock is selected), and to change the value of the hour and minute settings.
Press the 5 smart button to confirm the date and time. The digital recorder is now ready to function.

Note
If a mistake is made in the date/time settings, use the 4 smart button 3 any time during the procedure to step back to make corrections. It is also possible to change the date and time later using the menu. See Setting date and time on page 25 for more information.
3.8 Power-saving mode
After 60 minutes of inactivity, the digital recorder automatically goes into power-saving mode and the LCD screen will display the date and time. Press any button to reactivate it.
If the digital recorder is not used for more than two hours, it turns off completely. Turn the unit on by moving the On/Off switch to the OFF position and then back to the ON position.
Using your meeting 4 recorder
Before recording4.1
The digital recorder has a built-in monaural microphone that is used for recording when no external microphone is connected. To enhance sound quality and cover a wider range during recording, use the meeting microphones (for meeting recording) or the click-on interview microphone (for interviews).

Note
When an external microphone is connected to the digital recorder, the built-in microphone is disabled.
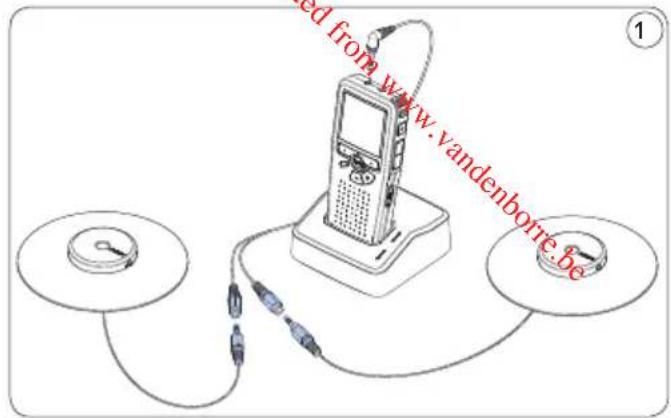
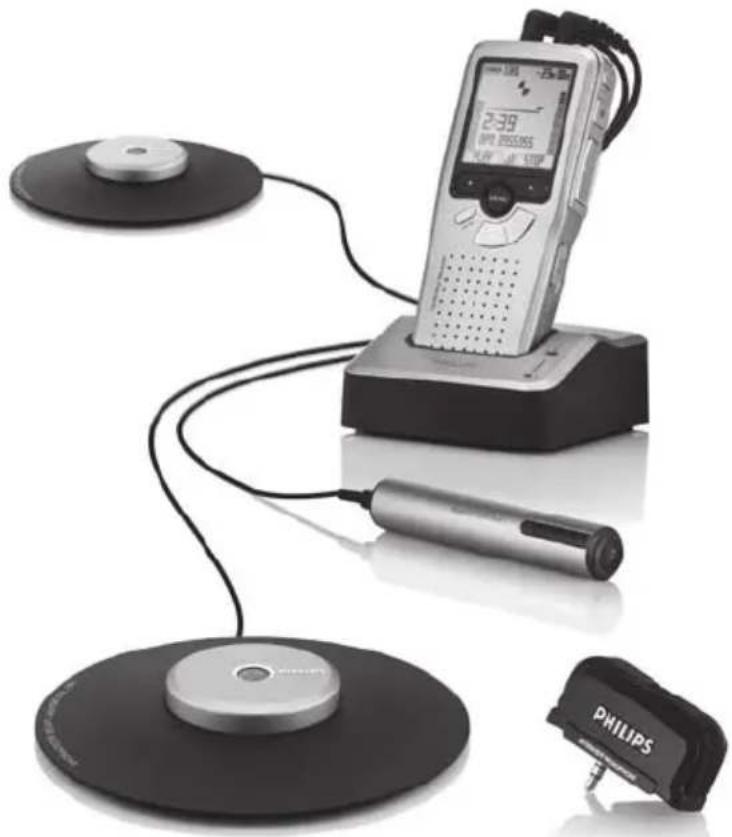
Meeting recording: connect and 4.1.1 position the meeting microphones
Make sure that the recorder is stopped. 1
Connect the plug of Y adapter to the 2
microphone socket of the digital recorder.
Connect the plug of each microphone to 3
one socket of the Y adapter. ①
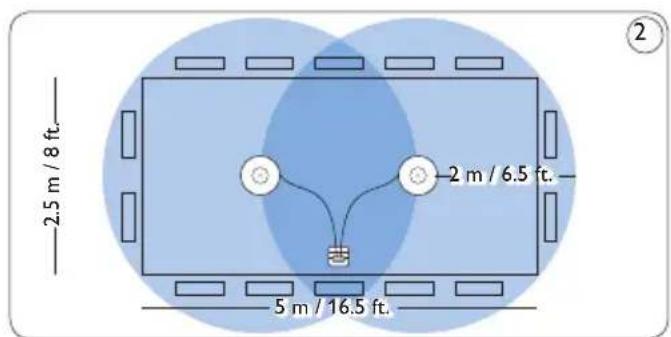
For optimal recording quality, position 4
the microphones on the table so that all
participants are not more that 2 meters or
6.5 feet away from the microphone. (2)

Tip
For large conferences, the operating range can be extended by joining together and connecting three microphones on each of the two microphone sockets of the Y adapter. 3 4 5
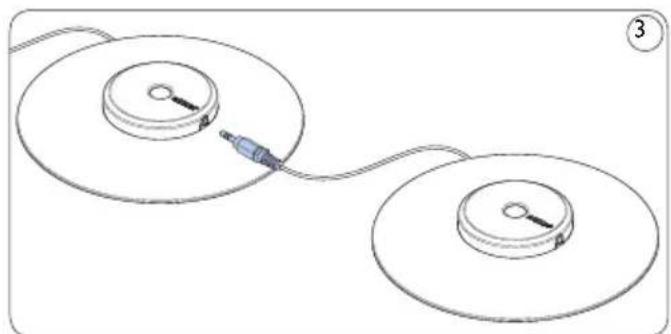
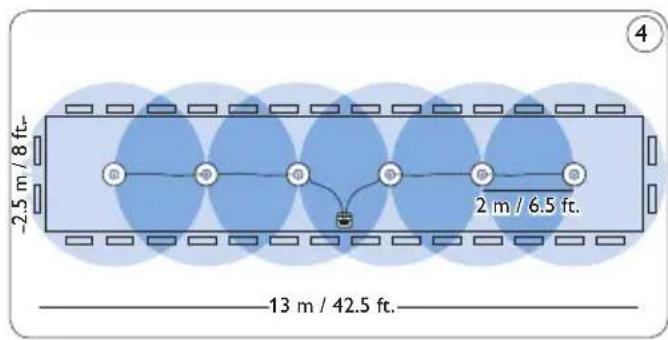
Connect and position up to 6 meeting microphones
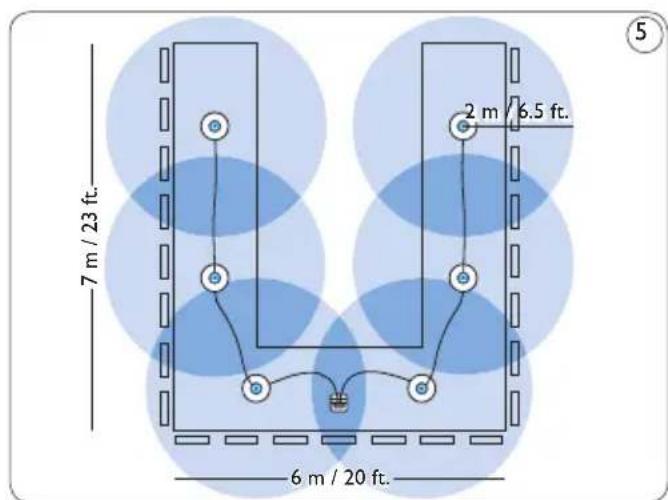
Connect and position up to 6 meeting microphones
Connect the remote control4.1.2
Connect the plug of the remote control 1 to the remote control socket of the digital recorder.
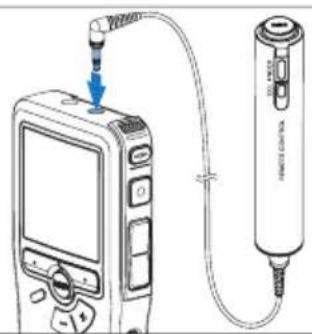

Note
When the remote control is connected, all buttons on the digital recorder are still usable except the REC button.
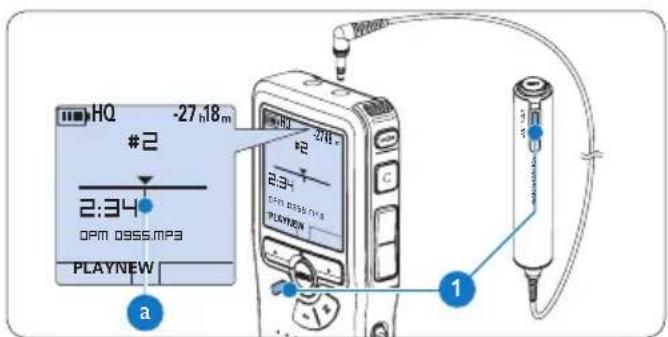
Interview recording: connect the 4.1.3 click-on interview microphone
Make sure that the recorder is stopped. 1 Insert the connector of click-on interview 2 microphone into the microphone socket of the digital recorder.

Recording4.2
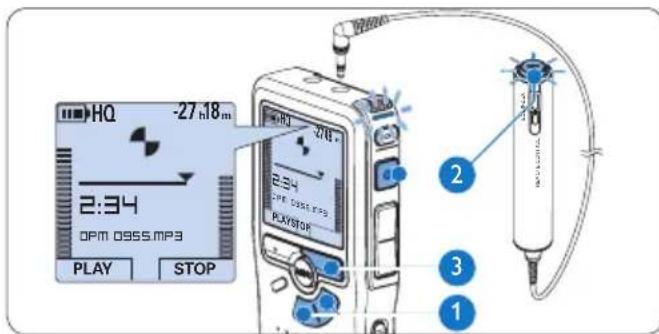
Create a new recording4.2.1
Follow these steps to create your first recording with the Conference Recording System:
A memory card must be inserted into the 1 memory card slot. See Insert and eject the memory card on page 9 for more information. Slide the On/Off switch to the 2 N position to switch on the digital recorder. Press the 3 NEW smart button to create a new recording.
Note
The NEW smart button is not displayed if the current recording is empty.
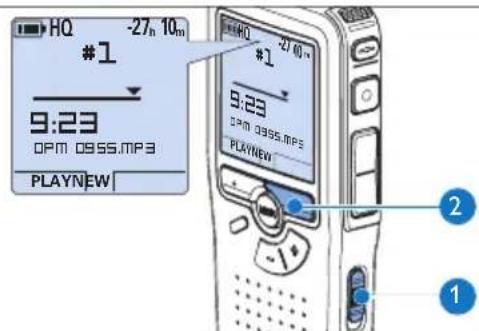
Press the 4 REC button and start speaking. The status LED 4 glows in red while recording.
Note
When the remote control is connected, the REC button on the digital recorder is deactivated.
The following information is displayed:
Remaining recording time
Recording mode
Current position in the recording
Recording time
File name
f Recording level meter (left channel)
Recording level meter (right channel)
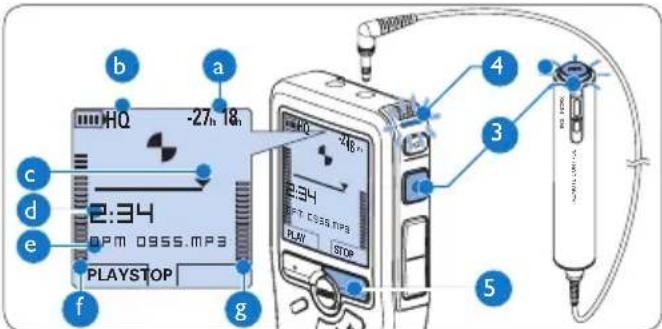
5 To stop recording, press the REC button 3 or the STOP smart button 5.

Tips
- Press the EOL button during recording to mark the present recording as finished and automatically continue recording into a new file. See Finish (lock) a recording on page 15 for more information.
An index mark can be set by pressing the INDEX button during record or playback. See Work with index marks on page 23 for more information.
4.2.2 Add to a recording (append)
Regardless of the current position in the recording, additions to a recording are always appended at the end of a file without overwriting the existing recording. Follow these steps to make additions to your recording:
1 Press the ^+ or - button ① while stopped to select the file to be appended.
Press the C button 2 and start speaking. The recording will automatically be appended to the end of the existing recording.
Press the 3OP smart button 3 to stop recording.
4.2.3 Finish (lock) a recording
When a recording is finished and no additional changes will be made, follow these steps to mark it as finished and protect it from being accidentally deleted:
1 Press the + or - button ① while stopped to select the recording to be marked finished.
Press the end-of-letter (L) button 2 to lock the file and mark it as finished. The symbol is displayed. a
To assign priority status to the recording, 3 press the EOL button 2 again within half a second. The ! symbol is displayed, indicating that the file has priority status. b
To make changes to the recording, press the EOL button 2 again to remove the finished mark.
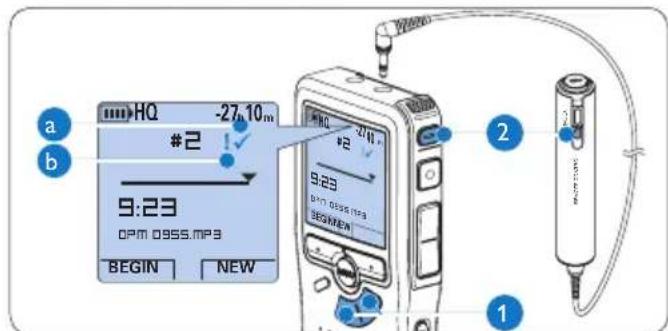

Tip
Philips SpeechExec software can be configured to download finished files only from the digital recorder to the PC.

Caution
Locked files are deleted when the memory card is formatted or the delete-all-dictations function is used.
4.2.4 Change the recording format
The recording format determines the audio quality of your recordings and affects the number of audio files that can fit on the memory card. The digital recorder supports the following recording formats:
| Recording mode | File format | Channels recorded | Recording time (1 GB memory) |
| PCM .wav 2 channels | 1.5 hours | ||
| XHQ .mp3 2 channels | 18 hours | ||
| HQ .mp3 2 channels | 36 hours | ||
| QP .ds2 (DSS QP) Mono | 85 hours | ||
| SP .dss (DSS SP) Mono | 170 hours | ||
Press the MENU button ① while stopped to open the menu.
2 Press the + or - button ② to select the Setup menu item and press the ENTER smart button. ③
3 Press the + or - button ② to select the Record format menu item and press the ENTER smart button ③.
4 Press the + or - button 2 to select a recording mode.
Press the OK smart button 4 to save the setting or press the CANCEL smart button 3 to exit the menu without changing the setting.
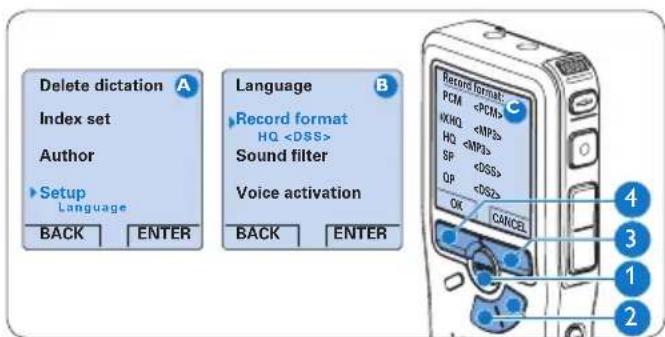

Note
PCM recording mode is not available by default and must be enabled through Philips SpeechExec Dictate. See Advanced configuration on page 21 for more information. PCM recording mode requires a high speed SD card.
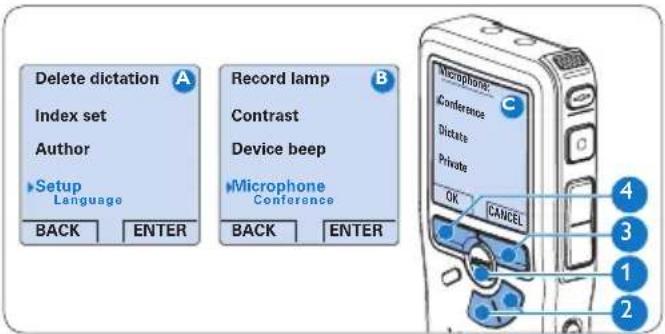
4.2.5 Adjust the microphone sensitivity
Set the microphone sensitivity for the environment and your recording preferences.
Press the MENU button 1 repeatedly during recording to switch the microphone sensitivity between Low (Private), Medium (Dictate) and High (Conference).
The microphone sensitivity can also be set in the setup menu:
Press the MENU button ① while stopped to open the menu.
2 Press the + or - button ② to select the Setup menu item and press the ENTER smart button ③.
3 Press the + or - button ② to select the Microphone menu item and press the ENTER smart button. ③
4 Press the ^+ or - button 2 to choose the microphone sensitivity: Low (Private), Medium (Dictate) and High (Conference).
5 Press the OK smart button 4 to save the setting or press the CANCEL smart button 3 to exit the menu without changing the setting.
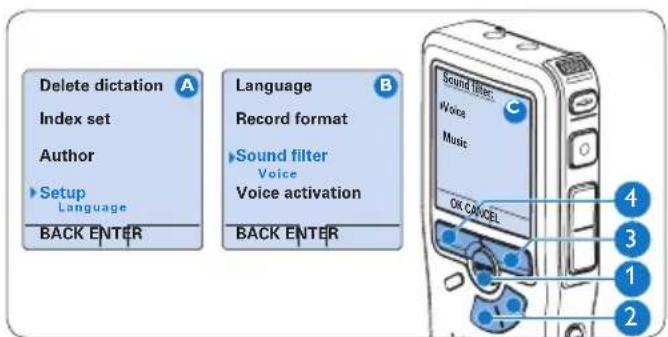
Set the sound filter4.2.6
Activate the sound filter to minimize low- and high-frequency sounds and optimize voice recordings.
Press theENU button ① while stopped to open the menu.
2 Press the + or - button ② to select the Setup menu item and press the ENTER smart button ③.
3 Press the + or - button ② to select the Sound filter menu item and press the ENTER smart button. ③
4 Press the ^+ or - button 2 to choose between Voice (sound filter active), and Music (sound filter inactive). Press the smart button 4 to save the setting or press the CANCEL smart button 3 to exit the menu without changing the setting.
Monitor recording4.2.7
Headphones can be connected to the digital recorder to hear the sound being recorded and to monitor the record level.
Connect the headphones to the headphone 1 socket of the digital recorder.
Press the + or - button during recording to adjust the sound volume.


Note
The record level cannot be adjusted using the volume button. Adjust the microphone sensitivity if the record level is too low or too high by pressing the MENU button repeatedly during recording or in the setup menu. See Adjust the microphone sensitivity on page 16 for more information.
When voice-activated recording is activate, the + or - button changes the record threshold level, not the volume level.
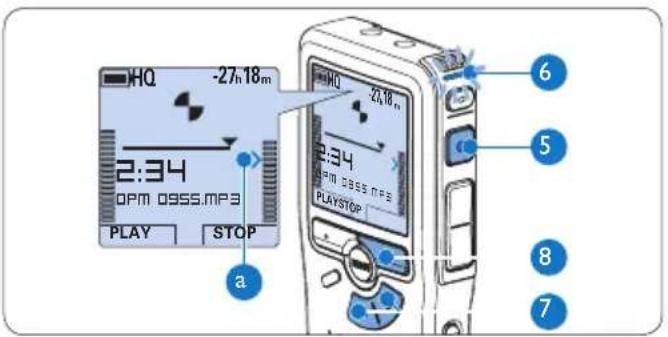
Playback4.3
1 Press the + or - button ① while stopped to select the recording to play back. Press the 2 AY smart button ② to start playback.
The following information is displayed:
Current position in the dictation
Recording mode
Playback time
File name
3 Press the ^+ or - button 1 to adjust the playback volume during playback. Press the 4 EED smart button 3 to adjust faster or slower file playback. Press the 5 OP smart button 2 to stop playback.
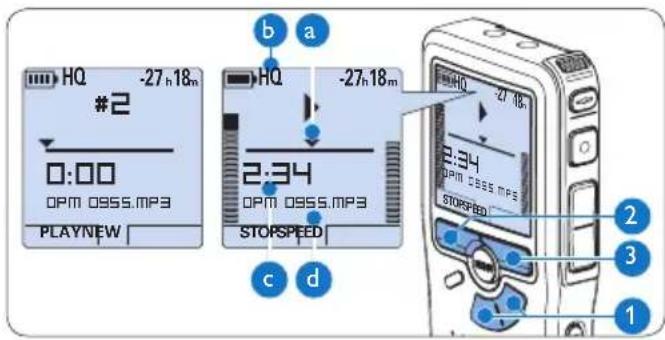

Tip
Press and hold the MENU button for a few seconds to access additional information about files, the device and the memory card.
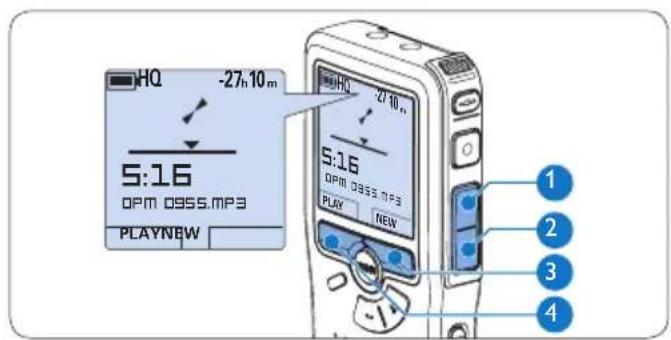
Overview playback functions4.3.1
| Fast rewind | Press the REW button 1 briefly while stopped. Press the STOP smart button 3 to stop winding or the PLAY smart button 4 to stop winding and start playback. |
| Fast forward | Press the FWD button 2 briefly while stopped. Press the STOP smart button 3 to stop fast forward or the PLAY smart button 4 to stop fast forward and start playback. |
| Rewind | Press and hold the REW button 1 while playing or recording. Release the REW button to stop winding. |
| Cue | Press and hold the FWD button 2 while playing. Release the FWD button to cue-play. |
| Auto- backspace | Press the REW 1 button briefly while playing or recording to recap the last second. |
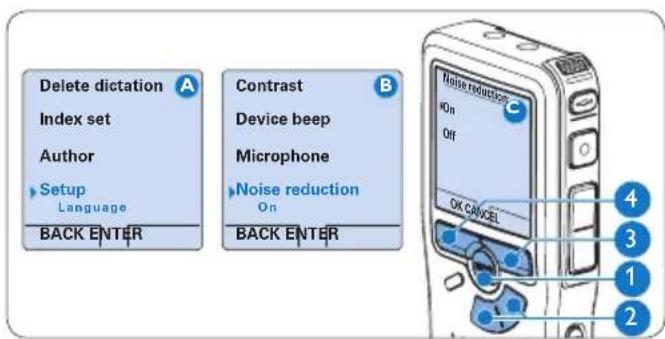
Noise reduction4.3.2
The noise reduction function reduces interfering background noise and improves sound quality during playback.
Press theENU button ① while stopped to open the menu.
2 Press the + or - button ② to select the Setup menu item and press the ENTER smart button ③.
3 Press the + or - button ② to select the Noise reduction menu item and press the ENTER smart button ③.
4 Press the ^+ or - button 2 to choose between On and Off. Press the 5 smart button 4 to save the setting or press the CANCEL smart button 3 to exit the sub-menu without changing the setting.
Delete4.4

Note
Before deleting a file, make sure that it is not marked finished and that the memory card is not set to read-only (locked). If the file is marked finished, unlock it by pressing the EOL button once.
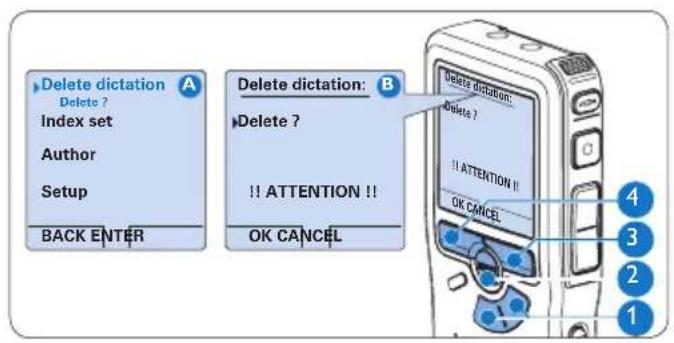
4.4.1 Delete a file
Follow these steps to delete a file entirely:
1 Press the ^+ or - button ① while stopped to select the file to be deleted. Press the 2 NU button ② to open the menu.
3 Press the ^+ or - button 1 to select the Delete dictation menu item and press the ENTER smart button 3. Press the 4 smart button 4 to delete the file permanently. Press the CANCEL smart button 3 to cancel the operation and leave the recording intact.
4.4.2 Delete part of a recording
Follow these steps to delete a section from a recording:
Navigate to the beginning of the section to 1 be deleted by playback or forward/rewind.
Press the 2-NU button ① while stopped to open the menu.
3 Press the + or - button ② to select the Delete section menu item and press the OK smart button ③.
Press the 4 ARK 1 smart button 4. A cross symbol appears on the screen.
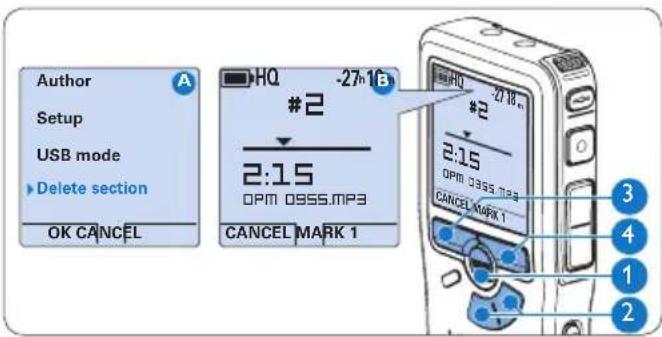
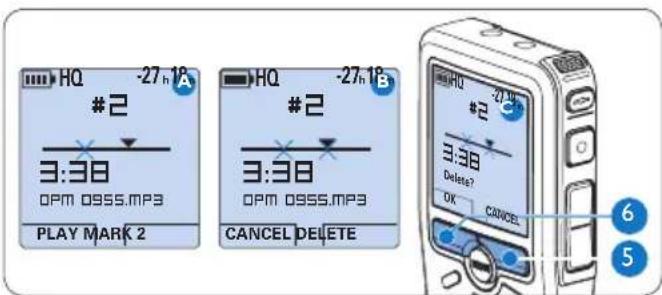
Find the second mark position by playback 5 or forward / rewind and press the MARK 2 smart button 5. The second cross appears. Press the 6 LETE smart button 5 and the OK smart button 6 to confirm the deletion of the marked section, or press the CANCEL smart button 5 to exit without deleting.
4.4.3 Delete all dictations
Caution
Files marked finished (EOL) are deleted when the delete-all-dictations function is used.
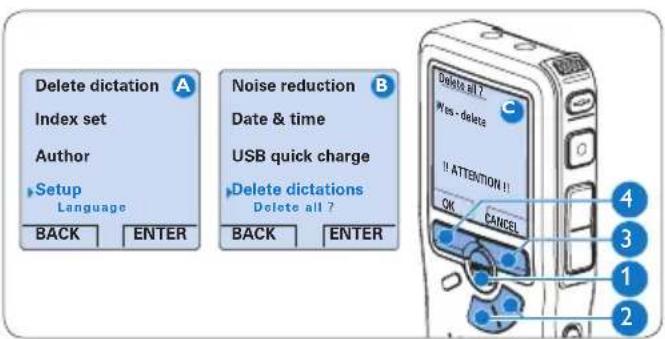
Follow these steps to delete all recordings:
Press theENU button ① while stopped to open the menu.
2 Press the + or - button ② to select the Setup menu item and press the ENTER smart button ③.
3 Press the ^+ or - button 2 to select the Delete dictations menu item and press the ENTER smart button 3. Press the 4ITER smart button 3 and the OK smart button 4 to confirm the deletion, or press the CANCEL smart button 3 to exit without deleting.
Use more of your meeting 5 recorder
Use Philips SpeechExec software5.1
Philips SpeechExec software can be used for advanced configuration of the digital recorder and automatic download, conversion and routing of dictation files.

Note
For detailed information about SpeechExec software, refer to the SpeechExec quick reference guide.
5.1.1 Advanced configuration
The digital recorder Configuration Wizard is part of the Philips SpeechExec Dictate software and guides users through the device configurations and settings of their digital recorder. The wizard assists users in configuring the time format, sound feedback, voice-activated recording, display appearance (standard or advanced display mode), the recording format,
microphone sensitivity, author names, and file download to the PC.
Connect the digital recorder to the PC 1 using a USB cable.
2 Start Philips SpeechExec Dictate software.
Click 3tings > General settings on the menu bar of SpeechExec to open the settings menu and select DPM/DT Configuration > DPM Wizard from the list on the left side.
Click the art Wizard... button to open the wizard. Follow the on-screen instructions to customize the digital recorder.
Click the 5ish button to close the wizard and confirm the transfer of the new settings to the digital recorder.

Note
When the digital recorder is connected to the PC for the first time, Windows detects the new hardware and automatically installs the required drivers. When the installation is complete, Windows may prompt you to restart the PC.
Download recordings to the PC5.1.2
With USB mass storage support, the digital recorder is automatically displayed as an external drive when it is connected to the computer. It can then be accessed easily with any Microsoft Windows program as a regular drive.
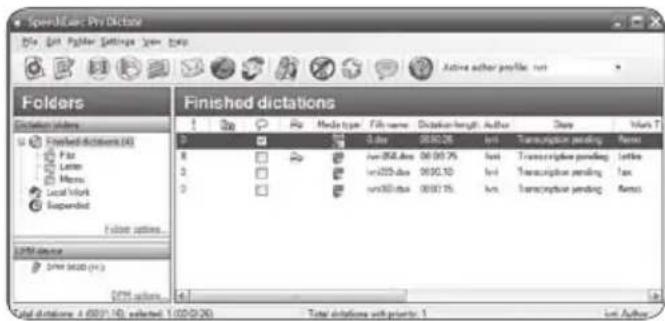
Use Philips SpeechExec software for automatic download, conversion and routing of files.
Make a recording with the digital recorder.1
2 Start Philips SpeechExec Dictate software. Connect the digital recorder to the PC 3 using the USB cable or the USB docking station.
By default, the recordings on the digital recorder will be downloaded automatically to the PC and moved to the Finished dictations folder of the work list.
Note
How and which files are downloaded after a digital recorder is connected can be configured in the settings menu of SpeechExec or with the Configuration Wizard.
5.2 Use voice-activated recording
Voice-activated recording is a convenience feature for hands-free recording. When voice activated recording is enabled, recording will start when you begin speaking. When you stop speaking, the digital recorder will automatically pause recording after three seconds of silence, and resume only when you begin speaking again.
Press theENU button ① while stopped to open the menu.
2 Press the + or - button ② to select the Setup menu item and press the ENTER smart button ③.
3 Press the + or - button ② to select the Voice activation menu item and press the ENTER smart button ③.
4 Press the + or - button ② to choose Off or On.
Press the 5 × smart button ④ to save the setting or press the C A N C E L s m a r t b u t t o exit the sub- menu without changing the setting.
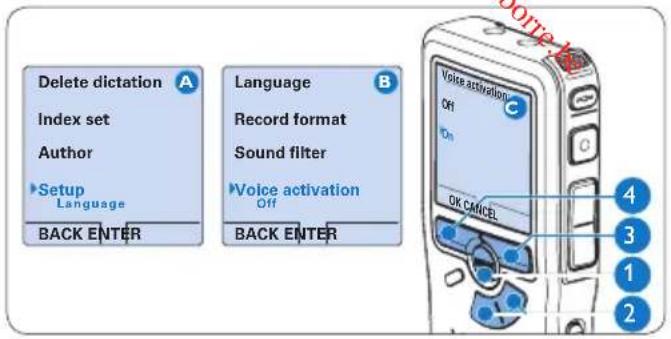
Press the 6 REC button and start speaking. The status LED ⑥ glows in red while recording. When the sound level is below the threshold sound level a, recording pauses after three seconds and the status LED flashes.
7 Press the ^+ or - button 7 to adjust the threshold sound level a while recording. Press the 8OP smart 8 button to stop recording.
5.3 Work with index marks
Index marks can be used to mark certain points in a recording as points of reference. A point of reference may be the beginning of a major section, or a part of the recording that you may want to revise later or access quickly.
Insert an index mark5.3.1
Press the iDEX button 1 during recording or playback to insert an index mark a. The index number is displayed for two seconds.

Delete an index mark5.3.2
Play back, fast forward or fast rewind to the 1 mark.
index mark to be deleted a
Press the DEX button 1 while stopped to delete the index mark.
5.3.3 Delete all index marks
Press theENU button while stopped to open the menu.
2 Press the + or - button ② to select the Delete indices menu item and press the ENTER smart button ③.
Press the 1TER smart button 3 and the OK smart button 4 to confirm the deletion, or press the CANCEL smart button 3 to exit without deleting.
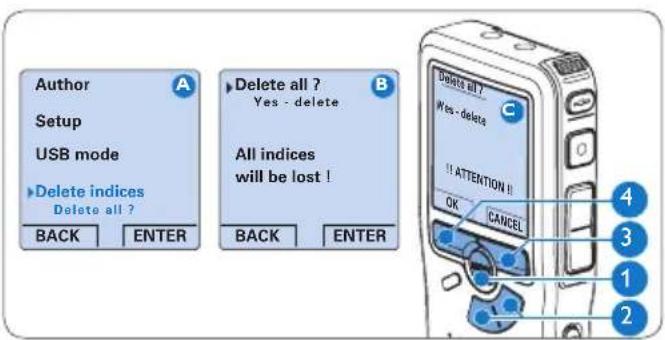

Note
The Delete Indices menu item is available only if the current dictation has at least one index
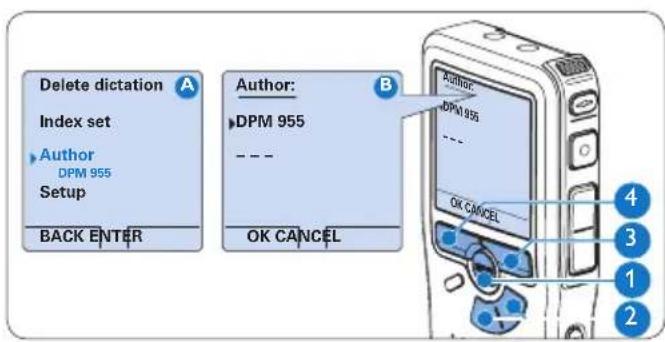
5.4 Assign an author's name
A keyword, such as the author's name can be assigned to every recording. The keyword can be used to identify recordings and automatic file routing in Philips SpeechExec software.

Note
Author names must first be set up with Philips SpeechExec software. See Advanced configuration on page 21 for more information. By default, the keyword category AUTHOR with the keywords 'DPM 955' and '--' (empty) is available on the digital recorder.
To assign an author's name to a recording: Press the FNU button ① while stopped to open the menu.
2 Press the + or - button ② to select the Author menu item. Press the ③ TER smart button ③ to display the list of names.
4 Press the + or - button 2 to select a name.
Press the 5K smart button 4 to confirm or the CANCEL smart button 3 to exit without assigning a name.
Display and sound functions5.5
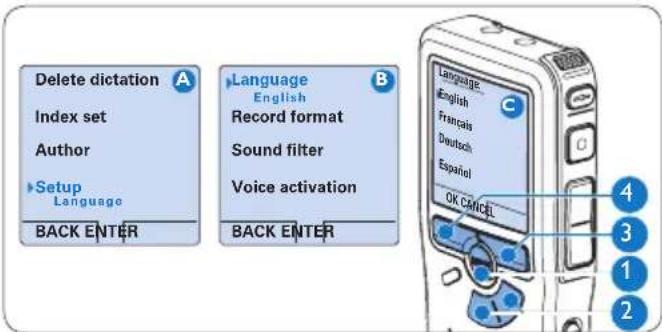
5.5.1 Setting the language
When using it for the first time, you will be prompted to set the language of the user interface. If the language is not correct follow these steps to change it:
Press theENU button ① while stopped to open the menu.
2 Press the + or - button ② to select the Setup menu item and press the ENTER smart button ③.
3 Press the + or - button ② to select the Language menu item and press the ENTER smart button ③.
4 Press the + or - button 2 to select a language.
Press the 5 × smart button ④ to save the setting or press the CANCEL smart button ③ to exit the sub- menu without changing the setting.
5.5.2 Setting date and time
When using it for the first time, you will be prompted to set the date and times. If the settings are not correct follow these steps to set them:
Press theENU button ① while stopped to open the menu.
2 Press the + or - button ② to select the Setup menu item and press the ENTER smart button ③.
3 Press the + or - button ② to select the Date & time menu item and press the ENTER smart button ③.
4 Press the + or - button ② repeatedly to change the value for the year, month or day. Press the 5 >smart button to advance the arrow (↑) to the next entry.
6 After setting the day, press the >smart button 3 to advance the settings to the correct time.
7 Press the + or - button 2 to select a 12-hour or 24-hour clock, AM or PM (if a 12-hour clock is selected), and to change the value of the hour and minute settings. Press the 8 smart button to confirm the date and time.
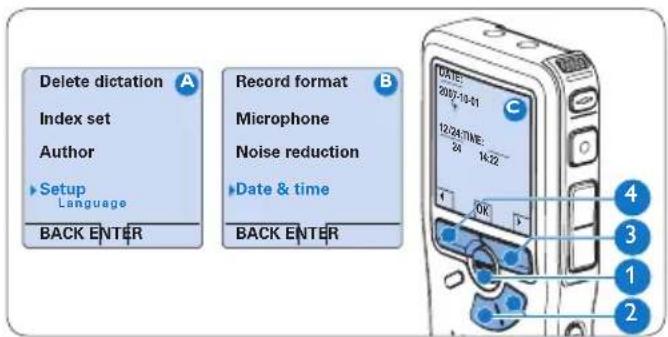

Note
If a mistake is made in the date/time settings, use the smart button 4 any time during the procedure to step back to make corrections.
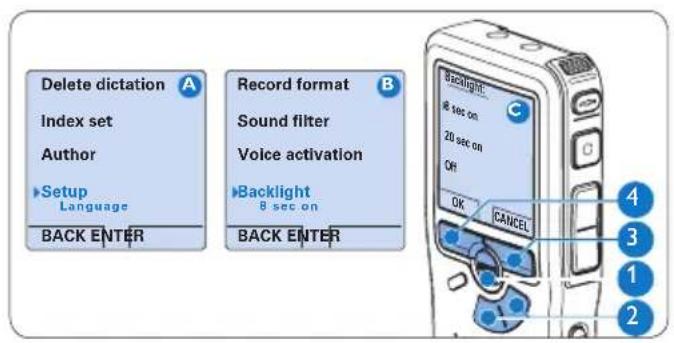
5.5.3 Backlight
The display of the digital recorder is by default backlit for eight seconds when a button is pressed.
Press theENU button ① while stopped to open the menu.
2 Press the + or - button ② to select the Setup menu item and press the ENTER smart button ③
3 Press the + or - button ② to select the Backlight menu item and press the ENTER smart button ③.
4 Press the ^+ or - button 2 to choose between 8 seconds, 20 seconds and Off. Press the smart button 4 to save the setting or press the CANCEL smart button 3 to exit the sub-menu without changing the setting.
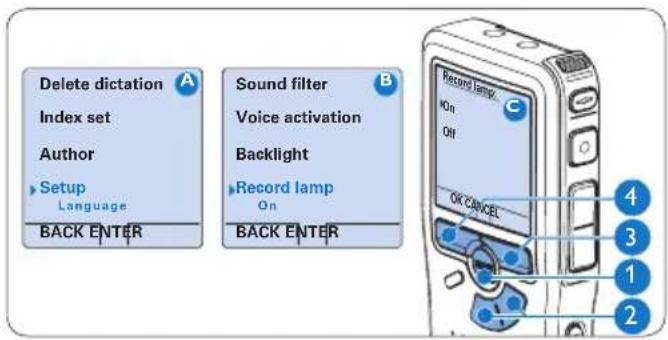
5.5.4 Record lamp
When enabled, the status LED/record lamp glows red during recording.
Press theENU button ① while stopped to open the menu.
2 Press the + or - button ② to select the Setup menu item and press the ENTER smart button ③
3 Press the + or - button 2 to select the Record lamp menu item and press the ENTER smart button 3.
4 Press the ^+ or - button 2 to choose between On and Off. Press the smart button 4 to save the setting or press the CANCEL smart button 3 to exit the sub-menu without changing the setting.
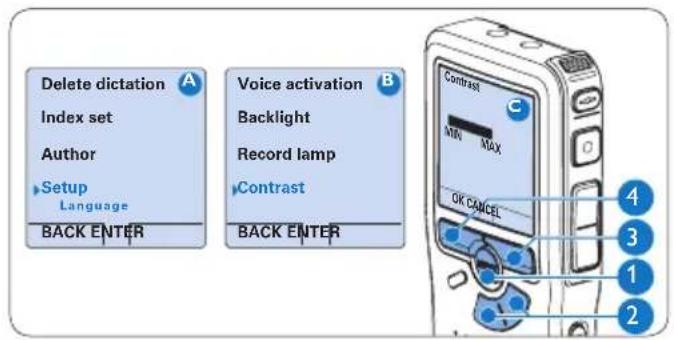
5.5.5 LCD contrast
The contrast of the LCD screen can be adjusted for the level of light in your environment and your viewing preferences.
Press theENU button ① while stopped to open the menu.
2 Press the + or - button ② to select the Setup menu item and press the ENTER smart button ③
3 Press the + or - button 2 to select the Contrast menu item and press the ENTER smart button 3.
4 Press the + or - button 2 to adjust the contrast.
Press the 5 K smart button 4 to save the setting or press the CANCEL smart button 3 to exit the sub-menu without changing the setting.
5.5.6 Device beep
The digital recorder is by default set to give sound feedback (beeps) when:
the end of the file is reached during playback an index mark is hit during fast forward or fast rewind
the battery level drops below 10% .
available memory drops below two minutesa command cannot be carried out
Press theENU button ① while stopped to open the menu.
2 Press the + or - button ② to select the Setup menu item and press the ENTER smart button ③.
Press the + or - button 2 to select the Device beep menu item and press the ENTER smart button 3.
4 Press the + or - button 2 to choose between On and Off.
Press the 5 × smart button ④ to save the setting or press the CANCEL smart button ③ to exit the sub- menu without changing the setting.

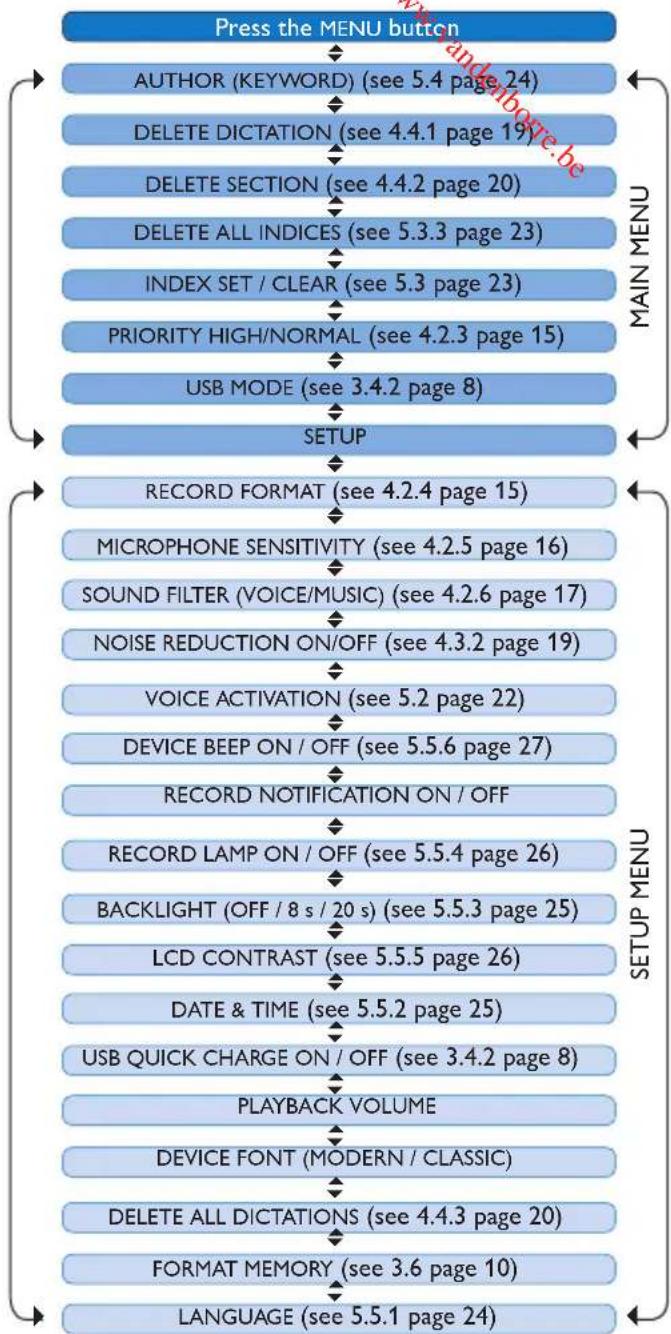
Menu list5.6

Note
Some settings, such as defining author names or switching to simple display mode, are available only through Philips SpeechExec Dictate. See Advanced configuration on page 21 for more information.
Disclaimer and Notices
Philips performs extensive testing with the most popular configurations. However, since PC add-ons and device drivers are updated continually, conflict-free operation cannot be guaranteed.
Benutzerhandbuch
1 Willkommen 30
Microphone p. interview

CD-ROM
Bouton FWD (Avance)10
Bouton Menu11
Downloaded from www.vandebore.be
Technical data
Pocket Memo digital recorder
Connectivity
Docking connector: 8-pin female
USB:· Mini USB 2.0 female
DC in: 6V
Microphone: 3.5 mm, impedance
2kΩ
Headphone: 3.5 mm, impedance
8Ω or more
Memory card: Secure Digital
(SD/SDHC)
Display
Type: TFT-Transreflective
- Diagonal screen size:
1.71 in./44 mm
Resolution: 128 × 128 pixels - Backlight color: white
Speaker
Built-in: 30mm round dynamic speaker
Output power: 200mW
Memory type
- Secure Digital (SD/SDHC) up to 32 GB
Recording specifications
- Recording formats:
MP3 (MPEG-1 Audio Layer 3)
- Digital Speech Standard / Quality Play (DSS QP)
- Digital Speech Standard / Standard Play (DSS SP),
PCM (Puls-Code Modulation)
-
Recording modes:
-
XHQ (.mp3/two channels)
HQ (.mp3/two channels)
DSS QP (.ds2/mono)
DSS SP (.dss/mono)
PCM (.wav/two channels) -
Recording time (with 2GB card):
XHQ: 36 hours
HQ: 72 hours
DSS QP: 170 hours
DSS SP: 340 hours
PCM: 3.1 hours
Sampling frequency:
-
XHQ: 128 kbit/s HQ: 64 kbit/s
DSS QP: 27 kbit/s
DSS SP: 13.5 kbit/s
PCM: 1.4 Mbit/s -
Compression rate:
XHQ:44.1 kHz
HQ:32kHz
DSS QP: 16 kHz
DSS SP 12 kHz
PCM:44.1kHz
-
Frequency response (Voice filter mode / Music filter mode):
-
XHQ: 300 - 8,000 Hz/ 50 - 20,000 Hz
HQ:300-8,000Hz/50-15,500Hz
DSSQP:300-7,000Hz/-
DSS SP: 300 - 5,700 Hz / -
PCM:300-8,000Hz/50-20,000 Hz
Power
- Battery type: two AAA batteries (LR03 or R03) or two Philips AAA Ni-MH rechargeable batteries (LFH9154)
Battery life (DSS SP mode):
23 hours with Philips Ni-MH rechargeable battery
20 hours with Philips alkaline battery
- Charging time (full charge): USB fast charging or power supply: 2.5 hours
Dimensions
Product dimensions (WxDxH): 50 × 17 × 116 mm / 2.0 × 0.7 × 4.6 in.
Weight: 106g / 3.7oz including two Philips AAA batteries
Meeting microphone LFH9172
Specifications
Design: Boundary layer microphone
Type: • Electret condenser microphone
Output impedance: approx. 2.2 kOhm @ 1 kHz
Sensitivity: -38 dBV
Frequency response: 30Hz - 18kHz
Phantom supply voltage: 1.5 to 5 V/0.5mA
Connectivity
Audio plug: 3.5mm
Audio jack (for cascading): 3.5 mmDimensions
Dimensions
Product dimensions (W× D× H) 130× 130× 18mm / 5.1× 5.1× 0.7^
Net weight: 108g / 3.8oz
Interview microphone
Specifications
- Electret condenser microphone
Output impedance: approx. 2.2 kOhm @ 1 kHz
Sensitivity: -42 dBV
Frequency response: 40Hz - 18kHz
Phantom supply voltage:
1.5 to 5V / 0.5mA per channel
Audio plug: 3.5mm
Dimensions
Product dimensions (W× D× H) 45× 17× 39mm / 1.8× 0.7× 1.5^
Net weight: 11 g / 0.4 oz
USB dock
Connectivity
- Docking connector: 8-pin male
PC connector: Mini-USB female
DC in: 6 V
Power
Power supply: 6 V DC / 850 mA
Power consumption: 800 mA max.
Product dimensions (W× D× H) 78× 78× 35mm / 3.1× 3.1× 1.4^
Net weight: 135g / 4.8oz
SpeechExec Pro Dictate
PC requirements
- Operating system: Windows 7 (32/64 bit) / Vista (32/64 bit) / XP (32 bit)
- Hardware: Pentium III, 500 MHz (Pentium IV or similar; 1 GHz recommended), 512 MB RAM (1 GB recommended)
Hard disk space: 100 MB for SpeechExec software, 250 MB for Microsoft .NET Framework - Windows-compatible sound
device
Free USB port
DVD-ROM drive
Green specifications
Compliant to 2002/95/EC (RoHS)
- Lead-free soldered product
Operation conditions
$$ 5 ^ {\circ} - 4 5 ^ {\circ} \mathrm {C} / 4 1 ^ {\circ} - 1 1 3 ^ {\circ} \mathrm {F} $$
Temperature:
Humidity: 10% - 90%
Package contents
- Pocket Memo digital recorder
4 meeting microphones - Click-on interview microphone
Remote control
Docking station - SpeechExec Dictate software
Power supply LFH9146
Philips Secure Digital (SD) memory card
Philips rechargeable AAA Batteries LFH9154 - Interchangeable primary power adapters
- Mini USB cable, Y adapter cable
Metal carry case - User manual, Quick start guide
Accessories (optional)
Transcription set LFH7277
Meeting microphone LFH9172
Philips Secure Digital (SD) memory card
Federal Communications Commission Notice
This equipment has been tested and found to comply with the limits for a Class B digital device, pursuant to part 15 of the FCC Rules. These limits are designed to provide reasonable protection against harmful interference in a residential installation. This equipment generates, uses, and can radiate radio frequency energy and, if not installed and used in accordance with the instructions, may cause harmful interference to radio communications. However, there is no guarantee that interference will not occur in a particular installation. If this equipment does cause harmful interference to radio or television reception, which can be determined by turning the equipment off and on, the user is encouraged to try to correct the interference by one or more of the following measures:
Reorient or relocate the receiving antenna.
Increase the separation between the equipment and the receiver.
Connect the equipment into an outlet on a circuit different from that to which the receiver is connected.
Consult the dealer or an experienced radio or television technician for help.
Modifications
The FCC requires the user to be notified that any changes or modifications made to this device that are not expressly approved by Philips may void the user's authority to operate the equipment.
Cables
Connections to this device must be made with shielded cables with metallic RFI/EMI connector hoods to maintain compliance with FCC rules and regulations.
Canadian notice
This Class B digital apparatus meets all requirements of the Canadian Interference-Causing Equipment Regulations.
Avis Canadian
Declaration of Conformity
Model number: LFH0955
Trade name: Philips Pocket Memo meeting recorder
Responsible party: Philips Speech Processing
Address: 66 Perimeter Center East, Atlanta, GA 30346, USA
Telephone number: 888-260-6261
Website: www.philips.com/dictation

LFH0955
Tested to comply with FCC standards
FOR HOME OR OFFICE USE
This device complies with Part 15 of the FCC Rules. Operation is subject to the following two conditions: 1) This device may not cause harmful interference. 2) This device must accept any interference received, including interference that may cause undesired operation.
CE Declaration of Conformity
Philips confirms that the product corresponds to the relevant guidelines of the European Union.

Specifications are subject to change without notice.
Trademarks are the property of Royal Philips or their respective owners.
© 2010 Royal Philips Electronics. All rights reserved.
Document version 3.0, 2010/10/12.
5103 109 9692.3