
EY7410 - Screwdriver PANASONIC - Free user manual and instructions
Find the device manual for free EY7410 PANASONIC in PDF.
| Brand | Panasonic |
| Model | EY7410 |
| Product type | Screwdriver (drill-driver) |
| Power supply | Li-ion battery 3.6 V, 1.5 Ah (model EY9L10) |
| Charger | Model EY0L10 (charging time: 15 min usage, 30 min full) |
| No-load speed | Low: 200 rpm, High: 600 rpm |
| Maximum torque | Low: 4.4 N·m, High: 1.5 N·m |
| Clutch | 21 settings, max torque 3.0 N·m |
| Chuck | Quick-release hex |
| Screwing capacity | Machine screws M2.5 to M5, wood screws Ø3.8 x 38 mm |
| Drilling capacity (metal) | Up to Ø5 mm |
| Weight (with battery) | 0.5 kg |
| Total length | 276 mm |
| Main functions | On/off, reverse rotation, bit lock, LED light, low battery indicator, 2-speed selector |
| Safety | Over-discharge protection, automatic stop in case of jamming, switch lock |
| Maintenance and cleaning | Clean with a dry, clean cloth. Do not use water, solvent, or volatile product. |
| Spare parts and repairability | Battery (EY9L10) and charger (EY0L10) available. For other parts, contact an authorized dealer. |
| Environmental information | WEEE-compliant recycling. Do not dispose of with household waste. |
Frequently Asked Questions - EY7410 PANASONIC
User questions about EY7410 PANASONIC
0 question about this device. Answer the ones you know or ask your own.
Ask a new question about this device
Download the instructions for your Screwdriver in PDF format for free! Find your manual EY7410 - PANASONIC and take your electronic device back in hand. On this page are published all the documents necessary for the use of your device. EY7410 by PANASONIC.
USER MANUAL EY7410 PANASONIC
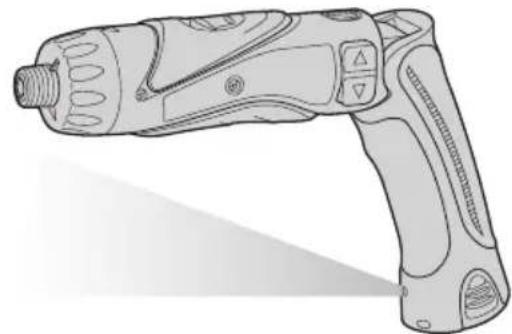
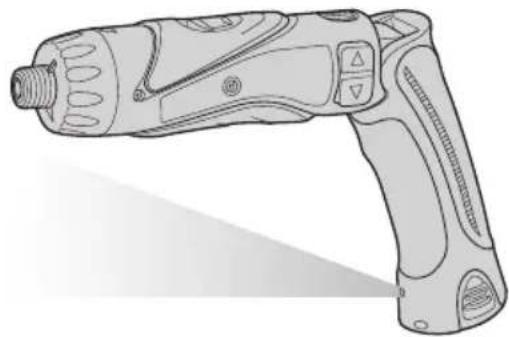
Cordless Drill & Driver
Akku-Bohrschrauber
AkkymyIaTOpHn dprJb-lypynoBepr
Model No: EY7410
Before operating this unit, please read these instructions completely and save this manual for future use.
IpeE3KcNpyataHnDHOyCTPOCTBA,NOXaYNYtA,NOHOCTHIO pOHTHRe DAHHYIO HCHPTyKIO IOOXpaHNTe DaHHOE pyKOBODCTO DnI NcONLb3OBAHmB 6dyJUeM.
Ipeedknyataeio daHOro npncpoio,6yIb naCkia, noBHCIO npOHTaTe DaHy iNCTpyuio i 3epeKtB daHn Noc6HKn dna BnKOpncTahry MaM6yTHbOMy.
Index/Index/Index/Indice/Index/Indice/Indeks/Index/Indeks/Hakemisto INdeKc/INdeKc
English: Page 5 Dansk: Side 56
YkpaHcbKa CToPiHa 96
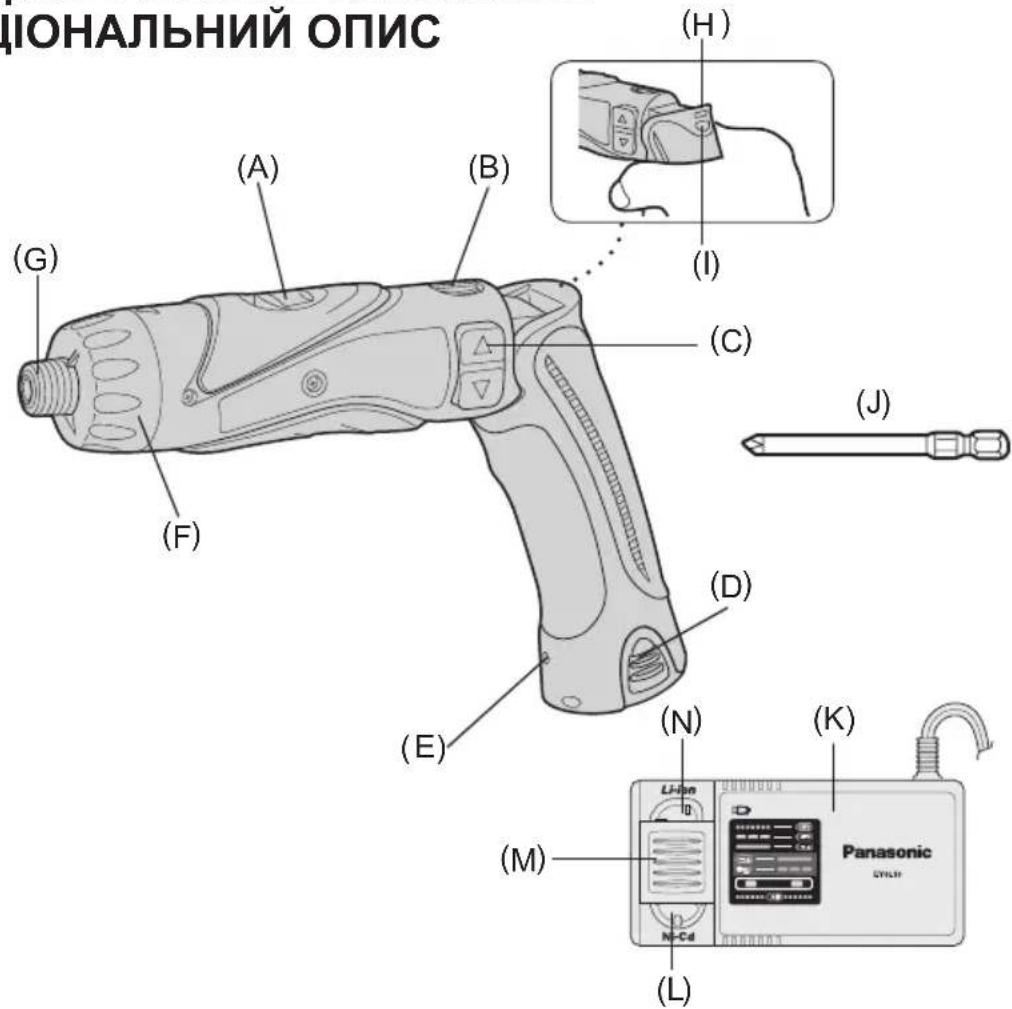
| (A) | Speed selector switch Bereichsschalter Sélecteur de vitesse de rotation Selettore di velocità Snelheidskeuzeschakelaar Commutador selector de velocidad Hastighedsvælgeromskifter Varvitalsomkopplare Hastighetsvelger Nopeusalueen valitsin Селекорный поеклоча差别ь скорсту Селекорный поемпачшвдкосту | (B) | Main switch lock Hauptschaltersperre Verrou de l'interrupteur principal Blocco interruptatore principale Hoofdschakelaarvergrendeling Bloqueo de interruptor principal Hoverafbryderlås Strömbrytarspärr Hovedbryterlås Päkytkimen lukko Бл_OK探测ка павною поеклоча Бл_OKванни roловного поемпоча | |
| (C) | Main switch Hauptschalter Interrupteur principal Interruttore principale Hoofdschakelaar Interruptor principal Hoverafbryder Strömbrytare Hovedbryter Pääkytkin Главный поеклоча Голobné поемпач LED light LED-Leuche Lumière DEL Luce LED LED-lampje Luz indicadora LED-lys LED-ljus LED-lys LED-valo С被告 С被告 С被告 С被告 Hexagonal bit chuck Sechskantbitfutter Mandrin de mèche hexagonal Mandrino esagonale per punte Zeskantrightorkop Portador de broca hexagonal Sekskantet borepatron Chuck für sexkantsbits Sekskantet borchuck Kuusioterän kiinnityslaite Шебtrightpanné зажимно патон для насадок Шебtrightpanné заисné патон對於 насадок | (D) | Battery pack (EY9L10) Akku (EY9L10) Batterie (EY9L10) Pacco battery (EY9L10) Accu (EY9L10) Bloque de pilas (EY9L10) Batteri (EY9L10) Batteri (EY9L10) Batteri-pakke (EY9L10) Akku (EY9L10) Батарейный blocok(EY9L10) Батарейный blocok(EY9L10) | |
| (G) | (F) | Clutch handle Kupplungsring Poignée de l'embrayage Impugnatura frizione Koppelingshandgreep Mango de embrace Koblingshändtag Koppingshandtag Clutchhändtak Kytkimen kahva Руковая муфты Руковая муфту | ||
| Hexagonal bit chuck Sechskantbitfutter Mandrin de mèche hexagonal Mandrino esagonale per punte Zeskantrightboorkop Portador de broca hexagonal Sekskantet borepatron Chuck für sexkantsbits Sekskantet borchuck Kuusioterän kiinnityslaite Шебtrightpanné зажимно патон對於 насадок Шебtrightpanné заисné патон對於 насадок | (H) | Battery low warning lamp Akkuladungs-Warnlampe Témoin d'avertissement de batterieasse Spia avvertenza batteria scarica Waurschuwingslampje voor lage accuspanning Luz de avis de bajo carga de bateria Adverselslampes batterieffekt lav Varningslampä für svagt batteri Varsellampe for at batteriet er for lavt Alhaisen akkujännitteen varoituslamppru П repdunprejdoця П repdunprejdoця П repdunprejdoця П repdunprejdoця П repdunprejdoця П repdunprejdoця | ||
| (I) | LED light ON/OFF button LED-Leuchten-EIN/AUS-Taste Bouton Marche/Arrêt de la lumière DEL Tasto di accensione e spegnimento della luce LED Aan/uit-toets (ON/OFF) voor LED-lampje Botón ON/OFF de luz LED TÀEND/SLUK-knap til LED-lys Strömbrytare für LED-ljus PÀ/AV-knapp for LED-lys LED-valon kytkin/katkaisupainike Кнока вklючени/вьключени с Beetodinoindnoюсовети Кнока вьимкинney/вимкинney сbitлiodioindho ngпдсвicуba Hняр有很大адok Hбор有很大адok | (J) | Bit set Bitsatz Jeu de mèches Inserimento punta Bitset Juego de brocas Bit Bitsuppsättning Bitsett Teräsarja Haßop有很大адok Haßip有很大адok | |
| (K) | Battery charger (EY0L10) Ladegerät (EY0L10) Chargeur de batterie (EY0L10) Caricabatterie (EY0L10) Acculader (EY0L10) Cargador de la batería (EY0L10) Batterioplader (EY0L10) Batteriladdare (EY0L10) Batterilader (EY0L10) Akkulaturi (EY0L10) Зарадное устриостwo (EY0L10) Зараднои писстri (EY0L10) | (L) | Ni-Cd battery pack dock Ni-Cd-Akkuladeschacht Poste d'accueil de la batterie autonome Ni-Cd Spazio raccordo pacco batteria Ni-Cd Ni-Cd accuhouder Enchufe de carga de batería Ni-Cd Ni-Cd batteripakningsdok Docka für NiCd-batteri Dokk for Ni-Cd-batteripakke Ni-Cd akun liitin Углоблике для установки有很大ейь-каддиевого Батаразимюг Broka Заглоблике對於 Встановлику有很大ейь- каддиевого Батаразимюг Broka | |
| (M) | Battery dock cover Ladeschachtabdeckung Couvercle du poste d'accueil de la batterie Coperchio vano batteria Deksel van accuhouder Cubierta de enchufe de carga de bateria Batteridokdæksel Batteridockningslucka Dokkdeksel til batterilader Akkuliittimen kansi Крышka углоблиения對於 батари Крышka заглоблиения對於 батapei | (N) | Li-ion battery pack dock Li-Ion-Akkuladeschacht Poste d'accueil de la batterie autonome Li-ion Spazio raccordo pacco batteria Li-ion Li-ion accuhouder Enchufe de carga de bateria Li-ión Li-ion batteripakningsdok Docka für litiumjonbatteri Dokk for Li-ion-batteripakke Li-ioniakun liitin Углоблике對於 установки有很大ейь-нoinного Батаразимюг Broka Заглоблике對於 Встановлику有很大ейь- каддиевого Батаразимюг Broka |
Read the Safety Instructions booklet and the following before using.
I. ADDITIONAL SAFETY RULES
1) Wear ear protectors when using the tool for extended periods.
Prolonged exposure to high intensity noise can cause hearing loss.
2) Be aware that this tool is always in an operating condition, since it does not have to be plugged into an electrical outlet.
3) When drilling into walls, floors, etc., "live" electrical wires may be encountered. DO NOT TOUCH THE CHUCK OR ANY FRONT METAL PARTS OF THE TOOL! Hold the tool only by the plastic handle to prevent electric shock in case you drill into a "live" wire.
4) If the bit becomes jammed, immediately turn the main switch off to prevent an overload which can damage the battery pack or motor. Use reverse motion to loosen jammed bits.
5) During charging, the charger may become slightly warm. This is normal. Do not leave the battery in the charger for more than 24 hours after charging is completed.
| Symbol | Meaning |
| V | Volts |
| --- | Direct current |
| n0 | No load speed |
| .../min | Revolutions or reciprocations per minutes |
| Ah | Electrical capacity of battery pack |
| Rotation only | |
| Read the operating instructions before use. | |
| For indoor use only. |
II. ASSEMBLY & OPERATION
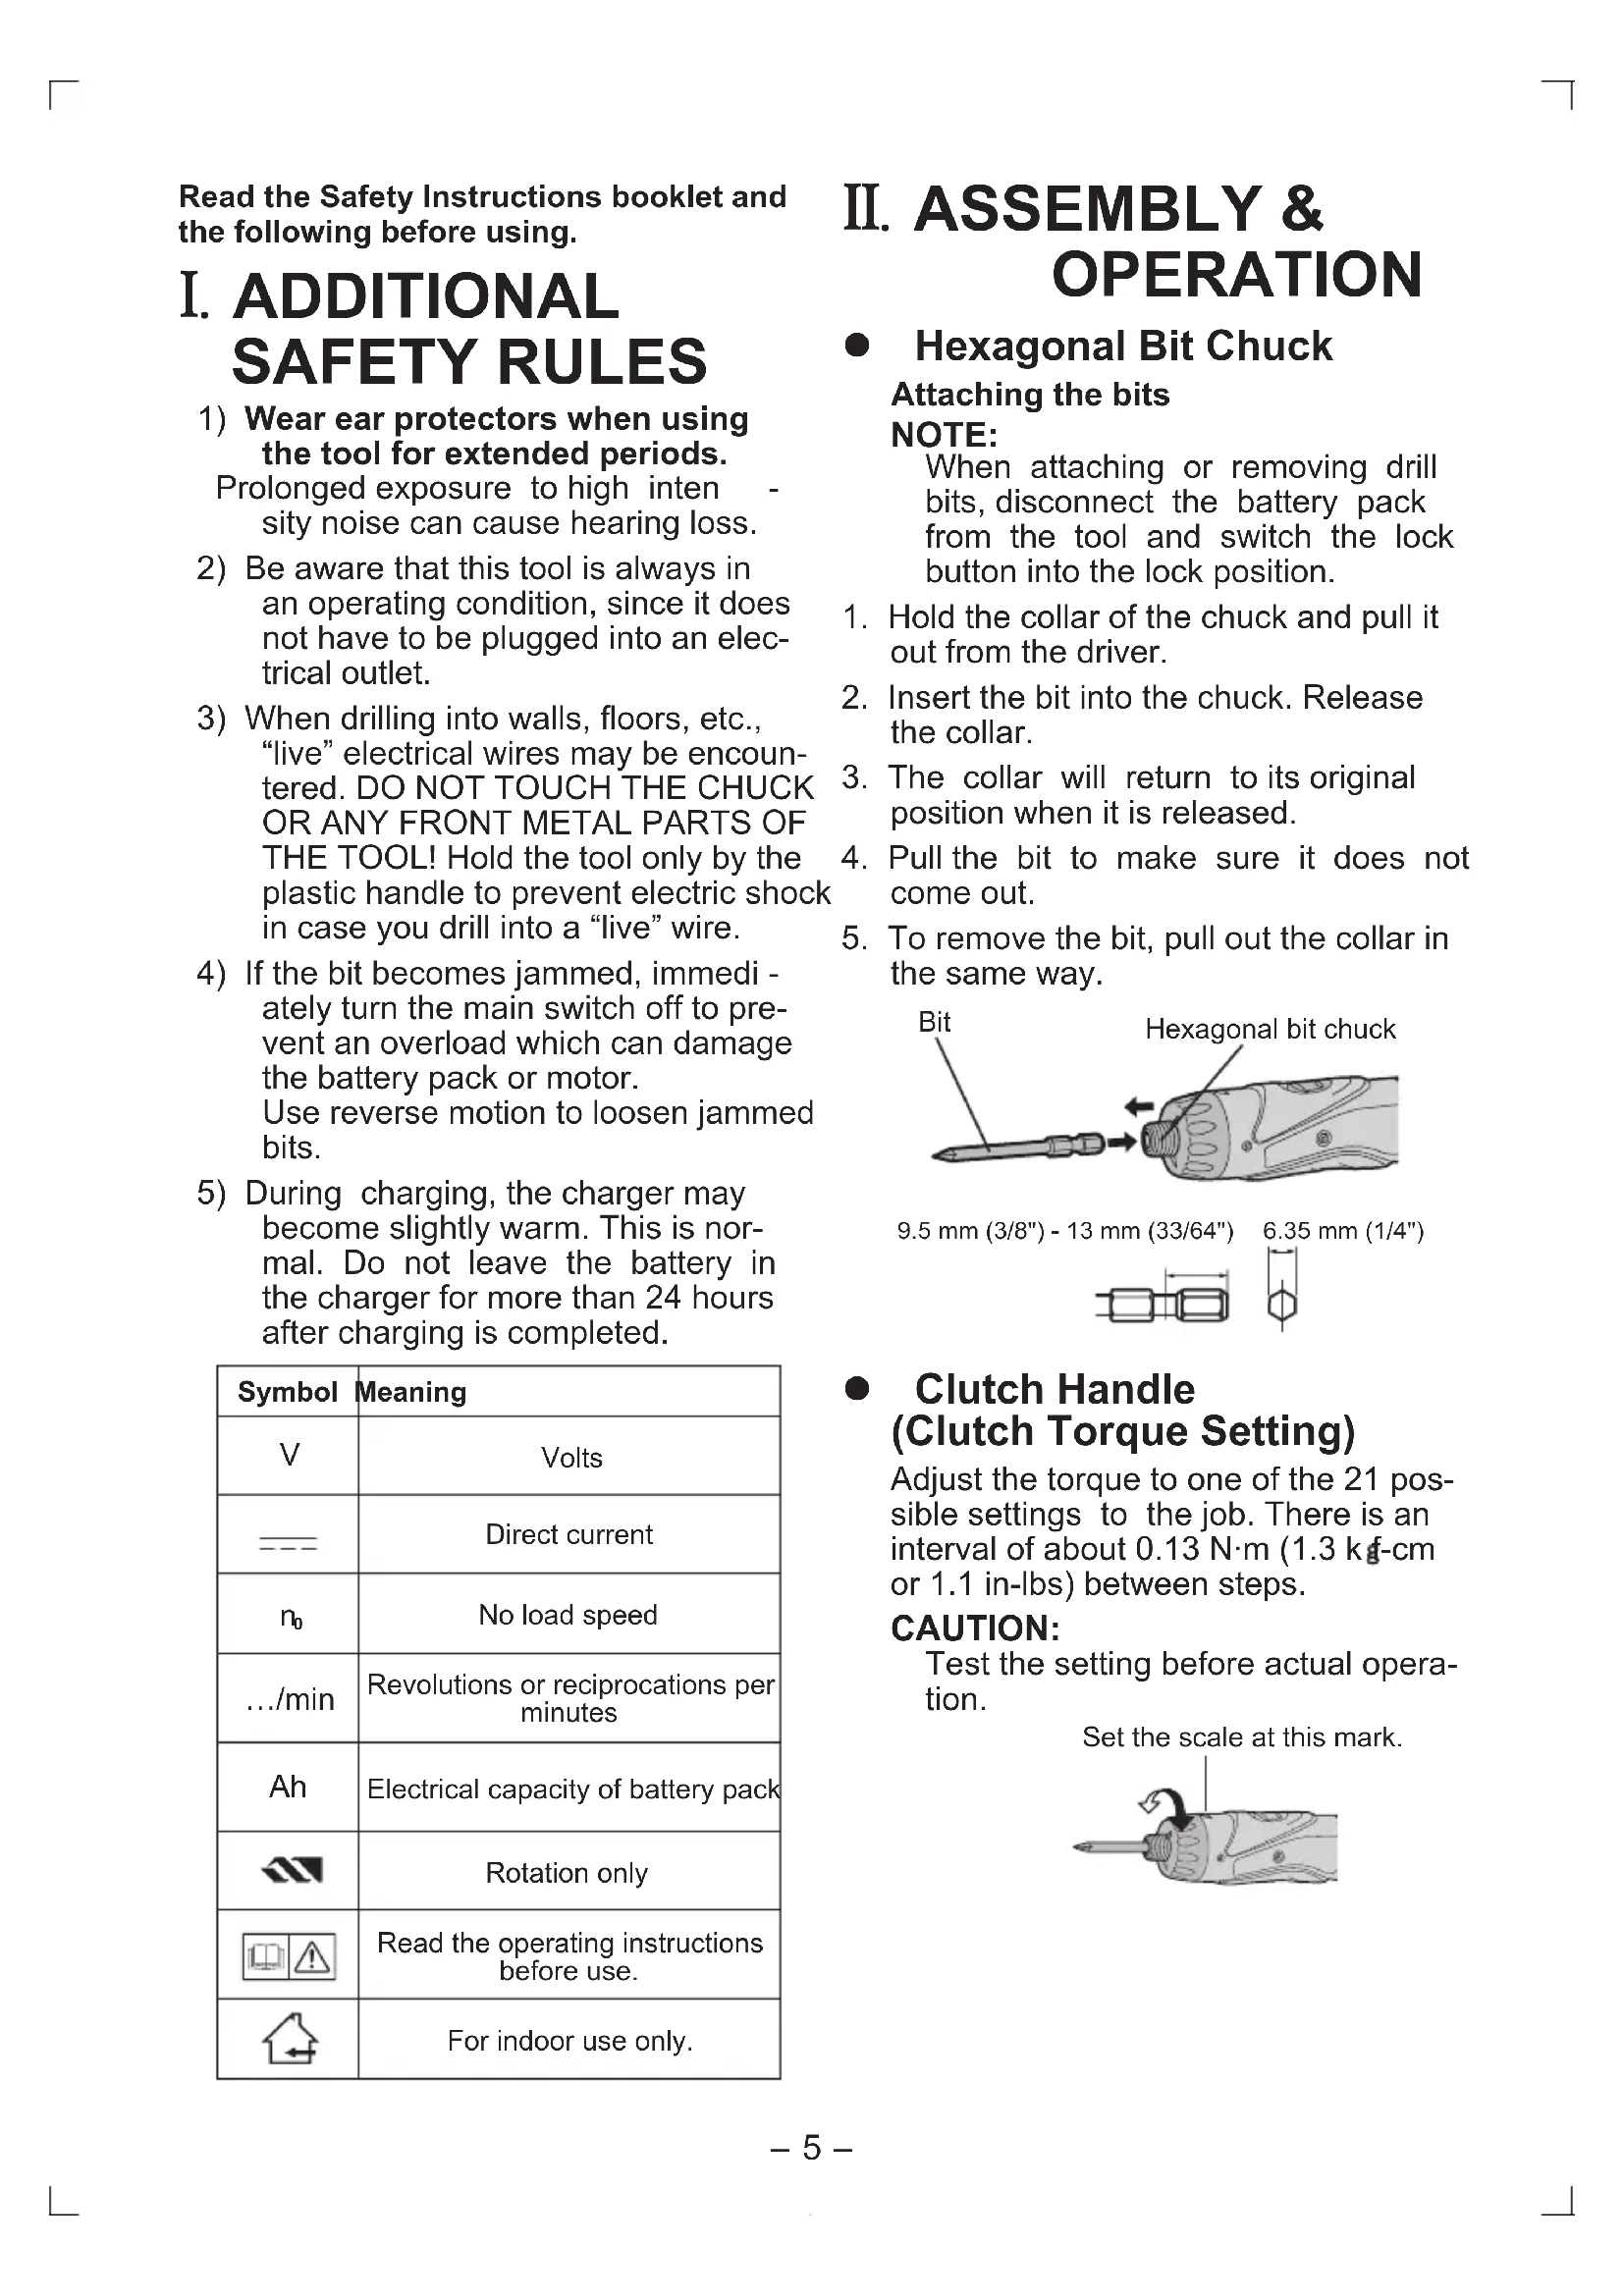
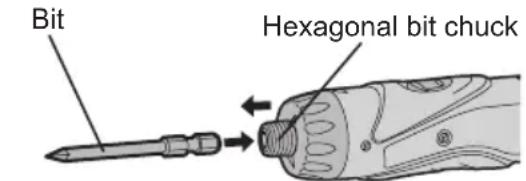
- Hexagonal Bit Chuck
Attaching the bits NOTE:
When attaching or removing drill bits, disconnect the battery pack from the tool and switch the lock button into the lock position.
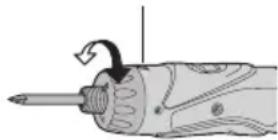
- Hold the collar of the chuck and pull it out from the driver.
- Insert the bit into the chuck. Release the collar.
- The collar will return to its original position when it is released.
- Pull the bit to make sure it does not come out.
- To remove the bit, pull out the collar in the same way.
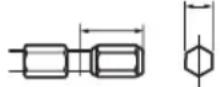
9.5 mm (3/8") - 13 mm (33/64") 6.35 mm (1/4")
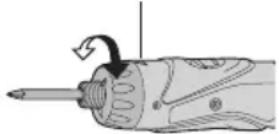
- Clutch Handle (Clutch Torque Setting)
Adjust the torque to one of the 21 possible settings to the job. There is an interval of about 0.13N· m (1.3 kg·cm or 1.1 in-lbs) between steps.
CAUTION:
Test the setting before actual operation.
Set the scale at this mark.
Reference for Adjusting Torque
| Setting | Torque Use | |
| 1 | Approx: 0.29 N·m(3.0 kgf-cm or 2.6 in-lbs) | For driving screws |
| 5 | Approx: 0.82 N·m(8.4 kgf-cm or 7.3 in-lbs) | |
| 9 | Approx: 1.35 N·m(13.8 kgf-cm or 12.0 in-lbs) | |
| 13 | Approx: 1.88 N·m(19.2 kgf-cm or 16.6 in-lbs) | |
| 17 | Approx: 2.41 N·m(24.6 kgf-cm or 21.3 in-lbs) | |
| 21 | Approx: 2.94 N·m(30.0 kgf-cm or 26.0 in-lbs) | |
| Approx: 4.4 N·m(45.0 kgf-cm or 39.0 in-lbs) | For power-ful drivingsscrews anddrilling |
- When using at high speeds, set the clutch at 10 or below. (Operation stops at the maximum torque of 1.5 N·m (15 kgf·cm) when the scale is higher.)
- The auto shut-off function may become inoperable at high clutch settings when battery power drops. Recharge the battery in that case.
NOTE:
The chart is only a reference. The torque settings may differ by materials, types of screws, etc. Please test it at your own conditions before use.
- Battery Low Warning Lamp
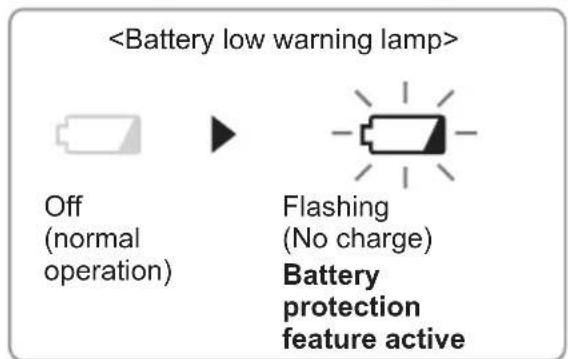
Excessive (complete) discharging of Li-ion batteries shortens their service life dramatically. The driver includes a battery protection feature designed to prevent excessive discharging of the battery pack.
The battery protection feature activates immediately before the bat
terry loses its charge, causing the battery low warning lamp to flash.
If you notice the battery low warning lamp flashing, charge the battery pack immediately.
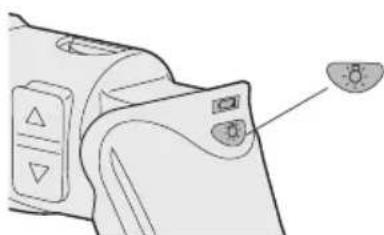
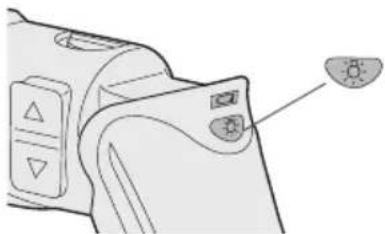
Using the LED Light
Use the LED light on jobs in dark locations such as attics to illuminate your workspace.

CAUTION
- The LED light is intended for use as a supplemental light source. Do not use it as a flashlight.
Doing so may result in accident or injury. -
Do not look at the light or shine it directly into your eyes.
Continuous exposure to the LED light may damage your eyes. -
Press to toggle the light on and off.
-
To use the light immediately after attaching the battery pack or after the drill has not been used for 5 minutes or more, operate the drill briefly.
- The light will automatically turn off if the drill is not used for 5 minutes.
-
The light uses an extremely small amount of current. Using the light has a negligible effect on the operational capacity of the drill.
-
The LED is incapable of lighting the tip of the bit when the drill is used in the straight configuration.
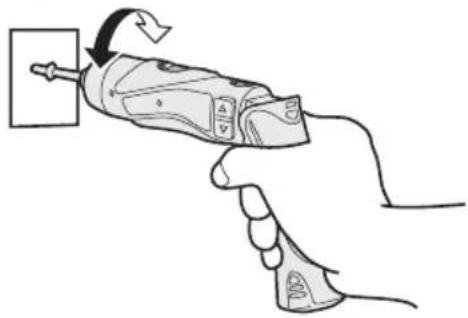
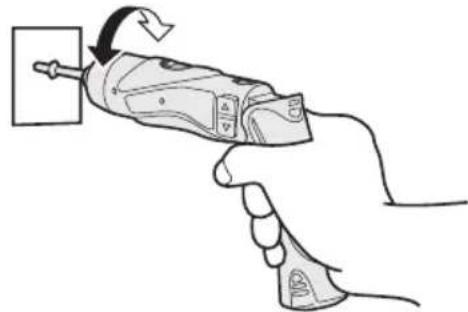
- Bit-locking Function
With the switch at off and the bit locked in place, the tool can be used as a manual screw-driver - up to 14.7 N·m (150 kgf·cm, 130 in-lbs).
There will be a little play in the driving shaft, but this is not a malfunction.
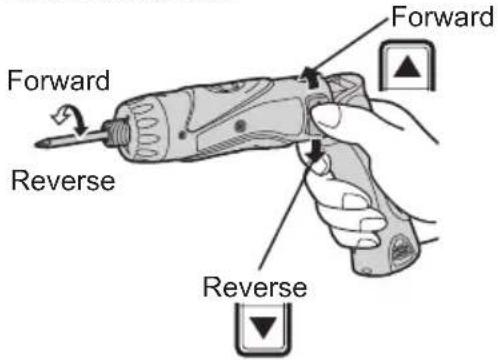
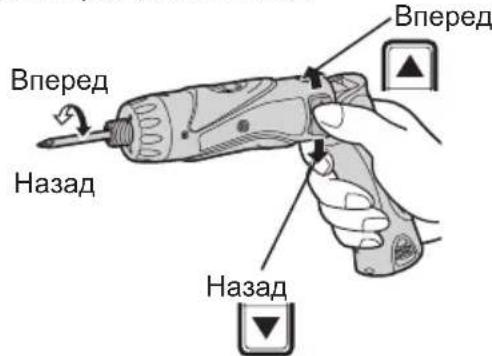
- Main Switch (ON/OFF)
Push the upper half of the switch for forward rotation, or the lower half for reverse rotation.
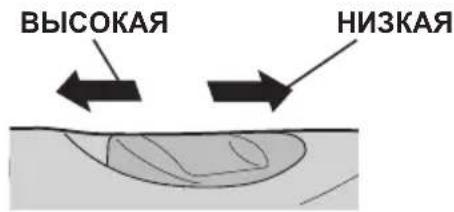
- Speed Selector Switch
To suit the application of this tool, two different rotational speeds are available. Depending upon use, either the high or low speed should be selected.
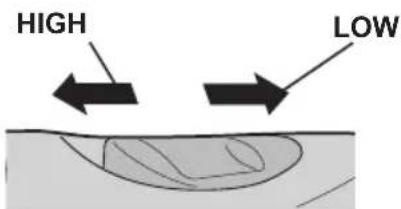
| Speed selection Torque | |
| LOW 200 /min (rpm) High | |
| HIGH 600 /min (rpm) Low |
CAUTION:
- Check speed selector switch before use.
- Do not operate the speed selector switch while the main switch is on (switch is in the ON position).
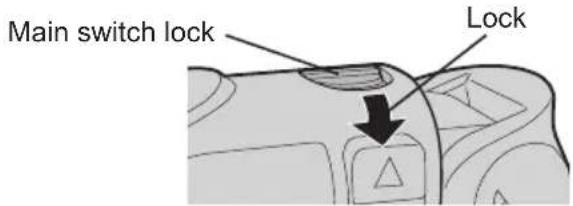
- Main Switch Lock
After use, set the main switch lock at the lock position to prevent accidental operation.
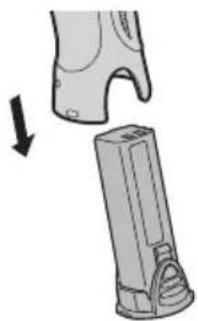
- Battery Pack (EY9L10)
CAUTION:
- Remove the battery pack away from the tool.
- Charge the battery pack using the battery charger.
- After charging has been completed, remove the battery pack from the charger and connect it to the tool. Disconnect the charger from the power source when not in use.
NOTE:
Use under extremely hot or cold conditions will reduce operating capacity per charge.
[Battery Pack]
For Appropriate Use of Battery pack
Li-ion Battery pack (EY9L10)
- For optimum battery life, store the Li-ion battery pack following use without charging it.
- The ambient temperature range is between 0^ (32^) and 40^ (104^) . If the battery pack is used when the battery temperature is below 0^ (32^) , the tool may fail to function properly.
- When battery pack is not in use, keep it away from other metal objects like: paper clips, coins, keys, nails, screws, or other small metal objects that can make a connection from one terminal to another.
Shorting the battery terminals togeth er may cause sparks, burns or a fire.
- When operating the battery pack, make sure the work place is well ventilated.
Battery Pack Life
The rechargeable batteries have a limited life. If the operation time becomes extremely short after recharging, replace the battery pack with a new one.
Battery Recycling
ATTENTION:
For environmental protection and recycling of materials, be sure that it is disposed of at an officially assigned location, if there is one in your country.
[Battery Charger]
Charging
Common Cautions for the Li-ion/Ni-Cd Battery Pack
NOTE:
- When a cold battery (of about 0^ or less) is to be charged in a warm
room, leave the battery in the room for at least one hour and charge it when it has warmed up to room temperature. (Failing to do so may result in less than a full charge.)
Cool down the charger when charging more than two battery packs consecutively.
- Do not insert your fingers into contact hole, when holding charger or any other occasions.
CAUTION:
To prevent the risk of fire or damage to the battery charger.
- Do not use power source from an engine generator.
- Do not cover vent holes on the charger and the battery pack.
- Unplug the charger when not in use.
Li-ion Battery Pack
NOTE:
Your battery pack is not fully charged at the time of purchase. Be sure to charge the battery before use.
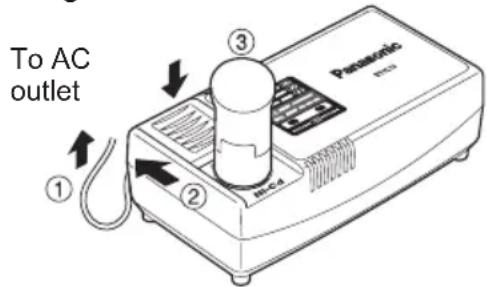
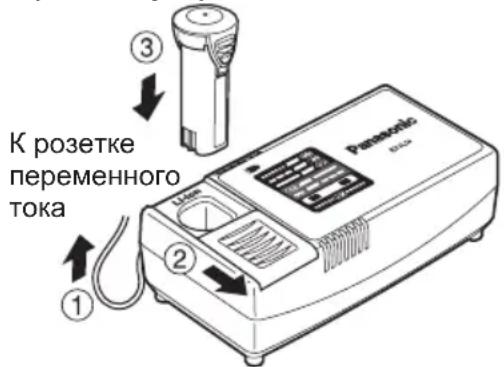
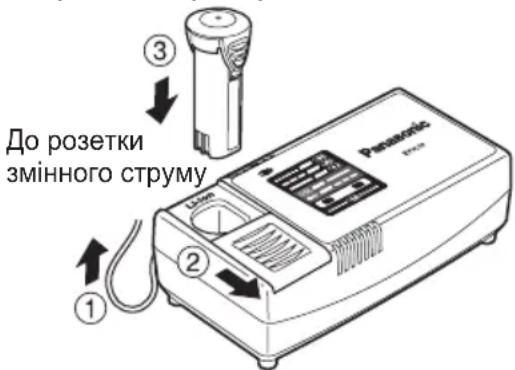
Battery charger (EY0L10)
- Plug the charger into the AC outlet.
NOTE:
Sparks may be produced when the plug is inserted into the AC power supply, but this is not a problem in terms of safety.
-
Slide the battery dock cover back to allow insertion of the Li-ion battery pack.
-
Verify that the cover is locked, s curely in place.
-
Insert the battery pack firmly into the charger.
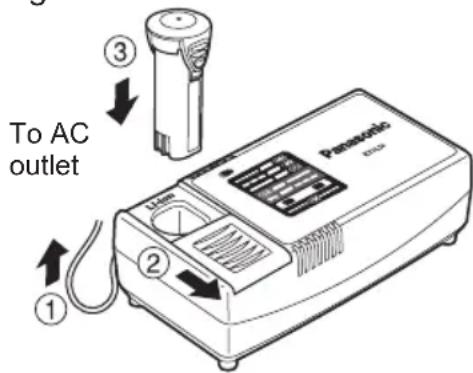
- During charging, the charging lamp will be lit.
When charging is completed, an internal electronic switch will automatically be triggered to prevent overcharging.
-
Charging will not start if the battery pack is warm (for example, immediately after heavy-duty operation). The orange standby lamp will be flashing until the battery cools down. Charging will then begin automatically.
-
The charge lamp (green) will flash slowly once the battery is approximately 80% charged.
-
When charging is completed, the charging lamp will start flashing quickly in green color.
-
If the temperature of the battery pack is 0^ or less, charging takes longer to fully charge the battery pack than the standard charging time. Even when the battery is fully charged, it will have approximately 50% of the power of a fully charged battery at normal operating temperature.
-
If the power lamp does not light immediately after the charger is plugged in, or if after the standard charging time the charging lamp does not flash quickly in green, consult an authorized dealer.
-
If a fully charged battery pack is inserted into the charger again, the charging lamp lights up. After several minutes, the charging lamp may flash quickly to indicate the charging is completed.
Ni-Cd Battery Pack
NOTE:
When you charge the battery pack for the first time, or after prolonged storage, charge it for about 24 hours to bring the battery up to full capacity.
Battery charger (EY0L10)
- Plug the charger into the AC outlet.
NOTE:
Sparks may be produced when the plug is inserted into the AC power
supply, but this is not a problem in terms of safety.
-
Slide the battery dock cover back to allow insertion of the Ni-Cd battery pack.
-
Verify that the cover is locked securely in place.
-
Insert the battery pack firmly into the charger.
- During charging, the charging lamp will be lit.
When charging is completed, an internal electronic switch will automatically be triggered to prevent overcharging.
- Charging will not start if the battery pack is warm (for example, immediately after heavy-duty operation).
The orange standby lamp will be flashing until the battery cools down. Charging will then begin automatically.
-
When charging is completed, the charging lamp will start flashing quickly in green color.
-
If the power lamp does not light immediately after the charger is plugged in, or if after the standard charging time the charging lamp does not flash quickly in green, consult an authorized dealer.
-
If a fully charged battery pack is inserted into the charger again, the charging lamp lights up. After several minutes, the charging lamp may flash quickly to indicate the charging is completed.
LAMP INDICATIONS
| Green Lit Charger is plugged into the AC outlet. Ready to charge. | |
| Green Flashing Quickly Charging is completed. (Full charge.) | |
| Green Flashing Battery is approximately 80% charged. (Usable charge. Li-ion only) | |
| Green Lit Now charging. | |
| Orange Lit Battery pack is cool. The battery pack is being charged slowly to reduce the load on the battery. (Li-ion only) | |
| Orange Flashing Battery pack is warm. Charging will begin when temper- ature of battery pack drops. | |
| Charging Status Lamp Left: green Right: orange will be displayed. | |
| Both Orange and Green Flashing Quickly Charging is not possible. Clogged with dust or malfunc- tion of the battery pack. | |
| If the temperature of the battery pack is -10°C or less, the charging status lamp (orange) will also start flashing. Charging will begin when the temperature of the battery pack goes up (Li-ion only) |
Information on Disposal for Users of Waste Electrical & Electronic Equipment (Private Households)

This symbol on the products and/or accompanying documents means that used electrical and electronic products should not be mixed with general household waste.
For proper treatment, recovery and recycling, please take these products to designated collection points, where they will be accepted on a free of charge basis. Alternatively, in some countries you may be able to return your products to your local retailer upon the purchase of an equivalent new product.
Disposing of this product correctly will help to save valuable
resources and prevent any potential negative effects on human health and the environment which could otherwise arise from inappropriate waste handling.
Please contact your local authority for further details of your nearest designated collection point.
Penalties may be applicable for incorrect disposal of this waste, in accordance with national legislation.
For Business Users in the European Union
If you wish to discard electrical and electronic equipment, please contact your dealer or supplier for further information.
Information on Disposal in Other Countries Outside the European Union
This symbol is only valid in the European Union.
If you wish to discard this product, please contact your local authorities or dealer and ask for the correct method of disposal.
III. MAINTENANCE
Use only a dry, soft cloth for wiping the unit. Do not use a damp cloth, thinner, benzine, or other volatile solvents for cleaning.
IV. ACCESSORIES
Use only bits suitable for size of drill's chuck.
V. SPECIFICATIONS
MAIN UNIT
| Model EY7410 | ||
| Capacity | Screw driving | Machine screw M2.5 - M5 |
| Wood screw ø 3.8 x 38 mm (5/32 " x 1-29/64") | ||
| Drilling For metalø 5 mm (13/64) | ") spc t = 1.6 mm | |
| Motor | 3.6 V DC | |
| No load speed | LOW: 200/min (rpm) | |
| HIGH: 600/min (rpm) | ||
| Maximum torque | LOW: 4.4 N·m (45 kgf-cm, 39 in-lbs) | |
| HIGH: 1.5 N·m (15 kgf-cm, 13 in-lbs) | ||
| Maximum clutch torque | 3.0 N·m (30 kgf-cm, 26 in-lbs) | |
| Overall length | 276 mm (10-55/64") | |
| Weight (with battery pack) | 0.5 kg (1.1 lbs) | |
BATTERY PACK
| Model EY9L10 | |
| Storage battery | Li-ion Battery |
| Battery voltage | 3.6 V DC (3.6 V x 1 cell) |
| Capacity | 1.5 Ah |
BATTERY CHARGER
| Model EY0L10 | |
| Weight 0.6 kg (1.3 lbs) |
Electrical rating See the rating plate on the bottom of the charger.
| Charging time | 2.4 V | 3.6 V | |
| 1.2 Ah | EY9021 | EY9025 | |
| 15 min. | 15 min. | ||
| 1.5 Ah | EY9L10 | ||
| Usable: 15 min. | |||
| Full: 30 min. |
NOTE:
- For applicable battery packs to this charger, see the label on the charger or the latest general catalog.
The instruction label on the battery packs also shows the applicable charger.
ONLY FOR U.K.
VI. ELECTRICAL PLUG INFORMATION
FOR YOUR SAFETY PLEASE READ THE FOLLOWING TEXT CAREFULLY
This appliance is supplied with a moulded three pin mains plug for your safety and convenience.
A 5 amp fuse is fitted in this plug.
Should the fuse need to be replaced please ensure that the replacement fuse has a rating of 5 amp and that it is approved by ASTA or BSI to BS1362.
Check for the ASTA mark or the BSI mark on the body of the fuse.
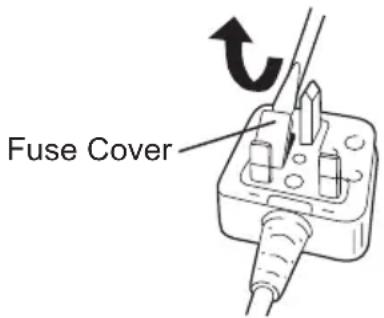
If the plug contains a removable fuse cover you must ensure that it is refitted when the fuse is replaced.
If you lose the fuse cover the plug must not be used until a replacement cover is obtained.
A replacement fuse cover can purchased from your local Panasonic Dealer.
IF THE FITTED MOULDED PLUG IS UNSUITABLE FOR THE SOCKET OUTLET IN YOUR HOME THEN THE FUSE SHOULD BE REMOVED AND THE PLUG CUT OFF AND DISPOSED OF SAFELY. THERE IS A DANGER OF SEVERE ELECTRICAL SHOCK IF THE CUT OFF PLUG IS INSERTED INTO ANY 13 AMP SOCKET.
If a new plug is to be fitted please observe the wiring code as shown below.
If in any doubt please consult a qualified electrician.
IMPORTANT:
The wires in this mains lead are coloured in accordance with the following code:
Blue: Neutral
Brown:Live
As the colours of the wire in the mains lead of this appliance may not correspond with the coloured markings identifying the terminals in your plug, proceed as follows. The wire which is coloured BLUE must be connected to the terminal in the plug which is marked with the letter N or coloured BLACK.
The wire which is coloured BROWN must be connected to the terminal in the plug which is marked with the letter L or coloured RED.
Under no circumstances should either of these wires be connected to the earth terminal of the three pin plug, marked with the letter E or the Earth Symbol 1三
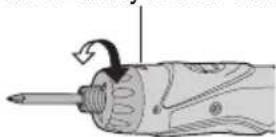
How to replace the fuse: Open the fuse compartment with a screwdriver and replace the fuse and fuse cover if it is removable.
This apparatus was produced to BS800.
Pacco battery Li-ion
NOTA:
- Interruptor principal (ON/OFF)
- Anvendelse at LED-Iyset
PykoTka MyΦTbI (YcTaHOBKa KpyTЯero MOMeHTa MyΦTbI)
YCTAHOBITE Heo6xOdHmbl JIpa60tbl KpyTAA MOMeHT B OJHO 2 BO3MOXHBIX 3HaueHn. Mexdy HUMN cyuectByet INHTepBaJI npImepHo B 0,13 H·M (1,3 Krc-cM).
BHIMAHNE:
PpOBepey yctaHOBky nepeHacToaue npabotoi.
YCTAHOBITE WKAJY BO3JIe 3TOI METKN.
PekomeHdaunn nla HacTpoNkpyTa- Uero MOMeHTa
- Pn nCNoB3OBAHn Ha BbICOKNX CKOpocTayCTaHOBNTe 3HaueHne KpyT Jaero M Ome HTa M yTbI NOJoxHe 10 nn Hx. (Pa6oTa NpeKpaAaetc npn MaKcMaJIbHOM
KpyTaeM MOMeTe 1,5 H-M (15 Krc-CM), ecn yctaHOBneHo 60nee BbICOKoe 3HaueHne).
-Функця abTomatueckoro OTKIOyehnMoKeT CTaTB He3oΦpeKTINBHOI npNcNoJIb3OBAHnHa BbICOKNX 3HaYeHnX KpyTaJeRO MOMHTa Mytbl,ecn3ap4d 6atapeu CHn3ntc. B TaKOM cnyae 3apndTe 6atapeo.
ПОНМЕЧАНЕ:
Данная ТабиcaяВлЯETСТОлькоpekomeндаци.Знayehne ycta-HOBK KpyTЯшero MOMeHTa MoKeTOTЛИЧАБСЯ B 3aBNCIMOCTN OTMaTePnAIOB,TINOB WypynOB N.T.I.ПoxaIyIcTa,пpoBepbTe erO Bco6CTBENHbIX YCNOBnX NepeIDNcNoJIb3OBAHNEM.
He Oka3bIbaet He6laIarOpnpyTHoro BO3dEInCTBna Ha npOn3BOaNTeJIbHOCTb DpeJn.
CBeToNDnHaI NOcBETKa He MoKet OCBETb KOHeu HacaKn, ecn DpeJIb IcNoJIb3yETcB PpAMoN KOHfNpyaun.
-ФункцяблOKировин hacadkn
C BbIKIIOUeHHbIM nepeKJIIOuATEJeM 3aΦNKcnpoBaHHoH Na MeCTe HacaIKO-OTBepTKO, DaHHbI INHCTpyMeHT MOxET NcNoJIb3OBaTbcB KaueCTBe pyHOJ OTBepTKn Do 14,7 H·M (150 Krc-cM). B NaTpOHe 6yJeT npNCytCTBOBaTb He6oJIbShoJ IIOΦT, YTO He YBJIaTeCJ HeINcnpaBHOCTbIO.

HOrO 6noka
He TnaBbI nepeKIOuOaTeJIb (BKl./BblKJI.)
HaxmTeBepxHIOIPOJOBHyIJaBpa- 电 HpeNnHnxHIOIPOJOBHy IaBpaueHna3aI.
- CeJIeKTopHbI nepeKJIouaTeIb CKOpOCTn
Дя COOTBETCTBЯ npIMeHNo DaHHbI NHCTpyMeHT nMeet DBe pa3nUHbIe CKOPoCTn BpaUeHn. B 3aBncMocTn OT NcNoJIb3OBAHn Heo6xOJMo Bbl6paTb JN60 BBICOKyO CKOpOCTb, JN6O HN3Kyo.
CTAHOBUTCaype3MepHO KOPOTKIM,3aMeHNTe 6aTapeHHbI 6NOK Ha HOBbI.
YtNiN3aCn86aTapeBHNMAHNE:
B ueJx 3aunTbI OKpykaHouSei cpebl I yTuIN3aun MaTePnAIOB, y6eINTecb, UTO OHa yTuIN3nPOBaHa B OcNuaNBHO npEHa3NaueHHOM MeCTe, eCNI TAKOBbIe ecTb B BaWei CtpaHe.
[3apяДhoe yctpoIcTBO]
3apяdka
Obune Mepbippeoctopoxhoctn InTn-NOHOro/HKeIbKaMneBoro 6aTaapeHoro 6noka
ПРИМЕЧАНЕ
-Призарядкхолоногбатарйног 6лoka (c TemnepatypoH nIXe 0^ (32^) B TeTlOM MeCTe, OCTaBbTe 6atapeHbI 6LOK B 3tOM MeCTe nnoOxJnte 6OJIee OdHoro Yaca, noka 6atapeHarpeetcdo ypoBHa TEmnepatypbl OkpykaIOUeI cpeIb. B npotuBHom cnlyae, 6atapeHbI 6Lok MoKET He 3apAHTcN NOHOCtBu.
- Oxlaante 3apdHoe yctpoiCTBO npn nocpeobatebHO 3apdke 6oJee Yem DByx 6aTapeHbIX 6IOKOB.
He BCTaBnTe Baun nalbU b KOHTaKTHbIe OTBepCTn, KOrDa Bbl DePKeTe 3apAnHoe yCTpOInCTBO, a TaKKe B Dpynx Cnyaax.
BHIMAHNE
ДлпnpedotbpaueHnpycka noxapa nIIN NOBpeKdEHHa 3apAHHO yCTpoiCTBa.
He nCnoB3yIe B KaueCTBe NcToUHnKa PntAHn IeHepaTOp DBNrAteJIa.
He 6IOKpynte BeHTnlaCIOHHbIE OTBepCTnHa 3apAnHom yCTpOInCTBe n 6aTapeHOM 6Ioke.
- BbIKIIOUHTe 3apAHOe yCTPOIcTBO N3 WTeNCEJIbHOJ PO3ETK, ECNI OHO He IcNoJIb3yETc.
JIHTN-NOHHbI 6aTapeHbI 6JOK
ПРИМЕЧАНЕ:
Baw 6aTaapeHbI 6nok He yBnreTcnoJIHOCTbIO 3apJxKeHHbIM BO BpEmnOKynKHe 3abTe 3apAnTb erO nepeNcNoJIb3OBaHnEM.
3apnHoe yctpoicTbD(EY0L10)
- BknHouTe 3apAHHoe yCTpoiCTBO B WtencelbHyIO p03eTKy nepemEHHO TOka.
ПРИМЕЧАНЕ:
Pn NOdkIIOUeHm WTeNceJbHOB BUNK K NCTOUYHK NITAHN NepemEHORo TOKa MOryT NOABNTcR NCKpbl, HO 3TO He PpeCTaBJIeT npo6nemy C TOnkN 3peHn6e30NaChOcTN.
2.CdBnHbTe Ha3aJ KpbIuKU yrIy6JIeHnA JIA 6aTapeN, YTO6bI BCTaBNTb IINTINHOHHbI 6aTapeHbI 6JOK.
- Y6eIntecb, yTO KpbIuKa HaJeXHo 3aФИKcnpOBaHa Ha MeCTe.
3.ПиOTHO BCTaBbTe 6aTapeHbI 6JOKВ 3apAHDoe yCTPOINCTBO.
4.BoBpem3apRk6yTeT rpeTb lamnoKa 3apRkN. Pocne 3aBepseHn3apRkN aBTomatUeCKn cpa6oTaET BHyTpEHn 3JeKTPOHbI nepeKIOuAteJb, ppeOToBpauaqay Upe3MepHyTO 3apRkY.
3apKa Hnay 6batapeHbI 6IOK cNIuKOM ropuH (HaNPmep, HeNOCpeDCTBeHHo NocJe 6yHKUHOHPOBaHnra np 6OJIbwoi Harpy3Ke). OpaHxVeBaJ lamNoUcka peXIMa OxINDaHnA 6yDet MIRatb, noka 6batape He OCTbIHET. 3aTeM 3apJaKa NaHHeTcABTomATnueckn.
TpBaN BnN Bmy BucKOi IHTeHCNBHOCT MoKe Pn3BeCTn Do BtpaTcnyx.
2) Pam'raTae, 0o daHn iNCTpyMeHT 3aBXKn nepe6yBaEc y po6OyOMy cTaHi, ockiIbKn Ioro He Tpe6a BMkKatn B eJeKTPnHy po3eTKy.
3)П ри c Be рд Ли Н и OT 3aRbHnHyBaHHi wypyniB BCEpeDInHy CTIN, niДnor i T.i. IHCTpymeHT MoKe Д O T O p K H y T n Cя npOBODiB, kI nepe6yBaIOTB NiД Ha np y ro I . H E TO Pk lECT N I PAAH HOO IAT PO W B N D K O I R P N A TAKOX ByNb-IAKIX IHUHX INPEPDHH METAJEBNX DETAJEI IHCTPymeHTY! RaBnHpyTe wypyn a60 3a6nBaete noRO BCEpeDInHy npOBODY, lo 3hAxOdntbcra NiД HanpyroIO, 3 MeTOIO 3anobirHna YpaJxEHn eJIeKtpnHm CTPymOM TpImaIte IHCTpymeHT JnIe 3a IINaCTMaCOBy pyKoTky.
4) YKUO HacaKa 6yla 3aTnchYta, HeraHNO BmKHiTB rOIOBHN BmNKauch 3 MeTOO 3anO6irAHNpeHaBaHTaxKeHH, 0 MOKe NOsKOJNTu 6batapeHNI 6IOK a6o MOTOp. INa BnBiNbHeHH HaCAdOK, 0 3aknn Hnncra BnKOpNCToByTe peBepcNBn pyx.
5)ПдЧасЗарджehнЗapdHn npictpiMoKe 3JIeKa HarpiTncb. LcE HOpMaIbHnM.He 3aIIuwaTe 6atapey 3apdHomy npicTpoi 6Ibwe HIX Ha 24 roDHH nICJy 3aBepWeHHa3apdKn.
6) InΦopMaúiŋo TepMiHy cIyXbN (npndaTHOcTi)
BcTaHOBNeHn BnO6HnKOM TepMin cnJx6n (npdaTHocTi) cboRo BnO6y dopIBHoe 7 pOKam 3 daTN BnTOBHeHHa yMOBN, 0BnpiBnKOpNCToBYeTbC
y cybopi BiiNIOBIDHOCTI Do DiiCHOIHCTpykui 3 ekCnnyatau Ta TexHnXCTaHdapTIB, 0o 3actOCOByOTbcrdo zuoro Bnpo6y.
Tepmin cnyk6n 6aTapeHnx 6IokIB dopBHOe: 500 3apdKam (TiIbKn DnI HikeJb-KaMIEBOr 6aTapeHoro 6NOKy),1200 3apdKam (TiNbKn dIpy HikeJb-Metan-riDnHOr 6aTapeHoro 6NOKy) 3 daTN Bnpo6HnCTBa 3a THX CAMNX yMOB.
Maucycita EneKtpik BopKc, TtD. Ocaka, JnoHia
PykoTka MyΦTN (BcTaHOBJIeHHKpyTnIbHOro MOMeHTy MyΦTN)
BctaHOItb Heo6xIDHn IJRApo6OTN KpyTINbHn MOMeHT B OJHe 321 MoXnBnx 3HaueHb. Mix HmN icHyc iHTepBaI np6n3Ho y0,13 H·M (1,3Krc-cM).
YBAGA:
IpeBipTe yCTaHOBky IpeD cnpaBXHHboIO po60TOIO.
BctaHObitb wkaJy 6iJI piei mitkn.
Pekomehdaui IJnHaIaWtYBaHHKpyTINbHOro MOMeHTy
Bumkheha (3BnuaHa np60ta)
Mirae (3apJxehnHe Bi6yBaTbc) BbIMKHeHa 4yHKi3axncty 6aTaapei
HaMipHe (noBHe) po3pJxKeHn JtiHIOHHx 6bapei pi3KO cKOpOyEc CtpOK iXhBoI cLyK6n. DaHn dpInb ocHaueHn fYHKciEIO 3axNCTy 6bapei, kA np3NaUeHa dnn PonepeJxKeHHa HaMipHoro po3pJxKeHHa 6bataepHoro 6lOky.
-Функцязaxnctу6aTapeiakTNByeTbc8 6e3nocepeHb0 nep ed TUM,ЯK 6aTapeBTPaNTb cBm 3apd,io 3Mywye MURATI nonepdxkyBaNbHy lamnoky Hn3bKOro 3apny 6aTapei.
- RaKUO Bn NOMITUNI, IIO nonepaJyBaJIbHa JAMNOUka Hn3bKOro 3apAHy 6aTapei Mrae, HeraHNo 3apAДITb 6aTapeHn 6Jok.
BukopncTaHHcBiTIOIoHOro nIdcBiUyBaHHa
BukopncToByte cBITNoIOJHe NiDCbiyBaHHaIPO6OTNB TaKHX TEMHIXMICxIKTOPIA TmUcOBOOCBITJIeHHaHEBeNIKOi PO6Ooi 3OH.

YBAGA
CbitIOiOHe nIDCBiyBaHHn np3HaueHe dIy BkOpNCtAHHry y kocTiDOnomixHoro DxKepeNa CBiTna.HeBkOpNCTOByTe II B kocTi JixTapnka.Lc moKe np3BeCTn Do HeaacHOroBnnapky a60 TpaBMn.
He nBtbcnHa noCbitno i He Cbititb Hm npraMo B oci. TpBaHn BnNB CbitNa CbitNo iOda MoKe noKoDntn Bawi oci.
1.HaTnCKaIte KHONKy Dnay BBIMKHeHHaIBUMKHeHHi CBiTNOIOHOHorO niDCBiyBaHHa.
-Дя BnKOp nCTaHnЯ niDCbITkn 6e3nocepedHbO nicJnpiKlnoueHnR 6atapeHoro 6Ioky a6o nicJrToro, Rk DpInb He BnKOpNCTOByBaBCr npotraRom 5 XBnInH i DOBwe, BBIMKHITb dpInb Ha KOPOTKn Yac.
PiDCBiyBaHHaBTOMaTnHOBMNkaETbCra,AKUO DpNJIb He BnKOpNCTOByETbC npOTrAOM 5 XBNINH
PiDCBiuByBaHHn BnKOpNCTOBye DyKe Cna6Kn CTpym. BnKOpNCaHn H niCbiuyBaHH He 3aBdaE HeratNBHO BnNBy Ha npOdyKTNBHicTb dpnIa.
CbitnoioDHe NiDCBiyBaHnHa He MOKe OCBiTHT KHeu HacaKn, RaKIO dpNb BkOpNCTOByeTbcy nprami KOHphiIpyaui.
-ФункцяблokуbaHHаcadkn
3 B N M K H E H N M ⅡaФIKCOBAHO Ha Micu HacaKoHO-BNKpyTKOIO, DaHn IHCTpyMeHT MOKe BHKOPNCTOBYBaTnCRA B KOCti pyHoiB NKpyTKI Do 14,7 H·M (150 Krc-cM).B NaTPOHi 6yHe npCyTHi HeBeJIKNI JIOΦT, Ⅲo He E HecnpaBHicTIO.
JIiTi-IOHn6aTapeHn6IOK PPIMITKA:
BaW 6aTapeHn 6bok He c nobHicTIO 3apJxKeHmNPiD Yac npu6aHHa. He 3a6yDbTe 3apJntn Noro nepei BnKOpNCtAHHM.
3apdHn npnctpi (EY0L10)
- BbIMKHiTb 3apAHNn npncTpI B wTeNce- IbHy po3ETky 3MiHHoro cTpymy.
#
Pn niknueHHI wTeNcBHOI BNIKn Do XKepeNa KINBJeHHa 3MiHHM CTpyMOM MoKyTb 3'ABNTncra icKpn, aNe
Ye CTBOpyI npo6JIeMy 3 TOnKn 3OpY 6e3neKn.
- 3dBnHbTe Ha3aJ KpNkUy 3aRn6JeHHa JIg 6aTapei, Uo6 BCTaBHTu IITi-iOHn6aTapeHn 6Iok.
- IpekeohaTeCb, 0Kpnka HadiHNO 3aikcoBaHa Ha Micci.
- ⅢiNbHo BCTaBTe 6aTapeHn 6JOK B 3apAHN npncTpi.
Matsushita Electric Works, Ltd.
Osaka, Japan


- ADDITIONAL SAFETY RULES
- ASSEMBLY & OPERATION
- CAUTION:
- NOTE:
- - Battery Low Warning Lamp
- Using the LED Light
- CAUTION
- - Bit-locking Function
- - Main Switch (ON/OFF)
- - Speed Selector Switch
- - Main Switch Lock
- - Battery Pack (EY9L10)
- [Battery Pack]
- For Appropriate Use of Battery pack
- Li-ion Battery pack (EY9L10)
- Battery Pack Life
- Battery Recycling
- ATTENTION:
- [Battery Charger]
- Charging
- Common Cautions for the Li-ion/Ni-Cd Battery Pack
- Li-ion Battery Pack
- Ni-Cd Battery Pack
- LAMP INDICATIONS
- Information on Disposal for Users of Waste Electrical & Electronic Equipment (Private Households)
- For Business Users in the European Union
- Information on Disposal in Other Countries Outside the European Union
- MAINTENANCE
- ACCESSORIES
- SPECIFICATIONS
- BATTERY CHARGER
- ONLY FOR U.K.
- ELECTRICAL PLUG INFORMATION
- FOR YOUR SAFETY PLEASE READ THE FOLLOWING TEXT CAREFULLY
- IMPORTANT:
- Pacco battery Li-ion
- NOTA:
- - Interruptor principal (ON/OFF)
- - Anvendelse at LED-Iyset
- PykoTka MyΦTbI (YcTaHOBKa KpyTЯero MOMeHTa MyΦTbI)
- BHIMAHNE:
- ПОНМЕЧАНЕ:
- -ФункцяблOKировин hacadkn
- He TnaBbI nepeKIOuOaTeJIb (BKl./BblKJI.)
- - CeJIeKTopHbI nepeKJIouaTeIb CKOpOCTn
- YtNiN3aCn86aTapeBHNMAHNE:
- [3apяДhoe yctpoIcTBO]
- 3apяdka
- Obune Mepbippeoctopoxhoctn InTn-NOHOro/HKeIbKaMneBoro 6aTaapeHoro 6noka
- ПРИМЕЧАНЕ
- BHIMAHNE
- JIHTN-NOHHbI 6aTapeHbI 6JOK
- ПРИМЕЧАНЕ:
- 3apnHoe yctpoicTbD(EY0L10)
- PykoTka MyΦTN (BcTaHOBJIeHHKpyTnIbHOro MOMeHTy MyΦTN)
- YBAGA:
- BukopncTaHHcBiTIOIoHOro nIdcBiUyBaHHa
- YBAGA
- -ФункцяблokуbaHHаcadkn
- JIiTi-IOHn6aTapeHn6IOK PPIMITKA:
- 3apdHn npnctpi (EY0L10)
- #
Brand : PANASONIC
Model : EY7410
Category : Screwdriver