MC 4415 - Hi-fi system AEG - Free user manual and instructions
Find the device manual for free MC 4415 AEG in PDF.
| Product Type | Hi-Fi System |
| Brand | AEG |
| Model | MC 4415 |
| Power Supply | 230 V, 50 Hz |
| Output Power | 100 W PMPO |
| Net Weight | 2.8 kg |
| Protection Class | II |
| Radio Receiver | FM (87.8-108.7 MHz), AM (525-1638 kHz) |
| Disc Player | CD, CD-R, CD-RW, MP3 |
| Additional Media | USB port, SD/MMC card slot |
| Playback Functions | Play, pause, stop, search, repeat, random play, programming |
| Sound Adjustment | Volume, bass on/off (Bass ON/OFF) |
| Headphone Jack | Yes, 3.5 mm stereo jack |
| Remote Control | Yes, with CR2025 lithium battery |
| Laser Type | Class 1 |
| Warranty | 24 months |
| Maintenance and Cleaning | Disconnect before cleaning, wipe with a slightly damp cloth without additives |
| Safety | Do not expose to water, do not open the motor unit, use properly grounded outlets |
Frequently Asked Questions - MC 4415 AEG
User questions about MC 4415 AEG
0 question about this device. Answer the ones you know or ask your own.
Ask a new question about this device
Download the instructions for your Hi-fi system in PDF format for free! Find your manual MC 4415 - AEG and take your electronic device back in hand. On this page are published all the documents necessary for the use of your device. MC 4415 by AEG.
USER MANUAL MC 4415 AEG
Overview of the Components.. 3
Instruction Manual. 41
Technical Data.. 45
14 Guarantee Page 45
FRANÇAIS
JEZYK POLSKI
Sommaire
Listedesifferenténelémentedecommande.. Page 3
SR = Silberoxid-Batterie
CR = Lithium-Batterie
UKW (Stereo) = FM.ST, UKW = FM, Mittelwelle = AM (Mono)
D-47906 Kempen/Germany

16 Interruptor BASS OFF/ON
17 Tecla
MODE
(Repetir/Reproduccion casual)
18 Tecla PROGRAM (Memoria)
m = 311 ;

SKIPF 1SKIPF

para arente)

SKIP

para trás) I
(mostar o album derente paraTRS/
para
cima)
2 Teclas SKIP -/+
UKW (Stereo) = FM ST., UKW = FM, Onda Media = AM (Mono)
16 BASS OFF/ON bryter
(nedover/oppover album)
2SKIP-/+knapper
(soking tilbake/framover)
3
PROG
knapp
$$ B A S S O N = p \hat {a}, B A S S O F F = a v. $$
Slá av
General Safety Instructions
Read the operating instructions carefully before putting the appliance into operation and keep the instructions including the warranty, the receipt and, if possible, the box with the internal packing. If you give this device to other people, please also pass on the operating instructions.
- To avoid the risk of fire or an electric shock, you should not expose the device to rain or moisture. Consequently, do not use the device in the immediate vicinity of water - for example near a bath tub, a swimming pool or in a damp cellar.
- Use the device only for the intended purpose.
- Only connect the device at a properly installed plug socket. Pay attention that the specified voltage corresponds to the voltage of the plug socket.
- When using external mains supply, pay attention to the correct polarity and voltage. Always place the batteries in the correct direction.
- Assemble the device in such a way that the available ventilation openings are not covered.
- Never open the housing of the device. Incorrect repairs can constitute a considerable risk for the user. Should the device become damaged, in particular the mains supply cable, do not operate the device any longer, but rather have it repaired by an expert. Check the mains supply cable regularly for damage.
- For safety reasons a broken or damaged mains lead may only be replaced by an equivalent lead from the manufacturer, our customer service department or a similary qualified person.
- If the device is not used for a longer period, remove the plug connector from the plug socket or take out the batteries.
These symbols may be found on the machine and are intended to indicate the following:
The lightning symbol should advise the user of parts in the inside of the device which carry dangerously high voltage levels.
The symbol with an exclamation mark should advise the user of important operation or maintenance instructions in the accompanying documentation.
Devices bearing this symbol work with a, class 1 laser for tracing the CD. The built-in safety switches should prevent the user being exposed to dangerous laser light, which is invisible to the human eye, when the CD compartment is opened.
Under no circumstances should these safety switches be bypassed or manipulated, as this could result in a danger of exposure to the laser light.
Children and Frail Individuals
- In order to ensure your children's safety, please keep all packaging (plastic bags, boxes, polystyrene etc.) out of their reach.
Caution! Do not allow small children to play with the foil as there is a danger of suffocation!
- In order to protect children or frail individuals from the hazards of electrical equipment, please ensure that this device is only used under supervision. This device is not a toy. Do not allow small children to play with it.
Symbols in these Instructions for Use
Important information for your safety is specially marked. It is essential to comply with these instructions in order to avoid accidents and prevent damage to the machine:
WARNING:
This warns you of dangers to your health and indicates possible injury risks.
CAUTION:
This refers to possible hazards to the machine or other objects.
NOTE: This highlights tips and information.
Special safety information
This device works with
a class 1 laser.
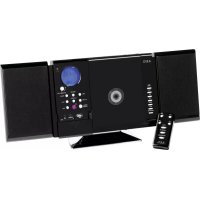
Overview of the Components
1
CD
compartment
2
LCD
play
3 DOOR OPEN CD compartment
4
TUNING
control
5 button Play/Pause
6 STOP button
7 CD/MP3/USB/SD Function selector button
8 SKIP button (forward search)
9 SKIP button (reverse search)
10 BAND Band selection switch
(AM / FM ST. / FM)
11 Card slot
12 USB connection
13 FUNCTION Function selector switch
(POWER OFF / CD/MP3/USB/SD / RADIO)
14 PHONES Headphones connection
15 VOLUME +/- (volume) buttons
16 BASS OFF/ON switch
17 MODE button (repeat/random)
18 PROGRAM button (memory)
19 IR Sensor for the remote control
20 POWER control lamp
Reverse Side (not shown)
21 SPEAKERS R/L Loudspeaker connections
22 AC Mains connection
23 FM ANT. throw-out aerial
1 FOLDER DOWN/UP buttons
Remote Control
(down/up
2SKIP-/+buttons (reverse search/forward search)
3
4
PROG
MODE
button
button
(repeat/random)
5 STOP button
6 PLAY/PAUSE button
(Play/Pause)
Start-up of the device/Introduction
- Read the operating instructions thoroughly before the start-up!
- Select an appropriate location for the device, e.g. a dry, fl at, non-slip surface on which the device can be easily operated.
- Make sure that the device is adequately ventilated!
- Connect the loudspeakers to the back of the music centre to the sockets market „Speaker R and L“ (21).
- Insert the plug into a properly installed 230V , 50Hz power socket. Please ensure that the mains voltage corresponds to the information on the type plate.
i NOTE:
The lithium cell in the battery compartment of the remote control has been secured for transport with a foil. This prolongs the lifetime of the battery. Before initial use please remove this foil so that the remote control is ready for operation.
Inserting the Batteries
The battery of the remote control is a long-life lithium cell. If the range of the remote control is reduced during use, please proceed as follows:
- Open the battery compartment on the back of the remote control.
- Replace the cell by a battery of the same type (CR 2025).
Ensure correct polarity. - Then close the battery lid.
If the remote control is not used for a prolonged period, remove the batteries in order to prevent battery acid leaking.

CAUTION:
Batteries are not to be disposed of together with domestic wastes. Dispose of the used batteries at the relevant collection bin or at your dealer's.

WARNING:
Do not expose the batteries to high temperatures or direct sunlight. Never throw batteries into the fire. There is a danger of explosion!
Notes on Handling Batteries
- Keep batteries away from children. They are not a toy!
- Never throw batteries into a fire or immerse in water.
- When inserting a battery, ensure the correct polarity.
-
Do not open the batteries by force.
-
Avoid contact with metallic objects. (Rings, nails, screws et cetera.) There is a danger of short-circuiting! As a result of a short-circuit batteries may heat up considerably or even catch fire. This may result in burns.
- For your own safety the battery poles should be covered with adhesive strips during transport.
If a battery leaks do not rub the liquid into your eyes or mucous membranes. If hands come into contact with the liquid they should be washed thoroughly and eyes rinsed out with clear water; if symptoms persist please consult a doctor.
Germany:
- As a consumer you are required by law to return used (rechargeable) batteries.
- You can return your old (rechargeable) batteries free of charge where they were bought, as well as at the local public collection points in your town.
These symbols are to be found on coin cells containing harmful substances:
PR = zinc-air battery
LR = alkaline battery
SR = silver oxide battery
CR = lithium battery
CD deck transport protection
- Please open the CD compartment (1) by pressing the DOOR OPEN (open) button (3).
- Remove the transport protection from the CD player if present before use.
Headphone Socket (14)
Please use headphones with a 3.5 mm stereo jack plug; these should be inserted into the PHONES socket. The loudspeakers are then switched off.
General Operation
i NOTE:
Some keys are to be found both on the device itself and on the remote control. Keys with the same designation have the same function.
Volume
You can set the desired volume using the VOLUME control (15).
BASS OFF/ON (16)
To increase or decrease the bass output.
$$ B A S S O N = o n, B A S S O F F = o f f. $$
Switch-off
The machine is switched off when the function selector switch (13) is turned to the POWER OFF position. Unplug the device.
USB Connexion (12)
This device has been developed in accordance with the latest technical developments in the USB field. Unfortunately the large number of different types of USB storage media on offer today makes it impossible to guarantee full compatibility with all USB storage media. For this reason there may be problems in rare cases with playing back from USB storage media. This is not a malCD/MP3/USB/SD of the device.
- Turn the function selector switch (13) to the CD/MP3/USB/SD position.
- Now press the CD/MP3/USB/SD button (7) to select the USB mode.
- Connect a USB storage medium. After a few seconds, USB appears in the display and the total number of tracks.
- Press II PLAY/PAUSE (5/6) to play back the music data.
For operating instructions please see the section "Playing CDs/MP3s".

CAUTION:
Before you remove the USB storage medium turn the function selector switch (13) to the RADIO position.
Card slot (11)
- If you would like to play back data on an SD/MMC card please insert it into the opening provided.
- Turn the function selector switch (13) to the CD/MP3/USB/ SD position.
- Now press the CD/MP3/USB/SD button (7) to select the SD mode. After a few seconds "SD" appears in the display and the total number of tracks.
- Press II PLAY/PAUSE (5/6) to play back the music data.
For operating instructions please see the section "Playing CDs/MP3s".
Listening to the Radio
- Turn the function selector switch (13) to the RADIO position.
- Use the band selector switch (10) to select the desired frequency band.
$$ \begin{array}{c} \text {V H F (S t r e s e o) = F M S T . , V H F = F M ,} \ \text {M e d i u m w a v e = A M (M o n o)} \end{array} $$
- Tune in the desired station with the station adjustment knob TUNING (4).
- The FM.ST control lamp ((ST))) (in the display) only lights up when you have selected FM stereo and the station is being received in stereo quality. If reception is too weak and there is noise on the station being received, this lamp will flicker.
- Try to improve reception by turning and bending or twisting and altering the length of the antenna (23). Where reception is bad we recommend switching to FM.
- An aerial is integrated into the device for the reception of AM stations. The machine can be aligned to the station by turning it. In this frequency band programs are transmitted in "mono" only.
Playing CDs/MP3
This is how you play a CD
- Turn the function selector switch (13) to the ,CD/MP3/USB/SD" position.
- In order to open the CD compartment (1), press the DOOR OPEN button (3).
- Insert an audio CD with the printed side facing upwards on to the central cone so that the CD clicks into place and then close the lid of the CD compartment.
- After a few seconds the total number of songs/tracks is shown in the display.
- Press the PLAY/PAUSE button (5/6) in order to play the CD. The CD will play from the first title. The track currently being played, DISC or MP3 are shown in the display.
- In order to remove a CD, please press the STOP button (6/5), open the CD compartment DOOR OPEN (3) and lift the CD out carefully.
Always keep the CD deck closed.
I NOTE:
- In the case of CDs in MP3 format the track being played and the folder are shown alternately in the display. When the device changes to a different folder, 001 appears for the first track of the new folder.
- If a disc is incorrectly inserted - or no disc has been inserted - the symbol ,-- " and the word ,no" appear in the display.
- Playback of CDs produced by the user cannot be guaranteed due to the large variety of software and CD media available.
Description of the CD buttons
II PLAY/PAUSE (5/6)
You can briefly interrupt and resume playback using this button. The symbol fl ashes in the display. Pressing again continues playback.
SKIP /SKIPI (SKIP ^+ /SKIP-)(8/9/2)
With an audio CD or a CD in MP3 format playing:
With SKIP▶I / SKIP + you can jump to the next or previous track etc.
- If the button is kept pressed down, the machine starts to search through the tracks.
- If the button is kept pressed down in stop mode the machine quickly plays through the songs until the desired track is reached. When the play/PAUSE (5/6) button is pressed the track begins to play back.
The SKIP 1 /SKIP - button can be used as follows:
Press once = This starts the current track again from the beginning.
Press twice = This jumps back to the previous track.
Press three times = This plays the song before etc. If the button is kept pressed down, the machine starts to search through the tracks. If the button is kept pressed down in stop mode the machine quickly plays through the songs until the desired track is reached. When the II PLAY/PAUSE (5/6) button is pressed the track begins to play back.

In the case of CDs in MP3 format that contain folders, when the device changes to a different folder 001 appears for the first track of the new folder.
STOP (6/5)
The CD stops.
MODE (17/4)
Press once = (the REP. emits a fixed light) the current track is repeated continuously.
Press twice = (the REP. ALL emits a fire light) the whole CD is played continuously.
Press three times = the display contains the word RANDOM and the track number that is to be played first. All tracks are played back in random order.
Press four times = all functions are cancelled. The normal play mode is resumed.
Only for CDs in MP3 format
Press once = the current track is repeated continuously (REP. appears in the display).
Press twice = the selected folder of the MP3 CD is repeated continuously (REPEAT ALBUM appears in the display). Use the FOLDER button (10) to select individual folders.
Press three times = the whole CD is played continuously (REP. ALL appears in the display).
Press four times = the display contains the word RANDOM, MP3 and the track number that is to be played first. All tracks are played back in random order.
Press five times = the function is deactivated and the CD is played in the normal mode.
CD/MP3/USB/SD (7)
Press the button repeatedly to switch between DISC/MP3, SD and USB mode.
FOLDER UP/DOWN (1 on the remote control)
Press these buttons during playback to move up or down one folder. The display, e.g. ALBUM 001, fl ashes briefy. Then the CD begins to play back automatically. If the button is pressed in stop mode the display also fl ashes. Then start playback with the PLAY/PAUSE button (5/6).
Programmed Play
This can be used to program any desired sequence of tracks.
- Press th STOP key (6/5).
- Press the PROG(RAM) key (18/3). The number "P01" (storage location) and the symbol PROGRAM fl ash in the display. Use the SKIP▶I / SKIP I▶ (SKIP+/SKIP-) buttons (8/9/2) to select the desired track and then press the PROG(RAM) button (18/3) again. The display changes to memory slot P02.
i NOTE:
In the case of CDs in MP3 format that contain folders, when the device changes to a different folder 001 appears for the first track of the new folder.
- Select the next track with the SKIP / SKIP (SKIP+/SKIP-) key and press the PROG(RAM) key again. Repeat the procedure until all the desired tracks are selected.
I NOTE:
Once the storage capacity of the tracks to be programmed has been reached, -- - - fl ashes in the display.
- Press the II PLAY/PAUSE key (5/6). The playback starts. The selected track numbers are shown in the display in the correct order and the symbol DISC or MP3 and PROGRAM light up. Press this button to pause briefly the playback.
- Press once the STOP key (6/5) to stop the playback while retaining the program.
- To resume the playback of the program press first the PROG(RAM) key (18/3) once and then the PLAY/PAUSE key (5/6).
- To delete the program, press the STOP key (6/5) twice. The PROGRAM control lamp goes out.
The device stops automatically once the entire sequence of programmed tracks is completed. The programmed order of tracks remains in the memory until you change to a different mode, remove the CD from the CD compartment or switch off the device.
It is also possible to combine the programmed tracks with the REPEAT function. After you have programmed and started the device, please press the MODE button (17/4) up to three times and then you can use the functions as described under "MODE".
Playing back Music in MP3 Format
With this device it is possible to play back pieces of music in MP3 format. The device also supports all standard CD types: CD, CD-RW, CD-R.
This machine of is able to play MP3 CDs. Up to 200 tracks can be compressed and stored on these CDs. Your machine detects an MP3 CD automatically (the total number of tracks and MP3s appears in the display). If you would like to play one of these CDs, proceed as described under „Playing CDs/MP3". Tracks can be programmed as described under „Playing Back Programmed Tracks".
Please note:
There are a number of different recording and compression methods, as well as quality differences between CDs and self-recorded CDs.
Furthermore, the music industry does not adhere to fixed standards (copy protection).
For these reasons it is possible that in rare cases there are problems with the playback of CDs and MP3 CDs. This is not a malfunction of the device.
Cleaning and Maintenance
Always remove the mains plug before cleaning the machine.
- Any marks on the surface can be wiped off with a slightly damp cloth without any additives.
Troubleshooting
| Symptoms Course | Solution | |
| CD can not be played back. | CD is not inserted or inserted incorrectly. | Ensure that the disc is inserted with the label facing upwards. |
| CD jumps during playback. | Check the disc for fingerprints, dirt or scratches. | Check the disc for fingerprints, dirt or scratches. |
Technical Data
Model: MC 4415 CD/MP3
Power supply: 230 V, 50 Hz
Output rating: 100 W PMPO
Protection class: II
Net weight: 2,8 kg
Radio section:
Frequency ranges: UKW / FM 87,8 ~ 108,7 MHz
...MW/AM525\~1638kHz
This device has been tested according to all relevant current CE guidelines, such as electromagnetic compatibility and low voltage directives, and has been constructed in accordance with the latest safety regulations.
Subject to technical changes without prior notice!
Guarantee
The device supplied by our Company is covered by a 24 month guarantee starting on the date of purchase (receipt).
During the life of the guarantee any fault of the device or its accessories ascribable to material or manufacturing defects will be eliminated free of charge by repairing or, at our discretion, by replacing it. The guarantee services do not entail an extension of the life of the guarantee nor do they give rise to any right to a new guarantee!
Proof of the guarantee is provided by the proof of purchase. Without proof of purchase no free replacement or repair will be carried out.
If you wish to make a claim under the guarantee please return the entire machine in the original packaging to your dealer together with the receipt.
Defects to consumables or parts subject to wearing as well as cleaning, maintenance or the replacement of said parts are not covered by the guarantee and hence are to be paid!
The guarantee lapses in case of unauthorized tampering.
After the expiry of the guarantee
After the expiry of the guarantee repairs can be carried by the competent dealer or repair service against the payment of the ensuing costs.
Meaning of the "Dustbin" Symbol
Protect our environment: do not dispose of electrical equipment in the domestic waste.
Please return any electrical equipment that you will no longer use to the collection points provided for their disposal.
This helps avoid the potential effects of incorrect disposal on the environment and human health.
This will contribute to the recycling and other forms of reutilisation of electrical and electronic equipment.
Information concerning where the equipment can be disposed of can be obtained from your local authority.
CLASS 1 LASER PRODUCT TO IEC 60825 LASER KLASSE 1 NACH IEC 60825
UKF (Stereo) = FM ST., UKF = FM,
Fale srednie = AM (Mono)
URH (sztereo) = FM ST., URH = FM,
kozephullam = AM (mono)
TeHn Hnua HykdaounceB npncmOTpe
- Ⅲ coo6paKeHn 6e0nacHOCTn DnIeTe HcOCTaBnIe neKaTb yNAKOBky (PiactNKOBbie MeuKN, KapTOH, NeHONlACTN T.D.) 6e3 npncmOTpa.
BHHMaHHe! He no3BoJrTe DeTAM HrpaTb C nOIN3TNHeHOBOnnEHKo. Onachocb ydyub!
- 3aunntb dTei Hpynx nHykaOuxcx B yxoJe npcMOTpe, ot npaKeHH aNekTPOTOKOM, CLENTe 3a TeM, YTO6bI np6Op He BKNIOUACJc 6e3 npcMOTpa. 3ToT np6Op - He Irpuoka. He donyckaTe K Hemy Deten.
CMMBOJI npHMeHReMbIe B daHHOM pyKOBoDCTBe NOJb3OBaTeN
BaKhIbe peKOMeHdaaunn IJn oBeceueHnBaWei 6e3oNaCHocTH Oo3HaueHbI NO OcOeHNOMy. O6raTeJIbHO cJeNyIte 3TNm peKOMeHdaaunm, YTObI ppeOTbpaNTb HeCuaCTHbI cnUaynnnnoNOMky n3dEJIINr:
IPEyNPEKHEHNE:
IpeDynpexKaTeO onaCHOCTn IIN 3dOpOBbN BO3MOXHOM pncke nolyeHn TpaBMbl.
BHIMAHHE:
Yka3bIbaeHa BO3MOxHcyIO NaCHOCtB DnI N3dEINN INpynx OKpyKaOUINX ppeDMeTOB.
I IPNMEUAHNE:JaetcoBETNHHΦOpMaHIO.
CneunbHbe yka3aHHn 6e3onacHOCTN
CLASS 1 LASER
PRODUCT TO IEC 60825
LASER KLASSE 1
NACH IEC 60825
IaHHOe H3dEHNHe OCHaUeHo Ia3epHbIM MOyEm KnaCca 1.
O63op Detanei np6opa
1 OTceK CD
2 DicnneHa KndKx KpctTa
3OTcEK CD DOOR OPEN
4 Peryntop TUNING 5 II (BoKHHOOHcEbeHee/Thay3a) 6 STOKHOHa Ka
7Функюнаньнан конka CD/MP3/USB/SD
8 1 SKHrTO(Kmck Bnepe)9 4 SKHrTO(Kmck Ha3a)
10Функюньнлпpeкючateь BAND (AM / FM ST. / FM)
11 P3 nKapTockn
12 THe3do USB 13 FUNCTION ΦyHKuHOHaJIbHbI (POWER OFF / CD/MP3/USB/SD / RADIO)
14 PHONES THe3do NoKIOUOCHENH
15 KhoNkVOLUME + / - (rpoMkoctb)
16 BASS OFF/ON bblkliouateIb
17
MODE
(NOBTOP/BOCnpon3BeDeHne CnyaHOM
18 Khonka PROGRAM (namr)
19
IR DaTnK DnIyNbTa DnCTaHnU npAbeHH
20 KOHTpOBbHaJ lamnoUka POWER
06paTHa
21 He3da noKIOUOHeHn KOnHOK
SPEAKERS
22 THe3do nOdkNIOUChENHcETn AC
23Поволочая AnteHTHa FM ANT.
OTKpoTe OTceK dIaTapeiKn Ha HnKHei CTOpOHe nyIbTa.
3aMeHnTe 6bTapeKy Ha paBHo3NaHyU, ToJ Ke KOHcTpkyu (CR 2025). CLeJeTe 3a npaBnIbHOI NOJIpHOCBIO BO BpEMr NOkJIQUeHn.
PepraepoTeOTcK.
EcnI Ndy DOnrOe Bpem He nCnONb3yETcB, BbHbTe 6aTapeKn HHOIO N3 OTEKa, YTO6bI PpeD0TbPaTITb "BbITEKaHne" UeNou N3 HNX.
BHIMAHHE:
CTOpHaOpacBbAte BataPcKpCmHMycop.
TkoJyntca cdaIte OtpabotahHbIe 6aTaapeKnHa
RNeuaJIbHbI NyHK TpHema IIN B ToproBIO TOky.
PNEyIPEHJEHHE:
He noDBepraTe 6atapeKn CInbHOMy HArpeBy nnn paBCTBIO pRMBIX COINHEHyBIX LyueH. HNKoTda He 6pocaiTe 6atapeKN B OOrHb. CyIecTByET ONaCHOCTb aBa!
1 KhoNkFOLDERDOWN/UP
(BHn3/BBepx
2 KhoKs SKIP-/+
3
NONCK
Khonka
Ha3aI
PROG
4 KhoNka MODE (noBtop/
Bocnpoun3BeDene B CnyaHOM nopAnek)
5
STOKhonka
6
II PLAYBOLDUSE
(Bocnpom3BedeHne/Na3a)
PoirotOBka K BKNIOeHNO/BVeJeHne
- Ppei BkJIIOUeHHeM TIIaTeIbHO IpoUHTaIte pyKOBOIDCTBO nOJIb3OBaTeIa!
Ioi6epnte noxoadyuee mecTo dny yctahOBKn ceHTpa n KOHOK. IooXoJnIM RbIaTeCra cyxo, poBHOe HecKoJIb3Koe MeCTO,Ha KOTOPOM 6yDet yIO6HO IOlb30BaTbCS CEHTPOM. - PpocneIte 3a TeM, YTo6bI ueHtp XopoIo O6dyBaIcR BO3dyXOM!
ПОДКИОЧITE KОLOHКI K rHeZdAM "Speaker R" n "Speaker L" (21), ha 3aДнeI CTOpOHe ueHTpa.
BCTaBbTe CeTeByIO BnIKy B po3eTKy C HanpRAKeHHeM cETn 230 B,50 Tc, yCTaHOBNeHHyIO B COOTBeCTBmC npeIINcaHnHM. Y6eINTecbBTOM, yTO HApRAKeHHe 3JIeKTPocEtN CoBnAaet C HanpRAKeHHeM IITAHN UeHTpa, yKa3aHHoe Ha TINOBOM Rplbike.
I I P N M E U A H N E:
JIITHeBaH 6aTapeKHa, HaxOJaAaCBA BOTCEKe, 3aUuSeHa Ha BpEm TpaHCnOpTnPOBKn 3aUHTHOI FOJIbFOr. 3TO yDInHReT CpOK CnyKb6aTapeKN. Ipeep nepBbIM BKNIOUeHNEM ydAnITE 3Ty FOJbry, YTObI npNBecTI NylbT B paOoee COCTORHHe.
BcTabneHHe 6aTapeKn
IyblnDnCTaHcHNOHoro ynpabHeHn OCHaUeHN LHTHeBOn 6batapeKoC 60nbuM CpOKom Cnyk6bl. Ecn n TceHneM BpemH DaNbHOCTb DnyiCTBn IyIbTa nCTaHcHNOHOrO ynpabHeHn YMeHbWNTcR,TO NoCTynAte CNeDuOuM o6pa3OM:
XpaHnTe 6aTapeKn nOdaIbwe OTeT.3To He HrpyuKn!
- Hn B koem cnyae He 6pocai Te 6atapeKn B oroHb nIIN BOy.
Bctabnna 6atapeyn, cneinte 3a npabnboHNOIpaHocbIO.
He BcKpbBaIte 6aTapeKn.
He donyckaHTe KOHTa KaTa 6batapeek C MeTaNJIueeCKIMn npedMeTAMN. (KoJIbca, rBO3dN, WypynI r.n.) OnaCHOCTb KOpOTKOrO 3AmbKaHnI
KopoTKe 3aMbKaHHe MoKeT npNBecTn K CnIbHOMy HarpBaHnIO 6aTapeKnN daKe K ee BocPnaMeHeHHo. B pe3yIbTaTe MOxHO nOlyuHTb OkOrn.
B ueJx 6e3oNaChocTH peKOMHeHyETc3aKnBaTb noIIOca 6atapeek IInKoJIeHTO Ha BpEm XpaHEnn IIn nepeBO3KN.
Ecnb6aTapeKbBITEkna, HN B KOEMcnyae He donyckaTe nonadHn JNDKOCTN B rla3a NnHa dpytnecn3ncTbe 0bOOnuKn. B cnyae KOHTAKTa Nmbltpykn, nponolocKaTb rla3a YIcTOB BOIO, ECNI CNMITOMbl He nCue3HyT -obpaNTbca K BrpaY.
TePmaHn:
Bcem nontpe6nteJAM 3aKOH npEanncbIaET cdaBaTb 0paTHO oTpa6oTaHnble 6aTapeKn/aKKMyIaTOpbl.
Ctapbie 6atapeynAkkymyIaTOpby MoKHO 6ecnIaTHo CdaTb TaM, Tge OHN 6blN KyIeHbI, a TaKKe B 06ueCTBeHHbIX nyHKnx npHeMa No MeCTy KHTeBcTaBa.
Takne Hauinnc Bby HaiaTe Ha codepkaux BpeHbIe BeueCTBa 3nEMeHTax NITAHN Kpyrno CNIIOCHyTOF OOpMbI:
PR=BO3DyUHNo-UHHKOBaBbTaapeiKa
LR= 甲eNoHn6aTapeKa
SR=6aTaapeKa cOKcnDcpe6pa
CR=Литпеваябатуейка
TpaHcnpTHa ynakOBka CD nIeepa
- OTKpoIte oTceK CD (1), HAnKaB KHOnKy DOOR OPEN (OTKpbITb) (3).
- PpeI nepBbIM BkJIoueHHeM HeoXOIMO ydaNtB n3 OTeKa CD TpaHCnOpTHyU ynaKOBky, ecIn TaKOBaI NMeETcR.
The3do nooknHHeHnHayuHKnOB (14)
Длпnpocnyшванн 3Byko3anHcN nOlb3yTecb CTpeoHayuHnKamCo Ctepeo-BInOuKo3,5 MM, KOTopar BCTabJIeTcB BrHe3do PHONES.ДиHaMnKn pRn 3tOM OKIIOUaIOTcR.
06uhe npabHla noJIb3OBaHHa
I PnIMeUAHNE:
HeKOTOpBle KHNKn HMeHOTc KaH Na Npeep, TaK Ha Pny. OINHaKObBie KHNKn HMeHOT OINHaKObBie FyHKuH.
PerynipOBKa rpoMkoCTn
「pomkoctb 3Byka peylnpyetc npn nmooun KhoNk "VOLUME" (15).
BASS OFF/ON (16)
CnykntIyucneneHnnocna6neHn8baccob.
$$ B A S S O N = B K J I Q U E H O, B A S S O F F = B b i k J I Q U E H O. $$
BbIKJIOUeHHe
UTo6bI BbIKIOHHTb 3JIeKtponpnbOp nepeaBnHbTe
fYHKcIOHaJIbHbI nepeKIOuATEIb (13) B noIOJKeHne POWER
OFF.B 3aKIOUHeHH BbIHbTe wTencelb n3 po3eKn.
Pazbem USB (12)
JaHHOe H3dJIHe CCKHCTpyPBOaHO C yUcTOM NocNeDHIX TexHHueckHX DOCTNKeHIN B O6nactn nepeDaHn DaHHbIX uepe3 USB nopt. OJHaKo 60blOe KOJIuYeCTBO BHeuHNX 3AnOMHaUoox yCTpoiCTB USB pa3nHou KOHCTpyKuIN, KOTOpoe cerOdnr npedlaeraTcRTOPROBLe, He rapaHTnpyOT, K CoKaJIeHNO, IN NOHOr COBMecTHMOCTn Dpyr C DpyROM. ITo 3ToI npHInHe, B peKHX cnyaRx, MOrYT NOBITcN pO6BeMbl C BOCpON3BedeHMeC M MyIbTMmeDnaNbHOH NaMRTN, IMeHOSe pa3bem USB. 3To npOnCxOJNT He no npUnHe HeNCnPabHOCTbIO DAHHORO H3dJIIN.
- PpeBnHbTe fynKUHOHaNbHbI nepeKIOuHaTeIb (13) B noJooKeHne CD/MP3/USB/SD.
2.Пи помоци Кногк CD/MP3/USB/SD (7) Вьберпет peжим USB.
3.BCTaBtBe B rHe3do USB BHeUHHee 3aONMnHaOuIeue yctpoiCTBO.Ypees HeCKoJIbKO CeKyHd Ha DnCIIeep NOBNTcN POKa3aHne,USB" n O6Uee KOJInueCTBO Ha3BaHn My3bKaJIbHbIX pOn3BeDeHn. - Haxmte KhoNkII PLAY/PAUSE (5/6), YTObI BKNIOHtB UTeHHe My3bKaJIbHbIX DaHHbIX. KaYnpaBnTb N3dEINEM ONCaHO B rnaBe, BocpOn3BeDeHne DnCKOB CD/MP3".
Kak ynpabnIb n3dneHem onncAo B rnaBe ,BocnpOn3BeDeHne DnCKOB CD/MP3".
BHIMAHHE:
IpeepTeKakBbHytN3rHe3aUSB MylbTmMeHaNbHyu NaMrtb,nepeKIOUHTe FyHKUHOHaBbMypeKIOUATeB(13) B NOJOKeHHe RADI.
Paa dnn KaptoHn (11)
- TroBb Bocpon3BecTn 3aHc b KapTb SD/MMC-Card, BCTaBtte ee B npEynCMOTpeHHoe IJI Hee OTBepCTne.
- PpeBnHbTe FyHKnHOHaBbI nepeKIOuAteIb (13) B nOIOKeHne CD/MP3/USB/SD.
- Пп римоши Кногн CD/MP3/USB/SD (7) Вьберпецхим SD. Урета Heckолько секунд На ДисплеспогВИТСЯ NOKAЗHANE „SD" и OБ楚е кOLИЧECTBO Ha3BaHIM My3bIKAJIbHbIX pON3BVEdHIN.
- HaxMMTe KONKII PLAY/PAUSE (5/6), YTObbl BKNIOHHTb YTeHHe My3bIKaJIbHbIX daHHbIX. KaYnpaBnIb N3dEINEM ONCaHO B rnaBe, BocnpoN3BeDeHne DnCKOB CD/MP3".
Kak ynpabnIb n3dJIeHem onHcHo B rnaBe ,BocpOn3BeHeHne DnCKOB CD/MP3".
PpocnyuBaanHe paHonepea
- PpeBnHbTe fynKIOHaIbHbI nepeKnOaTeIb (13) B noLoXeHne RADIo.
- BbIepeTe npn nmoOni nepeKIOuATEaIg dHaIa3oHOB padno (10) HkyhHyO cactOt y dHaIa3oHa.
$$ \begin{array}{l} \text {Y K B (c t e p e o)} = F M S T., \text {Y K B} = F M, \ \text {c p e d h i n e B O L H b i} = A M (M O H O) \end{array} $$
- HactpoTeCb Ha hyKHyIO paAnocTaHcIIO npn IOMOJI peYJrTopa "TUNING" (4).
- KOnthpOJIbHaJnAmNoUka"FM.ST"((ST))(HaDncPlee) CBETITcTOIbKO B TOM Clyuae,ecnBbl6paH DnIaNa3OH YKB CTpeo n pInHMaemaJpaNocTaunr TpaHcImpyet B peXmme"CTepeO".Ecnn npHem IIOxOJ n c nomexamn, NaMPOka 6yDet Mrratb.
- NonpoByte ynyuHntb npHem, BpaAa, cKpyuHba HnI papKpyuHba aHTeHHy (23).B cnlyae nIOxOro npHema peKOMeHdyETcpeKJIouHtbcHa peXHM FM.
6.Длприма padионердв вдиалэоhe CB (AM)Вцentр ВстpoehaANTeHn.ВрашанИнИЗмehЯ ee NOLOKeHne HactpoITecbHa padinocTahuH.В stOMДиалэоhe padионердч trpHcHnpyOTCHToIbkoBpeKmE"MOHO".
KOMnakT-DmCK OCTaHOBNTCA.
MODE (17/4)
1x pa3 haxaTb = (REP. cBeNTcH HenpepbIbHO) BOCnpon3BOIDMaH Ha DaHHbIMOMeHT neChra Byet HEnpepbIBHO NOBTOpTaBCr.
2x pa3a haxaTb = (REP. ALL cBeTnTcH enpepbIBHO) BeCb KOMnAKT-dnck 6yJeT HnpepbIBHO NOBTOpATbCra.
3x pa3a haKaTb = Ha INcPJIe NOBHTCg COO6UeHHe RANDOMI HOMep 3aIncn, KOTOPa8 6yDet BOCPOn3BODITbCn PEPBOI. Bce 3aIncn 6yDyT BOCPOn3BODITbCn ODAHa 3a IpyrOuB CnyuHOM nOpRdKe.
4x pa3a HaKaTb = BCE cyHKun BbKlnOuaOTcBocpnou3BeDeHne npoJOnKHTcbA HOpMaJIbHOM peKIme.
Tolbko dIa CD dNcKOB c 3aNNCbIO B φopMaTe MP3
1x pa3 haKaTb = TeKyuzaI DOpOka 6yDet NOCToHNOBTOpTaCB (Ha IINcPiEe NOBHTCR REP.).
2x pa3a haKaTb = Bb6paHHa nnka CD dNcKa c 3aHcBHO BΦopMaTe MP3 6yDet nocToHHO BOCpON3BOHtBcA (Ha dNcPJIe e NORBHTCRePEAT ALBUM). Pn NiMoUe KNOHFKFOLDER (10) DeIaeTcB b6Op NaK.
3x pa3a haKaTb = BeCb CD-ДИСК 6уДТ NOCTOHRHNOBTOРЯТьСА (Ha DInCnIe NOrBHTCR REP. ALL).
4x pa3a haKaTb = Ha dncnnee noBnTc COo6eHne RANDOM, MP3 n Hmep 3aHcN, KOtopa 6ydet BocPOn3BOOHTbcn nepBoi. Bce 3aHcN 6ydyT BOCPOn3BOOHTbcn OHa 3a DpyroB B clyaHOM npRdKe.
5x pa3a haxatb = DeakTNBnpyETCN BOCpOn3BeDeHne CDNCKa nepeiTet B HopMaJIbHbI peKIM.
CD/MP3/USB/SD (7)
TOBTOPHIM HaKaTHEM KONKIN Bbl MoKHe nepKIOaTb peKIMbI OT DISC/MP3, SD do USB.
FOLDER UP/DOWN (KhoNka 1 Ha N,
HaKIMaIte Ha 3TN KONKn BO BpEmr BocpnOn3BeHeHn, YTObI NOMeHb FauH Ha npdeBdyuN mN INoCneDyOuN. Coo6ueHne, K pImepy ALBUM 001, Mraet HeKOToOpoe Bpemr. Pocne 3TOro ABTomatueckn CTapTyETcR BOCpOn3BeDeHne CD-DnCKA. Ecn n depKaTb 3Tu KONkny HAnatoB peKmE Stopp, To Ha dnCnPee TaKe 6yDet MraTb COo6ueHne. Pocne 3TOro CTapTyTe BocpnOn3BeHne npn NOMOuN KONKn II PLAY/PAUSE (5/6).
PporpamnoBaHne npraBka BocnpOn3BeDeHHA
DonyckaetraIIO6oBnnpaOKBOcnpOn3BeDeHn necen.
- HaKMMTe KHOHKnSTOP(6/5).
- HAnMnTe KHOHky PROG(RAM) (18/3).HaIcnPnee HaHcET MmTaPb P01 (HOMep rYeKei nnamrtn) nHaIncb PROGRAM. PnPi NMOoun KHOHOK SKIP I / SKIP I (SKIP+/SKIP-) (8/9/2) BbIbePnte HxKHyIO neCHIO n HAnKMnTe NoBtOHO KHOHky PROG(RAM) (18/3).Ioka3aHHn DnCpnernepeydt Ha CNeDyUOuOy RoeyKny NaMrtn P02.

ПИМЕЧАНО:
Ppi noJIb3OBAHm CD BΦopMaTe MP3 c pa3JIuHbIMn
paIaMn, pni CmeHe OJHO r oAHa Na Ha npyroi
noBnEeTcH 001, yTO O3Naayet nepByIO neCHIO HOBOrO
paIa.
- Пп пошни КногOK SKIP /SKIPI (SKIP+/ SKIP-) bblбрпгс сдуюн ecchno n haKMnTe noBtopHO KhoNky PROG(RAM).Пobtorpaite 3ty npoceyp do tex nop,poKa He bblбрпгс BCE neChn.

ПИМЕЧАНО:
Ecnn DoCTnHyT npeden EMKoCTn 3aONMaHOUero yctpoCTBa nporpamnpyemoro Ha3BaHn,TO Ha DnCnIe Mrraet NOKa3aTeNb
- Haxmte KhoNky II PLAY/PAUSE (5/6).Haunhaetc Bocnpo3BedeHne. Ha dncnlee 6ydt noaBraTbCn Homepa Bb6paHHbIX DOpoxek B nopAKe Bocnpo3BedeHn n CBeTtbcra CoO6eHne DISC, MP3 uIN PRO-GRAM.Haxab 3Ty KhoNky MoKHO npepBaT bporpyMMy Bocnpo3BedeHn Ha KOPOTkoE Bpemr.
- OndHokpaTHoe HaKaTne KhoNKn STOP (6/5) OCTaHaBnBaet Bocnpoun3BeDeHne, nporpaMma JKe COxpaHReTcR.
- Дян HOвОго CTарТа поррамьla HaЖмITE Chчала OДИн pa3 Ha KНОнky PROG(RAM) (18/3), a 3aTeM KНОнky ▲I PLAY/PAUSE (5/6).
- Trobl noTyuMbI nporpaMMy haKmnte 2 pasa KhoNky STOP (6/5). KoHtpoBHaJ lamNoUka PROGRAM noTyxHer.
Iocne BOCPON3BedeHn BCex Necen nporpAMMa ABTomaTneckn OCTaHOBNTC. 3anporpAMMPOBaHHbI NOPdoK BOCPON3BedeHn XpaHITcB nAmrN n CTnpaETCToIbKO B TOM Cnyae, cInMy3bKaJIbHbI ueHT bdyTe nepeKIOUeH B dpyroJ peXHM, KOMNaKT-DnCK bdyET BbHyT n3 OTceKa HIN CEHT pOcTO BbIKIOUeH.
IMeetc BO3MOXHOCTb KOM6HnHPOBaTb 3anporpammmpoBaHHbI neCHN C yHKUnei REPEAT. Nocne nporpammmpoBaHHu n CTapTa nporpammbl HaKMNTe KHONKY MODE (17/4),do 3 pa3, H BCE cyHUN MOHIO pIMHeHTb Ha nporpammy, KaK 3TO ONICAHO B pa3dene "MODE".
Bocnpon3BeDeHne My3bInn B φopMaTe MP3
HMeetc BO3MOKHOCTb BOCpon3BOOHTb 3BYKO3aHNC, CdaaHHbe B fOpMaTe MP3.Kpome 3tOro nneep uHTaET noTHBce paonocpaHeHHbe BNdbI dNCKOB:CD, CD-RW, CD-R.
YcTpaHHeH HeHcnpaBHOcTe
BbIXoHnA MoUHocTb: 100BaTT PMPO
Klacc 3auntbI:
Bec HETTO: 2,8 K
PdAnOpnpeMnHK:
Диана30ньчаст:..UKW/FM87,8\~108,7MHz...MW/AM525\~1638kHz
3To H3deneHne npoIIO BCE Heo6xOaIMbIe n AkTyaIbHbIe npOBepKn, npEaNcAHbIe DnpeKTHBOI CE, K npiM. Ha 3JIeKTPOMaHTHyIO COBMeCTHMOCb I COOTBeTCTBNE Tpe6oBaHmK Hn3KOBoIbTHOH TexHKe, OHO 6blIO TaKKe CCKOHCTpyHPOBaHO NocTpOeHO C yYeTom NocJeDHNX Tpe6oBaHmNo TexHKe 63OnaCHOCTN.
Mbl octabJHem 3a coboi npaBO Ha TEXHnueckne n3MeHeHnI
TapaHTnHoe 6o3aTeJIbCTBO
TapaHTnHbIcPOKHaTePPHTOpH NocCnCKoΦeepaunnyCTaHaBnBaETCNtHOMOChbIMN ppeCTaBnteJIaMn.
Kaccobbuekabnretc rapaHTnHbIM TaIOHOM. Be3 Hero HeBO3MOKeH 6ecnPaTHb peMOHT nIN 3aMeHa H3dEInr.
B clyae BO3HKnKOBHHn npTeH3n no rapaHTn, npeIbHBNTe 13dene B NOHOBKOMNJIeKTaun, C opHnHaJIbHOy naKOBKO n KACCobIM YekOM TpROBn TOUKe, PpOdaBWe 3TO H3dJIne.
DeΦeKbI N3HaUBaEmBx PnHnAJIeXHOCTe Hn TpyuNXcR DeTanei, a TaKKe YNCTKa, TexOBCnyKuBAHne Hn 3aMeHa TpyuNXcR DeTanei He nonaJATO npraHTIO, n no3tOMy npoBOaTcR 3a OTdEhHyOnlAty!
TapaHTN TepaETcA npB BCKpbITnH3dEINH NOCTOPOHHMNIuamn.
Pocne rapaHTn
Iocne okOHcaHHcpoKa rapaHTn,peMOHTn3dennipon3BOoHTc3a OnilaTy,COOTBETCTBYIOUIMM MaCTepCKHMnIyNHKTAMN cepBNCHO6CnyKbAHnA.
GARANTIE-KARTE
Garantiebewijs · Carte de garantie Certifi cato di garanzia · Tarjeta de garantia Cartao de garantia · Guarantee card Garantikort · Karta gwarancjna · Zaruuci list Garancia lap · TapaANTHINHAR Kaptoka
MC 4415 CD/MP3
24 Monate Garantie gemäß Garantie-Erklärung · 24 maanden garantie overeenkomstig schriftelijke garantie · 24 mois de garantie conformément à la déclaration de garantie · 24 meses de garantie según la déclaration de garantia · 24 meses de garantia, conforme a declaração de garantia · 24 mesi de garanzia a seconda della spiegazione della garanzia · 24 months guarantee according to guarantee declaration 24 manedes garanti i henhold til garantierklæring · 24 misiace gwarancjna podastawie karty gwarancjynej · Zaruka 24 mésicu podle prohläseni o zuruce · A garanci lásd a hasznalati utasitásban Tapanhnhhe obshaataelbctBa - cMTOPI pykoBODCTBO nlo hboBostatien
Kaudatum, Handlersterpal, Unterschrift - Kopdatum, Stempel van de leverancier, Handlewenning - Date dachat, cachet van revendur, signature - Fecha de compra, Sello del vendodor, Fimna - Data del compra, Carimbo du vendedor, Assinatura - Data del aquisito, timbro del commercante, fi ma - Purchase date, Dealer stamp, Signature - Kjopsdato, stempel la tormander, uncerskrift - Data kappa, Peczajka slekup. Popis - Datum kouno, Razilko prodcoe, Podis - A vassarasi datum, a vassarasi hely beygso, aloras da na noymo, neata toocnoa, nonico.