SDMG96X - Monitor SONY - Free user manual and instructions
Find the device manual for free SDMG96X SONY in PDF.
| Product Type | Color LCD Monitor |
| Brand | Sony |
| Model | SDM-G96X |
| Screen Size | 19 inches (diagonal) |
| Panel Type | Active matrix TFT (a-Si) |
| Maximum Resolution | 1280 x 1024 (SXGA) |
| Input Frequencies (Analog) | Horizontal: 28-80 kHz, Vertical: 56-75 Hz |
| Input Frequencies (Digital) | Horizontal: 28-64 kHz, Vertical: 60 Hz |
| Video Inputs | DVI-D (Digital) and HD15 (Analog) |
| Audio Input | Stereo mini-jack (0.5 Vrms) |
| Audio Output | Stereo speakers 2 W x 2, headphone jack |
| Dimensions (with stand) | 422.5 x 435.5 x 163 mm |
| Weight | Approx. 6 kg |
| Power Supply | 100-240 V AC, 50/60 Hz, 1.0 A max |
| Power Consumption | Normal: 53 W max, Standby: 1.0 W max, Off: 1.0 W max |
| Image Functions | Modes: Film, PC, Game, User; Adjustments: contrast, brightness, gamma, sharpness, color temperature |
| Auto Adjustment | Yes (phase, clock, position) for analog signal |
| Power Saving | VESA DPMS / DMPM, ENERGY STAR certified |
| Tilt | Adjustable (forward/backward tilt) |
| Security | Kensington lock, ventilation slots |
| Maintenance | Clean with a soft, dry cloth; do not use solvents |
| Compatibility | Plug-and-Play DDC2B, PC and Mac compatible |
| Included Accessories | Power cord, DVI-D cable, HD15 cable, audio cable, cable holder, CD-ROM, warranty card |
Frequently Asked Questions - SDMG96X SONY
User questions about SDMG96X SONY
0 question about this device. Answer the ones you know or ask your own.
Ask a new question about this device
Download the instructions for your Monitor in PDF format for free! Find your manual SDMG96X - SONY and take your electronic device back in hand. On this page are published all the documents necessary for the use of your device. SDMG96X by SONY.
USER MANUAL SDMG96X SONY
This display is designed for use in Japan only and cannot be used in any other country.
主女仕樣
SDM-G76X
Operating Instructions (GB)
SDM-G76X
SDM-G96X
Owner's Record
The model and serial numbers are located at the rear of the unit. Record these numbers in the spaces provided below. Refer to them whenever you call upon your dealer regarding this product. Model No. __ Serial No. ____
WARNING
To reduce the risk of fire or electric shock, do not expose this apparatus to rain or moisture.
Dangerously high voltages are present inside the unit. Do not open the cabinet. Refer servicing to qualified personnel only.
FCC Notice
This equipment has been tested and found to comply with the limits for a Class B digital device, pursuant to Part 15 of the FCC Rules. These limits are designed to provide reasonable protection against harmful interference in a residential installation. This equipment generates, uses, and can radiate radio frequency energy and, if not installed and used in accordance with the instructions, may cause harmful interference to radio communications. However, there is no guarantee that interference will not occur in a particular installation. If this equipment does cause harmful interference to radio or television reception, which can be determined by turning the equipment off and on, the user is encouraged to try to correct the interference by one or more of the following measures:
- Reorient or relocate the receiving antenna.
- Increase the separation between the equipment and receiver.
- Connect the equipment into an outlet on a circuit different from that to which the receiver is connected.
- Consult the dealer or an experienced radio/TV technician for help. You are cautioned that any changes or modifications not expressly approved in this manual could void your authority to operate this equipment.
IMPORTANT
If you have any questions about this product, you may call; Sony Customer Information Services Center 1-800-222-7669 or http://www.roy.com/
Declaration of Conformity
Trade Name:SONY
Model: SDM-G76X
SDM-G96X
Responsible Party: Sony Electronics Inc.
Address: 16530 Via Esprillo,
San Diego, CA 92127 U.S.A.
Telephone Number: 858-942-2230
This device complies with part 15 of the FCC rules. Operation is subject to the following two conditions: (1) This device may not cause harmful interference, and (2) this device must accept any interference received, including interference that may cause undesired operation.
NOTICE
This notice is applicable for USA/Canada only.
If shipped to USA/Canada, install only a UL LISTED/CSA
LABELLED power supply cord meeting the following
specifications:
SPECIFICATIONS
Plug Type Nema-Plug 5-15p
Cord Type SVT or SJT, minimum 3 × 18 AWG
Length Maximum 15 feet
Rating Minimum 7 A, 125 V
NOTICE
As an ENERGY STAR Partner, Sony Corporation has determined that this product meets the ENERGY STAR guidelines for energy efficiency.
Table of Contents
Precautions. 4
Identifying parts and controls 6
Setup 8
Step 1: Use the stand. 8
Step 2: Connect the display to your computer 8
Step 3: Connect the power cord. 9
Step 4: Secure the cords 9
Step 5: Turn on the monitor and computer 9
Adjusting the tilt 10
Selecting the input signal (INPUT button). 10
Customizing Your Monitor 11
Navigating the menu. 11
Setting the MODE (PICTURE MODE) 11
PICTURE menu 12
AUDIO menu 14
A SCREEN menu (analog RGB signal only) 14
一 MENU POSITION menu 16
INPUT SENSING menu 17
A LANGUAGE menu 17
RESET menu (reset to the default setting) 17
ON MENU LOCK menu 18
Technical Features 18
Controlling the volume 18
Power saving function. 19
Automatic picture quality adjustment function
(analog RGB signal only) 19
Troubleshooting. 20
On-screen messages 20
Trouble symptoms and remedies 21
Specifications. 23
Precautions
Warning on power connections
- Use the supplied power cord. If you use a different power cord, be sure that it is compatible with your local power supply.
For the customers in the U.S.A.
If you do not use the appropriate cord, this monitor will not conform to mandatory FCC standards.
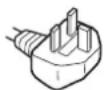
For the customers in the UK
If you use the monitor in the UK, be sure to use the appropriate UK power cord.
Example of plug types

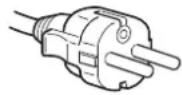
for 100 to 120V AC for 200 to 240V AC for 240V AC only
The equipment should be installed near an easily accessible outlet.
Installation
Do not install or leave the monitor:
- In places subject to extreme temperatures, for example near a radiator, heating vent, or in direct sunlight. Subjecting the monitor to extreme temperatures, such as in an automobile parked in direct sunlight or near a heating vent, could cause deformations of the casing or malfunctions.
- In places subject to mechanical vibration or shock.
- Near any equipment that generates a strong magnetic field, such as a TV or various other household appliances.
- In places subject to inordinate amounts of dust, dirt, or sand, for example near an open window or an outdoor exit. If setting up temporarily in an outdoor environment, be sure to take adequate precautions against airborne dust and dirt. Otherwise irreparable malfunctions could occur.
Be careful not to touch the air vents on the upper rear of the display, since they become heated.
Place this unit on a flat surface. Do not place it on an uneven surface like the edge of a desk. If a part of this unit sticks out from such surface, it may fall or cause damaged and injury.
Ventilation
The openings of the top and bottom parts are provided for necessary ventilation. To ensure reliable operation of the set, and to protect it from overheating, these openings must never be blocked or covered.
The ventilation should not be impeded by covering the ventilation openings with items, such as newspapers, tablecloths, curtains, etc.
Handling the LCD screen
- Do not leave the LCD screen facing the sun as it can damage the LCD screen. Take care when you place the monitor by a window.
-
Do not push on or scratch the LCD screen. Do not place a heavy object on the LCD screen. This may cause the screen to lose uniformity or cause LCD panel malfunctions.
-
If the monitor is used in a cold place, a residual image may appear on the screen. This is not a malfunction. The screen returns to normal as the temperature rises to a normal operating level.
- If a still picture is displayed for a long time, a residual image may appear for a while. The residual image will eventually disappear.
- The LCD panel becomes warm during operation. This is not a malfunction.
About the built-in stereo speakers
- Do not remove the screws from the back of the speaker. Doing so may lead to a malfunction.
- Be sure to keep magnetic recording equipment, tapes, and floppy discs away from the speaker's opening as the speakers generate a magnetic field. This magnetic field may affect data stored on magnetic tapes and discs.
Note on the LCD (Liquid Crystal Display)
Please note that the LCD screen is made with high-precision technology. However, black points or bright points of light (red, blue, or green) may appear constantly on the LCD screen, and irregular colored stripes or brightness may appear on the LCD screen. This is not malfunction.
(Effective dots: more than 99.99% )
Maintenance
- Be sure to unplug the power cord from the power outlet before cleaning your monitor.
- Clean the LCD screen with a soft cloth. If you use a glass cleaning liquid, do not use any type of cleaner containing an anti-static solution or similar additive as this may scratch the LCD screen's coating.
- Clean the cabinet, panel, and controls with a soft cloth lightly moistened with a mild detergent solution. Do not use any type of abrasive pad, scouring powder, or solvent, such as alcohol or benzine.
- Do not rub, touch, or tap the surface of the screen with sharp or abrasive items such as a ballpoint pen or screwdriver. This type of contact may result in a scratched picture tube.
- Note that material deterioration or LCD screen coating degradation may occur if the monitor is exposed to volatile solvents such as insecticide, or if prolonged contact is maintained with rubber or vinyl materials.
Note that if service personnel changes some parts during repair, these parts may be retained.
Transportation
- Disconnect all cables from the monitor and grasp the monitor firmly with both hands when transporting. If you drop the monitor, you may be injured or the monitor may be damaged.
- When you transport this monitor for repair or shipment, use the original carton and packing materials.
Installation on a wall or a mounting arm
If you intend to install the display on a wall or a mounting arm, be sure to consult qualified personnel.
Disposal of the monitor
- Do not dispose of this monitor with general household waste.
- The fluorescent tube used in this monitor contains mercury. Disposal of this monitor must be carried out in accordance to the regulations of your local sanitation authority.
For customers in the United States
This product contains mercury. Disposal of this product may be regulated if sold in the United States. For disposal or recycling information, please contact your local authorities or the Electronics Industries Alliance (http://www.eiae.org).
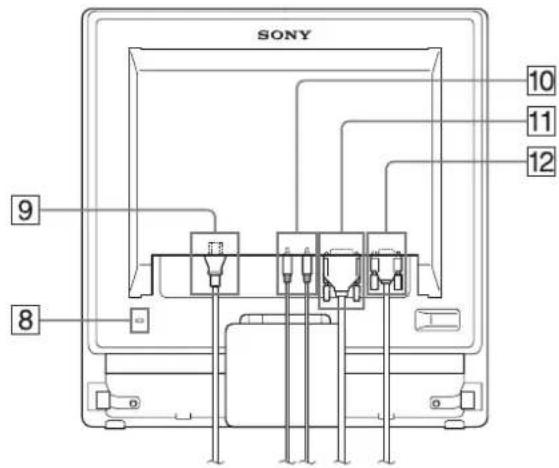
Identifying parts and controls
See the pages in parentheses for further details.
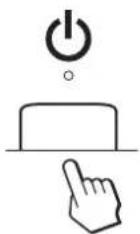
The (power) switch and the control buttons are on the front right lower side of the monitor.
Front of the display
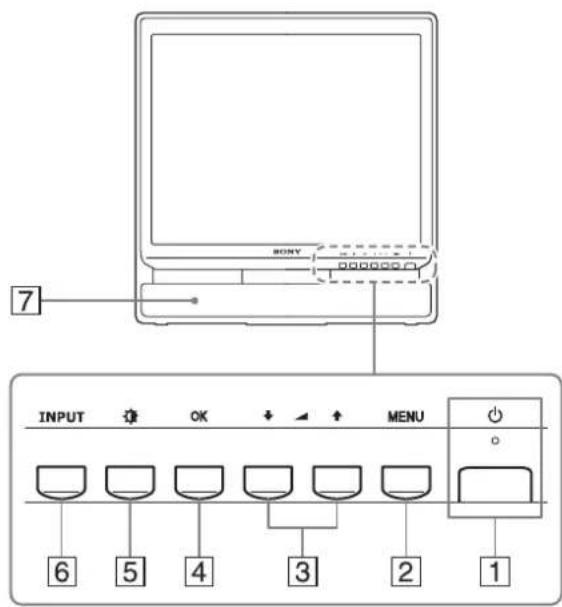
1 (Power) switch and indicator (pages 9, 19)
To turn the display on or off, press the (power) switch upward.
The power indicator lights up in green when the display is turned on, and lights up in orange when the monitor is in power saving mode.
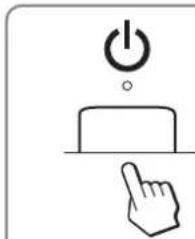
Press to turn the display on or off.
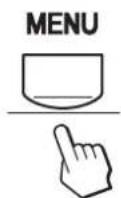
2 MENU button (page 11)
This button displays or closes the main menu.
You can also switch on the DDC/CI function by keeping this button pressed for more than 8 seconds.
3 / and (volume control) buttons (page 11, 18)
These buttons are used to select the menu items and make adjustments, and also display the "Volume" menu to control the volume.
OK button (page 11)
This button selects the item or executes the settings in the menu.
5 (CTURE MODE) button (page 11)
This button is used to adjust the PICTURE MODE.
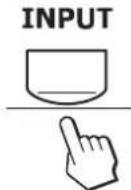
6INPUT button (page 10)
This button switches the video input signal between INPUT1 and INPUT2 when two computers are connected to the monitor.
7 Stereo speakers (page 18)
These speakers output the audio signals as sound.
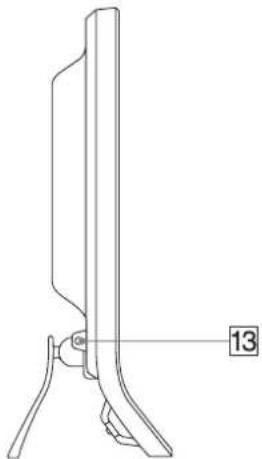
Rear of the display
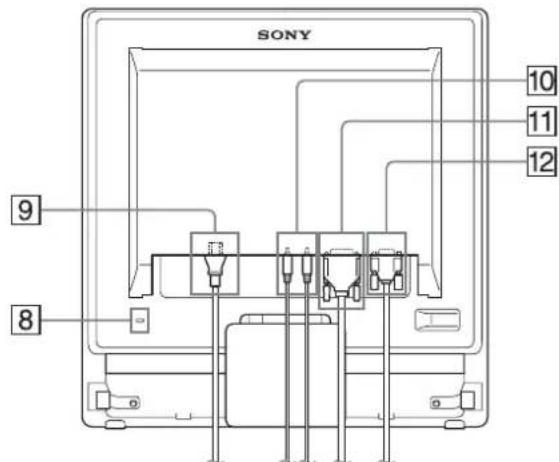
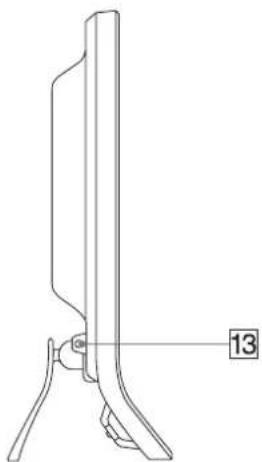
Side view of the LCD display
8Security Lock Hole
The security lock hole should be applied with the Kensington Micro Saver Security System.
Micro Saver Security System is a trademark of Kensington.
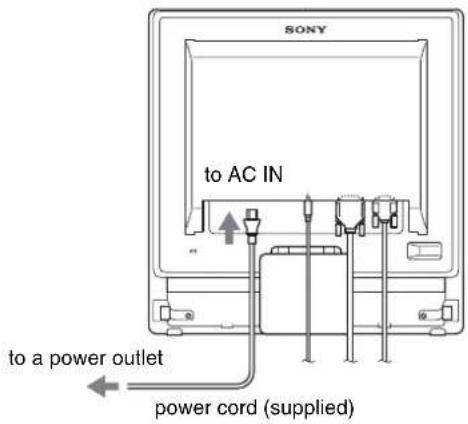
9AC IN connector (page 9)
Connect the power cord (supplied).
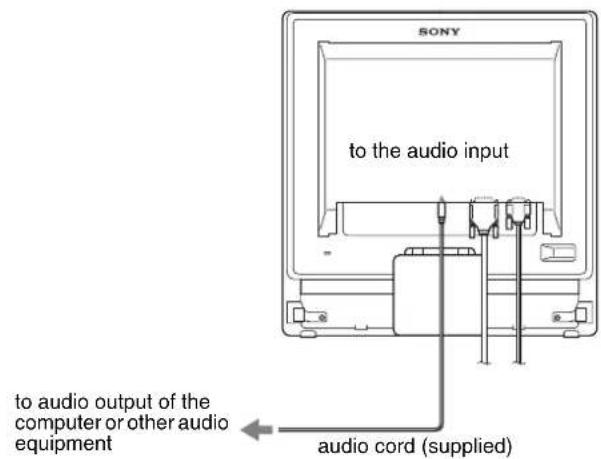
Audio input jack for INPUT1/2 (page 8)
This jack inputs audio signals when connected to the audio output jack of a computer or other audio equipments connected to INPUT1/INPUT2.
11DVI-D input connector (digital RGB) for INPUT1 (page 8)
This connector inputs digital RGB video signals that comply with DVI Rev.1.0.
12HD15 input connector (analog RGB) for INPUT2 (page 8)
This connector inputs analog RGB video signals (0.7 Vp-p, positive) and SYNC signals.
13Headphones jack (page 18)
This jack outputs audio signals to the headphones.
Setup
Before using your monitor, check that the following items are included in your carton:
- LCD display
- Pow e r c o r d
HD15-HD15 video signal cable (analog RGB) - DVI-D video signal cable (digital RGB)
Audio cord (stereo miniplug) - Cord strap
- CD-ROM (utility software for Windows/Macintosh, Operating Instructions, etc.)
Warranty card - Quick Setup Guide
Step 1:Use the stand
Using the supplied stand
Open the stand.
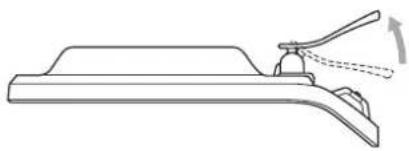
Note
The stand is folded at the factory. Be sure not to place the display vertically with the stand as it is. Otherwise, the display may topple over.
Using the VESA compatible stand
When using a non-supplied VESA compatible mounting arm or stand, use the VESA compatible screws to attach.
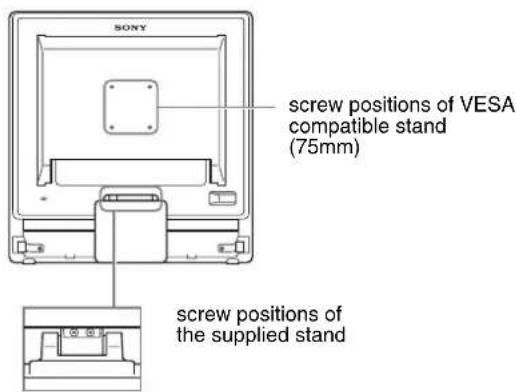
Bottom-side view
You can use the display with or without the supplied stand.
Step 2: Connect the display to your computer
Turn off the monitor and computer before connecting.
Notes
- Do not touch the pins of the video signal cable connector as this might bend the pins.
- Check the alignment of the HD15 connector to prevent bending the pins of the video signal cable connector.
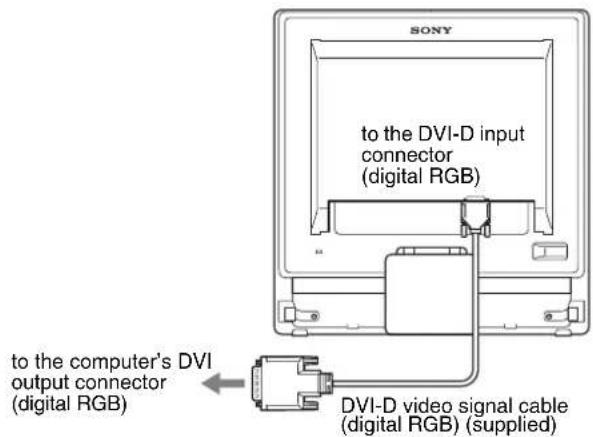
Connect a computer equipped with a DVI output connector (digital RGB)
Using the supplied DVI-D video signal cable (digital RGB), connect the computer to the monitor's DVI-D input connector (digital RGB)
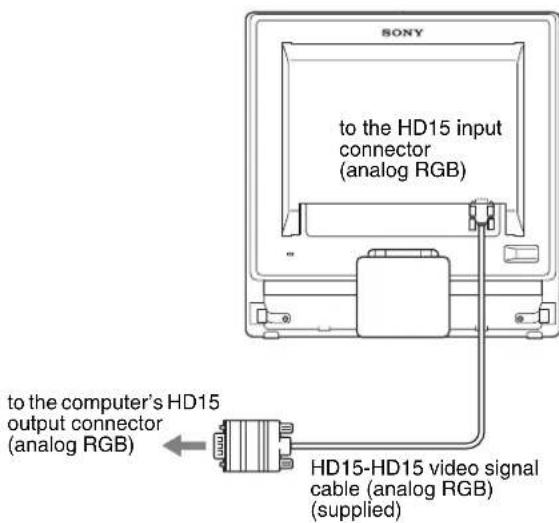
Connect a computer equipped with an HD15 output connector (analog RGB)
Using the supplied HD15-HD15 video signal cable (analog RGB), connect the computer to the monitor's HD15 input connector (analog RGB).
Connect the audio cord Connect the supplied audio cord to the monitor's corresponding audio input jack.
Using the monitor's speakers or headphones, you can listen to sound from your computer or other audio equipment connected to the monitor's audio input jacks.
For more information, see "Controlling the volume" on page 18.
Step 3:Connect the power cord
With the monitor and computer switched off, first connect the power cord to the monitor, then connect it to a power outlet.
Step 4:Secure the cords
1 Bundle the cables and cords.
Using the supplied cord strap, bundle the cables and cords.
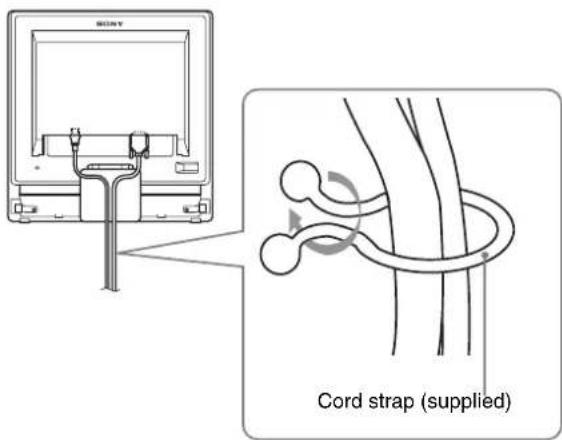
The illustration of the back of the monitor shown here is that of the SDM-G76X.
The same applies for the other models.
Step 5:Turn on the monitor and computer
Press the (power) switch.
The (power) indicator of the monitor lights up in green.
Turn on the computer.
The installation of your monitor is complete. If necessary, use the monitor's controls to adjust the picture.
- If no picture appears on your screen
Check that the power cord and the video signal cable are properly connected.
- If NO INPUT SIGNAL appears on the screen:
The computer is in the power saving mode. Try pressing any key on the keyboard or moving the mouse.
- If CABLE DISCONNECTED appears on the screen:
Check that the video signal cable is properly connected.
- If OUT OF RANGE appears on the screen:
Reconnect the old monitor. Then adjust the computer's graphics board within the following ranges.
| Analog RGB Digital RGB | |
| Horizontal frequency | 28-80 kHz 28-64 kHz |
| Vertical frequency | 56-75 Hz 60 Hz |
| Resolution | 1280 × 1024 or less |
| 1280 × 1024 or less | |
For more information about the on-screen messages, see "Trouble symptoms and remedies" on page 21.
No need for specific drivers
The monitor complies with the "DDC" Plug & Play standard and automatically detects all the monitor's information. No specific driver needs to be installed to the computer.
The first time you turn on your computer after connecting the monitor, the setup Wizard may appear on the screen. In this case, follow the on-screen instructions. The Plug & Play monitor is automatically selected so that you can use this monitor.
The vertical frequency turns to 60Hz
Since flickers are unobtrusive on the monitor, you can use it as it is. You do not need to set the vertical frequency to any particular high value.
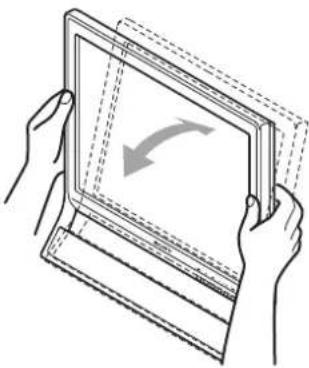
Adjusting the tilt
This display can be adjusted within the angles shown below.
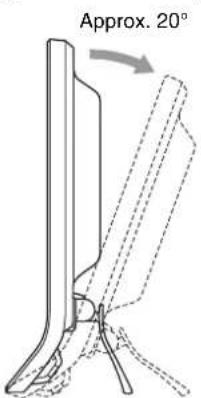
Grasp the lower sides of the LCD panel, then adjust screen tilt.
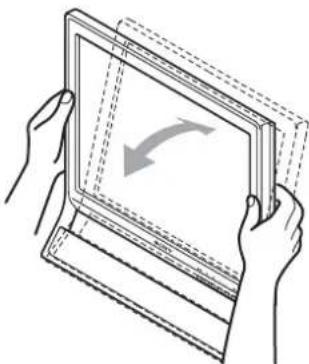
To use the display comfortably
This display is designed so that you can set it up at a comfortable viewing angle. Adjust the viewing angle of your display according to the height of the desk and chair, and so that light is not reflected from the screen to your eyes.
Note
When adjusting the screen tilt, make sure not to knock or drop the display off the desk.
Selecting the input signal (INPUT button)
Press the INPUT button.
The input signal changes each time you press this button.
| On-screen message (Appears about 5 seconds on the upper left corner.) | Input signal configuration |
| INPUT1: DVI-D DVI-D input connector (digital RGB) for INPUT1 | |
| INPUT2: HD15 HD15 input connector (analog RGB) for INPUT2 | |
Customizing Your Monitor
Before making adjustments
Connect the monitor and the computer, and turn them on. Wait for at least 30 minutes before making adjustments for the best result.
You can make numerous adjustments to your monitor using the on-screen menu.
Navigating the menu
Using the MENU, / , and OK buttons
1 Display the main menu.
Press the MENU button to display the main menu on your screen.
2 Select the menu you want to adjust.
Press the / buttons to display the desired menu. Press the OK button to select the menu item.
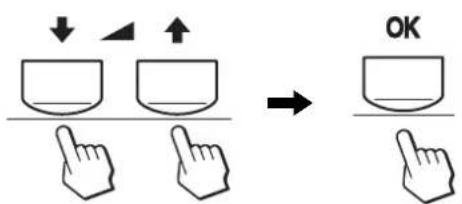
3 Adjust the menu.
Press the / buttons to make the adjustment, then press the OK button.
When you press the OK button, the setting is stored, then the display returns to the previous menu.
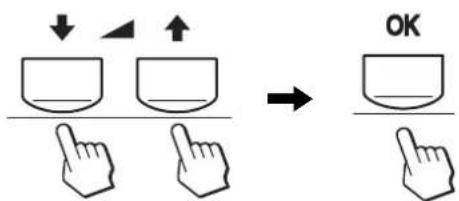
4 Close the menu.
Press the MENU button once to return to normal viewing. If no buttons are pressed, the menu closes automatically after about 45 seconds.
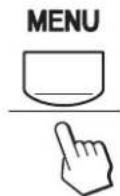
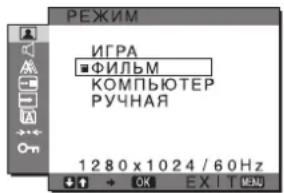
Setting the MODE (PICTURE MODE)
If you press the button on the lower right side of the monitor repeatedly, you can select MODE from MOVIE PC USER GAME.
Press the button repeatedly.
The default setting of MODE is set to MOVIE. When you press the button once, MOVIE (the default setting) is displayed, and when you press again, PC is displayed.
Each time you press the button, the mode changes as follows.
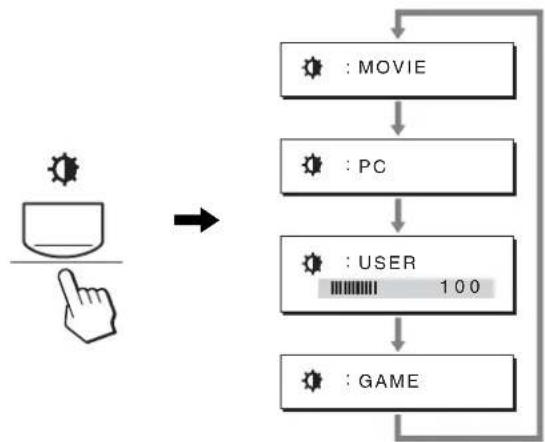
Each mode appears on the screen and MODE is changed. The menu automatically disappears after about 5 seconds.
With USER selected, you can adjust the backlight level by pressing the / buttons or by selecting backlight from the MENU.
Note
You can fine adjust the picture quality for each mode.
Resetting the adjustments
You can reset the adjustments using the RESET menu. See page 17 for more information on resetting the adjustments.
Controlling the monitor by computer
Press the MENU button down for at least 5 seconds. You will see an on-screen message indicating the current setting. After 3 seconds the DDC/CI setting is switched on or off, as shown below.
On-screen messages (Appear for a while)
| DDC-CI : ON (default setting) | Allows the computer to control menu settings. |
| DDC-CI : OFF Does not allow the computer to control menu settings. | |
Note
This function applies only to computers that support the DDC/CI (Display Data Channel Command Interface) function.

PICTURE menu
You can adjust the following items using PICTURE menu.
(GAME/MOVIE/PC/USER)
- MODE
- BACKLIGHT |:O
- CONTRAST 0
BRIGHTNESS
-COLOR
GAMMA
SHARPNESS - MODE RESET
MODE menu
You can select the appropriate screen brightness for your purpose. The PICTURE settings can be set for each mode. The changed setting is automatically applied for each input (INPUT1/INPUT2).
1 Press the MENU button.
The main menu appears on the screen.
2 Press the / button to select (PICTURE) and press the OK button.
The PICTURE menu appears on the screen.
3 Press the / button to select MOVIE and press the OK button.
The MODE menu appears on the screen.

4 Press the / button to select the desired mode and press the OK button.
The default setting is MOVIE.
- GAME: Bright picture.
MOVIE: Clear picture with strong contrast. -
PC: Soft tone picture.
-
USER: Picture with low brightness.
Note
You can fine adjust the picture quality for each mode.
Adjusting the backlight (BACKLIGHT)
If the screen is too bright, adjust the backlight to make the screen easier to see.
1 Press the MENU button.
The main menu appears on the screen.
2 Press the / buttons to select (PICTURE) and press the OK button.
The PICTURE menu appears on the screen.
3 Press the / buttons to select (BACKLIGHT) and press the OK button.
The BACKLIGHT menu appears on the screen.
4 Press the / buttons to adjust the light level and press the OK button.
Adjusting the contrast (CONTRAST)
Adjust the picture contrast.
Note
While COLOR is set to sRGB, you cannot adjust CONTRAST, BRIGHTNESS or GAMMA.
1 Press the MENU button.
The main menu appears on the screen.
2 Press the / buttons to select (PICTURE) and press the OK button.
The PICTURE menu appears on the screen.
3 Press the / buttons to select (CONTRAST) and press the OK button.
The CONTRAST menu appears on the screen.
4 Press the / buttons to adjust the contrast and press the OK button.
Adjusting the black level of an image (BRIGHTNESS)
Adjust the picture brightness (black level).
Note
While COLOR is set to sRGB, you cannot adjust CONTRAST, BRIGHTNESS or GAMMA.
1 Press the MENU button.
The main menu appears on the screen.
2 Press the / buttons to select (PICTURE) and press the OK button.
The PICTURE menu appears on the screen.
3 Press the / buttons to select (BRIGHTNESS) and press the OK button.
The BRIGHTNESS menu appears on the screen.
4 Press the / buttons to adjust the brightness and press the OK button.
Adjusting the color temperature (COLOR)
You can select the picture's color level for the white color field from the default color temperature settings.
Also, if necessary, you can fine tune the color temperature.
You can set the desired color temperature for each mode of the brightness of screen.
1 Press the MENU button.
The main menu appears on the screen.
2 Press the / buttons to select (PICTURE) and press the OK button.
The PICTURE menu appears on the screen.
3 Press the / buttons to select (COLOR) and press the OK button.
The COLOR menu appears on the screen.
4 Press the / buttons to select the desired color temperature and press the OK button.
Whites will change from a bluish hue to reddish hue as the temperature is lowered from 9300K to 6500K (default setting).
When you select "sRGB," the colors adjust to the sRGB profile. (The sRGB color setting is an industry-standard color space protocol designed for computer products.) If you select "sRGB," the color settings of your computer must be set to the sRGB profile.
Notes
- If a connected computer or other equipment is not sRGB-compliant, color cannot be adjusted to the sRGB profile.
While COLOR is set to sRGB, you cannot adjust CONTRAST, BRIGHTNESS or GAMMA.
Fine tuning the color temperature (USER ADJUSTMENT)
The color temperature can be set for each mode (GAME/MOVIE/PC/USER).
1 Press the / buttons to select ADJUST and press the OK button.
The USER ADJUSTMENT menu appears on the screen.
2 Press the / buttons to select R (Red) or B (Blue) and press the OK button. Then press the / buttons to adjust the color temperature and press the OK button.
Since this adjustment changes the color temperature by increasing or decreasing the R and B components with respect to G (green), the G component is fixed.
3 Press the / buttons to select , then press the OK button.
The new color setting is stored in memory and automatically recalled whenever USER is selected.
The COLOR menu appears on the screen.
Changing the gamma setting (GAMMA)
You can associate the picture's color shade on the screen with the picture's original color shade.
Note
While COLOR is set to sRGB, you cannot adjust CONTRAST, BRIGHTNESS or GAMMA.
1 Press the MENU button.
The main menu appears on the screen.
2 Press the / buttons to select (PICTURE) and press the OK button.
The PICTURE menu appears on the screen.
3 Press the / buttons to select (GAMMA) and press the OK button.
The GAMMA menu appears on the screen.
4 Press the / buttons to select the desired mode and press the OK button.
Adjusting the sharpness (SHARPNESS)
Adjust to sharpen the edge of images, etc.
1 Press the MENU button.
The main menu appears on the screen.
2 Press the / buttons to select (PICTURE) and press the OK button.
The PICTURE menu appears on the screen.
3 Press the / buttons to select (SHARPNESS) and press the OK button.
The SHARPNESS menu appears on the screen.
4 Press the / buttons to adjust the sharpness and press the OK button.
MODE RESET menu (resetting every mode to the default)
You can reset the adjustments to the default settings.
1 Press the MENU button.
The main menu appears on the screen.
2 Press the / button to select (PICTURE) and press the OK button.
The PICTURE menu appears on the screen.
3 Press the / buttons to select (MODE RESET) and press the OK button.
The MODE RESET menu appears on the screen.
4 Press the / buttons to select the desired mode and press the OK button.
- OK: To reset every mode in the PICTURE menu to the default settings.
- CANCEL: To cancel resetting and return to the PICTURE menu.
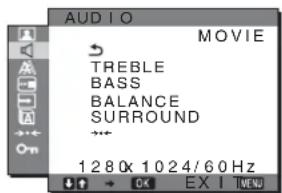
AUDIO menu
You can adjust the following items using the AUDIO menu.
TREBLE
BASS
BALANCE
- SURROUND
- RESET +
Adjusting TREBLE, BASS or BALANCE
1 Press the MENU button.
The main menu appears on the screen.
2 Press the / buttons to select (AUDIO) and press the OK button.
3 Press the / buttons to select TREBLE, BASS or BALANCE, and press the OK button.
4 Press the / buttons to adjust the treble, bass or balance, and press the OK button.
NOTE
Only when SURROUND is set to off, TREBLE and BASS can be adjusted.
Selecting SURROUND
1 Press the MENU button.
The main menu appears on the screen.
2 Press the / buttons to select (AUDIO) and press the OK button.
3 Press the / buttons to select SURROUND and press the OK button.
4 Press the / buttons to select the desired mode and press the OK button.
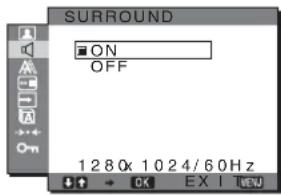
- ON: Provides powerful sound surround effect.
- OFF: Turns off the surround effect.
■ AUDIO RESET menu (resetting every mode to the default)
You can reset the adjustments to the default settings.
1 Press the MENU button.
The main menu appears on the screen.
2 Press the / button to select (AUDIO) and press the OK button.
The AUDIO menu appears on the screen.
3 Press the / buttons to select (RESET) and press the OK button.
The AUDIO RESET menu appears on the screen.
4 Press the / buttons to select the desired mode and press the OK button.
- OK: To reset every mode in the AUDIO menu to the default settings.
- CANCEL: To cancel resetting and return to the AUDIO menu.
SCREEN menu (analog RGB signal only)
You can adjust the following items using the SCREEN menu.
- AUTO ADJUST
PHASE
PI T C H
HCENTER
V C E N T E R

Note
When receiving digital RGB signals from the DVI-D input connector for INPUT1, adjustment is unnecessary.
Automatic picture quality adjustment function
When the monitor receives an input signal, it automatically adjusts the picture's position and sharpness (phase/pitch), and ensures that a clear picture appears on the screen ( page 19).
Note
While the automatic picture quality adjustment function is activated, only the (power) switch will operate.
If the automatic picture quality adjustment function of this monitor seems to not completely adjust the picture
You can make further automatic adjustment of the picture quality for the current input signal (See AUTO ADJUST below).
If you still need to make further adjustments to the picture quality
You can manually adjust the picture's sharpness (phase/pitch) and position (horizontal/vertical position).
These adjustments are stored in memory and automatically recalled when the monitor receives a previously input and registered input signal.
Make further automatic adjustments to the picture quality for the current input signal (AUTO ADJUST)
1 Press the MENU button.
The main menu appears on the screen.
2 Press the m/M buttons to select press the OK button.
(SGREEN) and
The SCREEN menu appears on the screen.
3 Press the m/M buttons to select AUTO ADJUST and press the OK button.
The AUTO ADJUST menu appears on the screen.
4 Press the m/M buttons to select ON or OFF and press the OK button.
- ON: Make the appropriate adjustments of the screen's phase, pitch and horizontal/vertical position for the current input signal and store them. Note
When the monitor is turned on or the input signal is changed, AUTO ADJUST makes the automatic adjustments.
OFF: AUTO ADJUST is not available.
Note AUTO ADJUST works automatically when the input signal is changed.
5 Press the m/M buttons to select and press the OK button.
Return to the menu screen.
Adjust the picture's sharpness and position manually (PITCH/PHASE/H CENTER/VCENTER)
You can adjust the picture's sharpness as follows. This adjustment is effective when the computer is connected to the monitor's HD15 input connector (analog RGB).
1 Set the resolution to 1280 × 1024 on the computer.
2 Load the CD-ROM.
3 Start the CD-ROM
For Windows User
When Auto run operates:
Select the area, language and model, and click DISPLAY ADJUSTMENT TOOL (UTILITY).
4 Click "Adjust" and confirm the current resolution (top value) and recommended resolution (bottom value), and then click "Next".
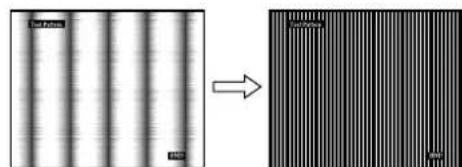
Test pattern for PITCH appears.
5 Press the MENU button.
The main menu appears on the screen.
6 Press the m/M buttons to select press the OK button.
(SAREEN) and
The SCREEN menu appears on the screen.
7 Press the m/M buttons to select PITCH and press the OK button.
The PITCH adjustment menu appears on the screen.
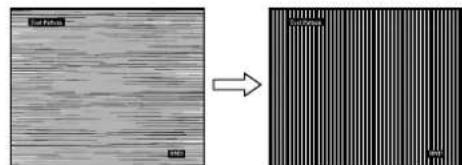
8 Press the m/M buttons until the vertical stripes disappear.
Adjust so that the vertical stripes disappear.
9 Press the OK button.
The main menu appears on the screen.
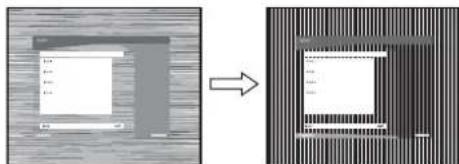
If horizontal stripes are observed over the entire screen, adjust the PHASE using the following procedures.
10 Click "Next".
Test pattern for PHASE appears.
11 Press the m/M buttons to select PHASE and press the OK button.
The PHASE adjustment menu appears on the screen.
12 Press the / buttons until the horizontal stripes are at a minimum.
Adjust so that the horizontal stripes are at a minimum.
13 Press the OK button.
The main menu appears on the screen.
14 Click "Next".
Test pattern for CENTER appears.
15 Press the / buttons to select H CENTER or V CENTER and press the OK button.
The H CENTER adjustment menu or V CENTER adjustment menu appears on the screen.
16 Press the / buttons to center the test pattern on the screen.
17 Click "Next".
Click "End" or "EXIT" to turn off the test pattern.
When Auto run fails to operate:
1 Open "My Computer" and right click the CD-ROM icon.
Go to "Explorer" and open the CD-ROM icon.
2 Open [Utility] and then select [WINDOWS].
3 Start [WIN Utility.EXE].
Test pattern appears. Go to step 4.
For Macintosh User
1 Open the CD-ROM.
2 Open [Utility] and then select [MAC].
3 Open [MAC UTILITY] and then start [MAC_CLASSICUTILITY] or [MAC OSXUTILITY].
Test pattern appears. Go to step 4.
4 Press the MENU button.
The main menu appears on the screen.
5 Press the / buttons to select (SCREEN) and press the OK button.
The SCREEN menu appears on the screen.
6 Press the / buttons to select PHASE and press the OK button.
The PHASE adjustment menu appears on the screen.
7 Press the / buttons until the horizontal stripes are at a minimum.
Adjust so that the horizontal stripes are at a minimum.
8 Press the OK button.
The main menu appears on the screen.
If vertical stripes are observed over the entire screen, adjust the PITCH using the following procedures.
9 Press the / buttons to select PITCH and press the OK button.
The PITCH adjustment menu appears on the screen.
10 Press the / buttons until the vertical stripes disappear.
Adjust so that the vertical stripes disappear.
11 Press the OK button.
The main menu appears on the screen.
12 Press the / buttons to select H CENTER or V CENTER and press the OK button.
The H CENTER adjustment menu or V CENTER adjustment menu appears on the screen.
13 Press the / buttons to center the test pattern on the screen.
14 Click "END" on the screen to turn off the test pattern.

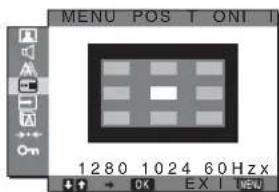
MENUPPOSITIONmenu
You can change the menu position if it is blocking an image on the screen.
1 Press the MENU button.
The main menu appears on the screen.
2 Press the / buttons to select (MENU POSITION) and press the OK button. The MENU POSITION menu appears on the screen.
3 Press the / buttons to select the desired position and press the OK button. There are three positions each for the top, center and bottom of the screen.

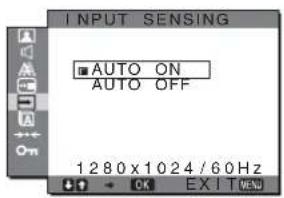
INPUT SENSING menu
When you select AUTO ON in the INPUT SENSING menu, the monitor automatically detects an input signal to an input terminal, and changes the input automatically before the monitor goes into the power saving mode.
1 Press the MENU button.
The main menu appears on the screen.
2 Press the / buttons to select (INPUT SENSING) and press the OK button.
The INPUT SENSING menu appears on the screen.
3 Press the / buttons to select the desired mode and press the OK button.
-
AUTO ON: When the selected input terminal has no input signal, or when you select an input terminal by the INPUT button on the monitor and the terminal has no input signal, the on-screen message appears (page 20) and the monitor checks the input signal to another input terminal automatically to change the input. When the input is changed, the selected input terminal is displayed on the left upper of the screen. When there is no input signal, the monitor goes into the power saving mode automatically.
-
AUTO OFF: The input is not changed automatically. Press the INPUT button to change the input.

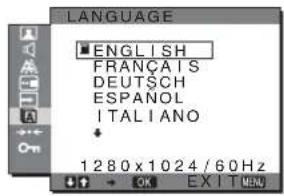
LANGUAGE menu
You can change the languages used on menus or messages displayed on this monitor.
1 Press the MENU button.
The main menu appears on the screen.
2 Press the / buttons to select A (LANGUAGE) and press the OK button.
The LANGUAGE menu appears on the screen.
3 Press the / buttons to select a language and press the OK button.
- ENGLISH
FRANÇAIS: French - DEUTsCH: German
- ESPANOL: Spanish
ITALIANO:Italian - NEDERLANDS: Dutch
SVENSKA: Swedish
·RySOKN
·:
·中文: C h i n e s e
RESET menu (reset to the default setting)
You can reset the adjustments to the default settings.
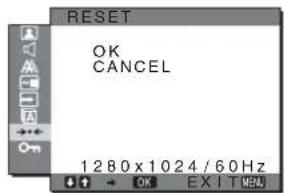
1 Press the MENU button.
The main menu appears on the screen.
2 Press the / buttons to select (RESET) and press the OK button.
The RESET menu appears on the screen.
3 Press the / buttons to select the desired mode and press the OK button.
- OK: To reset all of the adjustment data to the default settings. Note that the LANGUAGE setting is not reset by this method.
- CANCEL: To cancel resetting and return to the menu screen.
- MENU LOCK menu
You can lock the control of buttons to prevent accidental adjustments or resetting.
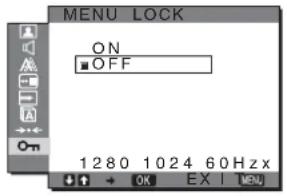
1 Press the MENU button.
The main menu appears on the screen.
2 Press the / buttons to select ON (MENU LOCK) and press the OK button.
The MENU LOCK menu appears on the screen.
3 Press the / buttons to select either ON or OFF.
-
ON: Only the (power) switch and MENU button will operate. If you attempt any other operation, the icon appears on the screen. With MENU LOCK set to ON, only this menu item can be selected.
-
OFF: MODE LOCK is set to OFF.
Technical Features
Controlling the volume
Using the monitor's speakers or headphones, you can listen to sound from your computer or other audio equipment connected to the monitor's audio input jacks.
You can control the volume by using a separate "Volume" menu from the main menu.
1 Press the / buttons when no menu appears on the screen.
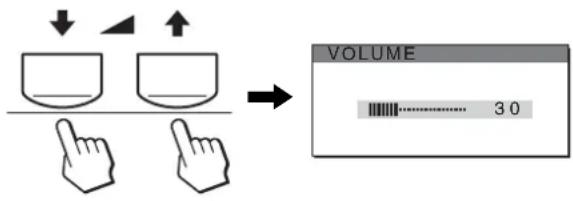
2 Press the / buttons to control the volume.
The menu automatically disappears after about 5 seconds.
Notes
- You cannot adjust the volume when the main menu is displayed on the screen.
- When your monitor is in power saving mode, no sound comes from the speakers or the headphones.
Power saving function
This monitor meets the power-saving guidelines set by VESA, ENERGY STAR, and NUTEK. If the monitor is connected to a computer or video graphics board that is DPMS (Display Power Management Standard) for Analog input/DMPM (DVI Digital Monitor Power Management) for Digital input compliant, the monitor will automatically reduce power consumption as shown below.
SDM-G76X
| Power mode Power consumption (power) indicator | |
| normal operation | 50 W (max.) green |
| active off* (deep sleep)** | 1.0 W (max.) orange |
| power off 1.0 W (max.) off | |
SDM-G96X
| Power mode Power consumption | ( power) indicator | |
| normal operation | 53 W (max.) green | |
| active off* (deep sleep)** | 1.0 W (max.) orange | |
| power off 1.0 W (max.) off | ||
- When your computer enters the "active off" mode, the input signal is cut and NO INPUT SIGNAL appears on the screen. After 5 seconds, the monitor enters the power saving mode.
** "deep sleep" is the power saving mode defined by the Environmental Protection Agency.
Automatic picture quality adjustment function (analog RGB signal only)
When the monitor receives an input signal, it automatically adjusts the picture's position and sharpness (phase/pitch), and ensures that a clear picture appears on the screen.
The factory preset mode
When the monitor receives an input signal, it automatically matches the signal to one of the factory preset modes stored in the monitor's memory to provide a high quality picture at the center of the screen. If the input signal matches the factory preset mode, the picture appears on the screen automatically with the appropriate default adjustments.
If input signals do not match one of the factory preset modes
When the monitor receives an input signal that does not match one of the factory preset modes, the automatic picture quality adjustment function of this monitor is activated to ensure that a clear picture always appears on the screen (within the following monitor frequency ranges):
Horizontal frequency: 28 - 80kHz
Vertical frequency: 56 - 75Hz
Consequently, the first time the monitor receives input signals that do not match one of the factory preset modes, the monitor may take a longer time than normal to display the picture on the screen. This adjustment data is automatically stored in memory so that next time, the monitor will function in the same way as when the monitor receives the signals that match one of the factory preset modes.
If you adjust the phase, pitch and picture position manually while OFF of AUTO ADJUST is selected
For some input signals, the automatic picture quality adjustment function of this monitor may not completely adjust the picture position, phase, and pitch. In this case, you can set these adjustments manually (page 15). If you set these adjustments manually, they are stored in memory as user modes and automatically recalled whenever the monitor receives the same input signals.
Notes
- While the automatic picture quality adjustment function is activated, only the (power) switch will operate.
- The picture may flicker during this time, but this is not a malfunction. Simply wait a few moments until the adjustment completes.
Troubleshooting
Before contacting technical support, refer to this section.
On-screen messages
If there is something wrong with the input signal, one of the following messages appears on the screen. To solve the problem, see "Trouble symptoms and remedies" on page 21.
If OUT OF RANGE appears on the screen
This indicates that the input signal is not supported by the monitor's specifications. Check the following items.
Example
INFORMATION
OUTOFRANGE INPUT1:DVI-D xxx.xkHz/xxxxHz
If "xxx.x kHz/xxx Hz" is displayed
This indicates that either the horizontal or vertical frequency is not supported by the monitor's specifications.
The figures indicate the horizontal and vertical frequencies of the current input signal.
If “RESOLUTION >1280 × 1024 ” is displayed
This indicates that the resolution is not supported by the monitor's specifications (1280 × 1024 or less).
If NO INPUT SIGNAL appears on the screen
This indicates that no signal is being input.
Example
GO TO POWER SAVE
The monitor will enter the power saving mode after about 5 seconds from the time the message is displayed.
If CABLE DISCONNECTED appears on the screen
This indicates that the video signal cable has been disconnected.
Example
GO TO POWER SAVE
The monitor will enter the power saving mode after about 45 seconds from the time the message is displayed.
Trouble symptoms and remedies
If a problem is caused by the connected computer or other equipment, please refer to the connected equipment's instruction manual.
| Symptom Check these items | |
| No picture | |
| If the (power) indicator is not lit after power cord is connected, or if the (power) indicator is not lit after the power switch is pressed, | ·Check that the power cord is properly connected. |
| If "CABLE DISCONNECTED" appears on the screen, | ·Check that the video signal cable is properly connected and all plugs are firmly seated in their sockets (page 8).·Check that the video input connector's pins are not bent or pushed in.·Check that the input select setting is correct (page 10).·A non-supplied video signal cable is connected. If you connect a non-supplied video signal cable, "CABLE DISCONNECTED" may appear on the screen before entering the power saving mode. This is not a malfunction. |
| If "NO INPUT SIGNAL" appears on the screen, or the (power) indicator is orange, | ·Check that the video signal cable is properly connected and all plugs are firmly seated in their sockets (page 8).·Check that the video input connector's pins are not bent or pushed in.·Check that the input select setting is correct (page 10).■Problems caused by a computer or other equipment connected, and not caused by the monitor·The computer is in the power saving mode. Try pressing any key on the keyboard or moving the mouse.·Check that your graphics board is installed properly.·Change your graphic board to the latest driver. Or match the version of your graphic board to the current OS.·When using a laptop computer, set the output of your computer to video out (for details on video out setting, contact your computer manufacturer).·Check that the computer's power is on.·Restart the computer. |
| If "OUT OF RANGE" appears on the screen, | ■Problems caused by a computer or other equipment connected, and not caused by the monitor·Check that the video frequency range is within that specified for the monitor. If you replaced an old monitor with this monitor, reconnect the old monitor and adjust the computer's graphics board within the following ranges:Horizontal: 28-80 kHz (analog RGB), 28-64 kHz (digital RGB)Vertical: 56-75 Hz (analog RGB), 60 Hz (digital RGB)Resolution: 1280×1024 or less·Start your OS in Safe mode and restart the computer after setting the resolution. The setting of safe mode varies depending on your OS. For more details, contact your computer manufacturer. |
| If you are using Windows and replaced an old monitor with this monitor, | ·If you replaced an old monitor with this monitor, reconnect the old monitor and do the following. Select "SONY" from the "Manufacturers" list and select "SDM-G76X" or "SDM-G96X" from the "Models" list in the Windows device selection screen. If the model name of this monitor does not appear in the "Models" list, try "Plug & Play." |
| If using a Macintosh system, | ·If you use the Macintosh adapter (not supplied), check that the Macintosh adapter and the video signal cable are properly connected. |
| Picture flickers, bounces, oscillates, or is scrambled | ·Adjust the pitch and phase (analog RGB signal only) (page 15).·Try plugging the monitor into a different AC outlet, preferably on a different circuit.■Problems caused by a computer or other equipment connected, and not caused by the monitor·Check your graphics board manual for the proper monitor setting.·Confirm that the graphics mode (VESA, Macintosh 19" Color, etc.) and the frequency of the input signal are supported by this monitor. Even if the frequency is within the proper range, some graphics boards may have a sync pulse that is too narrow for the monitor to sync correctly.·Adjust the computer's refresh rate (vertical frequency) to obtain the best possible picture. |
| Picture is fuzzy · Adjust the brightness and contrast (page 12). · Adjust the pitch and phase (analog RGB signal only) (page 15). ■ Problems caused by a computer or other equipment connected, and not caused by the monitor · Set the resolution to SXGA (1280 × 1024) on your computer. | |
| Picture is ghosting | · Eliminate the use of video cable extensions and/or video switch boxes. · Check that all plugs are firmly seated in their sockets. |
| Picture is not centered or sized properly (analog RGB signal only) | · Adjust the pitch and phase (page 15). · Adjust the picture position (page 15). Note that some video modes do not fill the screen to the edges. |
| Picture is too small | ■ Problems caused by a computer or other equipment connected, and not caused by the monitor · Set the resolution to SXGA (1280 × 1024) on your computer. |
| Picture is dark · Adjust the brightness (page 12). · Adjust the backlight (page 12). · It takes a few minutes for the display to become bright after turning on the monitor. | |
| Wavy or elliptical pattern (moire) is visible | · Adjust the pitch and phase (analog RGB signal only) (page 15). |
| Color is not uniform | · Adjust the pitch and phase (analog RGB signal only) (page 15). |
| White does not look white | · Adjust the color temperature (page 13). |
| Monitor buttons do not operate (Appears on the screen) | · If MENU LOCK is set to ON, set it to OFF (page 18). |
| The monitor turns off after a while | ■ Problems caused by a computer or other equipment connected, and not caused by the monitor · Set the computer's power saving setting to off. |
| Resolution displayed on the menu screen is incorrect | · Depending on the graphics board setting, the resolution displayed on the menu screen may not coincide with the one set on the computer. |
If any problem persists, call your authorized Sony dealer and give the following information:
- Model name: SDM-G76X or SDM-G96X
- Serial number
- Detailed description of the problem
- Date of purchase
- Name and specifications of your computer and graphics board
Specifications
SDM-G76X
LCD panel Panel type: a-Si TFT Active Matrix
Picture size: 17.0 inch
Input signal format RGB operating frequency*
Horizontal: 28 - 80kHz (analog RGB)
28-64 kHz (digital RGB)
Vertical: 56 - 75Hz (analog RGB)
60Hz (digital RGB)
Resolution Horizontal: Max.1280 dots
Vertical: Max.1024 lines
Input signal levels Analog RGB video signal
0.7 Vp-p, 75 Ω, positive
SYNC signal
TTL level, 2.2k
positive or negative
(Separate horizontal and vertical)
Digital RGB (DVI) signal:
TMDS (Single link)
Audio input Stereo minijack, 0.5 Vrms
Speaker output 2W× 2
Headphones jack Stereo minijack
Power requirements 100 - 240V 50 - 60Hz
Max. 1.0 A
Operating temperature 5-35 ^ C
Dimensions (width/height/depth)
Display (upright):
Approx. 383.5 × 404.5 × 163 ~mm
(15^1 / 8 × 16 × 6^1 / 2 inches)
Mass Approx. 5.5kg (12 lb 2 oz)
Plug & Play DDC2B
Accessories
See page 8.
SDM-G96X
LCD panel Panel type: a-Si TFT Active Matrix
Picture size: 19.0 inch
Input signal format RGB operating frequency*
Horizontal: 28 - 80kHz (analog RGB)
28-64 kHz (digital RGB)
Vertical: 56 - 75Hz (analog RGB)
60 Hz (digital RGB)
Resolution Horizontal: Max.1280 dots
Vertical: Max.1024 lines
Input signal levels Analog RGB video signal
0.7 Vp-p, 75 Ω positive
SYNC signal
TTL level, 2.2k
positive or negative
(Separate horizontal and vertical)
Digital RGB (DVI) signal:
TMDS (Single link)
Audio input Stereo minijack, 0.5 Vrms
Speaker output 2W× 2
Headphones jack Stereo minijack
Power requirements 100-240 V, 50-60 Hz
Max. 1.0 A
Operating temperature 5-35 C
Dimensions (width/height/depth)
Display (upright):
Approx. 422.5 × 435.5 × 163 ~mm
(16^3 / 4 × 17^1 / 4 × 6^1 / 2 inches)
Mass Approx. 6kg (13 lb 3^5 / 8 oz)
Plug & Play DDC2B
Accessories See page 8.
- Recommended horizontal and vertical timing condition
Horizontal sync width duty should be more than 4.8% of total
horizontal time or 0.8 s whichever is larger.
Horizontal blanking width should be more than 2.5 sec
Vertical blanking width should be more than 450~ sec
Design and specifications are subject to change without notice.
TFTLCD Color Computer Display
Mode d'emploi
(FR)
SDM-G76X
SDM-G96X
© 2006 Sony Corporation
Owner's Record
The model and serial numbers are located at the rear of the unit. Record these numbers in the spaces provided below. Refer to them whenever you call upon your dealer regarding this product. Model No. __ Serial No. ____
WARNING
To reduce the risk of fire or electric shock, do not expose this apparatus to rain or moisture.
Dangerously high voltages are present inside the unit. Do not open the cabinet. Refer servicing to qualified personnel only.
FCC Notice
This equipment has been tested and found to comply with the limits for a Class B digital device, pursuant to Part 15 of the FCC Rules. These limits are designed to provide reasonable protection against harmful interference in a residential installation. This equipment generates, uses, and can radiate radio frequency energy and, if not installed and used in accordance with the instructions, may cause harmful interference to radio communications. However, there is no guarantee that interference will not occur in a particular installation. If this equipment does cause harmful interference to radio or television reception, which can be determined by turning the equipment off and on, the user is encouraged to try to correct the interference by one or more of the following measures:
- Reorient or relocate the receiving antenna.
- Increase the separation between the equipment and receiver.
- Connect the equipment into an outlet on a circuit different from that to which the receiver is connected.
- Consult the dealer or an experienced radio/TV technician for help. You are cautioned that any changes or modifications not expressly approved in this manual could void your authority to operate this equipment.
IMPORTANT
If you have any questions about this product, you may call; Sony Customer Information Services Center 1-800-222-7669 or http://www.sony.com/
Declaration of Conformity
Trade Name:SONY
Model: SDM-G76X
SDM-G96X
Responsible Party: Sony Electronics Inc.
Address: 16530 Via Esprillo,
San Diego, CA 92127 U.S.A.
Telephone Number: 858-942-2230
This device complies with part 15 of the FCC rules. Operation is subject to the following two conditions: (1) This device may not cause harmful interference, and (2) this device must accept any interference received, including interference that may cause undesired operation.
NOTICE
This notice is applicable for USA/Canada only.
If shipped to USA/Canada, install only a UL LISTED/CSA
LABELLED power supply cord meeting the following
specifications:
SPECIFICATIONS
Plug Type Nema-Plug 5-15p
Cord Type SVT or SJT, minimum 3 × 18 AWG
Length Maximum 15 feet
Rating Minimum 7 A, 125 V
NOTICE
As an ENERGY STAR Partner, Sony Corporation has determined that this product meets the ENERGY STAR guidelines for energy efficiency.
Table des matieres
Précautions. 4
Specifications techniques. 19
Specifications techniques
Contrôle du volume
Verticale:56-75Hz (RVB
analogique)
The model and serial numbers are located at the rear of the unit. Record these numbers in the spaces provided below. Refer to them whenever you call upon your dealer regarding this product. Model No. __ Serial No. ____
WARNING
To reduce the risk of fire or electric shock, do not expose this apparatus to rain or moisture.
Dangerously high voltages are present inside the unit. Do not open the cabinet. Refer servicing to qualified personnel only.
FCC Notice
This equipment has been tested and found to comply with the limits for a Class B digital device, pursuant to Part 15 of the FCC Rules. These limits are designed to provide reasonable protection against harmful interference in a residential installation. This equipment generates, uses, and can radiate radio frequency energy and, if not installed and used in accordance with the instructions, may cause harmful interference to radio communications. However, there is no guarantee that interference will not occur in a particular installation. If this equipment does cause harmful interference to radio or television reception, which can be determined by turning the equipment off and on, the user is encouraged to try to correct the interference by one or more of the following measures:
- Reorient or relocate the receiving antenna.
- Increase the separation between the equipment and receiver.
- Connect the equipment into an outlet on a circuit different from that to which the receiver is connected.
- Consult the dealer or an experienced radio/TV technician for help. You are cautioned that any changes or modifications not expressly approved in this manual could void your authority to operate this equipment.
IMPORTANT
If you have any questions about this product, you may call; Sony Customer Information Services Center 1-800-222-7669 or http://www.sony.com/
Declaration of Conformity
Trade Name:SONY
Model: SDM-G76X
SDM-G96X
Responsible Party: Sony Electronics Inc.
Address: 16530 Via Esprillo,
San Diego, CA 92127 U.S.A.
Telephone Number: 858-942-2230
This device complies with part 15 of the FCC rules. Operation is subject to the following two conditions: (1) This device may not cause harmful interference, and (2) this device must accept any interference received, including interference that may cause undesired operation.
NOTICE
This notice is applicable for USA/Canada only.
If shipped to USA/Canada, install only a UL LISTED/CSA
LABELLED power supply cord meeting the following
specifications:
SPECIFICATIONS
Plug Type Nema-Plug 5-15p
Cord Type SVT or SJT, minimum 3 × 18 AWG
Length Maximum 15 feet
Rating Minimum 7 A, 125 V
NOTICE
As an ENERGY STAR Partner, Sony Corporation has determined that this product meets the ENERGY STAR guidelines for energy efficiency.
Inhalt
© 2006 Sony Corporation
Owner's Record
The model and serial numbers are located at the rear of the unit. Record these numbers in the spaces provided below. Refer to them whenever you call upon your dealer regarding this product. Model No. __ Serial No. ____
WARNING
To reduce the risk of fire or electric shock, do not expose this apparatus to rain or moisture.
Dangerously high voltages are present inside the unit. Do not open the cabinet. Refer servicing to qualified personnel only.
FCC Notice
This equipment has been tested and found to comply with the limits for a Class B digital device, pursuant to Part 15 of the FCC Rules. These limits are designed to provide reasonable protection against harmful interference in a residential installation. This equipment generates, uses, and can radiate radio frequency energy and, if not installed and used in accordance with the instructions, may cause harmful interference to radio communications. However, there is no guarantee that interference will not occur in a particular installation. If this equipment does cause harmful interference to radio or television reception, which can be determined by turning the equipment off and on, the user is encouraged to try to correct the interference by one or more of the following measures:
- Reorient or relocate the receiving antenna.
- Increase the separation between the equipment and receiver.
- Connect the equipment into an outlet on a circuit different from that to which the receiver is connected.
- Consult the dealer or an experienced radio/TV technician for help. You are cautioned that any changes or modifications not expressly approved in this manual could void your authority to operate this equipment.
IMPORTANT
If you have any questions about this product, you may call; Sony Customer Information Services Center 1-800-222-7669 or http://www.sony.com/
Declaration of Conformity
Trade Name:SONY
Model: SDM-G76X
SDM-G96X
Responsible Party: Sony Electronics Inc.
Address: 16530 Via Esprillo,
San Diego, CA 92127 U.S.A.
Telephone Number: 858-942-2230
This device complies with part 15 of the FCC rules. Operation is subject to the following two conditions: (1) This device may not cause harmful interference, and (2) this device must accept any interference received, including interference that may cause undesired operation.
NOTICE
This notice is applicable for USA/Canada only.
If shipped to USA/Canada, install only a UL LISTED/CSA
LABELLED power supply cord meeting the following
specifications:
SPECIFICATIONS
Plug Type Nema-Plug 5-15p
Cord Type SVT or SJT, minimum 3 × 18 AWG
Length Maximum 15 feet
Rating Minimum 7 A, 125 V
NOTICE
As an ENERGY STAR Partner, Sony Corporation has determined that this product meets the ENERGY STAR guidelines for energy efficiency.
Indices
Precauciones 4
The model and serial numbers are located at the rear of the unit. Record these numbers in the spaces provided below. Refer to them whenever you call upon your dealer regarding this product. Model No. __ Serial No. ____
WARNING
To reduce the risk of fire or electric shock, do not expose this apparatus to rain or moisture.
Dangerously high voltages are present inside the unit. Do not open the cabinet. Refer servicing to qualified personnel only.
FCC Notice
This equipment has been tested and found to comply with the limits for a Class B digital device, pursuant to Part 15 of the FCC Rules. These limits are designed to provide reasonable protection against harmful interference in a residential installation. This equipment generates, uses, and can radiate radio frequency energy and, if not installed and used in accordance with the instructions, may cause harmful interference to radio communications. However, there is no guarantee that interference will not occur in a particular installation. If this equipment does cause harmful interference to radio or television reception, which can be determined by turning the equipment off and on, the user is encouraged to try to correct the interference by one or more of the following measures:
- Reorient or relocate the receiving antenna.
- Increase the separation between the equipment and receiver.
- Connect the equipment into an outlet on a circuit different from that to which the receiver is connected.
- Consult the dealer or an experienced radio/TV technician for help. You are cautioned that any changes or modifications not expressly approved in this manual could void your authority to operate this equipment.
IMPORTANT
If you have any questions about this product, you may call; Sony Customer Information Services Center 1-800-222-7669 or http://www.sony.com/
Declaration of Conformity
Trade Name:SONY
Model: SDM-G76X
SDM-G96X
Responsible Party: Sony Electronics Inc.
Address: 16530 Via Esprillo,
San Diego, CA 92127 U.S.A.
Telephone Number: 858-942-2230
This device complies with part 15 of the FCC rules. Operation is subject to the following two conditions: (1) This device may not cause harmful interference, and (2) this device must accept any interference received, including interference that may cause undesired operation.
NOTICE
This notice is applicable for USA/Canada only.
If shipped to USA/Canada, install only a UL LISTED/CSA
LABELLED power supply cord meeting the following
specifications:
SPECIFICATIONS
Plug Type Nema-Plug 5-15p
Cord Type SVT or SJT, minimum 3 × 18 AWG
Length Maximum 15 feet
Rating Minimum 7 A, 125 V
NOTICE
As an ENERGY STAR Partner, Sony Corporation has determined that this product meets the ENERGY STAR guidelines for energy efficiency.
Indice
Precauzioni 4
| 0INFORZION |
| FUOIGR A M M A |
| INGRESISCVD I-D |
| xxxx.xkHz/xxxxHz |
The model and serial numbers are located at the rear of the unit. Record these numbers in the spaces provided below. Refer to them whenever you call upon your dealer regarding this product. Model No. __ Serial No. ____
WARNING
To reduce the risk of fire or electric shock, do not expose this apparatus to rain or moisture.
Dangerously high voltages are present inside the unit. Do not open the cabinet. Refer servicing to qualified personnel only.
FCC Notice
This equipment has been tested and found to comply with the limits for a Class B digital device, pursuant to Part 15 of the FCC Rules. These limits are designed to provide reasonable protection against harmful interference in a residential installation. This equipment generates, uses, and can radiate radio frequency energy and, if not installed and used in accordance with the instructions, may cause harmful interference to radio communications. However, there is no guarantee that interference will not occur in a particular installation. If this equipment does cause harmful interference to radio or television reception, which can be determined by turning the equipment off and on, the user is encouraged to try to correct the interference by one or more of the following measures:
- Reorient or relocate the receiving antenna.
- Increase the separation between the equipment and receiver.
- Connect the equipment into an outlet on a circuit different from that to which the receiver is connected.
- Consult the dealer or an experienced radio/TV technician for help. You are cautioned that any changes or modifications not expressly approved in this manual could void your authority to operate this equipment.
IMPORTANT
If you have any questions about this product, you may call; Sony Customer Information Services Center 1-800-222-7669 or http://www.roy.com/
Declaration of Conformity
Trade Name:SONY
Model: SDM-G76X
SDM-G96X
Responsible Party: Sony Electronics Inc.
Address: 16530 Via Esprillo,
San Diego, CA 92127 U.S.A.
Telephone Number: 858-942-2230
This device complies with part 15 of the FCC rules. Operation is subject to the following two conditions: (1) This device may not cause harmful interference, and (2) this device must accept any interference received, including interference that may cause undesired operation.
NOTICE
This notice is applicable for USA/Canada only.
If shipped to USA/Canada, install only a UL LISTED/CSA
LABELLED power supply cord meeting the following
specifications:
SPECIFICATIONS
Plug Type Nema-Plug 5-15p
Cord Type SVT or SJT, minimum 3 × 18 AWG
Length Maximum 15 feet
Rating Minimum 7 A, 125 V
NOTICE
As an ENERGY STAR Partner, Sony Corporation has determined that this product meets the ENERGY STAR guidelines for energy efficiency.
Contudos
Precauções 4
Regular a nitidez (SHARPNESS)
Regular paraacular a nitidez do contorno das imagens, etc.
Regular TREBLE, BASS ou BALANCE
Menu RESET (repor as predefinições)
Resolucao Horizontal: Max.1.280 pontos
Vertical: Max.1.024 linhas
Níveis de sinal de entrada Sinal de video RGB analógico 0,7 Vp-p, 75 Ω, positivo
Sinal SYNC Nivel TTL, 2.2k
positivo ou negativo (Horizontal e vertical separada)
Sinal RGB digital (DVI):
© 2006 Sony Corporation
Owner's Record
The model and serial numbers are located at the rear of the unit. Record these numbers in the spaces provided below. Refer to them whenever you call upon your dealer regarding this product. Model No. __ Serial No. ____
WARNING
To reduce the risk of fire or electric shock, do not expose this apparatus to rain or moisture.
Dangerously high voltages are present inside the unit. Do not open the cabinet. Refer servicing to qualified personnel only.
FCC Notice
This equipment has been tested and found to comply with the limits for a Class B digital device, pursuant to Part 15 of the FCC Rules. These limits are designed to provide reasonable protection against harmful interference in a residential installation. This equipment generates, uses, and can radiate radio frequency energy and, if not installed and used in accordance with the instructions, may cause harmful interference to radio communications. However, there is no guarantee that interference will not occur in a particular installation. If this equipment does cause harmful interference to radio or television reception, which can be determined by turning the equipment off and on, the user is encouraged to try to correct the interference by one or more of the following measures:
- Reorient or relocate the receiving antenna.
- Increase the separation between the equipment and receiver.
- Connect the equipment into an outlet on a circuit different from that to which the receiver is connected.
- Consult the dealer or an experienced radio/TV technician for help. You are cautioned that any changes or modifications not expressly approved in this manual could void your authority to operate this equipment.
IMPORTANT
If you have any questions about this product, you may call; Sony Customer Information Services Center 1-800-222-7669 or http://www.sony.com/
Declaration of Conformity
Trade Name:SONY
Model: SDM-G76X
SDM-G96X
Responsible Party: Sony Electronics Inc.
Address: 16530 Via Esprillo,
San Diego, CA 92127 U.S.A.
Telephone Number: 858-942-2230
This device complies with part 15 of the FCC rules. Operation is subject to the following two conditions: (1) This device may not cause harmful interference, and (2) this device must accept any interference received, including interference that may cause undesired operation.

BZ03
I3ROBtJIb:COHKnKopnopeuH AApEc:6-7-35 KItaunHaRaba,
UHHaraba-Ky, Tokno 141-0001, RnOH
CtpanaH-npou3BODHTeIb:KtTae
NOTICE
This notice is applicable for USA/Canada only.
If shipped to USA/Canada, install only a UL LISTED/CSA LABELLED power supply cord meeting the following specifications:
SPECIFICATIONS
Plug Type Nema-Plug 5-15p
Cord Type SVT or SJT, minimum 3 × 18 AWG
Length Maximum 15 feet
Rating Minimum 7 A, 125 V
NOTICE
As an ENERGY STAR Partner, Sony Corporation has determined that this product meets the ENERGY STAR guidelines for energy efficiency.
Copepknne
Mepblpeoctopoxhoctn 4
IeHTnФkaun DeTaan e n opraHOb ynpaBneHn. 6
IoproToBka K pa6oTe. .8
War 1: IcnoIb3OBAHne noIcTaBKn 8
War 2:ПодклioчиTe ДиспелК KOMьIoTepy. 8
War 3:Подклioчite kaбел nHTaHn. 9
IinokynateJeBBe.IInKo6pHTaHH
IIpn HcHIOJIb3OBAHH MOHHTopa B BeJIHKo6pHTaHH HOJIb3yIITecb COOTBCTCTBYIOIHMM Ka6c.IcM IHTaHH JJr BeJIHKo6pHTaHH.
PpIMepbI CeTeBbIX BUNOK
100-120B nepemehhoro Toka
200-240B nepemehhoro Toka
Tolbokd240B nepemehhoro Toka
CeTeBa pO3eTKa IIOJXHa HAXOHTbC B JIERKIOOCTyIHOM MecTe BOJIN3H OT IIpH6opa.
YctaHOBka
He yctaHaBnBaIte H He ocTaBnIte MOHITop:
B MecTax, HOBcpeKcHbIX BO3JeCHTBIO BbICOKHX TeMIIepaTyp, HApHMeP, PAnOM c 6aTapeAHH, HArpCeBaTCJIbHbIMN BO3JyXOBOJAMH, HIN B McCTax, Ie BO3MOxHO IIOnaIaHHe IIpMOrO COJIHeYHO CBeTa. Pa3McIeIHNC MOHTopa B McCTax, IOJIbCpeKcHbIX BO3JeCTBHIO BBICOKHX TeMIIepaTyp, HApHMeP, B ABTOMOHJIX, IIpHIapKOBAHHbIX B COJIHCCHbIX McCTAX, HIN pRJOM C HArpeBaTeJIbHbIMN BO3JyXOBOJAMH, MOXET IIpHBcCTN K JeOpMaIIH KOpIyCa HIN K HeCNHPaBHOCtBM.
B Mcctax, rIe BO3MOJHa Bn6paHn Hn pe3KHe MExaHueckHe BO3JeHCTBn.
PcIIO6bIMO60pyOBaHHem,KOTope H3IyTaETnHbHOeMaHHTHOE HOJE,HaIIpHMeP,TeJIeBHN3OpamHJINdpyTHMN IOMaIHMM IIpH6opAMH.
B MeCTax, Ie MoKet cKaIIINbAITcM HOrO IIbIIN, rP3H INI IeCKa, HAnpHMeP, pIOM COTKpbITbIM OKHOM INI BbIXoIOM NIOHomeIIeHH. EciN yCTPOIECTBO IIpeHOCHTcN IO YJIInE, O63aTeJIbHO IIpHMHTe COOTBeTCTBYIOIIHe MEPbI IIpeIOCTOPOXHOCTH IIpoTHB cyIIeCTBYIOIIeB BO3JyXe IIbIIN Ipr3H. B IIPOTHBHOM CIyuae ycTPOICTBO MOKeT 6bITb 6e3BO3BpaTHIOBpeKJeHO.
He KacaTecb BeHTIIHIOHHbIX OTBepCTH B BepxHei 3aHHeYacTH INCHJIe, IIOCKOJIbKy OHn CHJIbHO HarpeBaIOcra.
YcTaHOBHTCnCTeMyHaPOBHyIOIOBepXHOCtB.He
yCTaHaBBJIbBAIte ee Ha HEPOBHOIOBepXHOCTH: HAIPMHep,
Ha KpaIO CToJa.EcIN YAcTb CnCTeMbI BbCTyIaCT 3a KpaI IOBepXHOCTH,HaKOTOpO OHa yCTaHOBJHe,TO MOKeT
CTaTB IIpNHHOIIaJeHHa, TpaBMbI HII IIOLOMKH
ycTpOIHCTBa.
BeHTnJIaIuIa
OTBcpcTHB B cepHXH HHHXH YeCTx yCtpoNCTBa CnyKAT IIIB BEHTINIIN. IIO oecieueHH HaJIeXaIIe pa60TbI ycTpOncTBa H BO H36eXaHHe NpePeBa He cJeYeT 3aRopaxHBaTB HJIN 3aKpbHBaTB 3TN OTBepCTH.
HeIb3IpeTCTBOBaTBeHTNJIHIN,3aKpbIBaBBeHTNIIOHOHbIEOTBepCTnIpeJMeTaMn,TaKHMKaKaTa3eTb,CKaTePTh,3aHaBecknT.II.
06cIyXnBaHne KK-3KpaHa
He octabHnre KK-ekpAH B Mecrax, rJe Ha Hero Haaet coJIHne, TAK KaK 3TO MOKeT IIPNBecTH K eRO IOBpeXeHHIO. Co6IHOaIIte ocTOPoXHocTB IIpH pa3MeIeHHM OHHTopa y OKHa.
He ToJkaHte H He IapaaHte KK-3KpaH. He KlaIHTe TaeJIbe IpeIMTeHa KK-3KpaH. 3To MoXeT npHBecTH K HcKpHBJeHHO 3KpaHa HIN HeHCIIpaBHOCTH KK-ⅡaHeJIH.
- Ecln MOHHTOP HcIOJIb3yETcB XoJOIOHOM MecTe, To Ha 3KpaHE MoXeT IIORBHTbcOCTaTOYHOe H3O6paKeHHe.3To HC YBLIaTcH HeHCIIpaBHOCtBu. 3KpaH BO3BpaIaTcK O6bIHYOM BocIIPOH3BeJeHHo, KaK ToJbKO TeMIIepaTypa cTaHOBHTcH HopMaJIbHOH.
EcINBTeeHHeIOIrrO BpEmHHOTobpaKaTc HIOIBNXHOC H3o6paXKHe,TOHa 3KpaHC MoKCT HeHaIOJIRO IORBHTbcocTaTOHHe H3o6paKeHHe. OtaTOOHc H3o6paXKHe co BpcMeHm HCe3He
-KK-HaHeJIbHaPeBaEcTcBOBpeMa pa6Otbl.3To He ABJIECTcHHeCIIpaBHOCTbIO.
OBCTpOeHHbIX cTepeoHnHaMKkax
He H3BJIeKaHcBnHTbI H3 3aIIHe IIaHcJIN rPOMKOrOBOpHTeJI. 3TO MOKeT IIpHBecTH K HeHCIIpaBHOCTH.
3aHcBbAIOoee o6OpyOBAHHe, KaccTe bI HnckTe bI cJeUcyIepKAtb Ha IeKOTOpom pacCTOHHN OT OTBepCTH IIHHAMIKOB, TaK KaK IIHHAMHKn H3TyHaOT MaHTHTHOc IIIOc. 3TO MaHTHTHOc IIIOc MOKeT BO3JEcCTBOBaTb HA KaccTe bI NnCKeTb I nPnBeCTH K IOTpe XpaHIIHxCra HA HIX DaHHbIX.
PpmeuHne no KKd
7CTepeoHAmnKn (ctp. 19)
C IHOOMIIBIO JINHAMHKOB TpaHCJINpyeTc8 3BYK.
3aHnnaHeb MoHTopa
BnC6OkyHa dncnneJKKD
8OTBepCTHe 3aunTHoN 6JoknpoBKn
OTBepCTHe 3aHHTHO6JIOKNPOBKN Heo6XoHMO
HcHb3OBaT bIa cHCTeM 6c3OHaHocTH Kensington
Micro Saver Security System.
Micro Saver Security System -TOBaPbI 3HaK KOMHaHH
Kensington.
9ΓHe3do AC IN (ctp. 9)
IIOKJIIOUHTe Ka6eJIb IITaHnI (IIpHJaaraetc).
10BxoHoe aynorHe3do nBxO1/2 (ctp.8)
Yepe3 3TO rHc3IO IOCTyHaIOT 3ByKObIe cHRHaIbI Ipr INIOKJIIOUeHHN K BbIXOINOMy ayINOHHe3Iy KOMIBOTepa HIN dpyrOro aHIOHOCTBa, INIKJIIOueHHOrO K BXoJAM BXOJ1/BXOJ2.
11BxoJHoe rHe3D0 DVI-D (uΦpOBoR RGB) dIa BXOД1 (cTp.8)
Hepe3 3OT pa3bem HIOIaOTc HINpOBOBIE BIDeOCnHrHaJIbI RGB, coOTBeTcByIOIIne DVI Rev.1.0.
12BxoHoe rHe3do HD15 (aHaIorOBbI RGB) dIy BXOД2 (cTp.8)
Yepe3 3OT pa3bem IIOaIOTc aHaJIIOROBbIE BHeocHrHaJIb RGB (0,7 Vp-p, IIOJIOKHT.) H CnHrHaJIb CHHXPOHN3aIIIN.
13The3do HayuHkoB (ctp. 19)
Upe3 3TO RHC3IO HNOAcTcR 3ByK Ha HayuHHKn.
Повтовka к paбote
IpeepnIOJIb3OBAHHem MOHITopa IpoBepbTe HaJIINHe B Kopo6Ke cIeIyIOIIHX IIpHHaJIeXHOCTeH:
-KK-πnπη
Ka6cJIb IIITaIIINr
Ka6eJIb BnJeocnHaJa HD15-HD15 (aHaJorOBbl RGB)
Ka6eIbBnDeoCnHaJa DVl-D (HnΦpoBoR RGB)
- AyINOka6cJIb (CTepco MHHHITKeKep)
-ⅡepkaTeJIb npoBOIOB
CD-ROM (YTHINTbI,Windows Macintosh, HCTpyKINH NO 3KcIIyataTINH T.D.).
- TapaHTHnHBn TaJIOH
PyKOBODTBOIO6bIcTpOyCTaHOBKe
IpeepBbINOJIHeHEmHaCtpoek
PioccHHTe MOHTOP K KOMIbIOTcy, a 3aTcM BKJIOHTe HX.
HIOCTHXKHN HAJIyUHero PC3yJBtTa HAcTPOKN CJEYET BBIIOJHHTIIO IPOIIeCTBHH 30MH.
BoJIbIaH Yaactb HAcTpoeK MOHITopa IIPOH3BOJNTcC IHOOMOIIbIO 3KpaHHOro MeHIO.
Ha 3Kpane IIOBBHTcMCHIOPEXKM.
4 HaxMnte KHONKn / ,YTO6bI Bb6paTb HyXhBi peXHM, HaxMnte KHONKy OK.
IyoMuaHHIOyCTaHaBJIiBaTc3HaueHHeΦHJIbM.
- IΓPA: Jpkoe H3o6paXeHne.
-ФИMb:YeTKoe OyeHb KOHTpactHoe H3o6paKeHHe.
KOMNBIOTEP:H3o6paXeHHc MRAKHMToHaMH.
-PyHAR: H3o6paJaeHHe C Hn3KHM ypoBHeM npKocTH.
PpmeuHne
Bb MoKcTe ToHIO HAcTPOHTb KaCCTBO H3O6paXeHHa JIA KaKaJOrO peKHaMa.
PerynpoBka noDCBETK (IODCBETKA)
EcHn 3KpaH cHIIHKOM npKn, HAcTpoIe IIOcBETKy, TTo6bI C Hm 6bIIO yIO6He pa6oTaTb.
1 Haxmte KhoNky MENU.
Ha 3KpaHnOBHTCRrJABHOe MeHIO.
2 HaxMnte KhoNk / 1IJIy Bb6opa (H3O6PAXEH) HaxMnte KhoNky OK.
Ha 3KpaHIOBHTcMeHIO N3OBPAXEH.
3 HaKMnTe KHONKn / nIaBb6opa|O (NODCBETKA)HaKMnTe KHONKy OK.
Ha 3KpaHIOBHTcMeHIO IOCBETKA.
4 HaxMnte KhoNk / nHaCTpoiKu ypoBn npkoctn, 3aTeHaxMnte KhoNky OK.
HactpoIka KOHTpactHOCTN (KOHTPACT)
HacTpoIe KOHTpaCTb H3o6paKeHH.
Примеанно
Ipu ICBET ycTAHOBJIeHHom Ha sRGB BbI He cMOXKeTe BbIIIOJIHTb HAcTPOHN KOHTPACT, JPKOCTb HIN GAMMA.
1 HaxmTe KhoNky MENU.
Ha 3KpaHe IIOBHTcI rIaHoe MeHIO.
2 HaxMnte KhoNk N Bb6opa (N3O6PAXEH) HaxMnte KhoNky OK.
HaKpaHepoBHTcMeHIO3OBPAxEH.
3 HaXMMTe KHONK ↑ДЯ BBi6opa (KOHTPACT) n HaXMMTe KHONKY OK.
Ha ekpahe IIOBBTRcMeHIO KOHTPACT.
4 HaxMnte KhoNk / , 4To6bI OTPerynnpoBaTb KOHTpactHOCTb, 3aTEM HaxMnte KhoNky OK.
HactpoikKa ypoBHa YepHOrO uBeTa n3o6paXeHNr (RPKOCtB)
HaCtpoIte npKocTb H3o6paJxHn (ypOBeHb YcpHoro).
PpmeaHne
IIpH IUBET yCTaHOBJIeHHOM Ha sRGB BbI Hc CMOKeTe BBIOJIHTb NaCTPOKN KOHTPACT, JPKOCTb Hn GAMMA.
1 Haxmte KhoNky MENU.
Haekpae HOBHTcraabHoe MeHIO.
2 HaXMMTe KONKn ↑ДЯ BbI6opa (N3O6PAXEH) HaxMMTe KONky OI
Ha 3KpaHc IIOBHTcMeHHIO H3OBPAxEH.
3 HaKMnTe KHONK↓/↑ДЯ BbIbOpa HHaKMnTe KHOKNy OK.

Ha 3KpaHc IIOBHTcMeHIO JPKOCTb.
4 HaKMMTe KHONKn / ,YTO6bl OTpeRyNIpOBA Tb npKocTb,3aTEM HaKMMTe KHONky OK.
HactpoKa zBetoBOI TemnepaTypbI (LBT)
BbMOxKTe Bb6paTb yPOBeH bEBa H3O6paKeHH J1J 6eJIOHOH3 HAcTpOeK IIBeTOB0 TeMnpePaTypbI, KOtopa YCTAHOBJIHa IIO YMOLUHNO.
TaKKe IIpn Heo6XoHMOCTM MoXHO BbIOJIHHTb ToHKyO HAcTpOky IBeTOBOI TeIIepaTybl.
BbMOxTe yTaHOBBnTb Tpe6yEmyIO IBETOBYIO TeMIIepaTyPy JIN KaKJOrO peKHMApKpOCTN KpaHa.
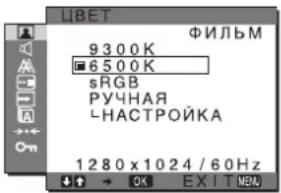
1 HaxmTe KhoNky MENU.
Ha ekpane HOBBtcr rJabHoe MeHIO.
2 HaKMnTe KHOKN / 1ДЯ BbIbopa (N3O6PAXEH) HauKMnTe KHOKNy OK.
Ha 3KpaHe IIOBHTcMeHIO H3O6PAXEH.
3 HaXMMTe KHNK / ДЯ BbIbopa (UBET) HaxMMTe KONky OK.
Ha 3KpaHnIOBHTcMeHIO LBT.
4 HaxMnte KhoNKn / dIy BbIbopa Heo6xOIMOn CBeTOBOI TeMnepaTpybl, a 3aTeM HaxMnte KhoNky OK.
BeJIb TOH 6yIeT H3MeHrTbcr O TOrJy6oBaTOrO JOKpAcHOBaTOrO OTeHKOB IO Mepe IOnHHKeHHNTEMIIepaTyPbIOT9300KIO6500K(3HaueHHe IyMOJIuaHHIO).
EcINBbIbIbIbIpaTe3HaueHHe“sRGB”,TOIpOphiJIb IBeTOBOrIOpocTpaHCtBAycTaHaBJIbBaetcra sRGB.
(IIapametp IIBeTa sRGB YBJIIEcTc OTPacJIeBBIM CTaHApTOM IPOTOKOJa IIBEToBOIIOPOCTpaHCTBa IJI KOMIIbIOTepHOI TEXHHKN).EcJIIN Bbl BBbIbIbIpaTe 3HaueHHe "sRGB", TO IIBeTOBaHAcTpOIIKa BaIIero KOMIIbIOTepa IOJIKHa 6blbYcTAHOBJIeHa Ha sRGB IIpoΦHJIb.
Приимechanicals
EcINIOKIIIOUeHHKOMIIBOTepHINIpyrOeOBaHne He ABJIIOCTsRGB-coBmecTHMbIMn,IbETHaCTpOHTbJIA sRGB npoΦHnHEJb38.
EcINIⅡIaPamETpa IBETyctaIOBHeIO ⅢaueHnEsRGB, 3NauchIIIpaPamETpoB KOHTPACT,APKOCtB HIN GAMMA NaCTpaNbaTb HeJIb3I.
Touha HacptpoKa UBeTOBOI TempepaTypb1 (PYHAR HACTP)
IbctOByIO TcMIePaTyPOxH0 yCTaHOBHT JIA KaXIOrO peKHaMa. (ITPA/ΦNJbM/KOMIIbIOTEP/PYHAR).
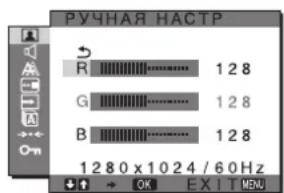
1 HaKMnTe KhoNKn / ДЯ Bblbopa HACTPOIKA n HaKMnTe KhoNky OK.
Ha ekpaHc IIOBHTcMCHIO PYHAR HACTP.
2 HaxMnte KHONKn / ,YTO6bl BbIbpaTb R (KpaChbI) nB CUNB (CUNH), a 3aTeHAXMNTe KNONKY OK. 3aTe HAXMNTe KNONK / dHaHactpoKn UBeTOBOI TemNepaTypbl, a NOTOM HAXMNTe KNONKY OK.
NocKoJIbKy 3Ta HacTPOKa IBeTeBOB TeMHePaTybI H3MeHcRc TpyTeM yBcJIHyCHeH NIN yMeHbIIeHHa COCTABJIOIHx R B OTHOCHTeJIbHO G (3eJIeHbI), COCTABJIOIIa G oCTaETcH HeH3MeHHO.
3 HaKMMTe KHONKn 1nBbIbopa 3JemeHTa , a 3aTEM HAXMMTe KHONky OK.
HOBa HAcTpoKa IIBeTa coXpaHHcTB IaMaTH N 6yJeT Bb3bBaTbCn III NaMaTH KaKJIbN pa3 IIpN BbIbOpe OJemeHTa PYA.
Ha 3KpaHc IIOBHTc MeHIO IIBET.
■Изменине napametpoB raMMbl (GAMMA)
BbMOXCTcCB3aTb IBCTOBOH OTTEHOK H3O6paKcHHa C opHHHaJIbHBIM IBeTOBBIM OTTEHKOM.
PpmeaHne
IIpuIUBETyCTaHOBJIeHOM Ha sRGB bHe cMOKeTe BbIOJIHTb HAcTPOHN KOHTPACT,APKOCTb HIN GAMMA.
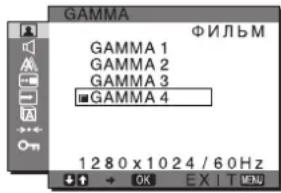
1 HaxmTe KhoIky MENU.
Ha əkpaHc IIOBHTcR rIaBHoc McHIO.
2 HaxMnte KhoNk ↓/↑ДЯ BBi6opa (H3O6PAXEH) n HaxMnte KhoNky OK.
Ha 3KpaHc IIoRbHTcMHeIO H3ObPAxEH.
3 HaKMMTe KONKn / dnn BbIbopa (GAMMA) n HAKMMTe KONKy OK.
Ha 3KpaHc IIOBHTcMHeIO GAMMA.
4 HaxMnte KONKn 1A JnB Bb6opa Heo6xOIMoropexkma, a 3aTeM HaxMnte KONky OK.
PerynnpobKa pe3KocTn (PE3KOCTb)
PeryInpoBka pe3KocTH KpOMOK H3O6paJxHn I T.I.
1 Haxmte KhONky MENU.
Ha 3KpaHe IIOBHTcR TJaBHOe MeHIO.
2 HaxMNTe KHOKN ⅡIЯ BbIbopa (N3O6PAXEH) HaxMNTe KHOKNy OK.
Ha 3KpaHnIOBHTcMeHIO N3OBPAxHE.
3 HaXMMTe KHONKn 1ДЯ BbIbopa (PE3KOCTb) HAXMMTe KHONKY OK.
Ha əkpane IIOBHTcR MeHIO PE3KOCTb.
4 HaKMTe KONKn / ,T06bI OTPerynipoBaTpe3KocTb,HaKMTe KONky OK.
MeHIO CBPOC PEXKIMA
(BOcCTaHOBJIeHHe 3HaueHnIO yMOJUaHHIO JIJI BCEx peXIMOB)→
Moxhio6pocntb hactpoKn IO 3naeHHIO yMOJIaHHIO.
1 Haxmte KhoNky MENU.
Ha 3KpaHIE IOBHTcR IJIaBHOC MeHIO.
2 HaxMMTe KONky / DnBb6opa 3IeMeHTa (N3O6PAXEH) HaxMMTe KONky OK.
Ha 3KpaIe IIOBHTcMeHIO H3OBPAXEH.
3 HaKMnTe KhoNKn / nIbBb6opa-(CEPOC PEXIMA)HaKMnTe KhoNky OK.
Ha 3KpaHc IIIOBHTcMHeIO CBPOC PEXIMA.
4 HaxMnte KONKn 1 nBb6opa Heo6xOIMoropexkma, a 3aTeHaxMnte KONky OK.
-OK: BocTaHOBJEHHe3HaYeHHIIO yMOJIaHHIO IIBCEXPeXHMOBBMEHIO H3OBPAKHE.
-OTMEHA: OTMeHa c6poca H BO3BpaT B MeHIO N3OBPAXKEH.
MeHIO AUDIO
CJyIOHc 3JcMHTbMOXHO IOCTPOHTb C IOMOIO MEHO AUDIO.
- BbICOKHE
HNU3KNE
BAJIAHC
OBbEMHbI3B
C BPOC

HactpoKa npaMeTpa BblCOKNE, HN3KNE nIb BAJIAHC
1 HaxmTe KhONky MENU.
Ha 3KpaHcIOBHTcR IaBHoc MeHIO.
2 HaxMnte KHONK 个nBb6opa3JemeHTa (AUDIO) n HaxMnte KHONky OK.
3 HaXMMTe KONKn / ,YTO6bI BbI6paTb BbICOKNE, HN3KNE nnn BAJAHC, nHaXMMTe KONKy OK.
4 HaxMnte KHONKn / ,YTO6bl HacTpOuNTb BbICOKne, H3Kne qactOTbI nn 6aJAnaC, n HaxMnte KHONky OK.
Приимechанisme
3HaueHHI IapamETPOB BBICOKNE HHN3KNE MOKHO HMeHHTb TOJIko ccII IaI IapamcTpa OBbEMHbI 3BYK yTaHOBJCIO 3HaueHne "BbIKJ".
Bb6opnapaetpaOBbEMHbIN3BYK
1 Haxmte KhoNky MENU.
Ha 3KpaHc HIOBHTcR JIaBHOC MHeIO.
2 HaxMnte KhoNKn 1nBb6opa 3JeMeHt a (AUDIO) HaxMnte KhoNky OK.
3 HaKMTe KhoNk / JnBb6opa OEBMhbl 3BYK n HaKMTe KhoNky OK.
4 HaxMMTe KONKn / ,YTO6bI BbI6paTb HyXHbI peKM, N HaxMMTe KONKy OK.
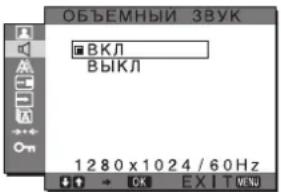
- BKN: O6ecnueHbAeTcRA MoHHbI 3ByK (aΦΦeKT o6bcMHOrO 3ByKa).
-BlkI: 06bEMHO3ByKa BILKIOeH.
MeHIO CBPOC HACTP.3B
(BOcCTaHOBJIeHHe 3HaueHnIO yMOJUHaHnO DJI BCEX peKIMOB)→
MoKHO c6pOCHb HAcTPOHKn IIO 3HaueHHI IO yMOJIyAHIO.
1 HaxmTe KhoNky MENU.
Ha ekpae HOBHTcra JIABIOc MeHIO.
2 HaxmTe KhONky 4nN BbI6opa 3JeMeHt a (AUDIO) n HaxmTe KhONky OK.
Ha ekpaHepoBHTcMeHIO AUDIO.
3 HaXMMTe KHOONK / 1nBbIbopa (CEPOC) HaxMMTe KhoNkOY OK.
HaKpaHHeIOBHTcMeHIO CBPOC HACTP.3B.
4 HaxmTe KhoNk / IaI BbI6opa Heo6xOIMoropexnma, a 3aTeM HaxmTe KhoNky OK.
-OK: BocTaHOBJIeHHe 3HaTeHII IIO yMOJTHAHIO JINBCexpeKHMOB B MeHIO AUDIO.
OTMEHA: Otmeha 6poca H BO3BpaT B MeHIO AUDIO.
MeHIO 3KPAH (ToIbKO dIa analoroboro cnHaJa RGB)
MOKHO BnIOJIHHb JaIbHeHIIyO ABOTMaTHUeCKyO HAcTPOIKy KaueCTBa H3O6paKeHII JII TeKyuIero BXoIHOrO CHHaJa (cM. pa3dcJ ABTOHACTPOIKA HIXc).
EcHn Tpe6yetcBbINOHNHTb DOONHInTeIbHyIO peryNipOBky KaueCTBa 1306paKeHH
MoKIO BpyHIO OTperyHPOBaTb pc3KocTb (pa3a/IIar) H NOJIOXKeHHe (no rOpH3OHTaH/HoBepTHKaH) H3OpaKeHH.
3THHAcTPOKnCOxpaHrOTcBIIaMRTN aBTOMaTHIeCKN B13bBAOTcKaKJbHpa3,KoJaMOHTOPIOIyAcTe PAHe CBBODHBINNCn H 3apeHCTpnpObaHHBxOHOH CNHaJI.
Дальhoeшne aBTOMaTHueckne HAcTpoiKn KaueCTBa n3O6paXeHnI dIЯ TeKyuero BXoDHorO crrHaIa (ABTOHACTPOIKA)
1 Haxmte KhoNky MENU.
Ha 3KpaHnIOBHTcR IaBHOe MeHIO.
2 HaKMMTe KHONKn / ДЯ BbIbopa (3KPAH) n HaxMMTe KHONky OK.
Ha 3KpaHe IIOBHTcMeHIO 3KPAH.
3 HaKMnTe KHONKn / 1BnBb6opa ABTOHACTPOIKA n HaxmTe KhONky OK. Ha 3KpaHe IIOBHTcMeHO ABTOHACTPOIKA.
4 HaxmTe KhoNk / IaBb6opa 3HaueHnBKII nn BblKn HaxmTe KhoNky OK.
BKJI:BbIOJINHTe COOTBeTCTBYIOHHe HAcTpOKN a3bI 3KpaHa,IIaRa IIIOJOxChnI IO TropNHOHTaJIn/BePTHKaJIIN JIMTeKyuIero BXoIHNOrO CnHaJa IN CoXpAHNTe HX.
Приимецни
IIpN BKIOHOM MOHHTOpe H3MeHENHO BXODIOM CHHaTe ABOTMATHECCKHe H3MeHENBAIIOJIHOITc C NOMOIOB OyHKINABTOHACTPOKA,
- BblKJI: ABTOHACTPOIKA HeIOCTyIIHa.
Птумецни
ФИКИА ABTOHACTPOIKA pa6oTaET ABTOMaTHIECKN B CJIyIae H3MeHENBxOJHORO CHIIaJa.
5 HaXMMTe KHNKn / DnBbIbopa 3aTeM HaxMMTe KONky OK.
Bo3bpaT K ekpany McHIO.
PyuHa peryIInpOvBa pe3KocTn n noLoXeHn u3o6paXeHn (UAR/ΦA3A/ TOpN3 CEHTP/BEPTNK CEHTP)
Pe3KocTb H3OpaXeHnMoXHO HAcTpoHTb CJeIyIOIHMMo6pa3OM. 3Ta HAcTpoKa JeIcTByET, KOrJa KOMIIbIOTepIOIKJIOUeH K BXoHOMy THe3Iy HD15 MoHITopa(aHaJIorOBbl RGB).
1 YctaHOBnTe pa3peuHne 1280 × 1024 Ha KOMNbIOTepe.
2 BctabTe KOMNaKT-ДиСК.
3 BkIIOUHTe DnCKOBOD CD-ROM
ДЯ NOJIb3OBAteJRA Windows
Korda pa6Otaert ABTONOINCK:
Bb6epHTpeTHO,3bIKHMOeJIb,3aTeMHaKMHTe CpcETBO HactpOKNHcIIcIe (UTILITY).
4 UeJIKNHTe "Adjust", noTBePnTe TeKyuuee pa3peWeHne (BepXHee 3HaueHne) n peKoMeHdyEmoe pa3peWeHne (HnxKHee 3HaueHne), 3aTeM HaxmTe "Next".
ByetIOka3aHaTecToBaTa6JIuaIyfHKuIIHIIAΓ.
5 HaxmTe KhoIky MENU.
HaekpaeIOBnBrrrTaIaBHOe MeHIO.
6 HaxMnte KHONKn / dna BbIbopa (3KPAH) n HaxMnte KHONky OK.
Ha 3KpaHnIOBHTcMeHIO 3KPAH.
7 HaxMnte KhoNKn / dnn Bb6opa WAr, 3aTeM HaxMnte KhoNky OK.
Ha 3KpaHe 6yTeI IOKa3aHO MeHIO HaCTpoKn IIIAΓ.
8 HaxnmaTe KHOJKN / noka BepTnKaJIbHbie noIocbHe Ncye3HyT.
OtperyIHyPeTaeKaHM o6pa3OM, YTO6bIBepTHKaJIbHbIE IOJIOcB IHCye3JH.
9 HaKMTe KHonky OK.
Ha 3KpaHe IIOBHTcraIaBHOe MeHIO.
EcHnHa Bcem 3KpaHc BnHbI rOpH3OHaJIbHbIe IIOIOcbI, OtperyHpyTe FA3A,BblIOJIHB cJeIyHOIIHe IIcHCTBnI.
10 ÜeJIKHnTe "Next".
ByETIOKA3aHaTeCTOBaTa6JIuHaJIAyHKINHΦA3A.
11 HaxMnte KhoNk / dIaBbI6opa A3A, 3aTeMaHaxMnte KhoNky OK.
Ha 3KpaHe 6yTeI NOKa3aHO MeHIO HAcTpoKN ΦA3A.
12 Haxmaite KhoKn / noka rOp3oHTaHbHbIe NOJocbi He cTaHyT MHHMaJIbHbIMN.
OtperyHpyTe TaKIM 06pa3OM, YTO6bI TROPHTaJIbHbIE IOJIOcbl 6BJHHMHMaJIbHbIMH.
13 Haxmte Khonky OK.
Ha ekpahe IIOBHTcra TlaBHOe MeHIO.
14 Ülçɪkhnte "Next".
EytETIOKA3aHaTectOBaTa6JIuuaJHKnH NHTP.
15 HaxMnte KhoNk / nla BbIbopa FOpN3 CEHTP nn BEPTNK LcHTP, 3aTeHaxMnte KhoNky OK.
Ha 3KpaHe 6yTe IOKa3aHO MeHIO HAcTpOioKN FOPN3 IIEHTP INI BEPTIK IIEHTP.
16 Haxmte KONKn / nI npemeeHn TectoBoro W6NoHa B ceHTp 3kpaHa.
17 ÜjIKNHnTe "Next".
HaKMHTe KHOIIKy “END” IIIN “BbIXOII” Ha 3KpaHe, TTO6bl OTKJIOHTb TCCTOBBI IIIa6JIOH.
Korda ABTONOncK he pa6oTaet:
1 OTKpoTe "MoN KOMNbHOTep" n npaBOI KHOKNOB MbIu NJIKNHTe 3HaQOK CD-ROM.
IpeHnTe B "PpOBoHnK" n OTKpoTte 3HaOK CDROM.
2 OtkpoiTe [Utility] n BbIbepuTe [WINDOWS].
HaekpaeHIOBHTcRJIaBHOC MHO.
EcHnHa Bcem 3KpaHe BnHbI BeptNkAJIbHbIe IIOIOBcI, OtperyHpyTe napaMeTp IIIAΓ, BBIOJHHB CneIyIOIIHe JeIcTBn.
9 HaxMnte KHONKn / dnn Bb6opa ⅢAΓ, 3aTeM HaxMnte KHONKY OK.
Ha əkpahe 6ydt IOKa3aHO MeHIO HAcTpoKn IIIAΓ.
10 Haxmaite KhoNk / noka BepTKaJIbHbIe NOJocbl He Ncye3HyT.
OtperyIHyIe TaKHM 06pa3OM, YTO6bI BcpTHKaJIbHbIe IIOJOCbI Hcye3JIN.
11 Haxmnte KhONky OK.
Ha 3KpaHnIOBHTcR rIaBHOe MeHIO.
12 HaKMTe KONKn / nA Bb6opa TOPN3 LEHTP nn BEPTNK LEPHT, 3aTeMa HAKMTe KONky OK.
Ha 3KpaHe 6yTe TIOKa3aHO MeHIO HAcTpoIKI OPH3 IHTP IN BEPTNK IETHP.
13 HaxMMTe KhoNk / nIepeMeueHn TecTOBOrO 7a6NoHa B ceHTp 3KpaHa.
14 HaxMMTe KhoNky "END" Ha 3KpaHe, TTo6bI OTKJIIOHTb TECTOBbI WAp6NoH.
MeHIO IO3 MEHIO
MOXHO H3MCHHTb HOJIOXeHHc MEHIO, cJJIN OHO 3aRopaKaHBaet H3o6paKHeHa 3KpaHe.
1 Haxmte KhoIky MENU.
HaKpaHnOBHTcRJtABHOe MeHIO.
2 HaKMnTe KhoNk nA Bb6opa (NO3 MEHIO) HauKMnTe KhoNky OK.
HaKpAeIOBnTcMHeIO IO3 MEHIO.
3 HaXMMTe KHNKn 1A Jn BbI6opa Heo6xOUMORo NOJOXKeHnHaXMMTe KONkY OK.
HMeetc TprB BapHaHTa pacnoJIOXeHHMaHeo:B BepxHei, IeHTpaJIbHOI HnKHeI YaCTH eKpaHa.
MeHIO PACIO3HBXODA
EcII Bb6paTb 3aHeHne ABTOPACII BKJI B MeHoPACIO3H BXOJIA, MOHTop aBTOMaTHUcKn 06HApyKIT BXoIHOn CnHraJI C BXoIHOro pa3beMa HIEpeKIIIOHTcHa HeRo, IIpeXeJe YcM MOHTOp IpeIeCTB peXHM 2KOHOOMN 3HeptHH.
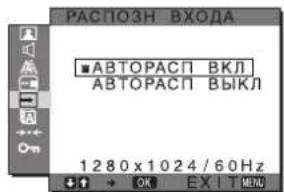
1 Haxmte KhoNky MENU.
Ha 3KpaHc IIOBHTcR IJIaBHOC McIO.
2 HaKMMTe KHOKN / nA BbIbOpa (PACIO3H BXODA), 3aTEM HAKMTE KHOKNy OK.
Ha 3KpaHc IIIOBIACTcMaMHIO PACIO3HBXOJA.
3 HaKMMTe KONKn 1 nA Bb6opa Heo6xOUMoropexkMa, a 3aTeM HaKMTe KONky OK.
-ABTOPACI BKJI:
EcHnHa BbIbpaHHOM BXOJHOM pa3bEmc
OTcyTCTByET BXOJHO CHHaJI HIN ECHN
BXoHOH pa3bEM BbIbpaCTcN
HOMOIOKHOHN INPUT Ha
MOHHTOPc HA ATOM pa3bEmc
OTcyTCTByET BXOJHO CHHaJI, Ha
3KpaHC IOBHTCCH CO6UIChNE (ctp.21)
H MOHHTOP aBTOMaTHueCKN IIPOBepHT
HAJIHNC BxOJHO CnHaJI HA IpyrNX
BXOJHbIX pa3bEmax H3MeHNT BXoJ.
IIpH N3MeHeHH BxOJa BbIbpaHHB
BXOHOH pa3bEM OTOpaxKaETcB
JIeBOM BepXHEm yTJy 3KpaHa.
PiN OTCyTCTBH IN BXOJHO TCHHaJI
MOHHTOP aBTOMaTHueCKN IIpeXoJITB
peXHM 3KOHOOMN 3HeprHH.
-ABTOPACn BblKJI:
ABTOMaTHuecKoe H3MeHeHHe BXOa He BbIOJIHeTcHaXMMTe KHOIIky INPUT IIIA H3MeHeHHB XoIHOrOpa3beMa.
MeHIO LANGUAGE
BbMOKeTe H3MeHHTb 3bIK, HcIOJIb3yeMbIM B MeHO COO6IIChHHx, BBIOJBMBIX HA kpaH MoHTopa.
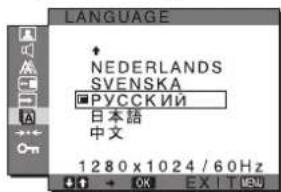
1 Haxmte KhONky MENU.
Ha 3KpaHe IOBHTcR TJAHOe MeHIO.
2 HaKMnTe KHONKn JI BbIbOpa (LANGUAGE) HaxmTe KhONky OK.
Ha ekpahe IIOBHTcMeHIO LANGUAGE.
3 HaKMnTe KhoNkI 1A BbIbopa Ra3bika HaxMnTe KhoNky OK.
-ENGLISH: AHTJIHCKHI
FRANCAIS:Фацузки
- DEUTSCH: Hemeikn
-ESPANOL:Испанckи
ITALIANO:HTaJIbHcKnI
- NEDERLANDS: ToglaHckn
-SVENSKA: IIBeJckn
*PyCCKN
- 日本語:
中KHTaickn
MeHIO CBPOC (BOcCTaHOBJIeHnE 3HaueHnI NO yMOJIaHnIO)
Mozho6pocntb hactpoKn IO 3naeHHIO yMOJuaHHIO.
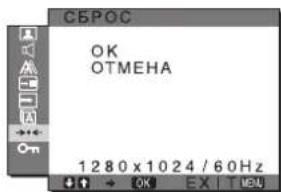
1 Haxmte KhoNky MENU.
Ha 3KpaHnIOBHTcR TJIaBHOe MeHIO.
2 HaxMnte KHONK / IaBbIbopa - (CEPOC) HaxMnte KHONKY OK.
Ha 3KpaHepoBHTcMeHIO CBPOC.
3 HaKMTe KONKn JI BbIbOpa Heo6xOIMOROpexkma, a 3aTeM HaKMTe KONKy OK.
OK: C6poc Bcex DaHHbIX HAcTpOKn I0 3HaYeHIN IO yMOJIaHINIO. Heo6xOHNOMIOMHHTb, YTO 3THM CIOCO6OM HCJIb38 c6pocHTb HaCtpoKy OJIeMeHTa A LANGUAGE.
-OTMEHA: Otmeha c6poca H BO3BpaT K 9KpaHy MeHIO.
MeHIO BJOKIPOBKAMEHIO
BbMOxKeTe 6JIOKpOBAbTyIpaBJIeHHe KHOIIKaMn IJIa IIpeIoTbPaUeHHcIyAaHbIX HAcrPoek HIN cOpoca.
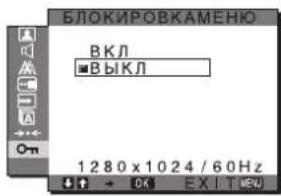
1 Haxmte KhoNky MENU.
Ha 3KpaHe IIOBHTcI rIaBHOe MeHIO.
2 HaxMnte KhoNk 1/AnB BbIbopa (BJOKINPOBKAMEHIO) HaXMMTe KhoNky OK. Ha ekpaHe IIOBHTcMeHIO BJOKINPOBKAMEHIO.
3 HaxMnte KhoNKn / nBbIbopa BKJI nnn BblKJI.
BKNI: Pa6OtaIOT TOJIbKO BIKIOHateJI (IIHTaHHe) H KHOIIKa MENU. IIpn BIIIOJIHEHHIpyTHX OIEpaHn Ha 3KpaHc IIOABHTcra 3HaOHK KGaI IapAMeTa BJIOKINPOBKAMEHIO Bb6paHo 3HaTeHHe BKJI, Bb6HpaeTcra TOJIbKO 3TOT 3JIEMeHT MeHIO.
BbIKJI: EIOKINPOBKAMEHIO yCTaHOBJeHO Ha BbIKJI.
EcnBxOxDhIe CnHaNbI He COOTBeTCTBYOT HNODHOMY N3 PpeBapNTeNbHO yCTaHOBJEHbIX Ha3aBODe peKIMOB
Ipi npHeme MOHHTOPOM BXOHHORO CHHaJIa, He COOTBcTCTBYIOIOERO HN ODNOMY H3 IpcJBapHTcJIbHO ycTaHOBJeHHbIX Ha 3aBOJe peXHMOB, aKTTHB3HpyeTcI cyHKIIra ABToMaTHueCKoPeYJINPOBKN KaueCTBa H3O6paKCHNI MOHHTOPa, KOtOpaa OBCCNEuHBact IOCTOARHNO YeTKoe H3O6paKHeHne Ha 3KpaHe (B cIeIyOUIHX dHaIIa3OHAX YACTOT CNxPONIH3aIIHN MOHHTOPa): Yactota Ropn30HTaJIbHO pa3BepTKH: 28-80 KII Yactota BepTHKaJIbHO pa3BepTKH: 56-75 TIO3OMy, KOrJa HA MOHHTOP HcPBbI PA3IOCTUYIae BXOIOHO CHrHAJI, He COOTBeTCTBYIOIIHN HN ODHOMY H3 IIpeJIbAPHTeJIbHO yCTaHOBJeHHbIX Ha 3aBOJe peXHMOB, JIOI OTObpAKeHHN 3IO6paKaeHHN Tpe6yeTc6 BoJIbIIe BpeMeHH, Yem O6bIHyO. DaHHbc 3TOH HAcTpOKn ABToMaTHueCKN COxPAHHOITCB IIAMrTI, IO3OTOMY B CIEJyIOIIHN pa3 MOHHTOP 6yIeT pa6oTaTB TaK, KaK IIpN pPiNeMe CHTHaIOB, COOTBcTCTBYIOIIHX OINOMY H3 IIpeJIbAPHTeJIbHO ycTaHOBJeHHbIX Ha 3aBOJe peXHMOB.
Pn HacTpoKe pa3bl, wara n noLoXeHnna 13o6paXeHnBpyHyIO,ecn dIaFyHKcIMN ABTOHACTPOKA BbI6paHO BbIKJI
IIH HeKOTOpbIX BXOINbIX CHHAIIOB cyHKINH ABTOMATNueCKo peYInHPOBKN KaueCTBa H3O6paKeHH 3TORO MOHTOPaMOKeT He IO KOIHua HAcTpOHTb NIOLOKeHHe H3O6paKeHH, pa3y H IIIaR. B ATOM cIyuae 3Ty HaCTpOky MOxHO BbIOJIHNTH BpyHyIO (ctP.16).EcINH AcTpOKn YcTaHOBJIEb BYPyHyIO, OHn COxpaHIOCTc B IIaMRTn KaK HOJb3OBaTEJIckHepeXIMbI aBTOMaTHueCKH BBIBIAIOTKaKJbn pa3, KOrJaHa MOHTOp IocTyIaOT TaKHe JKe BXOINbIE CHHaJIbI.
PpmeaHn
- EcJIn aKTHBnHPOBaHa yHKnna ABOTMAthueckoI perylnpOBKn KaecTbA H3O6paKeHHa, pa60TaET TOJIbKO BbIKIOHateJIb ① (IIITAHHe).
- H36paJxHe MoKET MHrAtb, 3To He JbIeTcH IIpH3aKOM HEnchPabHocTH. IPoCTO IIOIOXJIte HeCKoJIbKO cekyHd IO 3aBepHHeHHn HactpoHN.
HcJIeB (B BcPTHKaIBHOM
IOJIOKeHHN):
PnHmepHo
383.5×404.5×163MM
Macca IIpHMePHO 5,5K
Plug & Play DDC2B
IIpHnHaJIeJXHoCTN cm. cTp.8.
SDM-G96X
NaheJIb KKJ TnII NaHeJIH: aKTHBHaMaTPhIa a
Si TFT
Pa3Mep H3o6paKeHHa:
19,0 IOIOMOB
ΦopMaT BXOJHOrO cHrHaJa
paoboua yactota RGB*
Togn3oHTaJIbHa pa3BepTk:
28-80KΓ
(aHaIorOBbR RGB)
28-64K
(HpOBoR RGB)
BepTKaJIbna pa3BepTKa:
56-75I
(aHaIOROBbIN RGB)
60 Ωι (ιηφροBoH RGB)
Pa3peHneHnIo rohp3OHTaII:
MaKc.1280 toeK
Повертукалн:
Makc. 1024 strpokn
YpOBHn BXoHbIX CNHgHaIOB
AHAJIOROBbBnJeocHraI RGB
0.7 Vp-p, 75 Ω
HIOIOKHTeJIbHbI
CnHraJI cHHxpoHN3aIIN
ypOBeHbTTL,2,2KΩ,
IOJIOXHTeJIbHbI INJIN
OTPiTeJIbHbI
(Pa3JIeJIbHO rOpH3OHTaJIbHaHn
BepTHKa.IbHaJ
LHΦpOBB RGB (DVI)
(OJHo coeHHHeHHe TMDS)
AynOBxoC Tcrepeo MHH pa3bem,0.5 Vrms
BbIXoI rpoMkOrOBOpHTeJei
2 Br × 2
Ihe3no HayHHKOB CTepeo MMHpa3bEm
IIHTaHc 100-240B,50-60Tt,
MaKc.1.0A
Pa6o7aTeMIIepaTpya5-35 C
Pa3MepbI (HIIpHHa/BbICoTa/TJy6HHa)
HcIIeH (B BepTHKaJIbHOM
HOJIOXeHH):
ПиMHcpeHо
422.5× 435.5× 163MM
Maccia IIpHMePho 6Kr
Plug & Play DDC2B
IIpHnHaJIeXKHOCTH cm. cTp.8.
*PeKOMeHIOBAHHbIpeKHM CnHXPOHH3aIIHH IO TropH3OHTaJIH H BepTHKaJIH
IIIInpHa HmNyIbca RopH3OHTaIbHO CnHXPOHN3aIIH JOnJXHa 6bITb 60JIbIIe 4,8% 06IIErO IepHOJa RopH3OHTaJIbHO pa3BepTKH HIN 0,8 MKC, B 3aBNCMOCTH OT TO, KOTOPaH3 HNX 60JIbIIe.
HEpBaJI MExJy cHrHaJAMn rOpH3OHTaJIbHO pa3BepTKIIOJKeH 6bITb 60JIbIIe 2,5MkC.
HEpBaJI MEXy CHTHaJAmH BepTHKaJIbHOJ pa3BepTKI JOITKeH 6bITb 60JIbIIe 450 MKC.
KoHctpyKuHn H xapaKTepHCTHKN MOrTy H3MeHrTbC8 6c3 IIpeBaPHTeJIbHorO yBeHOMJIeHH.
TFTLCD Color Computer Display
Bruksanvisning
(SE)
SDM-G76X
SDM-G96X
© 2006 Sony Corporation
Owner's Record
The model and serial numbers are located at the rear of the unit. Record these numbers in the spaces provided below. Refer to them whenever you call upon your dealer regarding this product. Model No. __ Serial No. ____
WARNING
To reduce the risk of fire or electric shock, do not expose this apparatus to rain or moisture.
Dangerously high voltages are present inside the unit. Do not open the cabinet. Refer servicing to qualified personnel only.
FCC Notice
This equipment has been tested and found to comply with the limits for a Class B digital device, pursuant to Part 15 of the FCC Rules. These limits are designed to provide reasonable protection against harmful interference in a residential installation. This equipment generates, uses, and can radiate radio frequency energy and, if not installed and used in accordance with the instructions, may cause harmful interference to radio communications. However, there is no guarantee that interference will not occur in a particular installation. If this equipment does cause harmful interference to radio or television reception, which can be determined by turning the equipment off and on, the user is encouraged to try to correct the interference by one or more of the following measures:
- Reorient or relocate the receiving antenna.
- Increase the separation between the equipment and receiver.
- Connect the equipment into an outlet on a circuit different from that to which the receiver is connected.
- Consult the dealer or an experienced radio/TV technician for help. You are cautioned that any changes or modifications not expressly approved in this manual could void your authority to operate this equipment.
IMPORTANT
If you have any questions about this product, you may call; Sony Customer Information Services Center 1-800-222-7669 or http://www.roy.com/
Declaration of Conformity
Trade Name:SONY
Model: SDM-G76X
SDM-G96X
Responsible Party: Sony Electronics Inc.
Address: 16530 Via Esprillo,
San Diego, CA 92127 U.S.A.
Telephone Number: 858-942-2230
This device complies with part 15 of the FCC rules. Operation is subject to the following two conditions: (1) This device may not cause harmful interference, and (2) this device must accept any interference received, including interference that may cause undesired operation.
NOTICE
This notice is applicable for USA/Canada only.
If shipped to USA/Canada, install only a UL LISTED/CSA
LABELLED power supply cord meeting the following
specifications:
SPECIFICATIONS
Plug Type Nema-Plug 5-15p
Cord Type SVT or SJT, minimum 3 × 18 AWG
Length Maximum 15 feet
Rating Minimum 7 A, 125 V
NOTICE
As an ENERGY STAR Partner, Sony Corporation has determined that this product meets the ENERGY STAR guidelines for energy efficiency.
(endast for analog RGB-signal) 19
Felsökning 20
Skarmmeddelanden 20
Digital RGB-signal (DVI):
TMDS (Enkelänk)
Ljudangg Stereo miniuttag, 0,5 Vrms
Högtalareffekt 2 W × 2
Hörlursuttag Stereo miniuttag
Stromforsorjning 100-240 V, 50-60 Hz
Max. 1,0 A
Drifttemperatur 5-35
°C
Storlek (bredd/hojd/djup)
Skärm (upprätt):
ungefar 383,5× 404,5× 163mm
Digital RGB-signal (DV1):
TMDS (Enkel lang)
Ljudangg Stereo miniuttag, 0,5 Vrms
Högtalareffekt 2 W × 2
Hörlursuttag Stereo miniuttag
© 2006 Sony Corporation
Owner's Record
The model and serial numbers are located at the rear of the unit. Record these numbers in the spaces provided below. Refer to them whenever you call upon your dealer regarding this product. Model No. __ Serial No. ____
WARNING
To reduce the risk of fire or electric shock, do not expose this apparatus to rain or moisture.
Dangerously high voltages are present inside the unit. Do not open the cabinet. Refer servicing to qualified personnel only.
FCC Notice
This equipment has been tested and found to comply with the limits for a Class B digital device, pursuant to Part 15 of the FCC Rules. These limits are designed to provide reasonable protection against harmful interference in a residential installation. This equipment generates, uses, and can radiate radio frequency energy and, if not installed and used in accordance with the instructions, may cause harmful interference to radio communications. However, there is no guarantee that interference will not occur in a particular installation. If this equipment does cause harmful interference to radio or television reception, which can be determined by turning the equipment off and on, the user is encouraged to try to correct the interference by one or more of the following measures:
- Reorient or relocate the receiving antenna.
- Increase the separation between the equipment and receiver.
- Connect the equipment into an outlet on a circuit different from that to which the receiver is connected.
- Consult the dealer or an experienced radio/TV technician for help. You are cautioned that any changes or modifications not expressly approved in this manual could void your authority to operate this equipment.
IMPORTANT
If you have any questions about this product, you may call; Sony Customer Information Services Center 1-800-222-7669 or http://www.roy.com/
Declaration of Conformity
Trade Name:SONY
Model: SDM-G76X
SDM-G96X
Responsible Party: Sony Electronics Inc.
Address: 16530 Via Esprillo,
San Diego, CA 92127 U.S.A.
Telephone Number: 858-942-2230
This device complies with part 15 of the FCC rules. Operation is subject to the following two conditions: (1) This device may not cause harmful interference, and (2) this device must accept any interference received, including interference that may cause undesired operation.
NOTICE
This notice is applicable for USA/Canada only.
If shipped to USA/Canada, install only a UL LISTED/CSA
LABELLED power supply cord meeting the following
specifications:
SPECIFICATIONS
Plug Type Nema-Plug 5-15p
Cord Type SVT or SJT, minimum 3 × 18 AWG
Length Maximum 15 feet
Rating Minimum 7 A, 125 V
NOTICE
As an ENERGY STAR Partner, Sony Corporation has determined that this product meets the ENERGY STAR guidelines for energy efficiency.
Inhoud
| Analoge RGB Digitale RGB | ||
| Horizontalale frequently | 28-80 kHz 28-64 kHz | |
| Verticalale frequently | 56-75 Hz 60 Hz | |
| Resolutie 1.280 × 1.024 of minder | 1.280 × 1.024 of minder | |
[MAC_CLASSIC Utility] of [MAC OSX Utility].
The model and serial numbers are located at the rear of the unit. Record these numbers in the spaces provided below. Refer to them whenever you call upon your dealer regarding this product. Model No. __ Serial No. ____
WARNING
To reduce the risk of fire or electric shock, do not expose this apparatus to rain or moisture.
Dangerously high voltages are present inside the unit. Do not open the cabinet. Refer servicing to qualified personnel only.
FCC Notice
This equipment has been tested and found to comply with the limits for a Class B digital device, pursuant to Part 15 of the FCC Rules. These limits are designed to provide reasonable protection against harmful interference in a residential installation. This equipment generates, uses, and can radiate radio frequency energy and, if not installed and used in accordance with the instructions, may cause harmful interference to radio communications. However, there is no guarantee that interference will not occur in a particular installation. If this equipment does cause harmful interference to radio or television reception, which can be determined by turning the equipment off and on, the user is encouraged to try to correct the interference by one or more of the following measures:
- Reorient or relocate the receiving antenna.
- Increase the separation between the equipment and receiver.
- Connect the equipment into an outlet on a circuit different from that to which the receiver is connected.
- Consult the dealer or an experienced radio/TV technician for help. You are cautioned that any changes or modifications not expressly approved in this manual could void your authority to operate this equipment.
IMPORTANT
If you have any questions about this product, you may call; Sony Customer Information Services Center 1-800-222-7669 or http://www.roy.com/
Declaration of Conformity
Trade Name:SONY
Model: SDM-G76X
SDM-G96X
Responsible Party: Sony Electronics Inc.
Address: 16530 Via Esprillo,
San Diego, CA 92127 U.S.A.
Telephone Number: 858-942-2230
This device complies with part 15 of the FCC rules. Operation is subject to the following two conditions: (1) This device may not cause harmful interference, and (2) this device must accept any interference received, including interference that may cause undesired operation.
NOTICE
This notice is applicable for USA/Canada only.
If shipped to USA/Canada, install only a UL LISTED/CSA
LABELLED power supply cord meeting the following
specifications:
SPECIFICATIONS
Plug Type Nema-Plug 5-15p
Cord Type SVT or SJT, minimum 3 × 18 AWG
Length Maximum 15 feet
Rating Minimum 7 A, 125 V
NOTICE
As an ENERGY STAR Partner, Sony Corporation has determined that this product meets the ENERGY STAR guidelines for energy efficiency.
目录
使用前注意事项 4
识别部件和控制钮 5
安装 7
步骤1:使用支架 7
步骤2:将显示器连接到计算机 7
步骤3:连接电源线 8
步骤4:扎住电线 8
步骤5:打开显示器和计算机 8
调节倾斜度 9
选择输入信号(INPUT按钮) 9
设定显示器 10
3 打开 [MAC_U T I L I T Y],然后启动 [MAC_CLASSIC_U T I L I T Y]
© 2006 Sony Corporation
Owner's Record
The model and serial numbers are located at the rear of the unit. Record these numbers in the spaces provided below. Refer to them whenever you call upon your dealer regarding this product. Model No. __ Serial No. ____
WARNING
To reduce the risk of fire or electric shock, do not expose this apparatus to rain or moisture.
Dangerously high voltages are present inside the unit. Do not open the cabinet. Refer servicing to qualified personnel only.
FCC Notice
This equipment has been tested and found to comply with the limits for a Class B digital device, pursuant to Part 15 of the FCC Rules. These limits are designed to provide reasonable protection against harmful interference in a residential installation. This equipment generates, uses, and can radiate radio frequency energy and, if not installed and used in accordance with the instructions, may cause harmful interference to radio communications. However, there is no guarantee that interference will not occur in a particular installation. If this equipment does cause harmful interference to radio or television reception, which can be determined by turning the equipment off and on, the user is encouraged to try to correct the interference by one or more of the following measures:
- Reorient or relocate the receiving antenna.
- Increase the separation between the equipment and receiver.
- Connect the equipment into an outlet on a circuit different from that to which the receiver is connected.
- Consult the dealer or an experienced radio/TV technician for help. You are cautioned that any changes or modifications not expressly approved in this manual could void your authority to operate this equipment.
IMPORTANT
If you have any questions about this product, you may call; Sony Customer Information Services Center 1-800-222-7669 or http://www.sony.com/
Declaration of Conformity
Trade Name:SONY
Model: SDM-G76X
SDM-G96X
Responsible Party: Sony Electronics Inc.
Address: 16530 Via Esprillo,
San Diego, CA 92127 U.S.A.
Telephone Number: 858-942-2230
This device complies with part 15 of the FCC rules. Operation is subject to the following two conditions: (1) This device may not cause harmful interference, and (2) this device must accept any interference received, including interference that may cause undesired operation.
NOTICE
This notice is applicable for USA/Canada only.
If shipped to USA/Canada, install only a UL LISTED/CSA
LABELLED power supply cord meeting the following
specifications:
SPECIFICATIONS
Plug Type Nema-Plug 5-15p
Cord Type SVT or SJT, minimum 3 × 18 AWG
Length Maximum 15 feet
Rating Minimum 7 A, 125 V
NOTICE
As an ENERGY STAR Partner, Sony Corporation has determined that this product meets the ENERGY STAR guidelines for energy efficiency.
Obsah
[MAC_CLASSIC Utility] nebo
[MAC OSX Utility].
© 2006 Sony Corporation
Owner's Record
The model and serial numbers are located at the rear of the unit. Record these numbers in the spaces provided below. Refer to them whenever you call upon your dealer regarding this product. Model No. __ Serial No. ____
WARNING
To reduce the risk of fire or electric shock, do not expose this apparatus to rain or moisture.
Dangerously high voltages are present inside the unit. Do not open the cabinet. Refer servicing to qualified personnel only.
FCC Notice
This equipment has been tested and found to comply with the limits for a Class B digital device, pursuant to Part 15 of the FCC Rules. These limits are designed to provide reasonable protection against harmful interference in a residential installation. This equipment generates, uses, and can radiate radio frequency energy and, if not installed and used in accordance with the instructions, may cause harmful interference to radio communications. However, there is no guarantee that interference will not occur in a particular installation. If this equipment does cause harmful interference to radio or television reception, which can be determined by turning the equipment off and on, the user is encouraged to try to correct the interference by one or more of the following measures:
- Reorient or relocate the receiving antenna.
- Increase the separation between the equipment and receiver.
- Connect the equipment into an outlet on a circuit different from that to which the receiver is connected.
- Consult the dealer or an experienced radio/TV technician for help. You are cautioned that any changes or modifications not expressly approved in this manual could void your authority to operate this equipment.
IMPORTANT
If you have any questions about this product, you may call; Sony Customer Information Services Center 1-800-222-7669 or http://www.roy.com/
Declaration of Conformity
Trade Name:SONY
Model: SDM-G76X
SDM-G96X
Responsible Party: Sony Electronics Inc.
Address: 16530 Via Esprillo,
San Diego, CA 92127 U.S.A.
Telephone Number: 858-942-2230
This device complies with part 15 of the FCC rules. Operation is subject to the following two conditions: (1) This device may not cause harmful interference, and (2) this device must accept any interference received, including interference that may cause undesired operation.
NOTICE
This notice is applicable for USA/Canada only.
If shipped to USA/Canada, install only a UL LISTED/CSA
LABELLED power supply cord meeting the following
specifications:
SPECIFICATIONS
Plug Type Nema-Plug 5-15p
Cord Type SVT or SJT, minimum 3 × 18 AWG
Length Maximum 15 feet
Rating Minimum 7 A, 125 V
NOTICE
As an ENERGY STAR Partner, Sony Corporation has determined that this product meets the ENERGY STAR guidelines for energy efficiency.
Tartalomjegyzék
Ovintezkedesek 4
Alkatreszek es kezeloelemek 6
Uzembe helyezés. .8
Ezzel a gombbal allithato be a PICTURE MODE.
The model and serial numbers are located at the rear of the unit. Record these numbers in the spaces provided below. Refer to them whenever you call upon your dealer regarding this product. Model No. __ Serial No. ____
WARNING
To reduce the risk of fire or electric shock, do not expose this apparatus to rain or moisture.
Dangerously high voltages are present inside the unit. Do not open the cabinet. Refer servicing to qualified personnel only.
FCC Notice
This equipment has been tested and found to comply with the limits for a Class B digital device, pursuant to Part 15 of the FCC Rules. These limits are designed to provide reasonable protection against harmful interference in a residential installation. This equipment generates, uses, and can radiate radio frequency energy and, if not installed and used in accordance with the instructions, may cause harmful interference to radio communications. However, there is no guarantee that interference will not occur in a particular installation. If this equipment does cause harmful interference to radio or television reception, which can be determined by turning the equipment off and on, the user is encouraged to try to correct the interference by one or more of the following measures:
- Reorient or relocate the receiving antenna.
- Increase the separation between the equipment and receiver.
- Connect the equipment into an outlet on a circuit different from that to which the receiver is connected.
- Consult the dealer or an experienced radio/TV technician for help. You are cautioned that any changes or modifications not expressly approved in this manual could void your authority to operate this equipment.
IMPORTANT
If you have any questions about this product, you may call; Sony Customer Information Services Center 1-800-222-7669 or http://www.sony.com/
Declaration of Conformity
Trade Name:SONY
Model: SDM-G76X
SDM-G96X
Responsible Party: Sony Electronics Inc.
Address: 16530 Via Esprillo,
San Diego, CA 92127 U.S.A.
Telephone Number: 858-942-2230
This device complies with part 15 of the FCC rules. Operation is subject to the following two conditions: (1) This device may not cause harmful interference, and (2) this device must accept any interference received, including interference that may cause undesired operation.
NOTICE
This notice is applicable for USA/Canada only.
If shipped to USA/Canada, install only a UL LISTED/CSA
LABELLED power supply cord meeting the following
specifications:
SPECIFICATIONS
Plug Type Nema-Plug 5-15p
Cord Type SVT or SJT, minimum 3 × 18 AWG
Length Maximum 15 feet
Rating Minimum 7 A, 125 V
NOTICE
As an ENERGY STAR Partner, Sony Corporation has determined that this product meets the ENERGY STAR guidelines for energy efficiency.
Spistresci
[MAC_CLASSIC Utility] lub [MAC OSX Utility].
The model and serial numbers are located at the rear of the unit. Record these numbers in the spaces provided below. Refer to them whenever you call upon your dealer regarding this product. Model No. __ Serial No. ____
WARNING
To reduce the risk of fire or electric shock, do not expose this apparatus to rain or moisture.
Dangerously high voltages are present inside the unit. Do not open the cabinet. Refer servicing to qualified personnel only.
FCC Notice
This equipment has been tested and found to comply with the limits for a Class B digital device, pursuant to Part 15 of the FCC Rules. These limits are designed to provide reasonable protection against harmful interference in a residential installation. This equipment generates, uses, and can radiate radio frequency energy and, if not installed and used in accordance with the instructions, may cause harmful interference to radio communications. However, there is no guarantee that interference will not occur in a particular installation. If this equipment does cause harmful interference to radio or television reception, which can be determined by turning the equipment off and on, the user is encouraged to try to correct the interference by one or more of the following measures:
- Reorient or relocate the receiving antenna.
- Increase the separation between the equipment and receiver.
- Connect the equipment into an outlet on a circuit different from that to which the receiver is connected.
- Consult the dealer or an experienced radio/TV technician for help. You are cautioned that any changes or modifications not expressly approved in this manual could void your authority to operate this equipment.
IMPORTANT
If you have any questions about this product, you may call; Sony Customer Information Services Center 1-800-222-7669 or http://www.roy.com/
Declaration of Conformity
Trade Name:SONY
Model: SDM-G76X
SDM-G96X
Responsible Party: Sony Electronics Inc.
Address: 16530 Via Esprillo,
San Diego, CA 92127 U.S.A.
Telephone Number: 858-942-2230
This device complies with part 15 of the FCC rules. Operation is subject to the following two conditions: (1) This device may not cause harmful interference, and (2) this device must accept any interference received, including interference that may cause undesired operation.
NOTICE
This notice is applicable for USA/Canada only.
If shipped to USA/Canada, install only a UL LISTED/CSA
LABELLED power supply cord meeting the following
specifications:
SPECIFICATIONS
Plug Type Nema-Plug 5-15p
Cord Type SVT or SJT, minimum 3 × 18 AWG
Length Maximum 15 feet
Rating Minimum 7 A, 125 V
NOTICE
As an ENERGY STAR Partner, Sony Corporation has determined that this product meets the ENERGY STAR guidelines for energy efficiency.
Kazalo
Pozor 4
Delimonitorja in elementi za upravljanje 6
Nastavitev. 8
Korak 1: Uporabite podstavek. 8
Pritisnite stikalo (tok).
Indikator (tok) monitorja posveti v zeleni barvi.
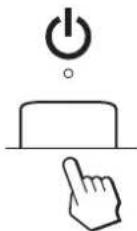
Velikost slike: 17,0
Oblika vchodega signala Delovna frekvenca RGB*
Horizontala: 28 - 80kHz (analogni
RGB)
28-64 kHz (digital)
RGB)
Vertikalna: 56 - 75Hz (analogni
RGB)
60Hz (digital)
RGB)
Resolucija Horizontalna: Največ 1.280 toč
Vertikalna: majvec 1.024 vrstic
Nivo vchodega signala Analogi RGB video signal
0,7 Vp-p, 75 Ω, positiven
SYNC signal
TTL nivo, 2.2 kΩ
positivenali negativen
(Locen horizontalen in
vertikalen)
Digitalni RGB (DVI) signal:
TMDS (enojna povezava)
Audio vhd Sterco mini-vtikac, 0.5 Vrms
Velikost slike: 19,0
Oblika vhdnegaa signala Delovna frekvenca RGB*
Horizontalna: 28-80priblzno. kHz
(analogni RGB)
28-64 kHz (digital)
RGB)
Vertikalna: 56 - 75Hz (analogni
RGB)
60Hz (digitali
RGB)
Resolucija Horizontalna: Najvec 1.280 tock
Vertikalna: majvec 1.024 vrstic
Nivo vchodega signala Analogi RGB video signal
0,7 Vp-p, 75 Ω, positiven
SYNC signal
TTL nivo, 2,2 kΩ
positivenali negativen
(Locen horizontalen in
vertikalen)
Digitalni RGB (DVI) signal:
TMDS (enojna povezava)
Audio vchod Stereo mini-vtikac, 0.5 Vrms
© 2006 Sony Corporation
Owner's Record
The model and serial numbers are located at the rear of the unit. Record these numbers in the spaces provided below. Refer to them whenever you call upon your dealer regarding this product. Model No. __ Serial No. ____
WARNING
To reduce the risk of fire or electric shock, do not expose this apparatus to rain or moisture.
Dangerously high voltages are present inside the unit. Do not open the cabinet. Refer servicing to qualified personnel only.
FCC Notice
This equipment has been tested and found to comply with the limits for a Class B digital device, pursuant to Part 15 of the FCC Rules. These limits are designed to provide reasonable protection against harmful interference in a residential installation. This equipment generates, uses, and can radiate radio frequency energy and, if not installed and used in accordance with the instructions, may cause harmful interference to radio communications. However, there is no guarantee that interference will not occur in a particular installation. If this equipment does cause harmful interference to radio or television reception, which can be determined by turning the equipment off and on, the user is encouraged to try to correct the interference by one or more of the following measures:
- Reorient or relocate the receiving antenna.
- Increase the separation between the equipment and receiver.
- Connect the equipment into an outlet on a circuit different from that to which the receiver is connected.
- Consult the dealer or an experienced radio/TV technician for help. You are cautioned that any changes or modifications not expressly approved in this manual could void your authority to operate this equipment.
IMPORTANT
If you have any questions about this product, you may call; Sony Customer Information Services Center 1-800-222-7669 or http://www.roy.com/
Declaration of Conformity
Trade Name:SONY
Model: SDM-G76X
SDM-G96X
Responsible Party: Sony Electronics Inc.
Address: 16530 Via Esprillo,
San Diego, CA 92127 U.S.A.
Telephone Number: 858-942-2230
This device complies with part 15 of the FCC rules. Operation is subject to the following two conditions: (1) This device may not cause harmful interference, and (2) this device must accept any interference received, including interference that may cause undesired operation.
NOTICE
This notice is applicable for USA/Canada only.
If shipped to USA/Canada, install only a UL LISTED/CSA
LABELLED power supply cord meeting the following specifications:
SPECIFICATIONS
Plug Type Nema-Plug 5-15p
Cord Type SVT or SJT, minimum 3 × 18 AWG
Length Maximum 15 feet
Rating Minimum 7 A, 125 V
NOTICE
As an ENERGY STAR Partner, Sony Corporation has determined that this product meets the ENERGY STAR guidelines for energy efficiency.
icindekiler
Uyarilar 4
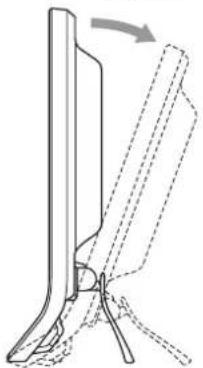
Yaklasik 20^
LCD panelin alt kismundan kavrayim ve egikligi ayarlayin.